1
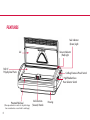
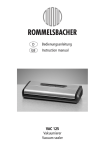
Turbo Vac
Model #1831
IMPORTANT!
Please keep these instructions
and your original box packaging.
www.deni.com
INSTRUCTIONS
FOR PROPER USE AND CARE
IMPORTANT SAFEGUARDS
When using this electrical appliance, safety
precautions should always be observed, including
the following:
n
n
n
n
n
n
n
n
n
Read all of the instructions before using.
Do not leave appliance when plugged in. Unplug
from outlet when not in use.
Do not use outdoors or on a wet surface.
Do not allow to be used as a toy. Close attention
is necessary when used by or near children.
Use only as described in this manual.
Do not use with damaged cord or plug. If the
appliance is not working properly, has been
dropped, damaged, left outdoors, or dropped
into water, return it to Keystone Manufacturing
Company Inc. for proper service, replacement or
repair immediately.
Avoid touching the heating wires when hot.
Do not vacuum seal liquids
Do not do the following: pull or carry by the cord,
use cord as a handle, close a door on cord or pull
cord around sharp edges or corners. Do not
operate appliance over cord. Keep cord away from
heated surfaces.
n
n
n
n
n
n
n
n
Do not use an extension cord with this unit.
However, if one is used, it must have a rating equal
to or exceeding the rating of this appliance.
Do not unplug by pulling on cord. To unplug,
grasp the plug, not the cord.
Do not place this appliance or cord on or near
a heat surface.
Do not immerse this appliance in water or use
if cord/plug is wet.
Do not handle plug or appliance with wet hands.
The use of accessories and attachments not sold
or recommended by Keystone Manufacturing may
be dangerous.
This unit is recommended for household, indoor
use only.
This vacuum sealer has a polarized plug (one blade
is wider than the other). This plug will fit in a
polarized outlet only one way, as a safety feature.
Reverse the plug if the plug does not fit fully in the
outlet. Contact a qualified electrician if it still does
not fit. Do not attempt to defeat this safety
feature.
SAVE THESE INSTRUCTIONS
1
FEATURES
Seal Indicator
(Green) Light
Vacuum Indicator
(Red) Light
Lid
Roll Of
Polyethylene Plastic
Cut-Bag/Create-A-Pouch Switch
High/Medium/Low
Heat Selector Switch
Patented Multiseal
(One exposed wire in center to cut plastic bags,
two covered wires on each side to seal bags.)
2
Air-Extraction
(Vacuum) Nozzle
Housing
Operating Your Vacuum Sealer
To make a bag:
1. Place the unit on a firm, level surface near an
electrical outlet.
2. Insert the roll of bagging material into the roll
compartment in the sealer. We recommend you
use only the plastic material supplied by Deni, for
Freshlock models.
3. Put the “Heat Selector” switch on medium.
4. Plug into an AC electrical outlet.
5. Make sure the selector switch is in the “cut-bag”
position.
6. Pull the bagging material over the sealing wires.
NOTE: The roll is folded into a double layer to form
the bottom seal of each bag.
7. Close the lid and press down firmly on the lid with
both hands, to activate the sealing mechanism.
Both the red (vacuum) and green (seal) indicator
lights will light up. Note: a correct seal will have a
straight, solid line across the seal. An incorrect seal
will be dotted.
8. After the green (seal) light goes off, (in about 10-15
seconds), lift the lid and tear away the excess
plastic at the beginning of the roll.
9. Next, create a custom-size bag by pulling out the
amount of plastic you need from the roll and place
over the sealing wires.
10. Repeat the sealing process in step 7. When the
green (seal) light goes out, pull the bag away from
the sealing wires. Now you have a bag sealed on
three sides ready to be filled and vacuum sealed.
NOTE: The bottom of the bag is where the white
label strip is.
Sealing a filled bag without vacuum action:
1. Make sure no food or liquid remains in the top
portion of the bag where the seal will be made.
This may interfere with the effectiveness of the seal.
2. Place the open end of the bag over the sealing
wires, making sure that the bagging material is flat,
with no creases along the line of the seal.
3. Close the lid and press down firmly on the lid with
both hands, to activate the sealing mechanism. Both
the red (vacuum) and green (seal) indicator lights will
light up.
NOTE: Remove the bag from the wire immediately after
the green “Seal” light goes off. If the bag starts to cool
it may stick to the wire and create a hole in the seal
when pulled off the wire.
3
4
Vacuum sealing:
1. Place the item to be stored inside the bag. Do not
fill completely. Allow a margin of 2 to 3 inches
between the item and the open end of the bag.
Make sure that the sealing area is free from liquid
or food particles.
2. Tilt the vacuum nozzle up.
Place the open end of the
bag over the sealing wires
and insert the vacuum nozzle
completely inside the bag.
Press down on the vacuum
nozzle to lock the bottom layer of the bag in place.
Take the top layer of the bag and pull it towards
the roll, so that the top of the bag remains open.
3. Close the lid and press down gently with your left
hand on the left side of the lid to activate the airextraction (vacuum) motor. Only the red (vacuum)
light will illuminate. The air will be extracted from
the bag. DO NOT press down on the middle or
right side of the lid, this will block the flow of air
from out of the bag and in through the vacuum
nozzle.
4. As the air is drawn out of the bag, the bag will cling
to the item being sealed. It may help to place the
bag on a cutting board to raise the bag to the
height of the nozzle. It may also help to lift, pull
or manipulate the bag.
5. Continue to press down with your left hand on the
left-hand side of the lid. When you have removed
as much air as possible, immediately press down
with your right hand on the right-hand side of the
lid, while keeping your left hand in place, to activate
the sealing mechanism. Both the red and green
lights will turn on. NOTE: The vacuum motor does
not operate when the green (seal) light is on.
6. When the green light turns off, open the lid and
remove the bag. You have completed your vacuumsealing action.
NOTE: It is not advisable to extract air from bags
containing liquid. The liquid can easily be drawn into
the working mechanism and cause damage.
“Boil-in-bag” reheating:
Foods cooked with the boil-in-bag method retain a high level of
flavor and nutrients. As an added precaution, it is recommended
that food in a Freshlock bag be placed inside a second, larger
Freshlock bag and vacuum sealed before cooking. Boil-in-bag
cooking is great for vegetables, fruits, casseroles, soups, stews,
and fish.
1. Put the bag in boiling water and bring to a boil
again. Do not cover. Do not puncture.
2. Reduce heat and maintain low boil.
3. Cooking time is measured from the second boil.
The time taken to cook will be reduced by
approximately one third compared with the usual
cooking methods. Do not boil for longer than
approximately 20 minutes. Foods can be cooked
straight from the freezer, but it is recommended
that large quantities are defrosted prior to cooking.
Microwave cooking:
1. Place bag on a microwave safe plate or dish.
2. Puncture bag several times with a fork to allow
steam to escape during microwave cooking.
Consult your microwave instruction booklet on
heating commercially prepared boil-in-bags for
times.
Create-A-Pouch:
You can use your FRESHLOCK vacuum sealer to create attached
pouches or a series of connected bags. When you move the
selector switch into the “O” position, the middle wire is turned off.
Therefore, the bag is only sealed, not cut, when you press down on
the lid. You can use this feature to attach a bag containing sauce to
a vacuum sealed entree, attach a bag with a topping to a vacuum
sealed dessert, or create a series of connected bags to make ice
pops. Creating pouches is also an ideal way to portion individual
servings of snacks as well as prepare recipe ingredients.
1. Place the selector switch in the create-a-pouch
“O” position.
2. Pull out the amount of polyethylene plastic needed
to make the first bag or pouch. Then seal the side
of the bag according to the previous instructions.
3. Raise the lid. You will notice that the plastic is not
cut, but rather sealed along two parallel sides.
This forms the sealed edges of two attached
bags/pouches. NOTE: You may separate the bag(s)
at a later time along this area using scissors.
4. Continue to pull the polyethylene from the roll
until you have enough plastic for your second
bag/pouch. Repeat sealing action. Repeat as many
times as necessary to create the desired number
of attached bags/pouches.
5. Before creating your final bag/pouch in the series,
return the selector switch to the cut-bag position.
This will cut the side of the final bag/pouch away
from the roll. Press down firmly with both hands to
seal and cut your bag.
6. Fill each bag/pouch.
7. Place the bags/pouches with open
ends along the sealing wires. Finish
the sealing action by following the
previous instructions. NOTE: You
will only be able to vacuum seal
one of the bags/pouches in the
series.
5
Heat Selector Switch:
By adjusting the heat selector switch, you can use your
vacuum sealer to seal many other plastic bags of
different thicknesses as well as plastic-line foil wrap
(i.e. potato chip bags).
When sealing FRESHLOCK bags from the supplied
polyethylene roll, use the medium setting.
In general, when sealing plastic that is about the same
thickness as the FRESHLOCK bags, use the medium
setting. When sealing plastic that is thicker, use the
high setting. When sealing plastic that is thinner or
lighter, use the low setting. When sealing a traditional
plastic wrap or sandwich storage bag, use the low
setting. To seal plastic-lined foil wrap, use the high
setting.
If you are not sure which position of the heat-selector
switch to select for the material you are using, place
the heat selector switch in the position you think is
correct and then seal a small portion of the material
to test the position.
If you have difficulty removing the material from the
cutting (center) wire, then move the switch to the next
highest setting (i.e. medium to high).
6
If the material pulls away from the cutting and sealing
wires too easily, or leaves a visibly poor seal, then move
the switch to the next lowest setting (i.e. medium to
low).
These are only guidelines for using the heat selector
switch. The best setting for the material you will seal
will be determined by your own results.
Hints and Tips
n
n
n
n
n
After placing the vacuum nozzle inside the bag for
vacuuming and before lowering the lid to vacuum
seal, open the bag wide, keeping the bottom part
of the open end locked under the vacuum nozzle.
This helps to create an air channel that enhances
the vacuum action.
To achieve an efficient seal, ensure that the area to
be sealed is completely clean and dry.
Also ensure that there are no creases or wrinkles in
the bag which would prevent a perfect seal.
Allow approximately 11/2” margin between the food
and seal to allow for expansion when freezing and
cooking.
Do not let up pressure on the lid between
operating the air-extraction (vacuum) feature and
activating the sealing mechanism. This could result
in air re-entering the bag that you are sealing.
n
n
The white stripe on the bag is for labeling.
Always make sure to remove the excess plastic
from around the vacuum nozzle after you have
finished sealing a bag.
n When packing boiling foods, allow them to cool
for 5 minutes before packing.
n We recommend waiting one minute between each
sealing operation.
n To maintain a high-integrity sealing action,
frequently clean the sealing wires.
n Boil-in-bag foods retain their flavor, the saucepan
remains cleaner, cooking odors are reduced, and it
saves energy.
n The vacuum removes the air from the bag,
prolonging storage life, and retaining food color.
It also saves space in the freezer or cupboard.
n Liquids can be vacuumed sealed by first freezing
the liquid in a container and then placing the solid
form in a bag.
n Remember that seasonings and flavorings alter or
intensify during storage, so reduce the amount of
salt, pepper and spices in dishes to be frozen.
Caring For Your Vacuum Sealer
1. Before attempting any cleaning operation, remove
the plug from the outlet.
2. Simply wipe the sealer with a soft, damp cloth.
Do not immerse in water. Do not use any abrasive
cleaners.
3. If particles of plastic adhere to the sealing wire,
wipe them off carefully to avoid damage to the wire.
It may help to carry out a sealing operation (closing
the lid and pressing fully down) without a bag in
position. This will heat the wire and soften any
plastic adhering to it.
The Freshlock Sealer Has Many Uses:
Food Storage
n Buy food in bulk volume or on sale at low cost and
then package for storage.
n Package meat, fish and poultry to freeze or to
refrigerate.
n Re-seal items in original packages. Great for rice,
pasta, brown sugar, cheese, bacon, nuts, pretzels,
potato chips, and other snacks.
n Package ingredients for special recipes.
n Pre-package servings for the weight-conscious or
those on special diets.
7
n
n
n
n
n
n
n
n
n
n
n
8
Save time by pre-cooking meals on weekends and
then packaging individual servings. Food is then
ready to reheat during the busy week. Cook by
microwave, boil-in-bag or open and cook by
conventional methods.
Pack lunches for school or work.
Save leftovers or send your guests home with
leftovers.
Save luncheon meat, cheese and salad fresh from
the deli.
Pack food for picnics, barbecues, boating and
camping.
Save garden-fresh vegetables.
Preserve coffee beans.
Prepare after-school snacks.
Package vitamins or medication for daily dosage.
Send “Care Packages” to loved ones.
Use the create-a-pouch feature to attach sauces to
entrees, toppings to desserts, or create a series of
ice pops.
General Storage
n Protect valuable documents such as insurance
policies and treasured photographs.
n Keep matches, maps and other items safe and dry
when boating, on picnics or camping.
n
n
n
n
n
n
n
n
n
n
n
n
n
n
n
n
Seal cosmetics, lotions, etc., against spills in
cosmetic cases, travel bags and suitcases.
Also wrap shoes separately to protect clothing.
Preserve newspaper articles, rare and valuable
books.
Prevent silverware from tarnishing.
Keep seeds and bulbs safe and dry for planting next
year.
Distribute party favors.
Organize the kids’ toys and crayons.
Keep dice and other game pieces from being lost.
Organize hardware items...screws, nails, nuts and
bolts, etc.
Protect baseball cards and stamp collections.
Pack bandages and other first-aid items for travel.
Seal and freeze ice for use in coolers and as a cold
compress for bumps, bruises, aches and pains.
Protect small items of clothing against moth
infestation.
Protect jewelry and family heirlooms.
Keep computer disks dust free.
Store and organize countless items around the
home such as paper clips, rubber bands, buttons
and sewing items, etc.
CUSTOMER SERVICE
If you have any questions or
problems regarding the operation
of your Deni Freshlock Turbo
Vac, call our customer service
department toll free:
Monday through Friday
8:30 a.m. to 5:00 p.m.
(Eastern Standard Time)
1-800-DENI-VAC
1-800-336-4822
or E-mail us at
[email protected]
ONE-YEAR LIMITED WARRANTY
Your Deni Freshlock Turbo Vac is warranted for one year from date of
purchase or receipt against all defects in material and workmanship. Should your
appliance prove defective within one year from date of purchase or receipt, return
the unit, freight prepaid, along with an explanation of the claim. If purchased in
the U.S.A. or other country, please send to: Keystone Manufacturing Company,
Inc. 33 Norris Street, Buffalo, NY 14207. If purchased in Canada, please send to:
Keystone Manufacturing Company, Inc., 151 Cushman Road, St. Catherines,
Ontario L2M 6T4. (Please package your appliance carefully in its original box and
packing material to avoid damage in transit. Keystone is not responsible for any
damage caused to the appliance in return shipment.) Under this warranty,
Keystone Manufacturing Company, Inc. undertakes to repair or replace any parts
found to be defective.
This warranty is only valid if the appliance is used solely for household
purposes in accordance with the instructions. This warranty is invalid if the unit
is connected to an unsuitable electrical supply, or dismantled or interfered with
in any way or damaged through misuse.
We ask that you fill in the details on your warranty card and return it within
one week from date of purchase or receipt.
This warranty gives you specific legal rights. You may also have other rights
which vary from state/province to state/province.
www.deni.com
Deni by Keystone Manufacturing Company, Inc.®
©2007 Keystone Manufacturing Company, Inc.
All rights reserved.
10