1
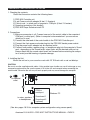
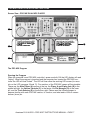
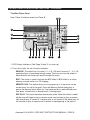
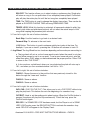
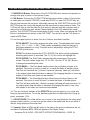
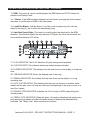
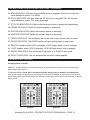
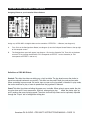
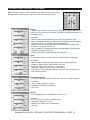
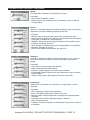
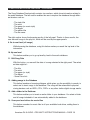
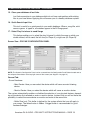
PRO MIX
TM
PROFESSIONAL DUAL MP3 CONTROLLER
SOFTWARE VERSION 1.0
Sampling
American DJ ® AUDIO Los Angeles, CA 90058 USA • www.americandj.com
CONTENTS
MINIMUM SYSTEM REQUIREMENTS......................................................................................2
INTRODUCTION TO THE PRO MIX SYSTEM...........................................................................2
IMPORTANT SAFETY INSTRUCTIONS.................................................................................3-4
HARDWARE CONTROLLER SET UP NOTES...........................................................................5
INSTALLING PRO MIX SOFTWARE..........................................................................................6
PRO MIX PLAYER CONTROLS AND FUNCTIONS..............................................................7-12
EFFECTS DETAILS............................................................................................................12-15
OTHER PRO MIX PLAYER FEATURES..............................................................................16-20
AUDIO FILE PREPARATIONS.............................................................................................21
CUSTOMER SUPPORT............................................................................................................21
SPECIFICATIONS....................................................................................................................21
MINIMUM SYSTEM REQUIREMENTS
PRO MIXTM System requirements:
Processor Speed: 400 Mhz Pentium II or compatible
Memory: 128 MB RAM
Operating System: Windows 98
CD-ROM Drive
Sound Card: 1 (for main output)
Recommended System Requirements:
Processor Speed: faster than a 400 Mhz Pentium II or compatible
Memory: 256 MB RAM
Operating System: Windows 2000
Sound Cards: 2 (1 card for main output and 1 card to monitor with headphones - Sound Card
driver should support Microsoft Direct X 8)
USB Connection: USB headphones may be use to monitor mix instead of the 2nd sound card
Modem: 56K or faster
INTRODUCTION TO THE PRO MIX SYSTEM
The American DJ PRO MIXTM System is a Professional MP3 PLAYER and CONTROLLER
solution. The PRO MIX is comprised of the PRO MIXTM software program running on a
Windows based computer that is connected to a PRO MIXTM hardware controller. With the
unique ability to play and mix MP3, WAV, WMA, Digital Audio, and CD audio files directly from
your computer via a hands on controller, American DJ brings you into the digital world like
never before.
Because the Microsoft Windows® Operating System is needed to run the PRO MIX, we are
assuming you are familiar with your computer and know how to navigate and use Windows.
This manual will only give information on using the PRO MIX software and configuring the
PRO MIX controller. If you have any questions concerning the use of the Windows OS,
please consult your Windows documentation.
It is recommended that you close all other applications on your computer when using the
PRO MIX program to improve system performance.
American DJ ® AUDIO • PRO MIX™ INSTRUCTIONS MANUAL • PAGE 2
IMPORTANT SAFETY INSTRUCTIONS
WARNING:
TO PREVENT FIRE OR SHOCK
HAZARD, DO NOT EXPOSE THE EASY
PLAY CONTROLLER UNIT TO WATER
OR MOISTURE.
CAUTION:
1. Handle the power supply cord carefully.
Do not damage or deform; it may cause
electric shock or malfunction when used.
Hold plug attachment when removing from
wall outlet. Do not pull on the cord.
2. To avoid electric shock, do not open the
top cover when the unit is plugged in. If
problems occur with the unit, call your local
American DJ AUDIO dealer.
3. Do not place metal objects or spill liquid
on the controller. Electric shock or malfunction may occur.
Please record and retain the model name
and serial number from your rating label.
Model No._______________________
Serial No. _______________________
The lightning flash with an
arrow triangular symbol is
intended to alert the user to the
presence of uninsulated “dangerous voltage” within the products enclosure, and may be of
sufficient magnitude to constitute a risk of electric shock.
The exclamation point triangular symbol is intended to alert
the user to the presence of
important operating and maintenance (servicing) instructions
in the user manual accompanying the Easy Play Player.
CAUTION
TO PREVENT ELECTRIC SHOCK DO
NOT USE THIS (POLARIZED)PLUG WITH
AN EXTENSION CORD, RECEPTACLE
OR OTHER OUTLET UNLESS THE
BLADES CAN BE CAREFULLY INSERTED TO PREVENT BLADE EXPOSURE.
NOTE:
This unit may cause interference to radio
and television reception.
CAUTION
RISK OF ELECTRICAL SHOCK
DO NOT OPEN
CAUTION: TO REDUCE THE RISK OF
ELECTRIC SHOCK, DO NOT REMOVE
THE COVER RACK.
THERE ARE NO USER SERVICEABLE
PARTS INSIDE. REFER SERVICE TO
YOUR AUTHORIZED AMERICAN DJ
AUDIO DEALER.
CAUTION:
USE OF CONTROLS OR ADJUSTMENTS
OTHER THAN THOSE SPECIFIED HEREIN MAY RESULT IN HAZARDOUS RADIATION EXPOSURE.
THE EASY PLAY MP3 PLAYER SHOULD
NOT BE ADJUSTED OR REPAIRED BY
ANYONE EXCEPT PROPERLY QUALIFIED SERVICE PERSONNEL.
American DJ ® AUDIO • PRO MIX™ INSTRUCTIONS MANUAL • PAGE 3
IMPORTANT SAFETY INSTRUCTIONS - CONTINUED
2. Save Instructions - The safety and operating instructions should be saved for
future reference.
10. Power-Cord Protection - Power-supply
cords should be routed so that they are not
likely to be walked on or pinched by items
placed upon or against them, paying particular attention to cords at plugs, convenience receptacles, and the point where
they exit from the appliance.
3. Heed Warnings - All warnings on the
appliance and in the operating instructions
should be adhered to.
11.Cleaning - The appliance should be
cleaned only as recommended by the
manufacturer.
4. Follow Instructions - All operating and
user instructions should be followed.
12. Non-use Periods - The power cord of
the appliance should be unplugged from
the outlet when left unused for extended
periods of time.
I. Read Instructions - All the safety and
operating instructions should be read
before the appliance is operated.
5. Water and Moisture -The appliance
should not be used near water - for example, near a bath tub, washbowl, kitchen
sink, laundry tub, in a wet basement or
near a swimming pool,etc.
6. Ventilation - The appliance should be situated so that its location or position does
not interfere with its proper ventilation. For
example, the appliance should not be situated on a bed, sofa, rug, or similar surface
that may block the ventilation openings; or,
placed in a built-in installation, such as a
bookcase or cabinet that may impede the
flow of air through the ventilation openings.
7. Heat - The appliance should be situated
away from heat sources such as radiators,
heat registers, stoves, or other appliances
(including amplifiers) that produce heat.
8.Power Sources -The appliance should be
connected to a power supply only of the
type described in the operating instructions
or as marked on the appliance.
9.Grounding or Polarization - Precautions
should be taken so that the grounding or
polarization means of an appliance is not
defeated.
13. Object and Liquid Entry - Care should
be taken so that objects do not fall and liquids are not spilled onto the enclosure
through openings.
14.Damage Requiring Service - The appliance should be serviced by qualified service personnel when:
A. The power-supply cord or the plug has
been damaged.
B. Objects have fallen, or liquid has been
spilled into the appliance.
C. The appliance has been exposed to
rain or water.
D. The appliance does not appear to operate normally or exhibits a marked
change in performance.
E. The appliance has been dropped, or
the enclosure damaged.
15.Servicing -The user should not attempt
to service the appliance beyond that described in the operating instructions. All
other servicing should be referred to qualified service personnel.
American DJ ® AUDIO • PRO MIX™ INSTRUCTIONS MANUAL • PAGE 4
HARDWARE CONTROLLER SET UP NOTES
1. Checking the contents
Check that the carton contains the following items:
1)
2)
3)
4)
5)
PRO MIX Controller unit
4-pin Power cord with adapter (6 feet / 1.8 meters)
Control cord - to attach unit to computer’s COM port (6 feet /1.8 meters)
Operating instructions (this booklet)
PRO MIX Player Software install CD
2. Connections
1) Make sure computer is off. Connect one end of the control cable to the computer’s
COM port (or serial port). (Refer to computer’s documentation if you are unsure
which port to use.)
2) Connect the other end of the control cable to the PRO MIX Controller port.
3) Connect the 4-pin power cord male plug into the PRO MIX female power socket.
4) Plug the power cord’s adapter into an electrical outlet.
5) Connect audio cables, speaker plugs, or headphone plug into the computer’s Sound
card - depending on the Sound card’s output jacks and the desired audio set up.
Always check that the sound output levels are lowered before restarting the computer to avoid possible hearing or speaker damage.
3. Installing the Unit
Mount the unit on to your console or rack with 19" EIA rack rails or set on tabletop.
CAUTION:
Be sure to use the supplied control cables. Using another type of cable may result in damage or may
compromise performance. Be sure the power is off to the unit and computer when connecting the
control cable. Otherwise the unit may not work properly and may cause damage the computer.
3
4
to electrical
outlet
2
PRO MIX Controller - Rear Panel
1
COM or
serial port
to mixer, speakers,
or headphones
5
Windows PC
Sound card 1
Sound card 2
(optional)
(See also pages 18-19 for computer system configuration using screen panel).
American DJ ® AUDIO • PRO MIX™ INSTRUCTIONS MANUAL • PAGE 5
INSTALLING THE PRO MIX SOFTWARE
The PRO MIX Program
Installing the software
Turn off CD Auto Run (so software will function properly). Locate and run the file named
“setup.exe” on the included CD-ROM. The installation will guide you through the process of
placing the program on the computer’s hard drive. Make sure you have at least 7 MB of free
space available on the hard drive to load the program. (Please note that the storing of MP3,
WAV and other audio files will require much more hard drive space.) Consult your Windows
manuals if you need further help installing software on your computer. Please visit the
American DJ web site for updates and other information regarding this product.
If the introduction program does not start automatically after inserting the PRO MIX CD-Rom,
do the following:
1.
2.
2.
3.
4.
5.
6.
7.
Turn off CD Auto Run (so software will function properly).
Insert the PRO MIX CD-Rom
Click the Windows ‘Start Menu’
Click ‘Run’
In the ‘Run dialog, click Browse.
In the ‘Browse’ dialog, look in list, double click ‘My Computer’
Under ‘My Computer’, double click the ‘PRO MIX American DJ CD’
Double click the ‘setup.exe’ file. The installation program will run a set-up wizard
and you will be prompted for your set-up.
If the software installation was unsuccessful after following the set-up instructions,
contact American DJ’s Customer Support Team Monday - Friday 9 a.m. - 5 p.m. Pacific
Standard Time (PST) at:
Toll Free:
Fax:
International:
E-mail:
800-322-6337 (U.S. & Canada only)
323-582-2610
+1 323-582-2650 (ask for Customer Support)
[email protected]
American DJ ® AUDIO • PRO MIX™ INSTRUCTIONS MANUAL • PAGE 6
PRO MIX PLAYER CONTROLS AND FUNCTIONS
Screen View - PRO MIX DUAL MP3 PLAYER
A
C
B
B
E
D
The PRO MIX Program
Running the Program
When the computer’s and PRO MIX controller’s power are both ON the LED display will read
“linking”. When the program is launched and the computer has located the PRO MIX controller the LED will read “linked”. The LED will then show the working LED screen (for more
info on the LED see page 10 and 11). Five sections of the PRO MIX screen will be viewable.
These are: the Main Player (A) section at the top, the Player A and B play lists (B) in the
middle left/right, the Volume Controls (C) in the center, the File Manager (D) at the lower
left, and the Track Selector (E) at the bottom right. Please read the following pages to
become familiar with each PRO MIX section, its function, and what each of the on screen
buttons (icons) do.
American DJ ® AUDIO • PRO MIX™ INSTRUCTIONS MANUAL • PAGE 7
PRO MIX PLAYER CONTROLS AND FUNCTIONS - CONTINUED
The Main Player Panel
Note: Player A functions exactly as Player B
15 16
1
2
14
13
3
12
4
5
6
7
8
9 10
11
1. LED Display Indicators. (See Page 10 and 11 for close up)
2. From left to right, this set of buttons includes:
SEARCH: This wheel has 3 forward (+1, +2 & +10) and 3 reverse (-1, -2 & -10)
speed positions for searching through songs. The more you turn the wheel in
either direction the faster you search through the music.
BOP: This button is used to activate the BOP effect. A BOP effect is a stutter,
creating a sound similar to a CD skipping.
MEMORY CUE: This button allows you to program up to 3 cue points on the
current song, first set a cue point. Press the Memory Button during play or
pause, the memory button lights up. Use frame search to reach desired point,
then press a flash button to memorize all 3 starting points.
REV PLAY: This button activates reverse play mode. When this effect is select
ed the song will begin to play in reverse mode, and continue to play in reverse
until reverse play is turned off. If reverse play is not turned off the whole play list
will continue to play in reverse until it returns to the beginning of the play list.
American DJ ® AUDIO • PRO MIX™ INSTRUCTIONS MANUAL • PAGE 8
PRO MIX PLAYER CONTROLS AND FUNCTIONS - CONTINUED
SGL/CNT: This function allows you to select single or continuous play. Single play
will return a song to it's cue point when it has completely been played. Continuous
play will play the entire play list until the last song has completely been played.
TIME: The TIME button is used to change the display time values. Time can be dis
played as ELAPSED PLAYING TIME and song REMAINING TIME.
TEMPO LOCK: While this function is activated, all commands related to pitch (jog
wheel, pitch slider and pitch bend buttons) will not effect the actual tempo of the
song while keeping the perceived pitch constant.
3. From left to right, this set of buttons includes:
Back Skip: Use this function to go back to a desired track.
Forward Skip: To advance to the next track.
(+10) Button: This button is used to advance quickly ten tracks at the time. For
example, if you are on track 2, pressing the +10 button will advance to track 12.
4. Jog Wheel: The Jog Wheel has two functions depending on the mode you are working in:
a. The jog wheel will act as a slow frame search control when the panel is not playing but either paused or set to a cue point. To set a new frame cue point, spin the
wheel then press PLAY when you have determined the proper position. Press CUE
to return to the "CUE POINT".
b. It also works as a pitch bend, when you turn clockwise the pitch will raise up to
16%, and when you turn counterclockwise it will fall to -16%.
5. From left to right, this set of buttons includes:
FLASH 1: Moves the cursor to the position that was previously stored for this
button through the "mem cue" function.
FLASH 2: Same as above.
FLASH 3: Same as above.
6. From left to right, this set of buttons includes:
IN/R. CUE: (CUE "ON THE FLY") This allows you to set a CUE POINT without stop
ping the play back. This button also sets the beginning of a seamless loop.
OUT/EXIT: Used to set the ending point when looping. When the Out/Exit button is
pressed, the player will play the loop continuously. To exit the loop, press the
Out/Exit button again.
RELOOP: If a SEAMLESS LOOP has been made, but the Player is not in SEAM
LESS LOOP mode, press the RELOOP BUTTON to activate the seamless loop
mode. RELOOP will appear in the Display Panel.
American DJ ® AUDIO • PRO MIX™ INSTRUCTIONS MANUAL • PAGE 9
PRO MIX PLAYER CONTROLS AND FUNCTIONS - CONTINUED
7. PAUSE/PLAY Button: Each press of the PLAY/PAUSE button causes the operation to
change from play to pause or from pause to play.
8. CUE Button: Pressing the CUE BUTTON during play provides a return to the position
at which play was started. If PAUSE is used before CUE or a new CUE POINT was set,
that will now become the cue point. Alternately pressing the PLAY BUTTON and the CUE
BUTTON allows the song to be played from the same position any number of times. The
CUE led will light up from the time the Cue button is pressed until the song has reset to
the position at which play was started. Steady lighting of this LED indicates the ready
position. The CUE BUTTON can be held down to play a song. When you release the CUE
Button it instantaneously returns to the CUE POINT. You can also tap the CUE button to
create a BOP Effect.
9. From the upper position to down, this set of buttons and sliders includes:
PITCH SELECT: This button changes the pitch value. The selectable pitch values
are +/- 12%, +/- 24%, +/- 50%. These values immediately reflect the amount of
pitch being applied to a song. The pitch value is adjusted by sliding the PITCH
SLIDER up and down.
PITCH: This button activates the PITCH SLIDER. The button will be highlighted
indicating pitch control is activated. The 12, 24, 50% button will highlight too.
PITCH SLIDER: The Pitch Slider changes the pitch percentage of the music
source. The pitch values range from 12, 24, 50%. Use the 12, 24, 50% Button,
to change the selected pitch value.
PITCH BEND + : The Pitch Bend function allows the positioning of beats to be
matched. This button is used to "catch up" to match the beats of another player.
The Pitch will rise while the (+) Button is pressed (allowing "catch up") and return
to the original pitch when the button is released. By changing the pitch of one song
respect to the other one, beats can be matched.
PITCH BEND - : The Pitch Bend function allows the positioning of beats to be
matched. This button is used "fall back" to match the beats of another player.
The Pitch will drop while the (-) Button is pressed (allowing fall back) and return to
the original pitch when he button is released. By changing the pitch of one song
with respect to the other one, beats can be matched.
10. This set of buttons includes all the EFFECTS that you can apply to your songs and
blue pop up panel buttons. To see the detailed explanation of each effect and its pop up
panel, see pages 12-14.
11. CROSS FADER: This slider allows you to move to the song playing in the other panel,
making a fade transition, you can also put the slider in the center and see a mix effect of
the two songs playing at the same time.
12. Counter: When in BPM. tap this button to the beat of the music to determine the current Beats Per Minute (BPM). BPM will appear in the Display Panel.
American DJ ® AUDIO • PRO MIX™ INSTRUCTIONS MANUAL • PAGE 10
PRO MIX PLAYER CONTROLS AND FUNCTIONS - CONTINUED
13. BPM: This button is used to switch between the BPM button and PITCH values displayed in the Display Panel.
14. > Button: If the BPM has been detected on both players, pressing this button causes
the player to synchronize its BPM to the other player.
15. Load Files Button: Use this Button if you like to add a single song, this won't be
added to the play list, but it will be the new playing song.
16. Auto Beat Synch Slider: This control is used to adjust the threshold for the BPM
detection. The threshold affects the way the beat LED glows, the lower the threshold, the
more sensitive the beat LED will be.
17
18
19
20
21
22
23
36
24
35
25
34
33
32
31
30
29
28
27
26
17. PLAY INDICATOR: The PLAY indicators will glow during normal playback.
18. CUE INDICATOR: This indicator details cue mode has been activated.
19. ELAPSED INDICATOR: This indicates that the time shown on the display is in elapsed
time.
20. TIME BAR INDICATOR: Shows the elapsed time of the song.
21. REMAIN INDICATOR: This indicate that the time shown on the display is in song
remaining time.
22. AUTO CUE INDICATOR: This indicates that the auto-cue function is enabled, which
means that the play cursor will skip any silence at the beginning of the song as soon as a
new file is loaded.
23. SEARCH STEP INDICATOR: Indicates the Fast Forward or REW speed during the
search process.
24. TEMPO LOCK INDICATOR: When this glows, all functions affecting pitch (pitch cursor,
pitch pend and jog wheel) will effect the tempo instead of keeping the perceived pitch
unaltered. The "Tempo Lock" button activates this function.
American DJ ® AUDIO • PRO MIX™ INSTRUCTIONS MANUAL • PAGE 11
PRO MIX PLAYER CONTROLS AND FUNCTIONS - CONTINUED
25. BPM INDICATOR: Will glow when the BPM button is engaged. This will also show the
value detailed in section 12 in BPM's.
26. PITCH INDICATOR: Will glow when the PITCH button is engaged. This will show the
value detailed in section 12 in pitch percentage.
27. PITCH OR BPM DISPLAY: Details either beat per minute or applied pitch percentage.
28. FRAME INDICATOR: Details the frames elapsed or remaining.
29. SECOND INDICATOR: Details the seconds elapse or remaining.
30. MINUTES INDICATOR: Details the minutes elapse or remaining.
31. TRACK INDICATOR: This will display the current track in play, pause, and cue mode.
32. PAUSE INDICATOR: The PAUSE indicator will glow during pause or cue mode.
33. RELOOP: Appears when LOOP is engaged, LOOP flashes when a loop is engaged.
34. LOOP: Appears when LOOP is engaged, LOOP will flash when a loop is engaged.
35. SINGLE INDICATOR: This will indicate if the player is in "SINGLE" play mode.
36. EFFECT INDICATOR: This will indicate when an effect is being applied.
PRO MIX EFFECTS DETAILS
Assigning Effects on Screen
PRO MIX’s 10 digital effects may accessed directly on on your computers screen by clicking on the desired
effects button (see diagram 1).
The following Effects: Flange, Echo, Parametric Equalizer, Gargle, Chorus, Distortion and Compressor,
have default settings, but new user created settings may be saved (or deleted) by clicking on the blue settings
button directly above each Effects Button (see diagram 2). See pages 14 and 15 for more information on pop-up
display panels.
Diagram 1
Diagram 2
American DJ ® AUDIO • PRO MIX™ INSTRUCTIONS MANUAL • PAGE 12
PRO MIX EFFECTS DETAILS - CONTINUED
Assigning Effects to your Controller Effects Buttons
Diagram 3
Diagram 4
Diagram 5
Assign any of PRO MIX’s 10 digital effects on the controllers EFFECTS 1 - 4 Buttons (see diagram 3).
A.
First, Click on the Configurations Button (see diagram 4) near the Collapse Screen Button at the top right
of the computer screen.
B.
The Configurations panel will appear (see diagram . Click on the Controller Tab. Then click on the down
arrow of FX1 and assign desired effect. FX1 corresponds to EFFECT 1 on the Controller (ie. FX2
corresponds to EFFECT 2 and so on).
Definitions of PRO MIX Effects
Scratch: This effect simulates scratching on a vinyl turntable. The jog wheel causes the platter to
move forward and backwards very quickly. This effect can be used in both play and pause modes.
When scratching in pause mode, the music stops as soon as the jog wheel is released. In play mode,
the music continues to play at normal speed when the jog wheel is released.
Coast:This effect simulates switching the power on a turntable. When going to pause mode, the platter spins down until it loses momentum. Similarly, when going to play
mode, the platter spins up
until it reaches the normal playing speed. The coast start and stop times can be separately adjusted
through the "Player" tab in configuration dialog box.
American DJ ® AUDIO • PRO MIX™ INSTRUCTIONS MANUAL • PAGE 13
PRO MIX EFFECTS DETAILS - CONTINUED
Note: To locate the effect’s display panel click on the blue button directly above
the effect bottom–see diagram at right. For more information see page 12.
Flange:
Flange is an echo effect in which the delay between the original signal and its
echo is very short and varies over time. The result is sometimes referred to as
a sweeping sound.
Parameters:
• Wet/Dry: Ratio of wet (processed) signal to dry (unprocessed) signal.
• Depth: Percentage by which the delay time is modulated by the low-frequency oscillator (LFO), in hundredths of a percentage point.
• Feedback: Percentage of output signal to feed back into the effect's input.
• Frequency: Frequency of the LFO.
• Delay: Number of milliseconds the input is delayed before it is played back.
• Waveform: Waveform of the LFO.
• Phase: Phase differential between left and right LFOs.
Echo:
An echo effect causes an entire sound to be repeated after a fixed delay.
Parameters:
• Wet/Dry: Ratio of wet (processed) signal to dry (unprocessed) signal.
• Feedback: Percentage of output fed back into input.
• Left Delay: Delay for left channel, in milliseconds.
• Right Delay: Delay for right channel, in milliseconds.
• Pan Delay: Value that specifies whether to swap left and right delays with
each successive echo.
Parametric Equalizer:
A parametric equalizer amplifies or attenuates signals of a given frequency.
Parameters:
• Center: Center frequency, in hertz.
• Bandwidth: Bandwidth, in semitones.
• Gain: Gain.
Reverb:
The reverberation effect is intended for use with music.
Parameter:
• In Gain: Input gain of signal, in decibels (dB).
• Reverb Mix: Reverb mix, in dB.
• Reverb Time: Reverb time, in milliseconds.
• HF Ratio:
American DJ ® AUDIO • PRO MIX™ INSTRUCTIONS MANUAL • PAGE 14
PRO MIX EFFECTS DETAILS- CONTINUED
Gargle:
The gargle effect modulates the amplitude of the signal.
Parameters:
• Rate: Rate of modulation, in Hertz.
• Shape: Shape of the modulation wave. The following values are defined:
Triangle, Square.
Chorus:
Chorus is a voice-doubling effect created by echoing the original sound with a
slight delay and slightly modulating the delay of the echo.
Parameters:
• Wet/Dry: Ratio of wet (processed) signal to dry (unprocessed) signal.
• Depth: Percentage by which the delay time is modulated by the low-frequency oscillator, in hundreds of a percentage point.
• FeedBack: Percentage of output signal to feed back into the effect's input.
• Frequency: Frequency of the LFO.
• Delay: Number of milliseconds the input is delayed before it is played back.
• Waveform: Waveform of the LFO.
• Phase: Phase differential between left and right LFOs.
Distortion:
Distortion is achieved by adding harmonics to the signal in such a way that,
as the level increases, the top of the waveform becomes squared off or
clipped.
Parameters:
• Gain: Amount of signal change after distortion.
• Edge: Percentage of distortion intensity.
• Eq Center: Center frequency of harmonic content addition.
• Eq Bandwidth: Width of frequency band that determines range of harmonic
content addition.
• Lowpass: Filter cutoff for high-frequency harmonics attenuation.
Compressor:
Compression is a reduction in the fluctuation of a signal above a certain
amplitude.
Parameters:
• Gain: Output gain of signal after compression.
• Attack: Time before compression reaches its full value.
• Release: Speed at which compression is stopped after input drops below
Threshold.
• Threshold: Point at which compression begins, in decibels.
• Ratio: Compression ratio.
• Pre-delay: Time after Threshold is reached before attack phase is started, in
milliseconds.
American DJ ® AUDIO • PRO MIX™ INSTRUCTIONS MANUAL • PAGE 15
OTHER PRO MIX PLAYER FEATURES
Screen View - PRO MIX PLAYER VOLUME OUTPUT
The Main Volume Output Panel
At the center of the PRO MIX screen is the Volume Output panel. Adjust the Player A and
Player B volume sliders to the desired audio level for both the Main Outputs (MAIN) and
Monitoring Levels (MON). If you have a second Sound Card installed in the computer, headphones may be used for monitoring the mix. Use caution in playing sound levels that my
damage ears or speakers.
(See page 16 for definitions of each button in the play list)
Screen View - PRO MIX PLAYER PLAY LISTS
PLAYER A PLAY LIST
1 2 34 5 6 7 8
PLAYER B PLAY LIST
The Player Play Lists Panel
Located on either side of the Volume Output panel are the Player Play Lists. These lists are
the files that have been loaded from your music library from the Database Panel (see the following section). Once these audio files have been loaded to the play list, you can determine
what order they will playback. Many adjustments can be made as to how your files will be
played. Using the Play List and other PRO MIX features such as BOP and Seamless Loop
can produce long unattended sets of great digital sound.
American DJ ® AUDIO • PRO MIX™ INSTRUCTIONS MANUAL • PAGE 16
OTHER PRO MIX PLAYER FEATURES - CONTINUED
The buttons at the top of the Play List Panel are for the following functions (see diagram on
page 15):
1. Add a Song
This button lets you add one or more songs to the play list, using a Windows' browsing
dialogue.
2. Delete a Song
This button enables you to delete songs from the play list according to the user's
selection. This action does not affect the database. A keyboard shortcut has been
associated to this button, the DEL key.
3. Select All Songs
This button selects all songs of the play list in a single move.
4. Invert Selection
This button inverts your last selection.
5. Move up a song
This button moves the selected song one step up, giving it a playing priority.
6. Move down a song
This button moves the selected song one step down, decreasing the playing priority.
7. Open a PlayList
This button lets you open a Winamp play list file in .m3u format.
8. Save a playlist
This button enables you to save a play list, using Winamp's .m3u format.
Screen View - PRO MIX SONG DATABASE PANEL
9 10 11 12 13 14 15 16
17
See pages 17-18 for definitions of each button in the database panel)
The Song Database Panel
At the bottom of the PRO MIX screen is where you actually call up the MP3 and other audio
files that are stored on the system. This audio file manager will help you locate the tracks you
have “ripped” and then load them into the PRO MIX. This tool will get you to your files quickly.
American DJ ® AUDIO • PRO MIX™ INSTRUCTIONS MANUAL • PAGE 17
OTHER PRO MIX PLAYER FEATURES - CONTINUED
The Song Database Panel actually contains two sections, which show information related to
the audio database. The left section enables the user to explore the database through different clusters such as:
- The
- The
- The
- The
- The
- The
track title
artist
genre (or music style)
length
album title
file name
The right section shows the browsing results of the left panel. Thanks to these results, the
user can add songs to the play list, which will be used by the upper panels.
9. Go to root level (all songs)
While browsing the database, using this button makes you reach the top level of the
information.
10. Up one level
This button enables you to go up level by level in the audio database.
11. Edit Song Data
With this button, you can edit the data of a song selected in the right panel. The select
ed data might be :
- The title
- The artist
- The genre (or style)
- The album
- Some Extra Info
12. Adding songs to the Database
This button launches a browsing dialogue, which gives you the possibility to search, to
select and to insert songs to the database. The songs will be accessible in physical
storing devices such as HDD's, CD's, DVD's or any other similar digital storage media.
13. Add a folder to the Database
This button enables you to insert an entire folder to your database. You select a folder
and all songs included in it are automatically added to the database.
14. Scan your local drives for music files
This button searches for music files in all your available local drives, adding them to
the database.
American DJ ® AUDIO • PRO MIX™ INSTRUCTIONS MANUAL • PAGE 18
OTHER PRO MIX PLAYER FEATURES - CONTINUED
15. Clean your database of lost links
Lost links are entries in you database which do not have real matches with existing
files in your local drives. Applying this will ensure you of a healthy database system.
16. Quick Search Input Line
This tool is useful for a quick search in your audio database. When a song title, artist
name or genre is typed in, all matches appear in the All Songs panel.
17. Select Play List where to send Songs
This button enables you to select the play list panel to which the song on which you
double clicked, will be send, the left one (for Player A) or right one (for Player B).
Screen View - PRO MIX CONFIGURATION PANEL
NOTE: The System's Configuration Panel can be accessed from the Configuration Panel Button located next to
the collapse screen button at the top right corner of the screen (see diagram 4 on page 14)
General Tab:
•
Sound Hardware:
- Main Device: Here you can select the device which will serve as main listening
device.
- Monitor Device: Here you select the device which will serve as monitor device.
The system automatically enables or disables the selection of your physical devices, depending on the device first-selected as main or monitor device, it means that you will not have the
possibility to select the same device as monitor and main at the same time.
- Buffer Size (ms): This buffer is defined for the system effects that you will apply to
your songs. The default value is 500ms. A bigger buffer is recommended for good
hardware designs.
American DJ ® AUDIO • PRO MIX™ INSTRUCTIONS MANUAL • PAGE 19
OTHER PRO MIX PLAYER FEATURES - CONTINUED
- Use hardware-mixed buffers: Check this item to instruct Direct Sound to use
hardware buffers.
• Sound File System:
- In-memory cache (Kb): This is the system memory used to facilitate memory "hungry"
operations, i.e. Search, Reverse, etc. Be careful if your system is low in memory.
Recommended size 2 MB.
- Disk Cache (Mb): You can set a quantity of disk space, between 0 - 40 Mbytes, that
can be used by the application to perform its operations. This cache memory will be
useful for Search, Reverse, etc.
- File Types: Here you will set the file types that your system will handle.
Default value: *.mp3;*.wma;*.wav.
- Excluded Folders: Here you exclude some folders, according to your needs ;
by default this item has the C:\Winnt folder.
Players Tab:
• Parameters:
- Coast Start Time (ms): Set coast effect’s start time from 0 - 3,000 milaseconds in
increments of 50 ms.
- Coast Stop Time (ms): Set coast effect’s stop time from 0 - 3,000 milaseconds in
increments of 50 ms.
- Start players in time remaining mode: When the default setting is checked the
player will start playing in the ‘Time Remaining’ mode. When unchecked the player
will start in the ‘Elapsed Time’ mode (see also page 11, #19 and #21).
Controller Tab:
· Controller:
- Com Port: The COM port that will be used to communicate with the controller.
- Baud Rate: The communication speed between PC and the Controller.
• Effects:
- FX1 thru FX4: Assign each effect to your controllers EFFECT 1 - EFFECT 4 Buttons
(see also page 13 on assigning effects to your controller effects buttons).
American DJ ® AUDIO • PRO MIX™ INSTRUCTIONS MANUAL • PAGE 20
AUDIO FILE PREPARATION
A few notes about digital audio preparation. In this manual we have addressed the use of
MP3, WAV, WMA and CD audio files for mixing and playback. The PRO MIX will also work on
WAV files and directly from audio compact discs. The MP3 file format is a widely accepted
digital audio file that produces great sound quality at reduced file size. With today’s technology it is now possible to have fast access to all your music and take it with you in a digital format.
The PRO MIX software does not include MP3 ripping capabilities. Third party software must
be used to rip CD, WAV and other file formats to MP3.
CUSTOMER SUPPORT
American DJ® provides a toll free customer support line, to provide set up and installation
help and to answer any question should you encounter problems during your set up or initial
operation. You may also visit us on the web at www.americandj.com for any comments or
suggestions. Toll free customer service hours are Monday through Friday 9:00 a.m. to 5:00
p.m. Pacific Standard Time.
Voice:
(800) 322-6337
Fax:
(323) 582-2610
International:
+1 323-582-2650 (ask for Customer Support)
E-mail:
[email protected]
SPECIFICATIONS
• Weight: 3.9 lbs./1.72 kgs.
• Dimensions (LxWxH): 5.25" x 19" x 2.25" / 132.8mm x 482mm x 57mm
19” rack mount - 3 rack spaces
Specifications and design are subject to change without notice for purpose of improvement.
American DJ ® AUDIO • PRO MIX™ INSTRUCTIONS MANUAL • PAGE 21
World Headquarters:
4295 Charter Street • Los Angeles, CA 90058 USA
www.americandj.com