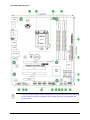
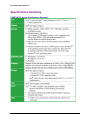
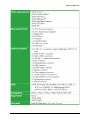
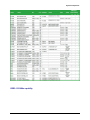
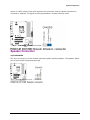
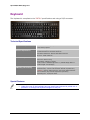
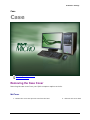
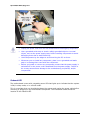
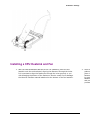
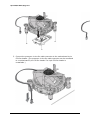
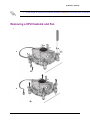
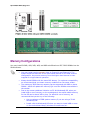
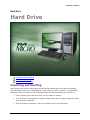
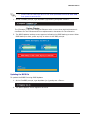
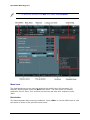
1
Spirit P8Q67-M-DO (Eng) Rev 1 Table of Contents Spirit P8Q67-AS User's Guide ................................................................ 1 Spirit P8Q67-AS Users Guide ......................................................... 1 Revision 1.0, February 2013 ................................................ 1 Please Read This First............................................................................. 1 Northern Micro Offices ............................................................................ 2 On-line Support ........................................................................................ 3 Getting Started ......................................................................................... 5 Getting Started .................................................................................... 5 Unpacking Your Computer ..................................................................... 5 Setting up Your Computer ...................................................................... 6 Starting up for the first time .................................................................... 7 Configuration ........................................................................................... 7 Keyboard .................................................................................... 8 Keyboard .................................................................................................. 8 Function Keys .......................................................................................... 8 Numeric Keypad ...................................................................................... 9 Mode Indicator Lights.............................................................................. 9 Entering Special Characters ................................................................. 10 Mouse ..................................................................................................... 10 Software / Operating System ................................................................ 11 System Components ............................................................................. 13 System Components ........................................................................ 13 Motherboard .............................................................................. 14 Motherboard ....................................................................................... 14 iii Spirit P8Q67-M-DO (Eng) Rev 1 Before you Proceed ............................................................................... 14 Onboard LED ................................................................... 15 Motherboard Layout .............................................................................. 15 Layout Contents ......................................................................... 17 Specifications Summary ....................................................................... 18 P8Q67-M DO Series Specifications Summary ....................... 18 CPU (Central Processing Unit) ............................................................. 20 CPU's Supported: ............................................................. 21 System Memory ............................................................... 22 System Memory................................................................................. 22 Memory Overview .................................................................................. 22 Memory Configurations......................................................................... 23 P8Q67-M DO Series Motherboard Qualified Vendors Lists (QVL) ...................................................................................... 24 DDR3-1333 MHz capability ................................................ 24 DDR3-1333 MHz capability ................................................ 25 DDR3-1066 MHz capability ................................................ 27 Expansion Slots ............................................................... 28 Expansion Slots ................................................................................. 28 Installing an Expansion Card................................................................ 29 Configuring an Expansion Card ........................................................... 29 PCI Slots ................................................................................................. 29 PCI Express x4 Slot ............................................................................... 29 PCI Express x16 Slot ............................................................................. 29 Jumpers .................................................................................................. 30 Clear RTC RAM (3-pin CLRTC) ............................................ 30 To erase the RTC RAM: ..................................................... 30 Intel® ME jumper (3-pin DIS_ME) ..................................... 31 Connectors ...................................................................... 32 Connectors .......................................................................................... 32 Rear Panel Ports .................................................................................... 33 iv Table of Contents Internal Connectors ........................................................................ 35 Front Panel Audio Connector ............................................................... 35 Serial Port Connector ............................................................................ 36 CPU and Chassis Fan Connector ......................................................... 37 ATX Power Connectors ......................................................................... 37 Digital Audio Connector ........................................................................ 38 Intel® Q67 Serial ATA 6.0Gb/s Connectors ........................................ 39 Intel® Q67 Serial ATA 3.0Gb/s connectors ......................................... 39 USB Connector ...................................................................................... 40 System Pannel Connector .................................................................... 41 LPT Connector ....................................................................................... 42 Chassis Intrusion Connector ................................................................ 42 Speaker Connector ................................................................................ 43 Software Support ............................................................. 44 Software Support ............................................................................. 44 Installing an operating system ............................................................. 44 Support DVD Information ...................................................................... 44 To run the Support DVD .................................................... 45 Hard Drive (SATA).................................................................................. 46 Performance Specifications ................................................ 46 Physical Specifications ...................................................... 46 Physical Dimensions ......................................................... 46 Environmental Specifications ............................................. 47 Electrical Specifications ..................................................... 47 Power Supply ......................................................................................... 47 Keyboard ................................................................................................ 48 Technical Specifications .................................................... 48 Special Features............................................................... 48 Mouse ..................................................................................................... 49 v Spirit P8Q67-M-DO (Eng) Rev 1 Features ......................................................................... 49 Installation / Settings ............................................................................. 51 Installation / Settings .................................................................... 51 Front Panel ............................................................................................. 52 Mid-Tower ....................................................................... 52 Slim Desktop ................................................................... 53 Back Panel.............................................................................................. 53 Case ......................................................................................... 55 Case ....................................................................................................... 55 Removing the Case Cover .................................................................... 55 Mid Tower ....................................................................... 55 Slim Desktop ................................................................... 57 Chassis Intrusion ................................................................................... 57 Mid-Tower ....................................................................... 57 Slim Desktop ................................................................... 59 Motherboard .............................................................................. 59 Motherboard ....................................................................................... 59 Before you Proceed ............................................................................... 59 Onboard LED ................................................................... 60 Installation & Removal .......................................................................... 61 Placement Direction .......................................................... 61 System Reset Jumper ........................................................................... 63 Clear RTC RAM (CLRTC) .................................................... 63 Central Processing Unit (CPU) ...................................................... 65 Central Processing Unit (CPU) .................................................... 65 Install a CPU ........................................................................................... 65 Installing a CPU Heatsink and Fan ....................................................... 69 Removing a CPU Heatsink and Fan ..................................................... 71 System Memory ......................................................................... 73 System Memory................................................................................. 73 vi Table of Contents System Memory Overview .................................................................... 73 Memory Configurations......................................................................... 74 Installing System Memory..................................................................... 75 Mid Tower ....................................................................... 75 Slim Desktop ................................................................... 76 Removing System Memory ................................................................... 78 Power Supply ......................................................................................... 79 Mid-Tower ....................................................................... 79 Slim Desktop ................................................................... 79 Hard Drive ................................................................................ 81 Hard Drive ........................................................................................... 81 Unpacking and Handling ....................................................................... 81 Hard Drive Removal ............................................................................... 82 Mid Tower ....................................................................... 82 Slim Desktop ................................................................... 84 Hard Drive Connections ........................................................................ 86 SATA Drive ...................................................................... 86 SATA Cable Connection ..................................................... 86 Optical Drive ........................................................................................... 87 Optical Drive Removal ................................................................ 87 Mid-Tower ....................................................................... 88 Slim Desktop ................................................................... 88 Video ........................................................................................ 88 Video ..................................................................................................... 88 Video Connectors .................................................................................. 89 Integrated Video Driver Installation .............................................. 89 To run the Support DVD .................................................... 89 PCI Express x16 ..................................................................................... 89 Removing/Adding a Video Card .................................................... 89 Mid-Tower ....................................................................... 89 Slim Desktop ................................................................... 90 PCI Adapter Cards ................................................................................. 90 PCI slots ................................................................................... 90 Removal/Install of a PCI Adapter Card .......................................... 91 vii Spirit P8Q67-M-DO (Eng) Rev 1 Mid-Tower ....................................................................... 91 Slim Desktop ................................................................... 91 Final Power Connection Procedures ................................................... 92 BIOS Information ................................................................................... 93 BIOS Information ............................................................................. 93 Managing and Updating your BIOS ............................................... 94 Managing and Updating your BIOS ........................................... 94 ASUS Update Utility ............................................................................... 95 Installing ASUS Update ..................................................... 95 Updating the BIOS ........................................................... 95 ASUS EZ Flash 2 .................................................................................... 96 To update the BIOS using EZ Flash 2: ................................. 96 ASUS CrashFree Bios ........................................................................... 97 Recovering the BIOS ........................................................ 97 ASUS BIOS Updater............................................................................... 97 Before updating BIOS ....................................................... 98 Booting the system in DOS environment ............................. 98 Backing up the current BIOS ............................................. 98 Updating the BIOS file ...................................................... 99 BIOS Setup Program ........................................................................... 100 Entering BIOS Setup at startup ........................................ 101 Entering BIOS Setup after POST....................................... 101 BIOS Menu Screen ......................................................... 102 EZ Mode ....................................................................... 102 Advanced Mode .............................................................. 103 Menu items ................................................................... 104 Back button ................................................................... 104 Submenu items .............................................................. 105 Pop-up window .............................................................. 105 Scroll bar ...................................................................... 105 Navigation keys ............................................................. 105 General help .................................................................. 105 Configuration Fields ........................................................ 105 Main Menu ............................................................................................ 105 System Language [English] ............................................. 106 System Date [Day xx/xx/xxxx] ........................................ 106 System Time [xx:xx:xx] ................................................. 106 Security ........................................................................ 106 viii Table of Contents Administrator Password .................................................. 106 User Password ............................................................... 107 Ai Tweaker Menu ................................................................................. 108 Memory Frequency [Auto] ............................................... 109 iGPU Max. Frequency [Auto] ............................................ 109 EPU Power Saving Mode [Disabled] .................................. 109 GPU Boost [OK] ............................................................. 110 DRAM Timing Control ...................................................... 110 CPU Power Management ................................................. 110 Offset Mode Sign [+] ...................................................... 111 CPU Voltage [Auto] ........................................................ 111 iGPU Offset Mode Sign [+] .............................................. 111 DRAM Voltage [Auto] ...................................................... 111 VCCIO Voltage [Auto] ..................................................... 112 PCH Voltage [Auto] ........................................................ 112 Load-Line Calibration [Auto] ............................................ 112 Advanced Menu ................................................................................... 112 Trusted Computing ......................................................... 113 CPU Configuration .......................................................... 113 System Agent Configuration ............................................ 115 PCH Configuration .......................................................... 115 SATA Configuration ........................................................ 115 Intel TXT(LT) Configuration ............................................. 116 USB Configuration .......................................................... 116 ME Subsystem ............................................................... 117 AMT Configuration .......................................................... 117 Onboard Devices Configuration ........................................ 117 APM .............................................................................. 119 Serial Port Console Redirection ........................................ 120 Monitor Menu ....................................................................................... 120 CPU Temperature / MB Temperature [xxxºC/xxxºF] ........... 121 CPU / Chassis Fan Speed [xxxx RPM] or [Ignore] / [N/A] .... 121 CPU Q-Fan Control [Enabled] ........................................... 121 Chassis Q-Fan Control [Enabled] ...................................... 122 CPU Voltage, 3.3V Voltage, 5V Voltage, 12V Voltage .......... 123 Anti Surge Support [Enabled] .......................................... 123 Boot Menu ............................................................................................ 123 Bootup NumLock State [On] ............................................ 123 Full Screen Logo [Enabled] .............................................. 124 Option ROM Messages [Force BIOS] ................................. 124 Setup Mode [EZ Mode] ................................................... 124 Boot Option Priorities ...................................................... 124 Boot Override ................................................................ 124 Tools Menu ........................................................................................... 124 ASUS EZ Flash Utility ...................................................... 125 ix Spirit P8Q67-M-DO (Eng) Rev 1 ASUS O.C. Profile ........................................................... 125 Exit Menu .............................................................................................. 125 Troubleshooting & FAQs .................................................................... 127 Troubleshooting & FAQs .............................................................. 127 When a Problem Occurs ..................................................................... 127 Steps to troubleshooting: ................................................ 128 How to Place a Service Call ................................................................ 128 Via telephone ................................................................ 128 Via the Internet ............................................................. 129 Via our Portal................................................................. 129 General procedures: ....................................................... 129 FAQs ..................................................................................................... 129 Troubleshooting PC............................................................................. 131 Power ........................................................................... 134 Display ......................................................................... 134 LAN .............................................................................. 135 Audio ............................................................................ 135 System ......................................................................... 136 CPU .............................................................................. 136 Troubleshooting No Display On Power Up........................................ 137 Troubleshooting Steps: ................................................... 137 Troubleshooting Motherboard ............................................................ 138 Platform Security ................................................................................. 139 Platform Security............................................................................ 139 TPM ....................................................................................................... 139 Warning of Potential Data Loss .......................................................... 140 Environmental Initiative ...................................................................... 141 Environmental Initiative .............................................................. 141 Introduction to Environmental Program ............................................ 141 Environmental Policy ...................................................... 142 Environmental Program ...................................................................... 142 x Table of Contents Care & Maintenance............................................................................. 145 Care & Maintenance....................................................................... 145 Electrostatic Discharge (ESD) ............................................................ 145 Static Electricity: Creating Charge .................................... 146 Static Electricity Precautions ............................................ 146 Location and Electrical Service .......................................................... 146 Cleaning & Moving Your Computer.................................................... 147 Information Backup ............................................................................. 147 Hard Drive Maintenance ...................................................................... 148 Passwords ............................................................................................ 148 Computer Viruses ................................................................................ 148 System Safety ...................................................................................... 149 Electrical safety.............................................................. 149 Monitor Safety Instructions ................................................................ 149 DOC Requirements .............................................................................. 150 Warranty Policy .................................................................................... 151 Glossary ............................................................................................... 153 Index ..................................................................................................... 163 xi Spirit P8Q67-AS User's Guide Spirit P8Q67-AS Users Guide Revision 1.0, February 2013 Please Read This First Northern Micro Offices On-line Support Please Read This First Thank you for buying a Northern Micro Spirit P8Q67-AS computer. Northern Micro is committed to providing our customers with the best value on the market today. This includes building the systems that meet your specific needs through to supporting any postsales issues you may encounter. 1 Spirit P8Q67-M-DO (Eng) Rev 1 All Northern Micro Spirit computers are assembled and tested in our Ottawa, Canada, manufacturing facility. A full Service & Support network across Canada stands behind every Spirit system built. The computer you have purchased is optimized for today’s Operating Systems and applications; however, in the future, you may come upon situations that demand greater processing power or speed. Thanks to the latest advances in computer hardware technology, your Spirit P8Q67-AS is completely upgradeable. Contact your Northern Micro Sales or Service representative for advice on how to upgrade your computer should the need arise. This manual has been prepared for both advanced and novice users. You will find general PC information as well as detailed specifications about the system you have purchased. Northern Micro Sales and Service & Support Departments may be reached at: 1-800-563-1007. Northern Micro is one of the leading Canadian hardware integrators and custom manufacturers of mid-range, high-end PCs and workstations. Our mission is to provide customized mid-range to high-end & high quality computer hardware products and services to meet the advanced technical needs of highly knowledgeable customers who seek to maximize their productivity. To be fully responsive to our customers’ wants and needs, we also: carries brand name computer products; supplies network peripheral equipment and multi-media products; supplies server / storage and printing solutions. Through all facets of the operations, we are driven by our quality philosophy. Northern Micro’s quality policy, communicated within and beyond the corporation, reads as follows: "Northern Micro is committed to delivering the ultimate customer satisfaction by providing reliable, innovative and flexible computing solutions and by continuously improving our product and service offerings". In essence, Northern Micro, its management and its employees strive to be their customers’ personal computer hardware specialists. Northern Micro’s focus is on quality and customer satisfaction, and to provide products and services in complementary areas of specialization. We strongly believe in treating customers as members of our own family. Northern Micro Offices Northern Micro is a Canada-wide operation with offices in Halifax, Montréal, Quebec City, Ottawa and Vancouver. Our headquarter and manufacturing plant are located in Ottawa. 2 Spirit P8Q67-AS User's Guide National Service Center: 1-800-563-1007 extension 241 NM Ottawa 3155 Swansea Cr. Ottawa, Ontario K1G 3J3 Phone: (613) 226-1117 Fax: (613) 226-3810 Toll Free: 1 (800) 563-1007 [email protected] NM Montréal 1260 Crescent, Suite 201 Montréal, Québec H3G 2A9 Phone: (514) 395-2386 Fax: (514) 395-2459 [email protected] NM Halifax 102 Chain Lake Drive Suite 220 Halifax, NS B3S 1A7 Phone: (902) 422-9383 Fax: (902) 422-9384 [email protected] NM Vancouver 10691 Shellbridge Way Suite 130 Richmond, BC V6X 2W8 Phone: (604) 231-5841 Fax: (604) 270-3644 [email protected] NM Québec 3107 ave des Hotels, Suite 24 Sainte-Foy, Québec G1W 4W5 Phone: (418) 654-1733 Fax: (418) 654-1744 Toll Free: 1 (877) 654-1733 [email protected] On-line Support Northern Micro has been continuously investing time and resources to improve and provide you with a wide range of on line support: The Secure Web portal where you can - Apply for a Personal Identification Number (PIN);Customize and order computer system on-line, Check the status of your orders;, Verify warranty expiry dates for systems ; Review service history and Manage your computer assets; The Service and Support Site where you can - Download the latest device drivers and BIOS Upgrade; Visit our PC Archives for specs, manuals and Place service calls, etc. And the Contact us page to find and contact the nearest Northern Micro office; Additionally read our Privacy Statement. Save time, do it online! 3 Getting Started Getting Started Unpacking Your Computer Setting up Your Computer Starting up for the First Time Configuration Keyboard Mouse Software / Operating System Unpacking Your Computer The Spirit P8Q67-AS is packed with molded foam or with honeycomb cardboard to keep it in place during transit. To unpack it, cut the tape holding the flaps, fold back the flaps, and carefully slide the PC and the packing material up out of the box. 5 Spirit P8Q67-M-DO (Eng) Rev 1 Save all cartons and packing material for future shipping and transportation. To repack the PC, reverse the above instructions. Here’s what you will find in the box: Mouse Keyboard Power cord Spirit System Setting up Your Computer After unpacking your computer and checking all the items in the box, you can set up and start your computer. Set the computer on a flat space. Tower units can be put on their sides. 6 Locate your monitor and computer in a dust-and-moisture-free area where there will be minimal glare on the screen. Getting Started Connect the monitor cable to the video connector at the back of the computer. Connect the mouse and keyboard cables to the matching connectors at the back of the computer. Plug the monitor power cord into a dedicated electrical outlet or a surge-protected power bar. Plug the system power cord into the back of the system in the matching connector; then plug the cord into the power bar. Starting up for the first time Turn on the devices in the following order: 1. Monitor 2. External devices (USB or other) 3. System power (if you are using an ATX power supply, you need to switch on the power supply as well as press the ATX power switch on the front of the chassis). For ATX power supplies, the system LED lights up when you press the ATX power switch. If your monitor complies with “green” standards or if it has a “power standby” feature, the monitor LED may light up or switch between orange and green after the system LED turns on. The system then runs the power-on tests. While the tests are running, the BIOS beeps or additional messages appear on the screen. If you do not see anything within 30 seconds from the time you turned on the power, the system may have failed a power-on test. Check the jumper settings and connections or call Northern Micro for assistance. Configuration Your computer’s CMOS memory chip stores such information as : date and time parallel port assignment serial port assignment hard disk drives memory passwords These system configuration details are established with the setup utility. Your Spirit P8Q67AS includes a BIOS upgrade utility. The computer will start its power on self test (POST ). If the POST fails, turn off all the components and check your connections, settings and internal components to ensure they are properly seated. Power the computer on once more. If it fails the POST a second time, please call your Northern Micro service representative. See "Troubleshooting" if problem persists. 7 Spirit P8Q67-M-DO (Eng) Rev 1 Keyboard Keyboard A computer keyboard sends messages from you to the computer. It has: QWERTY keys Function keys Cursor control keys A numeric keypad Keyboard indicator lights Currently several keyboard styles are available. The most popular is the enhanced keyboard shown. The keyboard is divided into several sections: Function Keys Numeric Keypad Mode Indicator Lights Entering Special Characters Function Keys These are located on the top of the keyboard. Function keys have specially defined uses pre-assigned by the software you use. They are used independently or in combination with other keys. 8 Getting Started Numeric Keypad This is located on the right of the keyboard. At the centre of the keypad are nine numeric keys. These keys can move the cursor as well as enter numbers, depending on whether the Num Lock key is pressed. Mode Indicator Lights In addition to the character, number and control keys, every keyboard has three lights that indicate the typing mode. Num Lock: When this light is on, the cursor-control function of the numeric keypad is disabled and the numeric mode is activated. Caps Lock : When this light is on, characters are in uppercase mode. Scroll Lock : When this light is on, text can be scrolled without moving the cursor. With Scroll Lock activated, you can move text vertically in line units. 9 Spirit P8Q67-M-DO (Eng) Rev 1 Hot keys : Some keys have special functions when pressed simultaneously. <Ctrl> + <Break>: Stops a program while it’s running <Windows> + <E> : Brings up Windows Explorer Entering Special Characters You can use the <alt> key with the numeric keyboard to enter special characters. The characters available are determined by the code page loaded by your operating system. Additional information about special characters and code pages may be available in your operating system software information. Mouse A mouse is the pointing device used by most programs. Choose a solid mouse that feels right for your hand. Many mouse programs allow left-handed users to switch the left and right button controls for better comfort. If you are left handed, make sure you don’t buy a mouse molded for right-hand use. Here are some terms used in software manuals for mouse techniques 10 Point Move the mouse so the mouse pointer on the screen is on the object you want. Click Press and release the mouse button (usually the left) once. Double click Rapidly press and release the mouse button twice. Getting Started Drag Point at an object, press the mouse button and hold it down, then drag the mouse to move the object to a new location on the screen. Drop After dragging the object to the right location, release the mouse button to fix the object in that location. Software / Operating System Software is the set of instructions used to direct the microprocessor . There are three layers of software: BIOS (basic input / output system): Startup software resident on the main-board, which tells the microprocessor where to find other software. Operating System: Operating software (e.g. Windows 7, LINUX ) is a basic set of instructions for running the computer that acts as a platform on which other programs run. Application Software: Specialized software for carrying out specific tasks such as word processing, graphics, data processing, database management or network management. With your computer, you will also receive utility programs and device drivers, which are used to customize computer operation to suit either hardware or software requirements. 11 System Components System Components Motherboard Hard Drive Power Supply Keyboard Mouse 13 Spirit P8Q67-M-DO (Eng) Rev 1 Motherboard Motherboard Before you Proceed Motherboard Layout Specifications Summary Central Processing Unit (CPU) System Memory Expansion Slots Jumpers Connectors Software Support Before you Proceed Take note of the following precautions before you install motherboard components or change any motherboard settings. 14 System Components Unplug the power cord from the wall socket before touching any component. Before handling components, use a grounded wrist strap or touch a safely grounded object or a metal object, such as the power supply case, to avoid damaging them due to static electricity. Hold components by the edges to avoid touching the ICs on them. Whenever you uninstall any component, place it on a grounded antistatic pad or in the bag that came with the component. Before you install or remove any component, ensure that the ATX power supply is switched off or the power cord is detached from the power supply. Failure to do so may cause severe damage to the motherboard, peripherals, or components. Onboard LED The motherboard comes with a standby power LED that lights up to indicate that the system is ON, in sleep mode, or in soft-off mode. This is a reminder that you should shut down the system and unplug the power cable before removing or plugging in any motherboard component. The illustration below shows the location of the onboard LED. Motherboard Layout Ensure that you install the motherboard into the chassis in the correct orientation. The edge with external ports goes to the rear part of the chassis. 15 Spirit P8Q67-M-DO (Eng) Rev 1 16 Place six screws into the holes indicated by circles to secure the motherboard to the chassis. DO NOT overtighten the screws! Doing so can damage the motherboard. System Components Layout Contents Connectors/Jumpers/Slots/LED Connectors/Jumpers/Slots/LED ATX Power Connectors (24-pin 1 10 Clear RTC RAM (3-pin CLRTC) EATXPWR, 8-pin EATX12V) 2 Intel LGA1155 CPU Socket 11 Standby Power LED (SB_PWR) CPU and Chassis Fan Connectors (4-pin 3 12 Speaker Connector (4-pin SPEAKER) CPU_FAN, 3-pin CHA_FAN) Chassis Intrusion Connector (4-1 pin 4 DDR3 DIMM slots 13 CHASSIS) USB Connectors (10-1 pin USB78, USB910, 5 LPT Connector (26-1 pin LPT) 14 USB1112, USB1314) Intel Q67 Serial ATA 3.0Gb/s Connectors 6 15 Intel ME JUMPER (3-pin DIS_ME) (7-pin SATA3G_1~4 [blue]) Intel Q67 Serial ATA 6.0Gb/s Connectors (7 Digital Audio Connector (4-1 pin 7 16 pin SATA6G_1/2 [gray]) SPDIF_OUT) Front Panel Audio Connector (10-1 pin 8 System Panel Connector (10-1 pin F_Panel) 17 AAFP) 9 Serial Port Connector (10-1 pin COM1) 17 Spirit P8Q67-M-DO (Eng) Rev 1 Specifications Summary P8Q67-M DO Series Specifications Summary 18 System Components 19 Spirit P8Q67-M-DO (Eng) Rev 1 CPU (Central Processing Unit) The motherboard comes with a surface mount LGA1155 socket designed for the Intel® second generation Core™ i7 / Core™ i5 / Core™ i3 processors. 20 Unplug all power cables before installing the CPU. System Components CPU's Supported: Core i3-2100 (3.1G,L3:3M,iGPU,2C,rev.Q0) Core i3-2100T(2.5G,L3:3M,iGPU,2C,rev.Q0) Core i3-2105 (3.1G,L3:3M,iGPU,2C,rev.D2) Core i3-2120 (3.3G,L3:3M,iGPU,2C,rev.Q0) Core i3-2120T (2.6G,L3:3M,iGPU,2C) Core i3-2125 (3.3G,L3:3M,iGPU,2C) Core i3-2130 (3.4G,L3:3M,iGPU,2C) Core i5-2300 (2.8G,L3:6M,iGPU,4C,rev.D2) Core i5-2310 (2.9G,L3:6M,iGPU,4C,rev.D2) Core i5-2320 (3.0G,L3:6M,iGPU,4C,rev.D2) Core i5-2390T(2.7G,L3:3M,iGPU,2C,rev.Q0) Core i5-2400 (3.1G,L3:6M,iGPU,4C,rev.D2) Core i5-2400S(2.5G,L3:6M,iGPU,4C,rev.D2) Core i5-2405S (2.5G,L3:6M,iGPU,4C,rev.D2) Core i5-2500 (3.3G,L3:6M,iGPU,4C,rev.D2) Core i5-2500K(3.3G,L3:6M,iGPU,4C,rev.D2) Core i5-2500S(2.7G,L3:6M,iGPU,4C,rev.D2) Core i5-2500T(2.3G,L3:6M,iGPU,4C,rev.D2) Core i7-2600 (3.4G,L3:8M,iGPU,4C,rev.D2) Core i7-2600K(3.4G,L3:8M,iGPU,4C,rev.D2) Core i7-2600S(2.8G,L3:8M,iGPU,4C,rev.D2) 21 Spirit P8Q67-M-DO (Eng) Rev 1 System Memory System Memory Memory Overview Memory Configurations Memory Overview The motherboard comes with four Double Data Rate 3 (DDR3) Dual Inline Memory Modules (DIMM) sockets. A DDR3 module has the same physical dimensions as a DDR2 DIMM but is notched differently to prevent installation on a DDR2 DIMM socket. DDR3 modules are developed for better performance with less power consumption. The figure illustrates the location of the DDR3 DIMM sockets: 22 System Components Memory Configurations You may install 512MB, 1GB, 2GB, 4GB, and 8GB unbuffered non-ECC DDR3 DIMMs into the DIMM sockets. You may install varying memory sizes in Channel A and Channel B. The system maps the total size of the lower-sized channel for the dual-channel configuration. Any excess memory from the higher-sized channel is then mapped for single-channel operation. Always install DIMMs with the same CAS latency. For optimum compatibility, we recommend that you obtain memory modules from the same vendor. The maximum 32GB memory capacity can be supported with 8GB or above DIMMs. ASUS will update the memory QVL once the DIMMs are available in the market. 23 Spirit P8Q67-M-DO (Eng) Rev 1 Due to the memory address limitation on 32-bit Windows® OS, when you install 4GB or more memory on the motherboard, the actual usable memory for the OS can be about 3GB or less. For effective use of memory, we recommend that you do any of the following: Use a maximum of 3GB system memory if you are using a 32-bit Windows® OS. Install a 64-bit Windows® OS when you want to install 4GB or more on the motherboard.http://windows.microsoft.com/enus/windows7/32-bit-and-64-bit-Windows-frequently-asked-questions This motherboard does not support DIMMs made up of 512Mb (64MB) chips or less. P8Q67-M DO Series Motherboard Qualified Vendors Lists (QVL) DDR3-1333 MHz capability 24 System Components DDR3-1333 MHz capability 25 Spirit P8Q67-M-DO (Eng) Rev 1 26 System Components DDR3-1066 MHz capability SS: Single-sided / DS: Double-sided DIMM support: A*: Supports one module inserted into any slot as single-channel memory configuration. B*: Supports one pair of modules inserted into either the blue slots or the black slots as one pair of dual-channel memory configuration. C*: Supports two pairs of modules inserted into both the blue slots and the black slots as two pairs of dual-channel memory configuration. Visit the ASUS website at www.asus.com for the latest QVL. 27 Spirit P8Q67-M-DO (Eng) Rev 1 Expansion Slots Expansion Slots In the future, you may need to install expansion cards. The following sub-sections describe the slots and the expansion cards that they support. Unplug the power cord before adding or removing expansion cards. Failure to do so may cause you physical injury and damage motherboard components. Installing an Expansion Card Configuring an Expansion Card PCI Slots PCI Express x4Slot PCI Express x 16 Slot 28 System Components Installing an Expansion Card To install an expansion card: 1. Before installing the expansion card, read the documentation that came with it and make the necessary hardware settings for the card. 2. Remove the system unit cover (if your motherboard is already installed in a chassis). 3. Remove the bracket opposite the slot that you intend to use. 4. Align the card connector with the slot and press firmly until the card is completely seated on the slot. 5. Secure the card to the chassis. 6. Replace the system cover. Configuring an Expansion Card After installing the expansion card, configure it by adjusting the software settings. 1. Turn on the system and change the necessary BIOS settings, if any. See BIOS Setup for more information. 2. Assign an IRQ to the card. 3. Install the software drivers for the expansion card. When using PCI cards on shared slots, ensure that the drivers support “Share IRQ” or that the cards do not need IRQ assignments. Otherwise, conflicts will arise between the two PCI groups, making the system unstable and the card inoperable. PCI Slots The PCI slots support cards such as a LAN card, SCSI card, USB card, and other cards that comply with PCI specifications. PCI Express x4 Slot This motherboard supports PCI Express x4 network cards, SCSI cards, and other cards that comply with the PCI Express specifications. PCI Express x16 Slot This motherboard has a PCI Express 2.0 x16 slot that supports PCI Express x16 2.0 graphic cards complying with the PCI Express specifications. 29 Spirit P8Q67-M-DO (Eng) Rev 1 Jumpers Clear RTC RAM (3-pin CLRTC) This jumper allows you to clear the Real Time Clock (RTC) RAM in CMOS. You can clear the CMOS memory of date, time, and system setup parameters by erasing the CMOS RTC RAM data. The onboard button cell battery powers the RAM data in CMOS, which include system setup information such as system passwords. Risk of explosion if battery is replaced by an incorrect type. Dispose of batteries according to manufacturer's instructions. To erase the RTC RAM: 1. Turn OFF the computer and unplug the power cord. 2. Move the jumper cap from pins 1-2 (default) to pins 2-3. Keep the cap on pins 2-3 for about 5-10 seconds, then move the cap back to pins 1-2. 3. Plug the power cord and turn ON the computer. 4. Hold down the <Del> key during the boot process and enter BIOS setup to re-enter data. 30 Except when clearing the RTC RAM, never remove the cap on CLRTC jumper default position. Removing the cap will cause system boot failure! If the steps above do not help, remove the onboard battery and move the jumper again to clear the CMOS RTC RAM data. After clearing the CMOS, reinstall the battery. System Components Intel® ME jumper (3-pin DIS_ME) This jumper allows you to enable or disable the Intel® ME function. Set this jumper to pins 1-2 to enable (default) the Intel® ME function and to pins 2-3 to disable it. Disable the Intel® ME function before updating it. 31 Spirit P8Q67-M-DO (Eng) Rev 1 Connectors Connectors Rear Panel Ports Front Panel Audio Connector Serial Port Connector CPU and Chassis Fan Connector ATX Power Connectors Digital Audio Connector Serial ATA 6.0 Serial ATA 3.0 USB Connector System Pannel Connector LPT Connector Chassis Intrusion Connector Speaker Connector 32 System Components Rear Panel Ports 1. PS/2 Mouse port (green). This port is for a PS/2 mouse. 2. Video Graphics Adapter (VGA) port. This 15-pin port is for a VGA monitor or other VGA-compatible devices. 3. LAN (RJ-45) port. This port allows Gigabit connection to a Local Area Network (LAN) through a network hub. Refer to the table below for the LAN port LED indications. LAN port LED Indications 4. Line In port (light blue). This port connects the tape, CD, DVD player, or other audio sources. 5. Line Out port (lime). This port connects to a headphone or a speaker. In 4channel, 6-channel, and 8-channel configurations, the function of this port becomes Front Speaker Out. 6. Microphone port (pink). This port connects a microphone. Refer to the audio configuration table below for the function of the audio ports in the 2, 4, 6, or 8-channel configuration. 33 Spirit P8Q67-M-DO (Eng) Rev 1 Audio 2,4,6,8-channel configuration To configure an 8-channel audio output: Use a chassis with HD audio module in the front panel to support an 8channel audio output. 7. USB 2.0 ports 1 and 2. These two 4-pin Universal Serial Bus (USB) ports are available for connecting USB 2.0/1.1 devices. 8. USB 2.0 ports 3 and 4 . These two 4-pin Universal Serial Bus (USB) ports are available for connecting USB 2.0/1.1 devices. 9. USB 2.0 ports 5 and 6. These two 4-pin Universal Serial Bus (USB) ports are available for connecting USB 2.0/1.1 devices. 10. DVI-D port. This port is for any DVI-D compatible device. DVI-D can’t be converted to output RGB Signal to CRT and isn’t compatible with DVI-I 11. DisplayPort. This port connects a display monitor or a home-theater system. 12. PS/2 Keyboard port (purple). This port is for a PS/2 keyboard. 34 System Components Internal Connectors Internal Connectors Front Panel Audio Connector Serial Port Connector CPU and Chassis Fan Connector ATX Power Connectors Digital Audio Connector Serial ATA 6.0 Serial ATA 3.0 USB Connector System Pannel Connector LPT Connector Chassis Intrusion Connector Speaker Connector Front Panel Audio Connector 10-1 pin AAFP 35 Spirit P8Q67-M-DO (Eng) Rev 1 This connector is for a chassis-mounted front panel audio I/O module that supports either HD Audio or legacy AC`97 audio standard. Connect one end of the front panel audio I/O module cable to this connector. Serial Port Connector 10-1 pin COM1 This connector is for a serial (COM) port. Connect the serial port module cable to this connector, then install the module to a slot opening at the back of the system chassis. 36 System Components The COM module is purchased separately. CPU and Chassis Fan Connector 4-pin CPU_FAN, 3-pin CHA_FAN Connect the fan cables to the fan connectors on the motherboard, ensuring that the black wire of each cable matches the ground pin of the connector. Do not forget to connect the fan cables to the fan connectors. Insufficient air flow inside the system may damage the motherboard components. These are not jumpers! Do not place jumper caps on the fan connectors! The CPU_FAN connector supports a CPU fan of maximum 2A (24 W) fan power. ATX Power Connectors 24-pin EATXPWR, 8-pin EATX12V These connectors are for ATX power supply plugs. The power supply plugs are designed to fit these connectors in only one orientation. Find the proper orientation and push down firmly until the connectors completely fit. 37 Spirit P8Q67-M-DO (Eng) Rev 1 DO NOT forget to connect the 4-pin / 8-pin ATX +12V power plug. Otherwise, the system will not boot up. We recommend that you use a PSU with higher power output when configuring a system with more power-consuming devices. The system may become unstable or may not boot up if the power is inadequate. If you are uncertain about the minimum power supply requirement for your system, refer to the Recommended Power Supply Wattage Calculator at http://support.asus.com/PowerSupplyCalculator/PSCalculator.aspx?SLanguage =en-us for details. Digital Audio Connector 4-1 pin SPDIF_OUT This connector is for an additional Sony/Philips Digital Interface (S/PDIF) port. Connect the S/PDIF Out module cable to this connector, then install the module to a slot opening at the back of the system chassis. 38 The S/PDIF module is purchased separately. System Components Intel® Q67 Serial ATA 6.0Gb/s Connectors 7-pin SATA6G_1/2 [gray] These connectors connect to Serial ATA 6.0 Gb/s hard disk drives via Serial ATA 6.0 Gb/s signal cables. These connectors are set to [IDE Mode] by default. In IDE mode, you can connect Serial ATA boot/data hard disk drives to these connectors. If you intend to create a Serial ATA RAID set using these connectors, set the SATA Mode item in the BIOS to [RAID Mode]. See SATA Configuration for details. You must install Windows® XP Service Pack 3 or later version before using Serial ATA hard disk drives. The Serial ATA RAID feature (RAID 0, 1, 5, and 10) is available only if you are using Windows® XP SP3 or later version. When using hot-plug and NCQ, set the SATA Mode item in the BIOS to [AHCI Mode]. See SATA Configuration for details. Intel® Q67 Serial ATA 3.0Gb/s connectors 7-pin SATA3G_1~4 [blue] These connectors connect to Serial ATA 3.0 Gb/s hard disk drives and optical drives via Serial ATA 3.0 Gb/s signal cables. If you installed Serial ATA hard disk drives, you can create a RAID 0, 1, 5, and 0+1(10) configurations with the Intel® Matrix Storage Technology through the onboard Intel® Q67 chipset. 39 Spirit P8Q67-M-DO (Eng) Rev 1 These connectors are set to [IDE Mode] by default. In IDE mode, you can connect Serial ATA boot/data hard disk drives to these connectors. If you intend to create a Serial ATA RAID set using these connectors, set the SATA Mode item in the BIOS to [RAID Mode]. See SATA Configuration for details. You must install Windows® XP Service Pack 3 or later version before using Serial ATA hard disk drives. The Serial ATA RAID feature (RAID 0, 1, 5, and 10) is available only if you are using Windows® XP SP3 or later version. When using hot-plug and NCQ, set the SATA Mode item in the BIOS to [AHCI Mode]. See SATA Configuration for details. USB Connector 10-1 pin USB78, USB910, USB1112, USB1314 These connectors are for USB 2.0 ports. Connect the USB module cable to any of these connectors, then install the module to a slot opening at the back of the system chassis. These USB connectors comply with USB 2.0 specification that supports up to 480 Mbps connection speed. 40 System Components Never connect a 1394 cable to the USB connectors. Doing so will damage the motherboard! The USB module cable is purchased separately. System Pannel Connector 10-1 pin F_PANEL This connector supports several chassis-mounted functions. 41 Spirit P8Q67-M-DO (Eng) Rev 1 System power LED (2-pin PLED) This 2-pin connector is for the system power LED. Connect the chassis power LED cable to this connector. The system power LED lights up when you turn on the system power, and blinks when the system is in sleep mode. Hard disk drive activity LED (2-pin +HDLED) This 2-pin connector is for the HDD Activity LED. Connect the HDD Activity LED cable to this connector. The IDE LED lights up or flashes when data is read from or written to the HDD. Power/Soft-off button (2-pin PWRBTN) This 2-pin connector is for the system power button. Reset button (2-pin RESET) This 2-pin connector is for the chassis-mounted reset button for system reboot without turning off the system power. LPT Connector 26-1 pin LPT The LPT (Line Printing Terminal) connector supports devices such as a printer. LPT is standardized as IEEE 1284, which is the parallel port interface on IBM PC-compatible computers. Chassis Intrusion Connector 4-1 pin CHASSIS This connector is for a chassis-mounted intrusion detection sensor or switch. Connect one end of the chassis intrusion sensor or switch cable to this connector. The chassis intrusion 42 System Components sensor or switch sends a high-level signal to this connector when a chassis component is removed or replaced. The signal is then generated as a chassis intrusion event. Speaker Connector 4-pin SPEAKER The 4-pin connector is for the chassis-mounted system warning speaker. The speaker allows you to hear system beeps and warnings. 43 Spirit P8Q67-M-DO (Eng) Rev 1 Software Support Software Support Installing an Operating System Support DVD Information Installing an operating system This motherboard supports Windows® XP / Vista / 7 Operating Systems (OS). Always install the latest OS version and corresponding updates to maximize the features of your hardware. Support DVD Information The Support DVD that comes with the motherboard package contains the drivers, software applications, and utilities that you can install to avail all motherboard features. 44 The contents of the Support DVD are subject to change at any time without System Components notice. Visit the ASUS website at www.asus.com for updates. To run the Support DVD Place the Support DVD to the optical drive. The DVD automatically displays the Drivers menu if Autorun is enabled in your computer. If Autorun is NOT enabled in your computer, browse the contents of the Support DVD to locate the file ASSETUP.EXE from the BIN folder. Doubleclick the ASSETUP.EXE to run the DVD. 45 Spirit P8Q67-M-DO (Eng) Rev 1 Hard Drive (SATA) Performance Specifications Transfer Rates: Buffer to Host (Serial ATA) Cache (MB) Rotational speed (RPM) 6 Gb/s (Max) 16 7200 Physical Specifications Formatted Capacity 250 GB Interface SATA 6 GB/s User Sectors Per Drive 488,397,168 SATA Latching Connector Form Factor RoHS compliant Yes 3.5 inch Yes Physical Dimensions Height 25.4 mm Length 147 mm Width 101.6 mm Weight 0.45 kg 46 System Components Environmental Specifications Temperature Operating 0° to 60 Non-operating -40° to 70 Shock Operating Shock (Read) 30G, 2ms Non-operating Shock 300G, 2ms Acoustics Idle Mode 2.6 bels (Typical) 2.7 bels (Max) Seek Mode 0 2.8 bels (Typical) 3.0 bels (Max) Electrical Specifications Current Requirements 12 VDC Power Dissipation AVG (Watts 25 C) Read / Write 6.19 Idle 4.60 Standby .79 Sleep .79 Power Supply Mid Tower SFF Watts 350 300 Form Factor ATX TFX UL, CSA, QPS X X FCC, 1CES-003 X X +5, +12, +3.3 X X 80 Plus Gold Certified XX 47 Spirit P8Q67-M-DO (Eng) Rev 1 Keyboard The Keyboard is compliant to the TBITS-5 specifications and using a PS/2 connector. Technical Specifications Function and Operation: 16 - character buffer (FIFO) 104/105 key layouts Electrical Specification: Maximum Rating: +5.0 VDC ± 10%, 200 mA maximum Contact Resistance: 500 Ohm maximum Insulation Resistance: DC100V 50M Ohm minimum Bounce: 10mS maximum Mechanical Specifications: Total Travel: 4.0 ± 0.5mm Pull Force: above 1.5 kg Dimensions: 480mm x 167mm Cable content: 26AWG.Single Wire x 4, 24AWG.Single WIre x 1 Cable Length: 2 M (straight) EMI/Safety and Reliability: EMI/Safety: FCC CLass B, CE approval, UL, CSA and TUV ESD Immunity: 0 KV to 8 KV minimum without any data loss ( software ); 8KV to 15KV minimum, may cause malfunctions but will not destroy any internal components (firmware) Operating Life: 10,000,000 times Special Features 48 Under the rear of the keyboard are two small legs that can be pulled out or pushed in to change the keyboard angles to suit you. System Components Mouse The mouse has a scroll function and a similar color to the system unit, the keyboard and the Monitor Features Buttons: 2 49 Spirit P8Q67-M-DO (Eng) Rev 1 Interface:USB or PS/2 Resolution: 400 dpi Mouse software : Not required Wheel: Simply roll the wheel to move around in documents - no more clicking the onscreen scroll bar repeatedly - saving you time and effort. Accelerated scrolling reacts to how quickly you roll the wheel, allowing faster movement in Web pages, documents, and other computer programs. . 50 Left- or Right-Handed Use: The ambidextrous design is comfortable whether you mouse with your left or right hand. Installation / Settings Installation / Settings Front Panel Back Panel Case Motherboard Central Processing Unit (CPU) System Memory Power Supply Hard Drive Optical Drive Video PCI Adapter Cards Final Power Connection Procedures 51 Spirit P8Q67-M-DO (Eng) Rev 1 Front Panel Mid-Tower Slim Desktop USB Ports There are two (2) additional USB Port on the Front panel of the computer. Audio Ports For convenience there is 1 (one) Microphone port and 1 (one) stereo line out port on the front panel. System Power Switch The system power switch is located on the front of the case. You should always be certain that the power is turned off before modifying the hardware configuration in any way. Pushing the power switch for less than 4 seconds places the system into sleep mode (if enabled in Setup). When the power button is pressed for more than 4 seconds, the system enters the Soft-Off mode. Reset Button The reset button allows you to restart the system without turning the power off. If you encounter any problems while using unfamiliar software you can always restart quickly from the RAM (Random Access Memory.) You will have to use a pen, pencil or other small object to press the Reset button. This feature was added to prevent accidental reset of the unit. Any data not saved to disk will be lost Indicator Lights These lights indicate the operation status of your computer. Mid-Tower The front panel gives access to power and reset switches, indicator light and front USB /audio. 52 Installation / Settings Slim Desktop Back Panel The back panel has all the connections that lead from the system unit to external peripherals and the power source. 53 Spirit P8Q67-M-DO (Eng) Rev 1 54 Turn off all power switches before connecting or disconnecting cables/wires! Ensure that cables/wires are attached to the peripheral device first and connect to the outlet unit later. Turn the system unit power switch off before you plug the power cable into an electrical outlet. See details on Rear Panel Connectors. Installation / Settings Case Case Removing the Case Cover Chassis Intrusion Removing the Case Cover Removing the case cover from your Spirit computer requires no tools. Mid Tower 1. Unlatch the cover and open the case from the back 2. Slide the side cover back 55 Spirit P8Q67-M-DO (Eng) Rev 1 3. Press the tabs as illustrated below and pull back the Front Bezel. 56 4. That opens the front case Installation / Settings Slim Desktop 1. Press down on the lever. 2. Slide the cover back 3. To remove the front case pull up the three tabs (see picture) and move them toward yourself 4. For a better visibility, remove the drive up and toward yourself as shown in the p blue thumb screws must first be removed case. Chassis Intrusion The removal of the case cover while the system is powered on will register a Chassis Intrusion Alert detected by the Chassis Intrusion lead on the motherboard. Mid-Tower 57 Spirit P8Q67-M-DO (Eng) Rev 1 58 Installation / Settings Slim Desktop Motherboard Motherboard Before you Proceed Installation and Removal System Reset Jumper Before you Proceed Take note of the following precautions before you install motherboard components or change any motherboard settings. 59 Spirit P8Q67-M-DO (Eng) Rev 1 Unplug the power cord from the wall socket before touching any component. Use a grounded wrist strap or touch a safely grounded object or to metal object, such as the power supply case, before handling components to avoid damaging them due to static electricity Hold components by the edges to avoid touching the ICs on them. Whenever you un-install any component, place it on a grounded anti-static pad or in the bag that came with the component. Before you install or remove any component, ensure that the power supply is switched off or the power cord is detached from the power supply. Failure to do so may cause severe damage to the motherboard, peripherals, and/or components. Onboard LED The motherboard comes with a standby power LED that lights up to indicate that the system is ON, in sleep mode, or in soft-off mode. This is a reminder that you should shut down the system and unplug the power cable before removing or plugging in any motherboard component. The illustration below shows the location of the onboard LED. 60 Installation / Settings Installation & Removal Before removing the Motherboard, ensure the power is off by checking this indicator light. (See section Before you proceed) When lit, the onboard LED indicates that the system is ON, in sleep mode or in soft-off mode, not powered OFF. Placement Direction When installing the motherboard, make sure that you place it into the chassis in the correct orientation. The edge with External ports goes to the rear part of the chassis as indicate in the image below. 61 Spirit P8Q67-M-DO (Eng) Rev 1 62 Place six screws into the holes indicated by circles to secure the motherboard to the chassis. DO NOT overtighten the screws! Doing so can damage the motherboard. Before you start, always make sure the computer is turned off. Observe standard static-electricity discharge precautions. You can damage your Installation / Settings expansion card, the motherboard, or both, by not being careful about this. 1. Unplug the system’s power cable from the back of the unit. 2. Remove the case cover.(Please see instruction on cover removal Cover) Removing the Case 3. Disconnect all cables and wires connected to the motherboard and expansion cards 4. Remove all expansion cards and remove all screws holding the motherboard in place. 5. Lift the motherboard out by pulling it up and away from the back of the case. Take note of where and how cables are connected for re-installation. System Reset Jumper This is a 'jumperfree'-design motherboard (See Advanced Menu in the BIOS Information section) for most of the operations. However there is a jumper setting for resetting the system called the clear RTC RAM (CLRTC) Clear RTC RAM (CLRTC) This jumper allows you to clear the Real Time Clock (RTC) RAM in CMOS. You can clear the CMOS memory of date, time, and system setup parameters by erasing the CMOS RTC RAM data. The onboard button cell battery powers the RAM data in CMOS, which include system setup information such as system passwords. To erase the RTC RAM: 1. Turn OFF the computer and unplug the power cord. 63 Spirit P8Q67-M-DO (Eng) Rev 1 2. Move the jumper cap from pins 1-2 (default) to pins 2-3. Keep the cap on pins 2-3 for about 5~10 seconds, then move the cap back to pins 1-2. 3. Plug the power cord and turn ON the computer. 4. Hold down the <DEL> key during the boot process and enter BIOS setup to re-enter data. 64 Except when clearing the RTC RAM, never remove the cap on CLRTC jumper default position. Removing the cap will cause system boot failure! Installation / Settings Central Processing Unit (CPU) Central Processing Unit (CPU) Install a CPU Installing CPU Heatsink and Fan Removing CPU Heatsink and Fan Install a CPU 65 Spirit P8Q67-M-DO (Eng) Rev 1 1. Push the lever down to unclip it (1) and lift it (2). 2. Open the load plate 66 Installation / Settings 3. Remove the protective cover from the load plate. Do not discard the protective cover. Always replace the socket cover if the processor is removed from the socket. 4. Do not touch the socket contacts or the bottom of the processor. 67 Spirit P8Q67-M-DO (Eng) Rev 1 5. Hold processor with your thumb and index fingers, oriented as shown. Ensure your fingers align to the socket cutouts. Align the notches with the socket. Lower the processor straight down without tilting or sliding the processor in the socket. 6. Close the load plate. Pressing down on the load plate, close and engage the socket lever. 68 Installation / Settings Installing a CPU Heatsink and Fan 1. With the MOTHERBOARD INSTALLED IN THE CHASSIS, place the fanheatsink onto the motherboard, aligning the fasteners through the holes. It is important to align the fasterners through the holes properly or you risk damaging the bottom of the fasteners. Also be careful not to damage the thermal interface material attached to the bottom of the fan heatsink. 2. Push do pattern place. Y fastene by gent fastene and pro process 69 Spirit P8Q67-M-DO (Eng) Rev 1 3. Connect the processor 4-wire fan cable connector to the motherboard 4-pin CPU fan header. (The processor 4-wire fan cable connector can be connected to a motherboard 3-pin CPU fan header if a 4-pin CPU fan header is unavailable.) 70 Installation / Settings Do not forget to connect the CPU fan connector! Hardware errors can occur if you fail t Removing a CPU Heatsink and Fan 1 2 71 Spirit P8Q67-M-DO (Eng) Rev 1 3 4 72 Installation / Settings System Memory System Memory System Memory Overview Memory Configurations Installing System Memory Removing System Memory System Memory Overview This motherboard comes with four Double Data Rate 3 (DDR3) Dual Inline Memory Module (DIMM) sockets. A DDR3 module has the same physical dimensions as a DDR2 DIMM but is notched differently to prevent installation on a DDR2 DIMM socket. DDR3 modules are developed for better performance with less power consumption. The figure illustrates the location of the DDR3 DIMM sockets: 73 Spirit P8Q67-M-DO (Eng) Rev 1 Memory Configurations You may install 512MB, 1GB, 2GB, 4GB, and 8GB unbuffered non-ECC DDR3 DIMMs into the DIMM sockets. 74 You may install varying memory sizes in Channel A and Channel B. The system maps the total size of the lower-sized channel for the dual-channel configuration. Any excess memory from the higher-sized channel is then mapped for single-channel operation. Always install DIMMs with the same CAS latency. For optimum compatibility, we recommend that you obtain memory modules from the same vendor. The maximum 32GB memory capacity can be supported with 8GB or above DIMMs. ASUS will update the memory QVL once the DIMMs are available in the market. Due to the memory address limitation on 32-bit Windows® OS, when you install 4GB or more memory on the motherboard, the actual usable memory for the OS can be about 3GB or less. For effective use of memory, we recommend that you do any of the following: Use a maximum of 3GB system memory if you are using a 32-bit Windows® OS. Install a 64-bit Windows® OS when you want to install 4GB or more on the motherboard.http://windows.microsoft.com/en- Installation / Settings us/windows7/32-bit-and-64-bit-Windows-frequently-asked-questions This motherboard does not support DIMMs made up of 512Mb (64MB) chips or less. For more details see System Memory Configuration. Installing System Memory It is not necessary to run setup after modifying the memory configuration. The system will auto detect the changed configuration. Make sure to unplug the power supply before adding or removing DIMMs or other system components. Failure to do so may cause severe damage to both the motherboard and the components. To Install the System Memory you need to start with removing the case cover from your Spirit computer. Mid Tower 1. Unlatch the cover and open the case from the back 2. Slide the side cover back 75 Spirit P8Q67-M-DO (Eng) Rev 1 3. Press the tabs as illustrated below and pull back the Front Bezel. 4. That opens the front case Slim Desktop 76 1. Press down on the lever. 2. Slide the cover back 3. To remove the front case pull up the three tabs (see 4. For a better visibility, remove the drive up and toward yourself as shown in the p Installation / Settings picture) and move them toward yourself blue thumb screws must first be removed case. To install a DIMM 1. Unlock a DIMM socket by pressing the retaining clips outward. 2. Align a DIMM on the socket such that the notches on the DIMM matches the break on the socket. 3. Firmly insert the DIMM into the socket until the retaining clips snap back in place and the DIMM is properly seated. 77 Spirit P8Q67-M-DO (Eng) Rev 1 A DDR3 DIMM is keyed with a notch so that it fits in only one direction. Do not force a DIMM into a socket to avoid damaging the DIMM. The DDR3 DIMM sockets do not support DDR DIMMs. Do not install DDR DIMMs to the DDR3 DIMM sockets. Removing System Memory To remove a DIMM 1. Press the retaining clip outward to unlock the DIMM. Support the DIMM lightly with your fingers when pressing the retaining clip. The DIMM might get damaged when it flips out with extra force 2. Remove the DIMM from the socket. 78 Installation / Settings Power Supply Removing a Power Supply Mid-Tower 1. Remove the four screws supporting the power supply. 2. Gently slide the power supply ou Slim Desktop 1. Remove the power supply screws 2. Lift-out the power Supply 79 Spirit P8Q67-M-DO (Eng) Rev 1 80 Installation / Settings Hard Drive Hard Drive Unpacking and Handling Hard Drive Removal Hard Drive Connections Unpacking and Handling Hard drives are precision instruments and should be handled with care during unpacking and installation; they can be damaged by rough handling, shock, vibration, or electrostatic discharge (ESD). Be aware of the following precautions when handling your hard drive . Do not unpack your hard drive until you are ready to install it. Your hard drive is packaged in a static shielding bag. Use this bag to place your hard drive on after unpacking. Save the packing materials in case you need to return your hard drive. 81 Spirit P8Q67-M-DO (Eng) Rev 1 Articles of clothing generate static electricity. Do not allow clothing to come in direct contact with the hard drive or circuit board components. Handle the hard drive by the sides only. Avoid touching the circuit board components. Do not drop or knock the hard drive. Do not stack hard drives or stand your hard drive on its edge. Hard Drive Removal It is not necessary to run setup after replacing the hard drive. The system will auto detect the changed configuration. Mid Tower 82 Remove the computer case cover. 1. Unlatch the cover and open the case from the back 2. Slide the side cover back 3. Press the tabs as illustrated below and pull back the Front Bezel. 4. That opens the front case Installation / Settings Locate the drive. Disconnect the signal and power cables from the drive. Press and Pull the metal tab to release the drive bay. Unclip the drive-bracket assembly and slide it off the support rails. To remove the drive from the assembly, slide the blue latches towards each other. Slide the hard drive out of the assembly. 83 Spirit P8Q67-M-DO (Eng) Rev 1 Slim Desktop Remove the computer case cover. 1. Press down on the lever. 84 2. Slide the cover back Installation / Settings 3. To remove the front case pull up the three tabs (see picture) and move them toward yourself Remove the drive cage assembly. Disconnect the signal and power cable from the drive. Flip and pull up the hard disc tray. Pull the sides of the hard disc tray to release. 4. For a better visibility, remove the drive up and toward yourself as shown in the p blue thumb screws must first be removed case. 85 Spirit P8Q67-M-DO (Eng) Rev 1 Hard Drive Connections SATA Drive SATA Cable Connection 86 Installation / Settings Because of their considerably narrower cables, SATA hard drives provide increased airflow and less clutter in the computer enclosure compared to PATA drives. Optical Drive Your system may include an Optical drive. Your drive is capable of reading compact disks meeting international standards, such as Photo CD, CD-I, ISO 9660, multi-session, CD-extra and XA (extended Architecture) disks. Your drive can also read DVD disks. In case of power failure, or if for some reason an Optical disk refuses to eject, gently insert a large straightened paper clip in the small opening (emergency eject) at the front of the Optical drive. Optical Drive Removal Please see instruction on cover removal Removing the Case Cover 87 Spirit P8Q67-M-DO (Eng) Rev 1 Mid-Tower Disconnect Optical power and data cables. To remove the dive from the assembly, slide the blue latches toward each other. Slide the optical drive out of the assembly. Video Video 88 Slim Desktop Disconnect Optical drive power and data cables. Lift the blue release mechanism to release the optical drive. Pull the Optical drive towards the front and out from the Disk Cage Installation / Settings Integrated Video Driver Installation PCI Express x16 Video Connectors The monitor is connected to the computer system via the 15 pin VGA, DVI-D or Display Port output ports from the motherboard. Integrated Video Driver Installation Your Northern Micro SPIRIT P8Q67-AS computer is delivered with the video component preconfigured for optimal performance with the monitor you have chosen. The Support DVD that comes with the motherboard package contains drivers, software applications, and utilities that you can install to get all motherboard features. This includes a driver for your video output. To run the Support DVD Place the Support DVD into the optical drive. The DVD automatically displays the Drivers menu if the Autorun function is enabled on your computer. The contents of the Support DVD are subject to change at any time without notice. Visit the ASUS website at www.asus.com for updates. PCI Express x16 Removing/Adding a Video Card Please see instruction on cover removal Removing the Case Cover Mid-Tower To remove a PCI type adapter, unlock the expansion card holder. Gently grasp the adapter by its edges and ease it out of the slot. 89 Spirit P8Q67-M-DO (Eng) Rev 1 Slim Desktop To remove a PCI type adapter, unlock the expansion card holder. Gently grasp the adapter by its edges and ease it out of the slot. PCI Adapter Cards Please see instruction on cover removal Removing the Case Cover PCI slots The PCI slots support cards such as a LAN card, SCSI card, USB card, and other cards that comply with PCI specifications. 90 Installation / Settings Removal/Install of a PCI Adapter Card The PCI slot opening mechanism on our Mid-Tower model is different from the one on the Slim desktop models. Please follow the picture instruction to open the slots: Mid-Tower To remove a PCI type adapter, flip up the expansion card holder. Gently grasp the adapter by its edges and ease it out of the slot. Slim Desktop To remove a PCI type adapter, unlock and then flip up the expansion card holder. 91 Spirit P8Q67-M-DO (Eng) Rev 1 Gently grasp the adapter by its edges and ease it out of the slot. Final Power Connection Procedures 1. After all connections are made, close the system case cover. 2. Make sure that all switches are in the off position. 3. Connect the power supply cord into the power supply located on the back of your system case. 4. Connect the power cord onto a power outlet that is equipped with a surge protector. 5. You may then turn on your devices in the following order: Monitor External devices System power 6. The power LED on the front panel of the system case will light, as will the monitor LED. The system will then run power-on tests. While the tests are running, additional messages will appear on the screen. If you do not see anything within 30 seconds from the time you turn on the power, the system may have failed a power-on test. Recheck your settings and connections or call your authorized dealer for assistance. 7. During power-on, hold down the<DEL> key to enter BIOS setup. (see BIOS Setup Program “BIOS SOFTWARE” for instructions) 92 BIOS Information BIOS Information Managing and Updating your BIOS BIOS Setup Program Main Menu Ai Tweaker Menu Advanced Menu Boot Menu Tools Menu Exit Menu 93 Spirit P8Q67-M-DO (Eng) Rev 1 Managing and Updating your BIOS Managing and Updating your BIOS ASUS ASUS ASUS ASUS 94 Update Utility EZ Flash 2 Utility CrashFree BIOS BIOS Updater Save a copy of the original motherboard BIOS file to a USB flash disk in case you need to restore the BIOS in the future. Copy the original motherboard BIOS using the ASUS Update utility. BIOS Information ASUS Update Utility The ASUS Update is a utility that allows you to manage, save, and update the motherboard BIOS in Windows® environment. ASUS Update requires an Internet connection either through a network or an Internet Service Provider (ISP). This utility is available in the support DVD that comes with the motherboard package. Installing ASUS Update 1. Place the support DVD in the optical drive. The Drivers menu appears. 2. Click the Utilities tab, then click AI Suite II. 3. Follow the onscreen instructions to complete the installation. Quit all Windows® applications before you update the BIOS using this utility. Updating the BIOS 1. From the Windows® desktop, click Start > Programs > ASUS > AI Suite II > AI Suite II X.XX.XX to launch the AI Suite II utility. The AI Suite II Quick Bar appears. 2. Click Update button from the Quick Bar, and then click ASUS Update from the popup menu. The ASUS Update main screen appears. From the list, select either of the following methods: Updating from the Internet a. Select Update BIOS from the Internet, then click Next. b. Select the ASUS FTP site nearest you to avoid network traffic, then click Next. c. From the FTP site, select the BIOS version that you wish to download then click Next. The ASUS Update utility is capable of updating itself through the Internet. Always update the utility to avail all its features. Updating from a BIOS file a. Select Update BIOS from file, then click Next. b. Locate the BIOS file from the Open window, then click Open. 3. Follow the onscreen instructions to complete the updating process. 95 Spirit P8Q67-M-DO (Eng) Rev 1 ASUS EZ Flash 2 The ASUS EZ Flash 2 feature allows you to update the BIOS without using an OS-based utility. Before you start using this utility, download the latest BIOS file from the ASUS website at www.asus.com. To update the BIOS using EZ Flash 2: 1. Insert the USB flash disk that contains the latest BIOS file to the USB port. 2. Enter the Advanced Mode of the BIOS setup program. Go to the Tool menu to select ASUS EZ Flash Utility and press <Enter> to enable it. 3. Press <Tab> to switch to the Drive field. 4. Press the Up/Down arrow keys to find the USB flash disk that contains the latest BIOS, and then press <Enter>. 5. Press <Tab> to switch to the Folder Info field. 96 BIOS Information 6. Press the Up/Down arrow keys to find the BIOS file, and then press <Enter> to perform the BIOS update process. Reboot the system when the update process is done. This function supports USB flash disks with FAT 32/16 format and single partition only. DO NOT shut down or reset the system while updating the BIOS to prevent system boot failure! ASUS CrashFree Bios The ASUS CrashFree BIOS 3 is an auto recovery tool that allows you to restore the BIOS file when it fails or gets corrupted during the updating process. You can restore a corrupted BIOS file using the motherboard support DVD or a USB flash drive that contains the updated BIOS file. Before using this utility, rename the BIOS file in the removable device into Q67TPM.ROM The BIOS file in the support DVD may not be the latest version. Download the latest BIOS file from the ASUS website at www.asus.com. Recovering the BIOS 1. Turn on the system. 2. Insert the support DVD to the optical drive or the USB flash drive that contains the BIOS file to the USB port. 3. The utility automatically checks the devices for the BIOS file. When found, the utility reads the BIOS file and enters ASUS EZ Flash 2 utility automatically. 4. The system requires you to enter BIOS Setup to recover BIOS setting. To ensure system compatibility and stability, we recommend that you press <F5> to load default BIOS values. DO NOT shut down or reset the system while updating the BIOS! Doing so can cause system boot failure! ASUS BIOS Updater The ASUS BIOS Updater allows you to update BIOS in a DOS environment. This utility also allows you to copy the current BIOS file that you can use as a backup when the BIOS fails or gets corrupted during the updating process. 97 Spirit P8Q67-M-DO (Eng) Rev 1 The succeeding utility screens are for reference only. The actual utility screen displays may not be as shown. Before updating BIOS 1. Prepare the motherboard support DVD and a USB flash drive in FAT32/16 format and single partition. 2. Download the latest BIOS file and BIOS Updater from the ASUS website at http://support.asus.com and save them on the USB flash drive. NTFS is not supported under DOS environment. Do not save the BIOS file and BIOS Updater to a hard disk drive or USB flash drive in NTFS format. 3. Turn off the computer and disconnect all SATA hard disk drives (optional). Booting the system in DOS environment 1. Insert the USB flash drive with the latest BIOS file and BIOS Updater to the USB port. 2. Boot your computer. When the ASUS Logo appears, press <F8> to show the BIOS Boot Device Select Menu. Insert the support DVD into the optical drive and select the optical drive as the boot device. 3. When the Make Disk menu appears, select the FreeDOS command prompt item by pressing the item number. 4. At the FreeDOS prompt, type d: and press <Enter> to switch the disk from Drive C (optical drive) to Drive D (USB flash drive). Backing up the current BIOS To backup the current BIOS file using the BIOS Updater 98 BIOS Information Ensure that the USB flash drive is not write-protected and has at least 8MB free space to save the file. 1. At the FreeDOS prompt, type bupdater /o[filename] and press <Enter>. The [filename] is any user-assigned filename with no more than eight alphanumeric characters for the filename and three alphanumeric characters for the extension. 2. The BIOS Updater backup screen appears indicating the BIOS backup process. When BIOS backup is done, press any key to return to the DOS prompt. Updating the BIOS file To update the BIOS file using BIOS Updater 1. At the FreeDOS prompt, type bupdater /pc /g and press <Enter>. 2. The BIOS Updater screen appears as below. 99 Spirit P8Q67-M-DO (Eng) Rev 1 3. Press <Tab> to switch between screen fields and use the <Up/Down/Home/End> keys to select the BIOS file and press <Enter>. BIOS Updater checks the selected BIOS file and prompts you to confirm BIOS update. 4. Select Yes and press <Enter>. When BIOS update is done, press <ESC> to exit BIOS Updater. Restart your computer. DO NOT shut down or reset the system while updating the BIOS to prevent system boot failure! For BIOS Updater version 1.04 or later, the utility automatically exits to the DOS prompt after updating BIOS. Ensure to load the BIOS default settings to ensure system compatibility and stability. Select the Load Optimized Defaults item under the Exit menu. Refer to Exit menu for details. Ensure to connect all SATA hard disk drives after updating the BIOS file if you have disconnected them. BIOS Setup Program Use the BIOS Setup program to update the BIOS or configure its parameters. The BIOS screens include navigation keys and brief online help to guide you in using the BIOS Setup program. 100 BIOS Information BIOS Menu Screen EZ Mode Advanced Mode Menu Items Back Button Submenu Items Pop-up Window Scroll Bar Navigation Keys General Help Configuration Fields Entering BIOS Setup at startup To enter BIOS Setup at startup: Press <Delete> during the Power-On Self Test (POST). If you do not press <Delete>, POST continues with its routines. Entering BIOS Setup after POST To enter BIOS Setup after POST: Press <Ctrl>+<Alt>+<Del> simultaneously. Press the reset button on the system chassis. Press the power button to turn the system off then back on. Do this option only if you failed to enter BIOS Setup using the first two options. Using the power button, reset button, or the <Ctrl>+<Alt>+<Del> keys to force reset from a running operating system can cause damage to your data or system. We recommend to always shut down the system properly from the operating system. The BIOS setup screens shown in this section are for reference purposes only, and may not exactly match what you see on your screen. Visit the ASUS website at www.asus.com to download the latest BIOS file for this motherboard. Ensure that a USB mouse is connected to your motherboard if you want to use the mouse to control the BIOS setup program. If the system becomes unstable after changing any BIOS setting, load the default settings to ensure system compatibility and stability. Select the Load Optimized Defaults item under the Exit menu. See Exit Menu for details. If the system fails to boot after changing any BIOS setting, try to clear the CMOS and reset the motherboard to the default value. See Jumpers for information on how to erase the RTC RAM. 101 Spirit P8Q67-M-DO (Eng) Rev 1 BIOS Menu Screen The BIOS setup program can be used under two modes: EZ Mode and Advanced Mode. You can change modes from the Exit menu or from the Exit/Advanced Mode button in the EZ Mode/Advanced Mode screen. EZ Mode By default, the EZ Mode screen appears when you enter the BIOS setup program. The EZ Mode provides you an overview of the basic system information, and allows you to select the display language, system performance mode and boot device priority. To access the Advanced Mode, click Exit/Advanced Mode, then select Advanced Mode. 102 The default screen for entering the BIOS setup program can be changed. Refer to the Setup Mode item in the Boot menu for details. BIOS Information The boot device options vary depending on the devices you installed to the system. The Boot Menu(F8) button is available only when the boot device is installed to the system. Advanced Mode The Advanced Mode provides advanced options for experienced end-users to configure the BIOS settings. The figure below shows an example of the Advanced Mode. Refer to the following sections for the detailed configurations. 103 Spirit P8Q67-M-DO (Eng) Rev 1 To access the EZ Mode, click Exit, then select ASUS EZ Mode. Menu items The highlighted item on the menu bar displays the specific items for that menu. For example, selecting Main shows the Main menu items. The other items (Ai Tweaker, Advanced, Monitor, Boot, Tool, and Exit) on the menu bar have their respective menu items. Back button This button appears when entering a submenu. Press <ESC> or use the USB mouse to click this button to return to the previous menu screen. 104 BIOS Information Submenu items A greater than sign (>) before each item on any menu screen means that the item has a submenu. To display the submenu, select the item and press <Enter>. Pop-up window Select a menu item and press <Enter> to display a pop-up window with the configuration options for that item. Scroll bar A scroll bar appears on the right side of a menu screen when there are items that do not fit on the screen. Press the Up/Down arrow keys or <Page Up> / <Page Down> keys to display the other items on the screen. Navigation keys At the bottom right corner of the menu screen are the navigation keys for the BIOS setup program. Use the navigation keys to select items in the menu and change the settings. General help At the top right corner of the menu screen is a brief description of the selected item. Configuration Fields These fields show the values for the menu items. If an item is user-configurable, you can change the value of the field opposite the item. You cannot select an item that is not userconfigurable. A configurable field is highlighted when selected. To change the value of a field, select it and press <Enter> to display a list of options. Main Menu The Main menu screen appears when you enter the Advanced Mode of the BIOS Setup program. The Main menu provides you an overview of the basic system information, and allows you to set the system date, time, language, and security settings. 105 Spirit P8Q67-M-DO (Eng) Rev 1 System Language [English] Allows you to choose the BIOS language version from the options. Configuration options: [English] [French] System Date [Day xx/xx/xxxx] Allows you to set the system date. System Time [xx:xx:xx] Allows you to set the system time. Security The Security menu items allow you to change the system security settings. If you have forgotten your BIOS password, erase the CMOS Real Time Clock (RTC) RAM to clear the BIOS password. See Jumpers for information on how to erase the RTC RAM. The Administrator or User Password items on top of the screen show the default Not Installed. After you set a password, these items show Installed. Administrator Password If you have set an administrator password, we recommend that you enter the administrator password for accessing the system. Otherwise, you might be able to see or change only selected fields in the BIOS setup program. 106 BIOS Information To set an administrator password: 1. Select the Administrator Password item and press <Enter>. 2. From the Create New Password box, key in a password, then press <Enter>. 3. Confirm the password when prompted. To change an administrator password: 1. Select the Administrator Password item and press <Enter>. 2. From the Enter Current Password box, key in the current password, then press <Enter>. 3. From the Create New Password box, key in a new password, then press <Enter>. 4. Confirm the password when prompted. To clear the administrator password, follow the same steps as in changing an administrator password, but press <Enter> when prompted to create/confirm the password. After you clear the password, the Administrator Password item on top of the screen shows Not Installed. User Password If you have set a user password, you must enter the user password for accessing the system. The User Password item on top of the screen shows the default Not Installed. After you set a password, this item shows Installed. To set a user password: 1. Select the User Password item and press <Enter>. 2. From the Create New Password box, key in a password, then press <Enter>. 3. Confirm the password when prompted. To change a user password: 1. Select the User Password item and press <Enter>. 2. From the Enter Current Password box, key in the current password, then press <Enter>. 3. From the Create New Password box, key in a new password, then press <Enter>. 4. Confirm the password when prompted. 107 Spirit P8Q67-M-DO (Eng) Rev 1 To clear the user password, follow the same steps as in changing a user password, but press <Enter> when prompted to create/confirm the password. After you clear the password, the User Password item on top of the screen shows Not Installed. Ai Tweaker Menu Memory Frequency iGPU Max. Frequency EPU Power Saving Mode GPU Boost DRAM Timing Control CPU Power Management Offset Mode Sign iGPU Offset Mode Sign DRAM Voltage VCCIO Voltage PCH Voltage Load-Line Calibration The Ai Tweaker menu items allow you to configure overclocking-related items. 108 Be cautious when changing the settings of the Ai Tweaker menu items. Incorrect field values can cause the system to malfunction. The configuration options for this section vary depending on the CPU and DIMM model you installed on the motherboard. BIOS Information Target DRAM Speed : xxxxMHz Displays the current DRAM speed. Memory Frequency [Auto] Allows you to set the memory operating frequency. Configuration options: [DDR3-800MHz] [DDR3-1066MHz] [DDR3-1333MHz] Selecting a very high memory frequency may cause the system to become unstable! If this happens, revert to the default setting. iGPU Max. Frequency [Auto] [Auto] The iGPU frequency may be optimized depending on the system loading. [Manual] The input value is the optimal iGPU frequency. However, the frequency may vary depending on the system loading. EPU Power Saving Mode [Disabled] Allows you to enable or disable the EPU power saving function. Configuration options: [Disabled] [Enabled] 109 Spirit P8Q67-M-DO (Eng) Rev 1 EPU Setting [AUTO] This item appears only when you set the EPU Power Saving MODE item to [Enabled] and allows you to select the EPU power saving mode. Configuration options: [AUTO] [Light Power Saving Mode] [Medium Power Saving Mode] [Max Power Saving Mode] GPU Boost [OK] [OK] Select [OK] to automatically optimize the iGPU frequency. [Cancel] Select [Cancel] to use a fixed iGPU frequency. DRAM Timing Control The sub-items in this menu allow you to set the DRAM timing control features. Use the <+> and <-> keys to adjust the value. To restore the default setting, type [auto] using the keyboard and press <Enter>. Changing the values in this menu may cause the system to become unstable! If this happens, revert to the default settings. CPU Power Management The sub-items in this menu allow you to set the CPU ratio and features. CPU Ratio [Auto] Allows you to manually adjust the maximum non-turbo CPU ratio. Use <+> and <-> keys or the numeric keypad to adjust the value. The valid value ranges vary according to your CPU model. Enhanced Intel SpeedStep Technology [Enabled] Allows you to enable or disable the Enhanced Intel® SpeedStep Technology (EIST). [Disabled] Disables this function. [Enabled] The operating system dynamically adjusts the processor voltage and core frequency which may result in decreased average consumption and decreased average heat production. Turbo Mode [Enabled] This item appears only when you set the previous item to [Enabled]. [Enabled] Allows processor cores to run faster than marked frequency in specific conditions. [Disabled] Disables this function. 110 The following three items appear only when you set both the Enhanced Intel SpeedStep Technology and Turbo Mode items to [Enabled]. BIOS Information Long duration power limit [Auto] Use the <+> and <-> keys to adjust the value. Long duration maintained [Auto] Use the <+> and <-> keys to adjust the value. Short duration power limit [Auto] Use the <+> and <-> keys to adjust the value. Primary Plane Current Limit [Auto] Use the <+> and <-> keys to adjust the value. Secondary Plane Current Limit [Auto] Use the <+> and <-> keys to adjust the value. Offset Mode Sign [+] [+] To offset the voltage by a positive value. [–] To offset the voltage by a negative value. CPU Voltage [Auto] Allows you to set the CPU voltage. The values range from -0.635V to +0.635V with a 0.005V interval. Refer to the CPU documentation before setting the CPU voltage. Setting a high voltage may damage the CPU permanently, and setting a low voltage may make the system unstable. iGPU Offset Mode Sign [+] [+] To offset the voltage by a positive value. [–] To offset the voltage by a negative value. iGPU Voltage [Auto] Allows you to set the iGPU voltage. The values range from -0.635V to +0.635V with a 0.005V interval. DRAM Voltage [Auto] Allows you to set the DRAM voltage. The values range from 1.185V to 2.135V with a 0.005V interval. According to Intel CPU specification, DIMMs with voltage requirement over 1.65V may damage the CPU permanently. We recommend you install the DIMMs with the voltage requirement below 1.65V. 111 Spirit P8Q67-M-DO (Eng) Rev 1 VCCIO Voltage [Auto] Allows you to set the VCCIO voltage. The values range from 0.735V to 1.685V with a 0.005V interval. PCH Voltage [Auto] Allows you to set the Platform Controller Hub voltage. The values range from 0.735V to 1.685V with a 0.005V interval. The values of the CPU Voltage, iGPU Voltage, DRAM Voltage, VCCIO Voltage, and PCH Voltage items are labeled in different color, indicating the risk levels of high voltage settings. The system may need better cooling system to work stably under high voltage settings. Load-Line Calibration [Auto] Load-line is defined by Intel VRM specification and affects CPU voltage. The CPU working voltage will decrease proportionally to CPU loading. Higher load-line calibration would get higher voltage and better overclocking performance, but increase the CPU and VRM thermal. This item allows you to set this function for better system performance. Configuration options: [Auto] [Disabled] [Enabled] The actual performance boost may vary depending on your CPU specification. Advanced Menu The Advanced menu items allow you to change the settings for the CPU and other system devices. Trusted Computing CPU Configuration System Agent Configuration PCH_Configuration SATA Configuration Intel TXT(LT) Configuration USB Configuration ME Subsystem AMT Configuration Onboard Devices Configuration APM Serial Port Console Redirection 112 Be cautious when changing the settings of the Advanced menu items. Incorrect field values can cause the system to malfunction. BIOS Information Trusted Computing The items in this menu allow you to set the TPM (Trusted Platform Module) feature. The following items function only when a TPM module is installed in this motherboard. TPM Support [Disabled] Allows you to enable or disable the TPM support. Configuration options: [Disabled] [Enabled] CPU Configuration The items in this menu show the CPU-related information that the BIOS automatically detects. The items shown in submenu may be different due to the CPU you installed. 113 Spirit P8Q67-M-DO (Eng) Rev 1 CPU Ratio [Auto] Allows you to set the ratio between the CPU Core Clock and the BCLK Frequency. Use <+> and <-> keys or the numeric keypad to adjust the ratio. The valid value ranges vary according to your CPU model. Intel Adaptive Thermal Monitor [Enabled] [Enabled] Enables the overheated CPU to throttle its clock speed to cool down. [Disabled] Disables the CPU thermal monitor function. Hyper-threading [Enabled] The Intel Hyper-Threading Technology allows a hyper-threading processor to appear as two logical processors to the operating system, allowing the operating system to schedule two threads or processes simultaneously. [Enabled] Two threads per activated core are enabled. [Disabled] Only one thread per activated core is enabled. Active Processor Cores [All] Allows you to choose the number of CPU cores to activate in each processor package. Configuration options: [All] [1] [2] [3] Limit CPUID Maximum [Disabled] [Enabled] Allows legacy operating systems to boot even without support for CPUs with extended CPUID functions. [Disabled] Disables this function. Execute Disable Bit [Enabled] [Enabled] Enables the No-Execution Page Protection Technology. [Disabled] Forces the XD feature flag to always return to zero (0). Intel(R) Virtualization Technology [Disabled] [Enabled] Allows a hardware platform to run multiple operating systems separately and simultaneously, enabling one system to virtually function as several systems. [Disabled] Disables this function. Enhanced Intel SpeedStep Technology [Enabled] Allows you to enable or disable the Enhanced Intel® SpeedStep Technology (EIST). [Disabled] The CPU runs at its default speed. [Enabled] The operating system controls the CPU speed. Turbo Mode [Enabled] This item appears only when you set the Enhanced Intel SpeedStep Technology item to [Enabled] and allows you to enable or disable the Intel® Turbo Mode Technology. [Enabled] Allows processor cores to run faster than marked frequency in specific condition. [Disabled] Disables this function. CPU C1E [Enabled] [Enabled] Enables the C1E support function. This item should be enabled in order to enable the Enhanced Halt State. 114 BIOS Information [Disabled] Disables this function. CPU C3 Report [Disabled] Allows you to disable or enable the CPU C3 report to the operating system. Configuration options: [Disabled] [ACPI C-2] [ACPI C-3] CPU C6 Report [Enabled] Allows you to disable or enable the CPU C6 report to the operating system. Configuration options: [Enabled] [Disabled] System Agent Configuration VT-d [Disabled] [Disabled] Disables the Intel Virtualization Technology for Directed I/O. [Enabled] Enables the Intel Virtualization Technology for Directed I/O. Initiate Graphic Adapter [PEG/iGPU] Allows you to decide which graphics controller to use as the primary boot device. Configuration options: [iGPU] [PCI/iGPU] [PCI/PEG] [PEG/iGPU] [PEG/PCI] iGPU Memory [64M] Allows you to set the iGPU memory size. Configuration options: [32M] [64M] [96M] [128M] iGPU Multi-Monitor [Disabled] Allows you to enable or disable the internal graphics device’s multi-monitor support for add-on VGA devices. And the memory size for internal graphics device will keep 64MB. Configuration options: [Disabled] [Enabled] PCH Configuration High Precision Timer [Enabled] Allows you to enable or disable the High Precision Event Timer. Configuration options: [Enabled] [Disabled] SATA Configuration While entering Setup, the BIOS automatically detects the presence of SATA devices. The SATA Port items show Not Present if no SATA device is installed to the corresponding SATA port. SATA Mode [IDE Mode] Allows you to set the SATA configuration. [Disabled] Disables the SATA function. [IDE Mode] Set to [IDE Mode] when you want to use the Serial ATA hard disk drives as Parallel ATA physical storage devices. [AHCI Mode] Set to [AHCI Mode] when you want the SATA hard disk drives to use the AHCI (Advanced Host Controller Interface). The AHCI allows the onboard storage driver to enable advanced Serial ATA features that increases storage performance on random workloads by allowing the drive to internally optimize the order of commands. 115 Spirit P8Q67-M-DO (Eng) Rev 1 [RAID Mode] Set to [RAID Mode] when you want to create a RAID configuration from the SATA hard disk drives. Serial-ATA Controller 0 [Enhanced] This item appears only when you set the SATA Mode item to [IDE Mode]. [Disabled] Disables the SATA function. [Enhanced] Set to [Enhanced] to support more than four SATA devices. [Compatible] Set to [Compatible] when using Windows 98/NT/2000/MS-DOS. Up to four SATA devices are supported under these operating systems. Serial-ATA Controller 1 [Enhanced] This item appears only when you set the SATA Mode item to [IDE Mode]. [Disabled] Disables the SATA function. [Enhanced] Set to [Enhanced] to support more than four SATA devices. S.M.A.R.T. Status Check [Enabled] S.M.A.R.T. (Self-Monitoring, Analysis and Reporting Technology) is a monitor system. When read/write of your hard disk errors occur, this feature allows the hard disk to report warning messages during the POST. Configuration options: [Enabled] [Disabled] Intel TXT(LT) Configuration Secure Mode Extensions (SMX) [Disabled] Allows you to enable or disable the Intel Secure Mode Extensions (SMX) technology. Configuration options: [Disabled] [Enabled] Intel TXT(LT) Support [Disabled] This item can be configured only when the Intel SMX, Intel Virtualization Technology (VT), and Intel Virtualization Technology for Directed I/O (VT-d) technologies are all enabled. Allows you to enable or disable the Intel Trusted Execution Technology. Configuration options: [Disabled] [Enabled] USB Configuration The items in this menu allow you to change the USB-related features. The USB Devices item shows the auto-detected values. If no USB device is detected, the item shows None. Legacy USB Support [Enabled] [Enabled] Enables the support for USB devices on legacy operating systems (OS). [Disabled] The USB devices can be used only for the BIOS setup program. [Auto] Allows the system to detect the presence of USB devices at startup. If detected, the USB controller legacy mode is enabled. If no USB device is detected, the legacy USB support is disabled. EHCI Hand-off [Disabled] [Enabled] Enables the support for operating systems without an EHCI hand-off feature. 116 BIOS Information [Disabled] Disables the function. ME Subsystem The items in this menu allow you to change the Intel® Management Engine (ME) feature. ME Subsystem [Enabled] Allows you to enable or disable accessing the ME subsystem. Configuration options: [Enabled] [Disabled] End of Post Message [Enabled] This item appears only when you set the ME Subsystem item to [Enabled]. Configuration options: [Enabled] [Disabled] Execute MEBx [Enabled] Allows you to enable or disable the Intel® Management Engine BIOS Extension (MEBx) feature. Configuration options: [Enabled] [Disabled] AMT Configuration The items in this menu allow you to change the Intel® Active Management Technology (AMT) feature. AMT [Enabled] Allow you to enable or disable the Intel® Active Management Technology (AMT) feature. Configuration options: [Enabled] [Disabled] Unconfigure AMT/ME [Disabled] Sets this item to [Disabled] to unconfigure AMT/ME without using a password or set it to [Enabled] to use a password. Configuration options: [Enabled] [Disabled] WatchDog Timer [Disabled] When set to [Enabled], the WatchDog Timer will monitor the time taken for each task performed by a software or hardware. Configuration options: [Enabled] [Disabled] The following two items become configurable only when you set the WatchDog Timer item to [Enabled]. OS WatchDog Timer [0] Use the <+> and <-> keys to adjust the value or key in a number directly. BIOS WatchDog Timer [0] Use the <+> and <-> keys to adjust the value or key in a number directly. Onboard Devices Configuration HD Audio Controller [Enabled] [Enabled] Enables the High Definition Audio Controller. [Disabled] Disables the controller. The following item appears only when you set the HD Audio Controller item 117 Spirit P8Q67-M-DO (Eng) Rev 1 to [Enabled]. Front Panel Type Allows you to set the front panel audio connector (AAFP) mode to legacy AC’97 or highdefinition audio depending on the audio standard that the front panel audio module supports. [HD] Sets the front panel audio connector (AAFP) mode to high definition audio. [AC97] Sets the front panel audio connector (AAFP) mode to legacy AC’97 SPDIF Out Type [SPDIF] [SPDIF] Sets to [SPDIF] for SPDIF audio output. [HDMI] Sets to [HDMI] for HDMI audio output. Intel LAN Controller [Enabled] [Enabled] Enables the Intel LAN controller. [Disabled] Disables the controller. Disable ME subsystem before you disable the LAN controller. Intel PXE OPROM [Disabled] This item appears only when you set the previous item to [Enabled] and allows you to enable or disable the PXE OptionRom of the Intel LAN controller. Configuration options: [Enabled] [Disabled] Serial Port Configuration The sub-items in this menu allow you to set the serial port configuration. This item functions only if there is a serial port (COM1) connector on the motherboard. Serial Port [Enabled] Allows you to enable or disable the serial port (COM). Configuration options: [Enabled] [Disabled] Change Settings [IO=3F8h; IRQ=4] Allows you to select the Serial Port base address. Configuration options: [IO=3F8h; IRQ=4] [IO=2F8h; IRQ=3] [IO=3E8h; IRQ=4] [IO=2E8h; IRQ=3] Parallel Port Configuration The sub-items in this menu allow you to set the parallel port configuration. 118 BIOS Information Parallel Port [Enabled] Allows you to enable or disable the parallel port (LPT/LPTE). Configuration options: [Enabled] [Disabled] Change Settings [IO=3F8h; IRQ=4] Allows you to select an optimal setting for Super I/O devices. Configuration options: [Auto] [IO=378h; IRQ=5;] [IO=378h; IRQ=5;] [IO=278h; IRQ=5;] [IO=3BCh; IRQ=5;] Device Mode [STD Printer Mode] Allows you to select the Printer Port mode. Configuration options: [STD Printer Mode] [SPP Mode] [EPP-1.9 and SPP Mode] [EPP-1.7 and SPP Mode] [ECP Mode] [ECP and EPP 1.9 Mode] [ECP and EPP 1.7 Mode] APM Restore AC Power Loss [Power Off] [Power On] The system goes into on state after an AC power loss. [Power Off] The system goes into off state after an AC power loss. [Last State] The system goes into either off or on state, whatever the system state was before the AC power loss. Power On By PS/2 Keyboard [Disabled] [Disabled] Disables the Power On by a PS/2 keyboard. [Space Bar] Sets the Space Bar on the PS/2 keyboard to turn on the system. [Ctrl-Esc] Sets the Ctrl+Esc key on the PS/2 keyboard to turn on the system. [Power Key] Sets Power key on the PS/2 keyboard to turn on the system. This feature requires an ATX power supply that provides at least 1A on the +5VSB lead. Power On By PS/2 Mouse [Disabled] [Disabled] Disables the Power On by a PS/2 mouse. [Enabled] Enables the Power On by a PS/2 mouse. This feature requires an ATX power supply that provides at least 1A on the +5VSB lead. Power On By PCI [Disabled] [Disabled] Disables the PME to wake up from S5 by PCI devices. [Enabled] Allows you to turn on the system through a PCI LAN or modem card. This feature requires an ATX power supply that provides at least 1A on the +5VSB lead. Power On By PCIE [Disabled] [Disabled] Disables the PCIE devices to generate a wake event. [Enabled] Enables the PCIE devices to generate a wake event. Power On By Ring [Disabled] [Disabled] Disables Ring to generate a wake event. [Enabled] Enables Ring to generate a wake event. Power On By RTC [Disabled] [Disabled] Disables RTC to generate a wake event. 119 Spirit P8Q67-M-DO (Eng) Rev 1 [Enabled] When set to [Enabled], the items RTC Alarm Date (Days) and Hour/ Minute/Second will become user-configurable with set values. Serial Port Console Redirection Console Redirection [Disabled] Enables or disables the console redirection feature. When enabled, it allows you to maintain a system from a remote location by redirecting keyboard input and text output through the serial port. Configuration options: [Enabled] [Disabled] Terminal Type [VT-UTF8] VT-UTF8 is the preferred terminal type for out-of-band management. The next best choice is VT100+ and then VT100. Configuration options: [VT100] [VT100+] [VT-UTF8] [ANSI] Monitor Menu The Monitor menu displays the system temperature/power status, and allows you to change the fan settings. 120 BIOS Information CPU Temperature / MB Temperature [xxxºC/xxxºF] The onboard hardware monitor automatically detects and displays the CPU and motherboard temperatures. Select Ignore if you do not wish to display the detected temperatures. CPU / Chassis Fan Speed [xxxx RPM] or [Ignore] / [N/A] The onboard hardware monitor automatically detects and displays the CPU and chassis fan speeds in rotations per minute (RPM). If the fan is not connected to the motherboard, the field shows N/A. Select Ignore if you do not wish to display the detected speed. CPU Q-Fan Control [Enabled] [Disabled] Disables the CPU Q-Fan control feature. [Enabled] Enables the CPU Q-Fan control feature. CPU Fan Speed Low Limit [600 RPM] This item appears only when you enable the CPU Q-Fan Control feature and allows you to disable or set the CPU fan warning speed. Configuration options: [Ignore] [200 RPM] [300 RPM] [400 RPM] [500 RPM] [600 RPM] CPU Fan Profile [Standard] This item appears only when you enable the CPU Q-Fan Control feature and allows you to set the appropriate performance level of the CPU fan. [Standard] Sets to [Standard] to make the CPU fan automatically adjust depending on the CPU temperature. [Silent] Sets to [Silent] to minimize the fan speed for quiet CPU fan operation. [Turbo] Sets to [Turbo] to achieve maximum CPU fan speed. [Manual] Sets to [Manual] to assign detailed fan speed control parameters. The following four items appear only when you set CPU Fan Profile to [Manual]. CPU Upper Temperature [70] Use the <+> and <-> keys to adjust the upper limit of the CPU temperature. The values range from 20ºC to 75ºC. CPU Fan Max. Duty Cycle(%) [100] Use the <+> and <-> keys to adjust the maximum CPU fan duty cycle. The values range from 20% to 100%. When the CPU temperature reaches the upper limit, the CPU fan will operate at the maximum duty cycle. 121 Spirit P8Q67-M-DO (Eng) Rev 1 CPU Lower Temperature [20] Displays the lower limit of the CPU temperature. CPU Fan Min. Duty Cycle(%) [20] Use the <+> and <-> keys to adjust the minimum CPU fan duty cycle. The values range from 0% to 100%. When the CPU temperature is under 40ºC, the CPU fan will operate at the minimum duty cycle. Chassis Q-Fan Control [Enabled] [Disabled] Disables the Chassis Q-Fan control feature. [Enabled] Enables the Chassis Q-Fan control feature. Chassis Fan Speed Low Limit [600 RPM] This item appears only when you enable the Chassis Q-Fan Control feature and allows you to disable or set the chassis fan warning speed. Configuration options: [Ignore] [200 RPM] [300 RPM] [400 RPM] [500 RPM] [600 RPM] Chassis Fan Profile [Standard] This item appears only when you enable the Chassis Q-Fan Control feature and allows you to set the appropriate performance level of the chassis fan. [Standard] Sets to [Standard] to make the chassis fan automatically adjust depending on the chassis temperature. [Silent] Sets to [Silent] to minimize the fan speed for quiet chassis fan operation. [Turbo] Sets to [Turbo] to achieve maximum chassis fan speed. [Manual] Sets to [Manual] to assign detailed fan speed control parameters. The following four items appear only when you set Chassis Fan Profile to [Manual]. Chassis Upper Temperature [70] Use the <+> and <-> keys to adjust the upper limit of the CPU temperature. The values range from 40ºC to 90ºC. Chassis Fan Max. Duty Cycle(%) [100] Use the <+> and <-> keys to adjust the maximum chassis fan duty cycle. The values range from 60% to 100%. When the chassis temperature reaches the upper limit, the chassis fan will operate at the maximum duty cycle. Chassis Lower Temperature [40] Displays the lower limit of the chassis temperature. CPU Fan Min. Duty Cycle(%) [60] Use the <+> and <-> keys to adjust the minimum chassis fan duty cycle. The values range from 122 BIOS Information 60% to 100%. When the chassis temperature is under 40ºC, the chassis fan will operate at the minimum duty cycle. CPU Voltage, 3.3V Voltage, 5V Voltage, 12V Voltage The onboard hardware monitor automatically detects the voltage output through the onboard voltage regulators. Select Ignore if you do not want to detect this item. Anti Surge Support [Enabled] This item allows you to enable or disable the Anti Surge function. Configuration options: [Disabled] [Enabled] Boot Menu The Boot menu items allow you to change the system boot options. Bootup NumLock State [On] [On] Sets the power-on state of the NumLock to [On]. [Off] Sets the power-on state of the NumLock to [Off]. 123 Spirit P8Q67-M-DO (Eng) Rev 1 Full Screen Logo [Enabled] [Enabled] Enables the full screen logo display feature. [Disabled] Disables the full screen logo display feature. Set this item to [Enabled] to use the ASUS MyLogo 2™ feature. Option ROM Messages [Force BIOS] [Force BIOS] The third-party ROM messages will be forced to display during the boot sequence. [Keep Current] The third-party ROM messages will be displayed only if the third-party manufacturer had set the add-on device to do so. Setup Mode [EZ Mode] [Advanced Mode] - Sets Advanced Mode as the default screen for entering the BIOS setup program. [EZ Mode] - Sets EZ Mode as the default screen for entering the BIOS setup program. Boot Option Priorities These items specify the boot device priority sequence from the available devices. The number of device items that appears on the screen depends on the number of devices installed in the system. To select the boot device during system startup, press <F8> when ASUS Logo appears. To access Windows OS in Safe Mode, do any of the following: Press <F5> when ASUS Logo appears. Press after POST. Boot Override These items displays the available devices. The number of device items that appears on the screen depends on the number of devices installed in the system. Click an item to start booting from the selected device. Tools Menu The Tools menu items allow you to configure options for special functions. Select an item then press <Enter> to display the submenu. 124 BIOS Information ASUS EZ Flash Utility Allows you to run ASUS EZ Flash 2. Press [Enter] to launch the ASUS EZ Flash 2 screen For more details, see ASUS EZ Flash 2. ASUS O.C. Profile This item allows you to store or load multiple BIOS settings. The Setup Profile Status items show Not Installed if no profile is created. Save to Profile Allows you to save the current BIOS settings to the BIOS Flash, and create a profile. Key in a profile number from one to eight, press <Enter>, and then select Yes. Load from Profile Allows you to load the previous BIOS settings saved in the BIOS Flash. Key in the profile number that saved your CMOS settings, press , and then select Yes. DO NOT shut down or reset the system while updating the BIOS to prevent the system boot failure! We recommend that you update the BIOS file only coming from the same memory/CPU configuration and BIOS version. Exit Menu The Exit menu items allow you to load the optimal default values for the BIOS items, and save or discard your changes to the BIOS items. You can access the EZ Mode from the Exit menu. 125 Spirit P8Q67-M-DO (Eng) Rev 1 Load Optimized Defaults This option allows you to load the default values for each of the parameters on the Setup menus. When you select this option or if you press <F5>, a confirmation window appears. Select Yes to load the default values. Save Changes & Reset Once you are finished making your selections, choose this option from the Exit menu to ensure the values you selected are saved. When you select this option or if you press <F10>, a confirmation window appears. Select Yes to save changes and exit. Discard Changes & Exit This option allows you to exit the Setup program without saving your changes. When you select this option or if you press <Esc>, a confirmation window appears. Select Yes to discard changes and exit. ASUS EZ Mode This option allows you to enter the EZ Mode screen. Launch EFI Shell from file system device. This option allows you to attempt to launch the EFI Shell application (shellx64.efi) from one of the available devices that have a file system. Launch EFI Shell from filesystem device This option allows you to attempt to launch the EFI Shell application (shellx64.efi) from one of the available devices that have a filesystem. 126 Troubleshooting & FAQs Troubleshooting & FAQs When a Problem Occurs How to Place a Service Call Remote Diagnostic FAQs Troubleshooting PC Troubleshooting no display on power up Troubleshooting Motherboard When a Problem Occurs The three main causes for problems to occur are: 127 Spirit P8Q67-M-DO (Eng) Rev 1 The environment Hardware Software The environment includes the temperature where the system is located, the humidity, the electrical load on the same circuit the system is on, the quality of the power received (surprisingly not always clean or in sufficient amount), the amount of static electricity around the system, the amount of dust in the air (resulting in heat issues), etc… Hardware includes components that fail for various reasons. Software includes drivers that translate application instructions into hardware instructions. These drivers may be faulty or may conflict with some versions of various applications. Software applications may also be faulty or configured for different hardware or platforms. These types of problems usually require new drivers or re-installation of known good drivers. Occasionally, the software application needs to be removed and re-installed or the system needs to be re-imaged (if an image is available). Most of this troubleshooting manual is focusing on the hardware causes of failure since the other two causes rely so heavily on factors that change from system to system. Steps to troubleshooting: Try to reproduce the problem. Document what has changed recently or what new task was attempted prior to the problem showing up. Was new hardware or software added just prior to the problem showing up? If so, try to remove that hardware or software. Make sure that all devices (computer and peripherals) have power and are turned on. This may sound too simple but has resolved many issues. Document any error message or beep code. Has the system configuration been changed? Is it correct? Has the boot sequence been changed? Are you booting from the desirable source? If you have gone through the above checklist and your system still does not function properly, check the following pages. The following instructions will help you solve some common problems. How to Place a Service Call Northern Micro provides support for your Spirit system from coast to coast. This section features our main service calls procedures. Via telephone Customers can contact our National Call Centre at 1-800-563-1007 (extension 241). Our regular business hours are Monday to Friday from 8:00AM-5:00PM. 128 Troubleshooting & FAQs Via the Internet You are also invited to use our self-serve services on the Web. To place your service call, please go to www.northernmicro.com. Via our Portal Service calls can also be placed via our portal. Access to the portal can be requested by contacting [email protected]. General procedures: To speed-up the process, our bilingual call coordinators will ask you for: product type and serial number; problem description; address, phone numbers, etc. Once your work order is registered, a technician will contact you within the next hour during regular business hours. Your dedicated technician will make a diagnostic and will offer suggestions. He or she will also determine if the problem is software or hardware related. If the problem is related to hardware, a technician will be deployed on site to solve the problem. If the problem is related to software and a technician is deployed on site, some charges may apply. Please note that most problems are solved over the phone. In either case, the technician will communicate with the client to confirm the time of the visit. FAQs 1. Recently I purchased this motherboard for my new system. When I tried to install Windows XP, the SATA drive connected to the PCH SATA controller cannot be recognized. Therefore, I had to abort the installation. However, I can install Windows 7 successfully. Is this normal? This is normal. The default setting for the SATA controller in BIOS is set to AHCI mode. If you would like to install Windows XP, please change the SATA controller mode to IDE mode in BIOS. Please see SATA Mode for more detail. 2. When I boot up my system, the ASUS logo screen always pops up twice. Is there a way to stop it from doing that? Please go to the Boot menu and manually set Option ROM Messages to "Keep Current". 3. I recently updated my motherboard BIOS to the latest version. However, after the update, my system is unable to enter the OS. How do I resolve this issue? When you update the BIOS, the settings for BOOT Option Priorities may be reset, resulting in the legacy boot device has higher priority than the UEFI device. Consequently, during the boot-up process, the system may be accessing other boot devices, which does not allow the system to enter the OS. You will need to manually set “Windows Boot Manager” back to the first boot option. 129 Spirit P8Q67-M-DO (Eng) Rev 1 4. I have connected 3 hard drives to my new system. I would like to change the boot priority of my hard drives, but I can only see one hard drive the boot priority menu. How do I change the boot priority? Under the EZ Mode UEFI BIOS will only show one device of each type. To change the priority, go into Advanced Mode, look for [Hard Driver BBS Properties] under [Boot] page, and change the boot priority from there. 3. Note: You may need to scroll down to the bottom of the [Boot] page to find [Hard Driver BBS Properties] item 4. 5. The AI Suite/PC Probe is not working properly. What do I do? 1. Load the default settings in BIOS (In case there are any overclocking in BIOS, and use the utility to adjust) 2. If the utility is still not able to be used, uninstall the version you are using and try to download the latest version from this link: http://dlsvr04.asus.com/pub/ASUS/misc/utils/AISuite_V10325.zip 6. There is a yellow exclamation mark next to “ PCI Simple Communication Controller” in Device Manager. How do I resolve this issue? If the Intel® Management Engine (Intel ME) driver has not been successfully installed, you may see this error. Download the appropriate driver from the link: http://support.asus.com/download.aspx?SLanguage=en&p=1&s=32&m=P7Q57M+DO&os=&hashedid=XSm0g8qR5qb7UN30 7. The disk drive numbers may not correspond as expected to the SATA channel numbers when you set up Windows Vista, Windows Server 2008, Windows Server 2008 R2, or Windows 7 on a computer that has multiple SATA or RAID disks. The disk-assignment numbers may not necessarily match the corresponding SATA or RAID channel numbers. There is no assurance of a consistent relationship between PnP enumeration and the order of the hard disks that are detected during setup. Devices are presented in the order in which they are enumerated. Therefore, the disk-assignment numbers may change between startups. For example, assume that you run Windows Vista, Windows Server 2008, Windows Server 2008 R2, or Windows 7 Setup on a computer that has two unformatted SATA or RAID hard disks. In this situation, Windows may present the second hard disk as Disk 0 when you are prompted for the disk on which to install Windows Vista, Windows Server 2008, Windows Server 2008 R2, or Windows 7. When you set up Windows Vista, Windows Server 2008, Windows Server 2008 R2, or Windows 7 on a computer that has multiple SATA or RAID hard disks, verify the disk drive on which you will set up Windows Vista, Windows Server 2008, Windows Server 2008 R2, or Windows 7 by checking the disk information. For example, on the screen that lets you select the drive for the setup destination, verify the volume name and the available space. 130 Troubleshooting & FAQs 7. You may not experience this problem when the Setup program runs on your computer. However, you may experience the problem if you configure Windows Vista, Windows Server 2008, Windows Server 2008 R2, or Windows 7 during installation or if you perform a recovery process that was provided by the computer manufacturer. 8. 9. I have installed a total of 4GB memory on my motherboard. However, it can only recognize around 3.1GB or less. How do I get it to recognize the total 4GB? If you installed total 4GB memory, the system will detect less than 4GB of total memory because of address space allocation for other critical functions, such as: System BIOS (including motherboard, add-on cards, etc..) - Motherboards resources - Memory mapped I/O - Configuration for AGP/PCI-Ex/PCI - Other memory allocations for PCI devices Different onboard devices and different add-on cards (devices) will result of different total memory size. e.g. more PCI cards installed will require more memory resources, resulting of less memory free for other uses. This limitation applies to most chipsets & Microsoft Windows 32-bit version operating systems. If you install Windows 32-bit version operating system, we recommend that you install less than 3GB of total memory. If more than 3GB memory is required for your system, then below two conditions must be met: 1. The memory controller which supports memory swap functionality is used. Chipsets later than Intel 975X, 955X, Nvidia NF4 SLI Intel Edition, Nvidia NF4 SLI X16, and AMD K8 CPU architecture support memory swap function. 2. Windows 64-bit OS which can address more than 4GB memory. You can check below URLs for reference: http://dlsvr.asus.com/pub/ASUS/mb/4GB_Rev1.pdf Troubleshooting PC This chapter presents some problems you might encounter and the possible solutions. My computer cannot be powered on and the power LED on the front panel does not light up Check if your computer is properly connected. Check if the wall outlet is functioning. 131 Spirit P8Q67-M-DO (Eng) Rev 1 Check if the Power Supply Unit is switched on. Refer to the section Starting up for the First Time. My computer hangs. Do the following to close the programs that are not responding: 1. Simultaneously press <Alt> + <Ctrl> + <Delete> keys on the keyboard, then click Start Task Manger. 2. Click Applications tab. 3. Select the program that is not responding, then click End Task. If the keyboard is not responding. Press and hold the Power button until the computer shuts down. Then press the Power button to turn it on. I cannot connect to a wireless network using the ASUS WLAN Card? (on selected models only) Ensure that you enter the correct network security key for the wireless network you want to connect to. Connect the external antennas (optional) to the antenna connectors on the ASUS WLAN Card and place the antennas on the top of your computer chassis for the best wireless performance. The arrow keys on the number key pad are not working. Check if the Number Lock LED is off. When the Number Lock LED is on, the keys on the number key pad are used to input numbers only. Press the Number Lock key to turn the LED off if you want to use the arrow keys on the number key pad. No display on the monitor. Check if the monitor is powered on. Ensure that your monitor is properly connected to the video output port on your computer. If your computer comes with a discrete graphics card, ensure that you connect your monitor to a video output port on the discrete graphics card. Check if any of the pins on the monitor video connector is bent. If you discover bent pins, replace the monitor video connector cable. Check if your monitor is plugged to a power source properly. Refer to the documentation that came with your monitor for more troubleshooting information. When using multiple monitors, only one monitor has display. 132 Ensure that the both monitors are powered on. During POST, only the monitor connected to the VGA port has display. The dual display function works only under Windows. Troubleshooting & FAQs When a graphics card is installed on your computer, ensure that you connect the monitors to the output port on the graphics card. Check if the multiple displays settings are correct. My computer cannot detect my USB storage device. The first time you connect your USB storage device to your computer, Windows automatically installs a driver for it. Wait for a while and go to My Computer to check if the USB storage device is detected. Connect your USB storage device to another computer to test if the USB storage device is broken or malfunctions. I want to restore or undo changes to my computerʼs system settings without affecting my personal files or data. The Windows® System Restore feature allows you to restore or undo changes to your computerʼs system settings without affecting your personal data such as documents or photos. The picture on the monitor is stretched. It is caused by the different resolutions of your monitor and your monitor. Adjust the screen resolution to fit your monitor. To change the screen resolution: 1. Do any of the following to open the Screen Resolution setting screen: Control Panel > Appearance and Personalization Click Display > Change display settings. Right click anywhere on your Windows desktop. When the popup menu appears, click Personalize > Display > Change display settings. 2. Adjust the resolution. Refer to the documentation came with your monitor for the resolution. 3. Click Apply or OK. Then click Keep Changes on the confirmation message. My speakers produce no sound. Ensure that you connect your speakers to the Line out port (lime) on the front panel or the rear panel. Check if your speak is connected to a electrical source and turned on. Adjust your speakers volume. Ensure that your computer's system sounds are not Muted. If it is muted, the volume icon is displayed as system sounds, click . To enable the from the Windows notification area, then click . If it is not muted, click and drag the slider to adjust the volume. 133 Spirit P8Q67-M-DO (Eng) Rev 1 Connect your speakers to another computer to test if the speakers arer working properly. The DVD drive cannot read a disc. Check if the disc is placed with the label side facing up. Check if the disc is centered in the tray, especially for the discs with nonstandard size or shape. Check if the disc is scratched or damaged. The DVD drive eject button is not responding. 1. Click Computer. 2. Right-click Power Display 134 , then click Eject from the menu. Troubleshooting & FAQs LAN Audio 135 Spirit P8Q67-M-DO (Eng) Rev 1 System CPU 136 If the problem still persists, refer to your Desktop PCʼs warranty card and contact the ASUS Service Center. Visit the ASUS Support site at http://support.asus.com for the service center information. Troubleshooting & FAQs Troubleshooting No Display On Power Up Troubleshooting Steps: Step 1 - Turn off the system power and unplug the power cord. Remove all PnP cards (Plug and Play) and cables including VGA, IDE, FDD, COM, USB, and external printer cable. Step 2 – Confirm CPU and DRAM is inserted properly. Step 3 – Clear CMOS. Step 4 – Plug the VGA card back into the system and also re-connect your monitor, mouse and keyboard. Reconnect the power cable to the motherboard and the power cord to the system. Step 5 – Turn on the power and make sure the CPU, power supply and CPU fan is functioning. 137 Spirit P8Q67-M-DO (Eng) Rev 1 Troubleshooting Motherboard 138 Platform Security Platform Security TPM Warning of Potential Data Loss TPM TPM (Trusted Platform Module) is an integrated chip on the motherboard that stores keys, passwords and digital certificates. It is specifically designed to enhance platform security above-and-beyond the capabilities of today’s software by providing a protected space for key operations and other security critical tasks. The information stored is typically much more resistant to attacks; both software and theft. TPM protects encryption and signature keys at their most vulnerable stages i.e operations when the keys are being used unencrypted in plain-text form. Access to data could be denied if the boot sequence is not as expected making email, secure web access and data protection much more secure. 139 Spirit P8Q67-M-DO (Eng) Rev 1 Systems with TPMs offer improved, hardware-based security in numerous applications, such as file and folder encryption, local password management, S-MIME e-mail, VPN and PKI authentication and wireless authentication for 802.1x. How do TPMs compare with smart cards or biometrics? They are complementary to the TPM, which is considered a fixed token that can be used to enhance user authentication, data, communications, and/or platform security. A smart card is a portable token traditionally used to provide more secure authentication for a specific user across multiple systems, while biometrics are providing that functionality in an increasing number of systems. Both technologies can have a role in the design of more secure computing environments. Can the Trusted Platform Module control what software runs? No. There is no ability to do this. The subsystem can only act as a 'slave' to higher level services and applications by storing and reporting pre-runtime configuration information. Other applications determine what is done with this information. How does Microsoft’s BitLocker technology relate to the TPM Microsoft BitLocker™ Drive Encryption is designed to make use of a Trusted Platform Module (TPM) 1.2 to protect critical system files and user data and to help ensure that a computer running Windows Vista has not been tampered with while the system was offline. Is the TPM required for BitLocker? For BitLocker™ to make use of a TPM, it must be a version 1.2. While it is possible to use BitLocker™ without a TPM by storing the keying material on a USB flash drive, this is not the preferred customer configuration, nor is it expected to be typical usage due to the cost and manageability challenges associated with this mode of use. Warning of Potential Data Loss Take precautions to mitigate the chance of data loss. Data encrypted by any program utilizing the Trusted Platform Module (TPM) may become inaccessible or unrecoverable if any of the following occurs: 140 Lost Password: Loss of any of the passwords associated with the TPM will render encrypted data inaccessible. No password recovery is available. Hard Drive Failure: In the event of a failure of a hard disk (or other storage media) that contains encrypted data, an image of the hard disk (or other storage media) must be restored from backup before access to encrypted data may become available. The owner/user should backup the system hard disk on a regular basis. Motherboard Failure: In the event of a platform failure and/or replacement of the motherboard, recovery procedures may allow migratable keys to be recovered and may restore access to encrypted data. All non-migratable keys and their associated data will be lost. Loss of Trusted Platform Module Ownership: Trusted Platform Module Ownership/contents may be cleared (via a BIOS switch) to allow for the transfer of a system to a new owner. If TPM ownership is cleared, either intentionally or in error, recovery procedures may allow the migratable keys to be recovered and may restore access to encrypted data. Environmental Initiative Environmental Initiative Introduction to Environmental Program Environmental Program Introduction to Environmental Program Northern Micro, in an effort to become more environmentally conscious has embarked on a number of programs over the years that pertain to environmental stewardship and comply with applicable laws and restrictions. These programs guide the organization to develop products that safely reduce or eliminate environmentally hazardous materials, promote a “reuse and recycle” End of Life Management model and improve energy efficiency. 141 Spirit P8Q67-M-DO (Eng) Rev 1 At Northern Micro we strive for continuous improvement of our environmental system by incorporating the best possible practices through our waste management and IT products recycling initiatives. We understand that the achievement of reducing the amount of pollution and waste into our natural environment must rely, to a large extent, on each individual member of the corporate team. As such, all employees, with the full support of management, contribute to the goal of reducing, reusing and recycling our products and the waste we produce. In this regard, Northern Micro also works with committed partners that exhibit a focus on Sustainable Development and Green procurement. The following are some organizations and programs that promote safe Environmental stewardship and in which Northern Micro participates as part of its overall commitment to our environmental policy. Electronics Product Stewardship Canada (EPSC) Rechargeable Battery Recycling Corporation (RBRC) EPEAT (a program of the Green Electronics Council) Energy Star, Microsoft WHQL, 80+ and TCO Development. Environmental Policy "Northern Micro is committed to continually reducing the amount of Pollution created in its manufacturing plant by offering recycling solutions for IT equipment and by properly reducing, reusing and recycling its packaging material. Northern Micro maintains an Environmental Management system that it is proud of and one that complies with all of its legal and other defined environmental requirements." Environmental Program ISO14001 Northern Micro is dedicated to providing computer products and services that meet or exceed the quality, operational performance and life cycle cost requirements of our customers. In an effort to continually improve our system we have implemented our Environmental Management System (EMS), which also meets the requirements of the ISO-14001 Environmental Management System. The Environmental Management System assures that NM computer products, their manufacturing, their delivery, and their recycling are processed under the control of the system. The System is designed to adhere to ISO 14001:2004 standard. The system assures conformance to legal and the company’s environmental policy and provides objective evidence of effective control. Northern Micro attained its ISO 14001 certification in November 2006. IEEE1680 The policy focuses on areas which address all stages of the product life cycle. IEEE 1680 is the first U.S. standard to supply environmental guidelines for institutional purchasing decisions involving desktop and laptop computers and monitors. It offers criteria in eight categories - materials selection, environmentally sensitive materials, design for end of life, end-of-life management, energy conservation, product longevity and life-cycle extension, packaging, and corporate performance. IEEE 1680 and its product registration and verification system are part of the Electronic Products Environmental Assessment Tool (EPEAT). 142 Environmental Initiative EPEAT EPEAT is a program of the Green Electronics Council and provides a procurement tool to help institutional purchasers in the public and private sectors evaluate, compare and select desktop computers, notebooks and monitors based on their environmental attributes. EPEAT also provides a clear and consistent set of performance criteria for the design of products, and provides an opportunity for manufacturers to secure market recognition for efforts to reduce the environmental impact of its products. Northern Micro EPEAT certified products are listed on the EPEAT’s web site (http://www.epeat.net). RoHS RoHS (Reduction of Hazardous Substances) - The reduction and/or elimination of environmentally sensitive materials and hazardous substances. As of July 31st 2005, all Northern Micro systems refreshed on the NMSO (National Master Standing Offer) utilize RoHS compliant components. Flame retardants and plasticizers - The elimination of intentionally added flame retardants and plasticizers in certain applications. Recycled plastics content - Ensuring that the product contains post consumer recycled plastic Renewable/bio based plastic materials - A declaration as to whether the product contains renewable/biobased plastic materials greater than 5.0 %, measured as a percentage of total plastic (by weight) in each product. Toxics in packaging - Ensuring a reduction/elimination of intentionally added toxics in packaging Other Environmental practices employed by Northern Micro Power Management - Ensuring maximum efficiency without sacrificing performance in product design. Thermal Consideration - Ensuring the proper case/motherboard/CPU configuration is developed to maintain the required Thermal levels. Acoustic Levels - Ensuring systems conform to ISO 9296 declaration methodology and employing the ISO 7779 test methodology for acoustic levels. Energy Star, Microsoft WHQL and 80 PLUS ENERGY STAR is a joint program of the U.S. Environmental Protection Agency and the U.S. Department of Energy to help save money and protect the environment through energy efficient products and practices. Northern Micro is an active participant in the Energy Star and certifies its products as Energy Star compliant (as listed on their web site http://www.energystar.gov/ ) The Microsoft WHQL program is used to qualify products that conform to industry standards for computer and related equipment. Among the criteria being measured are Power Management features (Wake On-LAN, ACPI, Sleep/Suspend/Hibernate) which greatly enhance the longevity of key system components, reduce power requirements and offer overall improved efficiency and performance to the user and the environment. The 80 PLUS program is one of the latest power conservation initiatives that promote the maximum operating efficiency of power supplies within computer equipment. The performance specification requires power supplies in computers and 143 Spirit P8Q67-M-DO (Eng) Rev 1 servers to be 80% or greater energy efficient at 20%, 50% and 100% of rated load with a true power factor of 0.9 or greater. TCO Development ensures that certified products are tested to conform to standards developed by them and which create a better working environment for office users. Northern Micro uses TCO ’03 certified LCD monitor products from its partners. EPSC The EPSC (http://www.epsc.ca) is a not-for-profit organization and works with an array of partners and stakeholders to design, promote and implement sustainable solutions for Canada's electronic waste problem. These industry leaders are aware of both the pressures on municipalities for landfill management and the environmental necessity to handle the potentially hazardous content of electronics products and reuse the valuable resources they contain. EPS Canada was created to work with both industry and government to develop a flexible, workable Canadian solution. Northern Micro is an active member of the EPSC. The EPSC has recognized both Environment Canada’s ECO Logo and the corresponding US EPEAT programs as tools for developing environmentally friendly solutions. RBRC RBRC (http://www.RBRC.com), through their North American wide program recycles used portable rechargeable batteries and old cell phones typically found in cordless power tools, cellular and cordless phones, laptop computers, camcorders, digital cameras, and remote control toys. RBRC recycles the battery chemistries: Nickel Cadmium (Ni-Cd), Nickel Metal Hydride (Ni-MH), Lithium Ion (Li-ion) and Small Sealed Lead (Pb). RBRC is dedicated to keeping rechargeable batteries and cell phones out of our nation’s solid waste stream and preserving natural resources. Northern Micro participates in the RBRC program and offers this free service to its clients for all batteries meeting the above specifications regardless of when and through whom they were purchased as Northern Micro is also a collection center for this program. 144 Care & Maintenance Care & Maintenance Electrostatic Discharge (ESD) Location and Electrical Service Cleaning & Moving your Computer Information Backup Hard Drive Maintenance Passwords Computer Viruses System Safety Monitor Safety Instructions DOC Requirements Warranty Policy Electrostatic Discharge (ESD) Short for electrostatic discharge: the rapid discharge of static electricity from one conductor to another of a different potential. 145 Spirit P8Q67-M-DO (Eng) Rev 1 Static Electricity: Creating Charge Under certain conditions (low humidity, carpeted floors, etc…) static electricity will build up. Contact with these sensitive components may cause the build-up to discharge into the integrated circuitry of the component; a powerful enough discharge may damage or destroy the component. Electrostatic discharge can change the electrical characteristics of a semiconductor device, degrading or destroying it. Electrostatic discharge also may upset the normal operation of an electronic system, causing premature equipment malfunction or failure. Static Electricity Precautions To protect components against damage from static electric discharge, you should follow some basic precautions whenever you handle them: Use a grounding wrist strap. The strap will have an ‘alligator’ clip at the end of a shielded wire lead. Clip it to a grounded object. Any static electricity will then harmlessly discharge through the strap. Put on and connect the strap before you handle the components. Use an anti-static pad. Put any components on the pad whenever you work on them outside the computer. If you don’t have a pad, put the components on the anti-static bag they came in. Both the wrist strap and pad are inexpensive and are generally available from computer supply companies. Location and Electrical Service Position your system unit, monitor and cables/wires away from direct sunlight, moisture, dust, oil and thoroughfares. Do not submit your equipment to harsh jarring. Ensure that all ventilation outlets are always free from obstruction. In the event of mechanical/power failure or damage, do not attempt to repair the system unit, monitor/s or cables/wires. Refer all such problems to experienced service personnel. Ensure that the back of the system unit is at least 3 inches away from anything that might obstruct the ventilation outlets and cause over-heating. Ensure that the power source is grounded correctly. This product is equipped with a 3-wire grounding-type plug. This plug will only fit into a grounded power outlet. 146 It is recommended not to service this product yourself, as opening and removing covers exposes dangerous voltage areas and other risks. Refer all servicing to service persons. Care & Maintenance Cleaning & Moving Your Computer The computer: Keep it in a dry, clean space and stand it on a flat surface Minimize exposure to dust – don’t get the power switches or other controls wet If you move it from a very cold environment to a warm environment, give the components time to reach room temperature before switching them on Use a mild cleaning solution (no detergents!) and a damp cloth to clean exterior surfaces Occasionally remove dust from interior surfaces, taking care not to touch or damage connections or chips The keyboard: Keep food and drinks away from the keyboard Use a mild cleaning solution and a damp cloth to clean exterior surfaces The monitor : Don’t touch the screen with hard objects such as pens and pencils Remove dust from the surface by blowing it or wiping it gently with a dry cloth; then use a soft cloth with nonabrasive liquid glass cleaner Check cleaner instructions to be sure that it is safe for glass The mouse : When your mouse doesn’t obey you, it’s time to clean it, use a mild cleaning solution (no detergents!) and a damp cloth to clean exterior surfaces. Moving the computer: It’s possible to damage data on the hard disk when you move your computer, so you should back up all critical data first. Remove all data disks from the drives. Turn off the computer and all peripherals. Unplug the power cord and disconnect all cables. If you aren’t familiar with the panel setup on your computer, sketch the location of cables first. Pack the computer and peripherals in well-cushioned packing cartons, preferably the original boxes. Information Backup It’s wise to make backup copies of your original software disc in the event that the original is damaged. For the same reason, you should frequently back up important data while you are working. Save your work to the hard disk regularly (some programs do this automatically or offer auto backup as an option). More importantly, save the data to a backup such as a tape drive, disc or removable hard disk several times during each work session. If your hard disk crashes or a power failure destroys your file or your office is broken into, you will be thankful you did. If your data is critical, it’s advisable to make a second backup and keep this in a fireproof safe or a safe location out of the office. 147 Spirit P8Q67-M-DO (Eng) Rev 1 Hard Drive Maintenance The hard disk is a rigid magnetic-sensitive disk mounted on a single spindle. Each disk has one or two read and write heads (for one or both sides), which float above the surface of the disk. The disk spins at a constant rate, and the heads move across the surface to locate information as required. Each disk is segmented into tracks, which are themselves divided into sectors. The address of a piece of information includes both the track and sector. Fragmented files After storing and removing many pieces of data, the hard disk can get fragmented — information for the same file may be scattered everywhere. When you call up that file, the heads must move many times back and forth to recall the information. Defragmenting the disk puts these pieces back together and gets your computer running fast again . Your operating system may offer a feature to consolidate your disk. There are also several programs available that examine and, if necessary, defragment the disk. Erased files If you erased a file by mistake, most operating systems offer an undelete or restore feature to recover some or all of your material. The more work you do on the computer after deleting the program , the lower the probability of full recovery. The fact that erased files remain on the disk may be a concern for some security applications. If security-sensitive information is erased and the computer or diskette passes to another person, security may be breached. To prevent this from happening, you can do a low-level format on a hard drive , or reformat a diskette. Programs for lowlevel operating system formats are readily available. Passwords A power-on password locks the keyboard and mouse to prevent unauthorized people from using your computer. When the computer is turned on, it prompts the user for a password. Entering the correct password unlocks the keyboard and mouse. Another option is to set a supervisor password, which restricts access to the setup utility only. This is critical because passwords can be disabled through the setup. Make sure you store your password in a secure place. If you forget your supervisor password, you will have to remove your battery and reconfigure your computer to get it working again. Computer Viruses Like viruses that infect humans, a computer virus contains instructions for its own proliferation and is potentially very harmful. Though some computer viruses are just playful, most are dangerous for your computer and data. For example, some viruses destroy the file allocation tables, so that your computer cannot locate files or software. Some viruses are programmed to become active on a certain date (e.g. April 1 or Friday 13) or when you execute a certain command. Programs are available that scan diskettes and hard drives for viruses. Some of these programs will also remove the virus. These programs can be set to test the computer for viruses every time you power up. To protect your computer from viruses, you should also scan every outside disk before using it. Write-protect your software diskettes so that they 148 Care & Maintenance cannot be infected. Avoid programs and diskettes from unknown sources. Only buy software in sealed packages. Networks, the Internet and bulletin board services represent special risks. Use only well known electronic bulletin boards. If you plan to download software from the bulletin board, ask the service what steps it is taking to guard against viruses. If your computer is behaving erratically, it may be infected by a virus. Check out the problem before proceeding further. There are more than 50,000 known viruses out there. Although there are thousands of viruses identified each year, there are still some that only exist in the imaginations (virus hoax) of the public and the press. System Safety Electrical safety Electric current from power, telephone and communications cables can be hazardous. To avoid any shock hazard, disconnect all power cords and cables as described below: Before removing the cover: Turn off the computer and all peripherals, such as monitors, printers and external devices. Unplug all power cords from electrical outlets. Disconnect all communications cords from external receptacles. Disconnect all cables and power cords from the back panel of the computer. Never remove the power supply cover. If you suspect a problem with this part, call Northern Micro service at 613-226-1117. Re-configuring To keep the computer from being damaged, NEVER reconfigure the board while the power is ON. If you wish to reconfigure the computer at any time, ensure that the power is turned OFF before changing any hardware settings, such as DIP switches or jumpers. Monitor Safety Instructions Never insert anything metallic into the monitor openings. Doing so may create the danger of electric shock. To avoid electric shock, never touch the inside of the monitor. Only a qualified technician should open the monitor’s case. Never use your monitor if the power cord has been damaged. Do not allow anything to rest on the power cord, and keep the cord away from areas where people can trip over it. Be sure to hold the plug, not the cord, when disconnecting the monitor from an electric socket. 149 Spirit P8Q67-M-DO (Eng) Rev 1 Openings in the monitor cabinet are provided for ventilation. To prevent overheating, these openings should not be blocked or covered. Also, avoid using the monitor on a bed, sofa, rug, or other soft surface. Doing so may block the ventilation openings in the bottom of the cabinet. If you put the monitor in a bookcase or some other enclosed space, be sure to provide adequate ventilation. Put your monitor in a location with low humidity and a minimum of dust. Do not expose the monitor to rain or use it near water. If the monitor accidentally gets wet, unplug it and contact an authorized dealer immediately. You can clean the monitor with a damp cloth when necessary, but be sure to unplug the monitor first. Place the monitor on a solid surface and treat it carefully. The screen is made of glass and can be damaged if dropped, hit or scratched. Locate your monitor near an easily accessible AC outlet. If your monitor does not operate normally, in particular, if there are any unusual sounds or smells coming from it, unplug it immediately and contact a service center. High temperatures can cause problems. Do not use your monitor in direct sunlight; keep it away from heaters and other sources of heat. Unplug the monitor when it is going to be left unused for an extended period of time. Unplug your monitor from the AC outlet before any service. To reduce the risk of electric shock, do not remove cover (or back). No userserviceable parts inside. Refer servicing to qualified service personnel. DOC Requirements A shielded power cord is required to meet ICES-003 emission limits and also to prevent interference to nearby radio and television reception. It is essential that only the attached power cord be used. Use only shielded cables to connect I/0 devices to this computer. You are cautioned that changes or modifications not expressly approved by the party responsible for compliance could void your authority to operate the equipment. This digital apparatus does not exceed the Class B limits for radio noise emissions from digital apparatus as set out in the radio interference regulations of Industry Canada. This equipment has been tested and found to comply with the Industry Canada ICES-003, Issue 2 Rev. 1, Digital Apparatus, Class B requirement. These limits are designed to provide reasonable protection against harmful interference in a residential installation. This equipment generates, uses and can radiate radio frequency energy and if not installed and used in accordance with the instructions, may cause harmful interference to radio communications. However, there is no guarantee that interference will not occur in a particular installation. If this equipment does cause harmful interference to radio or 150 Care & Maintenance television reception, which can be determined by turning the equipment off and on, the user is encouraged to try to correct the interference by one or more of the following measures: Reorient or relocate the receiving antenna. Increase the separation between the equipment and receiver. Connect the equipment into an outlet on a circuit different from that to which the receiver is connected. Consult the dealer or an experienced radio/TV technician for help. Warranty Policy Limited Warranty: All Northern Micro products shall be free from defects in materials and workmanship at the time of original sale by Northern Micro. All Northern Micro products are in accordance with our published specifications or those specifications agreed to by Northern Micro and the purchaser at the time of original sale. Warranty Period: Any Warranty Period purchased from Northern Micro is from the date of Customer purchase of the product. All defects must be reported to Northern Micro during the Warranty Period. Warranty Rights: For any product found to be defective, and reported to Northern Micro to be defective within the Warranty Period, Northern Micro, at its option, will repair or replace the defective product. Any repaired or replaced product will assume the remaining warranty coverage or will be covered for ninety (90) days from the date of repair or exchange, whichever is longer. Exclusions From Warranty: Any improper installation or use, operation beyond capacity, accidents not attributable to Northern Micro, substitution of parts not approved by Northern Micro or any alteration or repair by others in such manner as in Northern Micro's judgment affects the product materially and adversely shall void this Limited Warranty. Limitation of Remedies: Northern Micro’s obligation for defective product is limited to repairing or replacing the product, or parts thereof, as expressly stated in this Limited Warranty. In no event shall Northern Micro be liable for any direct, indirect, incidental, consequential, or special damages arising out of the operation, or failure of operation, of the product. Northern Micro shall not be liable for any costs of procurement of substitute goods, loss of profits, personnel costs, payments to third parties, or any consequential, incidental, and/or other damages of any kind resulting from a breach of any applicable express or implied warranty, or otherwise with respect to the sale of any Northern Micro product. Exclusion of Other Warranties: The above Limited Warranty constitutes the sole and exclusive warranty and remedy with respect to any defective Northern Micro product and is in lieu of all other obligations or liabilities of Northern Micro. All other warranties, expressed or implied are hereby disclaimed, including but not limited to any warranty of merchantability or fitness for any particular purpose. Northern Micro’s liability, whether based on contract, warranty, strict liability, tort, or any other basis, shall not exceed the price of the product whose defect or damage is the basis of the claim. 151 Glossary 1 100BASE-TX: 100BASE-TX is the predominant form of Fast Ethernet, providing 100 Mbit/s Ethernet. The configuration of 100BASE-TX networks is very similar to 10BASE-T. When used to build a local area network, the devices on the network (computers, printers etc.) are typically connected to a hub or switch, creating a star network. Alternatively it is possible to connect two devices directly using a cross-over cable. A AC97: AC'97 (short for Audio Codec '97) is Intel Corporation's Audio "Codec" standard developed by the Intel Architecture Labs in 1997, and used mainly in onmotherboards, modems, and sound cards. Audio components integrated into Intel chipsets consists of 2 components - an AC'97 digital controller, which is built into the I/O Controller Hub (ICH) of the chipset, and an AC'97 codec, which is the analog component of the architecture. AC'97 defines a high-quality, 16- or 20-bit audio architecture for the PC that is used in the majority of today's desktop platforms. AC'97 supports 96 kHz in 20-bit stereo resolution and 48 kHz in 20-bit stereo for multichannel recording and playback. ACPI: ACPI (Advanced Configuration and Power Interface) is an open industry specification co-developed by Hewlett-Packard, Intel, Microsoft, Phoenix, and Toshiba. ACPI establishes industry-standard interfaces for OS-directed configuration and power management on laptops, desktops, and servers. APIC: APIC (advanced programmable interrupt controller) application: Computer software that performs a task or set of tasks, such as word processing or drawing. Applications are also referred to as programs. ASCII: American Standard Code for Information Interchange, an encoding system for converting keyboard characters and instructions into the binary number code that the computer understands. ASIC: short for Application-Specific Integrated Circuit, a chip designed for a particular application (as opposed to the integrated circuits that control functions such as RAM in a PC). ASICs are built by connecting existing circuit building blocks in new ways. Since the building blocks already exist in a library, it is much easier to produce a new ASIC than to design a new chip from scratch. B bandwidth: The capacity of a networked connection. Bandwidth determines how much data can be sent along the networked wires. Bandwidth is particularly important for Internet connections, since greater bandwidth also means faster downloads. BIOS: BIOS, in computing, stands for basic input/output system. BIOS refers to the software code run by a computer when first powered on. The primary function of BIOS is to prepare the machine so other software programs stored on various media (such as hard drives, floppies, and CDs) can load, execute, and assume control of the computer. 153 Spirit P8Q67-M-DO (Eng) Rev 1 boot: To start up a computer. Cold boot—restarting computer after having turned off the power. Warm boot—restarting computer without having turned off the power. byte: Most computers use combinations of eight bits, called bytes, to represent one character of data or instructions. For example, the word “cat” has three characters, and it would be represented by three bytes. C cache: A small data-memory storage area that a computer can use to instantly re-access data instead of re-reading the data from the original source, such as a hard drive. Browsers use a cache to store web pages so that the user may view them again without reconnecting to the Web. CD-ROM: Compact Disc Read-Only Memory. An optically read disc designed to hold information such as music, reference materials, or computer software. A single CDROM can hold around 640 megabytes of data, enough for several encyclopedias. Most software programs are now delivered on CD-ROMs. CD/RW: Compact Disc ReWritable (CD-RW) is a rewritable optical disc format. A CD-RW recorder can rewrite 700 MiB of data to a CD-RW disc roughly 1000 times. CD-RW recorders can also write CD-R discs CMOS: CMOS (pronounced "see-moss"), which stands for complementary metal-oxidesemiconductor, is a major class of integrated circuits. CMOS chips include microprocessor, microcontroller, static RAM, and other digital logic circuits. The central characteristic of the technology is that it only uses significant power when its transistors are switching between on and off states. CPR (CPU Parameter Recall): The C.P.R. feature of the motherboard BIOS allows automatic resetting to the BIOS default settings in case the system hangs due to overclocking. When the system hangs due to overcloking , C.P.R eliminates the need to open the system chassis and clear the RTC data. cursor: A moving position-indicator displayed on a computer monitor that shows a computer operator where the next action or operation will take place. D database: A collection of similar information stored in a file, such as a database of addresses. This information may be created and stored in a database management system (DBMS). DDR2: DDR2 SDRAM (Double Data Rate Two Synchronous Dynamic Random Access Memory) is a computer memory technology that, as of 2005, is becoming the mainstream standard for personal computer memory. DDR2 is part of the SDRAM family of random access memory technologies, which is itself one of many DRAM implementations. disk drive: The equipment that operates a hard or floppy disc. domain: Represents an IP (Internet Protocol) address or set of IP addresses that comprise a domain. The domain name appears in URLs to identify web pages or in email addresses. For example, the email address for the First Lady is [email protected], “whitehouse.gov” being the domain name. Each domain name ends with a suffix that indicates what “top level domain” it belongs to. These are: “.com” for commercial, “.gov” for government, “.org” for organization, “.edu” for 154 Glossary educational institution, “.biz” for business, “.info” for information, “.tv” for television, “.ws” for website. Domain suffixes may also indicate the country in which the domain is registered. No two parties can ever hold the same domain name. domain name: The name of a network or computer linked to the Internet. Domains are defined by a common IP address or set of similar IP (Internet Protocol) addresses. download: The process of transferring information from a web site to the computer. It is possible to “download a file” or “view a download.” DSL: Digital Subscriber Line. A method of connecting to the Internet via a phone line. A DSL connection uses copper telephone lines but is able to relay data at much higher speeds than modems and does not interfere with telephone use. DVD: Digital Video Disc—Similar to a CD-ROM, it stores and plays both audio and video. DVI: (DVI-I or DVI-D) E EEPROM: An EEPROM (E²PROM, E2PROM), or Electrically-Erasable Programmable ReadOnly Memory, is a non-volatile storage chip used in computers and other devices (such as USB flash drives, in its flash memory version). EHCI: EHCI (Extended Host Controller Interface) is a standard that allows a computer host to interface with USB 2.0 devices at different data transfer speed. EIST: Enhanced Intel SpeedStep technology allows the system to dynamically adjust processor voltage and core frequency, which can result in decreased average power consumption and decreased average heat production. EM64T: Intel Extended Memory 64 Technology (Intel EM64T ) is a feature of to Intel's computing architecture that enables the desktop processor platform to access larger amounts of memory. With appropriate 64-bit supporting hardware and software, platforms based on an Intel processor supporting Intel EM64T can enable use of extended virtual and physical memory. Intel EM64T provides flexibility for 32-bit now and future software that supports 64-bit computing. F firewall: A set of security programs that protect a computer from outside interference or access via the Internet. Firewire (IEEE1394): PC and Apple® Computer's high-speed data transfer. Frequently used to import video to a computer. folder: A structure for containing electronic files. In some operating systems, it is called a “directory.” FSB (Front Side Bus): Front Side Bus (FSB) -is the term used to describe the CPU data bus. This bus carries all information that passes from the CPU to other devices within the system such as RAM, PCI expansion cards, hard disks, etc. FTP: File Transfer Protocol. A format and set of rules for transferring files from a host to a remote computer. G 155 Spirit P8Q67-M-DO (Eng) Rev 1 Gigabyte (GB): 1024 megabytes. Also called gig. GUI: Graphical User Interface. A system that simplifies selecting computer commands by enabling the user to point to symbols or illustrations (called icons) on the computer screen with a mouse. H Hard Disk (HDD): hard disk In contrast to floppy disk. One or more rigid magnetic disks rotating about a central axle with associated read/write heads and electronics, used to store data. Most hard disks are permanently connected to the drive fixed disks though there are also removable disks. High speed disks have an access time of 28 milliseconds or less, and low-speed disks run 65 milliseconds or more. hardware: The physical and mechanical components of a computer system, such as the electronic circuitry, chips, monitor, disks, disk drives, keyboard, modem, and printer. home page: The main page of a Web site used to greet visitors, provide information about the site, or to direct the viewer to other pages on the site. I input device: A device, such as a keyboard, stylus and tablet, mouse, puck, or microphone, that allows input of information (letters, numbers, sound, video) to a computer. interface: The interconnections that allow a device, a program, or a person to interact. Hardware interfaces are the cables that connect the device to its power source and to other devices. Software interfaces allow the program to communicate with other programs (such as the operating system), and user interfaces allow the user to communicate with the program (e.g., via mouse, menu commands, icons, voice commands, etc.). Internet: An international conglomeration of interconnected computer networks. Begun in the late 1960s, it was developed in the 1970s to allow government and university researchers to share information. The Internet is not controlled by any single group or organization. Its original focus was research and communications, but it continues to expand, offering a wide array of resources for business and home users. IP (Internet Protocol) address: An Internet Protocol address is a unique set of numbers used to locate another computer on a network. The format of an IP address is a 32bit string of four numbers separated by periods. Each number can be from 0 to 255 (i.e., 1.154.10.266). Within a closed network IP addresses may be assigned at random, however, IP addresses of web servers must be registered to avoid duplicates. Equal to 1,024 bytes. L Linux: A UNIX®-like, open-source operating system developed primarily by Linus Torvalds. Linux is free and runs on many platforms, including both PCs and Macintoshes. Linux is an open-source operating system, meaning that the source code of the operating system is freely available to the public. Programmers may redistribute and modify the code, as long as they don't collect royalties on their work or deny access to their code. Since development is not restricted to a single corporation more programmers can debug and improve the source code faster.. 156 Glossary M megabyte (MB): Equal to 1,048,576 bytes, usually rounded off to one million bytes (also called a “meg”). memory: Temporary storage for information, including applications and documents. The information must be stored to a permanent device, such as a hard disc or CD-ROM before the power is turned off, or the information will be lost. Computer memory is measured in terms of the amount of information it can store, commonly in megabytes or gigabytes. MHz: An abbreviation for Megahertz, or one million hertz. One MHz represents one million clock cycles per second and is the measure of a computer microprocessor's speed. For example, a microprocessor that runs at 300 MHz executes 300 million cycles per second. Each instruction a computer receives takes a fixed number of clock cycles to carry out, therefore the more cycles a computer can execute per second, the faster its programs run. Megahertz is also a unit of measure for bandwidth. modem: A device that connects two computers together over a telephone or cable line by converting the computer's data into an audio signal. Modem is a contraction for the process it performs: modulate-demodulate. monitor: A video display terminal. mouse: A small hand-held device, similar to a trackball, used to control the position of the cursor on the video display; movements of the mouse on a desktop correspond to movements of the cursor on the screen. MP3: Compact audio and video file format. The small size of the files makes them easy to download and e-mail. Format used in portable playback devices. multimedia: Software programs that combine text and graphics with sound, video, and animation. A multimedia PC contains the hardware to support these capabilities. N network: A system of interconnected computers. O operating system: A set of instructions that tell a computer on how to operate when it is turned on. It sets up a filing system to store files and tells the computer how to display information on a video display. Most PC operating systems are DOS (disc operated system) systems, meaning the instructions are stored on a disc (as opposed to being originally stored in the microprocessors of the computer). Other well-known operating systems include UNIX, Linux, Macintosh, and Windows. output: Data that come out of a computer device. For example, information displayed on the monitor, sound from the speakers, and information printed to paper. P PC board (printed circuit board): Printed Circuit board. A board printed or etched with a circuit and processors. Power supplies, information storage devices, or changers are attached. 157 Spirit P8Q67-M-DO (Eng) Rev 1 PCI Express: PCI Express, or PCIe is an implementation of the PCI computer bus that uses existing PCI programming concepts, but bases it on a completely different and much faster serial physical-layer communications protocol. PDA: Personal Digital Assistant. A hand-held computer that can store daily appointments, phone numbers, addresses, and other important information. Most PDAs link to a desktop or laptop computer to download or upload information. PDF: Portable Document Format. A format presented by Adobe Acrobat that allows documents to be shared over a variety of operating systems. Documents can contain words and pictures and be formatted to have electronic links to other parts of the document or to places on the web. Pentium chip: Intel's fifth generation of sophisticated high-speed microprocessors. Pentium means “the fifth element.” peripheral: Any external device attached to a computer to enhance operation. Examples include external hard drive, scanner, printer, speakers, keyboard, mouse, trackball, stylus and tablet, and joystick. personal computer (PC): A single-user computer containing a central processing unit (CPU) and one or more memory circuits. plug and play(PnP): Computer hardware or peripherals that come set up with necessary software so that when attached to a computer, they are “recognized” by the computer and are ready to use. POST: POST (Power-On Self Tests) printer: A mechanical device for printing a computer's output on paper. There are three major types of printers: Dot matrix: creates individual letters, made up of a series of tiny ink dots, by punching a ribbon with the ends of tiny wires. (This type of printer is most often used in industrial settings, such as direct mail for labeling.) Ink jet: sprays tiny droplets of ink particles onto paper. Laser: uses a beam of light to reproduce the image of each page using a magnetic charge that attracts dry toner that is transferred to paper and sealed with heat. PXE: The PXE (Preboot eXecution Environment) is an environment to bootstrap computers using a network interface card independently of available data storage devices (like hard disks) or installed operating systems. R RAID: Redundant Array of Inexpensive Disks. A method of spreading information across several disks set up to act as a unit, using two different techniques: Disk striping: storing a bit of information across several discs (instead of storing it all on one disc and hoping that the disc doesn't crash). Disk mirroring: simultaneously storing a copy of information on another disc so that the information can be recovered if the main disc crashes. RAM: Random Access Memory. One of two basic types of memory. Portions of programs are stored in RAM when the program is launched so that the program will run faster. Though a PC has a fixed amount of RAM, only portions of it will be accessed by the computer at any given time. Also called memory. ROM: Read-Only Memory. One of two basic types of memory. ROM contains only permanent information put there by the manufacturer. Information in ROM cannot be 158 Glossary altered, nor can the memory be dynamically allocated by the computer or its operator. RPM: RPM (Revolutions per minute) is a unit of frequency, commonly used to measure rotational speed, in particular in the case of rotation around a fixed axis. It represents the number of full rotations something makes in one minute. S SATA: Serial ATA (SATA or S-ATA) is a computer bus technology primarily designed for transfer of data to and from a hard disk. It is the successor to the legacy Advanced Technology Attachment standard (ATA, also known as IDE). This older technology was retroactively renamed Parallel ATA (PATA) to distinguish it from Serial ATA scanner: An electronic device that uses light-sensing equipment to scan paper images such as text, photos, and illustrations and translate the images into signals that the computer can then store, modify, or distribute. SCSI: SCSI stands for "Small Computer System Interface", and is a standard interface and command set for transferring data between devices on both internal and external computer buses.SCSI is most commonly used for hard disks and tape storage devices, but also connects a wide range of other devices, including scanners, CDROM drives, CD recorders, and DVD drives server: A computer that shares its resources and information with other computers, called clients, on a network. software: Computer programs; also called “applications.” storage: Devices used to store massive amounts of information so that it can be readily retrieved. Devices include RAIDs, CD-ROMs, DVDs surge protector: A controller to protect the computer and make up for variances in voltage. T TBITS-5: The Canadian Government TBITS -5 (Treasury Board Information Technology Standard) is a bilingual layout specifications for keyboard standard in information technologyequipment (effective since April 1st 1993). terabytes (TB): A thousand gigabytes. teraflop: A measure of a computer's speed. It can be expressed as a trillion floating-point operations per second. TPM: The Trusted Platform Module (TPM) is a component on the motherboard that is specifically designed to enhance platform security above-and-beyond the capabilities of today's software by providing a protected space for some security critical tasks. Using both software and hardware, the TPM protects encryption and signature keys at their most vulnerable stages--operations when the keys are being used in unencrypted forms. The TPM is specifically designed to shield unencrypted keys as well as platform and user authentication information from software-based attacks. U 159 Spirit P8Q67-M-DO (Eng) Rev 1 UNIX®: A very powerful operating system used as the basis of many high-end computer applications. upload: The process of transferring information from a computer to a web site (or other remote location on a network). v. To transfer information from a computer to a web site (or other remote location on a network). UPS: Universal Power Supply or Uninterruptible Power Supply. An electrical power supply that includes a battery to provide enough power to a computer during an outage to back-up data and properly shut down. URL: Uniform Resource Locator. 1. The protocol for identifying a document on the Web. 2. A Web address (e.g., www.census.gov). A URL is unique to each user. See also domain. USB: Universal Serial Bus. An industry standard for connecting different compatible peripheral devices across multiple platforms. Devices include printers, digital cameras, scanners, game pads, joysticks, keyboards and mice, and storage devices. USB peripherals offer the use of plug-and-play convenience by eliminating the need to turn off or restart the computer when attaching a new peripheral. Users can connect USB peripherals whenever they need them. For example, a user producing a newsletter could easily swap a digital camera for a scanner-without any downtime. Small, simple, inexpensive, and easy to attach, USB supports simultaneous connection of up to 127 devices by attaching peripherals through interconnected external hubs. user friendly: A program or device whose use is intuitive to people with a nontechnical background. V video teleconferencing: A remote “face-to-face chat,” when two or more people using a webcam and an Internet telephone connection chat online. The webcam enables both live voice and video. virus: An unauthorized piece of computer code attached to a computer program or portions of a computer system that secretly copies itself from one computer to another by shared discs and over telephone and cable lines. It can destroy information stored on the computer, and in extreme cases, can destroy operability. Computers can be protected from viruses if the operator utilizes good virus prevention software and keeps the virus definitions up to date. Most viruses are not programmed to spread themselves. They have to be sent to another computer by e-mail, sharing, or applications. The worm is an exception, because it is programmed to replicate itself by sending copies to other computers listed in the e-mail address book in the computer. There are many kinds of viruses, for example: Boot viruses place some of their code in the start-up disk sector to automatically execute when booting. Therefore, when an infected machine boots, the virus loads and runs. File viruses attached to program files (files with the extension “.exe”). When you run the infected program, the virus code executes. Macro viruses copy their macros to templates and/or other application document files. Trojan Horse is a malicious, securitybreaking program that is disguised as something benign such as a screen saver or game. Worm launches an application that destroys information on your hard drive. It also sends a copy of the virus to everyone in the computer's e-mail address book. W 160 Glossary WAV: A sound format (pronounced “wave”) used to reproduce sounds on a computer. Worm: See virus. WWW: World Wide Web (“WWW” or “the Web”) : A network of servers on the Internet that use hypertext-linked databases and files. It was developed in 1989 by Tim BernersLee, a British computer scientist, and is now the primary platform of the Internet. The feature that distinguishes the Web from other Internet applications is its ability to display graphics in addition to text. WYSIWYG: What You See Is What You Get. When using most word processors, page layout programs (See desktop publishing), and web page design programs, words and images will be displayed on the monitor as they will look on the printed page or web page. 161 Index A Advanced Menu ............................... 116 Advanced Mode ................................ 104 Ai Tweaker Menu .............................. 112 ASUS BIOS Updater .......................... 101 ASUS CrashFree Bios ........................ 101 ASUS EZ Flash 2 .............................. 100 ASUS Update Utility ............................ 99 ATX Power Connectors ........................ 39 B Back Button ..................................... 104 Back Panel ........................................ 55 Before you Proceed ............................ 61 BIOS 3 Utility .................................. 101 BIOS Information ............................... 97 Bios Menu Screen ............................. 104 BIOS Setup Program ........................ 104 Boot Menu ....................................... 127 C Care ............................................... 151 Case ................................................. 57 Chassis Intrusion ............................... 60 Chassis Intrusion Connector ................ 44 Cleaning & Moving Your Computer...... 153 Computer Viruses ............................. 154 Configuration ....................................... 7 Configuration fields .......................... 104 Configuring an Expansion Card ............ 30 Connectors ........................................ 33 CPU 20, 67 CPU and Chassis Fan Connector ........... 38 D Digital Audio Connector ....................... 39 DOC Requirements ........................... 156 E Electrostatic Discharge (ESD) ............ 152 Entering Special Characters ................. 10 Environmental Initiative .................... 147 Environmental Program..................... 148 Exit Menu ........................................ 129 Expansion Slots ................................. 29 EZ Mode ......................................... 104 F FAQ 133 FAQs .............................................. 131 Final Power Connection Procedures ....... 95 First time starting................................. 7 Frequently Asked Questions............... 133 Front Panel ........................................ 54 Front Panel Audio Connector ................ 37 Functions Keys..................................... 8 G Getting Started .................................... 5 H Hard Drive .................................. 47, 84 Hard Drive Connections....................... 89 Hard Drive Maintenance .................... 154 Hard Drive Removal ........................... 85 How to Place a Service Call................ 132 I Information Backup .......................... 153 Install a CPU...................................... 67 Installation ........................................ 53 Installation & Removal ........................ 63 Installing a CPU Heatsink and Fan ........ 71 Installing an Expansion Card................ 30 Installing an operating system ............. 46 Installing System Memory ................... 77 Integrated Video Driver Installation ...... 92 Internal Connectors ............................ 36 Introduction to Environmental Program ................................................ 147 J Jumpers ............................................ 31 K Keyboard ...................................... 8, 49 L Location and Electrical Service ........... 152 LPT Connector ................................... 43 163 Spirit P8Q67-M-DO (Eng) Rev 1 M S Main Menu ...................................... 109 Maintenance .................................... 151 Managing and Updating your BIOS ....... 98 Memory Configurations ................. 23, 76 Memory Overview .............................. 22 Menu Items ..................................... 104 Mode Indicator Lights ........................... 9 Monitor Menu................................... 124 Monitor Safety Instructions ............... 155 Motherboard ...................................... 14 Motherboard before you proceed .......... 15 Motherboard Layout ........................... 15 Mothrboard SystemComponents ........... 14 Mothrerboard ..................................... 61 Mouse ......................................... 10, 50 Scroll Bar ........................................ 104 Serial ATA 3.0.................................... 40 Serial ATA 6.0.................................... 40 Serial Port Connector .......................... 37 Setting up your computer ...................... 7 Settings ............................................ 53 Software ........................................... 11 Software Support ............................... 45 Speaker Connector ............................. 44 Specifications Summary ...................... 18 Starting up your Computer .................... 7 Submenu Items ............................... 104 Support DVD information .................... 46 System Components ........................... 13 System Memory ........................... 22, 75 System Memory Overview ................... 75 System Pannel Connector .................... 42 System Reset Jumper ......................... 65 System Safety ................................. 155 N Navigation Keys ............................... 104 Northern Micro Offices .......................... 3 Numeric Keypad ................................... 9 O On-Line Support................................... 3 Operating System .............................. 11 Optical Drive...................................... 90 P Passwords ....................................... 154 PCI Adapter Cards .............................. 94 PCI Express x1 Slot ............................ 30 PCI Express x16 ................................. 93 PCI Express x16 Slot .......................... 31 PCI Slots ........................................... 30 Platform Security ............................. 143 Please Read First .................................. 2 Pop-up Window ................................ 104 Potential Data Loss ........................... 144 Power Supply............................... 48, 82 R Rear Panel Ports................................. 34 Removing a CPU Heatsink and Fan ....... 73 Removing System Memory .................. 80 Removing the Case Cover ................... 57 164 T Tools Menu ...................................... 128 TPM 143 Troubleshooting ........................ 131, 135 Troubleshooting Motherboard ............ 142 Troubleshooting No Display On Power Up ................................................ 141 U Unpacking and Handling ...................... 84 Unpacking Your Computer ..................... 6 USB Connector .................................. 41 User Guide .......................................... 1 V Video Card ........................................ 92 Video Connectors ............................... 92 W Warning of Potential Data Loss .......... 144 Warranty Policy ................................ 157 When a problem occurs ..................... 132