1
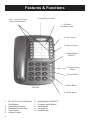
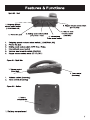
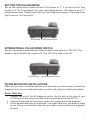
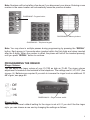
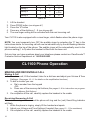
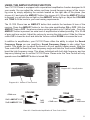
CL1100
Amplified
Telephone
Installation Guide
& User Manual
Congratulations on your purchase of the CL1100 Phone from
ClearSounds Communications™. Please read this User Manual
carefully in order to get the very best results from your telephone.
Keep the manual near the telephone for easy reference.
Please visit our web site at www.clearsounds.com to:
Register your product
Download additional manuals and trouble shooting tips
Conditions for Use
IMPORTANT SAFETY INSTRUCTIONS
Read and understand the Installation Guide & User Manual. When using your telephone
equipment, basic safety precautions should always be followed to reduce the risk of fire,
electric shock and injury to person, including the following.
WARNING: The CL1100 Phone is capable of amplifying sounds to a loud volume. It
is important to instruct all potential users of its proper operation. It is advised to adjust
the volume control to its minimum level (Low) when not in use and alert other users that
hearing damage can potentially result from misuse.
WARNING: To avoid the possibility of electrical shock, do not use this product near water
(For example, near a bathtub, wash basin, kitchen sink or laundry tub, in a wet basement
or near a swimming pool) while in the bathtub or shower or when you are wet. If the phone
becomes submerged in water, do not attempt to retrieve it until after you have unplugged
the line cord from the modular wall jack. Do not plug the phone back in until it has dried
completely.
WARNING: Avoid using the telephone during electrical storms. There may be a remote
risk of electric shock from lightning. If the electrical storm is present in your immediate
area, possibility of electrical shock exists.
WARNING: Do not use the phone if you suspect a gas leak in the area. The phone’s
electrical contacts could create a spark, which could ignite any heavy concentration of
leaking gas.
WARNING: Do not use liquid cleaners or aerosol cleaners on the telephone. Use a damp
cloth for cleaning.
PLEASE SAVE THESE INSTRUCTIONS
Table Of Contents
2
Table of Contents
Introduction
Condition For Use
Table of Contents
Features & Functions
Installation Steps
Components (Parts check list)
Installing the optional batteries
Setting the dialing mode
Phone mounting – desk & wall use
Programming memory dial buttons
Programming ringer – volume & style
CL1100 Phone Operation
Making & receiving a call
Using the amplification function
Volume, tone & amplification
Volume reset override
Outgoing speech volume
Dialing stored numbers
Last number redial
Flash button
Mute button
Troubleshooting Guide
Maintenance and Care
Specifications
FCC Regulatory Compliance
Warranty and Service
Page 2
Page 2
Page 3
Pages 4 - 5
Pages 6 - 9
Page 6
Page 6
Page 7
Pages 7 - 8
Page 8
Page 9
Pages 10 - 13
Pages 10 - 11
Page 11
Page 11
Page 12
Page 12
Page 13
Page 13
Page 13
Page 14
Page 15
Page 15
Pages 16 - 17
Page 18
3
Features & Functions
2. Visual Ring Indicator
1. M1 – M12 One-Touch
Memory Dial Buttons
3. Erasable
Phonebook Card
4. Tone Control
5. Volume Control
6. Amplify Button
(ON/OFF)
7. Program (save)
Button
8. Flash Button
9. Mute Button
Figure #2
10. Redial Button
1.
2.
3.
4.
5.
4
M1– M12 One-Touch Memory
Dial Buttons
Visual Ring Indicator
Phonebook Insert Card
Tone Control
Volume Control
6.
7.
8.
9.
10.
Amplify Button (ON/OFF)
Program (save) Button
Flash Button
Mute Button
Redial Button
Installation Steps
Installation of your ClearSounds™ CL1100 Phone is easy. There are some basic steps
you need to take when you set-up your CL1100 for the first time.
Check Parts list.
• Install (4) AAA Alkaline batteries (not included). Batteries are required if you wish to
increase the ringer level an additional 10 dB.
• Set the dialing mode.
• Choose desktop or wall mount.
• Program your memory dial buttons.
• Set ringer.
• Set your volume and tone.
PARTS CHECK LIST
Check to make sure your package includes the items described below. You should have
a TELEPHONE BASE, TELEPHONE HANDSET, 6ft LONG TELEPHONE LINE CORD,
8 inch SHORT TELPHONE LINE CORD, HANDSET CURLY CORD, WALL PLATE
ADAPTER, AND OWNERS MANUAL
INSTALLING THE OPTIONAL BATTERIES
(required if you wish to increase the ringer level up to 85 dB)
1. Open the battery compartment door located on the bottom of your phone by pulling
back the latch.
2. Insert correctly (4) AAA alkaline batteries
(not included) in the battery compartment
(See diagram #1). Be sure to observe battery
polarity as imprinted on the base of the
compartment.
3. Snap the battery compartment door back in
place.
4. The batteries will last approximately 1 year
before needing replacement.
5. Note: The telephone ringer will operate with
or without batteries.
6. Note: When replacing batteries, you will
need to remove the Wall Plate adapter if
in use. Slide the phone upward to remove
& disconnect the phone from your existing
wall jack. Slowly slide the Wall Plate adapter
down until it unsnaps from the phone.
DIAGRAM #1- Installing the batteries
Follow the directions above.
6
SETTING THE DIALING MODE
Set the dial mode switch located on back of the phone to “T” if you have Touch Tone
service or “P” for Pulse dialing if you have rotary dialing service. The default is set to “T”
dialing switch mode. Please check with your local telephone company if uncertain of the
type of service. (See diagram #2)
DIAGRAM #2 – Dialing mode switch
INTERNATIONAL PULSE SPEED SWITCH
Set the International speed switch located on back of the phone to “300 mS”. The
default is set to 300mS (See diagram #3). The 100 mS is used in the UK.
DIAGRAM #3 – International speed switch
PHONE MOUNTING INSTALLATIONS
Make sure you have a modular wall jack near the place you have chosen to install the
telephone. If you have an older phone jack, you will need to buy a modular jack adapter.
Desk / Table Use
1. Connect one end of the 6ft telephone cord to the line jack on the back of your
CL1100 Phone and connect the other end to a modular phone jack (RJ11C).
2. Connect the handset coil cord (curly cord) to the handset and to the telephone.
3. Lift the handset and listen for a dial tone. If you hear a dial tone, you phone is ready
to use. If there is no dial tone, check all your cords to make sure they are plugged in
securely.
7
Wall Mount Use
1. Slide the handset hanger tab out and reverse its position (rotate it 180 degrees).
Slide it back into place so that the hook points up (See diagram #4). This will keep the
handset from falling out of the cradle when it is mounted on the wall.
2. Insert the Wall Plate adapter (See diagram #5). It snaps into place. The cords phone
line should run underneath the wall-mounting bracket.
3. With the Wall Plate adapter installed, plug the 8in short phone cord into the telephone
jack on the CL1100 and then into the jack on the wall.
4. Holding the phone slightly above the mounting screws on the wall jack, push the
phone against the mounting screws so they are hooked into upper and lower keyhole slots on the back of the phone. Slowly slide the phone down until it snaps into
place (See diagram #6).
5. Connect the handset coil cord (curly cord) to the handset and to the telephone.
6. Lift the handset and listen for a dial tone. If you hear a dial tone, your phone is ready
to use. If there is no dial tone, check all your cords to make sure they are plugged in
securely.
DIAGRAM #4 – Reversing the hook
DIAGRAM #5 –Wall plate installation
DIAGRAM #6 – Wall installation
PROGRAMMING MEMORY DIAL BUTTONS
Your CL1100 Phone holds 12 programmed Memory Dial Buttons.
To program your one-touch memory dial buttons please follow instructions below:
1. Lift the handset.
2. Press the PROG button (See diagram #7).
3. Press one of the 12 Memory Dial buttons (M1 - M12) located on top of the phone
(See diagram #8). Each button can be programmed (or reprogrammed using the
same procedure) for a phone number up to 21 digits long.
4. Using the keypad, dial the number you would like to save, including 1 and the area
code (if applicable). (See diagram #9).
5. Press the PROG button again (See diagram #7).
6. To register your stored phone numbers, use the erasable phonebook card located
on the top of your phone. IMPORTANT: The phonebook card is non-removable.
Simply use a clean pencil eraser to make changes.
8
Note: Numbers will be lost after a few hours if you disconnect your phone. Entering a new
number in the same location will automatically erase the previous number.
DIAGRAM #7- Program button
DIAGRAM #8 – Memory buttons
DIAGRAM #9 – Telephone keypad
Note: You may store in multiple pauses during programming by pressing the “REDAIL”
button. Each pause is 2 seconds when inserted within the first digits and when inserted
after the 5 digits. WHen the number is dilled, the phone will halt at the inserted pause(s)
until you press “REDIAL” button to continue.
PROGRAMMING THE RINGER
Ringer Volume:
You can adjust the ringer volume of your CL1100 as high as 75 dB. The ringer volume
adjustment is located on the backside of the telephone. The settings are HI, LO, OFF (See
diagram 10). Batteries are required if you wish to increase the ringer level an additional 10
dB of gain, see page #6.
: Off
: Lo
: Hi
DIAGRAM #10 – Ringer volume switch
Ringer Style:
Your CL1100 Phone’s default setting for the ringer is set at 6. If you don’t like the ringer
style, you can choose a new one by changing the settings as follows:
9
Melody 1
Melody 2
Low
1
5
Mid
2
5
Melody 3
7
8
High
3
6
by default
9
CHART # 1
1.
2.
3.
4.
5.
Lift the handset
Press PROG button (see diagram #7)
Press the “#” button
Press any of the dial keys 1 - 9 (see diagram #8)
The new ringer setting will be activated with the next incoming call.
Your CL1100 is also equipped with a visual ringer, which flashes when the phone rings.
NOTE: You may temporarily turn OFF the audible ringer by selecting the “0” key in the
instructions above. An incoming call will now be indicated only by the red flashing indicator
light located on the top of the phone. The audible ringer will be automatically reset to the
previous setting (1 to 9) when the handset is lifted from the base unit.
If at any time you have questions about your telephone please contact our ClearSounds™
Customer Service Department at: 1-800-965-9043.
CL1100 Phone Operation
MAKING AND RECEIVING A CALL
Making A Call
1. To make a call, lift the handset, listen for a dial tone and adjust your Volume & Tone
Settings. (See pages 10 - 11 for details on the amplification functions)
2. To dial a number you can:
a. Dial a number from the keypad
-ORb. Press one of the memory dial buttons (See pages 8 - 9 for instructions on programming Memory Dial Buttons)
3. On completion of the call, carefully replace the handset in the cradle.
Receiving/Answering A Call
When an incoming call is received the phone will ring and the (red) Visual Ring Indicator
will flash.
1. While the phone is ringing, simply lift the handset and speak.
2. Adjust your Volume and Tone Settings if needed (See pages 10 - 11 for assistance)
3. On completion of the call, carefully replace the handset in the cradle.
10
USING THE AMPLIFICATION FUNCTION
Your CL1100 Phone is equipped with a specialized amplification function designed to fit
your needs. You can adjust the volume and tone (sound frequency range) of the incoming voice by simply adjusting the controls located on the right side of the phone (See
diagram #11) and using the AMPLIFY button (See diagram #12). When the AMPLIFY button
is pressed, you will see the red light on the AMPLIFY button light up. Adjust the VOLUME
and TONE to fit the levels to your own hearing requirements.
The CL1100 Phone has an AMPLIFY button that controls the loudness & tone of the
receiver. Press the AMPLIFY button to turn the extra amplification ON or OFF. With the
AMPLIFY feature OFF , the phone volume control provides up to 15 dB of gain. Once the
AMPLIFY button is pressed, an extra level of amplification is added providing 15 to 30 dB
of gain and tone control. Adjust the volume by moving the slide control. Slide the Volume
control UP to lower the level and slide the Volume control DOWN to increase the level.
In addition to amplification, your CL1100 Phone offers the ability to adjust the Sound
Frequency Range you are amplifying. Sound Frequency Range is also called Tone
control. This allows you to adjust the sound to fit your specific hearing needs. Slide the
Tone control UP, to boost the lower frequency range and slide the Tone control DOWN to
boost the high frequency range. This allows individuals with both high frequency and low
frequency hearing loss to use the CL1100 Phone. Please note: the Tone Control will only
operate once the AMPLIFY button is turned ON.
Diagram #12 – Amplify button
Diagram #11– Volume & Tone controls
VOLUME
TONE
+30db max
15dB AMPLIFY OFF
30dB AMPLIFY ON
0dB
15dB
Bass
+10dB max
Normal
Treble
+10dB max
Chart #2 – ClearSounds Amplification & Tone Control Chart
11
Volume Reset Override
In standard mode, the phone will reset to normal sound levels when you hang up. This
allows people who do not require the level of amplification offered on the phone to use it.
If you would like to override the reset, simply turn the AUTO AMPLIFY switch on the back
of the phone to “ON” (See diagram #13).
IMPORTANT: When the AUTO AMPLIFY switch is in the “ON” position, you do not need
to press the AMPLIFY button. Your amplification setting will remain as set.
DIAGRAM #13 - Volume override switch
Using Your CL1100 Phone with Hearing Aids
Your CL1100 Phone can be used with hearing aids equipped with a telecoil (T-coil). Adjust
your hearing aid “T-switch” to the “T” position. Make sure to hold the handset close to your
hearing aid.
Outgoing Speech Volume
You can adjust the sending volume (outgoing volume up to 12 dB) by using the Speech
Volume Control located on the back of the CL1100 phone. If your voice is faint or weak,
adjust the volume to “HI”. You can also decrease the volume as well. There are three
levels available “LO, NORMAL & HI” (See diagram #14).
DIAGRAM #14 – Outgoing speech volume switch
Dialing Stored Numbers
1. Lift the handset and listen for the dial tone.
2. Press the appropriate location button M1 – M12
and the number stored in this location will be dialed
automatically (See diagram #15).
DIAGRAM #15 – Memory Dial button
12
Last Number Redial
The redial button is used to quickly redial the last number you dialed.
1. Lift the handset and listen for the dial tone.
2. Press the “REDIAL” button (See diagram #16). The phone will redial up to 31 digits
automatically.
DIAGRAM #16 – Redial button
Flash Button
The FLASH button is used to disconnect a call and re-establish dial tone or to switch over
to another caller if you use custom calling services such as Call Waiting or Three Way
Calling. Please contact your local telephone company for information on these services.
1. During a call press the “FLASH” (See diagram #17 button to access the flash feature) .
DIAGRAM #17 – Flash button
Note: If you do not have any special telephone service , such as Call Waiting.
Pressing the “FLASH” button during a call may disconnect your current
conversation.
Mute Button
The MUTE button allows the user to conduct a private conversation that you do not want
the person on the other end to hear.
1. Press and hold the “MUTE” button (See diagram #18). You will still be able to hear
the caller but they cannot hear you during the mute operation.
2. To resume normal conversation, release the “MUTE” button.
DIAGRAM #18 – Mute button
13
Troubleshooting Guide
No dial tone
1. Check that all phone cord connections (including the curly cord) are securely plugged
into the telephone & wall jack.
2. Check that the phone is in the correct dialing mode, Tone (touch) or pulse (rotary).
3. Plug another phone into the wall jack to make sure your phone service is functioning
properly.
Call will not dial or dials very slowly
1. Check that the phone is in the correct dialing mode: Touch-Tone / Pulse Setting (See
diagrams #2+#3)
No audible ringer
1. Make sure the ringer is not set to “OFF” position (See diagram #10).
2. Check the volume level of the ringer.
3. Lift handset to reset the ring tone temporary “OFF” feature (see page #10).
4. You may have too many extensions on your line. Try unplugging a few devices.
No amplification
1. Check to see if the AMPLIFY Button is “ON” (See diagram #12). The red light should
be lit.
Noise, Static, Interference while using the handset
1. A filter may be required for homes with a DSL line or near Radio towers.
No numbers dialed when memory button is pressed
1. No number stored in that memory button.
2. Make sure the phone number was programmed and saved in the memory (See page
#13).
3. Make sure the programming is done in the correct dial mode (touch-tone or pulse
dialing).
4. If your phone has been disconnected for a few hours the numbers stored will be
lost.
14
Maintenance and Care
The CL1100 phone has been designed to give you years of dependable service. To ensure
the utmost in performance, follow these guidelines in caring for your phone:
1. Avoid dropping or knocking the unit.
2. Dust the unit regularly. Unplug your phone and wipe with a soft slightly damp cloth to
remove any dirt from it. To avoid damage, NEVER use an abrasive or strong solvent
to clean any part of the phone.
3. Keep the phone out of direct sunlight.
4. Avoid placing the phone in extremely humid conditions.
5. Avoid electric shock by keeping the phone away from water (i.e. bathroom, kitchen
sink, etc.)
Specifications
Maximum Gain:
30 dB in Wide band (300 to 3400Hz)
+/- 10 extra dB max Low Frequency (Bass 300 Hz)
+/- 10 extra dB High Frequency (Treble 3400Hz)
Dimensions:
Size:
8.5” X 6.5” X 2”
Weight: 1.50 lbs with batteries
Power Requirements:
Batteries: (4) AAA Alkaline batteries (not included)
15
FCC Registration Notice
THE INFORMATION INFORMING THE USER OF HIS/HER AND THE TELEPHONE
COMPANY’S RIGHT AND OBLIGATION IS OUTLINED BELOW.
a) This equipment complies with Part 68 of the FCC rules and the requirements
adopted by the ACTA. ON the bottom of this equipment is a label that contains,
among other information, a product identifier in the format US:AAAEQ##TXXXX.
If requested, this number must be provided to the telephone company.
b) All applicable certification jacks Universal Service Order Codes (USOC) for the
equipment is provided (i.e. RJ11C) in the package with each piece of approved
terminal equipment.
c) A plug and jack used to connect this equipment to the premises wiring and
telephone network must comply with the applicable FCC Part 68 rules and
requirement adopted by the ACTA. A compliant telephone cord and modular plug
is provided with this product. It is designed to be connected to a compatible
modular jack that is also compliant. See installation instructions for details.
d) The REN is used to determine the number of devices that may be connected to the
telephone line. Excessive RENs on a telephone line may result in the devices not
ringing in response to an incoming call. In most but not all areas, the sum of RENs
should not exceed five (5.00). To be certain of the number of devices that may be
connected to a line, as determined by the total RENs, contact the local telephone
company. [For products approved after July 23, 2001, the REN for this product is
part of the product identifier that has the format US:AAAEQ##TXXXX. The digits
represented by 17 are the REN without a decimal point (e.g., 03 is a REN of 0.3).
For earlier products, the REN is separately shown on the label.]
e) If this equipment causes harm to the telephone network, the telephone company will
notify you in advance that temporary discontinuance of service may be required. But
if advance notice isn’t practical, the telephone company will notify the customer as
soon as possible. Also, you will be advised of your rights to file a complaint with the
FCC if you believe it is necessary.
f) The telephone company may make changes in its facilities, equipment, operation
or procedures that could affect the operation of the equipment. If this happens the
telephone company will provide advance notice in order for you to make necessary
modifications to maintain uninterrupted service.
g) Should you experience trouble with the equipment, please contact: ClearSounds
Communications Attn: Repair Center, 8160 S Madison St, Burr Ridge, IL 60527,
800-965-9043 V/TTY, 888-654-9219 FAX, e-mail: [email protected] for
repair or warranty information. If the equipment is causing harm to the telephone
network, the telephone company may request that you disconnect the equipment
until the problem is resolved.
h) Please follow instructions for repairing if any (e.g. battery replacement section);
16
otherwise do not alter or repair any part of device except as specified.
Connection to party line service is subject to state tariffs. Contact the state public
utility commission, public service commission or corporation for information.
j) NOTICE: If your home has specially wired alarm equipment connected to the
telephone line, ensure the installation of the CL1100 does not disable your alarm
equipment. If you have questions about what will disable alarm equipment, consult
your telephone company or a qualified installer.
k) This equipment is hearing aid compatible.
i)
WARNING: Changes or modifications to this unit not expressly approved by the
party responsible for compliance could void the user’s authority to operate the
equipment.
NOTE: This equipment has been tested and found to comply with the limits for a Class B
digital device, pursuant to part 15 of the FCC Rules. These Limits are designed to provide
reasonable protection against harmful interference in a residential installation. This equipment generates, uses, and can radiate radio frequency energy and, if not installed and
used in accordance with the instructions, may cause harmful interference to radio communications. However, there is no guarantee that interference will not occur in a particular
installation. If this equipment does cause harmful interference to radio or television reception, which can be determined by turning the equipment off and on, the user is encouraged
to try to correct the interference by one or more of the following measures.
• Reorient or relocate the receiving antenna.
• Increase the separation between the equipment and receiver.
• Connect the equipment into an outlet on a circuit different from that to
which the receiver is connected.
• Consult the dealer or an experienced radio TV technician for help.
This product meets the applicable Industry Canada technical specifications.
The Ringer Equivalence Number is an indication of the maximum number of terminals allowed
to be connected to a telephone interface. The termination on an interface may consist of any
combination of devices subject only to the requirements that the sum of the Ringer Equivalence
Number of all the devices does not exceed five.
Should you experience trouble with this equipment, please contact: The Canadian Service
Center is Hall Telecommunications, 5477 R.R. #5, Hwy #6 North Guelph, Ontario, Canada
N1H 6J2. Tel no: 519-822-5420 Fax No: 519-822-5462 Contact person: Mr. Don Beam. The
US Service Center is ClearSounds Communications 8160 S Madison St - Burr Ridge, IL
60527 USA Tel No: 800-965-9043 V or 800-814-5359 TTY Fax No: 888-654-9219 e-mail:
[email protected] Contact Name: Customer Service for repair or warranty information. If
the equipment is causing harm to the telephone network, the telephone company may request
that you disconnect the equipment until the problem is resolved.
17