1
PR14 (Black / Noir)
PR15 (White / Blanc)
PR16 (White / Blanc) PR26 (Blue / Bleu)
PR17 (Black / Noir) PR27 (Green / Vert)
7:00
PRX20 (White / Blanc) PRX28 (Blue / Bleu)
PRX23 (Black / Noir)
PRX29 (Green / Vert)
PRX30 (White / Blanc)
PRX33 (Black / Noir)
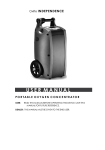
PR SERIES / SÉRIES
INSTRUCTION MANUAL
R EAD A LL I NSTRUCTIONS B EFORE U SING T HIS A PPLIANCE
LIRE TOUTES
MANUEL D’INSTRUCTIONS
I N S T R U C T I O N S AVA N T D ’U T I L I S E R C E T A P PA R E I L
LES
IMPORTANT SAFEGUARDS
When using electrical appliances, basic safety precautions should always be followed to reduce
the risk of fire, electric shock and/or injury to persons, including the following:
1. READ ALL INSTRUCTIONS BEFORE USING THE MACHINE.
2. Do not touch hot surfaces. Use handles or knobs.
3. To protect against electric shock, do not immerse cord, plugs or machine in water
or any other liquids.
4. Close adult supervision is necessary when this appliance is used by or near children.
5. Unplug from outlet when coffeemaker or clock are not in use and before cleaning.
Allow to cool before putting on or taking off parts and before cleaning the appliance.
6. Do not operate any appliance with a damaged cord or plug or after the appliance malfunctions
or has been damaged in any manner. Return this appliance only to the nearest authorized
service center for examination, repair or adjustment.
7. The use of accessory attachments not recommended for MR. COFFEE® products
may cause hazards or injuries.
8. Do not use outdoors.
9. Do not let cord hang over edge of table or counter or touch hot surfaces.
10. Do not place this appliance on or near a hot gas or electric burner or in a heated oven.
11. To disconnect, turn control to “OFF” position and remove plug from wall outlet.
12. Do not use appliance for other than intended use.
13. Use on a hard, flat level surface only, to avoid interruption of air flow underneath the appliance.
14. DECANTER USE AND CARE
Breakage may occur if the following instructions are not followed:
Use only decanters specifically designed for MR. COFFEE® Pause ‘n Serve models.
a. This decanter is designed for use with your MR. COFFEE® coffeemaker and therefore
must never be used on a rangetop or in any oven, including a microwave.
b. Do not set a hot decanter on a wet or cold surface.
c. Do not use a cracked decanter or a decanter with a loose or weakened handle.
d. Do not clean the decanter with cleansers, steel wool pads or other abrasive materials.
e. Discard decanter immediately if it is ever boiled dry.
f. Avoid sharp blows, scratches or rough handling.
15.
WARNING: To reduce the risk of fire or electric shock, do not remove any service
covers. No user serviceable parts inside. Repair should be done by authorized
personnel only. Opening the bottom service cover will void the warranty.
2
SPECIAL CORD SET INSTRUCTIONS
1. A short, power supply cord is provided to reduce the hazards resulting from becoming
entangled in or tripping over a longer cord.
2. An extension cord may be purchased and used if care is exercised in its use.
3. If an extension cord is used, the marked electrical rating of the extension cord must be
at least 10 amps and 120 volts. The resulting extended cord must be arranged so that
it will not drape over a countertop or tabletop where it can be pulled on by children
or tripped over accidentally.
* This appliance has a polarized plug (one blade is wider than the other).
To reduce the risk of electric shock, this plug will fit in a polarized outlet only
one way. If the plug does not fit fully in the outlet, reverse the plug. If it still
does not fit, contact a qualified electrician. Do not modify the plug in any way.
If Service Is Required, Do Not Return to Your Store
F OR S ERVICE , C ALL 1-800-MR COFFEE (1-800-672-6333)
9:00 A . M . TO 6:00 P. M ., E ASTERN S TANDARD T IME , M ONDAY THROUGH F RIDAY
9:00 A . M . TO 3:00 P. M ., E ASTERN S TANDARD T IME , S ATURDAY
TO ASSIST US IN SERVING YOU, PLEASE HAVE THE MODEL NUMBER
(PR14, PR15, PR16, PR17, PR26, PR27, PRX20, PRX23,
PRX28, PRX29, PRX30, PRX33) AND DATE OF PURCHASE AVAILABLE.
All repairs must be made by an authorized Sunbeam Service Center.
Please call us for assistance or for the location of the
nearest authorized Sunbeam Service Center.
PLEASE DO NOT RETURN THIS APPLIANCE TO YOUR STORE.
We welcome your questions, comments or suggestions.
PLEASE CALL US
AT
1-800-672-6333
OR
WRITE US
AT:
CONSUMER SERVICE DEPARTMENT
P.O. Box 948389
Maitland, Florida 32794-8389
SAVE THESE INSTRUCTIONS
3
I NTRODUCTION
CONGRATULATIONS! You are the owner of a MR. COFFEE® PR Series Coffeemaker.
A decanter-activated Pause ‘n Serve drip-stop valve allows you up to 30 seconds to sneak a cup
while the coffee is still brewing.
The PRX30 and PRX33 Models feature a Programmable Timer and 4-Hour Automatic Shut-Off.
Please read all of the instructions in this manual carefully before you begin to use this appliance.
Proper care and maintenance will ensure the long life of this appliance and its trouble-free operation.
Save these instructions and refer to them often for cleaning and care tips.
TABLE
OF
CONTENTS
PAGE
Important Safeguards. . . . . . . . . . . . . . . . . . . . . . . . . . . . . . . . . . . . . . . . 2
Cord Set Instructions . . . . . . . . . . . . . . . . . . . . . . . . . . . . . . . . . . . . . . . . 3
If Service Is Required . . . . . . . . . . . . . . . . . . . . . . . . . . . . . . . . . . . . . . . 3
Introduction . . . . . . . . . . . . . . . . . . . . . . . . . . . . . . . . . . . . . . . . . . . . . . . 4
Diagram of Parts . . . . . . . . . . . . . . . . . . . . . . . . . . . . . . . . . . . . . . . . . . . 5
Setting the Clock and Timer (PRX20, PRX23, PRX28 & PRX29) . . . . . . . . . . . . 6
Setting the Clock and Timer (PRX30 & PRX33) . . . . . . . . . . . . . . . . . . . . . . . 7
Brewing Coffee . . . . . . . . . . . . . . . . . . . . . . . . . . . . . . . . . . . . . . . . . . . . . 8
Automatic Pause ‘n Serve. . . . . . . . . . . . . . . . . . . . . . . . . . . . . . . . . . . . . 9
Automatic Shut-Off (PRX20 , PRX23, PRX30 & PRX33 Only) . . . . . . . . . . . . . . . 9
Cleaning Instructions . . . . . . . . . . . . . . . . . . . . . . . . . . . . . . . . . . . . . . . . 9
Decanter Cleaning . . . . . . . . . . . . . . . . . . . . . . . . . . . . . . . . . . . . . . . . . 10
Warranty Information . . . . . . . . . . . . . . . . . . . . . . . . . . . . . . . . . . . . . . 11
MR. COFFEE® REPLACEMENT
DECANTER MODEL PD12 (WHITE)
PD13 (BLACK)
PD15 (BLACK WITH GOLD TRIM)
FOR BETTER TASTING TEA AND COFFEE,
USE 8 – 12-CUP
MR. COFFEE® FILTERS.
F OR H OUSEHOLD U SE O NLY
FOR QUESTIONS OR SERVICE, CALL
1-800-672-6333
9:00 A.M. to 6.00 P.M., Eastern Standard Time, Monday through Friday
9:00 A.M. to 3.00 P.M., Eastern Standard Time, Saturday
4
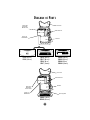
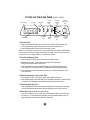
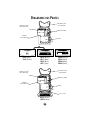
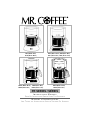
D IAGRAM OF PARTS
Dust Cover
Removable
Black Filter
Basket Insert
Water Reservoir
Swing-Out
Brew Basket
Decanter
{
7:00
PR14 (BLACK)
PR15 (WHITE)
PR16 (WHITE)
PR17 (BLACK)
PR26 (BLUE)
PR27 (GREEN)
PRX20 (WHITE)
PRX23 (BLACK)
PRX28 (BLUE)
PRX29 (GREEN)
Dust Cover
Water Reservoir
Decanter
Removable
Black Filter
Basket Insert
Swing-Out
Brew Basket
Warming Plate
00 00
PRX30 (WHITE)
PRX33 (BLACK)
5
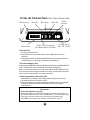
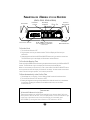
S ETTING THE C LOCK AND T IMER (PRX20, PRX23, PRX28 & PRX29)
PM INDICATOR
HOUR SET
MINUTE SET
HOUR
MIN
BREW SET
ON/OFF
INDICATOR
BREW
7:00
CLOCK DISPLAY
AUTO OFF LIGHT INDICATES
AUTO BREW NEEDS TO BE RESET
CONTROL SWITCH
ON – OFF – AUTO
To Set the Clock
1. Turn the Control Switch to OFF.
2. Plug the power cord into your electrical outlet. The Clock Display will flash until you
set the time.
3. Alternately press and hold the HOUR and MINUTE buttons until you reach the current time.
The PM Indicator Light in the display will illuminate to indicate PM time.
To Pre-Set the Brewing Time
Press and hold the BREW button while setting the desired brew time with the HOUR and MINUTE
buttons. The PM Indicator Light in the display will illuminate to indicate PM time.
NOTE: It is not necessary to set the clock in order to brew coffee. If the HOUR or MINUTE buttons
are not pressed, the clock will display 12:00 and will not change. You must set the correct time in
order for the clock to begin operation, or to brew at a pre-set time.
To Brew Automatically at the Pre-Set Time
1. Follow Steps No. 1 through No. 5 in the “Brewing Coffee” section of these instructions.
2. Turn the Control Switch to OFF and then to AUTO.
3. Brewing will begin at the time you have preset and the coffee will remain hot in the decanter
for two hours. To keep your coffee hot for an additional two hours, turn the Switch
from AUTO to ON.
I MPORTANT
To Reset AUTO Brew at Pre-Set Time
The programmable timer will NOT automatically brew the next day if left in the
AUTO position after its last use. This is a safety feature. If the OFF Indicator Light
in the lower right hand corner of the Clock Display is illuminated, reset
AUTO BREW by turning the Control Switch to OFF and then to AUTO.
6
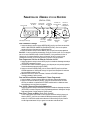
S ETTING THE C LOCK AND T IMER (PRX30 & PRX33)
PM Indicator
Hour Set
On/Off
Indicator
Minute Set
Auto Start
Indicator
(Green)
(Red)
Hour
Min
Auto
Select
AUTO START
ON
00 00
Clock Display
Warmer
Temperature
Dial
1–4
CLEAN
Auto-Start
Time
Mode
Select
Clean Mode
Indicator
(Red)
WARMER TEMP
1 – 4 Cup
Indicator
(Yellow)
To Set the Clock
1. Press and hold the HOUR button until the correct hour is reached. The PM Indicator Light
in the upper left corner of the Clock Display will illuminate and indicate PM time.
2. Press and hold the MINUTE button until the correct time is shown.
NOTE: It is not necessary to set the clock in order to brew coffee. If the HOUR or MINUTE buttons
are not pressed, the clock will display 12:00 and will not change. You must set the correct time
in order for the clock to begin operation or to brew at a pre-set time.
To Pre-Set the Brewing Time
1. Press and hold the AUTO button until the Auto Start light begins to flash.
2. Release the AUTO button. The Auto Start Indicator light will continue to flash
letting you know the Auto Start time can be set.
3. Press the HOUR button and then the MINUTE button until the desired time appears in the
Clock Display. This is the time you want your coffeemaker to begin brewing automatically.
4. After seven seconds, the Auto Start Indicator light will go out. The Clock Display will return
to the current time.
To Brew Automatically at the Pre-Set Time
1. Follow Steps 1 through 5 in the “Brewing Coffee” section of these instructions.
2. Press the Select button until the Auto Start light is illuminated, then release. The Auto Start light
will remain lit. The coffeemaker will automatically start brewing at the pre-set time.
To Check the Auto Start Time
Press and hold the AUTO button until the Auto Start light flashes. The pre-set time will appear
in the Clock Display. After seven seconds the Clock Display will return to the current time.
To Brew Four Cups or Less (Small Batch Mode)
If you are only brewing four cups or less, press and hold the Select button until the Auto Start
light and the 1 – 4 Cup lights are both illuminated. This mode extends the brewing cycle by
approximately 30% to ensure optimal saturation of the coffee.
7
I M P O R TA N T
CLEAN BEFORE USING THE FIRST TIME!
Wash decanter, lid and removable filter basket in mild detergent and water.
Rinse each thoroughly. Follow Steps 4 through 6 below (with water only)
to clean the inside of your coffeemaker.
B REWING COFFEE
1. Open the swing-out brew basket and insert a MR. COFFEE® paper filter into the inner filter basket.
2. Add desired amount of coffee according to the coffee measurement chart found on Page 9.
Shake lightly to level coffee.
3. Be sure the paper filter is properly centered before sliding the filter basket into place.
4. Fill the decanter with tap water to desired capacity as marked on the side of the decanter.
(1 cup equals 5 ounces) To brew 2 cups of coffee, fill the decanter to the middle of the
metal band. For easy and accurate filling, line markings can be found inside the water reservoir.
5. Pour the water into the reservoir. Place the empty decanter onto the warming plate.
6. Turn your coffeemaker ON. When coffee stops flowing, the brewing cycle is complete.
7. Carefully remove the filter basket and discard the used grounds and filter. Rinse the filter basket
and replace.
8. To make another pot of coffee, repeat Steps 1 through 7.
9. Be sure to turn your coffeemaker OFF when the decanter is empty and you are no longer using
your coffeemaker. Unplug the power cord when not using the coffeemaker or clock.
WARNING
•
To avoid risk of personal injury or damage to property as a result
of overflow, be sure that the decanter is squarely centered under
the brew basket during brewing cycle.
•
Brewed coffee and grounds, both in brew basket and decanter,
are very hot. Handle with care to avoid scalding.
•
If brew basket overflows, or if brew basket fails to drain into
decanter during brew cycle, do no open or handle basket.
Unplug coffeemaker, and wait for contents to cool before handling!
8
SUGGESTED COFFEE MEASUREMENT
For the best results, use level tablespoons
(Tbsp.) of drip grind, recommended for
automatic drip coffeemakers.
Remember to use more or less coffee
to suit your taste.
TO BREW
USE THIS MUCH COFFEE
12 Cups
10 Cups
8 Cups
6 Cups
4 Cups
2 Cups
11 Tbsp. or 5-1/2 scoops
9 Tbsp. or 4-1/2 scoops
7 Tbsp. or 3-1/2 scoops
6 Tbsp. or
3 scoops
4 Tbsp. or
2 scoops
2 Tbsp. or
1 scoop
A UTOMATIC PAUSE ‘ N S ERVE D RIP STOP VALVE
For your convenience, our Pause ‘n Serve feature allows you up to 30 SECONDS to sneak a cup
while the coffee is still brewing. It also prevents any remaining coffee in the filter basket from
dripping onto the warming plate once the brew cycle is completed.
A UTOMATIC S HUT-O FF
(PRX20, PRX23, PRX30 and PRX33 Only)
Your coffeemaker will keep your coffee hot for two hours (four hours for Models PRX30 and
PRX33) and then automatically shut off. To keep your coffee hot for an additional two hours,
turn the unit OFF and then to ON. When your decanter is empty, turn your coffeemaker off
by turning the switch to OFF.
TO A DJUST THE WARMING P LATE T EMPERATURE
(PRX30 and PRX33 Only)
After the coffee is brewed, you can keep it at just the right temperature. Use the Warmer
Temperature knob to adjust the warming plate temperature. Do not allow the decanter to boil dry.
This will damage the decanter.
C LEANING I NSTRUCTIONS
Your coffeemaker must be cleaned when you begin to notice excessive steaming or the brewing
time increases considerably. This condition is caused by a buildup of lime and mineral deposits
from your water. If the pumping action stops before all the water has been pumped out of the
machine, then the appliance requires cleaning. The frequency of cleaning depends on the hardness
of water used. The following table gives the suggested cleaning intervals.
S U GG E ST E D C LE A N I N G I N T E R VA L
TYPE
OF
WATER
CLEANING FREQUENCY
Soft Water
Every 80 Brew Cycles
Hard Water
Every 40 Brew Cycles
9
U SING M R . COFFEE ® C LEANER
(Read caution statement on side panel of MR. COFFEE® Cleaner box before use)
1. Fill the decanter with 4-5 decanter cups of warm water.
2. Empty contents of one packet of MR. COFFEE® Cleaner into the decanter and stir with a plastic
or wooden spoon until the cleaner is completely dissolved. This will make a clear blue solution.
3. Pour the blue solution into the coffeemaker.
4. Place the empty decanter on the warming plate. The swivel basket with the black filter insert
in place should be closed.
5. Press and hold the SELECT button until the CLEAN light is illuminated. You will notice that the
clean cycle is a bit slower than the brewing cycle. This is done automatically to give the cleaning
solution more time to clean.
6. At the end of the clean cycle, the audible signal will beep one time, the CLEAN light will go out
and the coffeemaker will shut off automatically.
7. Discard the blue solution and thoroughly rinse the decanter, lid and filter basket.
8. Repeat steps 1-7 with clean water (no blue solution). Using the regular “ON” mode,
continue to rinse out the unit until you see no remaining traces of the blue solution.
9. If a normal brewing flow is not achieved, repeat the cleaning Steps 1 – 8.
U SING V INEGAR
1. Pour one quart of undiluted white household vinegar into your coffeemaker.
2. Place a paper filter into the filter basket and slide the filter basket into place.
3. Place the empty decanter on the warming plate and turn the coffeemaker ON.
When three cups have flowed through, turn the coffeemaker OFF and let stand for 1/2 hour.
4. After 1/2 hour, pour the vinegar back into the coffeemaker.
5. Place the empty decanter on the warming plate. Turn the coffeemaker ON and let all of the
vinegar flow through.
6. Discard the vinegar and the paper filter.
7. To flush out all traces of vinegar, pour a decanter full of tap water into the coffeemaker,
turn it ON and allow it all to cycle through.
8. Discard the water and turn the coffeemaker OFF. Repeat Steps 7 and 8.
D ECANTER C LEANING
Hard water can leave a whitish mineral deposit inside the decanter. Coffee and tea discolor
these deposits, sometimes leaving a brownish stain inside the decanter. To remove these stains,
follow these simple steps:
1. Use a solution of equal parts white vinegar and hot water.
2. Let solution stand in decanter for about 20 minutes and then discard.
3. Wash and rinse the decanter thoroughly using a soft cloth. Do not use harsh abrasive cleaners.
These may cause scratches which can lead to breakage.
DEC ANTER
AND
L I D A R E T O P -R A C K D I S H WA S H E R S A F E
10
1-Y EAR L IMITED WARRANTY
Sunbeam Products, Inc. (“Sunbeam”) warrants that for a period of ONE year from the
date of purchase, this product will be free from defects in material and workmanship.
Sunbeam, at its option, will repair or replace this product or any component of the
product found to be defective during this warranty period. Replacement will be made
with a new or remanufactured product or component. If the product is no longer available,
replacement may be made with a similar product of equal or greater value. This is your
exclusive warranty.
This warranty is valid for the original retail purchaser from the date of initial retail purchase
and is not transferable. Keep the original sales receipt. Proof of purchase is required to
obtain warranty performance. Sunbeam dealers, service centers or retail stores selling
Sunbeam products do not have the right to alter, modify or any way change the terms
and conditions of this warranty.
This warranty does not cover normal wear of parts or damage resulting from any of the
following: negligent use or misuse of the product, use on improper voltage or current, use
contrary to the operating instructions, disassembly, repair or alteration by anyone other
than Sunbeam or an Authorized Service Center. Further, the warranty does not cover Acts
of God, such as fire, flood, hurricanes and tornadoes.
Sunbeam shall not be liable for any incidental or consequential damages caused by the
breach of any express or implied warranty. Except to the extent prohibited by applicable
law, any implied warranty of merchantability or fitness for a particular purpose is limited
in duration to the duration of the above warranty. Some states, provinces or jurisdictions
do not allow the exclusion or limitation of incidental or consequential damages or
limitations on how long an implied warranty lasts, so the above limitations of exclusion
may not apply to you. This warranty gives you specific legal rights, and you may also
have other rights that vary from state to state or province to province.
HOW TO OBTAIN WARRANTY SERVICE
Take the product to an Authorized Sunbeam Service Center. You can find the nearest
Authorized Sunbeam Service Center by calling 1-800-672-6333. If a Service Center
is not conveniently located, attach a tag to the product that includes your name, address,
daytime telephone number and description of the problem. Include a copy of the original
sales receipt. Carefully package the product and send either by UPS or Parcel Post with
shipping and insurance prepaid to:
SUNBEAM SERVICE CENTER
c/o Warranty Center
117 Industrial Row
Purvis, MS 39475
DO NOT RETURN THIS PRODUCT TO THE PLACE OF PURCHASE.
If you have any questions regarding this warranty please call 1-800-672-6333.
11
P RÉCAUTIONS I MPORTANTES
Lors de l’utilisation d’appareils électriques, pour réduire le risque d’incendie, électrocution et / ou
blessures personnelles, toujours prendre les précautions nécessaires, incluant celles qui suivent:
1. LISEZ TOUTES LES DIRECTIVES ATTENTIVEMENT AVANT DE L’USAGE DE L’APPAREIL.
2. Eviter de toucher les surfaces chaudes. Utiliser les manivelles ou les interrupteurs.
3. Pour vous protéger des risques d’électrocution, ne plongez jamais le cordon, ou la cafetière
dans l’eau ou tout autre liquide.
4. Faites particulièrement attention lorsque l’appareil est utilisé par, ou en présence d’enfants .
5. Débrancher l’appareil lorsqu’il n’est pas utilisé et avant de le nettoyer. Laissez refroidir
avant d’y placer ou y retirer des pièces et avant de le nettoyer.
6. Ne pas faire fonctionner un appareil dont le fil ou la fiche est endommagé ou après que l’appareil
ait mal fonctionné, qu’il ait été échappé ou endommagé d’une façon quelconque. Retourner
l’appareil seulement au centre de service autorisé pour fin de vérification ou réparation.
7. L’utilisation d’accessoires supplémentaires non recommandés par MR. COFFEE® peut entraîner
des risques d’accidents et de blessures.
8. Ne pas l’utiliser à l’extérieur.
9. Ne pas laisser le fil pendre de la table ou d’un comptoir et éviter qu’il touche à une surface chaude.
10. Ne pas placer sur ou près d’un poêle chaud ou dans un four chaud.
11. Pour débrancher, retirez la fiche de la prise murale.
12. Ne pas utiliser la cafetière autre que pour son utilisation intentionnelle.
13. Utiliser sur une surface plane et dure uniquement, pour éviter le risque d’interruption
de la circulation d’air sous l’appareil.
14. UTILISATION ET MAINTENANCE DE LA CARAFE
La carafe peut se casser si les instructions qui suivent ne sont pas respectées:
Utiliser uniquement des carafes spécialement destinées aux modèles de MR. COFFEE® Pause ‘N Serve.
a. Cette carafe est destinée à être utilisée avec votre cafetière Mr. Coffee et ne doit être en aucune
façon plaçée sur un dessus de cuisinière et de four, y compris un four à micro-ondes.
b. Ne déposez jamais une carafe chaude sur une surface froide ou mouillée.
c. Ne pas utiliser de carafe ébréchée ou ayant une poignée branlante ou non stable.
d. Ne pas nettoyer la carafe avec des recurants abrasifs.
e. Se débarrasser immédiatement de la carafe si elle a eu l’occasion de bouillir à vide.
f. Éviter de donner des coups, des égratignures ou de la malmener durant le transport.
15.
ATTENTION: Pour réduire le risque de feu ou de choc électrique, ne pas ôter
les membranes de protection. Ne contient pas de pièces pouvant être réparées
par l’utilisateur. Les réparations doivent être faites uniquement par un personnel
autorisé. Ouvrir le couvercle du fond réservé au service de réparation annulera
la garantie.
12
I NSTRUCTIONS POUR L’I NSTALLATION DU CORDON S PÉCIAL
1. L’appareil est livré avec un cordon d’alimentation court pour réduire les risques
d’enchevêtrement ou de trébuchement accidentel.
2. Un cordon d’extension peut être acheté et utilisé à condition de prendre des précautions.
3. La capacité électrique nominale de la rallonge devra être au minimum 10 Ampères et 120 V.
Placer le cordon d’alimentation de manière à ce qu’il ne pende pas du comptoir ou de la table,
où il pourrait être accessible aux enfants ou provoquer un trébuchement par inadvertance.
Les valeurs électriques nominales de la cafetière figurent sur le panneau inférieur de l’appareil.
* Cet appareil est doté d’une fiche polarisée (une broche est plus large que
l’autre). Pour réduire le risque de choc électrique, cette fiche ne va que dans
un sens seulement sur une prise de courant polarisée. Si la fiche ne s’enfonce
pas complètement dans la prise, la retourne et essayer de nouveau. Si elle ne
s’adapte toujours pas à fond, consulter un électricien qualifié. Veillez à
respecter les mesures de securité de la prise polarisée.
S I UNE R ÉPARATION E ST N ÉCESSAIRE ,
DE
NE PAS
R ETOURNER L’A PPAREIL DANS V OTRE M AGASIN
P OUR S ERVICE , A PPELER LE 1-800-MR COFFEE (1-800-672-6333)
9 H 00 DU MATIN À 6 HEURES DU SOIR (H ORAIRE DE L’E ST ) DU L UNDI AU V ENDREDI
DE 9 H 00 DU MATIN À 3 HEURES DU SOIR (H ORAIRE DE L’E ST ) DU S AMEDI
POUR NOUS PERMETTRE DE VOUS SERVIR, VEUILLEZ AVOIR SOUS LA MAIN LE NUMÉRO
DU MODÈLE (PR14, PR15, PR16, PR17, PR26, PR27, PRX20, PRX23,
PRX28, PRX29, PRX30, PRX33) ET LA DATE DE L’ACHAT.
Toutes les réparations devront être faites par centre de dépannage agréé Sunbeam.
Veuillez nous contacter pour assistance ou pour l’adresse du
Centre de Dépannage agréé Sunbeam le plus proche.
MERCI
DE NE PAS
RETOURNER CET APPAREIL
DANS
VOTRE MAGASIN.
NOUS APPRÉCIONS VOS QUESTIONS, COMMENTAIRES ET SUGGESTIONS.
NOS APPELER
À
1-800-672-6333
OU
NOS ÉCRIR À:
CONSUMER SERVICE DEPARTMENT
P.O. Box 948389
Maitland, Florida 32794-8389
CONSERVEZ C ES I NSTRUCTIONS
13
I NTRODUCTION
FÉLICITATIONS! Vous êtes désormais le propriétaire d’une machine à café MR. COFFEE®
Séries PRX30/33 12 Tasses.
Les Modèles PRX30 et PRX33 offrent une minuterie programmable et un arrêt automatique
après 4 heures.
Veuillez lire toutes les instructions de ce manuel avec précaution avant de commencer à utiliser
cet appareil. De la précaution d’emploi et un bon entretien garantiront la longue vie de cet appareil
et une utilisation sans soucis. Sauvegardez ces instructions et reportez y vous souvent pour
des conseils de nettoyage et d’entretien.
TABLE
DES
MATIÈRES
PAGE
Importants Conseils de Mise en Garde . . . . . . . . . . . . . . . . . . . . . . . . . . .
Instructions d’Installation du Cordon . . . . . . . . . . . . . . . . . . . . . . . . . . . .
Que Faire en Cas d’Entretien et de Réparation . . . . . . . . . . . . . . . . . . . . .
Introduction . . . . . . . . . . . . . . . . . . . . . . . . . . . . . . . . . . . . . . . . . . . . . . .
Diagramme des Composants . . . . . . . . . . . . . . . . . . . . . . . . . . . . . . . . . .
Paramétrage de l’Horloge et de la Minuterie . . . . . . . . . . . . . . . . . . . . . . .
Infusion du Café . . . . . . . . . . . . . . . . . . . . . . . . . . . . . . . . . . . . . . . . . . . .
Pause ‘N Serve Automatique . . . . . . . . . . . . . . . . . . . . . . . . . . . . . . . . . .
Arrêt Automatique . . . . . . . . . . . . . . . . . . . . . . . . . . . . . . . . . . . . . . . . . .
Instructions de Nettoyage. . . . . . . . . . . . . . . . . . . . . . . . . . . . . . . . . . . . .
Nettoyage de la Carafe . . . . . . . . . . . . . . . . . . . . . . . . . . . . . . . . . . . . . . .
Pour Ajuster la Plaque Chauffante . . . . . . . . . . . . . . . . . . . . . . . . . . . . . .
Garantie Limitée . . . . . . . . . . . . . . . . . . . . . . . . . . . . . . . . . . . . . . . . . . . .
POUR UN THÉ ET UN CAFÉ AU GOÛT MEILLEUR,
UTILISER LES FILTRES DE MARQUE
MR. COFFEE® DE 8 À 12 TASSES.
2
3
3
4
4
5
6
7
7
7
7
8
8
MODÈLES DE REMPLACEMENT DE
CARAFES MR. COFFEE PD12 (BLANC)
PD13 (NOIR)
P OUR U TILISATION D OMESTIQUE O NIQUEMENT
POUR DES QUESTIONS OU UN SERVICE DE DÉPANNAGE, APPELEZ
1-800-672-6333
DE
P OUR S ERVICE , A PPELER LE 1-800-MR COFFEE (1-800-672-6333)
9 H 00 DU MATIN À 6 HEURES DU SOIR (H ORAIRE DE L’E ST ) DU L UNDI AU V ENDREDI
DE 9 H 00 DU MATIN À 3 HEURES DU SOIR (H ORAIRE DE L’E ST ) DU S AMEDI .
14
D IAGRAMME DES PARTES
COUVERCLE POUR
LA POUSSIÈRE
PANIER À FILTRE
NOIR AMOVIBLE
RÉSERVOIR D’EAU
PANIER À
FILTRE PIVOTANT
CARAFE
{
7:00
PR14 (NOIR)
PR15 (BLANC)
PR16 (BLANC)
PR17 (NOIR)
PR26 (BLEU)
PR27 (VERT)
PRX20 (BLANC)
PRX23 (NOIR)
PRX28 (BLEU)
PRX29 (VERT)
COUVERCLE POUR
LA POUSSIÈRE
PANIER À FILTRE
NOIR AMOVIBLE
RÉSERVOIR D’EAU
PANIER À
FILTRE PIVOTANT
CARAFE
Warming Plate
00 00
PRX30 (BLANC)
PRX33 (NOIR)
15
PARAMÉTRAGE DE L’H ORLOGE ET DE LA M INUTERIE
(PRX20, PRX23, PRX28 & PRX29)
PARAMÉTRAGE
DE L’HEURE
INDICATEUR PM
Paramétrage
des Minutes
HOUR
MIN
BREW SET
INDICATEUR
MARCHE/ARRÊT
BREW
7:00
AFFICHAGE
DE L’HORLOGE
AUTO / ARRÊT LUMIÈRE INDIQUE
QUE L’AUTO BESOINS D’ÊTRE REMIS
À L’ÉTAT INITIAL
INDICATEUR
MARCHE/ARRÊT/AUTO
To Set the Clock
1. Turn the Control Switch to OFF.
2. Plug the power cord into your electrical outlet. The Clock Display will flash until you
set the time.
3. Alternately press and hold the HOUR and MINUTE buttons until you reach the current time.
The PM Indicator Light in the display will illuminate to indicate PM time.
To Pre-Set the Brewing Time
Press and hold the BREW button while setting the desired brew time with the HOUR and MINUTE
buttons. The PM Indicator Light in the display will illuminate to indicate PM time.
NOTE: It is not necessary to set the clock in order to brew coffee. If the HOUR or MINUTE buttons
are not pressed, the clock will display 12:00 and will not change. You must set the correct time in
order for the clock to begin operation, or to brew at a pre-set time.
To Brew Automatically at the Pre-Set Time
1. Follow Steps No. 1 through No. 5 in the “Brewing Coffee” section of these instructions.
2. Turn the Control Switch to OFF and then to AUTO.
3. Brewing will begin at the time you have preset and the coffee will remain hot in the decanter
for two hours. To keep your coffee hot for an additional two hours, turn the Switch
from AUTO to ON.
I MPORTANT
To Reset AUTO Brew at Pre-Set Time
The programmable timer will NOT automatically brew the next day if left in the
AUTO position after its last use. This is a safety feature. If the OFF Indicator Light
in the lower right hand corner of the Clock Display is illuminated, reset
AUTO BREW by turning the Control Switch to OFF and then to AUTO.
16
PARAMÉTRAGE DE L’H ORLOGE ET DE LA M INUTERIE
(PRX30 & PRX33)
INDICATEUR PM
Paramétrage
de l’Heure
Paramétrage
des Minutes
Hour
Indicateur de
Mise en Marche
Indicateur
Marche/Arrêt
Min
(Vert)
(Rouge)
Auto
Select
AUTO START
ON
00 00
Affichage de l’Horloge
Bouton de
Réglage de
la Température
1–4
CLEAN
Horaire de
Démarrage
Automatique
Mode de
Sélection
Indicateur pour
le Nettoyage
(Rouge)
WARMER TEMP
Sélecteur de
1 à 4 Tasses
(Jaune)
Pour Paramétrer l’Horloge
1. Appuyer et maintenir enfoncé le bouton HEURE (HOUR) jusqu’à ce que l’heure correcte ait été
atteinte. L’INDICATEUR DE LUMIÈRE PM (PM INDICATOR LIGHT), dans le coin supérieur
gauche de l’horloge, s’illuminera pour indiquer l’heure PM.
2. Appuyer et maintenir enfonçé le bouton MINUTE jusqu’à ce que l’heure correcte apparaisse.
REMARQUE: Il n’est pas nécessaire de paramétrer l’heure afin d’infuser le café. Si vous n’appuyez
pas sur les boutons HEURE (HOUR) ou MINUTE (MINUTE), l’horloge affichera 12:00 et ne
changera pas. Vous devez paramétrer l’heure correctement, de façon à ce que l’horloge
commence à fonctionner ou que le café commence à infuser à un horaire pré-défini.
Pour Programmer l’Horaire de Début de l’Infusion du Café
1. Appuyer et maintenir enfonçé le bouton AUTO jusqu’à ce la lumière du démarrage automatique
(AUTO START) commence à clignoter.
2. L’indicateur AUTO START continuera à clignoter, vous indiquant que vous pouvez programmer
l’horaire du démarrage automatique (AUTO START).
3. Appuyer sur le bouton HEURE (HOUR), puis sur le bouton MINUTE jusqu’à ce que l’heure
souhaitée apparaisse sur l’affichage de l’horloge. Il s’agit de l’heure à laquelle vous souhaitez
que votre cafetière se mette en route.
4. Relâcher le bouton AUTO. Après 7 secondes, l’indicateur AUTO START disparaitra.
L’horloge se remettra à l’heure courante.
Pour une Mise en Marche Automatique à l’Heure Programmée
1. Suivre les étapes 1 à 5 dans la section ‘Infusion du Café’ dans ce Manuel d’Instructions.
2. Appuyer sur le bouton de sélection (SELECT) jusqu’à ce que la lumière de l’AUTO START
s’allume, puis relâcher. La lumière de l’AUTO START restera allumée. La cafetière se mettra
automatiquement en route à l’heure programmée.
Pour Vérifier l’Heure de Démarrage Automatique
Appuyer et maintenir enfonçé le bouton AUTO jusqu’à ce la lumière du démarrage automatique
(AUTO START) commence à clignoter. L’heure programmée apparaîtra sur l’affichage de l’horloge.
Après sept secondes, l’horloge reviendra à l’heure courante.
Pour Faire 4 Tasses ou Moins (Mode Petite Quantité)
Si vous voulez n’obtenir que 4 tasses ou moins, appuyer et maintenir enfonçé le bouton de
sélection (SELECT), jusqu’à ce que la lumière de démarrage automatique (AUTO START)
et celle de 1-4 CUPS soient toutes les deux allumées. Ce mode rallonge le cycle d’infusion
du café d’approximativement 30% pour garantir une saturation maximale du café.
17
I M P O R TA N T
NETTOYER VOTRE MACHINE AVANT LA PREMIÈRE UTILISATION!
Nettoyer la carafe, le couvercle et le panier du filtre amovible dans une
solution d’eau légèrement savonneuse. Très bien rincer chacun des
éléments. Suivre les étapes 4 à 6 sur la page suivante (uniquement avec de
l’eau) pour nettoyer l’intérieur de votre cafetière.
B RIÈRE LE C AFÉ
1. Ouvrir le panier pivotant vers votre gauche. Insérer un papier filtre de la marque MR. COFFEE®
dans le panier à filtre intérieur noir.
2. Ajouter la quantité de café désirée en fonction du tableau de mesures de café ci-dessous.
Secouer légèrement pour niveler le café.
3. Vérifier bien que le filtre de papier est correctement centré avant de repositionner le panier à filtre.
4. Remplir la carafe avec de l’eau du robinet à la capacité souhaitée et tel qu’indiqué sur la paroi
de la carafe (1 tasse = 5 onces). Pour faire 2 tasses à café, remplir la carafe jusqu’au milieu
de la bande argentée. Pour faire 12 tasses, remplir la carafe jusqu’à la limite du bec verseur.
Pour un remplissage facile et précis, vous trouverez également les indications concernant
les tasses dans le réservoir.
5. Verser l’eau dans le réservoir à eau. Placer la carafe vide sur la plaque chauffante.
6. Appuyer et maintenir le bouton de sélection (SELECT) jusqu’à ce que la lumière rouge de
l’indicateur ON se mette en marche. Lorsque le café s’arrête de couler, un signal sonore de 5 bips
vous fera savoir que le cycle d’infusion du café est terminé. La lumière ON restera allumée après
la fin du cycle, pour vous indiquer que la plaque chauffante est toujours chaude.
7 Ôter avec précaution le panier à filtre intérieur noir et se débarrasser du marc de café et du filtre.
Rincer le panier à filtre et le repositionner.
8. Pour faire une autre carafe de café, répéter les étapes 1 à 7.
9. Soyez sûr d’éteindre votre machine à café lorsque la carafe est vide et que vous ne vous servez
plus de votre machine à café. Pour l’éteindre, appuyer sur le bouton de sélection jusqu’à ce
que toutes les lumières soient éteintes. Débrancher le cordon d’alimentation lorsque vous
n’utilisez pas la cafetière ou l’horloge.
•
•
•
ATTENTION !
Pour éviter tout risque d’accident corporel ou de dégat domestique
en raison de trop-plein, bien vérifier que la carafe est carrément
centrée sous le filtre durant le cycle de l’infusion.
Le café infusé et le marc de café contenus dans le panier sont
extrêmement chauds. Veuillez le manipuler avec précaucion pour
éviter des brûlures.
Si le panier à filtre déborde ou n’autorise pas l’égouttement durant
le cycle d’infusion, ne pas ouvrir ou tenir le panier. Débrancher la
machine à café et attendre le refroidissement du contenu avant
manipulation!
18
INFUSER
MESURES DE CAFÉ RECOMMANDÉS
Pour de meilleurs résultats, utiliser une
mouture appropriée pour les cafetières
goutte-à-goutte automatiques.
Rappelez-vous d’employer plus ou moins
de café à votre goût .
12 T
10 T
8T
6T
4T
2T
CAFÉ MOULU
11 Cu. S. ou 5-1/2 mesures
9 Cu. S. ou 4-1/2 mesures
7 Cu. S. ou 3-1/2 mesures
6 Cu. S. ou
3 mesures
4 Cu. S. ou
2 mesures
2 Cu. S. ou
1 mesure
VALVE DE M ARCHE -A RRÊT A UTOMATIQUE PAUSE ‘N S ERVE
Pour votre commodité, notre fonction Pause ‘N Serve vous permet de glisser une tasse pendant
une période de 30 secondes durant l’infusion du café. Cela évite également au café restant
dans le panier à filtre de couler sur la plaque chauffante une fois l’infusion terminée.
A RRÊT A UTOMATIQUE
(PRX20, PRX23, PRX30 and PRX33 Uniquement)
Après 4 heures, la cafetière émettra trois bips et s’arrêtera automatiquement. Votre cafetière
conservera votre café chaud pendant deux heures (quatre heures pour Modèles PRX30 et
PRX33) et puis le coupera automatiquement. Pour conserver votre café chaud pour des deux
heures supplémentaires, tournez l’appareil OFF et puis tournez l’appareil à ON. Quand votre
carafe est vide, arrêtez votre cafetière en tournant le commutateur à OFF..
P OUR A JUSTER LA T EMPÉRATURE DE LA P LAQUE C HAUFFANTE
(PRX30 and PRX33 Uniquement)
Après infusion du café, vous pouvez le maintenir à une température constante. Utiliser le bouton
WARMER TEMPERATURE pour ajuster la température de la plaque chauffante. Ne pas laisser la
carafe bouillir à vide. Cela risquerait de l’abîmer.
C LEANING I NSTRUCTIONS
Your coffeemaker must be cleaned when you begin to notice excessive steaming or the brewing
time increases considerably. This condition is caused by a buildup of lime and mineral deposits
from your water. If the pumping action stops before all the water has been pumped out of the
machine, then the appliance requires cleaning. The frequency of cleaning depends on the hardness
of water used. The following table gives the suggested cleaning intervals.
I N T E R VA L LE S S U GG É R É S E N T R E
TYPE D’EAU
LE
N E T TOYA G E S
CLEANING FREQUENCY
Eau Douce
Tous les 80 Cycles d’Infusion
Eau Dure
Tous les 40 Cycles d’Infusion
19
U TILISATION DU N ETTOYANT DE M R COFFEE
®
(Lire les précautions d’emplois sur le côté du paquet du nettoyant avant son utilisation)
1.Remplir la carafe avec de l’eau chaude (niveau d’indicateur 4 à 5 tasses dans la carafe).
2.Vider le contenu d’un sachet de MR. COFFEE Cleaner dans la carafe et remuer avec une cuiller
de plastique ou de bois jusqu’à dissolution complète du produit nettoyant. Cela créera une
solution bleue claire.
3.Verser la solution bleue dans la cafetière.
4.Placer la carafe vide sur la plaque chauffante. Le panier pivotant avec le filtre noir en place devra
être fermé.
5.Appuyer et maintenir le bouton SELECT jusqu’à ce que la lumière CLEAN apparaisse.
Vous pourrez noter que le cycle de nettoyage est un peu plus lent que le cycle d’infusion.
Cela est automatiquement fait afin de laisser au produit plus de temps pour nettoyer.
6.A la fin du cycle de nettoyage, un signal sonore fera entendre un bip, la lumière CLEAN
disparaîtra et la cafetière s’arrêtera automatiquement.
7.Jeter la solution bleue et bien rincer la carafe, le couvercle et le panier à filtre.
8.Répéter les étapes 1 à 7 avec de l’eau propre (pas de solution bleue). À l’aide de la mise en
marche régulière (ON), continuer à nettoyer l’intérieur l’appareil jusqu’à ce que vous ne voyiez
plus de traces de solution bleue.
9.Si un cycle normal complet n’est pas effectué, répétez les étapes 1 à 8.
U TILISATION DU V INAIGRE
1.Verser 1 litre de vinaigre blanc de cuisine non dilué dans votre cafetière.
2.Placer un filtre dans le panier à filtre noir et fermer le panier pivotant.
3.Placer la carafe vide sur la plaque chauffante et appuyer et maintenir le bouton SELECT jusqu’à
ce que la lumière CLEAN s’allume. Lorsque 3 tasses ont coulées, appuyer sur le bouton SELECT
pour éteindre la lumière CLEAN. Laisser reposer pendant 1/2 heure.
4.Après cette période de temps, verser à nouveau le vinaigre dans la cafetière. Mettre la carafe vide
sur la plaque chauffante.
5.Appuyer et maintenir le bouton SELECT jusqu’à ce que la lumière CLEAN s’allume.
Laisser le mode de nettoyage fonctionner jusqu’au bout.
6.Jeter le vinaigre et le filtre papier.
7.Pour se débarasser de toute trace de vinaigre, verser une carafe pleine d’eau du robinet dans la
cafetière, la mettre sur ON (lumière rouge «ON» allumée) et la laisser accomplir un cycle entier.
8.Jeter l’eau et éteindre la cafetière (OFF). Répéter les étapes 7 à 8.
N ETTOYAGE DE LA C ARAFE
L’eau dure peut laisser un dépôt minéral blanchâtre dans la cafetière. Le café et le thé colorent
ces dépôts, laissant parfois des taches brunâtres dans la carafe. Pour se débarasser de ces
taches, suivre ces simples étapes:
1.Utiliser une solution égale de vinaigre blanc et d’eau chaude.
2.Laisser la solution dans la carafe pendant environ 20 minutes puis la jeter.
3.Laver et rincer la carafe avec précaution à l’aide d’un chiffon doux. Ne pas utiliser de produits
nettoyants abrasifs. Cela peut causer des rayures qui peuvent ensuite aboutir à ce que la carafe
se casse.
LA CARAFE ET LE COUVERCLE PEUVENT ÊTRE MIS DANS LE COMPARTIMENT SUPÉRIEUR DE LA MACHINE À LAVER LA VAISSELLE.
20
1-Y EAR L IMITED WARRANTY
Sunbeam Products, Inc. (“Sunbeam”) warrants that for a period of ONE year from the
date of purchase, this product will be free from defects in material and workmanship.
Sunbeam, at its option, will repair or replace this product or any component of the
product found to be defective during this warranty period. Replacement will be made
with a new or remanufactured product or component. If the product is no longer available,
replacement may be made with a similar product of equal or greater value. This is your
exclusive warranty.
This warranty is valid for the original retail purchaser from the date of initial retail purchase
and is not transferable. Keep the original sales receipt. Proof of purchase is required to
obtain warranty performance. Sunbeam dealers, service centers or retail stores selling
Sunbeam products do not have the right to alter, modify or any way change the terms
and conditions of this warranty.
This warranty does not cover normal wear of parts or damage resulting from any of the
following: negligent use or misuse of the product, use on improper voltage or current, use
contrary to the operating instructions, disassembly, repair or alteration by anyone other
than Sunbeam or an Authorized Service Center. Further, the warranty does not cover Acts
of God, such as fire, flood, hurricanes and tornadoes.
Sunbeam shall not be liable for any incidental or consequential damages caused by the
breach of any express or implied warranty. Except to the extent prohibited by applicable
law, any implied warranty of merchantability or fitness for a particular purpose is limited
in duration to the duration of the above warranty. Some states, provinces or jurisdictions
do not allow the exclusion or limitation of incidental or consequential damages or
limitations on how long an implied warranty lasts, so the above limitations of exclusion
may not apply to you. This warranty gives you specific legal rights, and you may also
have other rights that vary from state to state or province to province.
HOW TO OBTAIN WARRANTY SERVICE
Take the product to an Authorized Sunbeam Service Center. You can find the nearest
Authorized Sunbeam Service Center by calling 1-800-672-6333. If a Service Center
is not conveniently located, attach a tag to the product that includes your name, address,
daytime telephone number and description of the problem. Include a copy of the original
sales receipt. Carefully package the product and send either by UPS or Parcel Post with
shipping and insurance prepaid to:
SUNBEAM SERVICE CENTER
c/o Warranty Center
117 Industrial Row
Purvis, MS 39475
DO NOT RETURN THIS PRODUCT TO THE PLACE OF PURCHASE.
If you have any questions regarding this warranty please call 1-800-672-6333.
21
©2000 Sunbeam Products, Inc. All rights reserved.
MR. COFFEE® is a registered trademark of Sunbeam Products, Inc.
Distributed by Sunbeam Products, Inc., Boca Raton, Florida 33431.
©2000 Sunbeam Products, Inc. Touts droits réservées.
MR. COFFEE® est une marque de deposée de Sunbeam Products, Inc.
Distributée par Sunbeam Products, Inc., Boca Raton, Florida 33431.
Printed in U.S.A. / Imprimé aux Étas-Unis
P. N. 106287