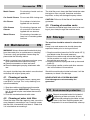
1
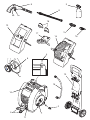
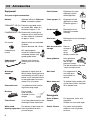
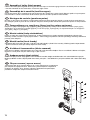
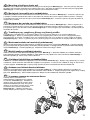
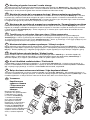
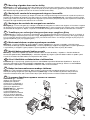
www.alto-online.com
ALTO Excellent 125/135
ALTO Excellent 125/135 X-TRA
EN
ES
PT
EL
PL
CS
HU
TR
RU
Instruction manual........................
Manual de Instrucciones ...............
Manual de Instruções ....................
γχειριδιο οδηγιων ..........................
Instrukcja obsługi..........................
Návod k obsluze.......................
Üzemeltetési útmutató ...............
Ýþletme kýlavuzu ............................
Руководство............................
3
9
16
23
30
37
43
50
57
-
8
15
22
29
36
42
49
56
63
9
3
8
9b
9a
16
12
7a
17
14
7b
4
6
13
15
10
2
5
1
11
We congratulate you on your new ALTO High Pressure Washer
We are confident that the new high pressure washer of ALTO will justify your expectations of quick and
effective cleaning. Now you have a cleaning device, which will facilitate your future cleaning tasks and make
them more effective. Many tasks, which were previously difficult, can now be solved in a few minutes and
with a much better result.
If, contrary to expectations, problems should arise which cannot be remedied by means of the information
in section 7.0, the ALTO service organization will be at your disposal.
ALTO is a global concern with a comprehensive knowledge within development and manufacturing of efficient and environmentally friendly cleaning solutions. Our product range comprises cleaning solutions for
selected customer groups - from machines for domestic use to big industrial cleaning systems.
The expertise of ALTO is cleaning focusing on the need of the customer. The key word is confidence - we
name it Total Cleaning Confidence TM. Our wish is that you as a customer should feel quite confident that
the cleaning equipment you buy from us is the most efficient and that it fulfils all of your expectations.
Best regards
ALTO Danmark A/S
Fields of application
EN
The applications for this product are domestic
cleaning jobs:
Car, motorbike, boat, caravan, trailer, patio/drive/
flagstones, woodwork, brickwork, barbecue,
garden furniture etc.
Contents
1.0
2.0
3.0
4.0
5.0
6.0
7.0
8.0
EN
Preparation..................................................... 4
Operating instructions .................................... 5
Accessories .................................................... 6
Maintenance................................................... 7
Storage........................................................... 7
Environmental protection................................ 7
Trouble shooting guide ................................... 8
Warranty conditions...................................... 64
Assembly of garden hose reel ............................. 68
Assembly of trolley .............................................. 70
Mounting of trolley on basic unit ......................... 71
Mounting of garden hose reel ............................. 72
Mounting of garden hose reel on trolley .............. 73
Wall mounting...................................................... 74
Model survey
EN
1. On/off switches
2. Water inlet connector and filter
3. Foam Sprayer
4. Cleaning tool for nozzle
5. High pressure hose/Electrical cable
6. Handle for manual winding
7a. TORNADO® PR nozzle
7b. POWERSPEED® nozzle
8. Spray lance
9. Spray gun with trigger (9b) and lock (9a)
10. Handle for carrying
11. Pedal for automatic winding
12. Nozzle storage (not standard)
13. Trolley (not standard)
14. Hose reel (not standard)
15. Connection hose (not standard)
16. Wall fitting (not standard)
17. Hose guidance (not standard)
Specifications: See model tag of machine.
We reserve the right to alter the specifications.
3
1.0 Preparation
Before starting up your high pressure washer, we
advise you to carefully read through this instruction
manual. Follow all instructions to minimize the risk
of injuries when using the machine.
Prior to operation
Before you start up your new machine for the first
time, you must mount the water inlet coupling.
EN
1.0 mm²
1.5 mm²
2.5 mm²
max.
max.
max.
12.5 m
20 m
30 m
Cable connections should be kept dry and off the
ground.
Always uncoil the extension cable completely to
avoid heat damage to the cable.
Water connection
Connect the high pressure washer by means of
the water hose to the water tap (pressure of inlet
water, max. 10 bar - temperature of inlet water, max.
50°C). You may use an ordinary 1/2" garden hose
of min. 5 m and max. 25 m. Attach the hose using
a quick connector.
NOTE: Connection to the public mains according to
regulations.
IMPORTANT! Only use water without any impurities. If there is a risk of running sands in the inlet
water (i.e. from your own well), an additional filter
should be mounted.
Assembly of garden hose reel (see page 68)
Assembly of trolley (see page 70)
Before starting up your machine please check it
carefully for any defects. If you find any, do not start
up your machine and contact your ALTO distributor.
Especially check:
The insulation of the electric cable should be
faultless and without any cracks. If the electric
cable is damaged, an authorized ALTO distributor
should replace it.
Mains power connection
The following should be observed when connecting
the high pressure washer to the electric installation:
Only connect the machine to an installation with
earth connection.
The electric installation shall be made by a certified electrician.
It is strongly recommended that the electric supply to this machine should include a residual
current device (GFCI).
Extension cable
Extension cables should be of a watertight construction and comply with the below-mentioned
requirements for length and cable dimensions.
4
Safety precautions
WARNING! High pressure jets can be
dangerous. Never direct the water jet
at persons, pets, live electrical equipment or the machine itself.
The operator and anyone in the immediate vicinity of the site of cleaning
should take action to protect themselves from being struck by debris dislodged during operation. Wear goggles
during operation.
Never try to clean clothes or footwear on yourself
or other persons.
Do not let children or people who have not read
the instruction manual operate the machine.
Never use the machine in an environment where
there could be a danger of explosion. If any doubt
arises, please contact the local authorities.
It is not allowed to clean asbestos-containing
surfaces with high pressure.
This high pressure washer must not be used at
temperatures below 0°C.
Preparation
EN
Operating Instructions
EN
Safety devices
2.3 Start
Locking device on spray gun:
The spray gun features a locking device (9a). When
the pawl is activated, the spray gun cannot be operated.
1. Check that the machine is in horizontal position.
NOTE: Do not place the machine in high grass!
2. Release the trigger lock (9a).
3. Activate the trigger of the spray gun (9b) and let
the water run until all air has escaped from hoses
and pump.
4. Press the On/Off switch "I" (1).
Thermal sensor:
A thermal sensor protects the motor against overloading. The machine will restart after a few minutes
when the thermal sensor has cooled.
2.0 Operating Instructions
2.1 Operating facilities
ON/OFF switch (1).
Spray gun (9) with lock (9A).
2.2 Connection
1. Unwind the high pressure hose and the electrical
cable (5) completely.
NOTE: Only use one extension hose of max. 7 m.
IMPORTANT! To ensure that the unwinding and
winding up of the high pressure hose and the
electrical cable is only done when the machine
is relieved of pressure, only tend the hose and
cable winder when the spray gun is detached and
the cable is unplugged.
2. Check that the filter is mounted in the water inlet
pipe (2) and that it is not clocked up.
The inlet filter must always be fitted in the water
inlet pipe to filter out sand, limestone and other
impurities, as they will damage the pump valves.
CAUTION: Failure to fit the filter will invalidate the
guarantee.
3. Screw the water inlet connector (2) onto the
water inlet pipe.
4. Make sure that the spray gun is locked in the Off
position by activating the pawl (9a).
5. Press the nipple of the high pressure hose (5)
into the spray gun (9).
6. Mount the nozzle or any other equipment you
want to use.
Note: When attaching to the snap connector, the
pawl on the side of the connector should come
out again. Press the pawl to detach the equipment.
7. Connect the machine to the water and power
supplies.
2.4 Operation
1. The spray lance is affected by a thrust
during operation - therefore always hold
it firmly with both hands. IMPORTANT:
Point the nozzle at the ground.
2. Activate the trigger (9b) of the spray gun (9).
3. Always adjust the distance and thus the pressure of the nozzle to the surface, which is to be
cleaned.
NOTE: The pressure can be adjusted at the TORNADO® PR nozzle (7A).
Højtryk
High
pressure
Lavtryk
Low
pressure
NOTE: Do not cover the machine during operation.
If the machine is left or not used for 5 minutes, it
must be switched off on the start/stop switch (Press
the On/Off switch "O".
2.5 End of operation
1. Press the On/Off switch “O” (1).
2. Disconnect the electrical plug from the socket.
3. Shut off the water supply and activate the trigger
(9b) to relieve the machine of pressure.
4. Detach the spray gun (9).
5. Wind up the hose and the cable (5) leading them
from the left to the right and back again in order
to wind them up in an even layer.
Concerning storage, please refer to section 5.0.
The pressure washer is now ready for operation.
5
3.0 Accessories
Equipment
EN
Patio Cleaner
Equipment for quick
cleaning of patio/
drive/flagstones.
Foam sprayer (3)
TORNADO® PR (7a) Pressure regulated universal nozzle. Max. effect at a
distance of approx. 7 cm.
Equipment for the
application of foam.
Distance approx. 1
m.
Garden brush
POWERSPEED® (7b) Nozzle with rotating jet for
stubborn dirt on hard surfaces. Max. effect at a distance
of approx. 10 cm.
Rotating brush for
cleaning of wooden
surfaces.
Rim brush
Rotating brush for cleaning of
wheel rims.
Wall accessosries
storage
Rack for
storage of
hose,
spray
handle, nozzles etc.
Hose guidance
Hose guidance
for stationary
use of high
pressure washer.
Can be mounted on the wall
- even around corners.
Wall hook
For suspension of
your high pressure washer on
the wall.
Water hose reel
To update trolley models with
a hose reel solution. Includes
25 m garden hose.
Only use original accessories.
Nozzles
Car nozzle
Attached with the „Click and
Clean“ connector system.
Special nozzle for enameled
surfaces.
Optimal distance: 30 - 50 cm.
Undershassis
nozzle
90o angled special
nozzle for undercarriage
and wheel arches. Integrated guide shoes.
Underchassis
spray lance
Special spray lance for
washing your car underneath.
Multiangle
adaptor
Adjusted in angles from 0o 90o for better working posture
and cleaning of hard to get at
places as for instance barrels
or the underside of the lawn
mower. Fits all nozzles.
Extension hose
7 m extension hose increasing the working range.
Brushes
For cars and
other surfaces.
Available in more
shapes.
Tube cleaner
15 m long tube cleaner for the
cleaning of tubes and drains.
Water-sandFor removal of paint and rust.
blasting equipment Sand available from do-ityourself shops.
6
Detergents
Stone & Wood
Cleaner
For flagstones, brick- and
woodwork.
Suitable for moss and algae.
Plastic Cleaner
For plastic and synthetic
materials such as garden
furniture.
Accessories
Metal Cleaner
EN
For cleaning of metal such as
garden tools.
Maintenance
EN
The inlet filter must always be fitted inside the water
inlet pipe to filter out sand, limestone and other
impurities, as they will damage the pump valves.
Car Combi Cleaner For cars etc. With rinsing wax.
Alu Cleaner
For surfaces of aluminium.
Applied with an atomizer.
Oil & Grease
Cleaner
For cleaning of grease and
oil on motors for instance.
Applied with an atomizer.
Wood Cleaner
For cleaning of wooden surfaces incl. of wooden garden
furniture.
CAUTION: Failure to fit the filter will invalidate the
guarantee.
4.3 Cleaning of machine vents
4.0 Maintenance
EN
WARNING! Always disconnect the electrical plug
from the socket prior to maintenance or cleaning.
To ensure a long and problem free working life,
please take the following advice:
The machine should be kept clean so as to let cooling air pass freely through the machine vents.
5.0 Storage
EN
The machine should be stored in a frost-free
room!
Pump, hose and accessories should always be
emptied of water prior to storing as follows:
Wash out water hose, high pressure hose, spray
lance and accessories before mounting.
Clean the connectors of dust and sand.
Rinse the detergent spraying attachment after
use.
1. Stop the machine (press the On/Off switch “O” (1)
and detach water hose and accessory.
2. Restart the machine and activate the trigger (9b).
Let the machine run until no more water runs
through the spray gun (9).
3. Stop the machine, unplug and wind up hose and
cable (5).
4. Place spray handle, nozzles and other accessories in the holders of the machine.
Any repair should always be made in an authorized
workshop with original spare parts.
Should the machine by mistake be frozen, it will be
necessary to check it for damage.
4.1 Cleaning of nozzle
NEVER START-UP A FROZEN MACHINE.
Frost damages are not covered by the
guarantee!
A clogging up in the nozzle causes a pump pressure which is too high. This is why cleaning is required immediately.
1. Stop the machine and disconnect the nozzle.
2. Clean the nozzle. IMPORTANT: The cleaning
tool (4) should only be used when the nozzle is
detached!
3. Flush the nozzle backwards with water.
4.2 Cleaning of water inlet filter
Clean the water inlet filter regularly once a month or
more frequently according to use. Carefully loosen
the filter with a screwdriver and clean it. Check that
it is intact before re-mounting it.
6.0
Environmental protection
Recycle unwanted materials instead of
disposing of them as waste. All tools,
hoses and packaging should be sorted,
taken to the local recycling center and
disposed of in an environmentally safe way.
7
7.0 Trouble shooting guide
EN
To avoid unnecessary disappointments, you should check the following before contacting the ALTO service
organization:
Symptom
Cause
Recommended action
Machine refuses to start
Machine not plugged in
Defective socket
Fuse has blown
Defective extension cable
Plug in machine.
Try another socket.
Replace fuse. Switch off other machines.
Try without the extension cable.
Fluctuating pressure
Pump sucking air
Check that hoses and connections are airtight.
Clean and replace or refer to local ALTO
distributor
Clean and replace or refer to local ALTO
distributor.
Valves dirty, worn out
or stuck
Pump seals worn out
Motor busses
Low voltage or
low temperature
Activate the trigger of the spray gun.
Machine stops
Fuse has blown
Incorrect mains voltage
Replace fuse. Switch off other machines.
Check that the mains voltage corresponds
to specification on the model tag.
Leave the washer for 5 minutes to cool down.
Clean the nozzle (see section 4.1)
Thermal sensor activated
Nozzle partially blocked
Fuse blows
Fuse too small
Change to an installation higher than the
amp. consumption of the machine.
You may try without the extension cable.
Machine pulsating
Air in inlet hose/pump
Allow machine to run with open trigger until
regular working pressure resumes.
Check that the water supply corresponds to
specifications required (see model tag)
NB! Avoid using long, thin hoses (min. 1/2”)
Clean the nozzle (see section 4.1)
Clean the filter (see section 4.2)
Straighten out hose.
Inadequate supply of
mains water
Nozzle partially blocked
Water filter blocked
Hose kinked
Machine often starts
and stops by itself
Pump/spray gun is
leaking
Contact your nearest ALTO Service Centre.
Machine starts, but
no water comes out
Pump/hoses or accessory
frozen
No water supply
Water filter blocked
Nozzle blocked
Wait for pump/hoses or accessory to thaw.
Connect inlet water.
Clean the filter (see section 4.2)
Clean the nozzle (see section 4.1)
In case problems other than the above occur, please contact your local ALTO distributor.
Customer services (UK only):
ALTO Cleaning Systems Ltd.
Phone: 01 768 868 995
Gilwilly Industrial Estate
Penrith, Cumbria CA11 9BN
Customer service (AUS):
8
ALTO Overseas Inc.
1B/8 Resolution Drive
P.O. Box 797
Caringbah, N.S.W. 2229
Phone: 02 9524 6122
8.0 Warranty conditions
EN
ALTO guarantees high pressure washers for domestic
use for 2 years. If your high pressure washer or accessories are handed in for repair, a copy of the receipt must
be enclosed.
Guarantee repairs are being made on the following
conditions:
that defects are attributable to flaws or defects in
materials or workmanship. (wear and tear as well as
misuse are not covered by the guarantee).
that the directions of this instruction manual have
been thoroughly observed.
that repair has not been carried out or attempted by
other than ALTO-trained service staff.
that only original accessories have been applied.
that the product has not been exposed to abuse such
as knocks, bumps or frost.
that only water without any impurities has been used.
that the high pressure washer has not been used for
rental nor used commercially in any other way.
Repairs under this guarantee include replacement of defective parts, exclusive of packing and postage/carriage.
Besides, we refer to your national law of sale.
The machine should be forwarded to one of the service
centres of the ALTO organisation with description/
specification of the fault.
Repairs not covered by the guarantee conditions will
be invoiced. (I.e. malfunctions due to Possible Causes
mentioned in section Troubleshooting Chart of the
instruction manual).
8.0 Garantia
PT
ALTO oferece garantia de 2 anos para aparelhos de alta
pressao utilizados por particulares. A garantia e valida a
partir da data de aquisicao. Em caso de necessidade de
reparacoes dentro do prazo da garantia, a copia da nota
fiscal de compra devera entao ser anexado ao aparelho ou
acessorios.
Condicoes de reparacao dentro do prazo de garantia:
em caso de falhas de material ou de fabricacao (a garantia nao e valida em questoes de desgaste ou desuso)
as intrucoes contidas no manual de instrucoes deverao
ser mantidas rigorosamente.
eventuais reparacoes nao podem ser efetuadas por outos
servicos tecnicos que nao sejam os autorisados pela ALTO.
somente deverao ser utilizadas pecas originais.
o aparelho de alta pressao nao tenha sido exposto a
sobregargas em forma de pancadas, queda ou congelamento.
Somente tenha sido utilizada agua limpa, sem impuridades.
que o aparelho de alta pressao nao tenha sido alugado,
ou tenha sido utilisado a fins comerciais.
Reparacoes dentro da garantia incluem somente a troca de
pecas danificadas; nao sao incluidas despesas de transporte
ou de embalagem. Em qualquer caso, serao validas as leis
nacionais de compra.
O aparelho devera ser entregue/transportado a uma oficina
de servicos tecnicos autorizada pela ALTO, juntamente com
uma descricao/especificacao do defeito.
Reparacoes que nao sejam abrangidas pela garantia serao
faturadas (como exemplo, se a origem da falha e devida a
um dos motivos mencionados no manual de instrucoes, capitulo problemas e solucoes.
64
8.0 Condiciones de la garantía
ES
ALTO garantiza el equipo de limpieza de alta presión
para uso doméstico por 2 años. La garantía se aplica
desde la fecha de compra. Debe adjuntar una copia del
recibo al entregar para la reparación su máquina de alta
presión o sus accesorios.
Las reparaciones cubiertas por la garantía deben
cumplir las siguientes condiciones:
que los defectos sean atribuibles a fallos o defectos
en los materiales o la manufactura. (El desgaste por
utilización así como el mal uso no están cubiertos por
la garantía).
que las instrucciones de este manual se hayan observado completamente.
que la reparación no haya sido realizada o intentada
por persona ajena al personal instruido por ALTO.
que se hayan utilizado únicamente accesorios originales.
que el producto no se haya expuesto a malos usos
tales como golpes, abolladuras o heladas.
que se haya utilizado únicamente agua sin impurezas.
que el equipo de limpieza de alta presión no se haya
arrendado ni utilizado comercialmente de cualquier
otra manera.
Las reparaciones cubiertas por esta garantía incluyen
la sustitución de partes defectuosas, a excepción del
embalaje y portes/transporte. Además, consulte su
Ley Nacional de Ventas. La máquina debe ser enviada a uno de los servicios técnicos de ALTO con la
descripción/especificación de la avería.
Las reparaciones no cubiertas por las condiciones de
esta garantía se facturan. (Es decir, los desperfectos
debidos a Posibles Causas mencionadas en la sección Problemas. Guía rápida del manual de instrucciones).
8.0 Οροι Εγγύησης
EL
Η ALTO εγγυάται την καλή λειτουργία των πλυστικών
µηχανών οικιακής χρήσης για 2 χρόνια. Η εγγύηση
ισχύει από την ηµεροµηνία αγοράς. Εάν η πλυστική
σας µηχανή ή κάποιο παρελκόµενο δωθεί για επισκευή,
πρέπει να συνοδεύεται από ένα αντίγραφο του
παραστατικού αγοράς. Επισκευές υπό εγγύηση γίνονται
υπό τις κάτωθι συνθήκες:
η ίλάίη είναι αποτέλεσµα κακής συναρµολόγησης ή
ελαττωµατικού µέρους του µηχανήµατος. (Συνήθης
φθορά όπως και κακή χρήση δεν καλύπτονται από
την εγγύηση).
έχουν ακολουθηθεί οι οδηγίες χρήσης πιστά.
δεν έχει γίνει επισκευή (ή προσπάθεια επισκευής) από
µη εξουσιοδοτηµένο συνεργείο της ALTO.
µόνο γνήσια παρελκόµενα και αξεσουάρ έχουν
χρησιµοποιηθεί.
το µηχάνηµα δεν έχει κακοµεταχειρισθεί, χτυπηθεί ή
υποστεί παγετό.
µόνο καθαρό (πόσιµο) νερό έχει χρησιµοποιηθεί.
ότι δεν έχει χρησιµοποιηθεί για άλλη από οικιακή
χρήση (ενοικίαση ή επαγγελµατική)
Η υπό εγγύηση επισκευή καλύπτει µόνo τα
ελαττωµατικά µέρη και όχι την συσκευασία και
απoστoλή ή µεταφορά του µηχανήµατος. Aλλωστε
απευθυνθείτε στην εθνική σας νοµοθεσία περί
πωλήσεων. Το µηχάνηµα πρέπει να δωθεί για επισκευή
µόνο σε εξουσιοδοτηµένο συνεργείο της ALTO µε
περιγραφή της βλάβης.
Επισκευές που δεν καλύπτονται από την εγγύηση
θα χρεωθούν. (∆ηλαδή, δισλειτουργίες µε „Πιθανές
Aιτίες“ που αναφέρονται στην ενότητα και στον πίνακα
επίλυσης προβληµάτων αυτού του εγχειδίου).
8.0 GWARANCJA
PL
ALTO udziela 2-letniej gwarancji na wysokociśnieniowe
urządzenie czyszczące przeznaczone na użytek domowy. Gwarancja wchodzi w życie z dniem zakupu. Jeżeli
wysokociśnieniowe urządzenie czyszczące oddaje się do
naprawy gwarancyjnej, należy przedłożyć kopię rachunku.
Naprawy gwarancyjnej dokonuje się pod warunkiem, że:
chodzi o wadę materiału lub błąd fabryczny ( zużycie
lub usterki wywołane niewłaściwą obsługą nie są objęte
gwarancją)
ściśle stosowano się do zaleceń instrukcji obsługi
naprawy nie próbowali dokonać inni niż autoryzowany
przez ALTO personel obsługi
używano tylko oryginalne akcesoria
wysokociśnieniowe urządzenie czyszczące nie było
narażone na uderzenia, upadek lub działanie mrozu
używano tylko czystej wody, bez zanieczyszczeń
wysokociśnieniowe urządzenie czyszczące nie było
wynajmowane lub w inny sposób używane do celów zarobkowych
Okres gwarancyjny obejmuje wymianę uszkodzonych części,
nie obejmuje natomiast kosztów przesyłki ani opakowania.
Poza tym odsyłamy do krajowego ustawodawstwa
dotyczącego sprzedaży.
Urządzenie należy wraz z opisem usterki przesłać lub
oddać do naprawy do autoryzowanego przez ALTO zakładu
naprawczego.
Naprawy nie objęte przepisami gwarancji są płatne.
(Przykładowo zakłócenia w eksploatacji spowodowane
przyczynami wymienionymi w instrukcji obsługi, w rozdziale
Zakłócenia funkcjonowania i ich usuwanie).
8.0 Garancia
HU
ALTO két év garancíát biztosít azokra a magasssnyomású
tisztitókra, amelyek magánhasználatra vannak szánva. A garancia a megvevési dátumtól lép érvénybe. Ha a gép vagy a
tartozékok egy része garanciában levö javításra van beadva,
a számla másolatát is be kell adni.
Garanciaszolgáltatás a következöket feltételezi:
hogy anyag-vagy gyárihibáról van szó. (Kopás vagy rendellenes használat nem számit be).
hogy a használati utasútások pontosan be vóltak tartva.
hogy a javítást kizárolag ALTO-autorizált ser viceszemélyzet
végezte, és nem mások.
hogy nem használtak nemeredeti tartozékot.
hogy a magassnyomású tisztitó nem vólt kitéve káros
hatásnak, mint: ütközés, ütés, esés vagy fagy.
hogy csak tiszta vizzel vólt használva
hogy a gép nem vólt kikölcsönözve vagy más módon üzleti
célra felhasználva.
Egy garanciajavítás magába foglalja a defektes részek kicserélését, de nem fedezi a küldést és a csomagolást.
A gép beadandó egy ALTO-szervezet mühelybe, a hibaleírással együtt.
Az olyan javítások, amelyeket a garanciahatározatok nem fedeznek, fakturálva lesznek. (Mint pl. üzemzavarok olyan okok
miatt amelyek a Hibamegtalálás és hibajavítás fejezetbe
vannak említve).
8.0 Záruka
CS
ALTO Vám poskytuje dvouletou záruku na tlakový atmosférický …isti… pro upotÍebení v domácnosti. Záruka
má platnost od datumu prodeje. Jestliñe si necháte
pÍístroj opravit v záru…ní lhçt, musíte zároveÁ pÍedloñit
kopii ú…tu. Podmínky pro poskytnutí bezplatné opravy v
záru…ní lhçt:
ñe se jedná o chybu v materiálu, nebo produk…ní
nedostatek. (Na poÓkození a opotÍebení se záruka
nevztahuje.)
ñe instrukce v návodu na upotÍebení byly pÍesn
dodrñeny.
ñe se nejedná o pokus opravy od jiných osob, neñ od
autorizovaného servisního personálu firmy ALTO.
ñe nebyly pouñité jiné doplÁky, neñ originální ALTO
doplÁky.
ñe tlakový …isti… nebyl poÓkozen napÍ. ránou, pádem,
nebo mrazem.
ñe byla pouñita jen voda bez ne…istot.
ñe tlakový …isti… nebyl pronajímán jiným osobám,
nebo jiným zpçsobem pouñíván na výdle…nou …innost.
Oprava v záru…ní lhçt zahrnuje výmnu porouchaných
dílç, ale nekryje pÍípadné poplatky za zásilku a balné.
V jiných pÍípadech platí reklama…ní Íád. PÍístroj poÓlete
nebo odevzdejte k servisnímu oddlení ALTO a uve‹te
druh poruchy.
Poplatky za opravy, které nejsou kryté zárukou budou
vyú…továny. (NapÍ. poruchy vyjmenované v návodu na
pouñití v kapitole Hledání a oprava poruch.
8.0 Garanti
TR
ALTO basýnçlý temizleyici için, özel kullanýmlarda 2 yýllýk garanti verir. Garanti satýn alýnma tarihinden itibaren
geçerlidir. Basýnçla temizleyici veya parçalarý garantinin
geçerli olduðu zaman içerisinde tamire verildiðinde,
satýn alma fiþinin kopisini beraber getirmelisiniz.
Garantinin geçerli olduðu durumlar :
Malzeme veya fabrikasyon hatalarýnda (kullanýmdan
dolayý meydana gelen eskime veya yanlýþ kullanýmlar
garanti kapsamýna girmez.)
Kullaným tarifnamesin deki uyarýlara eksiksiz olarak
uyulmasý þarttýr.
Tamirin ALTO yetkili tamircisi veya servis elemanlarý
dýþýndan baþkasý tarafýnca yapýlmamalý.
Orjinal parçalar dýþýnda bir parçanýn kullanýlmamasý
Basýnçla temizlecinin yanlýþ kullanýlmamasý, vurma,
düþürme veya buzlanma gibi olaylarýn olmamasý.
Kullanýlan suyun içinde pislik olmamasý gerekir.
Basýnçlý temizleyicinin kiraya verilmemesi veya baþka
bir þekilde ticari maksatlý kullanýlmamasý.
Garanti, sakat parçalarýn deðiþmesini karþýlar, ama posta
masrafý veya ambalaj masraflarýna karýþmaz. Ayrýca
ülkenizdeki milli tüketici kanununu tavsiye ederiz.
Makina ALTO servis bayilerine veya tamircilerine getirilir
veya gönderilir, makinadaki hata veya tamri edilmesini
istediðiniz konuyu servisimize söyleyiniz.
Garantinin karþýlamadýðý tamirler ücret karþýlýðý yapýlýr.
(Örnek olarak, kullanma tarifnamesinde belirtilen yanlis
kullanma veya hatalardan dolayi meydana gelen
hasarlar.)
65
8.0 Условия гарантии
RU
ALTO предоставляет двухгодичную гарантию на
бытовые моечные машины высокого давления.
Если Ваши моечная машина высокого давления
или принадлежности сдаются в ремонт, должна
прилагаться копия чека.
Гарантийный ремонт осуществляется в следующих
условиях:
дефекты связаны с браком или неисправностями
материалов или изделия. (данная гарантия
не распространяется износ и неправильное
использование);
указания в данном руководстве полностью
соблюдались;
никто, кроме подготовленных ALTO специалистов
по техническому обслуживанию, не производил и
не пытался произвести ремонт;
применялись только оригинальные
принадлежности;
изделие не подвергалось неправильной
эксплуатации, например, ударам, тряске или
заморозке;
использовалась только вода без каких-либо
примесей;
моечная машина высокого давления не сдавалась
в прокат и не использовалась другим образом в
коммерческих целях.
Ремонт по данной гарантии включает замену
неисправных деталей, за исключением упаковки
и расходов на пересылку/доставку. Кроме того,
мы соблюдаем торговое законодательство Вашей
страны.
Машину следует отправить в один из сервисный
центров компании ALTO с описанием/подробным
изложением неисправности.
За ремонт, на который не распространяется
данная гарантия, будет выставлен счет. (То есть
неисправности в результате Возможных причин,
упомянутых в главе Устранение неисправностей
настоящего руководства).
66
67
EN
Assembly of garden hose reel (I) or nozzle storage (II) (bright turned screws)
1: Fasten the aluminium clamp to the end brackets with the enclosed clips and four bright turned Philips head screws. 2a:
(models with garden hose reel) Place handle and adaptor in the hose reel, lead it into the recesses of the frame and mount
the arrangement with four bright turned Philips head screws. 2b: (models with nozzle storage) Lead the nozzle storage into
the recesses of the frame and mount the arrangement with four bright turned Philips head screws. 3: (models with garden
hose reel) Unwind the hose, mount the quick coupling in the centre of the reel. Wind up the hose again.
ES
Ensamblaje del carrete de la manguera de riego (I) o de la cápsula de almacenamiento de la boquilla (II) (tornillos torneados brillantes)
1: Fije la abrazadera de aluminio a los brazos de cojinete utilizando los clips de sujeción incluidos y cuatro tornillos Philips
torneados brillantes. 2a: (modelos con carrete para la manguera de riego) Monte el asa y el adaptador en el carrete de la
manguera, páselo a través de los orificios del chasis y monte el conjunto con cuatro tornillos Philips torneados brillantes.
2b: (modelos con cápsula de almacenamiento de la boquilla) Monte la cápsula de almacenamiento a los orificios del
chasis con cuatro tornillos Philips torneados brillantes. 3: (modelos con carrete para la manguera de riego) Desenrolle la
manguera, monte el empalme rápido en el centro del carrete y enrolle la manguera de nuevo.
PT
Montagem do enrolador de mangueira (I) ou compartimento para bicos (II)
(parafusos prateados)
1: Aperte o dispositivo de fixação de alumínio nos suportes utilizando os grampos fornecidos e quatro parafusos Philips
prateados. 2a. (modelos com enrolador de mangueira) Coloque a manivela e o adaptador no enrolador de mangueira,
encaixe nas ranhuras da estrutura e monte o conjunto com quatro parafusos Philips prateados. 2b: (modelos com compartimento para bicos) Encaixe o compartimento para bicos nas ranhuras da estrutura e monte o conjunto com quatro
parafusos Philips prateados. 3: (modelos com enrolador de mangueira) Desenrole a mangueira e monte o encaixe rápido
no centro do enrolador. Volte a enrolar a mangueira.
EL
Συγκρότηµα καρουλιού φύλαξης ελαστικού σωλήνα ποτίσµατος κήπου (I) ή
ακροφυσίου (µπεκ) (II) (κοχλίες στιλπνού χάλυβα)
1: Στερεώστε το συσφιγκτικό κοχλία αλουµινίου στις τελικές υποδοχές µε τη βοήθεια των σφιγκτήρων που περιλαµβάνονται
στη συσκευασία και τεσσάρων κοχλίων κεφαλής τύπου Philips από στιλπνό χάλυβα. 2α: (µοντέλα µε καρούλι για τη
φύλαξη ελαστικού σωλήνα) Τοποθετήστε τη χειρολαβή και τον προσαρµογέα στο καρούλι του ελαστικού σωλήνα,
καθοδηγήστε τη µέσα στις κοιλότητες του σκελετού και στερεώστε τη διάταξη µε τη βοήθεια τεσσάρων κοχλίων κεφαλής
τύπου Philips. 2β: (µοντέλα για τη φύλαξη ακροφυσίου) Οδηγήστε τη διάταξη φύλαξης του ακροφυσίου µέσα στις
κοιλότητες του σκελετού και στερεώστε τη µε τη βοήθεια τεσσάρων κοχλίων κεφαλής τύπου Philips. 3: (µοντέλα µε καρούλι
για τη φύλαξη ελαστικού σωλήνα) Ξετυλίξτε τον ελαστικό σωλήνα, και στερεώστε τη διάταξη ταχείας σύνδεσης στο κέντρο
του καρουλιού. Τυλίξτε τον ελαστικό σωλήνα ξανά.
PL
Montaż bębna z wężem ogrodowym (I) lub uchwytu na dysze (II) (śruby obrobione)
1: Zamocuj zacisk aluminiowy do wsporników ograniczających, używając do tego celu uchwytów dostarczonych z
urządzeniem i czterech obrobionych śrub o łbach z gniazdkiem krzyżowym. 2a: (dotyczy modeli wyposażonych w bęben
z wężem ogrodowym) Umieść uchwyt i złączkę w bębnie z wężem, naprowadź bęben na wycięcia w obudowie i zamontuj
całość za pomocą czterech obrobionych śrub o łbach z gniazdkiem krzyżowym. 2b: (dotyczy modeli z uchwytem na dysze)
Naprowadź uchwyt na wycięcia w obudowie i zamontuj całość za pomocą czterech obrobionych śrub o łbach z gniazdkiem
krzyżowym. 3: (dotyczy modeli wyposażonych w bęben z wężem ogrodowym) Rozwiń wąż i zamontuj szybkozłącze na
środku bębna. Zwiń wąż.
CS Sestava navijáku na zahradní hadici (I) nebo uložení trysky (II) (přesné soustružené
šrouby)
1: Upevněte hliníkový držák na koncová ramena přiloženými sponami a čtyřmi přesnými soustruženými šrouby s hlavou
Philips. 2a: (modely s navijákem pro zahradní hadici) Rukojeť a adaptér uložte do navijáku, vložte je to vybrání v rámu a
sestavu připevněte čtyřmi přesnými soustruženými šrouby s hlavou Philips. 2b: (modely s uložením trysky) Vložte úchytku
pro trysku do vybrání v rámu a sestavu připevněte čtyřmi přesnými soustruženými šrouby s hlavou Philips. 3: (modely
s navijákem pro zahradní hadici) Rozviňte hadici a do středu cívky namontujte rychlospojku. Hadici opět naviňte.
HU A kerti tömlődob (I) és a fúvókatartó (II) összeszerelése (fényes csavarok)
1: Erősítse fel az alumínium kengyelt a peremre a tartozékként kapott kapcsolóelemmel és négy fényes csillagfejű
csavarral. 2a: (kerti tömlődobos típusok) Helyezze a tartót és az illesztőbetétet a tömlődobba, illessze a ház
bemélyedéseibe, és erősítse fel a szerkezetet négy fényes csillagfejű csavarral. 2b: (fúvókatartós típusok) Illessze a
fúvókatartót a ház bemélyedéseibe, és erősítse fel a szerkezetet négy fényes csillagfejű csavarral. 3: (kerti tömlődobos
típusok) Csévélje le a tömlőt, és illessze a gyorscsatlakozót a dob közepére. Csévélje fel újra a tömlőt.
TR
Bahçe hortumu makarasý (I) ya da aðýz depolama bölmesinin (II) montajý (açýk
çevirmeli vidalar)
1: Alüminyum kelepçeyi, birlikte verilen klipsler ve dört açýk çevirmeli Philips baþlý vidayla uç braketlerine tutturun.
2a: (bahçe hortumu makaralý modeller) Kolu ve adaptörü hortum makarasýna yerleþtirin, bunu çerçevenin girintilerine
sokun ve dört parlak çevirmeli Philips baþlý vidayla tertibatý monte edin. 2b: (aðýz depolamasýna sahip) Aðýz depolama
bölmesini, çerçevenin girintilerine sokun ve tertibatý dört açýk çevirmeli Philips baþlý vidayla monte edin. 3: (bahçe
hortumu makaralý modeller) Hortumu açýn, hýzlý birleþtiriciyi, makaranýn ortasýna monte edin. Hortumu yeniden sarýn
68
RU Сборка барабана для наматывания поливочного шланга (I) или отделения для
хранения патрубков (II) (обточенные винты)
1: Закрепите алюминиевые фиксаторы на концевых кронштейнах, используя прилагаемые зажимы и четыре
обточенных винта под крестовую отвертку. 2а: для моделей с барабаном для наматывания поливочного шланга:
прикрепите рукоятку и переходник к барабану для наматывания шланга, совместите его с пазами в корпусе и
выполните монтаж, используя четыре обточенных винта под крестовую отвертку. 2б: для моделей с отделением
для хранения патрубков: совместите отделение для хранения патрубков с пазами в корпусе и выполните монтаж,
используя четыре обточенных винта под крестовую отвертку. 3: для моделей с барабаном для наматывания
поливочного шланга: размотайте шланг и установите быстроразъемное соединение в центре барабана. Снова
намотайте шланг на барабан.
R
II
L
I
69
EN Assembly of trolley (black screws)
Click the two trolley parts together ensuring that the two snaps on the front engage. Place the enclosed profile on the back
- note the orientation of the screw holes ! Fasten the eight screws.
ES
Ensamblaje de la carretilla (tornillos negros)
Una las dos partes de la carretilla hasta que encajen los dos resortes de la parte frontal. Monte el perfil en la parte posterior teniendo en cuenta la orientación de los orificios para los tornillos. Apriete los ocho tornillos.
PT
Montagem do carrinho (parafusos pretos)
Encaixe as duas partes do carrinho, assegurando-se de que os dois pontos de fixação na parte da frente estão bem juntos. Coloque o perfil na parte de trás, tendo em atenção a orientação dos orifícios dos parafusos! Aperte os oito parafusos.
EL
Συναρµολόγηση της τροχήλατης βάσης (κοχλίες µαύρου χρώµατος)
Κουµπώστε µαζί τα δύο τµήµατα της τροχήλατης βάσης φροντίζοντας να κουµπώσουν τα δύο αυτιά στο εµπρός µέρος.
Τοποθετήστε το εσωκλειόµενο προφίλ σχήµατος U στο πίσω µέρος, προσέχοντας τον προσανατολισµό των ανοιγµάτων
για τις βίδες ! Σφίξτε τις οκτώ βίδες.
PL
Montaż wózka (śruby nieobrobione)
Połącz ze sobą obie części wózka i upewnij się, że dwa umieszczone z przodu zatrzaski odpowiednio połączyły jego
elementy. Umieść ceownik na tylnej części wózka — zwróć uwagę na położenie otworów pod wkręty! Zamocuj ceownik za
pomocą ośmiu wkrętów.
CS Montáž vozíku (černé šrouby)
Zaklapněte obě části vozíku do sebe a zajistěte, aby obě západy v přední části zacvakly. Přiložený profil U dejte dozadu
– pozor na orientaci otvorů pro šrouby! Upevněte osmi šrouby.
HU A tolókocsi összeszerelése (fekete csavarok)
Rakja össze a tolókocsi két felét figyelve arra, hogy elöl a két pecek illeszkedjen. Illessze a mellékelt U idomot a hátuljára,
figyelve a csavarlyukak irányára. Húzza meg a nyolc csavart.
TR
Arabanın montajı (siyah vidalar)
Arabanın iki parçasını bir araya getirin ve ön taraftaki iki mandalı, doğru oturduklarından emin olarak birbirlerine geçirin.
Makinayla birlikte verilen U biçimli profili arka tarafa yerleștirin – vida deliklerinin yerleșimine dikkat edin ! Sekiz adet vidayı
sıkın.
RU Сборка тележки (черные винты)
Защелкните две части тележки вместе так, чтобы обязательно соединились
две защелки на передней части. Поместите прилагающийся П-образный
профиль на заднюю часть тележки, обратите внимание на ориентацию
резьбовых отверстий! Закрепите восемь винтов.
2
1
70
EN
Mounting of trolley on basic unit
The trolley can be mounted or dismounted according to the cleaning task. Mounting (I): 1. Press the pawl (A) and press
the trolley over the upper aluminium brace. Release the pawl. 2. Pull back the trolley as to let the lower part engage. Dismounting (II): 1. Press the pawl (A). Thus the machine can be lifted off the trolley.
ES
Montaje de la carretilla en la unidad básica
La carretilla puede montarse o desmontarse en función de las tareas de limpieza. Montaje (I): 1. Presione la palanca (A)
y coloque la carretilla presionándola sobre la abrazadera de aluminio de la parte superior. Suelte la palanca. 2. Empuje
la carretilla hacia atrás hasta que encaje la parte inferior. Desmontaje (II): 1. Presione la palanca (A) para desmontar la
máquina de la carretilla.
PT
Montagem do carrinho na unidade básica
O carrinho pode ser montado ou desmontado em função da tarefa de limpeza. Montagem (I): 1. Prima a lingueta (A) e
pressione o carrinho de forma a passar por cima do suporte de alumínio superior. Liberte a lingueta. 2. Puxe o carrinho
para permitir que a parte de baixo encaixe. Desmontagem (II): 1. Prima a lingueta (A). Deste modo, o aparelho pode ser
levantado do carrinho.
EL
Τοποθέτηση της τροχήλατης βάσης στη βασική µονάδα
Η τοποθέτηση ή αποµάκρυνση της τροχήλατης βάσης µπορεί να γίνεται ανάλογα µε την εργασία καθαρισµού.
Τοποθέτηση (I): 1. Πιέστε τη γλώσσα (A) και πατήστε την τροχήλατη βάση επάνω από το άνω στήριγµα αλουµινίου.
Απελευθερώστε τη γλώσσα. 2. Τραβήξτε πίσω την τροχήλατη βάση έτσι ώστε να αφήσετε το κάτω τµήµα να συνδεθεί.
Αποµάκρυνση (II): 1. Πιέστε τη γλώσσα (A). Έτσι η συσκευή µπορεί να ανυψωθεί και να αποµακρυνθεί από τη βάση.
PL
Montowanie wózka na konstrukcji podstawowej
Wózek można zamontować lub zdemontować, w zależności od procedury czyszczenia. Montaż (I): 1. Naciśnij zapadkę
(A) i przyciśnij wózek do górnej klamry aluminiowej. Zwolnij zapadkę. 2. Odciągnij wózek w tył aż do zaskoczenia dolnej
części. Demontaż (I): 1. Naciśnij zapadkę (A). Urządzenie można teraz zdjąć z wózka.
CS Montáž vozíku na základní jednotku
Vozík lze namontovat nebo demontovat podle typu čištění. Montáž (I): 1. Stiskněte západku (A) a zatlačte vozík přes
horní hliníkovou konzolu. Uvolněte západku. 2. Vozík odtáhněte, aby spodní část mohla zacvaknout. Demontáž (II): 1.
Stiskněte západku (A). Pak lze stroj z vozíku zdvihnout.
HU A tolókocsi felerősítése az alapkészülékre
A tolókocsi a tisztítási feladatnak megfelelően le- és felszerelhető. Felerősítés (I): 1. Nyomja meg a pecket (A), és nyomja
a tolókocsit a felső alumínium ellentartó fölé. Engedje vissza a pecket. 2. Húzza vissza a tolókocsit, hogy az alsó része is
a helyére ugorjon. Leszerelés (II): 1. Nyomja meg a pecket (A). Ezzel a készülék leemelhető a tolókocsiról.
TR
Arabanın ana ünitenin üzerine takılması
Temizleme ișine bağlı olarak araba takılabilir veya çıkarılabilir. Takma (I): 1. Kilit mandalına (A) bastırın ve arabayı üst
alüminyum desteğin üzerine doğru bastırın. Kilit mandalını serbest bırakın. 2. Alt parçanın geçmesini sağlamak için arabayı
geri çekin. Çıkarma (II): 1. Kilit mandalına (A) bastırın. Böylece makina kaldırılarak arabadan ayrılabilir.
RU Установка тележки на основном блоке
Тележку можно установить или
демонтировать в зависимости от задачи
по очистке. Установка (I): 1. Нажмите на
защёлку (A) и протолкните тележку через
верхнюю алюминиевую скобу. Отпустите
защёлку 2. Потяните тележку назад, чтобы
её нижняя часть вошла в зацепление.
Демонтаж (II): 1. Нажмите защёлку (A).
Теперь машину можно поднять с тележки.
I
II
A
A
1
2
71
EN
Mounting of garden hose reel / nozzle storage
The water hose reel can be mounted or dismounted according to the cleaning task. Mounting (I): 1. Press the pawl (A) and
place the water hose reel in the upper recess. 2. Press the aluminium brace into the lower recess. Dismounting (II): 1. Press
the pawl (A). 2. At first pull out the garden hose reel from the bottom and then from the top.
ES
Montaje del carrete de la manguera de riego / Almacenamiento para boquillas
El carrete de la manguera puede montarse o desmontarse en función de las tareas de limpieza. Montaje (I): 1. Presione
la palanca (A) y monte el carrete de la manguera de agua en el hueco superior. 2. Presione la abrazadera de aluminio
hasta que encaje en el hueco inferior. Desmontaje (II): 1. Presione la palanca (A) 2. En primer lugar, suelte el carrete de
la manguera de riego por la parte inferior y después por la parte superior.
PT
Montagem do enrolador de mangueira no equipamento / Compartimento para bicos
O enrolador de mangueira pode ser montado ou desmontado em função da tarefa de limpeza. Montagem (I): 1. Prima a
lingueta (A) e coloque o enrolador de mangueira na ranhura superior. 2. Pressione o suporte de alumínio para o encaixar
na ranhura inferior. Desmontagem (II): 1. Prima a lingueta (A). 2. Primeiro, puxe a parte inferior do enrolador de mangueira e, depois, a superior.
EL
Τοποθέτηση του τυλικτήρα λάστιχου κήπου / Θήκη ακροφυσίου
Ο τυλικτήρας του λάστιχου νερού µπορεί να τοποθετείται ή να αποµακρύνεται ανάλογα µε την εργασία καθαρισµού.
Τοποθέτηση (I): 1. Πιέστε τη γλώσσα (A) και τοποθετήστε τον τυλικτήρα του λάστιχου νερού στην εµπρός εσοχή. 2. Πιέστε
το στήριγµα αλουµινίου µέσα στην κάτω εσοχή. Αποµάκρυνση (II): 1. Πιέστε τη γλώσσα (A). 2. Κατ’ αρχήν τραβήξτε έξω τον
τυλικτήρα λάστιχου κήπου από το κάτω µέρος, και κατόπιν από επάνω.
PL
Montowanie bębna z wężem ogrodowym / Uchwyt na dysze
Bęben węża wody można zamontować lub zdemontować, w zależności od procedury czyszczenia. Montaż (I): 1. Naciśnij
zapadkę (A) i umieść bęben z wężem wody w górnym wycięciu. 2. Wciśnij klamrę aluminiową do dolnego wycięcia. Demontaż (II): 1. Naciśnij zapadkę (A). 2. Najpierw wyciągnij bęben z wężem ogrodowym z części dolnej a następnie z górnej.
CS Montáž bubnu zahradní hadice / Uložení trysky
Buben zahradní hadice lze namontovat nebo demontovat podle typu čištění. Montáž (I): 1. Stiskněte západku (A)
a buben hadice na vodu vložte do horní drážky. 2. Zatlačte hliníkovou konzolu do spodní drážky. Demontáž (II): 1.
Stiskněte západku (A). 2. Nejprve vytáhněte buben hadice ze spodní a poté z horní části.
HU A kerti tömlődob csatlakoztatása / Fúvókatartó
A víztömlődob a tisztítási feladatnak megfelelően le- és felszerelhető. Felerősítés (I): 1. Nyomja meg a pecket (A), és
helyezze a víztömlődobot a felső bemélyedésbe. 2. Nyomja az alumínium ellentartót az alsó bemélyedésbe. Leszerelés
(II): 1. Nyomja meg a pecket (A). 2. Húzza le a víztömlődobot először alulról, majd felülről.
TR
Bahçe hortumu makarasının takılması / Ağız depolama bölmesi
Temizleme ișine bağlı olarak su hortumu makarası takılabilir veya çıkarılabilir. Takma (I): 1. Kilit mandalına (A) bastırın ve
su hortumu makarasını üst girintiye yerleștirin. 2. Alüminyum desteği alt girintinin içine doğru bastırın. Çıkarma (II): 1. Kilit
mandalına (A) bastırın. 2. Bahçe hortumu makarasını ilk olarak alttan, daha sonra üstten dıșarı çekin.
RU Установка
барабана для
садового шланга
/ Подставка для
хранения для
насадок
Водяной шланг можно
установить или демонтировать
в зависимости от задачи
по очистке. Установка (I):
1. Нажмите на защёлку
(A) и поместите барабан
для водяного шланга в
верхний паз. 2. Протолкните
алюминиевую скобу (A) в
нижний паз. Демонтаж (II):
1. Нажмите защёлку (A). 2.
Сначала потяните барабан для
садового шланга из нижней
части, а затем из верхней.
72
II
I
1
2
2
A
1
A
EN
Mounting of garden hose reel on trolley
Mounting (I): 1. Press the pawl (A). Place the garden hose reel in the recess with the pawl. 2. Press the aluminium brace
into the lower recess. Dismounting (II): 1. Press the pawl (A). At first pull out the garden hose reel from the bottom and
then from the top. The garden hose reel can also be used without the trolley.
ES
Montaje del carrete de la manguera de riego en la carretilla
Montaje (I): 1. Presione la palanca (A) Acople el carrete de la manguera de riego en el hueco con ayuda de la palanca. 2.
Presione la abrazadera de aluminio hasta que encaje en el hueco inferior. Desmontaje (II): 1. Presione la palanca (A) En
primer lugar, suelte el carrete de la manguera de riego por la parte inferior y después por la parte superior. El carrete de la
manguera de riego también puede utilizarse sin la carretilla.
PT
Montagem do enrolador de mangueira no carrinho
Montagem (I): 1. Prima a lingueta (A). Coloque o enrolador de mangueira na ranhura com lingueta. 2. Pressione o suporte
de alumínio para o encaixar na ranhura inferior. Desmontagem (II): 1. Prima a lingueta (A). Primeiro, puxe a parte inferior
do enrolador de mangueira e, depois, a superior. O enrolador de mangueira também pode ser utilizado sem o carrinho.
EL
Τοποθέτηση του τυλικτήρα λάστιχου κήπου στην τροχήλατη βάση
Τοποθέτηση (I): 1. Πιέστε τη γλώσσα (A). Τοποθετήστε τον τυλικτήρα λάστιχου κήπου µέσα στην εσοχή µε τη γλώσσα. 2.
Πίεστε το στήριγµα αλουµινίου µέσα στην κάτω εσοχή. Αποµάκρυνση (II): 1. Πιέστε τη γλώσσα (A). Κατ’ αρχήν τραβήξτε
έξω τον τυλικτήρα λάστιχου κήπου από το κάτω µέρος, και κατόπιν από επάνω. Ο τυλικτήρας λάστιχου κήπου µπορεί να
χρησιµοποιηθεί και χωρίς την τροχήλατη βάση.
PL
Montowanie bębna z wężem ogrodowym na wózku
Montaż (I): 1. Naciśnij zapadkę (A). Umieść bęben z wężem ogrodowym w wycięciu z zapadką. 2. Wciśnij klamrę
aluminiową do dolnego wycięcia. Demontaż (II): 1. Naciśnij zapadkę (A). Najpierw wyciągnij bęben z wężem ogrodowym
z części dolnej, a następnie z górnej. Bęben z wężem ogrodowym może być także używany bez wózka.
CS Montáž bubnu zahradní hadice na vozík
Montáž (I): 1. Stiskněte západku (A). Buben zahradní hadice umístěte do drážky v západce. 2. Zatlačte hliníkovou
konzolu do spodní drážky. Demontáž (II): 1. Stiskněte západku (A). Nejprve vytáhněte buben hadice ze spodní a poté
z horní části. Buben zahradní hadice lze také používat bez vozíku.
HU A kerti tömlődob csatlakoztatása a tolókocsihoz
Felerősítés (I): 1. Nyomja meg a pecket (A). Illessze a tömlődobot a pecekkel ellátott bemélyedésbe. 2. Nyomja az
alumínium ellentartót az alsó bemélyedésbe. Leszerelés (II): 1. Nyomja meg a pecket (A). Húzza le a víztömlődobot
először alulról, majd felülről. A víztömlődobot a tolókocsi nélkül is lehet használni.
TR
Bahçe hortumu makarasının arabaya takılması
Takma (I): 1. Kilit mandalına (A) bastırın. Bahçe hortumu makarasını kilit mandalıyla girintinin içine yerleștirin. 2.
Alüminyum desteği alt girintinin içine doğru bastırın. Çıkarma (II): 1. Kilit mandalına (A) bastırın. Bahçe hortumu
makarasını ilk olarak alttan, daha sonra üstten dıșarı çekin. Bahçe hortumu makarası arabasız da kullanılabilir.
RU Установка барабана садового шланга на тележке
Установка (I): 1. Нажмите
защёлку (A). Поместите
барабан для садового
шланга в паз с защёлкой. 2.
Протолкните алюминиевую
скобу (A) в нижний паз.
Демонтаж (I): 1. Нажмите
защёлку (A). Сначала
потяните барабан для
садового шланга из нижней
части, а затем из верхней.
Садовый шланг также можно
использовать и без тележки.
I
II
A
A
2
1
1
2
73
EN
Wall mounting
The complete unit can be mounted on the wall by means of special wall fittings. At first mount the upper fitting. Then mount
the lower fitting (distance: 54 cm from edge to edge). Only mount the fittings on a sturdy wall. Adjust the length of screws
and size of rawlplugs to the type of wall.
ES
Instalación mural
La unidad completa puede montarse en la unidad con ayuda de apliques especiales para instalación mural. En primer
lugar, monte el aplique superior. A continuación monte el aplique inferior (distancia: 54 cm de un extremo al otro). Monte
los apliques solamente en una pared sólida. Ajuste la longitud de los tornillos y el tamaño de los anclajes al tipo de pared.
PT
Montagem na parede
A unidade completa pode ser montada na parede através de suportes de parede especiais. Primeiro, monte o suporte superior. Em seguida, monte o suporte inferior (distância: 54 cm de extremidade a extremidade). Certifique-se de que monta
os suportes numa parede resistente. Ajuste o comprimento dos parafusos e o tamanho das buchas ao tipo de parede.
EL
Επίτοιχη τοποθέτηση
Ολόκληρη η µονάδα µπορεί να τοποθετηθεί επίτοιχα µέσω ειδικών στηριγµάτων τοίχου. Κατ’ αρχήν τοποθετήστε το άνω
στήριγµα. Στη συνέχεια τοποθετήστε το κάτω στήριγµα (απόσταση: 54 εκ από τη µία άκρη στην άλλη). Τα στηρίγµατα θα
πρέπει να τοποθετούνται σε γερό τοίχο. Ρυθµίστε το µήκος των βιδών και των βυσµάτων ανάλογα µε το είδος του τοίχου.
PL
Montaż na ścianie
Kompletne urządzenie może być także zamontowane na ścianie za pomocą specjalnych uchwytów. Najpierw zamontuj
uchwyt górny. Następnie zamontuj uchwyt dolny (odległość: 54 cm od jednej krawędzi do drugiej). Uchwyty można
montować jedynie na solidnej ścianie. Dobierz odpowiednią długość wkrętów i wymiary kołków, dostosowane do rodzaju
ściany.
CS Montáž na stěnu
Celou jednotku lze namontovat na stěnu pomocí speciálních nástěnných montážních prvků. Nejprve instalujte horní, pak
dolní montážní prvky (vzdálenost: 54 cm od okraje k okraji). Montážní prvky instalujte pouze do stabilní zdi. Upravte délku
šroubů a velikost hmoždinek podle druhu zdi.
HU Falra erősítés
A teljes készüléket a falra lehet szerelni speciális fali rögzítőkkel. Először a felső rögzítőt kell felszerelni. Azután az alsó
rögzítőt (a két széle közötti távolság: 54 cm). A rögzítőket csak szilárd falra szabad felerősíteni. A csavarhosszt és a tipli
típusát a falnak megfelelően kell megválasztani.
TR
Duvara montaj
Makinanın tamamı, özel duvar montaj elemanları yardımıyla bir bütün olarak duvara takılabilir. İlk olarak üst montaj
elemanını takın. Daha sonra alt montaj elemanını takın (uzaklık: kenardan kenara 54 cm). Montaj elemanlarını kesinlikle
sağlam bir duvara takın. Vidaların
uzunluğunu ve duvara takılacak dübellerin
büyüklüğünü duvarın türüne göre ayarlayın.
RU Крепление на стене
Устройство целиком можно крепить
на стене при помощи специальных
настенных креплений. Сначала
установите верхнее крепление. Затем
установите нижнее крепление (на
расстоянии 54 см от края до края).
Устанавливайте крепления только на
прочной стене. Отрегулируйте длину
винтов и размер ролплагов по типу стены.
1
2
74
54 cm
3
Art. no. 106411346
Art. no. 6411150
Art. no. 6410762
Art. no. 6410766
Art. no. 6411134
Art. no. 106411326
Art. no. 106411325
EN
ES
PT
EL
PL
CS
HU
TR
RU
Extension hose
Alargo de manguera
Mangueira de extensao
Σωλνας προκτασης
Wąż przedłużający
Prodluñovací hadice
Hosszabító
Uzatma hortumu
Шланг-удлинитель
EN
ES
PT
EL
PL
CS
HU
TR
RU
Patio Cleaner
Patio cleaner
Patio cleaner
Patio cleaner
Patio cleaner
Patio cleaner
Patio cleaner
Patio cleaner
Patio Cleaner
EN
ES
PT
EL
PL
CS
HU
TR
RU
Rotating brush
Cepillo rotatorio
Escova rotadora
Βορτσα µε ξστρα
Szczotka rotacyjna
RozpraÓova… pny
Forgó kefe
Döner fýrça
Bpaщeниe щетки
EN
ES
PT
EL
PL
CS
HU
TR
RU
Tube cleaner
Tubo limpiador
Limpador de canos
Αποφρακτικό
Wkładka do czyszczenia rur
„isti… potrubí
Csötisztitó
Boru temizlemesi
Очиститель для труб
EN
ES
PT
EL
PL
CS
HU
TR
RU
Auto kit
Kit de automóvil
Produto carros
Κιτ αυτο κιντου της
Zestawu do samochodu
Autosoupravy
Autocsomagnélkül
Araba paketi
Aвто комплект
EN
ES
PT
EL
PL
CS
HU
TR
RU
Rim brush
Cepillo de bordes
Escova para jantes
Βούρτσα ζάντας
Szczotka do felg
Kartáč na disky kol
Kerék (felni) kefe
Kenar süpürgesi
Щетка для дисков колес
EN
ES
PT
EL
PL
CS
HU
TR
RU
Garden brush
Cepillo de jardín
Esvova para jardim
Bούρτσα κήπου
Szczotka ogrodowa
Kartáč na zahradnické náčiní
Kerti kefe
Bahçe süpürgesi
Садовая щетка
RECEIPT
xx/xx/2004
ALTO high pressure washer
......... €
ALTO Danmark A/S
Industrivej 1, DK-9560 Hadsund
Tel.: +45 7218 2100
www.alto-online.com
6527924 a
Printed in Denmark by Parajett A/S
Copyright © 2004 ALTO Danmark A/S
Total