1
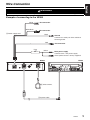
Installation manual
Manuel d’installation
Guía de Instalación
NP509
Clarion Co., Ltd.
All Rights Reserved.Copyright © 2009: Clarion Co., Ltd.
Printed in China / Imprimé en Chine / Impreso en China
*NP509(001-cover)E
1
QY-5012B
2009/1
CLARION PRODUCT REGISTRATION INFORMATION
For USA and Canada only
www.clarion.com
Dear Customer:
Congratulations on your purchase of a Clarion mobile electronic product. We are
confident that you’ll enjoy your Clarion experience.
There are many benefits to registering your product. We invite you to visit our website at
www.clarion.com to register your Clarion product.
We have made product registration simple with our easy to use website. The registration
form is short and easy to complete. Once you’re registered, we can keep you informed of
important product information.
Register at www.clarion.com - it’s easy to keep your Clarion product up to date.
INFORMATIONS DE L’ENREGISTREMENT DE PRODUITS CLARION
Pour les Étas Unis et le Canada seulement
www.clarion.com
Cher client:
Nous vous remercions d’avoir acheté ce produit électronique mobile Clarion. Nous sommes
confiants que vous apprécierez votre expérience Clarion.
Il y a beaucoup d’avantage à enregistrer votre produits. Nous vous invitons à visiter notre site
Web www.clarion.com pour enregistrer votre produit Clarion.
Nous avons facilité la tache d’enregistrement de produit simple et facile grâce à notre site Web.
Le formulaire d’enregistrement est court et facile à compléter. Lorsque vous êtes enregistrer,
nous pouvons vous tenir informé des informations important de produits.
Enregistrer à www.clarion.com - c’est facile de mettre à jour votre produit Clarion.
INFORMACIÓN DEL REGISTRO DE PRODUCTO DE CLARION
Para USA y Canada nomas
www.clarion.com
Querido Cliente:
Felicitaciones por su compra de producto electrónico móvil de Clarion. Estamos seguros que
usted gozará de su experiencia con el producto de Clarion.
Hay muchas ventajas al registrar su producto. Le invitamos a que visite nuestro sitio en internet
www.clarion.com para registrar su producto de Clarion.
Hemos hecho el registro de producto fácil en nuestro sitio. La forma de registro es corta y fácil
de completar. Una vez que lo registre, podremos proporcionarle la información de su producto.
Registrese en www.clarion.com - es fácil mantener su producto de Clarion actualizado.
*NP509(001-cover)E
1
Thank you for purchasing the Clarion NP509.
English
• Please read this manual thoroughly before operating this equipment.
• After reading this manual, be sure to keep it in a handy place (e.g., glove compartment).
• Check the contents of the enclosed warranty card and keep it carefully with this manual.
Contents
SPECIFICATIONS ............................................................................................................... 3
INSTALLATION AND WIRE CONNECTION MANUAL...................................................... 4
Safety Precautions ......................................................................................................... 4
Package Contents .......................................................................................................... 6
Name and Function of the Controls................................................................................ 6
Installing the Navigation Unit .......................................................................................... 7
Installing the GPS Anttenna ........................................................................................... 7
Wire Connection ............................................................................................................. 9
SPECIFICATIONS
Dimensions of the Main Unit:
5-9/32” Width (134mm) × 1-11/64” Height (29.6mm) × 5-5/8” Depth (143mm)
Weight of the Main Unit: 500g
* These specifications and designs are subject to change without notice for improvement purposes.
NP509
3
English
INSTALLATION AND WIRE
CONNECTION MANUAL
Safety Precautions
• For your own safety, please read this manual thoroughly before installation and connection. Please be
aware of the following precautions:
Symbol Identification
Notes on the Place to Install to
This manual uses various pictorial symbols to
show how to use this product safely and to avoid
harm to yourself, others and damage to your
property. Please ensure you study this manual
carefully.
WARNING
This symbol is intended to alert the user to
the presence of important operating
instructions. Failure to heed the
instructions may result in severe injury or
death.
CAUTION
CAUTION
This symbol is intended to alert the user to
the presence of important operating
instructions. Failure to heed the instructions
can result in injury or material damage.
Before Use
WARNING
• When installing the unit to a vehicle with
an airbag system, never install it in a
place where it may affect the operation of
the airbag.
If the airbag does not operate correctly at
an emergency situation, an accident or
injury may happen.
• Do not install this unit in the following
locations:
A location interfering with the driver’s
visual range or operation.
A location where the gear shift or brake
pedal are hindered.
A location where passengers are at risk.
An unstable location, or where the
system may fall.
If the operation is hindered or the unit
comes off, it may cause an injury or traffic
incident.
CAUTION
WARNING
CAUTION
• Confirm the battery voltage of the vehicle
to be installed. This unit is designed only
for vehicles with DC 12V power supply.
• Disconnect the negative terminal of the
battery before connecting wires,
otherwise an electric shock, injury by
short circuit may occur.
Car battery
4
NP509
• Do not install the system in the locations
described below. This may cause a fire,
accident or electrical shock:
A location exposed to rain or dust.
A location interfering with the driver’s
visual range or operation of the vehicle.
An unstable location, or where the system
may fall.
• Do not install the unit in areas subject to
strong vibration or other locations where
secure installation is not possible. Insecure
installation can cause the unit to work
loose, creating the risk of accident and
personal injury.
• Do not install this unit in a place exposed to
direct sunlight, heat or a place where the
vent holes or heat radiation holes are
covered.
Safety Precautions
Installation Notes
WARNING
• Please note the position of pipes, tanks
and electrical wirings before installing
the unit into the vehicle; failure in
avoiding these may cause a fire or
malfunction.
• Whenever using vehicle bolts or nuts for
unit installation or grounding, never use
the bolts and nuts of the steering system,
brake system, tank, or any other critical
safety component.
Doing so creates the risk of loss of
vehicle control, fire, and accident.
CAUTION
CAUTION
• Use only the supplied parts.
• If unspecified parts are used, they may
cause damage. If the unit comes off, it may
cause an accident or malfunction.
English
• When you install the antenna, mount it in a
place where the elements of the antenna do
not protrude beyond the edge of the front,
back, left and right of the vehicle.
If it comes in contact with pedestrians, it
may cause an accident.
Connection Notes
WARNING
• Loom all cables according to the
instruction manual, so as not to hinder
operation.
• Wire the connecting cords/cables away
from high temperature areas. If the
coatings of the cables melt, it could
cause an accident/fire by a short circuit.
Take care when wiring in the engine
compartment.
• When wiring the connecting cables in a
vehicle with an airbag system, never feed
the cables through a place where it may
affect the operation of the airbag.
An airbag not operating correctly in an
emergency may cause increased injury.
CAUTION
CAUTION
• Connect cables appropriately. If a wrong
connection is made, this may cause a fire or
accident.
• When passing cables through the body of
the vehicle, use non-conductive grommets.
If the coatings of the cables are worn out by
rubbing, this may cause an accident, fire or
a short circuit.
• After wiring cables, fix them with insulation
tape.
• Be sure to switch off the vehicle when
connecting or disconnecting cords to/from
the unit, otherwise an electric shock, injury
or accident may occur.
NP509
5
English
Package Contents
1
5
1
2
3
4
5
6
3
2
6
7
8
0
9
Main unit (Navigation unit) . . . . . . . . . . . . 1
Power supply cord . . . . . . . . . . . . . . . . . . 1
GPS antenna . . . . . . . . . . . . . . . . . . . . . . . 1
System cable (2.5 m) . . . . . . . . . . . . . . . . . 1
Velcro tape A . . . . . . . . . . . . . . . . . . . . . . . 2
Velcro tape B . . . . . . . . . . . . . . . . . . . . . . . 2
7
8
9
0
!
4
!
Double-sided tape . . . . . . . . . . . . . . . . . . . 1
Cord holder . . . . . . . . . . . . . . . . . . . . . . . . 3
Operation manual (Book) . . . . . . . . . . . . . 1
Installation manual (Book) . . . . . . . . . . . . 1
Warranty card . . . . . . . . . . . . . . . . . . . . . . 1
Name and Function of the Controls
1. Reset button
Use this button when the unit is frozen.
2. SD card slot
Use this slot to import updated data when it is
available in the future via an SD card. You can
import the location database of Safety Camera
stored in SD card to the internal memory.
3. USB port
Use this port to import updated map data when it
is available in the future via a USB memory stick.
3
1
6
NP509
2
English
Installing the Navigation Unit
Note:
• Never disassemble the unit by yourself.
1. Attach the Velcro tape.
• Affix the Velcro tape A to the bottom of the unit.
• Attach the Velcro tape B to the vehicle so it is positioned for mating with the Velcro tape A.
Note:
• Peel the backing paper from the adhesive side of the Velcro tape before affixing it to the unit or vehicle.
2. Attach the unit.
• Secure the unit by joining the pieces of Velcro tapes A and B.
Velcro tape A
Velcro tape B
Backing paper
Installing the GPS Anttenna
WARNING
• Do not install the GPS antenna in a place where it may interfere with the operation of the
airbag or hinder the driver’s visual range.
• Do not use the navigation system with the GPS antenna cord cut off. The power cables in the
cord may be short-circuited.
Note:
• The supplied GPS antenna is for installing inside the vehicle. Do not install it outside the vehicle.
• Install the GPS antenna more than 50 cm away from the main unit, other audio devices such as CD player,
and a radar detector. If it is installed near these devices, GPS reception may be impaired.
• It is recommended that the GPS antenna is sited towards the center of the road where GPS signal interruption
is minimized.
• To improve the GPS signal reception, install the GPS antenna horizontally on a flat plane.
• Do not wax or paint the cover of the GPS antenna. This may reduce the performance of the GPS antenna.
• Install the GPS antenna at least 10 cm away from the windshield.
• Wipe off the dirt of the mounting surface before installing the GPS antenna.
NP509
7
Installing the GPS Anttenna
English
1. Stick the double-sided tape to the bottom face of the GPS antenna.
Double-sided
tape
Bottom face of the GPS antenna
2. Mount the GPS antenna.
Stick it surely on a flat plane of the dashboard towards the center of the road where GPS signal
interruption is minimized.
3. Wire the GPS antenna cord.
Fasten the cord using the cord holders.
Stick it on a horizontal place of
the dashboard towards the
center of the road.
GPS antenna
Cord holder
(Shows an example in case of the left-hand traffic.)
8
NP509
WARNING
Be sure to read the section “Safety Precautions” before installation or connection operations.
Example of connecting to the VZ509
White
No connection
White/black
No connection
2 Power supply cord
Black
Red
Ground
Connect to a metal part of the vehicle to
connect ground.
No connection
Fuse
3A
Yellow
Main power supply
Connect to the +12V power supply
where power source is always supplied.
VZ509
NP509
3 GPS antenna
4 System cable
NP509
9
English
Wire Connection
Wire Connection
English
Example of connecting to the optional accessory kit
Speaker*
White
White/black
2 Power supply cord
Black
Ground
Connect to a metal part of the vehicle to
connect ground.
Red
+12V Accessory
Fuse
3A
Yellow
Main power supply
Connect to the +12V power supply
where power source is always supplied.
NP509
3 GPS antenna
+
2-ZONE
POWER
TILT
VOL
–
SOUND
ADJ
SOURCE
OPEN
Monitor
Remote control
sensor*
RCA video cable*
To video input
* Provided with the optional accessory kit.
Notes on wire connection
When connecting the plugs and sleeves, be sure to insert the plug until it locks securely. After completing
connections, fasten the cords using cord clamps and tapes.
Female
Cut 5 mm.
Male
tape
Sleeve
If the male knob is in the shape shown at A,
cut the female sleeve about 5 mm.
10
NP509
Clamp
Installation manual
Manuel d’installation
Guía de Instalación
NP509
Clarion Co., Ltd.
All Rights Reserved.Copyright © 2009: Clarion Co., Ltd.
Printed in China / Imprimé en Chine / Impreso en China
*NP509(001-cover)E
1
QY-5012B
2009/1