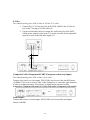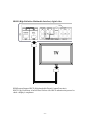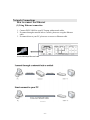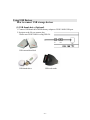
1
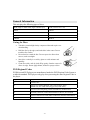
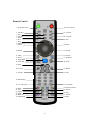
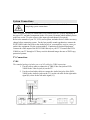
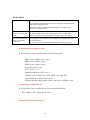
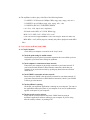
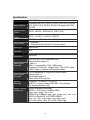
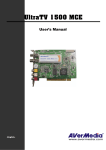
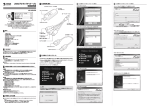
V888N DVD Player Instruction Manual DVD/VCD/SVCD/CD-DA/CDI-FMV/MP3/CD/CD-R/CD-RW/DVD-R compatible Read this manual before installation and use Contents Page Table of Contents -1- Warning -3- General Information Caring for Discs DVD Regional Codes DVD and Other Disc Features -4- Getting Started Package Contents Remote Control Battery Installation -6- Panel Descriptions Front Panel Rear Panel Remote Control -7- -9- System Connections TV Connections CVBS S-Video SCART (European version only) Component video (Pr/Pb/Y) High-Definition Multimedia Interface (HDMI) Audio System Connections Amplifier with two-channel analog stereo or Dolby Surround - 12 Amplifier with two channel digital stereo (PCM) or A/V receiver with multi-channel decoder (Dolby Digital/MPEG-2/DTS) - 13 - - 15 - Network Connections Using Ethernet connection - 15 - Using USB and PCMCIA Devices - 16 - How to Access myiHome - 17 - How to add myiHome - 18 - How to edit myiHome - 19 - How to delete myiHome - 21 - 22 - Configuring your V888N DVD Player IP Config page setup - 23 - WIFI Setup - 24 - Time setup - 25 - Update ROM - 26 - TV System/Video Output Setup - 27 - -1- Sound Output Setup - 28 - DVD Setup Menu Video CD playback control (PBC) Parental control (DVD only) TV Type (Screen Format) Change Password Playing Discs - 33 - Playing Media Discs (DVD player site operation menu) - 34 - Install Momitsu Media Center Software - 35 - Configure Your Momitsu Media Center General Preferences - 40 - 41 - Movie Preferences - 42 - Music Preferences - 44 - Add Window Media Player’s Playlists in myiHome Add WinAMP ’s Playlists in myiHome - 45 - 47 - Add Radio Playlist in myiHome - 48 - Photo Preferences - 49 - Language Preferences - 50 - Service - 51 - 51 - Connect V888N to Momitsu Media Center MMC Main Menu MMC Movie Mode - 52 - MMC Music Mode - 53 - MMC Photo Mode - 54 - MMC Media Service - 55 - Troubleshooting General Issues Audio Issues Video Issues - 56 - Specifications - 62 - -2- Warning TO REDUCE THE RISK OF FIRES AND ELECTRIC SHOCK, DO NOT EXPOSE THIS UNIT TO RAIN OR MOISTURE. CAUTION: To reduce the risk of fire and electric shock, do not remove the cover of this product. Refer all maintenance requests to authorized personnel only. This lighting flash arrow symbol in a triangle alerts users to the presence of non-insulated high voltage within the product's enclosure that present an electrical shock hazard. The exclamation point symbol in a triangle alerts users to the presence of important operating and maintenance instructions in the literature accompanying this product. The mark, displayed on the rear panel of the unit, indicates that the unit is a Class 1 device that uses lasers. No radiation hazard exists. Read through this instruction manual before installing and using the DVD-V888N. Only qualified personnel should service the DVD-V888N. Do not touch the power plug with wet hands. Pull the plug, not the cord, to disconnect the DVD-V888N from an electrical outlet. Turn the main power off when the DVD-V888N is not in use. Disconnect the power plug if you do not intend to use the DVD-V888N for a long period of time. Before moving the DVD-V888N, first remove the disc from the unit's tray. Do not open the cover or touch any of the components inside the unit. Do not install or operate the unit when it is directly exposed to sunlight or other objects that radiate heat -- the DVD-V888N may overheat and malfunction. Install the DVD-V888N in a cool, dry location. High moisture and humidity may damage the laser head. Install the DVD-V888N on a flat surface with good air circulation. Do not cover or obstruct the ventilation holes on the unit in any way -- the DVD-V888N may overheat. Clean the DVD-V888N by wiping the panel and case with a soft dry cloth. Do not apply any kind of thinner, alcohol or sprays. -3- General Information This unit plays the following types of discs: DVD (single or double sided, single or double layer) VCD (versions 1.0/1.1/2.0) SVCD CD-DA CDI-FMV MP3 AUDIO CD CD-R CD-RW DVD-R Caring for Discs Videodiscs contain high-density compressed data and require care when handling. Hold the disc by the edges, and/or the hole in the center. Do not touch the disc surface. Do not bend or scratch the disc. Do not expose it to direct heat sources, such as sunlight. Store discs vertically in a cool dry place to avoid moisture and humidity. Clean discs with a soft dry cloth. Wipe gently, from the center of a disc to its edge. Do not apply thinner, alcohol or sprays to discs. DVD Regional Codes DVD discs and DVD players are manufactured under the DVD Regional Code System, a worldwide standard. DVD players only play discs possessing the same Regional Code as the player. Regional Code Region 1 Canada, USA 2 Europe (incl. Poland, Romania, The Czech republic), Japan, Middle east (incl. Saudi Arabia, Egypt, Iran, South Africa) 3 East Asia (incl. Hong Kong, Taiwan, South Korea), Southeast Asia. 4 Australia, Caribbean, Central & South America, Mexico, New Zealand 5 Africa, Former Soviet Union, India, North Korea, Pakistan, Turkmenistan. 6 China -4- DVD and Other Disc Features Some DVD-V888N features rely on DVD software. Make sure that desired software features are available and enabled on the disc, follow the on-screen menu to access these features. Disc types DVD VCD SVCD/CVD CD LD Recording method Digital MPEG-2 Digital MPEG-1 Digital MPEG-2 Digital Analog Capacity Single-layer Single-sided 4.7GB =2hr 650MB 650MB 650MB Single-sided 74 min 45 min 74 min 1 hour Single-layer Double-sided 8.5GB =4hr Disc size Double-layer Single-sided 9.4GB =4.5hr Double-sided 8 cm or 12 cm Horizontal resolution 500 lines Subtitles 32 Soundtracks 8 2 hours Double-layer Doublesided 17GB =8hr 12 cm 240 lines 2 12 cm 8 cm or 12 cm 20 cm or 30 cm 350 lines 430 lines 8 16 4 2 Symbol Each DVD disc contains different combinations of features depending on the design and production of the disc. The following symbols represent some of these DVD features: DTS Digital Surround Dolby Digital Surround Number of Audio Tracks Number of Subtitles Screen Modes Number of Camera Angles Child Lock Regional Code/Video Output System -5- Getting Started 1. 2. 3. 4. 5. Read through this instruction manual. Unpack the unit. Load batteries into the remote control. Connect the DVD-V888N to your audio/video system properly. Plug the DVD-V888N (and other connected A/V devices) into an electrical outlet and turn power on. 6. Verify your DVD-V888N/TV/amplifier settings for audio and video. 7. Install Media Center server software in your PC. Package Contents The standard DVD-V888N package contains the following items: DVD-V888N DVD player Remote control (with batteries) AC power cord AV cables User's instruction manual Software CD Remote Control Battery Installation Batteries are packaged separately from the remote control. To load them into the remote control, remove the battery compartment cover first. Load “CR2025” batteries into the battery compartment. Position the + and – symbols on the batteries in the same orientation as the image of the batteries on the compartment. Remove the batteries if the remote control will not be used for a long period of time. -6- Panel Descriptions Front Panel VFD Display Disc Door LAN Link LED Open / Close Play Pause PREV NEXT STOP USB 2.0 (For Card reader, HDD) Main Power Switch Rear Panel Composite Video Output (CVBS) Analog Audio 5.1CH Output Optical Digital Audio Output Coaxial Digital Audio Output Component Video Output (Y/Pb/Pr) S-Video Output High-Definition Multimedia Interface (HDMI) 10/100/1000 Mbps Ethernet (RJ45) -7- Composite Video 1 Input (CVBS) AC Power Input Component Audio 3 Input S-Video Audio 2 Input Composite Audio 1 Input Component Video 3 Input (Y/Pb/Pr) S-Video Video 2 Input Remote Control 1. Eject Open/Close 26. Power On/Off 2. F.B Slow 3. Play 4. F.B W D 5. Pause 6. Prev 7. Stop 8. UP/Page UP 9. Movie 27. F.F Slow 28. F.F W D 29. Next 30. Music 10. Return 31. Refresh 11. Photo 32. Internet 12. AV In 13. Page Down 14. Video Out 33. SEARCH 34. Zoom 15. Enter 16. 4:3/16:9 35. MUTE 17. Volume 36. ADJ 18. Number Key 19. +10 Caps/Num 37. Clear/Back 20. Home 21. User 22. Angle 23. Menu 24. DVD Off 25. Information 38. Repeat A-B-ALL 39. SETUP 40. Title 41. Subtitle 42. Mute -8- System Connections Caution: Do NOT connect the AC power cord to outlet before completing system connections. There are number of ways to connect the DVD-V888N to the AV system, depending on the type of TV and other components in the AV system. No matter which method you use, make sure set the TV to the correct video input type and channel (if required). Refer to the manuals of your TV, VCR, stereo system, and other devices. Make necessary change before connecting system. For the best possible sound reproduction, connect the DVD-V888N Audio Out jacks to the Audio In jack of your amplifier, receiver, stereo, or audio/video equipment. See the section entitled, “Connecting to Optional Equipment”. Connect the video output of the DVD-V888N directly to your TV. If connect the DVDV888N to your TV through a VCR may result in distorted images because of DVD copy protection systems. TV Connections CVBS The standard package includes one set of AV cables for CVBS connections. 1. Use the yellow cable to connect the (CVBS) Video Out jack on DVDV888N to the Video In jack (A) on the TV. 2. Use the red and white cables to connect the Audio Out jacks of the DVDV888N to the Audio In jacks on the TV (use the red cable for the right audio signal (B), white for the left audio signal (C)). A BC -9- S-Video The standard package does NOT include an S-Video (Y/C) cable. 1. Connect the Y/C S-Video Out jack on the DVD-V888N to the S-Video In jack on the TV using an S-Video cable (A) 2. Use the red and white cables to connect the Audio Out jacks of the DVDV888N to the Audio In jacks on the TV (use the red cable for the right audio signal (B), white for the left audio signal (C)). A B C Composite/S-video/Component/SCART (European version only) Inputs The standard package does NOT include a Scart cable. Connect video sources to video inputs. DVD-V888N can convert video into HD format via HDMI. Video source can be a VHS, Video Gaming box or camcorder with composite, S-video or component output. *Not all types of signal can be converted to HD* Connection :Composite with Audio1; S-video with Audio 2;Component with Audio3 Audio Inputs: Connect audio sources to audio inputs. DVD-V888N can convert audio into digital format via HDMI. - 10 - Component video (Pr/Pb/Y) DVD discs consist of film- and video-based content. Progressive scan (Pr/Pb/Y) provides a flicker-free image with the most significant effects on film-based sources. To enjoy the full quality potential offer by this Progressive Scan DVD Video player, a Progressive TV is required. Progressive scan conversion is capable of 3:2 pull down for film-based content. It can double the vertical resolution of the picture to 525 lines every time when the picture is refreshed (1/60th of a second). It greatly improves the quality of moving images, especially during slow motion mode. The standard package does NOT include a component video cable. 1. Connect the Pr/Pb/Y Progressive Scan Out jacks on the DVD-V888N to the Progressive Scan In jacks on the TV using a Pr/Pb/Y cable (A). 2. Connect the left and right Audio Out jacks of the DVD-V888N to the left and right Audio In jacks on the TV (B). TV A B Note: Copy protection on some PAL DVDs may prevent progressive scan output. - 11 - HDMI (High-Definition Multimedia Interface) digital video ANALOG TV HDMI output Support HDCP (High-bandwidth Digital Content Protection) HDCP Copy Protection: A built-in Pass/Fail test uses HDCP authentication protocol to check a display's compliance. - 12 - Audio System Connections Amplifier with two-channel analog stereo or Dolby Surround To connect the DVD-V888N to your analog stereo or Dolby Surround audio system: 1. First, connect the DVD-V888N to the S Video, composite video, component (Pr/Pb/Y) video, Scart, or HDMI digital input of the TV. 2. Connect the DVD-V888N Audio Out jacks to the Audio In jacks on your stereo amplifier (use the red cable for the right audio signal (B), and white for the left audio signal (C)). Analog 5.1Ch decoder build-in Select preferred TVcompatible video output Amplifier TV - 13 - Amplifier with two channel digital stereo (PCM) or A/V receiver with multi-channel decoder (Dolby Digital/MPEG-2/DTS) The digital multi-channel connection provides the best sound quality. It requires a multichannel A/V receiver that supports one or more of the audio formats supported by the DVD-V888N (MPEG-2, Dolby Digital and DTS). Check the receiver manual and the logos on the front of the receiver for compatibility with these formats. Caution: Selecting the DTS audio stream automatically enables DTS digital video output due to licensing restrictions. AC3 and/or dts decoder build-in Six channels Digital Surround Sound via digital connection is possible only if your receiver has a digital multichannel decoder. Amplifier To see the selected audio format of the current DVD in the Status Window, press the System Menu or Audio button. If the digital output’s audio format does not match receiver capabilities, the receiver produces a strong, distorted sound or no sound at all. - 14 - Network Connections How to connect the Ethernet (1) Using Ethernet connection 1. Connect DVD-V888N to your PC/Laptop with network cables. 2. If connect through a network hub or a switch, please use a regular Ethernet cable. 3. If connect direct to your PC, please use a cross-over Ethernet cable. 10/100/1000 Mbps Ethernet Cable - 15 - Using USB Devices How to connect USB storage devices (1) USB thumb drive (Optional) 1. Connect USB thumb drive/HDD/memory adapter to DVD-V888N USB port. 2. Navigate to the file you want to play. *Please note DVD-V888N is using USB 2.0. USB external hard disk USB thumb drive USB card reader - 16 - How to Access myiHome Simple steps on how to access your myiHome *myiHome = My Internet Home, PC installed Momitsu Media Center software 1. When DVD-V888N powers on, it will detect and list all available PCs, installed Momitsu Media Center software (MMC) in the network. 2. Click on the respective buttons to perform its function, i.e. add, edit, or delete. 3. The cause of inactive myiHome could be either MMC is not running or PC is shutdown. myiHome icons descriptions: Indicates accessing myiHome Indicates that myiHome is inactive Indicates that myiHome is active - 17 - How to add myiHome Simple steps on how to add a new myiHome 1. To add, click “Add” button at main page. Add myiHome page will appear. 2. Enter your corresponding computer name (myiHome name) and IP address. 3. Click “save” when done. - 18 - How to edit myiHome Simple steps on how to edit your myiHome 1. To begin Edit myiHome, click “Edit” button on the myiHome main page. 2. Choose the myiHome that you want to edit. - 19 - How to edit myiHome (continue) Simple steps on how to edit your myiHome 1. Once chosen, the selected myiHome’s Name and IP will be displayed. 2. User can edit the IP address for myiHome. 3. Type in your PC IP address: xxx.xxx.xxx.xxx:8000 (Default port is 8000) 4. Click “save” when done. - 20 - How to delete myiHome Simple steps on how to delete your myiHome 1. To go to delete myiHome page, click “delete” button at main page. 2. To delete, check the myiHome box that you want to delete. 3. Click “delete” when done, and the selected myiHome will be deleted. - 21 - Configuring your V888N DVD Player Simple steps on how to configure your V888N 1. Press the ” Setup “ button on remote directly to setup page OR press “Shift+Setup" on keyboard to go directly to setup page. 2. You are now in the Options menu of the setup page. 3. Customize the browser according to your preference. Click “Save” when done. - 22 - IP Configure page setup Simple steps on how to configure your IP 1. Navigate to IP Config menu and press Enter to be in the IP Configuration setup page. 2. User can choose to configure in manual or automatic mode. In Manual mode, fill in all the fields listed in the IP Config setup page and press “Save”. 3. In Automatic mode, user must ensure that the network is also set to obtain IP automatic. 4. When finished, press the “Save” button on the screen. Automatic mode Manual mode - 23 - WIFI Setup Simple steps on how to setup your WIFI 1. Navigate to WIFI Setup menu and press Enter to be in the WIFI setup page. 2. Make sure the following fields are exactly the same as the setting at your existing wireless network (setting at your Access Point). 3. Press the “Save” button to save your latest setting. The system will then reboot using the new setting. Press the “Cancel” button to discard unsaved changes. 4. Please make sure your V888N is using the same SSID name as you wireless router or access point. SSID: Service Set ID, the name of our wireless network Connection: (1) Check “Direct to a computer” when you connect V888N direct to a PC/laptop. (2) Check “Infrastructure” when connecting to a wireless router or access point. WEP: Select Disable (No encryption), 64-bit or 128-bit encryption on your network. WEP Key: keyword for your WEP encryption. Only needed when the WEP setting select as 64-bit or 128-bit. - 24 - Time setup Simple steps on how to setup the time page 1. Navigate to Time Setup menu and press Enter to be in the Time setup page. 2. Fill in the fields listed in the Time Setup page and choose the time zone your country is in. 3. When finished, press the “Save” button on the screen. - 25 - Update ROM Update your V888N firmware. 1. Navigate to Update ROM icon and press Enter to be in the Update ROM page. 2. Check Firmware Update links to http://www.momitsu.com. Click this link to check for the latest firmware updates. - 26 - TV System/Video Output Setup The DVD-V888N can be set to output either a PAL or NTSC signal. Select the TV output option that matches the video signal of your TV. If your TV is NOT multi-system, the following symptoms may indicate that the incorrect output setting has been selected for the DVD-V888N: 1. Picture is distorted. 2. Picture is black and white only. 3. Picture is not full screen, or part of the border is not visible. To correct the above problem, change the DVD-V888N’s TV output setting to PAL or NTSC as follows: 1. Press the Setup button. 2. Press ▼ button to navigate to the Options icon & Video setting. 3. Press Enter to reveal this screen. 4. Click “Save” when done Composite/S-video/Component/SCART (European version only) Inputs Connect video sources to video inputs. DVD-V888N can convert video into HD format via HDMI. Video source can be a VHS, video gaming box or camcorder with composite, S-video or component output. *Not all types of signal can be converted to HD* - 27 - Audio Output Setup The DVD-V888N is equipped with the following audio outputs: 1. AC-3/DTS digital output (optical and coaxial) 2. Mix audio output – Left & Right 3. Scart output (European version only) For AC-3 surround output, connect the DVD-V888N digital output (optical or coaxial) to an amplifier with a built-in AC-3 decoder. For DTS surround output, connect the DVD-V888N digital output (optical or coaxial) to an amplifier with built-in DTS decoder When the AC-3/ DTS digital output option is selected, an AC-3/DTS decoding-capable amplifier is required. The Audio Setup – Digital Output option in the Setup menu should be set to Encoded Digital, NOT Analog/DPCM. Change this setting when necessary. 1. Press the Setup button. 2. Press ▼ button to navigate to the Options icon & Audio setting. 3. Press Enter to select the Encoded Digital option. 4. Click Save when done For analog audio output, choose the Analog/DPCM audio option, and make sure the DVD-V888N’s Audio Out jack is connected to the Analog Audio Input of your AV system. For digital audio output, choose the Encoded Digital option, and make sure the DVD-V888N’s Audio Out jack is connected to the Digital Audio input (optical or coaxial) of your AV system. - 28 - DVD Setup Menu Video CD playback control (PBC) Some Video CDs incorporate features such as content navigation through on-screen menus. To enable these features, turn on the VCD PBC option in the Initial Setup menu. 1. Press Setup to display the Setup menu. 2. Press ▼ twice for the Initial Settings option. 3. Press Enter to select the VCD PBC option. 4. Press ► to select ON or OFF. 5. Press to confirm. - 29 - Parental control (DVD only) DVD movies may contain scenes unsuitable for viewing by children. Such discs may contain “Parental Control” information that applies to the complete disc or to certain scenes on the disc. Scenes are rated from 1 to 8; the ratings are country dependent. Alternative scenes with different ratings may be available on the disc. The Parental Control prevents discs from being played and/or enables the alternative scenes that may be more appropriate for viewing by children when you setup properly. To change the parental control settings: 1. Press Setup to display the Setup menu. 2. Press ▼ twice, to navigate to the Initial Settings options. 3. Press ► then after press ▼ button go to the DVD control Parental Level. 4. Press ► to select a rating level (1-8) or Off. 5. Press to confirm. Disclaimer The DVD-V888N features the Parental Control system which supports DVDs with parental control options. Parental controls operate according to technical standards established by industry manufacturers. Two important considerations exist: 1. When the DVD-V888N was released, certain aspects of the technical standard had not yet been settled between the set makers and the disc industries. 2. The Parental Control system only works with discs that include the appropriate software. Under these circumstances, we cannot guarantee the function and reliability of the Parental Control system. Please take responsibility to make sure your disks respond to the Parental Control settings before allowing children access to the DVD-V888N. - 30 - TV Type (Screen Format) The DVD-V888N provides three possible TV output formats: 1. 4:3 Letterbox 2. 4:3 Pan and scan 3. 16:9 Widescreen The following image shows the effects of the TV screen format settings, depending on the actual type of video being delivered to the TV. To choose between these formats: 1. Press Setup to display the Setup menu. 2. Press ▼ twice for the Initial Settings option. 3. Press ► once and then ▼ twice for the TV Type option. 4. Press ► and ▼ to select 4:3 Letterbox, 4:3 Pan and Scan or 16:9. 5. Press button to confirm your selection. - 31 - Change Password 1. Press Setup to display the Setup menu. 2. Press ▼ twice for the Initial Settings option. 3. Press ► once and then ▼ five times for the Change Password option. 4. Press button go to the Set password. - 32 - Playing Discs Power On Activate the DVD-V888N using the main power switch on the front panel, and turn on the TV set and amplifier (if connected). DVD and System Settings Select the proper DVD-V888N, TV, and amplifier settings (AV1, AV2, S video, etc.) to display DVD output. The DVD Player power-on screen will appear on the screen when the correct settings are selected. Disc Loading Press the Eject button on the front panel (or remote control) to open the disc tray. Load a disc into the tray -- label side up -- and press the Eject button again to close the disc tray. Automatic Play The unit takes several seconds to read disc data, display the disc format logo in the upper left corner of the TV screen, and start playing automatically. MP3 discs normally take longer to load data before playing. Manual Play If a disc menu (which varies according to disc format and production design) appears on the screen and the disc does not automatically play, manual play control may be required. button to start playing, or Press the Press the control to select other options; press the Enter button - 33 - button on the remote to confirm the selected option. Playing Media Discs (DVD player site operation menu) This menu controls video, music, photo, and internet options. Main Menu When an ISO disc is placed in the DVD-V888N, the following screen appears: Choose the disc format that matches the disc placed in the DVD-V888N. This menu only appears for ISO discs, such as audio MP3, DIVX MPEG-4 (video and audio), and JPEG photo/picture disks. Standard audio discs, VCDs, and DVDs generally play automatically. Press ▲ and ▼ to choose a category. Press to confirm your selection. - 34 - Install Momitsu Media Center Software Momitsu Media Center (MMC) is media server software. It provides media services for DVD-V888N. Please install MMC before using Momitsu Media Center function. This software controls audio, video, music, and Internet. MMC Icon When you put V888N software CD in your PC, the following icon screen appears: Double click the mmcpc-v10.exe file and start to install. Select MMC Languages There are English and Germany for MMC program. Double select your language and click “Next”. - 35 - MMC Setup Wizard MMC Setup Wizard will help you to install and modify the options. Click “Next”. MMC License Agreement Select “I accept the agreement” and click “Next”. - 36 - MMC Information Click “Next”. MMC Program Folder You can change the program destination folder or leave it as default. Click “Next”. - 37 - Select Start Menu Folder Click “Next”. MMC setup Click “Next”. - 38 - Ready to Install MMC Review all the information and click “Install”. Completing MMC setup Click “Finish”. - 39 - Configure Your Momitsu Media Center To change MMC preferences, please use the management program. MMC Icon and System Tray Icon Click MMC icon and MMC system tray icon in order to bring up setup screen. MMC Main Menu This menu only appears in MMC mode. Please choose a category to play, such as movie, music, photo and Internet. Click “Edit” then click “Preferences”. - 40 - System Preferences Click “Edit” then click “Preferences”. System This screen provides system information. You can define MMC server TCP-IP ports for Internet Services (Default port: 8000). Security Click “Security” then type in your own password. Click “Save” to save your password. - 41 - Video Preferences Click “Movie”. Video Library You can change your own Movie Library folder location by clicking “Browse” button. Watch Folder You can add/remove multiple folders for your video files. Click “+“ button for adding and “–“ for removing. - 42 - After setup, you can double check video option in MMC operation menu. - 43 - Music Preferences Click “Music“. Music Library You can use your won folder location by changing Music Library. Click “Browse”. Watch Folder You can add multiple folders for your music files. Click “+” button to add folders and “– “ to remove. - 44 - Add Window Media Player & WinAMP’s Playlists in myiHome 1. myiHome now supports Playlists created in Windows Media Player (WMP) and WinAMP. 2. The playlist file formats that myiHome currently supports are .wpl (WMP), .asx (WMP), .m3u (WMP & WinAMP) and .b4s (WinAMP). How to Create My Playlists in WMP 8 for myiHome 1. Create a new playlist by clicking the New playlist button. Type a name for playlist, such as “Test” and press “Enter”. 2. Drag and drop your music files into the new Test playlist. Once done, go to the “WMP8 Media Library” drop down box on top right corner and select the “Test” playlist just created. 3. To save the “Test” playlist, go to File, select “Export Playlist to File...” and save “Test” playlist in the .asx file format. 4. Start myiHome Player and choose Music. A “My Playlists” folder named Test is shown on TV screen 5. If myiHome Player is already setup and running, refresh the Music channel page. 6. “My Playlists” Folder for WMP8 will not appear in myiHome Application. - 45 - How to Create My Playlists in WMP 9 for myiHome 1. Create a new playlist by clicking the “Playlists” button. Enter name for new playlist such as “TEST2” and press OK. “TEST2” will then be created in WMP9 My Playlists folder. 2. Drag and drop your music files into the new “TEST2” playlist. 3. To save the “TEST2” playlist, go to File, select “Save Playlist As...” and save “TEST2” playlist in one of the 3 Windows Media Playlists file format. 4. Start myiHome player and choose Music. A My Playlists folder is shown on TV screen. Click on the My Playlists to see the “TEST2” playlist folder. 5. If myiHome is already up and running, refresh the Music channel page. 6. “My Playlists” Folder for WMP8 will not appear in myiHome Application. - 46 - How to Create My Playlists in WinAMP for myiHome 1. Create a new playlist by clicking the “Playlists” button. A playlist name is automatically created. 2. To rename the new playlist, right-click the playlist and select “Rename playlist”. Type in a new name for playlist such as “TEST3” and press “Enter”. “TEST3” will then be created in the Playlist Editor. 3. You can now add music files to the new “TEST3” playlist. 4. To save the “TEST3” playlist, click the Playlist button again and select “Save playlist as...” 5. Save TEST3.b4s playlist in the My Music folder or the Music Library path set in myiHome Preferences. 6. Start myiHome Player and choose Music. The “TEST3” playlists folder is shown on TV screen. 7. If myiHome is already setup and running, refresh the Music channel page. - 47 - Add Radio Playlist in myiHome 1. myiHome also supports Radio Playlists files that are downloaded from internet, such as www.shoutcast.com. 2. To start, download the *.pls files from www.shoutcast.com. 3. Click the “Tune In!” icon and save the *.pls files into your Music library. 4. Start myiHome Player and choose Music channel, the *.pls files will be shown on TV screen. 5. If myiHome is already setup and running, refresh the Music page to automatically update the media files in Music library. 6. Radio Playlist will not appear in myiHome Application - Music. - 48 - Photo Preferences Click “Photo”. Photo Library You can use your own folder location by changing Photo Library. Click “Browse” to change the folder location. Photo Folders Under Video folder, you can setup music playing options. - 49 - General Preferences Click “General”. Appearance You can select your language. Currently English and Germany are available. Service Click “Service”. Select Music Play List You can select a Music Play list and use V888N to access over the network. - 50 - Connect V888N to Momitsu Media Center If the DVD-V888N is properly connected to your system and the system is turned on, there will be a menu appear on your TV. This menu controls important audio, movie, music, and Internet setting options. MMC Main Menu When DVD-V888N connects to a PC, the following screen appears: This menu only appears when DVD-V888N connects to your PC with MMC software enabled. Please choose a category to play, such as movie, music, photo and Internet. Press ▲ and ▼ to choose a category. Press to confirm your selection. When the content menu appears, available commands will show on the screen. Use these commands to navigate through and play disc content. When video or image content is playing, press stop button will usually bring you back to the contents menu screen. - 51 - MMC Movie Mode When you select Movie in MMC, the following screen appears: This menu only appears in MMC movie mode. Please choose a file to play. Press ▲ and ▼ to choose a category. Press to confirm your selection. When the content menu appears, available commands will appear on the screen. Use these commands to navigate through and play disc content. When video or image content is playing, press stop button will usually bring you back to the contents menu screen. - 52 - MMC Music Mode When you select Music in MMC, the following screen appears: This menu only appears in MMC music mode. Please choose a file to play. Press ▲ and ▼ to choose a category. Press to confirm your selection. When the content menu appears, available commands will appear on the screen. Use these commands to navigate through and play disc content. When video or image content is playing, press stop button will usually bring you back to the contents menu screen. - 53 - MMC Photo Mode When you select Photo in MMC, the following screen appears: This menu only appears in MMC photo mode. Please choose a file to play. Press ▲ and ▼ to choose a category. Press to confirm your selection. When the content menu appears, available commands will appear on the screen. Use these commands to navigate through and play disc content. When video or image content is playing, press stop button will usually bring you back to the contents menu screen. - 54 - MMC Services Mode When you select Services in MMC, the following screen appears: This menu only appears in MMC Internet mode. Please choose a file to play. Press ▲ and ▼ to choose a category. Press to confirm your selection. When the content menu appears, available commands will appear on the screen. Use these commands to navigate through and play disc content. When video or image content is playing, press stop button will usually bring you back to the contents menu screen. * Web Bookmark: After installing MMC on your PC, MMC will automatic import your IE bookmark as “Web Bookmark” * Web Directory: Preinstalled web channels * Radio: Preinstalled Internet radio channels * News: Preinstalled web News channels - 55 - Troubleshooting The following are a list of difficulties you may experience when using the DVD-V888N. Attempt the most common solutions provided below before calling for customer service. General Issues Symptom Possible solutions No power Verify that the power cord is firmly plugged into a working electrical outlet. Verify that the DVD-V888N main power switch is turned on. DVD-V888N does not respond to the remote control Aim the remote control directly at the front panel sensor. Panel buttons do not work Verify that the DVD-V888N is not in initial Setup mode. Reset the player by unplugging the AC cord from the electrical outlet. Disc doesn’t play properly, or at all Verify that the disc label is facing up. Clean the disc, if necessary. DVD-V888N does not respond to some operating commands during playback The disc may not enable certain operations. Remove any obstacles between the player and the remote control. Install new batteries in the remote control. Try a different disc; the disc in question may be defective. Check for scratches or warps. Refer to the disc manual for its capabilities. Audio Issues No sound or incomplete sound output Check audio connections and audio setup. Verify that the TV and amplifier/receiver connections are secure, and that they are powered on, and set to the correct audio format. Press the Audio button to select other audio tracks. The disc or track may be defective. Verify that the Mute function of the DVD-V888N, TV or amplifier is not active. The following operations disable sound output: reverse play, pause, step, slow, and search. This is normal. No audio at digital output Verify that the digital connections are secure, and that the Settings menu shows that digital output is set to ALL or PCM. Verify that the audio format of the selected audio language matches your amplifier/receiver capabilities. Not applicable for MP3 - 56 - Video Issues No picture Verify that the TV is turned on and set to the correct video mode/format. Verify that the system connections are secure. Plug in all connections firmly, and check for damaged cables. Verify that the disc is undamaged and in the player. Your disc may be defective; try a different disc. Completely distorted picture or no color with menu If the picture is completely distorted or if the picture rolls vertically, make sure the DVD-V888N’s NTSC/PAL setting matches the TV’s video signal. Distorted or black/white picture with DVD or Video CD Verify that your TV is capable of processing the video signal (PAL/NTSC) recorded on the disc. See TV System Setup for instructions on setting the NTSC/PAL option. See TV System Setup for instructions on setting the NTSC/PAL option. Q: What music file formats can I use? A: The myiHome is able to play audio files of the following format: MPEG I Layer 1 (MP1) (.mp1, .mpa) MPEG I Layer 2 (MP2) (.mp2) MPEG I Layer 3 (MP3) (.mp3) Ogg Vorbis (OGG) (.ogg) AC3 5.1 (AC3) (.ac3) Microsoft PCM Wave (WAV) (.wav) Advanced Audio Coding (AAC, ADIF, ADTS) (.aac, m4a, .aiff) Apple MPEG4 AAC Audio (M4A) (.m4a) Microsoft Windows Media Audio version 1 and version 2 (WMA) (.wma) Q: What image formats can I use? A: The myiHome is able to publish picture files of the following format: JPEG / Bitmap / GIF / Animated GIF / PNG Q: What video file formats can I use? - 57 - A: The myiHome is able to play video files of the following format: 3.1.1 MPEG 1 VCD format (1150Kbps CBR) (.mpg, .mpe, .mpeg, .dat, .m1v) 3.1.2 MPEG 2 up to 9.5Mbps (.mpg, .mpe, .mpeg, .m2v, .vob) 3.1.3 MPEG 4 (DivX4/5, XviD,WMV9, RMP4) (.avi, .divx, .xvid, .rmp4, .mov, .mp4,wmv) AVI audio codec: MP3, AC3, PCM, WMA, Ogg MOV: 3ivX + MP3, 3ivX + PCM, 3ivX + AAC (3ivX converted from supported MPEG 4 video codec using Dr. DivX II for MAC OS) MP4: MP4 + AAC (still in progress, currently only able to playback certain MP4 files) Q: I can't access myiHome from V888N A: 1. Check Computer Check that your computer is on and is not in "sleep" mode. 2. Check the path setting for media content Confirm that you have placed your media content in the correct folder you have assigned in your Preferences settings in myiHome. 3. Check computer's connection on home network Ensure that your computer is physically connected to your home network. If your home network includes a shared internet connection, check that your computer is on your home network by opening any internet browser and surf about the net. 4. Check V888N's connection on home network Ensure that your V888N is also physically connected to your home network. If your home network includes a shared internet connection, check if your V888N is able to go to the internet. 5. Check myiHome is running Check that your myiHome application is running on your computer. You can see the application either on the panel of you computer or an icon of myiHome that appears on the panel of your computer. 6. Check network security software Some network security software may block V888N from browsing to myiHome's application software running in your computer. If you are using network security software, try turning it off. - 58 - 7. Check that you are signed in If your computer is running on Windows XP, make sure you have signed in. 8. Check IP address of your computer If your computer running myiHome is not seen in V888N, you can always manually add in the IP address of that particular computer to access your digital content. You can do so in your main Login page of V888N and click on "add". This will lead you to further menu to add in the computer's name and its IP address. You can refer this in V888N User Guide page 18. Q: I can't hear any sound from V888N A: 1. Check volume, power and speakers Make sure that your television or entertainment centre are powered on, and that the volume is at an acceptable hearing range. Also certain entertainment centre allows you to choose the speakers for you to output. Please ensure that the correct speakers are selected. 2. Check connections If your V888N is connected to any home entertainment equipment, please check that the cables are connected properly and firmly. 3. Check the video and song Make sure that the content you are playing is selected correctly. Double check on your computer by double-clicking on that content you are streaming and make sure it contains sound. Q: I don't see any Video, Music or Photos on myiHome A: 1. Check for Video files Make sure that the folder you are setting to contain video. You can check this in your myiHome application installed in your computer by selecting "video" and the respective folder you wish to view from. If there are videos available, you should see the video/movie files listed on the right pane. You can also check this by browsing through your computer to see if that folder has already video files available. 2. Check for Music files Make sure that the folder you are setting to contain music files. You can check this in your myiHome application installed in your computer by selecting "music" and the respective folder you wish to play audio from. If there are music files available, you should see songs listed on the right pane. You can also check this by browsing through your computer to see if that folder has already music files available. - 59 - 3. Check for Photo files It is possible to publish folders set in your myiHome preferences that have no video, music or photos by accident. Make sure that the folder you are setting to contains photo. You can check this in your myiHome application installed in your computer by selecting "photo" and the respective folder you wish to publish from. If there are photos available, you should see thumbnails of the photos on the right pane. You can also check this by browsing through your computer to see if that folder has already photos available 4. Check digital content format Also make sure that the published content are supported by V888N, as listed in V888N specification page. Q: I changed some of the Video, Music and Photo content on myiHome but I can't see the changes on V888N. A: Some changes do not appear on your V888N immediately. You can reload the content which will refresh and obtain the latest changes made in myiHome by: 1. Pressing the "refresh" button on your remote control or keyboard 2. Select either "Video", "Music" or "Photo" on the menu while accessing myiHome Q: An error occurred while I was browsing my Video, Music and Photo content A: 1. Check that the content you are playing have not been deleted If you have moved or deleted some files while V888N is streaming, it may cause error on V888N. If this happened, please refresh or restart your V888N while browsing through myiHome. Or restart your myiHome application running in your computer; simply click on "File" and "Exit". Then double click on the myiHome icon on your computer to start the application again. 2. Check the number of files in your folder The group of video, music or photos that you are trying to access to may be too large. You can try to use other folders or playlist with fewer files. Or you can group the files within subfolder to minimize the amount of files stored within a folder itself. Q: V888N responds slowly when I watch movie, browse photo or listen to music A: 1. Publish multiple folders If there are a large number of files placed in a folder, navigating through these folders may be slow. Try creating more folders with less content in each one. 2. Remove unusable files - 60 - Remove unknown files. Non-supported file format although may not be seen in myiHome will still be processed through to filter all these out which may slow down during browsing. 3. Change performance settings Try adjusting your computer that is running myiHome application to optimal level. This is to enhance the performance of your computer while serving the published content to V888N. * For further information, please check our website: hyttp://www.momitsu.com - 61 - Specifications Model Name Support Media Support Video Format Support Audio Format TV System Audio System Audio DAC Video D/A Converter Maximum HDMI Resolutions Video Output Terminals Audio Output Terminals Network Terminals Support Format via Ethernet DVD-V888N (sliver color) Compatible with DVD, DVD-R, DVD+R, DVD-RW, DVD+RW, VCD, SVCD, CD-R, CD-RW, CD-DA, CDI-digital, MP3 ISO, MP4 ISO MPEG1, MPEG2 , MPEG4(AVI), JPEG (JPG) MPEG 1, LAYER 1, LAYER 2 , MPEG3 NTSC/PAL (or PAL-M for Brazil) TV System selectable. 5.1 Channels 5.1 Channels Dolby Digital AC-3 and dts output 96KHz/24-bit 10 bit 1920x1080 NTSC/PAL 4:3, 16:9 Progressive Scan. Composite RCA output x1 S-Video x1 HDMI x1, support 480p, 720p, 1080i output Component (Y/Pb/Pr) x1, support 480p, 720p, 1080i output SCART output x1 (Option for European market) Built-in Headphone x1 output with volume control Coaxial output x1 Optical digital output x1 Stereo audio RCA output x2 * 100BASE-TX/10BASE-T (RJ-45)×1 * MINI PCI support wireless IEEE 802.11b+g network (not including wireless card) • Video-on-demand supporting - MPEG 1 VCD format (1150Kbps CBR) (.mpg, .mpe, .mpeg, .dat, .m1v) - MPEG 2 up to 9Mbps (.mpg, .mpe, .mpeg, .m2v, .vob, .vro) - MPEG 4 (OpenDivX, XviD, RMP4,WMV9) (.m4v, .avi, .divx, .xvid, .rmp4, .mov, wmv, mp4) - AVI audio codec : MP3, AC3, PCM, WMA, Ogg - 62 - - MOV : 3ivX + MP3, 3ivX + PCM, 3ivX + AAC (3ivX converted from supported MPEG 4 video codec using Dr. DivX II for MAC OS) - MP4 : MP4V + MP4A (AAC) (only support non-hinted MP4) • Audio-on-demand supporting - MPEG I Layer 1 (MP1) (.mp1, .mpa) - MPEG I Layer 2 (MP2) (.mp2) - MPEG I Layer 3 (MP3) (.mp3) - Ogg Vorbis (OGG) (.ogg) - AC3 5.1 (AC3) (.ac3) - Microsoft PCM Wave (WAV) (.wav) - Advanced Audio Coding (AAC, ADIF, ADTS) (.aac) - Apple MPEG4 AAC Audio (M4A) (.m4a) - Microsoft Windows Media Audio version 1 and version 2 (WMA) (.wma) Remote Power Requirement Body Size Weight Accessories • Photo Album (JPEG) with all the supported audio format as background music. • Internet Radio supporting Shoutcast server MP3 Internet Radio stream. • Picture-in-Picture (Video in window) feature supported. • Playback control: Play/Pause, Go to (seeking), Fast Forward/Rewind, Slow Motion (MPEG 1 and 2 only). • Audio and Video Playlist supported. Full Remote Control function AC 100V-240V +- 10%, 50/60 Hz, 20W. 430mm(W) x 300mm(D) x 68mm(H) 5 Kg Remote Controller, RCA-RCA Cable, Power Cord, Instruction Manual - 63 - Media Format Specifications Digital TV (DTV) Digital TV is a broadcast video and audio standard that uses digital signals. It provides significant advantages and improvements over conventional analog technology. There are two versions of DTV: standard (SDTV) and high definition (HDTV). SDTV allows stations to broadcast multiple programs within the same bandwidth. While SDTV delivers signals superior to that of analog TV, HDTV is a magnitude of quality beyond it, displaying sound and images surpassing anything available in today’s home systems. Format Scan Lines Scan Range DTV 480 active (60i) 525 total 31.5 kHz (60p) 720x480 24p, 30p, 60p, or 60i fps 4:3 or 16:9 45 kHz (60p) 1280x720 24p, 30p, 60p 16:9 33.75 kHz (60i) 1920x1080 480 active HDTV 750 total Pixelization Frame Rate Aspect Ratio 60i 720 active 1125 total 1080 active Divx Format Definition DivX is a digital video compression technology based on MPEG-4 and developed by DivXNetworks,Inc.; do not confuse this acronym with DIVX (digital video express ),a DVD-ROM format endorsed by major movie studios that tracks and enforces strict copy protection standards. - 64 -