1
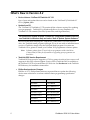
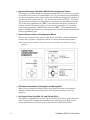
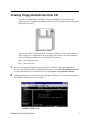
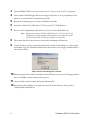
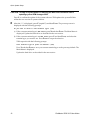
ProMaster 2500 ® V8.2 User Notes Contents What’s New in Version 8.2 . . . . . . . . . . . . . . . . . . . . . . . . . . . . . . . . . . . . . . . . 2 Reminders . . . . . . . . . . . . . . . . . . . . . . . . . . . . . . . . . . . . . . . . . . . . . . . . . . . . 5 Creating Floppy Diskette Set from CD . . . . . . . . . . . . . . . . . . . . . . . . . . . . . . . 7 Quick Update Steps . . . . . . . . . . . . . . . . . . . . . . . . . . . . . . . . . . . . . . . . . . . . . 9 IMPORTANT: TaskLink™ DOS users need to upgrade to V2.09 or greater in order to have access to all supports in this UniFam V8.2 software update. Version 2.09 of TaskLink DOS is available on the UniFam V8.2 CD or from the Data I/O Web site. See Readme.txt in the TaskLink DOS directory for installation instructions. IMPORTANT: For issues regarding floppy diskette support, see “Creating Floppy Diskette Set from CD” on page 7. Note: You do not need to update your software if you received these User Notes with a new programmer. To use this update, your ProMaster 2500 must have a minimum of 2 MB of RAM available (displayed at the top of the ProMaster 2500 screen). However, to make maximum use of the programmer, 8 MB of RAM is required. If you need additional RAM, call your Customer Support office as listed in the Preface of your User Manual. In the U.S., call 1-800-332-8246. 984-1028-041 What’s New in Version 8.2 Device Lists on “UniFam 8.2/TaskLink 6.0” CD Lists of new and updated devices can be found on the “UniFam 8.2/TaskLink 6.0” CD in \Update_Info. Update from CD The “UniFam 8.2/TaskLink 6.0” CD contains all the software required for updating your programmer. TaskLink™ for Windows® allows for easy installation of “UniFam 8.2” CD contents (Boot File, System Files, and Algorithm Sets). For instructions on how to install “UniFam 8.2” programmer software from CD, see TaskLink for Windows Help and select “How to Update System Software.” Please note that after inserting the “UniFam 8.2/TaskLink 6.0” CD into your CD drive, the TaskLink install program will begin. If you do not wish to install the latest version of TaskLink, simply close the TaskLink install program. You must use TaskLink 4.50 or greater to install your UniFam V8.2 programmer software update. Note: Software updates from CD work only on programmers with a hard drive. Contact Data I/O Sales for information on upgrading your programmer to a hard drive. TaskLink DOS Version Requirement TaskLink DOS users need to upgrade to V2.09 or greater in order to have access to all supports in this V8.2 software update. Version 2.09 of TaskLink DOS is available on the UniFam V8.2 CD or from the Data I/O Web site. See Readme.txt in the TaskLink DOS directory for installation instructions. Philips Semiconductor Changes Effective in V7.3, Philips Semiconductor requested that we update the following device menu selections to conform with their latest programming specification changes: 2 Old Name Now Called 89C51RB2 89C51RB2H 89C51RB2-PLC 89C51RB2H-PLCC 89C51RC2 89C51RC2H 89C51RC2-LQFP 89C51RC2H-LQFP 89C51RC2-PLCC 89C51RC2H-PLCC 89C51RD2 89C51RD2H 89C51RD2-PLCC 89C51RD2H-PLCC ProMaster 2500 V8.2 User Notes Devices Now Listed under SST Only Prior to the V7.9 update, the devices listed below were located under both Manufacturer: SST and Manufacturer: Silicon Stor. Starting with V7.9 and thereafter, these devices are listed only under Manufacturer: SST. Device Name Package Pins 39VF512 DIP 32 39VF512-PLCC PLCC 32 39VF512-TSOP TSOP 32 39VF010 DIP 32 39VF010-PLCC PLCC 32 39VF020 DIP 32 39VF020-PLCC PLCC 32 39VF020-TSOP TSOP 32 39VF040 DIP 32 39VF040-PLCC PLCC 32 39VF040-TSOP TSOP 32 29EE512 DIP 32 29EE512 PLCC 32 29EE512 TSOP 32 29EE010 DIP 32 29EE010 PLCC 32 29EE010 TSOP 32 29EE020 DIP 32 29EE020 PLCC 32 29EE020 TSOP 32 Mitsubishi Electric and Hitachi Transferred to Renesas Technology Corp On April 1, 2003, the semiconductor operations of Mitsubishi Electric and Hitachi were transferred to Renesas Technology Corporation. These operations include microcomputer, logic, analog and discrete devices, and memory chips other than DRAMs (flash memory, SRAMs, etc.). Beginning in V7.4, a new menu selection appeared for Renesas Technology Corporation. As a result of this transfer: All devices currently distributed by Renesas Technology Corporation are found under the "Renesas Tech" menu selection. ProMaster 2500 V8.2 User Notes 3 All new supports (devices) distributed by Renesas Technology Corporation, regardless of the Mitsubishi or Hitachi part markings, are found only under the "Renesas Tech" menu selection. All existing supports for Mitsubishi or Hitachi devices currently marketed by Renesas Technology Corporation are found under both their previous menu selections and the "Renesas Tech" menu selection. This dual listing prevents problems with customer Tasks. 4 ProMaster 2500 V8.2 User Notes Reminders Data I/O’s Web Site Replaces ‘Device List on Disk’ Have you been using the ‘Device List on Disk’ for your device information? As we announced in an earlier edition of these User Notes, we upgraded our device support and information tools to take advantage of the power, speed, and accessibility of the World Wide Web. Since the release of V6.0, all our device support information, device footnotes, and capacitor block configuration information is on the Web. Our Web address is http://www.dataio.com. Data I/O has stopped distributing the Device List on Disk. If you would like a device list, download it from http://www.dataio.com/ftp/device_lists/pm2500.txt Changes to Computer Remote Control (CRC) in V6.8 Beginning with V6.8, new CRC commands were added for: Programmer type query Device type query Device Electronic ID query Fill RAM with non-repeating test pattern Device list query Selection for checksum type Stand-alone device erase operation Updating programmer software For specific information about these new CRC commands, please see the updated UniSystem Computer Remote Control application note (983-0490-005) available on the Data I/O Web site at http://www.dataio.com. Beginning in V6.7, the 49] command in CRC mode first issues a prompt before returning to Terminal Mode so that XPI programmers can return an error message if nothing is connected to the serial port. Changes to Terminal Mode in V6.8 Beginning with V6.8, the “Device Configure Edit” screen appears under the Main Menu in Terminal Mode when a device is selected with options that can be edited. For all other device types, the More Commands menu is positioned lower on the screen than in previous versions. Note that the “Device Configure Edit” screen is also still available from the More Commands/Device Checks/Device Configure menu. The appearance of the “Device Configure Edit” screen changed in V6.8. With some newer sectored devices, it became possible to set the Begin Device and Device Block Size parameters from the “Device Configure Edit” screen. Also, the control-K option (^K) was added in V6.8. Pressing ^K changes the display and entry of sector information to an abbreviated mode useful for devices with a large number of sectors. Please refer to the Help feature for more information. Device operation block limit parameters are reset to defaults whenever a new device type is selected. In earlier versions, device operation block limit parameters were reset only if their values exceeded the size of the newly selected device. ProMaster 2500 V8.2 User Notes 5 Improved Checksum Calculation With Devices Using Sector Protect This change only affects filling the programmer RAM with “FF” before you program a 16-bit device. In versions of software before V5.9, if you entered sector protect data, only the least significant byte of the 16-bit word in RAM was changed. For example, if you entered sector protect data “01”, the 16-bit word would read “FF01”. All sectors were protected correctly but a different device checksum was calculated because the “FF” in the most significant byte (“FF01”) was added into the device checksum. In software version 5.9 and later, when you enter sector protect data “01”, the 16-bit word in the programmer’s RAM will be entered as “0001”. This modification was made so the high order byte does not change the device checksum reported at the end of the programming cycle. Names Indicate Location of Configuration Blocks The last four characters of the entries in the Device List “Base” column indicate the location of the capacitor configuration blocks, as shown in the illustration below. Note: The Programming Module Configuration chart in your handler User Manual is no longer applicable. PPI Adapter information is Displayed in the Message Bar When you are using the ProMaster 2500 in local mode, the name of the required adapter is displayed in the message bar if a PPI adapter is needed for a device operation. Use Device Guide Only With 150- and 220-mil SOICs The PM2500 is shipped with an 8-pin 150- and 220-mil SOIC device guide (known as a device keeper bar or flipper arm) installed next to the input track. Remove this device guide when you process devices other than 150- and 220-mil SOICs. 6 ProMaster 2500 V8.2 User Notes Creating Floppy Diskette Set from CD You will need high density 1.44 MB 3.5" floppy diskettes for the complete disk creation process. High density diskettes have the “HD” logo embossed on the plastic disk jacket. See below. High Density Diskette You should be able to purchase blank 3.5" floppy diskettes at your local computer or office supply store. Additionally, the following online vendors ship internationally and carry diskettes suitable for use with Data I/O products: http://www.compusa.com http://www.cdw.com 1 2 Boot your programmer using a previous version of software. After the programmer is booted, enter terminal mode. In TaskLink for Windows, click Tools >Programmer Interface to enter terminal mode. In TaskLink for DOS, click Utilities > Programmer Interface. In terminal mode, press the following keys: F1, M, F, F. This moves you through the menu to the FORMAT DISK screen as shown below. FORMAT DISK screen ProMaster 2500 V8.2 User Notes 7 3 4 5 6 7 On the FORMAT DISK screen, move the cursor to “Are you sure (Y/N)?” and press Y. Insert a blank 1.44 MB floppy disk into the floppy disk drive on your programmer. Press ENTER on your keyboard to format the floppy disk. Repeat the formatting process for the remainder of the disks. Insert the “UniFam 8.2/TaskLink 6.0” CD into your PC's CD-ROM drive. Browse to the 'X:\floppies\auto_v82' directory (where X is the CD-ROM drive). Note: When you insert the “UniFam 8.2/TaskLink 6.0” CD into your PC, the TaskLink v6.0 install program will auto-launch. You may either install TaskLink at this time, or cancel and install it at a later time. 8 9 Click on the first file in the directory to launch the WinImage Self Extractor. A status window will pop up describing the disk contents for this image. To create a label for the disk, copy the content information from the monitor onto a floppy diskette label for use in Step 11 below. Status window describing disk contents 10 When prompted, insert a disk (formatted as described above) into your PC's floppy diskette drive. Click OK to start the disk creation process. 11 After the disk is created, attach the floppy diskette label. 12 Repeat Step 8 through Step 11 and select the next file in the directory until you have completed the entire disk set. 8 ProMaster 2500 V8.2 User Notes Quick Update Steps Quick Update Steps TaskLink (DOS) and 2500 Note: You do not need to update your software if you received these User Notes with a new programmer. Note: If your 2500 has a hard drive, you can update system software and algorithms from CD. Regardless of the interface you use to operate your programmer, you must use TaskLink for Windows 4.50 or greater to update your system software and algorithms from CD. For instructions on how to update system software and algorithms, install TaskLink for Windows and see TaskLink online Help topic “How to Update System Software.” Once the update is completed, you may uninstall TaskLink for Windows and continue to use your preferred interface to operate your programmer. Note: TaskLink DOS users will need to upgrade to V2.09 or greater in order to have access to all supports in this UniFam V8.2 software update. 1 Turn off 2500. Ensure that the RS-232C cable from the PC is connected to the Handler port on 2500. If a cable is connected to the Auxiliary port, disconnect it. 2 3 Type tl a at the DOS prompt. 4 5 6 From the Utilities menu, select VT100 on Programmer Port. A blank screen is displayed. From the Options menu, select Programmer port and verify that the PC’s COM port is set to 9600 baud (default baud rate on programmer system disks) and Host port is set to None. Insert the copy of the new Boot Files Disk in the floppy disk drive and turn on 2500. After 2500 reboots, the following message is displayed: Disk revision does not match ROM Disk revision = y.yy ROM revision = x.xx Do you want to update ROM to new disk revision? (Y, N) Press Y to update the system ROM. 7 2500 responds with the following message: Current ROM contents will be over-written! WARNING: Removing power during update process damages 2500! Are you really sure? ProMaster 2500 V8.2 User Notes 9 Quick Update Steps CAUTION: Turning off system power or removing the Boot Files Disk while 2500 is updating system ROM damages 2500. Press Y to confirm the update of the system software. 2500 updates the system ROM to reflect the new version of system software. 8 After the “>” is displayed, press Z (capital Z) and then ENTER. The powerup screen is displayed with the following prompt: Do you want to select a new terminal type? (Y/N) a) If the current terminal type is DEC VT100, press N and then ENTER. The Main Menu is displayed. Update the hard drive as described in the next section. b) If the current terminal type is not DEC VT100, press Y and then ENTER, and select the terminal type you want to use. Press ENTER to accept the selection. 2500 responds with the following prompt: Save terminal type as power on default? (Y/N) Press Y and then ENTER to save your current terminal type as the powerup default. The Main Menu is displayed. Update the hard drive as described in the next section. 10 ProMaster 2500 V8.2 User Notes Quick Update Steps Update the Hard Drive Note: Regardless of the interface you use to operate your programmer, you must use TaskLink for Windows 4.50 or greater to update your system software and algorithms from CD. For instructions on how to update system software and algorithms, install TaskLink for Windows and see TaskLink online Help topic “How to Update System Software.” Once the update is completed, you may uninstall TaskLink for Windows and continue to use your preferred interface to operate your programmer. 1 2 3 Go to the More Commands/Configure System/Mass Storage screen. Choose Y (Yes) for installation of new software. If the new system software is to be used with the configuration currently installed on the hard drive, select Maintain the previous configuration and press Y. Note: If the new Boot Files floppy disk is not write-protected, 2500 will automatically update it with the previous configuration parameters installed on the hard drive to provide the user with a backup of the installed system. 4 Press ENTER to start the update and follow the instructions displayed on the screen. For instance, if the message Insert Algorithm Set 3 Disk appears, insert the Algorithm disk containing Algorithm Set 3. CAUTION: Do not remove disks from 2500 during this operation unless you are prompted to do so. CAUTION: Interrupting or aborting the update process may leave the 2500 hard drive without the files it needs for proper operation. The hard drive software update is complete when OPERATION COMPLETE is displayed in the message bar. The Revision Status fields should now contain the new version number in parentheses. 5 Remove floppy disks. Press ESC, then CTRL + W. 2500 will be rebooted with the software located on the hard drive and ready for operation. 6 7 After the “>” is displayed, press ALT + F1 to return to the TaskLink menu. Select Device List Update from the Utilities menu to update the device file so that it includes the new devices supported by 2500. ProMaster 2500 V8.2 User Notes 11