1
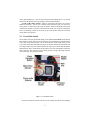
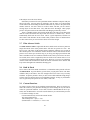
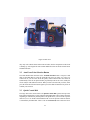
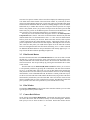
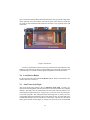
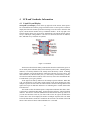
EOS 50/50e Elan II/IIe Operator’s Manual
prepared by Jim Strutz, updated by Niloy J. Mitra
9th August 2002
http://eosdoc.com/manuals.asp?q=ElanII
1
Contents
1 Introduction
4
2 Camera Top Controls
2.1 Shutter Button . . . . . . .
2.2 Main Dial . . . . . . . . . .
2.3 Command Dial . . . . . . .
2.4 Metering Mode . . . . . . .
2.5 Self Timer / Remote Control
2.6 Focus Mode Switch . . . .
2.7 Film Advance Switch . . . .
2.8 Built In Flash . . . . . . . .
2.9 Custom Functions . . . . .
.
.
.
.
.
.
.
.
.
.
.
.
.
.
.
.
.
.
.
.
.
.
.
.
.
.
.
.
.
.
.
.
.
.
.
.
.
.
.
.
.
.
.
.
.
.
.
.
.
.
.
.
.
.
.
.
.
.
.
.
.
.
.
.
.
.
.
.
.
.
.
.
.
.
.
.
.
.
.
.
.
.
.
.
.
.
.
.
.
.
.
.
.
.
.
.
.
.
.
.
.
.
.
.
.
.
.
.
.
.
.
.
.
.
.
.
.
.
.
.
.
.
.
.
.
.
.
.
.
.
.
.
.
.
.
.
.
.
.
.
.
.
.
.
.
.
.
.
.
.
.
.
.
.
.
.
.
.
.
.
.
.
.
.
.
.
.
.
.
.
.
.
.
.
.
.
.
.
.
.
4
4
4
5
8
8
9
10
10
10
3 Other Camera Controls & Features
3.1 Auto Exposure Lock Button . . .
3.2 Auto Focus Point Selection Button
3.3 Quick Control Dial . . . . . . . .
3.4 Function Button . . . . . . . . .
3.5 Film Rewind Button . . . . . . .
3.6 Film Window . . . . . . . . . . .
3.7 Camera Back Release . . . . . .
3.8 Lens Release Button . . . . . . .
3.9 Auto Focus Assist Light . . . . .
3.10 Remote Release Port . . . . . . .
3.11 Battery Compartment . . . . . . .
.
.
.
.
.
.
.
.
.
.
.
.
.
.
.
.
.
.
.
.
.
.
.
.
.
.
.
.
.
.
.
.
.
.
.
.
.
.
.
.
.
.
.
.
.
.
.
.
.
.
.
.
.
.
.
.
.
.
.
.
.
.
.
.
.
.
.
.
.
.
.
.
.
.
.
.
.
.
.
.
.
.
.
.
.
.
.
.
.
.
.
.
.
.
.
.
.
.
.
.
.
.
.
.
.
.
.
.
.
.
.
.
.
.
.
.
.
.
.
.
.
.
.
.
.
.
.
.
.
.
.
.
.
.
.
.
.
.
.
.
.
.
.
.
.
.
.
.
.
.
.
.
.
.
.
.
.
.
.
.
.
.
.
.
.
.
.
.
.
.
.
.
.
.
.
.
.
.
.
.
.
.
.
.
.
.
.
.
.
.
.
.
.
.
.
.
.
.
.
.
.
.
.
.
.
.
.
.
.
11
11
12
12
13
14
14
14
15
15
16
16
4 LCD and Viewfinder Information
4.1 Liquid Crystal Display . . . . . . . . . . . . . . . . . . . . . . . . .
4.2 Viewfinder Display . . . . . . . . . . . . . . . . . . . . . . . . . . .
17
17
18
5 Flash
5.1 Built In Flash . . . . . . .
5.2 Flash Metering . . . . . .
5.3 E-TTL Features . . . . . .
5.4 Flash Exposure Modes . .
5.5 Auto Fill Flash Reduction
5.6 Other Flash Options . . .
.
.
.
.
.
.
19
19
19
20
20
21
21
6 Lenses
6.1 EF Mount Lenses . . . . . . . . . . . . . . . . . . . . . . . . . . . .
6.2 Other Lenses . . . . . . . . . . . . . . . . . . . . . . . . . . . . . .
22
22
22
.
.
.
.
.
.
.
.
.
.
.
.
.
.
.
.
.
.
.
.
.
.
.
.
.
.
.
.
.
.
.
.
.
.
.
.
.
.
.
.
.
.
2
.
.
.
.
.
.
.
.
.
.
.
.
.
.
.
.
.
.
.
.
.
.
.
.
.
.
.
.
.
.
.
.
.
.
.
.
.
.
.
.
.
.
.
.
.
.
.
.
.
.
.
.
.
.
.
.
.
.
.
.
.
.
.
.
.
.
.
.
.
.
.
.
.
.
.
.
.
.
.
.
.
.
.
.
.
.
.
.
.
.
.
.
.
.
.
.
.
.
.
.
.
.
.
.
.
.
.
.
7 Optional Equipment
7.1 Battery Packs / Grips . .
7.2 Remotes . . . . . . . .
7.3 Viewfinder Options . . .
7.4 Off Camera Shoe Cord 2
.
.
.
.
23
23
23
24
24
8 Known Problems
8.1 Battery Compartment . . . . . . . . . . . . . . . . . . . . . . . . . .
8.2 Lens Incompatability . . . . . . . . . . . . . . . . . . . . . . . . . .
24
24
25
9 Specifications
25
.
.
.
.
.
.
.
.
.
.
.
.
.
.
.
.
.
.
.
.
3
.
.
.
.
.
.
.
.
.
.
.
.
.
.
.
.
.
.
.
.
.
.
.
.
.
.
.
.
.
.
.
.
.
.
.
.
.
.
.
.
.
.
.
.
.
.
.
.
.
.
.
.
.
.
.
.
.
.
.
.
.
.
.
.
.
.
.
.
.
.
.
.
1 Introduction
Elan II/IIe (North American designation) is the same camera as the EOS 50/50e (international designation). The "e" in the name refers to the "eye control" option that is
used to quickly select autofocus points as well as depth of field (DOF) preview. EOS,
by the way, stands for Electro Optical System.
In writing this instruction manual for the Canon EOS 50/50e and Elan II/IIe, I have
assumed that the user has a basic understanding of lens focal length, lens apertures,
focusing, shutter speeds, exposure, film type and speeds, as well as SLR cameras and
photography in general. If you need instructions with these basics, you will have to
find them elsewhere. However, for the most part, this manual will often give you more
advice and information than is available in the official Elan II/IIe manual.
The Elan II/IIe is a 35mm, Single Lens Reflex (SLR) camera. This allows the
operator to look through the same lens that is used for picture taking. It uses Canon’s
exclusive Electro Focus (EF) bayonet lens mount. It has no mechanical linkages other
than the mounting flanges themselves. All communication between lens and camera
body is done electronically. Several of the electrical connectors are used for power
and grounding and others are used to pass information and data in a serial buss fashion.
This has allowed Canon to bring several upgrades to their lenses and cameras while still
allowing complete compatibility with their older EOS equipment. It is a very versatile
system that is also being used in Canon’s newer digital SLRs.
2 Camera Top Controls
2.1 Shutter Button
The Elan II/IIe camera has several dials and buttons that you will need to familiarize
yourself with.
The most important button on the camera is the Shutter Button. It’s in the typical
position on the front, right corner of the camera near the top. Your right index finger
usually falls right to it as you hold the camera. If you press the shutter button part
way down until a slightly increased resistance is felt, the camera comes to life. The
camera’s usual response is that the exposure meter and auto focus (AF) are activated,
but this half press is also used for several other functions as well. Pressing it all the way
down usually fires the shutter to expose the film, depending on what mode the camera
is in.
2.2 Main Dial
On the right side, just behind the shutter button is a vertical dial called the Main Dial
or sometimes the Electronic Input Dial. Depending on the mode the camera is in, it is
used to set the aperture or shutter speed and select different functions. This may sound
confusing but actually it’s very logical in practice. If you need to make a value change,
chances are the Main Dial does it.
4
Figure 1: Top View
2.3 Command Dial
On the top left of the camera you will find the Command Dial. It selects the camera’s
exposure modes and other functions. The red L position is Lock, or the camera off
position. To turn the dial from the L position, press in the metal tab on the front of
the dial. The green square is full auto mode. The four small symbols to the right are
the PIC (Programmed Image Control) modes; portrait, landscape, macro, and action.
Basically they bias the shutter/ aperture combinations to favor longer exposures and
smaller apertures for landscape and macro modes and the other way around for portrait
and action modes. Portrait & macro modes as well as full auto mode will also raise
the flash when the camera thinks it’s appropriate. The major restriction with full auto
and PIC modes is that you cannot shift the relative values of the shutter and aperture
like you can in P mode. Nor can you bias the exposure up or down like you can in
P mode. The camera picks what it thinks is appropriate without allowing any further
advice from you. Now that you know what they are, ignore them. Using them will just
retard your education of photography as well as learning about the camera. The other
positions of the Command Dial are generally more useful.
P is for Program mode. It sets both the shutter speed and the aperture. It’s not much
different than full auto but one thing it won’t do is it won’t raise the flash for you. This
can be a useful mode when you need to grab the camera and shoot without much think-
5
Figure 2: Command Dial
ing. The primary advantage of P mode over full auto mode is that in P mode you can
use the Main Dial to shift the relative values of the shutter and aperture selection. This
is called Program Shift and it provides a way for you to bias the exposure towards faster
shutter speeds or smaller apertures while the camera insures accurate exposures. You
can also use the Quick Control Dial (QCD) on the camera back, to bias the exposure up
(lighter images) or down (darker images) depending on the effect that you want. This
is called Auto Exposure Compensation (AEC), and is only the ambient exposure bias.
It does not effect flash exposure.
Tv is for time value mode, also called "shutter priority." You set the shutter speed
with the Main Dial, based on the need to freeze action or portray subject movement
or simply for hand hold ability. The camera then selects an appropriate aperture for
correct exposure. While in Tv mode you can also use the QCD to change the exposure
up or down (AEC). This is only ambient exposure bias and it does not effect the flash
exposure.
Any shutter speed can be set between 1/4000 second to 30 seconds. Below 30
seconds the shutter goes into Bulb mode where it will stay open as long as you hold
the shutter button down or until the battery goes flat. The remote controller, RC-1 and
the remote switch, RS-60E3 both have methods to manually hold the shutter open as
long as you like.
Av is for aperture value mode, also called "aperture priority." You select the aperture
with the Main Dial, based on the need to limit or expand depth of field/focus, and the
camera selects a shutter speed to provide the proper exposure. Av mode can also be
used when you want to select the fastest shutter speed possible and still maintain proper
exposure in changing light. To do that you just set the aperture to the largest setting
6
(smallest number) and the camera will automatically select the fastest shutter speed
setting that will still provide the correct exposure. While in Av mode, you can also
use the QCD to change/bias the exposure up or down (AEC). This is only the ambient
exposure bias and it does not effect the flash exposure.
In P, Av or Tv modes, a blinking aperture or shutter indicator may mean that it is
out of its available range. So if your aperture is blinking f/5.6 and that is the lens’s
largest aperture, you will have to select a slower shutter speed to bring the required
aperture in line with your lens’s available aperture. Also if 4000 is blinking, then use a
smaller aperture to bring the required shutter speed down to what the camera is capable
of doing.
The shutter speed also blinks as a shake warning if the shutter speed falls more than
1/2 stop below the reciprocal of the lens length.
M is for manual exposure mode. You select the aperture with the Main Dial and
shutter speed with the QCD. The camera’s built-in light meter will still function in
manual mode and you can follow its lead or ignore it completely. The meter’s display
can be seen both in the viewfinder as well as on the top mounted Liquid Crystal Display (LCD) on the top right side of the camera. A proper exposure, according to the
camera’s meter, is when the meter indicator is centered on the scale. The meter scale
covers a four stop range. Each hash mark represents 1/2 stop of exposure deviation.
A negative indication shows with underexposure and a positive indication shows with
overexposure.
DEP is for depth of field auto exposure mode. It allows the camera to decide the
appropriate aperture and focus position to provide enough depth of field to keep two
selected distances sharply in focus. The easiest way to use it is to turn the Command
Dial to DEP, and use the center auto focus sensor, point the camera at the first subject
and press the shutter button half way to autofocus. Let the button up and then point the
same AF sensor on the top of the second subject and press the shutter half way again
to allow the lens to autofocus on the second subject. Then reframe your camera and
take the picture. The camera will select a focus distance between the subject distances,
then select an aperture small enough to keep both subjects in focus and then select a
shutter speed that will provide proper exposure. If you select the same subject distance
twice, the camera will select the widest aperture available to keep depth of field very
shallow. The lens must be set to AF for DEP mode to work and if you are using a zoom
lens, you must not change its zoom setting during the entire procedure. You can also
manually or eye control select the side AF sensors, but I think it just adds confusion.
A blinking aperture indicated that sufficient depth of field (DOF) can not be achieved.
You must focus on subjects that are closer to the same distance apart or use a wider angle lens. Flash can not be used with DEP mode
CF (Custom Function) is discussed below
CAL (Elan IIe only) is used for calibrating the Eye Control Focus (ECF) of the
Elan IIe to the shape and size of your eye. Turn the Command Dial to CAL, look
directly at the blinking AF point, press and hold the shutter button until the camera
beeps. Then look directly at the next blinking AF point and hold the shutter button
until the camera beeps. Turn the camera to the vertical position and press and release
the shutter briefly. Then look directly at the blinking AF point, press and hold the
shutter button until the camera beeps. Then look directly at the next blinking AF point
7
and hold the shutter button until the camera beeps. You’re all done, but you should
do this repeatedly in different kinds of lighting. The more you recalibrate, the more
accurate ECF will become.
There are three different calibration settings that can be used for different people
or for when you wear glasses, contacts, etc. You can change the calibration setting by
turning the Command Dial to CAL and then turning the Main Dial. You can see the
selection (1, 2 or 3) in both the viewfinder and the LCD on the top of the camera.
You can erase a calibration setting by selecting it and then holding the two small
thumb buttons on the upper right of the camera back, until the setting blinks in the LCD
screen on the top of the camera. You should always erase a calibration setting if it is
to be used by another photographer. Then recalibrate to their eye. Otherwise someone
else’s previous calibrations will continue to effect their new ones.
2.4 Metering Mode
Just below, and on the same switch stem as the Command Dial is the Metering mode
switch. The front (blank square) position sets the camera to center weighted metering.
If you are very used to metering patterns of older manual cameras and automatically
correct for their metering errors in difficult situations, you might feel more comfortable
with this position. The middle position sets the camera to 9.5% partial area metering.
This is basically a fat spot meter. The area it meters is a bit larger than the bright
circular area surrounding the center AF point. By setting custom function #8 to "1",
the partial metering area will move to the area surrounding the active AF point if that
point is selected manually or by eye control, otherwise it stays in the center. The
rear position (square with circle in it) of the metering mode switch sets the camera to
evaluative metering mode. This divides the picture area up into several areas, meters
them independently and then compares that to a database of possible images that would
create such a pattern of light & dark areas. The camera’s computer then decides what
exposure to use. This mode works quite well and provides the highest percentage of
accurate exposures with the least amount of effort, but its down side is, you never
really know how much it is biasing the exposure towards the dark or light areas. If
you know what you’re doing, in difficult lighting, such as a backlit portrait or an arctic
fox in the snow, you would be better off using the partial meter and making your own
compensations. You’ll also learn more this way.
2.5 Self Timer / Remote Control
Just to the front and left of the Command Dial is the Self Timer button that also activates the IR remote switch. Press this button and the Self Timer indicator appears in
the LCD. If you press the shutter, you will have 10 seconds before the shutter fires.
This should give you time to get into the picture yourself. The red light on the front
of the camera will blink every second and speed up for the last two seconds before it
fires. The beeper will also sound during this time if you don’t have the beeper turned
off. With custom function #5 set to "1", the self timer is reduced to a 2 second delay
with the mirror raising as soon as you press the shutter. This is used primarily to reduce camera vibrations caused by the mirror movement. Its main purpose is in extreme
8
macro and telephoto use. You can cancel the Self Timer during this 2 or 10 second
wait, before the shutter fires by pressing the Self Timer button again.
The RC-1 IR remote control is relatively inexpensive and works very well for
numerous situations. You can use it instead of the Self Timer when you want to be
in the picture, or when you want to trip the shutter without touching the camera that
would cause vibration. It also has a three position switch, off, on and 2 second delay.
The 2 second delay position is for when you are in the picture and want to hide the
remote before the exposure.
2.6 Focus Mode Switch
On the other side of the prism/flash hump you’ll find the Focus mode switch and the
Film Advance switch. The Focus mode switch is on top and has three positions and of
course, only works when the lens is set to AF mode itself. In One Shot mode, as soon
as you press the shutter button half way down, the camera will autofocus and lock onto
on a subject and it stays locked at this distance as long as you continue hold the shutter
button half way down. In this mode the focus has to lock onto some distance before the
shutter will fire. This can prevent out of focus pictures as long as the subject doesn’t
move towards or away from the camera.
Figure 3: Focus Mode Switch
In AI Servo mode the camera will focus on the subject but will not lock anything.
9
If the subject moves the focus follows.
Sometimes you want to focus on a particular distance and then recompose with your
subject off center. You can do this by selecting a side AF point, or by autofocusing
in One Shot mode and holding the shutter button half way down to keep that focus
distance selected. You can’t do this in AI Servo mode, but then you can’t track a
moving object in One Shot mode. They both have their advantages. Most people
prefer to keep the camera in One Shot mode and changing it when they need to.
There is a middle position, the AI Focus mode that is the same as One Shot mode
until the camera detects that the subject has moved closer or farther away. Then it
automatically shifts into AI Servo mode. This is a good compromise, but there are
times when it will shift into AI Servo mode when you don’t want it to and then there
are other times when you want it to but it doesn’t react fast enough.
2.7 Film Advance Switch
The Film Advance switch is right under the Focus mode switch. It has two positions.
Single Shot mode is the usual position and it will take one picture at a time. You
have to raise your finger off the shutter button completely and then press it again to
take another picture. In Continuous Advance mode the camera will continue to take
pictures at 2.5 frames per second as long as you keep your finger pressed down and
there is still film to burn. In Continuous Advance mode, and if you are also in AI Servo
focus mode, there will be a slight delay between frames as the camera looks to see if
it is still in focus and then readjusts as necessary. However if you were in Continuous
Advance mode and One Shot focus mode the camera would lock onto a distance and
keep it there throughout its continuous shooting spree.
2.8 Built In Flash
Just in front of the Focus Mode switch there is a button that when pressed will raise
the built-in flash. To get the flash to go back down you just push it down. The builtin flash is fairly weak and it’s also close enough to the lens to cause red eye in many
situations. Its primary benefit is when you have to have flash and didn’t bring along a
real one with you, and also when you need fill flash outdoors. As long as your distance
isn’t too great and your aperture isn’t too small, it will work.
2.9 Custom Functions
CF mode is used to set the eleven available Custom Functions. These are used to customize the camera to your particular shooting style and to change the way the camera
works for a particular situation. To use them, turn the Command Dial to the CF position, turn the Main Dial to select the custom function you want and then press the
"*-cf" button to change its value.
Custom Functions only work in the non-PIC modes.
The custom functions are:
1) Rewind Speed 0 = quiet, 1 = fast
2) Film leader 0 = rewind it in, 1 = leave it out
10
3) Auto DX film speed setting 0 = on, 1 = off
4) Use of * button
0 = AF start with shutter button, exposure lock with "*" button
1 = AF start with "*" button, exposure lock with shutter button
2 = same as 0, plus DOF check with "*" button
5) Mirror lock with self timer
0 = normal ten second self timer,
1 = mirror locks up and the self timer becomes two seconds
6) Second curtain flash sync 0 = off, 1) = on
7) AF assist beam 0 = off, 1) = on
8) Spot & FEL to focus point
0 = Partial meter & Flash Exposure Lock at center point only
1 = Partial meter and FEL follow the active AF sensor
9) Force 1/125 sync in AV mode
0 = In Av mode with flash provides full ambient exposure
1 = In Av mode the shutter is locked at 1/125 second
10) AF indicator lights 0 = off, 1) = on
11) Eye control DOF preview 0 = off, 1) = on (Elan IIe only)
3 Other Camera Controls & Features
3.1 Auto Exposure Lock Button
Just behind the top mounted LCD are two thumb buttons. The one on the left is the
AE Lock button. It’s marked with a "*-cf" symbol. The "cf" part of the symbol is to
denote that it is used to set the values of the custom functions, explained above. When
the camera is not set to the CF mode on the Command Dial, the AE Lock button can
do several things. Its primary purpose is to set the exposure for one scene and then
recompose the picture. This works particularly well with partial metering where you
want to meter a subject but compose the scene with the subject off center.
Normally pressing the shutter button half way activates autofocus, and pressing the
AE Lock button locks the exposure value that is determined by the camera’s metering
system. This is called Auto Exposure Lock (AEL). However, if custom function #4 is
set to "1" the functions are reversed. The primary reason you might want this is to move
your auto focus away from the shutter button. That way you would only reactivate AF
when you wanted to, not every time you press the shutter. If you couple this with
Canon’s USM lenses that allow Full Time Manual focusing (FTM), you can autofocus
by the push of the "*" button, and manually focus by turning the focus ring on the lens,
all without switching the AF/MF switch on the lens. This may not sound like a big
deal, but for many photographers this is the primary reason to buy Canon equipment.
The low end line of Canon lenses use a micro motor USM that does not allow FTM, so
pay attention to what you’re putting your money down for. USM stands for UltraSonic
Motor. They are nearly silent and the mid and upscale ones are fast!
Nikon has recently started selling a few Silent Wave lenses that are essentially the
same thing as USM. Only some of the high-end lenses have this "S" designation and
11
Figure 4: Back View
they only work with the latest Nikon Camera bodies, but the competition on this front
is heating up. Also Sigma has some similar HSM lenses that are made in both Canon
and Nikon mounts.
3.2 Auto Focus Point Selection Button
The other thumb button back here is the AF Point Selection button. You press it and
then use the Main Dial to select the particular AF point you want, or to select eye
control AF. Or you can select all the AF points, which will then allow the camera to
automatically select the AF point it thinks you probably want for the scene, usually the
closest subject with sufficient contrast. When you have selected what you want, either
press the AF Point Selection button again or press the shutter button half way down to
confirm your selection.
3.3 Quick Control Dial
The large dial on the camera back is the Quick Control Dial (QCD). Most previous
EOS cameras did not have a QCD. That forced the Main Dial to do too many functions
depending on what button you had pushed. The QCD allows you to bias the exposure
while in P, Av or Tv modes and in Manual mode it sets the aperture while the shutter
is controlled by the Main Dial. There is also an on/off switch, above and to the left of
12
the QCD. This simply activates the QCD when in the "1" position. I usually leave it
on. Others complain that the dial gets moved accidentally, so they keep it turned off.
3.4 Function Button
On the camera back near the left side is the Function button. Repeated presses of the
button cycle you through several different options. There is no fixed starting point in
this cycle so the first press may be anywhere in the cycle of options. I’ll start with
the ISO selector. Press the Function button repeatedly until you get there, and then
turn the Main Dial until you get the film speed you want. Press the shutter button half
way to confirm your selection. Unless you have custom function #3 set to "1", this
EI (Exposure Index) or "rated" ISO will only apply to the roll of film you have in the
camera. As soon as you put another film canister into the camera it will select the
film speed that is imbedded into the DX coding. Obviously custom function #3 is for
when you want to "rate" a film and have several rolls of it you want to burn right away.
Wedding photographers frequently do this with some professional films.
Another press of the Function button will get you to Auto Exposure Bracketing
(AEB). By turning the Main Dial you will see the single exposure point, on the exposure scale, in the LCD, turn into three points. As you turn the dial further the exposure
points will separate more. Each click of the dial separates the exposure points an additional 1/2 exposure stop away from each other. If you want AEB to be three separate
exposures, 1 stop apart, set the scale so the outside points are at -1 and +1 with the
center point in the center of the exposure graph. Press the shutter half way to confirm
your selection. The next three shots will be; 1) at the selected exposure, 2) one stop
under exposed, and then 3) one stop over exposed. You can do this same thing without
AEB by using Auto Exposure Compensation for each exposure, but AEB provides an
easy way to do this for several different shots in a row. Maybe even the whole roll. If
you want more or less than a 3 shot AEB, you would have to do it with AEC or just use
Manual mode.
The next press of the Function button brings the camera to Red Eye Reduction
mode. Use the Main Dial to select "0" for off, or "1" for on. Press the shutter button
half way down to confirm your selection. This only works with the built-in flash in the
up position. You probably won’t need it with an external flash as it sits farther away
from the lens axis. This mode provides you with several seconds of a bright white light
to help reduce the iris of the subjects eyes. Just press the shutter button half way down
for three seconds and then take the picture. This will annoy your subjects to no end,
and in my opinion this is a nearly worthless feature, but other cameras have them, so
Canon had to do it too.
The next press of the Function button brings the camera to the beep control feature. Use the Main Dial to select "0" for off, or "1" for on. Press the shutter button
half way down to confirm your selection. I don’t normally like cameras beeping at me,
but I leave this one on because it confirms when the focus has locked on, and it’s quiet
enough not to be a real bother.
The next press of the Function button brings the camera to the Multi-Exposure
mode. Use the Main Dial to select the number of exposures you will want on this frame
of film. Nine is the maximum. Press the shutter button half way down to confirm your
13
selection. The exposure counter in the LCD will now display the remaining exposures
to be taken on this frame instead of the usual frame number. If you decide you don’t
want to use all the Multiple Exposures you selected, simply press the MF button again
and then turn the Main Dial until the numbers remaining disappear. Press the shutter
button half way to confirm this selection. Getting more than 9 exposures on a single
frame is also possible; before you get to the last exposure for this frame, press the MF
button until you get back to the Multi-Exposure mode and turn the Main Dial to add
more exposures. Press the shutter button half way to confirm this selection.
The next press of the Function button brings the camera to the Flash Exposure
Compensation (FEC) feature. This works for both the built-in flash and any attached
dedicated flash units. Use the Main Dial to select + or - FEC. Press the shutter button
half way down to confirm your selection. With Canon EOS cameras, flash exposure
is totally separate from the regular ambient exposure. Applying the regular Auto Exposure Compensation will not effect the flash exposure, and using FEC will not effect
AEC. There are many times you would want to adjust one or the other but not both,
however resetting the film ISO will effect both. Often using -0.5 to -1.0 FEC is desired
for additional fill flash reduction. Keep in mind that Canon already applies up to -1.5
stops of auto fill flash reduction depending on light levels.
3.5 Film Rewind Button
Just below the Function button is the Film Rewind button. You can use this to rewind
the film early. It will also increase the speed of the rewind by pressing it again. Normally the Elan II/IIe auto rewinds when it comes to the end of a roll. It does this in the
silent rewind mode. You can speed this up by pressing the rewind button after it starts
to auto rewind.
The Elan II/IIe uses an Infrared (IR) frame counter that allows you to remove
a roll of partially used film by pressing the rewind button, and with custom function
#2 set to "1" the film leader will be left out. You can then mark on the canister how
many frames have been used. When you reload it into the camera to use the remaining
unused frames, set the Command Dial to M, the shutter at 1/4000, put the lens cap on,
set the focus switch on the lens to MF, and fire the shutter until you get back to the same
frame number you had when you removed the film. There is no need to waste an extra
frame to guarantee that you won’t overlap the last exposure. The IR frame counter will
place you back to the same exact position every time without frame overlap.
3.6 Film Window
The dark little Film Window on the left side of the camera back allows you to see what
type and speed of film you have loaded.
3.7 Camera Back Release
On the left side is the Camera Back Release. Canon made two backs for the camera,
one with a date feature and one without, but they are not interchangeable. With the
back open you can see where the film is to be loaded. Put the film canister into the
14
space on the left side and pull the film leader out until it lines up with the orange mark
on the right side of the open camera, and close the back. If the camera is not already
on, turn it on now, and the film will wind to the first frame. Can’t get much easier with
35mm film.
Figure 5: Inside View
You can see the IR frame counter near the top of the film rail on the right side. This
might fog some infrared type films, but most IR film users report that it is actually not
a problem in spite of Canon’s cautions against using IR films with the Elan II/IIe.
3.8 Lens Release Button
To the left of the lens mount is the Lens Release button. Push it in and turn the lens
counter clockwise to remove it.
3.9 Auto Focus Assist Light
Also on the front of the camera is the red Autofocus Assist Light. It emits a patterned near infrared light that will allow the camera to autofocus in otherwise complete
darkness. This light comes on automatically and very briefly when the camera is autofocusing in low light situations. It’s range is up to 21 feet for center AF point and 13
feet for side AF points. This will depend on the lens being used. If you have an external Speedlite flash unit attached the camera will usually use the AF assist light in the
external flash instead of the one built into the camera body. This will save the camera
battery power and the external lights are usually more powerful. Some external flash
15
Figure 6: Front View
units do not cover the side AF points however, so with those flashes, the camera will
use it’s own AF assist light when a side AF point is selected. When using some large
diameter lenses the left side AF assist light may be blocked by the lens barrel. The
dark red circle that houses the AF assist light, close to the shutter button, also houses
the receiver for the optional IR remote control, RC-1.
3.10 Remote Release Port
On the left side of the camera is a small hole that is actually the plug in port for the
RS-60E3 Cord Remote. Just plug it in and you can trip your shutter without touching
your camera. This makes for much steadier shots when using a tripod.
3.11 Battery Compartment
The Battery Compartment is on the bottom, on the right side. It uses a 2CR-5 lithium 6
Volt battery. Canon claims that you can expect up to 90 rolls of 24 exposure film with
one battery. Cold weather and use of the internal flash will reduce that considerably.
Below zero (F) temps and using flash on all exposures will reduce this to as little as 6
rolls of film.
16
4 LCD and Viewfinder Information
4.1 Liquid Crystal Display
The liquid crystal display (LCD) on the top right side of the camera, shows quite a
bit of information about what is going on with the camera. At the top left is a numeric
display that shows the shutter speed when metering, but is also used to show the film
speed, custom function number and eye calibration number. At the top right is the
aperture display that is also used to show AEB amount, and custom function option,
red eye, and beeper setting numbers. The next row down has the ECF on indicator,
ISO, AEB and red eye reduction on symbols.
Figure 7: LCD Panel
The third row down has the battery indicator that shows how much battery power is
left. It usually shows full until shortly before the battery starts to die. A flashing battery
indicator, or no battery indicator at all, usually means the battery is dead. A flashing
battery indicator can also mean that the camera has locked up for some reason. The
usual solutions are; take the battery out, try a new battery, clean the battery contacts,
clean the lens and lens mount contacts, remove the lens, remove the external flash unit.
If it still blinks, you’ve got a problem.
To the right of the battery indicator is the multiple exposure indicator. When this
is lit you should also see the frame counter portion of the LCD showing how many
multiple exposures are left before the camera advances the film. Moving further to the
right is the beeper on indicator and then a CF indicating that a custom function has
been turned on.
The fourth row has the Flash Exposure Compensation indicator that shows whenever the FEC is something other than 0. To the right is the self timer / remote activation
indicator. Just below it is the MF (Manual Focus) indicator that shows up when ever
you turn the autofocus switch on your lens to MF. To the far right is the film frame
counter, that is also used to display the number of multiple exposures left to be taken
before the film advances and it also counts down the self-timer. The bottom of the LCD
shows a film canister if film is loaded and blinks if it is rewound.
17
To the right is the exposure graph. Most of the time the indicator is under the 0
mark, but if you have set Auto Exposure Compensation (AEC) the indicator will move
to the - or the + side to show how much compensation you are using. It has a +/- 2
stop range. This graph is also used to show Auto Exposure Bracketing (AEB). As you
set AEB you will see the single indicator become three indicators showing how much
AEB you have selected. You will also see a numeric indication of the AEB amount in
the upper right hand of the display. You can combine AEB with AEC, but you are still
limited to the 2 stop maximum range.
The graph also is used as a short count down indicator for the red eye reduction
lamp.
The exposure graph is also used when metering in manual mode. Setting the indicator to 0 is what the camera’s meter recommends. Of course one of the prime reasons for
using manual mode is disregard what the meter says, but it still gives you an indication
of how far you are from the recommended exposure.
4.2 Viewfinder Display
The viewfinder also shows much of the same information as the LCD so that you can
see necessary data without removing your eye from the viewfinder. The screen is called
a New Laser Matte screen and it is fairly bright, but it is accused of sacrificing contrast
for brightness. This would be bad, if true, in a manual focus camera but isn’t much
to complain about with autofocus. You can see three autofocus squares that light up
as they come into focus, indicating which AF point is active. The actual AF area is
slightly larger than the small squares show but accurately indicate the spot. There is
also an AF indicator dot in the line of lights below the screen. These AF squares will
also light up when you manually focus your EF (EOS) mount lens. But if you are using
a manual focus lens with a lens adapter they will not work.
The central AF point is a cross type sensor and is sensitive to contrasting lines in
any direction. The outer AF points are linear and are sensitive to horizontal contrasting
lines. They won’t work if the only lines are completely vertical. In practice this isn’t
much of a issue and you can always tip the camera a bit for vertical lined subjects.
Also on the screen is a small square in the upper left. This is what you look at
to activate the DOF preview when using eye control on the Elan IIe. To use it you
have to have the camera in One Shot focus mode, lock the focus on something using
eye control to select the AF point, then look at the little square. The lens will then
stop down to the taking aperture and you will see the screen get darker and the depth
of field get deeper. Of course you have to have selected an aperture smaller than the
lenses maximum for this to do anything.
When you press the shutter button half way down the meter is activated and the
viewfinder data display is lit up. At the bottom of the view screen, starting on the left,
there is an eye control indicator. Next to it is the * of the Auto Exposure Lock (AEL)
indicator, followed by a flash ready indicator that is also used to indicate invalid Flash
Exposure Lock (FEL) warning. The numeric display is for the shutter speed, eye control calibration, and FEL lock indication. The next numeric display is for the aperture
value. Followed by the Flash Exposure Compensation (FEC) indicator. Then there is
the exposure graph like the one on the LCD and is used for the same purposes. The
18
farthest right, bottom indicator is a dot to show that the camera has found something to
focus on.
5 Flash
5.1 Built In Flash
The Elan II/IIe’s Built In Flash is TTL only. Like all such built in flash units, it is
limited by its low power. It is also very close to the lens axis, and this frequently
causes the dreaded red eye effect in your pictures, which is really just the flash lighting
up the back side of the subject’s eyeball. Moving the flash farther above your lens is
the best solution. This will also cause any shadows on the wall behind your subject
to fall below the image of your subject where it will either not be seen or not be as
objectionable.
The built in flash unit also houses a bright white light that acts as a red eye reduction
lamp. With the flash up and red eye enabled, press and hold the shutter button until the
graph indicator at the bottom of the viewfinder (as well as the one in the LCD) centers
itself. Then take the picture. What happens is the bright light shines in the eyes of the
subject and causes the iris of the eye to contract, reducing the red reflection from the
back of the eye. Most people find this totally annoying, so now that you know how to
do it, turn the thing off! There are better ways of dealing with red eye. Including red
eye removal pens for your prints.
When using some larger lenses the built in flash may be partially blocked by the
lens barrel. This will cause a rounded shadow at the bottom of the picture. This is most
pronounced at wide zoom settings and close distances. The cure is to use an external
flash since it is mounted higher above the lens.
5.2 Flash Metering
The Elan II/IIe is capable of Through The Lens (TTL) and Advanced TTL (A-TTL)
flash metering with external Canon E and EZ series Speedlites. It is also capable of
Evaluative TTL (E-TTL) flash metering with external Canon EX series Speedlites. For
several reasons, E-TTL is generally the preferred metering method.
With TTL and A-TTL, the camera’s built-in flash meter senses the light Through
The Lens (TTL) and reflected Off The Film (OTF). When enough light has reached the
film the camera signals the flash to stop it’s flash pulse. This all takes place in less than
1/1000 second. On the Elan II/IIe this exposure is metered by a four area, three zone
flash meter and metering is biased toward the general area of whatever autofocus point
is active at the time.
With E-TTL mode, the flash exposure control is determined before the shutter
opens by means of a pre-flash that is metered by the same meter as the camera’s regular,
ambient light, evaluative meter. This pre-flash occurs about 1/20 second before the
main flash and you can usually see it in the viewfinder just before it blacks out for the
exposure. This system compares the ambient light reading with the flash reading and
adjusts both the ambient exposure and flash exposure to, hopefully, provide the optimal
19
exposure. E-TTL also biases the flash exposure towards the area surrounding the active
AF point.
E-TTL usually works better than TTL and A-TTL when the lighting is difficult such
as a backlit or small nearby subject with a distant background, or an off-center subject.
E-TTL is also an improvement with daylight fill flash, providing a more natural look.
5.3 E-TTL Features
Canon’s E-TTL system allows the pre-flash to be fired up to 16 seconds before the main
flash, so you can have Flash Exposure Lock (FEL) by pressing the AE Lock button.
This allows you to point the camera at the subject, determine and set the flash exposure
for the subject, and then recompose to shoot. It is very similar to Auto Exposure
Lock (AEL) but for the flash exposure. FEL normally biases the exposure to the area
surrounding the central AF, but if custom function #8 is set to "1" the flash is biased to
the active AF point if the AF point is either manually chosen or selected by eye control.
E-TTL also provides a method of metered high speed sync (FP Flash) to allow you
to use an EX series Speedlite at a shutter speed faster than the normal top sync speed
of the camera (1/125 sec.) This will allow you to use faster film and wider apertures
when using daylight fill flash. Canon’s FP Flash mode works in E-TTL mode so it
automatically calculates flash exposures.
Wireless E-TTL Flash can also be done with some Canon Speedlites. You need a
master mounted on camera (or attached to an Off Camera Shoe Cord 2) and at least one
slave. The 550EX works best as a master and you use either a 420EX or another 550EX
as the slave. The wireless mode only works in E-TTL or wireless manual modes, and
only with the Speedlites that have this feature built in. At the time of this writing, this
limits you to the 420EX, 550EX, or one of Canon’s two E-TTL ring flashes. The STE2 has no flash built in, but can be used as the shoe mounted master instead of using
another flash for this. The Sigma EF-500 Super is a third party 550EX clone and can
also be used as either a slave or a master.
Second Curtain Sync with custom function #6 set to "1", is a feature that effects
flash exposures with relatively long shutter speeds. Its primary purpose is to get light
trails to follow the flash instead of leading it. In normal sync mode the flash fires at
the beginning of the exposure. If the exposure is long and the subject moves, some
of that movement might be recorded on film, and it will look like it’s in front of the
flash exposure. Scenes like moving cars with headlights on will appear to be moving
backwards. Setting the sync to the second curtain makes the trailing movement appear
behind the subject. Second curtain sync can usually be left on without any negative
results and it works with the built-in flash. There will be a multi headed arrow symbol
that shows on the LCD of an external Speedlite when second curtain sync is on. Second
Curtain Sync works with all of Canon’s E, EZ and EX series Speedlites.
5.4 Flash Exposure Modes
In low light with the camera in P, Full Auto, and PIC modes the camera will usually
select a wide aperture. Also the shutter speed will be held to no slower than 1/60
second, but as light levels increase the shutter speed will rise to be equal to the camera’s
20
highest sync speed (1/125 sec.). Also as light levels increase, to the point of over
exposure by the brighter ambient light, the lens aperture will get increasingly smaller.
With the camera in Av, Tv and M modes, the camera meter will insist on a full and
proper ambient light exposure in addition to your flash exposure. It’s the same thing as
night flash mode in some other cameras. The background will be properly exposed by
the ambient light exposure and the flash will insure that the subject in the foreground
is properly exposed by the flash. However, if the light is dim, the shutter speed will get
very slow, often too slow to hand hold the camera. If that happens you can simply turn
the camera back to P mode which will raise the shutter to 1/60 second, but this will
usually create dark, underexposed backgrounds. A slow shutter speed with the camera
mounted on a tripod is often the best solution. Also, the Elan II/IIe has custom function
# 9 to keep the shutter speed at 1/125 sec. in Av mode if you want that.
I find that when using flash, setting the camera to manual mode is usually easier to
keep everything in control. Since the flash exposure is being determined automatically
anyway, having the camera on manual really doesn’t slow much of anything down.
Also, remember, that with flash the aperture effects both ambient lighting and flash
lighting, but the shutter speed only effects ambient lighting. This is because the flash
pulse is much faster than the shutter.
5.5 Auto Fill Flash Reduction
The Elan II/IIe automatically provides negative Flash Exposure Compensation (FEC)
when shooting in bright light. If using flash with light levels above 10EV (equal to
f/5.6 @ 1/30 seconds) the camera assumes you want a normal ambient light exposure
with fill flash to brighten the nearby subject, so it reduces the normal flash output.
This effect fades in as the brightness of the ambient lighting increases above EV10.
The maximum of -1.5 stops of FEC is applied with TTL/A-TTL metering and up to
2 stops with E-TTL. This auto FEC happens in all camera modes and is designed to
make your fill flash pictures more natural looking. Most people like the effect but many
photographers want even more reduction for their fill flash pictures. This can be easily
done with the Elan II/IIE by means of the FEC control on the camera body. This FEC
will be in addition to any auto FEC the camera decides on. Some EOS cameras have a
custom function to eliminate this Auto Fill Flash Reduction, but the Elan II/IIe does
not.
5.6 Other Flash Options
Other Flash Options: The Elan II/IIe does not have a flash PC connector to use with
studio lights and other manual flash units, but you can use a generic hot shoe to
PC adapter. Nikon’s AS-15 is a good quality one, but there are lower cost versions as
well. With a manual or studio flash you will need a flash meter to get consistent flash
exposure. Published guide numbers can’t always be trusted.
The Elan II/IIe can also use auto flash units like the venerable Vivitar 283/285 or
Sunpak 383. This is a way to get a more powerful flash without breaking the bank to
do it. There are several big limitations however. The meter is in the flash unit and it
will not take into account the lens’s field of view. This can give inaccurate exposures.
21
You will also have more things to set on the flash (ISO, aperture, zoom) and on the
camera you will have to manually set the lens aperture to what the flash says, and you
will have to make sure that your shutter doesn’t exceed 1/125 second. Still, with all
that, auto flash is a bargain if power and versatility are the main considerations. But if
speed & ease of use are a priority get an EX series Speedlite.
The most important consideration with non-dedicated flash units is the sync voltage. You must test this with a good volt meter (at least 20,000 ohms per volt). With the
flash charged up & ready to fire, lay one lead across the contact at the side of the flash
foot and the other on the center pin. Canon says it has to be 6 volts or less, although
up to 10 volts is probably close enough. Some flash units like the older models of the
Vivitar 283 have more than a 200 volt sync trigger. These can fry your camera in one
pop, and accumulated use of even a 20 volt sync could damage your camera.
The most complete information about Canon flash technology, metering and theory
can be found at: http://teladesign.com/photo/eos-flash/
6 Lenses
6.1 EF Mount Lenses
All lenses that are designed for EOS cameras have an EF mount on them. They all
should work with the Elan II/IIe. Some older third party lenses are known to cause
the camera to temporarily lock up due to an incompatibility problem that is discussed
below. All Canon EF mount lenses will work fine. The better grade of Canon USM
lenses (28-105 USM, etc.) use a ring type AF motor that allows Full Time Manual
(FTM) focusing without selecting MF on the lens switch. FTM allows you to auto
focus and then quickly touch up your focus manually. Used with custom function #4
to move the AF start to the AE Lock button, these lenses will change the way you
take pictures. Or at least the way you focus. Before you buy one of Canon’s cheaper
lenses try one of the better versions. Be warned that cheaper USM lenses (28-90 USM,
75-300 USM) will not allow FTM.
In my opinion there are no good reasons to buy a cheap third party lens with any
Canon EOS camera. There are too many incompatibility problems and they are no
better than Canon lenses of equal price. However there are quite a number of better
third party lenses that can save you money over Canon’s good but pricey selection of
better lenses. Keep in mind that you get what you pay for. At least sometimes you do.
6.2 Other Lenses
In addition you can use any T mount lens with a T mount adapter ring. T mounts are
frequently used for cheap mirror lenses that have nearly worthless image quality. But
the T-Mount is also used for macro bellows, attaching the camera to a microscope or
telescope as well as some worthwhile older lenses.
You can also use any M42 screw mount lens with a M42 to Screw mount adapter.
Very decent, low cost fisheye lenses are often found in M42 mount. These lenses were
22
designed for cameras like the early Pentax Spotmatics. Some of the lenses were very
good and can be found cheap.
There are also adapters made to fit older Canon manual focus lenses, but these will
either not allow infinity focus or will increase the focal length of your lens with a small
teleconverter built in. They are not really worth the price or limitations unless you have
a very special old Canon lens to use with your EOS camera.
There are also adapters made to fit the EF mount camera to Nikon, Tamron Adaptall
and other lenses. The downsides to using any of these adapted lenses is that they can
be manual focused only and they will have to be metered in the stop down mode. That
is, they will not have an auto aperture, so metering will be done in M, Av or P mode,
with a slightly darkened viewfinder. So focus first. The LCD and viewfinder display
will show the aperture as "00" but you set the aperture on the lens barrel with these
anyway.
7 Optional Equipment
7.1 Battery Packs / Grips
The BP-50 Vertical Grip is available for the Elan II/IIe. It is also a battery pack as
it takes either four AA batteries or the 2CR-5 that the camera normally uses. It also
has an additional shutter button to use in the vertical position and a switch to disable
it. It’s quite handy and I usually leave mine on unless I’m trying to reduce the size of
my photo equipment. One problem with the vertical grip is that it displaces the tripod
mount from directly under the lens axis to a position just over an inch to the right side.
It also would be more useful to add a Main Dial, AE Lock button and AF point selector
button. But at least this leaves an upgrade path for future cameras.
The BP-5B is an external battery pack that is used with the vertical grip. It has a
dummy 2CR-5 battery attached to a coiled wire, and at the other end is a battery pack
for 4 D cells. You can keep the batteries warm in your coat & still take pictures in sub
zero temperatures. The BP-5B is the same as a BP- 5 (for the EOS 5/A2/A2e) but adds
a top plate for the BP-50 that has a hole for the power cord to go through. You can use
the slightly cheaper BP-5 and modify the top plate yourself if you want.
7.2 Remotes
The RC-1 Infra Red Remote is also available and will trip the shutter from up to 15
feet in front of the camera. You can also use it to trip a tripod mounted camera from
directly overhead if you are close enough, so it can be used for macro and long lens use
as well. With custom function #5 set to "1" and the shutter set to bulb, a quick press of
the RC-1 will raise the mirror, wait two seconds, then open the shutter and hold it open
until you press the RC-1’s button again.
The RS-60E3 Cord Remote is short, but convenient for tripod use. It plugs into
the small connector at the lower right side of the camera. It uses a small mini-plug and
some stereo audio extension cords can be used with it to extend its range. It has a two
position switch just like the camera shutter button. Half a press to activate AF and a
23
full press to fire the shutter. It also has a switch lock to keep the lens open in bulb mode
without having to hold the button.
7.3 Viewfinder Options
Dioptric Corrective Lenses ED are available to correct vision problems. The Elan
II/IIe has 19.5mm of eye relief. Normally people with glasses or contacts have no
problem with the viewfinder of the Elan II/IIe but glasses wearers may have to move
their eye around some to see all of the image or the data display at the bottom of the
screen. For this and other reasons some people prefer to take their glasses off while
shooting. For these people and others that have a hard time seeing the viewfinder
image sharply Canon makes Dioptric Corrective Lenses (DC lenses) for the Elan II/IIe.
The viewfinder has a -1 built in making the image appear about 1 meter away. The DC
lenses are marked to take this into account so a 0 DC lens is actually a +1 to compensate
for the built in -1. If your normal distance prescription is -4, buy the Canon -4 DC lens.
But you may want to try them out before you buy.
The Eyecup Ec II is standard but the optional larger Eyecup Ed-E can also be
used. The viewfinder attachments, Angle Finder B and Magnifier S can be used but
you have to use the Adapter Ed to mount them to the larger than normal viewfinder of
the Elan II/IIe.
7.4 Off Camera Shoe Cord 2
The Off Camera Shoe Cord 2 (OCSC2) is used to get an external Speedlite flash
mounted off the camera’s hot shoe. It provides about 2 feet of easy extension and if you
pull on the coiled wire you can stretch it to about 3 feet. Canon recommends against
it, but you can extend this by adding two OCSC2’s together, end-to-end. Check this
out thoroughly before you need to make sure you don’t have any impedance induced
exposure errors.
8 Known Problems
8.1 Battery Compartment
Not all 2CR-5’s are exactly the same dimensions. Some are just a wee bit short and
this can cause problems with the Elan II/IIe. The usual problem is the camera will lock
up when you take a picture and the battery indicator in the LCD will blink. (There are
other problems that can also cause this same symptom however.) This can be easily
remedied by putting a small piece of cardboard between the bottom of the battery and
the battery door. This will press the battery farther into it compartment, insuring better
contact. You can also reach into the battery compartment with a small hook and raise
the battery contacts as they seem to bend down too far with use. For what it’s worth,
Sanyo 2CR-5 are reported to work best with the Elan II/IIe.
The battery door hinge is just a thin piece of plastic that bends when you open it.
With a lot of use or abuse this can fail. Canon USA sold me one for cheap although
24
the repair process was a bit tricky. Fortunately this hasn’t proven to be as frequent a
problem as many people expected that it would be.
8.2 Lens Incompatability
Other than problems with the battery compartment, the most frequently reported trouble seems to be an incompatibility with some third party lenses. They sometimes cause
the camera to lock up with the battery indicator flashing in the LCD. Some lenses will
simply not work at all with the Elan II/IIe and others will lock up only if you use it with
the motor drive set on continuous. Some third party lenses will not cause this symptom
but the aperture will not work or it will display some other malady.
9 Specifications
The EOS Elan II/IIe is a great camera with plenty of features for the enthusiast. It has
proven to be reliable and easy to use. It has been upgraded to the EOS 30/Elan 7/7e
which has a few more AF point, a bit faster operation and a few other improvements,
but the Elan II/IIe isn’t far behind.
Viewfinder coverage: 90% vertical and 92% horizontal with 19.5mm of eye relief
Metering system: 6 zone evaluative, 9.5% partial and center weighted
Metering range: EV1 to EV 20 with 50mm f/1.4 lens and 100ISO film
Film Speed range: ISO 6 to ISO 6400, or ISO 25 to ISO 5000 with DX coding
AF working range: EV 0 to EV18 with ISO 100 film
AF assist beam: Near infrared, up to 21 feet for center AF point and 13 feet for
side AF points
Shutter: Electronically timed, 30 seconds to 1/4000 second, top flash sync at 1/125
sec.
Film advance: 2.5 frames per second max.
Built in flash: GN of 42 feet with ISO 100 film, coverage for 28m lens
Dimensions & weight: 152.5mm (W) x 104.4mm (H) x 71mm (D), 590 grams
25