1
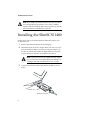
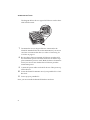
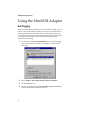
USERS GUIDE SLIMSCSI 1480 A DAPTER © 1997 Adaptec, Inc. All rights reserved. Adaptec, and the Adaptec logo are trademarks of Adaptec, Inc. which may be registered in some jurisdictions. Printed in Singapore STOCK NO.: 511537-00, Rev. A KL 8/97 ▼ ▼ ▼ ▼ SlimSCSI 1480 Adapter User’s Guide R ▼ ▼ ▼ ▼ Contents Introduction 1 Contents of Kit 1 System Requirements 1 Installing the SlimSCSI 1480 2 Installing the SlimSCSI Windows 95 Driver 5 Using the SlimSCSI Adapter 6 Hot Plugging 6 Controlling the SCAM and Ultra Features 7 Understanding SCSI 10 SCSI IDs 10 SCAM Protocol 10 Terminating the SCSI Bus 11 Obtaining SCSI Cables 11 Connector Types 12 Troubleshooting 13 General Hardware Troubleshooting 13 General Software Troubleshooting 14 Windows 95 Troubleshooting 14 Contacting Adaptec 19 Electronic Support 19 Technical and Product Support 19 Sales and Ordering Information 20 iii Introduction Congratulations on your purchase of Adaptec’s SlimSCSI 1480. The SlimSCSI 1480 delivers full 32-bit PCI performance at speeds up to 20 MBytes/sec., allowing your high-performance SCSI devices to operate at their maximum speed. Enjoy the same versatility and performance as a desktop PC, plus the convenience of instant plug-in connections and hot swapping. Contents of Kit ■ SlimSCSI 1480 CardBus-to-UltraSCSI Adapter ■ SlimSCSI 1480 setup diskette ■ SlimSCSI 1480 Adapter User’s Guide ■ 50-pin high-density cable ■ 50-pin low-density cable ■ Adaptec EZ-SCSI software and Quick Reference Guide ■ Mail-in card for free DB25 cable ■ Registration card System Requirements ■ Portable PC with CardBus-enabled PC Card slot ■ Windows® 95, version 4.00 950B or later 1 SlimSCSI 1480 User’s Guide Note: The CardBus specification differs from the standard PC Card (PCMCIA) specification. As a result, CardBus adapters like the SlimSCSI 1480 will not operate in, and cannot be inserted in, a standard PC Card slot. Installing the SlimSCSI 1480 Follow these steps to install the SlimSCSI 1480 and connect your SCSI devices to it: 1 Remove the SlimSCSI 1480 from its packaging. 2 Determine which of the two 50-pin cables you will use to connect the SlimSCSI 1480 to your first (or only) SCSI device. To do this, see which cable connector (high-density or low-density) fits the SCSI connector on the back of the device. Note: If your SCSI device has a DB25 (25-pin) connector, you can order a free DB25 cable from Adaptec by sending in the card included in this User’s Guide. 3 Connect the SlimSCSI cable to the SlimSCSI 1480, as shown below: CardBus Slots SlimSCSI 1480 SlimSCSI Connector 2 Installing the SlimSCSI 1480 4 Plug the other end of the cable into the first (or only) SCSI device, as shown below. Make sure the SCSI device is not powered. SCSI Connector SCSI Device Terminator 5 (Optional) Connect up to two additional UltraSCSI devices by daisy-chaining them to the first device, as shown below: SCSI Devices Terminator 6 Be sure that each SCSI device has a unique SCSI ID ranging from 0 to 6. If any two devices have the same ID, change the SCSI ID of one device. This is usually done by changing a switch on the back of the device. (For more information, see SCSI IDs on page 10.) 3 SlimSCSI 1480 User’s Guide The diagram below shows a typical SCSI device with a selectable SCSI ID switch: 7 Terminate the last (or only) SCSI device connected to the SlimSCSI 1480. Read the device documentation if you are not sure how to terminate the device, or refer to Terminating the SCSI Bus on page 11. 8 Be sure that at least one external SCSI device provides SCSI bus termination power or that the last device on the bus supplies termination power to itself. Read the device documentation if you are not sure whether the SCSI device provides termination power. 9 Connect all power cables to the SCSI devices. Then power up all the devices. 10 Insert the SlimSCSI 1480 into one of your portable PC’s CardBus slots. 11 Power up your portable PC. Next, you must install the SlimSCSI Windows 95 driver. 4 Installing the SlimSCSI Windows 95 Driver Installing the SlimSCSI Windows 95 Driver 1 If Windows 95 is not already running, start it now. 2 If the SlimSCSI 1480 is not already inserted in the CardBus slot, insert it now. Then wait until Windows 95 finishes building the database information for the adapter. The Windows 95 Update Device Driver Wizard starts automatically. 3 When you are prompted by the Update Device Driver wizard, insert the SlimSCSI 1480 Setup Diskette for Windows 95 in the floppy disk drive. Click the Next button. Note: Refer to the Windows 95 Device Driver Wizard Help if you have questions about installing the driver. 4 If you see Adaptec APA-1480 CardBus SCSI Controller in the dialog box, click the Finish button. If you see a message prompting you to insert the disk that is already in the floppy drive, click OK. Then type a: as the source from which to copy files and click OK again. 5 Wait until the PC Card (PCMCIA) icon appears on the Windows taskbar in the lower right corner of the screen. This indicates that the driver is successfully installed! If the PC Card icon does not appear on the taskbar, click the Start button and select Settings and Control Panel. In the Control Panel, double-click the PC Card (PCMCIA) icon. In the Properties dialog box, select Show control on taskbar if it is not already selected and click OK. The PC Card icon should then appear on the taskbar. Congratulations! You have successfully installed the SlimSCSI 1480! 5 SlimSCSI 1480 User’s Guide Using the SlimSCSI Adapter Hot Plugging After you install the APA-1480 driver for the SlimSCSI 1480, you can insert or remove the SlimSCSI 1480 at any time except when data is being transferred on the SCSI bus. This is called hot plugging. (You can tell that data is being transferred if the SCSI device activity light is on.) Follow these steps to remove the SlimSCSI 1480 while Windows 95 is running 6 1 Click on the small PC Card (PCMCIA) icon in the lower right corner of the screen. You will see a dialog box similar to the following: 2 Select Adaptec APA-1480 CardBus UltraSCSI Adapter. 3 Click the Stop button. 4 When you see the message You may safely remove this device, remove the SlimSCSI 1480 from the slot. Using the SlimSCSI Adapter Caution: Your PC may hang if you remove the adapter before the message appears. When you insert the SlimSCSI 1480 adapter while Windows 95 is running, Windows 95 detects the adapter and the device(s) connected to it. (Be sure the devices are powered before you insert the adapter!) Controlling the SCAM and Ultra Features ■ SCAM stands for SCSI Configured AutoMatically, a feature that lets the PC automatically assign SCSI IDs to SCSI devices when it boots. This eliminates possible hardware conflicts that can occur when two devices have the same SCSI ID. (The SCSI device itself must also support SCAM.) ■ Ultra stands for UltraSCSI, a very fast data transfer mode that is supported by newer SCSI devices. By default, the SCAM and Ultra options are enabled when you install your SlimSCSI 1480 adapter. To disable or enable the SCAM and Ultra features: 1 From Windows 95, click the Start button, point to Settings, and then click Control Panel. 2 Double-click the System icon, and then select the Device Manager tab. 3 Select View devices by type. 7 SlimSCSI 1480 User’s Guide 4 Double-click SCSI Controllers. The System Properties dialog box now looks like this: 5 Double-click Adaptec APA-1480 CardBus UltraSCSI Adapter. 6 Select the Settings tab in the dialog box. In the Adapter Settings box type one of these commands: ■ To disable the Ultra option, type: /no_ultra ■ To disable the SCAM option, type: /no_scam ■ To disable both SCAM and Ultra options, type: /no_ultra /no_scam Be sure to include a space between the options, as shown. 8 Using the SlimSCSI Adapter The dialog box will now display the options you have entered, as shown below: Note: To enable an option that you previously disabled, return to the Adapter Settings box and delete one or both commands. 7 Click OK. 8 When you are prompted to restart your computer, click Yes. 9 SlimSCSI 1480 User’s Guide Understanding SCSI SCSI (pronounced “scuzzy”) stands for Small Computer Systems Interface. SCSI is an industry standard computer interface for connecting SCSI devices (such as hard disk drives, CD-ROM drives, and scanners) to a common SCSI bus. A SCSI bus is an electrical pathway consisting of a SCSI adapter (such as the SlimSCSI adapter) installed in a computer and one or more SCSI devices. SCSI cables are used to connect the devices to the SCSI card. For the SCSI bus to function properly, SCSI IDs must be assigned to the SCSI devices and the SCSI adapter, and the SCSI bus must be properly terminated. SCSI IDs Each device attached to the SlimSCSI 1480 adapter, as well as the adapter itself, must be assigned a unique SCSI ID number from 0 to 6. A SCSI ID uniquely identifies each SCSI device on the SCSI bus and determines priority when two or more devices are trying to use the SCSI bus at the same time. ■ The SlimSCSI 1480 adapter is preset to SCSI ID 7, which gives it the highest priority on the SCSI bus. ■ In Windows 95, you can use the Device Manager to view the SCSI ID and other information about each installed SCSI device. ■ If you installed Adaptec® EZ-SCSI® software, you can use the SCSI Explorer utility to view the SCSI ID and other information about each installed SCSI device. SCAM Protocol The SlimSCSI 1480 supports the SCSI Configured AutoMatically (SCAM) protocol, which assigns SCSI IDs dynamically and resolves SCSI ID conflicts automatically when you start the computer. If you have SCSI disk drives or other SCSI devices that support SCAM, you do not need to manually assign SCSI IDs to these devices. 10 Understanding SCSI Terminating the SCSI Bus To ensure reliable communication on the SCSI bus, terminators must be installed (or enabled) on the devices at the physical ends of the SCSI bus. The terminators on all devices between the physical ends must be removed (or disabled). Termination on the SlimSCSI 1480 is permanently enabled, since it is always at one end of the SCSI bus. There are various methods for terminating disk drives and other SCSI devices. Read the device documentation if you are not sure how to do this. Here are some general guidelines for termination: ■ Termination is usually controlled by installing or removing a SCSI terminator. On some SCSI devices, termination is controlled by setting a switch on the back of the device, as shown in the illustration on page 4. ■ Most SCSI devices come from the factory with termination enabled. Obtaining SCSI Cables You will need additional SCSI cables if you connect more than one SCSI device to your SlimSCSI 1480. It is important to use highquality cables to ensure that data is read and written correctly. Adaptec provides high-quality SCSI cables designed specifically for use with the SlimSCSI 1480. For purchasing information, contact Adaptec at 1-800-442-7274, Monday to Friday, from 6 a.m. to 5 p.m. (Pacific Time). External SCSI Cables PCMCIA 26-pin to High-Density 50-pin Cable PCMCIA 26-pin to Centronics 50-pin Cable PCMCIA 26-pin to DB25 Cable1 1 See the free cable offer on the card included in this User’s Guide 11 SlimSCSI 1480 User’s Guide Connector Types Several different types of SCSI connectors are used on SCSI devices, and each type requires a different kind of cable. The following diagrams illustrate the different kinds of SCSI connectors: SCSI-2 High-density 50-pin Connector Typically used with high-performance CD-ROM drives, hard disk drives, Jaz drives, and Plug and Play devices. SCSI-1, Low-density Centronics 50-pin Connector Used with many CD-ROM drives, hard disk drives, SCSI tape drives, and scanners DB25 Connector Used with Iomega ZIP drives, Syquest EZFlyer, etc. If you have a SCSI device with a DB25 connector, you can order a free DB25 cable from Adaptec to connect it to the SlimSCSI 1480. The mail-in card for the cable is inserted in this User’s Guide. The total length of cabling on the SCSI bus should not exceed the maximum lengths listed in the following table: Maximum Cable Lengths 12 Number of Devices Data Transfer Rate Maximum Cable Length 3 UltraSCSI 1.5 m 3 UltraSCSI SCSI-2 3m 7 SCSI-1 SCSI-2 6m Troubleshooting Troubleshooting Most problems with the SlimSCSI 1480 result from errors in preparing and connecting the SCSI devices to it. If you have problems, check the items below. Note: If you have problems with a specific SCSI device when other SCSI devices are working correctly, contact the manufacturer of the problem device for troubleshooting information. General Hardware Troubleshooting ■ Be sure all SCSI cables and power cables are properly connected and all SCSI devices are powered. ■ Be sure the SlimSCSI 1480 is firmly seated in the CardBus slot. ■ Be sure each SCSI device has a different SCSI ID. ■ Be sure the last (or only) SCSI device on the SCSI bus is terminated. ■ Be sure at least one SCSI device connected to the SlimSCSI 1480 supplies termination power to the SCSI bus. Otherwise, the SCSI devices will not work correctly. (Some devices have a switch to enable or disable termination power. See the device documentation for more information.) The SlimSCSI 1480 terminates itself but does not provide termination power to other devices on the SCSI bus (the adapter would need to draw this power from the portable PC’s battery, which would not be desirable). 13 SlimSCSI 1480 User’s Guide General Software Troubleshooting Some portable PCs have a Suspend/Resume button to save power without turning off the PC. If your PC hangs (that is, freezes, or stops responding to keystroke commands) after you use this button to resume activity, it may indicate that you need to update the pccard.vxd and cbss.vxd files. Follow these steps to update these files and eliminate the hang problem: 1 In Windows 95, click the Start button, then click Run. 2 In the Run window, type command, then click OK. 3 At the DOS prompt, type cd \windows\system and press Enter. If Windows 95 is installed in a different directory, type that directory name instead. 4 Type: copy pccard.vxd pccard.sav and press Enter. Then type copy cbss.vxd cbss.sav and press Enter. The old pccard.vxd and cbss.vxd files are now saved under a different name, in case you need to recover them later. 5 Type exit and press Enter to close the MS-DOS Prompt. 6 Insert the SlimSCSI 1480 Setup diskette in the floppy disk drive. 7 Click the Start button, then click Run. 8 In the Run window, type a:\cardbupd and click OK. The files are updated automatically. Note: The update program assumes that your Windows 95 program files are in the C:\Windows directory. If Windows 95 is installed in a different directory, you must enter the correct location by typing a:\update <current path to your Windows 95 files> For example: a:\update c:\Win95 9 14 Click the Start button, click Shut Down, select Restart the Computer, and click Yes. Troubleshooting Windows 95 Troubleshooting How do I determine if the Windows 95 socket is enabled and is running correctly? 1 Insert the SlimSCSI 1480 in the CardBus slot. 2 Click the Start button and click Settings. 3 Click Control Panel. 4 Double click the System icon, and then select the Device Manager tab. 5 Double-click SCSI controllers. If APA-1480 CardBus is not listed, double click Other Devices. 6 If PCMCIA Socket is not listed, or if it is listed but has a yellow exclamation mark or a red X next to it, PCMCIA Socket has not been loaded properly or is not configured properly. See your Windows 95 documentation for more information. When I start Windows 95, the system locks up when the Windows logo is displayed. How can I get the system to start so I can verify that the SlimSCSI 1480 is functioning normally? 1 Start or restart your PC, and view the onscreen messages. 2 When Starting Windows 95 appears, press and release F8 while the text is on the screen. 3 From the menu that is displayed, select Safe Mode. (It may take several minutes for Windows 95 to load.) 4 Verify that the SlimSCSI 1480 software driver is loading properly (see below). How do I determine if the SlimSCSI Windows 95 miniport driver is working correctly? 1 Insert the SlimSCSI 1480 into the CardBus slot, if it is not already inserted. 2 Click the Start button and click Settings. 3 Click Control Panel. 15 SlimSCSI 1480 User’s Guide 4 Double-click the System icon, then select the Device Manager tab. 5 Double-click SCSI controllers. The driver for the SlimSCSI adapter is listed as Adaptec APA-1480 CardBus UltraSCSI Adapter. ■ If the driver is listed, this means it is loaded properly. ■ If the driver is listed but has an exclamation mark inside a yellow circle, it is in a problem state (usually indicating a conflict with other hardware using the same resources.) ■ If the driver is listed but has an ‘X’ inside a red circle, this indicates that it is disabled and is not loading. ■ If the SCSI controllers icon or the APA-1480 CardBus driver is not listed, reinstall the driver (see directions on page 5.) Note: Software upgrades (including downloadable drivers) for Adaptec products are available on the Adaptec Web site at http://www.adaptec.com An “X” inside a red circle appears with the SlimSCSI 1480 software driver in Device Manager. What does this mean? It means that the software driver is disabled and is not loading. Follow these steps to enable the driver: 1 Double-click the SlimSCSI 1480 software driver in Device Manager. 2 Under the General tab, check the Original Configuration (current) box. What if there is no SCSI controllers icon under Device Manager, or the SlimSCSI 1480 software driver does not appear under Device Manager? If the SCSI controllers icon or the software driver does not appear: 1 Double-click the Add New Hardware icon in the Control Panel. 2 Select Yes on the second screen of the Add New Hardware Wizard to have Windows search for the SlimSCSI 1480. 16 Troubleshooting 3 Follow the onscreen instructions. If Windows 95 does not detect the SlimSCSI 1480, run the Add New Hardware Wizard again: 1 Double-click Add New Hardware in the Control Panel. 2 Select No on the second screen of the wizard. 3 Select SCSI controllers on the next screen. 4 Select the model of your Adaptec SCSI adapter. If the SlimSCSI 1480 is not listed, you may be able to install the driver from the Windows 95 CD-ROM. To do this, follow these steps: 1 Place the Windows 95 CD-ROM in your CD-ROM drive and run the Add New Hardware wizard. 2 Select No on the second screen of the wizard. 3 Select SCSI controllers on the next screen. 4 Click the Have Disk button, then click the Browse button. 5 Look in the \drivers\storage directory of the CD-ROM and select the model of your SCSI adapter. The SlimSCSI 1480 software driver does not appear under the SCSI Controllers icon in Device Manager. However, there is a listing for PCMCIA CardBus Controller under the Other Devices icon in Device Manager. What does this mean? The SlimSCSI 1480 driver is not loading and must be reinstalled. Follow these steps to reinstall the driver: 1 Insert the SlimSCSI 1480 driver diskette in the floppy disk drive. 2 Double-click the Add New Hardware icon in Control Panel. 3 Select No on the second screen of the wizard. 4 Select SCSI controllers on the next screen. 5 Click the Have Disk button, and then click OK. 6 Select Adaptec APA-1480 CardBus Controller. 17 SlimSCSI 1480 User’s Guide The SlimSCSI 1480 fits in the PC Card slot on my PC, but the PC cannot find the card or the devices connected to it. What is wrong? You may need a BIOS upgrade from the PC manufacturer. Follow these steps to determine if this is the case: 1 Click the Start button, select Settings, and select Control Panel. 2 Double-click the System icon. 3 Click the General tab in the System Properties dialog box. If Windows 95 version 4.00.950b or higher is listed in the top right area of the dialog box, your SlimSCSI 1480 probably needs a system BIOS update from the PC manufacturer. How can I check the status of a resource (for example, IRQ, Memory, I/O)? 1 Click the Start button, point to Settings, then click Control Panel. 2 Double-click the System icon, then click the Device Manager tab. 3 4 Click Computer, then click Properties. On the View Resources tab, click the option button for the type of resource you want to check. Read the information. ■ If a specific resource is not listed, the resource is not used by a device. ■ If a resource is listed more than once, the resource is used by more than one device. ■ If a resource is used by an unknown device, the resource is used but the device using the resource cannot be detected. How do I use the Hardware Conflict Troubleshooter in Windows 95? 1 2 3 4 ❒ 18 Click the Start button, then click Help. From the Contents tab, double-click Troubleshooting. Double-click If you have a hardware conflict. Follow the step-by-step instructions in the Help topic. Contacting Adaptec If you have questions about installing or using your Adaptec product, check this user’s guide first—you will find answers to most of your questions here. If you need further assistance, please contact us. We offer the following support and information services: Electronic Support Technical information, including product literature, answers to commonly asked questions, information on software upgrades and other topics is available electronically through the following: ■ Adaptec World Wide Web (WWW) site at http:// www.adaptec.com. ■ File Transfer Protocol (FTP) server at ftp.adaptec.com. ■ Adaptec USA Bulletin Board Service (BBS) at 408-945-7727; supports up to 28,800 bps (bits per second), 8 data bits, 1 stop bit, no parity. No product literature is available on the Adaptec BBS. ■ Interactive Fax System at 408-957-7150; available 24 hours a day, 7 days a week. Technical and Product Support ■ For technical support and information about many of Adaptec’s electronic support services, call 800-959-7274 or 408-945-2550, 24 hours a day, 7 days a week. ■ To use the Adaptec Interactive Support System, call 800-959-7274 or 408-945-2550, 24 hours a day, 7 days a week. The system prompts you with questions regarding your problem and then provides step-by-step troubleshooting instructions. ■ To speak with a product support representative, call 408-934-7274, M–F, 6:00 A.M. to 5:00 P.M., Pacific Time. After hours, on weekends, and on holidays, product support is also available for a fee at 800-416-8066. 19 Sales and Ordering Information ■ For sales information, call 800-959-7274 or 408-945-2550, M–F, 6:00 A.M. to 5:00 P.M., Pacific Time. ■ To order Adaptec software and SCSI cables, call 800-442-7274 or 408-957-7274, M–F, 6:00 A.M. to 5:00 P.M., Pacific Time. ■ To request additional documentation for Adaptec products, call 800-934-2766 or 510-732-3829, M–F, 6:00 A.M. to 5:00 P.M., Pacific Time. Copyright © 1997 Adaptec, Inc. All rights reserved. No part of this publication may be reproduced, stored in a retrieval system, or transmitted in any form or by any means, electronic, mechanical, photocopying, recording or otherwise, without the prior written consent of Adaptec, Inc., 691 South Milpitas Blvd., Milpitas, CA 95035. Trademarks Adaptec, the Adaptec logo, APA, and EZ-SCSI are trademarks of Adaptec, Inc. which may be registered in some jurisdictions. Windows and Windows 95 are registered trademarks of Microsoft Corporation in the U.S. and other countries used under license. All other trademarks are owned by their respective owners. Changes The material in this document is for information only and is subject to change without notice. While reasonable efforts have been made in the preparation of this document to assure its accuracy, Adaptec, Inc. assumes no liability resulting from errors or omissions in this document, or from the use of the information contained herein. Adaptec reserves the right to make changes in the product design without reservation and without notification to its users. Disclaimer IF THIS PRODUCT DIRECTS YOU TO COPY MATERIALS, YOU MUST HAVE PERMISSION FROM THE COPYRIGHT OWNER OF THE MATERIALS TO AVOID VIOLATING THE LAW WHICH COULD RESULT IN DAMAGES OR OTHER REMEDIES. 20 Federal Communications Commission Radio Frequency Interference Statement WARNING: Changes or modifications to this unit not expressly approved by the party responsible for compliance could void the user’s authority to operate the equipment. This equipment has been tested and found to comply with the limits for a Class B digital device, pursuant to Part 15 of the FCC rules. These limits are designed to provide reasonable protection against harmful interference in a residential installation. This equipment generates, uses, and can radiate radio frequency energy, and if not installed and used in accordance with the instruction manual, may cause harmful interference to radio communications. However, there is no guarantee that interference will not occur in a particular installation. However, if this equipment does cause interference to radio or television equipment reception, which can be determined by turning the equipment off and on, the user is encouraged to try to correct the interference by one or more of the following measures: • Reorient or relocate the receiving antenna. • Increase the separation between equipment and receiver. • Connect the equipment to an outlet on a circuit different from that to which the receiver is connected. • Consult the dealer or an experienced radio/television technician for help. Use a shielded and properly grounded I/O cable and power cable to ensure compliance of this unit to the specified limits of the rules. This device complies with part 15 of the FCC rules. Operation is subject to the following two conditions: (1) this device may not cause harmful interference and (2) this device must accept any interference received, including interference that may cause undesired operation. Adaptec, Inc. APA-1480 Tested To Comply With FCC Standards FOR HOME OR OFFICE USE Canadian Compliance Statement This Class B digital apparatus meets all requirements of the Canadian Interference-Causing Equipment Regulations. Cet appareil numérique de la classe B respecte toutes les exigences du Règlement sur le matérial brouilleur du Canada. 21 Adaptec Software License Agreement In return for acquiring a license to use the software (“Software”) and related documentation, you agree to the following terms and conditions: 1 License: This Agreement grants you, the Licensee, a license to: a use the Software on a single computer system which incorporates an Adaptec SCSI Card, or in the case of a multi-user or networked system which permits access to the Software by more than one user at the same time, at a single working location. b make one copy of the Software in machine readable form solely for back-up purposes provided you reproduce Adaptec’s copyright notice and any proprietary legends. 2 Restrictions: You may not distribute copies of the Software to others or electronically transfer the Software from one computer to another over a network. You may not use the Software from multiple locations of a multi-user or networked system at any one time. The Software contains trade secrets and in order to protect them you may not decompile, reverse engineer, disassemble, or otherwise reduce the Software to a human-perceivable form. YOU MAY NOT MODIFY, ADAPT, TRANSLATE, RENT, LEASE, LOAN, RESELL FOR PROFIT, DISTRIBUTE, NETWORK OR CREATE DERIVATIVE WORKS BASED UPON THE SOFTWARE OR ANY PART THEREOF. 3 Ownership of Software: As Licensee, you own the media upon which the software is fixed, but Adaptec retains title and ownership of the Software recorded on the original media and all subsequent copies of the Software regardless of the form or media in which or on which the original and other copies may exist. This license is not a sale of the Software or any copy. 4 Confidentiality: You agree to maintain the Software in confidence and to not disclose the Software to any third party without the express written consent of Adaptec. You further agree to take all reasonable precautions to preclude access of unauthorized persons to the Software. 5 Term: This license is effective until January 1, 2042, unless terminated earlier. You may terminate the license at any time by destroying the Software (including the related documentation) together with all copies or modifications in any form. Adaptec will have the right to terminate your license immediately if you fail to comply with any term or condition of this Agreement. Upon any termination, including termination by you, you must destroy the Software (including the related documentation) together with all copies or modifications in any form. 6 Limited Warranty: Adaptec warrants only that the media upon which the Software is furnished will be free from defects in material or workmanship under normal use and service for a period of thirty (30) days from the date of delivery to you. ADAPTEC DOES NOT AND CANNOT WARRANT THE PERFORMANCE OR RESULTS YOU MAY OBTAIN BY USING THE SOFTWARE OR DOCUMENTATION. THE FOREGOING STATES THE SOLE AND EXCLUSIVE REMEDIES ADAPTEC WILL PROVIDE FOR BREACH OF WARRANTY. EXCEPT FOR THE FOREGOING LIMITED WARRANTY, ADAPTEC MAKES NO WARRANTIES, EXPRESS OR IMPLIED, AS TO NONINFRINGEMENT OF THIRD PARTY RIGHTS, MERCHENTABILITY OR FITNESS FOR A PARTICULAR PURPOSE. Some states do not allow the exclusion of implied warranties or limitations on how long an implied warranty may last, so the above limitations may not apply to you. This warranty gives you specific legal rights and you may also have other rights which vary from state to state. 7 Limitation of Liability: IN NO EVENT WILL ADAPTEC BE LIABLE TO YOU FOR ANY SPECIAL DAMAGES, INCLUDING ANY LOST PROFITS, LOST SAVINGS OR OTHER INCIDENTAL OR CONSEQUENTIAL DAMAGES, EVEN IF ADAPTEC HAS BEEN ADVISED OF THE POSSIBILITY OF SUCH DAMAGES, OR FOR ANY CLAIM BY ANY OTHER PARTY. Some states do not allow the exclusion or limitation of special, incidental, or consequential damages, so the above limitation or exclusion may not apply to you. 8 Limitation of Remedies: Adaptec’s entire liability and your exclusive remedy shall be: a the replacement of any media not meeting Adaptec’s limited warranty which is returned to Adaptec; or b if Adaptec or its distributor is unable to deliver replacement media which is free of defects in materials or workmanship, you may terminate this Agreement by returning the Software and your money will be refunded. 22 9 Export: You acknowledge that the laws and regulations of the United States restrict the export and re-export of the Software. You agree that you will not export or re-export the Software or media in any form without the appropriate United States and foreign government approval. 10 U.S. Government Restricted Rights Legend for Units of the DoD: Use, duplication or disclosure by the Government is subject to restrictions as set forth in subparagraph (c)(1)(ii) of the Rights in Technical Data and Computer Software clause at 252.227-7013. Adaptec, Inc., 691 South Milpitas Boulevard, Milpitas, California 95035. 11 U.S. Government Restricted Rights Legend for Civilian Agencies: Use, reproduction or disclosure is subject to restrictions as set forth in subparagraphs (a) through (d) of the Commercial Computer Software - Restricted Rights clause at 52.227-19 and the limitations set forth in Adaptec, Inc.’s standard commercial agreement for this software. Unpublished - rights reserved under the copyright laws of the United States. 12 General: You acknowledge that you have read this Agreement, understand it, and that by opening the package you agree to be bound by its terms and conditions. You further agree that it is the complete and exclusive statement of the agreement between Adaptec and you which supersedes any proposal or prior agreement, oral or written, and any terms of this Agreement or any different terms will be enforceable against Adaptec unless Adaptec gives its express consent, including an express waiver of the terms of this Agreement, in a writing signed by an officer of Adaptec. You assume full responsibility for the use of the Software and agree to use the Software legally and responsibly. This Agreement shall be governed by California law except as to copyright matters which are covered by Federal law. This Agreement is deemed entered into at Milpitas, California by both parties. Should any provision of this Agreement be declared unenforceable in any jurisdiction, then such provision shall be deemed to be severable from this Agreement and shall not affect the remainder hereof. All rights in the Software not specifically granted in this Agreement are reserved by Adaptec. Should you have any questions concerning this Agreement, you may contact Adaptec by writing to: Adaptec, Inc., Legal Department, 691 South Milpitas Boulevard, Milpitas, California 95035. 23 Limited 5-Year Warranty Adaptec, Inc. (“Adaptec”) warrants to the purchaser of this product that it will be free from defects in material and workmanship for a period of five (5) years from the date of purchase. If the product should become defective within the warranty period, Adaptec, at its option, will repair or replace the product, or refund the purchaser’s purchase price for the product, provided it is delivered at the purchaser’s expense to an authorized Adaptec service facility or to Adaptec. Repair or replacement parts or products will be furnished on an exchange basis and will either be new or reconditioned. All replaced parts or products shall become the property of Adaptec. This warranty shall not apply if the product has been damaged by accident, misuse, abuse or as a result of unauthorized service or parts. Warranty service is available to the purchaser by delivering the product during the warranty period to an authorized Adaptec service facility or to Adaptec and providing proof of purchase price and date. The purchaser shall bear all shipping, packing and insurance costs and all other costs, excluding labor and parts, necessary to effectuate repair, replacement or refund under this warranty. For more information on how to obtain warranty service, write or telephone Adaptec at 691 South Milpitas Boulevard, Milpitas, CA 95035, (800) 959-7274. THIS LIMITED WARRANTY DOES NOT EXTEND TO ANY PRODUCT WHICH HAS BEEN DAMAGED AS A RESULT OF ACCIDENT, MISUSE, ABUSE, OR AS A RESULT OF UNAUTHORIZED SERVICE OR PARTS. THIS WARRANTY IS IN LIEU OF ALL OTHER EXPRESS WARRANTIES WHICH NOW OR HEREAFTER MIGHT OTHERWISE ARISE RESPECT TO THIS PRODUCT. IMPLIED WARRANTIES, INCLUDING THOSE OF MERCHANTABILITY, FITNESS FOR A PARTICULAR PURPOSE AND NON-INFRINGEMENT SHALL (A) HAVE NO GREATER DURATION THAN 5 YEARS FROM THE DATE OF PURCHASE, (B) TERMINATE AUTOMATICALLY AT THE EXPIRATION OF SUCH PERIOD AND (C) TO THE EXTENT PERMITTED BY LAW BE EXCLUDED. IN THE EVENT THIS PRODUCT BECOMES DEFECTIVE DURING THE WARRANTY PERIOD, THE PURCHASER’S EXCLUSIVE REMEDY SHALL BE REPAIR, REPLACEMENT OR REFUND AS PROVIDED ABOVE. INCIDENTAL OR CONSEQUENTIAL DAMAGES, INCLUDING WITHOUT LIMITATION LOSS OF DATA, ARISING FROM BREACH OF ANY EXPRESS OR IMPLIED WARRANTY ARE NOT THE RESPONSIBILITY OF ADAPTEC AND, TO THE EXTENT PERMITTED BY LAW, ARE HEREBY EXCLUDED BOTH FOR PROPERTY DAMAGE, AND TO THE EXTENT NOT UNCONSCIONABLE, FOR PERSONAL INJURY DAMAGE. SOME STATES DO NOT ALLOW THE EXCLUSION OR LIMITATION OF INCIDENTAL OR CONSEQUENTIAL DAMAGES FOR CONSUMER PRODUCTS, AND SOME STATES DO NOT ALLOW LIMITATIONS ON HOW LONG AN IMPLIED WARRANTY LASTS, SO THE ABOVE LIMITATION OR EXCLUSIONS MAY NOT APPLY TO YOU. This warranty gives you specific legal rights, and you may also have other rights which vary from state to state. 24