1
This us®r manual iT_cludesd®taiied usage
instruotions
for
}/OUl" oa/-r/@l'F_
ti_is manualtho_oughi\,
Click a topic
Samsung
SMART CAMERA
USLR
dAl_
DVSOO/DVSOOF/DVSOS/DVSOSF
Pl@(/s@
!@8(I
HIIII}
r_ways
C }rrlpy
II}I
/Vlll
SaleII
tile
Warning--stuat
others
to
owing
III'I0[III111011
precasllOnS
c -_smat cou a cause
al [
l jury
usage
T DS I0
SVOIQ
as
geroL/s
SltUallofI8
aficl
@ SL/fe
DeSK
Derformarlce
of
our
car-@er]t
Prevent damage to subjects' eyesight,
to yoursef or
Do not Jse the rash Jn cose }ro) slty (closer than 1 m/3 lt/to
Deolole or SrlffNals
If y )u use me Tash toe c ose to yc ur suoject s
eyes, _nIs cab cause te['¢ }orD.ry or DermArlerl[ eyeslgn[ aar-nage
Do not disassemble or attempt to repair your camera.
Ths may resu t r e ecTrc SNOOKor aamage TOme camera.
Keep your camera away from small children and pets.
F\eep
Do not use your camera near flammable or explosive gases and
liquids.
youI _ camera
}Nlaren
and
81 61 al
an rns.Is.
Sma
a(
3essorles
i}8[[8
Yqay
out
3aJse
of
the
"each
cnoF,
of
sN'-ia
r _ DI" sel'lou8
-his may cause a t re or exolos o
nju% if swal owed. Mov r"£ Da_s ana _ccessones _- _ y presen_
}nysioa ]angers as we
Do not insert flammable materials into the camera or store these
materials near the camera.
Do not expose the camera to direct sunlight or high
temperatures for an extended period of time.
Th s may 3ause _ ire or e]ectr s sn )ok
U_-, ongea
3suse
Do not handle your camera with wet hands.
Th s may resu_ in eectr c snock
1
exposure
oermaneN_
to
aamage
8Jrl
]NY or
extreme
to yoL/r
cameras
ier@
Derail
[rlYerNal
res
ca
OR
O(
/enIs
Avoid covering the camera or charger with blankets or clothes.
Avoid interference with pacemakers.
Mairltair; a n- -- Jrr; of q5 str] oe?vveen t s ca hera ar]fJ al
}acemaKers to avolc potential irqterferenoe as reec mmenQe® D!
the nar ataetur÷r and the nc e[ enaent researcr _roup, wireless
Techno ogy Research, If y su f/ave any r÷ason to sus )ect tna_your
3arRera
is interferirhg wltn
a pacemaKer
or ouqer
r'rleQlc
_tl c]evoe
uJrn off the camera [mrnediat6 s ano contact the manu{actL_-6- ol
tne oaeemaker or me@ca device tor _ul®anc a
Dhe camera r ay }verneau wr _'nmay _Jstorrtne camera o
cause a fir÷.
If liauid or foreign objects enter your camera, immediately
disconnect all power sources, such as the battery or charger.
and then contact a Samsung service center.
Comply with any regulations that restrict the use of a camera in
a certain area.
• /_vc d nterfer÷noe wt[
otner electronic aevloes
• Turn offthe samera wrlerh ir an aircratt. Your carT/erstcar] cause
interfere_lce With arcralt 6 ]u < ent. Fo OW a airline regJlatlons
striGturn i)ffy bur carr]erawNen GireoteG D_ _lrllne Dersonne
• Turn offthe camera near qqe_lcal eaulr- r'nent. 'four camera can
interfere wtl rnealoa erJulomer_ in nosr tal8 c qeatn care
fao/t es. Follow al r÷gulat ons. DosIeo warn ngs, ana a_recrlons
frorn ned cal oersonne
2
/_
Caution--situations Tna_cou a cause aarnage to yc _rcamera
o/ }ther eauiernent
Use the battery only for its intended purpose.
M sus r g The E _ery may _'ausea fire or e ectr c snoc_
Do qot touch the flash while it fires.
Remove the batteries from your camera when storing it for an
extended period of time.
/sIa
serous
ea
oatTerles
oa['rlage
rr/ay
IO '}/OUr
eaK
or corrode
over
TJr13e s_na
Theflast
cause
s
eryno_whentredanamayDurr
)ursKin
When you use the AC charger, turn off the camera before you
c_Yrler_-t
aisconnect the power to the AC charger.
Use only authentic, manufacturer-recommended,
Fa
Lithium-ion
ing
TO ao
s D ['38
9SU I
• "e or eleclr
c
s 1( b_,
replacement batteries. Do not damage or heat the battery.
/aairleHi
c. aamagea, or neaie8 Da_erles may cause cafire c
persona_ J{_ju_
Disconnect the charger from the wall socket when not in use.
Use only Samsung-approved
accessories,
Do not use a damaged power supply cord. plug, or loose outlet
when you charge batteries.
Fa ing to ao so _av "esu t in t re or electrc shoc
batteries, chargers, cables and
This may cause a tire or eectr c snc s_
" US rlc_ JnaulrlorlzeG DaIIeH@8C[ _.rgers, caoles or accessories
ea_ sasse batteries tc eXDIOC9, aamage your careens or cause
i@ury.
* Sar sung Jsnot r÷sponsible 1or damage }r njJres caused Dy
Do not allow the AC charger to come in contact with the +/terminals on the battery.
unapprovea Das:eres, chargers, capes or aooessores.
This may cause a tire or eectr _"snoo_
3
Donot
force
thecamera's
parts
orapply
pressure
tothe
Avoid interference with other electronic devices.
our camera3emts radio trequency (RF) s gnals that may nterfere
camera.
q S rTlay
Csuse
your
car'@eri_
to
qqaTUNCI
A/ITN U
OF
srqleaeo
or
if'r" }ro[ber
}/ 3rl elaec_
eeotroRic
eQu
Dme
suc rl as pacemakers, nearing alas, meo cal aevlces, al s
}tner
Exercise caution when you connect cables or adaeters and
install batteries and memory cards.
f _ ou torte the ;onnec_ors "- properly connec_ c,a }es, x
xqproper} ns_al baTteries aria memory ca_as, ! ou can aamage
DO
IS.
corlrlectors
aria
electrorq
3 Qevioes
irl hor'aes
or veh
c es,
OonsL
I It1@
r'nanutact Jrers of )ur e ectron c aevlces TOsolve _ny ir/te£efence
problems you expenence, To Dreverit urlwanted r terference, use
rl y 8arJ" _urqg approvea oev ce8 or aocessor es
aocessor@8
Use your camera in the normal position.
OIO corllacI
Keep cards with magnetic strips away from the camera case.
WIIN
your
car-rqerlc4 S iRterrqa
arlteNna
qformat c q storea on the car_ may De aamagea or erasec
Never use a damaged charger, battery, or memory card.
• Data transferrec Jia WLAN co_ s _ D leaKeo, so avola
Th s ma_ result n e ec_rc snook or camera nalfJnct on c
cause a tire.
tr_Nst@
[19
8eFISTIVe
eats
in DUD
C areas
or
or1 order1
rletworKs
• The carnef;_ ma utacturer is not is }le tot any aa_a Transfers tl a_
nfrnge
Check that the camera is operating properly before use.
orl
col
'rgn_s,
traaemarKs,
}uollc aecency orolnances
The manJfacturer ta es no responsibil ty for an_ _ss of files or
oarT age _nat may result from cart era malfunctior or imrbror_e
use,
You must plug the small end of the USB cable into your camera.
f the cable is reversec
_qayaamage your t es,
The manJfac_urer 8 no%"esDons o e Torar oss ot data
4
r%ellectua
)roper[y
aw8,
}F
......tllne ot the bseL" iv[ant,
13
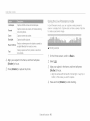
Copyright information
• Microsoft Windows and the Windows logo are
registered trademarks ot the Microsoft Corporation.
• Mac is a registered trademark of the Apple Corporation,
• microSD TM microSDHO TM, and microSDXO TM are
registered trademarks ot the SD Association.
• Wi Fi®, the Wi Fi CERTIFIED logo, and the Wi Fi logo are
registered trademarks ot the Wi Fi Alliance.
• Trademarks and trade names used in this manual are
the property of their respective owners.
_earn aooul your cameras ayoui, cons ana )aslc
Tunctlon8for shoot rig.
37
_earn now to caDtiJr9a DROIOana recora a vlaeo Dy
3e eoIIng
a if/oae
6O
_earn now to se_the o tlons in Shoot ng noae
83
• Camera specifications or contents ot this manual may
be changed without pnor notice due to upgrade of
camera functions,
• We recomrnend using your camera within the country
where you purehased.
• You are not allowed to reuse or distribute any part of
this manual without prior permission,
_earn now Toplay 'sac - DnoTos C"' 'aeos. ana ea'T
DROIOS
3art
9r8
orvlaeos
to your
_sc
compuTeK
earn
now
DnOIO
to connect
DrlnteB
c
DV@00F/DVS059
yoJr
]-
•
on
107
_eal- to connect to w rgiess local area ResNorK8
_ANs/and use func_ons
• For Open Souree License ir/tormation, refer to the
'OpenSourcelnfo,pdf' in the provided CD ROM,
128
Referto c x_ons Io confgc e your cameras settings
134
GeT tormation ab }ut error messages, speeflcations
ana ma ntenance
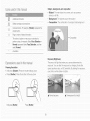
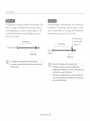
Subject, background, and composition
. Subject: The ma n objec]
anlms, or st _fe
Aa@T oriel
%or moTion
Safety warnings ant oreca.£ons
[ ]
)
a scene, sucn as a oersor
. Background:
The objects _roun8 me suojec_
- Composition:
The comb notch ot a subiec_ an,QDacKgrounc
Camera buttons, Eor example, [Shutter] represents me
snuKer
eutTon
Page number of related informator
The order of c xlons or rnenus, )u rnusTselect tc
oerform a steo: for examole: Select Face Detection
Normal (reoresents Seect Face Detection an8 mer
se4eetNormal
"
AnnotatDr
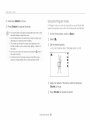
Exposure (Brightness)
The
Pressing the shutter
• Halt pr÷ss IShutter]: Pr÷ss the shutter naltwa, aowr
• Pres 3 [Shutter]
a[Tqourll
Df
0_ ]t
that
your
erlters
csrqlera
aeter[/-)lrles
Press me snu_er s me way aown
A
Half-press [Shutter]
Tne
exr osure. Tou car q_er me exDosur÷ oy chang ng me snu_ter
soeeq, aDer_ur_ wsue. or ISO sensitivty, By alter ng me e oosur÷.
your [- /otos pv oe oarKer or ig %e
Sress Shutter
6
Norma
exDosJre
A
Over@>
oosure
{TOO Drlgn]
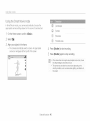
Basictrosbbshoeting
Learn to solve cornmon problems by setting shooting options,
Tile subiect
appear
Red eye occurs when the subject's eyes retlect light from the camera flash.
• Set the flash option to _ Red-eye or ___ Red-eye Fix. (p, 64)
s eyes
red
• If the photo has already been captured, select ,_
Red-eye Fix in the edit menu, (p, 97)
If dust particles are present in the air, you may capture them in photos when you use the flash,
• Turn off the flash or avoid capturing photos in a dusty place,
• Set ISO sensitivity options. (p. 66)
Photos are bhrred
Blurring can occur if you capture photos in low light conditions or hold the camera incorrectly,
Use the OIS function or hafl press [Shutter] to ensure the subject is focused, (p, 35)
Photos are blurred
when shoo@/g at
night
As the camera tries to let in more light, the shutter speed slows. This can make it difficultto hold the
camera steady long enough to capture a clear photo and may result in camera shake,
• Select Night Shot mode, (p, 51)
• Turn on the flash. (p. 64)
• Set ISO sensitivity options, (p, 66)
•
Subiecte
come
too
because
dark
bacHighting
out
of
Use a tripod to prevent your camera from shaking,
When the light source is behind the subject or when there is a high contrast between light and dark
areas, the subject may appear too dark,
• Avoid shooting toward the sun.
• Select Backlight in Scene mode. (p. 42)
• Set the flash option to _F Fill in. (p, 64)
• Adjust the exposure. (p, 74)
• Set the Auto Contrast Balance (ACB) option, (p. 75)
• Set the metering option to []
Spot if a subject is in the center d the frame, (p, 75)
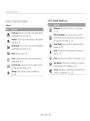
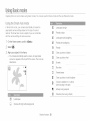
quick reference
el people
Picture in Pi<tu!o rl_ode _ 45
iSO sensitivity (t<.,adju,st the sensitivity to iigi/t,
66
Self Shot r_ode _ 46
©iildr< n mode _ 48
• rV (to adjust exposu_(,, _ ,4
Beauty Shot mede _ 50
• ACB ',tocer_perleate <,r eul_ect,s against bright
bacl<gr xnde) _ ,5
intelligent Por_!ait mode _ 51
Red cje,,'Red eye Fix {1o p!ev< nt or eorr_ ct
r_:d e!,, _ 64
•
Face Detection _ ,0
• Metering
Optic_lImage
•
VIeW
......
_ 75
n{_/lies
'
,%tabilizution (OiS) _ 33
Dy
e(_
he
a_/4dJ_u
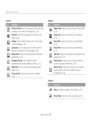
g files as <p,
umbr_al/s' _ 87
OrrlO[ _ _q
ewng f;le8 as a e oe sr_ov _ :
/;ho_es el sceneB/
(}st:>h_n_'}g
photosI}ngh}erit_
,_D[ [
L)el@[I _81 lies ONrN¢
• AEB (to eaptur< 3 pholos e[ the same scer_e
wit" ciiPeront cxpoeurus) _ 78
/ie/vng f_e_:_
or: aV
{_
e(_ory
_ 9F
L.or:Re_,t ,_ CEltca/i_era LO8 CO_iqE_r'}r
d;'rk
•
S<ene mode > SuneeL Duwn _ <9
•
Nijht
•
Fluu,h :_pti<,ne _ 64
Shot mo:b
_ 51
• Scene mode > Landscape _ 42
• Live Panoramamode _ 43
effectste phetes
leo sensitivity 'Toact uet the eensitiviiy to iighO
66
WSJR 0
NOlO
OF vloeo
aHar
Ng
)V',30@/DV°,O5 c _ny} _
}81 e8
WF
It
o _enan_ moose
seer vaema
)V,300fYDV%05f-ony) _ 11F
o _'lJt!Stll!{ :;Olll_(]aN(] VOJLYN@
_djU_<P,{
,. _ _hmess_o_the dlsp ay
Magi< Frame mode _ 53
R nny Face rr<,de _ 54
Pho!<; Fibs mode
Continuous,
Motion ©aptu'e
_- 78
_ 55
Splii She[ mode _ 57
Artistic Brush mode _ 58
of Lex_
<_(eric rnocle > ¢:;<t _ ,2
•
©lose up Shot mode _ 52
•
Macu., _ 67
Motion Ph<,io mode _ 5!}'
irl_age AdjLlet {to adj_st Sharpness, Contrast,
or Satu_ution) _ 79
App}yit_g t: ffects to videos
• Mevie Fibsmode _ 56
.
k.lsaflglu,q[/e(Jleplayla_lgua{2
o oec
;u_eua_oan<
line
_
s4
_ 132
Semele CON[_4}*IF
_ a service c@rl er _
qt
Basic funf'tions
.................................................................
13
Unpacking
Camera layout
blserting the battery and memory card
14
15
17
Chargblg the battery and turning on your camera
Charging t_e battery
@mhg cs_v'ourertr-era
Performing the initial setup
18
18
18
19
Learning icons ..........
Using the Home screen ...............................................
A<cessing t_e Homo screen .......................................
hens on t_e -_ome scr_een
21
22
22
23
Se-lng Wallpaper
25
Sebcting optbns or menus
Setting the display and sour/d
Seli,'_g rue display lyp_ ....
Se-l"g t_e sound
26
28
28
29
Capturing photos
30
/oombg ...............................................................
Redudng camera sha<e ¢d)lCS)
.....................................
Tips for getting a cbarer photo
31
33
35
Exlended
fur_c_ions
37
Using Basic modes
Usk'g the Sin,q1/\btu mode
Usir'g the Prog'a.'/mode
Using the Smal Moqe mode
Usir'g ,r_e Moqe mode
Using the Scene mode
Usbg "_e Uve Pa'/o_r_mamode
38
38
89
40
41
42
43
Using Scene modes
Using the Pictu'_ein Pctdr<_mode
45
45
Using the Sdf Shet mode
U_-,ng the C _dr<,nmode
46
48
Using the Jump Shet mode
Usir'g the Bea_,ty Sleetmode
48
50
Using ,he l*/t_lger,t Per,mr mode
Using the Ng_ Shot mode
51
51
Using b_e Cbs@up Shot n-ode
Using Magb modes
Ut'g the Mag© A'ar-_cmode
Usir'g the %nly Fa(e mode
Using the Photo Aker mode
Usir'g the Moqe Atur noue
Using the Sp_ Shet mode ..........................................
Usir'g ,r_eA_dst(; Br,,sh merle ...................................
Using ,r,e MeUon Pho,o mode
52
53
53
54
55
56
57
58
59
Shoc:_ing
opqbns
6o
Sebeting a resolution and quaB:y
Se erring a ,-osoluton ..................................................
S_eeLng a_ im@e qu:qty
61
61
62
Using the timer' ,
Shooting in the dark
R'<:vr:*_U'_g
red eye
Usng the F'a,_/_...........................................................
Adjus£ng the ISO :_<_'_s
Wty .......................................
Changing the camera's focus
63
64
64
64
66
67
Using tracking auto *<;cus ............................................
68
/\1/UtI'RCI
fig
t/_e =On;U,_, rtr( ,a
10
(}0iii_ilts
Playback/Edi
ir_g
Viewing photos or videos in Playback mode
Starting Ph%/bqnkmode
View'ng phc_los
Raying a video
Editing a photo ...................
Resizing photos
Qx@pirg port'-airs automatk ally
Rolating a photo
Applyir!g Srnart Filter c/'ects
Adjusting your phetes
Creating a print order (DPOF)
83
84
84
89
92
94
94
94
95
95
96
98
Viewing files on a TY'
Transferring files to your Windows computer
"a/s'orring files with Intelli studio
"ans'erring files r}y c onnecling the carne!s as a
removable dis<
99
100
101
Discer_r_ecUrgthe camera (ferWi/_dows XP)
Transferring flies to your Mac computer
104
105
Printing photos with a PictBridge photo pnnter
106
103
Wireless
network (DV300F/DV305F
only) .............
107
Connecting to a WLAN and configuring
network settings
108
Cor!riectirlg to aWl/\lXJ ......
108
Using the legin browser
109
Netw<:rkc:onnectien tips ....
110
Er/terir/g text ..........................................
111
Sending photos or videos to a smart phone ..........
112
Usng a smart phone as a remote shutter release .... 113
Using photo or video sharing websites ....................
115
Accessing a website .......................
115
Uploadir!g plsotes or vid_<)s..................................
1 15
Sending photos or videos via email
117
Changing s_maiit,ettings
117
Sending pholes or videes via email .........
118
Uploading photos to a cloud server .....
Using Auto Backup to send photos or videos
It!stalling the pmgrar-_*<;rAuto B,q(kup or/yuur PC
Ser/dir/g photes or videes I:oa PC
10
121
121
121
View ng photos or videos on a
-Pv'Link-enabled TV .........
123
Sending photos using Wi--Fi Direct
125
About the Wakeup on L.AN (WOL) feature
126
C0iii_ilts
Sottir_gs
Settings menu
/\ccessir!g tl'/__,seltingb m_q'/u
Sound
Display
Connectivily
General
Appendixes ......
Error messages ......................................................
Camera maintenance ................................................
128
129
12,9
130
130
181
132
134
135
137
Clearfing yeur cart e,a ...............................................
Using or storing the camerr_ ......................................
About memory cards
About the batl:ery
Before contacting a service center
137
188
139
142
146
Camera specifications
Glossary
FCC notice
149
153
158
Declaration sentence in official languages
Index
161
163
12
Basi
Le8 "naDOUI},our camera's _you[, icons, ana Dasic functions fo snooung.
Unpacking
14
Selecting options or menus
Camera layout
15
Setting the display aria sound
Inserting the battery and memory card
._ 1 /
Charging the battery and turning on
your camera
1_
urrllf g oil your camera
Performing the initial setup
Learning icons .......
OHS
}[I
@ NOn/@
J.(l@ HOlt1@
., 1_:
_
z l
Using the Home screen
/-_,IJC@SSIH U
Sett.,
18
3harg it lrle oaT[e_y
scr@el
8C[@@
22
_2
_{
..... 28
SeKing the _,_ _y V _
.......
_ne soun_
Capturing photos
.....
.................
'L_rnirlgon the/roll[ @o_,_y
29
JO
......
Zoolrllrlg
I_C]UL
_ Ctq//l@[_s_ S[/£tF,@ IUIbl
Tips for getting a clearer photo
_
:_:
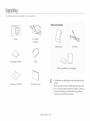
The following items are included in your product box,
Optional accessories
Camera
AC adapter/
USB cable
Camera
Rechargeable battery
case
oab]e
Strap
4emon/caro
5/_
User Manual CD ROM
A/V
Quick Start Guide
Memory oar(
aaaDiel
• The i ust_atlons nay differ BIghtly from the tems sslppea w _n_ )ul
product,
' The _e /s
-
sludedinlheboxmayditte/dependngon_nemoae
_oL san aurcnaseoDtonalaccessonesataretale
or_San_Llg
service oenteL Samsl ng is no_ respon8 Dieor any )rODems
causea Dy using unauTnorlzeaaccessories
Basicfunctions 14
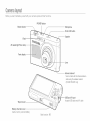
Cameralayout
Before you start, familbdze yourself with your camera's parts and their functions,
POWER button
Shutter button
Microphone
Front LCD button
Speaker
Flash -AF-assist light/Timer lamp ........................
Front display --
Internal antenna*
* Avoid contact with the internalantenna
while using the wireless network.
(DV300F/DV305F only)
USB and A/Vport
AcceSs USB cable and A/Vcable
Tripod mount
Battery chamber cover
Insert a memory card and battery
Basicfunctions 15
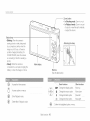
_" ...................
Zoom
button
• InShooting
mode:
Zoom
inorout
• InPlayback
mode:
Zoom
inonpart
otaphoto
orview
files
asthumbnails,
oradjust
the
volume
Status
lamp
• Blinking:
When
the
camera
is
saving
aphoto
orvideo,
being
read
byacomputer
orprinter,
when
the
image
isout
otfocus,
orthere
isa
problem
charging
thebattery
(On
DV300F/DV305F,
when
the
camer_
isconnecting
toWLAN
orsending
a
photo)
• Steady:
When
the
camera
is
connected
toacomputer,
charging
the
battery,
orwhen
theimage
isinfocus
Attaching the strap
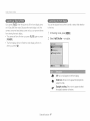
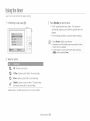
Main display
Buttons
(See the table below)
@
Access the Home screen,
O
Access options or menus.
®
Enter Playback mode.
®
Delete files in Playback mode,
Basic functions
_!_
_
BISP
_.
Q
(_
Basic functions 16
Change the macro option.
Change the display option,
Change the flash option.
Change the timer option,
Confirm the highlighted option or menu,
Other functions
Move down
Moveup
Move left
Move right
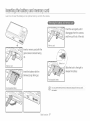
Inse£ingthe baSer7and memorycard
Learn howto insertthe batteryand an optionalmemory card into the camera.
Push the card gently until it
disengages from the camera,
and then pull it out of the slot.
insert a memory card with the
gold-colored contacts facing
up.
_]__
BatteBdock
/*
Slide the lock to the right to
iii
-
insert the battery with the
Samsung logo facing up
release the battery.
' Reohageable
b
Basicfunctions17
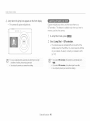
Chargingthe baSer7andturning on 70urcamera
Charging the batte_%
_
Turning on your camera
Before you use the camera for the first time, you must charge the
battery, Plug the small end of the USB cable into your camera,
and then plug the other end of the US8 cable into the AC}
adapter.
Press [POWER] to turn your camera on or off.
• The initial setup screen appears when you turn on the camera
for the first time. (p. 19)
}:1
Status lamp
• Red light on: Charging
• Red light off: Fullycharged
• Red light blinking: Error
Press [[]], The camera turns on and irnrnediatel, accesses
Playback mode.
charge or work properly.
Basicfunctions 18
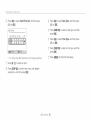
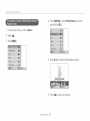
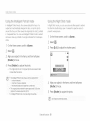
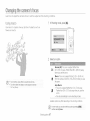
Pe erming the initial setup
When you tLIm on your camera for the first time, the initial setLip screen appears, Follow the steps below to configure the camera's basic
settings.
Verify that Language
is highlighted,
and then press
d
[®} or [OK].
Press [DISP/_]
to select Home,
and then press [OK].
• When you travel to another country, select Visit, and then
select a new time zone.
:;
_J
Press [_./_t_.P]to select a time zone, and then press
[OK] _[MENU],
Press [DISP/_] to select a language, and then
press [OK].
3
Press [_]
to select Time Zone,
and then press
• The screen may differ depending on the language selected.
[®} or [OK].
Basicfunctions 19
_!_ Press [_] to select Date/Time Set, and then press
!'i# Press [_] to select Date Type, and then press
[®] or [OK].
Date/Time
[®] or [OK],
'i/ Press [BISP/_]
press [OK].
Set
Year Month Day Hour Min
to select a date type, and then
DST
'
Press [_] to select Time Type, and then press
[®] or [OK].
'j) Press [BISP/_]
press [OK].
• Thescreenmaydifferdependingon the languageselected.
".. Press [MENU]to finish the initial setup.
/7 Press [_./@] to select an item
_:4 Press [BISP/_]
to select a time type, and then
to set the date, time, and daylight-
saving time, and then press [OK].
Basic functions 20
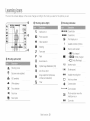
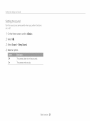
Learningicons
The icons the camera displays on the screen change according to the mode you select or the options you seL
Shooting options (right)
F_.s /Ins
8
[]
Q
Intellizoom on
Photo resolution
@ Shooting information
_Ol_/O|/61 Current date
|O:6ORflt
Current time
Front display is on
HB
Video resolution
|
Ei
@ Shooting options (left)
Memory card inserted
38
Frame rate
• _:
Fully charged
$"
Flash
• _
_:
Sound Alive ors
• C]:
#A
Auto focus option
F 2.5
Aperture value
Shutter speed
0n=|0
Available recording time
Exposure value adjusted
[]'_
White balance
,'_.,
Face detection
Partially charged
Empty (Recharge)
1/]65
Optical Image Stabilization (OIS)
Shooting mode
ISO sensitivity
Available number of photos
Metering
_ xua.0 (7
linage adjustment (sharpness,
contrast, and satu[ation)
r-l
Auto focus frame
(_)
Camera shake
Timer
a--
Face tone
_,o_a Zoom indicator
[_
Photo resolution when the
Intelli zoom is on
Burst option
Xl0.0
Basicfunctions 21
Zoom ratio
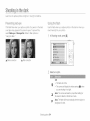
Usingthe Homescreen
You car/select
a shooting mode or access the settings menu by selecting the icons on the Home screen,
Accessing the Home sc_een
Its Shooting or Playback mode, press [_],
return to the previous mode,
Current Home screen
Press [12_] again to
• Rotate [Zoom] to the left or right to switch to another
Horr/e screen.
@
• Press [DiSP] to scroll to the Home screen name, and
then press [_/@] to switch to another Home screen.
• Press [_4@] repeatedly to switch to another Home
screen,
@
_
@
Basicfunctions 22
Mode icons
° Press [DISP/_'_/_/@] to scroll to a desired mode, and
then press [OK] to access the mode,
i.hi;iii{i
iiieiq0iTie
sci(}_eYi
Icons on the Home screen
<Wi-Fi>
(DV300F/DV305F
only)
<Basic>
_;;,_,v
Smart Auto: Capture a photo with a scene mode selected
automatically by the camera, (p. 38)
Remote Viswfindsr: Use a smart phone as a remote
shutter release and see a preview on your smart phone of
an image from your camera, (p. 113)
Program: Capture a photo with settings you have adjusted
_,_ manua,y.
(p.Sg)
Social Sharing: Upload photos or videos to fib sharing
websites. (p. 115)
Smart Movie: Record a video with a scene mode sebcted
automatically by the camera, (p. 40)
_
_S_
i!!:_,
Movie:
Record a video, (p. 41)
Scene: Capture a photo with options that are preset for a
specific scene. (p. 42)
MobileLink: Send photos or videos to a smart phone,
(p, 112)
-_
Email: Send photos or videos stored on the camera via
email, (p. 117)
_
Cloud:
Live Panorama: Capture and combine a series of photos
to create a panoramic image, (p, 43)
Settings: Adjust settings to match your preferences.
(p, 129)
Upload photos or videos to a cloud server, (p, 120)
Auto Backup: Serld photos or videos that you captured
with the camera to a PC wirelessly, (p, 121)
TV
Link:onView
photos or TV,
videos
camera
a widesoreerl
(p, that
123)you captured with the
Basic functions 23
<Scene>
<Magic>
Picture
inPicture:
abackground
photo
and
insert
asmaller
photo
orvCapture
ideo
into
the
foreground.
(p,
45)
Self
Shot:
Use
the
front
display
when
you
capture
aself
portrait.
(p,
46)
Children:
Attract
children's
with
ashort
animation
onthe
front
display,
(p.
48)attention
Jump
Shot:
Let
your
subjects
thebest
moment
jump
with
acountdown
onthe
fknow
ront
display,
(p.
48) to
Beauty
Shot:
Capture
with
options
tohide
facial
imperfections,
(p,
50)aportrait
5i_{_j
Intelligent
Portrait:
Save
2additional
portraits
automatically
using
the
face
detection
functions,
(p,51)
Night
Shot:
Capture
anight
scene
by
adjusting
shutter
speed.
(p.51)
Magic
Frame:
Capture
aphoto
with
various
frame
effects,
(p, 53)
Funny Face: Capture a photo with funny face effects.
(p. 54)
_
Photo Filter: Capture a photo with various filter effects,
(p. 55)
Movie
(p,
56)Filter:
]
Record a video with various filter effects,
Shot: Capture several photos and arrange them with
i Split
preset layouts, (p. 57)
:+++£_'_+a
Artistic Brush: Capture a photo and save a video that
shows how to apply the filter effect, (p. 58)
Motion Photo: Capture and combine a series of photos,
and then select an area to be animated to create a
GIF animation, (p, 59)
Close-up
Capture
close
upphotos
ofsubjects,
(p,
52) Shot:
<Album>
Album: View files by category in Smart album, (p. 86)
_
Basic functions 24
Photo Editor: Edit photos with various effects, (p, 95)
i.Jsiii{i
iiieiqoiTie
scieeyi
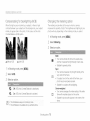
{!_ Scroll to the desired wallpaper,
Set
wallpaper
fortheHome
screen
with
thedesired
image.
OntheHome
screen,
scroll
to<Basic>
_ii
_Select
{_Select
Display
*Wallpapers,
_:S
Select
anoption.
(:7 Press [OK] to save.
Select
the
desired
wallpaper
from
the
default
Wallpaper
Gallery
gallery.
Album
Set a photo you have captured as wallpaper.
Basic functions
and then press [OK],
• If you select a photo you have captured, you can set a
specified area as wallpaper, Rotate [Zoom] to the left or right
to reduce or enlarge the area. Press [BISP/_/{/Q]
to
move the area,
25
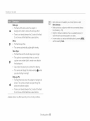
Selectingoptionsor menus
To select an option or a menu, press [MENU], and then press [OISP/_/_/_.)]
or [OK],
In Shooting mode, press [MENU].
_ii!
_ Select an option or a menu.
• Tomoveup or down, press[DISP]or [_].
• Tomoveleftor right,press[_] or [@],
Press [MENU]to go back to the previous menu.
{_ Press [OK] to confirm the highlighted option or menu
Basic functions
26
_i_!!_i_!!_i_tiii{ii
0ilii
i0ii_i;
0i¸ii_!!_i_
ii_;
d{ Press [DISP/_] to select White Balance, and then
press [@] or [OK].
On the Home screen, scroll to <Basic>
_'!_Select _.
3
Press [MENU],
:;
_J
Press [_./Q] to select a White Balance option.
(!_ Press [OK] to save your settings
Basic functions 27
S
ng the displayand sosnd
Learn how to change the basic display information and soclnd settings.
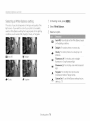
_._ethngthe display type
You car/select a display type for the Shooting or Playback mode.
Each type displays different shooting or playback information.
See the table below.
You can hide or show
modes,
the option
display
appearing
Press [OK] repeatedly,
• Hide the option display,
• Show the option display,
display
Press [DISP] repeatedly to change the display type,
A For example, in Scene mode
Shooting
° Hide all information about shooting options.
• Show all information about shooting options,
• Hide all information about the current file,
Playback
• Hide all information about the current file except
basic information.
° Show all information about the current file.
Basic functions
28
in some
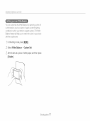
Setting the sound
Turn the sound your camera emits when you pertorm functions
on or off.
On the Home screen, scroll to <Basic>
_ii} Select
{_ Select Sound
* Beep Sound
_:S Select an option
off
The camera does not emit any sounds,
On
The camera emits sounds,
Basic functions
29
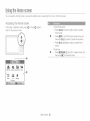
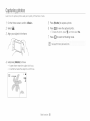
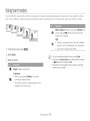
Captunngphotos
Learn howto capturephotos easilyand quicklyin SmartAuto mode.
On the Home screen, scroll to <Basic>
{!} Press [Shutteq to capture a photo
_!:'!_
Select _,
_!_ Press [Eli to view the captured photo.
• Todeletethe photo,press[/_], andthenselectYes,
{_ Align your subject in the frame.
/7 Press [Eli to return to Shooting mode.
@
d{ Half-press
[Shutter]
to focus.
• A green frame means the subject is in focus,
• A red frame means the subject is out of focus.
Basic functions
30
See page D5 tot t,ps to get de.el
photos:
(}8piiiiiii{i pix£0s
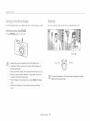
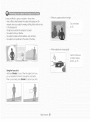
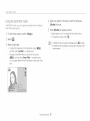
Turning on the front display
The front display
helps
you capture
photos
while viewing
yourself.
You can capture close up photos by adjusting the zoom.
In Shooting mode, press [F.LOD],
• Press
[RLCD]
again to turn it off.
Zoom ratio
Zoom out
• Several buttons are no_avai able when the front raspay _ums on
• n Self Shot }h dren. and Jump Shot modes the I on_ alsplay wl
acuva_eau_omatloa y,
....... en you sei _lmel op13ons,tfle trent disp ay w
• vvne,-, 'ouusetneoameranD
remain acwe
gnuy Tc surlyareas,
you
t_ 63/
ayno_
oe able to see _]e trorlt dsplay dealy.
The f_ont ]ls[ a!
moae
qo_ acuvate wner you c ess [ELOD] n Playbac_
-_enflTe trent d sp a_ s or [ne camera consumes more Dase_
swel
Basic functions 31
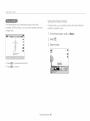
Zoom in
The
Digital
zoom
issupported
bydefault
inShooting
mode.
Ifyou
zoom
inonasubject
inShooting
mode
and
thezoom
indicator
isinthedigital
range,
your
camera
isusing
theDigital
zoom.
By
using
both
the5XOptical
zoom
and
5XDigital
zoom,
you
can
zoom
inupto25times.
Optical
range
r
If the zoom indicator is in the Intelli range, your camera is using
the Intelli zoom, Photo resolution varies according to the zoorn
rate if you use the Intelli zoom, By using both the Optical zoom
and Intelli zoom, you can zoom in up to 10 times.
i
Optical range
Zoom indicator --IITI
r
[] ×_S.a
I
Zoom--m1
I
[]
[] XlO.O
indicator
Digitalrange
Intellirange
t Th@D!gital zoom is not ava!l@le with the Tracl<i%AF option,
Ifyou capture a photo with the Digital zoom, the photo quality may be
lower than no_lal,
@
_ IntellizoomisnptavailablewithtbeTrackingAFoptiQn,
The Intellizoom helps you capture a photo with less quality
deterioration than the Digitalzoom, However, the photo quality may be
lower tflan when you use the ©ptical zoom,
The Ir/telJJ
zoom is availableonly when you set a 4:3 _eselution ratio,
Ifyeu set another resolution ratio with IntelJizoom on, the Intellizoom
wilJ be turned off automatically,
Basic functions 32
(}8piiiiiii{i
pix£os
Reducing came_a shake (OIS}
InShooting
mode,
press
[MENU].
2
Reduce camera shake optically in Shooting mode,
Select Intelli Zoom,
:_ Select an option,
_F
Off: The ]ntellizoom is deactivated.
(_
On: The ]ntellizoom is activated,
A Before correction
In Shooting
A After correction
mode, press [MENU],
:ii_ Select OIS
_
Basic functions
Select an option,
33
_
off: OlS is deactivated,
_
On: OIS is activated,
,_5,_
• OSmay
not
function
properly
wner
)umove
your
camera
totollow
amovng
suojecl
you
use
the
Digits
ZOOTT
__ere
stoo
mucn
c_
xre[a
SnaKe
flTe
shulter
speed
sslow
(tot
example,
when
you
capture
/ign_
scenes
_Te
cannery
is_ow
)Lcap[ure
aClose
upsno[
• t_)uuse
the
OBfunction
wth
at }ca,
your
images
may
seDurlea
oy
tne
vl:_ton
ofthe
OIS
sensor,
Deactwate
the
OI8
tunct
on
when
you
use
ampoc
tthe
samera
sntorarc
Dpea,
me
asplay
wDe e urry, I th s occurs.
turn oft the camera, ana _len _urni_on again
Basic functions 34
Tips for getting a clearer photo
Ensure nothing is
clocKing me lens
rash, or microonone
Bet the Optical Image Stab IizationCOTon TOreouce
samera snaKe ootioally,(p, 33
F_.s is
Hal-Dress [Shutter] and a@justTne
focus The carnera aojusts t/e focus anc
exposure automat ca Jy
--The camera 3ets me ape _urevaue
[]
[]
_H
an(]
snuTier
sDee(]
automatloaly.
Focus frame
• Press [Shutter] to capture fhe )note
T1qefocus frame aDoears r _reen,
• Change the compost_on an(] naT)tess [Shutter] again if the focus
frarne aseears in re@
--' Camera snaKe
When _ ou snoot n me (]arK,ave (] SeITng the flash op_on TO
Slow Sync or Off, The aoer_ure_emans eden c ger an@ITmay De
nar(]er TONOJ("
Thecamera sea( y long ÷nougn to capture a sear
mo_o,
• use a trloo(] el 3eTme flash opt on to Fill in, (e. 64/
* Set ISO sensitvily op] ors
Basc 1unctions
35
s, 66
t ma ae diffcult t( get your susie st n foc Js wnep
- tnere 18 _le contrast between TneSuoJecIano DSCKg[©urla
fc
® amp e, wnen yol. sulsjec_s weanng c otnlng Tnatis similar in co or
[o I e DaOKgrouno)
- tne gnt source Den11aThe SuDJeCT
ISIOODrcj1_
- the subject Is shin2 } refectlve
- The subject ncluoes norzonta aaT_ems,sucr _s Dmos
- the subject sot DOStbnec
the center ot the trarne
, When you capture photos Jn_owJgn_
Turn on the tash
o 64/
• When sut eczs ate movng rapaJR
Jse the Continuous
or Moton ()_ xure
tunctor" D, 78
Using the focus lock
Halt press [Shutter] to rocus. _vnen_nesubject is in focus
vo_ can eDoston the frame to change _necompos_lor
vvnen you are ready, press [Shutter] to car}ture voc }notc
3asc 1unctions 36
Learn
now to capture
Using
Basic
Js_g
a Dr" HO an(] record
modes
88
_ne b_ ar[/-_u_o rood ..................
_sln@ u_e v
glu_
_@e
usn L the Smad
_v_owe _ _ae
Jslng u]e ivlovle
mode
_sing the Scene
mode
J_l[/¢
Using
LII_LIVb
Scene
Pang
modes
_sln 8 ]Be blc]ure
;sng
........
"4Hid node
..........
.......
F/r'lc[ure
.}de ..........
g me Jume
)_/ot too@6
JSl/ild U]_ i]_elll( e
_orlraF
moae
.............
Using 1he Pholo
[ille
/N
using
FiKe[ mode
qz
usng
4{:
Jsl_/g
_c
aL
51
ihe CIo_ _-UD bnoI
(,_
b2
_ trle Magic
bt:
40
qng the Night SnoL mode
.,,-
modes
Jshg
48
Jsing the @eau[y
Magic
3f.
48
Shot rod( _
Jsing
a mode.
.,o
4{
mode
% 5eleotlng
88
4
me Self Shot mode
J,_ _ :heCMdren
_,-
a video
....s
tile Funny
e Movb
Frame
mode
_,8
Ze.ce rhode
_oae
oq
............
ou
5{}
me S@it Sho/mode
e Arnsuc
L [US[
ode
_ Motion P_o_o mode
_8
........
59
UsingBasicmodes
Capture photos or record videos using basic modes, You can also use the Scene mode and the Live Panorama mode,
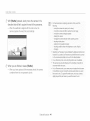
Using the Smut Auto mode
In Srnart Auto mode, your camera automatically chooses the
apFxopnate camera settings based on the type of scene it
detects, The Smart Auto mode is helpful if you are not familiar
with the camera settings for various scenes,
2
_i_
Landscapes at night
@
Portraits at night
Landscapes with backlighting
On the Home screen, scroll to <Basic>
_
Select _,
_:;_
_ Align your subjed in the frame,
• Thecameraautomatically
selectsa scene.Anappropriate
sceneiconappearsat thetop leftof the screen.Theiconsare
listedbelow.
_T_
Portraits with backlighting
Portraits
Close up photos of objects
_;_,_a_Close up photos of text
_{_
Sunsets
Blue skies
_!_{
Forested areas
_'i_
Close up photos of colorful subjects
Camera is stabilized or on a tripod
(when shooting in the dark)
Actively moving subjects
Fireworks (when using a tripod)
_
iLandscapes
Scenes with bnght white backgrounds
Extended functions
38
i.Jsiii{i
i_8sii)iix£i03
Using the P_og_ammode
_S Half-press [Shutteq to focus
In Program
Press [Shutter] to capture the photo.
speed
U
• tthecameraaoesno_recognzeanapptoF
Ire aetau t setti Is tot Smart Auto moae.
a_escenemoae
_use1
• Even if it detects aTace,the camera may not se ec[ a eorzral_moae
ae )enang on tne su[)jec_8 eoel_on or ilgn[ng
° The camera may not se ec_tne correc_ scene aepeno ng on tn6
snoo[ g cono_ons, sucr _s camera snake ign_ng, or (ls[ance to
_ne SL
mode,
and aperture
you can set most
value,
options,
except
the camera
the
shutter
sets automatically.
_/ On the Home screen, scroll to <Basic>.
2 Select ,,_
,_ Set the desired options,
•
)JeOT.
For a list of options,
Even if you use a tnpod, the camera may no_cle_ecTtn6 /_, mode t
_nesubject s movLn£
° n Smart Auto mode. the camera consumes more batter,,
which
refer to "Shooting
options".
(p. 60)
i
}weJ
eecause i_cnanges seeings olten to se ect aoeroe_la_escenes
_:SAlign your subject in the frame, and then half-press
[Shutter] to focus.
:;
_J Press [Shutteq to capture the photo.
Extended functions
39
i.Jsiii{i
{_8sii}
iix£io3
Using the Smart Movie mode
In Smart Movie mode, your camera automatically chooses the
appropriate camera settings based on the scene it has detectecfl
_
Landscapes
_]_
Sunsets
On the Home screen, scroll to <Basic>
2
Blue skies
Select _.
_i_i_
,
{_ Align your subjed in the frame.
• Thecameraautomatically
selectsa scene.Anappropriate
sceneiconwillappearat thetop leftof thescreen.
Forested areas
_:SPress [Shutteq to start recording.
{
Press [Shutter] again to stop recording.
t The camera may not select the correct scene depending on the
shooting conditle%, such as canTera 8hake, lighSng, and distant? te
"thesubject,
Extended functions
40
i.Jsig{i
i_8si(}
iix£ios
_/ On the Home screen, scroll to <Basic>.
Using the Movie mode
Its Movie
mode,
you car/customize
of up to 20 minutes
as MP4
_
(H,264)
in length,
settings
The camera
to record
saves
HD videos
recorded
2 Select _.
videos
files.
_!t Set desired options.
• Fora listof options,referto "Shootingoptions".(p. 60)
• H.264 MPEG 4 partl0/AVO) ie a high cc s_[ -ession vdeo torma:
es_aolsnee ev me ntemat ons stanoaros organ zat )r _]SO Be ant
TUT
z_ Press [Shutte_l to start recording.
• Some memo sar(_smay not suppo t high defnitior recording. Ityoh
care1eoes no[, GelS S vet esoluuor
{!!i Press [Shutteq again to stop recording.
•
@mary saras w_n sow writ rig speeos w i no_ suppor_ n C'
esoluuon vaec s. To recc ] ngn reso JtIONveeos, use memory cams
w_h faster wnte sDeeos
• t you actvate tne OIS tuNotionwh e reoold r _ a vloeo. INe earle a
may re sro me operating sob lo CTthe OS tunotior
t you use _he zoom function when [ecoreJNge vGee, tne camera ma
ecore me noise otthe zoom operatJn{ To decrease zoom nois_ us_
the Sound Ahvetuncton /D, 80/
Extendedfunctions 41
i.Jsiii{i {_8si(} iiioil]0s
LJsingthe Scene mode
The camera allows you to temporanly pause a video while
recording, With this function, you can record separate scenes as
a single video,
In Scene mode, you can capture a photo with options that are
preset for a specific scene.
On the Home screen, scroll to <Basic>.
®
• Press [OK] to pause while recording.
• Press [OK] to resume.
Extended functions
42
i.Jsiii{i
i_8sii}
iix£io3
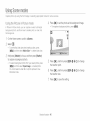
Using the Live Panorama mode
Landscape
Capture still lifescenes and landscapes.
Sunset
Capture scenes at sunset, with natural looking
reds and yeJIows.
Dawn
Capture scenes at sunrise.
Backlight
Capture backlit subjects.
Beach & Snow Reduce underexposure d subjects caused by
sunlight reflected from sand or snow.
Text
Its Live Panorama mode, you can capture a wide panoramic
scene in a single photo, Capture and combine a series of photos
to create a panoramic image,
A Shooting example
Clearly capture text from printed or electronic
documents.
On the Home screen, scroll to <Basic>.
_:S Align your subject in the frame, and then half-press
[Shutte(}
2 Select _.
to focus.
{_ Align your subject in the frame, and then half-press
::;
_J
Press [Shutter]
to capture the photo.
[Shutter] to focus,
• Alignthecamerawiththe far leftor the far nght,or verytop or
bottom,of the sceneyou wantto capture.
_S Press and hold [Shutter] to start shooting.
Extended functions
43
i.hi;iii{i
i_8sii}
iix£io3
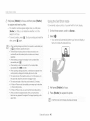
_!_With [Shutter] pressed, sbwly move the camera in the
direction that will let it capture the rest of the panorama.
• Whenthevievdinderisalignedwiththe next scene,the
cameracapturesthe nextphotoautomatically.
,:,a
o Forbest resu ts wnen cap[urlng r _noram_cDNOIOe.ave a t/e
tollowng
moving [ne camera ice c Jlotqyor too sow
movr ] [ne camera ice se [c capture tne nex[ n age
novng _ne camera a[ _rregu_arsoeeas
snaking tne camera
3nat _ng tne camera alrec[ior
_noo[ng In aarKp aces
e cap_ur ng a pno[o
ss )r.uungmov ng suDjeo_snea Dy
_noo[ng eonaJ[_onswn6 9 [ne D_lgn[nesso_co or or Jlgn[is
srlangn{
• 3eec[ing Live Panorama moae wll asaDie [ne a@[a ana epical zor
tun( tons. I ou select Live Panorama mode wh e the lens is zc )mec
Tnecamera automa_ca y zooms out to the detau [ cosl_lor
• n Live Parlors
_!_ When you are finished,
_moaeL some BNO([rig c )_lonsare not available
- The camera slay stop snoo_lng aue to [ne snooting cc nc )s_on c
ovemen[ w_
_ne seen6
release [Shutter],
• When you have captured all the necessary shots, the camera
combines them into one panoramic photo.
• in LIve Panorars _moae your camera may not cap[ure _ne las[ scene
n is erxrety it you stop movng iRecamera exac[y wr÷re you wan[
ne ecene to end. To cac[ure [ne enure scene "r_ove cur camera
51Jgn[ly
ceyona _Tepoln[ where } su wan[ zne scene to eric
Extendedfunctions 44
UsingScenemodes
Capture photos by using the front display or selecting appropriate modes for various scenes.
Using the Picture in Picture mode
._S Press [OK] to set the photo as the background
image.
• To recapture a background photo, press [MENU].
Its Picture in Picture mode, you can capture or select a full sized
background photo, and then insert a smaller photo or video into
the foreground.
On the Home screen, scroll to <Scene>.
2
Select @.
• To set the final video size when inserting a video, press
[MFNU], and then select Movie Size _a desired video size.
{_ Half-press
[Shutter]
to focus, and then press [Shutter]
to capture a background photo.
• To select a background photo from your saved photos, press
[MENU], and then select Open Image _a desired photo.
You cannot select a video file or a photo captured in Live
Panorama mode.
::;
Press [OK], and then press [BISP/_/_./6_)]
_J
to change
the insertion point.
(!_ Press [OK], and then press [BISP/_/_./@]
the insertion size.
/7 Press [OK] to save the setting,
Extended functions
45
to change
i.hi;ig{i
Si}0ix_
iix£io3
Half-press
[Shutterj
to focus, and then press [Shutter]
to capture and insert a photo,
Using the Self Shot mode
Conveniently
• The insertion window appears larger when you half press
[Shutter], so that you can determine whether or not the
subject is in tocus,
• To record a video, press [_]. To stop recording and insert the
video, press [_] again.
capture
photos
of yourself
with the
_/ On the Home screen, scroll to <Scene>.
_;:'_Select @.
• Yourcamerawillautomatically
detectyourface anddisplaya
frameto indicatethe detectedface.
• vvnen captunng DacKgrouna _ lo[o8, _ne reso UTJOR
S automatcaJy _eT
tc [_[} and a ohotos caDturea are saved
• The final F o_ure n e ct "e_clo[o8 or vlaeos are savea as one
cDmbined fle and the nserted eric[ca c vlaeos are no[ saver]
.......
separa_ey
........
• vvnen _ser_lngan nlage. _ne resoutlon for the con1} ned fie
au_omaucallyse_to
• vvnen _sertlng _vJaeo, tne resout c 1to the comb]ned fie is
au_omau(alb set to V6R or sinai er
• vvnen capturing a eaoKgrOb)a Dnoto. a verica] DDOTO
oaoturea n tne
veriJca DOS_on Is also]area nonzos[al y wl_qout auto ro_a[e
• The maximum s 7e of the Ber_lonwindow s I/4 or the screen, ant
tr/e asDec[ ratio _[aystne same when cnang ng tne size.
• The ma mum length otv leo tnat can De nser_ec s 2O minutes
- In Rcture n P cture mc _e. "_-_e
ava aDe zc DmrE _ge may De _ess_nan
1 o_r_esnooung moaes
{_ Half-press [Shutter] to focus.
• n Reture 1 P clure mode, you cannot set the Sound Alive c s_ons
° vvnen you select a background photo l_on-your savea _ -_o_os
ol8> )ars ma appear at the edges ot the mage, depending on _ne
aseec_ rauo
front display.
_
Extended functions
Press [Shutter] to capture the photo,
46
i.Jsiii{i
Si}0ix_
iix£i03
If you press [F.LCD] when the power is off, the front display turns
on in Easy Self Shot mode. Because the main display is off, the
camera consumes less battery power and you can prevent others
from viewing the rnain display,
• The camera will turn of[ when you press [RLCD] again or press
[POWER].
You can let subjects know when to smile or attract their attention
to the lees.
In Shooting
Select
mode, press [MENU].
Half Shutter
_ an option.
• The front display will turn off and the main display will turn on
when you press [_].
_F
Off: No icon will appear on the front display,
Smile Icon: Set an icon to appear that prompts the
subject to smile,
<_>
Extendedfunctions 47
Eyesight catching: Set an icon to appear to attract
the subject's attention to the lens,
i.Jsiii{i Si}0ix_ iix£ios
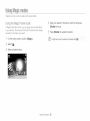
Using the Ghil@en mode
Using the Jump Shot mode
The Children mode attracts children by showing a short animation
on the front display,
Capture a photo of people jumping. An icon will appear on the
front display to tell your subjects when to jump.
On the Home screen, scroll to <Scene>,
2
Select
• The front display will activate and play the preset animation,
3
Press [MENU].
_S Select Background
Music
_ an option.
{!_ Align your subject in the frame, and then half-press
[Shutte(}
to focus.
(_ Press [Shutter]
On the Home screen, scroll to <Scene>.
to capture the photo.
2
Select _,
• To capture animated jump shots, refer to
"Captunng animated jump shots". (p. 49)
G vou_downb_d
_,_m_t,on_
tor__
_o<dJ_pW_o_T,
ht_,_
_to_ip__02/
{_ Press [Shutter],
• The AF assist light/timer lamp blinks.
• The front display will start a countdown a few seconds betore
shooting,
Extended functions
48
_S Jump when the jump icon appears on the front display
• Thecamerawillcapturemultipleshots.
Capture multiple jump shots, and then save thern as a
GIF al-fimation, This feature is available only when you insert a
memory card into the camera,
In Jump Shot mode,
press [MENU],
Select Jump Shot
_ GIF animation,
• The camera saves an animated GIF and one JPG of the
middle scene from the GIF file, You cannot view the JPG file
on your camera. To view it, connect your camera to a PC,
(p. 101)
Q
_ ifyou are Capturing PhOtosusing the jurnp shot timer in low ligh!
cond t on? or ndoors, ph0tos may appear darL
_-,If
youselect GIE animatiou, the resoltJti_n
is aut0malloally
so! to
, IfyouselectGIF animation,it/Tay takeIonge/tosavefies,
• Usea tripodto preventyou_cameraf_omsha[drlg:
Use a tripod to prevent you_camera from shakirlg.
Extended functions
49
i.Jsiii{i
Si}0ix_
iix£io3
Using the Beauty Shot mode
_!_ Press [_./6_)] to adjust Face Tone,
• For example, increase the face tone setting to make skin
appear lighter.
In BeautyShotmode, you car/capture a portraitwith optionsto
hide facialimperfections.
On the Home screen, scroll to <Scene>,
2
Select
_<_Press [_./6_p]to adjust Face Retouch.
• Forexample,increasethe tace retouchsettingto hidemore
imperfections.
[]
@
/7 Press [OK] to save the setting.
{i/ Align your subject in the frame, and then half-press
[Shutter] to focus.
!}_ Press [Shutteq to capture the photo.
4
Press [MENU].
:;; Select Face Tone.
_J
Extended functions
50
i.Jsiii{i
S(}0ii(!_
iix£i0s
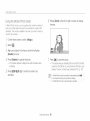
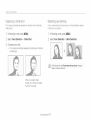
Using the Intelligent Po_t_ait mode
Using the Night Shot mode
Its Intelligent Portrait mode the camera detects the face of a
subject and automatically enlarges the face, crops the photo
around the face, and then saves the original photo and 2 portraits
in 3 separate files. You can use Intelligent Portrait mode to extract
and save close up portraits of a single individual from landscape
shots.
In Night Shot mode, you can use a slow shutter speed to extend
the time the shutter stays open. Increase the aperture vakle to
prevent overexposure.
On the Home screen, scroll to <Scene>.
_!:_!_
Select _.
On the Home screen, scroll to <Scene>.
2
{_ Press [_./6_p]to adjust the shutter speed.
Select _.
_ Align your subject in the frame, and then half-press
[Shutter] to focus.
_S Press [Shutter] to capture the photo.
• Theonginalphotoand2 croppedphotosaresavedunder
consecutivefilenames.
_:SAlign your subject in the frame, and then half-press
more than 2 faces are detected
fl-_edeteQted facial a@ais largertflan a certain ratio
[Shutter] to focus.
The cropped photos maintain Ihe same aspect ratie (16:9) as the
original el _-_einverse aspect _ati9(9:_6),
Press [Shutter] to capture the photo.
In Intelligent Portrait mode, it may take longer to save files.
Extended functions
51
i.Jsiii{i
Si}0ix_
iix£i03
LJsingthe Close4@ Shot mode
In Close up Shotmode, you can captureclose up photos of
subjects, such asflowers or insects,
On the Home screen, scroll to <Scene>,
_ii_ Select
_ Align your subject in the frame, and then half-press
[ShutteE} to focus.
F2.S 1/305
_:SPress [Shutter] to capture the photo
Extended functions
52
UsingMagicmodes
©apture a photo or record a video with various effects.
_:SAlign your subject in the frame, and then half-press
Using the Magic Frame mode
Its Magic Frame Shot mode, you car/apply various frame effects
to your photos, The shape and the feel of the photos will change
according to the frame you select,
[Shutter] to focus.
Press [Shutter] to capture the photo.
On the Home screen, scroll to <Magic>
_::_}_
Select _.
{_ Select a desired frame
Extended functions
53
i.hi;iii{ii'_s{iic iy_odes
Using the Funny Face mode
5
Capturea photowith effectsthat distort the face.
_i_Select Distortion Level.
On the Home screen, scroll to <Magic>
Press [MENU].
/7 Press [_/6_.p]to adjust Distortion Level.
_ii_ Select _,
{i/ Press [OK] to save the setting,
{_ Aim the camera at a face.
!}_ Half-press [Shutter] to focus.
_:SSelect a desired effed.
'0 Press [Shutterj to capture the photo,
I
, TheEunnyEacemodedoesnotworkifnefaceisdetected_
, When several faces ate detected, itis appJied to the closest face Only,
[]
@
Extended functions
54
i.hi;iii{ii'_s{iic iy_odes
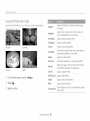
Using the Photo Filter mode
Apply various filter effects to your photos to create unique images.
Miniature
Apply a tilt shift effect to make the subject appear
.............
Vignetting
Apply the retro looking odors, high contrast, and
strong vignette effect of Lomo cameras,
Ink Painting
Apply a watercolor painting effect,
Oil Painting
Apply an oil painting effect.
Cartoon
Apply a cartoon painting effect.
Cross Filter
Add lines that radiate outward from bright objects to
imitatethe visual effect d a cross filter,
Sketch
Apply a pen sketch effect,
Soft Focus
Hide facial imperfections or apply dreamy effects,
Fish-eye
Blacken the edges d the frame and distort objects
to imitatethe visual effect of a fisheye lens,
Old Film
Apply a vintage film effect,
Half ToneDot
Apply a halftone effect.
Classic
Apply a black and white effect,
_!_'!_
Select _,
Retro
Apply a sepia tone effect,
{_ Select an effect.
Zooming Shot
Blur the edges of a photo to emphasize the subjects
in the center,
Miniature
Fish eye
VignettJng
Sketch
On the Home screen, scroll to <Magic>
Extended functions
55
i.Jsiii{i i'_s{iic iy_ocies
_:SAlign your subject in the frame, and then half-press
_
[Shutter] to focus.
Sketch
Apply a pen sketch effect,
Press [Shutter] to capture a photo.
Fish-eye
Distort dose objects to imitate the visual effect
of a fisheye lens.
Olassic
Apply a black and white effect,
Retro
Apply a sepia tone effect.
Palette Effect 1
Create a vivid look with sharp contrast and
strong color.
Palette Effect 2
Make scenes clean and clear,
Palette Effect 3
Apply a soft brown tone.
Palette Effect 4
Create a cold and monotone effect,
Using the Movie Filter mode
Apply various filter effects to your videos to create unique images.
2
On the Home screen, scroll to <Magic>,
_:SPress [Shutteq to start recording,
Select 2,
{
Press [Shutter] again to stop recording.
{_ Select an effect.
@
t I_you 8elect Miniature, the miniature recerdi% time is al_© displaye d
and is shorter than the real reco/ding time,
, Ifyou select Miniature, yeu _ar_netrecold the video sour_dl
Miniature
Apply a tilt shift effect to make the subject
appear in miniature,
Vignetting
Apply the retro looking colors, high contrast,
and strong vignette effect of Lomo cameras.
Half Tone Dot
Apply a halftone effect,
Extended functions
t Depending on the option you select, the recording speed may change
I
to _" and t_e recerdir!g resolution may change t° _GR Or smaller
autornatically.
56
i.Jsiii{i i'_s{iic iy_ocies
_:SAlign your subject in the frame, and then half-press
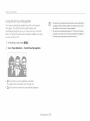
Using the Split Shot mode
Its Split Shot mode, you can capture several photos and arrange
them with preset layouts.
[Shutteq to focus.
5
Press [Shutteq to capture a photo.
° Repeatsteps4 and5 to capturetherestof the photos,
• Torecapturea photo,press ['_],
On the Home screen, scroll to <Magic>
_ii_ Select
{_ Select a split style.
• To aqust the sharpness of the dividing line, press [MENU],
and then select Line Blur _ a desired value.
shooting modes,
• To apply a Smart Filter effect to part ot the shot, press
[MENU], and then select Smart Filter _ a desired option.
You can apply different Smart Filter effects to each part of the
shot.
Extended functions
57
i.Jsiii{i i'_s{iic iY_BCies
_:/ Align your subject in the frame, and then half-press
Using the A_tistic Brush mode
In Artistic Brush mode, you car/capture a photo, and then view a
video that shows how to apply the filter effect.
[Shutter] to focus.
_!i Press [Shutter] to capture a photo.
° Affercapwnng_nephoto,the vdeo that showshowto a )p y
_nefite_w I begn automatca
On the Home screen, scroll to <Magic>
_ii_ Select _
_ii}
{_ Select a filter.
" InArtsSoBwsi moee.the fesolu[ION
ISau_omaucally
seato[]
o
_ma]Je
• _"[email protected]_ne[ sorewitfl thefiltereffectand_ne
eomatsnows _ow_c _pply_nefite_effectaresaveo
• ns,r[S_lcBrush
mode.tneavaaoezoomrangemayee ess_Tlanln
xne[ snoo_ngmooes
, ,_,Srtstlo
,
Blushmode.it r aytakelongerto savefiles
• ouoanno_b )loaoa vlaeooaeturedinArtisticBrushmodeva the
e ess ne_Jomlng
featureonyourcamera,(DV300F/DVS05F
Ink Painting
Apply a watercolor painting effect.
Cartoon
Apply a cartoon painting effect.
Sketch
Apply a pen sketch effect.
Extended functions
58
i.Jsiii{i i'_s{iic inodes
Using the Motion Photo mode
Its Motion Photo mode, you ear/capture and combine a senes of
photos, and then select an area to be animated to create a GIF
animation, This mode is available only when you insert a memory
card into the camera,
_!_ Rotate [Zoom] to the left or right to reduce or enlarge
the area.
On the Home screen, scroll to <Magic>
_!_'!_
Select _.
_ Align your subject in the frame, and then half-press
[Shutte(} to focus.
_S Press [Shutter] to capture the photo.
• Thecameracapturesmultiplephotoswhilethestatuslamp
is blinking.
{!_ Press [DISP/_/_./@]
animated.
/7 Press [OK] to save the photo,
• The camera saves an animated GIF and one JPG of the first
scene from the GF file. You cannot view the JPG file on your
camera. To view it, connect your camera to a PC. (p. 101)
to scroll to an area to be
_f}.
•
Extended functions
59
!nMot!onPhotomode,tJ-,eresolutiorlis automatioal!y
setto VGI:I.
• Use a tnpodto preventyeursamerat:omshaking;
Ir/MotionPholomode,itmaytakelongerto saveflies.
Shooting
Learn now to set tne ootions in Shooting mooe
Selecting a resolution and quality
_-_
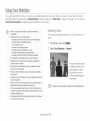
Jsing Smart Face
__,_u_ _1a resolu[ic
>e_ecu g an irr :_gequ_:_lity
_'_
F2
se!/is_erlngfaces _ },our lavontes
(My Sta
Using the timer _
63
Shooting
in the dark
64
<d/us[ing _ne exposure manuauy {Lv
b,revet41 g red-eye
64
bompensa[ina ]or Decqi(jnul]{I
Jslng the has
Jjusung _neISO sensitivit}
...........
Changing the camera's focus
)SJll{I
JSlf_
..........
/ Ib_Cr"-_f_ _;KIn_ 8U10
£qjUSil
U _ne IOCdS
lOCUS
ar÷8
........
Using Face Detection
L/efec[in_
io_ce8
eye DIJ[IKI[II_
......
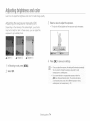
brightness and color
64
3h_ gwIg_ne me[eung o x_c
6{
Selecti_ j _ While Balance sell
/
67
Using burst modes
Adjusting images
68
Reducing the sound of the zoom
6c
Available shooting
A
?C
shooting
/1
3spOuting a sm_e shot
w_L_.uf}g
Adjusting
ecogru_on .............
/
]
mode
/2
/8
/a
3B
/
. !b
A;
g .....
....
....................
/C
/8
7c
80
options by
...................................
81
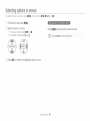
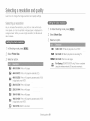
Selectinga resoBtionand qsality
Learn how to change the image resdution and quality settings.
_,>electmga resolution
As you increase the resolution, your photo or video will include
more pixels, so it can be printed on larger paper or displayed on
a larger screen, When you use a high resolution, the file size will
also increase.
In Video Shooting
_::_}_
Select
mode, press [MENU]
Movie Size
_ Select an option,
In Shooting
_ii_ Select Photo
mode, press [MENU]
lib
Size
1280 X 720: HD files to play back on an HD%!,
_IBIFI 640 X 480: SD files to play back on an analog TV,
I:I_GI:!
{_ Select an option,
a*m
4608 X 3456: Print on A1 paper,
4608 X 3072: Print on A1 paper in wide ratio(3:2),
4608 X 2592: Print on A1 paper in panorama ratio (16:9)
or play back on an HD%!,
3648 X 2736: Print on A2 paper,
2592 X 1944: Print on A4 paper,
I_
1984 X 1488: Print on A5 paper,
[_
1920 X 1080: Print on A5 paper in panorama ratio (16:9)
or play back on an HDTV,
[]
1024 X 768: Attach to an email,
Shooting options
61
320 X 240: Post on a web page.
For Sharing (DVS00F/DVS05Fonly): Post on a website
using the wireless network (30 seconds maximum),
_electmg an image quality
Set the photo and video quality settings. Higher image quality
settings will resc£ in larger file sizes,
The camera compresses and saves the videos you record in
MP4 (H.264) format.
In Video Shooting
The cameracornpressesand savesthe photos you capturein
the JPEGformat.
_::_!_
Select
mode, press [MENU]
Frame Rate,
{_ Select an option,
In Shooting mode, press [MENU],
z_!
_ Select Quality.
30
_-is
{_ Select an option.
_SF
Super Fine: Capture photos in super high quality,
Fine: Capture photos in high quality,
Normal: Capture photos in normal quality,
Shooting options
62
30 FPS: Record 30 frames per second.
15 FPS: Record 15 frames per second,
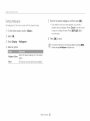
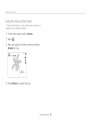
Usingthe timer
Learn how to set the timer to delay shooting.
In Shooting mode, press [_t_)].
{_ Press [Shutter]
o
ii{_i_i_iii_i!i_i!_i_l_i_@i!liiiii_iliilillllillilllllilill!lilil{illl_lll_liiililil_lili!
to start the timer
• The AF assist light/timer lamp blinks. The camera will
automatically capture a photo after the specified time has
elapsed,
• The front display will start a countdown before shooting.
_@ii_iii_@_l_i_iiiiiiiil{lilill@_i_l_l_l_l_l_l_!_i!_l!i!liill_i_iliil_i_i_i_i!i_i_
In some modes, you can also set the timer opSon by pressing
[M[_NIJ],and then selecti% Timer,
Select an option,
(_
Off: The timer i8 not active.
_,_
10 Sec: Capture a photo after a 10 second delay,
_,]
2 Sec: Capture a photo after a 2 second delay,
Double: Capture one photo after a 10 second delay
and another photo after a 2 second delay,
Available options may differ depending
on the shooting conditions
Shooting options
63
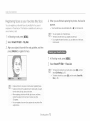
Shootingin the dark
Learn how to capture photos at night or in low light conditions.
Preventing red eye
Using the flash
If the flash fires when you capture a photo of a person its the dark,
a red glow may appear itsthe person's eyes, To prevent this,
select Red-eye or Red-eye Fix, Refer to flash options its
"Using the flash,"
Use the flash when you capture photos its the dark or when you
need more light its your photos.
In Shooting mode, press [_.],
!_i@_!i
¸ii!iiiii
¸¸iiiiiii_i
¸i@i!!ii!iiiiii!ijii!_i
¸i!!i!iiiiiiili_iliiiiiiiiiiii!!!!Iii!IIi!il
A Before correction
A Atter correction
Select an option.
Off:
• The flash will not fire,
tTg
. The camera will display the shake warning (_h) when
$
......
Auto: The camera will select a proper flash setting for
the scene it detects in Smart Auto mode,
you are shooting in low light,
_
Shooting options
64
Auto: The flash will fire automatically when the subject or
background is dark,
Six>fl>iiii{iiii iifl!!_dsi%:
Red-eye:
• The flash will fire twice when the subject or
<_>
background is dark to reduce the red eye effect.
• There is an interval between the 2 bursts d the flash,
Do not move unfil the flash fires a second time.
- \Aat<es _,mat your subJects are wmln me recomrnenaea @s_ance
tlom he fla@ _: 150
• t light tlom tfl/eflash s reflected or here s a suosta/xls amoun; OT
]c K in the alh my spots may appea in your photo
- in some oaes, you can aye set tt]e flash option W p/essng [MENU]
_na men selecmg Flasl_
Fill in:
_F
. The flash always fires,
, The camera automatically adjusts light intensity,
Slow Syne:
• The flash fires and the shutter stays open longer
• This option is recommended when you want to
_s
capture more ambient light to reveal more details in
the background.
• Use a tripod to prevent your photos from blurring,
• The camera will db@ay the shake warning (_1_)when
you are shooting in low light,
Red-eye Fix:
° The flash fires twice when the subject or background
is dark. The camera corrects red eyes through its
advanced software analysis.
• There is an interval between the 2 bursts d the flash,
Do not move until the flash fires a second time,
Available options may differ depending
on the shooting conditions
Shooting options
65
3ii00ii_i{i iri tiie dark
Adjusting the ISO sensitivity
The ISO sensitivity is the measure of a film's sensitivity to light as
defined by the Irlternational Organization tot Standardization (ISO).
The higher ISO sensitivity you select, the more sensitive to light
your camera becomes. Use a higher ISO sensitivity to capture
better photos and reduce camera shake when not rising the
flash,
In Shooting mode, press [MI:NU].
_ii_ Select ISO.
{_ Select an option.
• Select_ to use an appropriateISOsensitivitybasedonthe
brightnessof the subjectandlighting.
Shooting options
66
Changingthe camera'sfocus
Learn how to adjust the camera's focus to suit the subject and the shooting conditions.
In Shooting mode, press [_],
Using macro
Use macro to capture close Lip photos of subjects, such as
flowers or insects.
#ii!
_ Select an option.
_F]
Normal (AF): Focus on a subject farther than
32 in. (80 cm) away, Fartherthan 98 in, (250 cm) away
when you use the zoom,
Macro: Focus on a subject that is 2-32 in. (5-80 cm)
from the camera, 39-98 in, (100250 ore) when you use
the zoom,
15,7
in, (40 crn),
nl_
Auto Macro:
• Focus on a subject farther than 2 in, (5 ore)away,
Farther than 39 in, (100 ore) away when you use the
ZOOm.
.
It is set automatically in some shooting modes,
Available options may differ depending
Shooting options
67
on the shooting conditions,
Cix_ii!iiiii{i
ib!!_
(}siTi(!_i8_8
ice(is
Using tracking auto focus
Tracking
even
AF allows
when
you to track
and auto
focus
on your
subject,
_
-
you are moving,
f!eudonotselectafcsL]sarea._
sender OT[he sr eer
' Trachr g a subject may fail
_focustramew
aDDearrltne
_en
tne subject is too sma
_ne euDjec_moves excessve
In Shooting mode, press [MENU].
tne euDjeo[ is Dec _OryOUare st/oct1% n a Oa[KDlaoe
Dolors or Da_ternson IRe SLDjec_ano trle oaoKgrouno are __esame
_ii_ Select Focus Area _ Tracking AF
tne eursjec[ir suoes nonzoN[a Da_elRe. sucrl as Dllno8
_ne camera ena-ee excessvey
{_ Focus on the subject you want to track, and then
press [OK],
• A tocusframeappearson the subjectandfollowsthe subject
asyou movethe camera.
• vvrleNl:rao_'% a eL)jeot fa s the teous 1lamewil aD£_al as _-Wrill:e
_Jn{e
-
_etrame (Ell
t the camera fails to track the subject, you mL]st rese ect tl e su_ ec_
to Trao_
• t the camera fails to tr sus, the fecL]s flame w change to a recJ
5 lg e le frame (r-1
o if eL]use "dllstuner on otJcannot set Face Detect on cel]one. Timer
DDIIO[/_
[]
• The white frame means that your camera is tracking the
subject.
• When you halfipress [Shutter], the green frame means that
your subject is in tocus.
_S Press [Shutter] to capture the photo
Shooting options
68
Buret{
Dtons
aria
]R[e]J
ZOO[T
Cix_ii!iiiii{i
ib!!_
c8iTi(!_18_8
i0c(is
Adiusting the Iocus a_ea
You can get dearer photos by selecting an appropriate focus
area according to your subject's location in the scene.
'
In Shooting
_::_!_
Select Focus
mode, press
[MENU].
Area,
{_ Select an option,
_, _ _
[]
,
Center AF: Focus on the center of the frame (suitable
when subjects are located at or near the center),
[]
Multi AF: Focus on one or more of 9 possiUe areas,
[]
Tracking AF: Focus on and track the subject, (p, 68)
Available shooting options may differ depending on the shooting
conditions.
Shooting options
69
UsingIIIFa0e
lID cti©n
If you use Face Detection
adjusts
the
exposure
Smart
Face
options,
automatically.
Recognition
your
camera
Use Blink
to register
faces
can automatically
Detection
and prioritize
detect
a human
to detect
cbsed
the focus
on them,
face,
When
eyes or Smile
Shot
you focus
When your camera detects a face. i_tracks the detected face
Detecting faces
au_omauoa
Your camera
Face Detection m@ no_ De effective whet
scene,
_ne subject is far from the camera The focus frame wi aoDear
orange for Sm e Shot and Blink De_ec_lon
on a human
to capture
automatically
detects
a smiling
face,
face,
the camera
You can also use
up to 10 human
faces
in one
i_ In Shooting mode, press [MENU].
i_is IODD%n_or IODaar_
the subject is not faring tne camera
Select Face Detection _ Normal.
- tne SuDjeoIIs weanng sungEassesDr a mask
o the suqect's facbJ expression changes 8rasucaly
- tne suDjeo_is DaoKlJ[or Re _gn_ngDonations are uns[aole
- Face Detection is no_ avalaDle wrier you set the Tracking ,_
Depenolng on the snooung DpIlons yOUselectee, avaEaole Face
The face nearest the camera
or nearest the center of the
Detectbn options may differ,
DepenDing on tne Face Detection DDUOnSyou seec_e8, tne _Jmer
functior may r DtDe avaEao_e
scene appears in a white
focus frame and the rest
of the faces appear in gray
focus frames.
When you set Face Detection ootlons, the AF area is automascaly
setto Multi AF
• Depending on the Face Detectbr options you selected. Burst ootlons
may no_ De avalEaole,
• When iou set Smart Face mecognl_on oDt_onand capture Dno_o8of
Detected faces tney will De registered in the face ,s_
su can vow registered faces in order of priority in Playback Dec e.
p. 86) Even though faces are registered successfully, they m_ no_ De
classified in Pla/oacK mode
• a face detected with Smart Face Recc _nruonoption may no_ al: sear
inthe face list or Smart Album
Shooting options
70
i.Jsiii{i i::8ceil}eii£}ti0ii
Capturing a smile shot
Detecting eye blinking
The camera automatically releases the shutter when it detects a
smiling face.
If your camera detects closed eyes, it will automatically capture
2 photos in succession.
In Shooting
In Shooting mode, press [MENU].
_ii_ Select Face Detection
_ Smile Shot
Select
{_ Compose your shot.
• Thecameraautomatically
releasesthe shutterwhenit detects
a smilingface,
When your subject smiles
broadly, your camera can detect
the smile more easily.
Shooting options
71
mode, press [MENU].
Face Detection
_ Blink Detection.
i.Jsiii{i i::8cgil}eiei}ii0ii
Using Smart Face Recognition
The camera automatically registers faces that you frequently
photograph, The Smart Face Recognition feature will
automatically prlorltize the focus on those faces and on favorite
faces, The Smart Face Recognition feature is available only when
you use a memory card,
In Shooting
mode, press
Select Face Detection
and whether or not the subject iswea_lng glasses.
- The camera carl automatically register up to !2 races. I_the camera
recognizes a new race when 12 laces have already beer! reg!stered_
itwill replace the lowest prionty lace with the new one.
[MENU].
_ Smart
Face Recognition.
• _ : Faces that you have registered as favorites.
(% register faces as favorites, refer to page 73,)
" El : Faces that the carnera has automatically registered.
Shooting options
72
i.Jsifi{ii::8cgil}eiii£}tiOii
Registering Iaces as your favontes (My StaO
You can register
exposure
your favorite
on those
use a memory
faces.
faces
to prloritize
This %ature
the focus
is available
_:SWhen you are finished capturing the photos, the face list
appears,
• Yourfavontefacesare indicatedwitha _ on theface list.
and
only when
you
card,
youpan
register
Up
toS_,,orJto
f_0_s,
In Shooting mode, press [MENU].
The _asb will not {i_e when yqu registe£a favonte face,
Ifyou register the same face twice, you carl delete one of the faces
the face list,
_ii_ Select Smart FR Edit _ My Star
{_ Align your subject's face with the oval guideline, and then
press [Shutter] to register the face,
_/ In Shooting mode, press [MENU],
Select Smart FR Edit _ Face LisL
* To delete a favor!t9 {age__ress IOK], and therl 8elect Cance! My
star, (p, 86)
• Caol:dre photos of one person at a time when reg sterlng races
• Capl_re 5 photos ot fl-lesubject 5face tor best results one eacn
t_em tne fiont, lelt, rc _t,aeove, ana oelc
vvnen capturing shores trom the eft _n_,above, aria DeC
lS_L X _ne suojs x no_ to IUrT1nls o ser tace more thac
30 degrees
-
Youcan reg ster a face even _you capture only one photo of the
suc ect's race
Shooting options
73
Adjustingbrig
essand cebr
Learn how to adjust the brightness and color for better image quality.
Adiusting the exposure manually (EV)
Depending on the intensity of the ambient light, your photos
may be too bright or da_k, In these cases, you car/adjust the
exposure to get a better photo,
{_ Select a value to adjust the exposure
• Thephotowillbe brighterasthe exposurevalueincreases.
.....
iiiii!i
!i@iii@iiizi
_;_:!
7iTiii{i
¸#
_17ii
¸¸#i7;_
_!
';{7777{_7771_7_;!i7ii
¸il
¸il
¸il¸il
¸il
¸il¸#i71i177:
¸;7i
¸7
__%1{{i1711
_iiii
_
_i
ii7
!i{_!i!#_!!#i_i_ii_iiiTiii!i!iTii@!ii_ili_iiTi
A Darker ( )
A Neutral (O)
A Brighter (+)
_,,_Press [OK] to save your settings.
In Shooting
mode, press [MFNU]
Select EV.
" !fyou cannot decide on an appropnate exposure, select the
AEB (Auto Exposure Bracket) epees, The camera will oapture
3 consecutive photos, each with a different exposurel normal_
underexposed and overexposed (p, 78)
Shooting options
74
Acii_isiiii{ii'ii!iiiTiY_(!_Ss
_}!_iid
c0i0i ¸
Compensating for backlighting (ACB}
(}hanging the metedng option
When the light source is behind your subject or there is high
contrast between your subject and the background, your subject
is likely to appear dark in the photo, In this case, set the Auto
Qontrast Balance (AOB) option.
The metering mode refers to the way in which a camera
measures the quantity of light. The brightness and lighting of your
photos will vary depending on the metering mode you select.
In Shooting mode, press [MENU],
_:_!_
Select Metering
{_ Select an option,
J, Without ACB
J, With ACB
[]
Multi:
• Your camera divides the frame into several areas,
and then measures the light intensity of each area,
• Suitable for general photos,
In Shooting mode, press [MENU],
Spot:
• Your camera measures only the light intensity at the
_:_!_
Select ACB
[]
{_ Select an option,
very center of the frame,
• If a subject is not in the center of the frame, your
photo may be improperly exposed,
° Suitable for a subject with backlighting,
Off: ACB (Auto Contrast Balance) is deactivated,
On: ACB (Auto Contrast Balance) is activated,
[]
Center-weighted:
• Your camera averages the meter reading of the entire
frame with emphasis placed on the center,
• Suitable for photos with subjects in the center of the
frame,
Shootingoptions 75
Acii_isiiii{i
i'ii!iiiTiY_(!_ss
_}!_iid
c0i0i
¸
Selecting a White Balance setting
In Shooting mode, press [MENU].
The color of your photo depends on the type and quality of the
light source, If you want the color of your photo to be realistic,
select a White Balance setting that is appropriate for the lighting
conditions, such as Auto WB, Daylight, Cloudy, or Tungsten,
_::_!_
Select White Balance.
{_ Select an option,
nt_
Auto WB: Automatically set the White Balance based
on the lighting conditions,
Daylight: For outdoor photos on a sunny day,
Cloudy: For outdoor photos on a cloudy day or in
shadows,
Auto WB
{O} Daylight
Fluorescent H: For shooting under a daylight
fluorescent or 3 way fluorescent light,
FluorescentL:
light,
For shooting under white fluorescent
Tungsten: For shooting indoor photos under
incandescent bulbs or halogen lamps.
_, ©loudy
s6. Tungsten
im
Shooting options
76
Custom Set: To use White Balance settings that you
define, (p, 77)
D,ciitisiiii{i i'ii!TiTir_(!_ss
_}!_iid
c0i0i ¸
You can customize the White Balance by capturing a photo of
a white sudace, such as a piece of paper, cinder the lighting
conditions in which you intend to capture a photo, The White
Balance feature will help you to match the colors in your photo
with the actual scene.
In Shooting mode, press [MENU]
_ii_ Select White Balance
_Custom Set
{_ Aim the lens at a piece of white paper, and then press
[Shutter].
Shootingoptions 77
Usingburst modes
It car/be difficult to capture plaotos of fast moving subjects or capture natural facial expressions and gestures of your subjects its photos.
Also, it can be difficult to adjust the exposure correctly and select a proper light source. In these cases, select one of the burst modes.
Motion Capture: While you are pressing [Shutter], the
camera captures VGA photos (5 photos per second;
maximum of 30 photos).
AEB:
_l
In Shooting
mode, press
[MENU].
° Capture 3 consecutive photos, each with a different
exposure: normal, underexposed, and overexposed.
° Use a tripod to prevent blurry photos.
_ii_ Select Drive
{_ Select an option.
to VGA and set the ISO sensitivity to Auto.
Depending en the Face Detect!on option you selected some Burst
[]
ep_ens may not be avai]abb.
Single: Capture a single photo.
Continuous:
• While you are pressing [Shutter], the camera
continuously captures photos.
• The maximum number d photos depends on the
capacity of your memory card.
Shooting options
78
Adjustingimages
Adjust the sharpness, contrast, or saturation of your photos.
In Shooting mode, press [MENU].
_:SPress [_./_t_)]to adjust each value.
_ii_ Select Linage Adjust
Soften the edges on your photos (suitablefor
editing the photos on your computer),
{_ Select an option.
• Sharpness
• Contrast
• Saturation
+
Sharpen the edges to improve the clarity d your
photos. This may also increase the noise in your
photos.
Decrease the color and brightness.
+
Increase the odor and bnghtness.
Decrease the saturation.
+
{
Shooting options
Increase the saturation,
Press [OK] to save your settings.
79
Beducingthe soundof the zoom
When you use the zoom while recording videos, the camera can record the sound of the zoom. Use the Sound Alive function to reduce the
zoom noise.
J
In Video Shooting
mode, press
[MENU],
_r:"_Select Voice.
{_:5 Sebct an option.
a
Sound Alive On: Turn on the Soand Aive function tc
eauce
ire
zoom
no s@
Sound Alive Off: Turn off the Sound Aive functlo
SW/F The camera can record the zoom no se
!._
Mute Do not recom sounas
° Do not block the m s Dpnonewhen you use the Sound Alive
TURCI)r
• Recorc igs made with Sound Alive may dtrer a )l_l ac_uE
8ounqs
• nPct_'e
n Picture mode
su cannot set the Sound A ve
c }tons
Shooting options
80
Availableshootingoptionsby shootingmode
For details
about
shooting
options,
refer to "Shooting
Resolution
0
0
/x
Quality
/_
0
0
0
0
/x
Timer
/x
0
A_
_.
0
Flash
/_
0
/x
ISO sensitivity
Macro
/_
0
i
0
i
/x
0
0
0
0
0
/x
0
/x
/x
/x
/x
i
0
0
0
_.
0
/x
i
0
i
/x
/x
0
/_
EV
ACB
i
O
Focus area
Face detection
i
0
options",
0
_
O
/_
_.
_.
O
O
Metering
O
O
White balance
O
O
Drive
0
Image adjust
0
Sound Alive
/x
/x
0
Digital zoom
/x
_.
0
0
Intelli zoom
/_
/_
OIS
0
0
/x
/_
0
0
0
0
0
/_: In these modes, some options are limited or a certain option is set by default. O: The option is ava/able in this mode
Shooting options
81
0
0
0
Please refer to the warranty that came with your product or
visit our website www.samsung.com
for after-sales service or
inquiries.
/c 0678¢1