1
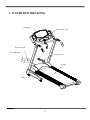
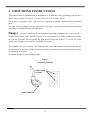
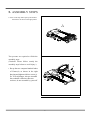
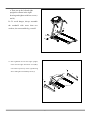
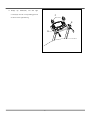
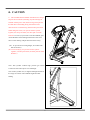
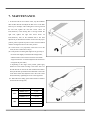
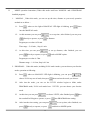
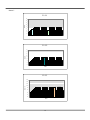
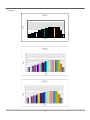
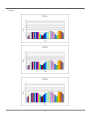
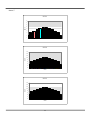
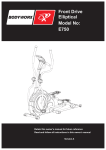
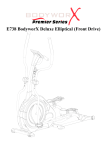
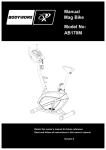
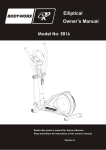
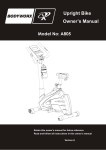
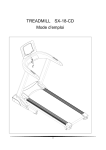
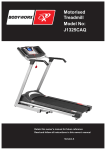
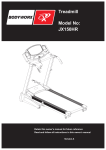
Treadmill
BODY WORX
Model No:
JX125
Retain this owner’s manual for future reference
Read and follow all instructions in this owner’s manual
Version A
1
INDEX
1. OVERVIEW DRAWING..............................................................................2
2. IMPORTANT SAFETY INSTRUCTIONS ..................................................3
3. GROUNDING INSTRUCTIONS ................................................................4
4. PRE-ASSEMBLY CHECK LIST .................................................................5
5. ASSEMBLY STEPS .....................................................................................6
6. CAUTION ....................................................................................................9
7. MAINTENANCE .......................................................................................10
8. COMPUTER OPERATION INSTRUCTIONS.......................................... 11
-1-
1. OVERVIEW DRAWING
Computer
Safety Key/ Clip
Power Switch
Circuit Breaker
Power Cord
Frame
Base
-2-
2. IMPORTANT SAFETY INSTRUCTIONS
When using this product, basic precautions should always be followed, including the following:
Please read the instruction carefully before starting to use this product.
Danger – To reduce the risk of electric shock:
1.
Always unplug this product from the electrical outlet immediately after using and before
cleaning the treadmill.
Warning – To reduce the risk of burns, fire, electric shock, or physical injury:
1.
The product should never be left unattended while plugged in.
Unplug the product from the outlet when not in use or before putting on or taking off the
clothes and other belongings.
2.
To avoid any danger, close supervision is necessary when this production is used by children,
invalids or disabled persons. So it is when the machine is working with such persons around.
3.
Be sure to use the product only for its intended use as described in this manual. Do not use any
attachment not recommended by the manufacturer in order to avoid any danger or accidents。
4.
Never operate the product if it has a damaged cord or plug, if it is not working properly, if it
has been damaged, or dropped into water. Please return the product to the service center of
seller for examination and repair.
5.
Do not carry this product by the supply cord or use the cord as a handle。
6.
Keep the cord away from hot surfaces or ground。
7.
Never operate the product with the air vents blocked. Keep the air vents free of lint, hair, etc。
8.
Never drop or insert any objects into any vent of the treadmill。
9.
Do not use or operate outdoors。
10. Do not operate where aerosol (spray) products are being used or where oxygen is thin。
11. Before turning the product power off, turn all controls to the off position then remove the plug
from the outlet。
12. Connect the product to a properly grounded outlet only。
13. If the power cord is damaged, be sure to ask the manufacturer for replacement to avoid
accidents .The seller and correlative qualified professionals are as well as eligible。
14.
If the machine has folding mechanism, user should descend the incline to original position after workout.
15.
During workout, you can’t use the folding mechanism function at the same time.
16. The product is only intended for household use.
-3-
3. GROUNDING INSTRUCTIONS
The products must be grounded first. If malfunction or breakdown occurs, grounding will provide a
path of least resistance for electric current to reduce the risk of electric shock.
The product is equipped with a cord having an equipment-grounding conductor and a grounding
plug.
The plug must be plugged into an appropriate outlet that is properly installed and grounded in
accordance with all local codes and ordinances.
Danger – Improper connection of the equipment-grounding conductor can result in a risk of
electric shock. Check with a qualified electrician or serviceman if you doubt whether the products
are properly grounded. Do not modify the plug provided with the product – if it will not fit the
outlet, have a proper outlet install by a qualified electrician.
The products is for use on normal 220V-240V and has circuit and contains a plug that looks like the
one illustrated in the figure. Make sure that the product is connected to an outlet having the same
configuration as the plug.
No adapter should be used with the product.
Figure
Grounding methods
GROUNDED
OUTLET
GROUNDED PIN
-4-
4. PRE-ASSEMBLY CHECK LIST
ITEM
Description
Qty
ITEM
Description
Qty
A
B
Frame
1
1
a
b
Truss Hex Screw M8xP1.25x40
Truss Hex Screw M8xP1.25x15
4
2
c
d
e
Truss Philips Screw M5xP0.8x15
4
SILICON
1
1
f
Safety Key/Clip
1
Left Decoration Cover
C
D
E
Right Decoration Cover
Cover-Right
1
1
1
F
Cup Holder
2
G
Bottle
1
Cover-Left
a
Hex Wrench + Screwdriver
c
b
E
G
D
d
5mm
e
C
B
f
A
F
5
5. ASSEMBLY STEPS
1. Don’t cut the strap before pick up the machine
from the box as shown in the right pictures.
A
Two persons are required to finish the
assembly steps.
(Caution!! Please follow exactly the
assembly steps below to avoid injury.)
a
1. Put up the two computer handrail tubes
of Frame(A) as shown in the right
drawing and tighten with hex screw(a).
Ps. To avoid danger, always assemble
the treadmill with more than two
workers, do not assemble by yourself.
a
6
2. Then put up the left and right
uprights as shown in the right
drawing and tighten with hex screw(a
and b).
Ps. To avoid danger, always assemble
the treadmill with more than two
a
workers, do not assemble by yourself.
b
b
a
3. After tightened the left and right uprights,
insert left and right decoration covers(B,C)
onto frame respectively as the right drawing
c
shows and tighten with Philips Screw(c)
C
c
c
B
c
7
4. Wedge cup holder(FG), left and right
covers(E,D) onto the corresponding position
F
as shown in the right drawing.
E
D
8
6. CAUTION
1. This treadmill has the foldable mechanism for storage.
Stop all the movements (including stop the running belt
and take off the power cord) before storage, then pull out
the POP-Pin of the folding fixing mechanism as the
direction shown in the drawing and then lift up the frame.
When doing this action, two persons need to operate
together, one lift up the frame, the other pull out of the
POP-Pin. In reverse, if you want to use the treadmill, pull
out the POP-Pin of the folding mechanism as the arrow
shows in the drawing and put down the frame slowly.
(Ps.1. To prevent from causing danger, be careful if the
kids are around.)
(Ps.2. To avoid injury, two persons need to operate
together, one lift up the frame, the other pull out of the
POP-Pin.)
Note: The Cylinder contains high pressure gas. Please
avoid crash with other objects to avoid danger.
Note: If the Cylinder is hit, it might be damaged and cause
the usage not smooth. The treadmill might fall while
folding.
9
7. MAINTENANCE
1. If the belt tends to move off the center, stop the treadmill.
Take the Hex Wrench and adjust the Hex Screw in the Rear
End Cap. For example, if the running belt is moving towards
the left side, tighten the left Hex Screw about 1/4
turn(clockwise); if the running belt is moving towards the
right side, tighten the right Hex Screw about 1/4
turn(clockwise); Turn on the treadmill after it has been
adjusted. If you find that the belt has not moved to the proper
position, please repeat the steps above. Don’t use the treadmill
d
until the running belt returns to the center position.
(Ps.1. This action is very important, if the belt is not in the
center, be sure to follow above steps.)
(Ps.2. The position of running belt might not stay precisely in
the center with slightly towards the left and right sides,
and the situation varies with how end-users use and the
weight of end-users. No need to adjust the belt if it doesn’t
rub against the parts aside.)
2. Depending on the usage of the product, please apply
SILICON on the board according to the below chart. Use
the Hex Wrench to unscrew the bolt inside the Rear Roller.
Then pull the belt up and daub some SILICON to the center
of the board. After that, adjust the belt to the center of the
deck, followed by tightening the screw to the original set.
(Ps. When the belt is sliding, please follow the above method
to lubricate the running belt. )
KGS/LBS
KGS
LBS
Speed
Interval
6KM/hr below
1 year
6~12KM/hr
6 months
12KM/hr above
3 months
4mile/hr below
1 year
4~8mile/hr
6 months
8mile/hr above
3 months
10
Note:
This maintenance is intended for
household use.
If used for business, it is suggested to
examine the product every other month.
8. COMPUTER OPERATION INSTRUCTIONS
I.
General Operation:
1. Turn on the treadmill
2. Put the safety key in the recess of the console.
The beeper will sound and all windows will display values, the initial values are 0, and not
blinking, this present treadmill is under START/READY position, under this situation, user can
11
hold the grip pulse sensor to detect heart rate value directly.
**If safety key/ clip doesn’t place in the recess of the console, the TIME window will display
“----“, then the treadmill can’t be operated normally.
**During work out, if the safely key/clip is off, then the beeper will sound for warning, then the
treadmill will stop operation. At this moment, put the safety key back to the recess of console,
then all the values will back to initial values.
**Under START/READY condition, if you did not hold grip pulse sensor, then PULSE window
will display HP, when you hold the both sides of grip pulse sensor, you will see the PULSE
window display the heart rate values.
** PULSE value range:40~240 Beats/min
12
** Check list below for different age and heart rate values:
HEART BEATS/MIN
170
150
120
20
3. Press
press
166
146
117
25
162
143
114
30
OVER
MIDDLE
LOW
157
137
111
35
153
135
108
40
149
131
105
45
145
128
102
50
140
124
99
136
120
96
55
60
132
116
93
65
(Age)
to start treadmill, the treadmill will start with a speed of 1.0km/hr, at this time
or
keys to increase/ decrease speed( also can press fast speed buttons
to instantly choose the speed you need), press
stop your workout( press
and hold the
once to
one time, all values stop changing. Then press the second time
button for 3 seconds, the treadmill will automatically go back to the
START/READY position.)
4. The treadmill has the function of incline adjustment. Press
angles of the treadmill, press and hold the
,
,
key to control the incline
buttons, treadmill will change
angles accordingly, when reach the angles you need, just release the buttons then the
treadmill elevation will stop changing.
** When the SAFETY KEY is taken off and then replaced, the treadmill will not reposit from
any position it is. You need to press start key to perform the reposition.
** When the power is on, the treadmill will not reposit from any position it is. You need to
press start key to perform the reposition.
** Under start/ready status, press stop key for 5 seconds, the treadmill will reposit from any
position it is.
**During performing any program, by press stop key, the program will stop. If users want to
resume to the program, press start key or press stop key again to leave the program and back to
13
start/ready status.
14
II.
、 MODE operation instruction (Under this mode total have MANUAL and 6 PROGRAM
installed program):
1.
MANUAL:Under this mode, you can set up the time, distance as your need, operation
method are as below:
1.1.
Press
, when see the light of MANUAL LED light is blinking, press
, then
into the MANUAL mode.
1.2.
At this moment you can press
,
to set up time, after finished, you can press
directly to operate, or press
to distance.
Program pre-set values is 20 min
Time range:5~99 min,Step is 1 min
1.3.
At this time you can press
press
,
to set up distance, after finished, you can
directly to operate, or press
back to MODE option.
Program pre-set value is 5 km
Distance range:1~9.9 km ,Step is 0.1 km
2. PROGRAM: Under this mode, including P1~P6 total 6 modes, you can choose your favorite
mode, operation as following:
2.1
Press
, when see MANAUL LED light is blinking, you can press
choose P1~P6 any one of mode, then press
2.2
,
to
then can into the mode you choose.
After into the mode, you can see the LEVEL window begins to blink, under
PROGRAM mode, P1~P6 each mode have 3 LEVEL, you can choose your favorite
mode.
2.3
At this time you can press
,
to choose LEVEL, after finished, press
the treadmill will begin to operate, or press
2.4
into PROGRAM time setting.
After into the time setting, you can press
,
press
and back to MODE option.
directly to operate, or press
15
then
to set up time, after finished, can
Program pre-set 32 min
Time range:5~99 min,Step is 1 min
2.5 Regarding to the P1~P6 installed values, please refer to the last page Annex 1~ Annex 6
III、Body fat mode:
1. Under START/READY condition, press
, you can see the Body Fat LED light is blinking,
present you are in to Body Fat function.
When you choose this function, program will require you enter following values.
◎Age: Pre-set value is 30,range:13~80,Step is 1. Press
correct value, press
、
to adjust, after choose
into next value setting.
◎Height: Pre-set value is 170 cm,range:130~200 cm,Step is 1 cm. Press
after choose correct value, press
、
to change 1 (Male),0(Female). After choose
into the next value setting
◎Weight: Pre-set value is 70 kg,range:30~130 kg,Step is 1 kg. Press
choose correct value, press
to adjust,
into next value setting.
◎Sex: Pre-set value is 1(male). Press
the correct option, press
、
、
to adjust. After
and put both hands straight and hold the grip pulse sensor
about 15seconds, after 15 seconds, Body Fat window will display your Body Fat value, in the
same time, on the computer panel left side the LED light will display figure evaluation.
2. As the male and female has different fat, so the figure evaluate light also different, below
provide a list for reference:
Light
Sex
1.(Male)
0.0~4.9
5.0~9.9
10.0~14.9
15.0~19.9
20.0~24.9
25.0~29.9
30.0~34.9
35.0 以上
0.(Female)
0.0~14.9
15.0~19.9
20.0~24.9
25.0~29.9
30.0~34.9
35.0~39.9
40.0~44.9
45.0 以上
16
17
Annex 1
P1-L1
16
14
12
Km/h
10
8
6
4
2
0
MIN
P1-L2
16
14
12
Km/h
10
8
6
4
2
0
MIN
P1-L3
16
14
12
Km/h
10
8
6
4
2
0
MIN
18
Annex 2
P2-L1
16
14
12
Km/h
10
8
6
4
2
0
M IN
19
Annex 3
20
Annex 4
P4-L1
16
14
Km/h
12
10
8
6
4
2
0
MIN
P4-L2
16
14
12
Km/h
10
8
6
4
2
0
MIN
P4-L3
16
14
12
Km/h
10
8
6
4
2
0
MIN
21
Annex 5
P5-L1
16
14
12
Km/h
10
8
6
4
2
0
MIN
P5-L2
16
14
12
Km/h
10
8
6
4
2
0
MIN
P5-L3
16
14
12
Km/h
10
8
6
4
2
0
MIN
22
Annex 6
P6-L1
16
14
12
Km/h
10
8
6
4
2
0
MIN
P6-L2
16
14
12
Km/h
10
8
6
4
2
0
MIN
P6-L3
16
14
12
Km/h
10
8
6
4
2
0
MIN
23
BODYWORX
BODY WORX