1
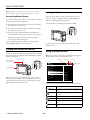
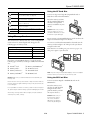
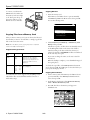
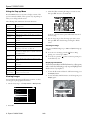
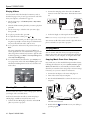
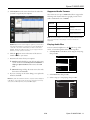
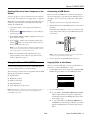
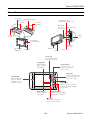
Epson P-3000/P-5000
Viewer Parts
SD card slot
CompactFlash card slot
Memory card
access light
CF card slot
Host USB connector
(for camera, flash drive, etc.)
eject button
Device USB
connector
A/V Out connector
(for computer)
Headphone
connector
Rubber
cover
Power switch
with Hold function
.
BATT
AC adapter
connector
Liquid Crystal
Display (LCD)
Battery cover
Strap hook
Reset button
Speaker
4-way ring
Press to select a photo
or navigate the menus
Charge light
Green for battery
charging; orange
for problems
Zoom buttons
Press to zoom in or out,
or adjust the volume for
music or video
OK button
Activity light
Press to select an option,
open a folder or photo, or
play music or video
OK
Flashes blue during
power on, printing,
file transfer, and
computer connection
Back
Charge
Menu
Display
Back button
Press to cancel your selection
or return to the previous display
or menu item
Menu button
Display button
Press to display a
pop-up menu.
Press to change the display
or view photo information
button
Press to select a file or rate
a photo from 1 to 5 stars
9/06
Epson P-3000/P-5000 - 1
Epson P-3000/P-5000
Interface
Specifications
USB connector
Two high-speed USB 2.0 (Mass Storage
Class) interfaces: Standard A, Mini-B
General
CPU
TMS320DM320
A/V Out
connector
Quadrupole mini pin jack (3.5 mm)
LCD
4.0 inches, Epson Photo Fine Ultra TFT
LCD; 640 × 480 pixels; 16,770,000 colors
Headphone Out
connector
Quadrupole mini pin jack (3.5 mm)
Memory
64MB SDRAM; 4MB flash ROM
CF Card slot
HDD
2.5 inch HDD
40GB (P-3000); 80GB (P-5000)
One slot (Type I/Type II, 3.3V) for
CompactFlash memory card and
Microdrive
SD Card slot
Dimensions
(without
projections)
Height
3.5 inches (88.7 mm)
One slot for SD memory card and
MultiMediaCard
Width
5.9 inches (150 mm)
Depth
1.3 inches (33.1 mm)
Weight
Approx. 15.0 oz (426 g), including battery
Temperature
Operating (or charging): 41 to 95 °F
(5 to 35 °C)
Non-operating: –4 to 140 °F
(–20 to 60 °C)
Altitude
Operating: 10,000 ft (3048 m) max.
Non-operating: 40,000 ft (12,192 m) max.
Humidity
(without
condensation)
Operating: 30 to 80%
Non-operating: 10 to 80%
Memory card
CompactFlash memory card (Type I/
Type II, including Microdrive™); SD™
memory card, SD High-Capacity Card,
MultiMediaCard,™ MultiMedia Card Plus
Battery
Rechargeable lithium-ion battery
Model
D111A
Size
(H × W × D)
0.88 × 0.80 × 2.78 inches
(22.45 × 20.4 × 71 mm)
Ratings
3.7 V, 2600 mAH
Temperature
Storing: –4 to 104 °F
(–20 to 60 °C)
Keep the battery in a cool place when
storing for a long period.
AC Adapter
Note: A commercially available CF adapter is
needed to use other memory cards.
Power sources
Type
Lithium-ion battery (D111A)
AC adapter (A351H)
Model
A351H
Input
AC 100 to 240 V, 50 to 60 Hz, 0.3 to 0.1 A
Output
DC 5.0 V, 2.3 A
Power
consumption
Maximum 18 W
Replacement Battery
Electrical
Input voltage
DC 5.0 V
Rated current
Maximum 2.3 A
Power
consumption
4 W (using the battery only)
9 W (using the AC adapter)
2 - Epson P-3000/P-5000
If you need a replacement battery, order the lithium ion
battery (D111A), product code B32B818262, from an
authorized Epson reseller. To find the nearest reseller, call
800-GO-EPSON (800 463-7766). Or you can purchase
online at www.epsonstore.com (U.S. sales) or www.epson.ca
(Canadian sales)
9/06
Epson P-3000/P-5000
4. Push the latch down. The battery pops out.
Installing/Replacing the Battery
Follow these steps to install or replace the Lithium ion battery:
1. Turn the viewer upside down and slide the battery cover to
the right to open it.
5. Pull out the battery. Then close the battery cover.
BAT
T.
2. If you need to remove the battery, follow the instructions
below, then return here to step 3.
3. Insert the battery into the compartment in the direction of
the arrow on the battery.
Charging the Battery
After installing the battery, you need to charge it using the AC
adapter. It takes about 3.5 hours to fully charge the battery
when the viewer is off, and longer when the viewer is on.
The Charge light is green while the battery is being charged.
When the battery is fully charged, the light turns off.
To charge the battery, connect the AC adapter as shown
below. Connect the other end to the power cord, and plug it
into an electrical outlet.
4. Close the battery cover and slide it to the left until it clicks.
BAT
T.
Caution: Do not connect the AC adapter when the battery is not
installed; this can damage the viewer.
Removing the Battery
The battery status is displayed in the top right corner of the
LCD screen when the viewer is on.
If you need to replace the battery or plan to store the viewer
for an extended period of time, follow these steps to remove
the battery:
:
Battery is fully charged.
:
Battery power is about half full.
:
Battery power is low.
:
Battery power is running out. The viewer will shut down
automatically. Charge the battery using the AC adapter.
:
Battery is charging.
1. Make sure the viewer is turned off.
2. Remove the AC adapter if it is connected to the viewer.
Caution:
Never remove the battery while the viewer is turned on. Doing so
may cause files to be lost or damaged.
3. Open the battery cover.
9/06
Epson P-3000/P-5000 - 3
Epson P-3000/P-5000
Note: The battery may become hot when the viewer is operated
during charging. Charging will stop until the battery cools down.
Locking the Buttons
Conserving Battery Power
You can lock the buttons on the viewer. This allows you to
place it in a purse or backpack and use it with headphones
without accidentally pressing the buttons.
To conserve battery power and protect the LCD screen, the
viewer has three power-saving features.
To lock the buttons, slide the power switch to Hold.
❏ The LCD screen turns dark after one minute of inactivity.
Press any button to turn it on.
❏ The LCD screen turns off after five minutes of inactivity.
Press any button to turn it on.
Hold
❏ The viewer turns off automatically after 10 minutes of
inactivity. Slide down the power switch to turn it back on.
When the AC adapter is connected, the viewer plays a
screen saver instead of turning off.
You can adjust the timing for all power-saving modes by
selecting Power Save in the Settings menu.
To unlock the buttons, slide the power switch back to the
middle position.
Turning the viewer On and Off
Using the Home Screen
To turn on the power, slide the power switch down as shown
below, then release it. The blue activity light flashes and the
Home screen appears.
Whenever you turn on the viewer, the Home screen appears.
All operations can be started from this screen.
Hold icon
Memory card
access light
SD icon
Battery icon
Home
Hold
CF icon
My Music
View Rated Files
Activity light
My Videos
My Photos
When you’re ready to turn off the viewer, make sure the
memory card access light is off. Then slide the power switch
down and hold it down for a few seconds until the activity
light flashes and the viewer turns off.
Backup Files
20122006.001
Memory Card
19122006.002
USB Device
19122006.001
Settings
18122006.001
17122006.001
The following table summarizes the Home Screen functions:
Icon
Function
Battery icon
Indicates the remaining charge in the battery. See
page 3.
CF icon
Indicates that a CompactFlash memory card is
inserted.
SD icon
Indicates that an SD memory card is inserted.
Hold icon
Indicates that the buttons are locked. See page 4.
My Music
Listen to music copied from your computer. See
page 10.
View Rated
Files
4 - Epson P-3000/P-5000
9/06
View files that you have rated with one or more
stars.
Epson P-3000/P-5000
Icon
Using the CF Card Slot
Function
My Videos
View folders and play videos that you have copied
into the Videos folder. See page 10.
My Photos
View folders and files that you have copied into
the Photos folder. See page 8.
Backup Files
View folders and files backed up from memory
cards or USB devices.
Memory Card
View files on memory cards or copy the files to the
viewer. See page 6.
USB Device
Copy files to or from a USB device. See page 13.
Settings
Check and adjust viewer settings.
You can use Type I and Type II CompactFlash cards or
Microdrive cards in the CF Card slot.
Insert the memory card into
the slot with the label facing
the LCD. Then push the
memory card all the way into
the slot.
Caution: Make sure you insert
memory cards in the correct
orientation. Otherwise, the card
and viewer may be damaged.
Using Memory Cards
If you are using a CompactFlash adapter, put the card into the
adapter and insert the adapter into the slot.
The viewer has two memory card slots, one for CompactFlash
cards, and one for Secure Digital cards. It supports the
following types of memory cards:
Memory card type
Maximum Capacity
CompactFlash Card (Type I and Type II)
8GB
Microdrive
4GB
SD (Secure Digital) and SD High Capacity Card
2GB
MultiMedia Card and Multimedia Card Plus
1GB
To remove a card from the CF Card slot, first make sure the
memory card access light is off. Then press the eject button
and pull out the card.
If the button is not sticking out, press it once to pop it out,
then press it again to eject the card.
If you have a CompactFlash adapter, you can also use the
following types of memory cards (up to 8GB) in the CF Card
slot:
❏ miniSD™ Card
❏ Memory Stick PRO Duo™
❏ Memory Stick™
❏ xD-Picture Card™
❏ Memory Stick Duo™
❏ SmartMedia Card
❏ Memory Stick PRO
❏ RS-MMC Card
™
Note: If you are using a CompactFlash adapter, remove the adapter
from the viewer; do not remove only the memory card.
Caution: Make sure you follow all instructions included with your
memory card.
Using the SD Card Slot
You can use Secure Digital or MultiMedia cards in the
SD Card slot.
Never remove a memory card or shake or drop the viewer while the
memory card access light is flashing. Doing so may cause files to be
lost or damaged.
Insert the memory card
into the slot with the label
facing the LCD. Then
push the memory card all
the way into the slot.
Do not put labels or stickers on memory cards. The sticker may peel
off, preventing the card from being ejected and damaging the viewer.
Avoid using or storing cards in direct sunlight, or in places that are
extremely hot, humid, or dusty.
Caution: Make sure you
insert memory cards in
the correct orientation.
Otherwise, the card and
viewer may be damaged.
9/06
Epson P-3000/P-5000 - 5
Epson P-3000/P-5000
To remove a card from the
Copying All Files
SD Card slot, first make sure
1. Insert the memory card.
the memory card access light
is off. Then press the top of
the card to make it pop up.
Pull the card out of the slot.
If the Memory Card Menu doesn’t open automatically,
select Memory Card in the Home screen, then press OK.
You see the following menu:
Memory Card
CF Memory Card Backup
Browse CF Memory Card
SD Memory Card Backup
Copying Files from a Memory Card
Browse SD Memory Card
After you insert a memory card, you can browse the files and
decide what you want to do with them, or simply copy all the
files on the card to the viewer.
2. Select CF Memory Card Backup or SD Memory Card
Backup. Then press OK.
Note: When the battery is low, copying may not be completed.
Use the AC adapter if this happens.
The files are copied to a folder that is automatically created
in the Backup Files folder on the viewer. The folder is
named according to the date and the date format you
selected, for example, 12252006.001. Folders are numbered
in the order they are copied.
Supported Image Formats
Supported
Files
Extension
Details
JPEG
.jpg
.jpeg
Minimum size: 72 × 72 pixels
Maximum size: 30 megapixels
Maximum image aspect ratio: 3:1
Progressive JPEG files are not
supported.
RAW
.nef
.crw
.erf
.cr2
.arw
If you want to change the name, see the User’s Guide for
instructions.
When the backup is complete, you see thumbnail images of
the copied photos.
To check the copied files, select Backup Files in the Home
screen, then press OK. Press OK again to select the folder you
just copied and display the files.
.dng JPEG data stored in the header of RAW
.mrw files is displayed.
.orf
.pef
Copying Selected Files
1. Insert a memory card. If the Memory Card Menu doesn’t
open automatically, select Memory Card in the Home
screen, then press OK.
For DNG files, the viewer supports only the JPEG preview
embedded in files saved with Adobe DNG Converter or
Adobe Photoshop.®
2. In the Memory Card menu, select Browse CF Memory
Card or Browse SD Memory Card.
3. Press OK. The files on the memory card appear in
thumbnail view.
Vista.JPG
6 - Epson P-3000/P-5000
9/06
Epson P-3000/P-5000
4. Press the Menu button to display the pop-up menu.
Folder is set as
screen saver
5. Select Backup, then press OK. Small white check boxes
appear on each thumbnail image.
My Photos
Private
folder
PV
01002000
Check
box
2006.1217
2006.1205
2006.1201
Vista.JPG
❏ By default, unsupported files are not displayed.
6. Use the 4-way ring to highlight each photo you want to
copy, then press the
button to select it. The selected
items are displayed with red check marks.
❏ Thumbnails of video files that have not been played back,
or have not been played back completely, are displayed with
( ) or
( ) respectively (not shown in minithumbnail view).
7. When you are finished selecting photos, press OK. The files
are copied to a folder that is automatically created in the
Backup Files folder on the viewer.
❏ Thumbnails of folders that have been backed up on
your computer in Backup Files are displayed with the
icon.
Viewing Photos
❏ Files in unsupported formats or with names that contain
unsupported characters may be displayed as “?”, and may
not be accessible.
After you have copied files from a memory card, you can view
or play them in various ways on your viewer or on a TV or
projector.
Changing the Display
You can change the file view by pressing the Display button
while in a folder.
Using the Viewer Screen
The following illustrations identify the icons that appear on
the screen:
Thumbnails
(12 per screen)
Rated file
My Photos/2006.1205
EPV2014.JPG
EPV2171.JPG
EPV2242.JPG
EPV2269.JPG
EPV2273.JPG
EPV2279.JPG
EPV2283.JPG
EPV2314.JPG
EPV0013.TXT
EPV2619.JPG
EPV2620.JPG
EPV0480.MP3
Down the Black
Beaches
Mini-thumbnails
(64 per screen)
Locked
file
Unsupported
file format
Music
file
Details
(file name, date modified, and
file size)
9/06
My Photos
Epson P-3000/P-5000 - 7
Epson P-3000/P-5000
Using the Pop-up Menu
3. Select the folder containing the images you want to view,
then press OK. You see a screen like this:
Press the Menu button at any time to display a menu of the
options currently available. These options vary, depending on
what you are doing with the viewer.
The following table summarizes the menu functions:
Audio Track
Setting
Selects the audio track for DivX videos that have
multiple tracks.
Copy/Move
Copies or moves files or folders.
Delete
Deletes files or folders.
Display mode
Selects modes for various types of videos.
Display photo
enhance
Displays photo images using a wider color gamut.
See page 9.
Edit
Locks files or folders, renames folders, or rotates
photos.
Rating
Rates files from one to 5 stars.
Photo Print
Prints photo images.
Play Settings
Sets the display size for videos, or returns to the
beginning of the video. See page 10.
Settings
To move to the next screen, press and hold the bottom of
the 4-way ring.
4. Use the 4-way ring to select the image you want to view,
then press OK. The selected image is enlarged to fill the
screen.
Zooming an Image
You can zoom RAW images up to 100% and JPEG images up
to 400%.
Adjusts LCD brightness, turns the key beep on or
off, and sets display options for private folders and
unsupported files.
Set as Screen
Saver
Creates a screen saver from the images in a folder.
Slide Show
Starts displaying the images in a folder as a slide
show.
Sort
Organizes the files in a folder by date, name, or file
extension.
Subtitle Setting
Selects subtitles for DivX videos that include them.
Video Print
Prints video images.
Wallpaper and
Icon Settings
Selects an image to be used as background for a
folder or the Home screen.
❏ To zoom in on an image, press the
pressing it to zoom in up to 400%.
❏ To zoom out, press the
zoom all the way out.
button. Continue pressing it to
Displaying Information
You can view metadata and Exif information, a histogram,
and a visual alert indicating poorly exposed highlight and
shadow areas of your photos.
1. To view the file name and date for a full-screen image, press
the Display button.
2. To view metadata, Exif information, and a histogram, press
Display again:
Viewing Images
You can display the images at full screen, zoom in, or show
several types of photographic information.
1. Use the 4-way ring to select My Photos or Backup Files.
Home
My Music
View Rated Files
28/12/2006
My Videos
My Photos
2006.1205
Backup Files
sample
Memory Card
USB Device
Settings
2. Press OK.
8 - Epson P-3000/P-5000
button. Keep
9/06
12:30:08
Epson P-3000/P-5000
3. To view the over- and under-exposure preview, press
Display a third time:
Viewing Videos
The viewer supports video files in resolutions ranging from
320 × 240 pixels to 720 × 576 pixels, with file sizes up to
2GB.
Supported video formats
File
format
Video codec
Audio codec
Detail
.avi
MPEG-4
(Advanced Simple
Profile)
AAC,
G.711,
PCM,
ADPCM
30 fps: 720 × 480
25 fps: 720 × 576
8 Mbps (peak)
4 Mbps (avg.)
Motion JPEG
G.711,
PCM,
ADPCM
30 fps: 720 × 480
25 fps: 720 × 576
60 fps: 320 × 240
.avi
.divx
DivX (Home
Theater Profile)
MPEG Audio,
PCM,
ADPCM
30 fps: 720 × 480
25 fps: 720 × 576
8 Mbps (peak)
4 Mbps (avg.)
.mov
MPEG-4
(Advanced Simple
Profile)
AAC, PCM
Motion JPEG
G.711, PCM,
ADPCM
.mp4
MPEG-4
(Advanced Simple
Profile)
AAC, PCM
.mov
.mp4
.m4v
H.264/AVC
(Baseline Profile
Level 1.2)
AAC, PCM
.wmv
Windows® Media
Video 9 (MP@LL)
Windows
Media Audio
9/9.1
.mpg
.mpeg
MPEG1 MPEG2
(MP@ML)
PCM, MPEG
Audio
.vob
.mod
MPEG2 (MP@ML)
PCM, MPEG
Audio
.asf
MPEG-4
(Advanced Simple
Profile)
ADPCM
In the preview, poorly exposed highlight and shadow areas
show graduated tone reversal. The brightest 6% of the
image shows 4 levels of black, and the darkest 6% shows 4
levels of white.
4. To return to normal display, press the Display button
again.
Displaying a Wider Color Gamut
Images are displayed in the color space they were captured in:
either sRGB or AdobeRGB. You can also display images in a
wider color gamut and correct color casts, backlighting,
underexposure, and low-contrast images with Display Photo
Enhance.
Note: Display Photo Enhance affects only the image shown on the
viewer, and does not change the file itself. The Menu, Display,
,
, and
buttons are not available in this mode.
1. When you are viewing a full-screen image, press Menu and
select Display Photo Enhance. You can use the 4-way ring
to view the next or previous photo in Display Photo
Enhance.
2. To return to the normal display, press Back.
30 fps: 720 × 480
25 fps: 720 × 576
8 Mbps (peak)
4 Mbps (avg.)
30 fps: 720 × 480
25 fps: 720 × 576
60 fps: 320 × 240
30 fps: 720 × 480
25 fps: 720 × 576
8 Mbps (peak)
4 Mbps (avg.)
30 fps: 320 × 240
850 kbps (peak)
768 kbps (avg.)
30 fps: 352 × 288
850 kbps (peak)
768 kbps (avg.)
30 fps: 720 × 480
25 fps: 720 × 576
10 Mbps (peak)
8 Mbps (avg.)
30 fps: 720 × 480
25 fps: 720 × 576
10 Mbps (peak)
8 Mbps (avg.)
30 fps: 720 × 480
25 fps: 720 × 576
8 Mbps (peak)
4 Mbps (avg.)
Note: DVD-Video, DivX menu, and WMV DRM are not supported.
9/06
Epson P-3000/P-5000 - 9
Epson P-3000/P-5000
Playing Videos
2. Connect the mini-plug on the other end to the A/V Out
connector on the side of the viewer. The LCD screen turns
off.
You can transfer video files directly from memory cards as
described on page 6. Or you can copy and convert video files
from your computer, as described on page 13.
1. Use the 4-way ring to select Backup Files or My Videos,
then press OK.
2. Select the folder containing the video you want to play, then
press OK.
3. Use the 4-way ring to select the video you want to play,
then press OK.
❏ To play or pause the video, press OK.
❏ To adjust the audio volume, press
3. Set the TV display to video input from the viewer.
or
.
Note: Some TVs may crop your images on the top and bottom.
❏ To rewind or fast-forward, press left or right on the 4-way
ring. Press repeatedly to increase the speed. (This function
may not work with some videos, such as .mov).
You can now use all of the viewer controls to play slide shows,
photos, and videos on your TV or projector.
❏ To stop the video and return to the previous screen, press
Back.
Playing Music
The viewer remembers where you stopped. When you
resume, playback starts 3 seconds before the stop point (for
videos longer than 1 minute). If you want to play the video
from the beginning, press Menu, select Play Settings, then
select Play from Beginning.
You can transfer audio files from your computer and play
them on the viewer. You can create playlists using the Epson
Link2 software on your computer, or using the viewer itself.
Copying Music From Your Computer
❏ To view information about the video, press Display. You
see a progress bar on the video. Press Display again to view
information including frame rate, bit rate, and video and
audio codecs:
First, make sure you have installed the Epson Link2 software,
following the instructions in your P-3000/P-5000 Basics guide.
WMA and WAV files are automatically converted to M4A
when they are transferred. You can specify conversion settings
if necessary; see your User’s Guide for instructions.
1. Connect the AC adapter to the viewer and plug it in.
2. Turn on the viewer and your computer.
:15/12/2006 12:24
3. Use the included USB cable to connect the viewer to your
computer.
Viewing Files on a TV
You can connect the viewer to a TV or AV projector and view
your images, videos, and slide shows.
You’ll need a camcorder AV cable (3.5 mm mini-plug to
3 RCA plugs), available at many electronics stores.
Larger end
1. Connect the three RCA plugs to the video and audio IN
jacks on your TV or projector.
Smaller end
The LCD screen turns off.
4. Double-click the
Epson Link2 icon on your desktop to
open the program.
10 - Epson P-3000/P-5000
9/06
Epson P-3000/P-5000
Supported Audio Formats
5. Click My Music on the screen, then locate the audio files
you want to copy from your computer.
The viewer can store up to 10,000 audio files. It supports the
following audio formats without copyright protection and
with a maximum file size of 100MB:
Audio file
extensions
Audio codec
Details
.m4a
AAC (MPEG4)
.mp3
MP3 (MPEG 1/2/2.5 Layer 3)
Maximum bit rate:
320 kbps
(48 kHz, 16 bit Stereo)
.wma
Windows Media Audio 9
Bit rate: 48 to 192 kbps
(48kHz, 16 bit Stereo)
Note: The viewer supports non-lossless-compliant M4A and WMA
files. Some files may not be played, even if the formats are
supported.
Playing Audio Files
Caution: Epson Link2 uses ID3 tags to organize your music files.
If the ID3 tag information is missing, these items will appear as
“unknown.” The viewer will rename your files to make them
playable. Always keep backup copies of your songs, and never
transfer your only copies to the viewer.
You can connect headphones to the
jack on top of the
viewer, or listen through the viewer’s built-in speaker.
1. Select My Music on the Home screen using the 4-way ring,
then press OK.
6. Click the
down arrow in the center of the screen to
transfer the files to your viewer.
Home
7. Disconnect the viewer from your computer:
❏ Windows: Right-click the icon in the lower right corner
of your screen and select Safely Remove Hardware or
Unplug or Eject Hardware. Then remove the USB
cable.
My Music
Music List
View Rated Files
Resume
My Videos
❏ Macintosh: Drag and drop the viewer icon to the trash,
then remove the USB cable.
My Photos
Backup Files
8. If you see a message on the viewer asking you to update the
music list, click OK.
2. Select Music List, then press OK.
3. Select a category to start playing, then press OK.
Note: Only audio files transferred from a computer can be displayed
in My Music. If you want to play a music file copied from a memory
card, select it in Backup Files, then press OK to play it.
My Music
Artist
Album
Genre
All
Playlist
Update Music List
9/06
All
Agians
Alimia
Andy Wells
Auidence Effects
Beaches
BOYS
Butterflies
Cindy Jackson
David Blues
Elvis Cole
JACKIE6
James Walter
johon jones
Micheal Pole
MOON 608
Epson P-3000/P-5000 - 11
Epson P-3000/P-5000
Backing Up Files to Your Computer
4. Select the desired track using the 4-way ring, then
press OK.
You can back up files to your computer automatically or
manually.
1. Double-click the
open the program.
Epson Link2 icon on your desktop to
00001/00568
You can do the following while listening to music or audio
files.
❏ To play or pause music, press OK.
❏ To adjust the volume, press
or
.
❏ To skip back or forward, press left or right on the 4-way
ring. Press and hold to rewind or fast-forward.
❏ To return to the previous screen (without stopping the
audio), press Back. (If you are not in My Music, the audio
stops when you press Back.)
2. If you see a message that Epson Link2 has found files in
your viewer’s Backup Files folder, click Yes to back up the
files automatically.
❏ To display information about the audio file such as codec,
bit rate, and sampling rate, press Display.
Note:
Only files that haven’t already been copied will be
transferred.
Copying Files To and From Your
Computer
3. To transfer files manually, click the Backup icon on the
left side of the screen, then click the
icon in the
middle of the screen.
You can use the Epson Link2 software to back up files from
the viewer to your computer and copy files from your
computer to the viewer. Make sure you have installed the
software, following the instructions in your Epson P-3000/
P-5000 Basics guide.
All the files in the Backup Files folder of the viewer are
copied to your computer.
By default, the files are copied to the Epson Link2 Backup
folder in My Documents (Windows) or Documents
(Macintosh).
1. Connect the AC adapter to the viewer and plug it in. Then
turn on the viewer and your computer.
4. If a confirmation dialog box is displayed, select whether to
delete or keep the transferred files in the viewer.
2. Use the included USB cable to connect the viewer to your
computer, as shown on page 10. The LCD screen turns off.
Note: You can also select individual video or photo files to transfer
from the viewer to your computer. For instructions, click the ? in the
upper right corner of the Epson Link2 screen.
Note: Although your computer may recognize the viewer as a
removable drive, it is best to transfer files using the Epson Link2
software.
Caution: When the viewer is connected to a computer, do not
connect a USB device to the Host USB port on the viewer. Do not
change the names of any folders on the viewer from your computer,
or the viewer may become unusable.
12 - Epson P-3000/P-5000
9/06
Epson P-3000/P-5000
Copying Files From Your Computer to the
Viewer
Connecting a USB Device
Before you connect a USB device, connect the AC adapter to
the viewer and plug it in if possible. If your USB device has an
AC adapter, use it to prevent the possible loss of files during
transfer.
You can copy photos, videos, and music from your computer
to the viewer. For instructions on copying music, see page 10.
WMV files are automatically converted to MP4 when they are
transferred, and videos that exceed 2GB are automatically
divided into multiple files.
1. Open the connector cover on the side of the viewer.
2. Plug the device into the Host USB connector on the side of
the viewer.
1. Connect the viewer to your computer as described on
page 10.
2. Double-click the
open the program.
If the device has a USB cable, connect one end of the cable
to the device and the other end to the Host USB connector
on the viewer.
Epson Link2 icon on your desktop to
3. Select Photos, Videos, or Music, depending on the type of
files you want to transfer.
4. Select the files to transfer in the Computer window, then
click the
down arrow in the center of the screen. The
files are transferred to the viewer.
Note: You can also transfer files by dragging and dropping them
into the lower contents window. For more information, click the
? in the upper right corner of the Link2 screen.
5. When you are finished transferring files between your
computer and the viewer, make sure you disconnect the
viewer as described on page 11.
Note: To prevent a possible malfunction, do not use both USB
connectors on the viewer at the same time.
3. Turn on the viewer and the USB device if necessary.
Copying Files to the Viewer
Using the Viewer With USB Devices
After you connect a USB device, you can copy all the files to
the viewer, or select individual files to copy.
You can connect a flash memory drive or other USB device to
your viewer and copy files to or from the device.
1. On the Home screen, use the 4-way ring to highlight USB
Device, then press OK. You see the USB Device menu:
The viewer supports devices that are compatible with the USB
Mass Storage specification, including:
USB Device
❏ Digital cameras
❏ Flash memory drives
❏ Memory card readers
Backup USB device to Viewer
❏ External hard drives
Copy all Backup Files
Browse USB Device
❏ Epson multimedia storage viewers
Note: USB hubs are not supported, and some USB devices may not
work without a power connection. Epson cannot guarantee the
compatibility of any device.
2. Do one of the following:
❏ To copy all files, select Backup USB device to Viewer,
then press OK. The files are copied to a folder that is
automatically created in the Backup Files folder on the
viewer. Skip to step 7.
❏ To copy selected files, select Browse USB Device in
the USB Device menu, then press OK. You see your files
displayed in thumbnail view. Continue with the steps
below.
9/06
Epson P-3000/P-5000 - 13
Epson P-3000/P-5000
3. Press the Menu button.
3. Press the Menu button to display the pop-up menu.
4. Select Backup, then press OK. Small white check boxes
appear on each thumbnail image.
My Photos/2006.1205
Copy/Move
Edit
Rate
EPV2014.JPG
EPV2171.JPG
EPV2242.JPG
Sort
Photo Print
Wallpaper and Icon Settings
Slide Show
EPV2273.JPG
EPV2279.JPG
EPV2283.JPG
Settings
Return to HOME
Delete
5. Use the 4-way ring to highlight each file you want to copy,
then press the
button to select it. The selected items are
displayed with red check marks.
6. When you are finished selecting files, press OK.
EPV0013.TXT
7. The files are copied to a folder that is automatically created
in the Backup Files folder on the viewer.
EPV2619.JPG
EPV2620.JPG
EPV2269.JPG
EPV2314.JPG
Down the Black
Beaches
EPV0480.MP3
4. Select Copy/Move, then press OK.
8. Wait until all the files are copied, then disconnect the USB
device.
5. Select Copy to USB Device, then press OK.
❏ If you selected a folder, all the files are copied to the
USB device. Wait until all the files are copied, then
disconnect the device.
Copying Files to the USB Device
You can copy all the files or selected files from the viewer to a
USB device.
❏ If you selected an individual file, you see your photos
displayed with white check boxes.
If your USB device has an AC adapter, connect the adapter
and plug it in before starting.
Continue with steps 6 and 7 below.
6. Use the 4-way ring to highlight each photo you want to
copy and press to select it. The selected items are
displayed with red check marks.
Backing Up All Files to a USB Device
This process may take some time, depending on the volume of
data in the viewer.
7. When you are finished selecting photos, press OK. Your files
are copied to the USB device. When the copy is complete,
you can disconnect the device.
1. Follow the instructions on page 13 to connect the USB
device.
2. On the Home screen, use the 4-way ring to highlight USB
Device, then press OK.
Resetting the Viewer
3. In the USB Device menu, select Copy all Backup Files.
If the viewer locks up, stops working, or you want to restore
its default settings, you can reset it.
USB Device
Gently insert the end of a paper clip into the Reset button
next to the viewer’s USB ports.
Backup USB device to Viewer
Browse USB Device
Copy all Backup Files
4. Press OK, then wait while the files are copied.
Copying Selected Files to a USB Device
1. Follow the instructions on page 13 to connect the USB
device.
The viewer shuts off, resets to its defaults and comes back on.
2. Select the file or folder you want to copy.
Related Documentation
CPD-22470
Epson P-3000/P-5000 Basics
Epson P-3000 or P-5000 User’s Guide
installed with the viewer software
14 - Epson P-3000/P-5000
9/06