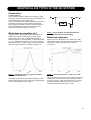
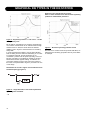
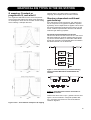
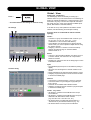
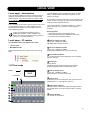
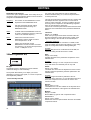
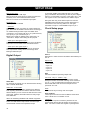
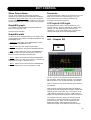
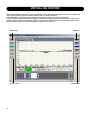
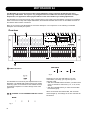
1
IMPORTANT SAFETY INSTRUCTIONS
The lightning flash with an arrowhead symbol within an
equilateral triangle, is intended to alert the user to the
presence of uninsulated “dangerous voltage” within the
product’s enclosure that may be of sufficient magnitude to
constitute a risk of electric shock to persons.
The exclamation point within an equilateral triangle is
intended to alert the user to the presence of important
operating and maintenance (servicing) instructions in the
literature accompanying the product.
1
2
3
4
5
6
7
8
9
Read these instructions.
Keep these instructions.
Heed all warnings.
Follow all instructions.
Do not use this apparatus near water.
Clean only with dry cloth.
Do not block any ventilation openings. Install in accordance with the manufacturer's instructions.
Do not install near any heat sources such as radiators, heat registers, stoves, or other apparatus (including amplifiers) that produce heat.
Do not defeat the safety purpose of the polarized or grounding-type plug. A polarized plug has two blades with one wider than the other. A
grounding type plug has two blades and a third grounding prong. The wide blade or the third prong are provided for your safety. If the provided
plug does not fit into your outlet, consult an electrician for replacement of the obsolete outlet.
10 Protect the power cord from being walked on or pinched particularly at plugs, convenience receptacles, and the point where they exit from the
apparatus.
11 Only use attachments/accessories specified by the manufacturer.
12
Use only with the cart, stand, tripod, bracket, or table specified by the manufacturer, or sold with the apparatus. When a cart is used,
use caution when moving the cart/apparatus combination to avoid injury from tip-over.
13 Unplug this apparatus during lightning storms or when unused for long periods of time.
14 Refer all servicing to qualified service personnel. Servicing is required when the apparatus has been damaged in any way, such as powersupply cord or plug is damaged, liquid has been spilled or objects have fallen into the apparatus, the apparatus has been exposed to rain or
moisture, does not operate normally, or has been dropped.
Warning!
•
To reduce the risk of fire or electrical shock, do not expose this equipment to dripping or splashing and ensure that no objects filled with liquids,
such as vases, are placed on the equipment.
•
This apparatus must be earthed.
•
Use a three wire grounding type line cord like the one supplied with the product.
•
Be advised that different operating voltages require the use of different types of line cord and attachment plugs.
•
Check the voltage in your area and use the correct type. See table below:
•
•
•
•
•
Voltage
Line plug according to standard.
110-125V
UL817 and CSA C22.2 no 42.
220-230V
CEE 7 page VII, SR section 107-2-D1/IEC 83 page C4.
240V
BS 1363 of 1984. Specification for 13A fused plugs and switched and un-switched socket outlets.
This equipment should be installed near the socket outlet and disconnection of the device should be easily accessible.
To completely disconnect from AC mains, disconnect the power supply cord from the AC receptable.
The mains plug of the power supply shall remain readily operable.
Do not install in a confined space.
Do not open the unit - risk of electric shock inside.
Caution:
You are cautioned that any change or modifications not expressly approved in this manual could void your authority to operate this equipment.
Service
•
There are no user-serviceable parts inside.
•
All service must be performed by qualified personnel.
a
IMPORTANT SAFETY INSTRUCTIONS
This equipment has been tested and found to comply with the limits for a Class B Digital device, pursuant to part 15 of the FCC rules.
These limits are designed to provide reasonable protection against harmful interference in residential installations. This equipment
generates, uses and can radiate radio frequency energy and, if not installed and used in accordance with the instructions, may cause harmful interference to radio communications. However, there is no guarantee that interference will not occur in a particular installation.
If this equipment does cause harmful interference to radio or television reception, which can be determined by turning the equipment off and on, the
user is encouraged to try to correct the interference by one or more of the following measures:
•
•
•
•
Reorient or relocate the receiving antenna.
Increase the separation between the equipment and receiver.
Connect the equipment into an outlet on a circuit different from that to which the receiver is connected.
Consult the dealer or an experienced radio/TV technician for help.
Caution:
You are cautioned that any change or modifications not expressly approved in this manual could void your authority to operate this equipment.
For the customers in Canada:
This Class B Digital apparatus meets all requirements of the Canadian Interference-Causing Equipment Regulations ICES-003.
Cet appareil numérique de la classe B respecte toutes les exigences du Réglement sur le matériel brouilleur du Canada.
This Class B digital apparatus complies with Canadian ICES-003. Cet appareil numérique de la classe B est conforme à la norme NMB-003 du Canada.
Certificate Of Conformity
TC Electronic A/S, Sindalsvej 34, 8240 Risskov,
Denmark, hereby declares on own responsibility that
following products:
EQ Station & Motofader 64
- that are covered by this certificate and marked with
CE-label conforms with following standards:
EN 60065
(IEC 60065)
Safety requirements for mains
operated electronic and related
apparatus for household and similar
general use
EN 55103-1
Product family standard for audio,
video, audio-visual and entertainment
lighting control apparatus for
professional use. Part 1: Emission.
EN 55103-2
Product family standard for audio,
video, audio-visual and entertainment
lighting control apparatus for
professional use. Part 2: Immunity.
With reference to regulations in following directives:
73/23/EEC, 89/336/EEC
Issued in Risskov, December 2003
Mads Peter Lübeck
Chief Executive Officer
b
TABLE OF CONTENTS
introduction
Motofader 64
Introduction
Important Safety Instructions &
Certificate of Conformity . . . . . . . . . . . . . . . . .a-b
Table of Contents . . . . . . . . . . . . . . . . . . . . . . . .3
Introduction . . . . . . . . . . . . . . . . . . . . . . . . . . . . .4
Quick Setup Reference . . . . . . . . . . . . . . . . . . .5
Front Panel Description . . . . . . . . . . . . . . . . . . .8
Rear Panel Description . . . . . . . . . . . . . . . . . . .10
Introduction . . . . . . . . . . . . . . . . . . . . . . . . . . . .44
Overview . . . . . . . . . . . . . . . . . . . . . . . . . . . . . .44
Operation . . . . . . . . . . . . . . . . . . . . . . . . . . . . .44
Store & Recall . . . . . . . . . . . . . . . . . . . . . . . . . .47
Processing & Application Overview
Processing Overview . . . . . . . . . . . . . . . . . . . .12
Graphical EQ Types . . . . . . . . . . . . . . . . . . . . .13
Operation -Guide
Global View . . . . . . . . . . . . . . . . . . . . . . . . . . . .17
Local View
1-8 Thru mode . . . . . . . . . . . . . . . . . . . . . . . . .19
Mix/Matrix mode . . . . . . . . . . . . . . . . . . . . . . . .20
Editing
Delay Limiter . . . . . . . . . . . . . . . . . . . . . . . . . . .21
Parametric EQ . . . . . . . . . . . . . . . . . . . . . . . . .22
Graphic EQ . . . . . . . . . . . . . . . . . . . . . . . . . . . .23
Three Band Dynamic EQ . . . . . . . . . . . . . . . . .24
Paradyn . . . . . . . . . . . . . . . . . . . . . . . . . . . . . .25
Control Section
General Operation . . . . . . . . . . . . . . . . . . . . . .26
Store . . . . . . . . . . . . . . . . . . . . . . . . . . . . . . . . .27
Recall . . . . . . . . . . . . . . . . . . . . . . . . . . . . . . . .28
Setup Page . . . . . . . . . . . . . . . . . . . . . . . . . . . .29
Utility Page . . . . . . . . . . . . . . . . . . . . . . . . . . . .33
Edit Control
All Graphic EQ . . . . . . . . . . . . . . . . . . . . . . . . .35
Group Graphic EQ . . . . . . . . . . . . . . . . . . . . . .35
Copy Paste Function . . . . . . . . . . . . . . . . . . . .36
Network
EQ Station in a Local Area Network (LAN) . . .37
Updating EQ Station Software . . . . . . . . . . . . .39
VirtualEQ Station
Overview . . . . . . . . . . . . . . . . . . . . . . . . . . . . . .40
Operation . . . . . . . . . . . . . . . . . . . . . . . . . . . . .41
MISCELLANEOUS
Technical Specifications . . . . . . . . . . . . . . . . . .42
MIDI Implementation . . . . . . . . . . . . . . . . . . . . .43
TC Electronic, Sindalsvej 34, DK-8240 Risskov
[email protected]
EQ Station
English version
Rev 2.01 - SW 2.20
Prod. No. 606109114
3
INTRODUCTION
"No compromise"........... could be the headline for EQ Station, while all components, both hardware and
software, are simply as good as it gets. The extreme conditions a live product are operated in due to heat,
moisture and humidity, and the high demands for sonic performance and wide dynamic range, simply means
that nothing but the best is good enough - and that is what you get with EQ Station.
This is of course a phrase often heard, but we believe that the many years of TC hardware and software
experience and knowledge that has been put into the EQ Station, makes this a true statement and we really
hope you will find the system useful and enjoyable.
EQ Station is a high-end live-EQ that combines the best quality processing with user-friendly control. EQ
Stations come in 4 and 8 channel configurations, all in a two rack-space box with the brightest color display
ever seen on a 19" device for pro audio applications.
Combined with the Motofader 64 flying-fader remote and a full TCP/IP based VirtualEQ Station for PC, the EQ
Station-solution is the next generation TC1128/6032 EQ-system solving any live-application, - from a complex
monitor system, Front Of House EQ or distributed Theater and Musical setup.
Main features in EQ Station:
•
•
•
•
•
•
•
•
•
•
•
•
•
6 band selectable shelving, parametric or notch filter EQ.
29 Band Graphic EQ - multiple types.
Lo cut
2 or 3 band Dynamic EQ
Delay (600mS)
Peak Limiter
Store/Recall of settings
TCP/IP based network
MIDI I/O
Bright color display
Intuitive front-panel operation
Optional Motofader 64 flying fader remote
VirtualEQ Station
Read through this operation manual to get more information about the specific features available in EQ
Station, or start to use the EQ Station right out of the box and get back to these pages in case you seek
answers to specific features.
Latest manual version can always be downloaded from www.tcelectronic.com
4
QUICK SETUP REFERENCE
... if you just need a quick basic setup guide.
Basic Analog setup
- with a single EQ Station
• Connect power and signal cables according to the
illustration above.
• Go to the Setup Page: I/O Configuration-Local I/O SetupI/O Mode and select “1-8 Thru” or “Mix/Matrix” according
to your application:
- 1-8 Thru - typical mode for monitor applications.
- Mix/Matrix - typical mode for Front Of house applications.
• Set relevant Inputs to Analog.
• Go to the Setup Page: I/O Configuration-ADA I/O
settings and set the ADA gain to match the connected
mixers Output.
5
QUICK SETUP REFERENCE
Network of 2 or more EQ Stations
......and setup the following:
• Rename all EQ Stations with different names such as;
EQS#1, EQS#2 etc. In EQ Station networks all units
must have unique names.
• Set Cluster. The Cluster defines a group of EQ Stations.
There can be more Clusters in a network. Per default the
Cluster is set to set to “A” - for this example, - leave all
EQ stations at this setting.
• Set Device Number on all EQ Stations. This number
specifies in which order channels will be assigned to
Cluster locations when you later perform a Cluster Auto
Setup - see example on adjacent page.
When a network of two or more EQ Stations is build all
channels must be assigned to a location in the Cluster
map found at the Global page.
A convenient “Auto Assign” function makes it very
easy to make a Cluster setup. Specific re-routing of
channels can always be made later.
• Connect power and audio connections according to the
previously described Setups.
• Connect also all EQ Stations via the RJ45 Link
connections using cross-coupled ethernet cables.
• Power on ALL units.
• On each unit, one by one: Go to the Setup-Network and
Device page....
• Set IP address. All EQ stations must have unique I/P
addresses. The default address in the EQ Station is set
to 192.168.1.100. Leave the first EQ Station at that
address. Change the next to 192.168.1.101 - and so
forth.
• The Subnet mask is per default set to 255.255.255.0
and should only be changed if you at a later stage
connect your EQ stations to a PC network that uses a
different Subnet mask.
- for the example on the adjacent page, - leave all EQ
Stations at 255.255.255.0.
Important!
You MUST ALWAYS reboot your EQ Stations after you
have changed:
•
•
•
•
Name
Device Numbers
IP Addresses
Subnet mask
..... before performing the Auto Setup described in the
following.
6
QUICK SETUP REFERENCE
Cluster Auto Setup
Now to the easy part.
• Enter the Global page on any unit; select: “I/O Settings”
and press OK
• Select “Auto Setup” and press OK.
If a Motofader 64 is connected to one of the EQ Stations, it
will be able to monitor and adjust Graphic EQ on all
available channels. The Motofader 64 can be connected to
the RS232 connection on any of the EQ Stations in the
network. If you have a network with 3 or more units, the
Motofader 64 should be connected to a unit in the middle
of the setup. This is to ensure optimal response between
EQ Station units and the Motofader 64.
Once connected and powered on the Motofader 64 will
access all available channels.
If you store a Scene preset, channel information from all
available channels will be stored and recalled in the EQ
Station where the preset is located.
Troubleshooting:
If you do not see the expected number of channels after an
“Auto Setup”:
- you have probably NOT given the EQ Stations different
device names, or
Depending on the configuration of each EQ Station the
channels are now assigned in the Cluster consecutively
and in the order defined by Device Numbers.
Example:
EQ Station with Device Number 1
EQ Station with Device Number 2
EQ Station with Device Number 3
: 4 channel version
: 4 channel version
: 8 channel version
- you have not given the EQ Stations device numbers, or
- you have not given the EQ Stations unique TCP/IP
numbers, or
- the Subnet Mask is not the same on all units
Primarily channels are sorted by Device Number.
However, if the Device Numbers are identical in the
different units, the channels are sorted by Device
Name.
You have given the three EQ Stations Device number 1, 2
and 3 and performed a Cluster Auto setup on the Global
page on one of the units..
In the Cluster the channels are now assigned according to
the table below:
Cluster Position
EQ Station
Device ID 1
Channels 1-2-3-4
EQ Station
Device ID 2
Channels 1-4
EQ Station 3
Device ID 3
Channels 1-8
1-2-3-4
5-6-7-8
9-10-11-12-13-14-15-16
7
FRONT PANEL
POWER On/Off
Heavy duty POWER switch. The EQ Stations auto sensing
power supply accepts 100 to 240V.
NETWORK
Indicates that network is established - as commonly seen
on network connection cards.
ACTIVITY
Indicates network activity - as commonly seen on standard
network connection cards.
CHANNEL - On/off
Overall processing On/off for the selected channel.
In “Off” position the Input signal is passed directly to
Output. Press and hold to activate/deactivate.
PARAM EQ - On/off
On/off for the Parametric EQ on the selected channel.
Press and hold to activate/deactivate.
GRAPH EQ - On/off
On/off for the Graphic EQ on the selected channel.
Press and hold to activate/deactivate.
DYN EQ - On/off
On/off for the Dynamic EQ on the selected channel.
Press and hold to activate/deactivate.
DISPLAY
The EQ Stations bright color display, with 320 x 240 pixel
resolution.
8
CHANNEL - Edit section
Press to access the I/O levels, Delay and Peak Limiter
functions for the selected channel. This is the Channel Edit
main page. From this page you can select which channel to
edit using the CHANNEL SELECT wheel. When more EQ
Stations are connected in a network all channels can be
accessed and edited from any EQ Stations front.
PARAM EQ - Edit section
Press to access the Parametric EQ pages for the selected
channel. Use the CHANNEL SELECT wheel to select
between all available EQ channels.
GRAPH EQ - Edit section
Press to access the Graphic EQ pages for the selected
channel. Use the CHANNEL SELECT wheel to select
between all available EQ channels.
DYN EQ - Edit section
Press to access the Dynamic EQ pages for the selected
channel.
LOCAL - View section
Gives an overview of the EQ station channels with Output
and Gain-reduction meters, and gives access to adjust I/O
levels and Delay.
GLOBAL - View section
Overview of, and access to edit the channel network
cluster setup. Stereo pairing and naming of channels are
also done from this page.
FRONT PANEL
CHANNEL SELECT wheel
Use the CHANNEL SELECT wheel to select which channel
to process. When more EQ Stations are connected in a
network, all channels can be accessed from any EQ
Station front.
RECALL
Press to initiate Recall operations. EQ station operates with
both individual Channel presets and global Scene presets.
STORE
Press to initiate Store operations. Both individual Channel
presets and Scene presets can be stored.
SETUP
Press to access settings such as: I/O configuration and
Network and Device information.
UTILITY
Via Utility you can setup various parameters such as UI
channel sync, LCD/LED light, MIDI, preset name,
configuration, Graphic EQ features, Framerate and
security.
CURSOR ARROW keys
Use the CURSOR keys to navigate in the control windows.
OK
Use OK to confirm operations when operating in the control
section.
ADJUST wheel
The ADJUST wheel is used to change parameter values.
etc.
ALL
When activated you have the possibility to adjust the
Graphic EQ on all channels at the same time. In a network
of multiple EQ Stations the Graphic EQ on all channels in
the network can be controlled simultaneously.
GROUP
With the Group function you can adjust the Graphic EQ on
a group of selected channels. All channels in a network
can be assigned to a group.
COPY/PASTE
The Copy/Paste function makes it possible to copy EQ
settings from one channel to another.
FLAT
In Parametric EQ: - Press and hold both the COPY and
PASTE buttons to flatten the EQ curve.
In Dynamic EQ: - Press and hold both COPY and PASTE
buttons to return parameters to default settings.
FREQUENCY / BANDWIDTH / GAIN
Fast access adjust knobs.
Note that in Dynamic EQ only the FREQUENCY knob is
relevant.
9
REAR PANEL
EQ Station with
fully expanded
Analog I/O slots
Analog I/O’s
Depending on the configuration, up to 8 channels of analog
I/O are available.
More on EQ Stations Analog I/O
EQ Station offers some of the finest converters available on
any studio or live processor today. The wide dynamic range
of these converters is complemented by analog domain
gain scaling, so the full resolution of the converters can be
used regardless of the operation level of the surrounding
equipment.
Analog I/O scaling
Max operating level can be set at positions from, 3 to
30dBu, each with additional Full Scale Safety Margin as
shown on illustration below.
For more exotic level handling requirements, the analog
Inputs may take in signals as hot as +30dBu, and both
Inputs and Outputs can have max level set as low as
+3dBu. Analog gain scaling is performed in steps of 3dB
between these extremes, and of course under automated
control.
To obtain good results from any audio system, level
structure and overload margin between machines has to be
set carefully. In Example No 1 of illustration above, the
Mixer, EQ and Amp have not been properly adjusted: The
Amp is driven to overload way before the drive capacity of
the Mixer and EQ is exhausted, and the resulting dynamic
range is only 94dB.
The same equipment performs much better if the
sensitivities are set as illustrated in Example 2. Mixers are
often locked at a certain optimum level, but EQ Station and
the Amps should still be set consciously. Normally, allow
upstream devices to have a bit of headroom over later
elements. The Safety Margin built into EQ Station ensures
that the Amp will always get a clean feed, and eventually
be the first to overload.
Note that insert points even on hi-end consoles tend to
operate at a lower max level than the mixer's main outputs.
Typical balanced insert I/O scaling for EQ Station would be:
- for unbalanced signals : 21dBu
- for balanced signals
: 24dBu
10
REAR PANEL
Digital I/O
With the optional Digital I/O card installed up to 8 channels
of digital I/O is available. The back-panels “option area” is
already prepared for this and the I/O card is easily installed
at your local TC Electronic Service center.
The digital I/O's are accessed through a standard D-SUB
25-pin connector with a similar pin-layout as found on e.g.
System6000 and any Yamaha digital AES/EBU I/O cards.
A 25-pin Sub-D to XLR connectors is supplied as standard.
Analog and digital Outputs are available adjacently,
however, the Inputs must be selected at the I/O
Configuration page accessed via the Setup menu. Please
refer to the description of the Setup page later in this
manual for further information
Word Clock - BNC
Word Clock Input on BNC connector is also available on
the digital I/O card, enabling external clock to control the
EQ Station. Clock Source is selected on the Setup page.
Control and Network
Ethernet
Standard Ethernet running TCP/IP is available, enabling
you to hook-up multiple EQ Stations in a network, and to
connect any PC as an external control interface.
A free-of-charge Virtual EQ editor is downloadable from
www.tcelectronic.com
connect multiple EQ Stations. However, in larger setups
increased speed on the user-interface can be achieved by
using a HUB-switch.
Please refer to the setups described on page 35 for more
information.
MIDI IN/OUT
Standard MIDI connection for external MIDI control of
Program Change and Control Change messages.
MIDI will be implemented in a later software update.
Remote RS 232 - Motofader 64
A 9-pin D-SUB connector located next to the MIDI I/O's is
used for connecting a Motofader 64.
When the Motofader is connected to an EQ Station, it is
possible to access all channels on the Ethernet network
from the Motofader 64 connected to any EQ Station in the
network.
The signal running between the EQ Station and the
Motofader is standard serial-data, but encrypted to make
sure that other products cannot accidentally interfere the
signal.
Power
EQ station is equipped with switch-mode power-supply that
accepts from 100 to 240 V, 50-60Hz
Due to the choice of standard TCP/IP protocol, it is
possible to connect any standard TCP/IP based wireless
network (LAN) to the system, enabling full wireless remote
control of all features in EQ Station from any standard PC
or Tablet PC or Labtop having wireless LAN built-in.
A built-in passive HUB makes it very easy to daisy chain
multiple EQ Station's to quickly establish a network. This
way you do not need an external HUB or network-switch to
11
PROCESSING OVERVIEW - SIGNAL FLOW
Introduction
The audio-processing features in EQ Station is made in the highest quality possible, with internal 48bit processing giving a
large headroom for EQ changes, and a noise floor well below the AD/DA performance, no matter how extreme EQ settings
you require. The internal headroom also makes it literally impossible to have internal overloads, and the Peak Limiter on
the Outputs will make sure that no nasty digital noises ever occur in your speakers.
Processing overview
For each channel in the EQ Station (no matter configuration) you always have the same processing capabilities. The
processing is always available, and you will therefore never have to make the choice of e.g. running Graphic EQ OR
Parametric EQ - in other words you will never run out of DSP-power on an EQ Station.
• Parametric EQ.
Lo and Hi filters can be set to shelving or parametric
type. Bands 1-4 selectable between Parametric or Notch.
• Graphic EQ.
Four different Graphic EQ types are available:
- TC1128
- Classic 960 Narrow-Q / Classic 960 Broad-Q
- Classic 27
On the following page you will find a more elaborate
explanation of these types.
• Dynamic EQ.
Two modes are available:
- Three band Dynamic EQ operating in the full frequency
range.
- Parametric Dynamic Two Band EQ (Paradyn) with
individual frequency selection.
• Delay, 600ms.
Individual Delay on each channel for alignment according
to position.
• Peak Limiter
High quality Output Limiter, primarily for protection of
speaker systems. The Peak Limiter is always active.
The processing runs in a fixed signal flow:
Note
• All processing is always available. Degrading of quality will not appear at any time no matter how much of the processing
features are activated.
• The order between the processing blocks cannot be changed.
Signal Flow
12
GRAPHICAL EQ TYPES IN THE EQ STATION
Introduction
A simple question
Why are graphical EQs so different? Even with the same
gain range and center frequencies they sound different and
respond differently to user settings. Why?
This section describes the fundamental differences of the 3
graphical EQ structures provided within the EQ station.
To fully utilize the Graphic EQ section of the EQ station a
basic understanding of these structures and how they
influence the processed signal, is necessary.
What does an equalizer do?
A graphical EQ in neutral position should act just like a
signal buffer within the audio frequency range, albeit
possibly with a short delay for digital implementations.
When one slider, e.g. the 1kHz slider, is moved from 0dB
to - say - +6dB, the EQ's gain at 1 kHz should increase to
6dB corresponding to a gain doubling. The total magnitude
response in this situation may look like this (Figure 1):
Figure 1 - Magnitude response of typical 1 kHz EQ
band set to +6dB with Q = 1
In principle the EQ achieves this effect by adding a 1-kHz
bandpass filtered version of the signal to the signal itself as
shown in block diagram form in Figure 2.
Figure 2 - Block diagram of single-band BP-feedforward EQ where Gain is slider setting.
Boost/cut symmetry
Suppose we move the slider of our 1-band EQ to -6dB?
Intuitively this ought to be just a matter of subtracting the
same amount of BP signal rather than adding it?
Not quite so:
Figure 3 - Asymmetry between '1 + BP' and '1 - BP'
This gross asymmetry is due to the non-linearity of the dB
measure (and to some extent human hearing): Doubling
the gain amounts to +6dB, while reducing it to 0 amounts
to minus infinity dB. To obtain -6dB at fc we need to
subtract only half, leaving one half, or -6dB:
13
GRAPHICAL EQ TYPES IN THE EQ STATION
Reduce the Q of the BP filter by a factor.
Either of these methods solve the boost/cut symmetry
problem to mathematical perfection:
Figure 4 - Asymmetry between '1 + BP´ and '1 - 0.5 BP'
and symmetry error.
But it's still not symmetrical! If we send the signal through
one of these one-band EQs set to +6dB and then through
another EQ set to -6dB, the result will be the dashed
(middle) curve in Figure 4 which deviates from neutral by
nearly 2dB!
In some EQ designs the ability to use the same BP filter
both for adding in boost cases and subtracting in cut cases
is considered a benefit, and the asymmetry is not
considered a problem. But we prefer symmetry, so that an
EQ with one setting is cancelled out perfectly by another
identical EQ with the opposite setting. To make the cut
curve (blue dotted in Figure 4) the exact mirror image of
the boost curve (black solid in Figure 4) we need to do one
of two things:
Restructure the circuit in Figure 2 from feed-forward to
feed-back topology (Figure 5).
Figure 5 - Single-band EQ in Cut-mode implemented
by BP negative feed-back.
- or
14
Figure 6 - Boost/cut symmetry problem solved
Now that we've chosen boost/cut-symmetric EQ filters, we
will discuss the remaining properties with only boost filters
as example.
GRAPHICAL EQ TYPES IN THE EQ STATION
Q mapping: Constant or
progressive Q, and which?
Two single-band EQs with the same center-frequencies
and the same slider settings may differ greatly depending
on the designer's choice of Q as a function of Gain setting,
as the following 3 examples will show:
Naturally there is an infinite number of possible Q
mappings, the examples shown are rather extreme.
Structure dependent multi-band
gain build-up
Even with identical center frequencies, gain settings and
Qs, the responses of two graphical equalizers may differ
significantly when multiple bands are applied. This is due to
the structure dependent multi-band gain build-up. We will
look at 3 different implementation structures with different
multi-band gain build-up properties.
Parallel BP feed-forward/feed-back structure
This structure which has been used in the TC 1128 and its
EQ Station digital twin produces relatively little gain buildup. Since it is based entirely on summation of BP filtered
signals, the responses of individual BP filters are added in
the absolute domain, not the dB domain.
Figure 8 - Three-band boost (i.e. feed-forward only)
extract of Parallel BP feed-forward/feed-back EQ
structure.
Figure 9 - Three-band boost extract of Cascade-ofbiquads EQ structure.
Note that the above used " Input + gain•BP" structure from
Figure 2 can be contained in a single bi-quadratic filter,
a.k.a. 'a biquad'. This structure is used in EQ Station's
'Classic27' algorithm.
Figure 7 a/b/c - Three different examples of Q mapping
15
GRAPHICAL EQ TYPES IN THE EQ STATION
Hybrid parallel/cascade structure
A compromise between the pure parallel and the pure
cascade structure is possible too. By implementing the
even-numbered bands in one parallel-type EQ and the
odd-numbered bands in another and then connect the two
in cascade, we get the cascade-structure type of gain
build-up between adjacent bands, and other bands with an
odd number of band steps between them, and the parallelstructure type of gain build-up between bands with an even
number of band steps between them.
Figure 10 - Six-band all-boost (i.e. feed-forward only)
extract of Hybrid structure EQ. The hybrid structure is
used in EQ Station's 'Classic960' algorithms.
Structure comparison with 3 adjacent bands set to +3dB
Let's see what response these three structures will produce
if we set 3 adjacent 1/3 octave bands with Q = 2 to +3dB:
Conclusion
Figure 12 - Extreme example of inter-band gain buildup: All bands set to +3dB
Filter structure consequences with a 3dB boost on all
bands
• The TC 1128 (Parallel) type adds
a total of approx: 7dB
• The 960 (Hybrid) type adds a total of approx: 8dB
• The Classical 27 (Cascaded type) ads a total of
approx: 10.5dB
As we have seen, a graphical equalizer is characterized
not only by its center frequencies and gain range but also
by its boost/cut symmetry, its Q (or bandwidth) as a
function of gain setting and its inter-band gain build-up
which depends on the implementation structure.
The EQ Station facilitates the commonly used graphic EQ
types in the recent past and should therefore be easy and
straight forward to use for anyone no matter your level of
experience.
Figure 11 - Examples of inter-band gain build-up with
identical settings and Q but 3 different implementation
structures
With all bands set to +3dB the difference between
implementation structures becomes even more
pronounced:
16
GLOBAL VIEW
Global - View
Press.....
....and select between I/O settings or Channel config.
I/O settings
Global page - Introduction
The Global page offers functionality for setting up a
network cluster of up to 64 EQ channels. The advantage of
setting up multiple EQ Stations in a network cluster is, that
it becomes very easy to monitor and adjust all channels in
the cluster from any of the User Interfaces available (front
panels, Motofaders or VirtualEQ Station).
To be able to set up and operate the EQ Station Cluster
network, read the following and examples carefully.
A few key terms to understand the Cluster network
topology.
Cluster:
• A Cluster is a group of EQ Stations with a total of up to
64 ch.'s (E.g. 8x 8 ch.'s or 16x 4 ch.'s - or any
combination of 4 and 8 channel EQ Stations).
• An EQ Station must be assigned to a specific network
Cluster when you want to operate multiple devices using
the TCP/IP network.
• Assigning a device to a cluster is done at the Setup/
Network and devices page on each EQ Station.
Default Cluster is: A.
Device:
• A devic e is the physical EQ Station unit. When set up in
a Cluster network, it is a MUST to set unique Device
Names for all units.
• Renaming of a device is done at the Setup page on each
individual EQ Station.
Channel Config
Input:
• The individual physical Inputs on EQ Stations (analog or
digital).
• All Inputs must be assigned to channel numbers in the
Cluster.
• Factory defaults are the logical numbers between 1 and 8.
• Assigning of physical Inputs to Cluster channel numbers
is done at the Global page.
Channel:
• A Channel is a number between 1 and 64 in a Cluster
• A Channel number may be assigned a physical input
from a device.
• Channels can be labeled with individual names.
• Assigning of Channel Cluster numbers to physical inputs
is done at the Global page.
Cluster - key issues
• All devices in a Cluster network MUST have unique
Device Names.
• All devices in a Cluster network MUST have unique IP
addresses with identical first three numbers
(e.g. 192.168.1.100 - 192.168.1.101, etc).
• All devices MUST have identical Subnet mask (e.g.
“255.255.255.0”) and identical Cluster ID (e.g. “A”).
• All devices MUST have unique Device Numbers.
17
GLOBAL VIEW
Basic Operation
• Press GLOBAL to access the Global View - Cluster
overview page. Use the CHANNEL wheel to scroll
through channels and view channel settings.
• Select I/O Settings or Channel Config. depending on
which settings you wish to edit and press OK.
• Select parameter/field to edit using the CURSOR keys
and set value using the ADJUST wheel.
Cluster position
Indicates which position in the Cluster the selected Input
channel is routed to.
Status LED
Green indicates : No conflicts.
Red indicates : Possible conflict. Two Input Channels
may be assigned to the same Cluster
position.
Channel
Use the CHANNEL wheel to select which Cluster position
you wish to see status on.
Device Name
Shows the name of the selected device. The Device name
is set on the Setup page on each device.
Channel Icon
To each channel an icon can be assigned giving fast visual
identification of which channel is operated. E.g. a
microphone to a vocal channel, a guitar for the guitar
channel etc.
Input
Indicates which Input channel is routed to the selected
cluster position.
Pair
Channels can be paired as 1/2, 3/4, 5/6 - 63/64.
Channel Name
Though an Icon assigned to each channel creates a basic
overview, you can of course assign a specific name to
each channel too.
Preset Name
The preset name is created when you store the preset.
Auto Setup
Press to perform an auto assignment of all available
channels. - see description on page 6-7.
18
Exit
Place cursor here and press OK to exit the Global page.
Meters
One or two Output meters depending on whether single or
paired channels are selected.
LOCAL VIEW
Local page - Introduction
The Local page supplies you with an overview of what is
assigned and processed to the Inputs on the physically
selected device. This means that the Local page is static
on the individual devices, and cannot be accessed from
other devices!
The Local page can be used to get an overview of the I/O's
on the individual devices, e.g. which Cluster Channel
numbers they are assigned to, and whether Input and
Output signal is present.
At the Local page there will always only be
displayed the number of I/O's available in the
device. This way it is possible to quickly see if the
unit is a 2, 4 or 8 channel device.
Local page - I/O modes
The EQ Station offers two different I/O modes:
• 1-8 Thru mode
• Mixer/Matrix mode
Switching between the two modes is done at the Setup
page.
1-8 Thru mode is made for applications where multiple
mono- or stereo-paired channels are required, e.g. for
monitor mix setups.
It is possible to monitor current state of the channels in the
device, and you can adjust In Level, Out Level and Delay
settings on each individual channel.
The I/O channels are connected “straight thru”; meaning
what is received on e.g. channel 1 is also Output on
channel 1.
Basic Operation
• Select channel using the CHANNEL wheel.
• Select parameter using the UP/DOWN cursor keys.
• Set values using the ADJUST wheel.
Channel Input Level Trim
Range: Off, -120dBFS to 0dBFS
Adjustable Input level per channel.
Out Level Indication (fader)
Range: Off, -120dBFS to 0dBFS
Fader position indicates the current set Out level.
Gain Reduction Meters
2 or 3 gain reduction meters depending on the selected
Dynamic EQ type.
1-8 Thru mode
Press.....
Delay Time
Range: 600ms
Individual Delay time per channel to match wedge,
speakers physical position or adjust delay lines.
Channel Output Level
Range: Off, -120dBFS to 0dBFS
Metric indication of the set Output level.
....to access
Channel Icon
A relevant Icon can be assigned to each channel for fast
identification. E.g. a microphone, guitar etc.
Input format indicator
Overload LED for all channels. Adjust the Output level on
the feeding device or use the Input level trim on the EQ
Station.
Channel Number
The number of the channel.
19
LOCAL VIEW
Mix Matrix mode
Basic Operation
• Select channel using the CHANNEL wheel
• Adjust value using the ADJUST wheel
Notice that this is a Local page. Only the channels on
the device you are operating is displayed here.
Analog/Digital Input indicators
Indicates when signal is present on the Inputs.
In Level
Range: -120dB to 0dB
Input Level Trim for the processing channels.
On/Mute
Mark and press OK (or turn ADJUST) to mute the
selected pair of Input channels.
Features at the Mix/Matrix routing page are:
• Input levels for the (up to) four stereo Input mix.
• Level for the Mix sum.
• Input selector for the processing channels. Select
between Left sum, Right sum, or a sum of Left+Right
sum (mono).
• Outlevel and Delay adjust for each channel.
In the Mix/Matrix mode it is possible to create a stereo mix
of several Input sources and then distribute the stereo mix
to several Outputs.
Take a look at the illustration above!
With an 8 channel EQ station up to four stereo Inputs can
be mixed to one stereo mix. The stereo mix can then be
distributed to the 8 Output channels.
The Mix/Matrix mode is ideal for Front of House or theater
applications where one or more stereo-mix sources needs
to be distributed to several output destinations (e.g. L/R
Front + Delays). Using the Mix/Matrix mode turns an 8
channel I/O EQ Station into a 4x stereo Input mixer + 8x
Output matrix device.
While the Mix/Matrix mode is an Input-mix setup
located at each device, it is not possible to mix more
Input channels between multiple EQ Stations.
Sum/Mix - level Output Master
Range: -120dB to 0dBFS
Level adjust parameter for the summed Input signal.
Summing up to 8 Input channels may cause internal
overload at this point. If overload is indicated, reduce
the SUM/MIX level.
Source Select
Select between: Left/Right - Left - Right
Out Level Indication
Indicates the set Output level.
Gain Reduction Meters
2 or 3 Gain Reduction meters depending on the
selected Dynamic EQ type.
Delay Time
Individual Delay time can be set in each processing
channel to match speaker position.
Channel Output Level
Range: -120dB to 0dB
Output level trim for individual processing channels.
Number
Channel number.
20
EDITING
Channel View Edit - Delay/Limiter
Channel Limiter
The EQ station features an individual High Quality Limiter
for each channel. The Limiter is a Peak type and operates
on Channel Outputs
Internal Overflow
Indicator
Threshold
Range: -30 to 0dBFS
Threshold setting for the selected channel or pair of
channels.
Release
Range: 20ms to 700ms.
Sets the Limiter release time.
In/Out Meters
Depending on whether you are looking on a single channel
or paired channels one pr two meters are displayed.
The yellow LED above the Output Meter indicates when
the Limiter is active.
Damp Meters
Indicates when the Dynamic EQ is active. Depending
whether you are using a ParaDyn or 3-Band type; 2 or 3
meters will show.
Channel
Preset
Meters and
Limiter indication
The Channel Edit display contains a graphic
representation of the total processing response
through the selected channel, and gives access to
adjust Delay, Limiter and Input/Output levels.
Basic Operation
• Select Channel using the CHANNEL wheel.
• Select which parameter to adjust using the ARROW
cursors.
• Set value using the ADJUST wheel.
In Level
Range: Off to 0dBFS
Sets the Input level for the selected channel.
Out Level
Range: Off to 0dBFS
Sets the Output level for the selected channel.
In- and Output levels are also displayed and can be
adjusted on the Local page.
Delay
Range: 0 to 600ms
Individual Delay on each channel for compensation of
speaker or wedge placement. The delay settings are
displayed and adjusted in both milliseconds (down to 1/10),
Feet, Meters and Frames. The desired frame-rate is set
globally at the Setup pages.
21
EDITING
Parametric EQ Edit
The six-band Parametric EQ is an easy to operate highquality algorithm supplying a precise response.
Basic Operation
• Select Band using the CURSOR keys and select filter
type using the ADJUST wheel.
• The Orange square indicates the current selected band.
• Adjustment of Frequency, Bandwidth and Gain is done
with the dedicated encoders on the front panel.
Band types:
• Lo band: Full parametric or low shelving type.
• Band 1-4: Full parametric or notch filter type.
• Hi band: Full parametric or high shelving type.
Lo Filter Range : 20Hz to 3kHz
Filter 1-4 Range : 20Hz to 30kHz
Hi Filter Range : 1kHz to 30kHz
Parametric and Shelving filters have a Gain Range of
+/-24dB.
The display graphics show the frequency response for the
Parametric EQ.
22
EDITING
Graphic EQ Edit
The Graphic EQ is a 29 band 1/3-octave type ranging
from 31Hz to 20kHz with +/-12dB gain range.
In addition to the Graphic EQ an adjustable LoCut,
ranging from Off to 600Hz, is also available.
Example 1
Graphic EQ Type Selector
There is big differences in behavior and response between
various industry standard analog graphic EQ's. With the
EQ Station you now have the option to select the response
type you prefer.
Using the Type Selector you can select between exact
DSP-emulations of main high-end graphic EQ types on the
live-market today.
Select between the following types:
• TC1128
• Classic960 Narrow-Q
• Classic960 Broad-Q
• Classic27
The EQ Station will mute all Outputs while shifting to
a different EQ type.
Example 2
Behind the four EQ types are not only a mapping of the
bandwidth response, but also three basically different ways
of combining 29 EQ filters. The TC1128 is a parallel
construction, the Classic960 types that are a combination
of parallel and cascaded filters and finally is the Classic27
a fully cascaded filter-structure.
(Read more about the differences and the consequences
of using the various Graphic EQ types in the manual
section called: “Graphical EQ types in the EQ Station”)
Basic Operation
• The display graphics show the frequency response for
the graphic EQ and the actual settings of the 29 bands.
• Adjustment of Frequency and Gain is done with the
dedicated encoders.
Example 3
• Adjustment of EQ type is done with the ADJUST wheel.
Dialing the bandwidth parameter highlights and selects
the bands left and right from the selected frequency,
enabling relative adjustment of several filters at the same
time.
Lo Cut
Range: Off to 600Hz
Lo Cut filter for the Graphic EQ section.
Bars - Curve or Bars & Curve
It is possible to view the Graphics EQ either as
• Bars (example 1)
• Curve (example 2)
• Bars & Curve (example 3)
Which of these options to use is setup in the Utility menu.
23
EDITING
Bandwidth knob functions.
Via the menu point “GraphEQ width” in the Utility menu you
can assign which of the following three functions should be
assigned to the BANDWIDTH knob:
Frequency:
The function of the FREQUENCY knob is
duplicated to the BANDWIDTH knob.
Sweep:
Set gain and sweep this gain setting
through the frequencies using the
BANDWIDTH knob.
Width:
In Width mode the BANDWIDTH knob can
be used to increase the frequency area with
center in the selected frequency.
Mirror:
Select mirror-mode and use the
BANDWIDTH and the GAIN encoder to
mirror frequencies in O dB
Curve:
Select curve-mode and use the
BANDWIDTH encoder to select more than
one frequency. Cut and boost frequencies in
curves. +/-3dB peer 1/3 oct.
3-Band Dynamic EQ
Two cross-over points and three sets of parameters,
enables individual setting of Lo, Mid and Hi performance
for the dynamic EQ.
This type of Dynamic EQ is typically used as a creative tool
that shapes the entire signal but can of course also be
used for system protection. In terms of creativity this type
of EQ-ing can be compared to what Mastering engineers
often do when shaping a master-mix.
The two set Crossover points defines the three bands each
holding its own individual set of the parameters described
below.
Threshold
Range: 0 to -45dBFS
When the Input signal exceeds the Threshold value the
Dynamic EQ starts to reduce the dynamic content of the
signal according to the set Ratio in the selected band.
- Regarding headroom
The Threshold always has a headroom of 45dB, but the
range is scalable with the ADA card settings on the; Setup
page-I/O Configuration-ADA I/O Settings-ADA gain.
Example:
With the ADA gain set at +21dB with Off set at 0dB, the
Threshold setting is 21dB and down to -24dB.
Ratio
Range: Off to Infinity
Specifies the Ratio of the performed compression on the
selected band.
Example:
With a Ratio setting of 2:1 the Compressor will reduce
every 2dB above the Threshold point to only 1dB.
EQ Type
Two different types of Dynamic EQ can be selected:
3-Band Full-range or 2 band ParaDyn.
The Dynamic EQ enables you to shape your sound
depending on energy in the signal, or to notch out specific
level dependent problems.
Three band Dynamic EQ
Attack
Range: 0.3 to 100ms
The Attack time is the time the Dynamic EQ uses to reach
the gain reduction specified by the Ratio parameter in the
selected band.
Example:
If the Input signal increases by 4dB above the set
Threshold with a Ratio set to 2:1 and the Attack time set to
20ms, the Compressor will use 20ms to reach a Gain
reduction of 2dB.
Release
Range: 20ms to 7 sec.
The fallback time. The time it takes for the Dynamic EQ to
release the attenuation of the signal in the selected band.
MakeUp
Range: 0 to12dB
Manual Make-up gain for each compression band.
Cross Over 1
Range: Off to 3.15kHz
Defines the Crossover point between the lower and middle
compression bands.
24
EDITING
CrossOver 2
Range: Off to 16kHz
Defines the Crossover point between the mid and high
compression bands. Low point is Limited by the Frequency
set by Crossover 1.
Input Drive
Range: -6 to 18dB
Level compensation in the Input of the Dynamic EQ for the
level change applied by the Parametric and Graphic EQ
sections.
EQ Type
Select between 3-Band or Paradyn.
2 band ParaDyn - Parametric EQ
Example:
With a Ratio setting of 2:1 the compressor will reduce
every 2dB above the Threshold point to only 1dB.
Attack
Range: 0.3ms to 100ms
The Attack time is the time the Dynamic EQ uses to reach
the gain reduction specified by the Ratio parameter in the
selected band.
Example:
If the Input signal increases by 4dB above the set
Threshold with a Ratio set to 2:1 and the Attack time set to
20ms, the Dynamic EQ will use 20ms to reach a Gain
reduction of 2dB.
Release
Range: 20ms to Lo Shelve
The fallback time. The time it takes for the Dynamic EQ to
release the attenuation of the signal in the selected band.
Frequency
Range: 20Hz to 20kHz
Sets the Center frequency on the two bands.
BW/Curve
Range: Lo Shelve - Hi Shelve to 4
At Lo and Hi Shelve selections the EQ operates as a
Dynamic EQ. At values from 0.10 to 4.00 the Dynamic EQ
operates as Parametric EQ, and this parameter sets the
Bandwidth.
The two-band Parametric Dynamic EQ - Paradyn - enables
you to set two fully independent dynamic notch filters.
As with a parametric EQ filter, - set the center frequency
and bandwidth as target area, and then find a matching
Threshold and Ratio to dynamically notch out level
dependent problems in the signal.
For each of the two bands:
Threshold
Range: 0 to -45dBFS
When the Input signal exceeds the Threshold value the
Dynamic EQ starts to reduce the dynamic content of the
signal according to the set Ratio in the selected band.
Input Drive
Range: -6 to 18dB
Level compensation in the Input of the Dynamic EQ for the
level change applied by the Parametric and Graphic EQ
sections.
EQ Type
Select between 2 band Paradyn and 3 band types.
Compare function
For optimal and easy comparing, the settings are
remembered when switching between the EQ types
and both settings are saved with presets.
- Regarding headroom
The Threshold always has a headroom of 45dB, but the
range is scalable with the ADA card settings on the Setup
page-I/O Configuration-ADA I/O Settings-ADA gain.
Ratio
Range: Off to Inf.:1
Specifies the Ratio of the performed compression on the
selected band.
25
CONTROL SECTION
SELECT ARROW keys
OK key
For entering and
confirmation
ADJUST wheel for
parameter adjustment
Basic Operation in the Control Section
• Press RECALL, STORE, SETUP or UTILITY to access these pages.
• Navigate using the ARROW keys.
• Use the ADJUST wheel to change parameter values.
Settings are instantly active.
Setting up Names, Device Number and Subnet Masks etc:
• Select the parameter using the ARROW keys and press OK.
• A display similar to the illustration below then pops up.
• Use the Left/Right ARROW keys to set cursor position
• Use the ADJUST wheel to select letter or number
• Use the Up/Down ARROW keys to select function:
Capital or lower-case letters; numbers or Cancel if you wish to abort the entire operation.
• Press OK to confirm and exit the display.
26
CONTROL SECTION
Channel presets
The Channel presets hold information for a full channel
setup, including Parametric, Graphic and Dynamic EQ,
Delay, Limiter, Levels and on/off state for the various
blocks.
The channel presets are useful for storing and recalling
settings for e.g. a specific monitor wedge, speaker or In
Ear Monitor. A Channel preset can be loaded into as many
channels as required.
• Presets are organized in folders as on common
computer operating systems. Both folders and individual
presets can be labeled with unique names.
• The Channel presets can individually be protected with a
password, securing that the preset cannot be changed or
deleted. A protected user-preset can of course be
recalled, modified and stored in a different user-preset
location.
• The Channel presets are stored/recalled by selecting a
folder and a preset within the folder using the ARROW
keys and ADJUST wheel, and finally by pressing OK to
execute the preset store.
• If in a recall situation a processing block is globally
locked with the Security function (see Setup), no
changes will be applied and a message will appear
saying: "Parts of preset not loaded due to Security lock."
Scene presets
Stores all processing settings for all channels in the
device in one preset location.
• 127 Scene user-preset locations are available in a list.
• The Scene presets are stored/recalled by selecting a
preset within a folder, and pressing OK to execute.
• When set up in a network, the Scene preset Store
command will store/recall up to ALL 64 channels settings,
saving the local device settings in the same Scene
preset number in each device.
• The Scene presets can individually be locked with a
password, securing that the preset cannot be changed or
deleted. A locked user-preset can of course be recalled,
modified and stored in a different user-preset location.
Preset Options
Quick Store
For fast storing of a preset. The current preset is
preserved. The new preset will be given the same name as
the preset currently recalled with a number added in
parentheses. E.g. (2); (3) etc.
Handling Presets - Store
New Auto Name
Presets are not automatically assigned a number. By
selecting the “New Auto Name” the first free preset number
is suggested to the current preset and the Naming Display
pops up.
Folder Options
• Place cursor at the Folder field
• Now select Folder using the UP/DOWN cursors or press
OK to get the following options:
New Folder, Rename Folder, Delete Folder or Protection.
• A padlock will indicate protected folders. To un-protect a
folder again, simply select the folder and select
protection again.
New
Press New to create a new preset and give the new preset
a name of your choice. The keyboard display will
automatically pop up.
Rename
Select a preset and press OK to rename the preset via the
keyboard display.
Overwrite
Select this storing option if you wish to overwrite the preset
selected from the list.
27
CONTROL SECTION
Delete
The Delete function can be used to delete specific presets.
If protection for the preset is set to “on” the preset cannot
be deleted. (see below)
Handling Presets - Recall
Protection
Each preset can be overwrite-protected. To later release
the protection of the preset, - place cursor on the preset
and select protection again.
System paramemeters are NOT stored with presets.
These parameters can be stored by performing a
System backup. The System backup feature is
accessed via the Setup page.
Introduction
(Please see previous page)
Operation
• Select Preset Type; Channel or Scene.
• Select Folder to recall from.
• Select preset within the selected folder.
• Press OK.
That's it !
28
CONTROL SECTION
Setup page
The Setup page contains functionality parameters and
device configuration. These settings will normally be
"set-and-forget" functions, not meant to change very
often.
I/O Configuration
The Digital I/O options and parameters described in the
following section will only be available if the optional
Digital AES/EBU card is installed
Input Select
For each set of Inputs you may select whether the EQ
Station should process the analog or digital signal present
on the respective Inputs.
This is set via the Input Select page.
8 channel version
Digital
Input 1+2
Input 3+4
Input 5+6
Input 7+8
Analog
1+2
3+4
5+6
7+8
Outputs
All available Outputs, both analog and digital are
open all the time.
Options that are unavailable due to the configuration
of your frame are ghosted in the EQ station menus.
I/O Mode
Channel 1-8 Thru mode or Mixer/Matrix mode
The 1-8 Thru mode is made for applications where multiple
mono- or stereo-paired channels are required, e.g. for
monitor mix setups.
In Mix/Matrix mode it is possible to create a stereo mix of
several Input sources then distribute the stereo mix to
several Outputs.
See Local page section for further description.
ADA I/O Settings
Equal settings on the Max AD In Level and Max Out Level
parameters gives unity gain through the unit.
4 channel version
Digital
Input 1+2
Input 3+4
Input 5+6
Input 7+8
Analog
1+2
3+4
Max AD In Level:
Range: 3 to 30dBu in 3dB steps
Input sensitivity that can be set on each input pair. The
expected dynamic content of the signal to be processed
should be determined and the Max AD In Level parameter
should be set accordingly to ensure sufficient headroom.
29
SETUP PAGE
Max DA Out Level:
Range: 3 to 30dBu in 3dB steps
Max DA Out level should be set to match the Input level
sensitivity of the connected downstream device.
Max DA out can be set on individual output pairs.
DA Output 1-8:
Three options are available
- Balanced
Use this setting when connecting to common balanced
gear. This mode should NOT be used when connecting to
an unbalanced single ended Input and neither when
connecting to a connection with pin 2 (or 3) disconnected,
nor if pin 2 (or 3) is connected to pin 1.
Better sound quality is obtained using “Unbal Pin 2” or
“Unbal Pin 3” Output mode setting for this purpose.
A consumer S/PDIF Output with less than 5 m of cable
going to EQStation will most likely be able to pass a digital
signal, if you remember to tie pin 3 of the XLR to pin 1, and
use a good 75 ohm coax cable from the S/PDIF Output.
Going the other way, most S/PDIF Inputs are fine with
AES/EBU electrical level without resistor attenuation or
transformers. Don't use long cable runs, and again
remember to tie pin 3 of the AES/EBU Output to pin 1.
Clock Setup page
- Unbal. pin 2 with signal on pin 2
Pin 3 must be connected to pin 1 either at the EQ Station
Output end or even better at the downstream device.
- Unbal. pin 3 with signal on pin 3
When using this mode pin 2 must NOT be connected.
This Output mode setting can be used though when
feeding a balanced Input.
Digital Output
Source
Determines to which clock the EQ Station should attempt to
lock to:
Options are:
• Internal
• Word Clock
• Input 1-2
• Input 3-4
• Input 5-6
• Input 7-8
Rate
Sets the EQ Stations operating sample rate.
Status Bits
For each pair of Outputs you can select between sending
AES or S/PDIF Status Bits.
Status bits - A few words:
S/PDIF and AES3 ("AES/EBU") interfaces are different
both regarding electrical level and the data format used.
With EQ Station you can choose the data format for each
Output pair, while the electrical interface is always high
level, balanced.
Advice for interfacing EQStation with S/PDIF equipment:
EQ Station Inputs accept S/PDIF as well as AES/EBU data
format. If an EQ Station Output feeds an S/PDIF Input,
choose S/PDIF format for that particular output.
30
"44.1 kHz - only" or "48 kHz - only"
When 44.1 or 48 kHz is chosen the EQ Station should
ideally be fed with an external matching clock. However, if
e.g "44.1 - only" is selected and the external clock is 48
kHz the EQ Station will convert the sample rate and
operate at 44.1 kHz.
Wide
In Wide mode any incoming clock is accepted.
Error Handling
These options concern how the EQ Station should react
when a Clock Error or mismatch occurs.
Freewheel
Though there may be inconsistency between the set
internal clock rate and the rate present on the Inputs or
BNC - NO action is taken with regards to passing audio.
SETUP PAGE
Mute
When a Clock Error occurs the Output channels are muted.
Clock is passed through Output channels.
Network and Device
Serial Number
The Serial Number of the EQ Station.
Cut Clk & mute (Cut Clock & mute)
When a Clock Error occurs the Output channels are muted.
Clock is cut and NOT passed through Output channels.
Software Version
Indicates currently loaded software.
Status Indication
Device Number
When performing an Auto Setup via the Global page the
assignment of channels in the cluster will be done
according to the set Device Number.
The following clock related messages can be displayed
in the top bar of the display:
CLOCK ERROR - red color
Clock Error indicates that the incoming master clock does
not match the set Rate. The EQ Station converts the
incoming master clock to the set Rate but indicates with
the message “Clock Error” that you should attend the
problem to achieve optimal performance.
Depending on how the Error handling parameter is set (see
previous column), audio may still be passed.
Example:
EQ Station with Device Number 1
EQ Station with Device Number 2
You have given the three EQ Stations Device number 1, 2
and 3 and performed a Cluster Auto assignment on the
Global page on any of the units..
In the Cluster the channels are now assigned according to
the table below:
NO LOCK (1/2) - yellow color
or - NO LOCK (3/4) - yellow color
or - NO LOCK (5/6) - yellow color
or - NO LOCK (7/8) - yellow color
The EQ Station will check for clock errors on the Inputs
consecutively starting with 1/2, then 3/4 etc. and report
errors in the order they are found.
Example:
Source is set to Input 1-2
is set to 44.1
Rate
On Input 1/2 a signal with a clock at 44.1kHz is present as
expected, but on e.g. Input 3/4 a signal with 48 kHz clock
is present. In this case you will see a yellow “No Lock 3/4”
tag. Solve this by setting the clock to 44.1kHz on the
device feeding Inputs 3/4.
When this problem is solved you may see an error
indication on 5-/6 or 7/8. Solve these problems likewise.
: 4 channel version
: 8 channel version
Cluster Position
EQ Station
Device Number 1
Channels 1-4
EQ Station 2
Device Number 2
Channels 1-8
1-2-3-4
5-6-7-8-9-10-11-12
Device Name
The name of the EQ Station you are operating. Naming
several EQ Stations in a network is done on the individual
units.
Cluster
Within the network, EQ Stations can be grouped in
Clusters.
For the EQ stations to see each other they must all be
assigned to the same Cluster. Default setting is “A”.
IP Address
All EQ stations must have unique I/P addresses. The
default address in the EQ Stations is set to 192.168.1.100.
Leave the first EQ Station at that address. Change the next
to 192.168.1.101 - and so forth.
Subnet Mask
The Default Subnet mask is 255.255.255.0 and should only
be changed if hooked up to a PC network that uses a
different Subnet Mask. Default Subnet mask on most
Windows systems is 255.255.255.0
31
SETUP PAGE
System Backup
MIDI
MIDI
MIDI
MIDI
UI Channel select
Ul Prog Mode select
UI Ctrl Mode select
UI CC Number select
MIDI Scene Channel
MIDI Scene Prog Mode
MIDI Scene Map From
MIDI
MIDI
MIDI
MIDI
Chnl
Chnl
Chnl
Chnl
Channel
Prog Mode
Bank Mode
Map From
MIDI Sys Ex Id
MIDI Sys Ex In
MIDI Sys Ex Out
A System backup is ideal, not only as a backup, but
also when cloning units.
Settings for the following parameters are included
when a System store/recall is performed.
Cluster ID
Active Channel
Channel Sync
Input Mode
Sample Rate
Clock Source
DA Output
Input Select
Dither
Status Bit
LCD Intensity
LED Intensity
Show Preset Name
Mix In Level
Mix Out Level
Show Graph
Mix Mute
Mix Out
Framerate
AES Sample Rate
Clock Error Policy
Graph EQ Width Mode
Lock Key
Lock Level
32
MIDI UI Ctrl Change Offset
UTILITY PAGE
In - Channel select on the EQ Station can be controlled
externally by a received MIDI CC value.
Per default values 0-63 on the set CC Number (0-119)
selects channels 1-64. However, the offset parameter can
be used to interface with devices sending values from
starting from 1.
The Utility page holds a variety of operation and
performance features.
Out - When channels are selected locally a MIDI CC value
on the set controller will be sent on MIDI Out. Connected
devices set up to receive these messages will respond.
In+Out - See above. The described features on both In and
Out applies.
Control Change Offset
Options: 0 to 63 or 1 to 64
Some devices send values starting from “0” and some from
“1”. The object is to select channels 1-64 in the UI. If your
controlling device displays control change values in the
display, these values typically start from 0. To be able to
associate those values directly with an EQS channel
number, you can select the "1 to 64" option, in which case
a control change value of 1 will select the first EQS
channel. Default setting is “0 to 63”.
MIDI - UI Channel Select
These parameters concern external channel control from
e.g. a mixer with MIDI. When selecting a channel on the
mixer to edit, you may want to see the same channel on
the EQ Station. This is possible by setting the following
parameters.
MIDI Channel:
Range: 1-16 or Omni
Sets the MIDI channel for UI Channel select.
Prog. Change
Off - The EQ Station does not respond to received MIDI
Program Changes on the selected channel.
In - Channels 1-64 are selected when program changes
1-64 on the selected MIDI channel is received.
Out - When selecting a channel on the EQ Station the EQ
Station will send out a Program Change message
simultaneously on the specified channel.
In+Out - With both In and Out selected the Channel to view
or edit on the mixer and EQ Station can be set from both
the mixer and from the EQ Station.
Control Change
The channel appearence of the EQ Station can also be
controll via MIDI CC’s.
CC Number:
Range: 0-119
Sets the CC number for UI channel select.
Scene Recall
The following parameters set conditions for external scene
recall.
MIDI Channel
Range: 1-16 or Omni
Defines on which MIDI channel the EQ station can receive
and send MIDI program change messages for a Scene
recall.
Prog. Change
Off - No response to MIDI program changes and no MIDI
program changes are sent at Scene recall.
In - Scenes can be recalled form an external MIDI device
or another EQ Station on the selected MIDI channel and
according to the MIDI map.
Out - When a Scene is recall locally a MIDI program
change is sent on the selected MIDI channel.
In+Out - See above. The described features on both In and
Out applies.
Map From - Map to
An incoming MIDI Pr. Change message from 1 to 128 can
be mapped to recall any Scene preset.
Off - No response to MIDI CC values and no MIDI CC
values are sent.
33
UTILITY PAGE
Channel Recall
The Channel Recall features allow you to recall channel
settings from or on external devices.
MIDI Channel
Range: 1-16 or Omni
Defines on which MIDI channel the EQ station can receive
MIDI program change messages for channel recall.
Prog. Change
Off: - No response to MIDI program changes and no MIDI
program changes are sent at Channel recall.
In: - Individual channel settings can be recalled when an
incoming program change is received on the selected MIDI
channel according to the Map.
• Press and hold FLAT and CHANNEL ON/OFF while
powering up the unit
Preset Copy function
The Preset Copy function allows you to copy presets from
the EQ Station you are opeartin to another.
How ?
First setup the conditions for the copy operation using the
following parameters, - then select “Copy” and press OK
Type
Use this parameters to select the type of preset to copy.
Seletc between: Channel, Scene or Folder.
When Folder is selected the entire folder will be copied.
Out: - A program change is sent on the selectd MIDI
channel at channel recall.
Source
Is the name of the Channel, Scene or Folder you wish to
copy, depending on the selected Type - see above.
In+Out: - See above. The described features on both In
and Out applies.
Dest. - Destination
Refers to the name of the EQ Station you wish to copy to.
Bank no as channel:
Range: On/off
Any preset can be recalled into a channel. Which channel
to recall a preset into is set by sending a MIDI CC on the
LSB(controller 32) followed by a program change.
Folder
If you are copying either a Channel or a Scene preset you
must set the destination folder on the EQ Station unit you
are copying to.
If you have chosen to copy a Folder you can only copy to
the root directory of the destnation unit as it is not possible
to save folders within folders.
NOTE The Map parameters described below MUST be set
for any preset recall to be able to take place.This is due to
the organizing structure in folders as opposed to banks
where presets automatically have preset numbers
assigned.
Map From - Map to
An incoming MIDI program change message can be
mapped to recall channel settings from a specific preset.
“Map from” sets the incoming program change. “Map to”
sets the channel preset to recall.
Security
Key
Press OK to change security key. To change the current
key you must first type in the old key - then the new.
Level
No Lock: - The Lock functions are off.
Graph.EQ & Recall accessible: - Only the Graphic EQ and
recall functions are accessible.
Graph. EQ accesible: - Only the Graphic EQ is accessible.
Recall accessible: - Only recall functions are accessible.
Lock Unit: - The entire userinterface is locked unless you
have the correct 4 digit key.
To disable the lock functions without having the key:
• Power off EQ Station
34
System Reset
Default settings
Press OK and confirm to recall factory default settings.
Parameters in the Network and Device menu are NOT
recalled/reset and presets are also kept.
Delete all presets
Press OK and confirm to delete all presets on the device
you are operating. Presets on all other units in the network
are NOT affected.
UI Channel Sync
This parameter can be set to on/off on individual units.
Units in the network with this parameter set to “on” will
display the same channel information on all units.
On/Off button delay
When set to “on” the 4 on/off buttons on the left side of the
display will respond only if the buttons ar pressed for 1
second. This feature can prevent accidental on/off
switching of the effect blocks that could result in critical
level boosts or level drops.
EDIT CONTROL
Show Preset Name
Framerate
On/ Off - Sets whether the preset name should be
displayed in the edit screens (Channel/Param EQ/Graph
EQ/DynEQ). Show preset name is set to “On” as default
but you may prefer to use the “Off” setting if you never use
presets and thereby get a “cleaner” look on the Edit pages.
Via the Channel page a delay per channel can be set. The
Delay time is shown on the channel page in ms, feet,
meters and frames. The Framerate should be set
according to the connected devices.
GraphEQ graph:
It is possible to view the Graphic EQ settings either as
Bars, Curve or Bars & Curve
see page 23 for examples
LCD Light & LED Light
The display and the LEDs on the EQ Station are very
powerful. This you will enjoy especially at outdoor usage.
However, you may find the light too powerful when
operating e.g. in an indoor theater setup. Therefore the
LCD and LED lights can be dimmed individually.
GraphEQ width
Via the menu point “GraphEQ width”you can assign which
of the following three functions should be assigned to the
BANDWIDTH knob:
ALL - Graphic EQ
- Frequency: The function of the FREQUENCY knob is
duplicated to the BANDWIDTH knob.
- Sweep: Set a Gain and sweep this gain setting
through the frequencies using the the BANDWIDTH knob.
- Width: - Select width-mode and use the BANDWIDTH
encoder to select more than one frequency and cut or
boost the frequencies using the GAIN button.
- Curve: - Select curve-mode and use the BANDWIDTH
encoder to select more than one frequency. Cut and boost
frequencies in curves. +/-3dB peer 1/3 oct.
- Mirror: - Select mirror-mode and use the BANDWIDTH
and the GAIN encoder to mirror frequencies in O dB.
The ALL function is only affecting the Graphic EQ part of
the processing. When activated, changes on the Graphic
EQ will be done on ALL the EQ channels in the machine.
When in a network, up to all 64 channels will be selected
and adjusted.
When entering the page a flat filter setting is displayed.
Changes in the Gain setting will be applied to all channels
relatively to their current state. E.g. if a channel is set to
-3dB at 250Hz and 250Hz is moved to +2dB at the ALL
display, the new actual setting will be -1dB for the channel.
The changes on the ALL display are remembered until
power down, or until the Reset button is pressed and
confirmed using OK. When a reset is performed, the
display filter settings will be flattened, but without
performing changes on the other EQ channels settings.
35
EDIT CONTROL
A yellow dot in the top of the display indicates when max.
settings are reached. This typically occurs when a
combination of adjustments on a specific band are made in
both the Global window and on an individual channel.
Copy Paste function
Example:
The 1kHz band is boosted 7dB via the All page but was
previously boosted 6dB via the regular channel page. As
the two boosts added gives a 13dB boost which is 1dB
more than the possible 12dB, a yellow dot in the top of the
band (see illustration) indicates this situation.
Group Graphic EQ
The Copy/Paste function is very useful for quickly moving
channel settings from one channel to another. This is e.g.
useful when one channel is adjusted in a monitor-mix
setup, and these settings then should be used as starting
point on other channels before further refinement of these.
The Group functionality is similar to the Graphic EQ ALL
channels adjust function, except that it is here possible to
make a pre-defined group of channels instead of adjusting
all channels.
The Group is selected on available channels in the device.
If in a network, a group can be made among all possible 64
channels.
Flat All - Flat Group
A flatten all function in both the All and Group functionality
is available.
• Press COPY + PASTE simultaneously
• Press OK to confirm
36
Basic Operation
• Select channel and processing block and press the Copy
button.
• Select the channel you want to paste into, with the
Channel wheel.
• Press Paste and OK to confirm. The transfer of settings
is now done.
It is possible to copy/paste following:
• Select Channel edit view to copy/paste the entire
channel processing settings including. all EQ's, Limiter
and Delay.
• Select Parametric EQ edit view to copy/paste the
parametric EQ block.
• Select Graphic EQ edit view to copy/paste the graphic
EQ block.
• Select Dynamic EQ edit view to copy/paste the dynamic
EQ block.
What is copied
it is always the current view that is copied.
When in the “All” display, all settings for the entire channel
is copied. not just the settings on the All page, but also
settings for the Parametric, Graphic and Dynamic EQs.
This also goes, no matter if the different EQ sections are
active or not.
EQ STATION IN A LOCAL AREA NETWORK
37
EQ STATION IN A LOCAL AREA NETWORK
Introduction
This section describes basic elements of a standard
LAN (Local Area Network), and how to apply these
when setting up one or more EQ Stations in a network.
This is relevant when updating EQ Station software
from a PC or when controlling EQ Stations e.g. via a
Tablet PC in live applications or when using more than
8 channels.
Basic terms
TCP/IP address
The TCP/IP address is unique to each unit connected in
the network. Two units in a network must therefore never
have the same IP address. However, to see each other the
first three digits which per default are “192.168.1” for the
EQ Station MUST be the same.
The EQ Stations default IP address is:
192.168.1.100
Subnet Mask
The Subnet Mask defines a group of units in the network.
That covers both EQ Stations and computers etc.
For the units to see each other the Subnet Mask MUST be
identical.
The EQ Station default Subnet mask is: 255.255.255.0
Specifically for the EQ Station
The EQ Station also has a few other interesting networkrelated topics. (please also see the description of the Setup
- Network and Devices page and also the “Quick Setup
Reference” at pages 6-7)
Device Name:
A name that is assigned to each individual EQ Station.
The Device Name MUST be unique for each unit !
As all EQ Stations in a Subnet Mask can be operated from
any of the units within the Subnet, the Device Name also
serves as a convenient identifier. The name will appear in
the operating displays.
Device Number:
The Device number specifies in which order, channels will
be assigned to Cluster locations when you perform a
“Cluster Auto Setup”.
(Please read the description of the Global page and also
the “Quick Setup Reference” at pages 6-7).
38
Using a HUB-switch or not ?
As illustrated on the previous page setups can be made
with or without a HUB-switch. Generally it can be said that
there is no need to use a switch in minor setups with just at
few EQ stations and maybe a PC connected. However, as
soon as the setups expand, increased speed on the update
of the EQ Station user-interfaces is achieved by placing
one or more switches in the setup at convenient places.
(see illustration at the previous page)
Be aware
- when no HUB or switch is used you must use Crosscoupled Ethernet CAT-5 cable for the network
connection.
- when a HUB or switch is used you must use standard
(non-cross-coupled) ethernet cables.
- when connecting directly to a computer there is an
uncertainty of which cable type to use. Most computers
work with a cross-coupled ethernet cable.
Subnet Mask - TCP/IP address
Win 2000 / Win NT / Win XP
The following examples are based on a Windows 2000
operating system. Illustrations etc. may vary slightly
between other operating systems.
Please note that a working TCP/IP protocol must be
installed on your computer before attempting to hook up
the computer on the network.
To find the TCP/IP address and the Subnet Mask settings
on your computer running Windows 2000:
• Go to Control Panel, Network and Dial UP Connections
• Double-click on your connection and select “Properties”
EQ STATION IN A LOCAL AREA NETWORK
• Select Internet protocol (TCP/IP) and “Properties”
• Mark “Use the following IP address.”
The EQ Station Subnet Mask can be altered, to
match your network Subnet Mask if this differs from
the standard 255.255.255.0. Please see the section:
Updating EQ Station Software
To update EQ Station and Motofader 64 software they must
be correctly setup in a network with a PC according to the
previous section.
Software can be downloaded via www tcelectronic.com
Download the software to an empty folder on your
computer.
Follow the instructions accompanying the software.
• Type in an IP address where the first three numbers are
identical to the three numbers in the EQ Stations IP
address. The fourth number MUST be unique.
Suggestion: 192.168.1.110
• Set Subnet mask identical to the EQ Stations Subnet
mask. The Default EQ Station Subnet mask is:
255.255.255.0
• For a network setup with EQ Stations the Gateway
settings can be left blank/ignored.
39
VIRTUAL EQ STATION
The VirtualEQ Station enables full control of all features from a Stationary PC, Laptop or Tablet PC via LAN. A PC
with a wireless system gives the ultimate flexibility with “no strings attached”.
Virtual EQ Station is designed to meet the busy live-engineers need for an “easy-to-learn Editor.
If you are familiar with the EQ Station already you will find the Virtual EQ Station extremely easy to operate.This
manual section describes the additional features in the software editor in detail. For detailed information of the
generic features, please refer to the descriptions elsewhere in this manual.
ON/OFF keys
Channel Select
40
EDIT keys
ADJUST keys
VIRTUAL EQ STATION
The drop down menus
Open the drop down menus easily using the keyboard by
pressing ALT followed by the first letter in each of the
dropdown menu headlines.
Example:
To enter the Edit menu press ALT followed by “E” which is
marked with and underscored as “Edit”.
Edit
Flat:
Flattens the EQ curve for the current selected channel.
Shortcut: Ctrl+X
Copy:
Copies the current EQ settings for the selected channel.
Shortcut: Ctrl+C
Paste:
Pastes copied EQ settings to the selected channel.
As the paste function is destructive it must be confirmed
via the pop-up screen that appears.
Shortcut: Ctrl+V
View
A few functions to optimize the appearance on the screen
to your liking.
Toolbar:
Hides/shows the toolbars.
Status:
Hides/shows the Status bar in the bottom of the editor.
Small size:
Reduces the size of the Editor window.
Global
Enters the Global View page from where you setup the
Cluster of channels and channel assignments.
Recall
Opens a Recall display similar to the one found on the EQ
Stations front.
Store
Opens the Store display similar to the one found on the EQ
Stations front.
Preset path:
By default a preset folder is created in the folder where the
Editor is installed. The default installation folder is:
C:/Program Files/TC Electronic/EQ Station
However, preset folders can be created on any location on
your harddisk.
Utility
UI channel sync:
In “on” position the EQ Station display stays in sync with
the changes performed on the PC Editor.
Show preset name:
In on position the preset name will be displayed in the
bottom line of the display. I you generally do not work in
presets you may find having the preset name in the display
redundant. The choice is yours.
Graph EQ graph:
It is possible to view the Graphic EQ settings either as
• Bars
• Curve
• Bars & Curve
see page 23 for examples
Framerate:
Via the Channel page a delay per channel can be set. The
Delay time is show on the channel page in ms, feet, meters
and Frames. The Framerate should be set according to the
connected devices.
Default settings:
Press OK and confirm to recall factory default settings.
Parameters in the Setup menu are NOT recalled/reset.
Presets are kept.
All
Via the All page it is possible to make graphical EQ
adjustments to all channels at the same time. All changes
are relative to the settings already made on the individual
channels.
Group
Channels in the group are selected either by left-clicking on
the Channel numbers using the mouse:
Tools
Setup:
For description of Device Num; Device Name and Cluster
please see page: 6-7 or 29.
Motofader port:
Select to which Com port the Motofader is connected.
- or by selecting channels on by one using the ARROW
keys followed by Enter.
41
TECHNICAL SPECIFICATIONS
EQ Station
Analog Input to Output
Connectors:
Input Impedance:
Output Impedance:
XLR balanced (pin 2+, pin 3-)
11/4 kohm (Balanced/unbalanced):
40/20 ohm (Balanced/unbalanced)
Max Input Level:
Max Output Level:
+15 to +30dBu with analog domain scaling
+15 to +24dBu balanced with analog domain scaling
Dynamic Range:
THD:
Frequency Response, +0/-0.1dB:
> 110dB (unweighted), BW: 20-20kHz, note 1
< -100dB @ BW: 20-20kHz
12 Hz - 20 kHz
Crosstalk:
< -110dB, 20 Hz to 20 kHz
AD and DA Conversion:
AD and DA + Processing Delay Total:
24 bit (Dual bit delta sigma sampling at 4.1/5.6/6.1/6.1 MHz)
1.54 ms
DSP
Internal sample rate:
Internal processing:
DSP power:
48 kHz, high performance low jitter clock circuit
Routing and processing 48 bit fixed point throughout
600 Million Instructions Per Second
Control Interface
Ethernet:
Ethernet passive HUB for network:
MIDI:
Motofader 64 remote:
10/100 Mbits/s, Base-T (RJ45 XLR-housed EtherCon connector)
10/100 Mbits/s, Base-T (RJ45 XLR-housed EtherCon connector)
In/Out (5-pin DIN connector)
Custom serial interface (9-pin D-Sub connector)
General
Display:
Finish:
Anodized aluminum face and side plates
Plated and painted steel chassis
Dimensions:
Mains voltage:
Power consumption:
19" x 3.50" x 11,5"
100 to 240 VAC, 50 to 60 Hz (auto-select)
<45W
EMC Complies with:
EN 55103-1 and EN 55103-2
FCC part 15, Class B
CISPR 22, Class B
IEC 60065, EN 60065, UL 6500 and CSA E65
CSA File#LR108093
0° C to 50° C ( 32° F to 122° F) / -30° C to 70° C (-22° F to 167° F)
Max. 90 % non-condensing
1 year *
Safety Certified to:
Technical Specifications are subject to change without notice.
Color TFT, QVGA 320x240 pixels
450 cd/m2 Luminance
Operating/Storage Temperature:
Humidity:
Warranty Parts and Labor:
* Up to 2 pixel errors in the TFT display is NOT considered as a
malfunction and does not invoke the warranty.
42
Digital I/O card
Connectors:
D-SUB, 25 pole (8 channels AES/EBU in/out)
Format:
Internal sample rates:
Internal clock precision:
External sample rates:
AES/EBU (24bit)
44.1kHz and 48kHz
+/- 25 PPM
44.1kHz and 48kHz +/- 200 PPM* or wide 30 – 50kHz
Jitter rejection filter (4'Th order filter):
Jitter gain:
Interface jitter:
< -3dB @ 10 Hz, < -68dB @ 500 Hz, < -100dB @ 1.3 kHz
< 1 dB @ 2Hz
<1ns peak, BW: 700Hz – 100kHz
Digital output phase:
<1%
Input variation before sample slip:
-28%>+50%
Processing Delay digital I/O:
0.7 mS
Frequency response DIO:
20 Hz - 24 kHz @ 48 kHz
20 Hz - 22 kHz @ 44.1 kHz
MIDI IMPLEMENTATION
EQ STATION - MIDI IMPLEMENTATION 09/03-04
Function
Transmitted
Recognized
Basic Channel
Default
Changed
1
1-16
1
OMNI-1-16
Mode
Default
Messages
Altered
X
X
True Voice
X
X
X
X
Velocity
Note ON
Note OFF
X
X
X
X
After Touch
Key’s
Channel
X
X
X
X
Pitch Bend
X
X
Control Change
O
O
Prog Change
O
O
SysEx
X
X
Note Number
Common
Song Pos
Song Sel
Tune
X
X
X
X
System real time
Clock
Commands
X
X
X
X
Aux Messages
Local ON/OFF
All Notes OFF
Active Sense
Reset
X
X
X
X
X
X
X
X
O:YES
X:NO
Mode 1: OMNI ON, POLY
Mode 3: OMNI OFF, POLY
Remarks
Mode 2: OMNI ON, MONO
Mode 4: OMNI OFF, MONO
43
MOTOFADER 64
The Motofader 64 is a quick-access module remote dedicated to solely control the Graphic EQ part of the
processing in EQ Station. The layout is very straight-forward and enables fast and direct operation of multiple
Graphic EQ's, for applications where physical faders are the most reliable way of making adjustments.
The Motofader 64 connections include mains voltage (build-in power supply) and serial RS232 connection for EQ Station.
When connected to a setup with multiple EQ Stations, the Motofader will have direct access to all available channels on
the network without further connections.
Below is an overview of the Motofader 64 and a brief description of it’s components. In the following is a detailed
description of functionality and options.
Overview
GRAPH EQ switch
Fig 2
The Motofader 64 controls only the Graphical EQ’s in the
EQ Station. The GRAPH EQ ON/OFF switch gives instant
monitoring option of on/off status for the selected channel,
and enables comparison of current settings versus a flat
graphic EQ.
CHANNEL and the CHANNELS SELECT buttons
Fig 1
44
Depending on how many EQ Stations you have
connected in your setup, you may have up to 64
channels of EQ.
• With the CHANNEL SELECT buttons you select which
group of channels to select from (1-16; 17-32; 33-48;
49-64)
• With the CHANNEL button you select channel within
the selected group.
When two channels are stereo-linked, both channels
LEDs will light up. The settings for the two channels will
be identical.
MOTOFADER 64
ALL, GROUP, COPY/PASTE
ALL
Allows adjustment of ALL channels in the the network (up
to 64) to be adjusted simultaneously.
When pressing the ALL button the faders will move to 0dB.
Changes on the faders will be applied to all channels
relatively to their current state. E.g. if a channel is set to
-3dB at 250Hz and 250Hz is moved to +2dB at the ALL
display, the new actual setting will be -1dB for the channel.
The changes on the ALL function are remembered until
power down, or until Reset is selected on the display and
OK is depressed. When a Reset is performed, the fader
settings will return to 0dB, but without performing changes
on the EQ channels settings.
If a frequency on a channel is not able to perform the
requested relative change because it has reached the max.
or min. value (+/-12dB), an indicator will be switched on in
the display.
COPY/PASTE
The Copy /Paste functions allows you to easily copy the
Graphical EQ settings from the current channel to one or
more channels.
The function is especially useful when one channel is
adjusted in a monitor-mix setup, and these settings are
then copy/pasted into other channels as starting point for
further refinement.
Copy Paste - step by step:
• Select Channel on the Channel-select buttons and press
the Copy button.
• Select the channel or channels you want to paste into,
with the Channel-select buttons.
• Press Paste.
• Press OK to confirm. The transfer of settings is now
done.
Flatten EQ function
Pressing COPY and PASTE simultaneously for 2 seconds
will flatten the currently displayed Graphic EQ.
There is no "undo" option for this function.
DISPLAY
If the Graphic EQ is locked with the Security function, no
changes will be applied.
GROUP
A group of channels can be selected and adjusted
simultaneously. Press GROUP and select any channel
between 1 and 64.
The Group functionality is similar to the ALL channels
adjust function on the EQ Station itself, except that it is
here possible to make a pre-defined group of channels
instead of adjusting all channels.
The Motofader 64 display.
The bright 2x16 character display with blue background will
show various information's such as e.g. frequency, level
and channel name.
HOME
The Group is selected on available channels in the device.
If in a network, a group can be made among all possible 64
channels.
When pressing the Group function, press or depress the
channel select buttons (LEDs will light up) to setup your
selection of channels.
The Group will be remembered until power-down.
Different groups can be built on MotoFaders and EQ
Stations
Pressing the HOME button brings you back to the Channel
select view which you can see as a generic starting point.
When adjusting a fader level, selected frequency and gain
will be shown at the display.
If you want to monitor a specific frequency gain on the
display without adjusting the fader, use the arrow keys to
find these specific parameters.
45
MOTOFADER 64
I/O
Use the arrow CURSOR keys for general navigation and
adjustment on the Motofader display, e.g. for adjusting
levels and LoCut.
MOTORIZED FADERS
The I/O button gives access to adjust LoCut and I/O levels.
Select of function and adjustment is done with the ADJUST
wheel and ARROW keys.
A/B
Press COMPARE to compare current settings with the
settings from the loaded preset.
A - is the settings from the stored preset.
B - is the adjusted preset.
If the Edited indication is not present in the display, and
pressing the A/B button does not change graphic EQ
values, current settings are the unmodified preset values.
As soon as you change a fader-value, the Edited flag will
appear.
The A/B compare only affects the Graphic EQ part of the
processing.
OK
The OK button is used to confirm destructive operations
such as the reset of “All” and “Group” settings, as well as
the “Paste” function. When confirmation is needed this will
be indicated in the display.
ADJUST wheel
The ADJUST wheel is used to change parameter values.
CURSOR
46
29 high-quality 60mm motorized faders, covering
frequencies from 31Hz to 20kHz is the main adjustment
section. The faders move fast and precisely, giving a truly
reliable picture of the Graphic EQ settings for selected
channel(s).
MOTOFADER 64
Store/Recall via Motofader 64
It is possible to store and recall Channel and Scene
presets via the Motofader 64. These functions are
particular useful e.g. when EQing wedges while standing in
front of them.
Presets can be loaded and handled ONLY to and
from the physical EQ Station unit that the Motofader
64 is connected to.
Step by step:
• Press HOME to enter the preset handling features.
• Use the two CURSOR keys to select function and the
ADJUST wheel to set value.
• To confirm functions - press OK.
The functions are:
- Preset Folder - select in which folder you wish to store or
recall from. This is the folder in which all of the following
operations are handled.
Scene Recall
<Preset1
>
- Scene Store - as with the Channel Store function you
have two options: Either overwrite an existing preset in
the selected folder or select the auto generated new
preset. Auto-generated presets are labeled “ScPresetxx”
where xx is a number in line based on which presets
already exist in the folder.
If e.g “ScPreset10” exist the next Auto-generated name
is “ScPreset11”.
Auto-generated presets names can be corrected later
from the EQ Station where the preset are stored.
Example:
Scene Store
<ScPreset1
>
Example:
Preset Folder
<Default
>
As new presets cannot be renamed from the
Motofader you may see the advantage of preparing
preset names on the EQ Station before setting up
presets when equing wedges.
- Channel recall - select which Channel preset you wish to
recall into the currently recalled channel.
Example:
Ch3
Ch. Recall
<ChPreset1
>
- Channel Store - you have two options: Either overwrite
an existing preset in the selected folder or select the auto
generated new preset. Auto-generated presets are
labeled “ChPresetxx” where xx is a number in line based
on which presets already exist in the folder.
If e.g “ChPreset10” exist the next Auto-generated name
is “ChPreset11”.
Auto-generated presets names can be corrected later
from the EQ Station where the preset are stored.
Example:
Ch3
Ch. Store
<ChPreset6
>
- Scene Recall - select which scene to recall within the
selected preset folder.
47