1
Apple II Pi Installation and User's Manual
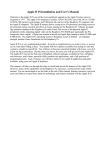
Welcome to the Apple II Pi: one of the most significant upgrades to the Apple II series since its
inception in 1977. The Apple II Pi integrates a modern 32-bit CPU/GPU, SD card, HDMI, and USB all
courtesy of the Raspberry Pi running as a co-processor to the Apple II. The Apple II’s 6502 remains
active, acting as an I/O processor, providing access to its keyboard, mouse, joystick and drives to Linux
running on the Raspberry Pi. By utilizing the GSport Apple IIgs emulator, the Apple II Pi can also be
the ultimate Apple II accelerator: emulating a maxed out Apple IIgs while seamlessly integrating most
of your physical Apple II peripherals.
Apple II Pi is a very sophisticated product: it can be as complicated as you want it to be, or as simple as
you want (and willing to buy). Your dealer will have options available from a plug-in, turnkey system
to a build-it-yourself kit. You will have to become somewhat familiar with Linux, even if it is just the
log in procedure. But the more you invest, the more you will get out of your Apple II Pi. The Apple II
Pi's operating system is Raspbian: an industrial strength, modern Linux distribution. The Apple II Pi
can run the full suite of Raspbian software packages available for free, including web browsers, mail
clients, powerful office productivity applications, and a full spectrum of programming tools. With
GSport, you will have almost every Apple II application and game available, using your real Apple II
hardware.
The Apple II Pi adapter card can connect to the Raspberry Pi two ways: an internal, directly attached
Raspberry Pi and an externally, ribbon cable attached Raspberry Pi. The internal mount is a neater
installation but it is very restrictive: it only works in an Apple //e with added cooling fan and access to
the video/audio ports is limited. All others should use the external attachment.
This manual will take you through the steps to install and access the features of the Apple II Pi.
However, many of the capabilities of the Raspberry Pi, and Linux, are beyond the scope of this manual.
You are encouraged to use the links at the end of this manual, Internet resources, and even your local
library to learn more about the technology and features included with the Apple II Pi.
Table of Contents
Part I: Installation...............................................................................4
Step
Step
Step
Step
Step
Step
Step
Step
Step
Step
Step
Step
Step
Step
0: Requirements.................................................................................4
1i: Internally mounted Pi parts identification........................................4
1e: Externally mounted Pi parts identification......................................5
2: Raspberry Pi Raspbian Setup...........................................................7
2.1: Apple II Pi Update and Upgrade.....................................................7
3: Apple II Setup.................................................................................7
3.1: Apple II configuration...................................................................8
4: Installing the Apple II Pi adapter card..............................................8
4i: Internal Pi mounting:......................................................................8
4e: External Pi mounting:....................................................................9
5: Booting Up....................................................................................10
5.1: Initial Apple II configuration........................................................10
5.2: Logging in..................................................................................10
6: Keeping Apple II Pi Updated...........................................................11
Part II: User Input..............................................................................12
Keyboard Input:........................................................................................12
Apple ][+ Keyboard Mapping (with Shift-Key mod):....................................................12
Apple //e, //c, IIgs Keyboard Mapping:........................................................................13
Mouse Input:............................................................................................14
Gameport Input:.......................................................................................14
a2joy:.......................................................................................................................... 14
a2joymou:.................................................................................................................. 14
a2joypad:................................................................................................................... 14
Part III: FUSE ProDOS driver...............................................................16
fusea2pi:..................................................................................................16
a2mount:.................................................................................................16
fusermount:.............................................................................................16
Part IV: GSport Apple IIgs Emulator.....................................................17
Installation:..............................................................................................17
Keyboard Input:........................................................................................17
Joystick Input:..........................................................................................17
Apple II storage media:.............................................................................18
GSport exit:..............................................................................................18
Apple II User:............................................................................................18
Part V: Tools...................................................................................... 19
Interactive Tools:......................................................................................19
a2mon:....................................................................................................................... 19
a2term:....................................................................................................................... 19
Development Tools:...................................................................................20
bload:......................................................................................................................... 20
brun:........................................................................................................................... 20
Floppy Disk Image Tools:...........................................................................20
dskread:..................................................................................................................... 20
2
dskwrite:..................................................................................................................... 20
Supplemental Files:..................................................................................21
bintomon:................................................................................................................... 21
merlin2text:................................................................................................................ 21
text2merlin:................................................................................................................ 21
a2libc:......................................................................................................................... 21
a2slideshow.mon:....................................................................................................... 21
a2slideshow.bin:......................................................................................................... 21
execfile:...................................................................................................................... 22
Part VI: Advanced Configuration.........................................................23
Loading joystick driver at boot time:..........................................................23
Mounting ProDOS devices automatically:...................................................23
Modification for Composite Output (Internal mounting):.............................24
Appendix A: Hmmm, that didn't work (troubleshooting).......................25
Appendix B: Theory of operation........................................................26
A2PI:........................................................................................................26
a2pid:......................................................................................................26
Appendix C: Links..............................................................................27
Acknowledgements:..........................................................................28
3
Part I: Installation.
These instructions will lead you through setting up the Raspberry Pi to connect with your Apple II.
This is a multi-step process; make sure you follow the instructions closely. It might help to read
through the steps before attempting it live. But be forewarned, this is a sophisticated product and will
require some amount of technical expertise with the Apple II and especially the Raspberry Pi running
Linux. You should have in your possession a Model A or Model B Raspberry Pi computer. The Apple II
Pi adapter card, labeled as such at the top, is the connection between the Raspberry Pi and the Apple II.
It provides power and communications channel between the two. There are two methods of attaching
the Raspberry Pi to the Apple II Pi adapter card: internal mounting and external mounting. The internal
mount is a neater installation but it is very restrictive: it only works in an Apple //e with added cooling
fan and access to the video/audio ports is limited. All others should use the external mounting.
Step 0: Requirements.
In addition to the Apple II Pi adapter card, you will need an Apple ][+ with 64K or newer Apple II, a
floppy disk drive, an A2PI floppy disk, a Raspberry Pi, a configured SD card, and a video cable
(composite or HDMI).
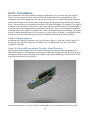
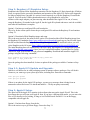
Step 1i: Internally mounted Pi parts identification.
The internally mounted Apple II Pi card uses the female header at the top where the Raspberry Pi's
GPIO header plugs in. The orientation is such that the USB ports stick out the front, the SD card sticks
out the back (over the top of the chips on the adapter card), and the HDMI port is at the bottom. Refer
to the following picture for clarification:
Note that the composite video port and the audio headphone jack are oriented upwards. Due to the
4
limited space inside the Apple IIe case, these ports are inaccessible without additional hardware
modification with the lid closed. The HDMI port, oriented at the bottom, requires a 90 or 270 degree
adapter for access. Some HDMI cables can be bought with this angle built-in and tend to have more
clearance than just the adapter. Depending on the slot you want to plug your Apple II Pi in to, the 90 or
270 degree adapter will provide the access to the HDMI port and clear the motherboard standoffs. If
your monitor only has a DVI connection, you will need either a HDMI ↔ DVI cable or HDMI ↔ DVI
adapter. All of these cables and adapters can easily be found on Amazon.com (links in Appendix).
Refer to the following pictures to see which adapter/cable you need for your installation:
90 degree HDMI adapter
270 degree HDMI cable
The USB (and Ethernet on Model B Pi) ports are easily accessed at the front end of the card. You do
NOT need an external power adapter for the Raspberry Pi: it derives power from the Apple II Pi
adapter card.
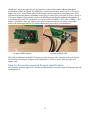
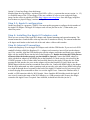
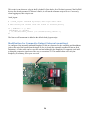
Step 1e: Externally mounted Pi parts identification.
The externally mounted Apple II Pi card uses the ribbon cable between the Apple II Pi adapter card and
the Raspberry Pi:
5
The ribbon cable is attached to the back of the Apple II Pi adapter card with the red stripe towards the
back of the card. The other end of the ribbon cable attached to the GPIO header on the Raspberry Pi
with the red strip toward the SD card end of the Pi. A Raspberry Pi case is recommended; it will need a
cutout for the GPIO header. You do NOT need an external power adapter for the Raspberry Pi: it
derives power from the Apple II Pi adapter card.
6
Step 2: Raspberry Pi Raspbian Setup.
Raspbian is the Debian Linux distribution customized for the Raspberry Pi. Basic knowledge of Debian
Linux is required for the successful installation and operation of the Apple II Pi. Refer to the Appendix
for links to helpful sites if needed. It is easiest, but not required, to set up the Raspberry Pi outside the
Apple II. You will need a USB keyboard and mouse to set up Raspbian as well as the
monitor+cable+angle-adapter you plan on using when installed in the Apple II. You can, of course,
setup the Raspberry Pi attached to the Apple II, but the Apple II keyboard and mouse won't be available
until after the installation is complete.
Option 1: Purchase pre-configured SD card from dealer.
This is by far the easiest option. Insert the pre-configured SD card into the Raspberry Pi and continue
to Step 2.1.
Option 2: Download official Raspbian image and setup.
This is the most involved, but most flexible, option. First, download the official Raspbian image from
the Raspberry Pi Foundation (http://www.raspberrypi.org/downloads) and copy to your SD card. Insert
the SD card and boot the Raspberry Pi. You will go through the NOOBS installation where you will
select Raspbian as the OS to run (https://github.com/raspberrypi/noobs/blob/master/README.md).
The initial Raspbian boot will automatically run raspi-config, the Raspberry Pi configuration program
(http://elinux.org/RPi_raspi-config). Once you have configured Raspbian, expanded the file system,
and reboot, login as the default user: pi, password: raspberry. Download and install the Apple II Pi
package using the following commands:
wget schmenk.is-a-geek.com/tarfiles/a2pi_armhf.deb
sudo dpkg -i a2pi_armhf.deb
Once the package has been installed, it's time to update all the packages available. Continue to Step
2.1.
Step 2.1: Apple II Pi Update and Upgrade.
Debian is well known for its solid packaging system to manage software packages. You will do this
whenever you want to get your system up-to-date, including now. Enter these commands:
sudo apt-get update
sudo apt-get upgrade
If there is an update for the Apple II Pi package, you may get a message about it being from an
untrusted or unverified source. Go ahead and install it – I really am pretty trustworthy.
Step 3: Apple II Setup.
The other half of the Apple II Pi equation is the software that runs on the Apple II itself. This is the
boot floppy that you will start your Apple II from. If you have a different boot media, you can move the
files over to that device for booting, as long as it is ProDOS based. ProDOS 1.9 is on the floppy;
compatible with all Apple IIs.
Option 1: Purchase boot floppy from dealer.
This is the easiest way to get a boot floppy. Proceed to Step 3.1
7
Option 2: Create boot floppy from disk image.
Installed from the a2pi package: /usr/share/a2pi/A2PI-x.y.PO (x.y represent the current version, i.e. 1.2)
is a ProDOS image of the 5¼ boot floppy. There are a number of ways to create a physical floppy
image, but the easiest is probably ADTPro (http://adtpro.sourceforge.net). Once the floppy image has
been written to a physical floppy, continue to Step 3.1.
Step 3.1: Apple II configuration.
On the boot floppy is a program, CONFIG. You must run this program to configure the slot number of
the Apple II Pi adapter. The Apple II Pi adapter card will run just fine in slot 3, if that makes your
choice any easier.
Step 4: Installing the Apple II Pi adapter card.
There are two versions of the Apple II Pi adapter card: internal mounting and external mounting. The
internal mount has a female header at the top where the Pi attaches to directly. The external mount has
a 90 degree male header on the back side of the card where a ribbon cable attaches.
Step 4i: Internal Pi mounting:
Connect the Raspberry Pi to the Apple II Pi adapter card with the GPIO header. If you received a PCB
standoff to further solidify the Raspberry Pi ↔ adapter card connection, insert it first into the adapter
card. Very carefully, align the GPIO header pins with the adapter card header and firmly press together.
Make sure the standoff inserts into the hole in the Raspberry Pi. Double check that the GPIO pins are
all inserted into the header properly, no pins should be exposed. Connect the HDMI adapter (or
cable with built-in adapter) to the HDMI port on the Raspberry Pi. Make sure the slot selected in the
CONFIG program is clear of other cables and carefully maneuver the Apple II Pi into the slot. When
pressing the card into the slot, press on the adapter card, not the Raspberry Pi itself. Make sure the
HDMI adapter/cable has clearance around the front of the slot. Connect the HDMI cable to the adapter.
Run the cable underneath any other expansion cards out one side or the other. Some HDMI cable plugs
are a tight fit through the access panels in the back of the Apple II. Find the best fit, but you may have
to shave the plug down somewhat to allow it to exit the Apple II case. Connect the Ethernet cable, if
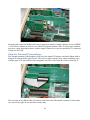
needed, or USB extension cable for Wi-Fi dongle. I have found the RFI shielding inside the Apple II
case severely restricts the range of the Wi-Fi dongles, so a USB extension cable to move the dongle
external to the Apple II case is required. Once installed, it should look like this (in slot 2):
8
Insert the other end of the HDMI cable into an appropriate monitor. Another option is to use an HDMI
↔ DVI cable or adapter in order to use a dedicated computer monitor. Older 4:3 aspect ratio monitors
may have a more appealing aesthetic with the Apple II than newer wide-screen monitor/TVs, and most
of them are DVI only.
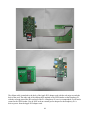
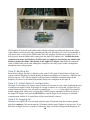
Step 4e: External Pi mounting:
The external mounting of the Raspberry Pi involves the Apple II Pi adapter card and a ribbon cable to
bring the Pi external to the Apple II case. This resolves many clearance, heat, and accessibility issues
with the Apple II Pi, but looks less like an upgrade card. Here is the backside of the card (in Slot 2):
The red stripe on the ribbon cable will connect on the back end of the header connector. Fold it neatly
so it can exit the Apple II case and clear nearby cards:
9
The Raspberry Pi connects to the ribbon cable with the red stripe toward the end opposite the yellow
video connector and next to the edge containing the SD card. A Raspberry Pi case is recommended. It
will need to have a cutout for the GPIO header. Do NOT attach an external power supply to the Pi – it
derives power from the ribbon cable coming from the Apple II Pi adapter card. . Double-check the
connections to ensure the Raspberry Pi GPIO pins are completely inserted into the ribbon cable
header as well as the ribbon cable header on the Apple II Pi adapter card. Either the composite
video or HDMI video can be used although the composite video may require further configuration
through the raspi-config program.
Step 5: Booting Up.
Insert the boot floppy into drive 1 and turn on the Apple II. The Apple II should start its floppy boot
sequence and the Raspberry Pi should identify the monitor and display its boot process. Sometime into
the boot process, if all is OK, the Apple II will beep when it establishes communication with the
Raspberry Pi. However, the initial boot probably needs to be configured on the Apple II.
Step 5.1: Initial Apple II configuration.
The Apple II will either try to connect using a serial card (if present) or issue a buzz signifying the need
to configure the Apple II client. If the Apple II is trying to connect on a serial card, just press a key to
exit the connection process. You will need to manually type run config. If the Apple II recognized it
needed configuration and buzzed, it will run the CONFIG program automatically. Enter the slot # of
the Apple II Pi adapter card, press the RETURN key, and the Apple II will attempt to re-establish
communication with the Pi. A normal beep will be issued when it connects.
Step 5.2: Logging in.
Welcome to the Apple II Pi. You can login using the Apple II keyboard using the username: pi and
password: raspberry. You can navigate the X Desktop with the Apple II mouse if you have one. If you
don't have an Apple II mouse, or prefer a USB mouse, plug it in to the USB port on the Raspberry Pi.
10
Both mice can be active simultaneously. Ditto for the keyboard: plug in a USB keyboard if you want to
supplement the Apple II keyboard (which lacks many modern keys). Continue on to the rest of the
Apple II Pi documentation to see how you can interact with your Apple II devices and use the GSport
emulator to turn your Apple II into the ultimate IIgs upgrade.
Step 6: Keeping Apple II Pi Updated.
Debian Linux, of which Raspbian is a port of, is known for it’s powerful package system that makes
installing software and maintaining your system very easy. Whenever you want to update your system,
issue the commands from Step 2.1:
sudo apt-get update
sudo apt-get upgrade
This will install all available updates. When upgrading the a2pi package, the Apple II keyboard may
become unresponsive – press Control+Reset to re-establish communication between the client and
server. If you find an update to the Apple II Pi boot floppy, you can easily overwrite the floppy in drive
1, slot 6 with this command:
dskwrite /usr/share/a2pi/A2PI-x.y.PO
(x.y represent the current version, i.e. 1.2). Label your floppy disk so you know what version it is. You
will be prompted to overwrite the existing volume; respond with ‘y’. Afterward, you will also need to
re-run the CONFIG program to set the slot # for the Apple II Pi adapter. Exit the Apple II client with
OpenApple+SolidApple+Delete key combination. Type:
run config
Enter the slot #. The Apple II will attempt to reconnect to the Raspberry Pi. There shouldn’t be many
updates to the boot floppy.
11
Part II: User Input.
Keyboard Input:
The Apple II Pi Linux daemon, a2pid, is responsible for mapping the ASCII characters from the Apple
II keyboard into modern scan codes used by the Linux input subsystem. Because of the limited number
of keys, the OpenApple and SolidApple keys are used as modifiers to the other keys. There is no
requirement to use the Apple II keyboard. Simply plug any compatible USB keyboard into the
Raspberry Pi, they will both be active simultaneously.
Apple ][+ Keyboard Mapping (with Shift-Key mod):
Paddle button 0 is mapped to the OpenApple key, which is mapped to the ALT (Alternate) key.
Paddle button 1 is mapped to the ClosedApple key, which is used as a FN (Function) modifier key.
SHIFT+CTRL+A is the Caps Lock toggle.
Note: The Apple ][+ is required to have the Shift-Key mod, and have paddles or joystick connected to
the game port.
Key
Alone
+SHIFT
+CTRL+SHIFT
+FN
←
→
←
→
DEL
TAB
DEL
TAB
HOME
END
1
1
!
!
F1
2
2
“
“
F2
3
3
#
#
F3
4
4
$
$
F4
5
5
%
%
F5
6
6
&
&
F6
7
7
‘
‘
F7
8
8
(
(
F8
9
9
)
)
F9
0
0
_
_
F10
Q
q
Q
NUL
q
Z
z
Z
~
z
X
x
X
`
x
P
p
P
@
p
N
n
N
^
n
12
I
i
I
{
i
O
o
O
}
o
L
l
L
|
l
J
j
J
[
j
K
k
K
]
k
M
m
M
\
m
Escape
ESC
“Exit”
“Exit”
CTRL+ESC
Two special key sequences have a backdoor function for Apple II Pi: Shift+Escape will exit the Apple
II client code, returning keyboard control back to the Apple II. If you want to resume interaction with
the Linux daemon, you can either re-run the A2PI:STARTUP program, or reboot the A2PI floppy. The
other key sequence, Control+Reset will re-establish the connection between the client and server. If
ever the Apple II keyboard becomes disconnected with the Raspberry Pi, Control+Reset should fix it.
If the keyboard is still not responsive, one or both of the Apple II and Raspberry Pi may need to be
rebooted.
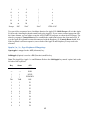
Apple //e, //c, IIgs Keyboard Mapping:
OpenApple is mapped to the ALT (Alternate) key.
SolidApple (Option) is used as a FN (Function) modifier key.
Note: The Apple IIgs, Apple //c+ and Platinum IIe have the SolidApple key named ‘option’ and on the
left side of the keyboard.
Key
Alone
+FN
←
→
←
→
HOME
END
↑
↑
PGUP
↓
↓
PGDOWN
Tab
TAB
INS
1
1
F1
2
2
F2
3
3
F3
4
4
F4
5
5
F5
6
6
F6
7
7
F7
8
8
F8
9
9
F9
13
0
0
F10
-
-
F11
=
=
F12
Delete
BS
DEL
Escape
ESC
CTRL+ESC
Return
ENTER
LF
Two special key sequences have a backdoor function for Apple II Pi: OpenApple+SolidApple+Delete
will exit the Apple II client code, returning keyboard control back to the Apple II. If you want to
resume interaction with the Linux daemon, you can either re-run the A2PI:STARTUP program, or
reboot the A2PI floppy. The other key sequence, Control+Reset will re-establish the connection
between the client and server. If ever the Apple II keyboard becomes disconnected with the Raspberry
Pi, Control+Reset should fix it. If the keyboard is still not responsive, one or both of the Apple II and
Raspberry Pi may need to be rebooted.
Mouse Input:
The Apple II mouse, if connected, will show up as a standard Linux mouse. The OpenApple key can
modify the single mouse button to return RIGHT_BTTN, and the SolidApple key can modify the
mouse button to return MIDDLE_BTTN. If you don't have, or don't want to use an Apple II mouse,
any compatible USB mouse can be plugged into the Raspberry Pi. The USB mouse won't be available
to the Apple II, but Linux and the GSport emulator will see it and use it.
Gameport Input:
Any Apple II gameport device can show up as a Linux device using one of the following drivers. A
joystick driver can be made to load automatically at boot time by inserting the driver into the
'/etc/rc.local' file. These drivers can be loaded by hand, using the command:
sudo <driver>
with <driver> being one of the three following:
a2joy:
Any Apple II game-port device can show up as a regular Linux joystick with the a2joy driver. There is
an additional X server rule installed by the a2pi package to make sure joysticks don't get used as mouse
control when running the X server.
a2joymou:
You can use the joystick to control the mouse with the a2joymou driver. The default mouse button is
connected to button 0. However, because the joystick buttons share the same circuitry as the
OpenApple and ClosedApple keys, the sequence to get the RIGHT_BTTN mouse click, you must
first depress button 1, then depress button 0 (button 1 modifies button 0). This removes the confusion
of using the keyboard Fn-x keys popping up right-click menus.
a2joypad:
The remaining driver, a2joypad, is a poorly tested driver for Koala Pad type devices. It will attempt to
14
make a track-pad out of it. My Koala Pad like device is not working well, so YMMV.
If previous Apple II Pi joystick driver is running, it should be stopped with:
sudo killall <driver>
15
Part III: FUSE ProDOS driver.
The FUSE driver (File system in User SpacE) for Apple II Pi works closely with the Apple II
environment to reflect the FUSE operation into a ProDOS MLI call. The FUSE driver knows very little
about the details of ProDOS. ProDOS itself does most of the work so that compatibility is guaranteed.
fusea2pi:
fusea2pi is the actual FUSE device driver. At start up it calls the ProDOS on_line function to retrieve
all the ProDOS volumes available to the Apple II. fusea2pi then makes a directory for each volume
named after the volume. In addition, each volume is made available as a raw device file named after it's
position in the ProDOS device table. The two default 5¼ drives in slot 6 are always made available for
non-ProDOS format floppies that can still be accessed in a raw mode. This way, volumes can be easily
backed up (copied elsewhere) and emulators can have access to the physical media.
ProDOS file names are munged in the same way that CiderPress attaches the meta information, type
and aux, to the end of the file name, separated by '#'. Also, file names are displayed in upper-case. The
decision to munge the file names in this was it in order to make a very visual distinction between the
ProDOS files and regular *nix files.
The driver can run directly, but the helper script a2mount is the recommended way to mount ProDOS
volumes. Run as:
fusea2pi <mount point> [fuse options..] [+rw]
The last option (must be last) is a fusea2pi only option which allows the raw device files to be
write-able. By default, they are read-only. It can be potentially dangerous to write to the raw device
while Linux accesses the mounted file system. If an emulator is going to be writing to the raw device
files, it is best to leave the mounted file system alone until the emulator is exited.
a2mount:
The a2mount script calls the fusea2pi and fills in some additional parameters to give your user name
the ownership of the files. This is the preferred way to call fusea2pi. It can accept up to two parameters:
one is the mount point, the second is the option +rw argument to make the raw device files write-able.
Run as:
a2mount <mount point> [+rw]
fusermount:
To unmount the ProDOS file system, call the FUSE command as:
fusermount -u <mount point>
Any additional users, which should have the ability to mount the ProDOS devices, need to be added to
the ‘fuse’ group with the following command:
sudo addgroup <username> fuse
16
Part IV: GSport Apple IIgs Emulator.
This section describes the GSport GS emulator enhanced functions for usage with Apple II Pi. There
are two options for running GSport: If you want a full-screen, immersive experience, the gsportfb
emulator is run from the console. When running the X GUI, the gsportx emulator is run in a window
alongside other X applications. By using the gsport command, the appropriate binary for the current
environment will be run: gsportfb for console, gsportx for X desktop. See http://gsport.sourceforge.net
for further information. The default configuration includes the Internet Starter Kit from Ewen Wannop.
You can get more information from his website at:
http://www.wannop.info/speccie/Site/Speccies_Home_Pages.html
Installation:
The GSport emulator can be installed with:
sudo apt-get install gsport
Keyboard Input:
Although it appears you are using an Apple II keyboard on an Apple II, in reality you are using a Linux
keyboard that just so happens to be an Apple II keyboard on a GS emulator running in Linux. To make
the Apple II keyboard useable under Linux, some of the key functions are different than when used as
just a Apple II. The mappings are mostly the same, but a few of the differences are noted below.
The Delete key has been mapped to BACKSPACE for Linux. To get the expected DELETE key
function under GSport, use the SolidApple+DELETE to get the $7F (DEL) character.
The OpenApple key is mapped to ALT, which GSPort maps back to OpenApple, so most operations
that use OpenApple should work as expected.
The SolidApple key is mapped to a Function key modifier. GSport will map F2 to SolidApple
(Option), which is SolidApple+2 on the Apple II Pi keyboard.
The Apple IIgs has a Control Panel that is accessed with OpenApple+CONTROL+ESC. To get this to
work under GSport and Apple II Pi, the sequence OpenApple+SolidApple+ESC is substituted to get
the Control Panel to open.
When running the full-screen frame-buffer GSport emulator, the only way to cleanly exit the emulator
is with ALT+F4 (SolidApple+OpenApple+4).
Joystick Input:
When running the full-screen frame-buffer GSport emulator, the only way to cleanly exit the emulator
is with ALT+F4 (SolidApple+OpenApple+4) or click on the X (close) button on the title bar.
It is very exciting to be able to provide a Linux joystick driver for Apple II joysticks. The Apple II
joystick will operate under GSport exactly like it does when running on Apple II hardware. The a2joy
driver works with Apple II Pi and the Linux input subsystem to provide joystick events to applications.
The a2joy driver can be set up to automatically start when the computer boots, or manually run before
GSport is started. To run manually, type sudo a2joy from the command line. The a2joy driver runs
constantly in the background to poll the joystick. It is very low overhead, but if you need every cycle
17
the Pi provides, you may kill the driver after running GSport with sudo killall a2joy. To get
GSport to use the native Linux joystick, enter the GSport Configuration Panel with F4 (SolidApple+4),
go to the joystick configuration, and select "Native Joystick 1".
Apple II storage media:
Another exciting feature of the Apple II Pi is access to the underlying Apple II storage media from
Linux. To facilitate the access from GSport, raw device files that look like normal Linux files but in
actuality map to the physical devices underneath are made available. GSport can use the raw device
files to gain access to the physical media, although with a performance hit (it is, after all, running on
real Apple II hardware at 1 MHz). GSport can be configured to use files for different disk mappings
through the config.txt file or through the F4 Configuration Panel. There is no requirement that Apple II
Pi devices have to mapped to the same GSport slot/drive device. The FUSE driver has an option to
make the raw device files write-able; by default they are read-only. This can be very dangerous, as
Linux thinks it has exclusive use of the file system. If GSport has write access to the device file, it is
best to stay out of the Linux mapped ProDOS file system until GSport has exited.
GSport exit:
Apple II Pi and GSport work together to provide an experience closer to an accelerated Apple IIgs than
an emulator running in a window on a foreign machine. Be careful, it is actually hard to differentiate
which environment you are really running. Take a moment before you just switch off the power when
you are done! Always exit GSport with SolidApple+OpenApple+4 (ALT+F4), then shutdown Linux
with:
sudo halt
Apple II User:
There is a special user account that can quickly launch the GSport full screen emulator and halt Apple
II Pi on exit that makes the Apple II Pi behave more like a traditional Apple II accelerator. Simply login
in as username: apple2 with an empty password. The default GSport environment will be run. If you
don’t have the pre-configured SD card, the apple2 user can be installed with:
sudo apt-get install apple2user
Exit the emulator with the ALT-F4 (OpenApple+ClosedApple+4) key combination. This will shut the
Apple II Pi down safely.
18
Part V: Tools.
Interactive Tools:
These tools are used to interact with the Apple II from the keyboard and screen. As real Linux tools,
they can also accept I/O redirection to automate keyboard input and capture output. The other common
ability (with the exception of bintomon) of the tools is to be able to connect to Apple II Pi remotely
over the network. A final, optional argument is the IP address of the Apple II Pi computer. The tools
can be built for a multitude of Linux and Unix computers and run remotely, connecting to the Apple II
Pi.
a2mon:
The Apple 1 has a very simple monitor program that can examine and change memory, as well as
execute code. a2mon is modeled after that monitor. As such, it isn't very powerful, but can be a
valuable tool when combined with I/O redirection. You can incorporate complete programs in the
monitor format, or just change a few bytes of memory. Calling code in RAM or ROM is simple.
There is a concept of current address. To specify an address, just enter it first on the command line. To
change memory contents, enter a colon either after a specific address or by it self to use the current
address followed by the bytes separated by spaces. Reading a range of memory involves specifying two
address separated by a period. To begin execution of code (run) at a specific address or current address,
type 'r'. Finally, 'q', will quit the session and return. Run as:
a2mon [IP addr]
a2term:
Probably the most interesting of the tools, a2term connects the Linux console to the Apple II console.
a2term connects to the Apple II running ProDOS BASIC. This is roughly equivalent to using an old
serial terminal connected to a Super Serial Card and issuing commands to redirect the keyboard and
screen I/O hooks.
AppleSoft programs, ProDOS commands, and Monitor commands are all available. Like a2mon, the
input and output can be redirected to files for automated keyboard input and output capture; similar to
running the EXEC command from ProDOS (and DOS 3.3). To quit, use the ESCAPE+Q sequence. To
send an actual ESC character, press ESCAPE twice. The DELETE key has been remapped to
BACKSPACE for convenience.
There are some limitations that have to be followed. The screen editing/cursor movement keys are not
available. As mentioned before, the DELETE key now backspaces to aid editing. Do NOT leave
AppleSoft BASIC, or the mouse and keyboard will be disconnected from Apple II Pi and you will have
to re-start BASIC.SYSTEM from the A2PI boot disk. If you run a program that doesn't do any screen
or keyboard I/O, you will see that your mouse and keyboard are no longer responsive. Apple II Pi relies
on the screen and keyboard I/O hooks to provide the co-operative tasking between Apple II programs
and Pi input events. CONTROL+C will usually break into an AppleSoft program (may take a few
tries) but machine code that isn't responding will require a press of CONTROL+RESET. Not to
worry, Apple II Pi will re-sync and return to BASIC (assuming memory hasn't been overwritten). In
19
drastic cases, an Apple II reboot may be necessary. The Apple II Pi will re-sync and you may continue
on. Run as:
a2term [IP addr]
Development Tools:
Apple II Pi really shines as a development environment for the Apple II. To aid in the rapid
development process, these tools were created to test binaries created in the Pi's native environment on
the actual Apple II.
bload:
bload will read a file from the Linux filesystem and copy it into the Apple II memory at the address
specified. Apple II Pi incorporated a relatively fast communications channel so this operation is about
as fast as reading from the floppy. Run as:
bload <filename> <address> [IP addr]
Hexadecimal addresses are entered in '0x' format otherwise decimal addresses are assumed.
brun:
Like bload, brun will load the binary file but will also jump to the loading address. Run as:
brun <filename> <address> [IP addr]
Floppy Disk Image Tools:
Getting floppy disk image files to and from actual floppy drives has been greatly simplified with the
wonderful tools like ADTPro. For most sophisticated image transfer applications, use something lie
ADTPro. However, when something cheap, quick, and dirty will suffice, these two tools can make fast
work of reading or writing disk images. Both of these tools only work on a 5¼ floppy drive in drive 1
of slot 6. The only image format they support is the ProDOS order: .PO
dskread:
dskread will read the disk in the floppy drive and create a disk image using the volume name on the
floppy for the filename. If the disk volume is HELLO, HELLO.PO is the name of the resulting disk
image file. Run as:
dskread [IP addr]
dskwrite:
Simple, just like dskread. Run as:
dskwrite <filename> [IP addr]
It will prompt you to overwrite the current volume name. 'Y' or 'y' will proceed and the floppy will be
written.
20
Supplemental Files:
These files are available under /usr/share/a2pi and can either be compiled or work with the installed
tools to demonstrate their function.
bintomon:
Converting a binary file to a monitor input format can be accomplished with bintomon. The command
is run as:
bintomon <hex address> <filename> [IP addr]
standard output can be redirected to save the formatted text or piped into a2mon.
merlin2text:
If you develop on the Apple II, most likely you have had experience with the MERLIN assembler.
Great assembler for small projects, but it uses a high ASCII format and spaces instead of tabs. This
quick utility quickly reformats the MERLIN text into a unix palatable text file for your favorite editor.
Run as:
merlin2text < <prodosfile> > <unixfile>
text2merlin:
Reverses the process above to put the text file back on to ProDOS media.
text2merlin < <unixfile> > <prodosfile>
a2libc:
All the tools include a2lib.c as a very poor, cheesy, horrible, etc. way to implement the Apple II Pi
daemon API. Only useful if you are looking to write your own tool or modify the code of the existing
tools.
a2slideshow.mon:
Use with a2mon as:
a2mon < a2slideshow.mon
Press ESC to leave the slideshow. The slideshow is displayed on the Apple II screen, not the Pis's
screen.
a2slideshow.bin:
Use with brun as:
brun a2slideshow.bin 0x2000
Press ESC to leave the slideshow. The slideshow is displayed on the Apple II screen, not the Pis's
screen.
21
execfile:
Use with a2term as:
a2term < execfile
Watch it automate AppleSoft.
22
Part VI: Advanced Configuration.
These are advanced configuration tasks that require some level of understanding of Linux. These
additions will already be made to the pre-configured Raspbian image, but for the do-it-yourselfer, or
just curious, they are presented here.
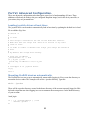
Loading joystick driver at boot time:
The joystick driver can be made to automatically load at boot time by updating the default /etc/rc.local
file to add the a2joy line:
#!/bin/sh -e
#
# rc.local
#
# This script is executed at the end of each multiuser runlevel.
# Make sure that the script will "exit 0" on success or any other
# value on error.
#
# In order to enable or disable this script just change the execution
# bits.
#
# By default this script does nothing.
# Print the IP
_IP=$(hostname
if [ "$_IP" ];
printf "My IP
fi
address
-I) || true
then
address is %s\n" "$_IP"
# Load Apple II Pi joystick driver
a2joy
exit 0
Mounting ProDOS devices automatically:
The ProDOS devices can set up to automatically mount when logging in. First, create the directory to
mount the devices under. This example will use the ~/prodos directory. Type this:
mkdir ~/prodos
There will be a prodos directory created in the home directory of the account currently logged in. Edit
the bash scripts that run when logging in or out to automate the mount process. In the home directory
of your account:
.bash_login
if [ ! -e ~/prodos/s6d1.po ] ; then
a2mount ~/prodos
fi
23
This script is run whenever a log in shell is loaded. It first checks for a file that is present if the ProDOS
devices are already mounted. If it doesn’t find it, it will run the a2mount script to do so. Conversely,
when logging out, this script is run:
.bash_logout
# ~/.bash_logout: executed by bash(1) when login shell exits.
# when leaving the console clear the screen to increase privacy
if [ "$SHLVL" = 1 ]; then
fusermount -u ~/prodos
[ -x /usr/bin/clear_console ] && /usr/bin/clear_console -q
fi
The line to call fusermount is added to the default .bash_logout script.
Modification for Composite Output (Internal mounting):
As configured, the internally mounted Raspberry Pi has no clearance for the composite and headphone
jacks at the top of the board when the Apple II case is closed (the externally mounted Pi has no such
limitation). A video cable can be cut at one end and soldered to the Raspberry Pi composite jack itself
to bring the composite signal out of the case, to a monitor/TV. This modification will void your
Raspberry Pi warranty; do at your own risk:
24
Appendix A: Hmmm, that didn't work
(troubleshooting).
Hopefully you had no problem getting the Apple II Pi working. But, if you did, here are a few things to
try:
•
Did the Apple II turn on? Although the Raspberry Pi is a very low-power computer, there is a
chance it could overwhelm a fully loaded Apple II. Triple check that the Raspberry Pi is
plugged into the header correctly. Then, try removing everything except the Apple II Pi adapter
card and the floppy controller card. If is still doesn't turn on, try removing the Apple II Pi card.
If it does turn on, remove the Raspberry Pi from the adapter card and try the empty adapter
card. If it still doesn't turn on, the adapter card may be defective. Call your dealer. If the Apple
II won't boot with the Raspberry Pi properly connected, your power supply may be on the edge
and need replacing.
•
Did the Pi turn on? Triple check that the Pi is properly connected to the header on the adapter
card. Is the SD card firmly connected? If it still doesn't turn on, remove it and try it with a wall
wart adapter that is known to work. Does it work with the wall wart adapter? If so, your Apple
II power supply may be on the edge and need replacement.
•
Did the Pi turn on, but no video? Have you tried the monitor+cable+angle-adapter before with
the Pi? If it worked earlier, check all the connections when it's inserted into the Apple II. Some
DVI monitors need a boost setting that can be found in the /boot/config.txt file.
•
Did both turn on, but no connection beep? Is the Apple II sitting there with a spinner icon in the
corner? This is probably because the Apple II client code is looking in the wrong slot for the
Apple II Pi adapter card. Press any key to exit the Apple II client and type run config to run
the Apple II Pi configuration program. Double check the slot assignment for the Apple II Pi
adapter card and enter the value. It will be saved. Type run startup to establish
communication with the Raspberry Pi. If this still doesn't work, you may have a defective
adapter card or Raspberry Pi. Call your dealer.
•
Everything connects but the keyboard is erratic? Don't forget you are using a ~30 year old
keyboard. It may need some cleaning or use to remove oxidation from the key switches. There
are many resources on how to clean an Apple II keyboard, but pressing the troublesome key a
few hundred times might just clear it up.
25
Appendix B: Theory of operation.
The Apple II Pi computer runs as two parts: the Apple II's 6502 processor is running a special device
driver under BASIC in ProDOS. This device driver sends keyboard and mouse events to a special
background process running in Linux on the Raspberry Pi, known as a daemon, accepting the input
events from the Apple II and inserting them into the Linux input subsystem where they are made
available to applications.
A2PI:
When the Apple II is turned on, the Raspberry Pi begins its boot process in parallel with the Apple II
boot procedure. The Apple II will run the STARTUP program on the A2PI floppy, load the A2PI driver,
and wait for the daemon to establish a connection. The A2PI driver will then hook the I/O vectors and
return. The STARTUP program exits, leaving the Apple II awaiting user input. Inside the input
routine, control is returned to the A2PI driver, which forwards keyboard and mouse events to the
Raspberry Pi, and responds to requests from software running under Linux. Because the Apple II
thinks it is simply waiting for user input, the A2PI driver can inject characters as if it came directly
from the keyboard – even if it came from a Linux program! Run a2term to see this in action.
a2pid:
On the Raspberry Pi, Linux will automatically start its list of services, one of which is the Apple II Pi
daemon: a2pid. When the a2pid daemon synchronizes with the Apple II client, the Apple II will give its
familiar beep, and the two computers will become one. Linux will complete the boot process and
present the 'login:' prompt at the console for the user to log in. Other Linux drivers and programs, such
as the joystick driver and the file-system driver, will connect to the Apple II through the a2pid server.
a2pid is the traffic cop, directing all program requests down to the Apple II and returning the results.
Memory ranges on the Apple II can be read and written, as well as control passed to routines on the
Apple II. This protocol, and the interface for external tasks, is what gives the Apple II Pi the ability to
provide many different functions of the Apple II to programs running on the Raspberry Pi, all
apparently simultaneously.
26
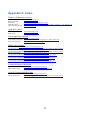
Appendix C: Links.
Raspberry Pi/Raspbian resources
Raspberry Pi Foundation:
Raspberry Pi Wiki:
Basic Setup:
Installing Software:
Debian Operating System:
http://www.raspberrypi.org
http://elinux.org/RPi_Hub
http://elinux.org/RPi_Hardware_Basic_Setup
http://elinux.org/RPi_Beginners#Installing_and_updating_software_to_your_Raspberry_Pi
http://www.debian.org
Apple II Pi vendors
Ultimate Apple II:
Retro Floppy:
https://ultimateapple2.com
http://www.retrofloppy.com
GSport Apple IIgs Emulator
GSport website:
http://gsport.sourceforge.net
Ewen Wannop’s homepage: http://www.wannop.info/speccie/Site/Speccies_Home_Pages.html
What is the Apple IIgs:
http://www.whatisthe2gs.apple2.org.za
HDMI Cable/Adapters
90 Degree Adapter:http://www.amazon.com/s/ref=nb_sb_noss_1?
url=search-alias=aps&field-keywords=hdmi+90+degree+adapter&rh=i:aps,k:hdmi+90+degree+adapter
270 Degree Adapter:
http://www.amazon.com/s/ref=nb_sb_noss_1?
url=search-alias=aps&field-keywords=hdmi+90+degree+adapter&rh=i:aps,k:hdmi+90+degree+adapter
HDMI ↔ DVI Adapter:
http://www.amazon.com/s/ref=nb_sb_noss_1?
url=search-alias=aps&field-keywords=hdmi+DVI+adapter&rh=i:aps,k:hdmi+DVI+adapter
HDMI ↔ DVI Cable:
http://www.amazon.com/s/ref=nb_sb_noss_1?
url=search-alias=aps&field-keywords=hdmi+DVI+cable&rh=i:aps,k:hdmi+DVI+cable
HDMI Angle Cable:
http://www.amazon.com/s/ref=nb_sb_noss_2?
url=search-alias=aps&field-keywords=hdmi+angle+cable&rh=i:aps,k:hdmi+angle+cable
Cleaning the Apple II Keyboard
Apple II FAQ input devices: http://www.faqs.org/faqs/apple2/faq/part15
Mike's Apple II pages:
http://www.willegal.net/appleii/appleii-keyboard.htm
Apple II Keyboard Shift-Key Mod
Apple II FAQ input devices: http://www.faqs.org/faqs/apple2/faq/part15
Apple II Support files:
http://support.apple.com/kb/TA30700?viewlocale=en_US&locale=en_US
27
Acknowledgements:
This project has been an exercise in leverage. Apple II Pi is the integration of a great many separate
projects and products that individually are impressive, but together make a greater whole. I can only
take credit for a small portion. Starting with the best computer ever built: thanks to Woz - hopefully I
have done your creation justice. The Raspberry Pi Foundation, for bringing the excitement of the early
microcomputer revolution into the modern age, for making it affordable and fun all over again. The
Linux and OSS developers; without your time and talent we wouldn’t have such an incredible software
repository to enjoy and learn from. Kent Dickey and the GSport team: bringing the Apple II
experience to computers everywhere. James Littlejohn for his PCB layout expertise. Ivan Drucker for
his A2CLOUD, A2SERVER, scripting help, and great feedback. Sean Fahey for his relentless support.
David Schmidt (DaveX) for actually reading the User Manual and no BS critiquing. The A2Pi beta
list: for all your feedback and support. Lastly, to the Apple II community (comp.sys.apple2, FB,
KFest), its users and developers over the years – you know who you are.
Apple II Forever!
Dave Schmenk
Lake Tahoe, December 2013
28