1
IB_DVD_KH6507_GB.qxd
19.10.2004
9:53 Uhr
Seite 1
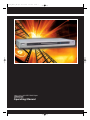
KH 6507 DVD Player
Operating Manual
IB_DVD_KH6507_GB.qxd
19.10.2004
9:53 Uhr
Seite 2
THE SILVERCREST KH 6507 DVD PLAYER CONTAINS A TECHNOLOGY FOR COPYRIGHT PROTECTION THAT PROTECTS
US PATENTS AS WELL AS OTHER INTELLECTUAL PROPERTY RIGHTS OF MACROVISION
CORPORATION AND OTHER COPYRIGHT OWNERS.
THE METHOD CLAIMS OF SPECIFIC
THE USE OF THIS TECHNOLOGY FOR COPYRIGHT PROTECTION MUST BE APPROVED BY MACROVISION CORPORATION
AND IS INTENDED EXCLUSIVELY FOR NON-COMMERCIAL, PRIVATE USE; ANY OTHER USE REQUIRES THE EXPRESS APPROVAL OF
MACROVISION CORPORATION.
REVERSE ENGINEERING AND DISASSEMBLING ARE EXPRESSLY PROHIBITED.
MANUFACTURED UNDER LICENSE FROM DOLBY LABORATORIES, INC.
DOLBY AND THE DOUBLE D SYMBOL ARE REGISTERED TRADEMARKS OF DOLBY LABORATORIES,
INC. CONFIDENTIAL UNPUBLISHED WORKS.
1992-1997 DOLBY LABORATORIES, INC. ALL RIGHTS RESERVED.
THE DEVICE IS PROTECTED BY US PATENTS 4,631,603 / 4,577,216 / 4,819,098 / 4,907,093 AND 6,516,132.
THE LICENSE APPLIES EXCLUSIVELY FOR PRIVATE USE.
THE SILVERCREST KH 6507 DVD PLAYER IS LICENSED AS A DIVX CERTIFIED PRODUCT.
Kompernaß Handelsgesellschaft mbH, Burgstraße 21, D-44867 Bochum, Deutschland/Germany
www.kompernass.com
KH6507
v.1.0
GB
09-22-2004
IB_DVD_KH6507_GB.qxd
19.10.2004
9:53 Uhr
Seite 3
1. Contents
2. Notes on safety . . . . . . . . . . . . . . . . . . . . . . . . . . . . . . . . . . . . . . . . . . . . . . . . . . . . . . . . . . . . . . . . . . . . . . . . . . . . . . . . . . . 6
3. Use and Functions . . . . . . . . . . . . . . . . . . . . . . . . . . . . . . . . . . . . . . . . . . . . . . . . . . . . . . . . . . . . . . . . . . . . . . . . . . . . . . . . 7
4. Delivery Contents . . . . . . . . . . . . . . . . . . . . . . . . . . . . . . . . . . . . . . . . . . . . . . . . . . . . . . . . . . . . . . . . . . . . . . . . . . . . . . . . 7
5. Technical Data . . . . . . . . . . . . . . . . . . . . . . . . . . . . . . . . . . . . . . . . . . . . . . . . . . . . . . . . . . . . . . . . . . . . . . . . . . . . . . . . . . . 7
General ..................................................................................................................................................................................7
Video Output .........................................................................................................................................................................7
Audio Output .........................................................................................................................................................................7
Digital Audio Output ............................................................................................................................................................7
6. Components, Operating Elements, Connections and Displays . . . . . . . . . . . . . . . . . . . . . . . . . . . . . . . . . . . . . . . . . . . 8
Front of the Device ...............................................................................................................................................................8
Information on the Display ..................................................................................................................................................8
Rear of the Device ................................................................................................................................................................8
Remote Control ....................................................................................................................................................................9
7. Setting Up the DVD Player . . . . . . . . . . . . . . . . . . . . . . . . . . . . . . . . . . . . . . . . . . . . . . . . . . . . . . . . . . . . . . . . . . . . . . . 10
7.1. Unpacking the Components........................................................................................................................................10
7.2. Inserting the Batteries into the Remote Control .....................................................................................................10
7.3. Selecting a Suitable Setup Location for the DVD Player .......................................................................................10
7.4. Connecting the DVD Player to a Television .............................................................................................................10
7.4.1. Connecting to a Television via Scart Cable/RGB ..............................................................................................10
7.4.2. Connecting to a Television via S-Video...............................................................................................................11
7.4.3. Connecting to a Television via the Video Input (Composite Video)...............................................................11
7.4.4. Connecting a Television via the Component Signal (YCbCr/Progressive Scan and YUV)......................................12
7.5. Connecting the DVD Player to a Video Projector...................................................................................................13
8. Connecting Audio Components to the DVD Player. . . . . . . . . . . . . . . . . . . . . . . . . . . . . . . . . . . . . . . . . . . . . . . . . . . 13
8.1. Connecting a HiFi System to the DVD Player .........................................................................................................13
8.2. Connecting Digital Audio Components to the DVD Player ..................................................................................13
8.2.1. Connecting via Digital Cable................................................................................................................................13
8.2.1.1. Connecting via Coaxial Cable ...........................................................................................................................13
8.2.1.2. Connecting via Optical Cable............................................................................................................................14
8.2.2. Connecting via Analog Cable ...............................................................................................................................14
9. Required Settings on the DVD Player Before Use. . . . . . . . . . . . . . . . . . . . . . . . . . . . . . . . . . . . . . . . . . . . . . . . . . . . 14
9.1. Using the OSD Menu...................................................................................................................................................15
9.2. Language Settings.........................................................................................................................................................15
9.3. Configuring the Television Display Format...............................................................................................................15
9.4. Configuring the Television Standard ..........................................................................................................................15
9.5. Configuring the Video Output / Television Mode ....................................................................................................16
9.6. Audio Settings ...............................................................................................................................................................16
9.6.1. Configuring the Analog Output ...........................................................................................................................16
9.6.2. Configuring the Digital Output ............................................................................................................................17
9.6.3. Configuring Prologic ..............................................................................................................................................17
9.6.4. Configuring the Dynamic (Dolby Digital)..........................................................................................................17
9.6.5. Settings for Mono VCDs/S-VCDs........................................................................................................................17
9.6.6. Setting for HDCD Audio CDs .............................................................................................................................18
9.6.7. Configuring Nighttime Mode................................................................................................................................18
3
IB_DVD_KH6507_GB.qxd
19.10.2004
9:53 Uhr
Seite 4
9.6.8. Speaker Settings .....................................................................................................................................................18
9.6.9.1. Configuring Speaker Sizes .................................................................................................................................18
9.6.9.2. Configuring the Distances from the Speaker to the Listener .......................................................................19
9.6.9.3. Setting the Speaker Volume Level....................................................................................................................19
9.6.9.4. Playing a Test Sound ...........................................................................................................................................20
9.7. Activating the Screen Saver ........................................................................................................................................20
9.8. Activating the Automatic Memory Function ............................................................................................................20
10. Using the DVD Player . . . . . . . . . . . . . . . . . . . . . . . . . . . . . . . . . . . . . . . . . . . . . . . . . . . . . . . . . . . . . . . . . . . . . . . . . . 21
10.1. Inserting Discs.............................................................................................................................................................21
10.2. Inserting Memory Cards with MP3/WMA/JPEG Files .........................................................................................21
10.2.1. SmartMedia Memory Cards (SM) .....................................................................................................................22
10.2.2. CompactFlash Memory Cards (CF I/CF II) .....................................................................................................22
10.2.3. MultiMediaCard/SecureDigital Memory Cards (MMC/SD)..........................................................................22
10.2.4. MemoryStick Memory Cards (MS) ...................................................................................................................22
10.3. Playing DVDs/VCDs/S-VCDs ..................................................................................................................................22
10.4. Playing Audio CDs .....................................................................................................................................................23
10.5. Playing DVD-R/DVD+R/DVD-RW/DVD+RW/CD-Rs/CD-RWs/Memory Cards with MP3/WMA/JPEG Files..23
11. General Functions During Playback . . . . . . . . . . . . . . . . . . . . . . . . . . . . . . . . . . . . . . . . . . . . . . . . . . . . . . . . . . . . . . . 24
11.1. Pausing Playback ........................................................................................................................................................24
11.1.1. Stopping Playback ................................................................................................................................................24
11.1.1.2. ... with Resume Function ..................................................................................................................................24
11.1.2.2. ... without Resume Function ............................................................................................................................24
11.2. Skip ...............................................................................................................................................................................24
11.3. Fast Forward/Rewind .................................................................................................................................................25
11.4. Activating Various Playback Modes.........................................................................................................................25
11.4.1. Repeat Playback...................................................................................................................................................25
11.4.2. Repeating Sequences (A–B)...............................................................................................................................26
11.4.3. Random Playback ................................................................................................................................................26
11.4.4. Using the Bookmark Function ...........................................................................................................................26
11.4.5. Using the Program Function...............................................................................................................................27
11.5. Title/Chapter Selection with the Number Buttons.................................................................................................28
12. Special Functions for DVD/VCD/S-VCD Playback . . . . . . . . . . . . . . . . . . . . . . . . . . . . . . . . . . . . . . . . . . . . . . . . . . 28
12.1. Calling Up the DVD Menu .......................................................................................................................................28
12.2. Selecting Chapters with the Search Function for DVD ........................................................................................29
12.2.1. Selecting Chapters by Time Position .................................................................................................................29
12.2.2. Selecting Chapters by Chapter Number............................................................................................................29
12.3. Slow Playback Forward/Backward ...........................................................................................................................29
12.4. Step Function ..............................................................................................................................................................29
12.5. Zoom In / Out .............................................................................................................................................................29
12.6. Changing Camera Angles ..........................................................................................................................................30
12.7. Showing/Hiding Subtitles...........................................................................................................................................30
12.8. Changing the Playback Language ............................................................................................................................30
12.9. Displaying Disc Information .....................................................................................................................................30
13. Special Functions for Audio CD Playback . . . . . . . . . . . . . . . . . . . . . . . . . . . . . . . . . . . . . . . . . . . . . . . . . . . . . . . . . . 30
13.1. Displaying Audio CD Information...........................................................................................................................30
13.2. Selecting Track by Time Position ..............................................................................................................................31
13.3. Selecting Passages of a Track by Time Position ......................................................................................................31
13.4. Scan Function..............................................................................................................................................................31
4
IB_DVD_KH6507_GB.qxd
19.10.2004
9:53 Uhr
Seite 5
14. General Audio Functions of the DVD Player . . . . . . . . . . . . . . . . . . . . . . . . . . . . . . . . . . . . . . . . . . . . . . . . . . . . . . 31
14.1. Adjusting the Playback Volume................................................................................................................................31
14.2. Muting the Sound .......................................................................................................................................................31
14.3. Adjusting the Dialog Volume....................................................................................................................................31
14.4. Activating the Equalizer Function ...........................................................................................................................32
14.5. Activating the Spatializer Function ..........................................................................................................................32
14.6. Activating the Bass Boost..........................................................................................................................................32
14.7. Activating the Treble Boost.......................................................................................................................................32
15. General Video Functions of the DVD Player . . . . . . . . . . . . . . . . . . . . . . . . . . . . . . . . . . . . . . . . . . . . . . . . . . . . . . . 32
15.1. Adjusting the Image Quality .....................................................................................................................................32
16. Other Functions of the DVD Player . . . . . . . . . . . . . . . . . . . . . . . . . . . . . . . . . . . . . . . . . . . . . . . . . . . . . . . . . . . . . . 33
16.1. Preferences ..................................................................................................................................................................33
16.2. Using the Sleep Timer Function ...............................................................................................................................33
16.3. Adjusting the Display Brightness .............................................................................................................................34
16.4. Activating/Deactivating the Password Check .........................................................................................................34
16.5. Selecting Your Own Password ..................................................................................................................................34
16.6. Using the Kid Safe Function .....................................................................................................................................34
16.7. Resetting the DVD Player to the Factory Settings ................................................................................................35
16.8. Switching Off the DVD Player .................................................................................................................................35
17. Cleaning the DVD Player . . . . . . . . . . . . . . . . . . . . . . . . . . . . . . . . . . . . . . . . . . . . . . . . . . . . . . . . . . . . . . . . . . . . . . . . 35
18. Troubleshooting . . . . . . . . . . . . . . . . . . . . . . . . . . . . . . . . . . . . . . . . . . . . . . . . . . . . . . . . . . . . . . . . . . . . . . . . . . . . . . . . 36
19. Glossary/Key Word Index . . . . . . . . . . . . . . . . . . . . . . . . . . . . . . . . . . . . . . . . . . . . . . . . . . . . . . . . . . . . . . . . . . . . . . . . 37
5
IB_DVD_KH6507_GB.qxd
19.10.2004
9:53 Uhr
Seite 6
2. Notes on safety
†
Danger!
Battery acid may leak from old batteries in particular.
Remove all batteries from the remote control if you are
do not use it for a prolonged period of time. This
protects the remote control against damage from leaking
battery acid.
Do not place the DVD player ...
ô
Ú
in locations that are exposed to direct sunlight. Otherwise, it may overheat and be irreparably damaged.
The risk of fire exists!
Ú
in the immediate vicinity of heat sources.. This includes
ovens, fan heaters and similar devices as well as
ventilation openings of other electronic devices. Otherwise, the DVD player may be irreparably damaged.
The risk of fire exists!
Ú
in damp environments. Otherwise, moisture may enter the
DVD player.This creates the risk of an electrical shock
and a fire!
Ú
in the immediate vicinity of water, such as bath tubs
or swimming pools. Never place containers filled
with water (e.g. flower vases) on the DVD player. If
water flows into the DVD player or the device falls
into water, the risk of an electrical shock exists!
Do not place any open flames – such as burning candles
– on the DVD player. Otherwise, the risk of fire exists!
Never attempt to repair a defective power cable yourself!
The risk of electrical shock exists!
|
Warning!
Never place other devices or heavy objects (e.g. televisions) on the DVD player. This could lead to malfunctions and/or permenant damage to the DVD player!
Never place the DVD player in locations that are subject to
heavy shocks or constant vibrations. This could lead to malfunctions and/or permenant damage to the DVD player!
The DVD player and the remote control do not contain
any parts that can be serviced by the user. If the housing
of the DVD player and/or remote control are opened,
the warranty is voided. If repairs are necessary, contact
one of our service partners in your area. The addresses
of our service partners can be found in the warranty
card. This is enclosed with the DVD player.
6
Note:
For damage from ...
Ú
opening of the housing of the DVD player and/or
remote control
Ú
Ú
repair attempts by unqualified persons
use of the DVD player that does not comply with the
intended use
no liability is accepted or warranty offered!
The DVD player becomes warm after it is switched on.
This is no cause for alarm and does not indicate a technical problem.
IB_DVD_KH6507_GB.qxd
19.10.2004
9:53 Uhr
Seite 7
3. Use and Functions
For audio playback, the following may be used and
connected to the Silvercrest KH 6507 DVD player:
The Silvercrest KH 6507 DVD player is exclusively
intended ...
Ú
Speakers of a television connected to the
DVD player.
Ú
Ú
External audio components such as HiFi systems,
receivers or surround sound systems (analog/digital).
as an electronic entertainment device for playback …
•
… of DVD videos in the formats 12 cm (diameter) and 8 cm (diameter) with the country/region
code 2 or
, labelled with the logo
.
ô Note:
•
… the standards DVD, DVD+R, DVD+RW,
DVD-R and DVD-RW (closed).
For damaged caused by use of the DVD player not in
compliance with the intended use, we accept no liability
and offer no warranty!
•
... the video formats MPEG-4/MPEG-4 ASP and
video data compressed with DivX 3.11, DivX 4.x,
DivX 5.x, multichannel DivX and DivX Pro
(DivX Certified Product) as well as Xvid.
•
•
… of video CDs (VCDs) and super video CDs
(S-VCDs).
•
•
•
… at data rates up to 10 Mbit/second.
… in the formats 12 cm (diameter) and 8
cm (diameter), labelled with the logo
.
… of audio CDs in the formats 12 cm (diameter) and 8 cm (diameter), labelled with the logo
.
… generally for the file formats CDA (.cda),
MP3 (.mp3), Windows Media Audio (.wma) and
JPEG (.jpg) on the storage media CD-R, CDRW as well as memory cards of types CF I,
CF II, SD, MS, MSPro, MMC and SM.
4. Delivery Contents
' DVD Player
' Infrared remote control
' 2 batteries for the remote control,
type AAA/LR 03/micro
' Audio/video RCA connector cable
' RGB Scart cable
' This operating manual
5. Technical Data
General
Ú
… for stationary operation indoors.
Mains connection:
Power consumption :
TV standard:
Operating temperature:
Humidity:
Weight :
Dimensions (LxWxH):
Ú
… for private, non-commercial use.
Video Output
For the playback of DVDs/VCDs/S-VCDs/audio CDs
and the file formats MP3 (.mp3), Windows Media
Audio (.wma) and JPEG (.jpg), the following can be
connected to the DVD player:
Output level:
Horizontal resolution:
Signal-to-noise ratio:
AC 230 V~ 50 Hz
15 Watt
PAL/NTSC
0° C to 40° C
5 ~ 90 % (no condensation)
2.2 kg
430 x 268 x 49 mm
1 ± 0.2 VP-p (75 )
500 lines
56 dB
Audio Output
Ú
Ú
Stereo and mono televisions with the television formats PAL or NTSC and the image formats 4:3 LB,
4:3 Pan & Scan, 16:9 widescreen.
Video projectors, provided they offer the corresponding connection options and the connection of
a DVD player is intended/permitted by the manufacturer of the video projector.
Impedance:
Output level:
Harmonic distortion:
Dynamic range:
Signal-to-noise ratio:
10 kΩ
1.8 + 0.2/0.8 Vrms (1kHz, 0dB)
0.01 % (JIS-A 1kHz, typical)
80 dB (JIS-A 1 KHz, typical)
95 dB (JIS-A 1 kHz, typical)
Digital Audio Outputs
Coaxial output and optical output
7
IB_DVD_KH6507_GB.qxd
19.10.2004
9:53 Uhr
Seite 8
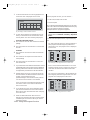
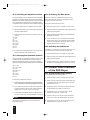
6. Components, Operating Elements, Connections and
Displays
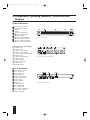
Front of the Device
q Power button (On/ Off)
w Memory card slot flap
e Disc tray
r Display
t button (Open/Close)
y /button (Play/Pause)
u button (Stop)
i button (Skip Forward)
o button (Skip Backward)
a button (Search Forward)
s button (Search Backward)
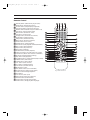
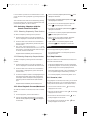
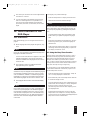
Information on the Display
q Display "DVD"
w Display "DTS"
e Display "VCD"/"SVCD"
r Display "Dolby Digital"
t Display Angel Camera Symbol
y Display "MP3"
u Display title/chapter/file
i Display "Pause"
o Display "Repeat"
a Display "Repeat All"
s Display "Play"
d Playback symbol
q
w
e
r
tyu
sa o i
Fig. 1 Front of device
q
w
e
r
d sa oi
t
y
u
Fig. 1.1 Information on the display
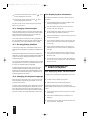
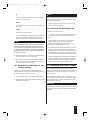
Rear of the Device
d RCA socket "Center“
f RCA socket "SL"
g RCA socket "FL"
h Socket "Optical"
j Socket "Euro Scart"
k Power cord with plug
l Socket "Pr/Cr"
; Socket "Pb/Cb"
2) Socket "Y"
2! Socket "Coaxial"
2@ RCA socket "FR"
2# RCA socket "SR"
2$ RCA socket "Subwoofer"
2% RCA socket "Video"
2^ Socket "S-Video"
8
dfg
h
2^ 2% 2$ 2# 2@ 2!
Fig. 1.2 Rear of the device
j
2) 1( l
k
IB_DVD_KH6507_GB.qxd
19.10.2004
9:53 Uhr
Seite 9
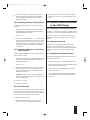
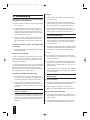
Remote Control
2& Standby button (switch DVD player on/off)
2* Sleep button (sleep timer function)
2( Dimmer button (adjust display brightness)
3) Open/Close button (open/close disc tray)
3! Number buttons 0/10 bis 9 (input numbers 1-9)
3@ 10+ button (input numbers 10-99)
3# Menu button (show DVD menu)
3$ OK button (confirm entry)
3% Display button (show disc information)
3^ Digest button (digest function)
3& Setup button (show OSD menu)
3* Mark button (bookmark function)
3( Zoom button (zoom in/out)
4) Repeat button (repeat playback)
4! Slow button (slow playback forward/backward.)
4@ Skip– button (skip backward)
4# Skip+ button (skip forward)
4$ Play button (playback)
4% Shuffle button (random playback)
4^ Video Out button (set video output TV mode)
4& Card button (Switch card and DVD inbetween)
4* 3D button (adjust spatializer setting)
4( Stop button (stop playback)
5) Pause/Step button (pause playback/step forward)
5! F.RWD button (fast rewind)
5@ F.FWD button (fast forward)
5# Vol– button (lower volume)
5$ A–B button (repeat sequence)
5% Vol+ button (increase volume)
5^ Mute button (mute)
5& PAL/NTSC button (set TV standard)
5* Program button (show program menu)
5( Control buttons left/right/up/down
6) Title button
6! CLR button (clear input)
6@ Search button (select time position)
6# Subtitle button (show subtitles)
6$ Angle button (change camera angle)
6% Audio button (change playback language)
Fig. 2 Remote control
9
IB_DVD_KH6507_GB.qxd
19.10.2004
9:53 Uhr
Seite 10
7. Setting Up the DVD Player
Ú
in the immediate vicinity of heat sources. This includes
ovens, fan heaters and similar devices as well as ventilation openings of other electronic devices. Otherwise, the
DVD player may be irreparably damaged. The risk of
fire exists!
Ú
in damp environments. Otherwise, moisture may enter
the DVD player. This creates the risk of an electrical
shock and a fire!
Ú
in the immediate vicinity of water, such as bath tubs
or swimming pools. Never place containers filled
with water (e.g. flower vases) on the DVD player. If
water flows into the DVD player or the device falls
into water, the risk of an electrical shock exists!
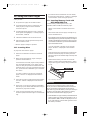
7.1. Unpacking the Components
Remove the DVD player and accessories carefully from
the packaging. Always hold the DVD player with two
hands. Never let the DVD player or remote fall! This
could lead to irreparable damage.
7.2. Inserting the Batteries into the
Remote Control
1 Open the battery compartment on the back side of
the remote control.
2 Remove the protective film from the two batteries of
type AAA/LR03/micro included with the DVD player.
Then insert both batteries into the battery compartment. Be sure to insert the batteries with the correct
polarity.The correct polarity is indicated inside the battery compartment.
Do not place any open flames – such as burning candles
– on the DVD player. Otherwise, the risk of fire exists!
| Warning!
Never place other devices or heavy objects (e.g. televisions) on the DVD player. This could lead to malfunctions and/or permenant damage to the DVD player!
3 Put the battery compartment cover back in place.
ô
Note:
Never place the DVD player in locations that are subject to
heavy shocks or constant vibrations. This could lead to
malfunctions and/or permenant damage to the DVD player!
To ensure faultless functioning of the remote control:
7.4. Connecting the DVD Player to a
Television
Ú
Always point the remote control directly at the DVD
player when using it.
Ú
Remain within 5 meters of the DVD player when
using the remote control.
After setting up the DVD player, you can now connect it to
a television.The DVD player can be connected to televisions with the television standards PAL, NTSC and multistandard televisions.
Ú
Make certain that no objects obstruct the reception between the remote control and the DVD player.
ô Note:
Otherwise, the remote control may function improperly.
7.3. Selecting a Suitable Setup Location for the DVD Player
Place the DVD player on a flat, level, scratch-proof and
slip-proof surface.
The DVD player does not function with televisions of
the television standard SECAM.
Depending on the features of the television, there are
various options for connecting the DVD player to it:
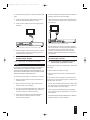
7.4.1. Connecting to a Television via ScartCable/RGB
† Danger!
ô Note:
Do not place the DVD player ...
Ú
in locations that are exposed to direct sunlight. Otherwise, it may overheat and be irreparably damaged. The
risk of fire exists!
10
Connecting the television with a Scart-cable via the RGB
input is the connection option that offers the highest quality.
Select this connection option if the television has an RGB
input. In case of doubt, consult the operating manual of the
television.
IB_DVD_KH6507_GB.qxd
19.10.2004
9:53 Uhr
Seite 11
To connect the DVD player to a television with a Scart
cable:
5 Insert the red plug of the audio/video RCA cable into
1 Insert the supplied Scart cable into the socket on
6 Insert the second red plug of the audio/video RCA
the RCA socket FR on the DVD player.
the DVD player labelled with Euro Scart.
cable into the RCA socket for the right channel on
the television.
2 Insert the Scart cable into the Scart socket of the
television.
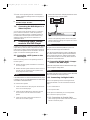
Fig. 4 Connecting a television via S-video
7 Set the television to the AV channel that displays
the S-video signal. Consult the operating manual of
the television if you are unsure how to do this.
Check in the operating manual of the television
whether additional settings must be configured on
the television.
Fig. 3 Connecting a television via Scart cable / RGB
3 Set the television to RGB mode in the AV channel.
In case of doubt, consult the operating manual of
the television for instructions.
Ô
On this topic, also refer to Section 9.5. "Configuring
the Video Output/ TV Mode".
7.4.2.
Connecting to a Television via S-Video
Ô
On this topic, also refer to Section 9.5. "Configuring
the Video Output / TV Mode".
7.4.3. Connecting to a Television via the
Video Input (Composite Video)
ô Note:
For this type of connection, the television must have an Svideo input and two unused RCA sockets. In case of
doubt, consult the operating manual of the television. You
also require an S-video cable, as none is supplied. S-video
cables are available in audio/video stores.
If the television to which you would like to connect the
DVD player …
Ú
does not have an S-video input and
Ú
does not have a Scart socket, but does have RCA
sockets
To connect the DVD player to a television via S-video:
1 Plug the S-video cable into the S-video socket on
the DVD player.
2 Plug the other end of the S-video cable into the
S-video socket on the television.
you can connect the DVD player to the television via
the video input. This connection option is referred to as
composite video. To do this:
1 Pick up the included audio/video RCA cable. Insert
the yellow plug of the audio/video RCA cable into
the video socket on the DVD player.
3 Pick up the included audio/video RCA cable. Insert
the white plug of the audio/video RCA cable into
the RCA socket FL on the DVD player.
2 Insert the second yellow plug of the audio/video
RCA cable into the corresponding RCA socket on
the television.
4 Insert the second white plug of the audio/video
RCA cable into the RCA socket for the left
channel on the television.
3 Insert the white plug of the audio/video RCA cable into
the RCA socket FL on the DVD player.
11
IB_DVD_KH6507_GB.qxd
19.10.2004
9:53 Uhr
Seite 12
4 Insert the second white plug of the audio/video
RCA cable into the RCA socket for the left channel on the television.
5 Insert the red plug of the audio/video RCA cable into
the RCA socket FR on the DVD player.
6 Insert the second red plug of the audio/video RCA
cable into the RCA socket for the right channel on
the television.
For both variants – YCbCr/YPbPr and YUV – you require:
Ú
Ú
the included audio/video RCA cables and
two additional audio/video RCA cables. These are
available in audio/video stores.
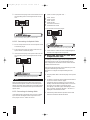
To connect the DVD player to a television via component
video:
1 On the rear side of the DVD player, you will find
three coloured component out sockets Y, Pb/Cb and
Pr/Cr. Insert the red plug of the included
audio/video RCA cable into the RCA socket Pr/Cr.
2 Insert the second red plug of the audio/video RCA
cable into the component video IN socket Pr/Cr on
the television.
3 Insert the white plug of the audio/video RCA cable into
the RCA socket Pb/Cb on the DVD player.
4 Insert the second white plug of the audio/video
Fig. 5 Connecting a television via composite video
RCA cable into the component video IN socket
Pb/Cb on the television.
7 Check in the operating manual of the television
Ô
whether additional settings must be configured on
the television.
5 Insert the yellow plug of the audio/video RCA cable into
On this topic, also refer to Section 9.5. "Configuring
the Video Output / TV Mode".
6 Insert the second yellow plug of the audio/video
the RCA socket Y on the DVD player.
RCA cable into the corresponding component
video IN socket Y on the television.
7.4.4. Connecting a Television via the Component Signal (YPb/CbPr/CR/Progres- 7 Pick up the two additional RCA cables. Insert the
white plug of the RCA cable into the RCA socket
sive Scan and YUV)
FL on the DVD player .
The YPb/CbPr/Cr sockets of the DVD player output
so-called "component signals". The component signals
are available in the form of …
Ú
Ú
Ô
8 Insert the second white plug of the audio/video
RCA cable into the RCA socket for the left channel on the television.
"YUV" signals (interlaced) and in the form of
9 Insert the red plug of the audio/video RCA cable
"YCbCr" signals (full images/progressive scan).
into the RCA socket FR on the DVD player.
On this topic, refer to Section 19. "Glossary /
Key Word Index".
10 Insert the second red plug of the audio/video RCA cable
into the audio socket for the right channel on the television.
The cabling for YCbCr/YPbPr/progressive scan and
YUV is identical. For both connection options, the television must have two unused RCA sockets.
For YCbCr/YPbPr/progressive scan, the television (or
video projector) must possess the progressive scan
function. In case of doubt, consult the operating manual
of the television (or video projector).
Fig. 6 Connecting a television via component video
12
IB_DVD_KH6507_GB.qxd
19.10.2004
9:53 Uhr
Seite 13
11 Check in the operating manual of the television
4 Insert the second red RCA cable plug into the RCA socket
whether additional settings must be configured on
the television.
Ô
On this topic, also refer to Section 9.5. "Configuring
the Video Output/ TV Mode".
7.5.
Connecting the DVD Player to a
Video Projector
You can also connect the DVD player to a video projector instead of a television. Check the operating
manual of the video projector to determine which of
the described connection options are available. Any
additional cables required can be obtained from
audio/video stores.
8.
Connecting Audio Components to the DVD Player
Instead of the television speakers, the sound can also be
played back by external audio components. To accomplish this, HiFi systems, Dolby Digital/DTS receivers or
surround sound systems can be connected to the DVD
player. You have the following options here:
8.1. Connecting a HiFi System to the
DVD Player
Before connecting, check in the operating manual of
the HiFi system …
Ú
Ú
ô
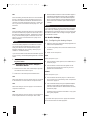
for the right channel on the HiFi system.
whether the HiFi system is suitable for connection
to a DVD player.
whether the HiFi system has RCA sockets. If this is
the case, you can connect the HiFi system to the
DVD player with RCA cables.
Note:
If the audio/video RCA cable included with the DVD player
is already in use, you will need additional RCA cables. These
are available in audio/video stores.
To connect a HiFi system:
1 Insert the white RCA cable plug into the RCA sokket FL on the DVD player.
Fig. 7 Connecting a HiFi system via RCA cables
5 Check in the operating manual of the HiFi system
whether additional settings are required for connection to a DVD player.
ô Note:
For optimal sound: Place the speakers of your HiFi
system to the left and right of the television.
If you have connected the DVD player to the television
with a Scart cable: The audio signals are transmitted to
the HiFi system over the RCA cables and to the television over the Scart cable. In this case, set the volume of
the television to the lowest value.
8.2. Connecting Digital Audio Components to the DVD Player
Digital audio components can be connected to the DVD player either via digital or analog cables.
ô Note:
The cables required for the connection options described
below are available at audio/video stores.
8.2.1. Connecting via Digital Cable
Check in the operating manual of the digital audio
component whether it can be connected to the DVD
player …
Ú
Ú
via a coaxial cable or
via an optical cable
2 Insert the second white RCA cable plug into the
RCA socket for the left channel on the HiFi
system.
3 Insert the red RCA cable plug into the RCA
socket FR on the DVD player.
If both options are available, you can freely decide
which connection option you prefer.
8.2.1.1. Connecting via Coaxial Cable
1 Insert the plug of the coaxial cable into the coaxial
socket on the DVD player.
13
IB_DVD_KH6507_GB.qxd
19.10.2004
9:53 Uhr
Seite 14
2 Insert the second plug of the coaxial cable into the
corresponding socket of the digital audio component.
1 Insert one RCA plug each into …
Ú
Ú
Ú
Ú
Ú
Ú
the FL socket
the FR socket
the SL socket
the SR socket
the Center socket and
the Subwoofer socket
on the rear side of the DVD player.
Fig. 8 Connecting a HiFi system via coaxial cable
8.2.1.2. Connecting via Optical Cable
1 Pull off the protective cover over the optical socket
of the DVD player.
Fig. 10 Connecting a HiFi system via analog cables
2 Then insert the plug of the optical cable into the
optical socket of the DVD player.
2 Insert the RCA cables into the corresponding RCA
sockets of the digital audio component.
3 Insert the second plug of the optical cable into the
corresponding socket of the digital audio component.
9. Required Settings on the DVD
Player Before Use
All settings on the DVD player can be configured with
the remote control in the "On-Screen Display Menu".
This is displayed on the television screen and is referred
to below as the OSD menu.
Before using the DVD player for the first time, you must
configure a few settings in this menu.
To be able to configure the required settings via the
menu:
1 Plug the power cable of the DVD player into a power
Fig. 9 Connecting a HiFi system via optical cable
ô
Note:
When connecting the optical cable, dust must not be
allowed into the optical socket. This could disrupt the
optical signal and cause malfunctions. Place the protective cover back onto the socket when you disconnect the
optical cable!
socket
2 To switch on the DVD player, press the Power button
on the front side of the DVD player.
If the DVD player is already on, but is currently in
standby mode: Press the standby button on the remote control once to switch on the DVD player.
The display of the DVD player first displays "Hello",
then "Loading" and finally "NoDisc". "No Disc" is
displayed on the television screen.
8.2.2. Connecting via Analog Cable
3 Familiarise yourself with the operation of the OSD
If the digital audio component does not have a digital
input: Connect the digital audio component to the
DVD player via RCA cables. To do this:
14
menu with the brief instructions below:
IB_DVD_KH6507_GB.qxd
19.10.2004
9:53 Uhr
Seite 15
9.1. Using the OSD Menu
b To hide the OSD menu: Press the Setup button again
or select the main menu item Exit Setup Menu.
To call up the OSD menu of the DVD player:
1 Press the Setup button on the remote control once.
The OSD menu is displayed on the television screen.
In the bar at the top of the OSD menu, you will see
six symbols. The symbols – from left to right – stand
for the main menu items …
9.2. Language Settings
1 Select the main menu item General Setup Page and
the submenu item OSD Language.
2 Select the language in which the OSD menu should
be displayed.
Ú
Ú
Ú
Ú
Ú
"General Setup Page"
"Audio Setup Page"
"Video Setup Page"
"Preference Page" and
"Password Setup Page".
The sixth symbol stands for "Exit Setup Menu".
The symbol of the currently selected main menu item
is displayed with a coloured circle. Initially, the main
menu item General Setup Page is displayed with its
submenu items.
The following languages are available:
Ú
Ú
Ú
Ú
German
English
Spanish
Portuguese
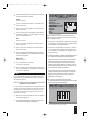
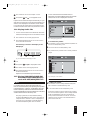
9.3. Configuring the Television Display
Format
1 Select the main menu item General Setup Page and
the submenu item Screen Type.
• • GENERAL SETUP PAGE • •
•
SCREEN TYPE
ANGLE DISPLAY
OSD LANGUAGE
CAPTIONS
SCREEN SAVER
LAST MEMORY
PS
ON
GER
OFF
OFF
OFF
2 Select the display format of the television connected to
the DVD player. The following options are available:
4:3 Pan Scan
When playing films in the format 16:9, the left and right
edges of the image are cut off. This makes the most possible use of the screen height.
4:3 Letterbox
GOTO GENERAL SETUP PAGE
Fig. 11 OSD menu overview
2 You can select the individual menu items with the
control buttons on the remote control. The currently
selected menu item is displayed highlighted in yellow.
To the right of the currently selected menu item, the
list of available options is displayed. You can switch
from the selected menu item to the list of available
options by pressing the OK button. The currently
selected option will then be shown highlighted in yellow.
3 You can switch between the available options by
pressing the control buttons up/down. To select the
desired option: Press the OK button once the option
is highlighted in yellow.
When playing films in the format 16:9, black bars can be
seen along the top and bottom edges of the screen.
16:9
Television display format for widescreen televisions.
When playing films in the format 16:9 with 16:9 (1.78:1)
widescreen televisions, no black bars are seen on the top
and bottom edges of the screen and the left and right
edges of the image are not cut off.
9.4. Configuring the Television Standard
1 Select the main menu item Preference Page and the
submenu item TV System.
2 Select the television standard of the television
connected to the DVD player:
4 When you have completed configuring the desired
settings, you have the following options:
a If you would like to configure additional settings in
other submenus: Press the left control button until
you can once again switch between the main menu
items with the left/right control buttons.
Auto
With this setting, the standard with which the
DVD/VCD/S-VCD was recorded is selected automatically. Only set Auto if you have connected the DVD player
to a multi-standard television.
15
IB_DVD_KH6507_GB.qxd
19.10.2004
9:53 Uhr
Seite 16
PAL
With this setting, DVDs/VCDs/S-VCDs recorded with
the PAL standard are played. DVDs/VCDs/S-VCDs
that were recorded with the NTSC standard are automatically converted and played in the PAL format. Set
PAL if you have connected the DVD player to a PAL
television.
NTSC
With this setting, DVDs/VCDs/S-VCDs recorded with
the NTSC standard are played. DVDs/VCDs/S-VCDs
that were recorded with the PAL standard are automatically converted and played in the NTSC format. Set
NTSC if you have connected the DVD player to an
NTSC television.
3 Select the submenu item TV Mode. If the DVD player is
connected to the television via the YCbCr (progressive
scan) connection option: In this case, select the option PSCAN. If the DVD player is not connected to the television via the YCbCr connection option: Select the option
Interlace.
ô Note:
If you have selected an incorrect video output, the television screen may suddenly go black. This is not a defect
of the television or the DVD player! In such a case: Press
the Video Out button until an image once again appears
on the television screen.
9.6. Audio Settings
9.6.1. Configuring the Analog Output
ô
Note:
1 Select the main menu item Audio Setup Page, then the
The correct setting depends on the television to which
you would like to connect the DVD player. In most
cases, your television will correspond to the typical
television standard for your country, unless you purchased it in a different country.
submenu item Speaker Setup.
2 In the Analog Setup menu, select the submenu item
Downmix.
3 Select one of the options …
If you are not certain which television standard is typical
in your country, consult the operating manual of the television.
LT/RT
Select this option if you …
Ô
On this topic, refer to Section 19. "Glossary /
Key Word Index".
9.5. Configuring the Video Output /
Television Mode
Ú
have connected a HiFi system (and a subwoofer) to
the DVD player.
Ú
have connected a surround sound system to the
DVD player and would like to use only its front
speakers and the subwoofer.
1 Select the main menu item Video Setup Page, then
the submenu item Video Output.
STEREO:
2 Select one of the three options available here:
Select this option if you …
OFF
Ú
have connected the DVD player to a stereo television and have not connected any audio components
to the DVD player or
Ú
have connected a Dolby Prologic-compatible amplifier,
receiver or HiFi system via the analog stereo output
(with RCA cable to the RCA cable sockets FL and FR)
of the DVD player.
Select this setting if the DVD player was not connected
to the television via Scart cable or component video.
YUV
Select this setting if the DVD player is connected via
component video YUV.
RGB
Select this setting if the DVD player is connected to an
RGB-capable television via the 21-pin Scart cable.
Otherwise, the sound will be inaudible or very quiet
during disc playback!
V Surr
If you select this option, the DVD player will simulate
surround sound with the audio playback.
16
IB_DVD_KH6507_GB.qxd
19.10.2004
9:53 Uhr
Seite 17
OFF
On
Disable the DOWNMIX and enable the 5.1ch function.
At the condition of DOWNMIX is setup to OFF, could
setup the PRO LOGIC II.When you select ON, it means that
2ch audio could be dummy as 5.1ch, multispeaker could be
hard such as VCDs, S-VCDs, MP3.
9.6.2. Configuring the Digital Output
1 Select the main menu item Audio Setup Page, then the
submenu item SPDIF Setup.
2 In the Digital Output Setup Page, select the sub-
OFF
Select Off, it means that PROLOGIC II does not work.
menu item SPDIF Output.
Ô
3 Choose between the options …
SPDIF Off
Select SPDIF Off if you have not connected any
digital audio components to the DVD player.
SPDIF/RAW
On this topic, also refer to Section 9.6.9.1. "Configuring the Speaker Sizes“.
9.6.4. Configuring the Dynamic (Dolby
Digital)
To balance out the volume differences between loud
and soft passages during playback of Dolby Digital
sound:
Select SPDIF/RAW if you have connected a multichannel digital audio component – such as a Dolby
Digital or DTS receiver or a 5.1 channel surround
sound system – to the DVD player via an optical or
coaxial cable.
1 Select the main menu item Audio Setup Page, then the
SPDIF/PCM
3 Use the control buttons to set a value between Off
submenu item Dolby Digital Setup.
2 In the Dolby Digital Setup menu, select the submenu item Dynamic.
and Full.
Select "SPDIF/PCM" if you have connected a twochannel digital audio component to the DVD player via
an optical or coaxial cable.
9.6.5. Settings for Mono VCDs/S-VCDs
ô Note:
Manual
Select Manual if you would like to configure the above
settings separately for CDs, Dolby Digital, DTS and
MPEG and not have them apply generally. After you
have selected Manual: In the Digital Output Setup
Page, select the submenu items CD, Dolby Digital,
DTS and MPEG in turn. For each item, select one of
the options SPDIF Off, SPDIF/RAW, SPDIF/PCM
only. Then select the submenu item LPCM output.
Choose between the sampling frequencies 48 kHz and
96 kHz.
9.6.3. Configuring Prologic
These settings are only relevant for playing VCDs/SVCDs. The sound on VCDs/S-VCDs may be available as
Ú
1-language in stereo or
Ú
2-language in mono
1 In the Audio Setup Page, select the submenu item
Dolby Digital Setup.
2 In the submenu Dolby Digital Setup, select the
submenu item Dual Mono.
1 Select the main menu item Audio Setup Page, then
the submenu item SURROUND.
3 For mono VCDs/S-VCDs, select one of the options
…
2 In the 3D Processing Page, select the submenu item
ProLogic II.
3 Choose between the options …
17
IB_DVD_KH6507_GB.qxd
19.10.2004
9:53 Uhr
Seite 18
STEREO:
You will hear the first language from the front left and the
second language from the front right speaker.
L-MONO:
You will hear the first language from the front
left and right speakers.
1 In the Audio Setup Page, select the submenu item
SPEAKER SETUP.
2 In the Analog Setup submenu, select the submenu
3
item POST DRC. Here you can configure the Nighttime Mode for playing DVDs. This mode can be useful if you wish to watch a DVD at night.
Select one of the options On, Off or Auto.
R-MONO:
You will hear the second language from the front
left and right speakers.
9.6.8. Speaker Settings
MIX-MONO:
You will hear both languages respectively from the
front left and front right speakers.
The steps described below only refer to the connection of
the DVD player to an audio component via analog
cables. If you have selected one of the digital connection
options …
ô Note:
9.6.6. Setting for HDCD Audio CDs
ô
Note:
These settings are only relevant for the playback of
audio CDs encoded according to the HDCD system.To
make use of the advantages of HDCD, the HDCD filter
of the DVD player must be activated.How to activate/
deactivate this filter is described in the following steps.
Ú
Ú
connection via coaxial cable or
connection via optical cable,
you do not have to configure the speaker settings described
below on the DVD player, but rather on the respective
audio component. Consult the operating manual of this
audio component for information on how to configure these settings.
1 In the Audio Setup Page, select the submenu item
HDCD.
For optimal sound, it is necessary to adapt the audio
playback to …
2 Choose between the options …
Off
Select Off if you do not want to play HDCD audio
CDs with the DVD player. With this setting, the
HDCD filter of the DVD player is deactivated.
Ú
Ú
Ú
On
Select On if you want to play HDCD audio CDs with the
DVD player.With this setting, the HDCD filter of the
DVD player is activated.
9.6.7. Configuring Nighttime Mode
ô Note:
When you lower the playback volume with the volume
buttons, this affects all 6 audio channels. In other words,
the volumes of background noises as well as music and
dialogue are all lowered equally. In nighttime mode,
however, only the playback volume of background
noises, music, etc. is lowered. This makes the dialogue
remain clearly audible even at a low playback volume.
the connected audio components,
the spatial conditions at the location of the DVD
player / audio components and
your personal preferences.
9.6.9.1. Configuring Speaker Sizes
To configure the speaker settings if you have connected
the DVD player to an audio component via analog
cable:
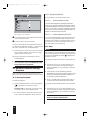
1 In the Audio Setup Page, select the submenu item
SPEAKER SETUP.
2 In the Analog Setup Page, select all speakers in
turn:
Front
Select the option ...
Ú
18
Large, if large speakers are connected for the front audio
channels on the audio component.
IB_DVD_KH6507_GB.qxd
Ú
19.10.2004
9:53 Uhr
Seite 19
Small, if small speakers are connected for the front audio
channels on the audio component.
• • AUDIO SETUP PAGE• •
Center
Select the option ...
Ú
Large, if a large center speaker is connected to the
audio component.
Ú
Small, if a small center speaker is connected to the
audio component.
Ú
Off, if you would like to deactivate the audio channel
for the center speaker or no center speaker is connected to the audio component
Rear
Select the option ...
SPEAKER SETUP
SPDIF SETUP
DOLBY DIGITAL SETUP
CHANNEL DELAY
CHANNEL TRIM
EQUALIZER
SURROUND
HDCD
CENTER
Fig. 12 Audio setup menü
Enter the distance values for all speakers here. The
distance values to be entered are calculated according
to the following formulas:
Ú
Distance for center speaker = distance of the left/right
front speaker to the listening position - distance of the
center speaker to the listening position
Ú
Distance for the left/right rear speakers = distance
of the left/right front speaker to the listening position - distance of the left/right rear speaker to the
listening position
Distance for subwoofer = distance of the left/right front speaker - distance of the subwoofer to the listening position
Ú
Large, if large rear speakers are connected to the
audio component.
Ú
Small, if small rear speakers are connected to the
audio component.
Ú
Off, if you would like to deactivate the audio channels
for the rear speakers or no rear speakers are connected
to the audio component.
Ú
Subwoofer
Select the option ...
3 Press the OK button once. Initially, the center speaker is
Ú
On, if a subwoofer is connected
to the audio component.
Ú
Off, if you would like to deactivate the audio channel for the subwoofer or no subwoofer is connected
to the audio component.
ô
Note:
If you have selected the option Off under Center, Rear
and Subwoofer, the audio playback takes place only on
two channels (stereo).
9.6.9.2. Configuring the Distances from the
Speaker to the Listener
selected, as can be seen in the yellow marking on the
screen. Press the left/right control buttons to select the
distance from the center speaker to the listener.You can
set the distance between 0 and 170 cm. Press the OK button once the correct distance is displayed.
4 Now press the up/down control buttons to select the
additional speakers and the subwoofer. The selected
speaker will be highlighted in yellow on the screen.
Press the OK button once the correct distance is
displayed for each speaker.
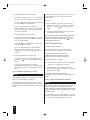
9.6.9.3. Setting the Speaker Volume Level
1 In the Audio Setup Page, select the submenu item Channel
Trim.The following screen is displayed:
For an optimal sound experience, the distance from the
speakers to the listern should be configured correctly. If
the distances are configured correctly, the sound from
all speakers should reach the listener position at the
same time. To do this:
1 Measure and record the distances from all speakers
to the listening position.
2 In the Audio Setup Page, select the submenu item Channel Delay.The following screen is displayed:
LEFT
Fig. 13 Adjusting the speaker volume
19
IB_DVD_KH6507_GB.qxd
19.10.2004
9:53 Uhr
Seite 20
2 Initially, the left volume control for the front left
speaker is selected. Press the up/down control buttons to set the volume level between 10 and -10 dB.
The audio channel that should currently be playing the
test sound is indicated at the bottom of the OSD menu.
4 To deactivate the test sound, select the option Off.
3 Then press the left/right control buttons to select
the other speakers. The currently selected speaker
is indicated at the bottom of the screen. Set the desired volume levels here as well.
4 Once you have set the volume levels, press the OK
button. The screen disappears.
ô Note:
If you are not certain which value is right for you, configure
this setting from your listening position while playing a
DVD/VCD/S-VCD. Test all the settings until you have
found one that sounds best to you.
9.7. Activating the Screen Saver
ô Note:
The screen saver prevents images displayed for long
periods from being burned into the television screen.
When the screen saver is activated, it is automatically
displayed as soon as …
Ú
OSD menu is displayed on the screen for an extended period of time and
Ú
no button is pressed on the remote control / DVD
player during this time.
9.6.9.4. Playing a Test Sound
We recommend activating the screen saver.To do this:
To test the audio settings for the playback of 5.1 channel
surround sound, the DVD player has a test sound. To
activate the test sound:
1 Select the main menu item General Setup Page and
ô Note:
2 Select the option On to activate the screen saver.
the submenu item Screen Saver.
Select the option Off to deactivate the screen saver.
The test sound can only be activated if ...
Ú
in the Analog Output Setup Page, the submenu item
Downmix is set to off
Ú
and no disc is inserted into the DVD player.
9.8. Activating the Automatic Memory
Function
ô Note:
This function is not available for all discs!
1 Select the main menu item Audio Setup, then the
submenu item SPEAKER SETUP.
The DVD player has an automatic
memory function. If it is activated, ...
2 In the Analog Output Setup Page, select the
submenu item Test Tone.
3 Select the option On. Do not close the OSD menu
Ú
Ú
Ú
Ú
Ú
Ú
the DVD player "remembers" the last disc played.
Ú
the DVD player saves the point at which playback
of the disc was interrupted.
while the test sound is playing. The test sound can
be heard as a static on each of the connected speakers in turn. It is output to the audio channels in the
order ...
If the disc is inserted back into the DVD player, the
playback is continued from the saved point.
Left (front left speaker)
To activate the automatic memory function:
Center (center speaker)
1 Select the main menu item General Setup Page and
the submenu item Last Memory.
Right (front right speaker)
2 Choose between the options On and Off.
Right Surr (rear right speaker)
Left Surr (rear left speaker)
20
IB_DVD_KH6507_GB.qxd
19.10.2004
9:53 Uhr
Seite 21
10. Using the DVD Player
6 The contents of the inserted disc are now loaded;
this may take a few seconds. "Loading" is displayed
on the television screen during this process.
After you have …
Ú
Ú
set up the DVD player at a suitable location
connected the DVD player to a television (or a
video projector) using one of the described
connection options
10.2. Inserting Memory Cards with
MP3/WMA/JPEG Files
To insert memory cards of types CF I/CF II, SD,
MS/MSPro, MMC and SM into the DVD player:
1 Switch on the television connected to the DVD
player.
Ú
Ú
Ú
connected the DVD player to a HiFi or surround
sound system (analog/digital) or a Dolby Digital or
DTS receiver, if desired
2 Make certain that the DVD player is ready for operation and switched on.
inserted the batteries into the remote control
If the television, the DVD player and any additionally connected equipment (e.g. an audio component) are ready for
operation and switched on and the DVD player is correctly connected to the television, you will see the OPENING
logo on the television screen.
and know how to access and use the setup menu
with the remote control …
… the DVD player is ready for operation.
If no disc is present in the disc tray of the DVD
player: "No Disc" is displayed on the television
screen.
10.1. Inserting Discs
To play a disc with the DVD player:
3 Open the flap in front of the memory card slot on the
1 Switch on the television connected to the DVD
front side of the DVD player. To do this, press once
with your finger on the dotted triangle on the flap. The
flap opens.
player.
2 Make certain that the DVD player is ready for
operation and switched on.
4 Now slide the memory card into one of the two
memory card slots. Follow the steps below – depending on which type of memory card you would like
to play.
If the television, the DVD player and any additionally connected equipment (e.g. an audio component) are ready for operation and switched on and
the DVD player is correctly connected to the television, you will see the OPENING logo on the television screen.
Upper slot
Lower slot
If no disc is present in the disc tray of the DVD
player: "No Disc" is displayed on the television
screen.
3 Open the disc tray by pressing the Open/Close button once. "OPEN" is displayed on the television
screen.
4 Place a disc on the disc tray with the printed/label
side facing up. For double-sided discs: The side you
would like to play must face down.
5 After you have placed the disc in the disc tray:
Press the Open/Close button again to close the disc
tray.
Fig. 14 Memory card slots
| Warning!
Always be sure to insert the memory cards into the
memory card slots as described below! Never bend the
memory cards while inserting them into the memory
cards slots! Only push the memory cards up to the stop in
the memory card slot with a light pressure. If memory
cards cannot be inserted without applying force:
Ú
Check whether it is a type of memory card that the DVD
player can play. Only memory cards of types CF I/CF II,
SD, MS/MSPro, MMC and SM can be played. Do not
try to insert memory cards of other types into one of
the memory card slots!
21
IB_DVD_KH6507_GB.qxd
19.10.2004
9:53 Uhr
Seite 22
Ú
Check whether you have inserted the memory card into
the memory card slot in the correct direction.
Ú
Never try to insert memory cards into the memory
card slots using force!
This could result in irreparable damage to the DVD player,
memory card and the files on the memory card!
Ú
Ú
the side of the memory card that contains the contacts must face up and
the angled corner of the memory card points to the left.
10.2.4. MemoryStick Memory Cards (MS)
ô Note:
Memory Stick memory cards must be inserted into the
bottom memory card slot. Insert MS memory cards with
the contacts first and slide them straight into the bottom
memory card slot. It is essential that …
Always be sure to pull the memory card at the stop mode
Ú
the side of the memory card that contains the contacts must face up and
Ú
the angled corner of the memory card points to the left.
10.2.1. SmartMedia Memory Cards (SM)
ô
Note:
5 Once the memory card is correctly inserted into the
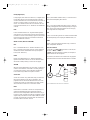
Only SmartMedia memory cards of type 3.3 V can be used!
SmartMedia memory cards of type 5 V cannot be used!
SmartMedia memory cards of types 3.3 V and 5 V can easily be differentiated according to the diagram below:
memory card slot, the red indicator light next to the
bottom slot lights up.
6 Press the Card button to display the memory contents.
5V
3.3 V
10.3. Playing DVDs/VCDs/S-VCDs
ô Note:
DVDs/VCDs/S-VCDs generally have a region code that
is printed on their cases. The DVD player can only play
DVDs/VCDs/S-VCDs with ...
Fig. 15 Differences between SM memory cards
SmartMedia memory cards (3.3 V) must be inserted into
the bottom memory card slot. Insert SM memory cards
with the contacts first and slide them straight into the
bottom memory card slot. It is essential that …
Ú
Ú
the side of the memory card that contains the contacts must face down and
the angled corner of the memory card points to the left.
Ú
Ú
the region code 2 or
the symbol
If no region code is printed on the case of a
DVD/VCD/S-VCD, it may not be possible to play it. In
this case, this is not a malfunction of the DVD player.
7 As soon as the contents of the inserted disc have
been loaded, the following is shown in the display of
the DVD player:
10.2.2. CompactFlash Memory Cards (CF I/CF II)
CompactFlash memory cards of types 1 and 2 must be
inserted into the top memory card slot. Insert CF memory cards with the contacts first and slide them straight
into the memory card slot. The side of the memory card
labelled with the manufacturer logo must face downward.
Fig. 16 Information in the display for DVD/S-VCD
q For DVDs: DVD
10.2.3. MultiMediaCard/SecureDigital
Memory Cards (MMC/SD)
For VCDs/S-VCDs: VCD or S-VCD
w The current audio playback setting, in this example:
MultiMediaCard/SecureDigital memory cards must be inserted
into the bottom memory card slot. Insert MMC/SD memory
cards with the contacts first and slide them straight into the
bottom memory card slot. It is essential that …
the Dolby Digital symbol (depending on the inserted DVD).
e The elapsed play time of the DVD/VCD/S-VCD currently being played in hours, minutes and seconds.
22
IB_DVD_KH6507_GB.qxd
19.10.2004
9:53 Uhr
Seite 23
r The number of the current chapter or track.
t The symbols and for the playback mode.
7 As soon as the contents of the inserted CD-R/CDRW/memory card with MP3/WMA/JPEG files have been
loaded, the CD-R menu is displayed on the screen.
Playback of the inserted disc begins automatically. It is possible that the contents will not be played immediately but a
selection menu displayed on the television screen instead.
In this case: Use the control buttons of the remote control
to select the desired menu item. Then press the OK button.
00:00
00:00
001/005
q
PHOTO 1
w
e
PHOTO 2
10.4. Playing Audio CDs
PHOTO 3
PHOTO 4
7 As soon as the contents of the inserted disc have been
PHOTO 5
loaded, the following is shown on the television screen:
Ú
Ú
The number of the currently played track
Fig. 18 Displaying JPEG Files
The elapsed playback time of the current track in
hours, minutes and seconds
q
The following is shown in the display of the
DVD player:
If no folders are present:
The number of the currently selected file/number of
files on the disc/memory card
w List of the files on the disc/memory card
e
For JPEG files: A preview of the currently selected
image
00:00
001/001
Fig. 17 Information in the display for CDs
00:00
q
\
q
w The symbols and for the playback mode
e The number of the currently played track
r The elapsed playback time of the current track in
CD
PHOTOS 1
w
PHOTOS 2
PHOTOS 3
PHOTOS 4
PHOTOS 5
PHOTOS 6
minutes and seconds.
Playback of the inserted disc begins automatically.
10.5. Playing DVD-R/DVD+R/DVD-RW/
DVD+RW/CD-Rs/CD-RWs/Memory
cards with MP3/WMA/JPEG Files
Fig. 19 Display of the folders
Ô
Please continue reading at step 9.
q
If folders are present:
The number of the currently selected folder/number of folders on the disc/memory card
w
List of the folders on the disc/memory card
ô Note:
In contrast to audio CDs, files can be saved in folders on a
DVD/CD-R/CD-RW/memory card. Depending on this possibility, the following steps – if required – are described for DVD/CDRs/CD-RWs/memory cards with and without folder structures.
Due to the bandwidth limit, could not playback JPEG-file,WMA
and MP3 at the same time in the memory card.
The playing of DVD/CD-Rs/CD-RWs/memory
cards with MP3/WMA/JPEG files is controlled via
a separate menu. This CD-R menu is displayed on
the screen once a DVD/CD-R/CD-RW/memory
card with MP3/WMA/JPEG files is inserted.
8 First select a folder from the folder list by pressing
the control buttons up/down. The currently selected
folder is highlighted in yellow in the folder list.
Then press the OK button. The CD-R menu now
displays a list of the files in the selected folder in
place of the folder list.
23
IB_DVD_KH6507_GB.qxd
19.10.2004
9:53 Uhr
Seite 24
11.1.1. Stopping Playback
00:00
00:00
001/020
q
To stop playback, press the Stop button once.
\
..
w
11.1.1.2. ... with Resume Function
PHOTO 1
PHOTO 2
PHOTO 3
PHOTO 4
PHOTO 5
Fig. 20 Display of the subfolders
q The number of the currently selected file/number of
files in the selected folder
w List of the files in the current folder
To return to the folder list: Use the up/down control buttons to select the folder with the name "..". Then press the
OK button. The folder list is now displayed again.
If you have stopped playback by pressing the Stop button
once:The DVD player automatically saves the point at which
you stopped the playback.This function is called the "resume
function". "Press: <Play> to continue" is displayed on the television screen.As soon as you press the Play button again, the
playback is continued from the saved point.
11.1.2.2. ... without Resume Function
If you have stopped playback by pressing the Stop button once: If you press the Stop button a second time,
the saved point at which you stopped playback is cleared. As soon as you press the Play button again, playback starts again from the beginning.
11.2. Skip
ô Note:
9 Select the file you would like to play first using the
control buttons up/down. The current file is highlighted in yellow in the file list.
10 Press the OK button. The selected file is now
This function may not be available for all DVDs/VCDs/
S-VCDs/memory cards! If you attempt to execute a function that is not available, the symbol
is displayed on
the television screen.
played/displayed.
Ô
For information on the functions available
during playback: please read Section 11. "General Functions During Playback“.
11. General Functions During
Playback
By pressing the Skip Forward button during plaback of
a ...
Ú
DVD/VCD/S-VCD: you can skip forward to the
start of the next chapter. The selected chapter is
played immediately; it is not necessary to press the
Play button.
Ú
Audio CD/CD-R or CD-RW/memory card with
MP3/WMA files: you can skip forward to the start of the
next title.The selected title is played immediately; it is
not necessary to press the Play button.
Ú
CD-R or CD-RW/memory card with JPEG files: you
can skip forward to the next image in the image list.
While a disc/memory card is being played, you can
make use of the following functions of the DVD player:
11.1. Pausing Playback
To pause the playback:
1 Press the Pause/Step button once during playback.
is displayed on the television screen
For DVDs only: On the screen, you will see a paused image of the currently displayed scene.
By pressing the Skip Backward button during playback
of ...
Ú
DVD/VCD/S-VCD: you can skip backward to the
start of the previous chapter. The selected chapter is
played immediately; it is not necessary to press the
Play button.
Ô
What are chapters? On this topic, please refer to
Section 19. "Glossary / KeyWord Index".
2 To continue playback, press the Play button once.
After a few seconds, playback will be continued.
24
IB_DVD_KH6507_GB.qxd
Ú
Ú
19.10.2004
9:53 Uhr
Seite 25
Audio CD/CD-R or CD-RW/memory card with
MP3/WMA files: you can skip backward to the start
of the currently played title. The selected title is
played immediately; it is not necessary to press the
Play button.
CD-R or CD-RW/memory card with JPEG files:
you can skip backward to the previous image in the
image list.
ô Note:
For audio CDs, the sound is played back at higher speed
during fast forward/rewind.
For DVDs/VCDs/S-VCDs, no sound is played during
fast forward/rewind.
3 To continue playback of the disc at normal speed
from the selected point, press the Play button once
while fast forwarding/rewinding.
11.3. Fast Forward/Rewind
ô Note:
11.4. Activating Various Playback
Modes
The fast forward/rewind function is not available for the
playback of CD-Rs/CD-RWs/memory cards with JPEG
files.
ô Note:
To locate specific points during playback using the fast
forward/rewind function:
These functions may not be available for all discs/
memory cards! If you attempt to execute a function that
is not available, the symbol [X] is displayed on the television screen.
1 For fast forward, press the F.Fwd button …
Ú
once for two times fast forward speed;
displayed on the screen.
2x is
Ú
twice for four times fast forward speed;
displayed on the screen.
4x is
During playback of a disc, you can activate the following playback modes:
11.4.1. Repeat Playback
With the repeat playback function, you can …
Ú
three times for eight times fast forward speed;
8x is displayed on the screen.
Ú
four times for sixteen times fast forward speed;
is displayed on the screen.
Ú
five times for thirty-two times fast forward speed;
32x is displayed on the screen.
2
For fast rewind, press the F.Rwd button …
Ú
once for two times fast rewind speed;
displayed on the screen.
2x is
Ú
twice for four times fast rewind speed;
displayed on the screen.
4x is
Ú
three times for eight times fast rewind speed;
is displayed on the screen.
Ú
four times for sixteen times fast rewind speed;
displayed on the screen.
Ú
five times for thirty-two times fast rewind speed;
32x is displayed on the screen.
16x
•
For audio CDs/VCDs/S-VCDs: repeat playback of
individual tracks or the entire audio CD.
•
For DVDs: repeat playback of either the title, chapter or the entire DVD.
•
For CD-Rs/CD-RWs/memory cards with
MP3/WMA/JPEG files: switch between the playback modes, single, repeat one, repeat folder and
folder.
1
Press the Repeat button once during playback.
For audio CDs/VCDs/S-VCDs:
Track is
displayed on the screen. The current track is played
now repeated.
8x
16x is
For DVDs:
Chapter is displayed on the screen.
The current chapter is played repeatedly.
For CD-Rs/CD-RWs/memory cards with
MP3/WMA/JPEG files: „Single“ is displayed briefly
in the CD-R menu. The currently selected file is
played only once.
25
IB_DVD_KH6507_GB.qxd
19.10.2004
9:53 Uhr
Seite 26
2 Press the Repeat button a second time.
For audio CDs/VCDs/S-VCDs: "All" is displayed on
the screen. The entire audio CD is now repeated.
For DVDs/VCDs/S-VCDs: With this function, you can
repeat playback of a specific sequence within the
current chapter.
To do this:
For DVDs:
Title is displayed on the screen. The
current track is played now repeated.
For CD-Rs/CD-RWs/memory cards with
MP3/WMA/JPEG files: "repeat one" is displayed
briefly in the CD-R menu. The currently selected
file is played reapeted.
1 During playback, press the A–B button on the
remote control as soon as the start of the desired
sequence is reached.
A is displayed on the
screen.
2 Press the A–B button again as soon as the end of
the desired sequence is reached.
3 Press the Repeat button a third time.
For audio CDs/VCDs/S-VCDs:
All is no longer
displayed on the screen. The function repeat playback is now deactivated.
For DVDs:
All is displayed on the screen. The
entire DVD is now repeated.
The repeating of the selected sequence starts immediately; it is
not necessary to press the Play button.The sequence is repeated until you press the A–B button again.
AB is no
longer displayed on the screen.
11.4.3. Random Playback
If you select random playback for …
For CD-Rs/CD-RWs/memory cards with MP3/
WMA/JPEG files: "Repeat folder" is briefly
displayed in the OSD menu. The entire folder is
repeated.
4 Press the Repeat button a fourth time.
For DVDs: The function repeat playback is now
deactivated.
All is no longer displayed on the
screen.
CDs/VCDs/S-VCDs: the tracks of the inserted
CDs/VCDs/S-VCDs are played in random order.
DVDs/CD-Rs/CD-RWs/memory cards with
MP3/WMA/JPEG files: the files of the inserted
DVD/VCD/S-VCD are played in random order.
To activate SHUFFLE playback:
1
For CD-Rs/CD-RWs/memory cards with
MP3/WMA/JPEG files: "Folder" is displayed briefly in the CD-R menu. The entire folder is played
once.
Press the SHUFFLE button once during playback.
"SHUFFLE" is displayed on the screen.
2 To deactivate the random playback: Press the
SHUFFLE button again. "SHUFFLE" is no longer
displayed on the screen.
11.4.2. Repeating Sequences (A–B)
ô
Note:
The repeating of sequences is not available for the playback of CD-Rs/CD-RWs with JPEG files.
For audio CDs and CD-Rs/CD-RWs/memory cards
with MP3/WMA files: With this function, you can repeat playback of a specific sequence within the current title/file.
For CD-Rs/CD-RWs/memory cards with
MP3/WMA/JPEG files, FOLDER is displayed on the
screen.
11.4.4. Using the Bookmark Function
ô Note:
The bookmark function is not available for the playback of
CD-Rs/CD-RWs/memory cards with JPEG files. CDRs/CD-RWs/memory cards with MP3/WMA files, the Mark
button has a different function, see Section 11.4.5. "Using the
Program Function".
During playback, you can set "bookmarks" in order to
listen to or view selected passages again at a later time.
You can set up to twelve bookmarks. To do this:
26
IB_DVD_KH6507_GB.qxd
1
19.10.2004
9:53 Uhr
Seite 27
Press the Mark button once during playback. The
bookmark menu is displayed on the screen
BOOKMARK
With the program function, you can combine …
Ú
Ú
Audio CDs/VCDs/S-VCDs tracks
DVDs chapters
into an individual title/chapter/file sequence. You can specify the order in which the titles/chapters/files should be played. You can combine a maximum of twenty
titles/chapters/files for programmed playback.
Fig. 21 Display of the bookmark function
Ô
2 As soon as the playback has reached the point at
which you would like to set the bookmark: Press
the Play button once. The following is displayed:
Ú
Ú
Ú
For Audio CDs/VCDs/S-VCDs:
The number of the track that contains the selected
passage.
The time position of the bookmark in minutes and
seconds.
What are titles and chapters? On this topic,
please refer to Section19. "Glossary / Key Word
Index".
To combine titles/chapters/files for programmed playback:
1 For audio CDs/VCDs/S-VCDs: During playback or
while playback has been stopped, press the Program button once. The program menu is displayed
on the screen:
For DVDs:
The number of the title that contains the selected
passage.
Ú
The number of the chapter that contains the selected passage.
Ú
The time position of the bookmark in hours, minutes and seconds.
3 If you would like to set additional bookmarks: Use the
Fig. 22 Display of the program menu for audio CDs
up/down/left/right control buttons to select additional
memory positions for bookmarks. Press the Play button again when you would like to set the bookmark.
Each of the numbered fields stands for one of the
available program memory positions for titles. You
must enter the desired title numbers after these
numbers.
4 Repeat steps 2 and 3 until you have set all the de-
1 For DVDs: During playback or while playback has
sired bookmarks. To delete bookmarks: Select the
number of the bookmark with the
up/down/left/right control buttons. Then press the
CLR button. The bookmark is now deleted.
been stopped, press the Program button once. The
program menu is displayed on the screen:
Once you have set all the desired bookmarks, press
the "Mark" button once to hide the bookmark
menu on the screen.
5 If you would like to skip to the passages at which
you have set bookmarks at a later time: Press the
Mark button again. The bookmark menu is displayed on the screen.
Fig. 23 Display of the program menu for DVDs
6 Select the desired bookmark with the control
buttons. Then press the Play button. Playback starts
immediately at the location at which you set the
selected bookmark.
11.4.5. Using the Program Function
27
IB_DVD_KH6507_GB.qxd
19.10.2004
9:53 Uhr
Seite 28
Each of the numbered fields stands for one of the
available program memory positions for chapters.
After these numbers, you must now enter ...
Ú
in the input field labelled TT: The title number under
which the desired chapter is stored on the DVDs.
Ú
in the input field labelled CH: The number under
which the desired chapter is stored on the DVDs.
5 To clear the program, press the Program button
again during playback. In the program menu, first
select the Stop option and press the OK button.
Then select the EXIT option and press the OK button again. "Program" is no longer displayed on the
screen. The program function is now deactivated.
11.5. Title/Chapter Selection with the
Number Buttons
ô Note:
If you are not certain which number a desired title or
chapter has: Select the desired chapter during playback
with the Skip Forward/Skip Backward buttons. Then press
the Display button to display information about the
DVD/VCD/S-VCD on the screen. Here you will find the
current title and chapter numbers, among other information.
Instead of using the Skip function, you can also select titles/chapters of a disc using the number buttons on the
remote control. To do this:
1 During playback or during paused playback, press
the number buttons on the remote control that correspond to the desired title/chapter number. Press
one of the buttons 1 to 9 to enter single-digit
title/chapter numbers. To enter title/chapter numbers from 11 to 19: Press the 10+ button followed
by one of the buttons 1 to 9.
2 Enter the title and chapter numbers in the input
fields with the number buttons 1 to 9. Example: To
enter the title or chapter number 01, press the number button 1. To enter the title or chapter number 15,
press the 10+ number button followed by the 5
number button. To enter the title or chapter number
25, press the 10+ number button twice followed by
the 5 number button.
If you would like to delete an entry in one of the
input fields: Select the corresponding input field with
the control buttons and press the CLR button. The
entered numbers are deleted.
Example: To select title/chapter 15, press the 10+ button
followed by the 5 button.To select title/chapter numbers
20 or higher: Press the 10+ button until the first digit the
desired title/chapter number is displayed on the screen.
Then press the number button that corresponds to the
second digit of the desired title/chapter number. Example:To select title/chapter 35, first press the 10+ button
three times.Then press the 5 button.
2 Playback of the title/chapter with the entered number now starts automatically.
If you would like to delete the entries in all input
fields: Use the control buttons to select the EXIT
option beneath the input fields. Then press the OK
button. The program menu is hidden, all entries are
deleted.
12. Special Functions for
DVD/VCD/S-VCD Playback
ô Note:
Once you have entered the title/chapter number, the
green selection indicator automatically moves to the
next program memory position.
Ô
On this topic, also refer to Section 13.1. "Displaying Disc Information".
The following functions may not be available for all
DVDs! If you attempt to execute a function that is not
available, the symbol
is displayed on the television
screen.
12.1. Calling Up the DVD Menu
3 Repeat step 2 until you have programmed all desired
titles/chapters.
4 Now use the control buttons to select the Start
option beneath the input fields. Then press the OK
button. Playback of the programmed title/chapter
sequence starts immediately. "Program" is displayed
on the screen.
28
Many films on DVD have a root menu on the disc that
offers the option to play the main film as well as other
options, such as …
Ú
Ú
Ú
selecting the language for subtitles and audio
selecting chapters directly
playing bonus material on the film (background
information, "Making of", etc.).
IB_DVD_KH6507_GB.qxd
19.10.2004
9:53 Uhr
Seite 29
If such a menu is present on the inserted disc: You can
call up the menu during playback by pressing the Menu
button.
Ú
twice for one fourth playback speed forward.
displayed on the screen.
1/4 is
Ú
The individual menu items can be selected by pressing
the control buttons. To confirm the selected menu item,
press the Play button or the OK button.
three times for one eighth playback speed forward.
1/8 is displayed on the screen.
Ú
four times for one sixteenth playback speed forward.
1/16 is displayed on the screen.
12.2. Selecting Chapters with the
Search Function for DVD
Ú
five times for half playback speed backward.
displayed on the screen.
Ú
six times for one fourth playback speed backward.
1/4 is displayed on the screen.
Ú
seven times for one eighth playback speed bakkward.
1/8 is displayed on the screen.
Ú
eight times for one sixteenth playback speed
backward.
1/16 is displayed on the screen.
1/2 is
12.2.1. Selecting Chapters by Time Position
To select a chapter by entering its time position:
1 Press the Search button once during playback. A
menu is displayed on the bottom half of the screen.
2 Press the down control button until the submenu
3
item CH Time is highlighted in yellow. Then press
the OK button.
The "Time" input field containing "–:––:––" is now
selected. Use the number buttons 0 to 9 to enter the
time position of the desired chapter with five digits
for hours, minutes and seconds.
ô Note:
No sound is played during slow playback.
2 To continue playback at normal speed, press the
Playback starts immediately at the selected point.
Play button once.
12.2.2 Selecting Chapters by Chapter Number
12.4. Step Function
To select a chapter by entering the title and chapter
number:
To play the contents of an inserted DVD/VCD/S-VCD
forward as individual frames:
1 Press the Search button once during playback. A
1 Press the Pause/Step button once during playback
menu is displayed on the bottom half of the screen.
to pause the playback. On the screen, you will see a
paused image of the currently displayed scene.
2 Press the down control button until the submenu
item Chapter is highlighted in yellow. Then press
the OK button.
3 To enter the chapter number in the highlighted input
field: Press the number buttons that correspond to
the chapter number. Example: To start playback of
chapter 8, press the number button 0/10 followed
by 8.
Playback starts immediately at the selected point.
2 With each additional press of the "Pause/Step" button, the paused image is advanced by one frame.
3 To continue playback, press the Play button once.
12.5. Zoom In / Out
During playback of a DVD/VCD/S-VCD, you can zoom
the image on the screen in or out at multiple levels. To
do this, press the Zoom button on the remote control …
12.3. Slow Playback Forward/Backward
Ú
once for the first zoom in level.
displayed on the screen.
To view the contents of a DVD/VCD/S-VCD at slower
speed:
Ú
twice for the second zoom in level.
displayed on the screen.
Ú
three times for the third zoom in level.
briefly displayed on the screen.
4x is
Ú
four times for the first zoom out level.
briefly displayed on the screen.
1/2 is
2x is briefly
3x is briefly
1 For slow playback, press the Slow button …
Ú
once for half playback speed forward (in comparison
with the normal playback speed).
1/2 is displayed
on the screen.
29
IB_DVD_KH6507_GB.qxd
19.10.2004
9:53 Uhr
Seite 30
Ú
five times for the second zoom out level.
brielfy displayed on the screen.
Ú
six times for the third zoom out level.
briefly displayed on the screen.
1/3 is
1/4 is
12.9. Displaying Disc Information
To display all available information about a DVD on
the screen:
1 Press the Display button once during playback. The
To return to the normal screen size, press the Zoom
button one more time.
following is displayed on the screen:
Ú
Left: The number of the current title / the total
number of titles on the DVD.
Ú
In the middle: The number of the current chapter /
the total number of chapters on the DVD.
Ú
Right: The elapsed time of the current title in hours,
seconds and minutes.
12.6. Changing Camera Angles
Many DVDs/VCDs/S-VCDs contain scenes that were
recorded simultaneously from different camera angles.
With such DVDs/VCDs/S-VCDs, you can view the
same scene from various perspectives.
To do this, press the Angle button during playback of
the corresponding scene. Each press of the Angle button switches to one of the available camera angles.
2 If you press the Display button a second time: The
time until the end of the current title is displayed
on the right.
12.7. Showing/Hiding Subtitles
3 If you press the Display button a third time: The
If the DVD/VCD/S-VCD has subtitles, these can be
displayed during playback by pressing the Subtitle button.
elapsed time of the current chapter is displayed on
the right.
4 If you press the Display button a fourth time: The
Pressing the Subtitle button the first time displays the
subtitles in the first available language. Each additional
press of this button displays the subtitles in another
available language.
time until the end of the current chapter is displayed on the right.
5 To hide the disc information: Press the Display button one more time. "Display Off" is briefly displayed on the screen.
The currently selected subtitle language and its number
are displayed on the screen (e.g. 01/03 German for the
first of three available subtitle languages).
To deactivate the subtitle function: If the last of the
available subtitle languages is displayed (e.g. 03/03
English for the third of three available subtitle languages), press the Subtitle button again. "Subtitle Off" is
briefly displayed on the screen.
13. Special Functions for
Audio CD Playback
13.1. Displaying Audio CD Information
12.8. Changing the Playback Language
In addition to the information displayed on the screen
…
With many DVDs/VCDs/S-VCDs, you can select a different playback language during playback. To do this,
press the Audio button.
Ú
Ú
The first press of the Audio button switches to the first
available playback language. Each additional press of
the Audio button switches to the next available playback language. The currently selected playback language and its number are briefly displayed on the screen.
Pressing the Display button during playback will
display additional information. If you press the Display
button ...
30
number of the currently playing track
elapsed time of the currently playing track
Ú
one time, the time until the end of the current title
is displayed.
Ú
two times, the elapsed time of the entire CD is
displayed.
Ú
three times, the time until the end of the last track
on the audio CD is displayed.
IB_DVD_KH6507_GB.qxd
Ú
19.10.2004
9:53 Uhr
Seite 31
four times, "Display OFF" appears briefly on the
screen. All information displays are now hidden. To
once again display the CD information, press the
Display button again.
13.2. Selecting Track by Time Position
To select a track by entering its time position on the
audio CD …
2 To deactivate the scan function, press the Digest
button again. "Scan" is no longer displayed on the
screen.
14. General Audio Functions
of the DVD Player
14.1. Adjusting the Playback Volume
1 Press the Search button on the remote control twice
during playback or while playback is paused.The following is displayed on the screen:
Press the Vol + button to increase the playback volume.
Press the Vol – button to decrease the playback volume.
Disc Go To: -- : --
The change in the volume is displayed on the screen
between the values 0 (sound off) and 20 (maximum
volume).
2 In the input field containing "––:––", enter the time
position of the desired title on the audio CD. Enter
the time position with four digits for minutes and
seconds. To do this, use the number buttons 0/10 to
9. Playback is started immediately at the selected
time position.
13.3. Selecting Passages of a Track by
Time Position
To select a specific passage of a title by entering its time
position within the track:
1 Press the Search button twice during playback of the
14.2. Muting the Sound
To mute the sound, press the Mute button during
playback. "Mute" is displayed on the screen. If you
would like to restore the sound, press the Mute button
once again. "Mute Off" is briefly displayed on the
screen.
14.3. Adjusting the Dialog Volume
To separately raise/lower the volume of dialog when playing DVDs/VCDs/S-VCDs:
track or while playback is paused. The following is
displayed on the screen:
1 Press the Setup button to display the OSD menu.
Track Go To: -- : --
2 Select the main menu item Audio Setup Page, then the
submenu item SPEAKER Setup.
2 Enter the time position with four digits for minutes
and seconds. To do this, use the number buttons
0/10 to 9. Playback is started immediately at the
selected time position.
3 In the Analog Output Setup Page, select the submenu item Dialog.
4 Use the up/down control buttons to set the dialog
Example: You would like to select a passage that
begins one minute after the start of the track. Press
the following buttons
Ú
Ú
volume between the values 0 and 20. Then press the
OK button.
0 and 1 for 1 minute;
0 and 0 for 0 seconds
13.4. Scan Function
If you activate the scan function, the titles on the inserted audio CD will be played for a few seconds each in
the order in which they are found on the disc. The playback ends with the last track on the audio CD.
To activate the scan function
1 Press the Digest button during playback of an
audio CD. "Scan" is displayed on the screen.
31
IB_DVD_KH6507_GB.qxd
19.10.2004
9:53 Uhr
Seite 32
14.4. Activating the Equalizer Function
14.6. Activating the Bass Boost
The sound playback can be modified by various equalizer
settings. Each equalizer setting has its own characteristic
emphasis in the treble, middle and bass ranges. This allows
you to adjust the sound playback to your personal listening preferences. To activate the various equalizer settings:
The DVD player has a double bass boost function.
When the bass boost function is activated, the bass
tones sound "fuller" and richer.
1 Press the Setup button to display the OSD menu.
1 Press the Setup button to display the OSD menu.
2 Select the main menu item Audio Setup Page, then the
2 Select the main menu item Audio Setup Page, then the
To activate the bass boost function:
submenu item Equalizer.
3 Select the submenu item Effects. Select one of the
Ú
Ú
Ú
Ú
Ú
Ú
Ú
Ú
options:
Rock
Pop
Live
Dance
Techno
Classic
Soft
Off
4 To deactivate the equalizer function: In the submenu
submenu item Equalizer.
3 Select the submenu item Bass Boost. Choose between
the options On and Off.
4 If you would like to also activate the second bass
boost level: Return to the submenu item Equalizer
and select the submenu item Super Bass. Choose
between the options On and Off.
14.6. Activating the Treble Boost
In addition to the bass boost, the DVD player also has
a boost function for treble tones. To activate this:
item Sound Mode, select the option Off.
1 Press the Setup button to display the OSD menu.
14.5. Activating the Spatializer Function
2 Select the main menu item Audio Setup Page, then the
The DVD player can simulate the sounds of various rooms.
In addition to the equalizer function, this is the second
option for adjusting the sound to your personal listening
preferences. The following spatializer options are available:
Ú
Ú
Ú
Ú
Ú
Ú
Ú
Ú
Concert
Living room
Hall
Bathroom
Cave
Arena
Church
Off
submenu item Equalizer.
3 In the Equalizer menu, select the submenu item Treble Boost. Choose between the options On and Off.
15. General Video Functions
of the DVD Player
15.1. Adjusting the Image Quality
To configure/adjust the image quality:
1 Press the Setup button to display the OSD menu.
To activate the spatializer function:
2 Select the main menu item Video Setup Page, then
1 Press the 3D button during playback.The first spatializer func-
the submenu item Quality. Select each of the following options in turn …
tion is now activated.Its name is briefly displayed on the screen.
2 Each additional press of the 3D button switches to
Ú
Brightness: Here you can set the brightness of the
image between the values of -20 and + 20.
Ú
Contrast: Here you can set the image contrast
between the values of – 16 and + 16.
Ú
Gamma: Here you can set the overall brightness
(correction of the total brightness) of the image.
Ú
Saturation: Here you can set the Saturation of the
image between the values of –9 and +9.
another spatializer option. Their names are briefly
displayed on the screen as they are selected.
3 To deactivate the spatializer function: Press the 3D button until "Reverb: Off" is briefly displayed on the screen.
ô
Note:
This function is available for Audio CDs/VCDs/SVCDs/WMA/MP3.
32
IB_DVD_KH6507_GB.qxd
19.10.2004
9:53 Uhr
Seite 33
Ú
Hue: Here you can set the hue of the image between
the values of –9 and +9.
Ú
Luma Delay: Select here between the options 0 T
and 1 T. The settings serve to compensate for or
synchronize any delays between the brightness
(luminance) and color (chrominance) of the video
signal.
To configure your preferred settings:
1 Press the Setup button to display the OSD menu.
16. Other Functions of the
DVD Player
16.1. Preferences
With these settings, you can configure how DVDs are
played:
Ú
ô
What language should be played during DVD playback.
Note:
DVDs can only be played in the selected language if this
language is available on the DVD.
If this is not the case, the DVD is played in one of the
available languages. For most DVDs, information
about the available audio languages can be found on
the DVD case.
Ú
The language in which the subtitles should be
displayed during DVD playback.
ô
Note:
Subtitles can only be displayed in the selected language if
this language is available on the DVD. If this is not the
case, no subtitles or subtitles in a different language are
displayed. For most DVDs, information about the available subtitle languages can be found on the DVD case.
Ú
ô
The language in which the DVD menu should be displayed.
Note:
Not all DVDs have a menu. If a menu is available: The
menu can only be displayed in the selected language if
this language is available on the DVD. If this is not the
case, the menu is displayed in one of the available languages. With most DVDs, you can select the language in
which the menu should be displayed within the DVD
menu itself.
2 Select the main menu item Preferences Page.
ô
Note:
The main menu item Preference Page cannot be selected
while a disc/memory card is being played. For this reason, first stop the playback by pressing the Stop button
twice.
3 In the Preference Page, select the submenu item
Audio. Select your preferred playback language
here.
4 Then select the submenu item Subtitles in the Preference Page. Select your preferred language for
subtitles here.
5 Lastly, select the submenu Disc Menu in the Preference Page. Select the language that you prefer for
the display of the DVD menu.
16.2. Using the Sleep Timer Function
The DVD player has a sleep timer function. If this is
activated, the DVD player will automatically switch
itself off after a preprogrammed period of time. For
example, this is useful if you would like to watch a
DVD or listen to music while falling asleep. Activating
the sleep timer function makes certain that the DVD
player will not keep running all night long.
You can program in time ranges between 15 and 180
minutes before shutdown of the DVD player. To activate the sleep timer function:
1 Press the Sleep button during playback. "Sleep 15
min" is briefly displayed on the screen.
Each additional press of the Sleep button switches
to a different length of time.
2 Once the desired length of time is displayed on the
screen: Wait until the display of "Sleep" disappears
from the screen. The DVD player will now
automatically switch itself off after elapsing of the
last displayed time.
3 To deactivate the sleep timer function: Press the
Sleep button until "Sleep Off" is briefly displayed
on the screen. Once this display has disappeared, the
sleep timer function is deactivated.
33
IB_DVD_KH6507_GB.qxd
19.10.2004
9:53 Uhr
Seite 34
16.3. Adjusting the Display Brightness
3 Select the option Change. A window with three
input fields is displayed:
The brightness of the display can be adjusted in three
levels. To do this:
1 Press the Dimmer button once. "Hi" appears in the
display. The display is now set to the highest of the
three brightness levels.
2 Press the Dimmer button a second time. "Lo" appears in the display. The display is now set to the
lowest of the three brightness levels.
3 Press the Dimmer button a third time."Nor" appears in the display.The display is now set to the
middle of the three brightness levels.
16.4. Activating/Deactivating the Password Check
The DVD player has a password system. If this is activated, a number combination must be entered to
change the settings to prevent access by children.
To activate or deactivate the password check:
1 Press the Setup button to display the OSD menu.
Fig. 24 Setting the password
The input field Old Password is automatically
selected first. Enter the factory-set password 136900
with the number buttons. Then the second input
field New Password is automatically selected.
4 Enter the desired new password in the input field
New Password. Please note that the new password
must also consist of a six-digit number combination.
Use the number buttons again to enter the new
password. Then the third input field Confirm PWD is
automatically selected.
2 Select the main menu item Password Setup Page
and then the submenu item Password Mode.
5 Enter the desired new password again in the input
field Confirm PWD.
3 Select the option …
6 Press the OK button. Your new password is now
Ú
On to activate the password check. The password
check is activated in the default factory settings.
Ú
Off to deactivate the password check. Because the
password check is activated in the factory settings, a
window now appears. Enter the factory-set password 136900 into the input field Password in this
window. Use the number buttons for this. Then
press the OK button.
saved.
ô Note:
16.5. Selecting Your Own Password
You can replace the factory-set password 136900 with a
password of your own choosing. This must consist of six
digits. You can use the numbers 0 to 9. To change the
factory-set password:
1 Press the Setup button to display the OSD menu.
If you forget your password: The old, factory-set password 136900 can still be used.
16.6. Using the Kid Safe Function
Many DVDs and VCDs/S-VCDs have an age rating. The
age rating indicates the age groups for which the contents
of the DVD/VCD/S-VCD are intended. The age rating is
usually printed on the disc case and/or on the
DVD/VCD/S-VCD itself.
The DVD player has a kid safe function with three possible
levels.This prevents the playing of DVDs/VCDs/S-VCDs that
are not rated for the configured age group.To select an age
rating level:
2 Select the main menu item Password Setup Page
and then the submenu item Password.
1 Press the Setup button to display the OSD menu.
2 Select the main menu item Preference Page and then
the submenu item Parental.
3 Select one of the three age rating levels here:
34
IB_DVD_KH6507_GB.qxd
19.10.2004
9:53 Uhr
Seite 35
G
ô Note:
Only DVDs with no age limitation or with an age
rating of G can be played.
Before resetting to the factory settings, consider the following: All of your previous settings in the OSD menu
will be lost after the reset.
PG 13
3 Select the option Reset. The DVD player is now
No DVDs with an age rating of PG 13 or higher can
be played.
reset to the factory settings.
16.8. Switching the DVD Player Off
Adult
To switch the DVD player off:
All of DVDs can be played.
1 If a disc or memory card is being played: First stop
If you have activated the password check, the password check window is displayed. Enter the password in the input field, then press the OK button.
the playback. To do this, press the Stop button
twice.
2 Open the disc tray to remove any inserted disc
ô
Note:
The exact functioning of the kid safe function depends on the
individual DVD/VCD/S-VCD.With many DVDs/VCDs/SVCDs, playback is not possible at all while the kid safe function
is activated.With others, chapters not suitable for the respective
age rating level are skipped over or replaced by a different chapter. Please also note that …
Ú
Ú
DVDs/VCDs/S-VCDs that are not labelled with an
age rating may still have an age rating.
With many DVDs/VCDs/S-VCDs that are labelled
with an age rating, the kid safe function with configured age rating level will not work.
16.7. Resetting the DVD Player to the
Factory Settings
If you would like to reset all the settings you have
configured in the OSD menu: Reset the DVD player to
the original factory settings. To do this:
1 Press the Setup button to display the OSD menu.
2 Select the main menu item Preference Page and the
submenu item Default.
from the DVD player. To do this, press the
Open/Close button. Then close the disc tray by
pressing the Open/Close button again.
To remove a memory card from the memory card slot:
Press the Card button to switch from memory card
mode to another mode. Then carefully pull the memory
card straight out of the memory card slot. Then close
the flap on the memory card slot by pressing it closed.
3 Press the Standby button.The DVD player now switches to the "Standby" mode.To switch the DVD player
back on, press the Standby button again.To switch the
DVD player off entirely, press the Power button.
17. Cleaning the DVD Player
Only clean the housing of the DVD player with a
slightly damp cloth and a mild cleanser. When cleaning,
make certain not to allow any moisture to enter into
the DVD player!
Clean the inside of the disc tray – if necessary – only
with a clean, dry brush (e.g. lens cleaning brush, available from camera stores). Never use moisture to clean
the inside of the disc tray!
| Warning!
If moisture enters the DVD player, the risk of an electric
shock exists! The DVD player may also be irreparably
damaged!
35
IB_DVD_KH6507_GB.qxd
19.10.2004
9:53 Uhr
Seite 36
18. Troubleshooting
No sound
A Check whether the television and/or DVD player
The display is blank/DVD player does not function,
even though it was switched on
have been muted.
B Check whether all connector cables between the
A Check whether the power cord is properly plugged
DVD player and any audio components connected
are firmly plugged into the appropriate sockets.
into the socket.
B Check whether the socket into which you have
plugged the power cord of the DVD player is supplying electricity by plugging in another device. If
necessary, plug the power cable of the DVD player
into a different power socket.
C Check whether the settings in the OSD menu
match the connection option you have used to connect the audio components to the DVD player.
Ô
Refer here to Section 8. "Connecting Audio Components to the DVD Player".
C Switch off the DVD player by pressing the "Power"
button and wait for ten seconds. Then switch the
DVD player back on by pressing the "Power" button.
D Consult the operating manual of the television to
determine whether any settings must be configured
on the television in order to use the DVD player
with the television.
The display indicates "No Disc", even though a disc
was inserted
E Consult the operating manual of any connected audio
A The disc is dirty, scratched or damaged. Clean the disc or
component to determine whether its settings must be
configured in order to use it with the DVD player.
insert a different disc.
F If you …
Inserted disc is not played
A film of condensation may have formed on the laser
sensor lens of the DVD player. In particular, this may
occur if the DVD player has been subjected to large
temperature fluctuations.
Ú
have connected the DVD player to a stereo television and have not connected any audio components
to the DVD player or
Ú
have connected a Dolby Prologic-compatible audio
component via the analog stereo output (with RCA
cable to the RCA cable sockets "FL" and "FR") of
the DVD player:
In this case, place the DVD player in a dry environment
at normal room temperature. First remove any inserted
disc from the disc tray. Then leave the DVD player
switched off for at least one hour without using it until
the condensation film has evaporated.
Check whether the option Stereo has been selected
in the Analog Output Setup Page under the submenu item Downmix.
No image or only black and white image
Ô
A Check whether all connector cables between the
DVD player and the television (or video projector)
are firmly plugged into the appropriate sockets
B Check whether the settings in the OSD menu
match the connection option you have used to connect the DVD player to the television (or the video
projector).
Also refer to Section 9.6.1. "Configuring the
Analog Output"
No 4:3 or 16:9 image
A Consult the operating manual of the television to determine which image format the television supports.
B Check whether the settings in the OSD menu
match the available image format of the television.
Ô
Refer here to Section 7. "Connecting the DVD
Player to a Television".
C Consult the operating manual of the television (or
the video projector) to determine whether any settings must be configured on the television (or video
projector) in order to use the DVD player with
television.
Remote control does not function
A Check whether the batteries of the remote control
are inserted into the battery compartment with the
correct polarity.
B Check whether the batteries in the remote control
are dead and replace both batteries, if necessary.
36
IB_DVD_KH6507_GB.qxd
19.10.2004
9:53 Uhr
Seite 37
ô Note:
C Make certain that there are no obstructions
between the remote control and the DVD player.
D Remain within five meters of the DVD player when
For damage from ...
Ú
opening of the housing of the DVD player and/or
remote control
Ú
repair attempts by unqualified persons
using the remote control.
Playback language / subtitle language does not
match the settings in the OSD menu
no liability is accepted or warranty offered!
The playback language / subtitle language configured in
the OSD menu is not available on the inserted disc.
19. Glossary / Key Word Index
One or more functions cannot be activated
What are DVDs, VCDs and S-VCDs?
The selected function may not be available for all
DVDs/VCDs/S-VCDs. If you attempt to execute a
function that is not available, the symbol [X] is displayed on the television screen.
None of the buttons on the device or on the remote control function / other malfunctions
A Switch the DVD player off by pressing the "Power"
button. Wait ten seconds, then press the "Power"
button again once to switch the DVD player back
on.
B If the problem still persists: Reset the DVD player to the
factory settings.
Ô
Refer here to Section 16.7. "Resetting the DVD
Player to the Factory Settings“.
DVDs
DVD is the abbreviation for "Digital Versatile Disc".
DVDs are used to store audio and video data; they exist in
the sizes 8 cm and 12 cm (diameter). With a storage capacity many times greater than that of CD-Rs/CD-RWs,
DVDs offer up to eight hours of playback time for the
audio and video data they contain.
VCDs/S-VCDs
"Video CD" (VCD) and "Super Video CD" (S-VCD)
refer to two methods for compressed – i.e. space-saving –
storage of films on CDs. VCDs and S-VCDs exist in the
sizes 8 cm and 12 cm (diameter). Their storage capacity is
lower than that of DVDs. As a result, they only offer a
playback time of 20 minutes (8 cm size) or 74 minutes (12
cm size) for the audio and video data they contain.
Contact one of our service partners in your area if …
VCDs exist in two versions:
Ú
the malfunctions listed cannot be corrected as
described above or
Ú malfunctions arise other than those listed
† Danger!
Never attempt to repair a defective power cable yourself!
The risk of electrical shock exists!
| Warning!
The DVD player and the remote control do not contain
any parts that can be serviced by the user. If the housing
of the DVD player and/or remote control are opened,
the warranty is voided. If repairs are necessary, contact
one of our service partners in your area. The addresses
of our service partners can be found in the warranty
booklet. This is enclosed with the DVD player.
Ú
With VCDs/S-VCDs of version 1.1, only audio and
video data can be played.
Ú
With VCDs/S-VCDs of version 2.0, PBC (Playback
Control) functions are available. In addition, paused
images can be displayed in high resolution.
Playback Control (PBC)
VCDs/S-VCDs of version 2.0 have Playback Control
("PBC"). This means that a root menu is available on
the VCD/S-VCD with which various features of the
VCD/SVCD can be accessed.
What are titles and chapters?
Titles are the largest units of video and audio data on
DVDs; with many DVDs, the (main) film has the title
number 01. Additional title numbers may be used for
bonus material (e.g. film trailer, background information, etc.) that is available on many DVDs.
37
IB_DVD_KH6507_GB.qxd
19.10.2004
9:53 Uhr
Seite 38
Chapters are the next smaller unit of video and audio
data beneath titles. If the title or titles on a DVD/VCD/
S-VCD are subdivided into chapters, they are assigned
numbers that can be entered to select the chapters directly.
Please note that
Ú
not all DVDs have titles subdivided into (numbered)
chapters
Ú
chapters are also referred to as "scenes" (such as in
the root menu of DVDs)
Half images (interlacing) / full images (progressive
scanning)
A standard television image consists of 576 visible lines;
first the odd then the even image lines are displayed in
alternation. In other words, one half image is shown at
a time. In this way, only 30 full images (60 half images)
can be displayed per second. This method is referred to
as "interlace" format.
What are Scart, S-video, composite video, progressive scan and YUV?
In contrast, the progressive scan format displays all
image lines at once, meaning that 60 full images are
displayed per second. This increases the overall quality
of the image; for example paused images and text appear sharper.
Scart
Decoder
Scart refers to a 21-pin, standardised connector over which
the RGB signals, video signals and S-video signals as well
as numerous control and additional signals are transmitted.
The sound on DVDs with home theatre sound is saved
on the DVD in encrypted (encoded) form. Various
encryption formats exist for different purposes, e.g.
AC-3 for the playback of Dolby Digital surround
sound.
S-video
When the DVD player is connected to a television via
S-video, the brightness and colour signals are separated;
this achieves better image sharpness and less "colour
noise“. Colour noise refers to the overlaying of the
colourful, usually highly saturated parts of a video image with irregular, variable flaw patterns.
In order to play back encrypted sound, the playback
devices (e.g. the DVD player) or connected audio components (e.g. surround sound systems) must have a
decoder that converts the encrypted signals back into
music or sound.
The Silvercrest KH 6507 DVD player has an AC-3 decoder for Dolby Digital 5.1 surround sound signals.
Composite video
Dolby Surround
Video signal or FBAS signal; this refers to a video signal
that contains both colour and brightness information.
Progressive scan
Normally,TVs and video projectors are supplied with "half
images" that are displayed as alternating sets of lines (interlacing).This results in clearly visible line structures. In contrast,
progressive scan refers to the supply of full images (with this
DVD player at the YPbPr output), progressive scan signals
can only be processed by playback devices (primarily large
screen televisions, projectors) that offer this feature.The image quality is significantly better than typical video signals.
YUV (component video out)
YUV refers to the component signal, which is available
with this device at the YPbPR output in the form of
"half images"; generally, this is the best signal for large
screen televisions and projectors that cannot process
progressive scan signals. As with RGB video signals, the
YUV consists of three separate video signals:
Ú
Ú
the brightness signal "Y" and
the two colour differential signals "Pb/Cb" and "Pr/Cr"
38
Dolby Surround is an analog audio format with which
the two channels of a stereo audio signal are used to
store surround sound information for an additional
channel. Dolby Surround decoders convert the signals
back into sound or music and send the audio to two
additional speakers that are situated behind the listener.
Dolby Prologic
In comparison with the Dolby Surround audio format,
Dolby Prologic uses an additional channel in the stereo
signal; this is the "center" channel. The corresponding
center speaker is situated directly between the stereo
speakers. The deepest tones are sent to a low range
speaker, called a "subwoofer". The subwoofer can be
placed at any location in the room; the reason for this is
that the deep tones emitted by the subwoofer cannot be
precisely localised by the human ear.
IB_DVD_KH6507_GB.qxd
19.10.2004
9:53 Uhr
Seite 39
Dolby Digital (5.1)
WMA
Dolby Digital, also referred to as AC3, is a digital audio
format with which up to six separate audio channels
can be transmitted. On most current DVDs, the audio is
stored in "Dolby Digital 5.1" format; the "5" in the
name "5.1" stands for the three front and two rear surround sound channels, the "1" stands for the subwoofer
channel.
WMA ("Windows® Media Audio“) is a file format for
audio files developed by Microsoft®.
DTS
DTS is the abbreviation for "Digital Theatre System"
and refers to one of the most common surround sound
formats for DVDs. As with Dolby Digital 5.1, DTS uses
three front and two rear surround sound channels as
well as a subwoofer channel.
JPEG
JPEG ("Joint Photographics Expert Group") refers to
a widely used graphics format developed by the organisation of the same name, with which colour and gray
scale image data are compressed.
DivX
DivX® is an encoding format for video and multimedia
data developed by the company DivXNetworks®, Inc.
MPEG
What are PAL, NTSC and SECAM?
PAL
PAL is the abbreviation for "Phase Alternation Line".
PAL is the typical and most common colour television
standard in Central and Western Europe (exception:
France, see "SECAM").
MPEG ("Moving Picture Experts Group") refers to a
video compression standard.
What are folders?
In contrast to → audio CDs, the titles on a CD-R/CDRW with → MP3, → WMA or
→ JPEG files can be stored in folders, for example, to
organise titles from various genres.
NTSC
NTSC is the abbreviation for "National Television
System Committee". NTSC is a colour television standard that is used primarily in the USA and Japan.
For instance, the structure of an MP3 CD may appear
as shown below if the MP3 files were saved in folders.
SECAM
SECAM is the abbreviation for the French "système en
couleur avec mémoire". SECAM is currently the typical and most common colour television standard in
France and many Eastern European countries.
Audio CDs
Audio CDs contain only audio data; they are also available in the sizes 8 cm and 12 cm (diameter). The
playback time for the audio data stored on CDs is 20
minutes (8 cm size) or 74 minutes (12 cm size). Audio
data is stored on audio CDs in the CDA format.
Fig. 25 Possible folder structure for an MP3 CD
MP3
MP3 refers to a method or format for compression of
audio files developed by the Fraunhofer Institute.
Works of music compressed in MP3 format are only a
fraction of their original size, making it possible to store
significantly more music on CD-Rs/CD-RWs, for example, than can be stored on typical audio CDs that save
the audio data in the CDA format.
39
IB_DVD_KH6507_GB.qxd
19.10.2004
9:53 Uhr
Seite 40