1
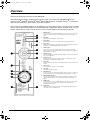
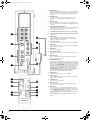
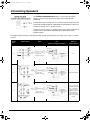
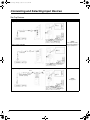
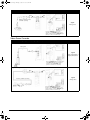
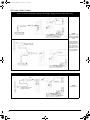
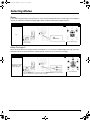
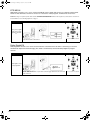
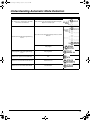
Gimo1.book Page 1 Monday, October 13, 2003 10:44 AM
Safety & Regulatory Information
The following sections contain notices for various countries:
Notice for the USA
Notice for Canada
FCC Part 15: This equipment has been tested and
found to comply with the limits for a Class B digital
device, pursuant to Part 15 of the FCC Rules. These
limits are designed to provide reasonable protection
against harmful interference in a residential installation.
This equipment generates, uses, and can radiate radio
frequency energy and, if not installed and used in
accordance with the instructions, may cause harmful
interference to radio communications. However, this
notice is not a guarantee that interference will not occur
in a particular installation. If this equipment does cause
harmful interference to radio or television reception,
which can be determined by turning the equipment off
and on, the user is encouraged to try one or more of the
following measures:
❒ Reorient or relocate the receiving antenna.
❒ Increase the distance between the equipment and
receiver.
❒ Connect the equipment to an outlet on a circuit
different from that to which the receiver is
connected.
❒ Consult the dealer or an experienced radio/ TV
technician.
CAUTION: To comply with the limits for the Class B
digital device, pursuant to Part 15 of the FCC Rules, this
device must be installed with computer equipment
certified to comply with the Class B limits.
All cables used to connect the computer and peripherals
must be shielded and grounded. Operation with noncertified computers or non-shielded cables may result in
interference to radio or television reception.
MODIFICATIONS
Any changes or modifications not expressly approved
by the grantee of this device could void the user’s
authority to operate the device.
This apparatus complies with the Class B limits for radio
interference as specified in the Canadian Department of
Communications Radio Interference Regulations.
Cet appareil est conforme aux normes de CLASSE “B”
d’interference radio tel que spe’cifie’ par le Ministère
Canadien des Communications dans les règlements
d’interfèrence radio.
Important Notice
A serial number can be found on your product. Please
write this number down and keep it in a secure area.
This is for your security.
CAUTION
Take care to prevent accidental operation of speakers at
excessive sound pressure levels!
If you do not hear sound from speakers, keep the
volume control at a low level while trying to restore
sound. This will prevent accidental operation at
uncomfortably loud levels.
European Compliance
This product conforms to the following:
EMC Directive 89/336/EEC as amended by 92/31/EEC
and 93/68/EEC
Mains operated products for the European market
comply with LVD Directive 73/23/EEC as amended by
93/68/EEC. Communication / RF wireless products for
the European market comply with Directive R&TTE
1999/5/EC.
Declaration of Conformity
According to the FCC96 208 and ET95-19,
Manufacturer/Importer’s Name: Creative Labs, Inc.
Manufacturer/Importer’s Address:
1901 McCarthy Boulevard
Milpitas, CA. 95035
Tel: (408) 428-6600
declares under its sole responsibility that the product
Trade Name: Creative Labs
Model Numbers: MF8000
has been tested according to the FCC / CISPR22/97
requirement for Class B devices and found compliant
with the following standards:
EMI/EMC: ANSI C63.4 1992, FCC Part 15 Subpart B
Complies with Canadian ICES-003 Class B
This device complies with part 15 of the FCC Rules.
Operation is subject to the following two conditions:
1. This device may not cause harmful interference,
and
2. This device must accept any interference received,
including interference that may cause undesirable
operation.
Ce matériel est conforme à la section 15 des régles
FCC. Son Fonctionnement est soumis aux deux
conditions suivantes:
1. Le matériel ne peut étre source D’interférences et
2. Doit accepter toutes les interférences reques, Y
compris celles pouvant provoquer un fonctionnement
indésirable.
Compliance Manager
Creative Labs, Inc.
October 23, 2003
WARNING: Handling the cord(s) on this product may expose you to lead, a chemical known to the State of
California to cause cancer and birth defects or other reproductive harm. Wash hands after handling.
IMPORTANT SAFETY INSTRUCTIONS
READ INSTRUCTIONS - Read all safety and operating
instructions before operating the product.
RETAIN INSTRUCTIONS - Keep all safety and operating
instructions for future reference.
HEED WARNINGS - Take note of all warnings on the
product and in the operating instructions.
FOLLOW INSTRUCTIONS - All operating and usage
instructions should be followed.
CLEANING - Unplug this product from the power source
before cleaning. Do not use liquid or aerosol cleaners. Use a
damp cloth for cleaning.
ATTACHMENTS - Do not use attachments or accessories
not recommended by Creative as they may cause hazards.
WATER AND MOISTURE - Do not use this product
near any water source or water hazard – for example, near a
bath tub, wash bowl, kitchen sink, or laundry tub; in a wet
basement; or near a swimming pool; and the like.
PLACEMENT - Place the product on a stable surface or
recommended stand, or sold with the product. Otherwise,
the product may fall and cause injury to a person, and damage
to the product. Follow the manufacturer’s instructions for
mounting the product.
VENTILATION - To ensure reliable operation and to
prevent overheating, do not block or cover ventilation
openings and slots with fabrics or impermeable material. Do
not place in a built-in installation such as a bookcase or rack
unless there is proper ventilation or Creative’s instructions
have been adhered to.
HEAT - Do not place this product anywhere near heat
sources such as radiators, stoves, and other products
(including amplifiers) that produce heat.
POWER SOURCES - This product is specifically designed
for operation within the electrical range(s) specified on the
provided power adapter and use outside of this range shall be
at your own risk. Please contact your local electric utility
company if you have any questions about the electrical
voltage at your intended location of use.
DAMAGE REQUIRING SERVICE - Unplug the product
from the power source. Call for servicing when:
POLARIZATION - The product may be equipped with a
polarized alternating-current line plug, a safety feature. As
one blade is wider than the other, this plug can only fit into
the power outlet in one way. If you cannot insert the plug
fully into the outlet, reverse the plug. If the plug still fails to
fit, contact your electrician to replace your obsolete outlet.
Do not force the plug into the outlet.
c) the product has been exposed to rain or water.
POWER-CORD PROTECTION - Arrange the powercords to minimize the risk of damage from traffic or other
hazards. Pay particular attention to the area near the plug
head, the power source outlet and the connection from the
product.
LIGHTNING - Unplug the product from the power source
during lightning storms or if unused for long periods of time.
This will prevent lightning and power-line surge damage to
the product.
a) the power-supply cord or plug is damaged.
b) objects have fallen through or liquids have been spilled
into the product’s openings.
d) the product does not operate normally when following
the operating instructions
e) the product behaves differently.
f ) the product has been dropped or damaged in any way.
REPLACEMENT PARTS - When replacing parts, check
that the service technician has used replacement parts
specified by Creative or have the same characteristics as the
original parts. Unauthorized substitutions may result in fire,
electric shock, or other hazards.
SAFETY CHECK - After servicing or repairing the
product, get the service technician to perform safety checks
to be sure that the product working properly.
OVERLOADING - Do not overload wall outlets,
extension cords, or integral power circuits as this can result
in a risk of fire or electric shock.
OBJECT AND LIQUID ENTRY - Never push any object
through the product’s openings, as this can result in a fire,
electric shock or damage. Do not spill liquids on the product.
SERVICING - Do not attempt to service the product
yourself. Refer all servicing to qualified service personnel.
1
Gimo1.book Page 2 Monday, October 13, 2003 10:44 AM
Contents
Overview .................................................................. 3
Connecting Speakers............................................... 5
Connecting and Selecting Input Devices ................. 6
Selecting Modes....................................................... 9
Understanding Automatic Mode Detection............. 11
Adjusting Output Channels .................................... 12
Technology Overview............................................. 13
Adapter Specifications ........................................... 13
Information in this document is subject to change without notice and does not represent a commitment on the part of Creative Technology Ltd. No part of this
manual may be reproduced or transmitted in any form or by any means, electronic or mechanical, including photocopying and recording, for any purpose without
the written permission of Creative Technology Ltd.
Version 1.0
September 2003
Copyright © 2003 Creative Technology Ltd. All rights reserved. The Creative logo, Sound Blaster and the Sound Blaster logo, Live!, Audigy, Inspire and
GigaWorks are trademarks or registered trademarks of Creative Technology Ltd. in the United States and other countries. Sony and PlayStation are trademarks
or registered trademarks of Sony Corporation. Nintendo and Gamecube are trademarks or registered trademarks for Nintendo. Microsoft and Xbox are
trademarks or registered trademarks of Microsoft Corporation. Manufactured under license from Dolby Laboratories. "Dolby", "Pro Logic", and the double-D
symbol are trademarks of Dolby Laboratories. Confidential unpublished works. Copyright 1992-1997 Dolby Laboratories. All rights reserved. Manufactured under
license from Digital Theater Systems, Inc. U.S. Pat.No's. 5,451,942; 5,956,674; 5,974,380; 5,978,762; 6,487,535 and other U.S. and world-wide patents issued
and pending. "DTS", "DTS-ES" and "Neo:6” are trademarks of Digital Theater Systems, Inc. Copyright 1996, 2002 Digital Theater Systems, Inc. All Rights
Reserved. All other logos, brands and product names are trademarks or registered trademarks of their respective holders and are hereby recognized as such.
All specifications are subject to change without notice. Actual contents may differ slightly from those pictured.
2
Gimo1.book Page 3 Monday, October 13, 2003 10:44 AM
Overview
Thank you for choosing the Creative Decoder DDTS-100.
With audio quality that rivals a component home theater system, your Creative Decoder DDTS-100 lets you
experience DTS®, DTS-ES®, DTS Neo:6®, Dolby® Digital, Dolby Digital EX, and Dolby Pro Logic® II multichannel
audio from your DVD player, game console, or personal computer.
Your Creative Decoder DDTS-100 gives you the flexibility of connecting different types of speaker systems and input
devices. Refer to the following chapters for recommended setup configurations. Before you begin, make sure your
decoder and the devices that you want to connect to it are turned off and disconnected from the wall outlet.
1
DIGITAL button
Press to select one of the following digital inputs: OPTICAL 1, OPTICAL 2, OPTICAL 3, or
COAXIAL. For more information, see “Connecting and Selecting Input Devices” on
page 6.
2
Mode LEDs
Indicate the media format of the selected mode.
9
3
Volume LEDs
Indicate the master volume, or the volume of the selected output channels.
10
4
Volume knob
Adjusts the master volume, or the volume of the selected output channels. For more
information, see “Adjusting Output Channels” on page 12.
5
SELECT button
Press to select one of the following output channels (for volume adjustment):
CENTER, REAR, SUBWOOFER, or REAR CENTER. For more information, see “Adjusting
Output Channels” on page 12.
12
6
Headphone jacks
Connect to headphones (available separately). Output to speakers is muted when
you connect headphones.
13
7
Infrared receiver
Receives infrared signals from the remote control. For reliable remote control
functionality, do not obstruct the infrared receiver.
8
Power LED
Lights up red when the decoder is set to Standby, and turns off when you turn on the
decoder.
9
Power button
Press to turn on the decoder, or set it to Standby.
10
Input LEDs
Indicate the selected audio input.
11
ANALOG button
Press to select one of the following analog inputs: ANALOG 1, ANALOG 2, or ANALOG 3.
For more information, see “Connecting and Selecting Input Devices” on page 6.
12
DOLBY DIGITAL EX button
Press to upmix 5.1-channel audio to 6.1-channel audio (for 6.1 speaker systems
only). For more information, see “Connecting and Selecting Input Devices” on
page 6.
13
MODE button
Press to select the one of the following listening modes: STEREO, DOLBY PLII MOVIE,
DOLBY PLII MUSIC, NEO:6 CINEMA, or NEO:6 MUSIC. For more information, see
“Selecting Modes” on page 9.
14
Output LEDs
Indicate the selected output channels (for volume adjustment). Master volume is
selected when none of the LEDs are lit.
7
8
11
1
2
3
4
5
6
14
3
Gimo1.book Page 4 Monday, October 13, 2003 10:44 AM
15
ANALOG inputs
Connect to a maximum of three stereo sources using cables with
RCA phono plugs (available separately) for input to the decoder. For
more information, see “Connecting and Selecting Input Devices” on
page 6.
16
COAXIAL input
Connects to a digital source using a Coaxial cable. For more
information, see “Connecting and Selecting Input Devices” on
page 6.
17
OPTICAL inputs
Connect to a maximum of three digital sources using Optical cables.
For more information, see “Connecting and Selecting Input Devices”
on page 6.
18
SPEAKER CONFIGURATION switch
Select 6.1/7.1 when using a 6.1 or 7.1 speaker system, and select 5.1
when using a 5.1 speaker system. For more information, see
“Connecting Speakers” on page 5.
19
To Wall Outlet (Disconnect when not in use for several days)
20
Power Supply Adapter (Types of adapters may vary in different
countries)
19
21
AUDIO outputs
Connect to multichannel speakers (available separately). For
detailed information on speaker connections, refer to the User’s
Guide of your multichannel speakers.
20
22
16V AC IN connector
Connects to a wall outlet using the supplied Power Supply Adapter.
23
TEST button
Press to activate a test noise. For more information, see “Adjusting
Output Channels” on page 12.
24
MUTE button
Press to mute the volume.
25
Output Channel buttons
Press to select the Rear Center, Center, Rear or Subwoofer output
channels.
26
ANALOG button
Press to select and switch between the following analog inputs:
ANALOG 1, ANALOG 2, or ANALOG 3.
27
DYNAMIC MODE button
The Creative Decoder DDTS-100 is set, by default, to compressed
Dynamic Mode. To enable the full dynamic range to be heard at lower
volumes, you may uncompress the dynamic range to its full splendor
by pressing the DYNAMIC MODE button on the remote control. The
uncompressed mode can only be enabled with the remote control.
The decoder will acknowledge uncompressed Dynamic Mode by
illuminating all of the Volume LEDs momentarily. Pressing the
DYNAMIC MODE button again enables the compressed Dynamic
Mode; the first four Volume LEDs will light momentarily to
acknowledge that the compressed mode is enabled.
28
POWER button
Press to turn on the decoder, or set it to Standby.
29
VOL +/- buttons
Press to adjust the volume. For more information, see “Adjusting
Output Channels” on page 12.
30
COAXIAL button
Press to select the COAXIAL input.
31
OPTICAL button
Press to select and switch between the following digital inputs:
OPTICAL 1, OPTICAL 2, or OPTICAL 3.
32
Mode buttons
Press to select the one of the following listening modes: STEREO,
DOLBY PLII MOVIE, DOLBY PLII MUSIC, NEO:6 CINEMA, or NEO:6 MUSIC.
Press the DOLBY DIGITAL EX button to upmix 5.1-channel audio to
6.1-channel audio (for 6.1 speaker systems only).
Press the DOLBY PLII button to toggle between Movie and Music
modes.
Press the NEO:6 button to toggle between Cinema and Music
modes.
15
16
21
17
22
18
23
24
25
28
29
30
26
27
4
31
32
Gimo1.book Page 5 Monday, October 13, 2003 10:44 AM
Connecting Speakers
The SPEAKER CONFIGURATION switch is used to select the type of
speaker system that you will be connecting to the Creative Decoder
DDTS-100.
Select 6.1/7.1 if you are using a 6.1 or 7.1 speaker system. To experience the
full potential of Dolby Digital EX and DTS-ES encoded program material, we
recommend using 6.1 or 7.1 speaker systems.
Select 5.1 if you are using a 5.1 speaker system. This is to prevent the loss of
program content when playing back Dolby EX and DTS-ES encoded
program material.
The diagrams below show the recommended switch settings and connections to Creative 5.1, 6.1 and 7.1 speaker
systems.
Speaker
Type
Speaker Inputs
Cable
Limegreen
Orange
Black
5.1 audio cable
(available separately)
Limegreen
Orange
6.1 audio cable
(available separately)
Black
Orange
No upmix required
Orange
Orange
Lime-green
Black
7.1
7.1 audio cable
(available separately)
Black
NA
Lime-green
Black
6.1
Limegreen
Recommended
Upmix for
Speaker System
Lime-green
Black
5.1
DDTS-100 Outputs
and
Speaker Configuration Setting
Grey
Orange
For a 7.1-channel
soundfield, select the
6.1 → 7.1 upmix
function on your
speaker system. For
more information,
refer to the User’s
Guide of your speaker
system.
5
Gimo1.book Page 6 Monday, October 13, 2003 10:44 AM
Connecting and Selecting Input Devices
Set-Top Devices
DVD, VCD, CD and MiniDisc® Players
Using an optical connection
Optical cable
Press the DIGITAL button on your decoder,
or the OPTICAL button on your remote
control to select an OPTICAL input
(OPTICAL 1, OPTICAL 2 or OPTICAL 3).
Using a coaxial connection
Signal:
DTS, DTS-ES, Dolby
Digital, Dolby Digital EX or
Digital (PCM) stereo
Coaxial cable
Press the DIGITAL button on your decoder,
or the COAXIAL button on your remote
control to select COAXIAL.
Using an analog connection
White
Red
Miniplug-to-Dual-RCA cable
(available separately)
Signal:
Analog stereo
Press the ANALOG button on your
decoder, or the ANALOG button on your
remote control to select an ANALOG input
(ANALOG 1, ANALOG 2 or ANALOG 3).
6
Gimo1.book Page 7 Monday, October 13, 2003 10:44 AM
Digital Audio Players
White
Red
Miniplug-to-Dual-RCA cable
(available separately)
Signal:
Analog stereo
Press the ANALOG button on your
decoder, or the ANALOG button on your
remote control to select an ANALOG input
(ANALOG 1, ANALOG 2 or ANALOG 3).
Video Game Consoles
Sony® PlayStation®, Sony PlayStation 2, Nintendo® GameCube® and Microsoft® Xbox®
Using an optical connection
Optical cable
Signal:
DTS, Dolby Digital, or
Digital (PCM) stereo
Press the DIGITAL button on your decoder,
or the OPTICAL button on your remote
control to select an OPTICAL input
(OPTICAL 1, OPTICAL 2 or OPTICAL 3).
Using an analog connection
White
Red
Signal:
Analog stereo
AV cable (available separately)
Press the ANALOG button on your
decoder, or the ANALOG button on your
remote control to select an ANALOG input
(ANALOG 1, ANALOG 2 or ANALOG 3).
7
Gimo1.book Page 8 Monday, October 13, 2003 10:44 AM
PC Users (Audio Cards)
Audio cards with digital output connectors
(such as Creative Sound Blaster® Audigy® 2 ZS, Audigy 2, Audigy and Live!® series audio cards)
Using an optical connection
Optical cable
Press the DIGITAL button on your decoder,
or the OPTICAL button on your remote
control to select an OPTICAL input
(OPTICAL 1, OPTICAL 2 or OPTICAL 3).
Using a coaxial connection
Signal:
DTS, DTS-ES, Dolby
Digital, Dolby Digital
EX or Digital (PCM)
stereo
For best performance,
ensure that audio
output signals are not
decoded by your
audio card. For more
information, refer to
the User’s Guide of
your audio card.
Miniplug-to-RCA cable
(available separately)
Coaxial cable
Press the DIGITAL button on your
decoder, or the COAXIAL button on your
remote control to select COAXIAL.
Audio cards with analog output connectors
White
Red
Signal:
Analog stereo
Miniplug-to-dual-RCA cable
(available separately)
Press the ANALOG button on your
decoder, or the ANALOG button on your
remote control to select an ANALOG input
(ANALOG 1, ANALOG 2 or ANALOG 3).
8
Gimo1.book Page 9 Monday, October 13, 2003 10:44 AM
Selecting Modes
Stereo
In this mode, program material is played back as a two-channel soundfield. Select this mode to play stereo program
material, or to downmix multichannel Dolby Digital, DTS, and other multichannel program material.
Program Material
Mode Select
Output to Speakers
Any
Press the MODE button on your decoder, or the STEREO button on your remote control
to select STEREO
Two-channel soundfield
Dolby Pro Logic II
Select this mode with stereo program material for playback as a 5.1-channel soundfield. Dolby Pro Logic II has two
submodes: MOVIE for stereo television or video programs, and MUSIC for stereo music recordings.
Program Material
Mode Select
Output to Speakers
Analog Stereo, Digital
(PCM) Stereo, and
Dolby Digital 2.0
Press the MODE button on your decoder, or the DOLBY PLII button on your remote
control to select DOLBY PLII MOVIE or DOLBY PLII MUSIC
5.1-channel soundfield
9
Gimo1.book Page 10 Monday, October 13, 2003 10:44 AM
DTS NEO:6
DTS Neo:6 is played as a 5.1- or 6.1-channel soundfield. Use this mode with stereo or 5.1 program material. DTS
Neo:6 has two submodes; Cinema for stereo or 5.1 television or video programs, and Music for stereo music.
Note:When using a 5.1 speaker system, make sure the SPEAKER CONFIGURATION switch on the rear panel of your decoder is set to 5.1. For
more information, see “Connecting Speakers” on page 5.
Program Material
Mode Select
Output to Speakers
Press the MODE button on your decoder, or the NEO:6 button on your remote control to
select NEO:6 CINEMA or NEO:6 MUSIC
5.1- or 6.1-channel soundfield
Analog stereo, Digital
(PCM) stereo, Dolby
Digital 2.0, and DTS
5.1
Dolby Digital EX
Dolby Digital EX decodes a rear center channel from the surround channels to deliver a convincing 6.1-channel
soundfield for improved surround imaging. This mode is automatically selected for Dolby Digital EX program
material.
Program Material
Mode Select
Output to Speakers
Press the MODE button or the DOLBY DIGITAL EX button on your decoder, or the
DOLBY DIGITAL EX button on your remote control to toggle between DOLBY DIGITAL and
5.1- or 6.1-channel soundfield
Dolby Digital 5.1 and
Dolby Digital EX
DOLBY DIGITAL EX
10
Gimo1.book Page 11 Monday, October 13, 2003 10:44 AM
Understanding Automatic Mode Detection
Program Material
Output Signal From Source
CDs, DVD movies or DVD games with Dolby
Surround encoded material
Dolby Surround encoded material transmitted via digital
(Optical or Coaxial) inputs
Auto Detection
Dolby Surround encoded material transported as a S/PDIF
bitstream
S/PDIF bitstream with Dolby Digital EX flag
inactive
Dolby Digital
DVD movies encoded with Dolby Digital or
Dolby Digital EX, with Dolby Digital EX flag
active
Dolby Digital EX
DVD movies or games encoded with DTS
DTS
DVD movies encoded with DTS-ES discrete
DTS-ES Discrete
DVD movies encoded with DTS-ES Matrix
DTS-ES Matrix
11
Gimo1.book Page 12 Monday, October 13, 2003 10:44 AM
Adjusting Output Channels
When playing back multichannel programs, you may want to set the output channel levels to suit your sitting position
relative to the speakers. This is to obtain the desired (balanced) output required for multichannel playback from all
speakers.
Adjusting volume
1
Press the SELECT button on your decoder, or press the Output Channel buttons on the remote control, until the LED of the
channel you want lights up. Master volume is selected when none of the LEDs are lit.
Volume
knob
2
Turn the Volume knob on your decoder, or press the VOL +/- buttons on the remote control, to adjust the volume. The
Volume LEDs on your decoder display the volume levels. The more lit LEDs there are, the higher the volume.
Low volume
High volume
If the volume setting of any channel remains unchanged for 2–3 seconds, the Volume knob reverts to its role as the master
volume control.
Adjusting speaker balance using the TEST button
1
2
Press the TEST button on the remote control to generate a test noise.
The test noise starts playing from the reference channel (Front Left), and then
alternates clockwise to Center, Front Right, Rear Right, Rear Center, Rear Left and
Subwoofer. This test sound cycle will repeat three times, but you can stop it at any
point by pressing the TEST button again.
Note:When the SPEAKER CONFIGURATION switch is set to 5.1, the test noise will not be played
on Rear Center.
Front
Right
Rear
Right
Rear
Center
Center
Front
Left
Repeats
3 times
Rear
Left
Subwoofer
3
4
While the test sound is playing, all Output LEDs on your decoder’s front panel will
blink and only the volume controls will be enabled.
While the test sound is playing, use the Volume knob on the decoder or the VOL +/- buttons on the remote control to adjust
the volume level for each speaker.
Note:You can also activate the test noise if you want to check that your speakers are working, properly connected and placed in the correct
position.
12
Gimo1.book Page 13 Monday, October 13, 2003 10:44 AM
Technology Overview
DTS Digital Surround
DTS Digital Surround is a discrete 5.1-channel digital audio format that delivers five discrete full-range channels
(Left, Center, Right, Left Surround and Right Surround) plus a separate Low Frequency Effects (LFE) channel.
DTS-ES Extended Surround
DTS-ES is the only digital audio format capable of delivering 6.1 channels of discrete audio in the consumer
electronics market.
DTS Neo:6
DTS Neo:6 provides up to six channels of matrix decoding from stereo or 5.1 material.
Cinema mode
The Cinema mode is used with stereo television for movie soundtracks. The result is improved dialogue and
surround presence. This mode also upmixes a DTS 5.1 input to create a 6.1-channel soundfield.
Music mode
The Music mode is used with any stereo music recording and provides a wider listening space.
Note:For a 6.1-channel soundfield, the SPEAKER CONFIGURATION switch must be set to 6.1/7.1.
Dolby Digital
Dolby Digital (also referred to as AC-3) delivers five discrete full-range channels (Left, Center, Right, Left Surround
and Right Surround) plus a separate LFE channel.
Dolby Digital EX
Dolby Digital EX creates six full-bandwidth output channels from 5.1-channel sources. This is done using a matrix
decoder that derives three surround channels from the two in the original recording. For best results, Dolby Digital
EX should be used with movie soundtracks recorded with Dolby Digital Surround EX.
Dolby Pro Logic II
Dolby Pro Logic II creates five full-bandwidth output channels from two-channel sources. This is done using an
advanced, high-purity matrix surround decoder that extracts the spatial properties of the original recording without
adding any new sounds or tonal colorations.
Movie mode
The Movie mode is for use with stereo television shows and all programs encoded in Dolby Surround. The result is
enhanced soundfield directionality that approaches the quality of discrete 5.1-channel sound.
Music Mode
The Music mode is for use with any stereo music recordings, and provides a wide and deep sound space.
Adapter Specifications
Output from adapter:
16 V AC, 600 mA
Input:
Varies according to region.
13