1
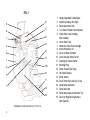
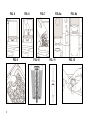
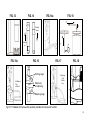
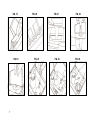
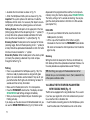
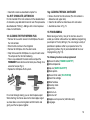
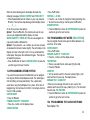
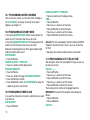
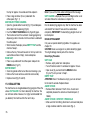
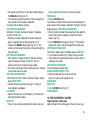
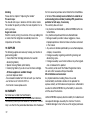
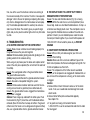
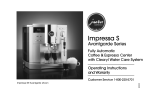
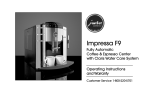
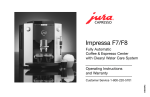
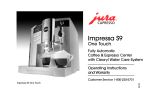
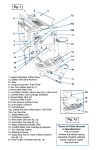
Impressa S9, S8, S7
Fully Automatic
Coffee & Espresso Center
with Claris Water Care System
Operating Instructions
and Warranty
Customer Service 1-800-220-5701
Impressa S9 shown here with frothXpress Plus installed
D. This appliance has a polarized plug (one blade is wider
than the other). As a safety feature, this plug will fit in a
polarized outlet only one way. If the plug does not fit fully in
the outlet, reverse the plug. If it still does not fit, contact a
qualified electrician. Do not attempt to defeat this safety
feature.
CAUTION
This appliance is for household use. Any servicing other than
cleaning and user maintenance should be performed by an
authorized service representative.
• Do not immerse base in water or try to disassemble.
• To reduce the risk of fire or electric shock, do not remove
the base. No user serviceable parts inside. Repair should
be done by authorized service personnel only.
• Check voltage to be sure that the voltage indicated on the
name plate agrees with your voltage.
• Never use warm or hot water to fill the water container!
Use cold water only!
• Keep your hands and the cord away from hot parts of the
appliance during operation.
• Never clean with scouring powders or hard implements.
JURA-CAPRESSO
Jura was founded in 1931 in Switzerland.
Capresso was founded in 1994 in the USA.
Both companies have joined forces in the US to
bring you the best Fully Automatic Coffee
Centers available anywhere. With innovative and
user-friendly features, high quality materials,
clear instructions and superb customer service
we are sure you will experience the best coffee,
espresso, cappuccino or latte you ever had. We
hope you will enjoy your new Fully Automatic
Coffee Center and will recommend it to your
friends. For more information about our products
check our website www.capresso.com.
Michael Kramm, President
2.
FIG. 1
10
9
11
8
12
7
13
6
14
5
15
4
15a*
3
16
2
17
1
18
19
* frothXpress-Plus System see Fig. 15, 15a, 16
3.
1.
2.
3.
4.
5.
6.
7.
8.
9.
10.
11.
12.
13.
14.
15.
15a.
16.
17.
18.
19.
Height-Adjustable Coffee Spout
Operating Display (See Fig.2)
Removable Water Tank
Low Water Flotation Device(Inside)
Claris Water Care Cartridge
(Not Installed)
Lid for Water Tank
Holder for Claris Water Cartridge
Aroma Protection Lid
Cover for Bean Container
Lid for Ground Coffee Funnel
Opening for Ground Coffee
Warming Plate
Steam System (See Fig.3)
Hot Water Release
Steam Nozzle
Dual-Frother-Plus (See Fig.14,14a)
Used Coffee Container
Removable Grid
Removable Drawer/Used Water Tray
Cover for Programming Buttons
(See Figure 3A)
A.
B.
Operating Display
Steam System
FIG. 2
FIG. 3
COFFEE
READY
K.
FIG. 3A
M.
F.
FIG. 4
N.
S.
P.
T.
Q-.
Q+.
R.
T1.
Steam
Nozzle
C.
D.
G.
E.
H.
A. Display Dialog System
B. ON/OFF Button
C. SPECIAL COFFEE Button
D. 1-CUP SMALL Button
E. 1-CUP LARGE Button
F. RINSE Button
G. 2-CUP SMALL Button
H. 2-CUP LARGE Button
L.
K. STEAM PORTION Button
N.
L. Selector Switch for
Coffee or Hot Water
P.
M. PERMANENT STEAM
Button
GROUND Coffee Button
Program Button (P-button)
Q-/Q+. Minus/Plus Buttons
CLARIS BUTTON
R.
(for replacements only)
S.
TABLET CLEANING Button
T.
N-Button to return to
COFFEE READY status
T1.
Decalcifying Button
(DECALC)
4.
FIG. 5
FIG. 9
5.
FIG. 7
FIG. 6
FIG. 10
FIG. 8a
FIG. 11
FIG. 8b
FIG. 12
FIG. 13
FIG. 14a
FIG. 14
FIG. 15
2
3
Frothing:
down
Steaming
up
1
FIG. 15a
FIG. 16
FIG. 17
Frothing range
frothXpress
Plus
attached
DIAL
Steam only
no siphoning
FIG. 18
Siphoning
with
flexible
hose
Steaming range
Fig.15-17: Standard with Impressa S9, separately available with Impressa S7 and S8.
6.
FIG. 19
FIG. 23
7.
FIG. 20
FIG. 24
FIG. 21
FIG. 25
FIG. 22
FIG. 26
TABLE OF CONTENTS
1.
2.
3.
4.
4.1
4.2
4.3
5.
6.
7.
7a.
7b.
8.
9.
10.
11.
11a.
11b.
11c.
12.
12a.
13.
14.
14a.
14b.
14c.
14d.
14e.
14f.
14g.
15.
15.1
PAGE
Important Safeguards / Jura Capresso .................1-2
Drawings .........................................................3-7
Product Registration ......................................... 9
Customer Service ............................................. 9
Welcome to the Impressa S7, S8, S9 .................. 9
A Word About "Crema" Coffee ........................... 9
Pressure Brewing ............................................. 10
Different Coffee Drinks ...................................... 10
Coffee Facts .................................................... 10
Please Don’t/Please Do ..................................... 10
Factory Settings ............................................... 11
Preparing the Machine for the First Time ............. 11
Adding Coffee Beans ........................................ 12
First Time Grinding/Brewing ............................... 12
Adjusting the Grinder ........................................ 12
Rinsing the Machine ......................................... 12
Adjusting for Water Hardness............................. 13
Claris Water Cartridge ....................................... 13
Installing the Claris Cartridge ............................. 13
Programming the Claris Cartridge ....................... 14
Replacing the Claris Cartridge............................ 14
Making Espresso and “Crema Coffee” ................. 14
Using Ground Coffee ........................................ 15
Processing Hot Water ....................................... 15
Frothing and Steaming Milk ............................... 15
Using the Dual-Frother-PLUS ............................. 16
Cleaning the Dual-Frother-PLUS ......................... 16
Using the frothXpress PLUS System w. milk ctn. .. 16
Using the frothXpress PLUS System w. flex hose .. 17
Hot Chocolate, Café Mocha .......................................... 18
Cleaning the FrothXpress PLUS System..................... 18
Cleaning the Milk Container ......................................... 18
Programming ................................................................. 18
Programming Powder Quantity .................................. 19
PAGE
Programming Coffee Temperature ......................... 19
Programming Cup Size (Water Quantity)............. 19
Programming Steam Portion .................................. 20
Programming Hot Water (Tea Portion) .................. 20
Programming Claris Filter Cartridge ......................14/20
Programming Water Hardness ...............................13/21
Programming Economy Mode ................................ 21
Programming Timer Clock ...................................... 21
Programming Auto Turn-On Time .......................... 21
Programming Auto Shut-Off Time ......................... 22
Cup Counter, Etc. ..................................................... 22
Programming Language Selection......................... 22
Re-install Factory Settings ...................................... 22
Care and Maintenance............................................. 22
Fill Water .................................................................... 22
Emptying the Used Coffee Container ................... 22
Emptying the Used Water Tray............................... 23
Fill Beans ................................................................... 23
Stones and Beans .................................................... 23
Removing Stones or Other Foreign Objects
from the Burr Grinder............................................... 23
16.7
Cleaning Metal Contacts ........................................... 24
16.8
Cleaning the Frother Systems ................................ 24
16.9
General Cleaning Instructions ................................ 24
16.10 Emptying System Before Transport .......................... 24
17.
Automatic Cleaning Cycles ..................................... 24
17.1
Cleaning with Special Tablet................................... 24
17.2
Decalcifying ................................................................ 25
18.
Tips for Perfect Coffee ............................................ 26
19
Supplies ..................................................................... 27
20.
Warranty ..................................................................... 27
21.
Troubleshooting......................................................... 28
Capresso Address Information ........................................ 29
15.2
15.3
15.4
15.5
15.6
15.7
15.8
15.9
15.10
15.11
15.12
15.13
15.14
16.
16.1
16.2
16.3
16.4
16.5
16.6
8.
1. PRODUCT REGISTRATION
Please read the enclosed product registration form now. Fill it out
and mail or fax it to us within two weeks after purchasing your
machine or register online through our website: www.capresso.com.
Important: This registration is part of your warranty.
2. CUSTOMER SERVICE
Thank you for choosing this Jura-Capresso product. Please
study these operating instructions carefully before using your
new machine. We highly recommend to view the enclosed video.
Should you require further information please call our special
TOLL FREE number: 1-800-220-5701, Mon-Fri 9AM – 9PM &
Sat 9AM – 5PM Eastern Standard Time. If you call at any other
time please leave a message with your telephone number and
when we can all you back. You can also send us a FAX at:
201-767-9684 or EMAIL us at [email protected]
3. WELCOME TO THE IMPRESSA S7, S8, S9
This fully automatic espresso coffee center is completely programmable and extremely user friendly. With two independent
Thermoblock heating systems it can switch from brewing coffee
to frothing milk without any up- or down-time. It can prepare 1
or 2 cups of excellent, professional quality espresso or coffee at
a time with just a push of a button. The two-step pressure brewing system - well known in commercial applications - was adapted and refined by Jura coffee specialists and is the trademark of
each Jura-Capresso coffee center. This Intelligent Pre Brew
Aroma System (I.P.B.A.S) ensures optimal coffee extraction and
will finish every cup with a rich layer of "crema" - proof for perfectly pressure brewed coffee. The built-in commercial conical
9.
burr grinder grinds beans to the correct fineness. A separate
filler funnel lets you use pre-ground coffee. The second
Thermoblock generates unlimited steam instantly. With the Dual
Frother Plus you can steam and froth (for cappuccino) or just
steam milk (for lattes). The unique frothXpress Plus system (standard on the S9, optional on S7 and S8) siphons, heats, steams
and froths milk automatically. You can also program a specific
amount of frothed/steamed milk and the machine will always
deliver the correct volume. A separate hot water spout lets you
prepare a cup of tea or any other hot beverage in seconds. You
can program and fine tune your machine for different cup sizes,
coffee strengths, temperature, fineness of grind, automatic turnon and turn-off times, language and more. You can select from
different maintenance set-ups. The machine will automatically
remind you when to refill water, clean, change filter or decalcify.
A special section lets you check how many coffees you prepared
with the different coffee buttons. Finally, for peace of mind, there
is a complete set of "factory default setting" (See chapters 6 and
15.14).
4. A WORD ABOUT "CREMA COFFEE"
According to the majority of coffee experts, grinding, tamping
and brewing under high pressure is the ideal extracting process
for maximum flavor and aroma. Your Jura-Capresso automatic
coffee center will always produce espresso and coffee with a
thick, foamy layer called "crema." The crema traps the fine aromatics and the light gaseous flavors that register on the palate.
The high pressure and the short brewing time prevent the
extraction of bitter oils and release less caffeine than any other
brewing methods. You will always make the absolute freshest
and most aromatic cup of coffee. This is also the reason why
many European restaurants and hotels will serve you freshly
pressured brewed coffee only. Experiment with your new
machine and prepare yourself the best and most enjoyable cup
of coffee!
4.1 PRESSURE BREWING
You can make any quantity of coffee from 1⁄2 oz. to 16 oz. Please
note: in order to create the "crema" on top of your coffee, the
machine brews coffee at slightly lower temperatures than a drip
coffee maker. Since your coffee is delivered directly into your
cup we recommend to enjoy it immediately.
4.2 DIFFERENT COFFEE DRINKS
Here are some guidelines for the most popular coffee drinks:
• Ristretto: 1⁄2 to I oz. of coffee.
• Espresso: 1 to 2 oz. coffee.
• Double Shot: 3 to 4 oz. of coffee.
Definitely add a bit of sugar to the above drinks.
• Crema Coffee: 5 oz. to 7 1⁄2 oz. of coffee
• Cappuccino: Espresso plus 3 to 4 oz. of hot frothed milk.
• Latte: Espresso plus 3 to 5 oz. of steamed milk with little or
no froth.
• Café Mocha: add chocolate syrup to the milk before
frothing/steaming.
Experiment with the size of your milk based drinks. For stronger
coffee taste add more coffee, for more milk taste use more
frothed milk.
4.3 COFFEE FACTS
• Caffeine is tasteless. A "strong" coffee or espresso is mostly
the result of the amount of coffee in relation to the amount of
water. The longer a bean is roasted, the less caffeine it has.
• Arabica and Robusta are two genetically different kinds of
beans. "Arabica" beans have more flavor and a little less caffeine
than "Robusta" beans which are mostly used in lower priced
coffees and instant coffees.
• Espresso is not a bean, it's the way the coffee is roasted and
prepared. Typical US espresso roasts result in darker beans with
an oily outside. European espresso roasts are medium brown
with no or very little oils showing on the outside. Please note: If
you use dark, oily beans, see chapter 8 for special handling.
5. PLEASE, DON’T... (or you void your warranty protection):
• Never fill instant coffee into the grinder or ground coffee funnel
it can damage the functioning of the brewing chamber.
• Never fill sugar coated coffee beans into the bean container.
• Never fill frozen beans into the bean container. If you store
beans in the freezer, let them thaw for 3 to 4 hours before
filling them into the bean container.
• Never fill anything other than coffee beans into the bean container (no chocolate, rice, nuts, spices, etc.
• Never fill anything but fresh, cold clean water into the water
container, except when decalcifying (chapter 17.2).
• Never use mineral or carbonated water. You can use tap
water, spring water, distilled water and reverse osmosis water.
• Never repair or open the machine yourself. All repairs should
be performed only by an authorized service center.
10.
PLEASE, DO...
• Fill water tank with fresh, cold water only.
• Remove any foreign particles (small stones) from coffee beans.
• Let frozen beans thaw for 3 to 4 hours before pouring them
into the bean container.
All Display Messages Are Shown in GREEN
6. FACTORY SETTINGS
Each machine leaves the factory with the settings described
below. To change any of these settings, see chapter 15.
• SPECIAL COFFEE button (Fig.2,C) brews ~8 oz. of coffee.
• 1-CUP SMALL button (Fig.2,D) brews ~2 oz. of coffee.
• 1-CUP LARGE button (Fig.2,E) brews ~5 oz. of coffee.
Other settings: Each of the three buttons above can be set
from ~1/2 oz. to 8 oz. of coffee. The 2 cup buttons (Fig.2; G,H)
will automatically produce twice as much coffee as the setting
of the corresponding 1-cup buttons.
• Hot water (TEA PORTION): 5 oz. Other settings: The hot water
release can be set to any amount between 1/2 oz. and 16 oz.
• 5-hour auto shut-off. Other settings: manual shut off, auto
shut-off from 1/2 hour to 9 hours after last use.
• Water hardness setting: level 2.
Other settings: --, 1, 3, 4
• Filter: FILTER NO (Claris Water Care Cartridge: not installed)
Other Settings: FILTER YES (see chapter 11.)
• Coffee temperature: HIGH
Other setting: NORMAL
• Steam portion: 14 seconds
Other settings: 3 to 250 seconds in 1 second intervals
• Language in: English.
11.
Other settings: French, Portuguese, German, Italian,
Dutch, Spanish
• Economy Mode: Off
Other setting: Economy Mode: On
• Time: --. (not set)
Other setting: Set a time
• Unit On: --. (not set)
Other setting: Set a time that the unit turns on automatically.
(Requires that you first set a time.)
7. PREPARING THE MACHINE FOR THE FIRST TIME
The following procedure is only necessary when setting up
the machine for the first time and after “Emptying System
Before Transport” (see chapter 16.10).
• Plug-in machine.
• Do not fill water tank now.
• Switch your machine on by pressing the ON/OFF button
(Fig. 2,B). The machine adjusts fully-automatically to the
starting position.
PLEASE WAIT
FILL SYSTEM / PRESS STEAM
• Place a container underneath the steam nozzle (Fig.4).
• Press the PERMANENT STEAM button (Fig.3,M).
FILL WATER (machine beeps).
• Remove water tank and rinse well with clear tap water.
• Fill water tank and replace. Make sure that tank engages well.
FILL SYSTEM / PRESS STEAM
• Press the PERMANENT STEAM button (Fig.3,M).
PLEASE WAIT
RINSE UNIT
• Place a container under the coffee-spout (Fig. 8b) and press
the RINSE button (Fig. 2,F).
UNIT RINSING
COFFEE READY
Attention: You can only make coffee when the display reads
COFFEE READY.
CUP ILLUMINATION
The cup illumination adds a dramatic touch to brewing coffee.
Providing the machine is plugged in, you can activate the cup
illumination for 3 minutes by pressing any button.
7a. ADDING COFFEE BEANS
• Lift up cover of the bean container (Fig. 5) and remove aroma
protection lid (Fig. 6).
• Clean out any dirt or foreign objects from the bean container.
• Fill the bean container with coffee beans (Fig.7), replace the
aroma protection lid (Fig.6), and close the cover.
7b. FIRST TIME GRINDING/BREWING
•
•
•
•
•
Move the coffee spout up (Fig.8b).
Put a large cup underneath the coffee spout.
Make sure there is water in the tank.
Push the SPECIAL COFFEE button (Fig.2,C).
The machine will start grinding. Then it will pre-brew, pause,
and continue brewing. It will brew approx. 8 oz. of coffee.
During the first brewing cycle the coffee will be extremely
weak since some of the ground coffee stays in the connector
channel between the grinder and the brewing chamber. Your
next cup of coffee will be fine.
8. ADJUSTING THE GRINDER
You can adjust the grinder to the roast of your coffee.
We recommend the following:
• Light roast: use a finer adjustment.
• Dark roast: use a coarser adjustment.
• Open the cover of the bean container (Fig.5).
• To adjust grinding turn the selector switch to the desired
position (Fig.9).
You have the following possibilities:
• The smaller the dots, the finer the grinding.
• The bigger the dots, the coarser the grinding.
IMPORTANT: The grinding grade can only be adjusted while
the grinder is actually grinding.
ATTENTION: Oily beans tend to stick together. Stir beans just
before grinding to ensure a proper flow of beans into the burrs.
9. RINSING THE MACHINE
The machine will automatically complete a rinse cycle when it is
turned off (or when the machine turns off automatically). When
the machine is cold and you turn the machine on it will warm up.
PLEASE WAIT
RINSE UNIT
• Place an empty cup under the coffee-spout (Fig. 8b) and
press the RINSE button.
You can always rinse at any time. Just press the RINSE button.
12.
10. ADJUSTING FOR WATER HARDNESS
The water is heated inside the machine. With use, this leads to
calcium deposits forming inside the machine. The display will
remind you when it is time to perform a decalcifying cycle. The
machine is set to level 2 (medium hard water). If you have
harder water you need to set it to a higher level. If you have
softer water you can set it to level 1. If you are not sure about
the hardness of your water, ask your local water company for
the "Water Hardness in Grains."
HARDNESS LEVEL 1: grains 2-9
HARDNESS LEVEL 2: grains 10-19
HARDNESS LEVEL 3: grains 20-29
HARDNESS LEVEL 4: grains 30+
You can also use the enclosed water hardness indicator strip to
determine the water hardness:
• Insert the stick for one second into the water you want to
use. Shake off any access water and wait for one minute.
• If all five fields of the test stick turn reddish, set the hardness
level to 4. If four fields turn reddish, set the hardness level to
3. If three or less fields turn reddish, leave the level in
position 2.
You can change the hardness settings as follows:
COFFEE READY
• Open cover for programming buttons (Fig.1,19) and press
and hold the P button (Fig.3A,P) until you hear a beep.
PRESS KEY / POWDER QUANTITY
• Press the + button several times until the display shows:
HARDNESS LEVEL 2.
• Press the P button. You will hear one beep.
13.
• You can now change the hardness level by pressing the +
button until the desired level is displayed.
• Press the P button once again to confirm. Another beep will
be heard.
• Press the N button. The display will show COFFEE READY.
In level – – the water hardness monitor is turned off.
IMPORTANT: Turning the monitor off requires you to use the
Claris filter cartridge or distilled water.
11. CLARIS WATER CARTRIDGE
The machine comes with one free Claris water cartridge. The
Claris water cartridge is specially made for use with the
Impressa machines. The Claris cartridge:
• Reduces the water hardness up to 75%.
• Removes (if present) up to 85% chlorine, up to 90% lead, up
to 95% copper and up to 67% aluminum.
• Cleans the water through an upward current principle (See
Fig. 10) just before the brewing cycle starts, ensuring freshly
filtered water every time you make coffee.
• Eliminates decalcifying. When using the Claris water cartridge,
you never need to decalcify your machine.
• Is available through your retailer, the enclosed mail order form,
or through www.capresso.com, or call 1-800-220-5701.
11a. INSTALLING THE CLARIS CARTRIDGE
•
•
•
•
Make sure the water tank is empty.
Remove cartridge from its bag.
Snap the Claris extension tube on top of the cartridge (Fig. 11).
Open water container lid and pull up the holder for the Claris
cartridge (Fig.12).
• Insert the cartridge with its tapered end down and the extension piece up. Make sure it fits snugly over the white mesh
piece inside the water container. Push down gently (Fig.13).
• Close the holder for the cartridge so that it engages in the
water tank (Fig.12).
• Fill the water tank with fresh cold water and replace.
11b. PROGRAMMING THE CLARIS CARTRIDGE
COFFEE READY.
• Open cover for programming (Fig.1,19).
• Press the P button until you hear a beep.
PRESS KEY / POWDER QUANTITY.
• Press the + button several times until the display shows:
FILTER NO
• Press the P button (you will hear a beep). The word NO flashes.
• Press the + button once and the word YES flashes.
• Press the P button to confirm.
RINSE FILTER / PRESS STEAM.
• Place a large container (approx. 1 liter or at least 22 oz.) under
the steam nozzle (Fig. 4) and press the PERMANENT STEAM
button (Fig.3,M).
PLEASE WAIT / FILTER RINSING. Water will be pushed
through the steam nozzle and will stop automatically. The water
might be slightly discolored. Discard water. This procedure
activates the Claris cartridge.
FILTER YES
• Press the N button.
COFFEE READY
IMPORTANT: If you select "YES" for the Claris Cartridge the
function WATER HARDNESS is suppressed and turned off.
11c. REPLACING THE CLARIS CARTRIDGE
The filter is monitored automatically. After approx. 50 liters
(approx. 55 quarts) of water, the filter loses its effect. The display
will show:
REPLACE FILTER
Attention: The filter should be changed every 2 months if you
use less than 50 liters. In this case, no message will appear in
the display.
• Remove the old cartridge, snap the extension tube onto
the new cartridge and install. The old cartridge is environmentally friendly. Dispose with regular household trash.
• Fill water tank with fresh water.
• Open front cover and press the CLARIS button (Fig.3A,R).
for a few seconds until you hear a beep.
RINSE FILTER / PRESS STEAM
• Place a large container (approx. 1 liter or at least 22 oz.) under
the steam nozzle and then press the PERMANENT steam
button (Fig.3,M).
PLEASE WAIT / FILTER RINSING
Water will be dispersed into the container and will stop
automatically. When the cycle stops the machine will display
COFFEE READY.
12. MAKING ESPRESSO AND “CREMA COFFEE”
To understand the principles of pressure brewing refer to
chapters 4. through 4.3.
14.
Push the ON/OFF button to turn the machine on.
PLEASE WAIT
The machine is heating up. Then the display will read:
RINSE UNIT
• Place an empty cup under the coffee-spout (Fig. 8b) and
press the RINSE button (Fig. 2,F).
UNIT RINSING
COFFEE READY You are now ready to make coffee.
• Place 1 or 2 cups under the coffee-spout and press one of the
cup buttons (Fig. 2; C,D,E,G,H). The pre-brew system moistens
the coffee powder, briefly interrupts the flow and then starts
the real brewing process. IMPORTANT: You can stop the flow
of coffee at any time by pressing any of the coffee buttons.
• Adjust the coffee-spout (Fig. 8a,8b) to the size of your cups.
12a. USING GROUND COFFEE
• Open cover (Fig. 1,19).
• Press the GROUND COFFEE button (Fig. 3A; N).
FILL POWDER.
• Fill 1 or 2 level measuring scoops of ground coffee into the
opening for ground coffee (Fig. 1,11).
IMPORTANT: Never use instant coffee.
• Now push one of the coffee buttons to brew your coffee.
NOTE: If the GROUND COFFEE button (Fig. 3A,N) is pressed by
mistake just press one of the cup buttons. The machine will run
a rinse cycle and return to COFFEE READY.
13. PROCESSING HOT WATER
• Place a cup under the height-adjustable coffee spout
15.
(Fig. 8a or 8b) and turn selector switch to the right (Fig. 3,L)
to the water symbol. Hot water will come out of the hot water
spout (Fig.1,14). During this time the display will read:
TEA PORTION. After 5 oz. of hot water (factory setting) the
flow will stop automatically. The display will read: CLOSE TAP.
• Turn the selector switch back to the coffee symbol (Fig. 3,L)
COFFEE READY. To change the programmed amount of hot
water see chapter 15.5.
14. FROTHING AND STEAMING MILK
The Impressa S9, S8 and S7 can be operated with two different
frothing systems:
a) The Dual Frother-PLUS which is mounted on all machines.
b) The frothXpress-PLUS system which is included with the S9.
For the S7 and S8 order this system with the enclosed order
form or through our website: www.capresso.com.
Recommendation:
• If you froth for only one or two cups at a time and want 100%
control over the frothing/steaming process, the Dual FrotherPLUS might be the preferred equipment. Use with the
PERMANENT STEAM button (Fig. 3,M).
• If you always want the same amount of milk and milk froth in
your cup or you make three, four, five or more cappuccinos in
a row the frothXpress-PLUS is definitely faster and more
convenient to use. Ideally use the STEAM PORTION button.
Frothing (Cappuccino): Injecting hot steam into the milk to warm
the milk and create a firm layer of tiny bubbles.
Steaming (Latte): Injecting hot steam to warm the milk without a
frothy layer.
14a. USING THE DUAL FROTHER PLUS
14b. CLEANING THE DUAL FROTHER PLUS
Frothing Position: The cylinder of the frother is pushed down.
Steaming Position: The cylinder is pushed up ( see Fig. 14).
• Fill at least 4 to 5 oz. of cold milk into a frothing pitcher. The
pitcher should have at least a 10 to 12 oz. capacity. You can
also use a larger pitcher (e.g. 20 oz.) and fill it with up to 13 oz.
of milk. (Normally 3 to 5 oz. of milk is what you need for one
cappuccino or one latte). Always start with cold milk. Skim
milk will produce the most froth and will let you taste more of
the coffee. Milk with 1% and 2% fat will give you a bit less froth.
Regular milk (3% fat) will produce even less froth.
The machine is ready to produce steam as long as both green
lights in the steam buttons are illuminated (Fig. 3,K & M).
• If they are off, just push either button. Both lights will start
blinking for about 15 seconds and then will stay illuminated.
• Immerse the frother into the milk so that the black tip and part
of the cylinder are below the surface of the milk. The tip of the
frother should not touch the bottom of the pitcher.
• Now push the PERMANENT steam button. Hot steam will be
injected into the milk. The display will read STEAM INTAKE.
Tips for steaming: Leave the cylinder in the "up" position. Make
sure that the milk does not start boiling. You can stop the
steaming process at any time by pushing the PERMANENT
steam button. To continue steaming, just push the button again.
Tips for frothing: Start with the frother in the steaming position
("up") for 10 to 20 seconds, depending how much milk you are
working with. This way the milk is first heated. Then push down
the cylinder. The sound will change and milk-froth will build up
immediately. This way the froth on top of your milk is also warm.
If the milk is not warm enough, continue in the steaming position.
The tip and sleeve of the frother are high precision parts (Fig. 14).
Always keep those parts clean and free of any milk residue.
Make sure that the two side holes, the grove and the hole on the
bottom of the tip are always free of any milk deposits.
• After finishing frothing, remove the Dual Frother Plus and
immerse it in a cup with warm water. This is the easiest way to
keep the milk from hardening. The frother is attached securely
to the steam nozzle. Before pulling it down, turn it a few times
to loosen it. Then turn and pull down at the same time. When
replacing the frother turn and push it up to make a tight connection. This will prevent the frother from becoming loose
when steam is passing through.
Cleaning the steam nozzle: The Dual-Frother-PLUS is off (Fig. 4).
• Place a cup underneath the steam nozzle and press the
PERMANENT steam button. Steam will eject any milk
droplets. Stop the process after one or two seconds.
Tip: if the steam nozzle is blocked by hardened milk, use a needle
and loosen up the milk deposit. Then let some steam pass
through the steam nozzle.
14c. USING THE FROTHXPRESS PLUS SYSTEM
WITH MILK CONTAINER (standard with S9)
The frothXpress system lets you produce hot steamed or frothed
milk right into your cup. After playing a bit with this attachment
you will be able to get exactly the amount of frothed or steamed
milk you want in your cup (refer to the video).
• Remove the Dual-Frother-PLUS.
• Fill the milk container with cold milk.
16.
• Assemble the milk container as shown in Fig. 15.
• Attach the frothXpress-PLUS system as shown in Fig. 15a.
Important: This system siphons milk and mixes it inside the
frothXpress with hot steam. It is necessary that all parts are connected tightly, otherwise the siphoning process will not work.
Frothing Position: The dial points to the upper part of the face
(frothing range). Start with the dial pointing to the "-" symbol (12
o'clock). Milk will be siphoned, heated and frothed. For hotter
milk, move the lever towards the "+" symbol (See Fig. 15).
Steaming Position: The dial points to the lower part of the face
(steaming range). Start with the dial pointing to the "-" symbol (6
o'clock). Milk will be siphoned and heated with no froth. For hotter
milk move the lever towards the "+" symbol.
Steam Only Position: When the dial points to the steam symbol
(3 o'clock), the siphoning is blocked. Only steam will pass
through the frother Fig. 16.
Frothing
• Place a cup underneath the frothXpress (see Fig. 15a). The
machine is ready to produce steam as long as both green
lights in the steam buttons are illuminated. If they are off, just
push either button. Both lights will start blinking for about 15
seconds and then will stay illuminated.
• Make sure that the dial points to the 12 o'clock position.
• Press the PERMANENT steam button. The display will read
STEAM INTAKE and frothing will begin immediately.
• When you have enough frothed milk push the button again.
Frothing will stop.
If you always use the same amount of frothed/steamed milk, you
can use the STEAM PORTION button (Fig. 3,K). Steam will be
17.
dispensed for the programmed time and then it will stop automatically. During this time the display shows STEAM PORTION.
The factory setting is for 14 seconds of steaming. You can program the steam portion button to froth from 3 to 250 seconds
(see chapter 15.4).
Hotter Milk
• If you want your frothed milk hotter, move the dial to the
middle position (3 o'clock).
• Lift the cup so that the bottom of the frother is slightly
immersed into the milk. Push the PERMANENT steam button.
Hot steam will increase the milk temperature. Push the button
again to stop.
Steaming
Setting the dial to the lower part of the face, will eliminate any
froth build up. Milk will be siphoned and warmed. Otherwise it is
the same procedure as explained above under "Frothing".
TIP: After filling your cup(s) with the desired amount of hot
frothed milk you can immediately move it (them) underneath the
coffee spouts and brew coffee.
14d. USING THE FROTHXPRESS PLUS SYSTEM
WITH FLEXIBLE HOSE (Fig. 17)
The S9 comes equipped with a long flexible hose. This is useful
if you have your regular milk in the milk container and you want
to use another milk or chocolate milk.
• Insert the black connecting piece into the frothXpress system.
Insert the other side of the flexible hose into a milk carton.
• Now froth or steam as described in chapter 14c.
14g. CLEANING THE MILK CONTAINER
14e. HOT CHOCOLATE, CAFE MOCHA
• Remove the lid of the milk container. (The milk container is
dishwasher safe; upper rack.)
• Clean the lid and the two metal hoses with warm water.
• Assemble as shown in Fig. 15.
For hot chocolate fill the milk container with the desired amount
of chocolate syrup, add cold milk and stir well. Then proceed as
described under "Frothing". Adding a shot or two of espresso
makes it a Café Mocha.
15. PROGRAMMING
14f. CLEANING THE FROTHXPRESS PLUS
• Remove the hose which connects the frothXpress Plus and
the milk container.
• Store the milk container in the refrigerator.
• Remove the frothXpress from the steam nozzle.
• Drop the hose and the frothXpress in a cup with warm water.
This will prevent the milk from hardening.
• Place a cup underneath the steam nozzle and push the
PERMANENT steam button and let steam pass through for a
second or two (see Fig. 4).
• Replace the frothXpress-PLUS system.
For a more thorough cleaning you can take the pieces apart.
When attaching the chrome sleeve to the black nipple, angle it
as shown above. Use a twisting back and forth motion and
gently push the two pieces together.
Before leaving our factory, many of the functions are set to
enable you to obtain coffee without any additional programming
(see chapter 6 “Factory Settings”). You can change a variety of
parameters to produce coffee to your personal taste. The
programming buttons (Fig. 3A) are located behind the cover
for programming (Fig.1,19).
The following functions can be programmed:
■ Amount of coffee (POWDER QUANTITY)
■ Coffee temperature
■ Cup size (WATER QUANTITY)
■ Steam portion
■ Amount of hot water (TEA PORTION)
■ Claris filter cartridge
■ Water hardness
■ Economy mode
■ Clock/time
■ Auto turn-on
■ Auto shut-off
■ Supplies and cup counter (information only)
■ Languages
18.
• To begin programming, open cover, press and hold the
P button until you hear a "beep."
The display will always show the first function:
POWDER QUANTITY / PRESS KEY.
You are now in programming mode.
15.1 PROGRAMMING POWDER QUANTITY
COFFEE READY
• Press the P button.
POWDER QUANTITY / PRESS KEY
• Press the coffee button you want to program (Fig. 2; button
C,D or E).
POWDER
–_ _ _ ll_ _ _+
• Push the + or - button to increase or decrease the ground
coffee quantity. The vertical bars in the display will move
accordingly. This will make your coffee stronger or milder.
• To store this new setting in memory press the P button.
POWDER QUANTITY / PRESS KEY
You can now change the setting for another coffee button. Just
press that coffee button and repeat above procedure.
IMPORTANT: The "2-cup" buttons are adjusted automatically.
• Press the N button to return to COFFEE READY or press the
+ button to go to the next function.
15.2 PROGRAMMING COFFEE TEMPERATURE
COFFEE READY
• Press the P button.
POWDER QUANTITY / PRESS KEY
19.
• Press the + button until the display shows
TEMP. COFFEE / PRESS KEY
All coffee buttons are set to temperature HIGH. The other
setting is NORMAL and will reduce the coffee temperature by
about 7º F.
• Press the coffee button that you want to program (Fig.2;
button C,D,E): TEMP. HIGH
• Push the + button. The display changes to TEMP. NORMAL.
• To store this new setting in memory press the P button.
TEMP. COFFEE / SELECT KEY
• Press the N button to return to COFFEE READY or press the
+ button to go to the next function.
15.3 PROGRAMMING CUP SIZE (WATER QUANTITY)
You can program any of the three "single-cup" buttons to
produce between 1⁄2 oz. and 8 oz. of coffee. The "double-cup"
buttons will automatically produce twice that amount. See
chapter 6 for the factory-set cup sizes.
• Make sure you have coffee beans in the bean container.
COFFEE READY
• Press the P button.
POWDER QUANTITY / PRESS KEY
• Press the + button until the display shows
WATER QUANTITY / PRESS KEY
• Place a cup under the coffee spout (Fig. 8a or 8b) and press
the coffee button you want to program (Fig.2,C,D,E),
e.g. 1-small-cup-button.
The machine starts grinding and the display shows:
1 SMALL CUP / PLEASE WAIT
When the actual brewing starts the display alternates the
following messages: ENOUGH COFFEE? and PRESS KEY P.
• When the desired amount of coffee is in your cup, press the
P button. The machine stops brewing and the display shows:
–_ _ _ ll_ _ _+
At this time you have two options:
Option 1: Press the P button. The machine will save the cup
size you just programmed and the display will show
WATER QUANTITY / PRESS KEY You can now program the
cup size for another coffee button.
Option 2: If you press the + or – buttons you can now increase
or decrease the amount of water slightly. The vertical bars in the
display will move to the right or left. Put a cup underneath the
coffee spout. Now press the coffee button again. The machine
will repeat the process.
• Press the N button to return to COFFEE READY or press the
+ button to go to the next function.
15.4 PROGRAMMING STEAM PORTION
If you want the same amount of frothed milk you can program
how long the frother should dispense steam. The advantage is
that the frothing will stop automatically. This is particularly
useful when using the frothXpress Plus system. At the time of
programming, the machine will not froth. It will simply store the
time (3 to 250 seconds).
COFFEE READY
• Press the P button.
POWDER QUANTITY / PRESS KEY
• Press the + button until the display shows
STEAM PORTION
• Press the P button.
PORTION /....20 SEC.
• Press the + or – button to change the frothing/steaming time.
• To store this new setting in memory press the P button.
STEAM PORTION
• Press the N button to return to COFFEE READY or press the
+ button to go to the next function.
15.5 PROGRAMMING HOT WATER (TEA PORTION)
You can program the hot water spout to deliver between 1⁄2 oz.
and 16 oz. of hot water.
COFFEE READY
• Press the P button.
POWDER QUANTITY / PRESS KEY
• Press the + button until the display shows
TEA PORTION
• Place a cup under the hot water spout (Fig.8a or 8b).
• Press the P button.
OPEN TAP
• Turn the selector switch to the water symbol (Fig.3,L). Hot
water will flow into your cup. The display shows
ENOUGH TEA? / CLOSE TAP
• When you have enough hot water in your cup turn the
selector switch back to the cup symbol (Fig. 3,L). The hot water
flow will stop. TEA PORTION
• Press the N button to return to COFFEE READY or press the
+ button to go to the next function.
15.6 PROGRAMMING THE CLARIS CARTRIDGE
See chapter 11b.
20.
15.7 PROGRAMMING WATER HARDNESS
(This function only comes up if the Claris Filter Cartridge is
set to FILTER NO.) To change the setting for the water
hardness see chapter 10.
15.8 PROGRAMMING ECONOMY MODE
In the setting ECONOMY MODE ON the heating element for
steam turns off 10 minutes after last use of steam.
In the setting ECONOMY MODE OFF the heating element for
steam turns off 20 minutes after last use of steam.
Whenever the heating element is off the green indicator lights
inside the steam buttons are off.
COFFEE READY
• Press the P button.
POWDER QUANTITY / PRESS KEY
• Press the + button until the display shows
ECONOMY MODE OFF
• Press the P button.
• Press the + button to change to ECONOMY MODE ON
• Press the P button to confirm.
• Press the N button to return to COFFEE READY or press the
+ button to go to the next function.
15.9 PROGRAMMING TIMER/CLOCK
If you want the machine to turn itself on automatically you need
to set the time.
COFFEE READY
• Press the P button.
21.
POWDER QUANTITY / PRESS KEY
• Press the + button until the display shows
TIME –.–
• Press the P button.
• Press the + or – button to set the hours.
• Press the P button to confirm the hours.
• Press the + or – button to set the minutes.
• Press the P button to confirm the minutes.
Attention: The time is displayed in the 24hr mode (not AM/PM).
Therefore if the actual time is 3:45 p.m. you must set the time
to 15:45.
• Now press the + button to advance to the next function.
15.10 PROGRAMMING AUTO TURN-ON TIME
After setting the actual time (see chapter 15.9) you can now set
the auto turn-on time.
UNIT ON —.—.
• Press the P button.
• Press the + or – button to set the hours.
• Press the P button to confirm the hours.
• Press the + or – button to set the minutes.
• Press the P button to confirm the minutes.
The machine will turn itself on at the programmed time.
IMPORTANT: To switch off the automatic timer proceed as
follows:
• Press the P button.
• Press the N button.
UNIT ON :—
15.11 PROGRAMMING AUTO SHUT-OFF TIME
The machine is programmed to shut off 5 hours after last use.
You can select from 1⁄2 hour to 9 hour shut off or manual shut off.
COFFEE READY
• Press the P button.
POWDER QUANTITY / PRESS KEY
• Press the + button until the display shows
OFF AFTER 5.0 HOURS
• Press the P button.
• Press the + or – button for desired setting.
• Press the P button to confirm.
• Press the N button to return to COFFEE READY or press the
+ button to go to the next function.
15.12 CUP COUNTER, ETC.
The cup counter will show you the total number of coffee and
water uses. It will show for example 22 SUPPLIED. If you
push any of the coffee buttons or the rinse button it will show
you how often this particular button has been used. (There
is no display for number of hot water or steam uses).
• Press the N button to return to COFFEE READY or press the
+ button to go to the next function.
15.13 PROGRAMMING LANGUAGE SELECTION
The machine can display its messages in seven languages.
COFFEE READY
• Press the P button.
POWDER QUANTITY / PRESS KEY
• Press the + button until the display shows
LANGUAGE ENGLISH
• Press the P button.
• Press the + or – button for desired language.
• Press the P button to confirm.
15.14 RE-INSTALL FACTORY SETTINGS
You can re-install the factory settings for the following
functions:
• coffee and water quantity, coffee temperature for all
coffee buttons, steam portion and tea portion.
Proceed as follows:
COFFEE READY
• Press and hold the N button until you hear a beep. Now the
above functions are set according to chapter 6 (factory settings).
16. CARE AND MAINTENANCE
16.1 FILL WATER
FILL WATER
If this message shows on the display, no more coffee can be
made until you fill the water container. The water container will
never be completely empty. The low water floatation device
(Fig.1;4) activates the FILL WATER indicator when there are
about 10 oz. of water left.
• Remove water tank, rinse and fill with fresh water and replace.
16.2 EMPTYING THE USED COFFEE CONTAINER
EMPTY GROUNDS
Used coffee grounds are collected in the used coffee container
(Fig.1,16). If this message shows on the display no more coffee
can be made until you empty the used coffee container.
22.
• Remove the used water tray carefully since there is water in
it (Fig.1, Fig.18, Fig.19)
ATTENTION: Do not unplug the machine while you are
emptying the coffee grounds.
• Empty the used coffee container and the water tray
(drawer).
• Make sure the two metallic contacts of the drawer are clean
and dry (Fig. 20).
• Replace the used coffee container and drawer.
COFFEE READY
stone will end up in the used coffee container).
However larger stones can block the burr grinder. The noise of
the grinder will become very loud and the grinder will block.
Before Filling Beans into the Bean Container:
• Shake your bean bag thoroughly so that a stone will fall to
the bottom of the bag.
• Before emptying the bean bag completely, check if there
are any particles that look like stones and remove them.
16.3 EMPTYING THE USED WATER TRAY
If the burr grinder is blocked, proceed as follows:
• Turn off the machine by pushing the ON/OFF button (Fig. 2,B).
Wait until the machine has shut down completely.
• Unplug the machine.
• Open the bean container and remove all beans (scoop out
beans or use a hand-held vacuum cleaner).
• Loosen the two screws in the bean container (Fig.24) and
remove the bean container (Fig.25).
• If any beans remain, remove them.
• Attach the burr grinder release tool to the upper burr (Fig.26).
• If you cannot find this tool call 1-800-220-5701 and we will
send the tool to you free of charge.
• Turn the tool counter-clockwise slowly until the stone
becomes loose.
Attention: Do not try to turn the tool clockwise.
• Replace the bean container, and tighten the two screws.
• Turn machine on and test the grinder without beans to see
if the blockage has disappeared.
EMPTY TRAY
If this message shows on the display no more coffee can be
made until you empty the drawer. Follow the instructions in
chapter 16.2.
16.4 FILL BEANS
FILL BEANS
• Fill beans as described in chapter 7a.
The message FILL BEANS will only disappear after making
the next cup of coffee.
We recommend cleaning the bean container from time to time
with a dry cloth before you refill beans (please make sure the
machine is turned off when cleaning.)
16.5 STONES AND BEANS
Every coffee specialty store will tell you that occasionally small
stones can be found in between coffee beans. Small stones will
be processed through the burr grinder without any harm (the
23.
16.6 REMOVING STONES OR OTHER FOREIGN
OBJECTS FROM THE BURR GRINDER
16.7 CLEANING METAL CONTACTS
EMPTY TRAY/CLEAN CONTACTS
• Remove used water tray (Fig.1, 18).
• Clean the metal contacts (Fig. 20) with hot water and dishwashing liquid. Use a household brush if necessary.
• Replace water tray. COFFEE READY
16.8 CLEANING THE FROTHER SYSTEMS
See chapters 14b, 14f and 14g.
16.9 GENERAL CLEANING INSTRUCTIONS
Never use abrasive materials or chemicals to clean the
machine.
• Clean the housing with a soft, damp cloth.
• Rinse water tank daily and fill with fresh cold water.
16.10 EMPTYING THE SYSTEM BEFORE TRANSPORT
This procedure is necessary to prevent water and frost damage
in case you intend to transport the machine.
COFFEE READY
• Remove the frother system. Leave the steam nozzle attached
(Fig. 4).
• Place a container under the steam nozzle.
• Press the PERMANENT steam button (Fig. 3, M).
STEAM INTAKE
• Now remove the water tank. The machine will still release
some steam. You will hear a knocking noise and the machine
will stop after approx. 30 seconds.The display will show
PRESS STEAM/ FILL SYSTEM.
• Turn off the machine (Fig.2, B). You can now safely transport
the machine.
• The next time you turn on the machine, proceed as described
in chapter 7.
17. AUTOMATIC CLEANING CYCLES
17.1 CLEANING WITH SPECIAL TABLET
The machine monitors how many coffees are brewed and how
often the rinsing program is activated. After approx. 200 coffees
the display will show CLEAN UNIT. You can continue to make
coffee, however we highly recommend that you clean the
machine as described below within the next few days. This
cleaning program will remove oil build-ups in the brewing
chamber. If the display shows CLEAN NOW you should clean
the machine immediately. There will also be a "beep".
This cleaning program takes about 15 minutes. Please use the
enclosed white cleaning tablet. The machine comes with a pack
of 2 tablets. To re-order see chapter 19.
Important: Once the cleaning program has started do not
interrupt the procedure.
• Make sure the machine is on.
• Open the cover (Fig. 1,19) and push and hold the TABLET
CLEANING button (Fig. 3A,S) until you hear a beep.
EMPTY TRAY (FILL WATER might also show).
• Make sure that the water container is at least half full.
• Remove and empty the tray and the used bean container
and replace. Attention: Even if the tray and the bean
container are already empty, you still need to remove
24.
the tray for approx. 20 seconds and then replace it.
• Place a large container (24 oz.) underneath the
coffee spout (Fig.1, 1).
ADD TABLET/ PRESS CLEANING
• Open the ground coffee funnel lid (Fig.1,10) and drop one
white tablet into the opening (Fig.23).
• Push the TABLET CLEANING button (Fig.3A,S) again.
• The machine will start the automatic cleaning program by
dispensing water in intervals into the container underneath
the coffee spout.
• When finished, the display shows EMPTY TRAY and the
machine "beeps".
• Remove the tray. There will be water in the tray and in the
used coffee container. Empty, clean and replace.
RINSE UNIT
• Place a cup underneath the coffee spout and push the
RINSE button (Fig.2,F).
COFFEE READY
• Clean the ground coffee funnel after each cleaning cycle.
• Remove the funnel and rinse under hot water and dry.
• Replace funnel (Fig.21 and 22).
17.2 DECALCIFYING
The machine has an integrated decalcifying program. When the
shows UNIT CALCED it is time to decalcify the machine. You
can still make coffee. However, it is highly recommended that
you decalcify the machine within the next 2 days.
25.
Note: If you use the Claris water cartridge and the message
UNIT CALCED is displayed, then your cartridge function is not
activated. Follow the instructions in chapter 11a.
Run the decalcifying program only after the machine has been
switched off for at least 5 hours and has cooled down
completely. IMPORTANT: The decalcifying program must not
be interrupted.
DECALCIFYING AGENT:
Only use our special decalcifying tablets. For supplies see
chapter 19.
CAUTION: Never use vinegar or any other decalcifying agent.
This might damage internal parts of the machine.
Decalcifying Procedure
UNIT CALC
• Remove, empty water tank and replace
• Turn off machine and let it cool down for approx. 5 hours.
• Open cover (3), push and hold the DECALC button
(Fig. 3a,T1) until you hear a "beep".
EMPTY TRAY
ATTENTION: Even if the drawer is empty you must remove it
for at least 20 seconds. Replace drawer.
AGENT IN TANK
• Remove Water Container. Fill with 20 oz. of water and
completely dissolve the contents of one blister pack (2
tablets).
AGENT IN TANK / OPEN TAP / PRESS CALC
• Make sure that the frothing attachment is removed and place
a large container under the steam nozzle (Fig. 4).
• Turn selector switch (Fig. 3L) to the water symbol and press
the DECALC button (Fig. 3A, T1).
• The machine will pump the mixture in intervals through the
steam nozzle into the container underneath.
During this time the display will show:
UNIT DECALC/PLEASE WAIT
After about 12 minutes the machine "beeps". The display
will show PRESS CALC.
• Empty the container underneath the steam nozzle and
place it underneath the hot water release (Fig.1,14).
• Now push the DECALC button again (Fig. 3A, T1). The
machine will now pump the mixture in intervals through the
hot water spout.
UNIT DECALC/PLEASE WAIT
• After another six to eight minutes the machine will beep
again. The display will show CLOSE TAP. Turn the
selector switch (fig. 3,L) back to the cup symbol.
• The machine will now pump the remaining mixture in intervals
into the used water tray inside.
UNIT DECALC/PLEASE WAIT.
• After another 20 to 30 minutes the machine "beeps" and the
shows EMPTY TRAY.
• Carefully remove the used water tray (Fig.1,18 ), empty it,
rinse thoroughly and replace.
FILL WATER
• Remove the water tank, rinse thoroughly, fill it halfway with
fresh water and then replace.
OPEN TAP
• Place a 12 oz. container underneath the steam nozzle and
turn the selector switch (Fig.3,L) to the water symbol.
PRESS CALC
• Press the DECALC button.
The machine will pump the fresh water in intervals through the
steam nozzle into the container underneath. During this time the
display will show: UNIT DECALC/PLEASE WAIT
• When the machine "beeps" remove container from under the
steam nozzle, empty it and place it under the hot water
release. (Fig.1,14).
• Push the DECALC button again (Fig. 3A, T1). The machine
pumps fresh water in intervals through the hot water spout.
UNIT DECALC/PLEASE WAIT
The machine "beeps" again. The display shows CLOSE TAP.
• Turn the selector switch (Fig.3, L) back to the cup symbol.
• The machine will now pump fresh water in intervals into the
used water tray inside.
UNIT DECALC/PLEASE WAIT
The machine beeps and the shows
CLEAN CONTACTS/ EMPTY TRAY
• Empty the used water tray, clean the contacts
(see Fig. 19 and Fig. 20) and replace tray.
PLEASE WAIT
RINSE UNIT
• Push the RINSE button (Fig. 2,F)
COFFEE READY
18. TIPS FOR PERFECT COFFEE
Height adjustable coffee-spout
Adjust the height of the coffee-spout to the size of your cups.
26.
20. WARRANTY
the first consumer purchase and is limited to the United States
of America. This warranty covers all defects in materials or
workmanship (parts and labor) including UPS ground transportation for both ways, if necessary.
This warranty does not cover:
• Any machine not distributed by JURA-CAPRESSO within the
United States.
• Any machine not purchased from an Authorized Dealer.
• Damage caused by accident, abuse, negligence, misuse,
improper operation or failure to follow instructions contained
in this manual.
• Any service or alteration performed by an unauthorized person,
company or association.
• Damage caused by neglecting and omitting cleaning and
decalcifying cycles.
• Damage caused by use of instant coffee or any other ingredients not allowed in this product.
This warranty will be void if the Product Registration Card is
not sent within two weeks after purchase date.
Other limitations and exclusions:
Any implied warranties including fitness for use and
merchantability are limited in duration to the period of the
express warranty set forth above and no person is authorized to
assume for JURA-CAPRESSO any other liability in connection
with the sale of the machine.
For Home Use: Limited One Year Warranty
For Office and Commercial Use: Limited Six Month Warranty
This warranty covers your IMPRESSA S7, S8 and S9. This warranty is in effect for the period described above from the date of
JURA-CAPRESSO expressly disclaims liability for incidental and
consequential damages caused by the machine. The terms
“incidental damages” refer to the loss of the original purchasers
Grinding
Please refer to chapter 8 "Adjusting the Grinder."
Pre-warm cups
You should warm cups in advance with hot water or steam.
The smaller the quantity of coffee, the more important it is to
warm your cups.
Sugar and cream
Warmth is lost by stirring the contents of the cup. Adding milk
or cream from the refrigerator considerably lowers the
temperature of the coffee.
19. SUPPLIES
The following supplies are necessary to keep your machine in
good working order:
• Claris Water Filter Cartridge (eliminates the need for
decalcifying tablets).
• Special Cleaning Tablets (white tablets).
• Decalcifying tablets (if you do not use the Claris cartridge).
All these supplies are available through:
- your local Capresso retailer
- the enclosed mail order form that came with your machine
- our toll free line at 1-800-220-5701 or
- the Internet at www.capresso.com.
27.
time, loss of the use of the machine or other costs relating to
the care and custody of the machine. The terms “consequential
damages” refer to the cost of repairing or replacing other property which is damaged when this machine does not work properly. The remedies provided under this warranty are exclusive
and in lieu of all others.This warranty gives you specific legal
rights, and you may also have other rights which vary from state
to state.
21. TROUBLESHOOTING
A. NO COFFEE COMES OUT OF THE COFFEE SPOUT
Reason: Beans in bean container are not feeding properly into
the grinder because they are stuck together.
Solution: Stir beans before grinding and while grinding turn the
grinding selector to the coarsest setting.
When using very oily beans pour the beans onto a plate and let
some of the sticky oils evaporate (this will not harm the aroma of
the coffee).
Reason: You used ground coffee in the ground coffee funnel.
The ground coffee was too fine.
Solution: Use ground coffee which is ground somewhat coarser.
Reason: No water is transported through the system.
Solution: Remove water container and make sure that the connecting valve is free of any particles (like a coffee bean etc).
Reason: The ground coffee funnel is clogged; the internal brewing chamber is clogged.
Solution: Place a large cup underneath the coffee spout. Push
the rinse button (Fig.2,F) a few times until the blocked coffee is
removed. (Never fill more than 2 scoops of coffee in the ground
coffee funnel; the funnel is not a storage area for ground coffee).
Also, use a ground coffee which is ground somewhat coarser.
B. THE DISPLAY READS "FILL WATER" BUT THERE IS
ENOUGH WATER IN THE WATER TANK.
Reason: The low water floatation device (Fig.1,4) is missing.
Solution: Within the water tank is a small compartment (like a
mouse trap). Inside is a small black floatation device. On top is a
small clear see-through plastic cover. This small plastic cover is
missing and the floatation device is outside of the small compartment. Check if you can find both pieces inside the water
tank and put it back together. If you cannot find the pieces call
1-800-220-5701. We will send the pieces to you FREE OF
CHARGE.
C. INSUFFICIENT FROTHED MILK PRODUCTION
Reason: Milk is initially not cold enough or your milk is not
suited for thick frothing.
Solution: Make sure milk is cold. Use a different type of milk.
Skim milk will produce the thickest and longest lasting froth. Full
fat milk will produce less thick froth.
Reason: The components of the frother are not assembled
properly, or the components are clogged with hardened milk, or
one or more of the components is missing, or the steam nozzle
is clogged.
Solution:
a. Remove frother. Check that steam comes out of the steam
nozzle. If not, use a needle and clear blockage from inside
steam nozzle.
b. Clean all other frother parts and assemble properly.
See chapter 123.
c. If any parts are missing call Customer Service:
1-800-220-5701 or use the enclosed mail order form to order
the missing part.
28.
D. GRINDER MAKES AN EXTREMELY LOUD NOISE;
NO BEANS ARE GROUND
Reason: A stone or something else is blocking the burr grinder.
Solution: See chapter 16.5 and 16.6.
E. THE REMOVABLE DRAWER (Fig.1, 18) DOESN’T COME OUT
Reason: The internal used coffee disposal chute did not retract.
Solution: Turn off the machine. Wait a minute. Turn machine on
and wait until it stops making any noise. Now try to pull out the
drawer. If this does not work, turn the machine off. Now pull the
drawer out with some force. You will feel some resistance. When
the drawer is out you will see that the back wall of the used coffee container (Fig.1,16) is missing.
Reach into the machine and retrieve the back wall (it is a small
black flexible piece). Set the used coffee container aside and
insert the drawer (without the used coffee container) into the
machine. Turn the machine on. Wait until all noise has stopped.
The disposable chute should retract. Remove the drawer,
replace the used coffee container and insert it back into the
machine. Check if the drawer comes out easily.
Jura-Capresso LLC.
81 Ruckman Road
Closter, NJ 07624
1-800-220-5701 • 201-767-3999
Fax: 201-767-9684
email: [email protected]
Website: www.capresso.com