1
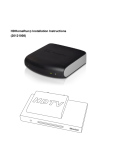
SageTV HD Media Extender
Model STX-HD100
Page 1
SageTV HD Media Extender
TM
Model STX-HD100
Installation and Setup Guide
Introduction
Thank you for purchasing the SageTV HD Media Extender, model STX-HD100. This document
provides an overview of how to install and setup the HD Media Extender. Further details
regarding how to use SageTV are covered in the SageTV User’s Guide, found on your computer
where SageTV is installed, or available for download from SageTV’s website (www.sagetv.com)
at: http://download.sage.tv/SageTV_Manual.pdf
Please take a moment to check the box contents. The contents should be:
The SageTV HD Media Extender, model STX-HD100
Composite A/V cable
Ethernet network cable
IR remote control and batteries
This setup guide
The STX-HD100 dimensions are approximately: 14 3/16” Wide x 1 15/16” High x 9 1/4” Deep,
including the feet and connectors on the back.
Doc Rev 1.0-D
Copyright 2007 SageTV, LLC All rights reserved
For additional support, go to www.sagetv.com/support.html or email us at [email protected]
SageTV HD Media Extender
Model STX-HD100
Page 2
Requirements
Before using the SageTV HD Media Extender, make sure the following requirements are met:
SageTV should already be installed and fully configured as a server on a Windows, Mac,
or Linux computer.
The SageTV server needs to have the SageTV Server and Media Extender and
Placeshifter Server options enabled. To find those options, start at SageTV’s Main
Menu on your server computer, then navigate through these menus: Setup -> Detailed
Setup -> Server.
The HD Media Extender comes with a SageTV Media Extender license. This license
needs to be registered on your SageTV server computer. (see below)
The firewall on your SageTV server computer needs to allow SageTV and the HD Media
Extender to contact each other over your network via certain ports. On your server
computer, make sure that SageTV is allowed through these ports: (UDP) 31100; (TCP)
31099.
Registering the Media Extender License
In order to use a SageTV HD Media Extender past the trial usage period, a license key must be
entered on the SageTV server for each extender to be used simultaneously.
To enter your license, on a Windows SageTV server system, go to the Windows Start button,
then select All Programs > SageTV > Register SageTV Media Extender License. Enter your
license in the dialog that appears.
To enter your license, on a Mac SageTV server system, go to System Preferences > SageTV >
Licenses. Select the plus (+) symbol to add an additional license.
Note: It is recommended that you exit SageTV on the server computer before entering a
Media Extender license. (If using service mode, stop the service.)
Connecting the HD Media Extender
Before connecting the HD Media Extender, please review the previous sections to make sure the
SageTV server is running and has the SageTV Server and Media Extender and Placeshifter
Server options enabled and that the extender license has been registered on the server PC. Once
that SageTV server is configured, you are ready to connect the extender.
Copyright 2008 SageTV, LLC All rights reserved
For additional support, go to www.sagetv.com/support.html or email us at [email protected]
SageTV HD Media Extender
Model STX-HD100
Page 3
The back of the HD Media Extender looks similar to this image (the actual unit’s connections
layout may vary):
For now, leave the unit unplugged and the power switch set to the Off position (0). Connect the
unit’s Audio, Video, and Network ports:
Network: Connect your network cable to the Ethernet port.
Audio: Choose one type of audio output ports to connect: HDMI, Optical, or Analog (L,R).
Video: Choose one type of video output ports to connect: HDMI, Component (Pb,Pr,Y), SVideo, or Composite (C).
Once those connections are made, plug in the unit’s power cable, but leave the unit off.
Turn on your TV and/or home theater equipment, making sure to set those devices to use the
same audio and video connections used on the extender.
Turn the HD Media Extender on via its power switch on the back. After a short delay (perhaps
10 – 20 seconds), the startup screen should be visible on your TV.
IMPORTANT! If you see no image on your TV, make sure that the TV is set to use the
same video connection used on the extender. If the connections are set correctly, use the
Video Out button near the bottom of the extender’s remote to change the video output
resolution used by the extender. Wait a few seconds after using the Video Out button
before pressing it again to try the next video output resolution. If you still have no output
on your TV after using the Video Out button five times, see the Troubleshooting Guide,
below.
Once the HD Media Extender is connected, turned on, and displaying information on your TV,
see the Configuring the HD Media Extender section for more setup details.
Copyright 2008 SageTV, LLC All rights reserved
For additional support, go to www.sagetv.com/support.html or email us at [email protected]
SageTV HD Media Extender
Model STX-HD100
Page 4
The Front Panel
The front of the HD Media Extender has seven buttons, some LED status lights, and two USB2
ports. (The USB2 ports are unused at this time.) The front panel buttons are:
Menu – When the extender is in standby mode, the Menu button wakes the extender and
displays the list of servers that the extender can connect to. When not in standby mode,
this button causes SageTV to go to the Main Menu. Notes: 1) this button functions the
same as the Home button on the remote. 2) If the Auto Connect to Server option has
been enabled in the Settings menu, then a dialog will appear on the Servers menu giving
you 5 seconds to cancel the automatic connection to the last-used SageTV server.
Up – Navigates up. During playback, this button acts as Channel Up.
Left – Navigates to the left. During playback, this button acts as Volume Down.
OK – Selects the currently highlighted item. During playback, this button will toggle the
information display and the Options menu.
Right – Navigates to the right. During playback, this button acts as Volume Up.
Down – Navigates down. During playback, this button acts as Channel Down.
Standby – When not already in standby mode, this button powers down the unit to
standby mode. (The device will still use some power in standby mode.) When in standby
mode, this button will wake the unit and return it to its previous mode: if it was connected
to a SageTV server, it will connect to that server; if it was on a configuration screen, it
will return to the Servers menu. Note: this button functions the same as the Power button
on the remote.
Configuring the HD Media Extender
Once the HD Media Extender is installed and plugged in, make sure the TV is turned on, then
turn the extender on via the power switch on the back of the device. The extender will turn on
and, after a brief startup period, will proceed to the Servers menu, where you can choose a
SageTV server to connect to or choose to configure the extender. Note: the first time the
extender is powered on, you should choose the Settings option from the first menu, especially if
you are looking for HDTV resolution video output to your TV.
IMPORTANT! If you see no image on your TV, make sure that the TV is set to use the
same video connection used on the extender. If the connections are set correctly, use the
Video Out button near the bottom of the extender’s remote to change the video output
Copyright 2008 SageTV, LLC All rights reserved
For additional support, go to www.sagetv.com/support.html or email us at [email protected]
SageTV HD Media Extender
Model STX-HD100
Page 5
resolution used by the extender. Wait a few seconds after using the Video Out button
before pressing it again to try the next video output resolution. If you still have no output
on your TV after using the Video Out button five times, see the Troubleshooting Guide,
below.
Servers
The Servers menu has the following choices:
A list of SageTV servers on your local network. Select the one you wish to connect to. If
any remote servers have been configured via the Settings menu’s Edit Server List option,
they will also be listed here. Connecting to a remote server will result in using the
extender as a Placeshifter client.
Refresh – Refresh the list of servers. If no servers are listed, or the one you are looking
for is not listed, make sure the server has the SageTV Server and Media Extender and
Placeshifter Server options enabled, then select this button to search for the available
servers again.
Settings – Go to the Settings menu to configure the HD Media Extender. Note: the first
time the extender is used, you should configure it via the Settings menu.
Note: If the Auto Connect to Server option has been enabled in the Settings menu, then when
the HD100 starts, a dialog will appear on the Servers menu giving you 5 seconds to cancel the
automatic connection to the last-used SageTV server.
Settings
The Settings menu is used to configure the HD Media Extender and has the following options:
Network Configuration – Choose whether to use DHCP (Automatic) or Static
(Manual) as the method for the extender to gets its IP address on your local network.
DHCP is recommended, if your network has a DHCP server, since it will then
automatically get an address. The Static option is an advanced option: once this is
selected, you will need to manually enter your network information.
Video Output – Choose this option to configure which video output port to use. Select
from Composite/S-Video, Component, or HDMI. After choosing Component or
HDMI, you will then be asked to select which output resolutions will be enabled. Tips:
1) While on the resolution selection menu, use the Video Out button on the remote to test
the different output resolutions. After each resolution change, the screen will display the
current resolution. For each valid resolution, check-mark its button to enable it. Then,
when using the extender in client mode (connected to a SageTV server), use the Video
Out button to toggle the output resolution between the ones check-marked here. 2) The
current resolution set on the resolution selection menu will be used as the default
Copyright 2008 SageTV, LLC All rights reserved
For additional support, go to www.sagetv.com/support.html or email us at [email protected]
SageTV HD Media Extender
Model STX-HD100
Page 6
resolution when connecting to a SageTV server. 3) See the Troubleshooting Guide,
below, regarding how to configure the extender to use PAL TV mode.
Audio Output – Choose this option to configure which audio output port to use. Select
from Analog (stereo L+R), S/PDIF (optical), or HDMI.
Firmware Update – Use this option to check for a firmware update for the HD Media
Extender. If an update is available, you will be asked whether to download it and update
your extender now. IMPORTANT! The screen may flash while the update is being
installed. This is normal. *** DO NOT TURN THE EXTENDER OFF WHILE A
FIRMWARE UPDATE IS IN PROGRESS. ***
Edit Server List – Use this option to add remote servers that the extender can connect to.
The STX-HD100 HD Media Extender can be used as a Placeshifter client when
connecting to a remote SageTV server from this list. The servers added here will be
displayed on the Servers menu, along with any servers discovered on the local network.
Auto Connect to Server – When checked, this will cause the extender to automatically
connect to the last server it was connected to the next time it is powered on. (It will go to
the Servers menu, then automatically connect after a few-second timeout period.)
Save Settings – Saves the current settings.
Exit Settings – Return to the Servers menu.
Supported Media Types
The following media types can be played natively by the HD Media Extender:
File Formats: AVI, ASF, MPEG, MKV, QuickTime, MP4
Video Codecs: MPEG-1/2, MPEG-4 ASP, H.264, WMV9
Audio Codecs: MPEG Audio, AAC, AC3, WMA, FLAC
In addition to the native support for the formats listed above, SageTV will attempt to transcode
other media formats to a type that the extender can play. Transcoding may not be available for all
possible media formats.
Notes:
DVD: The HD Media Extender is not capable of decoding encrypted DVD content, so it can not
be used for DVD-ROM viewing. But, non-encrypted DVD images imported into the video
library (home-made DVDs, for example) can be played back on the extender with full use of the
DVD’s menus.
Pictures: Any image format that the SageTV server can load will be viewable on the extender.
Copyright 2008 SageTV, LLC All rights reserved
For additional support, go to www.sagetv.com/support.html or email us at [email protected]
SageTV HD Media Extender
Model STX-HD100
Page 7
Troubleshooting Guide
This Troubleshooting Guide should be your first reference for any questions or problems you are
having with the HD Media Extender. For discussions with other SageTV users, you can post in
our discussion forum at forums.sagetv.com/forums. For SageTV technical support, submit a
support request at www.sagetv.com/request.html and we will reply within 72 hours.
Installing a SageTV Server Upgrade
When SageTV is closed on the server for an upgrade install, the HD Media Extender will go into
standby mode. After upgrading SageTV on your server, it is recommended that you check for an
extender firmware update before reconnecting to the server: while still in standby mode, press
the Home button on the remote or the Menu button on the front panel of the extender to return to
the Servers menu. Then, see Installing a firmware update, below.
Installing a firmware update
From the Servers menu, go to the Settings menu, where there is an option to check for a
firmware update. If an update is available, you will be asked whether to download it and update
your extender now. IMPORTANT! The screen may flash while the update is being installed.
This is normal. *** DO NOT TURN THE EXTENDER OFF WHILE A FIRMWARE
UPDATE IS IN PROGRESS. ***
There is no TV output and the unit does not respond at all
Confirm that the device’s power cord is plugged in and the power switch on the back of the unit
is turned on.
No servers listed on the Servers menu
Check the Requirements section near the beginning of this guide to confirm all configuration
requirements. If the extender is set to use DHCP as its network configuration, make sure there is
an active DHCP server on your network. If the extender is set to use a Static IP address as its
network configuration, confirm that those settings are correct.
No Video on the TV
If you see no image on your TV, make sure that the TV is set to use the same video connection
used on the extender. If the connections are set correctly, use the Video Out button near the
bottom of the extender’s remote to change the video output resolution used by the extender. Wait
a few seconds after using the Video Out button before pressing it again to try the next video
output resolution.
Copyright 2008 SageTV, LLC All rights reserved
For additional support, go to www.sagetv.com/support.html or email us at [email protected]
SageTV HD Media Extender
Model STX-HD100
Page 8
If the TV is connected via component and there is no video output after changing the resolution
five or more times via the Video Out button, see if the HDMI port is also connected on the
extender. If it is, disconnect the HDMI cable from the extender.
No HD Video
If the video output is not High Definition, return to the Settings menu from the Servers menu to
set the Video Output option to either Component or HDMI, then check-mark the resolutions
that can be used for the video output.
No Sound
If there is no sound while video or music is playing, return to the Settings menu from the
Servers menu to select the correct Audio Output option, and make sure the correct audio output
port is connected to your TV or home theater equipment.
The extender doesn’t use the default resolution I want
If the resolution is changed while using the extender as a client, it will not remember to use that
as the initial resolution the next time the extender connects to a SageTV server. To set the default
resolution, use the resolution selection menu after configuring the Video Output from the
Settings menu.
Using the extender in PAL TV mode
PAL support has been integrated into the latest firmware, starting with version “20080604 0” and
later. To change the extender to use PAL mode, you may need to reset the extender to its initial
state (only needed if you have used it previously), then enable PAL outputs.
To reset the extender, use the Configuration Reset Procedure, below, pressing the Menu and
Up buttons while turning on the power switch.
Once the extender has been reset, restart it a second time while holding the Menu and Down
buttons on the front panel until the ACTIVE LED stays on. At this point, PAL mode should be
enabled. If there is still no display on the TV, you may need to switch the video output mode
with the remote.
Configuration Reset Procedure
If none of the other troubleshooting suggestions have solved the problem, then you can try this
Configuration Reset Procedure:
1. Turn the extender off via the power switch on the back of the unit.
2. Press the Menu and Up buttons on the front panel at the same time and continue holding
them as you turn the power switch back on. Continue holding both the Menu and Up
buttons for about three seconds after power has been turned on, then release both buttons.
Copyright 2008 SageTV, LLC All rights reserved
For additional support, go to www.sagetv.com/support.html or email us at [email protected]
SageTV HD Media Extender
Model STX-HD100
Page 9
3. Note that you may need to use the Video Out button on the remote to change the video
output resolution.
4. After the reset procedure, check the above troubleshooting tips again.
If the extender is still not functioning properly after the Configuration Reset and rechecking the
troubleshooting tips, then contact SageTV technical support via www.sagetv.com/support.html.
STX-HD100 Warranty
The STX-HD100 is covered by a one year warranty. If the extender is not working correctly,
please check the troubleshooting tips listed above, then contact SageTV technical support via
www.sagetv.com/support.html.
Copyright 2008 SageTV, LLC All rights reserved
For additional support, go to www.sagetv.com/support.html or email us at [email protected]
SageTV HD Media Extender
Model STX-HD100
Page 10
Remote Control Layout
Power On/Off
Toggle between playing
media & the last menu
Client: SageTV Main Menu
In Standby: go to server list
Program Guide
Search Menu
Music Menu
Online Services Menu
Photo Menu
SageTV Recordings
Numeric entry keypad
- (dash)
Toggle Numeric
Text Entry mode
Change Audio
language
Previous Channel
Volume Up/Down
Channel Up/Down
Page Up/Down in menus
Options
Mute
Go Back to the
previous screen
Information
Select
Navigate Left, Right,
Up, and Down.
Watched
Favorite
Record
Play
Pause
Stop currently playing
media file
Skip Back
Skip Forward
Smooth REW
Smooth FF
Skip Back #2
Delete
Skip Forward #2
Toggle Aspect Ratio mode
Change Video Out resolution
Don’t Like
Return to DVD menu’s parent
Go to the DVD’s Menu
Copyright 2008 SageTV, LLC All rights reserved
For additional support, go to www.sagetv.com/support.html or email us at [email protected]
SageTV HD Media Extender
Model STX-HD100
Page 11
FCC Statement
This device complies with Part 15 of the FCC Rules. Operation is subject to the following two
conditions: (1) This device may not cause harmful interference, and (2) this device must accept
any interference received, including interference that may cause undesired operation.
NOTE: This equipment has been tested and found to comply with the limits for a Class B digital
device, pursuant to Part 15 of the FCC Rules. These limits are designed to provide reasonable
protection against harmful interference in a residential installation. This equipment generates,
uses and can radiate radio frequency energy and, if not installed and used in accordance with the
instructions, may cause harmful interference to radio communications. However, there is no
guarantee that interference will not occur in a particular installation. If this equipment does cause
harmful interference to radio or television reception, which can be determined by turning the
equipment off and on, the user is encouraged to try to correct the interference by one or more of
the following measures:
- Reorient or relocate the receiving antenna
- Increase the separation between the equipment and receiver
- Connect the equipment into an outlet on a circuit different from that to which the receiver is
connected
- Consult the dealer or an experienced radio/TV technician for help
Third Party Software Libraries
This product contains the following open source software which is covered under their
associated licenses: the linux kernel, busybox, udhcp, init, telnetd, inetd, phoneme advanced,
libjpeg, libpng and ffmpeg.
For source code availability; please contact [email protected]
Copyright 2008 SageTV, LLC All rights reserved
For additional support, go to www.sagetv.com/support.html or email us at [email protected]