1
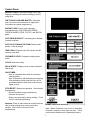
Microwave Oven Use and Care Manual and Cooking Guide ME96T MW96T FE116T FW116T Attention: Keep these instructions for future reference. If the oven changes ownership, be sure this manual accompanies oven. 1 Model Identification Important Safety Instructions Electrical Requirements Grounding Instructions Power Supply Cord Microwave Power Radio Interference Control Panel Usage Oven Light Setting the Clock Child Lock One Touch Cook Instant Cook 1, 2, or 3 Stage Cooking Delay Start Auto Accu-Thaw Auto Reheat Hold/Timer Cooking Guide Microwave Cooking Techniques Effects of Food Characteristics on Microwave Cooking Heating Tips Defrosting Tips Browning Tips Time Variations Microwave Utensil Guide Microwave Utensil Test Heating or Reheating Guide Defrosting Guide Freezer to Table Frozen Foods Guide Cooking Guide Care and Cleaning Interior, Exterior, and Door Discharge Air Vents Glass Tray Before Calling For Service Asure 2 3 6 6 6 6 6 7 8 8 8 8 8 9 10 10 11 12 12 13 13 13 14 14 14 14 15 15 16 17 19 19 26 26 26 26 26 28 Model Identification Complete the enclosed registration card and promptly return card to Amana's Product Registration department. If registration card is missing, call for consumer information at 1-800-843-0304. If outside U.S.A. call 1-319-622-5511. When contacting Amana, provide product information. Product information is located on the appliance nameplate on the left interior oven wall. Record the following information: Model Number: Serial Number: Manufacturing Number: Date of purchase: Dealer’s name and address: Keep a copy of sales receipt for future reference or in case warranty service is required. If something is operating incorrectly, read “Before Calling for Service” section on page 26. Any further questions or to locate an authorized servicer, call 1-800-NAT-LSVC (1-800-628-5782). If outside U.S.A. call 1-319-6225511. Service must be performed by an Amana authorized servicer if service is required. 2 IMPORTANT SAFETY INSTRUCTIONS Recognize this symbol as a SAFETY message WARNING WHEN USING ELECTRICAL APPLIANCES, BASIC SAFETY PRECAUTIONS SHOULD BE FOLLOWED TO REDUCE THE RISK OF BURNS, ELECTRICAL SHOCK, FIRE, INJURY TO PERSONS, OR EXPOSURE TO EXCESSIVE MICROWAVE ENERGY: 1. READ all instructions before using the appliance. 7. As with any appliance, CLOSE SUPERVISION is necessary when used by CHILDREN. 2. READ AND FOLLOW the specific “PRECAUTIONS TO AVOID POSSIBLE EXPOSURE TO EXCESSIVE MICROWAVE ENERGY” found on page 4. 8. DO NOT operate this appliance if it has a damaged cord or plug, if it is not working properly, or if it has been damaged or dropped. 9. 3. This appliance MUST BE GROUNDED. Connect only to properly grounded outlet. See “GROUNDING INSTRUCTIONS” on page 6. This appliance should be serviced ONLY by qualified service personnel. Contact nearest authorized service facility for examination, repair or adjustment. 4. Install or locate this appliance ONLY in accordance with the provided installation instructions. 5. Some products such as whole eggs and sealed containers - for example, closed glass jars may explode and SHOULD NOT be HEATED in this oven. 6. Use this appliance ONLY for its intended use as described in this manual. Do not use corrosive chemicals or vapors in this appliance. This type of oven is specifically designed to heat or cook. It is not designed for industrial or laboratory use. 10. DO NOT cover or block any openings on the appliance. 11. DO NOT store this appliance outdoors. DO NOT use this product near water- for example, near a kitchen sink, in a wet basement, or near a swimming pool, and the like. 12. DO NOT immerse cord or plug in water. 13. Keep cord AWAY from HEATED surfaces. 14. DO NOT let cord hang over edge of table or counter. 15. See door cleaning instructions on page 26. TO REDUCE THE RISK OF FIRE IN THE OVEN CAVITY: a. DO NOT overcook food. Carefully attend appliance if paper, plastic, or other combustible materials are placed inside the oven to facilitate cooking. b. Remove wire twist-ties from paper or plastic bags before placing bag in oven. c. If materials inside the oven should ignite, keep oven door closed, turn oven off, and disconnect the power cord, or shut off power at the fuse or circuit breaker panel. IF THE DOOR IS OPENED THE FIRE MAY SPREAD! d. DO NOT use the cavity for storage purposes. DO NOT leave paper products, cooking utensils, or food in the cavity when not in use. THIS APPLIANCE MUST BE SERVICED ONLY BY QUALIFIED SERVICE PERSONNEL. CONTACT YOUR NEAREST AUTHORIZED SERVICE FACILITY FOR EXAMINATION, REPAIR OR ADJUSTMENT. SAVE THESE INSTRUCTIONS 3 PRECAUTIONS TO AVOID POSSIBLE EXPOSURE TO EXCESSIVE MICROWAVE ENERGY (a) DO NOT attempt to operate this oven with the door open since open-door operation can result in harmful exposure to microwave energy. It is important not to defeat or tamper with the safety interlocks. (b) DO NOT place any object between the oven front face and the door or allow soil or cleaner residue to accumulate on sealing surfaces. (c) DO NOT operate the oven if it is damaged. It is particularly important that the oven door close properly and that there is no damage to the: (1) Door (bent), (2) hinges and latches (broken or loosened), (3) door seals and sealing surfaces. (d) The oven should NOT be adjusted or repaired by anyone except properly qualified service personnel. Caution 8. Briskly stir or pour liquids before heating to prevent spontaneous boiling or eruption. Do not overheat. If air is not mixed into a liquid, liquid can erupt in oven or after removal from oven. 9. All uncooked foods should be heated to a final internal temperature of at least 165°F. Some foods require higher temperatures. These recommended temperatures kill most food borne, disease causing organisms. Some common visual signs that indicate the cooking temperature has been reached: • Food steams throughout, not just around edges. • Center bottom of dish is very hot to the touch. 10. If using a microwave popcorn popper, use according to manufacturer's instructions. Do not continue to heat after popping has stopped. Popcorn will scorch or burn. Do not leave oven unattended. 11. Use only popcorn in packages designed and labeled for microwave use. Pop according to package directions, beginning with the minimum amount of time recommended. Use caution when handling hot popcorn bag. To avoid personal injury or property damage, observe the following: 1. Always press STOP/RESET before programming oven. 2. Do not deep fat fry in oven. Fat could overheat and be hazardous to handle. 3. Do not cook or reheat eggs in shell or with an unbroken yolk. Pressure may buildup and erupt. Pierce yolk with a fork or knife before cooking. Do not reheat previously cooked eggs in the microwave oven unless finely chopped or scrambled. 4. Pierce skin of potatoes, tomatoes, or other foods with a "skin" before cooking in microwave oven. This allows steam to escape during cooking. 5. Remove excess fat from meats and poultry to prevent spattering. 6. Do not heat baby bottles in microwave oven. 7. Do not home can in microwave oven. Home canning is generally done with metal lids. Since metal lids reflect heat, product may not be heated uniformly to 212°F or above. Food could deteriorate. USDA extension specialists do not recommend home canning in microwave ovens. 4 12. Microwave convenience foods are often packaged in specially designed packaging. Special plates, lids, containers, or other unique packaging materials may be used. Susceptor packing material (a thin, metalized plastic film) is frequently used to help brown and crisp foods such as microwave pizzas, French fries, or fish sticks. Be sure to follow food package instructions carefully. Contact convenience food manufacturer with questions concerning these products. Amana Refrigeration, Inc., does not endorse any brand of microwave convenience foods, or any type of microwave food packaging. 13. Do not operate microwave oven empty. This could damage the oven. 14. Do not use regular cooking thermometers in oven. Most cooking thermometers contain mercury and may cause “arcing”, malfunction, and/or damage to oven. 15. Do not heat sealed containers in oven. Containers with restricted openings such as syrup bottles or baby food jars must not be used for cooking. Food or liquid could expand quickly and cause container or bag to break. Pierce or open container or bag before heating. 16. Metal or ceramic accessories which are designed to absorb microwave energy to provide heat may be used with caution. Test device before use (See "Microwave Utensil Test" on page 15). Read and follow manufacturer's instructions provided with the accessory. Contact accessory manufacturer with questions concerning these accessories. Amana Refrigeration, Inc., does not endorse any brand of accessory. 17. Never use newspapers in oven since paper may ignite. 18. Pierce or open plastic bags (and other airtight containers) before heating in microwave oven. This allows steam to escape during cooking. 19. Containers may become hot and pot holders may be needed. 20. Closely supervise any use by children. Make sure they can read instructions and reach controls. Never allow them to lean or swing on oven door. 5 Electrical Requirements GROUNDING INSTRUCTIONS DO NOT UNDER ANY CIRCUMSTANCES CUT OR REMOVE THE ROUND GROUNDING PRONG FROM THE PLUG OR BEND THE POWER PRONGS TO FIT A RECEPTACLE OTHER THAN THE ONE SHOWN FOR YOUR OVEN. SUCH ABUSE OF THE PLUG CAN RESULT IN ELECTRICAL SHOCKS OR OVERHEATING. WARNING - IMPROPER USE OF THE GROUNDING PLUG CAN RESULT IN A RISK OF ELECTRIC SHOCK OR DEATH. This appliance MUST be grounded. In the event of an electrical short circuit, grounding reduces the risk of electric shock by providing an escape wire for the electric current. This appliance is equipped with a cord having a grounding wire with a grounding plug. The plug must be plugged into an outlet that is properly installed and grounded. DO NOT use a two-prong adapter. Consult a qualified electrician or serviceman if the grounding instructions are not completely understood, or if doubt exists as to whether the appliance is properly grounded. 120V-15AMP Do not use an extension cord. If the product power cord is too short, have a qualified electrician install a three-slot receptacle. This oven should be plugged into a separate 60 hertz circuit with the electrical rating as shown in the drawing at left. When a microwave oven is on a circuit with other appliances, an increase in cooking times may be required and fuses can be blown. Power Supply Cord • A short power supply cord is provided to reduce the risks resulting from becoming entangled in or tripping over a longer cord. Microwave Power Models ME96T and MW96T deliver 800 watts and models FE116T and FW116T deliver 900 watts of microwave cooking power to the oven cavity. Radio Interference Microwave oven operation may cause interference to radio, TV, or similar equipment. To reduce or eliminate interference: • Clean door and sealing surfaces of oven. See "Care and Cleaning" instructions on page 26. • Place radio, TV, etc. away from oven. • Use properly installed antenna on radio, TV, etc. to obtain stronger signal reception. 6 Control Panel Readout Display--Normally displays time of day. Displays remaining time when cooking by time or using timer. ONE TOUCH COOK/ONE MINUTE +--Operates oven for one minute increments on high power. Convenient one press programming. INSTANT COOK--Use to cook commonly microwaved items: POPCORN, BEVERAGE, FROZEN DINNER, PIZZA, POTATO, and BACON pads. AUTO REHEAT/SELECT--Use during Auto Reheat to select food item. AUTO ACCU-THAW/ACCU-THAW--Defrost meat, poultry, or fish by weight. TIME COOK--Programs up to 99 minutes and 99 seconds cycle time. COOKMATIC LEVEL--Programs cooking power levels. CLOCK--Sets time of day. DELAY START--Programs oven to start at desired time of day. HOLD/TIMER-• Use as a separate timer with no microwave cooking power. • Use in connection with defrosting and cooking. After defrosting, holds food with oven off for predetermined time after which oven turns on again to cook. STOP/RESET--Stops oven operation. Also cancels programming. • Erases mistakes during programming • Cancels minute timer • Stops oven temporarily during cooking. Touch twice to cancel programming. Numbers--Press in same order as would write them. Use to enter heating times, power levels and weights. Also used in Auto Accu-Thaw programming. START--Starts oven operation. Note: When Cookmatic Level is set on other than full power, intensity of oven light may vary. This is normal and indicates oven is operating correctly. 7 Usage Oven Light Oven light comes on when door is opened and also when oven is operating. If oven light burns out, it must be changed by authorized servicer. Setting the Clock 1. Press CLOCK/DELAY START. 2. Enter time of day by pressing numbers in sequence. For example, 10:35 (a.m. or p.m.) press number pads 1,0,3,5. 3. Press CLOCK/DELAY START again. Clock is set. If oven power is interrupted all programming instructions erase. Reset clock as indicated above. Child Lock When in the child lock mode, touch pads are disabled and microwave activity cannot take place. To Lock: 1. Press STOP/RESET. 2. Press and hold 5 and 7 at same time until L indicator lights up in the upper right corner of display. The child lock is now on. To Unlock: 1. Press and hold 5 and 7 at same time until L indicator disappears. Child lock is now off. One Touch Cook 1. Press ONE MINUTE+. To increase time by one minute intervals, touch ONE MINUTE+ repeatedly. POWER, TIME, and COOK indicators light up. Selected cooking time displays. Oven starts automatically and cooks at full power for time selected. Cooking time counts down in display. 2. When cooking cycle is complete, signal sounds and "END" displays. Remove food from oven. 8 Instant Cook Press one of the instant cook pads. 1. Press desired instant cook pad appropriate number of times. (See chart below.) Oven starts 2 seconds after last pad press. Total cooking time counts down in display. 2. When cooking cycle is complete, signal sounds and "END" displays. Remove food from oven. Instant Cook Pad Number of times to press pad Size or Amount of Food or Beverage 1 Regular 3.5 oz. 2 Light 3.0-3.5 oz. 3 Single 1.75 oz. 4 Light Single 1.5-1.75 oz. 1 3-4 oz. 2 6-8 oz. FROZEN DINNER 1 7-10 oz. 2 10-12 oz. PIZZA (1/12 of 15" pizza or 1/8 of 12" pizza each slice) 1 1 slice 2 2 slices 3 3 slices 4 4 slices 1 1 potato 2 2 potatoes 3 3-4 potatoes 1 2 slices 2 4 slices POPCORN BEVERAGE POTATO (6-8 oz. each) BACON Remarks Use one bag of microwave popcorn. Start with room temperature beverage. beverage before serving. Stir Follow box instruction for covering dinner and standing time. Place cold slice on microwave safe plate. Wash potatoes and prick with fork. Place on turntable in spokelike arrangement. Turn potato(es) over when signal sounds. Let stand 2-3 minutes after cooking. Arrange bacon slices on a plastic rack, in a utility dish or on several microwave safe paper towels. Cover with microwave safe paper towel. 9 1, 2, or 3 Stage Cooking Each cooking program can be set at a different time and power level. 1 Stage Cooking 1. Press TIME COOK. POWER, COOK, and I indicators light up. TIME indicator blinks. 2. Set cooking time (up to 99 minutes and 99 seconds) by pressing appropriate number pads. For example, to set 35 minutes press 3, 5, 0, 0 in sequence. Entered cooking time displays. START indicator light blinks. 3. Select cooking power level, if desired, by pressing COOKMATIC LEVEL (see chart below). If high power level is desired go to step 5. POWER indicator light blinks. Number Level Number Level 1 Warm 6 Simmer 2 Low 7 Med. High 3 Defrost 8 Reheat 4 Med. Low 9 Saute 5 Medium 10 High 4. Press appropriate number pad for desired Cookmatic level. Note: If power level is not selected before POWER indicator flashes 4 times, START indicator light blinks again. Follow steps 3 and 4 above to program Cookmatic level. 5. Press START. Oven operates and time counts down in display. 6. When cooking cycle is complete, signal sounds and "END" displays. Remove food from oven. 2 Stage Cooking 1. Set up first cooking program by following steps 14 of "1 Stage Cooking". 2. Press TIME COOK. 10, POWER, COOK, and II indicators light up. TIME indicator blinks. 3. Set second cooking time (up to 99 minutes and 99 seconds) by pressing appropriate number pads. Cooking time displays. START indicator light blinks. 4. Select cooking power level, if desired, by pressing COOKMATIC LEVEL. Power indicator light blinks. 5. Press appropriate number pad for desired Cookmatic level. 6. Press START. Oven operates and time counts down in display. Signal sounds between each cooking stage. 7. When cooking cycle is complete, signal sounds and "END" displays. Remove food from oven. 3 Stage Cooking 1. Repeat steps 1-5 of "2 Stage Cooking". 2. Repeat steps 2-6 of "2 Stage Cooking". 3. When cooking cycle is complete, signal sounds and "END" displays. Remove food from oven. Delay Start Delay Start programs oven to start at any desired time of day. Use to time start of 1, 2, or 3 stage cooking only. Important: Foods cooked by Delay Start should be very cold or frozen before placed in oven. Recommended foods include vegetables, fruit, smoked or frozen meats. Caution Avoid foods such as milk, eggs, cooked meats, poultry or fish, and any item containing uncooked yeast or baking powder when using Delay Start. 1. Program desired cooking time according to "1,2, or 3 Stage Cooking" above. 2. Press CLOCK/DELAY START. "0" displays. AUTO and START indicator lights blink. 3. Set desired start time of cooking by pressing appropriate number pads. Note: Times between 00:00 and 00:59 are impossible to set. 4. Press START. AUTO and START indicators light up. Time of day displays. At programmed time oven operates and completes cooking program entered. 5. When cooking cycle is complete, signal sounds and "END" displays. Remove food from oven. 10 Auto Accu-Thaw Defrost meat, fish, or poultry by weight. 1. Press ACCU-THAW. AUTO and DEF indicators light up. LBS indicator blinks. 2. Enter weight of meat, poultry, or fish to nearest tenth of a pound. (See chart at right.) Entered weight displays. Oven calculates cooking time automatically. For example, to defrost a 3 1/2 ounce turkey breast, press pad 2 for 0.2 tenths of a pound. To defrost a 4 pound, 5 ounce roast press 4, 3, 4 for 4 pounds, and 3 for 5 ounces. Food Item Maximum Weight Roasts, whole chicken, turkey breast 6 pounds chops, steaks, ribs, chicken and turkey pieces 4 pounds ground meat, stew meat, cornish hens, shrimp, scallops, whole fish, fish fillets and steaks 3 pounds 3. Press START. Time counts down in display. Note: Twice during defrosting time, oven signal sounds and "TURN" "OVER" "COVER" "EDGE" displays. Turn food over, rearrange or break apart at this time. If needed, shield food (see "Shield" on page 13). Close door and press START. 4. When cycle is complete signal sounds and "STAND" displays. Oven automatically calculates standing time. During standing time oven light and fan remain on. Turntable rotates. Oven power is off. When standing time is complete signal sounds and "END" displays. Remove food from oven. Ounces to Pounds Conversion Chart Programming Weight Food Weight Ounces Hundreths of a Pound Tenths of a Pound 0 to 1/2 0 to .05 0 1 to 2 .06 to .15 0.1 2-1/2 to 4 .16 to .25 0.2 4-1/2 to 5-1/2 .26 to .35 0.3 6 to 7 .36 to .45 0.4 7-1/2 to 8-1/2 .46 to .55 0.5 9 to 10 .56 to .65 0.6 10-1/2 to 12 .66 to .75 0.7 12-1/2 to 13-1/2 .76 to .85 0.8 14 to 15 1/2 .86 to .95 0.9 26 (1 lb, 10 oz) 1.63 1.6 64 (4 lbs.) 4 40 96 (6 lbs.) 6 60 11 Auto Reheat Auto Reheat allows user to reheat food listed in chart at right without having to select cooking times. All food must be precooked and at refrigerated temperature. 1. Press SELECT. The selected auto reheat item displays: • One press for a plate of food • Two presses for casserole servings • Three presses for soups/sauces • Four presses for vegetables AUTO, TIME and COOK indicators light up. START indicator flashes. 2. Press number pad for serving size (see chart at right). Selected serving size displays for two seconds followed by selected auto reheat item. 3. Press START. Selected serving size and auto reheat time counts down in display. 4. When cooking cycle is complete signal sounds and "END" displays. Remove food from oven. Category 1 2 3 4 Food Item Plate of food* Casserole (8 oz./serving) Soups/sauces (8 oz./serving) Vegetables (1/2 cup /serving) Allowed servings Remarks 1 Cover plate with wax paper. 1-4 Stir casseroles before serving. 1-4 Stir soups/ sauces before serving. 1-4 Stir vegetables before serving. *A typical plate of food consists of • 3-4 oz. meat • 1/2 cup starch (potatoes, pasta, rice, etc.) • 1/2 cup vegetable Hold/Timer Use this feature two ways: • As an independent timer without microwave • Holding food after defrosting with oven off for preset time followed by 1, 2, or 3 stage cooking Independent Timer 1. Press HOLD/TIMER. HOLD lights up. TIME indicator blinks. 2. Press numbers to set desired time. START blinks. 3. Press START. Display counts down set time. When timing cycle is complete "END" displays and signal sounds. Holding 1. Follow "Auto Accu-Thaw" steps 1-2. (See page 11 "Auto Accu-Thaw".) 2. Press HOLD/TIMER. HOLD indicator lights and TIME indicator blinks. 3. Press number pads for desired holding time after defrosting. 4. Follow steps 1-2 of "1 Stage Cooking" to set time. (See page 10, "1, 2, or 3 Stage Cooking".) 5. Press START. Oven starts and cycle time counts down in display. Note: Twice during Auto Accu-Thaw cycle, oven signal sounds and "TURN" "OVER" "COVER" "EDGE" displays. Turn food over, rearrange or break apart at this time. If needed, shield food (see "Shield" on page 13). Close door and press START. 6. When timing cycle is complete signal sounds and "END" displays. Remove food from oven. 12 Cooking Guide Microwave Cooking Techniques Many microwave cooking techniques are similar to those used in conventional cooking. Other techniques are necessary because of the unique way microwaves cook food. In microwaving, food should be arranged and handled to allow even exposure to microwave energy. Use the techniques described here for best microwave results. Stir foods such as casseroles and vegetables at intervals during microwaving to distribute heat evenly and speed cooking. Since food at the outside of dish absorb more energy, stir from outside to the center. Arrange unevenly-shaped foods such as chicken pieces or salmon steaks with the thicker, meatier parts toward the outside of the dish where they will receive more microwave energy. To prevent overcooking, place delicate areas of foods such as asparagus tips toward the inside of the dish to receive less microwave energy. Shield certain areas of food with small amounts of aluminum foil to prevent overcooking. Areas that may need shielding include quick-cooking parts of food such as the wing tips and leg ends of poultry, or areas that attract the most energy, such as the corners of square baking dishes. Turn over foods like pork chops or baking potatoes midway during the cooking time to expose all sides to equal amounts of microwave energy. Large foods such as roasts or whole cauliflower should also be turned over to promote even cooking. Let foods "stand" to complete cooking after they are removed from the oven. This is an important microwave technique that allows the center of foods such as cakes, whole vegetables and roasts to complete cooking without overcooking the outer areas. Large foods build up enough internal heat to continue cooking as they stand. The length of standing time depends on the density and surface area of the food. Place cooked food on a flat surface (counter top). Cover with foil or untensil lid for recommended time in this cooking guide. Effects of Food Characteristics on Microwave Cooking Piece size. Small pieces cook faster than large pieces. Pieces which are similar in size and shape cook more evenly. With large pieces of food, reduce the power setting for even cooking. Density of food. In both conventional and microwave cooking, dense foods, such as a potato, take longer to cook or heat than light, porous foods, such as a piece of cake, bread or a roll. Starting temperature. Foods taken from the freezer or refrigerator take longer to cook than foods at room temperature. Timings in our recipes are based on the temperatures at which foods are normally stored. Round shapes. Since microwaves penetrate food to about 1-inch from top, bottom and sides, round shapes and rings cook more evenly. Corners receive more energy and may overcook. This may also happen when cooking conventionally. Quantity of food. In both conventional and microwave cooking, small amounts usually take less time than large amounts. This is most apparent in microwave cooking where time is directly related to number of servings. Shape of food. In both conventional and microwave cooking, thin areas cook faster then thick areas. This can be controlled in microwaving by placing thick pieces near the outside edge, and thin pieces near the center. Delicacy. Foods with a delicate texture are best cooked at a lower power settings to avoid toughening. Natural moisture of food affects how it cooks. Very moist foods cook evenly because microwave energy is attracted to water molecules. Foods with uneven moisture should be covered or allowed to stand so heat can disperse evenly. 13 Heating Tips 1. When determining cycle time for a particular food, begin by using minimum time and check occasionally for doneness to avoid overcooking. 2. Small quantities of food or foods with low water content may burn or dry out and become hard if cooked too long. 3. Do not cook eggs in the shell. They may burst. 4. Foods with nonporous skin or membrane such as apples, potatoes or eggs should be pierced to prevent bursting when heated whole. 5. Do not pop popcorn in microwave oven unless in a special microwave popcorn accessory or unless popcorn is labeled for use in microwave ovens. 6. Do not use recycled paper products for cooking purposes in the microwave oven. 7. Do not use narrow neck bottles in the microwave oven. They may shatter. 8. Home canning in the microwave oven is not recommended. Harmful bacteria may not be destroyed. 9. Heating oil or fat for deep frying is not recommended. The hot fat could suddenly boil over, causing severe damage. Defrosting Tips 1. Freeze foods in a single layer, if possible, no larger than the size of the turntable. 2. If some areas of the foods thaw faster than others, cover with small pieces of aluminum foil to slow down or to stop the heating process. 3. It may be necessary to increase or decrease the cooking time in some recipes, depending on the starting temperature of the food. Browning Tips Some foods are cooked too quickly to brown in the microwave oven. For more eye appeal, these foods may need a color additive. Paprika, Coating mixes such as MICRO-SHAKE, SHAKE and BAKE, or browning sauces like KITCHEN BOUQUET, steak sauce and Worcestershire sauce may be used on chops, meat patties, or chicken parts. Roasts, poultry or ham cooked for 15 minutes or longer will brown on their own. Time Variations Cooking times given are approximate. Factors that may affect cooking time include starting temperature, volume, size of food, and utensils used. It is better to first undercook food than overcook. Time can always be added to properly cook recipes. 14 Microwave Utensil Guide ITEM USE COMMENTS Aluminum foil For shielding Small amounts or foil prevent overcooking of thin areas, edges and corners. Arcing may occur if too much foil is used or if it is less than 1-inch from oven walls. Browning dish Yes Check manufacturer's instructions for use and care. Do not preheat for more than 8 minutes. Ceramic, porcelain, stone ware Limited Dinnerware with metal trim or designs may cause arcing. Older dinnerware may not withstand the temperatures transferred from cooked foods. Check for microwave-safe labeling, or perform the "Microwave Utensil Test" below. Glass-ceramic Oven-glass Yes Excellent for cooking and heating. Most items are labeled "microwavesafe". Look for this when purchasing utensils. Glass jars, dishes No Most items can not withstand the temperature transferred from cooked foods. Breakage may occur. Paper bags No Do not use in microwave oven. May cause fire. Paper plates, cups Yes For short-term heating at low temperatures. Do not use recycled paper products; they may cause arcing or fire. Do not use wax coated paper products; the coating may melt. Paper towels, napkins Yes Use for short-term heating and covering, to absorb moisture and prevent spattering. Do not use recycled paper products; they may cause arcing or fire. Plastic cookware Yes Use only sturdy plastic products labeled "microwave-safe". Check manufacturer's directions for microwave uses. Plastic storage and food containers Limited Check manufacturer's directions for microwave uses of storage containers. Food containers such as margarine tubs are not designed to withstand the temperatures transferred from cooked foods, and may melt. Plastic wrap Yes Use only wrap labeled "microwave-safe". Use as a cover to hold in steam. Cover dish loosely, turning back one corner to vent steam. Avoid direct contact of wrap with food. Straw, wicker, wood Limited Use for short-term heating at low temperatures, such as for serving breads or rolls. Foam plates, cups Limited Use for short-term heating at low temperatures. Using at high temperatures or with foods high in fat will cause melting. Thermometers Yes Candy and meat thermometers labeled "microwave-safe" may be used in the microwave oven. Conventional candy and meat thermometers may be used to check temperatures after removing food from oven. Always check temperatures in several places in food. Waxed paper Yes Use as a cover to prevent spattering. Utensil Check Test Use the following test to check utensils for microwave safeness: 1. Place glass measuring cup of water next to empty dish to be tested in oven. 2. Heat on full power for one minute. 3. Check temperature of tested dish. If dish remains cool and water is hot, dish is microwave safe. If dish is slightly warm, use for short term cooking only. If dish is hot and water is cool, do not use. Dish remains cool if not absorbing microwaves and microwaves are being absorbed by water. Dish becomes hot if absorbing microwaves. 15 Heating or Reheating Guide • Directions below are for reheating already-cooked foods at refrigerator or room temperature. Always use microwave-safe ceramic, glass or plastic utensils. • Cover most foods (see tips) for fastest heating. Exceptions are rare or medium meats, some sandwiches, griddle foods like pancakes and baked foods. • Bubbling around edges of dish is normal, since center is last to heat. Suggested serving temperatures are given for most foods. Young children usually prefer cooler food, generally about 20°F lower. Adjust temperatures to personal taste. Stir foods before serving. • Be sure foods are heated through before serving. Steaming or bubbling around edges does not necessarily mean food is heated throughout. Stir food once or twice during heating, if possible, to ensure even, thorough heating. As a general rule, hot foods produce an area warm to the touch in center of underside of dish. Item Amount Suggested Serving Temp. Power Level Approx. Time (Min.) Saucy: such as meatballs, riblets, cocktail franks, etc. (3/4 cup/serving) 1 to 2 servings 3 to 4 servings 150°F (65°C) 150°F (65°C) HIGH (10) HIGH (10) 2 to 3 3 to 4 Dips: cream or process cheese 1/2 cup 1 cup 130°F (55°C) 130°F (55°C) MEDIUM (5) MEDIUM (5) 2 to 2 1/2 3 to 4 Pastry bites: small pizzas, egg rolls, etc. 2 to 4 servings 130°F (55°C) HIGH (10) 1 to 2 Appetizers Tip: Cover saucy appetizers with wax paper. Cover dips with plastic wrap. Do not cover pastry bites, or they will not be crisp. Meats and Main Dishes Thinly sliced roasted meat: Rare beef roast, minimum time; medium rare, maximum time, (3 to 4-oz./serving) 1 to 2 servings 3 to 4 servings 130°F-140°F (55°C-60°C) 130°F-140°F(55°C-60°C) MED-HIGH (7) MED-HIGH (7) 1 to 2 2 to 3 Well done: beef, pork, ham, poultry, etc. 1 to 2 servings 3 to 4 servings 150°F (65°C) 150°F (65°C) MED-HIGH (7) MED-HIGH (7) 1 to 2 1/2 3 to 4 Steaks, chops, ribs, other meat pieces: Rare beef steak 1 to 2 servings 3 to 4 servings 130°F (55°C) 130°F (55°C) MED-HIGH (7) MED-HIGH (7) 1 to 2 1/2 2 to 3 Well done beef, chops, ribs, etc. 1 to 2 servings 3 to 4 servings 150°F (65°C) 150°F (65°C) MED-HIGH (7) MED-HIGH (7) 2 to 2 1/2 2 to 4 Hamburgers or meatloaf, (4-oz./serving) 1 to 2 servings 3 to 4 servings 150°F-160°F (65°C-70°C) 150°F-160°F (65°C-70°C) HIGH (10) HIGH (10) 1 to 2 2 to 3 Chicken pieces, (6 to 8-oz./serving) 1 to 2 servings 3 to 4 servings 150°F (65°C) 150°F (65°C) HIGH (10) HIGH (10) 2 to 2 1/2 4 to 5 Hot dogs and sausages 1 to 2 servings 3 to 4 servings 130°F-140°F (55°F-60°C) 130°F-140°F (55°C-60°C) HIGH (10) HIGH (10) 3/4 to 1 1 to 2 Breakfast sausage links 4 130°F-140°F (55°C-60°C) HIGH (10) 1 to 2 Rice and pasta (2/3-3/4 cup/serving) Topped or mixed with sauce (2/3-3/4 cup/serving) 1 to 2 servings 150°F (65°C) HIGH (10) 1 to 2 1 to 2 servings 3 to 4 servings 150°F-160°F (65°C-70°C) 150°F-160°F (65°C-70°C) HIGH (10) HIGH (10) 2 to 5 4 to 5 MED-HIGH (7) MED-HIGH (7) 3/4 to 2 1 to 3 Tip: Cover main dishes and meats with waxed paper. Do not cover rare or medium rare meat. Sandwiches Moist filling: Sloppy joe, barbecue, ham salad, etc. in bun (1/3 cup/serving) 1 to 2 servings 3 to 4 servings 130°F-140°F (55°F-60°C) 130°F-140°F (55°F-60°C) 16 Item Amount . Power Level Approx. Time (Min.) Baked Goods Cake, coffee cake, doughnuts, sweet rolls, nut or fruit bread 1 piece 2 pieces 4 pieces 9-inch cake or 12 rolls or doughnuts DEFROST (3) DEFROST (3) DEFROST (3) DEFROST (3) 1/4 to 1 1/2 to 1 1/2 1 to 2 1 to 3 Dinner rolls, muffins 1 2 4 6 to 8 MED-HIGH (7) MED-HIGH (7) MED-HIGH (7) MED-HIGH (7) 1/4 to 1/2 1/4 to 3/4 1/2 to 1 1/2 to 1 1/2 Pie: fruit, nut or custard 1/8 of 9-inch pie=1 slice (use minimum time for custard) 1 slice 2 slices 4 slices 9-inch pie HIGH (10) HIGH (10) MED-HIGH (7) MED-HIGH (7) 1/4 to 1/2 1/4 TO 3/4 1 to 2 2 to 4 2 to 3 pieces 2 to 3 pieces 2 to 3 pieces HIGH (10) HIGH (10) HIGH (10) 1 to 2 1 1/2 to 2 1/2 1 1/2 to 2 1/2 Tip: Do not cover baked goods. Griddle Foods Pancakes, French toast or waffles (3" x 4") Plain, no topping Syrup and butter With 2 sausage patties (cooked) Tip: Do not cover griddle foods. Defrosting Guide • Use the guide below as a guide for freezing and defrosting specific items when using Auto Accu-Thaw. The chart on page 11 lists the recommended maximum weight for a variety of items. • Before freezing food, check chart below for best freezing method. Most foods should be frozen in a single layer. Giblets in whole poultry should be removed before freezing. • Unwrap food before defrosting. If it is difficult to remove plastic grocery store tray, it may be removed after the first stage of the defrost time. Place food on a microwave-safe rack, plate or shallow dish. • Check chart below for best defrosting method. Some foods should be separated after the first stage. Cover defrosted or warm areas with small strips of aluminum foil. Foil will prevent microwaves from cooking food. Item Freezing Method Defrosting Method Roasts, boneless or bone-in Short-term: store wrap Long-term: heavy-duty zip-top plastic freezer bags or freezer paper. Remove packaging. Place on plate. Cover warm or defrosted areas with foil after each stage. If center is still icy after 5 minute stand time, place in refrigerator until fully defrosted. Chops, Steaks, Ribs, Hamburger, Patties Freeze in a shape no larger than the turntable. Short-term: store wrap Long-term: heavy-duty zip-top plastic freezer bags or freezer paper. For best results freeze in single layer slightly overlapping if necessary. Ground Meat, Stew Meat Short-term: store wrap Long-term: heavy-duty zip-top plastic freezer bags or freezer paper. Beef, Pork, Lamb, Veal Poultry Whole chicken or duck Remove giblets before freezing. Wrap in heavyduty zip-top plastic freezer bag or freezer paper. 17 Remove packaging. Place on plate. Remove defrosted areas after each stage. Cover warm areas with foil after each stage. Remove packaging. Place on plate. Remove defrosted areas after each stage. Separate pieces and cover warm areas with foil. Remove packaging. Place on plate. Cover defrosted or warm areas with foil after each stage. If still icy after stand time, rinse with cool water to fully defrost. Item Freezing Method Defrosting Method Chicken or Turkey Pieces Freeze in shape no larger than turntable. Short-term: store wrap Long-term: heavy-duty zip-top plastic freezer bag or freezer paper. For best results freeze in a single layer, slightly overlapping if necessary. Remove packaging. Place on plate. Separate pieces and cover warm or defrosted areas with foil after each stage. If still icy after stand time, rinse with cool water to fully defrost. Whole Cornish Hens For best results, remove giblets before freezing. Short-term: store wrap Long-term: heavy-duty zip-top plastic freezer bag or freezer paper. Remove packaging. Place hen(s) on plate. Cover defrosted or warm areas with foil after each stage. If giblets were not removed before freezing, rinse cavity with cool water to remove. Turkey Breast Short-term: store wrap Long-term: heavy-duty zip-top plastic freezer bag or freezer paper. Remove packaging. Place on plate. Cover defrosted or warm areas with foil after each stage. If still icy after stand time, rinse with cool water to fully defrost. Fish and Seafood Whole Fish, Fillets and Steaks Freeze in shape no larger than turntable. Short-term: store wrap Long-term: heavy-duty zip-top plastic freezer bag or freezer paper. For best results freeze in a single layer, slightly overlapping if necessary. Shrimp and Scallops Freeze in a shape no larger than the turntable. Short-term: store wrap Long-term: heavy-duty zip-top plastic freezer bag or freezer paper. For best results freeze in a single layer, slightly overlapping if necessary. Remove packaging. Place on plate. Separate pieces and cover warm or defrosted areas with foil after each stage. If still icy after stand time, rinse with cool water to fully defrost. Remove packaging. Place on plate. Separate pieces and cover warm or defrosted areas with foil after each stage. If still icy after stand time, rinse with cool water to fully defrost. Total Defrosting Time (Min.) Power Level Method Bread or buns (1-lb) 4 to 8 DEFROST (3) Remove metal twist tie if necessary. Let stand 2 to 4 minutes. Heat and serve rolls (7 oz. pkg.) 1 1/2 to 3 DEFROST (3) Remove metal twist tie if necessary. Coffee Cake (11 to 14 3/4-oz.) 3 to 6 DEFROST (3) Remove from foil pan if necessary. Coffee ring (10-oz. pkg.) 2 to 4 DEFROST (3) Remove from foil pan if necessary. Sweet Rolls (8 3/4 oz. to 12 oz.) 3/4 to 4 DEFROST (3) Remove from foil pan if necessary. Doughnuts (1 to 4) 1/2 to 2 DEFROST (3) Arrange on paper towel. Doughnuts, glazed (1 box of 8 large) 2 to 4 DEFROST (3) Arrange on paper towel. French Toast (2 slices) 1 to 2 1/2 DEFROST (3) Arrange on paper towel. Let stand 2 min. Cake, Bundt type (24 oz.) 3 to 6 DEFROST (3) Let stand 10 to 20 minutes. Cake, frosted 2-3 layer (18 oz.) 2 to 5 DEFROST (3) Let stand 10 to 20 minutes Cake, filled or topped 1 layer (12 1/ 2 to 18-oz.) 2 to 5 DEFROST (3) Remove from foil pan if necessary. Let stand 10 minutes. Pound cake (12 oz.) 3 to 5 DEFROST (3) Remove from foil pan if necessary. Let stand 10 minutes. Item Breads, Cakes 18 Item Total Defrosting Time (Min.) Power Level Method Cheesecake, plain or fruit top (17 to 19-oz.) 5 to 9 DEFROST (3) Remove from foil pan if necessary. Let stand 20 to 30 minutes. Crunch cakes and cupcakes 1/2 to 1 minute each DEFROST (3) Arrange on paper towel. Fruit or nut pie (8-in.) 5 to 8 DEFROST (3) Remove from foil pan if necessary. Let stand 10 minutes. Cream or custard pie (14 to 23 oz.) 6 to 13 DEFROST (3) Remove from foil pan in necessary. Let stand 20 to 30 minutes. Box (10 to 16 oz.) 7 to 10 DEFROST (3) Remove foil or metal if necessary. Place package in bowl. After minimum time, break up with fork. Plastic pouch (10-oz. pkg.) 4 to 7 DEFROST (3) Place package in oven. Flex package once. Fruits Freezer to Table Frozen Foods Guide Food Container Defrost Time(Min.) Hold Time(Min.) Power Level Cooking Time(Min.) Comments Meatballs, raw 1 lb. ground meat (12, 1 3/4-inch meatballs) 9 or 10-inch microwave- safe plate 5 to 8 5 HIGH (10) 4 to 7 Arrange in circle on plate, cover loosely with plastic wrap. Rearrange halfway through time. For precooked meatballs reduce each time period by 2 minutes. Meatloaf, raw 1 1/2 lbs. ground meat 1 1/2 qt. microwave-safe ring mold or 8x4-inch loaf pan 20 to 25 15 MED-HIGH (7) 25 to 30 Cover with plastic wrap. If precooked, add 1/2 cup water and reduce cooking time by 10 minutes. 2-qt. microwave-safe casserole 14-16 oz. microwave-safe bowl 22 to 28 none HIGH (10) 14 to 18 4 to 7 5 HIGH (10) 3 to 4 Cover with lid or plastic wrap. Break up and stir while defrosting and cooking. Freeze food in flat oblong casseroles for fastest heating. 1-qt. casserole 2-qt. casserole 18 to 23 20 to 25 15 20 MED-HIGH (7) MED-HIGH (7) 8 to 12 15 to 22 Saucy Casseroles 1 1/2-quart 8 oz. Soup Cover. Break up and stir while defrosting and cooking to speed heating. Cooking Guide Meat • Always use microwave-safe ceramic, glass or plastic utensils. • Place meat on microwave-safe roasting rack in microwave-safe cooking dish. • Start meat fat side down. Shield any bone tips, thin meat areas or portions that are starting to overcook with 3-inch wide strips of foil. • Check temperatures in several places, before recommended stand time. 19 Total Cooking Time (Min./Lb.) Power Level Method Roast, boneless up to 4 lbs. Rare (130°F): 7 to 10 Med (140°F): 8 to 12 Well (160°F): 9 to 14 HIGH (10) for first 5 min. of total time, then MEDIUM (5) Place roast, fat-side down, on roasting rack. Microwave, turning over after half the time. Let stand, covered with aluminum foil, 10 minutes. 4.1 to 6 lbs. Rare (130°F): 7 to 10 Med (140°F): 9 to 12 Well (160°F): 14 to 16 HIGH (10) for first 8 min. of total time, then MEDIUM (5) Same as above. Roast, bone-in up to 4 lbs. Rare (130°F): 6 to 10 Med (140°F): 7 to 12 Well (160°F): 14 to 16 HIGH (10) for first 5 min. of total time, then MEDIUM (5) Same as above. 4.1 to 6 lbs. Rare (130°F): 6 to 10 Med (140°F): 7 to 12 Well (160°F): 14 to 16 HIGH (10) for first 8 min. of total time, then MEDIUM (5) Same as above. Chuck Roast, up to 6 lbs. 25 to 35 MEDIUM (5) Place roast in baking dish or 3-quart casserole. Add 1/4 cup desired liquid and seasonings. Cover. Microwave, turning over after half the time. Let stand 10 minutes. Hamburger Patties, 1/4 lb. each, 1/2-inch thick 2 patties 4 patties 1 to 2 3 to 6 HIGH (10) HIGH (10) Arrange patties on roasting rack. Microwave to desired doneness, turning over after half the time. Let stand 1 to 2 minutes. Well (170°F): 10 to 14 HIGH (10) for first 5 min. of total time, then MEDIUM (5) Place roast, fat-side down, on roasting rack. Microwave, turning over after half the time. Let stand, covered with aluminum foil, 10 minutes. Ham, canned 1 lb. 3 to 5 lbs. (130°F): 15 to 19 (130°F): 10 to 15 MEDIUM (5) Remove packaging. Place ham in baking dish. Cover dish loosely with plastic wrap. Microwave, turning over after half the time. Let stand 5 minutes. rolled boneless up to 5 lbs. (130°F): 13 to 18 MEDIUM (5) Remove packaging. Place ham in baking dish. Cover dish loosely with plastic wrap. Microwave, turning over after half the time. Let stand 5 minutes. Bacon 2 slices 4 slices 8 slices 2 to 2 1/2 3 to 3 1/2 6 1/2 to 8 HIGH (10) Arrange bacon on roasting rack or paper towel lined dish. Cover with paper towel. Microwave until crisp. Item Beef Pork Roast, boneless or bone-in up to 6 lbs. Poultry • Always use microwave-safe ceramic, glass or plastic utensils. • Place poultry on microwave-safe roasting rack in microwave-safe cooking dish. • Cover poultry with wax paper to prevent spattering. • Shield bone tips, thin areas or portions that are starting to overcook with 3-inch wide strips or foil. • Check temperatures, in several places, before recommended stand time. Item Total Cooking Time (Min./Lb.) Power Level Method Chicken whole up to 6 lbs. 8 to 12 (180°-185°F) MED-HIGH (7) Place chicken, breast-side down, on roasting rack. Microwave until meat near bone is no longer pink and juices run clear, turning over after half the time. Let stand, covered with aluminum foil, 5 to 10 minutes. pieces up to 3 lbs. 6 to 9 Dark meat (180°F-185°F) Light meat (170°F) HIGH (10) Arrange chicken, bone-side down, in dish. Microwave until meat near bone is no longer pink and juices run clear, rearranging and turning over after half the time. Let stand, covered with aluminum foil, 5 to 10 minutes. 20 Total Cooking Time (Min./Lb.) Power Level Method 5 to 9 (180°-185°F) HIGH (10) Arrange hen(s), breast-side down, in dish. Microwave until meat near bone is no longer pink and juices run clear, turning hens over after half the time and draining juices as necessary. Let stand, covered with aluminum foil, 5 to 10 minutes. 5 to 9 (180°-180°F) HIGH (10) for first 10 min. of total time, then MEDIUM (5) Place duckling, breast-side down, on roasting rack. Microwave for 10 min. as directed. Turn duckling over. Microwave at MEDIUM (5) until meat near bone is no longer pink and juices run clear, draining juices 2 or 3 times. Let stand, covered with aluminum foil, 5 to 10 minutes. Turkey whole 8 to 10 lbs. 10 to 17 (180°-185°F) HIGH (10) for first 10 min. or total time, then MEDIUM (5) Place turkey, breast-side down, in baking dish. Microwave for 1/4 of total time. Turn turkey over. Microwave for second 1/4 of total time. Turn turkey over again. Microwave for third 1/4 of total time. Turn turkey breast-side up. Microwave until meat near bone is no longer pink and juices run clear. Let stand, covered with aluminum foil, 15 to 30 minutes. pieces up to 3 lbs. 10 to 15 (180°-185°F) HIGH (10) for first 5 min. of total time, then MEDIUM (5) Arrange turkey, bone-side up, on roasting rack. Microwave until meat near bone is no longer pink and juices run clear, rearranging 2 times and turning over after half the time. Let stand, covered with aluminum foil, 5 to 10 minutes. breast up to 6 lbs. 10 to 16 (170°F) HIGH (10) for first 5 min. of total time, then MEDIUM (5) Place turkey breast, skin-side down, in baking dish. Microwave until meat is no longer pink and juices run clear, turning over after half the time. Let stand, covered with aluminum foil, 10 to 15 minutes. Item Cornish Hen(s) whole up to 5 lbs. Duckling whole up to 6 lbs. Fish and Seafood • Fish is done when it flakes easily with a fork. Center may still be slightly translucent, but will continue cooking as fish stands a few minutes after cooking. • Place fish on microwave-safe roasting rack in microwave-safe cooking dish. • Cook fish with or without sauce. A tight cover steams fish, or use a lighter cover of wax paper or paper towel for less steaming. • Do not overcook fish. Check at minimum time. Total Cooking Time (Min/Lb) Power Level Method 7 to 9 MEDIUM (5) Place fish on roasting rack. Microwave until fish flakes easily with fork, turning over and rearranging after half the time. Let stand 3 to 5 minutes. steaks up to 3 lbs. 8 to 12 MEDIUM (5) Arrange steaks on roasting rack with meaty portions toward outside of rack. Cover rack with wax paper. Microwave until fish flakes easily with fork, turning over and rearranging after half the time. Let stand 3 to 5 minutes. fillets up to 3 lbs. 3 to 7 HIGH (10) Arrange fillets in baking dish. Cover dish with wax paper. Microwave until fish flakes easily with fork, turning over and rearranging after half the time. Let stand 2 to 3 minutes. Scallops up to 3 lbs. 3 to 7 HIGH (10) Arrange seafood in baking dish. Cover dish with wax paper, Microwave until firm and opaque, stirring 2 to 3 times. Let stand 5 minutes. 3 to 5 HIGH (10) Same as above. Item Fish whole up to 3 lbs. Shrimp up to 3 lbs. 21 Eggs • Always pierce whole yolks before microwaving to prevent bursting. • Never cook eggs in the shell, and do not reheat in-shell cooked eggs. They could explode. • Cook eggs just until set, they are delicate and can toughen if overcooked. Scrambled Eggs Egg(s) Butter Milk/Water Egg Cooking Time (Min.) Method 1 2 4 8 1 teaspoon 2 teaspoons 1 tablespoon 2 tablespoons 1 tablespoon 1 tablespoon 2 tablespoons 1/4 cup 1/2 to 1 1 to 1 1/4 2 to 3 3 to 4 1/4 Place butter in small bowl or casserole. Microwave at HIGH (10) for 20 to 60 seconds, or until butter melts. Add egg(s) and milk. Beat until well blended. Microwave at HIGH (10) as directed or until eggs are set yet moist, stirring 3 or 4 times. Let stand 2 to 3 minutes. (Eggs will finish cooking during standing.) Hard Cooked Eggs (use chopped in salads and sandwich fillings) Egg(s) Egg Cooking Time(Min.) Method 1 2 4 3/4 to 1 1/4 1 to 2 1/2 3 to 4 1/2 Use a 6-oz. custard cup for each egg. Break 1 egg into each cup. Pierce yolk(s) 2 times with a toothpick. Cover cup(s) with plastic wrap. Microwave at MEDIUM (5) as directed, or until whites are opaque and yolks are almost set, rearranging cups once. Let stand 2 to 3 minutes. (Eggs will finish cooking during standing.) Chill before chopping. Pasta and Rice • Always use microwave-safe ceramic, glass or plastic utensils. • For pasta use about half the amount of hot tap water required for conventional boiling, there is less evaporation in a microwave oven. Add recommended amount of salt, if desired and vegetable oil (optional, to prevent sticking). • For rice use same or slightly more water as with conventional boiling. Add recommended amount of salt, if desired. Method Hot Vegetable Salt Cooking Power Item Water Oil (Optional) Time(Min.) Level (Optional) Eggs Noodles, 8 oz. (about 4 1/2 cups) Yield: 5 cups Elbow Macaroni, 8 oz. (about 1 1/2 cups) Yield: 4 cups Small Shell Macaroni, 8 oz. (about 3 1/4 cups) Yield: 4 cups Spaghetti 8 oz. Yield: 4 cups Rice, long grain, 1 cup Yield: 3 cups 6 cups 1 Tbsp. 1 tsp. 17 to 23 HIGH (10) In 3-quart casserole, combine water, oil and salt. Cover. Microwave 10-15 minutes, or until boiling. Stir. Add noodles. Stir. Microwave 7-8 minutes, or until tender, stirring once. Rinse and drain. 6 cups 1 Tbsp. 1 tsp. 17 to 24 HIGH (10) In 3-quart casserole, combine water, oil and salt. Cover. Microwave for 10-15 minutes, or until boiling. Stir. Add macaroni. Stir. Microwave 79 minutes, or until tender, stirring once. Rinse and drain. 6 cups 1 Tbsp. 1 tsp. 17 to 24 HIGH (10) Same as above. 6 cups 1 Tbsp. 1 tsp. 18 to 25 HIGH (10) In 3-quart casserole, combine water, oil and salt. Cover. Microwave 10 to 15 minutes, or until boiling. Stir. Add spaghetti. Stir. Microwave 8 to 10 minutes, or until tender, stirring once. 1 tsp. 20 to 25 HIGH(10) first 5 min., then MEDIUM(5) 15-20 min. In 2-quart casserole, combine rice, water, salt and 2 teaspoons butter or margarine. Cover. Microwave until rice is tender and liquid is absorbed. Let stand 5 minutes. Fluff with fork. 2 cups 22 Cereal • Always use microwave-safe ceramic, glass or plastic utensils. Use large enough container to avoid spillover. • Start with hot tap water to shorten cooking time. • Do not cover (prevents spillover). Cooking Item/ Bowl Cereal Salt Hot Method Time At Servings Size (Optional) Water High(10)(Min.) Farina quick regular Grits quick Oats quick regular 1 2 4 1 qt. 2 qt. 3 qt. 2 1/2 Tbsp. 1/3 cup 2/3 cup 1/8 tsp. 1/4 tsp. 1/2 tsp. 3/4 cup 1 1/3 cups 3 1/2 cups 1/2 to 2 1 to 3 3 to 6 In bowl, combine cereal and salt. Stir in water. Microwave, stirring once. Stir before serving. 1 2 4 1 qt. 2 qt. 3 qt. 2 1/2 Tbsp. 1/3 cup 2/3 cup 1/8 tsp. 1/4 tsp. 1/2 tsp. 1 cup 1 3/4 cups 3 1/2 cups 2 to 4 3 1/2 to 5 7 to 11 In bowl, combine cereal and salt. Stir in water. Microwave, stirring 2 to 3 times. Stir before serving. 1 2 4 1 qt. 2 qt. 3 qt. 4 1/2 Tbsp. 9 Tbsp. 1 1/4 cups 1/8 tsp. 1/4 tsp. 1/4 tsp. 1/2 cup 1 cup 2 cups 1/2 to 1 1/2 2 to 4 3 to 7 In bowl, combine grits and salt. Stir in water. Microwave, stirring 2 or 3 times before serving. 1 2 4 1 qt. 1 1/2 qt. 2 qt. 1/3 cup 2/3 cup 1 1/3 cup 1/4 tsp. 1/2 tsp. 3/4 tsp. 3/4 cup 1 1/2 cups 3 cups 1/2 to 2 2 1/2 to 4 1/2 4 to 7 In bowl, combine oats and salt. Stir in water. Microwave, stirring once. Stir before serving. 1 2 4 1 qt. 2 qt. 3 qt. 1/3 cup 2/3 cup 1 1/3 cup 1/8 tsp. 1/4 tsp. 1/2 tsp. 1 cup 1 1/2 cups 3 cups 1 1/2 to 3 3 to 5 5 to 7 In bowl, combine oats and salt. Stir in water. Microwave; stirring after 2 minutes, then 1 or 2 times. Stir before serving. Vegetables Item Total Cooking Time (Min/Lb.) Power Level Method Acorn Squash, 1 to 1 1/2 lbs. each 1 2 6 to 11 8 to 16 HIGH (10) Pierce each squash at least once with knife. Microwave until tender, turning over once. Let stand 6 minutes. Cut in half. Remove pulp and seeds. Asparagus, fresh, 1 lb. 5 to 7 HIGH (10) Arrange in baking dish with tips toward center of dish. Add 1/4 cup water. Cover dish with plastic wrap. Microwave until tender, rearranging once. Let stand 3 minutes. Beans, green, fresh, 1 lb. 7 to 11 HIGH (10) Trim and discard ends of beans. In 1 1/2-quart casserole, combine beans and 1/4 cup water. Cover. Microwave until tender, turning over once. Let stand 3 minutes. Beets, fresh, 1 lb. 12 to 18 HIGH (10) Trim and discard leaves. In 1 1/2-quart casserole, combine beets and 1/2 cup water. Cover. Microwave until tender, turning over once. Let stand 3 minutes. Peel and trim ends of beets. 7 to 9 HIGH (10) Trim and discard tough ends of spears. Arrange broccoli in baking dish with flowerets toward center of dish. Add 1/4 cup water. Cover dish with plastic wrap. Microwave until tender, rearranging once. Let stand 3 minutes. 6 to 8 HIGH (10) In 1 1/2-quart casserole, combine sprouts and 1/4 cup water. Cover. Microwave until tender, stirring once. Let stand 3 minutes. 12 to 15 HIGH (10) In 2-quart casserole, combine cabbage and 2 tablespoons water. Cover. Microwave until tender, stirring once. Let stand 3 minutes. Broccoli Spears, fresh, 1 to 1 1/2 lbs. Brussels Sprouts, fresh 1 lb Cabbage, chopped, 1 1/2 lbs. 23 Total Cooking Time (Min./Lb.) Power Level Method 12 to 14 HIGH (10) Arrange cabbage in baking dish. Add 1/4 cup water. Cover dish with plastic wrap. Microwave until tender, rearranging cabbage once. Let stand 3 minutes. 8 to 12 HIGH (10) Cauliflower, fresh, flowerets, 1 1/2 lbs. In 1-quart casserole, combine carrots and 2 tablespoons water. Cover. Microwave until tender, stirring once. Let stand 3 minutes. 7 to 12 HIGH (10) whole 1 to 1 1/2 lbs In 2-quart casserole, combine carrots and 2 tablespoons water. Cover. Microwave until tender, stirring 2 times. Let stand 3 minutes. 9 to 13 HIGH (10) Trim and discard leaves and stem. Place cauliflower, cored-side up, on plate. Cover with plastic wrap. Microwave until tender, turning over after half the time. Let stand 3 minutes. Item Cabbage, wedges, 1 to 1 1/2 lbs. Carrots, sliced, 1 lb. Corn, on cob fresh, 7 to 8 oz. each 2 4 5 to 8 8 to 13 HIGH (10) frozen large ears 2 4 Husk corn. Arrange in baking dish. Add 2 tablespoons water. Cover dish with plastic wrap. Microwave until tender, turning over and rearranging once. Let stand 3 minutes. 5 to 8 8 to 13 HIGH (10) Arrange in baking dish. Add 2 tablespoons water. Cover dish with plastic wrap. Microwave until tender, turning over and rearranging once. Let stand 3 minutes. small ears 2 4 4 to 5 6 to 7 HIGH (10) Same as above. 5 to 7 HIGH (10) In 1-quart casserole, combine mushrooms and 3 tablespoons butter. Cover. Microwave until tender, stirring once. Let stand 3 minutes. Peas, green, fresh, shelled, 2 cups 5 to 7 HIGH (10) In 1-qt. casserole, combine peas and 1/4 cup water. Cover. Microwave until tender, stirring once. Let stand 3 minutes. Potatoes, white, 6 to 8 oz. each 1 2 4 4 to 5 7 to 8 10 to 12 HIGH (10) Prick each potato several times with fork. Arrange in spoke-like fashion on paper towels. Microwave until tender, turning over once. Let stand 5 minutes. new, 1 1/2 to 2 lbs. 6 to 12 HIGH (10) Prick each potato several times with fork. In 2-quart casserole, combine potatoes and 3 tablespoons water. Cover. Microwave until tender, stirring once. Let stand 3 minutes. Spinach, fresh, 1 lb. 5 to 9 HIGH (10) Wash and trim spinach. Place in 3-quart casserole. Cover. Microwave until tender, stirring once. Let stand 3 minutes. Sweet Potatoes or Yams, 5 to 7 oz each 1 2 3 4 3 1/2 to 5 5 to 7 7 to 9 9 to 12 HIGH (10) Prick each potato several times with fork. Arrange in spoke-like fashion on paper towels. Microwave until tender, turning over once. Let stand 3 minutes. Zucchini, sliced, 1 lb. 8 to 12 HIGH (10) In 2-quart casserole, combine zucchini and 2 tablespoons water. Cover. Microwave until tender, stirring 2 times. Let stand 3 minutes. Vegetables, canned, 15 to 17 oz. 3 to 5 HIGH (10) Place undrained vegetables in 1-quart casserole. Cover. Microwave until heated through, stirring once. frozen, 8 to 12 oz. 5 to 9 HIGH (10) In 1-quart casserole, combine vegetables and 2 tablespoons water. Cover. Microwave until heated through, stirring once. Let stand 3 minutes. Mushrooms, whole, sliced 1 lb. 24 Cakes and Desserts • Always use microwave-safe ceramic, glass or plastic utensils. • Before adding measured amount of batter, grease bottoms and sides of dishes, but do not flour. Or, for easy removal, line dish with wax paper or paper towel. • Cakes are done when toothpick or long skewer stuck in center comes out clean. • Crust on cakes will be soft. Refrigerate cake if firm exterior is desired for frosting. Item Total Cooking Time (Min.) Power Level Method Ring Cake, fluted, 10 to 12 cups 10 to 13 MEDIUM (5) for first 8 min., then HIGH (10) 2 to 5 min. Microwave until edges begin to pull away from sides and skewer inserted in center comes out clean. Let stand 10 min. Invert onto serving plate. 11 to 13 MEDIUM-LOW (4) for first 9 min., then MED-HIGH (7) 2 to 4 min. Microwave one layer at a time, until edges begin to pull away from sides and center springs back when touched lightly. Let stand 5 to 10 min. Invert onto serving plate. 20 to 30 seconds per cupcake HIGH (10) Fill cups half to two-thirds full of batter. Microwave until centers spring back when touched lightly. Let stand 3 to 5 min. Brownies, 8-inch square 10 to 12 MEDIUM (5) for first 6 min. then HIGH (10) 4 to 6 minutes. Place dish on saucer in oven. Microwave until edges begin to pull away from sides and toothpick inserted in corner comes out clean. Cool. Single Pie Crust 3 to 6 HIGH (10) Thoroughly prick bottom and sides with fork. Microwave until dry and opaque. Cool. Frozen Pie Crust, deep dish 4 to 7 MEDIUM (5) to thaw, HIGH (10) to cook Remove packaging. Transfer crust to glass pie plate. Microwave 30 to 60 seconds. Let stand 2 to 3 minutes to finish thawing. Thoroughly prick bottom and sides with fork. Increase power to HIGH (10). Microwave 3 to 6 minutes, or until dry and opaque. Cool. Crumb Crust 1 to 3 HIGH (10) Microwave until set. Cool. Total Cooking Time (Min.) Power Level Method 20 to 35 seconds per muffin MED-HIGH (7) For best shape use microwave muffin pan or make reusable "homemade muffin cups" by cutting down paper hot drink cups. Check for doneness at minimum time. Rich thick batters may take longest time. 11 to 13 MEDIUM (5) for first 8 min. then HIGH (10) 3 to 5 min. Prepare according to recipe, or package directions. Toothpick inserted in center should come out clean. Top surface will look glossy and will set during standing time of about 15 minutes. 11 to 13 MEDIUM (5) Same as above. 6 to 8 MED-HIGH (7) Same as above. Let stand 2 to 5 minutes. 1/2 to 1 5 to 7 HIGH (10) and MEDIUM (5) Microwave topping 1/2 to 1 minute at high. Add biscuits and microwave 5 to 7 minutes at medium until biscuits spring back when lightly touched. Cake Layer, Two 8-inch rounds Cupcakes, up to 6 at a time Breads Item Muffins, up to 6 at a time. Note: Do not use foil liners. Quick Breads, scratch and from a mix 8-inch loaf Coffee Cakes, scratch and from a mix 8-inch round square Cornbread, 8-inch square Coffee Cakes, from refrigerated biscuits 8-inch round 25 Care and Cleaning Interior, Exterior and Door Discharge Air Vents If walls, floor, and door of microwave oven become splattered, wipe with paper towel or clean with mild detergent in warm water using soft sponge or cloth. Wring sponge or cloth to remove excess water before wiping oven. If desired, boil a cup of water in microwave oven to loosen soil before cleaning. • Do not use cleaners containing ammonia. These could damage finish. • Never pour water into microwave oven bottom. • Do not use water pressure type cleaning systems. There will be a slight buildup of cooking vapors along discharge louvers in back of oven on right side. Clean air vent with damp cloth and dry thoroughly. Glass Tray Wipe up spills immediately. Wipe with damp cloth. To clean more thoroughly remove tray from oven. Wash carefully in warm sudsy water, rinse, and dry thoroughly. Tray is heavy and can be broken if dropped. Before Calling for Service If microwave oven does not operate: • Confirm oven is plugged into dedicated circuit. • Confirm oven is on grounded circuit. • Check fuse or circuit breaker. Determine if circuit is operable by plugging another item in outlet. • Confirm door is securely closed. If oven operates, but will not heat food: • Place one cup cool water in oven. Heat for one minute. If water temperature does not rise, oven is operating incorrectly. Note: Oven light must be changed by authorized servicer. If oven operates intermittently: • Check inlet and discharge areas for obstructions. • Confirm oven was not operated empty or with metal utensils. WARNING To avoid electrical shock, personal injury or death, do not remove outer case at any time. Only authorized servicer should remove outer case. If removed by another person, warranty is void. Warranty service must be performed by an authorized Amana servicer if service is required. To locate an authorized Amana servicer, call 1-800-NAT-LSVC (1-800-628-5782). If outside U.S.A. call 1-319-622-5511. When contacting us, provide product information including model and serial numbers and date of purchase. Model and serial numbers are located on appliance nameplate on left interior oven wall. For questions concerning product usage, installation, or warranty call for consumer information at 1-800-8430304. If outside U.S.A. call 1-319-622-5511. 26 27 Asure Extended Service Plan Amana is pleased to offer long-term service protection on this new microwave oven. Asure Extended Service Plan is specially designed to supplement Amana's strong warranty. Asure provides budget-protecting coverage on microwave oven for up to five full years and includes parts, labor and travel charges. A participating Amana dealer has details or contact: Amana Refrigeration, Inc. Consumer Affairs Department Amana, IA 52204 1-800-843-0304 1994 Amana Refrigeration, Inc. Amana, Iowa 52204 Part No. C8940835 Printed in U.S.A. 28