1
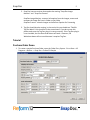
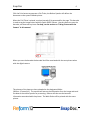
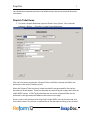
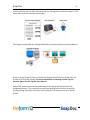
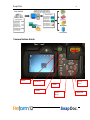
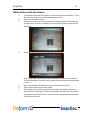
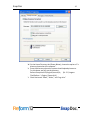
Reform To Snap Doc
11/04/09
Snap Doc
2
Contents
About the Snapdoc Plugin .....................................................................................................3
System Requirements ...........................................................................................................3
Hardware Requirements .......................................................................................................3
Installation ............................................................................................................................4
Plugin Registration and Licensing ..........................................................................................4
Starting the Required Services...............................................................................................4
Tutorial .................................................................................................................................5
Purchase Order Demo ...........................................................................................................5
Dispatch Ticket Demo............................................................................................................7
Camera Button Guide.....................................................................................................……..9
Taking Pictures with the Camera .........................................................................................10
Uploading Pictures with the Camera ...................................................................................11
How to obtain your IP Address ............................................................................................12
How to Change Folder Permissions .....................................................................................13
Camera Wireless FTP File Transfer Setup.............................................................................13
Snap Doc
3
About the Snapdoc Plugin
Snapdoc simplifies the process of accurately identifying pictures and automatically
distributing to printers, fax, email, and archive systems. Automatic distribution allows
information to be easily shared and accessed. This manual will provide an overview of the
installation and configuration instructions and a detailed tutorial.
System Requirements
• Reform 12 Enterprise or Reform 12 PDC
• Snapdoc Plugin
• Tagdoc Plugin (Optional)
• For Evaluation and Demonstration: Windows XP, Windows 2003 Server, Windows
Vista, Windows 7 or Windows 2008 Server (64 Bit Operating Systems are Supported)
• For Production Systems: Windows 2003 Server or Windows 2008 Server (64 Bit
Operating Systems are Supported)
• Microsoft SQL Server (SQL Server Express will be automatically installed by the
Snapdoc installer if it is not present on the current system)
• Microsoft .NET Framework 2.0 (installed automatically if not present on the current
system)
All required Reform software downloads can be found at www.fabsoft.com >>
Downloads section.
Hardware Requirements
•
A Ricoh Caplio 500SE digital camera and associated components that come with the
box.
•
Production System Recommendation (These suggestions are only estimations. High
load environments may require multiple servers, or additional hardware.)
1. Pentium 4 Processor
2. 4 GB RAM
3. HDD Space 100 GB (Redundancy recommended)
4. Battery Backup (UPS)
5. Dedicated server, no other software products except for virus and
security programs.
Minimum System Requirements for demonstration purposes only
1. Pentium 4 Processor
2. 2 GB RAM
•
Snap Doc
4
3. HDD Space 30 GB
Hardware specifications depend greatly on the workload and throughput that is required.
Higher end processors and greater amounts of memory will increase the amount of
information and data that Reform can process thus improving overall system throughput.
For load balancing or failover, multiple servers can also be used. (Note: A license for Reform
and each plug-in is required for each server running the software.) Before obtaining the
server that you plan on utilizing for Reform, please check the plug-ins’ user manuals for
System Requirements as well as they may require additional hardware. For production
systems, we also recommend redundant hard drives utilizing the mirroring features of RAID
(Redundant Array of Independent Disks) to minimize data loss and expedite system
recovery in the event of a hardware failure. Battery backups are also suggested to maintain
system uptime and reliability in case of power failures.
Installation
To install the Snapdoc Plug-in components, download and run the installer.
Step through the prompts and accept the User License Agreement. The installation will
begin. Allow the installation to complete and then read on to the next section to learn how
to set up the Snapdoc integration.
Plugin Registration and Licensing
When evaluating Reform 12, the plugins will also be in an evaluation mode for that period
of time. Once Reform has been purchased and licensed, the required plugins must also be
licensed in order to continue functioning correctly.
Please see the “Reform 12 Licensing and Registration” section of the Reform 12 User
Manual for more information on how to license Reform 12 Plug-ins. After the license is
entered, the Reform Spooler will need to be restarted to refresh the licenses. More
information regarding the Reform Spooler Service can be found in the Reform 12 User
Manual.
Starting the Required Services
1. First, the Reform spooler must be running. The service name is “Reform12
Spooler Service”
Snap Doc
5
2. Snap Doc has two services that need to be running “Snap Doc Image
Monitor” and “Snap Doc Process”
SnapDoc Image Monitor - extracts information from the images, moves and
renames the image file from In folder to Out folder
SnapDoc Process - submits images to the Reform Spooler for Processing
3. Tag Doc should also be running, in the service list you should see “FabSoft
Tag Doc Watch” this should be in the started state. If you do not see this
please make sure the Tag Doc plug-in is setup correctly. If the Tag Doc plug-in
is not installed, the Purchase Order demo will work. However, the
Worksheet demo will not work because it requires Tag Doc.
Tutorial
Purchase Order Demo
1. To create a sample Purchase Order, open the Order Entry System. Go to Start > All
Programs > Reform…> Snap Doc > Create PO Sample
Snap Doc
6
Click the Print button to generate a Pick Ticket, the Reform Spooler will deliver the
document to the systems default printer.
When the Pick Ticket is printed, a unique barcode ID is generated for the page. This barcode
is used to tag the images taken with the Caplio 500SE camera. Use the camera to scan the
barcode, and then take a picture. For help, see the section on “Taking Pictures with the
Camera” in this manual.
When you scan the barcode the barcode id will be associated with the next picture taken
with the digital camera.
The pictures of the items are then uploaded to the designated folder
(Reform…\Camera\In\). The services will extract the information from the image and send
the data to the reform spooler for processing. Reform will then use the barcode
information associated with the picture. The Work Order will be printed with the same
picture.
Snap Doc
7
You should see a document printed to the default printer with the picture and document
information
Dispatch Ticket Demo
1. To create a Sample Worksheet, open the Order Entery System. Go to Start>All
Programs > Reform… > Snap Doc > Create Picture Worksheet.
Click the Print button to generate a Dispatch Ticket, the Reform Spooler will deliver the
document to the system’s default printer.
When the Dispatch Ticket is printed, unique barcode IDs are generated for the top four
barcodes on the worksheet. These four barcodes are used to tag the images taken with the
Caplio 500SE camera. A fifth Tag Doc barcode that acts as the unique identifier for the
document is then generated and added to the bottom of the page.
Write a note on the document and using Ricoh’s Caplio 500SE scan the first barcode, and
then take a picture. This process is repeated for all four barcodes resulting in four pictures
Snap Doc
8
one for each barcode. For help, see the section on “Taking Pictures with the Camera”. (This
demo will only use one picture per barcode.)
The images are uploaded into a designated folder and automatically processed by Reform.
At last, scan the Dispatch Ticket, to the Reform\Plugins\ScanDirectory1\ folder from the
scanner as a Tiff group 4 image. For more information on scanning and the Tag Doc
barcode, please see the Tag Doc User Manual.
Reform will read the document barcode and pull the appropriate pictures from the
designated location. The scanned forms with associated pictures can then be used for
printing, faxing, emailing or archiving. In this example it will be printed to your default
printer.
Snap Doc
9
Camera Button Guide
Power
Playback
DISP.
Zoom
Keys
Memo
Arrow
Keys
Menu/Ok
Snap Doc
10
Taking Pictures with the Camera
1.
2.
3.
To associate a barcode with a picture, you must scan the barcode first. To do
this, turn the camera on with the green power button.
Then press the Memo button.
Holding the camera, with it pointing at one of the barcodes on the example
dispatch ticket, so that it is shown in the center of the display, press the Left
Arrow Key.
4.
It should display the barcode number that you scanned.
5.
6.
7.
Note: It may have an extra character or number at the end of the barcode.
This extra character is normal, and is used as a way to check that the barcode
is valid.
Now press the Menu/Ok Button so that you can take the picture.
Take a picture how you normally would.
Then repeat the process of scanning the barcode, and taking a picture, for
each barcode on the page. On the example dispatch ticket, make any notes
you wish on the left hand side, so that the notes correspond to the barcodes
with the picture taken.
Snap Doc
11
Uploading Pictures with the Camera
Using a USB cable (recommended)
A. Plug-in the camera into the USB port on the computer.
B. Setup the default picture drop directory. Go to Start>Programs >
Reform... > Snap Doc > Snap Doc Image Monitor Setup. Browse to the
new camera hard drive that contains your pictures. This process will
delete all the pictures on the camera so please back them up first.
C. Restart the “Snap Doc Image Monitor” service.
If you are using the Wireless Network option (advanced section)
A. Press the Playback button.
B. Select the Picture/Pictures that you wish to send
1. Single Picture or All Pictures
a. Use the Left and Right Arrow keys to find a picture you
want to upload.
2. Multiple Pictures
a. Press the Zoom Out button twice.
b. Highlight a picture you want to upload
C. Press the Menu button
D. Scroll down using the Up and Down Arrows in the PLBK STGS
Column, and select the “File Send”.
E. Press the Right Arrow Key.
F. Select the Network Setup you want to use, and press the Menu/Ok
Button.
G. If you are uploading one or all pictures, select Either Send One, or
Send All Pictures, and Press the Menu/Ok button. If you are
uploading multiple pictures, it will display the attachment menu,
where you can mark which images you want to upload. To mark an
image for uploading, press the Menu/Ok button, and an envelope
Snap Doc
12
icon will appear on the image. Once you have all the pictures you
want to upload selected, press the DISP button.
H. The Camera will connect to the wireless network, and upload the
pictures to your FTP.
How to obtain your IP Address
1. Click Start > Run
2. Type “cmd” without the quotes, and press enter.
3. In the command prompt, type “ipconfig” without the quotes, and press
enter.
4. The IP Address of your computer should be listed here, in the format:
###.###.###.###
Snap Doc
13
5. Try to remember the IP, you will be asked to type in the IP address when
setting up the Wireless FTP Transfer. Type “exit” without the quotes and
press enter to close the command prompt.
How to Change Folder Permissions
1. Find the folder you want to give permission to, and right click on it. (In our
demo, it is Reform…\Plugins\Camera\In )
2. Click on Properties.
3. Click the “Security” Tab
4. Select the Group “Everyone”
a. If “Everyone” is not in the list, Click Add.
b. Type Everyone in the textbox.
c. Click Check Names.
d. Click OK
e. It should now be in the list.
5. In the permissions section, check the boxes for : Modify, Read, and Write
Camera Wireless FTP File Transfer Setup
1. If you are going to have the camera transfer the images using a wireless
network, please follow the next steps to setup an FTP on the demo PC.
Snap Doc
14
Otherwise, you can skip this section of the manual and use the USB
method.
B. Note: The installation may ask for your windows CD.
C. A few things to gather before starting the installation:
1. Wireless Network Information
a. ESS-ID
b. Communication Channel
c. Cryptography
d. Network Key/Pass phrase
e. Authentication
D. First, go to Start > Settings > Control Panel
E. Click Add or Remove Programs
F. On the left side, click “Add/Remove Windows Components”
G. Select “Internet Information Services (IIS)” and click “Details”.
H. Check the boxes next to “Common Files”, “Internet Information
Services Snap-In”, and “File Transfer Protocol (FTP) Service”,
I. Click OK to close the window, and then click “Next”.
J. Follow the instructions to complete the setup.
K. Once it is installed, go back to the Control Panel.
L. Open Administrative Tools
M. Open Internet Information Services
N. On the left section of the window, Click the + to expand the list.
O. Under FTP Sites, Select “Default FTP Site”
P. Right Click on it, and Choose Properties.
Q. Next to Username, click Browse.
R. Click Advanced.
S. Click the “Find Now” Button on the right side.
T. In the list of users, select the one that begins with “IUSR_” This
username is created with the setup of IIS.
U. Click OK twice to get back to the FTP Site Properties window.
V. On the Security Accounts tab (Shown Below), Check the boxes that
say “Allow Anonymous Connections”, Allow only anonymous
connections”, and “Allow IIS to control password”.
Snap Doc
15
W. On the Home Directory tab (Shown Below), choose the option of “a
directory located on this computer”.
X. Enter the directory where the camera should upload pictures to.
For this demo, we will use the directory
ReformEnterpriseV12\Plugins\Camera\In\ (Ex: C:\ Program
Files\Reform…\ Plugins \Camera\In\)
Y. Check the boxes “Read”, “Write”, and “Log visits”
Snap Doc
16
Z. Click OK
AA. Confirm that the FTP is running, to do this, make sure that the Start
button is gray on the IIS window.
BB. You can now close the IIS window.
Snap Doc
17
NOTE: If you run into problems uploading files, see the section at the
end of this document on “Changing Folder Permissions”.
2. Now that the FTP is ready, we must enter the wireless and FTP
information to the camera settings.
CC. Click Start > Programs > Caplio Software > Caplio Setting
DD.Click the Add Button to add a new Setup.
EE. Next, select the “Wireless LAN” option as the Connection Method
and click the Detail button next to it.
FF. Here, Click Add to create a new wireless setup.
GG.
Fill in your wireless network information and click OK. (
Connection Method should be “Infrastructure”)
HH.For the Send Method section, choose the “Send via FTP” option,
and click Detail.
II. Click Add to create a new FTP setup.
Snap Doc
18
JJ. For the server name, enter the IP Address of your computer. (For
help obtaining your computers IP Address, See the section at the
end of this document.)
KK. Enter the username : Anonymous
LL. Enter the password: anonymous
MM.
Click OK.
NN.
Click Apply
OO.
Now, connect your camera to your PC using the USB cable. If
this is the first time you are connecting the camera, it may ask for
you to install the drivers. (Supplied with the CD)
PP. Once the camera is connected and the drivers are correctly
installed, click the “Transfer to Camera” button.
QQ.
When it asks if you want to update the camera with the new
settings, click “Yes”.
RR. Click OK twice to close the Caplio Setting program.
For more details regarding the Caplio camera, please refer to the respective user manual.