1
PDVR-1000
Pocket mini Digital Video Recorder
USER MANUAL
Please read all the instructions completely before use
and save this manual for future reference.
Table of Contents
Preface
1
Copyrights & legal issue
1
Safety Notes
2
Main Features
3
The Name of Each Part
4
Basic Preparation before operation
6
Button Operation
12
Structure of Menu Tree
13
Main Menu & Operation
15
Connecting to TV or LCD
33
Connecting to PC for downloading and uploading 34
Playback on the PC
35
Upgrading Firmware
37
Application of Accessories
38
General Specification
42
Warranty Card
44
Preface
Thank you for purchasing PDVR-1000 manufactured by Diasonic Technology Co., Ltd.
It is important to read and understand all instructions before use. After use of the manual,
put the manual in a place you can reach easily. If you misplace this manual, you may ask
it to Diasonic Technology Co., Ltd. or a distributor for downloading the copy.
Copyrights & legal issue
ú
DIASONIC Technology has all copyrights of this user manual. Reproduction,
distribution, and commercial use of a part of or the entire user manual without
prior consent of DIASONIC Technology are strictly prohibited by laws.
ú
All information contained in this manual has been carefully studied and written,
but it is subject to change without prior notice for functional and performance
improvement. DIASONIC Technology will not take any responsibility for issues
arising due to differences between the product and information contained in
the user manual.
ú
Diasonic Technology Co., Ltd. does not take any responsibility for any issue
rose from use of any file(s), software or contents under patent or copyright.
ú
Reproduction of files is prohibited for other than personal purposes by law.
ú
User must be in charge of all responsibilities for recording and storing something
including all activities in use of the device. Therefore, use must be careful if the
activity with the device is illegal.
Diasonic Technology does not take any responsible for any damage caused
by the use of this device or damage claim made by a third party.
ú
Diasonic Technology does not take any responsible for the loss of data caused
by other actions than repair services by Diasonic Technology.
ú
Diasonic does not take any responsibility for the data stored or recorded in
the device, so user must be careful to manage & keep the date.
Preface / Copyright & legal issue
ú
1
Safety Notes
ú
Do not store the device in any place with following conditions:
- High temperature (45ç or higher)
- Exposure to the direct sun rays or a heating device
- Inside the car with closed windows (especially, in the summer)
- Humid place such as the bathroom
ú
When removing dust, use soft cloth in dry. Do not use organic solvents
such as thinner or benzene or wet cloth.
ú
Do not place a debit card or a bus pass near the speakers.
The magnetic interference may occur, which will damage the card.
ú
Do not place the device near a magnet. The device may not be
workable properly.
ú
Do not repair, disassemble, or remodel the device.
ú
Do not use the product in a place where use of electronic devices is
prohibited.
ú
Do not operate or set up this device while driving. If it is required to
change set up, please do it after pulling over the car or before driving.
ú
Do not heat up or short the main body or the battery.
ú
When using an auxiliary device, leave a gap between the auxiliary
device and the main device.
2
ú
Safety Notes
Incorrect use of the product by the user or a third party or static electricity
or electric shock loaded on the product may cause loss of or change in
the data saved in the product during repair services or replacement of
the battery.
ú
Keep the device out of reach of children.
Main Features
01
1. PDVR-1000
ú
ú
ú
ú
ú
ú
ú
ú
ú
ú
ú
Law enforcement grade pocket mini Digital video recorder.
2.4" color LCD(320x240) with LCD off/on setup function while recording.
Stamping Time & Date for future evidence.
The most advanced video recording format(H.264) with efficiency compression & resolution of
recording file.(720x480/30fps/Max/NTSC.)
Longer Recording Time in better video quality than MPEG4 format.
External micro SD card slot compatible with SDHC(16GB) for expanding the memory capacity.
Recording by Motion Activation Detection.
WAV Voice recording format for clear sound quality.
Endless Recoding with overwriting.
Changing storage while recording if a current memory is full. (Selectable)
Various Recording Options.
Rec. Video+Audio/Video or Voice only.
Rec. fps(5/10/15/20/25/30fps for NTSC & 5/10/15/20/25fps for PAL) & quality(High/Std./Low)
selectable.
Timer Recording.
Snap Photo Shot and slide show.
NTSC or PAL selectable in the recorder.(AV-in/out)
Securely recording file backup in low battery power.
Built-in mic. & Speaker.(mono)
Wired Remote Controller.(Stop/Record/Pause/Hold)
Built-in rechargeable battery.(2hrs 30mins lasting in rec./2000mAH)
Additional battery pack for expanding a recording or a playback time.(Option)
Convenience carrying case for carrying PDVR-1000 & additional battery pack together.(Option)
AC/DC adaptor.(DC5V 2A/Max.)
USB 2.0 PC interface without any drive installation.
Light Weight(98.5g) and mini size.(95 x 59.6 x 18.3(mm))
ú
ú
ú
ú
ú
ú
ú
ú
ú
ú
ú
2. Camera
ú
ú
ú
ú
ú
ú
ú
ú
ú
ú
ú
1/3" Color Sony CCD pinhole camera.
NTSC(768x492)/PAL(768x582)
450 TV Line.
1/60-1/110,000sec(Auto) of Electronic Shutter.
0.1Lux.(Min. Illumination)
90 degree of Angle of View.
Auto White Balance.
5V 200mA.(Max.)
4 different button & screw adaptor.
Separated wired microphone.(-32dB)
Size: 29.4x27.8x18.2(mm)/Including button adaptor height.
Weight: 22.5g/Including ext. mic & cable
Main Features
ú
3
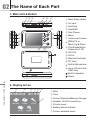
02 The Name of Each Part
1. Main Unit & Button
ྙྚྛ
ྜ ྜྷ ྞ
ྙ Neck Strap Holder
ྚ Air Vent
ྛ Hold Key
ྟ
ྡྷ
ྦ
ྣ
ྦྷ
ྤ
ྜ Stop/ESC
ྜྷ Rec./Pause
ྞ Menu
ྟ Volume up & down
ྠ RW & FF or
Menu Up & Down
ྥ
ྠ
ྡ Play/Pause/Enter/
ྡ
Power On & Off
ྡྷ A/V-Out
ྣ A/V-In
ྤ Remote Controller
ྥ DC Jack
ྦ Built-in Microphone
ྦྷ micro SD card slot/
USB Jack
Built-in Speaker
Reset
4
The Name of Each Part
2. Display & Icon
ྙ
ྚ
ྛ ྜ ྜྷྞ
ྙ Date
ྚ Time
ྟ
ྛ Current Selected Memory Storage
ྜ Speaker On/Off or earphone
ྜྷ Volume Level
ྞ Battery Status Indicator
ྟ Current selected menu
The Name of Each Part
02
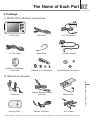
3. Package
1) PDVR-1000 with Basic Accessories
PDVR-1000
USB Cable
AC/DC Adaptor
AV Out Cable
Hand Strap
Pinhole Camera
Bracket for installment
on the wall
20.5mm
15.2mm
11.5mm
10.3mm
Adaptors for Camera lens
Normal Buttons and screw
2) Optional Accessories
5
Carrying Case
Camera Extension cable
(5m/10m)
Battery Pack
Remote Controller
AV-in Cable
තGThe design or shape of accessory on the above is just for reference. It would be different than real one.
The Name of Each Part
Earphone
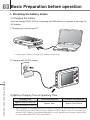
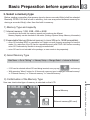
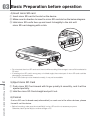
03 Basic Preparation before operation
1. Checking the battery status
1) Charging the battery
User can charge PDVR-1000 by connecting the USB cable to a computer or by using the
AC Adaptor.
ྙGCharging by connecting to PC
තGIt takes approx.20hrs for charging the battery by USB cable.
ྚGCharging with AC/DC adaptor
6
Basic Preparation before operation
2) Battery Charging Time & Operating Time
Charging Time
Approx. 5hrs in Power On
Approx. 3hrs 30mins in Power Off
Continuous play time
Continuous recording time
Approx. 4hrs
Approx. 2hrs 30mins
තGWhen plugging or unplugging the AC/DC adaptor, turning off the unit is strongly recommended.
The maker strongly recommends using a supplied AC/DC adaptor, but if it is necessary that
another AC/DC adaptor is purchased separately at a shop, please check its electric specification
is in accordance with PDVR-1000's specification.
Basic Preparation before operation
03
3) Battery Remaining Status
Full Charge
Some Power Consumed
Power almost drained
No Power
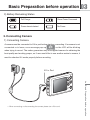
2. Connecting Camera
1) Connecting Camera
A camera must be connected to AV-in port before starting a recording. If a camera is not
connected or in loose, error message pop-up
on the LCD will be blinking
when trying to record. The maker guarantees only the supplied camera for obtaining the
best quality and working proper, so if user would like to use another maker's camera, it
must be checked if it works properly before recording.
AV-in Port
7
Basic Preparation before operation
තGWhen connecting or disconnecting the camera please turn off the unit.
03 Basic Preparation before operation
2) Checking PAL or NTSL
ྙGAV-in
A camera type(PAL or NTSC) shall be selected correctly on the menu.
Setting -> Display Setup -> Video Format -> NTSC or PAL
ྚGAV-out
PAL or NTSL is only supportable system for the Video-out, so for monitoring on another
display device such as LCD or TV while recording, a right type of the camera system shall
be connected and selected on the device.
3) Extension Camera Cable(Optional Item)
If it is required to extend the camera cable, the extension camera cable on the optional
accessory may be affordable.
8
Basic Preparation before operation
තGWhen using the camera extension cable, there will be some decline of the recorded quality in voice
recording, but video recording. Please keep in mind that the longer the cable is, the worse quality
is in voice recording.
Basic Preparation before operation
03
3. Select a memory type
Before starting a recording, the memory type to store a recorded file(s) shall be selected.
Basically PDVR-1000 has a built-in memory, but user may select external memory for
storing a recorded file(s) other than the built-in memory.
1) Memory Type and capacity
ྙGInternal memory: 1GB, 2GB, 4GB or 8GB
GGGGGතGAccording to the model, the memory capacity on board may be different.
Memory capacity can be checked on the menu. (Setting->System Setup->Memory Information)
ྚGExpandable Memory(External memory): micro SD(up to 16GB compatible)
GGGGGතGmicro SD including SDHC is compatible, but it might not work properly according to a brand of
maker. So, make sure if the SD card is compatible properly with PDVR-1000 before recording.
micro SD Card made by Sandisk is strongly recommended.
GGGGGතGmicro SD card is not included in the package, so user needs to buy separately.
2) Select Memory Type
Main Menu -> Go to "Setting" -> Memory Setup -> Storage Select -> Internal or External
GGGGGතGIf SD card is selected without SD card being inserted, error pop-up (
) is shown up.
GGGGGතGWith pressing "Menu" button for 2-3seconds, memory type is changed "Internal memory"
to "External memory" or "External memory" to "Internal memory".
3) Confirmation of the Memory Type
User can check what type of memory is selected on the LCD.
External memory(SD card)
Basic Preparation before operation
Internal Memory
9
03 Basic Preparation before operation
4) Insert micro SD card
ྙGInsert micro SD card to the slot on the device.
ྚGMake sure its direction to insert to micro SD card slot as the below diagram.
ྛGHold micro SD card's face up and insert it straightly to the slot until
micro SD card stopping with a click.
තGDo not extract the micro SD card out of the slot while recording if the storage to save a file is selected to
SD card.
තGIf inserting micro SD card in wrong way or inclined angle, the contact part of micro SD card could be
damaged or jammed inside.
තGIf micro SD card may not be inserted correctly, it may not be readable.
10
5) Eject micro SD Card
Basic Preparation before operation
ྙGPush micro SD Card inward with finger quickly & smoothly, and it will be
ejected partially.
ྚGHold the micro SD Card straight and pull it out.
6) Format
If micro SD card is brand-new(unformatted) or used one in the other devices, please
format it on this device.
තGBefore formatting, make sure the stored file(s) in micro SD card is not necessary anymore.
Otherwise, back up the file(s) to another storage or PC.
Basic Preparation before operation
03
4. Set up Time & Date
All values of the device are set up at the factory defaults if turning on first time after
purchasing. So it is necessary to set up time and date at current value for stamping
current time and date to the recorded file and other functions like Timer Recording.
1) Set up time & Date
Main Menu -> Setting -> System Setup -> Time Set -> Date Set(YYYY-MM-DD) ->
Time Set(HH:MM) -> Date Display(Y/M/D or M/D/Y) -> Time Display (12H or 24H)
Moving to the next or
previous option
Changing the value
up or down
Confirming a setup
ESC
5. Hold
Hold key works to prevent a mistake from unexpected operation, so this shall be checked
if it is on before starting a record.
Hold Off
11
තGIf Hold is on, "lock icon" is displayed on the top of the LCD and
pressing any button.
is in pop-up whenever
Basic Preparation before operation
Hold On
04 Button Operation
ත Long key: Hold a key for 2-3 seconds / Short Key: Hold a key for 1 second
Long Key
- Power On/Off
Short Key
- Play/Pause in Playing a file
- Enter/Select in Menu &
file list
- AV-out(TV or LCD)˩
LCD of PDVR-1000
(Only applicable
on Main Menu)
- Stop playing or recording
- Escape out of a current
menu
- Start/Pause
12
Button Operation
- LCD off while recoding
or preview
- Int. Memory˩
Ext. memory in no
operation
(Only applicable
in Main Menu)
- Show up a submenu in
each mode (RECORD/
VIDEO/VOICE/PHOTO)
- Vol. up or down
continuously
- Vol. up or down in playing
a file
- Value up or down
continuously
- Value up or down in Time
Setup
- Move to the next or back
to the previous option
continuously
- Move to upper or lower
directory continuously
- Move to the next or back
to the previous option
- Go up to Main menu directly
at a submenu in SETTING
- Move to upper or lower
directory
- FF or REW in playing
ත Press any button for returning to the LCD On while LCD off in security recording.
Structure of Menu Tree
05
Main Menu
RECORD
VIDEO
VOICE
PHOTO
SETTING
Preview
Rec.
Rec.
Preview
Rec. Setup
Rec.
File List
File List
Snap Shot
Timer Rec. Setup
Playback
Playback
File List
Play Setup
Playback
Display Setup
Memory Setup
System Setup
RECORD
Preview
Rec. Time: Off/10/20/30/60min.
Rec.
Mic Sensitivity: Low/Middle/High
Rec. Time: Display a value set at preview & Rec. Setup in SETTING
Mic Sensitivity: High/Middle/Low
VIDEO
Rec.
Rec. Time: Display a value set at preview & Rec. Setup in SETTING
Mic Sensitivity: High/Middle/Low
File List
File Play
File Delete: No/One/All
File Protect: No/One/All
VOICE
Playback
File Information: File Name/File Size/File Protection
Video Repeat: No/One/All One/All
Rec.
Display Out: LCD/TV
Rec. Time: Display a value set at preview & Rec. Setup in SETTING
Mic Sensitivity: High/Middle/Low
File List
File Play
File Protect: No/One/All
File Information: File Name/File Size/File Protection
PHOTO
Playback
Voice Repeat: No/One/All One/All
Preview
Snap Shot Time: Off/10/20/30/60min.
Snap Shot
File List
File Play
File Delete: No/One/All
File Protect: No/One/All
File Information: File Name/File Size/File Protection
Playback
Slide-Show: No/Yes
Slide-Show Time: 1/3/5/7/10sec.
Structure of Menu Tree
File Delete: No/One/All
13
05 Structure of Menu Tree
SETTING
Rec. Setup
Input Source:Video+Audio/Video
Video Quality: High/Standard/Low
Resolution: 720x480/352x240/176x120(NTSC)
720x576/352x288/176x144(PAL)
Frame Rate: 5/10/15/20/25/30fps(NTSC)
5/10/15/20/25fps(PAL)
Motion Detection: On/Off
Time Stamp: On/Off
Rec.Time: Off/10/20/30/60min.
Endless Rec.: No/Yes
Timer Rec. Setup
Set: Cancel/Once/Everyday
Start
End
Play Setup
YYYY-MM-DD
AM/PM HH:MM
YYYY-MM-DD
AM/PM HH:MM
Video Repeat: No/One/All One/All
Voice Repeat: No/One/All One/All
Photo Thumbnail View: No/Yes
Slide Show: No/Yes
Slide Show Time: 1/3/5/7/10sec.
Display Setup
Video Format: NTSC/PAL
Display Out: LCD/TV
LCD Brightness: 0/1/2/3/4/5/6/7/8/9
LCD Backlight: Off/3/5/10/All sec.
Memory Setup
Storage Select: Internal/External
Format: Internal/External
14
Memory Change: No/Yes
Structure of Menu Tree
Memory Information
System Setup
Internal:Total & Remain
SD Card:Total & Remain
Speaker Control: On/Off
Auto Power Off Time:Off/1/3/5/7/10min.
Date Set: YYYY-MM-DD
Time Set: AM/PM HH:MM
Date Display: Y/M/D or M/D/Y
Time Display: 12H/24H
Factory Default Set: No/Yes
Time Set
Firmware Version
Battery Pack: On/Off
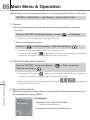
Main Menu & Operation
06
1. Main Menu
̻
RECORD
- Previewing before recording.
- Recording a video input signal from the connected camera.
- The file recorded in this mode is stored at the "VIDEO".
̻
VIDEO
- Recording an video input signal from the connected camera.
- A recorded video file(s) is stored here and played back.
̻
VOICE
- Recording a voice input signal from a built-in microphone or
a microphone on the camera.
- A recorded audio only file(s) is stored here and played back.
̻
PHOTO
- Previewing before snap photo.
- Taking a snap shot.
- A photo file(s) taken by Snap Shot is stored here and reviewed.
̻
SETTING
- User can set up setting values.
2. Operation of Each menu
තGIf starting a recording, STOP won't work within 5seconds.
තGMaximum size of the file to be made in PDVR-1000 is 4GB. So when a file size is reached to 4GB in
a recording, it automatically saves the file and then start a new recording with new file index.
තGDo not take a SD card out while recording to external memory storage but if it is made, PDVR-1000
automatically powers off. The file was recording just befor taking the SD card won't be displayed on
PDVR-1000, but it might be playable on a PC.
තGBefore starting a recording, make sure the battery status. We strongly recommend to record with
AC/DC adaptor for long recording.
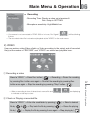
1) RECORD
In this mode, user can make a video (Video+Audio or Video Only) and previews what is
recorded before starting a recording.
15
Main Menu & Operation
තGIn case of selecting "Video+Audio" as an Input source in Rec. Setup, audio is not recorded together
if 5fps is selected in frame rate. So if it is necessary to record audio together with video at 5fps, set
up the frame rate at over 10fps.
06 Main Menu & Operation
Before starting a recording, user shall select one of recording types (Video+Audio or Video only)
SETTING -> Record Setup -> Input Source -> Video+Audio or Video.
ྙGPreview
User can make sure what is recorded thru preview before starting a recording.
i. Preview
Move to "RECORD" on the main display -> Press (
) -> Previewing
තGLetter of "Preview" is displaying on the right of the LCD.
ii. Start a recording after preview
Preview ->
-> Start a recording -> Stop the recording by
තGLetter of "Preview" is changed to "Rec" on the right of the LCD.
If pressing a REC button(
) again while recording, the recording is paused and
re-start the recording by pressing the REC button once again.
ྚGQuick Recording without preview
Move to "RECORD" on the main display ->
-> Start a recording->
Stop the recording by
තGIf pressing a REC button(
) again while recording, the recording is paused and
re-start the recording by pressing the REC button once again.
16
තGWhen a recording is done, it takes time to save a file and
to indicate on the way to save.
are displaying
Main Menu & Operation
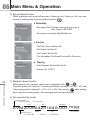
ྛGSet up optional values
While previewing & recording, values of recording time & Microphone sensitivity can
be adjustable by pressing "MENU".
̻
Previewing
- Recording Time: Off/10/20/30/60Min.
GGGතGSet up a recording time
- Microphone sensitivity: High/Middle/Low
06
Main Menu & Operation
̻
Recording
- Recording Time: Display a value set at preview &
Rec. Setup in SETTING
- Microphone sensitivity: High/Middle/Low
තGIf a camera is not connected to PDVR-1000 or in loose, "No Signal"(
) will be blinking
3 times.
තGThe recorded video file is stored and playable at the "VIDEO" on the main menu.
2) VIDEO
User can make a video(Video+Audio or Video according to the setup) and all recorded
file(s) at the modes of "RECORD" and "VIDEO" are stored and playable here.
ྙGRecording a video
Move to "VIDEO" -> Press Rec. button (
) -> Recording -> Pause the recording
by pressing Rec. button once again -> Re-start the recording by pressing Rec.
තGWhen a recording is done, it takes time to save a file and
to indicate on the way to save.
17
)
are displaying
ྚGCheck or Playing a recorded file
Move to "VIDEO" -> Enter into a subfolder by pressing (
file by
file by (
&
-> Play back the file by pressing (
) -> Select a desired
) -> Pause the playing
) -> Replay the file by pressing it once again -> Stop playing by (
)
Main Menu & Operation
button once again -> Stop the recording by pressing "Stop" button (
06 Main Menu & Operation
ྛGSet up Optional Value
While operating each function(Recording, Checking a file, Playing a file), user can
change a setting value by pressing Menu button(
).
Recording
̻
- Recording Time: Display a value set at preview &
Rec. Setup in SETTING
- Microphone sensitivity: High/Middle/Low
File List
̻
- File Play: Play a selected file
- File Delete: No/One/All
- File Protect: No/One/All
- File Information: File Name/File size/File Protection
Playing
̻
- Video Repeat: No/One/All One/All
- Display Out: LCD/TV
18
ྜGPlayback Speed Control
Main Menu & Operation
While playing a file, playback speed can be adjustable with
&
Playback speed has 2 options, "increasing plackback speed(x1˩x2˩x4˩x8)" and
"decreasing playback speed(x1˩x1/2˩1/4˩x1/8)". By pressing
while playing
back, option(Increasing speed˩Decreasing speed) can be switchable.
ྜྷGThe recorded file format
Recording Mode
- AV: Audio+Video
- VO: Video Only
Year
Day
File Index
AVM200904231640-001. mpg
Recording Type
- M: Normal Rec.
Month
- T: Timer Rec.
Time
- E: Endless Rec.
File Format
Main Menu & Operation
06
Ex: AVM200904060059-001.mpg
GGGGGGGTGRecorded in Video+Audio thru normal rec. on 6 April, 2009 at 00:59
̻
VOM200905011459-002.mpg
GGGGGGGTGRecorded in Video only thru normal rec. on 1 May, 2009 at 14:59
̻
AVT200907210152-001.mpg
GGGGGGGTGRecorded in Video+Audio thru Timer rec. on 21 July, 2009 at 1:52
̻
AVE200908041801-004.mpg
GGGGGGGTGRecorded in Video+Audio thru Endless rec. on 21 August, 2009 at 18:01
̻
තGThe file(s) recorded in PDVR-1000 is only playable in PDVR-1000.
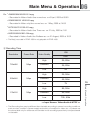
ྞGRecoding Time
Resolution
720x480
352x240
30fps
30fps
30fps
Video Quality
1GB
Hour
High
2h, 20m
Standard
3h, 20m
Low
5h
High
3h, 50m
Standard
4h, 50m
Low
7h
High
8h, 50m
Standard
9h, 50m
Low
10h, 40m
<< Input Source: Video+Audio & NTSC >>
තGThe Recording time may be different than the table according to several recording conditions
such as noise, condition of power supply and activity of a subject for video, etc., so please use
the above table only for reference and consider more recording space than you expect based
on the table.
19
Main Menu & Operation
176x120
Frame Rate
06 Main Menu & Operation
3) VOICE
User can make a voice only file thru a built-in microphone or a microphone on the camera
as well as storing and playing a recorded voice file in this mode.
ྙGRecording a voice
Move to "VOICE" -> Press Rec. button (
Rec. button (
(
) -> Recording -> Pause by pressing
) once again -> Re-start the recoding by pressing Rec. button
) -> Stop the recording by pressing Stop button (
)
i. LCD Display
Recording
Pause
20
Main Menu & Operation
තGWhile recording, user can monitor what is being recorded by plugging an earphone in AV-out.
If an earphone is plugged in,
is displayed on the LCD.
තGIf stopping a recording, file list in voice folder is showed up just after saving a recorded file
and the last saved file is indicated in yellow.
ྚGChecking a recorded voice file
Move to "VOICE" -> Enter into a subfolder by pressing (
) -> Listing files
Main Menu & Operation
06
i. Enter into the voice file list
Display a current selected
folder in yellow.
ii. Escape from the voice file list
තGJust upper directory of the file list shows photo, video and voice folder as the above display, and
only voice file stored in each folder can be shown and playable in voice mode when entering
into each folder(photo, video & voice).
තGQuick recording can be made by pressing Rec. button(
) at anywhere in the file list.
ྛGPlaying a recorded voice file
Move to "VOICE" -> Enter into a subfolder by pressing (
Select a desired file to play by (
or
) -> Listing files ->
) ->Playing the file by (
Playing
තGThe recorded file format: WAV(AvM200905102231-001.wav)
The file(s) recorded in PDVR-1000 is only playable in PDVR-1000.
Pausing
21
Main Menu & Operation
i. LCD Display
)
06 Main Menu & Operation
ྜGThe recorded Voice file format
Audio Only
Year
Day
File Index
AOM200904231640-001. wav
Recording Type
- M: Normal Rec.
Month
Time
File Format
- T: Timer Rec.
ྜྷGSet up optional values
While operating each function(Recording, File list, Play), user can change a setting
value by pressing Menu button(
̻
) if necessary.
Recording
- Recording Time: Display a value set at preview &
Rec. Setup in SETTING
- Microphone sensitivity: High/Middle/Low
̻
File List
- File Play: Play a selected file
- File Delete: No/One/All
- File Protect: No/One/All
22
Main Menu & Operation
- File Information: File Name/File size/File Protection
̻
Playing
- Video Repeat: No/One/All One/All
Main Menu & Operation
06
4) PHOTO
In this mode, user can take a photo as well as storing and reviewing photos to be taken
in this mode.
ྙGTaking a SNAP PHOTO
Move to "PHOTO" -> Press Rec. button (
(
) -> Previewing -> Press Rec. button
) -> Taking a photo
තGPhoto is taken in 320x240 as a default.
තGWhile previewing, "Preview" is displaying on the LCD and then "Snap shot" is displaying on
the LCD when taking a photo.
ྚGDisplaying a photo
Move to "PHOTO" -> Enter into a folder by pressing (
Select a desired file to display by (
or
) -> Listing files ->
) -> Displaying the file by (
තGMaximum image size to displayable on PDVR-1000 is "1600x1200".
තGIt is different to display a photo according to a display setup as below displays.
Photo Thumbnail View with "No"
Photo Thumbnail View with "Yes"
23
Main Menu & Operation
SETTING -> Play Setup -> Photo Thumbnail View -> No or Yes
)
06 Main Menu & Operation
ྛGSet up Optional Values
While operating each function(Preview, File list & Displaying), user can change a
setting value by pressing Menu button(
̻
).
Previewing
- Snap Shot Time: Off/10/20/30/60Sec
GGතGSet up a recording time
- Taking a photo every setting time from the first shot until
pressing STOP.
̻
File List
- File Play
- File Delete: No/One/All
- File Protect: No/One/All
- File Information: File Name/File size/File Protection
̻
Displaying
- Slide-Show: No/Yes
- Slide-Show Time: 1/3/5/7/10Sec
24
Main Menu & Operation
ྜGThe image file format
Year
Day
File Index
IMG200904231640-001. jpg
Image File
Month
Time
File Format
Main Menu & Operation
06
5) SETTING
User can set up most of options & values in this menu and recording a video can be
made in this mode, too.
ྙGRecord Setup
i. Input Source
Setting up whether recording a video together with a audio or recording a video only.
This option should be set up before recording a video.
- Video+Audio: Recording a file with Video & Audio.
- Video: Recording a file with Video only.
ii. Video Quality
iii. Resolution
This is a setup for deciding a maximum size of display when making a video file, but
user should consider that a file size shall be bigger or smaller according to set up one
of these values.
- NTSC: 720x480/352x240/176x120
- PAL: 720x576/352x288/176x144
25
Main Menu & Operation
- High: If a file is required to be recorded in higher quality, recommend selecting
this value, but the file size shall be bigger.
- Standard: It is recommended to record in normal quality.
- Low: If recording time is more important, set it up at this value. Recording time
shall be extended by decreasing the file quality.
06 Main Menu & Operation
iv. Frame Rate
This is to set up how many frame is recorded per second with.
The higher value is, the smother motion is but the file size is in opposite.
- NTSC: 5fps/10fps/15fps/20fps/25fps/30fps.
- PAL: 5fps/10fps/15fps/20fps/25fps.
v. Motion Detection
Automatically it starts a recording by detecting a motion but if there is no motion, it
pauses a recording.
තGIf the motion detection is made with 720X480, 30frames & high video quality,
the frame rate of the recorded file could be decreased to around 20 frame in
average (NTSC), so it is helpful to set up one of the values related to quality at
lower (Resolution/Frame rate/Video Quality) to increase the frame rate in
recording. In addition, it is also helpful to increase the frame rate that LCD Off
while recording with 720X480, 30frames & high video quality.
තGLCD Off: Press
for 2-3seonds while previewing or recording. If so, LCD is Off,
but previewing or recording keeps on. Press any key to LCD back if necessary.
vi. Time Stamp
If the option is selected, a recording date(YY/MM/DD) and Time(00:00:00) are stamped
on the file and shown on the video while playing back. But if a file is recorded in the
option off, the file is not displaying a date & time when playing back.
vii. Record Time
It is option to set up for how long it is recorded. If setting up one of these values, it will
be off automatically after recording for a set time.
26
- Off/10/20/30/60Min.
Main Menu & Operation
viii. Endless Recording
It is a feature to continuously record by going back to the beginning of a recorded file
when a memory is full until stop the recording and sequentially more advanced recorded
part from the beginning is overwritten by new recording.
තGTo use this function, a minimum memory capacity shall be remained.
720x480
352x240
176x120
50MB
25MB
12MB
Main Menu & Operation
06
තGIf there is any recorded file to keep, backup it to PC or the other memory storage before
operating this function.
̰GThe Priniple of endless recording
File 1
File 1
Files made in a normal recording
File 3
Files made in the endless recording
Int. or Ext. memory storage
තGMaximum size of the file to be made in PDVR-1000 is 4GB. So when a file size is reached
to 4GB in a recording, automatically save the file and then start a new recording with
new file index.
තGIn the endless recording, the function of a "Memory Change" is not applicable, so the endless
recording continues to record within the selected memory only(Int. or Ext. storage).
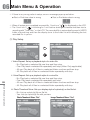
ྚGTimer Record Setup
This is a setup to start and stop a recording automatically on a specific set date & time.
27
Main Menu & Operation
i. Set
- Cancel: Timer Record Off.
- Once: Timer record is operated one time on a set time & date.
- Everyday: Time record is operated every single day on a specific time.
ii. Start: Set up a recoding start date & time. In case of setting up the set at "Every day",
only start time is settable.
iii. End: Set up a recoding end date & time. In case of setting up the set at "Every day",
only end time is settable.
06 Main Menu & Operation
තGIf there is any wrong value in setup, an error message pops up as below.
Start or End time value in wrong
̻G
Start or End date value in wrong
̻G
තGWhen all setups are completed successfully, "clock icon" (
) is displayed on the LCD.
තGThe "clock icon" (
) is blinking for 1min. before starting a schedule and then start a
recording with "Timer Rec." on the LCD. The recorded file is automatically saved in VIDEO
folder at a end time and then the display turns to the folder list with indicating the last
recorded file in yellow.
ྛGPlay Setup
i. Video Repeat: Set up a playback style of a video file.
- No: Play back a selected file one time and then stop.
- One: Play back a selected file repeatedly until stop.(Video Only applicable)
- All one: Play back all of files in a selected folder one time and then stop.
- All: Play back all of files in a selected folder repeatedly until stop.
ii. Voice Repeat: Set up a playback style of a voice file.
28
Main Menu & Operation
- No: Play back a selected file one time and then stop.
- One: Play back a selected file repeatedly until stop.
- All one: Play back all of files in a selected folder one time and then stop.
- All: Play back all of files in a selected folder repeatedly until stop.
iii. Photo Thumbnail View: Set up a display style of a photo(s) on the file list.
- No: List up a photo(s) file on file list.
- Yes: List up a photo(s) file with preview.
Photo Thumbnail View: "No"
Image Thumbnail View: "Yes"
Main Menu & Operation
06
iv. Slide Show: Set up a photo(s) display style when selected a photo.
- No: display only selected photo.
- Yes: display all files sequentially in the selected folder by the slide show.
v. Slide Show Time: Set up an interval(1, 3, 5, 7, 10 sec) between a previous photo and
the next photo in a slide show.
ྜGDisplay Setup
i. Video Format: Select a color encoding system. PDVR-1000 supports PAL or NTSC.
තGThe selection of PAL or NTSC in PDVR-100 is closely related to a pinhole camera
type and an external display connection such as LCD and TV. If the color encoding
system of PDVR-1000 is not accordance with a type of a camera thru AV-in or an
external display device thru AV-out, there will be no signal on the LCD of PDVR-1000
or an external display device.
තGHow to set up PDVR-1000 according to camera type or External displayer.
PDVR-1000 setup
Camera type in AV-in
External displayer type in AV-out
NTSC
NTSC
NTSC
PAL
PAL
PAL
- LCD: Set up a LCD as an ext. display device.
- TV: Set up a TV as an ext. display device.
iii. LCD Brightness: Set up a level of LCD brightness(0-9).
තGLCD brightness is related to the battery life, so set up it at low level as lower as a
situation is allowed.
iv. LCD Backlight time: Set up a time of the LCD On. After a setup time (Off/3/5/10sec),
LCD is off automatically if there is no key operation, but the LCD is back On if there is
a key operation.
29
Main Menu & Operation
ii. Display out: Select an external display device thru AV-out to display what PDVR-1000
is previewing or recording.
06 Main Menu & Operation
ྜྷGMemory Setup
i. Storage Select: Select the storage type to save a recorded or play a file(s).
- Internal: Built-in memory.
- External: micro SD card.
තGThe capacity of internal memory can't be changeable and it may be different according
to a model.
ii. Format: Select a memory storage to be formatted.
- Internal: Format a built-in memory.
- External: Format a micro SD card.
තGBefore formatting a storage, make sure all contents in the storage are transferred to
another storage or PC, or unnecessary contents anymore. All responsibilities for the
contents are reserved by user.
iii. Memory Change: Set up whether continuously recording from the current selected
memory to the other memory by transferring memory storage automatically or not
when the current storage is full.
- No: Recording something as much as a capacity of a current selected storage is
and then stop recording.
̰GNo
30
Current selected memory
Additional memory
Total memory to record
Memory Transfer
Main Menu & Operation
Built-in
1GB
micro SD
1GB
Current selected memory
Additional memory
Built-in
1GB
Total memory to record
Memory Transfer
micro SD
1GB
Built-in
1GB
micro SD
1GB
Main Menu & Operation
06
- Yes: Recording something continuously up to a capacity of the other storage after
a current selected storage is full.
̰GYes
Current selected memory
Additional memory
Total memory to record
Memory Transfer
Built-in
1GB
micro SD
1GB
Built-in micro SD
1GB
1GB
2GB
Current selected memory
Additional memory
Total memory to record
Memory Transfer
micro SD
1GB
Built-in
1GB
micro SD Built-in
1GB
1GB
2GB
iv. Memory Information
User can check memory status of built-in memory(Internal memory) and External memory
(micro SD card).
- Total: Full capacity of a memory.
- Remain: Remain capacity of a memory after using.
31
ྞGSystem Setup
Main Menu & Operation
i. Speaker Control: Control the Built-in speaker. (On/Off)
According to the setup, speaker icon on the LCD is changed.
- On:
- Off:
තGIf plugging an earphone, speaker icon(
) is turned to a headphone icon(
).
06 Main Menu & Operation
ii. Auto Power Off Time: If there is no key or function operation for a setting time,
automatically power it off. (Off/1/3/5/7/10min.)
iii. Time set: Set up the time & date and display way on the PDVR-1000.
- Date Set: YYYY-MM-DD(ex.09-05-25)
- Time Set: AM(or PM)Hour : Minute(ex.PM02:14)
- Date Display: Y/M/D(ex.2009-05-25) or M/D/Y(ex.05-25-09)
- Time Display: 12H(PM02:14) or 24H(18:18)
iv. Factory Default: Return all setup values to the initial values set up by the factory.
- No
- Yes
තGDespite of returning all setting values to the factory default, there is no changes in the
stored data and a current date & time.
v. Firmware Version: Checking the firmware version of PDVR-1000.
තGMaker may release an up-to-date firmware if necessary to upgrade feature(s) or correct
any trouble of PDVR-1000 without any notice in advance.
vi. Battery Pack
32
Main Menu & Operation
- On
- Off
When a battery pack is connected for additional power supply, this should be selected
"On" for preventing abnormal operations from a low level of the battery pack power.
තGIf AC/DC adaptor is connected after the battery pack off, this value should be back
to "Off".
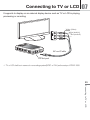
Connecting to TV or LCD
07
It supports to display on an external display device such as TV or LCD in playing,
previewing or recording.
Yellow (Video)
White (Audio L)
Red (Audio R)
AV-out Cable
AV-out port
තGTV or LCD shall be in same color encoding system(NTSC or PAL) as the setup of PDVR-1000.
33
Connecting to TV or LCD
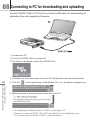
08 Connecting to PC for downloading and uploading
Connect PDVR-1000 to PC thru the provided USB cable for downloading or
uploading files and upgrading firmware.
ྙGConnect it to PC.
ྚGTurn it on if PDVR-1000 is in power off.
ྛGThe below is displayed on the LCD of PDVR-1000.
ྜGIf all tasks are done, disconnect it from the PC following the safe removal procedure.
34
ྜྷGClick the
on the right bottom of the Window OS. If so, the below is displayed up.
Connecting to PC for
downloading and uploading
ྞGWhen the below is showed up, disconnect it from the PC.
තGNo requiring any additional driver or S/W for connecting to PC.
තGWhenever connecting PDVR-1000 to PC, the folder(F) to store KM-player is up.
If it is not necessary to install to the PC, close this window.
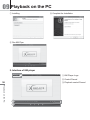
Playback on the PC
09
The recorded file(H.264) in PDVR-1000 is required to play back on the special
application("KM Player").
Install it on a PC following the installation procedures of KM Player by clicking
the file.
තG It is not available to remove "KM-player" in PDVR-1000 after installation.
KM-player can be obtained on an indicated website, too.
1. Installation of KM Player
ྙGClick the file of KM player.exe in the folder of
PDVR-1000
ྚ Select language
player_setup
ྛGRun a KM player wizard and click "Next"
ྜ License agreement and Click "I agree"
35
ྞ Choose a location of installation
Playback on the PC
ྜྷGChoose component and choosing
all is a default
09 Playback on the PC
ྠ Complete the Installation
ྟGInstalling
ྡGRun KM Plyer
2. Interface of KM player
1
ྙGKM Player Logo
ྚ Control Pannel
36
ྛGPlayback control Pannel
Playback on the PC
2
3
Upgrading Firmware
10
Maker will release an up-to-date firmware for improving its quality, making more
efficient or correcting any problem with PDVR-1000 without any notice in advance.
Regularly visit the maker's website or local distributor's website.
1. How to upgrade a firmware
GGྙ Download the last firmware from an indicated website.
GGྚ Unzip the firmware if it is compressed.
GGྛ Connect it to PC with USB cable.(If PDVR-1000 is in power off, turn it on.)
GGྜ If connecting is OK, the below folders are displayed on the top of the root directory.
photo
video
voice
GGྜྷ Copy "upgrade" folder out of the unzipped firmware file and paste it to the root directory
of PDVR-1000.
photo
video
voice
upgrade
GGྞ Disconnect PDVR-1000 from the PC and turn it off automatically, but if it may not turn
it off automatically, try it off manually.
GGྟ Turn it on once again. If so it starts the procedures of upgrade automatically as below
and then turn it off automatically. It may take a little time.
37
Setting -> System setup -> Firmware version.
තG Strangly recommend to upgrade with connecting AC/DC Adaptor.
තG Do not power off or press any key while upgrading. It may cause very serious problem to the unit.
තG If upgrading is made, some setting values are back to the factory defaults, so it is required to
set up once again if necessary.
තG If there is a malfunction or hang-up, please reset by pressing rest hole on the bottom.
Upgrading Firmware
GGྠ Turn it on and check the firmware version.
11
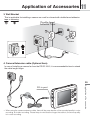
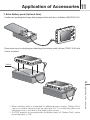
Application of Accessories
1. Earphone (Optional item)
Earphone is used for monitoring what will be recorded while recording or previewing
as well as it plays a file. In plugging the earphone,
is changed to
.
AV-out port
R/C port
තGDo not plug the earphone to the R/C port(Remote controller)
at any case. It may cause a malfunction to start a recording.
2. Switchable camera button & screw
It is useful to attach the provided button or screw type adaptor to the front of camera lens
when recording secretly.
38
Application of Accessories
20.5mm
15.2mm
11.5mm
10.3mm
Additional normal buttons are also packed as a basic accessory, so if it is required to record
in hiding the camera on a white shirt or a jacket, replace currently hung buttons on it with
these buttons not to be recognized by others.
තGpGusing this application, user makes sure if it is not in illegal before recording.
Maker or seller does not take any responsibility for any legal issue caused by this application.
Application of Accessories
11
3. Wall Bracket
This is applicable for installing a camera on a wall or a board with double-faced adhesive
tape or screwing.
Double-faced
Adhesive Tape
Screw
4. Camera Extension cable (Optional item).
In case of installing a camera far from the PDVR-1000, it is recommendable item to extend
the cable length longer.
39
තGWhen using the camera extension cable, there will be some decline of the recorded quality in voice
recording, but video recording. Please keep in mind that the longer the cable is, the worse quality
is in voice recording.
Application of Accessories
AV-in port
11
Application of Accessories
5. Additional AV-in Cable (Optional item).
When connecting the other camera with different connection jacks and power specification,
use the additional AV-in cable.
AV-in port
Yellow (Video)
White (Audio)
Power-out
5V 200mA
Additional AV-in Cable
6. Wired Remote Controller (Optional Item).
With the remote controller, to start, pause or stop a recording can be operated without
operating PDVR-1000 directly.
CLIP
The R/C can be clipped to the edge of
the pocket to hold firmly by adding the
clip to the R/C as the above diagram.
40
LED Indicator
Stop
Rec/Pause
Application of Accessories
Hold
- Stop: Stop recording.
- Rec./Pause: Start or pause recording.
- Hold: Hold on/off of key operation.
- LED Indicator: indicating currently recording or pausing.
(Red On: Recording/Red Off: Stop recording/Blinking: Pause recording)
Double-faced
Adhesive Tape
Attach the R/C under the table with a doublefaced adhesive tape, so others can't recognize
its operation.
Operate PDVR-1000 by R/C in the pocket.
Application of Accessories
11
7. Extra Battery pack (Optional Item).
It makes an operating time longer lasting (approx.5hrs) with 3pcs of Alkaline UM-2(R14/1.5V).
Easy hand-carry by attaching(or detaching) the battery pack to(from) PDVR-1000 with
Velcro as below.
Velcro
41
Application of Accessories
තGWhen a battery pack is connected for additional power supply, "Battery Pack"
option in system setup should be selected "On" for preventing abnormal
operations from a low level of the battery pack power.
තGIf AC/DC adaptor is connected after the battery pack off, "Battery Pack" option
should be back to "Off".
12
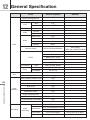
General Specification
SPEC
Detail & Support
Internal Storage Device
1-8GB
micro SD card (T-Flash)
1-16GB
LCD
Camera
Video
Audio
Size
2.4"
Resolution
320x240, TFT 262K
Ext. Camera
1Ch (CCD type)
Input Ch
1Ch (Support up to 720x480)
Output Ch
1Ch
Built-in MIC
YES
Input Ch
1Ch (Ext mic)
Output Ch
1Ch
Speaker
Mono
H/W
Remote Control
REC/STOP/PAUSE/HOLD
Remark
Support SDHC 16GB
TV/LCD Selectable
LED Display
(REC: ON, PAUSE: Blinking)
HOLD
PLAY
MENU, REC, STOP
KEYS
VOL UP, VOL DOWN
FF, REW
USB
USB 2.0 (High Speed)
Battery
3.7[V], 2000[mAH]
AC Adaptor
DC 5V, 2A
PC Interface
Power
Size
42
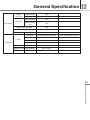
General Specification
Other
functions
Dimensions
95.6x59.6x18.0[mm]
Weight
98.5[g]
Memory Change in Memory Full
YES
Time stamp
YES
Record Quality Select
YES
Slide Show
YES
LCD On/Off
YES
Video/Audio Select
YES
Image Thumbnail View
YES
Support LCD Off to Recording
YES
Recording backup to low battery
YES
Auto Power Off
Video Format
Recording
Video
Recording
Resolution
Li-ion Polymer
Max View Size 1600x1200
YES
NTSC/PAL
Video+Audio, Video
NTSC: 720x480/352x240/176x120
PAL: 720x576/352x288/176x144
Frame Rate
5/10/15/20/25/30fps
Quality
High/Standard/Low
NTSC (PAL up to 25fps)
General Specification
Video
Recording
Recording
Audio Rec.
Snap Picture
YES
Auto Timely Shot
YES
Voice Recoding
YES
Video & Audio
Rec
YES
Motion Detection Rec.
10/20/30/60 sec
YES
Timer Recording
YES
Recording Time Normal Mode
Min 2hours30mins
Built-in Battery
Resolution
720x480/352x240/176x120
720x576/352x288/176x144
Frame Rate
Max. 30 fps with NTSC
Max. 25 fps with PAL
File Format
H.264
Playback speed
1/8, 1/4, 1/2, 1, 2, 4, 8
Video
Playback
Audio
File Format
Playback Time Normal Mode
PC Player
KM Player
12
WAV
Min 4 hours
Stored in the folder of PDVR-1000
Internet Download available
43
General Specification
13
Warranty Card
Warranty Card
Product: Pocket Video Recorder
Model: PDVR-1000
Warranty Period: 6 months
Purchase Date:
Name
Purchaser
Address
Telephone
Name
Seller
Address
Telephone
Please contact your retailer center of DIASONIC Technology Co., Ltd. When it is out
of order.
̻GGExchange, (charged or free) repair services, refund, and part-keeping periods comply
with regulations of the customer protection act.
̻GGFor questions or more information about the product, contact the customer center of
DIASONIC Technology Co., Ltd
̻GGThe warranty card is only valid in the country to purchase. Please keep the card for
a service.
̻GG
44
Warranty Card
Diasonic Technology Co., Ltd
Address: 321-43, Seoksu-dong, Manan-gu, Anyang-si, Gyeonggi-do (430-040), South Korea.
Reseller or distributor
June, 2009ྙ
Printed in Korea