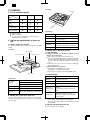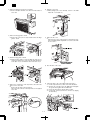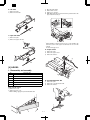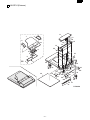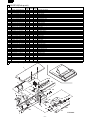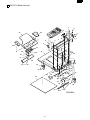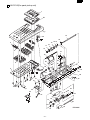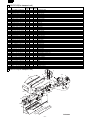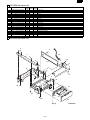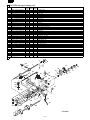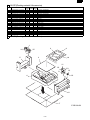
1
AR-SP3
CODE: 00ZAR15OPTA1E
AR-SP3
DIGITAL COPIER OPTIONS
AR-FX3
AR-DE9
MODEL
AR-SP3 (SPF)
AR-FX3 (FAX)
AR-DE9 (1 TRAY UNIT)
AR-PG1 (GDI + USB Kit)
∗ For the specifications, operational descriptions, circuit
diagrams, and Parts Guide of the AR-FX3, refer to the AR-F151
Service Manual and Parts Guide.
AR-PG1
CONTENTS
[ 1 ] GENERAL . . . . . . . . . . . . . . . . . . . . . . . . . . . 1 - 1
[ 2 ] UNPACKING AND INSTALLATION . . . . . . . . . . . . . 2 - 1
[ 3 ] AR-SP3 . . . . . . . . . . . . . . . . . . . . . . . . . . . . 3 - 1
[ 4 ] AR-DE9 . . . . . . . . . . . . . . . . . . . . . . . . . . . . 4 - 1
[ 5 ] AR-PG1 . . . . . . . . . . . . . . . . . . . . . . . . . . . . 5 - 1
● PARTS GUIDE
Parts marked with “ ” are important for maintaining the safety of the set. Be sure to replace these parts with specified
ones for maintaining the safety and performance of the set.
SHARP CORPORATION
This document has been published to be used
for after sales service only.
The contents are subject to change without notice.
AR-SP3
Part names
[1] GENERAL
Side cover
1. List of available options
Model
AR-150
AR-155
AR-F151
Option
AR-SP3
(SPF)
∗1
AR-FX3
(FAX)
∗1
AR-DE9
(1 TRAY UNIT)
∗1
Tray
AR-PG1
(GDI + USB Kit)
Specifications
: Option available
: Option not available
∗1: The option setup is provided in the models for Europe.
FAX and SPF are incompatible.
Copy paper size
5-1/2″ × 8-1/2″ to 8-1/2″ × 14″
Paper weight
15 lbs. to 21 lbs.
Paper capacity
One paper tray with capacity for 250 sheets
of 21 lb. bond paper
Weight
Approx. 6.6 lbs. (3 kg)
A. AR-SP3 (Single Pass Feeder)
Dimensions
The single pass feeder (SPF) holds up to 30 originals for automatic
feeding.
19.6″ (W) × 15.6″ (D) × 3.5″ (H)
(498 mm (W) × 395 mm (D) × 88 mm (H))
Power supply
Drawn from the copier
2. Outline and specifications of each option
Part names
C. AR-PG1 (GDI + USB Expansion Kit)
Original guides
(1) MAIN FEATURES
Document feeder tray
a. Printing from Windows 3.1x, Windows 95, Windows 98*, and
Windows NT 4.0 applications
∗ USB is supported on Windows 98 pre-installed only.
● High-speed and high-quality printing can be performed from Windows 3.1x, Windows 95, Windows 98, and Windows NT 4.0 applications through the SHARP GDI (Graphics Device Interface)
system.
● Since print data is processed in the computer, waiting time
during printing is short.
Feeding roller cover
b. High-speed printing at 8 pages/min.
● First print time is approximately 9.6 seconds.
(Excluding the communication time with PC)
● Print speed is 8 pages/min., when printing multiple pages.
SPF exit area
(2) SPECIFICATIONS
Specifications
Acceptable
originals
Weight: 14 to 23 lbs.
Size:
5-1/2″ × 8-1/2″ to 8-1/2″ × 14″
Capacity: Up to 30 sheets
Power supply
Drawn from the copier
Weight
Approx.6.6 lbs.(3kg)
Dimensions
19.6″ (W) × 15″ (D) × 4.3″ (H)
(498 mm (W) × 380 mm (D) × 110 mm (H))
B AR-DE9 (250 - Sheet Paper Feed Unit)
The paper feed unit provides the convenience of increased paper
capacity for the copier and a greater choice of paper sizes readily available for copying.
Resolution
600 or 300 can be selected.
Page description
language
SHARP GDI (Parallel)
SHARP GDI, USB (USB)
Page orientation
Portrait or landscape
First print time
Approx. 9.6 seconds*
Print speed
(multiple pages)
Approx. 8 pages per minute (letter or A4)
(Parallel)
Approx. 6 pages per minute (letter or A4)
(USB)
Interface port
Bi-directional parallel interface
(IEEE 1284 compliant) 2 m (6 feet) Max.
USB (B-type) interface (twisted pair cable)
2 m (6 feet) Max.
∗ First print time may differ depending on operating conditions,
such as power-supply voltage and room temperature.
Also the time may differ depending on data quantity to be printed
and applications.
D. AR-FX3 (Facsimile Expansion Kit)
Refer to the AR-F151 Service Manual.
1 – 1
AR-SP3
3) Remove the Mylar sheet from the rear cabinet.
● Remove the Mylar sheet that covers the hole for the actuator of
sensor unit.
[2] UNPACKING AND INSTALLATION
1. AR-SP3 Instalation Manual
4) Remove the hinge guides L and R.
● Remove the screws (two for each) and then remove the hinge
guides L and R.
5) Attach the hinge guides L and R.
● Attach the hinge guides L and R by fitting the pawls (two for
each) into the frame of the copier and secure them with the two
screws (M3 × 8) for each that have been removed in step 3.
Turn the main switch to the “OFF” position and remove the power plug
from the outlet.
1) Remove the document cover.
● Remove the document cover from the copier.
6) Place the SPF on the copier.
2) Remove the rear cabinet.
● Remove the four screws and then remove the rear cabinet.
2 – 1
AR-SP3
7) Connect the SPF with the copier using the relay harness.
<1> Fit the snap band to the position shown in the illustration.
<2> Attach the core to the relay harness. At this time, take care on
the core position and twist the harness two or three times.
<3> Secure the relay harness with the harness clamp.
<4> Connect the connector.
(Connect the connectors by aligning the black lines.)
10) Attach the sensor unit.
● While pushing up the sensor unit fully, secure it to the PWB
holder with a screw (M3 × 8).
M3X8
11) Attach the rear cabinet.
● Remove the rib from the rear cabinet.
<1> Hang the four pawls shown in the illustration below on the
plate.
<2> Push down the actuator of the sensor unit.
<3> Position the cabinet to the upper screw positions.
<4> Ensure that the actuator is inserted into the square hole of the
cabinet.
Note: While pushing down the actuator of the sensor unit, attach
the rear cabinet so that the actuator is inserted into the hole
of the rear cabinet.
8) Attach the core to the ground wire and secure it.
<1> Attach the core with two binding bands as shown in the illustration by taking care that the core is in the specified position.
<2> Secure the ground wire to the hinge guides with the binding
bands.
<3> Secure the ground terminal to the frame of the copier with a
screw (M3 × 10) and handle the wiring so that the core is
under the hinge guides.
9) Remove the securing tape of the relay harness and connect the
harness to the sensor unit.
● Remove the tape that secures the harness.
Then connect the connector of the relay harness to the supplied
sensorunit.
12) Attach the cover to the rear cabinet.
<1> Align the arrow marks as shown in the illustration.
<2> Then slide the cover to the left.
<3> Secure the cover with a screw.
2 – 2
AR-SP3
2. AR-FX3 Installation Manual
13) Attach the SPF to the copier.
● Attach the SPF by inserting the hinge guide sections of the SP3
into the hinge guides L and R.
1
2
2
Circuit standard label, 1 sheet
14) Insert the power plug into the outlet and turn the main switch of
the copier to the “ON” position.
15) Perform SIM setting.
● Execute simulation [2] of [26] and enter [1].
16) Check the ON/OFF operation of the open detection sensor and
book detection sensor.
● Execute simulation [2] of [2] and check that the indicator on the
operation panel lights up and goes out by opening and closing
the SPF. When the book detection sensor is turned ON/OFF, the
drum replacement lamp is turned ON/OFF accordingly.
Turn the main switch to the “OFF” position and remove the power plug
from the outlet.
1) Remove the document cover and the rear cabinet.
● After removing the document cover, remove the four screws and
then remove the rear cabinet.
17) Check the copy ratio, and then check the center displacement and
leading edge image void.
● Place an original on the document glass and make a copy.
Then, place an original in the document feeder tray and make a
copy.
If the center of the copy from the document glass is displaced
from the copyfrom the document feeder, adjust the center referring to the service manual.
2 – 3
AR-SP3
2) Remove the Mylar sheet from the rear cabinet.
● Remove the Mylar sheet that covers the hole for the actuator of
sensor unit.
6) Attach the sensor unit.
● While pushing up the sensor unit fully, secure it to the PWB
holder with a screw (M3 × 8).
M3X8
3) Remove the hinge guides L and R.
● Remove the screws (two for each) and then remove the hinge
guides L and R.
7) Replace the line cover.
● Remove the two screws, replace the line cover that has been attached at shipping with the supplied line cover, and secure it with
the two screws.
4) Attach the hinge guides L and R.
● Attach the hinge guides L and R by fitting the pawls (two for
each) into the frame of the copier and secure them with the two
screws (M3 × 8) for each that have been removed in step 2.
8) Place the SPF on the copier.
9) Connect the SPF to the copier with the SPF relay harness.
<1> Fit the snap band to the position shown in the illustration.
<2> Remove the screw that secures the PWB holder and tighten
the ground wire together with the PWB holder.
<3> Secure the relay harness with the harness clamp.
<4> Connect the connector.(Connect the connectors by aligning
the black lines.)
5) Remove the securing tape of the relay harness and connect the
harness to the sensor unit.
● Remove the tape that secures the harness.
Then connect the connector of the relay harness to the supplied
sensor unit.
2 – 4
AR-SP3
10) Attach the fax PWB.
● While ensuring that the connector of the fax PWB is securely
connected to that of the copier, attach the fax PWB to the PWB
cover with seven screws (M3 × 6) and connect the relay harness
connector.
Connect the relay harness to the connector of the fax PWB.
(Connect the connectors by aligning the black lines.)
13) Attach the cover to the rear cabinet.
<1> Align the arrow marks as shown in the illustration.
<2> Then slide the cover to the left.
<3> Secure the cover with a screw.
11) Attach the PWB cover.
● Attach the supplied PWB cover with five screws (M3 × 6).
M3X6
14) Attach the SPF to the copier.
● Attach the SPF by inserting the hinge guide sections of the FX3
into the hinge guides L and R.
M3X6
1
M3X6
M3X6
12) Attach the rear cabinet.
<1> Hang the four pawls shown in the illustration below on the
plate.
<2> Push down the actuator of the sensor unit.
<3> Position the cabinet to the upper screw positions.
<4> Ensure that the actuator is inserted into the square hole of the
cabinet.
Note: While pushing down the actuator of the sensor unit, attach
the rear cabinet so that the actuator is inserted into the hole
of the rear cabinet.
2
2
15) Stick the label to the rear cabinet.
● After installing the FAX expansion kit in the machine, please put
the registration label, packed with the kit, on the prescribed location.
∗ For the details,refer to the AR-FX3 Installation Manual.
2 – 5
AR-SP3
16) Insert the power plug into the outlet and turn the main switch of
the copier to the “ON” position.
3) Remove the OP gear cover and rubber feet from the bottom of the
copier.
● Remove the screw and remove the OP gear cover.
Then, take off and remove the rubber feet.
17) Perform SIM setting.
Execute simulation [2] of [26] and enter [1].
18) Check the ON/OFF operation of the open detection sensor and
book detection sensor.
● Execute simulation [2] of [2] and check that the indicator on the
operation panel lights up and goes out by opening and closing
the FAX-SPF. When the book detection sensor is turned
ON/OFF, the drum replacement lamp is turned ON/OFF accordingly.
19) Check the copy ratio, and then check the center displacement and
leading edge image void.
● Place an original on the document glass and make a copy. Then,
place an original in the document feeder tray and make a copy.
If the center of the copy from the document glass is displaced
from the copy from the document feeder, adjust the center referring to the service manual.
3. AR-DE9 Installation Manual
4) Install the second cassette unit to the copier.
● If the second cassette unit is aligned to the copier, it can be positioned automatically.
Hold the copier lightly to prevent it from toppling down and
secure the second cassette unit with four screws (M4 × 16).
Turn the main switch to the “OFF” position and remove the power plug
from the outlet.
1) Remove the DV cartridge from the copier.
● Open the bypass tray, side cover, and front cover, and then
remove the DV cartridge.
1
5) Remove the rear cover and connect the connector.
● Remove the screw and remove the rear cover.
Then, connect the connector of the second cassette unit to that
of the copier.
3
2
2) Make the copier upright.
● Close the front cover, side cover, and bypass tray, and then
make the copier upright in the orientation shown in the illustration.
2 – 6
AR-SP3
6) Attach the rear cover.
● Attach the rear cover to its original position and secure it with the
screw (M4 × 12).
9) Remove the paper tray lock for packing.
● Remove the paper tray lock for packing that secures the turning
plate in the paper tray by rotating it in the direction of the arrow
and store it in the specified position.
10) Set the paper tray side guide.
● Squeeze the lever of the paper tray side guide to slide the guide
to the position for the paper size to be used.
7) Return the copier to the normal orientation.
● When returning the copier to the normal orientation, gently return
it without giving a shock.
Paper guide (B)
Paper guide (A)
11) Load paper into the paper tray.
● When loading paper, do not exceed the maximum height line.
8) Insert the DV cartridge into the copier.
● Open the bypass tray, side cover, and front cover, and insert the
DV cartridge. Then, close the front cover, side cover, and bypass
tray.
3
2
12) Remove the optical locking screw and fusing unit packing lever so
that the copier is ready.
1
13) Insert the power plug into the outlet and turn the main switch to
the “ON” position. Then, perform the following procedure.
14) Perform SIM setting.
● Execute simulation [3] of [26] and enter [1].
15) Check the center displacement.
● Place an original on the document glass and make a copy using
the tray in the copier.
Then, make a copy using the tray in the installed optional paper
feed unit.
If the center of the copy from the optional paper feed unit is displaced from the copy from the tray in the copier, adjust the center referring to the service manual.
2 – 7
AR-SP3
3) Attach the GDI interface PWB.
● Fit the connector of the GDI PWB into the mounting position of
the copier, secure the side A with three screws, and then secure
the front B with two screws.
4. AR-PG1
A. Installation Manual
A
B
M3X8
M3X8
4) Attach the GDI harness.
● Attach the GDI harness so that the blue lines face forward and
also face toward the GDI interface side.
Note: Be careful about the direction of the blue lines.
Turn the main switch to the “OFF” position and remove the power plug
from the outlet.
1) Remove the cover of the rear cabinet.
● Remove the screw, slide the cover in the direction indicated by
the arrow, and remove the cover of the rear cabinet.
5) Attach the PWB cover.
<1> Before attaching the PWB cover, hold down the GDI harness
in the direction A in the illustration below.
<2> Fit the upper part of the PWB cover to the upper screw that
has been loosened in step 2 above.
<3> While rotating the lower part of the PWB cover clockwise, fit
it to the lower screw.
<4> Tighten the upper and lower screws to secure the cover.
2) Remove the PWB cover.
<1> Loosen the screws that secure the PWB cover.
<2> Push up the PWB cover and
<3> Rotate it counterclockwise to remove it.
2
1
3
1
2 – 8
AR-SP3
6) Attach the rear cover.
● Align the arrow marks as shown in the illustration and then slide
the cover to the left. Then, secure the cover with a screw.
(3) Installing the printer driver
The software for your printer is provided on CD-ROM.
Before installing the printer driver, be sure to check the following items.
● Is the printer connected properly to the computer?
● Does the printer have paper?
● Is there another GDI printer driver or Windows Printing System
printer driver already installed? If installed, change the printer
port setting. To change the printer port settings.
In this description, the following drive configuration is presumed.
Specify proper drives depending on the configuration of your computer.
Drive R: CD-ROM drive (installation source). If necessary,
replace R with the letter of your CD-ROM drive.
Drive C: Hard disk drive (installation destination). If necessary,
replace C with the letter of your hard disk drive.
a. Windows 95/Windows NT 4.0 Installation Instructions:
With both the computer and the printer turned off, connect the printer
to the computer with a parallel interface cable.
Arrow marks
1) Load paper into the paper tray of the printer. For instructions on
loading paper, see the section LOADING COPY PAPER in the
copier operation manual.
After sliding
2) Turn on the printer.
3) Turn on your computer and start Windows.
4) When using Windows 95 on a personal computer with plug & play*,
the “Update Device Driver Wizard” window will appear. Insert the installation CD-ROM into the CD-ROM drive. Click the Next button
and follow the on-screen instructions. Proceed to step 7. If the
“Copying Files” window appears during this operation, enter R:\ (if
the CD-ROM is designated as drive R) and click the OK button.
B. Installing the printer driver software
(1) Description of the printer driver
The printer driver is the software program which runs the printer. It converts the data in your file into information that the printer can understand. It also controls communication between the printer and
computer as the data is printed.
(2) Checking the hardware and software requirements
You will need the following hardware and software in order to install the
printer driver.
Computer type
Windows type
CPU
Physical RAM
Display
Hard disk free space
IBM PC/AT or compatible computer
equipped with a bi-directional parallel or
USB interface, and CD-ROM drive
Windows 3.1x, Windows 95, Windows 98*,
Windows NT 4.0
∗ USB is supported on Windows 98
preinstalled only.
486DX 66 MHz or better
Windows 95, Windows 3.1x: 8MB (16MB or
more is recommended.)
Windows NT4.0: 12MB (16MB or more is
recommended.)
Windows 98: 16MB (32MB or more is
recommended.)
640 × 480 dots (VGA) or better
10 MB or more
● If you use Windows 95 and the “New Hardware Found” window
will appear, click the Driver from Disk Provided by Hardware
Manufacturer button and then click OK. Proceed to step 6.
● If you use Windows 95 and the screen shown above or the “New
Hardware Found” window does not appear, proceed to step 5.
● If you use Windows NT 4.0, proceed to step 5.
∗ Plug & play
This feature is effective if both the computer and peripheral equipment are equipped with IEEE 1284 compliant parallel interface.
5) Insert the installation CD-ROM into the CD-ROM drive.
Click the Start button and select Run. When the screen shown
below appears, type R:\SETUP (if the CD-ROM is designated as
drive R) and click the OK button. Proceed to step 7.
Caution: The printer driver included in this product cannot be used
under Windows NT3.5x, OS/2, pure MS-DOS and other
operating systems which are not described above.
2 – 9
AR-SP3
6) “Install from Disk” window will appear. Insert the installation CDROM into the CD-ROM drive. Type R:\ (if the CD-ROM is designated as drive R) and click the OK button. Proceed to step 7.
4) When using Windows 98 on a personal computer with plug & play*,
the “Add New Hardware Wizard” window will appear. Click the Next
button and follow the on-screen instructions.
● If the “Add New Hardware Wizard” window does not appear,
proceed to step 8.
∗ Plug &play: For plug & play information
7) The installation program will start. To install the printer driver to
the default folder, click the Next button. To select a different folder,
select Browse or type in the new path and folder name. Click OK
and say YES to create the folder, select the Next button to continue.
8) On the display, you will see “printer port to be used”. Normally, this
is LPT1 and it is selected automatically.
Ensure that Yes is checked to use the printer as the default
printer.
Finally click the Next button.
9) A “Confirm installation” window will be displayed. To continue installation, click the Yes button.
5) Select Search for the best driver for your device and click the Next
button.
10) When the installation is complete, you will be asked whether or not
to print a test page. If you wish to do so, click the Yes button. At
this time, ensure that paper is loaded in the paper tray.
6) Insert the installation CD-ROM into the CD-ROM drive. (If you are
using the USB interface, confirm that the installation CD-ROM is in
the CD-ROM drive.) Select the CD-ROM drive and click the Next
button.
11) If the test print completes successfully, click the Finish button.
“The installation of the SHARP AR-150 Series Software is complete.” window will be displayed. Click the OK button.
b. Windows 98:
With both the computer and the printer turned off, connect the printer
to the computer with either a parallel or a USB interface cable.
1) Load paper into the paper tray of the printer. For instructions on
loading paper, see the section LOADING COPY PAPER found in
the copier operation manual.
2) Turn on the printer.
3) Turn on your computer and start Windows.
When using the USB interface:
● Connect your personal computer and the printer using a USB interface cable if you have not already done so.
● When the “Add New Hardware Wizard” window appears, insert
the installation CD-ROM, click the Next button, follow the onscreen instructions, and finally click the Finish button.
7) Windows driver file search will find the device “SHARP AR-150
Series”. Click the Next button. Proceed to step 9.
8) Insert the installation CD-ROM into the CD-ROM drive. (If you are
using the USB interface, confirm that the installation CD-ROM is in
the CD-ROM drive.) Click the Start button and select Run. When
the window shown below appears, type R:\SETUP (if the CD-ROM
is designated as drive R) and click the OK button. Proceed to step
9.
2 – 10
AR-SP3
9) The installation program will start. To select a different folder, select
Browse and type in the path and folder name where the printer
driver will be installed. Click OK and say YES to create the folder,
select the Next button to continue. To install the printer driver to the
default folder, click the Next button.
a. Uninstall AR-150 Series
The printer driver can be uninstalled. If the driver is uninstalled, printing
can no longer be performed on the printer.
For proper uninstallation, be sure to use the SHARP uninstall program
of the printer driver group.
10) On the display you will see “printer port to be used”. The printer
port is selected automatically. If you are using the parallel interface, this is LPT1. If you are using the USB interface, this is
LPT/USB1. Ensure that Yes is checked to use the printer as the
default printer. Finally click the Next button.
Readme
The latest information on the printer driver is included in this document.
Read the Readme first.
Advanced Settings
See help for Advanced Settings.
11) A “Confirm installation” window will be displayed. To continue installation, click the Yes button.
Status Monitor
The Status Monitor window provides visual information about the
printer state and current job.
12) When the installation is complete, you will be asked whether or not
to print a test page. If you wish to do so, click the Yes button. At
this time, ensure that paper is loaded in the paper tray.
DOS Emulation Setup
Status Monitor HELP
Assistance and information for Status Monitor.
13) If the test print completes successfully, click the Finish button.
“The installation of the SHARP AR-150 Series Software is complete.” window will be displayed. Click the OK button.
DOS Emulation HELP
Assistance and information for DOS Emulation support.
c. Windows 3.1x:
With both the computer and the printer turned off, connect the printer
to the computer with a parallel interface cable.
Advanced Settings HELP
Assistance and information for Advanced Settings.
1) Load paper into the paper tray of the printer. For instructions on
loading paper, see the section LOADING COPY PAPER in the
copier operation manual.
2) Turn on the printer and then start Windows on your computer.
3) Insert the installation CD-ROM into a CD-ROM drive.
4) Choose File from the Menu bar in Program Manager, and then
choose the Run... command.
5) Type R:\SETUP (if the CD-ROM is designated as drive R) in the
command line box and then click the OK button.
6) Select a directory to which the printer driver will be installed and
click the Next button. To install it to the default directory, click the
Next button.
7) A “printer port to be used” window will be displayed. Normally, LPT1
is automatically set.
Then ensure that Yes is checked to use this printer as the default
printer.
8) A “Confirm installation” window will be displayed. To continue installation, click Yes.
9) When the installation is complete, restart Windows.
(4) AR-150 Series printer driver group
When the printer driver is installed, the SHARP AR-150 Series printer
driver group will be created. This group of software programs provides
the following functions:
2 – 11
AR-SP3
[3] AR-SP3
1. Operational descriptions
A. Outline
The SPF (Single Path Feeder) is installed to the AL-1000/1200 as a standard provision, and it automatically copies up to 30 sheets of documents
of a same size. (Only one set of copies)
B. Document transport path and basic composition
(1) Pickup roller
(2) Sheet of document for paper feed
(4) Paper stopper
(5) Document feed roller
(6) Separation sheet
(7) Paper entry sensor
(8) PS roller D
(9) Transport follower roller
(11) Paper exit follower roller
(12) Document tray
(10) Paper exit roller
(3) Set detection ACT
C. Operational descriptions
Time chart (Tray feed)
Document set
SPID ON
Document set sensor
Document feed unit lamp ON
PSW ON
MIRM rotation
(Copier side)
MM rotation
CPFS ON
Main motor rotation
Copy start
The scanner is shifted
to the exposure position.
(SPF side)
SPFM rotation
SPF motor rotation
Paper feed
SPUS ON
Document feed
SPPD ON
Document transport sensor
PPD ON
RRC ON
Synchronization
Paper transport
Document transport
(Transfer)
(Exposure)
(Fusing)
(Document exit)
POD ON
(Paper exit)
In the zooming mode, the magnification ratio in the sub
scanning direction (paper transport direction) is adjusted
by changing the document transport speed.
3 – 1
AR-SP3
D. Cases where a document jam is caused
a.
b.
c.
d.
When
When
When
When
SPPD is ON (document remaining) when the power is turned on.
SPPD is not turned ON within about 1.5 sec (at 100% copy) after starting the document feed operation.
SPPD is not turned on within about 4.7 sec (at 100% copy) after turning on SPPD.
the SPF document jam release door or the OC cover is opened during document transport (SPF motor rotating).
1) Remove the belt, the paper feed frame SP, and two harnesses.
2) Remove the pickup unit.
2. Disassembly and assembly
No.
Part name Ref.
1
A
Sensor PWB
B
Pickup solenoid
C
Clutch
D
Manual paper feed roller, pickup roller
E
Belt
F
SPF motor
G
Paper entry sensor
H
PS roller
I
Paper exit roller
1
2
3
4
3
Pickup unit removal
1) Remove three fixing pawls from the bottom of the machine.
2) Remove the front cover and the rear cover.
1
1
2
2
*
1
3 – 2
When installing the parts, be careful of the hole position of the paper
frame SP.
AR-SP3
A. Sensor PWB
C. Clutch
1) Remove two screws from the bottom of the pickup unit.
2) Remove the upper cover.
1)
2)
3)
4)
Remove the E-ring.
Remove the pulley and bush.
Slide the bush in the arrow direction.
Lift the clutch, and 5) remove the clutch.
2
2
1
5
1
3
4
1
1) Remove two screws.
2) Remove the sensor PWB.
3) Remove the harness.
1
1
1) Remove the E-ring.
2) Remove the parts.
3
2
1
B. Pickup solenoid
1) Remove two screws.
2) Remove the pickup solenoid
2
D. Manual paper feed roller, pickup roller
2
1)
2)
3)
4)
1
Lift the paper stopper.
Slide the takeup roller unit.
Slide the bush in the arrow direction.
Remove the takeup roller unit.
A
1
A
*
When installing, hang iron core A on the solenoid arm.
2
3
3 – 3
4
AR-SP3
*
When installing the takeup roller, hang the projection of the takeup
roller unit on the solenoid arm.
1) Remove the parts.
2) Remove the manual paper feed roller.
3) Remove the pickup roller.
4) Remove the parts.
F. SPF motor
1)
2)
3)
4)
5)
6)
4
Remove
Remove
Remove
Remove
Remove
Remove
the harness.
four screws.
the drive unit.
the belt.
two screws.
the SPF motor.
6
3
1
2
1
5
1
5
2
3
2
4
1
Transport unit removal
1) Remove two screws.
2) Remove the document tray unit.
3) Remove five screws.
4) Remove the transport unit.
2
3
1
3
G. Paper entry sensor
1)
2)
3)
4)
3
Loosen the screw.
Open the paper exit PG.
Remove the paper entry sensor.
Remove the harness.
3
1
4
E. Belt
1) Remove the belt.
4
3
1
2
1
3 – 4
AR-SP3
1)
2)
3)
4)
H. PS roller
1) Remove the parts.
2) Remove the PS roller.
Open the right cabinet.
Remove three screws.
Remove one connector.
While tilting down the 2nd connection arm A, pull and remove the
paper feed unit toward you.
C
D
1
D
2
3
4
1
B
I. Paper exit roller
A
1
1) Remove the parts.
2) Remove the paper exit roller.
2
1
*
*
When installing, securely insert two bosses C on the machine side
and two bosses D on the paper feed unit side. Be sure to fix the
earth B.
Insert the 2nd page feed.
A. Paper sensor
1) Remove the pawl.
2) Remove the paper sensor.
3) Remove the harness.
1
2
3
2
[4] AR-DE9
1. Disassembly and assembly
No.
Part name Ref.
A
Paper sensor
B
Cassette detection SW
C
Paper feed solenoid
D
Transport roller
E
Paper feed clutch
F
2nd paper feed roller
1
B. Cassette detection SW
1) Remove the pawl.
2) Remove the cassette detection SW.
3) Remove the harness.
Paper feed unit removal
1) Remove the screw.
2) Remove the rear cover.
*
When installing, engage the pawl and install the unit.
1
3
2
2
A
1
4 – 1
AR-SP3
C. Paper feed solenoid
E. Paper feed clutch
1) Remove the screw.
2) Remove the connector.
3) Remove the paper feed solenoid.
1) Remove the E-ring.
2) Remove the paper feed clutch.
3) Remove the parts.
2
3
A
2
1
1
3
D. Transport roller
1) Remove two E-rings.
2) Remove the transport roller.
4
*
1
When installing, fit the cut surface A.
F. 2nd paper feed roller
1) Remove the E-ring and the parts.
2) Remove the 2nd paper feed roller.
A
B
A
1
3
B
2
*
Install so that the earth spring A is brought into contact over bearing
B.
2
C
1
D
*
4 – 2
When installing, hang the 2nd connection arm on the 2nd connection
arm SP B. Be sure to install so that the earth spring C is in contact
under the bearing D.
AR-SP3
2. Interface
1. Electrical section
A. PARALLEL INTERFACE
A. GDI/USB PWB
This printer uses a bi-directional parallel interface. Use the supplied interface cable.
Personal
Computer
Connector
36-pin DDK 57LE-40360-730B (D29) female connector or equivalent
connector
Cable
Shielded type bi-directional parallel interface
For best results,, use a printer interface cable which is IEEE1284 compliant.
Pin configuration
The pin numbers and signal names are listed in the following table.
GND
Pin
No.
IC503
IC502
7SH08F
CPU
IC9
IC113 74HC14
/ACK,BUSY,PE,
/FAULT,SLCT
/USB_EN
/SLCTIN,/INIT
/STB,/AUTOFD,
REV
/1284_EN
USB-IN
RESET/DISABLE
IC501
USS-725
74LS
244
74LS
244B
IC603
IC602
74LS
244A
EEPR
OM
5V
DATA -
5V
DATA +
DATA+
IC504
7SH08F
/ACK,BUSY,PE,/FAULT,SLCT
/STB,/AUTOFD,/SLCTIN,/INIT
PDATA0 7
74LS
245
IC601
GDI/USB PWB
PDATA0 7
ASIC
IC10
MCU PWB
18
1
36
19
USB
IEEE1284
Personal
Computer
[5] AR-PG1
The GDI/USB PWB has two circuits; one for transmitting and receiving
IEEE1284 signals and the other for transmitting and receiving USB signals and converting USB signals into IEEE1284 signals.
IC601, 602 and 603 are connected between IEEE1284 an ASIC to convert signals.
IC501 transmits and receives USB signals and converts USB signals
into IEEE1284 signals.
IC502 stores various setup data necessary for USB operation of IC501.
IC503 informs the CPU of connection of USB. It is connected with PC
via a USB cable. When 5V is inputted from PC to the IC’s input pin,
the output pin (signal name: USB-IN) is driven to HIGH to inform the
CPU of connection of USB.
IC504 detects connection with PC via a USB cable, supplies power to
the USB port signal line (signal name: DATA+) to enable USB communication.
When USB is connected, the CPU enables USB and disables
IEEE1284.
(When USB is enabled, IE1284 is disabled.)
5 – 1
Signal name
Pin
No.
Signal name
1
STB
19
GND (STB RET)
2
DATA1
20
GND (DATA1 RET)
3
DATA2
21
GND (DATA2 RET)
4
DATA3
22
GND (DATA3 RET)
5
DATA4
23
GND (DATA4 RET)
6
DATA5
24
GND (DATA5 RET)
7
DATA6
25
GND (DATA6 RET)
8
DATA7
26
GND (DATA7 RET)
9
DATA8
27
GND (DATA8 RET)
10
ACKNLG
28
GND
(ACKNLG RET)
11
BUSY
29
GND (BUSY RET)
12
PE (Paper End)
30
GND (PE RET)
13
SLTC
31
INPRM
14
AUTO LF
32
FAULT
15
(NC)
33
(NC)
16
GND (0 V)
34
(NC)
17
FG
35
+5 V
18
+5 V
36
SLTC IN
AR-SP3
B. USB INTERFACE
Connector
4-pin DDK DUSB-BRA42-T11
Type-B connector
Cable
Shielded twisted pair cable
(2 m (6 feet) Max.: high-speed transmission equivalent)
2
1
3
4
Pin configuration
The pin numbers and signal names are listed in the following table.
Pin No.
Signal name
1
+5V
2
– DATA
3
+DATA
4
GND
3. Print Area
The print area of this printer is shown below.
A. 600 dpi
B. 300 dpi
Dots
Dots
Paper
size
A
B
C
D
E
F
G
Paper
size
A
B
C
D
E
F
G
Letter
5100
4900
6600
6400
100
100
100
Letter
2550
2450
3300
3200
50
50
50
Legal
5100
4900
8400
8200
100
100
100
Legal
2550
2450
4200
4100
50
50
50
Invoice
3300
3100
5100
4900
100
100
100
Invoice
1650
1550
2550
2450
50
50
50
A4
4960
4760
7014
6814
100
100
100
A4
2480
2380
3507
3407
50
50
50
A5
3508
3308
4960
4760
100
100
100
A5
1754
1654
2480
2380
50
50
50
B5
4298
4098
6070
5870
100
100
100
B5
2149
2049
3035
2935
50
50
50
Folio
5100
4900
7800
7600
100
100
100
Folio
2550
2450
3900
3800
50
50
50
Foolscap
5100
4900
7440
7240
100
100
100
Foolscap
2550
2450
3720
3620
50
50
50
Portrait
Landscape
E
E
B
F
E
D C
G
E
F
D
C
G
Paper size
B
A
Print area
5 – 2
A
(2-B1)
/1284-EN
USB-ON
/USB-EN
3.3V
(2-B3)
(2-E3)
A
5V1
5V1
2
5 – 3
B
3
5
7
9
12
14
16
18
/STB
(2-D3)
(2-A2)
(2-A2)
(2-A3)
(2-A2)
/USB-EN
/AUTOFD
/SLCTIN
/INIT
C614
100p
C615
5V1
100p
C616
0.1u
C621
100p
100p
C617
1000p
C609
100p
(2-A2)
(2-A2)
C
(2-A2)
(2-A3)
(2-A2)
(2-A3)
PARAAD2
PARAAD0
(2-A3)
PARAAD3
PARAAD1
(2-A3)
PARAAD7
PARAAD4
(2-A2)
PARAAD5
(2-A2)
SLCT
PARAAD6
(2-A2)
/FAULT
1
DAP202K
D607
D608
DAP202K
D606
1.2kJ
R627
DAP202K
D602
DAP202K
2
PE
22J
22J
22J
22J
22J
D605
DAP202K
3
(2-A2)
R617
R616
R615
R614
R613
22J
3
(2-A2)
560p
C612
22J
22J
22J
1.2kJ
R626
5V1
DAP202K
D601
1.2kJ
R628
D609
1.2kJ
R629
D
DAP202K
D603
1.2kJ
R621
DAP202K
2
BUSY
100p
33p
C611
R612
R611
R610
R609
22J
22J
22J
22J
3
/ACK
100p
C618
33p
C610
R608
R607
R606
1
74LS244
2Y4
2Y3
2Y2
2Y1
1Y4
1Y3
1Y2
1Y1
19
1
17
15
13
11
8
6
4
2
100p
C608
2
2G
1G
2A4
2A3
2A2
IC603
2G
1G
2A4
2A3
2A2
2A1
1A4
1A3
1A2
1A1
100p
C607
3
19
1
17
15
13
2A1
1A4
1A3
1A2
1A1
74LS244
2Y4
2Y3
2Y2
2Y1
1Y4
1Y3
1Y2
IC602
100p
C606
1.2kJ
R620
1.2kJ
R622
3
0.1u
C620
3
11
8
6
4
7
/GDI-IN
USB-ON
9
SLCT
31FE-BT-VK-N
31
30
29
12
/FAULT
1Y1
100p
C605
1.2kJ
R619
D
1
1
USB-IN
14
PE
USB-IN
16
BUSY
5
18
/ACK
/STB
/AUTOFD
/SLCTIN
/INIT
/REV
PARAAD7
PARAAD6
PARAAD5
PARAAD4
100p
C604
2
28
27
26
25
24
23
22
21
20
19
18
17
16
15
14
13
12
11
10
9
100p
C603
1
8
0.1u
C619
C602
22J
22J
22J
22J
2
PARAAD3
PARAAD2
PARAAD1
74LS245
C601
R605
R604
R603
R602
R601
1.2kJ
R618
5V1
1
2
PARAAD0
1
19
9
8
7
6
5
4
3
2
5V1
C
2
7
6
5
4
3
DIR
A8
A7
A6
2
B8
B7
B6
A5
A4
A3
A2
A1
G
11
12
13
B5
B4
B3
B2
B1
IC601
(2-B4)
1
CN502
14
15
16
17
18
22000p
5V1
B
D604
1.2kJ
R623
DAP202K
2
1.2kJ
R624
1.2kJ
R625
GND
GND
GND
GND
GND
GND
GND
DATA 3
DATA 4
DATA 5
DATA 6
DATA 7
DATA 8
VCC
F GND
S GND
(NC)
F.G
E
5V1
/FAULT
/AUTOLF
5V1
36
35
34
33
32
31
30
29
28
27
26
25
24
23
22
21
20
19
3.3kJ
R630
/SLCTIN
VCC
(NC)
S GND
/INPRIM
GND
GND
SLCT
PE
BUSY
/ACK
GND
DATA 2
GND
GND
DATA 1
IEEE1284 CON
E
/DSTB
100J 1/2W
R501
18
17
16
15
14
13
12
11
10
9
8
7
6
5
4
3
2
1
CN501
SHIELD
3
4
C613
47u 16V
5V1
C501
SBO-02SAN
L501
GDI PWB(GDI SECTION)
A
1
2
3
4
AR-SP3
4. Circuit diagram
2
1
3
2
1
3
1
3
1
3
A
USB-IN
PDATA11
PCONTROL2
PDATA2
BUSY
nAUTOFD
PDATA12
5 – 4
24
23
25
20
19
18
17
5
10kJ
R511
26
C
0.1u
C511
27
5V-USB
3.3V
29
0.1u
C520
PDATA16
30
2
VDD5
1
PCONTROL1
IC503A
GND
5V2
(2-D3)
31
TC7SH08FU
4
VDD
32
B
(1-A4)
nINIT
5V2
GND
28
0.1u
nACK
C510
PCONTROL3
5V2
PDATA1
/INIT
PARAAD2
PCONTROL4
PARAAD0
BUSY
(1-C2)
(1-C1)
PDATA10
(1-C1)
/AUTOFD
(1-B3)
HLH
USS-725
PDATA7
PDATA3
VDD5
SELECT
VDD
16
15
nSTROBE
PDATA15
VDD5
GND
PDATA13
PDATA6
14
PDATA17
13
12
11
PDATA0
1
2
PARAAD3
(1-C1)
0.1u
SCAN_EN
PARAAD1
SLCT
(1-C2)
C507
PDATA4
nFAULT
PLH
SCL
(1-C1)
/STB
(1-B3)
5V2
9
10
VDD
SDA0
/ACK
PARAAD4
(1-C1)
0.1u
8
nSELECTIN
SELF_PWRD
(1-C2)
/FAULT
(1-C2)
C506
7
0.1u
C509
1kJ
R503
RESET
(1-B3)
/SLCTIN
64
PDATA14
63
6
62
GND
61
VDD5
60
PDATA5
59
PERROR
58
5
57
4
3.3V
56
3
0.1u
C508
55
0.1u
PCONTROL0
5V2
5V2
1kJ
R502
54
2
1
IC501
0.1u
C504
3.3V
0.1u
C622
53
(1-B3)
C505
5V2
3.3V
1.5u 16V
C503
SBO-02SAN
L503
1.5u 16V
C502
5V2
52
PARAAD5
L502
SBO-02SAN
51
PE
5V1
50
(1-C2)
PARAAD6
(1-C1)
3.3V
(1-B4)
C
49
(1-C1)
PARAAD7
(1-C1)
(1-A4)
B
5V2
nUSB_RESET
SUSPEND
GND
CLK_LO
CLK_HI
VDD
PLL_VDD
DPLS
DMNS
PLL_VSS
GND
SIXTEEN_BIT
VDD
TEST1
TEST0
DISABLE_1284
5V2
5
6
7
8
33
34
35
36
37
38
39
40
41
42
43
44
45
46
47
48
SDA
SCK
/WC
Vcc
IC502
C512
4
3
2
1
3.3V
/USB-EN
3.3V
0.1u
C515
3.3V
0.1u
C514
0.1u
C513
24C16
GND
A2
A1
A0
0.1u
D
15p
C516
(1-A4)
D
24J
24J
12MHz
X501
R506
R505
15p
C517
1.5kJ
R507
IC504A
5V-USB
(2-E3,C1)
TC7SH08FU
4
3.3V
5
3
4
GDI PWB (USB SECTION)
A
0.1u
C519
0.1u
C518
2
1
4
3
2
1
R508
F.G
R510
10kJ
R509
10kJ
E
USB-B CONNECTOR
CN503
GND
D+
D-
5V
24J
E
(1-A4)
(2-D3)
USB-ON
5V-USB
1
2
3
4
AR-SP3
SHIELD
3
22
21
3
AR-150P
PARTS GUIDE
CODE:00ZAR150PT/P1
MODEL
AR-SP3
AR-FX3
AR-DE9
AR-PG1
CONTENTS
1 AR-SP3-1(Exterors)
9 AR-SP3(Packing material & Accessories)
2 AR-SP3-2(Pick up unit)
F AR-FX3(Packing material & Accessories)
3 AR-SP3-3(Transport unit)
G AR-DE9(Packing material & Accessories)
4 AR-FX3-1(Base tray unit)
H AR-PG1(Packing material & Accessories)
5 AR-FX3-2(Fax panel pick up unit)
I AR-FX3(Fax panel PWB)
6 AR-FX3-3(Fax transport unit)
J AR-FX3(Fax PWB)
7 AR-DE9(2nd frame unit)
K AR-PG1(GDI/USB PWB)
8 AR-DE9(2nd paper feeding unit)
■
Index
SHARP CORPORATION
This document has been published to be
used for after sales service only.
The contents are subject to change without
notice.
AR-150P
DEFINITION
The definition of each Rank is as follows and also noted in the list
A : Parts necessary to be stocked as High usage parts.
B : Parts necessary to be stocked as Standard usage parts.
C : Low usage parts.
D : Parts necessary for refurbish.
E : Unit parts recommended to be stocked for efficient after sales service.
Please note that the lead time for the said parts may be longer than normal parts.
S : Consumable parts.
Please note that the following parts used in Copier under the same description are classified into A or B Rank depending
upon the place used.
Example : Gear made of Metal, Sprocket, Bearing, Belt made of Rubber, Spring clutch mechanism.
A Rank : The parts which may be with the revolution or loading.
B Rank : Parts similar to A Rank parts, but are not included in Rank A.
Because parts marked with "!" is indispensable for the machine safety maintenance and operation, it must be replaced with
the parts specific to the product specification.
F Other than this Parts Guide, please refer to documents Service Manual (including Circuit Diagram) of this model.
F Please use the 13 digit code described in the right hand corner of front cover of the document, when you place an order.
F For U.S. only-Use order codes provided in advertising literature.
Do not order from parts department.
1 AR-SP3-1(Exterors)
NO.
1
2
3
4
5
6
7
8
11
13
14
15
16
17
18
19
20
21
22
23
24
25
26
27
28
29
30
31
32
33
34
35
36
37
501
PARTS CODE
LSOU-0004QSZZ
LPLTP0011QSZZ
LPLTP0012QSZZ
NGERR0377FCZZ
XEPSD30P08X00
NGERH0193FCZZ
MSPRP0059QSZZ
PCOVP0036QSZZ
CFRM-0011QS51
XEBSD40P10000
CFRM-0013QS51
LBNDJ0013FCZ1
PSHEP0038QSZZ
PSHEP0063QSZZ
MSPRP0113QSZ1
PSHEP0037QSZ1
XEBSD30P08000
MHNG-0003QSZZ
XEBSE40P14000
NROLP0011QSZZ
PSPO-0001QSZZ
NSFTZ0010QSZZ
MSPRT0061QSZZ
MSPRP0060QSZZ
NROLP0010QSZZ
NSFTZ0009QSZZ
LPLTM0096QSZZ
LX-BZ0016QSZZ
MHNG-0004QSZZ
LSOU-0005QSZ3
PCUSS0010QSZ1
PSHEZ0102QSZZ
PSHEZ0112QSZZ
MSPRC0149QSZZ
CSOU-0004QS51
PRICE NEW
RANK MARK
AX
AH
AH
AD
AA
AB
AD
AK
BE
AA
BS
AA
AE
AC
AD
AE
AA
AX
AA
AD
AB
AE
AC
AD
AD
AE
AF
AC
AX
BB
AV
AD
AE
AC
BC
PART
RANK
D
C
C
C
C
C
C
D
E
C
E
C
C
C
C
C
C
C
C
C
C
C
C
C
C
C
C
C
C
D
C
C
C
C
E
DESCRIPTION
Original tray
Control plate F
Control plate R
Manual feeding rack gear
Screw (3´8X)
Manual feeding gear
Control plate spring
Rack cover
SPF pick up unit
Screw (4´10)
SPF transport unit
Wire band
Base tray sheet
Transport sheet
Earth spring
OC mat sheet
Screw (3´8)
SPF hinge L
Screw (4´14)
Delivery roller
Sponge
Delivery shaft
Delivery spring
Transport spring
Transport roller
Transport shaft
Base tray reinforce plate
Screw (3´8)
SPF hinge R
Base tray
OC sheet
Motor pressure sheet
Delivery earth sheet SPF
PS earth spring SPF
SPF original tray unit
–1–
AR-150P
1 AR-SP3-1(Exterors)
11
3
1
15 13
22
2
13
13
22
4
4
5
5
8
501
13
14
5
6
17
7
16
35
17
5
33
18
21
25
28 24
23
34
19
19
36
22
31
27 29
37
26
24 20
31
23
32
20
28
27
22
20
31
30 31
31
FCP03950
–2–
AR-150P
2 AR-SP3-2(Pick up unit)
NO.
PARTS CODE
GCAB-0008QSZZ
PSPO-0002QSZZ
MARMP0003QSZ1
LSTPP0001QSZZ
XEBSD30P08000
CPWBF0009QS51
DHAI-0055QSZZ
MLEVP0009QSZZ
MLEVP0010QSZZ
RPLU-0004QSZ1
XBPSD30P06KS0
MARMP0002QSZZ
MSPRT0067QSZ1
XRESP40-06000
NGERH0073QSZZ
PPIPP0008QSZZ
MSPRC1316FCZ1
LBOSZ1508FCZZ
LBSHZ0303FCZZ
NSFTZ0012QSZZ
NPLYZ0010QSZZ
XRESP30-06000
MSPRT0066QSZ1
PTME-0019QSZZ
NROLP0024QSZZ
NGERH0990FCZZ
XPSSP20-07000
NGERH0992FCZZ
NROLR0922FCZZ
NSFTZ0011QSZZ
MSPRC0115QSZZ
MARMP0004QSZZ
LFRM-0011QSZ1
MSPRD0114QSZ1
(Unit)
901 C F R M - 0 0 1 1 Q S 5 1
1
2
4
5
6
7
8
9
10
11
12
13
14
15
16
17
18
19
20
21
23
24
25
26
27
28
29
30
31
32
33
34
35
36
PRICE NEW
RANK MARK
AM
AC
AD
AD
AA
AG
AK
AD
AE
AQ
AA
AD
AB
AA
AE
AD
AE
AG
AC
AG
AE
AA
AC
AD
AL
AB
AA
AB
AR
AG
AB
AF
AL
N
AD
BE
PART
RANK
D
C
C
C
C
E
C
C
C
B
C
C
C
C
C
C
C
C
C
C
C
C
C
B
C
C
C
C
C
C
C
C
C
C
E
DESCRIPTION
Open and shut exterior
Stopper sponge
Stopper arm
Paper stopper
Screw (3´8)
SPF sensor PWB
Sensor harness
Set detect lever ACT
Open and shut detect lever ACT
PU solenoid
Screw (3´6KS)
Solenoid arm
Solenoid arm spring
E type ring
Clutch gear (20T)
SPF clutch sleeve
MF clutch spring B
Cam boss A2
M bushing C
Clutch shaft
20MXL pulley
E type ring
Clutch pawl spring
Clutch pawl
Pick up roller
Gear (16T)
Spring pin (f2-7)
Gear (20T)
Manual feeding roller
PF shaft
Paper feeding spring
Pick up arm
Paper feedind frame
PF frame spring
SPF pick up unit
2 AR-SP3-2(Pick up unit)
1
2
11
16
4
17
18
19 15
21
15
14
5
12
23 24
20
9
6
20
13
10
6
30 15
12
25 26
7
33
20
27
8
28 30
6
36
35
29
29
34
32
20
29 30
6
–3–
31
FCP03951
AR-150P
3 AR-SP3-3(Transport unit)
NO.
PARTS CODE
PGIDM0042QSZZ
XEBSD30P12000
LX-BZ0012QSZZ
NGERH0972FCZZ
MARMP0001QSZZ
XBPSD30P05K00
RMOTP0013QSZZ
DHAI-0084QSZ1
DHAI-0054QSZZ
LBNDJ0013FCZ1
MSPRT0064QSZ1
LFRM-0013QSZZ
XRESP50-06000
PSHEP3029FCZZ
NBLTT0006QSZZ
NGERH0047QSZZ
XPSSP20-09000
NBRGC0098FCZZ
NBRGM5006BCZZ
LFRM-0012QSZZ
PSHEZ0039QSZZ
LPLTP0013QSZZ
MSPRC0062QSZZ
MSPRP0065QSZZ
PSHEZ2174FCZZ
NPLYZ0146FCZZ
NBLTT0003QSZZ
JKNBZ0004QSZZ
MSPRC0063QSZZ
PGIDM0024QSZZ
RDTCT0004QSZZ
NROLM0023QSZZ
PBRSR0003QSZZ
PGIDH0029QSZZ
PSHEP0044QSZZ
NROLM0022QSZZ
PCOVP0037QSZZ
PCOVP0038QSZZ
XEBSD30P08000
RCORF1023LCZZ
(Unit)
901 C F R M - 0 0 1 3 Q S 5 1
1
2
3
4
5
6
7
8
9
10
11
12
13
14
15
16
17
18
19
20
21
22
23
24
25
26
27
28
29
30
31
32
33
34
35
36
37
38
39
40
PRICE NEW
RANK MARK
AL
AA
AC
AB
AF
AA
BB
AT
AR
AA
AC
AG
AA
AA
AG
AF
AA
AC
AB
AD
AG
AD
AC
AD
AB
AB
AG
AD
AB
AQ
AL
AP
AL
AL
AF
AP
AH
AL
AA
AL
PART
RANK
C
C
C
C
C
C
B
C
C
C
C
C
C
C
B
C
C
C
C
C
C
C
C
C
C
C
B
C
C
C
B
C
B
C
C
C
D
D
C
C
BS
E
DESCRIPTION
U-turn paper guide
Screw (3´12)
Screw
Gear (27T)
Drive arm
Screw (3´5K)
SPF motor
Grand wire
SPF interface harness
Wire band
Drive arm spring
Drive frame
E type ring
Flange sheet DUP2
Belt (83MXL4.8)
Gear (48T/15T)
Spring pin (f2-9)
Bearing
Bearing
Frame R
Sheet
Plate
Pressure spring
Open and shut lock spring
Paper feeding sheet
22MXL pulley
Belt (91MXL4.8)
JAM release knob
Delivery paper guide spring
Transport paper guide
Inlet detect sensor
Delivery roller
Discharge brush
Delivery paper guide
White sheet
PS roller
Front cover
Rear cover
Screw (3´8)
Core
SPF transport unit
3 AR-SP3-3(Transport unit)
40
38
9
7
8
2
10
39
1
11
2
16
13
14
18
2
4
22
13
19
25 23
37
24
20
24
26
17
19
29
13
32
39
30 31
29
13
28
17 19
27
39
15
17
21
3
5
36
35
34
33
FCP03952
–4–
6
12
AR-150P
4 AR-FX3-1(Base tray unit)
NO.
1
2
3
4
6
8
9
12
13
14
15
16
18
19
20
21
22
23
24
25
26
27
28
29
30
31
32
33
34
35
36
37
39
41
42
43
44
PARTS CODE
LANGT0005QSZZ
XEBSD30P10000
XEBSD40P10000
PGIDM0024QSZ2
LBNDJ0013FCZ1
LANGT0004QSZZ
XEBSD30P12000
PSHEP0038QSZZ
PSHEP0063QSZZ
PSHEZ0102QSZZ
MSPRP0113QSZ1
PSHEP0037QSZ1
NROLP0011QSZZ
PSPO-0001QSZZ
NSFTZ0010QSZZ
NSFTZ0009QSZZ
PSHEZ0112QSZZ
NROLP0010QSZZ
MSPRT0061QSZZ
XEBSD30P08000
MSPRP0060QSZZ
MSPRC0149QSZZ
MHNG-0004QSZZ
XEBSE40P14000
LPLTM0096QSZZ
LX-BZ0016QSZZ
MHNG-0003QSYZ
PCUSS0010QSZ1
LSOU-0005QSZ3
PCOVP0036QSZZ
NGERH0193FCZZ
MSPRP0059QSZZ
XEPSD30P08X00
NGERR0377FCZZ
LPLTP0140QSZZ
LSOU-0020QSZZ
LPLTP0139QSZZ
PRICE NEW
RANK MARK
AD
AA
AA
AQ
AA
AC
AA
AE
AC
AD
AD
AE
AD
AB
AE
AE
AE
AD
AC
AA
AD
AC
AX
AA
AF
AC
AX
AV
BB
AK
AB
AD
AA
AD
AF
AT
AF
PART
RANK
C
C
C
C
C
C
C
C
C
C
C
C
C
C
C
C
C
C
C
C
C
C
C
C
C
C
C
C
D
D
C
C
C
C
C
C
C
DESCRIPTION
Shaft holding angle R
Screw (3´10)
Screw (4´10)
Transport PG
Wire band
Shaft holding angle F
Screw (3´12)
Base tray sheet
Transport sheet
Motor pressure sheet
Earth spring
OC mat sheet
Delivery roller
Sponge
Delivery shaft
Transport shaft
Delivery earth sheet SPF
Transport roller
Delivery spring
Screw (3´8)
Transport spring
SPF earth spring
SPF hinge R
Screw (4´14)
Base tray reinforce plate
Screw (3´8)
SPF hinge L
OC sheet
Base tray XC
Rack cover
UC manual feed gear
Control plate spring
Screw (3´8X)
Manual feed gear
Reguration plate R- XC
Document tray XC
Reguration plate F- XC
–5–
AR-150P
4 AR-FX3-1(Base tray unit)
3
3
6 5
43
44
2
1
9
3
4
29
8
42
3
41
36
12
34
39
13
14
39
37
35
38
15
32
19
16
29
18
19
16
21
22
18
23
24
33
31
20
26
25
31
27
26
29
25
30
28
31
FCP03953
–6–
AR-150P
5 AR-FX3-2(Fax panel pick up unit)
NO.
1
2
3
4
5
6
7
8
9
10
11
12
13
14
15
16
17
18
19
20
21
22
23
24
25
26
27
28
29
30
31
32
37
39
40
41
42
44
45
46
47
48
49
50
51
PARTS CODE
PFILW0009QSZZ
CCAB-0027QS01
JBTN-0039QSZZ
JBTN-0038QSZZ
CBTN-0041QS01
CBTN-0040QS01
JBTN-0036QSZZ
CBTN-0037QS01
CPWBF0046QS51
XEBSD26P06000
PSPO-0006QSZ1
NSFTZ0012QSZZ
XRESP40-06000
LBOSZ1508FCZZ
MSPRC1316FCZ1
PPIPP0008QSZZ
NGERH0073QSZZ
LBSHZ0303FCZZ
MARMP0003QSZ1
LSTPP0008QSZZ
RPLU-0017QSZZ
MLEVP0009QSZZ
MLEVP0010QSZZ
MSPRT0067QSZ1
MARMP0002QSZZ
LPLTP0150QSZZ
MLEVP0011QSZ1
LFRM-0033QSZZ
PTME-0019QSZZ
MSPRT0066QSZ1
XBPSD30P06KS0
NPLYZ0010QSZZ
DHAI-0160QSZZ
DHAI-0159QSZ1
CPWBF0009QS52
XEBSD30P08000
MARMP0004QSZZ
MSPRC0115QSZZ
NGERH0992FCZZ
NROLR0922FCZZ
XPSSP20-07000
NSFTZ0011QSZZ
NROLP0024QSZZ
XRESP30-06000
NGERH0990FCZZ
PRICE NEW
RANK MARK
AL
AS
AE
AF
AH
AH
AF
AK
BH
AA
AB
AG
AA
AG
AE
AD
AE
AC
AD
AD
AQ
AD
AE
AB
AD
AG
AE
AP
AD
AC
AA
AE
AH
AN
AU
AA
AF
AB
AB
AR
AA
AG
AL
AA
AB
PART
RANK
C
C
C
C
C
C
C
C
E
C
C
C
C
C
C
C
C
C
C
C
B
C
C
C
C
C
C
C
B
C
C
C
C
C
E
C
C
C
C
C
C
C
C
C
C
DESCRIPTION
FAX filter XC
Operation exterior FAX XC
Enter key XC
Function key XC
Stop key XC
Start key XC
One touch key XC
Ten key XC
FAX panel PWB
Screw (2.6´6)
Stopper sponge
Clutch shaft
E type ring
Cam boss A2
MF clutch spring B
SPF clutch sleeve
Clutch gear (20T)
M bushing C
Stopper arm
Paper stopper F
PU sorenoid FAX
Set detect lever ACT
Open and shut detect lever ACT
Solenoid arm spring
Solenoid arm
FAX filter base
B4 actuator FAX
Paper feeding frame XC
Clutch pawl N
Clutch pawl spring
Screw (3´6KS)
20MXL pulley
SPF sensor FAX
FAX opration harness
FAX sensor PWB
Screw (3´8)
Pick up arm
Paper feeding spring
Gear (20T)
Manual paper feed roller
Spring pin (f2-7)
Paper feeding shaft
Pick up roller
E type ring
Gear (16T)
–7–
AR-150P
5 AR-FX3-2(Fax panel pick up unit)
1
26
2
12
39
3
18
5
16
14
15
13
17
13
6
4
21
19
7
24
20
8
31
25
23
13
22
9
32
18
27
28
30
29
31
10
10
41
10
11
31
40
44
45
40
47
46
37
50
18
42
51
45
48
47
45
18
–8–
49
FCP03954
AR-150P
6 AR-FX3-3(Fax transport unit)
NO.
1
2
3
4
5
6
7
8
9
10
11
12
13
14
15
16
17
18
19
20
21
22
23
24
25
26
27
28
29
30
31
32
33
34
35
37
38
41
42
43
44
45
46
47
50
PRICE NEW
RANK MARK
AD
AA
AK
AA
AL
AA
AL
AH
BB
AG
AF
AB
AC
AA
AC
AA
AA
AG
AA
AA
AF
AA
AC
AA
AB
AD
AQ
AB
AP
AP
AF
AL
AL
BA
AD
AG
AB
AD
AB
AD
AG
AC
AL
AE
AB
PARTS CODE
LPLTM0146QSZZ
XEBSD30P08000
PGIDM0058QSZZ
XEBSD30P12000
VSP50PB518P//
XEPSD30P08X00
PCOVP0043QSZZ
PCOVP0042QSZZ
RMOTP0013QSZZ
LFRM-0013QSZZ
MARMP0001QSZZ
NGERH0972FCZZ
LX-BZ0012QSZZ
LBNDJ0013FCZ1
MSPRT0064QSZ1
XEBSD30P08000
XBPSD30P05K00
NBLTT0006QSZZ
XRESP50-06000
PSHEP3029FCZZ
NGERH0047QSZZ
XPSSP20-09000
NBRGC0098FCZZ
XEBSD30P08000
NBRGM5006BCZZ
LFRM-0012QSZZ
PGIDM0024QSZ2
MSPRC0063QSZZ
NROLM0023QSZZ
NROLM0022QSZZ
PSHEZ0164QSZZ
PGIDH0029QSZZ
PBRSR0003QSZZ
DHAI-0161QSZ2
JKNBZ0004QSZZ
NBLTT0003QSZZ
NPLYZ0146FCZZ
MSPRP0065QSZZ
PSHEZ2174FCZZ
LPLTP0013QSZZ
PSHEZ0039QSZZ
MSPRC0062QSZZ
RDTCT0004QSZZ
DHAI-0162QSZZ
PTUBP0119FCZZ
PART
RANK
C
C
C
C
B
C
C
C
B
C
C
C
C
C
C
C
C
B
C
C
C
C
C
C
C
C
C
C
C
C
C
C
B
C
C
B
C
C
C
C
C
C
B
C
C
DESCRIPTION
PG reinforce plate
Screw (3´8)
U turn P/G XC
Screw (3´12)
Speaker
Screw (3´8X)
Rear cover XC
Front cover XC
SPF motor
Drive frame
Drive arm
Gear (27T)
Screw
Wire band
Drive arm spring
Screw (3´8)
Screw (3´5K)
Belt (83MXL4.8)
E type ring
Flange sheet DUP2
Gear (48T/15T)
Spring pin (f2-9)
Bearing R
Screw (3´8)
Metal D (B-F6-7)
Frame R
Transport PG
Delivery PG spring
Delivery roller
PS roller
White sheet R
Delivery paper guide
Discharge brush
SPF intertface harness FAX
JAM release knob
Belt (91MXL4.8)
Pulley (22MXL)
Open and shut lock spring
Paper feeding sheet
Plate
Plape
Pressure spring
Inlet detect sensor
Speaker harness
MC protect tube
6 AR-FX3-3(Fax transport unit)
7
5
4
2
14
50
50
6
47
1
4
3
21
43
45
8
42
16
26
18
12 17
10
19
25
27
41
28
22 25
38
37
34
28
19
24
41
15
11
13
22
23
44
16
6
20 19
9
46
24
30
35 22
25
29
33
32
31
FCP03955
–9–
AR-150P
7 AR-DE9(2nd frame unit)
NO.
1
2
3
4
5
6
7
8
9
10
11
12
13
14
15
17
18
PARTS CODE
GCOVA0005QSZZ
XEBSE40P12000
GCOVA0006QSZZ
PGIDM0016QSZZ
XEBSD40P12000
LPLTM0036QSZZ
GLEGG0064FCZZ
PGIDM0015QSZZ
MSPRC2544FCZZ
GCOVA0007QSZZ
NROLP1060FCZZ
MSPRT0112QSZ1
MARMP0012QSZZ
GCOVA0008QSZZ
XHBSD40P08000
CFRM-0009QS53
DHAI-0053QSZZ
PRICE NEW
RANK MARK
AM
AA
AN
AY
AA
AF
AC
AY
AC
AK
AF
AC
AD
AK
AA
BE
AM
PART
RANK
D
C
D
C
C
C
D
C
C
D
C
C
C
D
C
E
C
DESCRIPTION
Front cover
Screw (4´12)
Rear cover
Guide L
Screw (4´12)
2ND joint plate R
Rubber foot
Guide R
2ND transport cover spring
Transport cover
U-turn roller
Transport collar spring
2ND door arm
Right cover
Screw (4´8)
2nd paper feeding unit
2CS interface harness
7 AR-DE9(2nd frame unit)
2
2
18
1
2
15
2
3
5
5
4
5
6
17
9
8
7
9
16
13
7
11
12
16
10
16
12
11
13
14
16
– 10 –
FCP03956
AR-150P
8 AR-DE9(2nd paper feeding unit)
NO.
PARTS CODE
NROLP0019QSZ1
NBRGZ1043HCZZ
XRESP40-06000
NGERH0992FCZZ
XPSSP20-07000
LBOSZ1031FCZZ
MSPRC0161QSZZ
PPIPP0007QSZZ
NGERH1132FCZZ
NGERH1207FCZZ
MARMP0229FCZZ
MSPRC2545FCZZ
DHAI-0158QSZZ
VHPGP1A71A1-1
MLEVP0033QSZZ
MSPRD0058QSZZ
RPLU-0010QSZZ
XHBSD30P06000
PTME-0008QSZZ
MSPRC2546FCZZ
NGERH0041QSZZ
NGERH0990FCZZ
QSW-B0003QSZZ
CROLP0015QS01
LFRM-0009QSZ2
MLEVP0050QSZZ
MSPRD0159QSZZ
XWHSD30-08160
XEBSD30P08000
LBNDJ0013FCZ1
(Unit)
901 C F R M - 0 0 0 9 Q S 5 3
1
2
3
5
6
7
8
9
10
11
12
13
14
15
16
17
18
19
20
21
22
23
24
25
26
27
28
29
30
31
PRICE NEW
RANK MARK
AP
AD
AA
AB
AA
AC
AF
AD
AH
AF
AE
AB
AN
AG
AF
AG
AN
AA
AD
AB
AF
AB
AF
AU
AQ
AD
AC
AA
AA
AA
BE
PART
RANK
C
C
C
C
C
C
C
C
C
C
C
C
C
B
C
C
B
C
C
C
C
C
B
C
D
C
C
C
C
C
E
DESCRIPTION
Transport roller
Bearing (B-F5-13)
E type ring
Gear (20T)
Spring pin (f2-7)
Clutch boss
Clutch spring
Clutch pipe
Clutch gear (29T)
Joint gear (40T)
Joint arm
2nd joint arm spring
2nd harness
Photo sensor (GP1A71A1)
PPDI actuator
Earth spring
PF solenoid
Screw (3´6)
PF clutch pawl
2nd clutch pawl spring
2nd gear ID (18T/26T)
Gear (16T)
Tray detect switch
Paper feeding roller
Paper feeding frame
Actuator lever
2nd actuator spring
Washer
Screw (3´8)
Wire band
2nd paper feeding unit
8 AR-DE9(2nd paper feeding unit)
2
3 5
24
14
6
1
11
3
12
16
14
8
13
17
18
7
9
2
3
10
20
22
15
21
27
3
23
28
29
23
31
30
19
24
26
14
3
25
FCP03957
– 11 –
AR-150P
9 AR-SP3(Packing material & Accessories)
NO.
1
2
3
4
5
6
7
8
9
10
11
12
13
14
15
16
PARTS CODE
SSAKA0019SCZZ
TCADZ0075QSZZ
SPAKA0221QSZZ
SSAKH3012KCZZ
SPAKA0219QSZZ
SPAKA0220QSZZ
SPAKC0222QSZZ
PCUSS0010QSZ1
RCORF0022FCZZ
LBNDJ0013FCZ1
XBBSE30P08000
SSAKA2011KCZZ
DUNT-0084QS11
PGIDM0019QSZZ
PGIDM0020QSZZ
SSAKA3442QCZZ
PRICE NEW
RANK MARK
AA
AE
N
AE
N
AD
AP
N
AQ
N
AT
N
AV
AQ
AA
AA
AA
AU
AH
AH
AB
PART
RANK
D
D
D
D
D
D
D
C
C
C
C
D
E
C
C
D
DESCRIPTION
Vinyl bag (120´180mm)
Card
Spacer
Vinyl bag (790´740mm)
Packing add L
Packing add R
Packing case
OC mat
Ferrite core
Band
Screw (3´8)
Vinyl bag
DSPF sensor unit
Hinge guide L
Hinge guide R
Vinyl bag (340´450mm)
9 AR-SP3(Packing material & Accessories)
1
2
14
8
15
5
16
3
11
12
10
9
13
12
4
6
7
FCP03958
– 12 –
AR-150P
10 AR-FX3(Packing material & Accessories)
NO.
1
3
4
5
6
7
8
9
10
12
13
14
15
16
17
18
19
20
21
22
101
102
PARTS CODE
PCUSS0010QSZ1
TCADZ0076QSZZ
SPAKA0227QSZZ
TINSE0258QSZZ
SPAKA0226QSZZ
SPAKA0224QSZZ
SSAKH3012KCZZ
SPAKC0229QSZZ
XHBSE30P08000
SSAKA2011KCZZ
SPAKA0225QSZZ
SSAKA0019SCZZ
SPAKA399ACCZZ
SPAKA0228QSZZ
PCOVP0046QSZZ
PCOVP0045QSZZ
PGIDM0019QSZZ
PGIDM0020QSZZ
SSAKA3442QCZZ
DUNT-0084QS11
QCNW-7197XCZZ
TLABH0152QSZZ
PRICE NEW
RANK MARK
AV
AE
N
AE
N
AX
N
AE
N
AQ
N
AD
AT
N
AA
AA
AQ
N
AA
AB
AE
N
AF
AL
AH
AH
AB
AU
AH
AD
N
PART
RANK
C
D
D
D
D
D
D
D
C
D
D
D
D
D
D
D
C
C
D
E
B
C
DESCRIPTION
OC mat
Card
Spacer B
Operation manual
Spacer A
Packing add L
Vinyl bag (790´740mm)
Packing case
Screw (3´8)
Vinyl bag
Packing add R
Vinyl bag (120´180mm)
Vinyl bag
Protect sheet
Line cover A
PWB cover
Hinge guide L
Hinge guide R
Vinyl bag (340´450mm)
DSPF sensor unit
Line cable
Label
10 AR-FX3(Packing material & Accessories)
1
14
21
3
5
20
19
6
4
7
10
11
8
15
12
22
16
18
17
13
9
FCP3959
– 13 –
AR-150P
11 AR-DE9(Packing material & Accessories)
NO.
1
2
3
4
5
6
7
8
9
PARTS CODE
TTAG-0002QSZZ
LHLDW1226FCZZ
TCADZ0077QSZZ
SPAKA5108FCZZ
SSAKH0021SCZZ
SPAKC0223QSZZ
XEBSE40P12000
XEBSE40P16000
SSAKA2011KCZZ
PRICE NEW
RANK MARK
AB
N
AB
AE
N
AF
AC
AQ
N
AA
AA
AA
PART
RANK
C
C
D
D
D
D
C
C
D
DESCRIPTION
Tray rotation tag
Holder
Card
Packing add
Vinyl bag
Packing case
Screw (4´12)
Screw (4´16)
Vinyl bag
11 AR-DE9(Packing material & Accessories)
3
9
7
8
5
4
6
1
2
FCP03960
12 AR-PG1(Packing material & Accessories)
NO.
1
2
3
4
5
6
7
8
9
PARTS CODE
SPAK-548ECCZZ
SPAKA5824FCZZ
DHAI-0173QSZZ
XBBSE30P08000
SSAKA0019SCZZ
DUNT-0130QSZ1
TCADZ0078QSZZ
SPAKC0231QSZZ
TINSE0305QSZZ
PRICE NEW
RANK MARK
AB
AF
N
AE
N
AA
AA
AL
N
AH
N
AG
AY
N
PART
RANK
D
D
C
C
D
D
D
D
D
DESCRIPTION
Vinyl bag (140´260mm)
Protect sheet
GDAI harness
Screw (3´8)
Vinyl bag (120´180mm)
CD-ROM
Card
Packing case
Operation manual
12 AR-PG1(Packing material & Accessories)
GDI PWB,GDI harness
1
4
GDI PWB
6
5
7
2
3
8
9
FCP3961
– 14 –
AR-150P
13 AR-FX3(Fax panel PWB)
NO.
1
2
3
4
5
6
7
8
9
10
11
12
13
14
15
16
17
18
19
PARTS CODE
PSPAF0013QSZZ
QCNCM0811FCZZ
QSW-P0005QSZZ
RCRMZ0002QSZZ
RVR-B1440QCZZ
VCCCTV1HH471J
VCEAJU1CW226M
VCKYTV1EB104K
VHDDAN202U/-1
VHDDAP202U/-1
VHIHD4074344/
VHINJM431U/-1
VHP1LHLE-002A
VRS-TP2BD000J
VRS-TS2AD101J
VRS-TS2AD102J
VRS-TS2AD103J
VRS-TS2AD105J
VRS-TS2AD202J
PRICE NEW
RANK MARK
AD
AC
AC
AE
AF
AA
AB
AA
AB
AB
AX
AF
AC
AA
AA
AA
AA
AA
AA
PART
RANK
C
C
B
C
B
C
C
C
B
B
B
B
B
C
C
C
C
C
C
DESCRIPTION
20 V R S - T S 2 A D 2 0 3 J
AA
C
LCD spacer
Connector (9pin)
Tact swtch (B3F-6102)
Crystal
Volume (RK09J11TO)
Capacitor (50WV 470pF)
Capacitor (16WV 22mF)
Capacitor (25WV 0.10mF)
Diode (DAN202U)
Diode (DAP202U)
CPU (HD4074344)
IC (NJM431U)
LED (1LHLE-002A)
Resistor (1/8W 0W ±5%)
Resistor (1/10W 100W ±5%)
Resistor (1/10W 1.0KW ±5%)
Resistor (1/10W 10KW ±5%)
Resistor (1/10W 1MW ±5%)
Resistor (1/10W 2KW ±5%)
Resistor (1/10W 20KW ±5%)
VRS-TS2AD242F
VRS-TS2AD272F
VRS-TS2AD391J
VRS-TX2HD511J
VSDTA143EK/-1
VVLHLM3212-01
(Unit)
901 C P W B F 0 0 4 6 Q S 5 1
AB
AA
AA
AB
AB
BA
C
C
C
C
B
E
Resistor (1/10W 2.4KW ±1%)
Resistor (1/10W 2.7KW ±1%)
Resistor (1/10W 390W ±5%)
Resistor (1/2W 510W ±5%)
Transistor (DTA143EK)
(HLM3212)
E
Fax panel PWB
21
22
23
24
25
26
N
BH
[CN701]
[S701~747]
[Y701]
[VR701]
[C705~707]
[C702,703]
[C701,704,711,712,714~718]
[D704,705]
[D706,707]
[IC701]
[IC703]
[D701~703]
[J701~746]
[R750]
[R716~729,740~742]
[R730]
[R739]
[R752]
[R701~715,734~737,748,749]
[R733]
[R732]
[R745~747]
[R731]
[Q701]
[IC702]
14 AR-FX3(Fax PWB)
NO.
1
2
3
4
5
6
7
8
9
10
PARTS CODE
VHI27C08001QS
PSHEZ0190QSZZ
QCNCM7022SC1J
QCNCW0034QSZZ
QJAKT7004XCZZ
QSOCZ0051FCZZ
RC-DZ1080RC0L
RC-K1E104HCZT
RC-KZ1053RC1E
RCILZ0007QSZZ
PRICE NEW
RANK MARK
BA
N
AD
AE
AL
AH
AD
AR
AA
N
AC
AF
PART
RANK
B
C
C
C
C
C
C
C
C
C
11 R C I L Z 1 0 3 2 C C Z Z
AD
C
RCILZ1063YCZZ
RCILZ7009XCZZ
RCRSP6676RCZZ
RCRSZ0013QSZZ
RFILZ0002QSZZ
RFILZ0005QSZZ
RMPTW4103QCJJ
AC
AC
AG
AP
AG
AC
AB
C
C
B
B
C
C
B
12
13
14
15
17
18
19
N
20 R M P T W 4 2 2 0 Q C J J
AB
B
21 R M P T W 4 2 2 3 Q C J J
AB
B
22 R M P T W 4 3 9 0 Q C J J
AA
B
RRLYD3213QCZZ
RTRNZ0009QSZZ
UBATL2034SCZZ
VCCCCY1EH102J
VCCCCY1HH101J
VCCCCY1HH180J
VCCCCY1HH201J
VCCCCY1HH220J
VCCCTQ1HH332J
VCCCTV1HH330J
VCEAGA0JW107M
VCEAGA1AW226M
VCEAGA1CW106M
VCEAGA1CW107M
VCEAGA1CW226M
VCEAGA1CW476M
VCFYEG2EA223M
VCFYJU2EA334K
VCFYJU2EA824K
AH
AQ
AH
AB
AA
AA
AA
AA
AC
AA
AC
AB
AA
AC
AB
AB
AE
AD
AE
B
B
B
C
C
C
C
C
C
C
C
C
C
C
C
C
C
C
C
23
24
25
26
27
28
29
30
31
32
33
34
35
36
37
38
39
40
41
DESCRIPTION
IC (27C08002QS)
Sheet
Connector
Connector
Connector
IC socket (DICF-42C-E)
Capacitor (EECS5R5H105)
Capacitor (25WV 0.1mF)
Capacitor (25WV 1mF)
Choke coil
Coil (SBO-02SAN)
[IC502]
[CN501]
[CN601]
[CN502]
[IC502]
[C515]
[CN501~610]
[C656]
[L521]
[L501,503,504,505,511~516,522~526]
Coil (ACB1608M-60)
[L608]
Coil (ACB2012M)
[L601,603~605,609]
Crystal (32.768KHz)
[Y501,502]
Crystal (49.192MHZ)
[Y503]
Filter (LF1290-102)
[L506,507]
Filter (ZJ5501-470TK)
[L502]
Block resistor (10KW´4 1/32W ±5%)
[BR549,550]
Block resistor (22W ´4)
[BR501,502,507,510,513,514,520,521,522~525,527~541,543,545~548,551~554]
Block resistor (22KW´4)
[BR508,509,542,544]
Block resistor (1/32W 39W´4)
[BR503~506,511,512,555~561,526]
Relay (OUAZ-SH-112)
[RY501]
Transformer
[T501]
Battery (CR2354)
[BT501]
Capacitor (1608Type/1000pF/CH)
[C623]
Capacitor (50WV 100pF)
[C626,635]
Capacitor (50WV 18pF)
[C620]
Capacitor (50WV 200pF)
[C639,650,655]
Capacitor (50WV 22pF)
[C613,614]
Capacitor (50WV 3300pF)
[C624]
Capacitor (50WV 33pF)
Capacitor (16WV 100mF)
[C546,557,559,561~563,569]
Capacitor (10WV 22uF)
[C506,509,528,529,531,540,541,554,565,568,572,573]
Capacitor (16WV 10mF)
[C510,513,519,567]
Capacitor (16WV 100mF)
[C516,560,564]
Capacitor (16WV 22mF)
[C558]
Capacitor (16WV 47mF)
[C566]
Capacitor (250WV 0.022mF)
[C505]
Capacitor (250WV 0.33mF)
[C555]
Capacitor (250WV 0.82mF)
[C517,571]
– 15 –
AR-150P
14 AR-FX3(Fax PWB)
NO.
PARTS CODE
42 V C K Y C Y 1 C B 3 3 3 K
PRICE NEW
RANK MARK
AB
43 V C K Y C Y 1 C F 1 0 4 Z
AA
VCKYCY1EF104Z
VCKYCY1EF104Z
VCKYCY1HB103K
VCKYCY1HB331K
VCKYCY1HF473Z
VCQYNU1HM473K
VCQYNU1HM332J
VCQYNA1HM473K
VCQYNU1HM683J
VHDDAN202U/-1
VHDDAP202U/-1
VHDDSS133//-1
VHDEK14////-1
VHD1SS355//-1
VHD10E1////-1
VHDRB501V40-1
VHEHZ27-1//-1
VHERD2.7EB2-1
VHERD4.3EL3-1
VHIBU4051BCF/
VHIBU4053BCF1
VHICGS410//-1
VHICG46533175
VHIHY18164CSJ
VHILC8213K/-1
VHILM311//-1F
VHILM386M//-1
VHILZ9FH19///
VHIMC34063P-1
VHINJM084M/-F
VHINJU6355E-1
VHINSFX200-25
VHINS32FX164/
VHITL431CLP-2
VHIULN2003ANS
VHIW24257A12J
VHIW2465S70LL
VHIW166G/////
VHI1816-6//-1
VHI74VHC11///
VHPPC814///-1
VHPPC817///-1
VHVRA391PV6-1
VHVTNR5V471K/
VRD-HT2EY330J
VRD-HT2EY392J
VRD-HT2EY4R7J
VRD-HT2HY101J
VRD-HT2HY153J
VRD-HT2HY4R7J
VRD-HT2HY561J
VRS-CY1JD000J
VRS-CY1JD100J
VRS-CY1JD101J
VRS-CY1JD102J
AA
AA
AA
AA
AA
AB
AC
AA
AC
AB
AB
AA
AE
AB
AA
AD
AB
AB
AB
AF
AE
AU
BA
AZ
AZ
AD
AE
AV
AN
AH
AM
BG
BG
AG
AE
AN
AW
AT
AZ
AF
AE
AF
AE
AD
AA
AA
AA
AA
AB
AA
AA
AA
AA
AA
AA
VRS-CY1JD103J
AA
VRS-CY1JD103J
VRS-CY1JD104J
VRS-CY1JD105J
VRS-CY1JD106J
VRS-CY1JD121J
VRS-CY1JD123J
VRS-CY1JD181J
VRS-CY1JD182J
VRS-CY1JD221J
VRS-CY1JD222J
VRS-CY1JD223J
VRS-CY1JD330J
VRS-CY1JD331J
VRS-CY1JD390J
VRS-CY1JD333J
VRS-CY1JD472J
VRS-CY1JD473J
VRS-CY1JD511J
VRS-CY1JD512J
VRS-CY1JD562J
AA
AA
AA
AA
AA
AA
AA
AA
AA
AA
AA
AA
AA
AA
AA
AA
AA
AA
AA
AA
44
45
46
47
48
49
50
51
52
53
54
55
56
57
58
59
60
61
62
63
64
65
66
67
68
69
70
71
72
73
74
75
76
77
78
79
81
82
83
84
85
86
87
88
89
90
91
92
93
94
95
96
97
98
99
100
101
102
103
104
105
106
107
108
109
110
111
112
113
114
115
116
117
118
N
PART
DESCRIPTION
RANK
C
Capacitor (16WV 0.033mF)
[C538]
Capacitor (16WV 0.10mF)
C
[C501~504,507,508,511,512,514,520,521,523,524,527,532~537,542~545,547~553,556,570]
C
Capacitor (25WV 0.10mF)
[C601,602,608~610,612,615~619,625,628,630~634]
C
Capacitor (25WV 0.10mF)
[C636~638,640~649,651~654,657~660,664]
C
Capacitor (50WV 0.010mF)
[C611,662,663]
C
Capacitor (50WV 330pF)
[C539]
C
Capacitor (50WV 0.047mF)
[C629,627,661]
C
Capacitor (50WV 0.047mF)
C
Capacitor (50WV 3300pF)
[C530]
C
Capacitor (50WV 0.047mF)
[C575]
C
Capacitor (50WV 0.068mF)
[C522]
B
Diode (DAN202U)
[DA603,604]
B
Diode (DAP202U)
[DA601,602]
B
Diode (DSS133)
[D504]
B
Diode (EK14)
[D501,502,505]
B
Diode (1SS355)
[D603~606]
B
Diode (10E1)
[D503]
B
Diode (RB501V-40)
[D607]
B
Zener diode (HZ27)
[ZD502]
B
Zener diode (RD2.7EB2)
[ZD503,504]
B
Zener diode (RD4.3EL3)
[ZD505,506]
B
IC (BU4051BCF)
[IC608]
B
IC (BU4053BCF1)
[IC516,605]
B
IC (CGS410)
[IC508]
B
IC (CG46533175)
[IC509]
B
D RAM (HY18164CSJ)
[IC504]
B
IC (LC8213K)
[IC505]
B
IC (LM311)
[IC607]
B
IC (LM386M)
[IC609]
B
IC (LZ9F19)
[IC506]
B
IC (MC34063P)
[IC513]
B
IC (NJM084M)
[IC606]
B
IC (NJU6355E)
[IC602]
B
IC (NSFX200-25)
[IC503]
B
IC (NS32FX164)
[IC507]
B
IC (TL431CLP-2)
[IC514]
B
IC (ULN2003ANS)
[IC603]
B
IC (W24257A12J)
[IC512]
B
IC (W2465S70LL)
[IC501]
B
IC (W166G)
[IC604]
B
IC (1816-6)
[IC510,515]
B
IC (74VHC11)
[IC601]
B
Photo coupler (PC814)
[IS503]
B
Photo coupler (PC817)
[IS502]
B
Varistor (PA391PV6)
[V501]
B
Varistor (TNR5V471K)
[RV502,503]
B
Resistor (1/4W 33W ±5%)
[R522]
C
Resistor (1/4W 3.9KW ±5%)
[R626]
C
Resistor (1/4W 4.7W ±5%)
[R521]
C
Resistor (1/2W 100W ±5%)
[R501,513]
C
Resistor (1/2W 15KW ±5%)
[R510,512]
C
Resistor (1/2W 4.7W ±5%)
[R509]
C
Resistor (1/2W 560W ±5%)
[R503]
C
Resistor (1/16W 0W ±5%)
[R621,633,670,728,730,732]
C
Resistor (1/16W 10W ±5%)
[R725]
C
Resistor (1/16W 100W ±5%)
[R607,622,666]
C
Resistor (1/16W 1.0KW ±5%)
[R647,664,673,703]
Resistor (1/16W 10KW ±5%)
C
[R511,514,605,620,624,627,644,661,663,665,669,675~691,693,695~700]
C
Resistor (1/16W 10KW ±5%)
[R704,705,717~719,726,727,729,733,734]
C
Resistor (1/16W 100KW ±5%)
[R614]
C
Resistor (1/16W 1.0MW ±5%)
[R619]
C
Resistor (1/16W 10MW ±5%)
[R618]
C
Resistor (1/16W 120W ±5%)
[R723]
C
Resistor (1/16W 12KW ±5%)
[R628,708]
C
Resister (1/16W 180W ±5%)
[R505~508,623,645,646,648,649,650,660,662,668]
C
Resistor (1/16W 1.8KW ±5%)
[R714]
C
Resistor (1/16W 220W ±5%)
[R671,667,720]
C
Resistor (1/16W 2.2KW ±5%)
[R604,712]
C
Resistor (1/16W 22KW ±5%)
[R520,631,653,694,707]
C
Resistor (1/16W 33W ±5%)
[R630,639,640,641,642]
C
Resistor (1/16W 330W ±5%)
[R638,643,706,711]
C
Resistor (1/16W 39W ±5%)
[R613,615,616,617,625,722,724]
C
Resistor (1/16W 33KW ±5%)
[R610]
C
Resistor (1/16W 4.7KW ±5%)
[R606,609]
C
Resistor (1/16W 47KW ±5%)
[R515,611,612]
C
Resistor (1/16W 510W ±5%)
[R716]
C
Resistor (1/16W 5.1KW ±5%)
[R517,603]
C
Resistor (1/16W 5.6KW ±5%)
[R516]
– 16 –
AR-150P
14 AR-FX3(Fax PWB)
NO.
PARTS CODE
VRS-CY1JD750J
VRS-CY1JD821J
VRS-CY1JD822J
VRS-CY1JD911J
VRS-TS2AD680J
VRS-TS2AD000J
VRSCY1JD1542F
VRSCY1JD2153F
VRSCY1JD2433F
VRSCY1JD3740F
VRSCY1JD3921F
VRSCY1JD4642F
VRSCY1JD4872F
VRSCY1JD5112F
VRSCY1DR5622F
VS2SC3382-/-1
VS2SC3708-/-1
(Unit)
901 C P W B X 0 0 4 0 Q S 5 3
119
120
121
122
123
124
125
126
127
128
129
130
131
132
133
134
135
PRICE NEW
RANK MARK
AA
AA
AA
AA
AA
AA
AA
AA
AA
AA
AA
AA
AA
AA
AA
N
AD
AD
CE
PART
RANK
C
C
C
C
C
C
C
C
C
C
C
C
C
C
B
B
B
E
DESCRIPTION
Resistor (1/16W 75W ±5%)
Resistor (1/16W 820W ±5%)
Resistor (1/16W 8.2KW ±5%)
Resistor (1/16W 910W ±5%)
Resistor (1/10W 68W ±5%)
Resistor (1/10W 0W ±5%)
Resistor (1/16W 15.4KW ±1%)
Resistor (1/16W 215KW ±1%)
Resistor (1/16W 243KW ±1%)
Resistor (1/16W 374KW ±1%)
Resistor (1/16W 3.92KW ±1%)
Resistor (1/16W 46.4kW ±1%)
Resistor (1/16W 48.7KW ±1%)
Resistor (1/16W 51.1kW ±1%)
Resistor (1/16W 56.2KW ±1%)
Transistor (2SC3382)
Transistor (2SC3708)
[R721]
[R713]
[R651]
[R652]
[L607]
[L508~510,606]
[R709]
[R672]
[R674]
[R519]
[R701]
[R636,637,702]
[R635]
[R654,710]
[R518,655]
[Q504]
[Q501]
Fax PWB unit
15 AR-PG1(GDI/USB PWB)
NO.
1
2
3
4
5
6
7
8
9
10
11
PARTS CODE
QCNCW0946FCZZ
QCNCW1124LC3A
QCNCW7045XCZZ
RCILZ1032CCZZ
RCRSZ7011XCZZ
VCCCCY1HH101J
VCCCCY1HH150J
VCCCCY1HH330J
VCCCCY1HH561J
VCEAGU1CW106M
VCEAGU1CW476M
PRICE NEW
RANK MARK
AH
AE
AG
AD
AE
AA
AB
AA
AB
AA
AB
PART
RANK
C
C
C
C
B
C
C
C
C
C
C
12 V C K Y C Y 1 C F 1 0 4 Z
AA
C
VCKYCY1EB223K
VCKYCY1HB102K
VHDDAP202K/-1
VHIAT24C16N//
VHITC7SH08FU1
VHIUSS-725///
VHI74LS244NS1
VHI74LS245NS1
VRD-HT2HY101J
VRS-CY1JD102J
VRS-CY1JD103J
VRS-CY1JD122J
VRS-CY1JD152J
VRS-CY1JD203J
VRS-CY1JD220J
VRS-CY1JD240J
VRS-CY1JD332J
AA
AA
AB
AL
AE
BD
AH
AF
AA
AA
AA
AA
AA
AA
AA
AA
AA
C
C
B
B
B
B
B
B
C
C
C
C
C
C
C
C
C
13
14
15
16
17
18
19
20
21
22
23
24
25
26
27
28
29
DESCRIPTION
Connector (36pin)
Connector (31FEBT-VK-N)
Connector
Coil (SBO-02SAN)
Crystal (12MHz)
Capacitor (50WV 100pF)
Capacitor (50WV 15pF)
Capacitor (50WV 33pF)
Capacitor (50WV 560pF)
Capacitor (16WV 10mF)
Capacitor (16WV 47mF)
Capacitor (16WV 0.1mF)
Capacitor (25WV 0.022mF)
Capacitor (50WV 1000pF)
Diode (DAP202K)
EEPROM (AT24C16N)
IC (TC7SH08FU1)
IC (USS-725)
IC (74LS244NS1)
IC (74LS245NS1)
Resistor (1/2W 100W ±5%)
Resistor (1/16W 1.0KW ±5%)
Resistor (1/16W 10KW ±5%)
Resistor (1/16W 1.2KW ±5%)
Resistor (1/16W 1.5KW ±5%)
Resistor (1/16W 20KW ±5%)
Resistor (1/16W 22W ±5%)
Resistor (1/16W 24W ±5%)
Resistor (1/16W 3.3KW ±5%)
– 17 –
[CN501]
[CN502]
[CN503]
[L501~503,]
[X501,]
[C601~608,614~618,]
[C515,516,]
[C610,611,]
[C612]
[C502,503,]
[C501,]
[C504~515,518~520,619~622,]
[C613,]
[C609,]
[D601~609,]
[IC605]
[IC606,]
[IC604,]
[IC602,603,]
[IC601,]
[R501,]
[R502~504,]
[R509~511,]
[R618~629,]
[R507,]
[RV661,]
[R601~617,]
[R505,506,508,]
[R630,]
AR-150P
■
Index
PARTS CODE
[C]
CBTN-0037QS01
CBTN-0040QS01
CBTN-0041QS01
CCAB-0027QS01
CFRM-0009QS53
"
CFRM-0011QS51
"
CFRM-0013QS51
"
CPWBF0009QS51
CPWBF0009QS52
CPWBF0046QS51
"
CPWBX0040QS53
CROLP0015QS01
CSOU-0004QS51
[D]
DHAI-0053QSZZ
DHAI-0054QSZZ
DHAI-0055QSZZ
DHAI-0084QSZ1
DHAI-0158QSZZ
DHAI-0159QSZ1
DHAI-0160QSZZ
DHAI-0161QSZ2
DHAI-0162QSZZ
DHAI-0173QSZZ
DUNT-0084QS11
"
DUNT-0130QSZ1
[G]
GCAB-0008QSZZ
GCOVA0005QSZZ
GCOVA0006QSZZ
GCOVA0007QSZZ
GCOVA0008QSZZ
GLEGG0064FCZZ
[J]
JBTN-0036QSZZ
JBTN-0038QSZZ
JBTN-0039QSZZ
JKNBZ0004QSZZ
"
[L]
LANGT0004QSZZ
LANGT0005QSZZ
LBNDJ0013FCZ1
"
"
"
"
"
LBOSZ1031FCZZ
LBOSZ1508FCZZ
"
LBSHZ0303FCZZ
"
LFRM-0009QSZ2
LFRM-0011QSZ1
LFRM-0012QSZZ
"
LFRM-0013QSZZ
"
LFRM-0033QSZZ
LHLDW1226FCZZ
LPLTM0036QSZZ
LPLTM0096QSZZ
"
LPLTM0146QSZZ
LPLTP0011QSZZ
LPLTP0012QSZZ
LPLTP0013QSZZ
"
LPLTP0139QSZZ
LPLTP0140QSZZ
LPLTP0150QSZZ
PARTS CODE
NO.
PRICE
RANK
NEW
MARK
PART
RANK
5- 8
5- 6
5- 5
5- 2
7- 17
8-901
1- 11
2-901
1- 14
3-901
2- 7
5- 40
5- 9
13-901
14-901
8- 25
1-501
AK
AH
AH
AS
BE
BE
BE
BE
BS
BS
AG
AU
BH
BH
CE
AU
BC
C
C
C
C
E
E
E
E
E
E
E
E
E
E
E
C
E
7323855661291012-
18
9
8
8
14
39
37
34
47
3
13
22
6
AM
AR
AK
AT
AN
AN
AH
BA
AE
AE
AU
AU
AL
C
C
C
C
C
C
C
C
C
C
E
E
D
2- 1
7- 1
7- 3
7- 10
7- 14
7- 7
AM
AM
AN
AK
AK
AC
D
D
D
D
D
D
5- 7
5- 4
5- 3
3- 28
6- 35
AF
AF
AE
AD
AD
C
C
C
C
C
AC
AD
AA
AA
AA
AA
AA
AA
AC
AG
AG
AC
AC
AQ
AL
AD
AD
AG
AG
AP
AB
AF
AF
AF
AD
AH
AH
AD
AD
AF
AF
AG
C
C
C
C
C
C
C
C
C
C
C
C
C
D
C
C
C
C
C
C
C
C
C
C
C
C
C
C
C
C
C
C
441346898252582363651171461136445-
8
1
15
10
6
14
31
10
7
19
14
20
18
26
35
20
26
12
10
28
2
6
30
30
1
2
3
22
43
44
42
26
N
N
N
LSOU-0004QSZZ
LSOU-0005QSZ3
"
LSOU-0020QSZZ
LSTPP0001QSZZ
LSTPP0008QSZZ
LX-BZ0012QSZZ
"
LX-BZ0016QSZZ
"
[M]
MARMP0001QSZZ
"
MARMP0002QSZZ
"
MARMP0003QSZ1
"
MARMP0004QSZZ
"
MARMP0012QSZZ
MARMP0229FCZZ
MHNG-0003QSYZ
MHNG-0003QSZZ
MHNG-0004QSZZ
"
MLEVP0009QSZZ
"
MLEVP0010QSZZ
"
MLEVP0011QSZ1
MLEVP0033QSZZ
MLEVP0050QSZZ
MSPRC0062QSZZ
"
MSPRC0063QSZZ
"
MSPRC0115QSZZ
"
MSPRC0149QSZZ
"
MSPRC0161QSZZ
MSPRC1316FCZ1
"
MSPRC2544FCZZ
MSPRC2545FCZZ
MSPRC2546FCZZ
MSPRD0058QSZZ
MSPRD0114QSZ1
MSPRD0159QSZZ
MSPRP0059QSZZ
"
MSPRP0060QSZZ
"
MSPRP0065QSZZ
"
MSPRP0113QSZ1
"
MSPRT0061QSZZ
"
MSPRT0064QSZ1
"
MSPRT0066QSZ1
"
MSPRT0067QSZ1
"
MSPRT0112QSZ1
[N]
NBLTT0003QSZZ
"
NBLTT0006QSZZ
"
NBRGC0098FCZZ
"
NBRGM5006BCZZ
"
NBRGZ1043HCZZ
NGERH0041QSZZ
NGERH0047QSZZ
"
NGERH0073QSZZ
"
– 18 –
NO.
PRICE
RANK
NEW
MARK
PART
RANK
1144253614-
1
33
34
43
5
20
3
13
31
31
AX
BB
BB
AT
AD
AD
AC
AC
AC
AC
D
D
D
C
C
C
C
C
C
C
3625252578411425255883636251482578882814143614143625257-
5
11
13
25
4
19
34
42
13
12
32
21
32
28
9
22
10
23
27
16
27
23
45
29
28
33
44
37
27
8
18
15
9
13
21
17
36
28
7
37
27
26
24
41
18
15
26
24
11
15
25
30
14
24
12
AF
AF
AD
AD
AD
AD
AF
AF
AD
AE
AX
AX
AX
AX
AD
AD
AE
AE
AE
AF
AD
AC
AC
AB
AB
AB
AB
AC
AC
AF
AE
AE
AC
AB
AB
AG
AD
AC
AD
AD
AD
AD
AD
AD
AD
AD
AC
AC
AC
AC
AC
AC
AB
AB
AC
C
C
C
C
C
C
C
C
C
C
C
C
C
C
C
C
C
C
C
C
C
C
C
C
C
C
C
C
C
C
C
C
C
C
C
C
C
C
C
C
C
C
C
C
C
C
C
C
C
C
C
C
C
C
C
36363636883625-
27
37
15
18
18
23
19
25
2
22
16
21
16
17
AG
AG
AG
AG
AC
AC
AB
AB
AD
AF
AF
AF
AE
AE
B
B
B
B
C
C
C
C
C
C
C
C
C
C
AR-150P
PARTS CODE
NGERH0193FCZZ
"
NGERH0972FCZZ
"
NGERH0990FCZZ
"
"
NGERH0992FCZZ
"
"
NGERH1132FCZZ
NGERH1207FCZZ
NGERR0377FCZZ
"
NPLYZ0010QSZZ
"
NPLYZ0146FCZZ
"
NROLM0022QSZZ
"
NROLM0023QSZZ
"
NROLP0010QSZZ
"
NROLP0011QSZZ
"
NROLP0019QSZ1
NROLP0024QSZZ
"
NROLP1060FCZZ
NROLR0922FCZZ
"
NSFTZ0009QSZZ
"
NSFTZ0010QSZZ
"
NSFTZ0011QSZZ
"
NSFTZ0012QSZZ
"
[P]
PBRSR0003QSZZ
"
PCOVP0036QSZZ
"
PCOVP0037QSZZ
PCOVP0038QSZZ
PCOVP0042QSZZ
PCOVP0043QSZZ
PCOVP0045QSZZ
PCOVP0046QSZZ
PCUSS0010QSZ1
"
"
"
PFILW0009QSZZ
PGIDH0029QSZZ
"
PGIDM0015QSZZ
PGIDM0016QSZZ
PGIDM0019QSZZ
"
PGIDM0020QSZZ
"
PGIDM0024QSZ2
"
PGIDM0024QSZZ
PGIDM0042QSZZ
PGIDM0058QSZZ
PPIPP0007QSZZ
PPIPP0008QSZZ
"
PSHEP0037QSZ1
"
PSHEP0038QSZZ
"
PSHEP0044QSZZ
PSHEP0063QSZZ
"
PSHEP3029FCZZ
"
NO.
PRICE
RANK
NEW
MARK
PART
RANK
1436258258881425363636141482572514142525-
6
36
4
12
28
51
23
30
45
5
10
11
4
41
23
32
26
38
36
30
32
29
28
23
23
18
1
27
49
11
31
46
29
21
25
20
32
48
21
12
AB
AB
AB
AB
AB
AB
AB
AB
AB
AB
AH
AF
AD
AD
AE
AE
AB
AB
AP
AP
AP
AP
AD
AD
AD
AD
AP
AL
AL
AF
AR
AR
AE
AE
AE
AE
AG
AG
AG
AG
C
C
C
C
C
C
C
C
C
C
C
C
C
C
C
C
C
C
C
C
C
C
C
C
C
C
C
C
C
C
C
C
C
C
C
C
C
C
C
C
361433661010149105367791091046336825141431436-
33
33
8
35
37
38
8
7
18
17
34
33
8
1
1
34
32
8
4
14
19
15
20
4
27
30
1
3
9
17
16
19
16
16
12
35
17
13
14
20
AL
AL
AK
AK
AH
AL
AH
AL
AL
AF
AV
AV
AV
AV
AL
AL
AL
AY
AY
AH
AH
AH
AH
AQ
AQ
AQ
AL
AK
AD
AD
AD
AE
AE
AE
AE
AF
AC
AC
AA
AA
B
B
D
D
D
D
C
C
D
D
C
C
C
C
C
C
C
C
C
C
C
C
C
C
C
C
C
C
C
C
C
C
C
C
C
C
C
C
C
C
PARTS CODE
PSHEZ0039QSZZ
"
PSHEZ0102QSZZ
"
PSHEZ0112QSZZ
"
PSHEZ0164QSZZ
PSHEZ0190QSZZ
PSHEZ2174FCZZ
"
PSPAF0013QSZZ
PSPO-0001QSZZ
"
PSPO-0002QSZZ
PSPO-0006QSZ1
PTME-0008QSZZ
PTME-0019QSZZ
"
PTUBP0119FCZZ
[Q]
QCNCM0811FCZZ
QCNCM7022SC1J
QCNCW0034QSZZ
QCNCW0946FCZZ
QCNCW1124LC3A
QCNCW7045XCZZ
QCNW-7197XCZZ
QJAKT7004XCZZ
QSOCZ0051FCZZ
QSW-B0003QSZZ
QSW-P0005QSZZ
[R]
RC-DZ1080RC0L
RC-K1E104HCZT
RC-KZ1053RC1E
RCILZ0007QSZZ
RCILZ1032CCZZ
"
RCILZ1063YCZZ
RCILZ7009XCZZ
RCORF0022FCZZ
RCORF1023LCZZ
RCRMZ0002QSZZ
RCRSP6676RCZZ
RCRSZ0013QSZZ
RCRSZ7011XCZZ
RDTCT0004QSZZ
"
RFILZ0002QSZZ
RFILZ0005QSZZ
RMOTP0013QSZZ
"
RMPTW4103QCJJ
RMPTW4220QCJJ
RMPTW4223QCJJ
RMPTW4390QCJJ
RPLU-0004QSZ1
RPLU-0010QSZZ
RPLU-0017QSZZ
RRLYD3213QCZZ
RTRNZ0009QSZZ
RVR-B1440QCZZ
[S]
SPAK-548ECCZZ
SPAKA0219QSZZ
SPAKA0220QSZZ
SPAKA0221QSZZ
SPAKA0224QSZZ
SPAKA0225QSZZ
SPAKA0226QSZZ
SPAKA0227QSZZ
SPAKA0228QSZZ
SPAKA399ACCZZ
SPAKA5108FCZZ
SPAKA5824FCZZ
SPAKC0222QSZZ
SPAKC0223QSZZ
SPAKC0229QSZZ
SPAKC0231QSZZ
SSAKA0019SCZZ
"
– 19 –
NO.
PRICE
RANK
NEW
MARK
PART
RANK
21
44
35
14
36
22
31
2
25
42
1
24
19
2
11
20
26
29
50
AG
AG
AD
AD
AE
AE
AF
AD
AB
AB
AD
AB
AB
AC
AB
AD
AD
AD
AB
C
C
C
C
C
C
C
C
C
C
C
C
C
C
C
C
B
B
C
13- 2
14- 3
14- 4
15- 1
15- 2
15- 3
10-101
14- 5
14- 6
8- 24
13- 3
AC
AE
AL
AH
AE
AG
AH
AH
AD
AF
AC
C
C
C
C
C
C
B
C
C
B
B
141414141415141493131414153614143614141414285141413-
7
8
9
10
11
4
12
13
9
40
4
14
15
5
31
46
17
18
7
9
19
20
21
22
11
18
21
23
24
5
AR
AA
AC
AF
AD
AD
AC
AC
AQ
AL
AE
AG
AP
AE
AL
AL
AG
AC
BB
BB
AB
AB
AB
AA
AQ
AN
AQ
AH
AQ
AF
1299910101010101011129111012910-
1
5
6
3
7
13
6
4
16
15
4
2
7
6
9
8
1
14
AB
AP
AQ
AE
AQ
AQ
AE
AE
AE
AB
AF
AF
AT
AQ
AT
AG
AA
AA
361414614361314258256-
N
N
N
N
N
N
N
N
N
N
N
N
N
N
C
C
C
C
C
C
C
C
C
C
C
B
B
B
B
B
C
C
B
B
B
B
B
B
B
B
B
B
B
B
D
D
D
D
D
D
D
D
D
D
D
D
D
D
D
D
D
D
AR-150P
PARTS CODE
SSAKA0019SCZZ
SSAKA2011KCZZ
"
"
SSAKA3442QCZZ
"
SSAKH0021SCZZ
SSAKH3012KCZZ
"
[T]
TCADZ0075QSZZ
TCADZ0076QSZZ
TCADZ0077QSZZ
TCADZ0078QSZZ
TINSE0258QSZZ
TINSE0305QSZZ
TLABH0152QSZZ
TTAG-0002QSZZ
[U]
UBATL2034SCZZ
[V]
VCCCCY1EH102J
VCCCCY1HH101J
"
VCCCCY1HH150J
VCCCCY1HH180J
VCCCCY1HH201J
VCCCCY1HH220J
VCCCCY1HH330J
VCCCCY1HH561J
VCCCTQ1HH332J
VCCCTV1HH330J
VCCCTV1HH471J
VCEAGA0JW107M
VCEAGA1AW226M
VCEAGA1CW106M
VCEAGA1CW107M
VCEAGA1CW226M
VCEAGA1CW476M
VCEAGU1CW106M
VCEAGU1CW476M
VCEAJU1CW226M
VCFYEG2EA223M
VCFYJU2EA334K
VCFYJU2EA824K
VCKYCY1CB333K
VCKYCY1CF104Z
"
VCKYCY1EB223K
VCKYCY1EF104Z
VCKYCY1HB102K
VCKYCY1HB103K
VCKYCY1HB331K
VCKYCY1HF473Z
VCKYTV1EB104K
VCQYNA1HM473K
VCQYNU1HM332J
VCQYNU1HM473K
VCQYNU1HM683J
VHD10E1////-1
VHD1SS355//-1
VHDDAN202U/-1
"
VHDDAP202K/-1
VHDDAP202U/-1
"
VHDDSS133//-1
VHDEK14////-1
VHDRB501V40-1
VHEHZ27-1//-1
VHERD2.7EB2-1
VHERD4.3EL3-1
VHI1816-6//-1
VHI27C08001QS
VHI74LS244NS1
VHI74LS245NS1
VHI74VHC11///
VHIAT24C16N//
VHIBU4051BCF/
VHIBU4053BCF1
VHICG46533175
NO.
PRICE
RANK
NEW
MARK
PART
RANK
5
12
12
9
16
21
5
4
8
AA
AA
AA
AA
AB
AB
AC
AD
AD
9- 2
10- 3
11- 3
12- 7
10- 5
12- 9
10-102
11- 1
AE
AE
AE
AH
AX
AY
AD
AB
14- 25
AH
B
141415151414141515141413141414141414151513141414141415151415141414131414141414141314151314141414141414141415151415141414-
AB
AA
AA
AB
AA
AA
AA
AA
AB
AC
AA
AA
AC
AB
AA
AC
AB
AB
AA
AB
AB
AE
AD
AE
AB
AA
AA
AA
AA
AA
AA
AA
AA
AA
AA
AC
AB
AC
AA
AB
AB
AB
AB
AB
AB
AA
AE
AD
AB
AB
AB
AZ
BA
AH
AF
AF
AL
AF
AE
BA
C
C
C
C
C
C
C
C
C
C
C
C
C
C
C
C
C
C
C
C
C
C
C
C
C
C
C
C
C
C
C
C
C
C
C
C
C
C
B
B
B
B
B
B
B
B
B
B
B
B
B
B
B
B
B
B
B
B
B
B
129101191011910-
26
27
6
7
28
29
30
8
9
31
32
6
33
34
35
36
37
38
10
11
7
39
40
41
42
43
12
13
44
14
45
46
47
8
50
49
48
51
57
56
9
52
15
10
53
54
55
58
59
60
61
82
1
19
20
83
16
62
63
65
D
D
D
D
D
D
D
D
D
N
N
N
N
N
N
N
N
N
D
D
D
D
D
D
C
C
PARTS CODE
VHICGS410//-1
VHIHD4074344/
VHIHY18164CSJ
VHILC8213K/-1
VHILM311//-1F
VHILM386M//-1
VHILZ9FH19///
VHIMC34063P-1
VHINJM084M/-F
VHINJM431U/-1
VHINJU6355E-1
VHINS32FX164/
VHINSFX200-25
VHITC7SH08FU1
VHITL431CLP-2
VHIULN2003ANS
VHIUSS-725///
VHIW166G/////
VHIW24257A12J
VHIW2465S70LL
VHP1LHLE-002A
VHPGP1A71A1-1
VHPPC814///-1
VHPPC817///-1
VHVRA391PV6-1
VHVTNR5V471K/
VRD-HT2EY330J
VRD-HT2EY392J
VRD-HT2EY4R7J
VRD-HT2HY101J
"
VRD-HT2HY153J
VRD-HT2HY4R7J
VRD-HT2HY561J
VRS-CY1JD000J
VRS-CY1JD100J
VRS-CY1JD101J
VRS-CY1JD102J
"
VRS-CY1JD103J
"
VRS-CY1JD104J
VRS-CY1JD105J
VRS-CY1JD106J
VRS-CY1JD121J
VRS-CY1JD122J
VRS-CY1JD123J
VRS-CY1JD152J
VRS-CY1JD181J
VRS-CY1JD182J
VRS-CY1JD203J
VRS-CY1JD220J
VRS-CY1JD221J
VRS-CY1JD222J
VRS-CY1JD223J
VRS-CY1JD240J
VRS-CY1JD330J
VRS-CY1JD331J
VRS-CY1JD332J
VRS-CY1JD333J
VRS-CY1JD390J
VRS-CY1JD472J
VRS-CY1JD473J
VRS-CY1JD511J
VRS-CY1JD512J
VRS-CY1JD562J
VRS-CY1JD750J
VRS-CY1JD821J
VRS-CY1JD822J
VRS-CY1JD911J
VRS-TP2BD000J
VRS-TS2AD000J
VRS-TS2AD101J
VRS-TS2AD102J
VRS-TS2AD103J
VRS-TS2AD105J
VRS-TS2AD202J
VRS-TS2AD203J
VRS-TS2AD242F
VRS-TS2AD272F
VRS-TS2AD391J
– 20 –
NO.
14- 64
13- 11
14- 66
14- 67
14- 68
14- 69
14- 70
14- 71
14- 72
13- 12
14- 73
14- 75
14- 74
15- 17
14- 76
14- 77
15- 18
14- 81
14- 78
14- 79
13- 13
8- 15
14- 84
14- 85
14- 86
14- 87
14- 88
14- 89
14- 90
14- 91
15- 21
14- 92
14- 93
14- 94
14- 95
14- 96
14- 97
14- 98
15- 22
14- 99
15- 23
14-100
14-101
14-102
14-103
15- 24
14-104
15- 25
14-105
14-106
15- 26
15- 27
14-107
14-108
14-109
15- 28
14-110
14-111
15- 29
14-113
14-112
14-114
14-115
14-116
14-117
14-118
14-119
14-120
14-121
14-122
13- 14
14-124
13- 15
13- 16
13- 17
13- 18
13- 19
13- 20
13- 21
13- 22
13- 23
PRICE
RANK
AU
AX
AZ
AZ
AD
AE
AV
AN
AH
AF
AM
BG
BG
AE
AG
AE
BD
AT
AN
AW
AC
AG
AE
AF
AE
AD
AA
AA
AA
AA
AA
AB
AA
AA
AA
AA
AA
AA
AA
AA
AA
AA
AA
AA
AA
AA
AA
AA
AA
AA
AA
AA
AA
AA
AA
AA
AA
AA
AA
AA
AA
AA
AA
AA
AA
AA
AA
AA
AA
AA
AA
AA
AA
AA
AA
AA
AA
AA
AB
AA
AA
NEW
MARK
N
PART
RANK
B
B
B
B
B
B
B
B
B
B
B
B
B
B
B
B
B
B
B
B
B
B
B
B
B
B
B
C
C
C
C
C
C
C
C
C
C
C
C
C
C
C
C
C
C
C
C
C
C
C
C
C
C
C
C
C
C
C
C
C
C
C
C
C
C
C
C
C
C
C
C
C
C
C
C
C
C
C
C
C
C
AR-150P
PARTS CODE
VRS-TS2AD680J
VRS-TX2HD511J
VRSCY1DR5622F
VRSCY1JD1542F
VRSCY1JD2153F
VRSCY1JD2433F
VRSCY1JD3740F
VRSCY1JD3921F
VRSCY1JD4642F
VRSCY1JD4872F
VRSCY1JD5112F
VS2SC3382-/-1
VS2SC3708-/-1
VSDTA143EK/-1
VSP50PB518P//
VVLHLM3212-01
[X]
XBBSE30P08000
"
XBPSD30P05K00
"
XBPSD30P06KS0
"
XEBSD26P06000
XEBSD30P08000
"
"
"
"
"
"
"
"
XEBSD30P10000
XEBSD30P12000
"
"
XEBSD40P10000
"
XEBSD40P12000
XEBSE40P12000
"
XEBSE40P14000
"
XEBSE40P16000
XEPSD30P08X00
"
"
XHBSD30P06000
XHBSD40P08000
XHBSE30P08000
XPSSP20-07000
"
"
XPSSP20-09000
"
XRESP30-06000
"
XRESP40-06000
"
"
XRESP50-06000
"
XWHSD30-08160
NO.
PRICE
RANK
14-123
13- 24
14-133
14-125
14-126
14-127
14-128
14-129
14-130
14-131
14-132
14-134
14-135
13- 25
6- 5
13- 26
AA
AB
AA
AA
AA
AA
AA
AA
AA
AA
AA
AD
AD
AB
AL
BA
912362551234566684346147711141114687102583625258368-
AA
AA
AA
AA
AA
AA
AA
AA
AA
AA
AA
AA
AA
AA
AA
AA
AA
AA
AA
AA
AA
AA
AA
AA
AA
AA
AA
AA
AA
AA
AA
AA
AA
AA
AA
AA
AA
AA
AA
AA
AA
AA
AA
AA
AA
AA
AA
11
4
6
17
12
31
10
20
6
39
25
41
2
16
24
30
2
2
9
4
13
3
5
2
7
22
29
8
5
39
6
19
15
10
29
47
6
17
22
24
50
15
13
3
13
19
29
NEW
MARK
N
N
PART
RANK
PARTS CODE
C
C
B
C
C
C
C
C
C
C
C
B
B
B
B
E
C
C
C
C
C
C
C
C
C
C
C
C
C
C
C
C
C
C
C
C
C
C
C
C
C
C
C
C
C
C
C
C
C
C
C
C
C
C
C
C
C
C
C
C
C
C
C
– 21 –
NO.
PRICE
RANK
NEW
MARK
PART
RANK
AR-SP3
CAUTION FOR BATTERY REPLACEMENT
(Danish)
ADVARSEL !
Lithiumbatteri – Eksplosionsfare ved fejlagtig håndtering.
Udskiftning må kun ske med batteri
af samme fabrikat og type.
Levér det brugte batteri tilbage til leverandoren.
(English)
Caution !
Danger of explosion if battery is incorrectly replaced.
Replace only with the same or equivalent type
recommended by the manufacturer.
Dispose of used batteries according to manufacturer’s instructions.
(Finnish)
VAROITUS
Paristo voi räjähtää, jos se on virheellisesti asennettu.
Vaihda paristo ainoastaan laitevalmistajan suosittelemaan
tyyppiin. Hävitä käytetty paristo valmistajan ohjeiden
mukaisesti.
(French)
ATTENTION
Il y a danger d’explosion s’ il y a remplacement incorrect
de la batterie. Remplacer uniquement avec une batterie du
même type ou d’un type équivalent recommandé par
le constructeur.
Mettre au rebut les batteries usagées conformément aux
instructions du fabricant.
(Swedish)
VARNING
Explosionsfara vid felaktigt batteribyte.
Använd samma batterityp eller en ekvivalent
typ som rekommenderas av apparattillverkaren.
Kassera använt batteri enligt fabrikantens
instruktion.
(German)
Achtung
Explosionsgefahr bei Verwendung inkorrekter Batterien.
Als Ersatzbatterien dürfen nur Batterien vom gleichen Typ oder
vom Hersteller empfohlene Batterien verwendet werden.
Entsorgung der gebrauchten Batterien nur nach den vom
Hersteller angegebenen Anweisungen.
AR-SP3
COPYRIGHT © 1999 BY SHARP CORPORATION
All rights reserved.
Printed in Japan.
No part of this publication may be reproduced,
stored in a retrieval system, or transmitted,
in any form or by any means,
electronic, mechanical, photocopying, recording, or otherwise,
without prior written permission of the publisher.
SHARP CORPORATION
Digital Document Systems Group
Quality & Reliability Control Center
Yamatokoriyama, Nara 639-1186, Japan
1999 September Printed in Japan N