1
®
MonitorMouse
FOR OS/2
Version 2.1
Manual Version 2.1
®
MonitorMouse for OS/2
Version 1.0
User’s Guide
Manual Version 1.0a
Copyright © 1992-1995
by
Elo TouchSystems, Inc.
105 Randolph Road
Oak Ridge, Tennessee 37830
(615) 482-4100
A Raychem Company
All rights reserved.
P/N 008010-A
DOC # SW000042-A
Trademark Acknowledgements
IntelliTouch, AccuTouch, and MonitorMouse are registered trademarks, and ELODEV is a trademark of Elo
TouchSystems, Inc. All other trademarks are the property of their respective holders.
Copyright
Copyright © 1992-1995 by Elo TouchSystems, Inc. All rights reserved. Reproduction, adaptation, or translation without
prior written permission is prohibited, except as allowed under copyright laws. Printed in USA. H55039.
Software License Agreement
BY OPENING THE ACCOMPANYING DISK ENVELOPE, YOU ARE AGREEING TO BECOME BOUND BY THE
TERMS OF THIS AGREEMENT, INCLUDING THIS SOFTWARE LICENSE AND LIMITED WARRANTY.
Software License
This software is protected by both the United States copyright law and international treaty provisions. Therefore, except as
noted below, you should treat the software just like any other copyrighted material. Elo TouchSystems, Inc. (Elo)
authorizes you to make archival copies of the software for the purposes of backing up your software and protecting your
investment from loss, and to make additional copies for use within a single company or facility.
THIS SOFTWARE IS LICENSED FOR USE ONLY WITH ELO TOUCHSCREENS.
The enclosed software program object code (drivers, utilities, diagnostics, and/or demonstration programs) may be freely
duplicated or distributed without charge, but may not be resold. You may not decompile, reverse assemble, reverse
engineer, or patch any software program object code.
Any supplied software program source code is proprietary and may not be disclosed to third parties. Such source code may
be modified and/or partially or completely incorporated into your own applications, together with any supplied object
code, and the resulting programs may be used, given away or sold without additional licenses or fees.
You may not reproduce, distribute, or revise the program documentation without expressed written consent from Elo.
This software and accompanying written materials may contain reference to, or information about, Elo products
(equipment or programs), that are not now available. Such references or information must not be construed to mean that
Elo intends to provide such products, programming, or services.
Limited Warranty
THIS SOFTWARE AND ACCOMPANYING WRITTEN MATERIALS ARE PROVIDED "AS IS" WITHOUT
WARRANTY OF ANY KIND. FURTHER, ELO DOES NOT GUARANTEE, OR MAKE ANY REPRESENTATIONS
REGARDING THE USE, OR THE RESULTS OF THE USE, OF THE SOFTWARE OR ACCOMPANYING WRITTEN
MATERIALS IN TERMS OF CORRECTNESS, ACCURACY, RELIABILITY OR CURRENTNESS. IF THE
INCLUDED SOFTWARE OR ACCOMPANYING WRITTEN MATERIALS ARE DEFECTIVE, YOU, AND NOT ELO
OR ITS DEALERS, DISTRIBUTORS, AGENTS, OR EMPLOYEES, ASSUME THE COST OF ALL NECESSARY
SERVICING, REPAIR, OR CORRECTION. THE ENTIRE RISK AS TO THE RESULTS AND PERFORMANCE OF
THE SOFTWARE AND ANY FURTHER PROGRAMS OR WRITTEN MATERIALS DEVELOPED UTILIZING
THESE MATERIALS IS ASSUMED BY YOU.
Elo warrants only that the disk is free from defects in material and workmanship under normal use and service for a period
of sixty (60) days after receipt.
Elo's entire liability and your exclusive remedy as to the disk shall be, at Elo's option, either return of the purchase price or
replacement of the disk.
EXCEPT AS PROVIDED ABOVE, ELO DISCLAIMS ALL WARRANTIES, EITHER EXPRESSED OR IMPLIED,
INCLUDING BUT NOT LIMITED TO IMPLIED WARRANTIES OF MERCHANTABILITY AND FITNESS FOR A
PARTICULAR PURPOSE, WITH RESPECT TO THE SOFTWARE, WRITTEN MATERIALS OR DISK. IN NO
EVENT SHALL ELO BE LIABLE FOR ANY INCIDENTAL OR CONSEQUENTIAL DAMAGES OF ANY KIND.
Governing Law
This Agreement shall be governed by and construed in accordance with the laws of the State of Tennessee.
ii
Contents
Chapter 1- Introduction ................................... 1
About this Manual ............................................. 1
About MonitorMouse for OS/2 .................................... 2
Touchscreen Controller Compatibility .......................... 2
Software Compatibility..................................... 4
Coordinates vs. Mickeys .............................. 4
Video Compatibility ....................................... 4
Differences from Previous Versions ........................... 4
Distribution Rights ........................................ 5
Other Versions of MonitorMouse ............................. 5
Product Registration ........................................... 5
Contacting Elo ............................................... 6
Chapter 2- Installing MonitorMouse for OS/2................... 7
Before you Begin ............................................. 7
Step 1 - Configure your Controller ................................. 8
Step 2 - Copy the Software ...................................... 8
International Versions ..................................... 9
Step 3 - Modify CONFIG.SYS .................................... 9
Detailed Instructions for System Configurations .................. 9
Serial Touchscreen Controller on PC-Bus System................ 10
No Mouse ........................................ 10
Disabling the COM Drivers............................ 10
Serial Touchscreen Controller on PS/2 System .................. 11
No Mouse ........................................ 11
Disabling the COM Drivers............................ 11
PC-Bus Touchscreen Controller ............................. 12
No Mouse ........................................ 12
Disabling the COM Drivers............................ 12
Micro Channel Touchscreen Controller ........................ 13
No Mouse ........................................ 13
Step 4 - Install the Touchscreen Control Panel ....................... 14
Step 5 - Calibrate the Touchscreen ............................... 14
Installing the Elo Wallpaper ..................................... 15
Chapter 3- Using MonitorMouse for OS/2 .................... 17
Touchscreen Control Panel ..................................... 17
Calibration ............................................ 17
Mouse Button Emulation Mode ............................. 18
Double Clicking .................................... 19
Click Sound on Touches .................................. 20
Double-Click Area ....................................... 20
Border Width .......................................... 20
iii
Tips on Using the Touchscreen in Presentation Manager .................. 20
Removing the Mouse Pointer ............................... 20
Resizing Windows....................................... 21
Menus ............................................... 21
Scrolling .............................................. 21
Maximizing Windows ..................................... 21
Using the Overscan Area.................................. 21
Option Buttons and Check Boxes............................ 22
Choosing the Control-Menu, Minimize, Maximize, and Restore Buttons . 22
Tips on Public Access Kiosk Applications ........................... 22
Programming Options ......................................... 24
Appendix A - Configuring Your Controller.................... 25
General Information .......................................... 25
Choosing an Interrupt (IRQ) for PC-Bus Controllers............... 25
Controller Data Sheets ........................................ 26
IntelliTouch Serial Controller (E281-2300)...................... 27
IntelliTouch Serial Controller (E281{A}-4002) ................... 28
AccuTouch Serial Controller (E271-2210) ...................... 29
AccuTouch Serial Controller (E271-140)....................... 30
IntelliTouch PC-Bus Controller (E281-4035) .................... 31
E281-4035 Emulation Modes .......................... 32
IntelliTouch PC-Bus Controller (E281{A}-4025) .................. 33
AccuTouch PC-Bus Controller (E271-2201) .................... 35
AccuTouch PC-Bus Controller (E271-141) ..................... 36
AccuTouch Micro Channel Controller (E271-2202) ............... 38
Controller Installation................................ 38
Appendix B - Driver Command Reference .................... 39
Command Line .............................................. 39
Flags ..................................................... 40
Appendix C - Troubleshooting............................. 43
Appendix D - Installation for AVC .......................... 45
Index ................................................ 47
iv
Introduction
• About this Manual 1
• About MonitorMouse for OS/2 2
• Product Registration 5
• Contacting Elo 6
ABOUT THIS MANUAL
This manual provides all of the information you need to install and use
MonitorMouse for OS/2, Elo TouchSystems’ touchscreen driver for OS/2. This
manual is organized as follows:
Chapter 1
Describes the software included, and the hardware requirements.
Chapter 2
Describes how to install the MonitorMouse for OS/2 software.
Chapter 3
Details the use of MonitorMouse for OS/2 and its options.
Appendix A
Provides detailed information on configuring your touchscreen
controller.
Appendix B
Provides a reference for the MonitorMouse for OS/2 driver
command line and flags.
1
2
Chapter 1 - Introduction
Appendix C
Gives tips on troubleshooting a MonitorMouse for OS/2
installation and includes a sample CONFIG.SYS file.
Appendix D
Gives additional installation steps for using MonitorMouse for
OS/2 with IBM Audio Visual Connection (AVC) multimedia
authoring tool.
See the !READ.ME! file (if present) on the accompanying disk. It contains any
additions or changes made after this manual was printed.
For details on available product configurations, touchscreen theory of operation,
and general troubleshooting, see the IntelliTouch Product Manual or the
AccuTouch Product Manual as appropriate.
ABOUT MONITORMOUSE FOR OS/2
Included on the accompanying disk is MonitorMouse for OS/2, a touchscreen
driver for IBM OS/2 versions 1.3 through 3.x (Warp). MonitorMouse for OS/2
allows you to run all Presentation Manager mouse-driven applications and off-theshelf software without modification using an Elo touchscreen.
MonitorMouse for OS/2 and an Elo touchscreen are recommended for all OS/2
applications that require an intuitive user interface, such as a public kiosk
application. Touchscreens are also popular in point-of-sale, process control,
instrumentation, multimedia, gaming, education, simulation, and training
applications. Elo touchscreens may be used in a harsh environment not
appropriate for a mouse or keyboard.
With MonitorMouse for OS/2, the touchscreen may be used alone, or in
conjunction with any mouse. Various mouse button emulation modes are
supported providing options on how button clicks are simulated. You can choose
the best mode for your application, and change between modes at any time.
Applications using only the left button are the easiest to use with the touchscreen.
Touchscreen Controller Compatibility
Elo manufactures two types of touchscreen technologies. The IntelliTouch
surface wave technology provides excellent clarity and durability. The
AccuTouch resistive technology features pressure-activated screens with rapid
response and high resolution. PC-Bus, Micro Channel, and serial touchscreen
controllers are available.
About MonitorMouse for OS/2
3
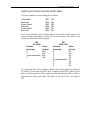
MonitorMouse for OS/2 will work with the Elo touchscreen controllers listed
below. E281{A}-4002 refers to both the E281-4002 and E281A-4002 controllers.
Likewise, E281{A}-4025 refers to both the E281-4025 and E281A-4025
controllers.
Controller Model
E281-2300
E281{A}-4002
E271-2210
E271-140
E281-4035
E281{A}-4025
E271-2201
E271-141
E271-2202
Interface
RS-232
RS-232
RS-232
RS-232
PC-Bus
PC-Bus
PC-Bus
PC-Bus
Micro Channel
Touchscreen Type
IntelliTouch
IntelliTouch
AccuTouch
AccuTouch
IntelliTouch
IntelliTouch
AccuTouch
AccuTouch
AccuTouch
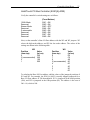
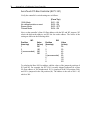
The following obsolete part numbers may be cross-referenced to some of the
controller model numbers referred to above.
Part Number
Controller Model
00285X-XXX Enclosure
Contains E281-4002 IntelliTouch
Serial Controller, configured for
Stream Mode, Binary Mode, Z-Axis
Enabled, 9600 Baud.
E271-3 Enclosure
Contains E271-140 AccuTouch
Serial Controller, configured for
2400 Baud, 8-Bit Data, Binary
Mode, Filtered Mode, Stream
Mode.
002710-XXX Controller
E271-140
Controller
002714-XXX Controller
E271-141
Controller
00285X-2-XXX Controller
E281-4002
Controller.
00285X-25-XXX Controller
E281-4025
Controller.
AccuTouch
AccuTouch
IntelliTouch
IntelliTouch
Serial
PC-Bus
Serial
PC-Bus
4
Chapter 1 - Introduction
Software Compatibility
MonitorMouse for OS/2 is compatible with
(Warp).
OS/2 versions 1.3 through 3.x
Coordinates vs. Mickeys
MonitorMouse will work with all Presentation Manager and WIN-OS/2 mousedriven applications. All OS/2 Full Screen and DOS applications that ask the
mouse driver for coordinates (absolute position) rather than mickeys (relative
motion) will also work.
If your OS/2 Full Screen or DOS application is mickey-based, find out from the
developer if it can also operate in an absolute mode. Sometimes a set-up
parameter or flag can be used, or a different input device specified during
installation, which also emulates the mouse.
Relative motion cannot be emulated with absolute pointing devices because the
position of the cursor or highlighting in mickey-based applications is unknown to
the pointing device driver. The driver is not able to determine the distance from a
touch to the cursor. Knowing this distance is critical for simulating that motion
with mickeys. Other complicating factors include unknown mickey-to-pixel ratios
and acceleration or ballistic algorithms used by the application.
Video Compatibility
The video function of the display and the Elo touchscreen installed on the display
are entirely separate systems. Therefore, the touchscreen is compatible with all
video cards and modes. Problems with the display should be treated as display
problems, not touchscreen problems.
Differences from Previous Versions
MonitorMouse for OS/2 version 2.1 replaces version 2.0 on systems with OS/2
1.3 or later. MonitorMouse for OS/2 version 2.1 cannot be used on OS/2 1.1 or
1.2 systems.
Touchscreen performance with MonitorMouse for OS/2 version 2.1 has been
enhanced over version 2.0 when using an IntelliTouch controller with firmware
revision 2.2 or later, or an AccuTouch or IntelliTouch SmartSet™ controller
(E271-22xx or E281-23xx).
Product Registration
5
Distribution Rights
MonitorMouse for OS/2 and its support software may be distributed freely in
executable form with any software you develop using them. See the license
agreement at the beginning of this manual for details.
Other Versions of MonitorMouse
MonitorMouse for OS/2 is only one in a family of MonitorMouse products for
various operating systems available separately from Elo. Each has a similar "look
and feel" for a consistent user interface across platforms.
MonitorMouse for DOS emulates the standard mouse driver MOUSE.COM on
the IBM family of personal computers, 100% compatibles, and PS/2 systems
running DOS. Programs using MOUSE.COM, MOUSE.SYS, or compatible
versions, will work with MonitorMouse. ELODEV™, the Elo touchscreen driver
program for DOS, is also included.
MonitorMouse for Windows works with all Microsoft Windows applications.
MonitorMouse for Windows is included with MonitorMouse for DOS.
MonitorMouse for Windows NT works with all Microsoft Windows NT
applications (PC version only).
MonitorMouse for Macintosh works on the Apple Macintosh II computer or later
with System 6 or System 7.x.
PRODUCT REGISTRATION
For the latest product announcements and software releases, be sure to fill out and
return the product registration card packaged with this manual.
6
Chapter 1 - Introduction
CONTACTING ELO
Elo TouchSystems, Inc.
105 Randolph Road
Oak Ridge, TN 37830
VOICE:
(615) 482-4100 (Eastern Time)
FAX:
(615) 482-4943
Technical Support Line
VOICE:
(615) 220-4299 (Voice mail after hours)
FAX:
(615) 482-6617
BBS:
(615) 482-9840
(Downloads only, up to 14.4K baud, multiple protocols)
CompuServe: GO ELOTOUCH
Select Elo TouchSystems from the Messages and Library menus.
Product announcements, press releases, application notes, software drivers and
utilities are available on CompuServe and the Elo BBS.
Your comments and suggestions are welcome.
Installing MonitorMouse for
OS/2
• Before you Begin 7
• Configure your Controller 8
• Copy the Software 8
• Modify CONFIG.SYS 9
• Install the Touchscreen Control Panel 14
• Calibrate the Touchscreen 14
• Installing the Elo Wallpaper 15
BEFORE YOU BEGIN
First be sure OS/2 is installed and operating properly with your mouse.
As you will be modifying the CONFIG.SYS file, it is best to have the OS/2
installation disks or a bootable DOS disk readily available. This way, any problems
in CONFIG.SYS which cause the system not to boot can be corrected by rebooting
from the disk(s).
Five steps are required when installing MonitorMouse for OS/2:
7
8
Chapter 2 - Installing MonitorMouse for OS/2
Step 1
Step 2
Step 3
Step 4
Step 5
Configure your controller
Copy the software
Modify CONFIG.SYS
Install the Touchscreen Control Panel
Calibrate the touchscreen
STEP 1 - CONFIGURE YOUR CONTROLLER
Verify your controller configuration using the setup instructions provided in
Appendix A. Elo typically ships touchscreen controllers preconfigured for use with
Elo software, including MonitorMouse for OS/2. Configuration requires setting
switches and/or installing jumpers that determine controller operating parameters.
You will need these parameters when you install the MonitorMouse for OS/2
driver software.
For controller installation instructions, refer to the IntelliTouch Product Manual or
the AccuTouch Product Manual.
STEP 2 - COPY THE SOFTWARE
The following files are on the MonitorMouse for OS/2 disk:
!READ.ME!
MONMOU01.SYS
MONMOU02.SYS
MONMOU03.SYS
ELOCAL2.EXE
ELOCAL2.DLL
ELOCAL2.HLP
ELO.BMP
@6253.ADF
COMDUMP.EXE
BUSSTAT.EXE
SAWDUMP.EXE
Text file containing any additions or changes
made after this manual was printed.
Touchscreen driver for serial touchscreen
controllers on PC-Bus systems.
Touchscreen driver for serial touchscreen
controllers on Micro Channel systems.
Touchscreen driver for PC-Bus and Micro
Channel touchscreen controllers.
Touchscreen Control Panel used to calibrate
the touchscreen and select options.
Used by ELOCAL2.EXE.
Help file for ELOCAL.EXE.
Elo desktop wallpaper.
Description File for the E271-2202 Micro
Channel touchscreen controller.
DOS program for testing serial touchscreen
controllers.
DOS program for testing PC-Bus touchscreen
controllers.
DOS program for testing IntelliTouch touchscreen
controllers.
Step 3 - Modify CONFIG.SYS
9
Create a subdirectory on your hard disk and copy the files into it. For example,
CD \
MD ELO
COPY A:*.* ELO
International Versions
International versions of the Touchscreen Control Panel are included in
subdirectories on the MonitorMouse for OS/2 disk. Replace ELOCAL2.DLL and
ELOCAL2.HLP on your hard disk with the versions from the appropriate
subdirectory.
STEP 3 - MODIFY CONFIG.SYS
MonitorMouse for OS/2 is installed by commands in CONFIG.SYS. Use your
system editor to make these changes. In general, the changes are as follows:
•
Comment-out the existing DEVICE command(s) for your mouse.
•
Add a DEVICE command for the appropriate MonitorMouse for OS/2
touchscreen driver immediately after the commented-out DEVICE
commands(s).
•
Add a new DEVICE command for MOUSE.SYS.
The order of the DEVICE commands is important. See the sample CONFIG.SYS
in Appendix C, page 43.
Other changes may be required depending on your hardware configuration and
version of OS/2.
Detailed Instructions for System Configurations
Refer to the page number given below for detailed instructions on your specific
configuration.
Serial Touchscreen Controller on PC-Bus System
Serial Touchscreen Controller on PS/2 System
PC-Bus Touchscreen Controller
Micro Channel Touchscreen Controller
10
11
12
13
10
Chapter 2 - Installing MonitorMouse for OS/2
Serial Touchscreen Controller on PC-Bus System
Change your CONFIG.SYS file as follows:
TGO &'8+%'%>15>/175'5;5 =HNCIU?
FGXKEGE>GNQ>OQPOQWU[U EQPVTQNNGT %1/ RQTV DCWF TCVG
FGXKEGE>QU>OQWUGU[U UV[RGGNQOQW =HNCIU MGGR UCOG CU CDQXG?
where <controller> is:
2300
4002
2210
140
for the IntelliTouch E281-2300 serial controller.
for the IntelliTouch E281{A}-4002 serial controller.
for the AccuTouch E271-2210 serial controller.
for the AccuTouch E271-140 serial controller.
<COM port> is the number of the COM port where the serial output of the
touchscreen controller is connected.
<baud rate> matches the switch or jumper settings on the controller.
Here is an example MonitorMouse for OS/2 DEVICE command:
FGXKEGE>GNQ>OQPOQWU[U No Mouse
If you do not wish to have a mouse connected, change the "stype=elomou$" flag to
"type=elomou$" on the DEVICE=MOUSE.SYS command.
Disabling the COM Drivers
If your system COM ports are being used by the touchscreen and mouse, REM out
the DEVICE=COM.SYS and DEVICE=VCOM.SYS commands (if present) in
CONFIG.SYS. This prevents the COM drivers from displaying a message saying
the COM ports are unavailable.
If only the touchscreen is using a COM port, move the DEVICE=COM.SYS and
DEVICE=VCOM.SYS commands before the DEVICE=MONMOU01.SYS
command in CONFIG.SYS. Then add the flag (<COM Port>,0,0) to COM.SYS,
where <COM Port> is the same as on the DEVICE=MONMOU01.SYS command.
For example,
&'8+%'%>15>%1/5;5 Reboot and proceed to Step 4, page 14.
Step 3 - Modify CONFIG.SYS
11
Serial Touchscreen Controller on PS/2 System
Change your CONFIG.SYS file as follows:
TGO &'8+%'%>15>/175'5;5 =HNCIU?
FGXKEGE>GNQ>OQPOQWU[U EQPVTQNNGT %1/ RQTV DCWF TCVG
FGXKEGE>QU>OQWUGU[U UV[RGGNQOQW =HNCIU MGGR UCOG CU CDQXG?
where <controller> is:
2300
4002
2210
140
for the IntelliTouch E281-2300 serial controller.
for the IntelliTouch E281{A}-4002 serial controller.
for the AccuTouch E271-2210 serial controller.
for the AccuTouch E271-140 serial controller.
<COM port> is the number of the COM port where the serial output of the
touchscreen controller is connected.
<baud rate> matches the switch or jumper settings on the controller.
Here is an example MonitorMouse for OS/2 DEVICE command:
FGXKEGE>GNQ>OQPOQWU[U No Mouse
If you do not wish to have a mouse connected, change the "stype=elomou$" flag to
"type=elomou$" on the DEVICE=MOUSE.SYS command.
Disabling the COM Drivers
If your system has only one COM port which is being used by the touchscreen,
REM out the DEVICE=COM.SYS and DEVICE=VCOM.SYS commands (if
present) in CONFIG.SYS. This prevents the COM drivers from displaying a
message saying the COM port is unavailable.
Otherwise, move the DEVICE=COM.SYS and DEVICE=VCOM.SYS commands
before the DEVICE=MONMOU02.SYS command in CONFIG.SYS. Then add the
flag (<COM Port>,0,0) to COM.SYS, where <COM Port> is the same as on the
DEVICE=MONMOU02.SYS command. For example,
&'8+%'%>15>%1/5;5 Reboot and proceed to Step 4, page 14.
12
Chapter 2 - Installing MonitorMouse for OS/2
PC-Bus Touchscreen Controller
Change you CONFIG.SYS file as follows:
TGO &'8+%'%>15>/175'5;5 =HNCIU?
FGXKEGE>GNQ>OQPOQWU[U EQPVTQNNGT $CUG +1 2QTV +43
FGXKEGE>QU>OQWUGU[U UV[RGGNQOQW =HNCIU MGGR UCOG CU CDQXG?
where <controller> is:
4035
4025
2201
141
for the IntelliTouch E281-4035 PC-Bus controller.
for the IntelliTouch E281{A}-4025 PC-Bus controllers.
for the AccuTouch E271-2201 PC-Bus controller.
for the AccuTouch E271-141 PC-Bus controller.
<Base I/O Port> matches the jumper settings on the controller.
<IRQ> matches the interrupt jumper on the controller.
Here is an example MonitorMouse for OS/2 DEVICE command:
FGXKEGE>GNQ>OQPOQWU[U No Mouse
If you do not wish to have a mouse connected, change the "stype=elomou$" flag to
"type=elomou$" on the DEVICE=MOUSE.SYS command.
Disabling the COM Drivers
If you selected IRQ4 or IRQ3 for the touchscreen controller (the interrupts reserved
for
COM1
and
COM2),
move
the
DEVICE=COM.SYS
and
DEVICE=VCOM.SYS commands (if present) before the DEVICE=
MONMOU03.SYS command in CONFIG.SYS. This prevents the COM drivers
from displaying a message saying the COM port is unavailable. Add the flag
(<COM Port>,0,0) to COM.SYS, where <COM Port> is 1 for IRQ4 or 2 for IRQ3.
For example,
&'8+%'%>15>%1/5;5 Reboot and proceed to Step 4, page 14.
Step 3 - Modify CONFIG.SYS
13
Micro Channel Touchscreen Controller
Change your CONFIG.SYS file as follows:
TGO &'8+%'%>15>/175'5;5 =HNCIU?
FGXKEGE>GNQ>OQPOQWU[U EQPVTQNNGT
FGXKEGE>QU>OQWUGU[U UV[RGGNQOQW =HNCIU MGGR UCOG CU CDQXG?
where <controller> is:
2202 for the AccuTouch E271-2202 Micro Channel controller.
Here is an example MonitorMouse for OS/2 DEVICE command:
FGXKEGE>GNQ>OQPOQWU[U No Mouse
If you do not wish to have a mouse connected, change the "stype=elomou$" flag to
"type=elomou$" on the DEVICE=MOUSE.SYS command.
Reboot and proceed to Step 4, page 14.
14
Chapter 2 - Installing MonitorMouse for OS/2
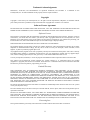
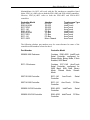
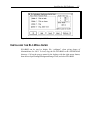
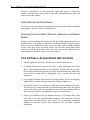
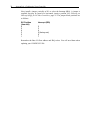
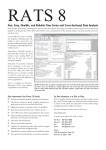
STEP 4 - INSTALL THE TOUCHSCREEN CONTROL PANEL
The Touchscreen Control Panel program, ELOCAL2.EXE, is a Presentation
Manager application for calibrating the touchscreen and setting various options.
See Figure 2-1.
Add the \ELO\ELOCAL2.EXE program to the System Setup Folder and label the
icon "Touchscreen". This is accomplished as follows:
1. Open the OS/2 System folder, then System Setup.
2. Open the Templates folder.
3. Drag the Program template with the right mouse button into the System Setup
folder. A Settings notebook will be displayed.
4. Enter "C:\ELO\ELOCAL2.EXE" as the Path and file name. Enter "C:\ELO" as
the Working directory.
5. Select the General tab. Change the Title to "Touchscreen".
6. Close the notebook.
See your OS/2 documentation for detailed instructions on installing new
applications.
STEP 5 - CALIBRATE THE TOUCHSCREEN
Double-click the Touchscreen icon with the mouse (as the touchscreen may not be
calibrated yet), or use the keyboard if the mouse is not connected. You may also
run ELOCAL2.EXE from an OS/2 Window prompt.
Select Calibrate and follow the on-screen instructions. After calibrating, the
touchscreen will work like the mouse. The DEVICE=MONMOUxx command in
CONFIG.SYS is updated with the new calibration points (-c flag). The calibration
points are then set automatically each time the system is started. Recalibration
should only be necessary after moving or resizing the video image, or after
changing either the touchscreen, controller, or monitor.
Close the Touchscreen Control Panel. (Other options in the Touchscreen Control
Panel are described in the next chapter.)
Installing the Elo Wallpaper
15
Figure 2-1. MonitorMouse for OS/2 Touchscreen Control Panel
INSTALLING THE ELO WALLPAPER
ELO.BMP can be used to display Elo “wallpaper” when giving demos of
MonitorMouse for OS/2. To load, copy the file ELO.BMP to the \OS2\BITMAP
directory. Call up the pop-up menu for the desktop with the right mouse button,
then choose Open/Settings/Background/Image/Tiled, and select ELO.BMP.
16
Chapter 2 - Installing MonitorMouse for OS/2
Using MonitorMouse for OS/2
• Touchscreen Control Panel 17
• Tips on Using the Touchscreen in Presentation Manager 20
• Tips on Public Access Kiosk Applications 22
• Programming Options 24
TOUCHSCREEN CONTROL PANEL
The MonitorMouse for OS/2 Touchscreen Control Panel (see Figure 2-1, page 15)
is detailed in the following sections.
Calibration
Select Calibrate to initiate the calibration sequence. Follow the on-screen
instructions. You will be given the opportunity to confirm the calibration points.
The need for calibration is unique to the touchscreen. Unlike mouse or keyboard
applications where the cursor is part of the image, a touchscreen is a physical
overlay with an independent coordinate system. Only by knowing the position of
the image can the driver software convert touchscreen coordinates into image
coordinates.
Besides the differences in touchscreens and controllers, calibration also
compensates for variations in the video image among displays. Calibration is also
17
18
Chapter 3 - Using MonitorMouse for OS/2
affected by horizontal and vertical adjustments on the monitor and by the physical
mounting of the touchscreen.
Additional calibration complications include image blooming, where brightlycolored images expand, and the "pincushion" effect, which causes the corners of
the display to be stretched. Poor display linearity can cause similarly-sized boxes to
be larger at the edges of the screen than they are in the middle, or vice-versa. The
displayed image can also be tilted. Even changing video modes can affect the
screen size.
Perfect calibration cannot be achieved in all circumstances. For example, the user
can encounter parallax problems with a change in position, or because the present
user is not the same stature as the person who calibrated the screen.
Even the most sophisticated calibration techniques can only partially overcome
such variations. Therefore, most touchscreen software uses only a two- or threepoint calibration sequence and instead relies on well-placed touch zones and
appropriate user feedback.
The three-point calibration sequence used by the Touchscreen Control Panel
automatically corrects inverted touchscreen installations and backwards cable
connections. X- or Y-axis inversion is normal for most touchscreens.
Once calibrated, MonitorMouse for OS/2 will be ready to run automatically each
time the system is restarted. Recalibration should only be necessary after moving
or resizing the video image, or after changing either the touchscreen, controller, or
monitor.
Mouse Button Emulation Mode
Four mouse button emulation modes are supported, equivalent to the
corresponding mode numbers in the other versions of the MonitorMouse family of
products. The current mode may be changed with the Touchscreen Control Panel.
After selecting the mode, CONFIG.SYS is updated (-m flag). Mode 6 is the
default.
The modes vary in the button actions they support (clicking, dragging, doubleclicking, etc.) You should choose the simplest mode that will work for your
application.
Mode 0
Left button clicking only. No dragging or right button is supported.
Works with large targets. Recommended for public kiosk
applications.
Moves the mouse pointer to your point of touch and “clicks” the left
button. A beep will confirm the click. The mouse pointer will not
Touchscreen Control Panel
19
move, nor will any other clicks be simulated until your finger is
lifted and the screen retouched.
Mode 1
Left button clicking only. No dragging or right button is supported.
Works with large and small targets.
The mouse pointer follows your sliding finger and the left button is
clicked at the point of release (lift-off).
Mode 5
Left button clicking and dragging. No right button is supported.
The left button is held down when you touch the screen, and it stays
down until you release, dragging as you move.
Mode 6
Same as Mode 5, but supports double-clicking by tapping twice.
Recommended for general use.
If the second touch occurs immediately after the first and is nearby,
a double-click will be simulated at the exact point of the first touch.
If you do not hear two beeps, you have tapped too fast.
Double Clicking
Double clicking is common in the OS/2 environment, so MonitorMouse mouse
button emulation mode 6 is recommended. If you are running a dedicated
application which does not use double clicking, you may use one of the other
modes.
The double-click speed for the mouse can be adjusted by changing the mouse
settings in the System Setup folder. It may be helpful to adjust this threshold
towards the slower end of the scale.
The hardware limitations of the touchscreen controller, the driver software, and the
system clock combine to limit the minimum double-tapping speed. A threshold
setting which permits a rapid double click with the mouse may not allow an equal
double-click speed with the touchscreen. Use the mouse settings program to test
the double-click speed for both the mouse and the touchscreen.
If you do not hear two beeps when double tapping with some older touchscreen
controllers, you are tapping too fast. Use a relaxed pace.
20
Chapter 3 - Using MonitorMouse for OS/2
Click Sound on Touches
A check box is available in the Touchscreen Control Panel for enabling/disabling
the "click" sound from the PC’s internal speaker for each touch. Audible feedback
is important because the touchscreen does not have any tactile feedback
mechanism. CONFIG.SYS is updated with the new setting (-b flag). Beeps are
enabled by default.
Double-Click Area
The double-click area may be specified in the Touchscreen Control Panel. This
area is used for detecting double-clicks in mouse button emulation mode 6.
Normally, OS/2 expects a double-click to be on the same pixel−easy to do with a
mouse, but almost impossible with a touchscreen. By expanding this area, it
becomes easier to double-click by double-tapping anywhere within this area. The
default number of pixels for X and Y are calculated after you calibrate the
touchscreen. CONFIG.SYS is updated with the new values (-a flag).
Border Width
To make resizing windows easier with the touchscreen, increase the Border Width
for the desktop. A value of 17 is recommended for 640x480 video resolution, 26
for 1024x768. For other resolutions, pick a border width that visually matches the
title bar width. Wide borders may look strange at first, but after awhile they will
seem normal. The new border width will not be reflected until the system is
rebooted.
TIPS ON USING THE TOUCHSCREEN IN PRESENTATION MANAGER
The following are suggestions for using the touchscreen with Presentation
Manager. Mouse button emulation mode 6 is assumed.
Removing the Mouse Pointer
A mouse pointer is not required in most touchscreen applications and may actually
be a distraction. The user's eyes will follow the pointer's movement instead of
focusing on the application. With a pointer present, the user performs the indirect
act of moving the arrow to an object instead of the direct, natural act of touching
the object.
With OS/2 3.0 (Warp), it is possible to disable the mouse pointer as follows:
1. Open the OS/2 System folder, then System Setup.
Tips on Using the Touchscreen in Presentation Manager
21
2. Open the Mouse icon. A Settings notebook will be displayed.
3. Select the Pointers tab.
4. Highlight the arrow icon. Select Edit.
5. With the Icon Editor, select File/New to create a null cursor. Select File/Save.
6. Close the notebook.
Resizing Windows
See Border Width, page 20.
Menus
Menus are best navigated by sliding along the menu bar, then down a drop-down
menu. Highlighting will follow your finger, indicating the position of touch. When
you release, the highlighted item will be selected. This technique is easier than
accurately tapping an item on the menu bar, and then tapping an item within a
drop-down or pop-up menu.
Scrolling
Scrolling lists can be performed by touching the scroll bars, as you would with the
mouse. Some lists can be scrolled more easily by touching the data area, sliding
your finger to an edge, then continuing to slide outside the area. This technique
works in drop-down lists, for example. In fact, the farther away you slide from the
list, the faster the data scrolls.
Maximizing Windows
To maximize a window, double tap on the window's title bar, rather than tapping
the Maximize button. Likewise, to restore a maximized window to its previous
size, double-tap its title bar instead of tapping the Restore button. You can also use
the Control menu to maximize, minimize, and restore windows.
Using the Overscan Area
MonitorMouse for OS/2 pushes all touches in the display's overscan area within
the screen image. This effectively enlarges the active touch area of zones on the
edges of the image. You may touch the edges and corners of the CRT face to easily
click on items displayed at the extremes of the image. For example, when a
22
Chapter 3 - Using MonitorMouse for OS/2
window is maximized, you may touch the upper-right corner to restore the
window, touch the top to click on the window title, and double-tap the upper-left
corner to close the window.
Option Buttons and Check Boxes
It is easier to select an option by touching the option name rather than touching the
option button. The same is true with check boxes.
Choosing the Control-Menu, Minimize, Maximize, and Restore
Buttons
Windows can be maximized and restored easily by double-tapping the title bar as
described above. The Minimize, Maximize, and Restore buttons, and the Controlmenu box can be difficult to touch as they are quite small on high-resolution
screens. Since they all act on button release, you can slide among them before
selecting as with the drop-down menus. You can also use the Control menu to
easily maximize, minimize, restore, and close windows.
TIPS ON PUBLIC ACCESS KIOSK APPLICATIONS
1. Run the application full screen. Do not have a title bar, menu bar, etc.
2. Use bright background colors (never black) to hide fingerprints and reduce
glare. A patterned background, such as dithering, will also help the eye focus
on the image rather than reflections, especially in background areas where there
are no icons or menu choices. Fingerprints make a system look dirty and
unattractive.
3. Use a simple point-and-click interface with large buttons. Do not use dragging,
double clicks, scroll bars, drop-down menus, multiple windows, etc.
4. Turn off the cursor. Users will focus on the entire screen instead of the arrow.
The presence of a cursor makes the user subconsciously think "how do I get the
arrow to do what I want?" By removing the cursor, the user's thinking/action is
direct instead of indirect, unlocking the true power of touchscreens.
5. Always give feedback to the user instantly on touch. A 3-D button effect works
well (such as an OS/2 standard button). Output a click sound, etc. Clear the
screen while searching for the next screen. Use an hourglass. Immediate
feedback is necessary because the touchscreen has no tactile feedback
mechanism.
Tips on Public Access Kiosk Applications
23
6. Optimize the application for speed. A quick response keeps the user's attention.
Users will walk away from a sluggish system. Speedy systems also reduce
vandalism. Do not use a graphics mode with higher than necessary
colors/resolution. It will only slow down the system. (Use of 256 colors is
typically more important than resolution above 640x480.)
7. The application must be intuitive. Guide the user. Limit choices. Test the
application on focus groups. If anyone pauses for even a moment, think how to
improve the application so it is totally obvious.
8. Consider using a sound card with digitized speech to prompt the user through
the application. For example, "Touch the first letter of the company you are
looking for." Click. "Now touch OK." Click. There is something almost
magical about a user interface with voice prompting and touch response. Your
brain can simultaneously process voice while absorbing an image.
9. The main screen must attract the user from a distance. Animation and large
fonts are ways to catch the eye. An attractive kiosk design is also important.
10. Other kiosk design tips: If forced air ventilation is used, position the fan at the
top near the monitor's vents. The intake should not be near the floor where
airborne dust from footsteps can become a problem. Air should not enter
around the CRT face either. The kiosk design should accommodate variation in
monitor dimensions and bezels, as monitor models may come and go every few
months. Speakers should point towards the user's face, not their knees. Choose
a finish that does not show fingerprints. Avoid polished stainless steel, chrome,
and glossy black paint.
All of the above suggestions may seem obvious, but it is surprising how many
developers miss some of these points. Sometimes a simple change to the
application can mean the difference between a project's success or failure.
24
Chapter 3 - Using MonitorMouse for OS/2
PROGRAMMING OPTIONS
Presentation Manager applications can launch the Touchscreen Control Panel
(ELOCAL2.EXE) with the DosExecPgm() function.
It is also possible to directly call the calibration procedure in the Touchscreen
Control Panel by executing ELOCAL2.EXE with a flag as follows:
ELOCAL2 -Calibrate
$SSHQGL[$
Configuring Your Controller
• General Information 25
• Controller Data Sheets 26
GENERAL INFORMATION
This appendix describes how to configure your controller’s switch and/or jumper
settings for use with MonitorMouse for OS/2. Controllers are typically shipped
pre-configured for use with MonitorMouse for OS/2.
Your controller’s switch and jumper settings can be found on one of the next few
pages. Our recommendations should give you the best performance, but feel free to
try other settings if an option is given.
For controller drawings and installation instructions, refer to the IntelliTouch
Product Manual or the AccuTouch Product Manual.
Choosing an Interrupt (IRQ) for PC-Bus Controllers
MonitorMouse for OS/2 requires all PC-Bus controllers to be in Interrupt Mode.
Choose the interrupt (IRQ) carefully so it will not conflict with another device
installed in the system.
25
26
Appendix A - Configuring Your Controller
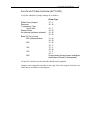
The following table lists the devices normally assigned to each IRQ:
IRQ
2
3
4
5
6
7
Device
Mapped to IRQ9
COM2
COM1
LPT2
Floppy disk controller
LPT1
Below are Elo’s recommendations for choosing an interrupt, in order of preference.
Skip the IRQ if a conflict may exist.
5, 7, 2, 3, 4, 6
CONTROLLER DATA SHEETS
Setup information for each controller begins on a new page. Skip to the appropriate
page for your controller.
Controller
IntelliTouch Serial Controller (E281-2300)
IntelliTouch Serial Controller (E281{A}-4002)
AccuTouch Serial Controller (E271-2210)
AccuTouch Serial Controller (E271-140)
IntelliTouch PC-Bus Controller (E281-4035)
IntelliTouch PC-Bus Controller (E281{A}-4025)
AccuTouch PC-Bus Controller (E271-2201)
AccuTouch PC-Bus Controller (E271-141)
AccuTouch Micro Channel Controller (E271-2202)
Page
27
28
29
30
31
33
35
36
38
NOTE
Switches may be labeled either OFF/ON or OPEN/CLOSE, depending on your
controller. The data sheet tables always list switch positions as OFF (open) or ON
(close).
Controller Data Sheets
27
IntelliTouch Serial Controller (E281-2300)
Verify the controller’s jumper settings are as follows:
9600 Baud
Binary Mode
Hardware handshaking enabled
Stream Mode
Reserved
Reserved
Power-on settings from jumpers
Reserved
Reserved
Emulation mode disabled
(From Left)
J0 - N
J1 - N
J2 - N
J3 - N
J4 - N
J5 - N
J6 - N
J7 - Y
J8 - N
J9 - N
J10 - N
J11 - N
Jumpers cross-connected horizontally on the bottom pins of the jumper block have
no effect and are available as extra jumpers.
28
Appendix A - Configuring Your Controller
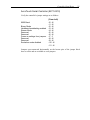
IntelliTouch Serial Controller (E281{A}-4002)
Verify the controller’s switch settings are as follows:
Stream Mode
Binary Mode
Z-axis enable
9600 Baud (recommended)
Reserved
Reserved
(From Bottom)
SW0 - OFF
SW1 - OFF
SW2 - ON
SW3 - ON
SW4 - ON
SW5 - ON
SW6 - ON
SW7 - ON
Controller Data Sheets
29
AccuTouch Serial Controller (E271-2210)
Verify the controller’s jumper settings are as follows:
9600 Baud
Binary Mode
Hardware handshaking enabled
Stream Mode
Reserved
Reserved
Power-on settings from jumpers
Reserved
Reserved
Emulation mode disabled
(From Left)
J0 - N
J1 - N
J2 - N
J3 - N
J4 - N
J5 - N
J6 - N
J7 - Y
J8 - N
J9 - N
J10 - N
J11 - N
Jumpers cross-connected horizonatally on the bottom pins of the jumper block
have no effect and are available as extra jumpers.
30
Appendix A - Configuring Your Controller
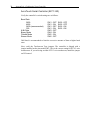
AccuTouch Serial Controller (E271-140)
Verify the controller’s switch settings are as follows:
Baud Rate
9600
4800
2400 (recommended)
300
8-Bit Data
Binary Mode
Filtered Mode
Stream Mode
SW1 - OFF
SW1 - ON
SW1 - OFF
SW1 - ON
SW3 - OFF
SW4 - ON
SW5 - ON
SW6 - OFF
SW2 - OFF
SW2 - OFF
SW2 - ON
SW2 - ON
2400 baud is recommended to limit the excessive amounts of data at higher baud
rates.
Next, verify the Touchscreen Type jumpers. The controller is shipped with a
jumper installed on the pins marked W1. This is the correct setting for E274 5-wire
touchscreens. If you are using an older E270 3-wire touchscreen, install the jumper
on W2 instead.
Controller Data Sheets
31
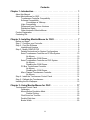
IntelliTouch PC-Bus Controller (E281-4035)
Verify the controller’s switch settings are as follows:
12-Bit Mode
Reserved
Stream Mode
Reserved
Z-axis enable
Reserved
SW1 - ON
SW2 - ON
SW3 - OFF
SW4 - ON
SW5 - ON
SW6 - ON
Next, set the controller’s Base I/O Port address with the W2 and W3 jumpers. W3
selects the high-order address, and W2 th low-order address. The values of the
settings are shown in the following table:
W3
HI (100X)
Position
(from top)
0
1
2 (recommended)
3
Value
(in hex)
000
100
200
300
W2
LOW (10X)
Position
(from top)
0
2
4
6
8 (recommended)
A
C
E
Value
(in hex)
00
20
40
60
80
A0
C0
E0
To calculate the Base I/O Port address, add the values of the jumpered positions of
W3 and W2. For example, the E281-4035 is shipped jumpered for a Base I/O Port
address of 280 hexadecimal. W3 is jumpered in the third position (200), and W2 is
jumpered in the fifth position (80). The address is the sum of 200 + 80, which is
280.
32
Appendix A - Configuring Your Controller
Next, install a jumper vertically at W1 to select the Interrupt (IRQ). The E2814035 is shipped jumpered for IRQ5. See Choosing an Interrupt (IRQ) for PC-Bus
Controllers, page 25. The jumper block positions are as follows:
Interrupt (IRQ)
W1
(from left)
2
3
4
5 (factory set)
6
7
Remember the Base I/O Port address and IRQ values. You will need them when
updating your CONFIG.SYS file.
E281-4035 Emulation Modes
The E281-4035 controller is software compatible with the E281A-4025 controller.
If you are using driver software that only supports the AccuTouch E271-141
protocol, the E281-4035 can be set up through switch SW5 (Z-axis disable) for
hardware compatibility with the E271-141 controller.
Controller Data Sheets
33
IntelliTouch PC-Bus Controller (E281{A}-4025)
Verify the controller’s switch settings are as follows:
(From Bottom)
SW1 - ON
SW2 - ON
SW3 - OFF
SW4 - ON
SW5 - ON
SW6 - ON
SW7 - ON
SW8 - ON
12-Bit Mode
Reserved
Stream Mode
Reserved
Z-axis enable
Reserved
Reserved
Reserved
Next, set the controller’s Base I/O Port address with the W2 and W3 jumpers. W3
selects the high-order address, and W2 the low-order address. The values of the
settings are shown in the following table:
W3
Position
(from top)
4
3 (recommended)
2
1
W2
Value
(in hex)
300
200
100
000
Position
(from top)
8
7
6
5 (recommended)
4
3
2
1
Value
(in hex)
E0
C0
A0
80
60
40
20
00
To calculate the Base I/O Port address, add the values of the jumpered positions of
W3 and W2. For example, the E281{A}-4025 is usually shipped jumpered for a
Base I/O Port address of 280 hexadecimal. W3 is jumpered in the third position
(200), and W2 is jumpered in the fifth position (80). The address is the sum of
200 + 80, which is 280.
34
Appendix A - Configuring Your Controller
Next, install a jumper vertically at W1 to select the Interrupt (IRQ). A jumper is
supplied, but may be found in a horizontal, inactive position. See Choosing an
Interrupt (IRQ) for PC-Bus Controllers, page 25. The jumper block positions are
as follows:
W1 Position
(from left)
6
5
4
3
2
1
Interrupt (IRQ)
2
3
4
5 (factory set)
6
7
Remember the Base I/O Port address and IRQ values. You will need them when
updating your CONFIG.SYS file.
Controller Data Sheets
35
AccuTouch PC-Bus Controller (E271-2201)
Verify the controller’s jumper settings are as follows:
Default from jumpers
Reserved
Touchscreen Type
AccuTouch
Stream Mode
No Interrupt (software selected)
Base I/O Port (in hex)
280 (recommended)
240
180
100
2A0
(From Top)
J7 - Y
J6 - N
J5 - Y
J4 - N
J3 - N
J2 - N
J1 - N
J0 - N
J1 - N
J0 - Y
J1 - Y
J0 - N
J1 - Y
J0 - Y
Cross-connect (connect jumper vertically so
the left pins of J0 and J1 are jumpered)
J10 and J11 elsewhere on the controller should not be jumpered.
Jumpers cross-connected vertically on the right side of the jumper block have no
effect and are available as extra jumpers.
36
Appendix A - Configuring Your Controller
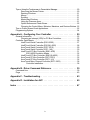
AccuTouch PC-Bus Controller (E271-141)
Verify the controller’s switch settings are as follows:
12-Bit Mode
No calibration data on reset
Stream Mode
Filtered Mode
(From Top)
SW1 - ON
SW2 - ON
SW3 - OFF
SW4 - ON
Next, set the controller’s Base I/O Port address with the W2 and W3 jumpers. W3
selects the high-order address, and W2 the low-order address. The values of the
setting are shown in the following table:
W3
Position
(from top)
1
2
3 (recommended)
4
W2
Value
(in hex)
000
100
200
300
Position
(from top)
1
2
3
4
5 (recommended)
6
7
8
Value
(in hex)
00
20
40
60
80
A0
C0
E0
To calculate the Base I/O Port address, add the values of the jumpered positions of
W3 and W2. For example, the E271-141 is usually shipped jumpered for a Base
I/O Port address of 280 hexadecimal. W3 is jumpered in the 3rd position (200),
and W2 is jumpered in the 5th position (80). The address is the sum of 200 + 80,
which is 280.
Controller Data Sheets
37
Next, install a jumper vertically at W1 to select the Interrupt (IRQ). A jumper is
supplied, but may be found in a horizontal, inactive position. See Choosing an
Interrupt (IRQ) for PC-Bus Controllers, page 25. The jumper block positions are
as follows:
Position
(from left)
1
2
3
4
5
6
Interrupt (IRQ)
2
3
4
5 (factory set)
6
7
Remember the Base I/O Port address and IRQ values. You will need them when
updating your CONFIG.SYS file.
Next, verify the Touchscreen Type jumpers. The controller is shipped with a
jumper installed on the pins marked W4. This is the correct setting for E274 5-wire
touchscreens. If you are using an older E270 3-wire touchscreen, install the jumper
on W5 instead.
38
Appendix A - Configuring Your Controller
AccuTouch Micro Channel Controller (E271-2202)
Verify the controller’s jumper settings are as follows:
Default from jumpers
Reserved
Touchscreen Type
AccuTouch
Stream Mode
Reserved
Reserved
Reserved
Reserved
(From Top)
J7 - Y
J6 - N
J5 - Y
J4 - N
J3 - N
J2 - N
J1 - N
J0 - N
Jumpers cross-connected vertically on the right side of the jumper block have no
effect and are available as extra jumpers.
Controller Installation
Installing controllers in a Micro Channel computer requires several additional
steps. Proceed in order as follows:
Copy the file @6253.ADF from the MonitorMouse for OS/2 distribution disk to
your Backup Copy of your "IBM PS/2 Reference Disk". If you do not have a
backup of your Reference Disk, boot with the Reference Disk in drive A and
follow the on-screen instructions to create one.
Follow the "Installing an Adapter" instructions in your IBM Personal System/2
Quick Reference. The controller (adapter) may be installed in any available slot.
Power up with your backup copy of the Reference Disk in drive A. Error 165—
Adapter Configuration Error—will appear because you just installed a new adapter.
Press [Enter] on the logo screen, then follow the on-screen instructions to
"Automatically configure the system."
Next, follow the on-screen instructions to "View Configuration" and verify that the
E271-2202 controller was detected. You should see installed in a slot the "Elo
E271-2202 Touchscreen Controller". The Base I/O Port and selected Interrupt
(IRQ) will also be shown. Later, if you have problems, you can "Change
Configuration" of the controller's Base I/O Port and Interrupt.
Quit the program, remove the Reference Disk, and restart the computer. The
system should now boot without any error messages. Continue your MonitorMouse
for OS/2 installation as you would with other controllers.
$SSHQGL[%
Driver Command Reference
• Command Line 39
• Flags 40
COMMAND LINE
In general, the MonitorMouse for O/S2 driver is configured with parameters and
flags as follows:
FGXKEGE>GNQ>OQPOQW:: U[U EQPVTQNNGT RCTCOGVGTU HNCIU
where <XX> is:
01
02
03
for serial touchscreen controllers on PC-Bus systems.
for serial touchscreen controllers on Micro Channel systems.
for PC-Bus and Micro Channel touchscreen controllers.
39
40
Appendix B - Driver Command Reference
and the <controller> parameters are:
<controller>,<COM port #>, <baud rate>
for serial touchscreen
controllers.
<controller>,<base port>,<interrupt (IRQ)> for PC-Bus touchscreen
controllers.
<controller>
for
Micro
Channel
touchscreen controllers.
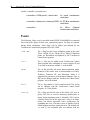
FLAGS
The following <flags> may be specified on the DEVICE=MONMOUxx command
line in any order, upper or lower case, separated by spaces. No flags are required
during initial installation. Some flags will be added and updated by the
Touchscreen Control Panel program, ELOCAL2.EXE.
-c<n1,..,n6>
The -c flag lists the n1-n6 calibration points in the order
XLow, XHigh, YLow, YHigh, ZLow, ZHigh. Calibration
points are determined and updated by the Touchscreen
Control Panel program.
-s<+/->
The -s+ flag may be added by the Touchscreen Control
Panel program after calibrating to correct swapped X and
Y axes due to incorrect cabling. -s- is the default.
-m<n>
The -m flag specifies the mouse button emulation mode,
identical to the modes used in MonitorMouse for DOS,
Windows, Windows NT, and Macintosh. Mode 6 is
suggested for general use in Presentation Manager. The -m
flag can be changed with the Touchscreen Control Panel
program. -m6 is the default.
-b<+/->
The -b+ flag enables a "click" sound on touch. The -b flag
can be changed with the Touchscreen Control Panel
program. -b+ is the default.
-a<x>,<y>
The -a flag specifies the size of the double-click area in
pixels. This area is used for detecting double-clicks in
mouse button emulation mode 6. Normally, OS/2 expects
a double-click to be on the same pixel—easy to do with a
mouse, but almost impossible with a touchscreen. By
expanding this area, it becomes easier to double-click by
double-tapping anywhere within this area. The defaults for
<x> and <y> are calculated after you calibrate with the
Flags
41
Touchscreen Control Panel program. This area may then
be manually adjusted with the Touchscreen Control Panel.
-w<n>
This flag is not normally required. If a stationary touch
generates continuous mouse clicks, add the -w flag.
Causes of continuous mouse clicks include IntelliTouch
controller firmware prior to version 2.2, serial controllers
operating at slower than recommended baud rates, or
controllers operating in environments of extreme noise.
Start with -w2 and increase <n> until the problem is
solved.
42
Appendix B - Driver Command Reference
$SSHQGL[&
Troubleshooting
Most problems are due to improper installation of the software drivers. Below is a
sample OS/2 2.1 CONFIG.SYS file.
+(5%>15>*2(5+(5 %#%*' %4'%.
24165*'..%>15>2/5*'..':'
5'6 75'4A+0+%>15>15+0+
5'6 5;56'/A+0+%>15>155;5+0+
5'6 15A5*'..%>15>%/&':'
5'6 #76156#46241)4#/56#5-.+56(1.&'45%100'%6+105
5'6 470914-2.#%'%>15>2/5*'..':'
5'6 %1/52'%%>15>%/&':'
.+$2#6*%>15>&..%>15>/&15%>%>15>#225>&..
5'6 2#6*%>15%>15>5;56'/%>15>/&15>9+015%>15>+056#..%>%>15>/&15%>15>#225
5'6 &2#6*%>15%>15>5;56'/%>15>/&15>9+015%>15>+056#..%>%>15>$+6/#2
%>15>/&15%>15>#225
5'6 241/26K=R?
5'6 *'.2%>15>*'.2%>15>*'.2>67614+#.
5'6 ).155#4;%>15>*'.2>).155
5'6 +2(A-';55$%5
24+14+6;A&+5-A+1;'5
(+.'5
&'8+%'%>15>6'56%()5;5
&'8+%'%>15>&155;5
&'8+%'%>15>2/&&5;5
$7(('45
+12.;'5
&+5-%#%*'.9#%%
/#:9#+6
/'//#059#22416'%6
59#22#6*%>15>5;56'/ $4'#-1((
6*4'#&5
24+06/10$7(5+<'
%17064;%>15>5;56'/>%17064;5;5
5'6 -';510
$#5'&'824+065;5
$#5'&'8+$/(.2;#&&
$#5'&'8+$/5#&&
$#5'&'815&&/&
43
44
Appendix C - Troubleshooting
5'6 $11-5*'.(%>15>$115'6 '2/2#6*%>15>#225
2416'%610.;01
5*'..%>15>/&15>%1//#0&%1/ %>15>/&15
(%$5
4/5+<'
&'8+%'%>15>/&15>8'//5;5
&15.19017/$
&'8+%'%>15>/&15>8&2:5;5
&'8+%'%>15>/&15>8:/55;5 7/$
&'8+%'%>15>/&15>8&2/+5;5
&'8+%'%>15>/&15>8%&41/5;5
&'8+%'%>15>/&15>89+05;5
&'8+%'%>15>15%&41/&/& 3
+(5%>15>%&(5+(5 3
$#5'&'8155%5+&/&
$#5'&'8#*#:#&&
&'8+%'%>15>/&15>8/175'5;5
&'8+%'%>15>21+06&&5;5
TGO &'8+%'%>15>/175'5;5
FGXKEGE>GNQ>OQPOQWU[U U E O D H
FGXKEGE>QU>OQWUGU[U UV[RGGNQOQW
&'8+%'%>15>%1/5;5
&'8+%'%>15>/&15>8%1/5;5
%1&'2#)'
&'8+0(1-$&75%>15>-';$1#4&&%2
&'8+0(15%48)#%>15>8+16$.&%2
5'6 8+&'1A&'8+%'58+1A8)#
5'6 8+1A8)#&'8+%'
$8*8)#
&'8+%'%>15>/&15>88)#5;5
If the driver commands are correctly placed in CONFIG.SYS, verify that the
controller type and communication parameters match the controller's. See
Appendix A for controller switch/jumper settings.
Check for any error message displayed by the drivers when the system is started.
The touchscreen driver will display power-on diagnostic results for most
touchscreen controllers, possibly indicating a hardware problem. Verify all
connections.
To display the diagnostic results, controller communication parameters, controller
firmware revision level, and software revision levels from the Touchscreen
Control Panel, select About, then Info.
Several DOS programs are included to assist in troubleshooting. Use COMDUMP
or BUSSTAT after booting under DOS to see if the touchscreen is transmitting
any data. Refer to the DOS and Windows Driver Guide for instructions. The
SAWDUMP utility displays the power-on diagnostics for IntelliTouch controllers
and gathers other useful information for Elo Technical Support.
For additional hardware troubleshooting steps, see the IntelliTouch Product
Manual or the AccuTouch Product Manual as appropriate. If you need help, see
Contacting Elo, page 6.
$SSHQGL['
Installation for AVC
To use MonitorMouse for OS/2 with IBM Audio Visual Connection (AVC)
multimedia authoring tool, perform the following additional steps after verifying
correct operation of the touchscreen with pRESENTATION Manager.
1. Extract the TOUCH.SYS and VTOUCH.SYS files from your OS/2 disks or
CD-ROM. Place TOUCH.SYS in the \OS2 directory and VTOUCH.SYS in
\OS@\MDOS directory.
2. Add DEVICE commands to your CONFIG.SYS file for TOUCH.SYS nad
VTOUCH.SYS as in the following example. These commands are in addition
to the change described in Chapter 2.
DEVICE=C:\ELO\MONMOU0X.SYS [existing parameters]
DEVICE=C:\OS2\TOUCH.SYS TYPE=ELOTOU$
DEVICE=C:\OS2\MDOS\VTOUCH.SYS
DEVICE=C:\OS2\MOUSE.SYS [existing parameters]
3. Reboot.
If the touchscreen does not appear properly calibrated in AVC applications, verify
that Presentation Manager is running in 640x480 resolution and recalibrate the
touchscreen with the Touchscreen Control Panel
45
46
Appendix D - Installation for AVC
,QGH[
@
@6253.ADF, 11, 44
0
002710-XXX Controller, 3
00285X-25-XXX Controller, 4
00285X-2-XXX Controller, 4
00285X-XXX Enclosure, 3
A
-a flag, 26, 48
absolute position coordinates, 4
AccuTouch PC-Bus Controller. See controllers
AccuTouch Product Manual, 2, 10, 31, 52
AccuTouch Serial Controller. See controllers
Apple Macintosh, 5
Audio Visual Connection (AVC), 2, 53
B
-b flag, 26, 48
BBS, 7
border width, 26
BUSSTAT program, 11, 52
compatibility
software, 4
touchscreen, 3
video, 4
CONFIG.SYS file, 2, 9, 14, 15, 16, 18, 38, 40, 43, 51, 53
configuration
CONFIG.SYS file, 9
controllers, 10, 31, 32, 33, 34, 35, 36, 37, 39, 41, 42, 44
DEVICE command, 12
Micro Channel controller, 13, 18
parameters, 12
PC-Bus controller, 13, 16
serial controller (PC-Bus System), 12, 14
serial controller (PS/2 System), 13, 15
touchscreen controller, 10
Control Panel. See Touchscreen Control Panel
coordinates, 4, 23
D
device drivers, 4
distribution rights, 5
DOS applications, 4
double clicking, 24
double-click area, 48, 49
double-click speed, 24
driver commands, 52
driver configuration, 12
E
C
-c flag, 19, 48
calibrating the touchscreen, 19
calibration
Touchscreen Control Panel, 23
click sound on touch, 26, 48
COMDUMP program, 11, 52
E271-140 serial controller, 14, 15, 32, 36
E271-141 PC-Bus controller, 16, 32, 42
E271-2201 PC-Bus controller, 16, 32, 41
E271-2202 Micro Channel controller, 18, 32, 44
E271-2210 serial controller, 14, 15, 32, 35
E271-3 Enclosure, 3
E281{A}-4002 serial controller, 14, 15, 34
E281{A}-4025 PC-Bus Controller, 32, 39
E281{A}-4025 PC-Bus controllers, 16
47
48
Index - I-Y
E281-2300 serial controller, 14, 15, 32, 33
E281-4035 PC-Bus controller, 16, 32, 37
Elo BBS, 7
Elo touchscreens, 2
ELO.BMP file, 11, 20
ELOCAL2.EXE program, 19
ELOCAL2.HLP file, 10, 12
ELODEV driver, 5
emulation modes, 2, 23
W
wallpaper, installing, 20
X
X-axis inversion, 23
Y
I
image coordinates, 23
IntelliTouch Product Manual, 2, 10, 31, 52
Interrupt Mode, 31
J
jumper settings, 14, 15, 16, 31, 33, 35, 41, 44, 52
M
Macintosh, 5, 48
mickeys, 4
MonitorMouse for DOS, 5, 48
MonitorMouse for Macintosh, 5
MonitorMouse for OS/2, 1, 2, 3, 4, 5, 9, 10, 12, 14, 15, 16,
18, 20, 22, 23, 28, 31, 44, 45, 53
MonitorMouse for Windows, 5
MonitorMouse for Windows NT, 5
mouse button emulation modes, 2, 23
MOUSE.COM, 5
O
obsolete part numbers, 3
R
READ.ME, 2, 10
S
switch settings, 34, 36, 37, 39, 42
T
Touchscreen Control Panel, 10, 12, 19, 20, 22, 23, 26, 30,
48, 49, 52, 53
V
versions, 2, 4, 5, 12, 23
video compatibility, 4
Y-axis inversion, 23
49