1
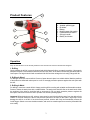
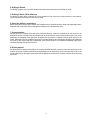
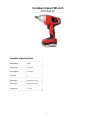
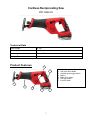
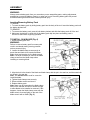
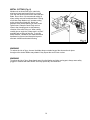
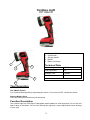
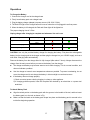
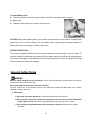
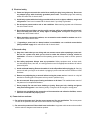
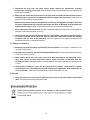
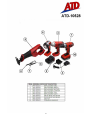
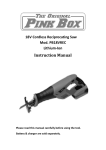
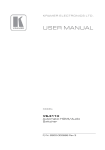
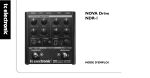
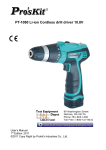
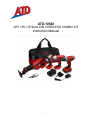
ATD-10528
4PC 18V LITHIUM ION CORDLESS COMBO KIT
Instruction Manual
1
Cordless Drill
PRT10528-01
Please read this MANUAL carefully before using the tool.
PRODUCT SPECIFICATIONS
Rated Voltage
18V DC
No-load Speed
0~350 / 0~1200Rpm
Chuck
½’’
Max Torque
22N.M (16.2 lb.ft)
Torque Setting
19+1
Charge Time
3~5 hours
Jacob Single Sleeve Chuck
2
Product Features
5
1.
2.
3.
4.
5.
6.
7.
8.
1
6
2
LED work light
Variable speed trigger
Bit holder
Battery
High/low gear slide switch
Forward/Reverse switch
Soft grip handle
Battery lock button
7
3
8
4
Operation
Only use tool bits which can be securely fastened in the chuck and for which the drill has been designed.
1. Drilling
Check whether the drill bit is correctly inserted and tightly fastened before you start the machine. Use properly
sharpened drill bits. Use screwdriver bits that are not overly worn. At the start of each drilling operation select a
lower speed. For large holes drill with a smaller drill bit first and then enlarge the hole using a larger drill bit.
2. Drilling in Wood
For drilling in wood use a wood drill-bit. Protect or fasten the work-piece in a suitable holder. Mark the positions
of the holes to be drilled with a sharp tool or a nail. Do not apply excessive pressure against the work-piece with
the drill.
3. Drilling in Metal
For drilling in metal use a steel drill-bit. Always provide sufficient cooling with suitable non-flammable coolants.
Protect or fasten the work-piece with a suitable holder. The work-piece should lie flat on the work bench. Mark
the positions of the holes to be drilled with a center-punch. Do not apply excessive pressure against the
work-piece with the drill. Allow the drill to operate at its normal operating speed.
Important! When beginning to drill, select a lower speed to avoid the bit slipping away from the desired hole
location. If the hole is deep, the drill bit may become jammed in the hole. In this event a high torque could
damage the drill bit or the drill. If the bit becomes jammed, hold the drill firmly and immediately release the
On/Off trigger. Switch to counter-clockwise rotation, and use a low rotation speed to remove the jammed drill bit
more easily.
3
4. Drilling in Plastic
For drilling in plastic use a steel drill bit and follow the same instructions as for drilling in wood.
5. Drilling in Stone, Brick, Masonry
For drilling in walls, stone, masonry etc. use a masonry-bit. Do not put too much pressure on the machine.
Follow the same instructions as for drilling in metal.
6. Using the drill as a screwdriver
Before using the machine check whether the screwdriver bit is inserted correctly. Avoid over-tightening screws,
otherwise the screw head may be damaged or stripping of the threads may occur.
7. Screw insertion
Set the direction of rotation of the drill to the clockwise direction. Insert the screwdriver bit into the slot in the
head of the screw. Hold the screw bit perpendicular to the head of the screw, otherwise the screw or the screw
head may be damaged. Press the screw bit against the screw with a constant pressure while driving in the
screw. When the screw is completely screwed in, hold the drill firmly and release the On/Off trigger, otherwise
the screw or the screw head may be damaged. If the On/Off trigger is not released immediately, high torque
could also damage the drill bit or the drill.
8. Screw removal
Set the direction of rotation of the drill to the counter-clockwise direction. Insert the screw-bit into the slot in the
head of the screw. Hold the screwdriver bit perpendicular to the head of the screw, otherwise the screw or the
screw head may be damaged. Press the screw bit against the screw with a constant pressure while removing
the screw.
4
Cordless Impact Wrench
PRT10528-02
PRODUCT SPECIFICATIONS
Rated Voltage
18V DC
Impact Power
0~3000 Ipm
No-load Speed
0~2000 Rpm
Anvil Size
½”
Rate Torque
230 N.M (169.7 ft.lb)
Max Torque
280 N.M (206.6 ft.lb)
Charge Time
3~5 hours
5
Product Features
1.
2.
3.
4.
5.
6.
1
4
LED work light
Variable speed trigger
Battery
Forward/Reverse switch
Soft grip handle
Battery lock button
2
5
6
3
Assembly
Selecting Correct Socket
Always use the correct size socket for bolts and nuts.
An incorrect size socket will result in inaccurate and inconsistent
fastening torque and /or damage to the bolt or nut.
Installing or Removing Socket
Always be sure that the tool is switched off and the battery pack is
removed before installing or removing the socket.
To install the socket, push it onto the anvil of the tool until it locks
into place. To remove the socket, simply pull it off.
Operation
Loosening nuts and bolts
Install socket as shown above. Place impact wrench and socket over nut or bolt making sure you have the
correct size and type of socket needed. Be sure impact wrench and socket are square with the nut or bolt.
Switch impact into the counter-clockwise direction and pull the variable speed trigger switch until nut or bolt is
removed. For stubborn nuts or bolts, a loosening agent may be needed prior to removing.
Tightening nuts and bolts
Start your nut or bolt by hand to ensure that you are not cross threading it. Be certain all threads are clean and
free of defects before tightening. After hand starting your nut or bolt, place impact wrench and socket over nut
or bolt making sure you have the correct size and type of socket needed. Be sure impact wrench and socket
are square with the nut or bolt. Switch impact into the clockwise direction and pull the variable speed trigger
switch until nut or bolt is tightened.
6
Cordless Reciprocating Saw
PRT10528-05
Technical Data
Rated Voltage
DC 18V
No-load Speed
0-2800/min
Stroke length
22mm (0.87’’)
Charging Time
3-5 hours
Product Features
7
6
1
2
3
4
5
7
1.
2.
3.
4.
5.
6.
7.
Adjustable pivoting blade shoe
Soft touch front handle
Variable speed trigger switch
Battery
Battery lock button
Soft grip handle
Lock-off switch
ASSEMBLY
WARNING:
Always remove battery pack from your saw when you are assembling parts, making adjustments,
assembling or removing blades, cleaning, or when not in use. Removing battery pack will prevent
accidental starting that could cause serious personal injury.
Inserting/Removing Battery Pack
TO INSERT:
1. To insert the battery pack by sliding battery pack into the body of the tool. Insert the battery pack until
the battery latches lock.
TO REMOVE:
1. To remove the battery pack, press in both battery latches and slide the battery pack off of the tool.
2. Make sure the latches on each side of the battery pack slip into place and battery pack is
secured to saw before beginning operation.
TO INSTALL SAW BLADE (Fig. 4)
1. Remove battery pack first.
WARNING:
Failure to remove battery pack from saw could
result in accidental starting causing possible
serious personal injury.
2. Loosen the blade clamp screw enough to
permit the saw blade to be inserted between
blade clamp and saw bar, by the blade wrench.
Note: it is never necessary to remove the blade
clamp screw from the blade clamp when
installing or removing blade.
3. Align the hole in the shank of the blade and blade clamp with the pin in the saw bar, and then seat both
on the pin in the saw bar.
Note: The wrench hole is used for wrench to
install the blade.
4. Tighten blade clamp screw securely.
5. Remove blade wrench and store it.
6. Replace battery pack.
Note: there may be times when the blade clamp
sticks to the saw bar and will not loosen enough
to allow blades to be installed or removed. If this
happens, loosen the blade clamp screw with the
blade wrench, then tap lightly on the end of the
blade wrench with a mallet. (Fig. 5)
8
GENERAL CUTTING (Fig. 6)
Hold your saw firmly in front of and clearly
away from you. Make sure saw blade is clear of
any foreign material. Be sure material to be cut
is held firmly. Small work pieces should be
securely clamped in a vise or with clamps to the
work bench or table. Mark the line of cut clearly.
Depress the lock-off button, then pull switch
trigger to start the cutting action.
Place the base assembly against the work piece.
Then move the blade into the work piece. Do not
force. Use only enough pressure to keep the
saw cutting. Let the blade and saw do the work.
Use of excessive pressure that causes bending
or twisting of the blade may result in broken
blades.
PLUNGE CUTTING (Fig. 7)
Mark the line of cut clearly. Choose a convenient
starting point inside the area to be cut out and
place the tip of the blade over that point. Rest
front edge of base (shoe) on work and hold
firmly in position. Depress the lock-off button,
then pull switch trigger to start the cutting action.
WARNING:
Make sure blade does not touch work until motor
reaches full speed, since this could cause loss
of control resulting in serious injury. With saw
blade at full cutting speed, slowly tilt saw
down-ward until tip of blade starts cutting work.
After blade penetrates work, tilt saw until blade
is perpendicular to the work.
9
METAL CUTTING (Fig. 8)
Metals such as sheet steel, pipe, steel rods ,
aluminum, brass and copper may be cut with
your saw. Be careful not to twist or bend the saw
blade. Do not force. We recommend cutting oil
when cutting most soft metals and steel. Cutting
oil will also keep blades cool, increase cutting
action, and prolong blade life. Never use
gasoline since normal sparking of motor could
ignite fumes. Clamp the work firmly and cut
close to the clamping point to eliminate any
vibration of the work being cut. When cutting
conduit pipe or angle iron, clamp work in a vise if
possible and cut close to the vise. To cut thin
sheet material, "sandwich" the material between
hardboard or plywood and clamp the layers to
eliminate vibration and material tearing.
WARNING
To reduce the risk of injury, be sure the blade always extends beyond the shoe and work piece
throughout the stroke. Blades may shatter if they impact the work-Piece or shoe.
WARNING
To reduce the risk of injury, Keep hands away from the blades and other moving part, always wear safety
goggles or Glasses with side shields. Use only specifically recommended.
10
Cordless Light
PRT10528-06
1.
2.
3.
4.
5.
1
Rotatable 90°head
On/off switch
Soft grip handle
Battery
Battery lock button
Technical Data
3
2
Rated Voltage
DC 18V
LED Light power
1W
Charging Time
3-5 hours
Battery
1300mAh
5
4
Tool Operation
The ON/OFF Switch
Turn cordless flash light ON by depressing the switch. To turn the tool OFF, release the switch.
Remove Battery Pack
Press the battery-lock button and pull downward.
Function Description
The cordless light has a 90 degree changeable head suitable for multi-angle work. Do not use this
light in damp or wet areas.. Do not look it directly into light as it is very bright and will cause damage
to your eyes.
11
Charger
PRT10528-04
_____________________
Technical Data
Model
HP2270380B
Rated Input Voltage
AC 100-120V, 60Hz
Rated Input Power
Max 0.25A
Rated Output Voltage
DC 22.7V
Rated Output Current
380mA
Charging Time
3-5hours
Protection Class II
Indoor operation only
Battery
PRT10528-03
__________________
12
Operation
To Charge the Battery
1. Connect the charger cord to the charger base
2. Firmly insert battery pack onto charger base
3. Plug the battery charger (adapter) to power source (100-120V / 60Hz).
4. The Red LED light on the charger base will come on when the unit is plugged in and has power.
5. When the battery is full charged, the Red and Green light will be lighted on.
The proper charging time is 3-5 hrs.
Unplug charger after charging is complete and whenever it is not in use.
Working status
Battery
Red
Green
Plug connected into the socket
Not Insert
On
On
Under charging
Insert
Insert
On
On
Off
Off
Fully charged
Insert
On
On
CAUTION: Use only the provided battery charger for charging the battery. First place the rechargeable
battery into the charging slot in the charger and then plug the charger into your 120VAC supply, such as a
wall outlet. Charging starts automatically.
Remove the battery from the charge after it’s fully charged (After about 5 hours). Always disconnect the
charger from the main power before you remove the battery from the charger.
z
The charger and battery may become warm to touch while charging. This is a normal condition, and
does not indicate a problem.
z
Use the charger at normal room temperatures whenever possible. To prevent overheating, do not
cover the charger and do not charge the battery in direct sunlight or near heat sources.
z
If the battery does not charge properly:
1) Check current at power outlet by plugging in a lamp or other appliance.
2) If charging problems persist, have the complete drill checked by an electrician or a power tool
technician.
To Attach Battery Pack
z
Align the raised portion on the battery pack with the grooves in the handle of the tool, and then insert
the battery pack in to the tool as shown in Fig
z
Make sure that the latch on the battery pack snaps into place and the battery pack is secured to the
tool before beginning operation.
13
To Detach Battery Pack
z
Depress both battery-release buttons located on the side of the battery pack to release
the battery pack.
z
Slide the battery pack back to remove it from the tool.
CAUTION: When placing battery pack in your cordless impact wrench, be sure raised rib on battery pack
aligns with groove in wrench’s battery port and latches snap in place properly. Improper assembly of
battery pack can cause damage to internal components.
BATTERY PROTECTION
The circuitry protects the battery pack from extreme temperature, over discharge, and over-charge. To
protect the battery from damage and prolong its life, the battery pack circuitry will turn off the battery pack
if it becomes overloaded or if the temperature becomes too high during use. Both red and green LED light
will turn on when the battery fully charged.
General Safety Rules
WARNING
Read all safety warnings and all instructions. Fail to follow all warnings and instructions may result in
electric shock, fire and/or serious injury.
Save all warnings and instructions for future reference
The term “power tool” in the warnings refers to your electrically operated (corded) power tool or battery
operated (cordless) power tool.
1) Work area
a) Keep work area clean and well lit. Cluttered and dark areas invite accidents.
b) Do not operate power tools in explosive atmospheres, such as in the presence of flammable
liquids, gases or dust. Power tools create sparks which may ignite the dust or fumes.
c) Keep children and bystanders away while operating a power tool. Distractions can inhibit
accidents.
14
2) Electrical safety
a) Power tool plugs must match the outlet. Never modify the plug in any other way. Do not use
any adapter plugs with electrically grounded power tools. Unmodified plugs and matching
outlets will reduce risk of electric shock.
b) Avoid body contact with electrically grounded surfaces such as pipes, radiators, ranges and
refrigerators. There is an increased risk of electric shock if your body is grounded.
c) Do not expose power tools to rain or wet conditions. Water entering a power tool will increase
the risk of electric shock.
d) Do not abuse the cord. Never use the cord for carrying, pulling or unplugging the power tool.
Keep cord away from heat, oil, sharp edges or moving parts. Damaged or entangled cords
increase the risk of electric shock.
e) When operating a power tool outdoors, use an extension cord suitable for outdoor use which
reduces the risk of electric shock.
f)
If operating a power tool in a damp location is unavoidable, use a residual current device
(RCD) protected supply which reduces the risk of electric shock.
3) Personal safety
a) Stay alert, watch what you are doing and use common sense when operating a power tool.
Do not use a power tool while you are tired or under the influence of drugs, alcohol or
medication. A moment of inattention while operating power tools may result in serious personal
injury.
b) Use safety equipment. Always wear eye protection. Safety equipment such as dust mask,
non-skid safety shoes, hard hat, or hearing protection used for appropriate conditions will reduce
personal injuries.
c) Avoid accidental starting. Ensure the switch is in the off position before plugging in. Carrying
power tools with your finger on the switch or plugging in power tools that have the switch on invites
accidents.
d) Remove any adjusting key or wrench before turning the power tool on. A wrench or a key left
attached to a rotating part of the power tool may result in personal injury.
e) Do not overreach. Keep proper footing and balance at all times. This enables better control of
the power tool in unexpected situations.
f) Dress properly. Do not wear loose clothing or jewelry. Keep your hair, clothing and gloves
away from moving parts. Loose clothes, jewelry or long hair can be caught in moving parts.
g) If devices are provided for the connection of dust extraction and collection facilities, ensure
these are connected and properly used.
4) Power tool use and care
a) Do not force the power tool. Use the correct power tool for your application. The correct power
tool will do the job better and safer at the rate for which it was designed.
b) Do not use the power tool if the switch loses its function. Any power tool that cannot be controlled
with the switch is dangerous and must be repaired.
15
c) Disconnect the plug from the power source before making any adjustments, changing
accessories, or storing power tools. Such preventive safety measures reduce the risk of starting the
power tool accidentally.
d) Make sure the stored, idle power tools are out of the reach of children and do not allow persons
unfamiliar with the power tool or these instructions to operate the power tool. Power tools are
dangerous in the hands of untrained users.
e) Maintain power tools. Check for misalignment or binding of moving parts, breakage of parts and
any other condition that may affect the power tools operation. If damaged, have the power tool
repaired before using it. Many accidents are caused by poorly maintained power tools.
f)
Keep cutting tools sharp and clean. Properly maintained cutting tools with sharp cutting edges are
less likely to bind and are easier to control;
g) Use the power tool, accessories and tool bits etc., in accordance with these instructions and in
the manner intended for the particular type of power tool, taking into account the working
conditions and the work to be performed. Use of the power tool for operations different from
intended could result in a hazardous situation.
5) Battery use and care
a) Recharge only with the charger specified by the manufacturer. One charger is suitable for only
one type of battery pack.
b) Use power tools only with specifically designated battery packs. Use any other battery packs may
create a risk of injury and fire.
c) When battery pack is not in use, keep it away from other metal objects, like paperclips, coins,
keys, nails, screws or other small metal objects, which can make a connection from one
terminal to another. Shorting the battery terminals together with other metal objects may cause burns
or a fire.
d) Under abusive conditions, liquid may be ejected from the battery; avoid contact. If contact
accidentally occurs, flush with water. If liquid contacts eyes additionally, seek medical help as
soon as possible. Liquid ejected from the battery may cause irritation or burns.
6) Service
a) Have your power tool serviced by a qualified repair person using only identical replacement
parts. This will ensure that the power tool is safe.
16
17