1
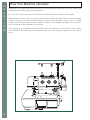
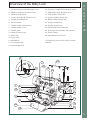
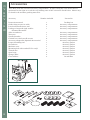
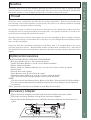
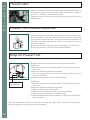
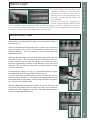
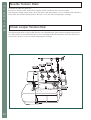
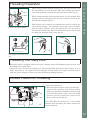
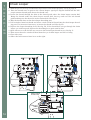
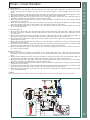
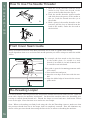
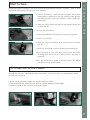
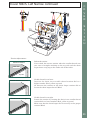
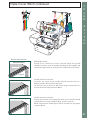
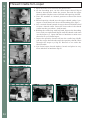
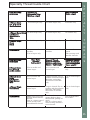
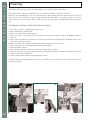
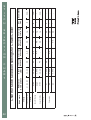
INSTRUCTION MANUAL
Model BLCS
"IMPORTANT SAFETY INSTRUCTIONS"
When using overlock machine, basic safety precautions should always be followed,
including the following.
Read all instructions before using this overlock machine.
DANGER-
To reduce the risk of electric shock.
1. The overlock machine should never be left unattended when plugged in. Always unplug this overlock machine from
the electrical outlet immediately after using and before cleaning.
2. Always unplug before replacing light bulb. Replace bulb with same type rated 15 watts/110 volts in 110V/120V area.
(15 watts 240 volts in 220V/240V area.)
WARNING-
To reduce the risk of burns, fire, electric shock, or injury to persons.
1. Do not allow to be used as a toy. Close attention is necessary when the sewing machine is used by or near children.
2. Use this overlock machine only for its intended use as described in this manual. Use only attachments recommended by the manufacturer as contained in this manual.
3. Never operate this overlock machine if it has a damaged cord or plug, if it is not working properly, if it has been
dropped or damaged, or dropped into water. Return the overlock machine to the nearest authorized dealer or service center for examination, repair, electrical or mechanical adjustment.
4. Never operate the overlock machine with any air openings blocked. Keep ventilation openings of the overlock
machine and foot controller free from the accumulation of lint, dust, and loose cloth.
5. Never drop or insert any object into any opening.
6. Do not use outdoors.
7. Do not operate where aerosol (spray) products are being used or where oxygen is being administered.
8. To disconnect, turn the main switch to the symbol "O" position which represents off, then remove plug from outlet.
9. Do not unplug by pulling on cord. To unplug, grasp the plug, not the cord.
10. Keep fingers away from all moving parts. Special care is required around the overlock machine needle.
11. Always use the proper needle plate. The wrong needle plate can cause the needle to break.
12. Do not use bent needles.
13. Do not pull or push fabric while stitching. It may deflect the needle(s) causing it to break.
14. Switch the overlock machine to the symbol "O" position when making any adjustments in the needle area, such as
threading needle, changing needle, threading looper, or changing presser foot, and the like.
15. Always unplug the overlock machine from the electrical outlet when removing covers, lubricating, or when making
any of the user servicing adjustments mentioned in the instruction manual.
16. Keep fingers away from moving parts, especially the area near the blades.
17. Please note that on disposal, this product must be safely recycled in accordance with
relevant National legislation relating to electrical / electronic products. If in doubt
please contact your retailer for guidance.
European
Union only
18. The appliance is not intended for use by young children or infirm persons without supervision.
19. Young children should be supervised to ensure that they do not play with the appliance.
"SAVE THESE INSTRUCTIONS"
"This overlock machine is intended for household use."
Welcome to the Baby Lock Cover Stitch Machine
Your Baby Lock Cover Stitch machine provides a variety of chain and cover stitches, allowing you
to create professional looking hems just like the ready-to-wear fashions in stores. A variety of
stitch widths and lengths also provide options for creating the look you want.
Your Baby Lock Cover Stitch is a high-quality, dependable machine. The patented Jet-Air
Threading system makes threading the looper a breeze. Speedy at 1300 stitches per minute,
BLCS allows you to complete hems quickly. Other features including differential feed,auto-tension release when the presser foot is lifted, and manual tension adjustments put you in control of
your project.
With proper care and maintenance, your Baby Lock Cover Stitch machine promises years of
high-quality, dependable performance and sewing pleasure. Keep this instruction manual as a
step-by-step guide to become familiar with your Baby Lock.
Happy Sewing!
For additional product information visit our website at
www.babylock.com
1
T
A
B
L
E
O
F
C
O
N
T
E
N
T
S
2
Table of Contents
OVERVIEW ..................................................................................................................4
How Your Machine Operates ................................................................................ 4
Overview of the Baby Lock ................................................................................... 5
Accessories ............................................................................................................. 6
Needles ..................................................................................................................7
Thread ..................................................................................................................7
Optional Accessories.............................................................................................. 7
Accessory Adapter ..................................................................................................7
Setting Up Your Baby Lock................................................................................ 8/9
Side Cover .............................................................................................................. 9
Thread Cutter...................................................................................................... 10
Presser Foot Pressure Adjustment..................................................................... 10
Snap-on Presser Foot .......................................................................................... 10
Stitch Length ....................................................................................................... 11
Differential Feed.................................................................................................. 11
Chain/Cover Stitch Tension Dials ...................................................................... 12
Needle Tension Dial............................................................................... 12
Chain Looper Tension Dial.................................................................... 12
THREADING ................................................................................................................13
Threading Preparation........................................................................................ 13
Threading Your Baby Lock ................................................................................. 13
Locked Position for Threading............................................................................ 13
Thread Stand and Thread Port Reference Chart .............................................. 13
Chain Looper ........................................................................................................14
Chain/Cover Needles........................................................................................... 15
Left Needle - C-1.................................................................................... 15
Center Needle - C-2 ............................................................................... 15
Right Needle - C-3 ................................................................................. 15
How to Use the Needle Threader ....................................................................... 16
Front Cover Seam Guide .................................................................................... 16
Re-threading Looper ............................................................................................16
Start to Sew ......................................................................................................... 17
To Chain-Off of the fabric.....................................................................................17
Table of Contents (Cont.)
CHAIN/COVER STITCH ............................................................................................ 18
Chain Stitching .............................................................................................. 18/19
Chain Stitch - Tension Adjustment...................................................... 19
Cover Stitch - Right Narrow - 3mm ............................................................. 20/21
Cover Stitch Tension Adjustment ......................................................... 21
Cover Stitch - Left Narrow - 3mm................................................................. 22/23
Cover Stitch Tension Adjustment ......................................................... 23
Cover Stitch - Wide - 6mm............................................................................. 24/25
Cover Stitch Tension Adjustment ......................................................... 25
Triple Cover Stitch - 6mm ............................................................................. 26/27
Triple Cover Stitch Tension Adjustment .............................................. 27
TECHNIQUES...............................................................................................................28
Turning Corners - Chain Stitch.......................................................................... 28
Turning Corners - Cover Stitch .......................................................................... 28
Flat Hemming - Cover Stitch ............................................................................. 29
Hemming in the Round - Cover Stitch............................................................... 29
Securing Chain and Cover Stitching.................................................................. 30
SPECIALTY THREADS ............................................................................................... 31
Using Specialty Threads..................................................................................... 31
Lightweight Threads........................................................................................... 31
Mediumweight Threads ...................................................................................... 31
Heavyweight Threads ......................................................................................... 31
Bypassing the Threading Port............................................................................ 32
Looper Threading Tool ........................................................................................ 33
Thread Cradle for Looper ................................................................................... 34
Specialty Thread Guide Chart ........................................................................... 35
MAINTENANCE .......................................................................................................... 36
Troubleshooting.............................................................................................. 36/37
Replacing Needles ............................................................................................... 38
Replacing Light Bulb .......................................................................................... 39
Cleaning............................................................................................................... 40
TECHNICAL DATA...................................................................................................... 41
Technical data ..................................................................................................... 41
STITCH SELECTION CHART .................................................................................... 42
Chart for Stitch Selection Setting for Chain/Cover ................................................... 42
T
A
B
L
E
O
F
C
O
N
T
E
N
T
S
3
O
V
E
R
V
I
E
W
4
How Your Machine Operates
Awareness of its simple operation will enable you to become more proficient in its use. Please read
all instructions before using your new machine.
Use one, two or three chain/cover stitch needles and one looper for a chain or cover stitch.
When forming a chain stitch, the chain needle thread catches the chain looper to form a straight
stitch on the top of your fabric and thread chain loops on the underside. Use 2 or 3 cover stitch
needles and the chain looper to form a double or triple row of straight stitching on the top and a
weave of thread on the underside of your fabric.
After setting up your machine for the first time, take a few moments to learn how it sews. Before
your machine is threaded, turn the handwheel toward you and watch the operation of the various
parts.
Overview of the Baby Lock
1. Presser foot pressure adjusting screw
16. Accessory compartment & spool stand
2. Machine lock button release lever
17. Differential feed adjusting lever
3. Machine lock button
18. Left needle tension dial
4. Presser foot thread release lever*
19. Center needle tension dial
5. Looper threading lever
20. Right needle tension dial
6. Thread cutter
21. Looper tension dial
7. Needle height viewing area
22. Needle drop drawer
8. Needle clamp screw
23. Chain looper threading port
9. Needle plate
24. Telescopic thread guide and antenna
10. Snap-on presser foot
25. Power switch
11. Side cover
26. Attachment screw holes
O
V
E
R
V
I
E
W
12. Front table
13. Handwheel
* Raising the presser foot releases needle
14. Carrying handle
threads.
15. Stitch length dial
4
24
1
6
18
19
20
14
7
16
23
8
10
9
11
21
25
5
13
15
17
3
26
2
22
12
5
O
V
E
R
V
I
E
W
6
Accessories
Your Baby Lock has a built-in accessory compartment. To open, swing the "lid" on the thread
spoolstand to the right to reveal the tray holding some of the accessories listed below. Others may
be found in the machine packing materials.
Accessory
Number included
Instruction manual
Guide fixing screws for table
Lint brush/needle insert tool
Package of assorted sized needles
Schmetz ELx705CF
Allen screwdriver
Tweezers
Needle threader
Chain/Cover stitch needle screws
Accessory adapter(for Optional Accessories)
Looper threading tool
Screwdriver
Machine cover
Mounting bolt with washer(U.S.A. only)
Thread nets
Spool caps
Sponge disks
Cone holders
Located in
1
2
1
1
Packing box
Accessory compartment
Accessory compartment
Accessory compartment
1
1
1
2
1
1
1
1
1
4
4
4
4
Accessory compartment
Accessory compartment
Accessory compartment
Accessory compartment
Accessory compartment
Accessory packet
Accessory packet
Accessory packet
Accessory packet
Accessory packet
Accessory packet
Accessory packet
On machine
Needles
Your Baby Lock is set up with Schmetz ELx705CF needles size 90/14. This is suitable for most
medium and heavyweight fabrics. For lightweight fabrics use size 80/12, ELx705CF needles. The
ELx705CF needle is a semi-ballpoint design and is suitable for knits and wovens.
Thread
All types of thread may be used on your Baby Lock, but 100% long-staple polyester thread, crosswound on a cone, consistently provides the best stitch performance. Because the threads must
pass through several thread guides at high speeds, they must be of uniform thickness and high
strength with a minimum amount of linting.
Good-quality cotton or cotton-covered polyester threads sew well, though they produce more lint,
creating the need to clean the machine more frequently. Poor grades of thread can result in frequent fraying, breaking and unbalanced stitches.
O
V
E
R
V
I
E
W
Threads of other fiber contents and weights may be used, depending on their strength and thickness. Testing will help you determine how easily they can pass through the thread guides, thread
slots, needles and loopers.
Important Note: For maximum performance of the Baby Lock, it is recommended to use "100%
polyester-long fiber thread". Recommended brands are Maxi-Lock and Metrosene. This thread
also performs best when used with many decorative threads for sewing specialty decorative techniques.
Optional Accessories
CHAIN/COVER STITCH OPTIONAL ACCESSORIES
Belt Loop Folder (3/4" & 1-1/2")-(19mm & 38mm)
Double Fold Bias Binder (1-1/8" & 1-3/8")-(28mm & 36mm)
Elastic Gatherer Bracket
Elastic Guide for Gatherer Bracket (1/4", 3/8" & 1/2")-(7.5mm, 10mm, & 13mm)
Fabric Guide
Pintuck Foot with 2 guides
Plain Hemmer (1/4" & 1/2")-(7mm & 13mm)
Single Downturn Feller (1/4", 5/8" & 1")-(7mm, 16mm & 25mm)
Knit / Woven Double Fold Bias Binder (8mm, 10mm, &15mm)
NOTE:
Use the front two Attachment Screw Holes for the Knit / Woven Double Fold Bias Binder.
Use the back two Attachment Screw Holes with the Accessory Adapter for the Optional
Accessories.
These optional accessories are available at your Baby Lock retailer.
Accessory Adapter
Place Accessory Adapter over the back two holes of the front cover table.
Place the accessory bracket on top of the Accessory Adapter.
Insert the Guide Fixing Screws to hold the Accessory Adapter and Accessory in
place.
7
O
V
E
R
V
I
E
W
Setting Up Your Baby Lock
1. Remove machine from box
After removing the packing materials from
the box, gently lift your Baby Lock by grasping the handle provided on the top of the
machine. Place the machine on a sewing
table or any level surface that provides
ample work area to the left. Place the foot
controller in a pedal stay, if desired, and
place it under the sewing table.
2. Plug in the machine
A
Plug the power cord into the machine first,
then into a wall outlet. The power switch is
located toward the back on the right side of
the machine. Always make sure the power is
off when the machine is not in use (fig. A).
Available foot controller for U.S.A.: Model
YC-482 or YC-420W.
3. Polarized plug
This appliance has a polarized plug (one
blade wider than the other). To reduce the
risk of electric shock, this plug is intended to
fit in a polarized outlet only one way. If the
plug does not fit fully in the outlet, reverse
the plug. If it still does not fit, contact a qualified electrician to install the proper outlet.
Do not modify the plug in any way.
4. Foot controller
The sewing speed of the machine is determined by the amount of pressure applied to
the foot controller. When not in use, do not
place anything on the foot controller, or the
machine could start inadvertently and the
controller or motor could burn out.
8
Setting Up Your Baby Lock
5. Position the telescopic thread guide.
Raise the telescopic thread guide to its
highest position. Rotate the shaft to the
left and right until each section "clicks" into
a locked position (fig. B).
6. Opening Front table
B
To open the front table, place your thumb
against the tab, and slide the cover to the
right. A slight pull toward you will allow
the cover to swing down, providing access
to the chain looper.
(fig. C).
O
V
E
R
V
I
E
W
C
Side Cover
Open side door on the left for easy access to
the chain looper thread tray.
Close door before sewing.
9
O
V
E
R
V
I
E
W
Thread Cutter
There is a thread cutter located on the left side of your machine. At
the end of a seam, sew off the fabric edge and continue sewing to
create a 5 - 6 inch(12 - 15cm) thread chain.
Bring the chain of thread up and back and pull forward into the
thread cutter.
Presser Foot Pressure Adjustment
The presser foot pressure has been preset at the factory and rarely
needs adjustment. You may find it necessary, however, to decrease
the pressure for thick fabrics or increase pressure for thin fabrics to
feed more smoothly under the foot. Use a coin to turn the screw on
top of the machine.
To increase pressure, turn the pressure adjusting screw clockwise.
To decrease pressure, turn the screw counterclockwise.
Snap-On Presser Foot
The Baby Lock has the convenience of a snap-on presser foot.
To Release:
1. Raise the presser foot lever. This will also lower the feed dogs out
of the way.
2. Raise the needles to the highest position.
3. Push the presser foot release lever located at the back of the
presser foot holder.
4. Slide the presser foot to the left of the needles.
Presser Foot
Release Lever
To Replace:
1. Raise the presser foot lever.This will also lower the feed dogs out
of the way.
2. Raise the needles to the highest position.
3. Slide the foot from the left to right.
4. Align the bar to the foot with the groove in the holder.
5. Lower the presser foot lever to snap into place.
6. Turn the hand wheel counter clockwise to engage the feed dogs in
the up position.
The raised markings on the toe of the foot are seam line guides. They indicate the needle positions to help guide your fabric for accurate seaming.
10
Stitch Length
The stitch length adjusting dial is conveniently located just to the left of the
front cover, near the base plate (fig. A).
The dial shows the stitch-length ranging from 1, for the shortest stitch, to 4
for the longest.
B
A
Simply turn the dial aligning the
desired setting with the indicator mark
on the machine. A stitch length of 3mm, or about 10 stitches per inch is ideal for most fabrics.
For seaming very lightweight fabrics, you may prefer a shorter stitch length. When sewing heavier fabrics, you may choose to lengthen the stitch (fig. B).
O
V
E
R
V
I
E
W
Differential Feed
Your Baby Lock serger is equipped with differential feed.The set of
feed dogs work independently in order to ensure smooth sewing on
all fabrics (fig. A)
When the differential feed adjusting lever, located at the machine's
right, front edge is set on "N" for normal feeding, the feed dogs move
the same distance. This is the setting to use for most fabrics and
applications (fig. B).
A
When the dial is set above "N", the front feed dog will feed more fabrics than the back. This is because the front feed dog moves at a
greater distance than the back feed dogs. As a result, the fabric
becomes compressed or eased, as the diagram on the front cover
indicates. This can eliminate wavy seams in stretchy fabrics or those
cut on the bias grain.
At the maximum setting of 2.0 (fig. C), the differential feed can gather a lightweight fabric to nearly double fullness (fig. D).
The front feed dog is actually feeding in twice as much fabric as the
back feed dog is feeding out. To maximize the gathering effects, use
the longest stitch length setting. Fabric weight will affect the gathering. Test stitch for desired results.
B
D
When the differential feed lever is set below "N" (fig. F), the front feed
dog moves less distance than the back feed dog. This adjustment
stretches the fabric slightly as it is sewn. The lower settings prevent
puckers on lightweight fabric (fig. E).
C
E
F
11
O
V
E
R
V
I
E
W
Needle Tension Dials
From left to right the dials are:
Red for C1 chain needle, Yellow for C2 chain needle and Green for C3 chain needle.
The tension settings range from 0 to 9. The fabric and thread that you are working with will determine what the tension setting will be. Be sure to sew test after changing the settings.
Chain Looper Tension Dial
The chain looper dial is color coded blue for easy identification. The tension settings range from 0
to 9. The fabric, thread and stitch that you are working with will determine what the tension setting will be. Be sure to sew test after changing the settings.
12
Threading Preparation
When using overlock threads (cones) place the cone securely over
the spool holder on your machine. The spool holders prevent the
cone from spinning, enabling the thread to feed evenly. (fig. A)
When using standard sewing thread spools, use the sponge disks
(sponge side up) and spool caps (on top of spool) to prevent the
thread from tangling. (fig. B)
A
Cones with Spool Holder
Thread nets can be placed over threads that tend to slip off the
spool during sewing. For example: rayon, silk, nylon, invisible,
and decorative threads. Place the thread net over the spool of
thread and fold net back, (fig. C) Pull thread from the top of spool
to enable the thread to feed evenly. (fig. D)
B
Standard sewing thread
with sponge disks and spool
cap.
C
Thread net on thread
T
H
R
E
A
D
I
N
G
D
Pulling thread through net
Threading Your Baby Lock
Your Baby Lock is equipped with an exclusive "Instant Jet-Air Threading System" for fast, easy
threading of the chain looper.
One push of the "Jet-Air" threading lever will automatically thread the chain looper. It is no
longer necessary to use tweezers for threading the thread guides. If a looper thread breaks or
runs out, just re-thread it. There is no need to follow threading sequence.
Locked Position for Threading
1. Open the front cover.
2. Raise the presser foot to release all threads.
3. Depress the machine lock button firmly.
Rotate the machine handwheel slowly toward
you until the button "snaps" into the locked
position and the lock button release lever
moves to the far left (fig.A).
A
Note: The Baby Lock must be in the locked
position when threading the looper unless otherwise indicated.
13
T
H
R
E
A
D
I
N
G
Chain Looper
1. With the presser foot up and machine lock button in the locked position, see fig. A page 13.
2 Place the thread cone or spool on the "Chain Looper" spool pin. Slip the thread into the telescopic antenna thread guide above the thread cone.
3. Insert the thread through the hole of the thread guide above the chain looper tension dial.
Bring the thread under the chain looper tension dial, then up and over the left thread
guide,making sure the thread is in the tension disk. (See fig.A).
4. Take the thread down to the chain looper threading port.
5. Pull 18 inches (40cm) of thread and insert 1 inch (10cm) of thread into the chain looper threading port. Use tweezers if necessary, to insert the thread end. (See fig. B).
6. Depress the looper threading lever. (See fig. B). If the thread does not go through the chain
looper eye with one push, depress the threading lever again until it does.
7. Open side cover to the left for easy access to the chain looper thread in tray. See fig. C.
8. Trim excess thread to 4 inches (2.5cm) from the eye of chain looper and leave it hang.
9. Close side cover.
10. Move the lock button release lever to the right.
A
Chain Looper
Thread Tray
Side
Cover
14
B
C
Chain / Cover Needles
Left Needle C-1
1. Raise presser foot and place the thread on the far left spool pin. Slip the thread into the telescopic antenna thread guide directly above the thread spool. See drawings below for reference.
2. Bring thread down from the telescopic antenna, snap thread into the red thread guide on the
top of the machine, and then down into the red hole above the tension dial.
3. Bring the thread down the right side of the red tension dial, under the dial and back up the
left side, making sure the thread is in the tension disk.
4. Bring the thread through thread guide at top of machine and down to the pre-tension thread
guide above the needle.
5. Pass the thread from the left side behind the pre-tension thread guide plate on needle clamp
and into thread guide above the needle. See drawings below for reference.
6. With the needle threader or tweezers in the accessory compartment, thread needle in the left
"C-1" needle position.
Center Needle C-2
1. Raise presser foot and place the thread on the second from the left spool pin. Slip the thread
into the telescopic antenna thread guide directly above the thread spool. See drawings below
for reference.
2. Bring thread down from the telescopic antenna, snap thread into the yellow thread guide on
the top of the machine, and then down into the yellow hole above the tension dial.
3. Bring the thread down the right side of the yellow tension dial, under the dial and the thread
guide below the dial.
4. Bring the thread through thread guide at top of machine and down to the pre-tension thread
guide above the needle.
5. Pass the thread from the right side behind the pre-tension thread guide plate on needle clamp
and into thread guide above the needle. See drawings below for reference.
6. With the needle threader or tweezers in the accessory compartment, thread needle in the center "C-2" needle position.
T
H
R
E
A
D
I
N
G
Right Needle C-3
1. Raise presser foot and place the thread on the back right spool pin. Slip the thread into the
telescopic antenna thread guide directly above the thread spool. See drawings below for reference.
2. Bring thread down from the telescopic antenna, snap thread into the green thread guide on
the top of the machine, and then down into the green hole above the tension dial.
3. Bring the thread down the right side of the green tension dial, under the green dial and under
the thread guide located below the yellow tension dial.
4. Bring the thread through thread guide at top of machine and down to the pre-tension thread
guide above the needle.
5. Pass the thread from the right side behind the pre-tension thread guide plate on needle clamp
and into thread guide above the needle. See drawings below for reference.
6. With the needle threader or tweezers in the accessory compartment, thread needle in the right
"C-3" needle position.
NOTE:
After threading the needles, the thread is then place to the left and top of the presser foot.
15
T
H
R
E
A
D
I
N
G
How To Use The Needle Threader
A
1. Hold the needle threader with the arrow
mark on top. Place the thread in the
groove of the needle threader. (fig.A)
2. Push the needle threader against needle
and slide down the groove of the needle to
the eye. Push the thread into the eye of
the needle.
3. With a point of the needle threader or the
tweezers pull the loop of thread from the
back of the needle, under the foot and to
the back left.
B
Front Cover Seam Guide
There are marks on the bed of the Baby Lock that can be used as a guide while sewing.
It will depend on what cover or chain stitch needle position you will be using as to what the width
will be.
For example, the first mark on the left closest
to the needle plate, C-1 needle is 1 inch
(2.5cm), C-2 needle is 7/8 inch (2.25cm), and
C-3 needle is 3/4 inch (2cm).
This guide is great for hemming garments with
cover stitch.
1. Turn under hem and press.
2. Align the raw edge of the hem with the needles
3. Align the folded edge of hem with the correct
guide mark.
Re-threading Looper
If a thread breaks, raise the presser foot and pull the broken thread from under the foot. Open the
front table, depress the machine lock button.. Re-thread the machine above the threading port,
leaving an 18inch (40cm) thread tail. Thread the looper as usual and move lock button release
lever to the right. Close the front cover and sew a test sample.
Note: When re-threading your Baby Lock using the "Jet-Air Threading" feature, make sure that
the previous thread that was in the looper (tube) is completely removed. This will eliminate any
chance of the previous thread obstructing the flow of the air when re-threading the machine.
16
Start to Sew
When threading is complete, the loose threads should initially interlock on fabric. This is most
important when sewing the chain or cover stitches.
1. Cut all threads to 4 inch (10cm) in length. All threads
should then be placed over the top and left of the presser
foot. The threads at this time cannot be placed under the
presser foot.
A
2. Place the fabric under the presser foot directly below the
needles (fig. A).
3. Lower the presser foot.
4. Turn the handwheel toward you to form 2 or 3 stitches.
B
T
H
R
E
A
D
I
N
G
5. Start to sew slowly.
6. After the first few stitches, stop and cut excess threads
(fig. B).
7. Start the next seam at the toe of the presser foot(fig.C).
C
8.You only need to raise and lower the presser foot when
working with thick fabric or when precise position is
required.
Note: Be careful not to push or pull the fabric. The BLCS
will feed it evenly without help.
To Chain-Off of the Fabric
Your BLCS will sew a chain off the edge of the fabric. For best results, we recommend to follow
the instructions below.
1.At the end of the seam, change the stitch length to 4 (fig.A).
2. Let the thread flow from the back of the 2-4 inches without pulling (figB).
3. Start the seam at the toe of the presser foot (figC).
A
B
C
17
C
H
A
I
N
S
T
I
T
C
H
I
N
G
Chain Stitching
The chain stitch is formed using two threads, one thread in the needle and one thread in the chain
looper.
Chain Stitching looks like a straight stitch on the top of the fabric while the chain looper thread
forms a chain on the underside of the fabric. The chain stitch has stretchability that is not found
in the conventional locked straight stitch from a sewing machine. The chain stitch is used to stabilize seams in woven fabrics and where needed in knit fabrics. The chain stitch can also be used for
sewing wide elastic in garments and applying bias tape.
For Chain Stitch:
1. Place the machine in locked position to thread the chain looper.
2. Follow the diagram to thread the chain looper,see page 19. Open side cover of machine to
make sure the thread is through the eye of the chain looper. Trim thread to 4 inches (10cm)
and lay in tray.
3. Follow the guide to thread the chain/cover stitch needle, (C-1, C-2, or C-3). Place needle thread
on top and to the left of presser foot before sewing.
4. Move the lock button release lever to the right.
5. Set stitch length and other machine adjustments(See chart below).
6. Place the fabric under the needle and turn handwheel toward you two or three stitches in the
fabric. Cut the excess threads and start sewing.
Note: All chain and cover stitches must be started with fabric under the needle.
CHAIN STITCH
18
Needle Position
Stitch Length
C-1, C-2 or C-3
3,0 - 4,0
Chain Stitching - continued
C
H
A
I
N
S
T
I
T
C
H
I
N
G
Tension Adjustments
Balanced tension
under side
Balanced tension Chain stitch has correct tension when the needle thread sews
a straight seam on the top side and the chain looper thread
forms loops on the under side of the fabric.
top side
Needle thread is too loose
Needle thread is too tight
Needle thread is too loose Increase the chain /cover needle thread tension dial to a
higher number. (Red, yellow or green)
Or lower the chain looper tension dial to loosen the chain
looper thread. (Blue)
Needle thread is too tight
Loosen the chain /cover needle thread tension dial to a lower
number. (Red, yellow or green)
Or increase the chain looper tension dial to a higher number
for tighter tension on the the chain looper thread. (Blue)
19
C
O
V
E
R
S
T
I
T
C
H
Cover Stitch -Right Narrow - 3mm
The narrow cover stitch consists of two rows of straight stitching on the top side of the fabric with
an overlock stitch on the underside of the fabric. This stitch is very common in the garment industry to hem knit garments. The narrow cover stitch is used on fine knits such as jersey and single
knits for hemming or topstitching. The cover stitch is not limited to knit fabrics. It also works well
with woven fabrics.
The Right Narrow cover stitch is formed using two "C" needle positions and the chain looper. The
needle positions are C-2 and C-3. The width of the narrow cover stitch is 3mm.
For Cover Stitch:
1. Place the machine in locked position to thread the chain looper.
2. Follow the diagram to thread the chain looper, see page 21. Open the side cover of the machine
to make sure the thread is through the eye of the looper. Trim thread to 4 inches (10cm) and
lay in tray.
3. Follow the diagram to thread the chain/cover stitch needles C-2 and C-3. Place needle threads
on top and to the left of presser foot before sewing.
4. Move the lock button release lever to the right.
5. Set stitch length and other machine adjustments(See chart below).
6. Place the fabric under the needles and turn handwheel toward you two or three stitches into
the fabric. Cut the excess threads and start sewing.
Note: All chain and cover stitches must be started with fabric under the needle.
COVER STITCH - RIGHT NARROW
20
Needle Position
Stitch Length
C-2 and C-3
3,0 - 4,0
Cover Stitch- Right Narrow continued
C
O
V
E
R
S
T
I
T
C
H
Tension Adjustments
Balanced tension
under side
Balanced tension Cover stitch has correct tension when the needle thread sews
two rows of straight stitching on the top side and the chain
looper forms a zig zag on the underside of the fabric.
top side
Needle thread is too loose
Needle thread is too tight
Needle thread is too loose Increase the chain /cover needle thread tension dial to a
higher number. (Red, yellow or green)
Or decrease the tension on the chain looper tension dial to
loosen the chain looper thread. (Blue)
Needle thread is too tight Loosen the tension by turning the chain /cover needle thread
tension dial to a lower number. (Red, yellow or green)
Make sure that the chain looper dial is correctly set for proper
tension (Blue)
21
Cover Stitch -Left Narrow - 3mm
C
O
V
E
R
The narrow cover stitch consists of two rows of straight stitching on the top side of the fabric with
the overlock stitch on the underside of the fabric. This stitch is very common in the garment industry to hem knit garments. The narrow cover stitch is used on fine knits such as jersey and single
knits for hemming or topstitching. The cover stitch is not limited to knit fabrics. It also works well
with woven fabrics.
S
T
I
T
C
H
For Cover Stitch:
1. Place the machine in locked position to thread the chain looper.
2. Follow the diagram to thread the chain looper, see page 23. Open the side cover of the machine
to make sure the thread is through the eye of the looper.
3. Follow the diagram to thread the chain/cover stitch needle positions C-1 and C-2. Place needle
threads on top and to the left of presser foot before sewing.
4. Move the lock button release lever to the right.
5. Set stitch length and other machine adjustments.(See chart below)
6. Place the fabric under the needles and turn handwheel toward you two or three stitches into
the fabric. Cut the excess threads and start sewing.
The Left Narrow cover stitch is formed using two "C" needle positions and the chain looper. The
needle positions are C-1 and C-2. The width of the narrow cover stitch is 3mm.
Note: All chain and cover stitches must be started with fabric under the needle.
COVER STITCH - LEFT NARROW
22
Needle Position
Stitch Length
C-1 and C-2
3,0 - 4,0
Cover Stitch- Left Narrow continued
C
O
V
E
R
S
T
I
T
C
H
Tension Adjustments
Balanced tension
under side
Balanced tension Cover stitch has correct tension when the needle threads sew
two rows of straight stitching on the top side and the chain
looper forms a zig zag on the under side of the fabric.
top side
Needle thread is too loose
Needle thread is too tight
Needle thread is too loose Increase the chain /cover needle thread tension dial to a
higher number. (Red, yellow or green)
Or decrease the tension on the chain looper tension dial to
loosen the chain looper thread. (Blue)
Needle thread is too tight
Loosen the tension by turning the chain /cover needle thread
tension dial to a lower number. (Red, yellow or green)
Make sure that the chain looper dial is correctly set for proper
tension. (Blue)
23
C
O
V
E
R
Cover Stitch -Wide - 6mm
The wide cover stitch consists of two rows of straight stitching on top the fabric with an overlock
stitch on the underside of the fabric. This stitch is very common in the garment industry to hem heavier knit fabrics such as double knits, sweatshirt fleece, and polar fleece. The wide cover stitch is not
limited to knit fabrics. It also works well with medium to heavy woven fabrics.
The wide cover stitch is formed using two "C" needle positions and the chain looper. The needle posi-
S
T
I
T
C
H
tions are C-1 and C-3. The width of the wide cover stitch is 6mm.
For Cover Stitch:
1. Place the machine in "locked" position to thread the chain looper. (pg.13).
2. Follow the diagram to thread the chain looper, see page 25. Open the side cover of the machine to
make sure the thread is through the eye of the looper.
3. Follow the diagram to thread the chain/cover stitch needle positions C-1 and C-3. Place needle
threads on top and to the left of presser foot before sewing.
4. Move the lock button release lever to the right
5. Set stitch length and other machine adjustments. (See chart below).
6. Place the fabric under the needle and turn handwheel toward you two or three stitches in the
fabric. Cut the excess threads and start sewing.
Note: All chain and cover stitches must be started with fabric under the needle.
COVER STITCH - WIDE
24
Needle Position
Stitch Length
C-1 and C-3
3,0 - 4,0
Cover Stitch-Wide-6mm continued
C
O
V
E
R
S
T
I
T
C
H
Tension Adjustments
Balanced tension
under side
Balanced tension Cover stitch has correct tension when the needle threads sew
two rows of straight stitching on the topside and the chain
looper forms a zig zag on the underside of the fabric.
top side
Needle thread is too loose
Needle thread is too tight
Needle thread is too loose Increase the chain /cover needle thread tension dial to a
higher number. (Red, yellow or green)
Or decrease the tension on the chain looper tension dial to
loosen the chain looper thread. (Blue)
Needle thread is too tight
Loosen the tension by turning the chain /cover needle thread
tension dial to a lower number. (Red, yellow or green)
Make sure that the chain looper dial is correctly set for proper
tension. (Blue)
25
C
O
V
E
R
Triple Cover Stitch - 6mm
The Triple Cover Stitch can be used for topstitching, hemming, and elastic application . The stitch
can also be used as a decorative stitch upside down with the overlock side on the right side of the
fabric. The garment industry uses the Triple Cover Stitch frequently in activewear.
The Triple Cover Stitch is formed using all three "C" needle positions and the chain looper. The Triple
Cover Stitch is made up of three rows of straight stitching on the top of the fabric with the chain
S
T
I
T
C
H
looper forming an overlock stitch on the underside of the fabric.
For Triple Cover Stitch:
1. Place the machine in "locked" position to thread the chain looper.
2. Follow the diagram to thread the chain looper, see pg.27. Open the side cover of the machine to
make sure the thread is through the eye of the chain looper. Trim thread to 4 inches (10cm) and
lay in tray.
3. Follow the diagram to thread the chain/cover stitch needle positions C-1, C-2 and C-3. Place
needle threads on top and to the left of presser foot before sewing.
4. Move the lock button release lever to the right.
5. Set stitch length and other machine adjustments. (See chart below.)
6. Place the fabric under the needles and turn handwheel toward you two or three stitches in the
fabric. Cut the excess threads and start sewing.
Note: All chain and cover stitches must be started with fabric under the needle.
TRIPLE COVER STITCH
26
Needle Position
Stitch Length
C-1, C-2 and C-3
3,0 - 4,0
Triple Cover Stitch continued
C
O
V
E
R
S
T
I
T
C
H
Tension Adjustments
Balanced tension
under side
Balanced tension Triple Cover stitch has correct tension when the needle
threads sew three rows of straight stitching on the topside and
the chain looper forms a zig zag on the underside of the fabric.
top side
Needle thread is too loose
Needle thread is too tight
Needle thread is too loose Increase the chain /cover needle thread tension dial to a
higher number. (Red, yellow or green)
Or decrease the tension on the chain looper tension dial to
loosen the chain looper thread. (Blue)
Needle thread is too tight
Loosen the tension by turning the chain /cover needle thread
tension dial to a lower number. (Red, yellow or green)
Make sure that the chain looper dial is correctly set for proper
tension. (Blue)
27
T
E
C
H
N
I
Q
U
E
S
Turning Corners - Chain Stitch
Sew to the point in fabric where you want to turn a corner. Stop the machine. Turn the handwheel
toward you (counter clockwise) by hand, making sure the needle is going down in the fabric.
Slowly start to raise the needle OUT OF FABRIC. Stop when you see the eye of the needle. (The
point of the needle will still be in the fabric.) Raise the presser foot (fig A), and slowly pivot the
fabric (fig B). Lower the presser foot and continue to sew (fig C).
A
B
C
Turning Corners - Cover Stitch
Sew to the point in fabric where you want to turn a corner. Stop the machine. Turn the handwheel
toward you (counter clockwise) until the needles are down in the fabric. Turn the handwheel away
from you (clockwise) until the needles are in the highest position and the needles are out of the
fabric. Raise the presser foot (fig A) and slowly pivot the fabric. Align the needles with the stitching on the fabric (fig B) and lower the presser foot. Continue to sew. (fig C)
To keep the stitch from unraveling at the corner(s), use a hand needle and thread to complete the
corner on the top of the fabric and catch the chain looper thread on the underside.
A
28
B
C
Flat Hemming - Cover Stitch
A
1. Leave one seam on the garment open.
2. Measure, turn up and press hem on garment.
3. On right side of garment mark hem allowance with marking pen.
4. Place garment right side up under the presser foot, aligning the marked hem with the needles. Make sure both needles are positioned on the raw edge of the hem (fig A).
5. Sew hem.
6. Sew seam on garment.
Note: Optional guide or attachments will help with hemming. (fig.B) Ask your Baby Lock retailer.
T
E
C
H
N
I
Q
U
E
S
B
Hemming in the Round - Cover Stitch
A
B
1. Sew all seams on the garment.
2. Measure, turn up and press the hem on garment.
3. Stitch around the hem, overlapping the hem approximately 1/2 inch (13mm). (fig.A)
4. Turn the handwheel towards you until the needles are in
the lowest position in the fabric.
5. Carefully reverse the handwheel until the needles are in
the highest position.
6. Raise the presser foot to release the tension.
7. Carefully and firmly pull fabric and threads to the left.
Cut threads.
8. Pull threads to the back of fabric and tie off or use a seam
sealant to secure the threads at the tie off (fig.B) (fig.C).
C
29
T
E
C
H
N
I
Q
U
E
S
30
Securing Chain and Cover Stitching
The Chain Stitch and Cover Stitch can easily be removed. Trim the chain tail to edge of fabric and
the "end" of the seam and pull on the chain looper thread on underside of the fabric. This will give
you the opportunity to "Unsew" an incorrect seam very easily.
To secure the chain stitch or cover stitch, at the end of the seam, bring the needle thread(s) to the
back of the fabric and tug on the needle threads to secure the seam.
The cover stitch needle threads may also be tied to prevent raveling of the stitch.
To secure the beginning of the Cover stitching the thread tail can be brought around to the front of
the needles and caught into the cover stitching. (This technique is not for chain stitch)
See illustration below.
Using Specialty Threads
Stitching with specialty threads can form beautiful stitches. These heavy or shiny threads can be
used to enhance the appearance of a stitch and create special effects.
Some specialty threads work well through the needle and chain looper, while others are too heavy
to be threaded through the needle and are for chain looper use only.
Use the "Specialty Thread Guide Chart" on page 35 as a guide for the specialty threads. Keep in
mind that the quality of the thread may vary and tension setting will vary from thread to thread.
Make a test sample before starting on the project.
Lightweight Threads
Lightweight threads such as rayon machine-embroidery thread, lingerie thread, can easily be
threaded on the Baby Lock. Very fine monofilament threads may need threading assistance of a
"Threading Cradle" (pg. 34) or "Looper Threading Tool" (pg 33)
Medium weight Threads
Medium weight threads, such as topstitching thread, Décor rayon, stretch nylon thread are too
bulky to easily "jet-air" through the threading port and looper. By using a "Threading Cradle"
(pg.34) or "Looper Threading Tool" (pg.33), the heavier threads can be threaded easily in the
Baby Lock.
S
P
E
C
I
A
L
T
Y
T
H
R
E
A
D
S
Heavy weight Threads
Heavy weight threads such as Pearl Crown Rayon, Décor 6, and Candlelight will need extra
attention in the chain looper. Directions for bypassing the threading port on page 32 may need to
be used for heavy weight thread.
Please follow the Specialty Thread Guide Chart on page 35 for special instructions concerning the
use of these threads.
31
S
P
E
C
I
A
L
T
Y
T
H
R
E
A
D
S
Bypassing the Threading Port
Heavyweight threads can be used through the chain looper
thread paths. Specific techniques may require that the thread
bypass the thread port for the thread pull to be loosened. Start
with the machine threaded with regular serger thread.
1. Open front cover and raise the presser foot.
2. Just above the threading port, clip the chain looper thread.
Pull the thread out of the upper guides and remove the
thread cone.
3. Place the specialty thread on the spool pin. Thread it into
the upper guides and tension disk. Bring the thread end
through the hole just left of the jet-air threading port. (This
will allow the front door to be closed while sewing. Leave
approximately 12 inches (30cm) of thread to be threaded
through the chain looper. (fig. A).
4. With machine lock button released, use the tweezers to pull
the existing looper thread out of tube extending from the
threading mechanism (fig. B). Leave the thread in the looper arm.
5. Tie the specialty thread onto the regular thread with an
overhand knot (fig. C). Pull on the regular thread from the
looper eye until the specialty thread comes through the looper eye.
6. Lay the thread end in the chain looper tray and close the
side door. (fig.D)
If the thread is heavy and the overhand knot (step #5) is too
large for the looper tube, follow directions #1 thru #6 on page
34 to make a thread cradle. Then:
1. Release machine lock button.
2. While holding the loose ends of the thread cradle with one
hand, use the tweezers to pull the cradle loop out of the tube
extending from the threading mechanism with the other
hand.
3. Insert 2 inches (5cm) of the decorative thread into the cradle
loop. Pull on the loose ends of the thread cradle from the
looper eye until the specialty thread comes through the
chain looper eye.Lay in the chain looper tray and close the
side door.
32
A
B
C
D
Looper Threading Tool
A
B
1. Open the front cover and raise the presser foot.
2. At the threading port, cut the chain looper thread. Remove
chain looper thread from under the presser foot and the
upper thread guides. Replace cone of thread with specialty
thread.
3. Place the machine in "locked" position to thread the chain
looper.
4. Thread specialty thread into the upper thread guides, leaving an 18-inch (40cm) tail above the threading port.
5. Place the straight end of the looper threading tool into the
threading port. Push the looper threading tool until the
end comes out of the looper eye. Open side door of machine
to see threading tool come out of the eye of chain looper.
6. Insert the specialty thread tail into the looper threading
tool eye (fig.A). Pull the straight end of the looper threading tool through the looper eye bringing the specialty
thread with it. (fig.B)
7. Cut chain looper thread to 4 inches (10cm) and place in
tray. Close the side door of the machine.
S
P
E
C
I
A
L
T
Y
T
H
R
E
A
D
S
33
S
P
E
C
I
A
L
T
Y
T
H
R
E
A
D
S
Thread Cradle for Looper
A
B
1. Open the front cover and raise the presser foot.
2. At the threading port, cut the chain looper thread. (fig.A)
Remove thread from under the presser foot and the upper
thread guides. Replace cone of thread with specialty thread.
3. Place the machine in "locked" position to thread the chain
looper.
4. Thread specialty thread into the upper thread guides, leaving an 18 inch (40cm) tail above the threading port. (fig.C)
5. Cut a 24 inch (55cm) strand of serger thread and fold in half
to form a thread cradle. Insert the loose ends of the thread
cradle into the port about 1 inch (2.5cm).
6. Holding the cradle loop with left hand, depress the threading
lever with your right hand (fig.D) until the thread ends come
out the looper eye. Open side door of machine to make sure
thread is in eye of chain looper.
7. Insert the specialty thread tail into the cradle loop (fig.E),
pull the serger thread ends until the specialty thread comes
through the looper eye (fig.F). Discard or set aside the
thread cradle.
8. Cut chain looper thread 4inches (10cm) and place in tray.
Close side door of machine. (fig.G)
C
D
E
34
F
G
Specialty Thread Guide Chart
CHAIN/COVER
STITCHES
Topstitching
Buttowhole Twist
(Medium weight)
Wooly Nylon
(Medium weight)
Metallic Threads
(Light weight)
2-Thread Chain
C-1, C-2, or C-3
Needle Position
In chain looper only
In chain looper only
In needles only
3-Thread Cover Stitch In chain looper only
Left Narrow
Right Narrow
Wide
In chain looper only
In needles only
4-Thread Triple
Cover
Stitch
In chain looper only
In chain looper only
In needles only
COMMENTS :
Not recommended for
needles.
Use in looper only.
Not recommended for
needles.
Sew at a slower
speed
when sewing with
metallic threads.
CHAIN/COVER
STITCHES
Clear Nylon
Filament
(lightweight)
Lingerie Thread,
Rayon or Polyester
Machine-embroidery
Thread (lightweight)
Decorative Thread:
Décor, Candlelight,
Pearl Crown Rayon
(heavy weight)
2-Thread Chain
C-1, C-2, C-3
needle position
Use in needle and
chain looper
Use in needle and
chain looper
Use in chain looper
only
3-Thread Cover
Stitch
Left Narrow
Right Narrow
Wide
Use in needle and
chain looper
Lingerie thread: Use in
Use in chain looper
needles and chain looper. only
Machine embroidery
thread:Use in needles
only.
4-Thread Triple
Cover Stitch
Use in needle and
chain looper
Lingerie thread: Use in
needles and chain looper.
Machine embroidery
thread:Use in needles
only.
Use in chain looper
only
COMMENTS:
Make sure to use soft,
pliable monofilament
thread.
Sew at a slower speed
when sewing with
monofilament thread.
Use thread nets or
sponge disks to keep
thread from spilling off
spool.
Sew at a slower speed
when sewing with decorative thread.
Not recommended
for needles
S
P
E
C
I
A
L
T
Y
T
H
R
E
A
D
S
35
M
A
I
N
T
E
N
A
N
C
E
Troubleshooting
Before taking your machine in for service, check the following:
Machine fails to start:
1. Are electrical plugs properly connected?
2. Is the power switch on?
3. Check household circuit breaker or fuse.
4. Is the lock button release lever in the unlocked position?
Thread breaks:
1. Is the machine threaded correctly? Check each thread path carefully.
2. Is the correct needle inserted for the particular stitch? - C-1, C-2, or C-3?
3. Is the needle inserted correctly?
4. Is the needle bent and worn?
5. Are you using good quality thread?
6. Is the thread feeding off the cone/spool freely?
7. Is the needle size correct for the type of fabric being used?
8. Are the needles being used the correct Schmetz ELx705CF system?
Chain or Cover Stitching:
1. Are the tensions too tight on the chain/cover needles or the chain looper?
2. Is the stitch length too short?
3. Did you start the first stitch in the fabric?
Skipped Stitches:
1. Is the needle bent or worn?
2. Is the needle inserted correctly?
3. Is the serger threaded correctly?
4. Is the presser foot pressure right for the fabric?
5. Is the correct needle being used for the particular stitch?
6. Is the correct needle being used for the type of being sewn fabric?
7. Is the fabric being pulled from the rear of the machine while sewing?
Fabric will not feed in machine:
1. Is the machine lock button released?
2. Is the presser foot down?
3. Are the presser foot, and feed dogs free of lint?
4. Is the presser foot pressure right for the fabric?
5. Is the stitch length set properly?
6. Is the needle plate secure on the machine?
36
Troubleshooting Continued
Stitch Unbalanced:
1. Is the machine threaded correctly?
2. Is the proper presser foot on the machine?
3. Is the correct needle inserted and threaded?
4. Is the thread in the tensions?
5. Are the tensions set correctly for the chain/cover needles?
6. Is the tension dial set correctly for the chain looper?
7. Is the chain looper threaded correctly?
8. Is the needle thread(s) in the correct tension disk?
Looper Threading Difficulties:
1. Is the thread end in the threading port correctly?
2. Is at least 1 inch (2.5cm) of the thread end in the threading port?
3. Is there at least 18-inches (40cm) of loose thread beyond the thread guide above the threading
port?
4. Is there a kink or twist in the 18 inch (40cm) of thread to restrict the flow into the threading
port?
M
A
I
N
T
E
N
A
N
C
E
5. Is the thread caught to prevent going through the chain looper?
37
M
A
I
N
T
E
N
A
N
C
E
Replacing Needles
Needle Identification (fig. A)The chain/cover stitch needles are on the front portion of the
needle clamp and are identified by C-1,C-2 and C-3.
C-1-Left chain/cover stitch needle can be used for chain stitch,
left narrow cover stitch, wide cover stitch or triple cover
stitch.
C-2-Center chain/cover stitch needle can be used for a chain
stitch, left narrow cover stitch, right narrow cover stitch or
triple cover stitch.
C-3-Right chain/cover stitch needle can be used for a chain
stitch, right narrow cover stitch, wide cover stitch, or triple
cover stitch.
C3
C2
C1
A
To Replace a Needle 1. Raise the needle to the highest position by turning the
handwheel toward you.
2. Using the allen screwdriver, loosen the needle screw for the
needle to be changed. Screws are located by sequence as
indicated above. Note: To prevent the needle from falling
into the needle plate, hold it with the needle insert tool as
you loosen the screw (fig. B).
3. Use the needle insert tool or tweezers to insert the new
needle with the flat side to the back. Insert needle as far as
it will go, check the needle viewing window (fig. C).
4. Tighten the needle clamp screw.
B
Note: If you do drop a needle down into the machine just pull
out the needle-drop drawer at the bottom of your serger.
The needle will be on the drawer (fig. D).
C
D
38
Replacing Light Bulb
1. For safety reasons, unplug main power cord prior of replacing light bulb.
2. Open front cover.
3. Remove light bulb and replace bulb with the same type rated (15watts/110volts or
15watts/240volts). See below draft for reference.
15W/110V
15W/110V
(Screw Type)
M
A
I
N
T
E
N
A
N
C
E
10W/240V
15W/240V
(Bayonet Type)
39
M
A
I
N
T
E
N
A
N
C
E
Cleaning
Your Baby Lock will operate at best performance if it is kept clean at all times.
Your Baby Lock's major moving parts are well protected and do not need to be oiled.
However, we recommend to use the cleaning brush often during garment construction in order to
keep lint off, the needle bar, the feed dog mechanism and looper. If machine needs to be oiled,
check with your nearest Baby Lock retailer for use of high grade recommended sewing machine
oil.
TO REMOVE NEEDLE PLATE PROCEED AS FOLLOW:
1. For safety reasons, unplug main power cord.
2. Raise and remove presser foot.
3. Remove needles from needle clamp.
4. For easy access to the needle plate lock pin set screw, raise needle clamp to its highest position.
(fig. A).
5. Place allen screwdriver (1.5mm) into allen screw and loosen needle plate pin holder screw. See
(fig. B) for location of screw.
6. Remove needle plate lock pin (fig B) and remove needle plate front screw.
7. Open left side cover of machine and remove needle plate.
8. Clean machine. (fig C)
9. Place needle plate onto machine and insert needle plate lock pin.
10. Tighten allen screw needle plate lock pin and check and make sure that top needle plate lock
pin is flush with needle plate.
11. Place needle plate front screw and tighten screw.
Note: For better stitch performance, make sure needle C-1.C-2,and C-3 do not touch either side of
needle plate hole.
A
40
B
C
Technical Data
Looper Threading System:
Tension Dials:
Stitch Length Dial:
Differential Feed Ratio:
Presser Foot:
Looper
Needle System:
Number of Needles:
Sewing Speed:
Machine Weight:
Light Bulb:
Stitch Types:
Jet Air Threading for chain looper
Dials for Chain/Cover stitch needles
1.0-4.0mm
0.6 to 2.0
Snap On Foot
Chain Looper
Organ ELx705CF #80/12 and #90/14
3 - C-1,C-2,C-3
Up to 1500 s.p.m.
7.3 kg/16 2bs.
15W / 110V or 10W / 240V
Chain Stitch
- Right (C-1), Center (C-2), Left (C-3)
Cover Stitch
- Narrow Left
- Narrow Right
-
Wide
Triple
-
Triple Cover Stitch : 6.0mm
Cover Stitch - Wide : 6.0mm
Cover Stitch - Narrow: 3.0mm
T
E
C
H
N
I
C
A
L
D
A
T
A
Stitch Width: Cover Stitch
41
S
E
L
E
C
T
I
O
N
C
H
A
R
T
42
Chain stitch
2 Thread
Cover St. Wide
Cover St. Narrow
3 Thread
Triple Cover Stitch
4 Thread
Stitch name
3-5
3-5
-
-
3,0-4,0
C3
-
4-6
4-6
-
4-6
Right needle
tension dial
3,0-4,0
-
-
4-6
3-5
4-6
4-6
4-6
-
4-6
4-6
Left needle Center needle
tension dial tension dial
C2
3,0-4,0
3,0-4,0
C1-C3
C1
3,0-4,0
3,0-4,0
3,0-4,0
Stitch
L/dial
C2-C3
C1-C2
C1 / C2 / C3
Nb.Needles
& ndle position
2-3
2-3
2-3
1-2
1-2
1-2
1-2
Chain looper
tension dial
Chart for stitch selection settings for Chain/Cover
"
"
N
"
"
N
N
Diff.
Feed
-
-
-
6mm
"
3mm
6mm
Seam width
S
T
I
T
C
H