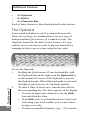
1
Introduction
Introduction
Congratulations on your choice of a state-of-the-art
Quicktionary-II™, WizCom’s hand-held, bilingual scanning
dictionary. Inside Quicktionary-II’s tip is a sophisticated
electronic eye mounted above two rollers. This eye enables
you to scan in and instantaneously translate a wide range of
printed text.
With Quicktionary-II, you can scan in entire lines of text
and translate the words at the push of a button. If you have
purchased a Quicktionary-II Voice product and are scanning
in English, Quicktionary-II’s powerful text-to-speech
technology reads the scanned text aloud as you are translating it. In addition, Quicktionary-II contains advanced
editing features that enable you to change the words you’ve
scanned in, as well as manually enter words for translation.
The Opticard on the Quicktionary-II case enables you to
quickly enter words that are inconvenient to scan.
The QuickStart guide included in the Quicktionary-II
package is designed to help you start using your
Quicktionary-II right away. The accompanying CD contains
a movie with additional tips about using Quicktionary-II.
WizCom does not accept any direct or indirect liability for
financial losses or claims from third parties, resulting from
use of this product and all its functions, or for any damage
Quicktionary II
Quicktionary-II can be upgraded, enabling you to add more
dictionaries and interface languages. Upgrading to a
QuickLink Pen™ is also possible, by adding other types of
applications and components.
1
Introduction
caused by its improper use. WizCom reserves the right to
make technical alternations.
The WizCom Web site is located at
http://www.wizcomtech.com.
Contact us to remain up to date about applications, dictionaries and other components for your Quicktionary-II.
Conventions
Quicktionary II
The following conventions are used in this manual:
2
•
Menus and menu options are displayed in bold type
(e.g., the Information option in the Main Menu).
•
In the instructions, the word “select” means “scroll to
… and press 2”. For instance, “Select Information”
means to “scroll to Information, then press 2”.
•
Sections of this manual referred to by their specific
name are written in italics (e.g., the section Using the
Character Bar).
•
The examples in this manual are taken from our
English - German dictionary.
Table of Contents
Introduction
1
Conventions 2
Getting Started
5
Package contents 5
Familiarizing Yourself With Quicktionary-II 5
Setting up Your Quicktionary-II 7
Basic Quicktionary-II Commands 7
Learning To Scan 9
Using the Dictionary
11
Input Screen 11
Translation Screen 12
Dictionary Entry Screen 13
Dictionary Entries 14
Menus
Dictionary 20
Preferences 21
Help 23
Pen Main Menu 24
Main Menu Options 24
Quicktionary 24
PC-Controlled Communications 24
Quicktionary II
Quicktionary Menu Options 20
20
3
Table of Contents
Preferences 24
Information 28
Additional Quicktionary-II Features 29
The Opticard 29
The Editor 30
Editing Commands 33
The Character Bar 34
Quicktionary II
Using the Character Bar 36
4
Upgrading Your Quicktionary-II
38
Care and Cleaning
40
Batteries
40
Pen Technical Data
41
Troubleshooting
42
Index
44
Getting Started
Getting Started
Package contents
Before using your Quicktionary-II, take time to check the
package contents to make sure that you have received all the
following items. If anything is missing, contact your
Quicktionary-II dealer.
•
•
•
•
•
•
•
•
Quicktionary-II unit (in protective case)
Quicktionary-II case with Opticard sticker on the bottom
Two AAA batteries
Earphone *
Registration card
Operation manual
QuickStart guide
Quicktionary-II instruction CD
Familiarizing Yourself With Quicktionary-II
Your Quicktionary-II contains the following parts:
Display
Keypad
Built-in
speaker
Power
button
Protective cover
•
•
Tip
Protective cover
* Quicktionary-II Voice products only
Quicktionary II
Tip
5
Quicktionary II
Getting Started
6
•
•
•
•
Power button
Keypad
Display
Built-in speaker *
•
•
•
Battery compartment cover
Battery compartment
Flash memory card pocket and connector**
Earphone outlet
PC Link Connector
•
•
Earphone outlet*
PC link connector* *
* Quicktionary-II Voice products only
** Used only for Quicktionary-II upgrade
Getting Started
Setting up Your Quicktionary-II
Step A. Insert Batteries
1.
Remove the battery compartment cover from the back
of the Quicktionary-II.
2.
Insert two AAA batteries (included in packaging) in
the correct direction.
3.
Replace the battery compartment cover.
Step B. Remove Protective Cover
Before scanning, always remove the protective cover from
the tip so that the electronic eye is exposed. Always replace
the cover when you have finished scanning, to avoid damage.
Basic Quicktionary-II Commands
The Quicktionary-II Buttons and Their Basic Functions
The keypad contains seven buttons for operating your
Quicktionary-II. The basic functions of each button are
listed below.
Function
1
Turns the Quicktionary-II on and off.
2
Accesses a list or menu option; enters
a command.
Activates edit mode.
Toggles a checkbox on or off; x = on.
3
Returns you to the previous screen or
menu, or accesses the word list.
Quicktionary II
Button
7
Getting Started
Button
Function
Quicktionary II
Returns you to the Input screen from
the Quicktionary Menu.
Exits the Edit menu.
4
Scrolls up.
5
Scrolls down.
6
Scrolls right.
Toggles a checkbox on or off; x = on.
Toggles inverse text mode on and off
in the Input screen. (An
appears in
the upper-right of the display, indicating
that the device is in this mode.)
Double-click: Jumps to the right edge
of the scanned text while in edit mode.
Toggles Reduced Display on in the
Dictionary Entry screen.
7
Scrolls left.
Toggles a checkbox on or off; x = on.
Toggles Reduced Display off in the
Dictionary Entry screen.
Double-click: Jumps to the left edge
of the scanned text while in edit mode.
Navigating Menus and Lists
To select a menu or option:
1. Scroll through the menu using 4 or 5 until the item
you want is highlighted.
8 2. Press 2.
Learning To Scan
To select an entry from a list:
1.
Scroll through the list using 4 or 5 until the entry
you want is highlighted.
2.
Press 2.
To select a command button on the display:
1.
Scroll to the button using the arrow keys until the
button is highlighted.
2.
Press 2.
Error Messages
If an error occurs during operation of your Quicktionary-II,
such as scanning a line of text too quickly, an error message
appears. To close the message, press 2.
Scanning Limitations
Quicktionary-II allows you to scan printed text 6-22 points
in size (up to 8mm) in a wide variety of fonts and in all
colors on contrasting backgrounds except:
• red on white
• white on red
• blue on black
• black on blue
This section takes you step by step through the process of
scanning text into Quicktionary-II.
Step A. Turn Quicktionary-II On
Before scanning, remove the protective cover from the tip
and press 1 to turn on Quicktionary-II.
Quicktionary II
Learning To Scan
9
Learning To Scan
Step B. Select Quicktionary-II’s Default Language
The first time you turn your Quicktionary-II on, you are asked
to select the current dictionary. Scroll to the dictionary you want
using 4 or 5, then press 2. The Input screen appears. A red
light blinks in the tip, signifying that you are ready to scan.
Note: The red light should blink each time you are about
to scan. If the light does not blink, turn your QuicktionaryII off, then on again.
Step C. Switch to Left-Handed Use (Optional)
If you are left-handed, switch Quicktionary-II to lefthanded use prior to scanning:
1.
Press 3. The Quicktionary Menu appears.
2.
Scroll to Pen Main Menu using 5, then press 2.
3.
Scroll to the Preferences menu, then press 2.
4.
Scroll to the Right-/Left-Handed option, then press 2.
5.
With the Left-Handed option displayed, press 2.
The text on the display turns 180º.
6.
To return to the dictionary, press 3 twice, then press 2.
Quicktionary II
Scanning instructions are the same for left-handed users.
10
Step D. Scan Text
1.
Place the rollers about 1/2 inch (1 cm.) before the
beginning of the first word of the sample text below:
Quicktionary-II obviates the need for antiquated
translators.
2.
Hold the Quicktionary-II with the tip at a 75º-90º
angle from the text you are scanning, with the rollers
lightly touching the page.
Using the Dictionary
3.
4.
Scan gently from left to right. Make sure to keep the
center of Quicktionary-II’s tip aligned with the center
of the letters in the line of text while you scan.
Tip: Keep the side of your hand on the scanning
surface while scanning.
When the rollers have passed the end of the line of
text, lift Quicktionary-II off the page. The translation
appears on the display.
Step E. Rescan Inaccurate Text (Optional)
If the scanned text contains errors, rescan the text according
to Step D above.
Using the Dictionary
Input Screen
The Input screen displays the language in which you are
scanning and the input field, which is highlighted.
Quicktionary II
Once you have selected a dictionary, the Input screen for the
current dictionary is always displayed when you turn
Quicktionary-II on.
11
Using the Dictionary
Input Screen
Scan in the text you want to translate according to the
scanning instructions in Learning To Scan, above.
Quicktionary-II processes the text you have scanned and
displays its translation in one of two screens: the Translation
screen or the Dictionary Entry screen. Both are explained in
detail below.
Translation Screen
The Translation screen appears whenever you scan in more
than one word at a time. It is split into two sections. The
upper section displays the scanned text. The lower section
displays the dictionary entry corresponding to the selected
word in the text. The translations start on the next line.
Selected
word
Quicktionary II
Voice icon *
12
Scroll arrow indicates
additional scanned text
Word List
sign
Headword
Translation
Translation screen
* Quicktionary-II Voice products only
Scroll arrow indicates
additional translation
Using the Dictionary
Dictionary Entry Screen
The Dictionary Entry screen displays the dictionary entry
* Quicktionary-II Voice products only
Quicktionary II
To use the Translation screen:
1.
Press 6 and 7 to scroll forward and backward
through the scanned text. A right scroll arrow at the
end of the text indicates that you can scroll to the right
to view the continuation of the text. Similarly, when
you scroll right, the left scroll arrow indicates that you
can scroll left to view the previous section of the text.
• As each word in the text is highlighted, the
dictionary entry and translations appear in the
lower screen. If the highlighted word is a
derivative of a dictionary entry, the corresponding
dictionary entry appears. If the highlighted word is
the first word in an idiom, the idiom appears.
• If Auto Speak* is activated (see the section
Quicktionary Menu Options, below),
Quicktionary-II pronounces each word as it is
highlighted.
• If you scroll left to the Voice icon*
Quicktionary-II pronounces the entire line of text.
• You can scan again while in the Translation
screen. The current text is overwritten.
2.
Press 5 and 4 to scroll through the translations in the
lower section of the screen. The scroll arrows to the
right of the dictionary entry indicate in which
direction you can scroll to view more translations.
3.
To view the dictionary entry without the scanned text,
press 2. The Dictionary Entry screen appears.
13
Using the Dictionary
and translations for a single word. If the scanned word is not
a dictionary entry, but a derivative of one, then the corresponding dictionary entry appears.
•
If you scan in a single word, Quicktionary-II jumps
automatically to the Dictionary Entry screen.
•
If you press 2 from the Translation screen,
Quicktionary-II displays the Dictionary Entry screen,
which shows the dictionary entry and translations for
the highlighted word.
To pronounce the headword displayed in the Dictionary
Entry screen, press 2 *.
You can scan again while in the Dictionary Entry screen.
The current text is overwritten.
Dictionary Entries
A dictionary entry contains the following elements:
Headword
Homonym
number
Quicktionary II
Phonetics
14
Part of speech
Translation
(e.g., noun)
Dictionary Entry screen
* Quicktionary-II Voice products only
Word List sign
Using the Dictionary
Headword – A single word or hyphenated word listed in the
dictionary. When the selected word is a derivative of a
dictionary entry, the corresponding dictionary entry appears.
Homonym number***– When the scanned word corresponds to two or more identical dictionary entries with
separate meanings, each meaning is a separate entry with its
own number.
Phonetics – The phonetic transcription of the headword. This
appears only when Reduced Display is unchecked. For a
guide to the phonetic symbols used in the dictionary, select
Pronunciation Guide from the Help option in the Quicktionary
Menu. (See the section Quicktionary Menu Options,below.)
Part of speech –Specifies the part of speech represented by
the translation that follows—e.g., verb, adjective or noun.
Some dictionary entries contain several parts of speech.
When the
symbol appears to the right of a translation,
continue scrolling downward to view additional translations
of parts of speech.
Idioms – Expressions, phrasal verbs and multiple-word
Last translation
of headword
Translation of idiom
Dictionary Entry displaying idiom
*** Not included with all dictionaries
Scroll arrow
indicating
additional
idioms
Quicktionary II
First idiom
15
Using the Dictionary
nouns containing the headword. These are listed below the
translations of the headword.
Note: If you scan in text containing an idiom,
Quicktionary-II automatically displays the translation of
the idiom when the first word of the idiom is highlighted.
Example: If the scanned text contains the idiom ‘move
in’—e.g., in the scanned text ‘They moved in yesterday’—
the translation of ‘move in’ appears when ‘moved’ is
highlighted.
In addition, dictionary entries contain the following features:
Word List Sign
Quicktionary II
The Word List sign appears to the right of the headword
when the meaning of the highlighted word is somehow
ambiguous. It indicates that you can access a list of
alternative dictionary entries when:
•
The scanned word corresponds to more than one
dictionary entry.
Example: If you scan the word ‘walking,’ Quicktionary-II
enables you to choose between the dictionary entries
‘walking’ (adjective and noun) and ‘walk’ (verb and noun).
16 Word list for the word ‘walking’
Using the Dictionary
•
•
•
The scanned image is incomplete or unclear.
Quicktionary-II gives you a list of possible spellings
from which to choose.
The scanned word corresponds to two or more
identical dictionary entries with separate meanings
(i.e., homonyms)—for example, ‘stick’ (noun) and
‘stick’ (verb).
The translation of an idiom corresponds to the
dictionary entry for a word other than the highlighted
word. To view the translation of the highlighted word
only, select the word from the word list.
Example: When the scanned text contains the idiom ‘a
close call’, the translation of ‘a close call’ appears when
‘a’ is highlighted. However, this idiom is part of the
dictionary entry for ‘close.’ To view the translation of ‘a’,
you must go to the word list and select ‘a’.
Homographs*
A homograph is a word that has more than one pronunciation with a corresponding separate meaning. If, when Auto
* Quicktionary-II Voice products only
Quicktionary II
To use the word list:
1.
Make sure that the word you want is displayed in the
Dictionary Entry screen.
2.
Press 3. The word list for the selected word appears.
3.
Scroll to the word you want and press 2. The
dictionary entry for the selected word appears.
4.
To return to the word list, press 3 again.
5.
To exit the list without making a selection, press 3.
17
Using the Dictionary
Speak is activated (see the section Quicktionary Menu
Options, below), you scan a homograph, Quicktionary-II
displays a homograph list that shows each homograph and
its corresponding part(s) of speech—e.g., ‘close’ (verb) and
‘close’ (adj.):
Homograph list
•
Quicktionary II
•
18
If the homograph is part of a scanned sentence,
Quicktionary-II displays the homograph list when you
highlight the word in the Translation screen. Scroll to
the entry you want and press 2. Quicktionary-II
returns to the Translation screen and automatically
pronounces the selected word.
If the homograph is the only word you have scanned,
Quicktionary-II automatically displays the homograph
list. Scroll to the entry you want and press 2.
Quicktionary-II displays the Dictionary Entry screen.
Press 2 to pronounce the word.
The homograph list does not appear automatically when
Auto Speak is deactivated. Instead, it appears when you
press 2 while in the Dictionary Entry screen in order to
pronounce the highlighted word.
Split Verbs***
If you scan in a line of text that contains a split verb (e.g., in
*** Not included with all dictionaries
Using the Dictionary
German), Quicktionary-II automatically recognizes the verb
and combines the parts. The dictionary entry for the verb is
displayed as soon as you highlight the first part of the verb
that appears in the sentence.
Example: If you scan in the sentence ‘ihr stellt etwas auf’,
the dictionary entry for ‘aufstellen’ appears as soon as
you highlight ‘stellt’.
Compound Words ***
If you scan a word that is not a dictionary entry, but is a
compound word consisting of existing dictionary entries
(e.g., in German), Quicktionary-II separates the compound
word into its respective entries. The translation of the
primary word in the compound word appears first, with the
word list sign next to it.
To display the dictionary entry for another part of the
compound word:
1.
Press 2 to go to the Dictionary Entry screen (if you
scanned in more than one word).
2.
Press 3 to display the word list.
3.
Scroll to the word you want to translate and press 2.
*** Not included with all dictionaries
Quicktionary II
Example: If you scan the word ‘Sprachgemeinschaft’, the
entry for ‘gemeinschaft’ appears. Go to the word list and
select ‘Sprache’ to view the translation for that word.
19
Menus
Menus
Quicktionary II contains two menus, the Quicktionary
Menu and the Main Menu.
Quicktionary Menu Options
The Quicktionary Menu contains four menu options. To
display this menu, go to the Input screen and press 3.
Menu options are:
Dictionary
Dictionary contains a series of dictionary tools, as well as
an option for changing the current dictionary:
Quicktionary II
History
This option displays a list of the most recently translated
words for all dictionaries on the Quicktionary-II, with the
last word you translated at the top of the list. To select one
of these words and view its translation:
1.
Select Dictionary, then select History.
2.
Scroll through the list to the word you want.
3.
Press 2. The dictionary entry appears.
4.
Press 3 to return to the History list.
5.
Press 3 again to return to the Dictionary Menu, and
again to return to the Quicktionary Menu.
The History list can store up to 80 words. Once the list is
full, the oldest word is deleted from the list to make room
for the most recent one.
Adjacent Entries
This option displays a list of all headwords in the current
20 dictionary, placing you on the last word you translated or
Menus
the last History word you selected. If you haven’t translated
a word or selected a History word during the current
session, it places you on the first word in the dictionary. You
can then scroll through the list to find a different word in
order to view its translation.
1.
Select Dictionary, then select Adjacent Entries.
2.
Scroll to the word you want.
3.
Press 2. The dictionary entry appears.
4.
Press 3 to return to the Adjacent Entries list.
5.
Press 3 to return to the Dictionary menu, then press
3 again to return to the Quicktionary Menu.
Select Dictionary
Use this option to change the current dictionary.
1.
Select Dictionary, then select Select Dictionary. A
menu appears that displays the dictionaries on your
Quicktionary-II.
2.
Scroll to the dictionary you want, then press 2. The
Input screen appears.
Note: Changing the current dictionary does not change
the menu language. To change the menu language, select
Interface Language from the Preferences option in the
Main Menu. (See the section Main Menu Options, below.)
Select this option to erase all entries from the History list.
Quicktionary-II returns to the Input screen.
Preferences
Quicktionary II
Reset History
The Preferences menu contains options for adjusting
dictionary features on your Quicktionary-II. You can change 21
Menus
more than one preference at a time. Once you have changed
the preferences, press 3 to return to the Quicktionary
Menu. Preferences are:
Inverse
Select this preference if you are scanning inverse text (lightcolored text on a dark background). To toggle Inverse on or
off, press 2, 7 or 6; x = on. Alternatively, you can press
6 prior to scanning text into the Input screen in scan only
mode. When inverse text mode is selected, the red light in
the tip of Quicktionary-II blinks rapidly.
Reduced Display
This preference determines whether display elements in the
current dictionary, such as phonetics, appear with the
translations. When Reduced Display is selected, certain
display elements are hidden. (See Dictionary Guide in the
Help menu for specific details.) To toggle Reduced Display
on or off, press 2, 7 or 6; x = on.
Note: You can toggle Reduced Display on or off in the
Dictionary Entry screen, by pressing 7 or 6.
Quicktionary II
Auto Speak*
22
When Auto Speak is selected, Quicktionary-II pronounces
each word in the dictionary the moment you select it for
translation. To toggle Auto Speak on or off, press 2, 7 or
6; x = on.
Line(s) Per Scroll
This preference determines how many lines Quicktionary-II
* Quicktionary-II Voice products only
Menus
scrolls at a time in the Translation and Dictionary Entry
screens. To change the number of lines per scroll, press 7 or
6. Quicktionary-II can scroll one, two or three lines at a time.
Help
The Help menu contains options that display information
about the current dictionary. After viewing the information
in each option, press 3 to return to the Help menu, then
press 3 again to return to the Quicktionary Menu. Help
options are:
Pronunciation Guide***
The Pronounciation Guide displays a list of symbols used
for the phonetic transcription displayed after each dictionary
entry. Next to each symbol is an example of how it is
pronounced. Scroll through the list using 4 or 5.
Abbreviations Guide***
This option displays a list of abbreviations used in the
current dictionary, and indicates what each abbreviation in
the list stands for. Scroll through the list using 4 or 5 .
Dictionary Guide***
About
The About option displays information about QuicktionaryII, the current dictionary and the text-to-speech software.
*** Not included with all dictionaries.
Quicktionary II
The Dictionary Guide displays information about the
dictionary, such as which elements are hidden in reduced
display mode. Scroll through the guide using 4 and 5.
23
Menus
Pen Main Menu
Select this option to display the Main Menu.
Main Menu Options
The Main Menu contains an additional series of options
relating to the overall Quicktionary-II unit. In addition, if
you upgrade your Quicktionary-II and add applications to it,
you will be able to access the applications from this menu.
Quicktionary
The Quicktionary option displays Quicktionary-II’s Input
screen so you can begin using the dictionary.
Quicktionary II
PC-Controlled Communications
The PC-Controlled Communications option appears in the
Main Menu only if your Quicktionary-II has been upgraded
by the addition of a flash memory card. See the section
Upgrading Your Quicktionary-II Unit for a further explanation of this menu item.
Preferences
Quicktionary-II contains default settings for scanning and
24 interface languages, the menu type and other features. You
Menus
can change these default settings by selecting Preferences
from the Main Menu. Preferences contains the following
options:
Scanning Language
Use this option to change the default scanning language of
Quicktionary-II.
1.
Select Scanning Language.
2.
Scroll to the required language and press 2.
Interface Language
Use this option to change Quicktionary-II’s interface language.
1.
Select Interface Language.
2.
Scroll to the language you want and press 2.
Communications Settings
Communications Settings appears in the Preferences
menu only if your Quicktionary-II has been upgraded by the
addition of a flash memory card. See Upgrading Your
Quicktionary-II Unit for a further explanation of this option.
The Voice Settings menu contains options for controlling
the way words are pronounced by Quicktionary-II:
Volume
Use this option to adjust the volume level of the speaker.
* Quicktionary-II Voice products only
Quicktionary II
Voice Settings*
25
Menus
1.
2.
3.
Select Volume. The adjustment bar appears.
Adjust the volume level to the setting you want using
4 or 5.
Press 2.
Pitch
Use this option to adjust the pitch of the speaker.
1.
Select Pitch.
2.
Scroll to the pitch you want using 4 or 5. The higher
the number, the higher the pitch.
3.
Press 2.
Reading Speed
This option enables you to adjust the speed at which
Quicktionary-II pronounces words.
1.
Select Reading Speed.
2.
Scroll to the reading speed you want using 4 or 5.
The higher the number, the faster the speed.
3.
Press 2.
Quicktionary II
Auto Shut-Off Time
Quicktionary-II automatically shuts off after 60 seconds if
you do not scan or press any key. Use this option to change
the automatic shut-off time.
1.
Select Auto Shut-Off Time.
2.
Change the automatic shut-off time using 4 or 5.
3.
Press 2.
Right-/Left-Handed
26 Use this option to switch between right- and left-handed
Menus
modes. Switching between these modes rotates the text on
the display 180º.
1.
Select Right-/Left-Handed .
2.
Scroll to the mode you prefer using 4 or 5.
3.
Press 2.
Menu Type
Use this option to define whether Quicktionary-II’s menus
appear as Text Only, Icons Only, or Text and Icons.
1.
Select Menu Type.
2.
Scroll to the menu type you prefer 4 or 5.
3.
Press 2.
Long-Press Interval*****
Double-Click Interval
Use this option to adjust the amount of time between the
two clicks for a double-click.
***** Not included in all Quicktionary-II products
Quicktionary II
Use this option to adjust the amount of time you need to
keep a button pressed for a long press.
1. Select Long-Press Interval; the adjustment bar appears.
2. Move the slider to the setting you want, using 7 or 6.
3. Test the setting by pressing and briefly holding down
5. If the screen flashes, the setting is fine. If the screen
does not flash, either adjust the setting to a faster speed
or press longer.
27
Menus
1.
2.
3.
Select Double-Click Interval; the adjustment bar appears.
Move the slider to the setting you want, using 7 or 6.
Test the setting by double-clicking 5. If the display
flashes, the setting is fine. If the display does not
flash, either adjust the setting to a slower speed, or
double click faster.
Contrast
Use this option to adjust the brightness of the display.
1.
Select Contrast; the adjustment bar appears.
2.
Adjust the contrast using 7 or 6. The higher the
number, the darker the display.
3.
Press 2.
Information
Quicktionary II
The Information option contains a number of items that
display information about your Quicktionary-II unit. After
selecting an item to view information, press 3 to return to
the Information menu.
Memory Status
This option appears in the Information menu only if your
Quicktionary-II has been upgraded by the addition of a flash
memory card. See the section Upgrading Your Quicktionary-II
28 Unit for a further explanation of Memory Status.
Additional Features
Compact Memory
This option appears in the Information menu only if your
Quicktionary-II has been upgraded by the addition of a flash
memory card. See the section Upgrading Your Quicktionary-II
Unit for a further explanation of Compact Memory.
Battery Status
Select this option to check how much power is left in the
batteries. A diagram displays the power level.
Serial Number
Select this option to view the serial number of your
Quicktionary-II.
About
Select About to view the version number of your
Quicktionary-II, copyright information and the version
number of the Quicktionary-II operating system.
Quicktionary-II contains three advanced features that enable
you to edit the text you have scanned and to enter text
manually. These features are:
Quicktionary II
Additional Quicktionary-II
Features
29
Additional Features
•
the Opticard
•
the Editor
•
the Character Bar
Each of these features is described in detail in this section.
The Opticard
Some words and phrases can’t be scanned because the
letters are too large, are handwritten or are on a type of
background that Quicktionary-II is unable to scan. The
Opticard, located on the back of Quicktionary-II’s case,
enables you to enter these words or phrases manually by
scanning in letters one at a time using the bar codes.
Quicktionary II
To use the Opticard:
1.
Holding the Quicktionary-II case horizontally, with
the Opticard title on the right, scan the Opticard key
in the bottom left corner of the Opticard to activate
the Opticard mode. When Opticard mode is activated,
the light in Quicktionary-II’s tip blinks rapidly.
2.
To enter a letter in lower case, scan the bar code for
the corresponding key. The letter appears on the display.
• To enter an upper-case character, scan the Shift,
bar code then the letter.
• Scan Shift twice to activate/deactivate Caps Lock.
Activating Caps Lock enables you to enter letters
in upper case only.
30
• To enter a controlled character (e.g., ?, ß), scan the
Additional Features
3.
4.
5.
6.
Ctrl bar code, then the letter. Controlled characters
can be entered only for the active character set.
• To enter a controlled character in upper case, scan
Ctrl, then Shift (or Shift, then Ctrl), then the letter.
To enter a space, place the cursor in front of the letter
that will follow the space, then scan the spc key.
To delete the previous character, scan Shift, then the
del. key.
Continue scanning in letters as required.
To translate the word you have entered, scroll to GO
and press 2. The corresponding dictionary entry
appears, and you are now back in normal scanning mode.
The Editor
Quicktionary-II contains two basic input modes: scan only
and edit.
Scan Only Mode
When Quicktionary-II is in scan only mode, the Input
screen is displayed, with the input field highlighted. You can
scan in text, but cannot edit it.
Edit Mode
Quicktionary II
To edit text, you must activate edit mode:
1.
Press 3 to return to the Input screen from the
Translation or Dictionary Entry screen. The text you
scanned in is highlighted.
Press 2 to go into edit mode. The text is de-highlighted.
2.
When Quicktionary-II is in edit mode, the Input screen
appears, but the text you have scanned is displayed as regular
31
text with a blinking cursor at the beginning of the field.
Additional Features
Editing Text
Once you are in edit mode you can edit the text using the
Edit Menu, the Character Bar or Opticard.
•
To access the Edit Menu for the editing commands,
press 3.
•
To access the Character Bar, press 2. The Character
Bar enables you to enter text manually to overwrite or
insert characters.
When editing, you can use Quicktionary-II’s double-click
feature to jump to the edge of the scanned text. Double-click
7 to jump to the beginning of the text or 6 to jump to the end.
Adding to Scanned Text
You also can scan in additional text while in edit mode,
retaining the original text while inserting the new text at the
cursor location:
1.
If the input cursor isn’t located at the point where you
want to insert the new text, use 7 or 6 to scroll to the
desired input location.
2.
Scan in the new text in the same manner as the
original text.
Quicktionary II
Note: Quicktionary-II allows you to scan in a maximum
of 200 characters prior to translating the text.
When you scan in text while in edit mode, the new text is
highlighted.
•
Press 2 to erase the highlighted text (i.e., so that you
can rescan it).
•
Press any other key to de-highlight the text and scroll
in the direction of the arrow.
32 •
Select GO to display the translation of the text.
Editing Commands
•
Select CLEAR to delete all text in the input field.
Scanning Hyphenated Words
Use edit mode to scan in hyphenated words appearing at the
end of one line and the beginning of the next, such as in the
sample sentence below:
Quicktionary-II enables you to translate a sentence in seconds.
1.
2.
3.
4.
Press 2 to activate edit mode.
Scan the first line.
With the text you have just scanned still highlighted,
scan the second line.
Select Go to display the translation.
Editing Commands
When you press 3 while in edit mode, the Edit Menu
appears. This menu contains options for the following
editing commands:
Resume Editing
Select this command to exit the Edit Menu and return to the
entry in edit mode to resume editing or scanning. To exit the
Edit Menu, press 3 again.
Quicktionary II
Activate Overwrite Mode
Selecting this command toggles Quicktionary-II to
overwrite mode so that you can overwrite existing text using
the Character Bar or Opticard. The Activate Overwrite
Mode option changes to Activate Insert Mode when selected.
When Quicktionary-II is in insert mode, a blinking cursor
33
appears between two characters. If you add a character or
Editing Commands
characters using the Character Bar or Opticard, they are
inserted at the cursor location.
When Quicktionary-II is in overwrite mode, the current
character is highlighted. Adding characters using the
Character Bar or Opticard overwrites the text starting at the
highlighted character.
Clear Text
Select Clear Text to delete the text from the Input screen.
Quicktionary-II returns to the Input screen, in edit mode.
Note: Quicktionary-II must be in edit mode in order to
access the Edit Menu.
The Character Bar
The Character Bar enables you to enter new text manually,
or to overwrite or insert characters in the scanned text. The
Character Bar can be activated only if Quicktionary-II is in
edit mode. To activate it, press 2.
Quicktionary II
The Character Bar operates in either insert mode or
overwrite mode, according to the setting in the Edit Menu.
The Character Bar
The Character Bar contains a basic character set (in lower
case) for the language of the current dictionary, as well as
34 the following buttons:
Editing Commands
Punctuation
If you scroll to the Punctuation button and press 2, it becomes
the active sequence and a series of punctuation marks is displayed.
Numerals
If you scroll to the Numerals button and press 2, it
becomes the active sequence and numbers 0-9 are displayed.
Alphabet
If you scroll to the Numerals or Punctuation button and
press 2, it becomes the active sequence and the Alphabet
button (displayed in Latin characters or the relevant
character set) appears in its stead. To reselect the alphabet as
the active sequence, scroll to the Alphabet button and press
2.
Multiple Characters
Single Character
If you scroll to the Multiple Characters button and press 2,
it toggles to the Single Character button and you can enter
only one character at a time, using the Character Bar.
Quicktionary II
When the Multiple Characters button appears, you can enter
more than one character at a time. Multiple characters is the
default mode.
35
Editing Commands
Delete
The Delete button enables you to delete characters (see
below for instructions).
Note: If you are in insert mode and the input field contains
the maximum 200 characters, the cursor jumps immediately to the Delete button when you access the Character
Bar. It won’t move from the Delete button until you delete
a character from the field. If you delete all characters in
the field, the Character Bar disappears automatically.
In addition, the end of the alphabet sequence contains the
following symbol:
Insert Space
If you scroll to the Insert Space symbol and press 2, it
enters a space in the text or overwrites a character with a space.
Using the Character Bar
Quicktionary II
To enter multiple characters:
1.
Press 3 to return to the Input screen, then 2 to
activate edit mode.
2.
Scroll to the location in the field where you want to
insert or overwrite a character.
3.
Press 2 to access the Character Bar.
4.
Scroll to the first character you need in the Character
Bar and press 2.
36 5. Repeat Step 3 for each character you are entering.
Editing Commands
To enter one character at a time:
1.
Press 3 to return to the Input screen, then 2 to
activate edit mode
2.
Scroll to the location in the field where you want to
enter a character.
3.
Press 2 to access the Character Bar.
4.
Scroll to the Multiple Characters button and press 2.
The Character Bar toggles to single character mode. It
remains in this mode until you scroll to the Single
Character button and press 2 to reactivate the
Multiple Characters button.
5.
Scroll to the required character in the Character Bar.
6.
Press 2. The new character is entered at the cursor
location.
To enter a variation of a character (e.g., in upper case or
with an accent added):
1.
Scroll to the letter in the Character Bar.
2.
Press 4 or 5. The Character Bar is replaced by a list
of variations for the selected letter. Pressing 4 places
the cursor on the upper-case variation (see below);
pressing 5 places the cursor on the lower-case variation.
Scroll to the variation you want using 7 or 6.
Press 2.
Note: To toggle out of the sequence for the selected letter
without making a selection, press 4 or 5 again.
To delete a character or characters:
1.
Scroll to the character you want to delete. If
Quicktionary II
3.
4.
37
Upgrading Your Pen
2.
3.
4.
5.
Quicktionary-II is in insert mode, the cursor is
positioned before the character. If Quicktionary-II is
in overwrite mode, the character is highlighted.
Press 2 to activate the Character Bar.
Make sure you are in multiple characters mode if you
want to delete more than one character.
Scroll to the delete button and press 2.
If you are deleting more than one character, press 2
for each character in the sequence that you want to
delete.
Upgrading Your Quicktionary-II
Quicktionary II
Your Quicktionary-II can be upgraded through the addition
of a flash memory card, which is part of the Quicktionary-II
upgrade package. The flash memory card enables you to add
dictionaries to your unit, as well as other applications and
components that turn your Quicktionary-II into a
QuickLink Pen.
The QuickLink Pen is a hand-held, portable scanner that
enables you to gather, store and organize printed text, such
as notes, business cards, tables and charts, and transfer it to
your computer or PDA. In addition, the QuickLink Pen can
be used to scan text directly into the computer or to transmit
data to a cellular phone so that it can be faxed.
The Quicktionary-II Upgrade Kit is available from your
local Quicktionary-II dealer or from the WizCom on-line
shop (accessible through http://www.wizcomtech.com).
Once a Quicktionary-II unit is upgraded, the following
38 additional menu options appear automatically:
Upgrading Your Pen
PC-Controlled Communications
This option, which appears in the Main Menu, switches
Quicktionary-II to “communications mode” so that you can
communicate with your computer in order to add new
dictionaries and QuickLink Pen applications to the unit. It
also enables your Quicktionary-II to perform other
QuickLink Pen functions that require Pen-computer
communications.
Communications Settings
Communications Settings appears in the Preferences
submenu of the Main Menu. It contains two sub-options for
setting up communications between Quicktionary-II and
your computer: Connection Device and Baud Rate. The
Communications Wizard refers you to these settings when
you install the QuickLink Desktop application that comes
with the upgrade package.
Memory Status
Compact Memory
Compact Memory appears in the Information submenu of
the Main Menu. Select this option to maximize free space
on Quicktionary-II’s flash memory card by compacting
components on your unit.
Quicktionary II
Memory Status appears in the Information submenu of
the Main Menu. Select this option to check how much flash
memory is left on your Quicktionary-II unit. The Memory
Status option is especially useful when you plan to add
components to Quicktionary-II and want to know whether
the flash memory card contains enough free memory.
39
Care and Cleaning
Care and Cleaning
Your Quicktionary-II conforms to the highest standards of
craftsmanship and manufacture. To ensure its continuing
excellent performance, please adhere to the following
instructions for care and cleaning:
•
Protect your Quicktionary-II from direct sunlight,
heat, dampness and dust. Do not drop or knock the
device; keep it in its protective plastic case to avoid
scratches. ALWAYS replace the tip’s protective cover
when not in use.
•
Clean the Quicktionary-II only with a soft, dry cloth.
Never use a wet cloth or solvents such as benzene or
diluting agents.
•
NEVER clean, wipe or tamper with Quicktionary-II’s
tip. It contains a sensitive electronic eye that could
become damaged.
•
Should your Quicktionary-II require servicing,contact
the retail outlet where you purchased your unit.
Batteries
Quicktionary II
Quicktionary-II uses two AAA batteries. To check the
batteries, select Battery Status from the Information menu
in the Quicktionary-II Main Menu.
If the batteries are low, a picture of a battery with a slash
through it appears on the Quicktionary-II display. When the
batteries are about to run out, Quicktionary-II shuts down
automatically.
When replacing batteries, use only high-quality, alkaline
40 batteries, or rechargeable nickel cadmium batteries.
Technical Data
Technical Data
ARM 7 TDMI
RAM memory
64 to 192KB
ROM memory
4MB minimum****
Socket for flash
memory cards
2MB/4MB/8MB
(upgradeable)
Serial communications
IrDA and RS232
Optic head
128 pixels linear array image
sensor 400 DPI resolution
Display dimensions
61mm x 20mm/2.4” x .8”
122 x 32 pixel resolution
Supply voltage
Two 1.5v AAA batteries
Weight
90 grams/3 oz. (not including
batteries and/or flash memory
card)
Size
Length (with cover): 163 mm/
6.4” Width: 38 mm/1.5”
Height: 23 mm/1”
Low power consumption
Compliant to FCC class B
Compliant to CE standards
UL listed
**** Depending on the dictionary languages
Quicktionary II
•
•
•
•
Processor
41
Troubleshooting
Troubleshooting
Problem:
The Quicktionary-II doesn’t scan.
Solutions:
•
Check to see whether Quicktionary-II is turned on
and is in scanning mode, and the protective cover has
been removed from the tip.
•
Check whether you are scanning regular text in
inverse text mode, or inverse text in regular text mode.
•
If you previously were using the Opticard, make sure
you switched out of Opticard mode prior to returning
to normal scanning.
Quicktionary II
Problem:
An error message, “Word not found.”, appears on the
display every time you scan a word.
Solution:
Verify that you are using the correct dictionary (e.g.,
English->German and not German->English).
Problem:
The text in the Quicktionary-II display appears upside
down.
Solution:
Adjust the Quicktionary-II to right- or left-handed use.
Problem:
The words you want to scan are in a format too large or
small to scan, or the text is printed unclearly.
Solution:
42 Use the Opticard.
Troubleshooting
Problem:
An error message, “Excessive light”, appears on the display.
Solution:
Move the Quicktionary-II away from the strong light source
(such as sun, lamp, etc.) shining directly on the tip.
Problem:
An error message, “Scanned too fast”, appears on the
display.
Solution:
Scan more slowly.
Quicktionary II
43
Index
Index
A
Abbreviations Guide, 23
About, 23, 29
Accented characters, 37
Activate Overwrite Mode, 33
Adjacent Entries, 20-21
Auto Shut-Off Time, 26
Auto Speak, 13, 18, 22
B
Batteries
Inserting, 7
Replacing, 40
Status, 29
Battery compartment, 6
Baud Rate, 39
Quicktionary II
C
44
Care and cleaning, 40
CD, 1, 5
Character Bar, 34-38
Alphabet button, 35
Deleting characters, 36, 37
Entering accented
characters, 37
Entering multiple
characters, 36
Entering single
character, 37
Insert space, 36
Multiple Characters
button,35
Numerals button, 35
Punctuation button, 35
Single Character button,35
Character set, 34
CLEAR button, 33
Clear Text, 34
Communications
Settings, 25, 39
Compact Memory, 29, 39
Compound word, 19-20
Connection Device, 39
Contrast, 28
Conventions, 2
Current dictionary, 10, 11, 21
D
Default language, 10
Default settings, 24
Deleting characters, 37
Derivatives, 13, 14, 15
Dictionaries, adding, 38
Dictionary (menu option),20
Dictionary Entry screen, 12
Dictionary Guide, 23
Display, 6
Double click, 32
Double-Click Interval, 27
E
Earphone, 5, 6
Edit Menu, 32, 33
Index
Edit mode, 31, 34
Editing commands.
See Edit Menu
Editing text, 32-34
Electronic eye, 1, 7
Error message, 9
Excessive lighting, 43
F
Flash memory card, 6, 38
G
GO button, 32
H
Headword, 14, 15
Help, 23
History, 20
Homographs, 17-18
Homonyms, 15, 17
Hyphenated words, 33
I
Keypad, 6, 7
L
Left-handed use.
See Scanning: Right-/LeftHanded use
Line(s) Per Scroll, 22
Long-Press Interval, 27
M
Main Menu, 20, 24-29
Memory Status, 28, 39
Menu language.
See Interface Language
Menu Type, 27
O
Opticard, 1, 5, 30-31, 32
Overwrite mode, 34
P
Part of speech, 15
PC link connector, 6
PC-Controlled
Communications, 24, 39
Pen Main Menu, 24
Phonetics, 15
Pitch, 26
Quicktionary II
Icons Only, 27
Idioms, 15, 16, 17
Information, 28
Input field, 11, 31, 36
Input screen, 8, 10, 11, 20, 31
Insert mode, 33, 36
Interface Language, 25
Inverse text, 8, 22, 42
K
45
Index
Power button, 6, 9
Preferences, 21-23, 24
Pronunciation Guide, 15, 23
Protective cover, 6, 7
Speaker, 6
Split verbs, 18-19
T
Q
QuickLink Pen, 38
Quicktionary
(menu option),24
Quicktionary Menu, 8, 20-23
R
Reading Speed, 26
Reduced Display, 8, 15, 22
Registration, 1, 5
Reset History, 21
Resume Editing, 33
Right-/Left-Handed, 26
Rollers, 1, 10, 11
Quicktionary II
S
46
Scan only mode, 31
Scanned text, adding to, 32
Scanned too fast, 43
Scanning
Angle, 10
Instructions, 9-11
Limitations, 9, 32, 36
Problems, 42
Right-/left-handed use, 10, 26
Scanning Language, 25
Scroll arrows, 13
Select Dictionary, 21
Serial number, 29
Technical data, 41
Text and Icons, 27
Text Only, 27
Text to speech, 1
Tip, of Quicktionary-II,
1, 5, 10, 11
Translation, 14
Translation screen, 12-13, 18
Troubleshooting, 42-43
U
Upgrading, 38-39
Upside-down text, 42
V
Version number, 29
Voice icon, 13
Voice Settings, 25
Volume, 25
W
WizCom on-line shop, 38
WizCom Web site, 2
Word list, 17
Word List sign, 16
Word not found, 42
FCC COMPLIANCE NOTICE
This device complies with Part 15 of the FCC Rules. Operation is
subject to the following two conditions:(1) this device may not
cause harmful interference, and (2) this device must accept any
interference received, including interference that may cause
undesired operation.
The FCC Wants You to Know:
This equipment has been tested and found to comply with the
limits for a Class B digital device, pursuant to Part 15 of the FCC
rules. These limits are designed to provide reasonable protection
against harmful interference in a residential installation. This
equipment generates, uses and can radiate radio frequency energy
and, if not installed and used in accordance with the instructions,
may cause harmful interference to radio communications.
However, there is no guarantee that interference will not occur in a
particular installation. If this equipment does cause harmful
interference to radio or television reception, which can be
determined by turning the equipment off and on, the user is
encouraged to try to correct the interference by one or more of the
following measures:
a) Reorient or relocate the receiving antenna.
b) Increase the separation between the equipment and receiver.
c) Connect the equipment to an outlet on a circuit
different from that to which the receiver is connected.
d) Consult the dealer or an experienced radio/TV technician.
FCC Warning
Information in this document is subject to change without notice.
No part of this document may be reproduced or transmitted in any
form or by any means, for any purpose, without the written
permission of Wizcom Technologies Ltd.
Quicktionary II
Modifications not expressly approved by the manufacturer could
void the user authority to operate the equipment under FCC Rules.
47
Quicktionary II