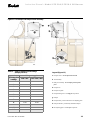
1
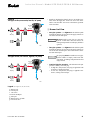
CF
Oil
Burner
Instruction Manual
Low/High Operation
Firing rate: CF2500A
17.0 – 19.9 GPH
CF2500
17.0 – 25.0 GPH
CF3500A
17.0 – 35.0 GPH
Motor voltage: 208/230 — 60 Hz std.
Thank you for purchasing a Beckett
burner. With proper care and regular
maintenance, it will provide years of
trouble-free service. Please take a few
minutes to read the section entitled “To
the owner” inside this manual. Then, keep
the manual in a safe place where it can be
easily located if needed by your
professional service technician.
2500/3500
2500/
CF 3500
MODEL
Instruction Manual – Model CF2500/CF3500 Oil Burner
Please . . . read this page first
Hazard definitions
The following will be used throughout this manual to bring attention to hazards and their risk factors, or to special information.
Denotes presence of a hazard which, if
ignored, will result in severe personal injury,
death or substantial property damage.
Denotes presence of a hazard which, if
ignored, could result in severe personal injury,
death or substantial property damage.
Denotes presence of a hazard which, if
ignored, could result in minor personal injury
or property damage.
Intended to bring special attention to
information, but not related to personal injury
or property damage.
To the owner —
Installation and adjustment of the burner
requires technical knowledge and the use of
combustion test instruments. Do not tamper
with the unit or controls. Call your qualified
service technician. Incorrect operation of the
burner could result in severe personal injury,
death or substantial property damage.
Have your equipment inspected and adjusted
at least annually by your qualified service
technician to assure continued proper
operation.
Never attempt to use gasoline in your heating
appliance or to store gasoline or combustible
materials near the heating equipment. This
could result in an explosion or fire, causing
severe personal injury, death or substantial
property damage.
To the installer —
Read all instructions before proceeding.
Follow all instructions completely. Failure to
follow these instructions could result in
equipment malfunction, causing severe
personal injury, death or substantial property
damage.
This equipment must be installed, adjusted
and started only by a qualified service
technician – an individual or agency, licensed
and experienced with all codes and
ordinances, who is responsible for the
installation and adjustment of the equipment.
The installation must comply with all local
codes and ordinances and with the National
Fire Protection Standard for Oil-Burning
Equipment, NFPA 31 (or CSA B139-M91).
To the owner —
Never burn garbage or refuse in your heating
appliance or try to light the burner by tossing
burning material into the appliance. This
could result in severe personal injury, death
or substantial property damage.
Never attempt to use crankcase or waste oil in
your heating appliance. This could damage
the fuel unit or heating equipment, resulting
in risk of severe personal injury, death or
substantial property damage.
Never restrict air openings on the burner or to
the room in which the appliance is located.
This could result in fire hazard or flue gas
leakage, causing severe personal injury, death
or substantial property damage.
To the installer —
Concealed damage - If you discover damage
to the burner or controls during unpacking,
notify the carrier at once and file the
appropriate claim.
Contacting Beckett for service information
or parts - Please record the burner serial number
(and have available when calling or writing).
You will find the serial number on the
Underwriters Laboratories label, located on
the left rear of the burner.
50 Hz motors — The burner ratings, air
settings and nozzle ratings are based on
standard 60 hz motors (at 3450 rpm). Derate
all ratings 20% when using 50 hz motors.
Consult factory for specific application data.
High altitude installations — Accepted industry practice requires no derate of burner capacity up to 2,000 feet
above sea level. For altitudes higher than 2,000 feet, derate burner capacity 4% for each 1000 feet above sea level.
2
Form 6104 BCF-35-R0699
Instruction Manual – Model CF2500/CF3500 Oil Burner
Warranty
Contents
Beckett warrants its equipment to those who
have purchased it for resale, including your
dealer. If you have any problems with your
equipment or its installation, you should
contact your dealer for assistance.
Please . . . read this page first ................ 2
Pre-installation checklist........................... 4
Specifications
Fuels
Firing range
Mount the burner .......................................... 6
#1 or #2 Fuel Oil
CF2500A 17.0 - 19.9 GPH
CF2500
17.0 - 25.0 GPH
Connect fuel line(s) ...................................... 8
CF3500A 17.0 - 35.0 GPH
Motor
2 HP 3450 RPM
Wire the burner ............................................ 10
208/230/60 hz/1-PH std.
13.4 amps @ 230 VAC
Sequence of operation - typical ............ 11
Optional voltages:
(60 hz or 50 hz) –
Prepare the burner for start-up ............. 11
• 208/230/480/3-PH
Ignition Trans.
Housing
Fuel unit
Oil nozzle
Shipping wt.
Dimensions
120V/12,000V
Start the burner .......................................... 14
Cast aluminum
100 - 300 PSIG
45° - 70° solid
Maintenance and service......................... 15
106 lbs.
See Figure 7 (Page 7)
(See NOTICE on opposite page for 50
hz motor applications.)
Agency approvals
• Underwriters Laboratories has certified
this burner to comply with ANSI
Standard 296 and has listed it for use
with No. 1 or No. 2 fuel oil as specified
in ASTM D396. State and local
approvals appear on the burner rating
label.
• Certified by ULC.
• Approved by Commonwealth of
Massachusetts - State Fire Marshall.
• Accepted by N.Y.C. M.E.A.
• Other approvals may be available and
must be specified at time of order.
Form 6104 BCF-35-R0699
Replacement parts ................... Back cover
Before you begin . . .
The following resources will give you additional information
for your installation. We suggest that you consult these
resources whenever possible. Pay particular attention to the
appliance manufacturer’s instructions.
Appliance manufacturer’s instructions — Always follow
the appliance manufacturer’s instructions for burner
installation, equipment and setup.
1–800–OIL–BURN — Beckett’s technical services hot-line.
www.beckettcorp.com — Beckett’s website.
3
Instruction Manual – Model CF2500/CF3500 Oil Burner
Pre-installation checklist
❏ Combustion air supply
❏ Vent system
• The burner requires combustion air and ventilation air for
reliable operation. Assure that the building and/or combustion air openings comply with National Fire Protection
Standard for Oil-Burning Equipment, NFPA 31. For appliance/burner units in confined spaces, the room must have
an air opening near the top of the room plus one near the
floor, each with a free area at least one square inch per
1,000 Btu/hr input of all fuel burning equipment in the
room. For other conditions, refer to NFPA 31 (CSA B1139M91 in Canada).
• If there is a risk of the space being under negative pressure
or of exhaust fans or other devices depleting available air
for combustion and ventilation, the appliance/burner
should be installed in an isolated room provided with outside combustion air.
• The flue gas venting system must be in good condition
and must comply with all applicable codes.
❏ Clearances
• With the burner installed in the appliance, there must be
adequate space in front of and on the sides of the burner to
allow access and operation. Verify that the clearance dimensions comply with all local codes and with the appliance manufacturer's recommendations.
❏ Electrical supply
• Verify that the power connections available are correct for
the burner. All power must be supplied through fused disconnect switches.
❏ Verify burner components —
•
•
•
•
•
Burner box, Model CF2500A/CF2500/CF3500A
Air tube assembly (selected per following)
Mounting flange kit
Pedestal mounting assembly kit (recommended)
Oil nozzle, per Table 1 — Use only 45° to 70° solid pat-
tern nozzles unless otherwise shown by appliance manufacturer.
The CF2500A, CF2500 and CF3500A are dual nozzle burners. To select the nozzles, use half of the maximum firing
rate and select a nozzle under the 300 psig column (high
fire rate). Select the corresponding nozzle from column 1
(Rated gph @ 100 psig). Two nozzles will be required.
❏ Fuel supply
Table 1 – Nozzle capacities at various pressures
• The fuel supply piping and tank must provide #1 or #2
fuel oil at pressure or vacuum conditions suitable for the
fuel unit (oil pump) on the burner. Refer to fuel unit literature in the literature envelope in the burner carton to verify
allowable suction pressure.
Rated
Pressure - pounds per square inch
gph @
100 psig 125 150 175 200 250 300
5.00
5.59
6.13
6.61
7.07
7.50
The fuel unit is shipped without the by-pass
plug installed. You must install this plug on
two-pipe system. DO NOT install the by-pass
plug in the fuel unit if connected to a onepipe oil system. Failure to comply could cause
fuel unit seal failure, oil leakage and potential
fire and injury hazard.
5.50
6.15
6.74
7.27
7.78
8.70
9.54
6.00
6.71
7.33
7.94
8.48
9.49
10.40
6.50
7.26
7.96
8.60
9.20
10.30 11.25
7.00
7.82
8.56
9.25
9.90
11.06 12.12
7.50
8.38
9.19
9.91
10.60
11.85 13.00
8.00
8.94
9.80
10.58
11.31
12.65 13.85
When fuel supply is level with or higher than burner
fuel unit —
• When the fuel unit is not required to lift the oil, the installation is usually suitable for either a one-pipe or two-pipe
oil system. The oil pressure at the inlet of the fuel unit must
not exceed 3 psig.
• See Figure 8 for one-pipe fuel supply installations. See
Figure 9 for two-pipe fuel supply installations.
8.50
9.50
10.45
11.27
12.06
13.40 14.70
9.00
10.06
11.02
11.91
12.73
14.20 15.60
9.50
10.60
11.70
12.60
13.50
15.00 16.45
When fuel supply is below the burner fuel unit —
• Use a two-pipe oil system when the fuel unit must lift the
oil more than 2 feet. The return line provided by the twopipe system is needed to purge the air from the fuel lines
and minimize the likelihood of air-related problems during operation.
4
8.66
10.00
11.18
12.25
13.23
14.14
15.81 17.32
10.50
11.74
12.85
13.90
14.85
16.60 18.18
11.00
12.30
13.47
14.56
15.55
17.39 19.05
11.50
12.85
14.08
15.22
16.26
18.18 19.92
12.00
13.42
14.70
15.87
16.97
18.97 20.78
12.50
13.98
15.31
16.54
17.68
19.76 21.65
13.00
14.54
15.92
17.20
18.38
20.55 22.52
13.50
15.10
16.53
17.85
19.09
21.34 23.38
Form 6104 BCF-35-R0699
Instruction Manual – Model CF2500/CF3500 Oil Burner
❏ Verify firing rate
Figure 2 – Air tube mounting dimensions
• Refer to appliance manufacturer’s instructions (if available) for firing rate and nozzle selection. Otherwise, the
maximum recommended firing rate for the burner depends
on the length of the firing chamber and the distance from
the burner center to the chamber floor. Verify that the chamber dimensions are at least as large as the minimum values
given in Figure 1. If the appliance dimensions are smaller
than recommended, reduce the firing rate accordingly.
E Insertion depth
G Air tube to inside of chamber
– 0.25" ± 0.125"
T Air tube length
D Tube diameter
T
2°
G
1
D
❏ Verify air tube
• The information in this section may be disregarded if the
air tube is supplied by the appliance manufacturer.
• The following tube arrangements are available:
Model CF2500A: Tube KP — 17.0 to 19.9 GPH
Model CF2500:
Tube KP — 17.0 to 25.0 GPH
Model CF3500A: Tube KM — 17.0 to 35.0 GPH or
Tube KR — 17.0 to 35.0 GPH
• Maximum firing capacity depends on the firebox pressure.
Use Table 2 to verify the correct air tube type for the firing
rate required. (Tube KR [CF3500A] is an optional air tube
combination for maximum capacity rate. It requires a larger
I.D. flange No. 51631.)
• See Figure 2 to verify the correct air tube length and air
tube combination code.
F
E
① Install the burner with a 2° pitch as shown.
A.T.C. Codes
(A.T.C. = Air Tube Combination)
CF2500A/
CF2500
CF3500A
Tube KP
Tube KM
Tube KR
Dimensions
Dimensions
Dimensions
T
D
All — 6 ½"
Figure 1 – Min. combustion chamber dimensions
3502
6¾"
—
F
T
3¼" All —
CF 66 KP 8"
—
9 ¼"
D
8"
F
T
D
F
4 ½" All — 9 ¹⁵⁄₁₆" 5 ¹⁄₈"
CF 80 KM —
CF 92 KM —
—
—
10¼" CF 102 KP 11 ½" CF 114 KM 11 ½" CF 114 KR
13¾" CF 136 KP 15"
CF 150 KM 14"
CF 140 KR
17¾" CF 176 KP 19"
CF 190 KM 19"
CF 190 KR
Table 2 – Air tube capacity vs. firebox pressure
Tube KP
Firebox
pressure
(In. W.C.)
L
Minimum dimensions
(all boilers)
17 gph
22 gph
27 gph
32 gph
35 gph
Form 6104 BCF-35-R0699
A
10.5"
11.5"
12.5"
12.5"
13.0"
No
10%
10%
reserve
turndown
turndown
air
Maximum firing rate GPH
A
3501
Firing rate
No
reserve
air
Tube KM/KR
L
48.0"
58.0"
66.0"
73.0"
77.0"
0.0
25.0
22.5
35.0
31.5
0.2
24.8
22.3
33.5
30.2
0.4
24.6
22.3
32.0
28.8
0.6
24.5
22.1
30.2
27.2
0.8
24.3
21.9
28.8
25.9
1.0
24.1
21.7
27.1
24.4
Note: 10% turndown indicates sufficient reserve air to reduce
the CO2 in the flue to 90% of its value.
Note: The above ratings may vary 5% due to variations in actual job
conditions.
5
Instruction Manual – Model CF2500/CF3500 Oil Burner
Mount the burner
Figure 4 – Nozzle and nozzle line assembly
S
❏ Mount flange(s) on air tube
P
0.713311"
• This section does not apply to burners with welded flanges.
• Do not install air tube on burner.
• For non-pressure firing flange, refer to Figure 3: Install
gasket (item a ) and flange (item d ). Ignore the next
paragraph.
• For pressure-firing flange, refer to Figure 3: Slide gasket
(item a) onto the air tube, making sure the top of the air
tube is up. Predrill holes in the pressure firing plate (item b)
to match the appliance studs. Slide the pressure firing plate
(item b) and flange (item d) onto the air tube as shown.
Wrap ceramic fiber rope (item c) around the air tube and
press tightly into the inside diameter of the flange (item d).
• Slide the air tube (item e) into position in the appliance
front. Tighten the flange-mounting-stud nuts. Set the
insertion of the air tube so dimension G is ¹⁄₄" nominal.
• Pitch the air tube at 2° from horizontal as shown and secure
the flange to the air tube. Remove the flange-mounting
stud nuts and remove the air tube from the appliance.
Q
Low fire
nozzle
High fire
nozzle
R
3504
3505
Figure 3 – Mount flange(s) on air tube
Critical dimensions —
S (Electrode spacing)
= ³⁄₃₂"
Q (Nozzle to head)
= ¹⁄₄"
2°
G
c
a
b
=
=
¹⁄₄"
¹⁄₈"
Failure to properly set and maintain the
electrode and nozzle spacing dimensions can
cause incorrect burner ignition or poor
combustion. This could result in severe
personal injury, death or substantial property
damage.
e
d
3503
❏ Mount air tube to burner
• Remove the rear access door from the back of the burner
for improved access to the interior.
• Attach the air tube to the burner with the bolts and acorn
nuts provided. The acorn nuts must go on the outside of
the burner, with the bolts inserted from the inside.
❏ Install nozzle
• See Figure 4. Install the oil nozzle in the nozzle adapter.
Use a ³⁄₄" open-end wrench to steady the nozzle adapter
and a ⁵⁄₈" open-end wrench to turn the nozzle. Tighten
securely but do not overtighten.
• Check, and adjust if necessary, the critical dimensions P,
Q, R and S shown in the drawing. Verify that the oil tube
assembly and electrodes are in good condition, with no
cracks or damage.
6
P (Nozzle center line to electrode tip)
R (Nozzle face to electrode tip)
❏ Install nozzle line assembly
• Insert the nozzle line assembly into the burner air tube as
in Figure 5.
• See Figures 5 and 6. Assemble the adjusting plate assembly per the instructions in the assembly packet.
• Slide the secondary adjusting plate (item f) completely to
the left on the indicator adjusting plate (item e). Fingertighten acorn nut c to secure the two plates together. Slide
both plates completely to the left on the primary adjusting
plate (item g) and finger-tighten acorn nut d.
• Slide the completed adjusting plate assembly over the
nozzle line end. Move the plate assembly and the nozzle
line so the plate assembly fits into position as shown in
Figure 5.
• Install the spline nut (Figure 5, item b) on the end of the
nozzle line, leaving the nut loosely placed so the plates
can be moved.
• Connect the high-voltage leads from the ignition transformer to the electrodes.
Form 6104 BCF-35-R0699
Instruction Manual – Model CF2500/CF3500 Oil Burner
Figure 5 – Nozzle line assembly in burner
Z
Measure dimension Z from
front (flat) face of head to
end of air tube, as shown.
d
Figure 6 – Adjusting plate assy.
g
d
e
f
c
b
a
3508
c
Legend (Figures 5 and 6)
a
b
c
d
3506
❏ Set dimension Z
3507
Measure dimension Z from the flat
surface between (not on) the raised fins.
• Replace the rear access door on the
burner, making sure that the adjusting
plate assembly is now securely held in
place.
• Loosen acorn nut d in Figure 5. Slide
the nozzle line and plate assembly until dimension Z in Figure 5 is:
CF2500A/CF2500
1³⁄₄" ± ¹⁄₁₆"
CF3500A (tube KM) 2⁵⁄₈" ± ¹⁄₁₆"
CF3500A (tube KR) 3⁹⁄₁₆" ± ¹⁄₁₆"
• When dimension Z (from end of air tube
to flat area of front face of head) is cor-
H
J
K
1¾"
a
3509
b
c
Legend
H Housing total length — 20"
J Center to bottom of housing — 14¹⁄₂"
Form 6104 BCF-35-R0699
rectly set, tighten acorn nut d. Verify
that the adjusting plate assembly is
properly seated at the rear access
door, as shown in Figure 5.
• Attach the oil line from the oil valve
to the nozzle line end. Tighten securely.
• Before proceeding, check dimension Z once again. Loosen acorn nut
d if necessary to reposition the
nozzle line. Once dimension Z is set,
do not loosen acorn nut d again.
For the setting of acorn nut c, refer
to page 12.
❏ Insert burner
Figure 7 – Burner installed in appliance front
D
Adjusting plate assembly
Spline nut for securing nozzle line
Bottom acorn nut
Top acorn nut (for setting dim. Z
only)
e Indicator adjusting plate
f Secondary adjusting plate
g Primary adjusting plate
K Overall housing height — 22³⁄₄"
• Position the burner in the front of
the appliance and loosely tighten
the nuts on the mounting studs. The
burner should be pitched downward
2° as shown in Figures 3 and 7.
• See Figure 7. Install the pedestal
support kit (recommended) by attaching the ³⁄₄" npt flange (item a)
to the bottom of the burner using
the (4) #10 screws provided. Cut and
thread (one end only) a ³⁄₄" pipe
nipple (item b ) with length 14.5
inches less than dimension D in Figure 7. Thread the pipe into the
flange. Then slip the pipe end into
the floor flange (item c).
• Secure the burner to the appliance
by tightening the nuts on the burner
flange mounting studs. Then secure
the pedestal support floor flange set
screw to the pipe.
7
Instruction Manual – Model CF2500/CF3500 Oil Burner
Connect fuel line(s)
• Install the oil lines using the following
guidelines. Failure to comply could lead
to equipment damage and present a risk of
severe personal injury, death or substantial property damage due to leakage of oil
and potential fire hazard.
• Use only flare fittings at joints and connections. Never use compression fittings.
• Install fittings only in accessible locations
to assure any leak will be detected.
• Where joint sealing is needed, use only
pipe dope. Never use Teflon tape. Tape
strands can break free and damage the fuel
unit.
• Never use a one-pipe oil system with a lift
in excess of 2 feet with an H fuel unit. On
two-pipe oil systems, verify that the suction line vacuum does not exceed the fuel
unit manufacturer’s recommendation.
Figure 8a
One-pipe oil flow, one nozzle, low fire, “H” pump
d
c
c
200 psig
to
300 psig
200 psig
to
300 psig
g
b
a
p
c
3510
Figure 8b
One-pipe oil flow, two nozzles, high fire,“H” pump
❏ Fuel unit by-pass plug
The CF2500A, CF2500 and CF3500A burners
are shipped without the by-pass plug
installed. You must install this plug on twopipe systems. DO NOT install the by-pass plug
in the fuel unit if connected to a one-pipe oil
system. Failure to comply could cause fuel
unit seal failure, oil leakage and potential fire
and injury hazard.
❏ Oil supply/return lines
• Install the oil tank and oil lines in accordance with all
applicable codes.
• Size the oil supply and return lines using the guidelines
given in the fuel unit literature included in the literature
envelope. Oil line flow rate will equal the burner rate for
one-pipe systems. For two-pipe systems, refer to Table 3
for the fuel unit gearset capacity - the rate at which fuel is
recirculated when connected to a two-pipe system. Size
two-pipe oil lines based on this flow rate.
• Use continuous lengths of heavy-wall copper tubing,
routed under the floor where possible. Do not attach fuel
lines to the appliance or to floor joists if possible. This
reduces vibration and noise transmission problems
• Install an oil filter sized to handle the fuel unit gearset flow
capacity (Table 3) for two-pipe systems. Size the filter
for the firing rate for one-pipe systems. Locate the filter
immediately adjacent to the burner fuel unit.
8
d
c
c
g
200 psig
to
300 psig
200 psig
to
300 psig
b
a
p
c
200 psig
to
300 psig
Legend
3511
(see opposite page)
Table 3 - Fuel unit gearset capacities
Fuel unit
model number
H5PAN-C100H
Gearset capacity
(gallons per hour)
79
Form 6104 BCF-35-R0699
Instruction Manual – Model CF2500/CF3500 Oil Burner
Figure 9a
Two-pipe oil flow, one nozzle, low fire, “H” pump
d
c
c
g
200 psig
to
300 psig
200 psig
to
300 psig
• Install two high-quality shutoff valves in accessible locations on the oil supply line. Locate one valve close to the
tank. Locate the other valve close to the burner, upstream
of the fuel filter.
❏ Burner fuel flow
b
a
p
c
• One-pipe systems – See Figure 8 for the fuel flow paths
for high-fire and low-fire operation. Oil supply connects to
one of the fuel unit Inlet ports.
Do not install by-pass plug in a one-pipe
k
3512
system. Could cause unit seal failure, oil
leakage and potential fire and injury hazard if
ignored.
• Two-pipe systems – See Figure 9 for the fuel flow paths
for high-fire and low-fire operation. Oil supply connects to
one of the fuel unit Inlet ports. Oil return connects to the
fuel unit Return port.
Figure 9b
Two-pipe oil flow, two nozzles, high fire, “H” pump
d
c
c
200 psig
to
300 psig
200 psig
to
300 psig
g
b
a
p
By-pass plug must be installed in a two-pipe
system. Failure to comply could cause unit
seal failure, oil leakage and potential fire and
injury hazard.
• Low-fire/high-fire operation – The fuel unit nozzle port
pressure is factory set at 300 psig.
• At high fire, full pressure (300 psig) is applied at both
oil nozzles, causing full input.
• At low fire, full pressure (300 psig) is applied at one
nozzle, causing reduced input.
c
200 psig
to
300 psig
Legend
a
b
c
d
g
k
p
k
3513
(for Figures 8a, 8b, 9a and 9b)
Return port
Nozzle port
Oil valves
Nozzle & adapter
Inlet port
Return line to oil tank
Air bleed valve
Form 6104 BCF-35-R0699
9
Instruction Manual – Model CF2500/CF3500 Oil Burner
Wire the burner
Do not by-pass any safety control. By-passing a safety control could result in severe personal injury, death or
substantial property damage.
Install the burner and all wiring in accordance with the
National Electrical Code and all applicable local codes or
requirements.
burner, with R8184 oil primary, for reference purposes only.
The CF2500/CF3500A burner is available with many different
wiring configurations. Refer to the wiring diagram shipped
with the burner for the actual wiring applying to your burner.
Wire the burner in compliance with all instructions provided
by the appliance manufacturer. Verify operation of all controls
in accordance with the appliance manufacturer's guidelines.
When firing over 20 GPH, the CF2500 and CF3500A will be
supplied with a flame safeguard control. An airflow switch
and low-fire start switch may also be supplied. Consult local,
state and federal codes for burner requirements above 20 GPH.
See Figure 10 for a typical wiring diagram for a CF2500A
Figure 10 – CF2500A Typical wiring
H
N
G
Power supply
120v/60 hz
Legend
FD
Fused disconnect, by others
LM
Limit controls, by others
OP
Operating controls, by others
PR
Oil primary control, R8184 typical
CC
Flame sensor, cad cell typical
TM
Optional delay timer
TR
Ignition transformer
M1
Burner motor
S1
Primary oil valve
S2
High-fire valve
S3
Redundant oil valve
DM
Damper motor and end switch
∗ H/L
Insert high/low-fire control here
FD
LM
Field wiring
OP
Factory wiring
BK
BK = black
OR = orange
BL = blue
BR = brown/red
Motor M1 wiring 14 ga
PR
WH = white
All other wiring 16 ga
T
T
LFHS
Low-fire hold switch
T–T
24-volt thermostat/limit terminals
F-F
TR
BL
S3
TM
Cad cell flame sensor terminals
OR
OR
OR
Note 1 — Indicates alternate wiring for interrupted ignition controls — connect
transformer to blue primary lead. For intermittent duty — connect transformer to
orange primary lead only.
WH
BL (Note 1)
S1
T
LFHS
H/L
F
S2
R
B
M1
F
10
DM
W
CC
DM
Electrical shock hazard - can cause
injury or death. Disconnect power before
installing or servicing. Provide ground
wiring to the burner in accordance with
the National Electrical Code.
WH
BR
WH
WH
WH
3514
Form 6104 BCF-35-R0699
Instruction Manual – Model CF2500/CF3500 Oil Burner
Sequence of operation — typical
1. On call for heat from the appliance operating controls (and
the circuit from T to T of the R8184 closed), power is
applied to the R8184 black wire (BK).
high fire. The damper motor end switch is set to operate
before the damper has reached full open to assure a smooth
transition to high fire.
2. The R8184 applies 120 volts to the orange wire (OR), activating the burner motor (M1) and the ignition transformer
(TR). The oil pump is operated by the burner motor, so oil
pressure is delivered to the oil valve inlets.
7. If a high/low-fire control is installed at H/L, this control
will cycle the firing rate automatically during an operating cycle.
3. Power is applied to the oil valve circuit. If optional timer,
(TM), is installed, oil flow will be delayed for the timer
duration, thus providing a prepurge period. When the timer
times out, oil valves S1 and S3 are activated, allowing oil
to flow to the low-fire nozzle.
8. At the start of the cycle, the R8184 begins checking for
flame signal between F and F. Flame must be established
within 15 seconds of initiation. If no flame is sensed after
15 seconds, the R8184 will terminate all power to the
blower and oil circuits, shutting the burner down. The control will electrically lock out.
4. With the low-fire hold switch (LFHS) in the “IN” position,
the burner will remain at low fire.
• To reset the control after lockout, wait 2 to 3 minutes
after lockout to give the internal switch time to cool.
5. When the low-fire hold switch is moved to the “OUT”
position, the damper motor (DM) will be activated. This
will begin opening the air damper.
Then push the reset button on the primary control, allowing the burner to operate in normal sequence.
• Troubleshoot the reason for flame sense failure.
6. When the damper motor end switch is tripped, high-fire oil
valve (S2) is activated, providing pressure at the high-fire
oil nozzle. With both nozzles firing, the burner is now at
9. When the call for heat signal terminates (at the black wire
of the R8184), the R8184 terminates power to all circuits,
closing the oil valves and stopping the burner motor.
Prepare the burner for start-up
Start-up checklist –
Verify the following before attempting to start burner.
❏ Combustion air supply and venting have been inspected
and verified to be free of obstructions and installed in
accordance with all applicable codes.
❏ Fuel supply line is correctly installed, the oil tank is
sufficiently filled, and shutoff valves are open.
❏ Oil nozzles have been selected correctly and securely
installed in the nozzle adapter.
❏ Burner is securely mounted in appliance, with pressure
firing plate and gasket installed for pressurized chamber
application.
❏ Fuel unit by-pass plug is installed for two-pipe oil systems.
(Do not install by-pass plug for one-pipe systems.)
❏ Appliance has been filled with water (boilers) and controls
have been operationally checked.
❏ Fuel connection to nozzle line assembly is secure.
❏ Burner has been installed in accordance with appliance
manufacturer’s instructions (when available).
❏ Dimension Z has been set per this instruction manual. See
Set dimension Z on page 7.
Form 6104 BCF-35-R0699
❏ Also refer to appliance manufacturer’s instructions (when
available) for start-up procedures.
11
Instruction Manual – Model CF2500/CF3500 Oil Burner
Prepare the burner for start-up - continued
❏ Z dimension
Figure 11 – Adjusting plate initial setting, typical
• Should be set per these instructions (see page 7). The top
acorn nut (Figure 11, item d) should never be loosened
once the Z dimension is initially set.
d
❏ Adjusting plate assembly
e
f
g
c
b
h
3515
(Figure 11)
• Make sure spline nut (item b) and bottom acorn nut (item
c) are loose.
❏ Initial head position (Figure 11)
Legend
• The indicator plate assembly (item e) markings correspond
to head position settings.
• Slide the secondary adjusting plate (item f) toward the rear
of the burner until the number on the indicator plate corresponds to the initial head setting given in Table 4 for the
desired firing rate (high-fire).
• Figure 11 shows a typical example, with a head setting of
5.
• When the head position has been set, tighten the bottom
acorn nut (item c) and the spline nut (item b).
b Spline nut for securing nozzle line
c Bottom acorn nut (for head adjustments
d Top acorn nut (for setting dim. Z only
— do not loosen after setting Z)
e Indicator adjusting plate
❏ Initial air settings (Figure 12)
• Loosen the screw holding the air adjusting plate (item m).
Set the air to the desired low-fire rate. (The numbers on this
plate correspond to the approximate firing rate settings
given in Table 5.)
• Rotate the air adjusting plate until the lower edge of the
pointer is opposite the number from Table 5 corresponding
to the desired low-fire rate.
• This initial setting should be adequate for starting the
burner at low fire. Once the burner is in operation, the air
setting will be adjusted for best performance as discussed
later in this manual.
• The damper moves to high-fire position as the damper rod
(item d) rotates the damper linkage arm (item f). You will
adjust the setting of the damper linkage arm when setting
the high-fire air as discussed on page 14 in Start the
burner.
• Follow the procedures given later in this manual for fine
tuning the air settings.
❏ Set appliance limit controls
• Set the appliance limit controls in accordance with the
appliance manufacturer's recommendations.
• Move the low-fire hold switch (not shown) to the “IN”
position. This will hold the burner in low fire during initial
start-up.
12
f
Secondary adjusting
plate
g Primary adjusting
plate
h Copper oil line from
oil valve to nozzle line
❏ Prepare the fuel unit for air venting
• To vent air from one-pipe oil systems, attach a clear hose to
the vent plug on the fuel unit. Provide a container to catch
the oil. Loosen the vent plug.
• Vent the air as described under Start the burner, page 14.
Table 4 – Initial indicator adjustment plate
settings (head position)
Firing rate, gph
Approximate
head settings
Tube “KP”
Tube “KM”/“KR”
0
--
--
1
--
17.00
2
--
17.50
3
17.00
18.00
4
17.50
18.50
5
18.00
19.00
6
18.50
20.00
7
19.00
21.00
8
20.00
28.00
9
21.00
32.00
10
25.00
35.00
Form 6104 BCF-35-R0699
Instruction Manual – Model CF2500/CF3500 Oil Burner
Figure 12 – Air damper and damper motor assembly
a
a
b
OPEN
CLOSE
b
CLOSE
c
d
d
h
e
5
7 8 9 10 1
11
2
2
3
4
6
0 1
f
g
k
m
3516
3517
Table 5 – Initial air adjusting plate settings
(damper position)
Firing rate, gph
Legend (Figure 12)
Approximate
adjusting plate
settings
Tube “KP”
Tube “KM”/“KR”
0
--
--
1
8.00
8.00
c Ball joint assembly – do not adjust position of ball
joint
2
9.00
9.00
d Damper rod
3
11.00
11.00
4
12.00
12.00
5
15.00
15.00
f Damper linkage arm - sets high-fire air position
6
17.00
17.00
g Damper
7
18.00
19.00
8
19.00
22.00
9
20.00
25.00
k Damper indicator - permanently attached to damper
10
22.00
29.00
m Air adjusting plate - sets low-fire air position
10.5
25.00
35.00
Form 6104 BCF-35-R0699
a Damper motor – do not adjust internal cam
b Arm assembly
e Damper rod guide
h Damper label - position indicator for air adjusting plate
13
Instruction Manual – Model CF2500/CF3500 Oil Burner
Start the burner
Do not proceed unless all prior steps in this
manual have been completed. Failure to
comply could result in severe personal injury,
death or substantial property damage.
Do not attempt to start the burner when excess
oil has accumulated, when the appliance is
full of vapor or when the combustion chamber
is very hot. Do not attempt to reestablish flame
with the burner running if the flame should be
extinguished during start-up, venting or
adjustment. Allow the unit to cool off and all
vapors to dissipate before attempting another
start. Failure to comply with these guidelines
could cause an explosion or fire, resulting in
severe personal injury, death or substantial
property damage.
Damper motor and motor arm assembly - Do
not attempt to adjust the cam setting in the
damper motor. It is factory preset. Do not move
the ball joint assembly further out on the
motor arm assembly. This would change the
timing of damper opening versus fuel rate.
The damper linkage arm screw must be
tightened securely to assure the damper will
provide sufficient air at high fire. Failure to
comply could cause unreliable combustion
or flame failures, leading to possible severe
personal injury, death or substantial property
damage.
❏ Start burner and vent air from oil line
1. Move the low-fire hold switch to the “IN” position (to
hold burner in low fire when started).
2. Verify that the air adjusting plate (Figure 12, item m) has
been set to the initial low-fire air position as described on
page 12 under Initial air settings.
3. Loosen the screw on the damper linkage arm (Figure 12,
item f) and allow the damper indicator (Figure 12, item k)
to rest on the air adjusting plate (Figure 12, item m).
4. Open the oil shutoff valves in the oil supply (and return)
line(s) to the burner.
5. Set the thermostat (or operating control) to call for heat.
6. Close the line switch to the burner. The burner motor
should start immediately.
7. If the burner motor does not start, reset the motor overload
switch (if so equipped) and press the reset switch of the
burner primary control.
8. Vent the fuel unit as soon as the burner motor starts
rotating. To vent —
❏ Attach a clear plastic tube to the air bleed valve (Figure
8a, 8b, 9a or 9b as applies, item p).
14
❏ Place the end of the tube in a container to catch the
oil. Then loosen the fuel unit air vent valve.
❏ Tighten the air vent valve after all air has been purged.
❏ IF burner stops during venting —
• The burner primary control will lockout if flame
is not established within its time limit.
This is typically 15 seconds for R8184 primary
controls, but may be less for other flame
supervisory controls.
• The burner may lockout several times during the
period needed to purge all the air. Reset the
primary control each time in order to continue
purging.
• If the burner is equipped with an R8184 primary,
you will need to wait about 2 minutes after each
lockout to allow time for the reset switch to cool.
• Squeeze off the air bleed tubing or close the air
vent valve when the pump stops running to prevent
air from flowing back into the oil line.
If the fuel unit air vent valve is completely
open, assuring no flow of oil to the burner oil
nozzle, you can temporarily jumper the F-F
terminals of an R8184 primary during the
purge period to allow enough time for all air
to purge. Never leave the burner unattended
when doing this. Remove the jumper when
purging is completed. This procedure should
only be used by a qualified burner technician,
experienced in burner operation and
control. Improper application of this method
can cause combustion chamber explosion, fire
hazard or fuel leakage, resulting in severe
personal injury, death or substantial property
damage.
❏
IF burner stops after flame established —
•
Additional venting is probably required. Repeat
the air venting procedure.
9. Once flame is steady, proceed to Set high-fire air.
❏ Set high-fire air
1. Allow the burner to run at low fire until the appliance has
warmed sufficiently.
2. Visually check the flame. The flame should not be dark
orange or smoky. If the flame appears to be smoking, increase the amount of air by readjusting the damper indicator to a higher number.
3. Once the appliance has warmed, the high-fire setting can
be checked and adjusted.
4. Locate the approximate air adjusting plate setting for high
fire in Table 5, page 13.
5. Place the low-fire hold switch in the “OUT” position.
The damper motor will begin to rotate.
a. At the same time, loosen the screw securing the air
adjusting plate (Figure 12, item m) as the damper begins to move.
Form 6104 BCF-35-R0699
Instruction Manual – Model CF2500/CF3500 Oil Burner
b. Slowly rotate the air adjusting plate (increase the
amount of air) as the damper drives to high-fire.
c. Lock down air adjusting plate at the high-fire air setting found in Table 5 for the high-fire rate.
6. Use combustion test instruments to adjust the burner.
a. Adjust the air until a trace of smoke is achieved with
CO2 level as high as possible (lowest possible O2).
Example: 13.5% CO2 (2.5% O2) with a trace of smoke.
b. Increase the air to reduce CO2 by 2 percentage points
at a zero smoke level. (Increase O2 by 3 percentage
points at a zero smoke level.)
Example: Reduce CO2 from 13.5% to 11.5%, with zero
smoke (or increase O2 from 2.5% to 5.5%).
c. A margin of reserve air has been added to accommodate variable conditions.
7. Check the breech draft pressure against the appliance
manufacturer’s recommended setting (typically + 0.1"
W.C.).
8. If the breech pressure is higher or lower than recommended
level, adjust the appliance breech damper to achieve the
specified setting. Recheck the smoke and CO2 levels.
Adjust burner air if necessary.
9. Once all settings are complete and satisfactory, rotate the
damper linkage arm (Figure 12, item f) until it touches
the damper rod (Figure 12, item d) and tighten the damper
linkage arm screw securely.
❏ Set low-fire air
1. Loosen the air adjusting plate (Figure 12, item m) screw
and set the air adjusting plate at the low-fire air setting
found in Table 5, page 13. The damper should stay at the
high-fire setting. The damper linkage will prevent movement of the damper plate.
2. Move the low-fire hold switch from the “OUT” to the
“IN” position.
a. The damper will return to the low-fire air setting.
3. Check the smoke and CO2 (O2) levels.
a. Pull a smoke sample from the flue.
b. The sample should be clean (zero smoke level).
c. Check the CO2 (O2) level:
CO2 should be at 11 to 12% (O2 at 5.9 to 4.5%).
If the CO2 is less than 11% (O2 more than 5.9%), decrease
the air and check the smoke level.
4. Operate the burner from low fire to high fire and back to
verify operation.
5. Turn the burner off. Wait one or two minutes (for chamber
to clear) and then turn on again to verify starting characteristics.
6. Perform limit circuit performance test specified by appliance manufacturer to verify operation of burner/appliance combination.
Maintenance and service
The burner must be serviced at least annually by a qualified service technician to assure continued reliable
operation. Operation and adjustment of the burner requires technical knowledge and the use of combustion test
instruments. Do not tamper with the burner or controls. Failure to comply could result in failure of the burner or
system, resulting in severe personal injury, death or substantial property damage.
Annual service
— by qualified service technician
Have the burner inspected, tested and started at least annually
by a qualified service technician. This annual test/inspection
should include at least the following:
❏ Inspect combustion air and vent systems.
❏ Replace oil filter.
❏ Oil motor (if not permanently lubricated).
Monthly maintenance
— by owner
❏ Replace oil nozzles.
❏ Clean burner and blower wheel (if needed to remove lint
or debris).
❏ Test ignition and combustion at low and high fire and
verify air damper settings.
❏ Test oil supply line vacuum - verify that it is within allowable range indicated in fuel unit literature.
❏ Check pump pressure to nozzles at low and high fire.
❏ Inspect fuel system (including tank, lines and all connections).
Form 6104 BCF-35-R0699
❏ Observe combustion air openings and vent system for
integrity. Openings must be clean and free of any obstructions.
❏ Check the oil lines and fittings to verify there are no leaks.
❏ Observe burner ignition and performance to verify smooth
operation.
❏ Shut the system down if you observe abnormal or questionable operation. Call a qualified service agency for
professional inspection and service.
15
Instruction Manual – Model CF2500/CF3500 Oil Burner
Replacement parts
5
4
2
1
3
11
19
25
20
12
21
LOW FIRE START VALVE
OUT
IN
LOW FIRE HOLD
15
22
16
7
6
8
5
6
7
8
9 10
11
12
0
1
2
3
4
9
13
10
23
3518
14
Item Part name
Description
Part number
1
Air tube
Specify burner model and tube length
(See Figure 2, page 5 for codes)
2
Flange kit
Adjustable flange
3
Damper motor assem- All models
bly
51229
4
Electrode assembly
All models
51212
9 ¼" long
5990092
10 ½" long
5990104
5
6
Ignition leads
Nozzle line assembly
See Figure 13
17
Item Part name
18
24
Description
Part number
Damper linkage arm
All models
5984BK
10
Damper spring
All models
4339
11
Adjusting plate assembly
All models
51478
12
Knurled nut
All models
3666
13
Fuel pump
H pump (standard)
21529
14
Pedestal kit
All models
51193
15
Oil valve
Box mounted
7201
9
12 ¾" long
5990126
16 ¼" long
5990162
16
Damper door
All models
16703GY
20 ¼" long
5990202
17
Damper indicator
All models
5985BK
Specify burner model and air tube length
18
Coupling
Specify pump used
19
Sight glass
All models
31346
20
Rear cover assembly
CF2500/CF3500A
51204
21
Control
Specify
22
Transformer
12,000 volt
23
Motor
Specify burner model
24
Blower wheel
CF2500/CF3500A
25
Motor relay
Specify relay used
7
Head assembly
CF2500/CF3500A
8
Fuel lines
Specify length
51475P
Figure 13
Adjustable mounting plates for CF2500/CF3500A
51214
21528
Kit #51630
16" Diameter
Kit #51631
16" Diameter
(Use only with
KR air tube)
Kit #51498
13.92" Diameter
U.S.A.: P. O. Box 1289 • Elyria, Ohio 44036 • 800-645-2876 • 440-327-1060 • FAX 440-327-1064
Canada: R. W. Beckett Canada, Ltd. • 430 Laird Road • Guelph, Ontario, N1G 3X7 • 800-665-6972 • FAX 519-763-5656
Form 6104 BCF-35-R0699