1
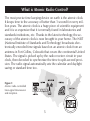
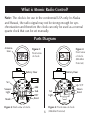
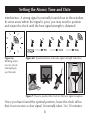
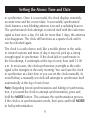
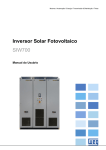
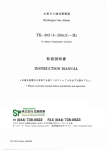
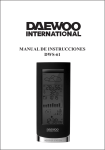
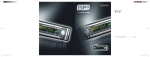
Hadrons™ Desktop
U.S. Atomic Clock
& Weather Station
SN004 Instructions
Read and save these instructions.
Dear Sharper Image Customer,
Thank you for your purchase of a Sharper Image product. We appreciate
your business very much.
Our goal is that you will be completely satisfied with this product’s
quality and performance. We offer generous return privileges and
excellent warranties on all our products.
Since 1977, The Sharper Image has shared the fun of discovering
innovative products that make life better and more enjoyable. We’ve
been in business a long time because we are an exciting place to shop
and — just as importantly — we strive to deliver outstanding customer
service that exceeds your expectations.
Enjoy your purchase!
Call 1-800-344-4444 for ordering and customer service, or visit
, our award-winning Website.
Table of Contents
What is Atomic Radio Control?...................................................5
Parts Diagram.............................................................................6
Batteries.....................................................................................7
Setting the Atomic Time and Date...............................................7
Setting the Clock.......................................................................10
Weather Station........................................................................13
What is Head
Atomic
H1Radio
or H2Control?
The most precise time keeping device on earth is the atomic clock.
It keeps time to the accuracy of better than 1 second for every million years. The atomic clock is a huge piece of scientific equipment
and it is so expensive that it is normally found in laboratories and
standards institutions, etc. Thanks to the latest technology, the accuracy of the atomic clock is now brought to your home. The NIST
(National Institute of Standards and Technology) broadcasts electronically encoded time signals based on an atomic clock from an
antenna in Fort Collins, Colorado that covers the continental United
States. The signal is picked up by the radio receiver circuit in your
clock, then decoded to synchronize the time to split-second precision. The radio signal automatically sets the calendar and daylight
saving or standard time too.
Figure 1:
Atomic radio-controlled
time-signal transmission
and reception.
What is Atomic Radio Control?
Note: The clock is for use in the continental USA only. In Alaska
and Hawaii, the radio signal may not be strong enough for synchronization and therefore the clock can only be used as a normal
quartz clock that can be set manually.
Parts Diagram
Antenna
Icon
Figure 4:
Front view
of clock.
(Weather
Forecast)
Figure 2:
Front view
of clock.
Battery Door
Battery Door
Set
Snooze
Light
Mode
Add
Sub
DST
Reset
Set
Light
Figure 3: Back view of clock.
Figure 5: Front view of clock.
(Weather Forecast)
Up °C/°F
Down
Reset
Head
H1 or H2
Batteries
The clock and the weather station each use 2 AAA (or UM-4) batteries
(purchase separately). Insert the batteries, observing proper +/– polarities, as indicated by the diagram in the battery compartment.
Notes:
•We recommend Alkaline batteries.
• In accordance to the environmental laws in your area, properly
dispose of the used batteries.
• If the unit is operating in an unfavorable way or is malfunctioning, remove then reinsert the batteries in the back of the
clock. Then press the RESET button on the back of the clock.
Setting the Atomic Time and Date
When the receiver circuit is in operation, the antenna icon on the
LCD blinks. The bars facing the antenna indicate the strength of the
radio signal: no bars mean there is no signal or a very weak signal
being received; one bar indicates a weak signal; 5 bars indicates
the strongest signal. Use the radio signal strength indicators to find
a location where the reception is strong. Do not put the clock on a
metal wall. If the clock is too close to electrical appliances, such as
a TV, mobile phone or computer, they may cause undesirable signal
Setting the Atomic Time and Date
interference. A strong signal is normally found close to the window.
In some areas where the signal is poor, you may need to position
and rotate the clock until the best signal strength is obtained.
Figure 6a:
Blinking antenna icon (clock
attempting to
synchronize).
Figure 6b: Synchronization and radio signal strength indication.
Figure 7: How to position the clock for the best signal reception.
Once you have found the optimal position, leave the clock still so
that it can receive a clear signal. It normally takes 3 to 10 minutes
Setting the
Head
Atomic
H1 or
Time
H2and Date
to synchronize. Once it is successful, the clock displays extremely
accurate time and the correct date. A successfully synchronized
clock features a non-blinking antenna icon and a radiating beacon.
The synchronized clock attempts to refresh itself with the radio time
signal at least once a day. If it fails for more than 3 days, the antenna
icon disappears. The clock still functions as a quartz clock until it
can be refreshed again.
The clock is a radio device and, like a mobile phone or the radio,
in certain locations and times of day, it may not pick up a strong
enough signal to synchronize. If the clock fails to synchronize in
the first attempt, it reattempts at the top of every hour until 12:00
a.m. In most cases, the clock synchronizes overnight as the radio
signal is the strongest in the early morning. You can leave the clock
to synchronize at a later time or you can set the clock manually. As
noted below, a manually set clock still attempts to synchronize itself
automatically at the top of every hour.
Note: Regarding forced synchronization and halting of synchronization, if you want the clock to attempt synchronization, press and
hold the MODE button. This activates the synchronization process.
If the clock is in synchronization mode, then press and hold MODE
to halt synchronization.
Setting the Clock
In normal display mode, press MODE button to view the following
in this order: Current Date (month, day and year); Current Time;
and Daily Alarm Time.
After releasing the MODE button, the screen returns to normal
display in 10 seconds. If you press and hold the SET button for 2
seconds in any mode, the clock enters that particular mode. To
adjust settings, press ADD or SUB.
Notes:
• DST can be set in Normal Display mode by pressing and holding
the DST button for more than 2 seconds. DST can also be set in
Current Time mode by pressing the DST button once.
• Once you have manually set the DST or Standard Time, the clock
will not set the Daylight Saving Time automatically due to the
manual override. To return to default setting, press RESET.
10
Setting the Clock
Setting the Zone
The zone can be set in normal display mode or in the Time Set
mode. In normal time mode, press and hold the SET button. To
change the zone, press ADD or SUB button. To exit, press the
SET button once again.
Setting the Current Date
Normal Display.
MODE C — Alarm
Push & hold SET button to set alarm time.
Mode A — Calendar
(including the year)
Push and hold SET button
to set calendar.
MODE B — TIME
Push and hold SET button
to set time;
a short push of DST button
to set DST/Standard.
11
Setting the Clock
Press the MODE button to enter Mode A (Calendar with Year).
To enter the Year mode, press and hold the SET button for 2
seconds. The last two digits of the year blink. Press ADD or SUB
button to enter correct year, then press the SET button to set month
and day.
Setting the Current Time
When in Mode A (Calendar with Year), press the MODE button
to enter Mode B (Time). The SET button functions the same as in
the other modes. SET sequence is as follows: Time Zone; Seconds;
12/24-Hour Display; Hour; Minutes. Press ADD or SUB button
to change. After the time is set, press DST button once to set
Daylight Saving Time.
Setting the Alarm
When in Mode B (Time), press the MODE button to enter Mode
C (Alarm). Press and hold the SET button to enter Alarm Hour and
Minutes settings. Press ADD or SUB to change. To enter Alarm
On/Off setting, press SET button once more. When in the Alarm
On/Off setting, press ADD or SUB to set the alarm on or off. When
set to ON, appears; when off, disappears.
12
Setting the Clock
Note: If in 12-hour mode, a.m. or p.m. appears. Daily alarm sound
can be identified by short, rapid beeps. When the alarm is beeping, you can turn it off by pressing any button, except the SNOOZE
button, on the back of the clock for 2 seconds. To snooze, press
any button located on the back of the unit. Duration is 5 minutes.
Backlight
To illuminate the LCD on the main clock unit, press the SNOOZE/
LIGHT button. To illuminate the Weather Station, press the LIGHT
button on that back of the unit.
Weather Station
The Weather Station is capable of detecting atmospheric pressure
changes. Once the batteries have been installed, the LCD shows all
the segments for a few seconds, then changes to show the humidity
and the temperature. The pressure display shows (blank) “---- - 0h.”
The weather forecast area is blank. The blinking arrows inside the
window at the upper left corner indicate that the pressure is currently being read. Once this instrument successfully receives the
pressure data, it displays the barometric pressure reading on the
LCD, as well as the corresponding weather forecast icon.
13
Weather
Head H1Station
or H2
In order to “predict” the correct weather, you must set the approximate altitude of your location because the atmospheric pressure
varies at different altitudes. Press the SET button. The barometer
changes to the altitude of your location. To adjust the altitude of
your location, press UP or DOWN accordingly. After setting the
altitude, press SET once to return to normal barometer display.
Note: The limits for the altitude settings are from -325 feet below
sea level to 6,558 feet above sea level (-99m to 1,999m).
14
Weather Station
To determine your altitude, either contact your local library or visit
http://www.worldatlas.com/aatlas/infopage/elvation.htm. (The Website listed appears only as a helpful reference. The Website, its name
and logos remain the sole property of the owners of the Website
and of the trademark.)
Based on the collected data, the weather forecast predicts the
weather for the upcoming 6 to 8 hours as indicated below:
Notes:
• In order to provide an accurate weather prediction, the weather
forecast station needs to run and collect data for at least 12 hours.
The prediction covers the next 6 to 8 hours and may not necessarily reflect the current situation.
• The accuracy of this pressure-based weather forecast station is
about 70% to 75%.
• The Sunny icon on the weather forecast station implies clear
weather.
Reading the Barometric Pressure
To show the pressure history of last 6 hours, press DOWN. If data is
available, the display shows the data with the corresponding hour.
15
Weather Station
For example, 1003 -2 on the LCD means the pressure measurement
is 1003 mbar) and the -2 means the data was collected 2 hours ago.
By comparing the pressure value (mbar), it provides a hint to predict
the weather condition. If the pressure value is rising, the weather
condition may improve. If the pressure value is not changing, the
weather condition may stay at the current condition. If the pressure
value is declining, the weather condition may become poor. The
pressure trend indicator shows the pressure trend.
Means the pressure is rising.
The weather conditions may improve.
Means the pressure is not changing.
The weather may stay at the current condition.
Means the pressure is declining.
The weather conditions may become poor.
Note: The pressure limits on your weather forecast can display a
pressure level between 700mbar and 1,050 mbar. The operation
pressure of the clock unit is from 970 mbar to 1,030 mbar.
16
Weather Station
Reading the Temperature
To select either °C or °F, press the °C/°F. The weather station can
show a temperature between 14°F and 122°F (-10°C and 50°C). If
the temperature exceeds the maximum, HI appears on the LCD.
Note: The operating temperature range of the clock is 32°F to
122°F (0°C to 50°C). If the indoor temperature is below 32°F (0°C),
the LCD may not be viewable.
Reading the Humidity
If the displayed humidity is less than 39%, the letter ”D“ appears to
indicate ”Dry.“
If the displayed humidity is between 40% and 70%, and if the temperature is between 68°F and 77°F (20°C and 25°C), the letter ”C“
appears to indicate ”Comfortable.“
If the displayed humidity is over 70%, the letter ”W“ appears to
indicate ”Wet.“
17
Weather Station
Notes:
• Weather instruments take some time to respond to sudden
changes in temperature and relative humidity. Placing the clock
in a location with free airflow helps the instruments obtain a
quicker and more accurate reading.
• When the temperature is at or below 32°F (0°C), the LCD
shows --% for humidity.
• The operation humidity is from 15% to 95%.
18
Warranty
What Is Covered
This warranty covers any defects in materials or workmanship, with the exceptions stated below.
How Long Coverage Lasts
This warranty runs for 90 days from the date of original purchase.
What Is Not Covered
This warranty does not cover damage caused by misuse or use other than as intended and described
in the product instruction manual, or loss or damage to batteries or removable parts.
What The Sharper Image Will Do
The Sharper Image warrants this product against defects in materials and workmanship. When repair is
not practical, The Sharper Image will have the option to replace the defective product with one that is
the same or has similar functionality.
How to Obtain Service
Return the product and receipt, along with a brief explanation of the problem, to:
T.S.I. - Returns Department
2901-A West 60th Street
Little Rock, AR 72209
If you have questions please feel free to contact our customer service representatives at 1-800-344-5555
or by email at [email protected].
This warranty gives you specific legal rights, and you may have other legal rights that vary from state to state.
© 2007 Sharper Image Corporation
Sharper Image Corporation
350 The Embarcadero, Sixth Floor
San Francisco, CA 94105-1218
Shop online:
Actual product may differ slightly from the product described herein.
V1 04/07