1
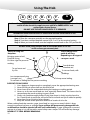
M350E
Installation & User Instructions
You must read these instructions prior to using the
appliance and retain them for future reference.
For more information on our exciting product range ring
Creda Answer Centre 08701 54 64 74
OR
Visit us on the NET at
http://www.creda.co.uk
Our site invites you to make use of our interactive cookbook and product selector. Feel
free to browse our product range to see what’s bubbling away at the moment or to ask
for help on our products and services
General Domestic Appliances Ltd. Morley Way Peterborough PE2 9JB
Creda Answer Centre 08701 54 64 74
Web http://www.creda.co.uk
It may be necessary from time to time to change the specification outlined in this booklet
without notice. Any change which is made will not affect your statutory rights.
Contents
Control Panel _____________________________________________________________4
Oven Timer Operation __________________________________________________5 - 11
Using The Hob ____________________________________________________________12
Using The Grill ________________________________________________________13 - 15
Using the Top Oven (See also General Information Book) ___________________16 - 17
Using the Main Oven (See also General Information Book) __________________18 - 19
Something Wrong? ____________________________________________________20 - 22
Service __________________________________________________________________23
To the Installer
Before installation fill in the product details on the back cover of this
booklet. The information can be found on the rating plate.
To the User
You must read the instructions prior to using the appliance and then
retain them for future reference.
3
Control Panel
A
B
C
D
●
A
B
C
D
E
F
●
●
G
Hob Control and
Hob On neon
●
E
F
G
●
Top Oven / Grill Control
with Pilot light
●
Main Oven Control with
Pilot light
Timer
COOLING FAN
When operating the ovens or grill a fan will operate, emitting a
cool breeze from below the control panel.
Oven Interior
Lights
The oven lights are operated when their respective oven
control is used. (N.B. Not all models have a top oven interior light.)
Slow Cooking
The main oven has a "Slow Cook Setting" this can be used for slow
cooking, keeping food warm and warming plates for a short period
(see page 19).
Hob On Light
The Hob On light will illuminate when one or more hotplates are switched on.
This light remains illuminated until all the hotplate controls have been turned
off.
Note: Ensure that all controls have been switched off when you have finished using the
appliance.
4
Oven Timer Operation
Note: Timer must be set to ‘Time of Day’ and ‘Manual’ before the ovens
can be used.
AUTOMATIC COOKING
The Top Oven and Main Oven can be controlled by the automatic timer. When the timer control
has been set for one oven, it is possible to use the other oven only during the same automatic
cooking programme.
NEVER operate the grill when the ovens are set to cook automatically because the oven
cavity can become warm and this may cause bacterial growth in food.
HINTS ON AUTOMATIC COOKING
1. Select foods which will require the same cooking time and temperature.
2. To ensure food does not cool down and require reheating, set the end time so the food
is ready when you require it.
3. Always ensure that meat and poultry is defrosted before placing in the oven.
4. Whenever possible, keep food as cool as possible before placing in the oven, ideally
straight from a refrigerator.
5. If cooking food that requires frying before placing in the oven for auto cooking, keep
the delay start time to a minimum.
6. Never place hot or warm food in the oven for delay start cooking as it could cause the
oven to be warm and produce harmful bacteria in the food.
7. We advise that dishes containing left-over cooked poultry or meat, e.g. Shepherd's Pie,
should not be cooked automatically if there is to be a delay period.
8. Ensure that delay start times are kept to a minimum to prevent bacterial growth in
food.
9. Wine or beer may ferment and cream may curdle during the delay period so it is best
to add these ingredients just before serving.
10. Foods which discolour should be protected by coating in fat or tossing in water to which
lemon juice has been added, prior to placing food in the oven.
11. Dishes containing liquid should not be filled too full to prevent boiling over.
12. Food should be well sealed (but not airtight) in a container to prevent the loss of liquid
during cooking. Aluminium foil gives a good seal.
13. Always ensure that food is piping hot and cooked thoroughly before serving.
14. Only reheat food once.
5
Know Your Timer
CLOCKFACE
The timer incorporates a 24 hour clock.
Ensure the correct time of day is always set, before using your cooker.
Minute Cook Stop
Minder Period Time
SYMBOLS
Will light up when you select a Minute Minder Period and will remain lit
for the period set.
Minute Cook Stop
Minder Period Time
This “Cookpot” symbol will light up either:–
_ When the cooker is in "Manual Mode"
– When you press the Cook Period Button and set a length of time for an
Auto Cooking Programme. (
symbol will light up during Auto Cooking)
Cook Cook
End Stop
MinuteMinute
Period Period
Time Manual
MinderMinder
Time
A
A
U
TT
O
O
Minute
Minute
Cook Cook
End Stop
Minder
PeriodPeriod
Time Manual
Minder
Time
"A" will light up:–
– When the timer is first turned on it will flash. (It will go out when a
time of day is set).
– When an Auto Cooking Programme has been set.
The Auto symbol "A" will flash at the end of an Auto Cooking programme to
indicate that the programme has finished.
(When the "A " symbol is flashing, to return the oven to Manual
operation, turn the oven controls off, ensure that the correct time of day is
set, and press the "Cook Period & Stop Time" buttons together– The "A"
symbol will go out.)
TIMER FUNCTION BUTTONS
Minute Minder
Button
Here you can set a time period of up to 23 hours 59 minutes, that will count
down. When it reaches zero, the timer will emit an audible tone.
For Example: If you set 20 minutes, the audible tone will occur 20 minutes
later.
AUTO COOKING PROGRAMME
Cook Period Button
Stop Time Button
"+" and "–" Buttons
6
Cook Period is the actual length of time for which, the timer will switch the
oven(s) on as part of an "Auto Cooking" programme.
(e.g. If you set 2 hours, the food will be cooked for 2 hours).
The time of day at which you want an “Auto Cooking” programme to stop.
For Example: If you set a "Cook Period" for 2 hours, and "Stop Time" of 11:00.
The timer will switch the oven(s) on at 9:00 and turn the oven(s) off at 11:00.
You will hear an audible tone at 11:00, to indicate that the Auto Cooking
Programme has finished.
Notes:
– When setting an Auto Cooking programme you will need to set the oven
control(s) to the required temperature(s) when you set the timer.
– If an Auto Cooking programme has been set the oven(s) will only operate
during the pre-programmed time.
Used to adjust the various timer function settings.
Used to adjust pitch of audible tone (see other notes on timer operation).
Oven Timer Operation
SETTING THE TIME OF DAY
A
U
T
O
A
MinuteMinute
Cook Cook
End Stop
Minder
Period Period
Time Manual
Minder
Time
Step 1 Make sure all oven controls are turned Off.
Step 2 Check the electricity supply to the cooker is turned on.
When switched on the display will show 0.00 and "A" symbol,
both will be flashing intermittently.
Step 3 Press & hold in both the "Cook Period & Stop Time" buttons
together.
MinuteMinute
Cook Cook
End
Stop
MinderMinder
Period Period
Time Manual
Time
Step 4 With the "Cook Period & Stop Time" buttons still held in,
press either the "+" or "–" buttons to set the correct time of day.
Step 5 Release all the buttons simultaneously.
The time of day is now set and the
symbol will light up to
show that the timer is in "Manual Mode"
To change the time of day repeat Steps 3, 4 & 5 above.
Note:
Bell Symbol
You cannot adjust the time of day if the timer has been set
for an Auto Cooking Programme.
SETTING THE MINUTE MINDER
Step 1 Ensure the time of day is set correctly.
Step 2 Press and hold the Minute Minder Button.
Minute
Minute
Cook Cook
End Stop
Minder
Minder
PeriodPeriod
Time Manual
Time
Step 3 With the "Minute Minder" button held in, set the required Minute
Minder time using the "+" and "–" buttons, a symbol will light up.
Release all buttons and the timer display will revert back to the time of day.
Bell symbol will remain lit to signify that a Minute Minder period has been set.
At the end of the set time a bleeping sound will be heard, and the symbol
will go out.
12 . 20
The bleeping sound will continue for several minutes unless cancelled (see
step 4)
MinuteMinute
Cook Cook
End Stop
Time
MinderMinder
Period Period
Time Manual
Step 4 To cancel the bleeping sound press the Minute Minder button,
timer display will revert back to the time of day after the buttons
are released.
To cancel Minute Minder before the Minute Minder period has finished.
Step 1 Press the minute minder button.
Step 2 Press the "_" button until 0.00 and the symbol appear in the
display window.
Step 3 To cancel the bleeping sound press Minute Minder button.
When the Minute Minder has been set, the time remaining can be checked
at any time by simply pressing the Minute Minder button
7
Oven Timer Operation
There are two Auto Cooking programmes that can be selected using your timer:a) To set the timer to switch the oven(s) On and Off automatically.
b) To set the timer to switch On immediately and OFF automatically after a set cook
period.
a) TO SET TIMER TO SWITCH THE OVEN(S) ON AND OFF AUTOMATICALLY.
Step 1
Step 2
Check that the correct time of day is set, if not follow instructions for setting the time
of day.
Place food onto the correct shelf position in the oven and close the oven door(s).
Cookpot Symbol
Step 3 Press & hold in the “Cook Period” button, the display will read
0.00 with the cookpot
symbol lit up.
0 . 00
Step 4 With the Cook Period button still held set the required Cook
Period using the “+” and “–” buttons.
MinuteMinute
Cook Cook
End Stop
Time
MinderMinder
Period Period
Time Manual
14 . 20
A
A
U
T
O
Release the buttons and the timer display will revert to the time of day with
the Auto symbol "A" & Cookpot
symbol remaining lit.
A
U
T
O
A
16 . 20
A
U
T
O
Stop
MinuteMinute
Cook Cook
End
MinderMinder
Period Period
Time Manual
Time
A
14 . 20
Minute Cook End
Minder Period Time Manual
Step 5 Press and hold the" Stop Time" button.
The display will read the earliest possible stop time for the
cook period that you have set above.
Step 6 With the Stop Time button still held in, use the "+" and "-"
buttons to set the "Stop Time". i.e. The time you require the oven
to switch off.
A
U
T
O
Release all the buttons and the timer will revert back to the time
of day. The "A" symbol will remain lit to signify that an Auto
Cooking Programme has been set. The
symbol will go out.
When the Auto Cook Programme starts the
will then light up
again.
Step 7 Turn the oven control(s) to the required temperature, and if
necessary select the appropriate oven.
8
Oven Timer Operation
A
16 . 20
A
16 . 20
Minute Cook
Minute Cook End Stop
Manual
Minder
Minder
PeriodPeriod
Time Time
At the end of the Automatic Cook Period the Auto Symbol "A" will
flash and an intermittent bleeping sound will be heard. The
symbol will go out.
The bleeping sound will continue for several minutes unless
cancelled. (see step 8) The "A" symbol will continue to flash until the
timer is returned to Manual operation (see below).
Step 8
Press the Cook Period button to cancel the bleeping sound.
Step 9
Turn the oven control(s) to the OFF position.
Step 10
Press the Cook Period and Stop Time buttons together to return the
oven(s) to Manual Operation. The "A" symbol will go out and the
Cookpot symbol will light up
Note 1
When cooking automatically the Cook Period can be checked at any time
by simply pressing the Cook Period button.
Note 2
When cooking automatically the Stop Time can be checked at any time by
simply pressing the Stop Time button.
9
Oven Timer Operation
b) TO SET TIMER TO SWITCH ON IMMEDIATELY AND OFF AUTOMATICALLY
AFTER A SET COOK PERIOD
Step 1
Check that the correct time of day is set, if not follow instructions for setting the time of
day.
Step 2
Place food onto the correct shelf position in the oven and close the oven door(s).
Step 3
Turn the oven control(s) to the required temperature, and if necessary select the
appropriate oven function.
Cookpot Symbol
Step 4 Press & hold in the "Cook Period" button, the display will read
0.00 and the cookpot
symbol will light up.
With the Cook Period button still held set the required Cook Period using the
"+" and "–" buttons, the "A" symbol will light up. (Example: 1hr 30 minutes).
Stop
MinuteMinute
Cook Cook
End
MinderMinder
Period Period
Time Manual
Time
Note: Cook Period is the length of time the food requires to cook.
Step 5 Release all buttons.
A
U
T
O
The timer display will revert to the time of day with the Auto symbol "A" lit &
Cookpot symbol
remaining lit.
A
A
U
T
O
At the end of the Cook Period the"A" symbol will flash and an intermittent
bleeping sound will be heard. The cookpot symbol
will go out.
The bleeping sound will continue for several minutes unless cancelled. (see
step 6) The "A" symbol will continue to flash until the timer is returned to
Manual operation (see below).
A
A
U
T
O
A
Step 6 Press the "Cook Period" button to cancel the bleeping.
Stop
MinuteMinute
Cook Cook
End
Time
MinderMinder
Period Period
Time Manual
Step 7 Turn the oven control(s) to the OFF position.
A
U
T
O
Step 8 Press the "Cook Period" and "Stop Time" buttons together to
return the cooker to Manual operation. (The "A" symbol will go
out, and the
Cookpot symbol will light up).
Minute Cook Stop
MinuteMinder
Cook Period
End
Time
Minder Period Time Manual
Note 1
When cooking automatically the Cook Period can be checked at any time
by simply pressing the Cook Period button.
Note 2
When cooking automatically the Stop Time can be checked at any time by
simply pressing the Stop Time button.
10
Oven Timer Operation
OTHER NOTES ON TIMER OPERATION
1. To cancel the Auto Cooking programme before or after auto cooking starts, press the
"Cook Period" and "Stop Time" buttons together, this will return the cooker to
the manual operation.
2. When cooking Automatically the "Cook Period" can be checked at any time by simply
pressing the "Cook Period" button.
3. When cooking Automatically the "Stop Time" can be checked at any time by simply
pressing the "Stop Time" button
4. Having set a Cook Period and Stop Time an electronic device stores the
information. The device within the timer will switch the oven(s) on and off at the
required time.
5. When setting an Auto Cooking Programme and a mistake is made, to clear:–
(a) Press and hold in the "Cook Period" and "Stop Time" buttons together to return
the cooker to manual operation.
(b) Start the sequence again.
6. If at any time the display shows three flashing zero’s 0.00. It is likely that the electricity
supply to the oven has been interrupted. Reset the timer to the correct time of day.
Food in the oven may, therefore, not have been cooked, before serving check food is
thoroughly heated and completely cooked.
7. To set each function always press and hold the required function button and at the
same time press "+" or "–" buttons.
8. To adjust the pitch of the Bleeping sound, simply press the "–" button while the
audible tone is sounding. For example:(a) Press and hold the minute minder button.
(b) With the minute minder button still held in, press the "+"button and set one minute.
(c) When the Bleeper sounds after one minute, press and release the "–" button, until
preferred pitch is set.
(d) Press and release the Minute Minder button to cancel the bleeping.
11
Using The Hob
A
B
C
D
●
E
F
●
●
G
In the unlikely event of a crack (no matter what size) appearing in the ceramic surface,
switch off the electricity supply to your appliance IMMEDIATELY and
contact your service centre.
DO NOT USE THE APPLIANCE UNTIL IT IS REPAIRED
NEVER allow aluminium foil to be in contact with the hob surface when in use.
SETTING THE HOTPLATE
Step 1 Place the saucepan centrally on the required hotplate.
Step 2 Turn the associated hotplate control (A, B, C or D) to the required setting.
Step 3 When you have finished, turn the hotplate control knob to the OFF position O.
DO NOT allow young children near to the cooker when it is in use
as the surfaces get extremely hot!
Guide To Using The
Hotplates.
Bringing water to boil,
Deep fat frying,
Dissolve sugar for preserve
making.
To seal meat and
fry fish.
H
L
These settings are a
guide & will vary
depending on the type of
saucepans used.
To melt butter,
chocolate etc.
To simmer foods, milk
puddings
Low temperature frying
(sausages etc.)
To keep water boiling.
To maintain a ‘Rolling Boil” for preserve making.
DEEP FAT FRYING SAFELY
1. Use a deep pan, large enough to completely cover the appropriate heating area.
2. Never fill the pan more than one third full of oil.
3. Never leave oil or fat unattended during the heating or cooking period.
4. Never try to fry too much food at a time, especially frozen food. This lowers the fat
temperature too much resulting in greasy food.
5. Always dry food thoroughly before frying, then lower it slowly into the hot oil or
fat. Frozen foods in particular will cause the fat to froth and spit if added to quickly.
6. Never heat fat or fry with a lid on the pan.
7. Keep the outside of the pan clean and free of streaks of oil or fat.
When cooking food that contains sugar (most food) or syrup, use a utensil which is large
enough to prevent boil over or spillage. Sugar spillage will permanently damage the hob
and therefore should be cleaned off with care immediately. If sugar spillage has occurred,
remove it as long as it is still hot with a metal safety razor scraper. This will avoid any damage.
NEVER LET IT COOL BEFORE REMOVING.
12
Using The Grill -Thermostatic Grilling
A
B
C
D
●
E
F
●
●
G
GRILLING CANNOT BE UNDERTAKEN WITH THE GRILL / TOP OVEN DOOR CLOSED.
Never line the grill pan with aluminium foil.
DO NOT allow young children near to the cooker when it is in use as the surfaces get
extremely hot!
BEFORE USE
POSITION THE GRILL PAN CENTRALLY UNDER THE GRILL ELEMENT
* Check that the timer, (G) is in Manual.
* Place the shelf in the correct position (see Grill Chart)
* Leave the top oven door fully open (as shown in diagram)
DOOR POSITION FOR GRILLING
The oven/grill control is designed to operate either the oven or grill depending on the position
of the oven door. With the door in the open or grilling position, as shown, the door switch
enables the grill to operate.
With the oven door in the grilling position, heating of the grill is achieved by turning the control
clockwise to the desired ‘grill setting’ on the control panel. (see grill chart).
After use; turn the Top Oven / Grill control anti-clockwise to the off (O) position.
13
Using The Grill - Grill Pan
The grill pan handle is detachable to allow easier cleaning and storage.
REMOVING THE GRILL PAN HANDLE
Step 1
Step 2
Step 3
Step 1 Remove screw & washer from the grill pan handle.
Step 2 Tilt the handle over the recess
Step 3 Slide it towards the end of the pan and remove handle.
Grill Pan
Food Grid
14
Guide To Grilling
NOTE: This guide should be followed carefully as the control setting, shelf position and
grilling time may differ from your previous cooker
GRILL CHART
Food
Preheat Grill for 5
minutes on settings
stated below
Shelf position from
base of Oven
Approximate
Cooking time
Toasting of Bread
products
220˚C
2
3 - 10 mins depending
on type of food
Small cuts of meat,
sausages, bacon, etc.
140/150˚C
1
10 - 20 mins
Chops etc.
140/150˚C
1
20 - 30 mins
Fish:
Whole
Fillets
140/150˚C
140/150˚C
1
2
Cook on base of pan
10 - 15 mins
Pre - Cooked potato
products
200˚C
2
10 - 20 mins
Pizzas
150˚C
1
Preheat pan first
4 - 12 mins
Browning of food
200˚C
1
5 - 7 mins
The settings in the above guide have been developed to cook food successfully without
excessive fat spitting and splashing.
The Grill temperatures below relate to heat settings recommended on food packs.
Grill Settings
Very Low
100˚C
Low
130˚C
Medium
150˚C
Medium High
200˚C
High
220˚C
Always position the grill pan centrally under the grill element to ensure even cooking.
15
Using The Top Oven
The top oven should be used to cook small quantities of food.The oven is designed so that the grill
element operates at a reduced heat output, this is combined with a heating element situated
underneath the floor of the oven. To ensure even cooking of the food it is important that cooking
utensils are positioned correctly on the oven shelf so that the element is directly above. As a guide,
the front of the utensil should be approx. 100mm (4”) from the front of the shelf.
Note: Charts are a guide only, to suit personal taste and requirements, it may be
necessary to increase or decrease temperatures by 10oC. It may also be necessary to increase or
decrease cooking times.
SHELF POSITIONING
ENSURE SHELVES ARE FITTED THE CORRECT WAY UP
2
SHELF POSITION 1 OR
FLOOR OF OVEN TO BE USED
WHEN USING THE TOP OVEN
AS A CONVECTION OVEN.
1
DO NOT PLACE FOOD/UTENSILS DIRECTLY ON THE OVEN FLOOR
ALWAYS USE A SHELF
There should always be at least 25mm (1 inch) between the top of the food and the grill element.
WARNING: Items stored in the top oven will get hot when the main oven is in use.
DO NOT allow young children near to the appliance when the top oven is in use as the surfaces get
extremely hot.
16
Using The Top Oven
A
B
C
D
●
E
F
●
●
G
SETTING THE TOP OVEN
Step 1 Check that the timer (G) is in manual.
Place the shelf in the correct position (see Top Oven Temperature Charts in
General information book)
Step 2 Select the required cooking temperature using control (E) clockwise (see Top
Oven Temperature Charts in General information book). The pilot light ( ● )
will immediately come on, and stay on until the oven reaches the required
temperature. The light will then automatically go off and on during cooking as
the oven thermostat maintains the correct temperature.
Step 3 When the oven has reached the required temperature, place the food on
the shelf (positioned as shown in the Top Oven Temperature Charts) and
close the oven door.
Step 4 When you have finished, turn the control knob to the OFF position (O).
PLATE WARMING
Place the oven shelf in position 1 (from the base of the oven). Put the plates and
dishes to be warmed on the shelf. Close the oven door, turn the top oven control knob
to 100°C and allow the plates to warm for 10 to 15 minutes.
TOP OVEN UTENSILS
Do not use meat pans or baking trays larger then - 225mm x 300mm (9" x 12")
DO NOT use the grill pan or main oven meat pan in the top oven, as the air
circulation will be seriously restricted.
17
Using The Main Oven
Since a circulaire fan oven heats up more quickly, and generally cooks food at a lower
temperature than a convection oven, pre-heating is often unnecessary. For guides on “preheating”, “cooking temperatures” and “cooking times”, see “Oven Temperature Charts” in General
Information book.
NOTE: Charts are a guide only, to suit personal taste and requirements, it may be necessary
to increase or decrease temperatures by 10˚C. It may also be necessary
to increase or decrease cooking times.
POINTS TO REMEMBER ABOUT FAN OVENS
Fan ovens heat up quicker than convection ovens, so pre - heating is often unnecessary.
Cooking can be carried out at slightly lower temperatures.
Identical cooking results can be achieved no matter what shelf is used.
MAIN OVEN SHELF POSITIONING FOR FAN OVEN
Most foods will cook satisfactorily on any shelf position, due to even distribution of heat in the
main oven, but the shelves must be evenly spaced. The top oven rod shelf can be used in the
main oven when cooking large quantities of food. (N.B. Maximum 3 shelves in the main oven).
Food or utensils must never be placed directly on the floor of the oven for cooking.
DO NOT allow young children near to the appliance when the oven is in use
as the surfaces get extremely hot.
MAIN OVEN UTENSILS
Do not use:
Meat pans larger than 375mm x 300mm (15” x 12”)
Baking Trays larger than 325mm x 250mm (13” x10”)
TEMPERATURE & TIME
When all three shelves are in use to cook large quantities of food, it may be necessary to increase
the cooking times given in the temperature charts by a few minutes to allow for the loss of heat
due to extra time taken to load the oven, and the larger mass of food. Baking trays should have
an even gap around the oven.
A
B
C
D
●
E
F
●
●
G
SETTING THE MAIN OVEN
Step 1 Check that the timer (G) is in manual.
Place the shelf in the correct position (see Main Oven Temperature Charts in General
Information book)
Step 2 Select the required cooking temperature using control (F) clockwise (see Main Oven
Temperature Charts in General Information book). The pilot light ( ● ) will immediately
come on, and stay on until the oven reaches the required temperature.. The light will
then automatically go off and on during cooking as the oven thermostat maintains the
correct temperature.
Step 3 When the oven has reached the required temperature, place the food on the shelf
(positioned as shown in the Main Oven Temperature Charts in General Information
book) and close the oven door.
Step 4 When you have finished, turn the control knob to the OFF position (O).
When you open the oven door during cooking a momentary puff of steam may appear,
this is NOT a fault. It is perfectly normal and is the sign of a good door seal.
18
Using The Main Oven For Other Functions
“SLOW” SETTING
This is used for slow cooking, keeping food warm and warming plates for short periods. Extra care
must be taken when warming bone china. Do not place food or plates on the floor of the oven.
DO NOT place food or plates directly on the oven floor as this could damage both the
oven lining and the plates which are being warmed
Some advantages of slow cooking are:
The oven stays cleaner because there is less splashing.
Timing of food is not as critical, so there is less fear of overcooking.
Inexpensive cuts of meat are tenderised.
Fully loading the oven can be very economical.
Cooking times can be extended in some cases by up to 2hrs. for late-comers.
The kitchen stays cooler.
OPERATION:
1) Place the prepared food in the main oven and ensure the door is fully closed.
2) Select Slow Cooking temperature by turning main oven temperature control (F)
clockwise ensuring the oven door is fully closed.
STORAGE AND RE-HEATING OF FOOD
1) If food is to be frozen or not served immediately, cool it in a clean container as quickly as
possible.
2) Thaw frozen food completely in the refrigerator before re-heating.
3) Re-heat food thoroughly and ensure it is piping hot before serving.
4) Only re-heat food once.
POINTS TO BEAR IN MIND WHEN PREPARING FOOD:
1) Make sure all dishes will fit into the oven before preparing the food.
2) All dishes cooked by the ‘Slow’ setting should be cooked for a minimum of 6 hours. They
will 'hold' at this setting for a further hour but marked deterioration in appearance will be
noticed in some cases.
3) Joints of meat and poultry should be cooked at fan oven 170oC for 30 mins before turning to
the Slow setting.
4) Meat over 2.7 Kg. (6 lbs) and poultry over 2 Kg. (4 lbs 8oz) are unsuitable for the Slow setting.
5) Always stand covered joints on a rack over the meat tin, to allow good air circulation.
6) Pork joints can only be cooked, if by testing with a meat thermometer and internal
temperature of at least 88oC is reached.
7) This method is unsuitable for stuffed meat and poultry.
8) Always bring soups, casseroles and liquids to the boil before putting in the oven.
9) When casseroles are used, cover the food first with foil and then the lid to prevent loss of
moisture.
10) Always thaw frozen food completely before cooking.
11) Root vegetables will cook better if cut into small even sized pieces.
12) Always adjust the seasoning and thickenings at the end of the cooking time.
13) Egg and fish dishes need only 1-5 hours cooking and should be observed from time to time.
14) Dried red kidney beans must be boiled for a minimum of ten minutes after soaking,
before inclusion in any dish.
19
Something Wrong?
Before calling a Service Engineer, please check through the following lists.
THERE MAY BE NOTHING WRONG.
Problem
Check
Slight odour or small
amount of smoke when
grill / oven used first
time
This is normal and should cease after a short period.
Nothing Works
If you find that the timer display is blank, then it is likely
that there is no electricity supply to your oven. Check:
(i) That the main cooker wall is switched on
(ii) Other appliances, to see if you have had a power
cut.
(iii) The main circuit breaker for the property
Timer Display shows "0:00"
with "A" Flashing
The power supply to your oven has possibly been
interrupted, but has now come back on again. Reset the
timer to the correct day and "Manual" operation using the
instructions given in the timer section of the book.
Marks appearing on hob /
Can not clean hob
(a) It is imperative that Ceramic Hobs are cleaned and
conditioned regularly - Please refer to the Care and
Cleaning section of your General Notes book for further
information.
Please note that replacement Hob Cleaning and
Conditioning kits are available from our Spare Parts
Department under Part number 6224842
(b) With any Ceramic Hob, using the correct pans is
essential. Not all pans are suitable - Please refer to the Pan
section of your General Notes book for further
information.
Main oven and Top ovens
do not work, but the grill
works
Your timer may be set for an Auto Cooking programme:
Check the timer to see whether "A" is lit or flashing. If it is
then please follow the instructions given in the Timer
section of this book to return the timer to Manual
operation.
Top oven and grill do not
work, but Main oven works.
Operating the cooker under the following conditions may
cause a safety device to operate:
(a) Grilling with the door closed - Always grill with the door
fully open
(b) Grilling for an excessively long period at maximum
setting - see Grilling guide.
Switch off appliance and allow to cool for approx 30 mins.
Switch the cooker back on and check that the Grill / Top
oven is now operating.
20
Something Wrong?
Problem
Can not set an "Auto Cook"
programme / Can
not get the timer to turn
the ovens on and off at the
required times
Check
Remember "Cook Period" is the actual length of time for
which the timer will switch the oven(s) on as part of an
"Auto Cooking" programme.
Grill keeps turning on and
off
When the Grill control is operating at less than its maximum
setting, the Grill will cycle on and off, this is normal and not
a fault.
Draught from beneath
control panel
A gentle flow of air will be blown from beneath the control
panel when the appliance is used. If the appliance is still
warm, this cooling fan may run on, or restart itself when all
controls have been turned off.
The fan will stop once the appliance has been cooled. This is
normal and not a fault.
Timer buzzer / bleeper
operates continually
The bleeper will stop automatically after several minutes. To
cancel, press the minute minder button to silence.
Oven temperatures too
high or low
Check temperature and shelf positions are as
recommended in the Oven Temperature Charts.
It may be necessary to increase or decrease the
recommended temperature slightly to suit your taste.
Oven does not cook evenly
Check:
(a) Temperature and shelf positions are as recommended in
the Oven Temperature Charts.
(b) Oven utensils being used allow sufficient air flow around
them.
Oven lamp does not work
The oven lamp is not covered by the guarantee. The part is
easily changed (see the section on oven lamp replacement)
A new lamp may be obtained from our Spare Parts
department by calling: 0541 530530
Condensation on the wall
at the rear of the cooker.
Steam and / or condensation may appear from the vent at
the rear of the appliance when using an oven particularly
for foods with a high water content e.g. frozen chips, roast
chicken etc. This is normal, and any excess should be wiped
off.
Steam is a by-product of cooking any food with a high
water contact. To help minimise always:
a) Try to avoid leaving food in the oven to cool after being
cooked especially with the control knob turned off.
b) Use a covered container, wherever possible.
Steam / Condensation in
the oven after use.
If you have been through the above list and there is still a problem; you should
identify your service agent using the list on the back page and
contact your local service office.
21
Key Contacts
Service
Creda has the largest appliance manufacturer’s service team in Europe, trained
specialists directly employed by us to ensure your complete confidence.
Repair Service
UK: 08709 066 066
Republic of Ireland: 1850 302 200
You will be asked for the following information:Name, address and postcode.
Telephone number
Model / Serial number of the appliance
Clear and concise details of the query or fault
Place and Date of purchase
(Please keep the receipt as evidence will be required when the engineer calls).
Extended Warranty
To join: UK 08709 088 088
Republic of Ireland: 1850 502 200
Genuine Parts & Accessories
Mail Order Hotline
UK: 08709 077 077
Republic of Ireland: (01) 842 6836
For further product information
08701 54 64 74
All Creda Services are offered as an extra benefit and do not affect your statutory rights.
General Domestic Appliances Limited, Morley Way, Peterborough, PE2 9JB
PRINTED BY SIMLEX . FOUR ASHES, WOLVERHAMPTON.
November 2000 Part no. 491700013-03