1
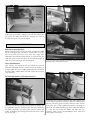
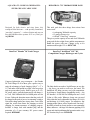
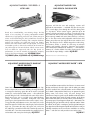
ASSEMBLY AND OPERATION MANUAL
™
™
Warranty
AquaCraft will warrant this kit for 90 days after the purchase date from defects in materials or
workmanship. AquaCraft will either repair or replace, at no charge, the incorrectly made part.
Make sure you save the receipt or invoice you were given when you bought your model! It is your proof
of purchase and we must see it before we can honor the warranty.
To return your SuperVee 27 for repairs covered under warranty you should send your boat to:
Hobby Services
3002 N. Apollo Drive, Suite 1
Champaign, Illinois 61822
Attn: Service Department
Phone: (217) 398-0007, 9:00 am – 5:00 pm Central Time M-F
E-mail: [email protected]
Entire Contents © Copyright 2006
AQUZ1001 for AQUB17** V1
CHARGER RECOMMENDATIONS:
TABLE OF CONTENTS
DTXP4002 Piranha™ DC Peak Charger, This is a good basic
charger. You will also need #GPMM3131 Charge Adapter.
ITEMS REQUIRED FOR COMPLETION &
BATTERY PACK RECOMMENDATIONS ............................2
SAFETY PRECAUTIONS ....................................................2
SPECIFICATIONS & DESCRIPTION CHANGES ................2
USEFUL TOOLBOX ITEMS ................................................3
OTHER USEFUL ITEMS TO HAVE ON HAND ..................3
BOAT TERMINOLOGY ......................................................3
PREPARING YOUR BOAT FOR OPERATION ....................3
LAUNCH PROCEDURE......................................................4
CHECK THE RADIO SYSTEM ............................................4
RUNNING THE SUPERVEE 27 ..........................................5
TUNING YOUR SUPERVEE 27 ..........................................5
MAINTENANCE ................................................................6
MODIFYING YOUR CURRENT BATTERY PACKS ..............6
RACING ............................................................................7
ENGINE TROUBLESHOOTING FLOWCHART ..................9
ORDERING REPLACEMENT PARTS ..................................9
Or
DTXP4170 DuraTrax® IntelliPeak™ ICE™ DC Competition
Charger and #GPMM3148 Charge Adapter
SAFETY PRECAUTIONS
• Use care to avoid touching the propeller anytime the
motor is operating. Pay equally close attention to items
such as loose clothing, shirtsleeves, ties, scarves, long hair
or loose objects such as screwdrivers or pencils that may
fall out of shirt or jacket pockets on to the spinning prop.
If your fingers, hands, etc. come in contact with the
spinning propeller, you may be severely injured.
• Because of the speed and mass of this boat, it is capable
of inflicting property damage and severe personal injury if
a collision occurs. Never run this boat in the presence of
swimmers or where the possibility of collision with people
or property exists.
Thank you for purchasing the AquaCraft SuperVee 27
Brushless! This manual contains the instructions you need
to safely prepare, operate, and maintain your R/C boat.
Read over this manual thoroughly before operating the
SuperVee 27 Brushless boat.
• Radio Control boats are controlled by radio signals, which
are subject to possible interference from other R/C
transmitters, paging systems or other electrical noise.
Before turning your radio on, make sure no one else in the
area is operating a radio on the same frequency (channel).
If for any reason you feel this model is not for you, return
it to your local dealer immediately. PLEASE NOTE: Your
hobby dealer can not accept a return on any model boat
after assembly has begun.
• Use safety glasses when starting or running your boat.
The propeller may throw loose material such as sand or
gravel into your face.
• The metal hardware on your boat can be sharp. Be careful
handling the parts.
ITEMS REQUIRED FOR COMPLETION &
BATTERY PACK RECOMMENDATIONS
• The brushless motor may become hot. After a run allow
the motor to cool before touching it.
You will need to purchase the following items to operate your
SuperVee 27 Brushless Boat. We highly recommend the use
of the following products.
If the buyer is not prepared to accept the liability associated
with the use of this product, the buyer is advised to return
this kit immediately in new and unused condition to the
place of purchase.
BATTERY RECOMMENDATIONS:
DTXC2162 3800mAh 7.2 volt high performance battery
packs with Deans Ultra Plug (2 packs required)
Or
DTXC1905 2000mAh 7.2 volt sport battery packs with
Deans Ultra Plug (2 packs required)
If you have existing 7.2 volt battery packs, you can update
them for use in the SuperVee 27 by changing the connectors
to Deans Ultra connectors. You can learn how to do this by
reading "MODIFYING YOUR CURRENT BATTERY PACKS TO
deans ULTRA CONNECTORS" on page 6 in this manual.
SPECIFICATIONS & DESCRIPTION CHANGES
All pictures, descriptions, and specifications found in this
instruction manual are subject to change without notice.
AquaCraft maintains no responsibility for inadvertent errors in
this manual.
You will also need: 8 AA batteries for the Transmitter
2
USEFUL TOOLBOX ITEMS
PREPARING YOUR BOAT FOR OPERATION
As with any hobby, it is a good idea to assemble a useful
collection of tools and accessories to bring along anytime
you head out to the pond. Here are some items you will want
to keep handy.
Carefully remove your SuperVee 27 Brushless boat and stand
from the box. You may wish to keep the box in order to
transport and store your SuperVee Brushless 27.
❏
❏
❏
❏
❏
❏
❏
❏
Decals have been provided for your SuperVee 27 Brushless.
Simply cut them out, peel, and stick! See the photos on the
box for a decal placement example.
Metric and Standard Hex Drivers
Metric wrenches (10mm and 12mm) Pliers
Hook & Loop Material (GPMQ4480)
Hobby Knife (HCAR0109)
Marine-grade grease for lubricating the drive cable
(AQUB9500) GrimRacer Speed Grease Driveline
Cable Lube
Extra ‘AA’ batteries
Thread locking compound
CA glue and De-bonder
THE BOAT STAND
OTHER USEFUL ITEMS TO HAVE ON HAND
❏
❏
❏
❏
❏
❏
❏
❏
❏
❏
Paper towels
Spray-on glass cleaner
Sunglasses
Sun block
Waders or rubber boots
Cooler with plenty of cold water and soda
Folding table
Lawn chairs
First-aid kit
Canopy for shelter
Your boat comes with a custom laser cut and engraved stand.
It’s pre-built with soft protective cradle strips to help keep
your boat scuff free and get you on the water fast.
TRANSMITTER ASSEMBLY
Note: The transmitter is not water resistant and should never
come in contact with water.
BOAT TERMINOLOGY
BOW: The front of the boat
STERN: The back of the boat
PORT: This is the left side of the boat when aboard and facing
the front (bow). An easy way to remember this is that both
port and left contain four letters.
STARBOARD: This is the right side of the boat when aboard
and facing the front (bow).
HULL: The body of the boat.
❏ 1. Remove the transmitter antenna from the plastic bag located
on the back of the cardboard transmitter protector. Screw the
antenna into the hole located at the top of the transmitter. Give a
light tug on the antenna to make sure it is threaded in properly.
DECK: The top of the boat.
HATCH: Typically a removable top to access the inside of
the hull.
3
INSTALLING THE BATTERIES IN THE HULL
❏ 1. Stick the provided Hook and Loop found in the bottom
❏ 2. Slide the battery door open on the bottom of the
of the hull onto your batteries. Slip the batteries in place with
the connector end of the battery pointing at the front of the
boat. The installed laser cut battery locators in the bottom of
the boat help align the batteries for the best running center of
gravity for maximum boat performance.
transmitter and install eight (8) fresh “AA” batteries. Follow the
diagram located in the bottom of the battery tray for proper
battery orientation.
❏ 3. Turn the transmitter “ON”. The battery light should glow
bright red. If the light does not turn on re-check the
installation of the batteries.
POWERING UP THE SYSTEM
❏ 1. Turn the power “ON” to the transmitter.
❏ 2. Plug the batteries into the speed control plugs and listen
REMOVE THE HATCH AND INSTALL THE ANTENNA
for a single beep >BEEP<
❏ 3. Pull the throttle trigger to full throttle and hold until you
hear one (1) beep. >BEEP<
❏ 4. Release the trigger and you will hear five (5) more evenly
spaced short beeps. >BEEP<>BEEP<>BEEP<>BEEP<>BEEP<
Your motor is now armed and ready for operation.
If the system does not arm and follow the sound sequence
above, unplug the batteries and change the position of the
throttle reversing switch. Switch TH.REV on the transmitter
and start the process over.
Slowly advance the throttle to check proper operation of the
motor. If the propeller turns the wrong way switch any two
(2), of the three (3) motor connector leads to change the
direction of the motor. Avoid holding the throttle wide open
for any length of time with the boat out of the water.
Check the direction of the rudder. Standing behind the boat
rotate the steering wheel to the left. The trailing edge of the
rudder should move towards the left. Move the wheel to the
right. The rudder should move towards the right. If this is not
the case, you will need to reverse the direction of the servo
on your transmitter using switch ST.REV.
Now is also a good time to do a system (radio) range check.
With the transmitter antenna fully collapsed and the boat
safely on its stand, walk away from the boat approximately
50-75 feet. The radio system should remain still and operate
cleanly. If the radio system chatters, make sure the receiver
antenna is properly installed in the boat's radio box and that
you have fresh batteries in the transmitter.
❏ 1. Locate and turn the rear hatch lock 1/4 turn to unlock
and remove the hatch. Install the receiver antenna tube by
pushing lightly into the plastic antenna base as shown.
Reattach the hatch by pushing down on the top of the lock.
Your boat is ready for operation.
4
RUNNING THE SUPERVEE 27
TUNING YOUR SUPERVEE 27
Gently place the boat in water that is at least 8” deep and free
of obstacles (weeds, rocks, sticks, ducks, muskrats, etc.).
You can make hardware adjustments to your SuperVee 27 to
suit your driving style or achieve maximum handing and
speed for your water conditions.
Throttle up to full speed. NOTE: Your SuperVee 27 will
cavatate for the first 10 to 15 feet. This is normal! If the boat
has a tendency to turn right or left, adjust the steering trim
knob on your transmitter until the boat runs in a straight line
when the steering wheel is at neutral.
Also note: If you stop the boat on the water with the
batteries low the boat might not get back on plane. It's OK
to bring it back into shore and give the boat a light forward
toss to get it back on plane.
Strut settings: You can use the information below as a guideline
to help you understand what happens when you adjust the angle
of the strut. Remember that the prop and water conditions play a
huge part in the performance of the boat.
When you are ready to bring your boat back to shore, drive it
parallel to shoreline. After you have stopped the motor turn
the boat towards shore.
Neutral or no angle: Good for most setups, but ultimately the
prop, weight of the boat and water conditions will determine
if you are going to run your boat with Neutral strut angle.
Positive angle: Positive strut angle causes the bow (front) to
run high making the boat faster but less stable and likely to
blow off course or crash in rough water. This also places the
least amount of stress on the motor and speed control.
When finished running, retrieve the boat and unplug the
batteries first. Then turn the power “OFF” to your boat and
transmitter (in that order).
Driving Tips
The motor and propeller spin counter clockwise on your
SuperVee 27. This will naturally cause the boat to turn better
to the right than to the left. Keep this in mind when you are
turning your boat to the left.
Negative angle: Negative strut angle can cause the boat to run
tight. Remember, make small adjustments at a time as
negative strut angle places the most amount of stress on the
drive components. Too much negative angle and your boat
might “stuff” dive under water if it comes off a wave.
Remember small adjustments.
Your SuperVee 27 is very fast and very agile. It’s a good idea to let
off the throttle as you enter the corner. Likewise if the boat starts
to get out of shape you will want to let off the throttle to get the
boat settled back down. You can make adjustments to the boat's
hardware for better handling and even more performance, but just
remember, one small adjustment at a time. For more tuning info
see “Tuning your SuperVee 27” at the AquaCraft website,
www.aquacraftmodels.com or by reading below.
PROPELLER CHOICES
The propeller plays a huge part in how your SuperVee 27
performs. The FRP prop that comes with the boat is a good all
around prop but if you want even more performance, try your
hand at a metal prop. To start with, here are a few good choices.
Octura X-440, X440/3, X640, M440,
ABC 40X53, 40X52/3
Prather 215, 220
Rudder angle: Tilting the bottom of the rudder to a positive angle
(away from the transom) will cause the transom to run higher out
of the water in the corners. Tucking it under will cause the transom
to run deeper. Keep in mind as you make your adjustments that a
small change can make a big difference.
You are likely going to want to stay away from lifting props
(unless modified by a professional) like the Octura 00 series
and the ABC H series propellers.
5
Trim Plates: The trim plates are used to help control the ride
of the hull. If the boat is hopping, you can bend down the
trim plates. If it looks like the boat is running wet, you can
bend the trim plates up a small amount.
MAINTENANCE
RADIO BOX MAINTENANCE
When finished running, remove the hatch and open the radio
box by unsnapping the side latches. Let the cover sit on the
side of the boat and wipe away water that might have
collected in the radio box compartment. It is best to leave the
radio box cover and hatch cover off the boat overnight to
allow any water that might enter to evaporate.
Using a 2.5mm allen wrench to carefully unscrew the radio
box and slide it forward to remove.
HULL MAINTENANCE
After running, the exterior of the hull should be cleaned.
Common household cleaners can be utilized for cleaning. It
is also a good idea to use a 100% cotton towel to wipe down
the boat. 100% cotton towels will not scratch the paint on
your new boat.
MOTOR AND DRIVE SYSTEM MAINTENANCE
Remove the drive cable by loosening the cable coupler with
a set of 10mm and 12mm wrenches. Slide the cable out and
wipe any remaining grease and water from the cable. Set this
aside to dry. This is also a good time to place a few drops of
light oil on the motor shaft bearings. If the motor was dunked
it is also best to remove the motor and blow out any
remaining water. Grease (AQUB9500) the drive cable and
install it back in the boat.
When you are through running your SuperVee 27 for the day
it’s a good idea to grease the drive cable. Do so by unhooking
the motor connectors and water lines from the motor and
rudder. Unhooking the steering ball link and unscrew it from
the steering rod.
6
MODIFYING YOUR CURRENT BATTERY PACKS
TO DEANS ULTRA CONNECTORS
Deans Ultra Connector, #1303 (two (2) Female connectors)
Modifying your current battery packs to Deans Ultra Connectors
is easy to do and is HIGHLY recommended with this boat. The
Deans Ultra Connectors will provide you all the performance you
need regarding the power output of this boat.
NOTE: The Deans ultra connector is fast becoming the
connector of choice for high performance applications like
the SuperVee 27. When installing these connectors to your
current batteries, look closely at the connector and you will
see a small + (positive) and – (negative) symbol molded on the
back side of the connector. You're going to need to solder the
red wire of your battery pack to the + (positive) symbol and
the black wire to the – (negative).
Let's get started. It's really not hard to do.
Wait for the solder to cool before sliding the shrink wrap over
the exposed solder joint. Heat the shrink to secure it in place.
Repeat with the other wire.
RACING
Although it is very enjoyable to go out and run the SuperVee
27 by yourself, the real fun and excitement of R/C boating is
experienced when you get involved in racing. Racing against
other boats is much different than running your boat alone.
The following suggestions will hopefully provide helpful
strategies when racing a model boat.
A good set-up for running alone may not be the best for racing
conditions. Race water conditions create challenges different
from running alone and water conditions constantly change
during a race. Five or six boats racing against one another will
create rough water conditions on the race course and to
successfully compete in racing situations, it may be necessary
to adjust the ride characteristics of the boat. You can do this
by tilting the rudder under the boat or pulling it back a small
amount. You can also make small adjustments to the strut by
loosening the strut bolts and tweaking the strut's position
before tightening the bolts back down.
Begin by discharging your batteries. Cut off the existing
connector one wire at a time. Make sure that you do not let
any part of the exposed wires touch each other. Strip back
about 4mm of wire insulation off one of the wires and pre-tin
the end of the exposed wire with 60/40 radio solder and
soldering iron.
Wakes caused by other boats can upset the balance and ride
characteristics of even a well-trimmed model boat. When
running down the straight-aways, don’t follow in another
boat’s wake. Wakes generated by other boats while entering
and negotiating a corner are especially dangerous. Cutting
across a wake when entering a corner can cause the boat to
“hook” and maybe even flip over.
Racing other boats through a corner presents possibly the
greatest challenge and the first corner after the start of a race
can be especially challenging. The boat entering the corner
first has the task of holding its position (often called “holding
your lane”) through the corner and following boats must then
attempt to hold their lanes. Changing lanes and crossing a
wake to gain a position in a turn can result in “hooking” the
boat and possibly flipping it. Executing a good start in the
inside lane is one key to successful racing.
Avoid beating yourself. In any type of racing, there are some
situations you can control and other situations that you
cannot control. Take time to check that the linkages, fasteners,
prop and radio system are in proper working order. During
the race, making a good start and driving defensively. Most of
all, be well prepared and have fun.
Slide on a length of shrink tubing over the wire and slide it as
close to the battery you can. Pre-tin the end of the wire and
appropriate solder tab on the connector and solder the wire
to this tab.
7
NATIONAL MODEL BOATING ORGANIZATIONS
There are three national model boating organizations in the
United States and Canada:
IMPBA or International Model Power Boat Association
www.impba.net
NAMBA or North American Model Boat Association
www.namba.com
APBA or American Power Boat Association
(RC Boat Category)
www.apba-rcboating.com
For “oval racing” place the buoys similar to the above sketch.
NOTE: The above patterns are not based on any sort of official
standards; therefore, you may set up racecourses any way you
desire, using your imagination to make the races more
interesting. Usually the smaller courses will provide more
action and excitement. The length of the races can be
determined by a set number of laps around the buoys (for
example, the first boat to complete 5 laps is the winner); or by
time (for example, whoever is leading at the end of two
minutes is the winner).
Each of the three organizations has its own rule book governing
model boat racing, sanctioned events, and recognized records.
Organized model boat racing is offered at both regional and
national levels. Location of clubs, race dates and locations,
membership applications, and other information can be obtained
through their respective websites. Another good source for
information regarding all aspects of model boat operation is
http://www.intlwaters.com/
Of course, racing does not have to be an organized and
sanctioned competition to be fun. Small informal races can be
very exciting. Here are some suggestions for setting up a
simple racecourse for boats:
PLEASE READ these valuable running tips as well as the
“Safety Precautions” at the beginning of this manual
BEFORE Running the SuperVee 27 to ensure a successful and
safe run.
NEVER attempt to swim after a stalled or capsized boat! Wait
patiently for the wind currents to return the boat to shore or
use a tennis ball attached to the end of a fishing rod to retrieve
a stalled or capsized boat.
1
NEVER threaten wildlife with any R/C vehicle! This is the
quickest way to get R/C boating banned from your favorite
local pond.
Before running your SuperVee 27, it is a good idea to check
the water-cooling system to make sure all tubes are properly
connected and unblocked.
Check all screws to make sure they are securely fastened.
Make 2 to 4 simple and inexpensive “marker buoys” with
empty milk jugs, string, and heavy objects for anchors, similar
to the above sketch.
CAUTION: Windy conditions cause rough water that will
affect the performance of your SuperVee 27 and increase the
chances of capsizing.
Total run time of the SuperVee 27 is approximately 4 to 7 minutes.
CAUTION! The motor may become hot! Allow it to cool for a
few minutes before touching.
Your SuperVee 27 may take on small amounts of water,
especially when running in rough water and when making
tight turns. Keep a roll of paper towels handy and dry out the
hull interior after every run.
2
Always store your SuperVee 27 with the hatch cover and
radio box cover removed to allow the interior to dry out
completely. If you neglect to do this, it may result in corrosion
of the electronic components.
For “drag racing” place the buoys similar to the above sketch.
8
IMPORTANT: If, for whatever reason, your boat takes on a large amount of water, swamps or sinks, causing the radio
equipment to get wet, you must do the following immediately: Remove the battery packs and radio equipment from the boat.
Allow the components to air dry completely. Reinstall the components and check for proper operation before running the boat
again.
The Waiting Game
If your SuperVee 27 should happen to stall or capsize, water currents and wind will slowly carry it to shore. The bad news is
that the boat could be carried to the opposite shore. Keep variables like wind direction and size of the lake in mind when
surveying areas to run your boat.
It is not advisable to run R/C boats on any free-flowing bodies of water such as creeks or rivers.
HELPFUL TIP:
Use a fishing reel with at least 12lb. line and a tennis ball tied to the end to retrieve a stalled or capsized model boat.
GOOD LUCK AND GREAT BOATING!
ORDERING REPLACEMENT PARTS
To order replacement parts for the AquaCraft SuperVee 27, use the order numbers in the Replacement Parts List that follows.
Replacement parts are available only as listed and can be purchased from hobby shops or mail order/Internet order firms.
Hardware items (screws, nuts, bolts) are also available from these outlets. If you need assistance locating a dealer to purchase
parts, visit www.hobbico.com and click on “Where to buy.” If this kit is missing parts, contact Hobbico Product Support.
Replacement Parts List
Order #
AQUG7000
AQUM7010
AQUB9212
AQUB6201
AQUB9044
AQUB7883
AQUB7884
AQUB6310
AQUB7885
AQUB7886
AQUB7887
AQUB8603
AQUB9012
AQUB7888
Order #
AQUB9518
Description
Marine Brushless Motor, B36-56
Marine Brushless Water-cooled ESC,
45-Amp
ESC Water-cooling jacket, SV27
Fiberglass Cowl, white SV27
Trim Plates w/backplates, SV27
Drive Cable w/prop shaft assembled, SV27
Prop Shaft Bushing, SV27
Decal Sheet, all SV27
Drive Dog with Prop Nut, SV27
Motor cable coupler, SV27
Motor Mount with motor screws,
mounting bolts and screws, SV27
Radio Box with servo tray and Lid, SV27
Servo Linkage w/connectors (all) SV27
FRP 3-blade 40mm Prop (2) SV27
AQUB7880
AQUB7881
AQUB7882
AQUB8713
AQUB7100
AQUB9519
AQUZ1001
AQUB9513
AQUB9514
9
Description
FE Mono Rudder Assembly with
mounting bracket, mounting bolts and
backplate
FE Rudder Blade with set screws and
water fitting
FE Mono Strut Assembly with mounting
bracket and bolts, SV27
FE Mono Turn Fin with bracket, backplate
and bolts, SV27
Rudder Control Arm, SV27
Boat Stand, unassembled, SV27
Aluminum Water cooling Outlet with
mounting nut
Instruction Manual
Silicon Water Jacket, 36/45mm
GrimRacer Cowl Locks (2)
AQUACRAFT™ MODELS GRIMRACER™
SPEED GREASE CABLE LUBE
DURATRAX® 7.2V 3800MAH NIMH PACK
Designed for both electric and nitro boats, this
waterproof blue lubricant — with specially formulated,
“non sling” properties” — reduces friction and wear on
flex cable and direct drive systems. 20 fl. oz. (59mL) jar.
AQUB9500
This stick pack has three things that serious boat
racers need:
• A whopping 3800mAh capacity
• 12-gauge silicone wire
• A Deans® Ultra Plug™ connector
This gives you the capacity of two and a half 1500mAh
sport packs for the weight of one, and the components to
handle the power with ease. Charges at up to 6A
maximum and weighs 15.2 oz. DTXC2162
DuraTrax® Piranha™ DC Peak Charger
DuraTrax® IntelliPeak™ ICE™ DC
Competition Charger, Discharger and Cycler
Compact, lightweight, easy to transport — the Piranha
DC Peak Charger is all of these, plus a perfect way to
enjoy the advantages of peak charging. Only 4” x 3” x
1.6” and under a half-pound in weight, it fits in a pocket
and can go anywhere you do. Hook it up to an 11-15V
DC power source, push the button and it will charge 6or 7-cell, 1200-3600mAh NiCd or NiMH packs at a fast
4A rate. Delta peak detection ensures that the pack will
be charged to the peak of power. An automatic switch to
50A trickle charge makes sure it stays there. Twin LEDs
signal the switch from linear fast charging to trickle
charging, for instant awareness of charging progress.
Includes a charge lead with standard plug and the
protection of a 5-year warranty. DC power source
required. DTXP4002
The little details can make a big difference on race day
— the fewer you need to sweat over, the better! The
IntelliPeak ICE helps you stay cool, with competitionlevel features. Forget battery compatibility issues — the
ICE handles 1-10 cell NiCd or NiMH packs and 1-4 cell
Li-Ion or LiPo packs. Whatever charge rate you need
falls within this unit’s adjustable fast-charge (0.1-8.0A)
and discharge (0.1-10.0A) ranges. Ten memories, four
charging modes (linear, reflex, impulse and “four step”),
the ability to break in electric motors or run commutator
lathes, and more…the large 168 character graphing LCD
screen and simple pushbutton/dial operation make every
ICE function easy to use. DTXP4170
10
AQUACRAFT MODELS™ TOP SPEED™ 2
NITRO ARR
AQUACRAFT MODELS V24
ONE-DESIGN GASOLINE RTR
Beginners will like the ease and simplicity, veterans will
applaud the construction — and both will love the way this
4-1/2’ assault force slices through the surf! The driving force
is a Fuji-Imvac™ BT-24 marine engine, good for up to 40
minutes of high-gear haulin’ per fill-up. A tuned pipe keeps
the action hot...the Tri-Flow water cooling system keeps the
BT-24 running smooth and sweet. Power delivery is courtesy
of a ¼” flex drive and an ASD (Adjustable Surface Drive) that
allows you to fine-tune the angle of the 65mm stainless steel
prop. The fiberglass hull is double-stepped to reduce drag,
and features strakes, a vertical fin and wings to enhance
stability and handling. Fiberglass, aluminum and stainless
steel construction contribute to durability — and control is
courtesy of a Futaba 2PEKA FM radio, metal-geared S3305
servo and the Super Wedge™ rudder. AQUB40**
Based on a record-holding, race-winning design, the Top
Speed 2 has everything an aspiring competition modeler
could want: a high-quality, painted (in red, yellow, orange or
white) and finished fiberglass hull; performance features to
boost speed and improve handling; and a complete hardware
package for installing any radio and engine you choose.
Strakes and water breaks allow the Top Speed 2 to reach
tremendous speeds. A slot on the underside of the cowl lets
you add weight to fine-tune balance. While veteran racers
will no doubt be impressed with the Top Speed 2’s
performance, its ease of assembly and operating simplicity
make it ideal for new boaters, too. AQUB0001 white,
AQUB0002 yellow, AQUB0003 red, AQUB0004 orange
Built under license from ocke mannerfelt design
AQUACRAFT MODELS KING’S RANSOM™
PIRATE SHIP RTR
AQUACRAFT MODELS REEF RACER™ 2 RTR
Dive into offshore action with the Reef Racer 2! It comes out of
the box with decals already in place and the radio gear, motor
and ESC installed. Twin, twist-off hatches on the enclosed hull
and a hook & loop-attached hatch keep ‘em protected against
taking water, but release easily for pack changes and
maintenance. Drop in a pack, bury the throttle and the Reef Racer
leaps into action! You’ll enjoy the quick response of the direct
drive and the Reef Racer 2’s “turn on a dime” maneuverability —
even at top speed. If you happen to flip or roll — don’t worry! The
self-righting hull gets you hatch-side up and back into the action
in seconds. And if you’re a southpaw, you’ll be glad to know you
can adapt the included AquaCraft pistol for left-hand use with just
a Phillips screwdriver and a few minutes. Available in six sizzling
colors — and all of ‘em ready to make waves on the water!
Don’t look any further for a ready-to-run R/C pirate ship,
because AquaCraft has the one and only: the King’s Ransom,
a masterpiece that brings pirate lore to life with its included
motor, ESC, and 2-channel radio system — all installed. The
painted fiberglass hull is decked out with some of the richest
detail you’ve ever seen in an RTR vessel: wood planking,
railings and banisters, retractable walk-plank...even four
pirate figures, hand-painted for realism with a capital “Aaar!”
Using provided polycarbonate inserts, the cloth sails can be
bowed to appear wind-filled on static display. To head out for
high seas, just remove the strips, roll up the sails, and screw
the stabilizing 3-pound keel to the hull. Two handy stands are
included, too — one that accommodates the model plus keel,
and another with name plate for display. AQUB58**
AQUB14**
11