1
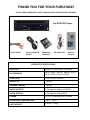
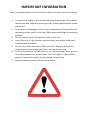
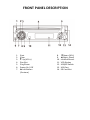
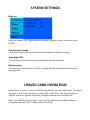
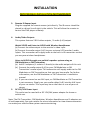
Thank You for purchasing the SD-‐100U CAR DVD/CD PLAYER USER MANUAL V1.2 Bravo View Technology 20153 Paseo Del Prado Walnut, CA 91789 United States of America 909-‐869-‐0699 www.bravoview.com TABLE OF CONTENTS Table of Contents…………………………………………….………………………………………….………2 Package Contents………………………………….………………..………….…….……………….………..3 Specifications…………………………………………………..…………….………………….…….………….3 Important Information…………………………………………………………………..……..…….………4 Introduction……………………………………………………………………………….……………….………5 Care & Maintenance…………………………………………………………………….………………..……6 Remote Control……………………………………………………………………………………………….…7-‐8 Front Panel Description……………………………………………………………………………………….9 Rear Panel Description………………………………………………………………………….……………10 Basic Operations………………………………………………………………………………………..….11-‐12 System Settings………………………………………………………………………………………..……13-‐17 USB/SD Card Operation………………………………………………………………………………….…..17 Installation…………………………………………………………………………………………………….18-‐19 Limited Warranty………………………………………………………………………………………….……20 THANK YOU FOR YOUR PURCHASE! PLEASE TAKE A MOMENT TO GET FAMILIAR WITH THE PACKAGE CONTENTS Car DVD/CD Player 3ft A/V Cable Infrared Remote Sensor Mounting Brackets Wire Harness Remote Control PRODUCT SPECIFICATIONS DISC TYPE DVD±R / DVD± RW / CD-‐R/RW DIC FORMATS MP3 / MP4 / HDCD / WMA / JPEG / VCD / SVCD / DIVX / CPRM TV SYSTEM NTSC OR PAL Format S/N RATIO 85 dB DYNAMIC RANGE 80 dB AUDIO OUTPUT 1 Composite Audio L+R (RCA) VIDEO OUTPUT 2 Composite Video (RCA) POWER DC 12V Consumption 10 Watts OPERATING TEMPERATURE -‐20°C 80°C UNIT WEIGHT 4.0 lbs ( 1.2kg) IMPORTANT INFORMATION Before operating/installing your Car DVD Player, please read these instructions carefully. 1. 2. 3. 4. 5. 6. 7. To ensure the safety of this product during transportation, the internal mechanism was fixed with security screws. Please remove these screws before use. To prevent any damage to the internal components of this product, the mounting screws must be less than 5MM when attaching the mounting brackets. Do not remove the Serial Number Label on this unit. Install the unit in a dry location and avoid any area where build-‐up of condensation is possible. Do not try to load more than 1 DISC at a time. Doing so will jam the internal mechanism and prevent the unit from functioning. If the unit overheats, or malfunctions, turn off the power. After the unit has had adequate time to cool down, turn it on again. If the problem persists, contact the dealer you purchased the unit from. Keep this owners manual for future reference INTRODUCTION The Bravo View SD-‐100U is a full-‐featured Car DVD/CD Player designed specifically for the mobile environment. It’s intended for use with other multimedia products such as roof-‐mount and headrest LCD screens as well many other mobile video solutions. SD-‐100U is equipped with one 3.5mm Audio/Video input. This AUX input allows the connection optional Audio/Video components such as a camcorder, video game system, or a portable media player. This DVD Player incorporates several video output settings to allow the best possible viewing experience, regardless of what type of video monitor you may be using. The SD-‐100U plays DVD discs in NTSC or PAL formats (NTSC is the standard North American video format), CD-‐Audio discs, and CD-‐recordable discs with MP3 files. For more details on disc types supported, please see “Product Specifications” in the front page of this manual. The remote control (included) provides access to the full set of standard DVD functions, such as subtitle control, digital freeze-‐frame viewing, viewing from multiple camera angles, selection of various language audio soundtracks, and digital playback at fast or slow speeds. The SD-‐100U remote also supports direct access to specific DVD chapters or CD tracks. CARE AND MAINTENANCE Handling and Cleaning DVD’s and CD’s Avoid leaving fingerprints on the discs when handling it; always handle a disc by its edges. Always store discs in their protective cases. Always ensure that discs are clean and dry before inserting. Protect discs from heat and direct sunlight. Dirt, dust, scratches and warped discs will cause unit malfunction. DO NOT PUT LABELS ON DISCS Disc Cleaning Use a dry soft cloth to wipe the surface of a disc. If a disc is especially dirty use a soft cloth slightly moistened with ribbing alcohol. Never use solvents such as benzine, or conventional record cleaners as they may damage the surface of the disc. Disc Cleaning REMOTE CONTROL 1. POWER 2. AUX IN Press POWER to turn the unit ON or OFF. Switches to 3.5mm AUX input 3. 4. SETUP For DVD setup, please refer to the “SYSTEM SETTINGS” section. I Skip to previous chapter or track. 5. SUBTITLE 6. Changes the SUBTITLE language on a multi-‐ subtitle language DVD disc. In the MENU mode this button serves as a cursor button to select left. 7. MENU 8. 9. While playing DVD, push this button to display the option menu included in the disc (whether it works depends on the type of disc). Rapid Reverse, each time button is pressed, the speed of rapid reverse changes according to the disc as follows. LANGUAGE Multi-‐language selectable. 10. L/R Multi-‐language selectable. 11. SLOW Slow motion 12. REPEAT Repeat the selected chapter or title. 13. NUMBER BUTTONS (0-‐9) number buttons are used to enter number of CD track or DVD chapter. 14. 10+When you select tracks/chapters over 10, Press 1 time, and then press the next digits. When you select tracks/chapters over 20, press 2 times, then press the next digits, for example "13”, press this key, then press "3". 15. EJECT Press this button; the disc will be unloaded from the player and press it again the disc will be loaded. REMOTE CONTROL 16. OSD Playing time and track information is displayed on the front display. 17. I While playing push this button to skip to next chapter or track. 18. In the MENU mode this button serves as a cursor button to select up. 19. In the MENU mode this button serves as a cursor button to select right. 20. ENTER Press this button to execute the entered number or the selected item. 21. Search the disc forward. 22. In the MENU mode this button serves as a cursor button to select down 23. Play or Pause current content. 24. STOP While playing, press this button once to pause playing, and then press to resume playing. But if you press twice, the playing will be stopped completely. 25. STEP Frame-‐by-‐Frame play. 26. USB/SD Press this button to select USB or SD mode 27. ZOOM Allows the picture to be increased in size. 28. P/N No function 29. VOL+ Volume Up. 30. VOL-‐ Volume Down. 31. MUTE Audio is temporarily interrupted. FRONT PANEL DESCRIPTION 1. 2. 3. 4. 5. 6. 7. Eject Enter Up (VOL+) Disc Slot Play/Pause Power On / Off Left Button (Previous) 8. 9. 10. 11. 12. 13. 14. Down (VOL-‐) Right (Next) Infrared Sensor VFD Display USB/SD Switch USB Port SD Card Slot REAR PANEL DESCRIPTION OPTIONAL NOTE: For Wireless Headphones to work properly, the White & Red RCA output must be connected to your System’s audio inputs. UNIVERSAL LCD MONITOR BASIC OPERATION Power On/Off and Playback 1). Press power button on remote control or on the front panel of the player. 2). Insert the disc into the disc slot, with label side facing upward. 3). The player will accept the disc automatically, and begin to read it; it can identify different disc formats then display it on the TV screen. If directory or menu picture display in the screen, you can press the direction buttons , , and buttons in the remote control to move lighting band to desired title and press [ENTER] button to select it, also you can directly press number buttons to select track. Select item through Menu If the DVD disc has menu, you can display the menu by pressing MENU button, then you can select a popular item to play according to following procedures. 1). Press MENU The screen display menu picture, the content to be selected varies with different discs. 2). Press the directory buttons ,, or to select the desired item. 3). Press ENTER to confirm the selected item. BASIC OPERATION Forward/Reverse When you press FWD/REV under the Play mode, the unit will start to forward/reverse. You can play discs at various speeds. With each consecutive press of FWD/REV, the playback speed changes. There are 4 speed levels for DVD discs in FWD/REV: X2, X4, X6, X8. There are 4 speed levels for disc types other than DVD disc: X2, X4, X8, X16.Press PLAY to resume the normal playback. Track Selection There are more than one operation procedures available A. Press I or I to skip to the next or the previous track and play. B. For those discs with track number, directly Press number buttons to enter the No. of the desired track If the screen displays “Φ” there may be three possible reasons: (1) the track in the disc is not numbered; (2) the number entered is beyond the scope; (3) the disc has no number select function. C. Select among the song track list (such mp3 etc. menu list) Select Subtitle Language For DVD discs, you can Press SUBTITLE to switch the subtitle language. Keep pressing it, and the screen will display available languages alternatively. Select Audio Channel For DVD discs, you can press LANGUAGE to switch the audio channel. And for other discs, press L/R button to switch L/R channel. OSD Press OSD button, TV screen will display current playing time and state, i.e. playing time and remaining time, playing chapter/track information, press OSD each time, the screen will show a time alternatively. SYSTEM SETTINGS System Setup Menu You can press Setup key on the remote control to bring up the System Setup Menu when the unit is under the stop/playback mode. Language Set Press up /down / Left / Right direction button to select an item, and then press ENTER. OSD Language OSD menu set allow user to choose language for OSD menu and information display set option (as picture) SYSTEM SETTINGS Subtitle User can set subtitle language (DVD disc) option Note: Some disc can use subtitle display different from menu set. Audio User can set initials dub language by dub language set (DVD disc). Option Note: Some DVD disc dub language will be different from set dub language. DVD Menu User can set DVD menu language (DVD disc) item select as. Note: Some DVD menu use as different language display. Video Set Press up /down / Left / Right direction button to select an item, and then press ENTER. Aspect Ratio 16:9 (Widescreen): Choose this setting if your DVD player is connected to a widescreen monitor. (Use this mode for Bravo OVR-‐121WFM and OVR-‐154BL) 4:3 (Letter Box): Choosing this setting if your DVD player is connected to a normal ratio monitor. SYSTEM SETTINGS View Mode The user can choose 4 display modes. Fill: the picture will be stretched over entire screen. Original:the picture will be in its original format Auto Fit:the picture can automatically adapt to the screen format Pan Scan: The picture ratio is not changed, it makes picture stretch to whole screen from up and down or left and right TV System According to the Color System of the TV, you can choose the TV System. AUTO: Choose this settings if your DVD player is connected to a multi-‐system TV. NTSC: Choose this settings if your DVD player is connected to a NTSC TV. PAL: Choose this settings if your DVD player is connected to a PAL TV. The default setting is NTSC. SYSTEM SETTINGS Rating Set Press up / down/ Left / Right direction button to select an item, than press ENTER. Set Password The password option is initialized locked, and you cannot set the ratings limit or change the password. In order for the Ratings feature work, the password mode must be turned on. If you want to set the ratings limit, you will need to enter the default password, which is 8888, then press Enter to confirm. To change the password, you will be prompted for the old password, than prompted for a new password. Enter a 4-‐digit number (this is your password). Note: the password is a 4-‐digit number (default is 8888). The Rating feature is a rating limit system, like movie ratings. It works with DVD discs that have been assigned a rating. This helps you control the types of DVD’s that your family watches. There are two rating options: “NO ADULT” and “KID SAFE”. Select the “VIEW ALL” option to cancel the rating limit. The default setting is “VIEW ALL”. SYSTEM SETTINGS Misc set Press up /down / Left / Right direction button to select an item, and then press ENTER. Use Default settings: Choose this option to resume all the setup options to default settings. Auto play DVD: The DVD will skip the title menu and directly play the contents. Memory play: The user may choose power cut when playing DVD whether need memory last playing place. USB/SD CARD OPERATION When there’s no disc, insert the USB Storage Device into the USB/SD slot. The player will auto search the directories for saved MP3 / JPEG files. Also you can use the USB/SD button on remote controller to switch between the USB and DISC. Note: The USB/SD port function is only valid for flash memory USB/SD devices. (Supported formats: MP-‐3, WMA, MP-‐4 and JPEG) INSTALLATION PROFESSIONAL INSTALLATION RECOMMENDED! 5. DC 12V/24V 1. Wire Harness 3. Remote IR Sensor Input 1. 2. 2. AUX 3.5mm Audio/Video Input 4. Audio/Video Outputs Wire Harness (a) +12V switched lead (red) Connect the red lead to a suitable +12V circuit switched through the ignition (b) Battery negative lead (black) Connect the black lead to a suitable ground (vehicle chassis). Keep the ground wire as short as possible. Longer ground wires can lead to engine noise through the speakers. Ground wires should be no longer than 30” in length. Note: there is no constant wire lead in this system. This DVD player uses internal flash memory to remember its last position memory. AUX 3.5mm Audio/Video Input This input can be used with a wide variety of audio/video components. Most standard 3.5mm plugs can be used with this input. INSTALLATION PROFESSIONAL INSTALLATION RECOMMENDED! 3. 4. 5. Remote IR Sensor Input Plug the supplied the remote sensor jack directly. The IR sensor should be placed in a direct line of sight in the vehicle. This will allow the remote to control the DVD player remotely. Audio/Video Outputs This system features 2 RCA video outputs / 1 audio (L+R) output. Watch VIDEO and Listen to AUDIO with Wireless Headphones (a) Connect the video output to the monitor’s video input. (b) Connect the audio output (L+R) to your universal LCD monitor’s audio inputs. This connection will supply audio to the built-‐in IR transmitter so that you may use wireless headphones. Listen to AUDIO through your vehicle’s speaker system using an FM Modulator or FM Transmitter. (a) Add 2 Y-‐adapters (1 male-‐to-‐2 female) to the audio outputs of this unit. (b) Connect the audio output (L+R) to your FM Modulator or FM Transmitter’s audio inputs. This connection will supply audio to the FM Modulator or FM Transmitter so that you may hear audio. For further information, see the FM Modulator or FM Transmitter’s installation manual. (c) If your car stereo has an AUX input, an FM Modulator or FM Transmitter is not necessary. Simply run your audio cables (L+R) into the AUX input of your car stereo. This input may be on the front or rear of your car stereo. DC 12V/24V Power Input This outlet can be used with a DC 12V/24V power adapter for home or vehicle use. Note: The FM Transmitter, FM Modulator, Wireless Headphones and Y-‐adapters are all sold separately. See your retailer for more information on how these accessories can make your mobile video system more entertaining. Limited Warranty Bravo View Technology warrants this product (including any accessory and/or cable) against defects in material or workmanship as follows: 1. Labor. For a period of 1 Year from original date of purchase, if the product is determined to be defective, Bravo View will repair or replace the product at no charge. 2. Parts. For a period of 1 Year from original date of purchase, Bravo View will at no charge, replace with new or rebuilt parts in exchange for defective parts. The warranty will either continue from date of original purchase or 90 days from repair (Whichever is longer). This warranty does not cover customer misuse, improper installation, poor signal (including any “noise”), cosmetic damage, damage due by accident, abuse, negligence, commercial use, and improper operation. Proof of Purchase in the form of a copy of a bill of sale or copy of receipted invoice, which shows clearly the sale of the unit, is required. Repair or Replacement as provided under this warranty is the exclusive remedy of the consumer. Bravo View Technology shall not be liable for any incidental or consequential damage for breach of any express or implied warranty on this product. In no event shall Bravo View Technology be liable for any incidental or consequential damage whatsoever arising out of the use or inability to use the product. Under no circumstance shall Bravo View Technology’s liability exceed the purchase price paid for the product. Except to the extent prohibited by applicable law, any implied warranty or merchantability or fitness for a particular purpose on this product is limited in duration to the duration of this warranty. PROCESS: 1. 2. 3. 4. 5. Contact Bravo View and describe the problem with the unit. Please have your model number, date of purchase and where it was purchased ready. If requesting on-‐line, please include your name, address and telephone number. If determined that the item is warrantable, Bravo View will issue a RA# and provide an address to mail the unit back to. Bravo View is not responsible for articles lost or stolen during shipping. IT IS ADVISABLE TO SHIP THE UNIT IN A METHOD IN WHICH YOU CAN TRACK THE PACKAGE, AND POSSIBLY INSURE THE PACKAGE. Bravo View does not cover the expense of mailing the unit back to us. Once Bravo View receives and validates the unit to ensure it is within warranty, Bravo View will replace the unit, fix the unit, or offer a substitute of the unit if a replacement is not available. Bravo View may send a refurbished unit back. Bravo View will mail the unit back to you. To obtain warranty service, you must contact Bravo View Technologies for a Return Authorization Number (RA#). 866-‐40-‐BRAVO or visit www.bravoview.com.