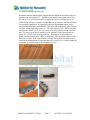
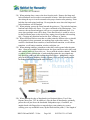
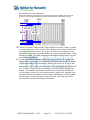
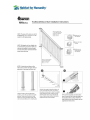
1
Do’s and Don’ts (Not a How-To)1 “Smart people learn from their mistakes. But the real sharp ones learn from the mistakes of others.” ― Brandon Mull, Fablehaven GENERAL INFO LINOLEUM SUB-FLOOR DOOR / DOOR CASING WINDOW / WINDOW CASING / SCREENS INSULATION & DRYWALL/SHEETROCK CABINETS CERAMIC TILE LAMINATE FLOOR SHELVING BASEBOARDS ATTIC ACCESS (SCUTTLE HOLE/HATCH) PATCHING BASEBOARDS, CASINGS, DRYWALL PAINTING & CAULKING STAIRS CEMENT & LUMBER EXTERIOR RAILINGS LIGHT FIXTURES AND BULBS TOWEL BAR, TOWEL RING AND TOILET PAPER HOLDER 3 27 35 43 47 55 59 71 91 97 101 103 109 115 123 129 141 145 APPENDICES (Tables & Manufacturer’s Manuals) How To Install St James Flooring (Dream House) Locking Laminate Planks – Wood and Tile Visuals (Armstrong) Trigonometric Tables Laminate Floors: How To Replace a Flooring Plank (Family Handyman) How To Replace Laminate Floor Board In Middle Of A Floor (Home Guides) How To Replace Laminate Planks (Kool Guide) FIBERON Traditional/Deluxe Railing Installation Instructions 1 148 150 152 153 158 161 167 Attributions were supplied where possible. Insufficient or non-existent attributions should be remedied if required. HHGL DO and DONT - 25.doc Page 1 10/25/2013 5:14:55 AM HHGL DO and DONT - 25.doc Page 2 10/25/2013 5:14:55 AM GENERAL INFO 1. Wear goggles when sawing with the table saw, miter saw, hand saw, jig saw, wet tile saw or multi-tool. 2. Wear goggles when nailing, stapling, drilling, using powder actuated hammers, etc. 3. The following are the standard tools used. Though not shown, stored with the tape measures are chalk lines. A chalk line is a spool of string coated with colored powder that can be strung out between two points on a piece of wood and then snapped against the wood, to place a straight line on the wood. NOTE: Red chalk has a dye in it that is difficult, if not impossible to remove. The blue chalk is also difficult to remove (wash as much away as possible with water and paint over), but may be a better alternative, especially over semi-gloss paint over sheetrock (more difficult over textured walls). 4. Various glues, caulking, adhesives and sealers are also used, some of which are shown below. HHGL DO and DONT - 25.doc Page 3 10/25/2013 5:14:55 AM 5. Various types of expanding foam are used, some of which are shown below. 6. A variety of nails are used, some of which are shown below. HHGL DO and DONT - 25.doc Page 4 10/25/2013 5:14:55 AM Nails are designated by length as shown in the following chart. Starting with 1” for 2d, each incremental “d” is ¼” longer. HHGL DO and DONT - 25.doc Page 5 10/25/2013 5:14:55 AM 7. A variety of screws are used, as designated by head types, some of which are shown below. For additional information about Torx screws, refer to the following table. HHGL DO and DONT - 25.doc Page 6 10/25/2013 5:14:55 AM Examples of Robertson and Torx headed screws and where they are used is given below. HHGL DO and DONT - 25.doc Page 7 10/25/2013 5:14:55 AM HHGL DO and DONT - 25.doc Page 8 10/25/2013 5:14:55 AM 8. When using an extension cord, make a loop out of the power cords as shown below, to prevent them being pulled apart while putting the least amount of strain on the cords which could result in damaged wires. www.artofmanliness.com 9. The baseboards (.563” x 3.5”) and door/window casings (.685” x 2.5”) used are shown below. Lowes Lowes 10. When using saw horses or benches, ensure they are level to the ground, fully open and if applicable, latched. 11. When working in rooms where there is normally water access, beware of .5 inch blue or red PEX (cross-linked polyethylene) piping that are capped with test plugs during the early construction phase (http://www.fixtureuniverse.com). These pipes are pressurized and the test plugs should not be removed, the pipes should not be bent, cut, etc. Working around these pipes typically occurs when installing sheetrock, cabinets, vanities, insulation and baseboards. HHGL DO and DONT - 25.doc Page 9 10/25/2013 5:14:55 AM NOTE: The placement of PEX is normally not a concern. However, when PEX is for a toilet, where piping is normally visible, it should be positioned such that it will go above the baseboard (and not thru the baseboard as shown above). The rule of thumb is 6” off the center of the C/L of the waste line and 6” above the subfloor. This is more than adequate to be above the baseboard material used (3.5”). Additionally the PEX should be affixed to a structure such that it will not move or point at an odd angle, such as that shown above with the copper restraint. This comprises a pre-formed stub-out with an attachment plate. If PEX is forced to go thru a baseboard, for whatever reason, especially near the curved top, only a partial flat surface is present for the conical sleeve/flange to sit against. For the case where the PEX must go thru the baseboard, a few things can help the situation. First, a .5” long piece of scrap PVC piping can be cut lengthwise, resulting in multiple curved pieces. These pieces can be placed in the hole in the baseboard and against the PEX acting as a wedge, to adjust the trajectory of the PEX. Additionally a scrap piece of baseboard can be painted, inverted, and turned finished side towards the wall and glued in place above the baseboard over the position of the PEX, and if necessary around the PEX. The result is a flat surface (by the combined baseboard and inverted baseboard) that the conical sleeve/flange covering the water pipe can sit against. Depending upon where the PEX comes thru the baseboard, larger pieces of inverted baseboard may be needed. If necessary, caulk between the inverted baseboard and wall. 12. To operate the BOSCH 4410L miter saw: grasp the handle; use your thumb to press the either RED left/right “LOCK-OFF” safety switch; pull/squeeze your fingers that are wrapped around the handle and BLACK power switch lever; release the “LOCK-OFF” safety switch; let the saw come up to maximum speed before starting your cut. Also, allow blade to stop rotating before raising the blade out of the work piece. And only then, remove the work piece from the miter table. From the BOSCH user manual: HHGL DO and DONT - 25.doc Page 10 10/25/2013 5:14:55 AM “WARNING: Never pull the saw toward you during a cut. The blade can suddenly climb up on top of the work piece and force itself toward you”. It also says “Lower the assembly all the way down and cut through the edge of the work piece. Push (but do not force) the head assembly towards the fence to the full rear position to complete the cut. Wait until blade comes to a complete stop before returning head assembly to the raised position and/or removing work piece.” 13. When using the BOSCH 4410L miter saw, if used with an extension cord, it should be used with a 3-wire, 3-blade grounded plug: less than 25 feet long and 14 gauge (AWG) or larger; less than 50 feet long and 12 gauge (AWG) or larger. 14. When using the BOSCH 4410L miter saw, consider setting it up on a raised surface such as on a board supported by two saw horses or benches. This will allow you to more accurately see what you are cutting and reduce back fatigue. Do not use on the ground/floor. Ensure that the board is large enough so that the saw will not rock forward and back. Be sure the board is thick enough so that the wood does not bend in the middle. Consider using temporary nails (hammer in and then bend over) in the base mounting holes to secure the miter saw. Put saw horses and wood away at the end of the day. Miter saw can be placed on top of the table saw at the end of the day so it can be easily secured. 15. To use the BOSCH 4410L miter saw, the red lock pin must be disengaged (34) and the black slide rail lock knob (24) (6 lobed) loosened. 16. If having difficulty cutting stock with the BOSCH 4410L miter saw, stop and examine the blade. If you need to replace the blade: 1) loosen front and rear cover plate screws, 2) lift the lower guard and the cover plate so blade bolt is accessible, 3) press arbor lock (40) and turn blade bolt clockwise, 4) remove blade bolt, outer washer and blade. 17. When using the Dewalt D55146 4.5 GAL compressor, it should be lying down horizontally. Also the compressor, if used with an extension cord, should be used with a 3-wire, 3-blade grounded plug, less than 50 feet long and 12 gauge (AWG) or larger (DO NOT USE 14 or 16 AWG). While usable outside, shield in HHGL DO and DONT - 25.doc Page 11 10/25/2013 5:14:55 AM the event of rain. 18. Disconnect the pressure hose (also yellow or orange) to the staple and/or nail gun before re-loading. The pressure hose has a quick disconnect with pull-down sleeve on it at the end that connects to the gun (3/8” NPT Male plug). In order to separate the tool from the hose, the pull-down sleeve on the hose must be grasped and pulled down against the resistance of a spring (https://www.osha.gov). The hose will pop out, so be prepared. To reconnect, pull back the pull-down sleeve and push onto the nozzle of the gun. 19. When the first to use the staple or nail gun each morning, put two drops of oil into the male air intake at the base of the gun. 20. Use the staple gun for the sub-floor. Use the finishing nail gun for door trim, window molding, closet cleats, attic scuttle, baseboards, fascia, etc. Use the framing nail gun for dense wood as in the 2” x 4” used for door frames, stair treads & risers, landings, etc. 21. When stapling, staple across the grain. For example for a long piece of wood the grain will probably go the length of the wood. Position the gun parallel to the length of the wood. The stapler will insert a staple across the length of the wood. If the stapler were used perpendicular to the length of the long piece of wood, the staple would insert a staple with the grain of the wood – thus both ends of the staple could be in the same grain and cause a split. This is especially important to consider if stapling near the edge of the wood as in a door casing. 22. For the nail guns use the appropriate nails. For the Hitachi nail guns, consider only using the Hitachi nails, just to be sure of compatibility (especially magazine angle). Look on the nail package to see the specifications. Using the wrong nails will jam the gun. Do not add a nail strip with less than 5 nails in it. Keep your hands and feet 8” away from the firing head. Nail as flush to the surface being nailed as possible. While sometimes an angle is desired, too steep an angle can result in ricochets. Similarly, while sometimes nailing near a corner or thru thin stock is desired, too fragile an area can result in the nail going totally thru the stock. If it appears that multiple nails are being driven at one shot, double check the lever near the trigger. There will be what appears to be a label with a single nail or a label with multiple nails. Ensure the lever is at the single nail position. See the chart below for information on the various Hitachi nail guns and staplers used at our site. NT65MA4 Finish Nailer Fastener Length 1.25"-2.5" HHGL DO and DONT - 25.doc Fastener Diameter 15-gauge Page 12 Magazine Angle Angled 34º Magazine Capacity 100 nails Misc 10/25/2013 5:14:55 AM N3804A Stapler .5"-1.5" 18-gauge Straight NR83A2(S) Framing Nailer Framing Nailer 2"-3.25" .113-.131 2"-3.5" .113-.148 Angled 21º Angled 21º R90AE(S) 100 staples 64-70 Narrow Crown .25" 64 34º HHGL DO and DONT - 25.doc Page 13 10/25/2013 5:14:55 AM 23. When using RIGID TS2410LS table saw with an extension cord, the rating must be 14 AWG @ 25’, 12 AWG @ 50’ and the service must be 15 AMP. 24. When ripping long pieces of stock with the RIGID TS2410LS table saw, both for when feeding the stock into the blade and when collecting the stock coming out of the blade, consider using adjustable folding pedestal rollers and a helper. 25. If having difficulty cutting stock with the RIGID TS2410LS table saw, stop and examine the blade. If you need to replace the blade: 1) lower the blade into the table, 2) remove the throat plate, 3) place small open blade wrench on flats on the arbor shaft, 4) place large closed blade wrench on hex nut on arbor shaft, and 5) turn large blade wrench towards the front of the machine. 26. When using the RIGID TS2410LS table saw, a push handle gives operators very good directional control while pushing the piece across the blade. Also, set the blade just high enough so that the bottom of the gullets, are at, or just below the top surface of the wood at their highest point. That helps the blade clear sawdust and introduces cooling air into the cut. When making a stopped cut, to get a straight up/down cut, using a jigsaw may be an alternative. The relationship of the wood to the blade gullet is shown below (http://www.familyhandyman.com, www.newwoodworker.com & http://www.waterfront-woods.com.) www.newwoodworker.com www.newwoodworker.com RIGID HHGL DO and DONT - 25.doc Page 14 10/25/2013 5:14:55 AM 27. Check circular power saws before using. If the cutting is difficult, a possibility is that you are using a saw configured for linoleum in which case, when looking at the leading edge of the saw blade (where the material to be cut makes its first contact with the saw blade), the teeth of the blade will point down or with the direction of travel of the material (1st photo below). For wood, the teeth of the blade will point up and against the direction of travel of the material (2nd and 3rd photos below). LINOLEUM 28. Jig saws are available to make cuts in wood where a vertical edge at the end of the cut is needed, as opposed to the curved edge (matching the curvature of the respective blade) of the table, miter or power saws. A jig saw is also useful when needing to cut an area partially thru, or within a piece of wood, rather than cutting straight all the way thru a piece of wood which the table, miter and power saws are good at. For example, when laying down a laminate floor, when you come to a register in the floor, and need to cut a rectangle in the center of a laminate plank, some jig saws can start the cut without a pre-drilled hole – a plunge cut, and then traverse around the edge of the marked cut-out for the register. 29. There are a variety of jig saws with a variety of features. Some have lasers on them that show you the path of the jig saw on the stock. Some have variable speed. Some are electric or battery powered. Some can tilt and make 45º cuts into the stock to give chamfered or beveled edges. The Milwaukee 6268-21 jig saw is shown below and is used as an example in this document. 30. To operate the Milwaukee, place it as you would a power saw (placement on stock, use of cutting guide, etc.). Per their documentation, press the lock button (11). Squeeze the On/Off switch (10). To change the speed of the reciprocating blade, slide the speed control dial (12). Depending upon the make and model of the jig saw you use, these controls will be in different places but should be easily located. HHGL DO and DONT - 25.doc Page 15 10/25/2013 5:14:55 AM 31. If having difficulty cutting stock with a jig saw, inspect the blade. If worn or burnt, change it immediately. Many jig saws use a simple screw in the side of the plunger to hold the blade in place. Some use a T-shank blade, like the Milwaukee. To change a blade on the Milwaukee, per the documentation, rotate the Quik-Lok lever (1) and hold it in position. Remove the old blade. Insert the new blade, fitting it over the groove in the support roller and push it firmly into the plunger as far as it will go; the lug of the saw blade must be in the plunger. Release the Quik-Lok tension lever. Note that the slot in the plunger will be at an angle to the blade. . 32. If you need to make a cut where there is an angle along the direction of travel of the blade, you can tilt the shoe up to 45º in either direction. To do this on the Milwaukee per the documentation, loosen the shoe adjustment lever (9) and pull the base forward slightly until the retaining lugs are no longer engaged. Tilt the show to the required preset angle (15º, 30º, or 45º) as read on the tilt angle scale. Push back the show into the retaining lugs and tighten the show adjustment lever. If angles other than the presets are required, set the desired angle and tighten the shoe adjustment lever without engaging the retaining lugs. 33. Power drills are available to make holes in material, either as pilot holes for screws, access holes for jig saw blades when the plunge cutting capability is not supported, holes for material pass thru such as PEX water pipes thru baseboards, screwing screws into brackets or sheetrock, screwing nuts onto bolts, etc. Features include variable speed, reversible direction, battery/electric operation, etc. A major distinction that needs to be understood for proper operation is what type of chuck is on the drill so you can determine which types of bits can be HHGL DO and DONT - 25.doc Page 16 10/25/2013 5:14:55 AM supported. If there is a limitation on bits supported, multiple drills may be needed. The common drill chucks and which bits they support are shown below. 34. Another feature of drills is the ability to control the torque applied to the chuck which in turn drives whatever bit (drill, screw, nut, etc.) is attached. When the desired torque is reached the chuck will no longer turn and a ratcheting noise will be heard. This will prevent applying excessive force to your bit/stock (e.g., stripping the bit head, the screw head, embedding the screw too deep or through the stock, etc.). For the desired torque, on the collar around the drill just before the chuck you will see numbers. The lower the number the more readily the chuck will stop. The higher the number, the less readily the chuck will stop. As you work on denser material you will most likely want a higher number. You can start with a lower number for a given task and gradually increase the torque until the desired effect is achieved. A combination of speed (governed by the trigger) and torque and muscle can be applied for greater effectiveness. For example, to drive through dense material, you might want a higher torque, but a lower speed. This might also give you better control. Also “putting your shoulder” into the back of the drill may help HHGL DO and DONT - 25.doc Page 17 10/25/2013 5:14:55 AM keep the bit seated into the screw head and prevent the bit from jumping out of the screw head prematurely. While undesirable, sometimes things need to be undone. This includes removing screws. Again, for dense material, when starting off, when the most torque is needed to remove a screw (the stock in contact with the bottom of the screw head provides a restraining force to being turned due to friction), a slow speed and muscle will potentially make removal of the a screw successful endeavor. Without these, a stripped screw head or a broken off screw head could result. 35. Another feature is that of impact. An impact drill has the ability to impart higher torque in bursts. This can be extremely helpful in very dense material. For example with a regular drill, when drilling into dense stock, with the lowest speed, with full muscle applied and the highest torque setting, the chuck will no longer turn, an impact drill may be your next step. But be careful, you may have to govern the amount you use the tool to prevent over-tightening or breakage from sustained use. The Milwaukee 2401-20 and 2650-20 are shown below. 36. One last feature is that provided by a hammer drill. Examples are the Hilti Hammer Drill (UH-700) and the Milwaukee 08240-20. They provide both a percussion drilling mode, for masonry, and a rotary drilling mode for wood and metal applications. 37. For all tools, keep the pneumatic hose, electrical cord, etc. out of the nailing, drilling, or cutting area. 38. For all tools, without turning on the power, place the tool “in-place” on the work piece and align properly. For saws, the stock should not yet be touching the blade. See personnel for specific guidance. Once all alignment and safety checks have been performed (hands out of the way, safety equipment in place, body a safe distance away, etc.), slow, careful, safe operation can commence. 39. Only cut wood and plastic/PVC railings with the standard miter saw, table saw, power saw, coping saw or jig saw. Use proper techniques to secure stock, especially pieces that are small or that easily fracture. Do not use these saws with fiber cement siding. There are special saws and shears for fiber cement siding. For straight cuts scribing the back of a board with a utility knife and snapping it over a 2x4 yields a clean break as long as you scribe it uniformly. Cut rigid insulation with a hand saw. Cut insulation (roll or batt) using a utility knife. HHGL DO and DONT - 25.doc Page 18 10/25/2013 5:14:55 AM 40. Cut plaster/sheet rock by drawing a line or placing a side of a metal square where the sheet rock is to be cut and then scoring it with a utility knife. Bend the sheet rock at the score line, turn the sheet rock over and cut the backing at the bend. 41. If a nail needs to be removed from finished wood, especially, if the nail head is flush to the finished wood, rather than trying to use the claw of a hammer or pliers, consider using a nail punch to drive the nail all the way thru the wood, and then filling in the hole with putty later. 42. If a nail extends out of a piece of lumber; needs to be removed; the nail will not be re-used; and traditional means have failed there is a simple trick to remove it. Use a claw hammer and position the nail between the claws at the base of the nail, not at the head. Then bend the hammer to the left or right side, 90° to the normal direction of travel -- claw-to-head. This will bend the nail around the claw, effectively making a new virtual head for the nail. As you continue to bend the hammer, the hammer will use this new head to pull the nail out of the lumber. You can then remove the hammer, place it again at the new base of the nail and repeat the above. You may find it useful to bend left sometimes, right at other times. Also, both to protect the wood and for a little more leverage, placing a piece of wood next to the nail and beneath the hammer head may help. 43. If a screw needs to be removed and the head has been stripped, it might be worthwhile to drill into the head of the screw with a drill whose diameter is the size of the screw head. Then the head will shear off. The lumber can then be pulled out with the screw in place. 44. If a screw has been partially removed and the screw head is sheared off, it might be possible to tighten a drill chuck over the remnants of the screw (treating the screw like a drill bit) and then using the drill to unscrewing the screw. 45. When using ladders: Place on stable, clean, level surfaces. Keep hands and feet clean as well as any mud, paint, caulk or dirt can make it unsafe for you or the next person to use the ladder should any of these contaminants get transferred to the ladder Keep ladders away from electrical wiring, corrosives, and flammables’. Stay at least 10’ away from unguarded, energized lines up to 50 kilovolts. HHGL DO and DONT - 25.doc Page 19 10/25/2013 5:14:55 AM For every additional 10 kV, increase distance by an additional 4” of clearance. (http://www.safetyandhealthmagazine.com) Inspect ladder components to ensure they are dry, clean, safe and in good working order. This includes the ladder steps/rungs, side rails, rope on extension ladders (no fraying, tangling, knots or in an obstructive position) , locking devices, safety feet, wood & metal parts (no dents, no broken parts, no visible metal fatigue, no sharp edges, no splinters, no loose or rusty pieces, etc.), etc. Don’t overextend equipment, don't overreach (too far out, too high up) body For step ladders always fully extend and lock the spreader bar For step ladders, do not use as a straight ladder, even if in a closed position. The front pads could slip. For step ladders, always stay below the top three steps For extension ladders, always stay below top two rungs For extension ladders always have 3 points of contact with the ladder, both feet and one hand. For extension ladders, set-up using a 75° angle between the ground and ladder. This is 4’ of height for every 1’ from the base of the ladder to the base of the wall (4:1). A ratio greater than 4:1 could cause the top of the ladder to tip away from the wall. A ratio of less than 4:1 could cause the base of the ladder slipping on the ground away from the wall. A simple way to determine if the angle is correct is for you to stand with your toes touching the base of the ladder at the rails, and if the tips of your fingers just touch the rung nearest your shoulder, the angle is correct. www.cbs.state.or.us http://www.compliance.gov For extension ladders, to set-up: place base of ladder against wall; go to other end of ladder and lift top of ladder over head; walk towards wall, pushing ladder up as you go, until ladder is vertical, against wall; keep ladder vertical and move it ¼ the distance of the desired ladders length; raise the fly section of the ladder, placing you foot on the base rung for stability once it is clear; and then lean the ladder against the wall. Ensure the 4:1 rule is implemented. HHGL DO and DONT - 25.doc Page 20 10/25/2013 5:14:55 AM www.cbs.state.or.us 46. Ask questions when in doubt. Report issues. Don't do anything that seems unsafe. 47. At the end of the day put staple and nail guns, as well as multi-tools back in their molded plastic cases, including small containers of oil, if any. Return to tool shed. 48. At the end of the day, wash out paint brushes and buckets using outside hose. Turn buckets upside down and leave out with brushes to dry. 49. At the end of the day, when returning power tools to the tool shed, for battery powered tools, remove the battery and place the battery in the appropriate battery charging unit. 50. At the end of the day put drills in the tool shed. Remember to put drill bits, sheet rock bits, torx head bits or square head screw bits in their proper case. 51. At the end of the day coil up all electrical extension cords, and store where directed. This includes the tool shed or in a secured area of the home being built. 52. At the end of the day loosely coil up all compressor hoses, and store where directed. Avoid getting kinks into the hoses. This includes the tool shed or in a secured area of the home being built. 53. At the end of the day, the moisture in the Dewalt D55146 compressor needs to be released. Ensure Auto/Off switch (L) is in the OFF position. Turn regulator knob (F) counterclockwise until fully closed. The drain cock valve (M) (black) is located on the underside of the compressor as it is lying down. From the DEWALT D55146 documentation, ensure drain cock valve is at the lowest point (this will assist in removing moisture, dirt, etc. from air tanks). Stand clear of the drain cock valve so that the moisture (and air) released does not point your way. Also, as the moisture (and air) is expelled it may kick up dust from the floor, so be prepared for the dust or move the compressor to a cleaner area. Grasp lever on drain cock valve. Slowly rotate lever to gradually bleed air from air tank. When air Tank Pressure Gauge reads 10 psi, rotate valve to the fully open position. Close drain cock valve when finished. Store unit in upright position. 54. At the end of the day, the blade in the table saw should be lowered beneath the table. 55. At the end of the day, the BOSCH 4410L miter saw should be secured – saw arm/handle down and red lock pin engaged (34) and head assembly slid to the HHGL DO and DONT - 25.doc Page 21 10/25/2013 5:14:55 AM rear as far as it will go and black slide rail lock knob (24) (6 lobed) tightened. 56. At the end of the day, chain together, thru sturdy non-removable handles/bars, the compressor, table saw and miter saw. Otherwise store in tool shed or where designated. 57. At the end of the day, put carpenters pencils, utility knives, hammers, safety glasses, gloves, knee pads, tape measures, duct tape, carpenters aprons, and tool belts in the appropriate can/bag/tub in the tool shed. 58. At the end of the day, sweep up any saw dust or insulation particles. Throw unusable discard wood, insulation, PVC, etc. into trash. Ask if not sure what is unusable. 59. At the end of the day, wrap the tip of caulking tubes with blue masking tape to forestall the caulks hardening. 60. At the end of the day, empty and then discard water bottles in recycle bin. 61. The general layout of the tool shed is shown below (left side when entering, followed by right side when entering): HHGL DO and DONT - 25.doc Page 22 10/25/2013 5:14:55 AM HHGL DO and DONT - 25.doc Page 23 10/25/2013 5:14:55 AM HHGL DO and DONT - 25.doc Page 24 10/25/2013 5:14:55 AM HHGL DO and DONT - 25.doc Page 25 10/25/2013 5:14:55 AM HHGL DO and DONT - 25.doc Page 26 10/25/2013 5:14:55 AM LINOLEUM SUB-FLOOR 62. When doing a sub-floor, for linoleum tile, the floor must be clear of all debris such as plaster droppings, protruding nail/screw heads, protrusions of wood from the floor, etc. Any of this type of debris will interfere with the sub-flooring seating properly and will be noticeable when stepped on. Sweeping the floor will make it easier to see this debris. Also looking around the seams of the floor will help find nail/screw protrusions. Using a heavy duty floor scraper, plaster droppings can be detected and removed. The scraper will also find nails and screws, which should then be driven into the floor with a hammer. Use a shopvac to suck up debris. Running the nozzle along the floor will also find debris/protrusions which should be corrected as described above. You may have to repeat these steps a few times. 63. When prepping the floor for the installation of the sub-floor, go around the perimeter of the floor – where the baseboard will go – and look for any paper, plaster or plastic that is sticking out from under the walls. Use a utility knife to trim what is sticking out. 64. Before you lay down any sub-floor sheets, assuming the joists in the floor and the studs in the wall line up, and both have the same on-center distances, mark at the base of the wall where the joists of the floor are. Make the mark so that when the baseboard is installed, the mark is covered and repainting the wall is not necessary. It is possible that the sheet rock has screws at the base of the sheet rock where the studs in the wall are, but they may also be where the bottom plate or shoe is located, so these screws may not be indicative of where studs are located. Hence HHGL DO and DONT - 25.doc Page 27 10/25/2013 5:14:55 AM the above is a good thing to do anyway. Knowing where the studs are (│or ║) can aid in the later installation of cabinets, vanities, door casings, baseboards, etc. Also knowing where electric outlet (Ø) wires, electric light switches (S), heat ducts/returns (HEAT), water pipes (P) and toilet are will tell you where NOT to nail. 65. When laying the first sheet (4’ x 8’ x 3/16”) of sub-floor: 1) make sure the subfloor sheet does not directly overlay the plywood sheet of the rough floor, it should be staggered by 4’ (length-wise). Compare the before and after photos below to see this staggering; 2) make sure the sub-floor sheets are perpendicular to the floor joists; 3) make sure the nailing pattern is facing up; 3) make sure the 8’ side of the 1st sub-floor sheet is parallel/equi-distant from the far wall. Thus, when you finish adding succeeding rows, you end up parallel with the far wall. Succeeding rows should be staggered by 4’ such that you never have the corners of 4 sub-floor sheets meeting. Dark lines in photo added for clarity. BEFORE HHGL DO and DONT - 25.doc AFTER Page 28 10/25/2013 5:14:55 AM 66. When laying sub-floor knee pads may be beneficial. 67. When stapling sub-flooring, due to the noise from the staple gun and due to the large quantity of staples used, ear protection may be beneficial. 68. Keep a .125” gap around sheets, on all edges. See dark lines in photo, above. 69. Go for simple easy cuts. See the photos, below, for various cuts. 70. When you come to a door threshold, you should cut to the edge of the threshold and then use another piece for the threshold, as opposed to trying to cut your piece to have a piece that sticks into the threshold. See the two areas on left side of the second photo, above, showing the gaps between pieces. 71. If you encounter an irregular area and you need to use two pieces, put the seam where it will be less visible/impactful, i.e., closer to a wall, rear of closet, etc. When working on an area with pieces, try not to use a really narrow piece and a wide piece. This will be unappealing. 72. When doing a threshold, if the areas on each side of the threshold will have different types of flooring, one part of the threshold should match the material on that side of the threshold and the other part of the threshold should match the material on the other side of the threshold. But don’t make the meeting of the two materials in the middle of a door threshold where the door meets the stop. The two types of flooring could be visible together. Instead, the meeting point should be under the door and recessed from the door stop by .125”. This way what you see on each side of the threshold when the door is closed is the material on that side of the threshold. You should NOT see the two different flooring materials. HHGL DO and DONT - 25.doc Page 29 10/25/2013 5:14:55 AM Below, see the threshold where linoleum will go and the various other floorings it will abut (ceramic tile, laminate, basement steps) during various stages of installation. ceramic tile & rough floor ceramic tile & sub-floor ceramic tile & linoleum Where door meets door stop ceramic tile, linoleum & threshold rough floor and sub-floor laminate & sub-floor laminate & linoleum linoleum, threshold , basement riser laminate, linoleum & threshold 73. When stapling the sub-floor, use 2.25” staples. Staple on the blue X’s. Start with a line of staples (every X) that goes from the middle of the outer edge of a long side (8’) across the sheet to the middle of the outer edge of the other long side (1). This bisects the 8’ x 4’ piece into two 4’ x 4’ pieces. Go two rows over and put a staple at just the ends of the row (2). Go two rows of X’s over and staple every X in that row (3). Repeat (4, 5). Put a staple in every X of the last row of X’s (at the outer edge of one of the 4’ sides) (6). Go back to the first row you did and now do as you did for the first section, going in the opposite direction. After finishing the row to the outer edge of the last 4’ side (12), make sure there is a HHGL DO and DONT - 25.doc Page 30 10/25/2013 5:14:55 AM staple in every X on the perimeter of the sheet. By working your way from the center out (1-6, 1-12) you avoid bulging/buckling. Do your other sheets. Remember to keep a .125” gap around sheets, on all sides. When the floor is complete, come back and make sure there is a staple on every X on the sheet. Weyerhauser sub-flooring was used. SurePly nailing pattern is shown in the photo below as a Weyerhauser nailing pattern photo was not available. 74. When stapling, look at the chamber holding the staples periodically to determine if you are close to running out of staples. Unless you are experienced, you will not be able to tell when you run out of staples. The staple gun will make mostly the same sound with or without staples. The staple gun will make the same indentation in the floor, with or without staples. Looking into the indentation in the wood may not always let you know if there is a staple present. Don't overfill the staple gun. When near empty, i.e., when there are about 6-8 staples left, you should add staples. 75. Just before the flooring is installed over the sub-floor, inspect the sub-floor to determine if any areas of the sub-floor need further stapling. Look for raised edges, bowed areas, etc. HHGL DO and DONT - 25.doc Page 31 10/25/2013 5:14:55 AM 76. Below, photo of flooring after linoleum installed and appliances staged. HHGL DO and DONT - 25.doc Page 32 10/25/2013 5:14:55 AM HHGL DO and DONT - 25.doc Page 33 10/25/2013 5:14:55 AM HHGL DO and DONT - 25.doc Page 34 10/25/2013 5:14:55 AM DOOR (SPLIT JAMB)/ DOOR CASING 77. Before installing door trim casing, ensure that all excess paper, plaster or plastic around the perimeter of the door jamb (top/bottom and sides) has been removed using a utility knife. Use a utility knife to make sure there is no excess plaster on the surface of the door jamb where the trim casing will go. Also, use a utility knife to make sure there is no excess plaster blocking the area between the outer edge of the door jamb and the door framing. In this area, insulation will be added to prevent drafts. 78. When installing doors, match the markings on the inside of the door frame with the manufacturers label on the door. A number such as 2-6/6-8 RH will be seen on the inside of the door frame on the door hinge side. The set of numbers before the slash are the door width in feet and inches (separated by a hyphen). The set of numbers after the slash are the door height in feet and inches (separated by a hyphen). The two letters indicate which way the door opens. There will also be an arrow pointing in the direction that the door opens. An arrow pointing to the left would have a RH designation. There will also be a dimension for the depth of the frame, i.e., 6-9/16”. All of this information will also be on the label attached to the door. Compare the markings on the door with the label on the door to ensure the right door is going into the right opening. 79. Measure the height, width and depth of the door jamb to understand if the door jamb will fit as-is into the door opening or if the jamb and/or door will need to be trimmed. NOTE: The casing/jamb/stop typically extends 1-3/16” lower than the door. If the jamb is too wide, it needs to be returned and the correct door acquired. HHGL DO and DONT - 25.doc Page 35 10/25/2013 5:14:55 AM If the jamb is not deep enough, the halves of the split jamb will not close properly. If the door needs to be trimmed, determine the depth of solid wood at the bottom of the door. This may be accomplished by drilling a small hole up through the bottom of the door until no resistance if felt. If however, after trimming the bottom of the door, the hollow portion of the door has been exposed (1st photo below); you need to retrieve the material trimmed off the door (2nd photo below). Then remove the inner solid core from the trimmed material (3rd photo below) and transfer it back into the hollow portion of the door (5th & 6th photos). Glue it in place (4th photo). Use wood clamps to press the door surfaces tight to the solid core. Let dry. Remember that the door does not extend to the bottom of the casing.( photos below from http://www.finehomebuilding.com) trimmed material with core 80. Look below at a complete picture, for a non-split jamb door (as are the other exterior doors), for an opening as shown in the drawing, with the manufacturers specifications, with actual measurements, during various stages of construction and installation, from inside and outside views. HHGL DO and DONT - 25.doc Page 36 10/25/2013 5:14:55 AM FIREBLOCK EXP FOAM WINDOW & DOOR EXP FOAM NOTE: Ensure that any light switches that are to be accessed from the bulkhead HHGL DO and DONT - 25.doc Page 37 10/25/2013 5:14:55 AM are on the door knob side of the door, as opposed to on the hinge side. NOTE: The door used at the base of the bulkhead is a Therma Tru door. The door came with an attached casing for the external side and an attached threshold. The door is affixed to the rough frame by nailing thru the supplied casing (exterior side of door). NOTE: When creating the rough frame, within existing studs, take a moment to look at the existing studs and the surrounding sheetrock. Ensure that when you install the door, if you need to add additional sheetrock, that there will be no problem when the casing on the internal side needs to be installed. Ensure that the new sheetrock will be flush with the rough frame. If the new sheetrock extends past the rough frame into the room, there will be a gap between the casing and door jamb, which will be problematic. If the new sheetrock is behind the rough frame, there will be a gap between the casing and sheetrock. This may be manageable with caulk or mesh and joint compound, if the gap is small. These doors already have the lock tee strike attached, so when installing the lock hardware, do not replace it. 81. When installing pre-hung doors with split-jambs, first insert the side of the splitjamb door with the door, jamb, casing, and stop (www.thebuildingblox.com & www.menards.com.) Split Jamb Groove Split Jamb Tongue Try to center the door jamb within the rough door framing. Then insert a nail on the hinge side – near the bottom – thru the casing - not the jamb/stop. Plumb and square the jamb. Also check that the reveal (gap between the door and the door jamb) is consistent around the door. Both conditions should be met. Nail thru the casing – not the jamb/stop. Use sets of wooden shims, wedges or spacers to take up the space between the door jamb and the rough framing in the wall, where you will be nailing. There should be six sets in this space. Place one set in the space adjacent to where the top hinge is, and one set on the corresponding door knob HHGL DO and DONT - 25.doc Page 38 10/25/2013 5:14:55 AM side. Place one set in the space adjacent to where the center hinge is (and one set on the corresponding door knob side where the lock tee strike is). Finally, place one set in the space adjacent to where the bottom hinge is (and one set on the corresponding door knob side). These locations are called out in the figure below. The wedges are installed staggered vertically (they overhang each other but not completely), with each adjacent wedge pointing in the opposite direction, using enough until they just fit. Then slide them all towards each other and they will increase in overall width and snugly take up the space between the jamb and the rough opening. As the wedges are placed where you are installing hinges, lock tee strikes, etc., you reduce the risk of impacting the square of the door and impacting the reveals as pressure is applied at these points. Doors can be heavy and over time pull at the top hinge and/or compress at the bottom hinge. You may want to install 3” screws in the top hinge to bring the top of the jamb back into square, at that time, and having the wedges there will ensure you do not pull only the top of the jamb towards the rough frame and pull the jamb out of square. Additionally after repeated closing of the door or forced entry, the lock tee strike may be pushed towards the rough frame, and again cause the jamb to come out of square, to impact the reveal, etc. Again, the wedges will help. After installing the other side of the split-jamb, the front and back halves of the door jamb should be fit together tightly in the tongue-and-groove joint, only then staple thru the tongue-and-groove joint/stop and the wedges to a) secure both halves of the jamb together and b) to secure the jamb to the framing in the wall. 82. Before installing doors, ensure the space at the bottom of the casing will accommodate the depth of the flooring that will be installed (i.e., laminate/wood, linoleum, carpet, tile (including mortar), etc). Otherwise a coping saw or tool like the Porter Cable Oscillating / Multi Tool with plunge cutting saw blade will be needed. Wear ear plugs when using the multi-tool. HHGL DO and DONT - 25.doc Page 39 10/25/2013 5:14:55 AM 83. Also ensure that the gap between the bottom of the door and the top of the flooring meets your needs i.e., a standard .5” gap or something larger if the gap under the door is being used as part of an HVAC air return system. 84. If door trim/casing did not come with the door and needs to be added, the inner edge of the casing does not lie edge to edge with the inner edge of the jamb. Instead there is about an eighth of an inch setback or reveal from the inner edge of the jamb (see (filled in arrows) in photo). Note: The term reveal was used previously in a different context. In that context the reveal is the gap between the door and the door jamb (see (open arrows) in photo). The wing of a hinge (where the hinge gets screwed into the jamb) is set into the jamb in the area provided by this reveal. This reveal also causes the casing to be set back and leaves room for the knuckle of the hinge (where the pin is inserted.) Similarly you will see the lock tee strike set into the jamb area provided by this reveal. Below show reveals for both a window and a door. WINDOW DOOR CASING JAMB REVEAL STOP HHGL DO and DONT - 25.doc Page 40 10/25/2013 5:14:55 AM 85. If door trim/casing did not come with the door and needs to be added, for the casing set back reveal, use a piece of wood the thickness of the reveal to help mark where the top reveal meets the side reveals at the top left/right corners of the jamb. Also mark the left/right side reveals at the bottom of the jamb. The top casing is done first. It will have two 135° angles, with the outer edge of the casing being longer than the inner edge. The inner edge will be shorter than the outer edge by two casing widths. The ends of the inner edge of the top casing should be measured to the length where the top left and right corner reveal line marks made previously. The top casing should be nailed in a temporary fashion so that corrections can be made, if necessary. The bottom of the left side casing will have a standard right angle cut. The top of the left side casing is cut at a 45° angle, going from the longer outer edge, in towards the inner edge. Use the miter saw for this cut. Make sure the miter saw is set to the correct angle, AND in the right direction. There are two 45° angles that can be set! The inner edge of the left casing will meet the reveal lines at the top left corner marked, above. When measuring the casing, remember to leave room at the bottom to allow room for whatever type of flooring will be used. Place a scrap piece of the flooring on the floor below where the casing will go and measure with it in place. Use the miter saw for the bottom cut of the casing. The left side casing should be nailed in a temporary fashion so that corrections can be made, if necessary. Make sure the left side casing meets up with the top left corner reveal mark and top casing and is vertical, using the 4’ level. It should also line up with the side reveal mark. If all is well, insert another nail to hold the left side casing in place, also in a temporary fashion. The right side casing is done next, like above. HHGL DO and DONT - 25.doc Page 41 10/25/2013 5:14:55 AM HHGL DO and DONT - 25.doc Page 42 10/25/2013 5:14:55 AM WINDOW / WINDOW CASING 86. Before installing window casing, using a utility knife, ensure that all excess paper (Weathermate Plus house wrap), expanding foam, plaster or poly vapor plastic around the outer perimeter of the window jamb has been removed using a utility knife. In this area, insulation will be added to prevent drafts. Use a utility knife to make sure there is no excess plaster on the surface of the window jamb where the casing will go. 87. Depending upon the window, the reveal or casing setback may extend around the whole window (i.e., no sill). In this case the intersection of the vertical and horizontal reveal will occur at 4 spots (Top Left, Top Right, Bottom Left, & Bottom Right). With no sill and no flooring as in the case of doors to be concerned about, your measure points are at the 4 spots. Cut and install window casing following steps much like those used for the door casing. 88. For the basement windows, the screens may be difficult to install. The first thing to note is that the screen sits in the outer track with the outer-most window. The screen has tow clips on its top edge and two clips on its bottom edge. The easiest way to install the screen is to: put it thru the window opening to the outside; use the two clear plastic tabs in the middle of the tops and bottoms of the screen to position the screen into the upper track; place a thin trowel between the bottom track and each of the bottom clips; while pulling inward on the bottom clear plastic tab; and when the screen is in the track, remove the trowels. It may be necessary to push the window bottom in from the outside. You may need a HHGL DO and DONT - 25.doc Page 43 10/25/2013 5:14:55 AM separate set of hands to pull the window and position the trowels. 89. The windows used are JELD-WEN Builder’s Collection. 90. During window installation and other construction activities at the site, the windows can get dirty from paint; saw dust, finger prints, expanding foam, caulk, etc. To clean the inside and outside of these double hung windows: raise the bottom window a few inches from the closed position; push in the channel on both sides of the rail (top of sash); gently nudge the top of the bottom window sash into the room, one side at a time; rotate the window in and then down; thus making the outer side of the window accessible for cleaning. With the bottom window in this position, you can lower the outer top window to a few inches above the bottom of the bottom window and perform the same push/nudge/rotate operations performed on the bottom window. To re-insert the windows, reverse the above directions. 91. These windows also have full length screens. To install these screens, push the screen out thru the window opening, holding both sides. Push the screen into the upper channel, ensuring that the two black spring loaded pins sit in the outer-most channel. Holding the screen by the two black spring loaded pins on the lower left and right side of the screen; gently pull the screen in so that the remainder of the HHGL DO and DONT - 25.doc Page 44 10/25/2013 5:14:55 AM screen is in the outer-most channel. Release both pins. HHGL DO and DONT - 25.doc Page 45 10/25/2013 5:14:55 AM HHGL DO and DONT - 25.doc Page 46 10/25/2013 5:14:55 AM INSULATION & DRYWALL/SHEETROCK 92. Before installing insulation around windows and before installing window molding, ensure window jamb extensions (used when window frame is not flush with the wall and needs build out) have been added. 93. GP DensGlass is a gypsum plaster used in area separation wall systems between homes as a firewall. Score with a knife and then bend along the scored line. As such, cuts should be a simple as possible. When used on the exterior of a home, when encountering a window, rather than making a cutout that goes around a window, best to cut the drywall where it meets the window. Then use additional pieces to continue around the window. Basically, stay with straight cuts. 94. When attaching the GP DensGlass (or equivalent) to the exterior of a home, make sure to nail it flush against the exterior wall. Be sure to hit studs. Do not be afraid to beat the board. Nail from one side, moving over stud by stud. If you do opposite ends simultaneously you run the risk of having a bulge in the middle that can’t readily be nailed in. 95. GP DensGlass (or equivalent) can also be used in the interior of a home (behind sheetrock) in area separation wall systems in multi-family townhouses as a firewall, in the basement. 96. For residential attics, foundations/slabs and crawl spaces, STYROFOAM Brand Square Edge Insulation (aka blue board rigid board), or equivalent can be used against interior walls and exterior foundations (i.e., interior walls, under sheetrock and exterior walls, under GP DensGlass as shown above). Rigid board is cut using a hand saw. It should be cut so that it fits snugly between studs. It is not nailed. For a continuous barrier, use multiple layers of rigid board (with Great Stuff Fireblock expanding foam (or equivalent) in any gaps or around the HHGL DO and DONT - 25.doc Page 47 10/25/2013 5:14:55 AM perimeter, or use Weathermate tape (or equivalent)) until the insulation is within the room. NOTE: Expanding foam expands at different rates to different sizes. Inquire as to these rates and sizes so you do not under/over do it. Fireblock is minimal expansion foam that fills, seals and insulates gaps up to ½ inch. Also, expanding foam can be very unwieldy. It can drip from where it is applied, from the nozzle of the can, etc. Wear gloves to protect your skin. Cover the area below where you’re working to protect against drips, which can be stubborn to remove and which may mar the drip area. Having a trash container nearby or other container into which the nozzle can be periodically cleaned is advised. Use a piece of scrap wood to scrape excess foam off the nozzle onto trash in the container. Fireblock (or equivalent) expanding foam can be used to insulate where ducts, PEX pipes, electrical wiring, etc. go through openings in the studs, floors, etc. 97. Around doors and windows (i.e., between the studs comprising the rough frame and the sheet rock) use Great Stuff Window & Door expanding foam (or equivalent). Great Stuff Window & Door seals and insulates gaps up to 3/8 inch. Some expanding foam should NOT be used in the space between the studs comprising the rough frame and the door / window jamb. Expanding foam in these places can bulge in the jamb and make a windows and doors difficult if not impossible to open. The product literature for Great Stuff states that it‘s lowpressure formula is designed not to bow or bend window and door frames. But typically, in these places, fluffy, loosely placed fiberglass insulation is used. When applying foam near windows and doors, allow to expand fully (tack free in minutes, trim-able in hours) before closing up these cavities in order to be able to remedy any unintended effects that may occur. 98. For interior walls, towards the inside of the home, R21 fiberglass insulation can be used. This insulation comes in rolls or batts, in 16” and 24” widths, matching the distance between studs, on-center. This allows in most cases the insulation to HHGL DO and DONT - 25.doc Page 48 10/25/2013 5:14:55 AM stay in place until vapor barrier/sheet rock is installed. Fiberglass insulation is cut with a utility knife. 99. Where noise is a potential issue, use Thermal and Sound Control insulation. This insulation is cut with a utility knife. 100. Where noise is a potential issue and fire resistance is a primary concern, such as between units in a duplex, use acoustical fire batting. This insulation is cut with a utility knife. 101. As a preventative measure against itching, when applying fiberglass insulation, wear gloves from the tubs in the tool shed. Also wear a mask, also found in the tool shed. 102. In the small gap area around doors and windows (i.e., in the space between the studs comprising the rough frame and the door / window jamb), cut off a strip of fiberglass insulation from a roll or batts, pull apart the insulation to get the desired thickness, place insulation along the gap where the insulation will go, then use a wooden wedge to gently insert the insulation into the gap. Don’t pack tight. Insulation works best when fluffy. 103. Before installing sheetrock /gypsum board over insulation in walls, for damp proofing, install a vapor barrier. This resembles a plastic sheet. Tack vapor barrier to studs using a heavy-duty hammer tacker. Do not cover outlets and switches. HHGL DO and DONT - 25.doc Page 49 10/25/2013 5:14:55 AM Rigid board is a vapor barrier so it does not need an additional vapor barrier. 104. Use ½” drywall on walls. For walls between homes in a duplex, use 5/8”. When installing sheetrock on a ceiling, use a drywall lift device. 105. To cut drywall, score lightly (you do not have to go very deep) with a utility knife and then bend along the scored line. Cut through the paper on the back side. Continued use of the utility knife in this fashion will dull the blade. If scoring becomes difficult, consider changing the utility knife blade. 106. Marking the location of the studs, both on the floor (if not already done) and on the ceiling (especially after the sheetrock has been put on the ceiling) will make it easier to find the studs when affixing the sheetrock to walls 107. Use 5/8” sheetrock on walls between adjacent units in duplexes. Leave a gap around the sheetrock, including the ceiling. The side wall sheetrock will cover up to ½” of ceiling gap along the top of the room perimeter. The side wall sheetrock against the ceiling will also contribute to the structural integrity of the ceiling. ~~http://www.familyhandyman.com/drywall/installation/common-drywall-installation-mistakes-and-how-to-avoid-them/view-all 108. For a ceiling, you have to install the sheets of drywall perpendicular to the direction of the joists. You have to start with one corner of the room, by using a full drywall board. The next row of drywall must start with half of a drywall sheet, as to create a proper layout. This is the stretcher bond pattern. http://www.howtospecialist.com/structure/how-to-install-drywall-ceiling/ HHGL DO and DONT - 25.doc Page 50 10/25/2013 5:14:55 AM 109. Hang the wall sheetrock horizontally (perpendicular to the framing members). Hang the first full sheet up against the ceiling, then the next scored-to-fit sheet beneath. For the bottom sheet, put the cut edge towards the floor. Keep the two finished edges together. 110. When hanging the sheetrock horizontally, there are fewer locations where two pieces of sheetrock that are competing to be screwed into the same area of a stud. The long section of the baseboard can be screwed into the stud, away from the screws of the neighboring sheetrock (above/below it). Only the butt ends will compete with neighboring sheetrock, but since you are hanging horizontally, there are fewer of those. According to Chapter 3 of the Gypsum Construction Handbook, published by USG, manufacturer of SHEETROCKS® Brand Gypsum “Perpendicular vs. Parallel Application Gypsum board may be applied perpendicular (long edges of board at right angles to the framing members) or parallel (long edges parallel to framing). Fire-rated partitions may require parallel application. (See Chapter 10 for specific information on fire-rated systems.) Perpendicular application is generally preferred because it offers the following advantages: 1. 2. 3. 4. Reduces the lineal footage of joints to be treated by up to 25%. Strongest dimension of board runs across framing members. Bridges irregularities in alignment and spacing of frame members. Better bracing strength—each board ties more frame members together than does parallel application. 5. Horizontal joints on wall are at a convenient height for finishing.” For wall application, if ceiling height is 8'-1" or less, perpendicular application of standard 4' wide panels results in fewer joints, easier handling and less cutting. If ceiling height is greater than 8'-1", or wall is 4' or less wide, parallel application is more practical.” HHGL DO and DONT - 25.doc Page 51 10/25/2013 5:14:55 AM 111. The walls in 55 Rock were 97” (8’-1”) high. The sheetrock used was 12’ x 4’. Both factors favor the horizontal placement of sheetrock. 112. Avoid tapered edges on outside corners. The corner of the bead will lie too low, making it difficult to cover with joint compound. The solution is to place cut edges along an outside corner. 113. Rather than a tight fit of sheetrock to the walls, outlet boxes, etc., leave a 1/8” gap. A tight fit can cause you to try to force fit it, possibly causing damage to the sheetrock. It's easier to fill a 1/8-in. gap with joint compound than to cut and repair a broken edge. 114. Avoid lining up a sheet of drywall with the edge of a door or window opening. Your home tends to shift and settle slightly, and that movement shows up at the corners of windows and doors. A joint at this location, even if it's well taped, is weaker than solid drywall. Chances are it'll crack in the future. It's better to notch drywall around openings, using a drywall or keyhole saw, rather than to make a joint. 115. With this in mind, when installing a casing around a window or door, it is a better situation when the sheetrock is continuous around the corners. A seam has the potential of being uneven, thus impacting the fit of the casing. ~~http://www.familyhandyman.com/drywall/installation/common-drywall-installation-mistakes-and-how-to-avoid-them/view-all ~~ http://www.familyhandyman.com/drywall/installation/common-drywall-installation-mistakes-and-how-to-avoid-them/view-all http://www.familyhandyman.com/drywall/installation/common-drywall-installation-mistakes-and-how-to-avoid-them/view-all HHGL DO and DONT - 25.doc Page 52 10/25/2013 5:14:55 AM Staggered sheets contribute to the structural strength of the wall. . HHGL DO and DONT - 25.doc Page 53 10/25/2013 5:14:55 AM HHGL DO and DONT - 25.doc Page 54 10/25/2013 5:14:55 AM CABINETS 116. When installing kitchen cabinets that sit on the floor, watch if sliding the cabinets along the floor that the kick plates don’t dislodge. The cam connector/connector assembly can come apart and may require re-connecting and if broken, gluing. 117. Before installing cabinets, ensure that the doors will open in the correct direction. For example, if standing in front of a stove, the doors to the cabinets flanking the stove should open on the sides closest to you. You should not have to peer around the door to see what is inside the cabinet. The same applies to you standing in front of a sink. 118. A counter top will sit on top of and across the cabinets sitting on the floor. For that reason, the cabinets should all be at the same height (distance from floor), plumb and level. Also the table top should overhang the cabinets uniformly. The fronts of the cabinets need to be at the same distance from the wall. Shims at the rear of a cabinet that make a cabinet plumb and level may mess up the table top overhang. 119. The cabinets must also be securely attached to wall studs, each other, and in some cases, the floor. This is so that they can handle the weight of the counter top as well as pressure from adjacent appliances especially when they are at the end of a row of cabinets and act as a frame around a dishwasher. For “freestanding” end pieces, attachment to the floor as well as being attached to an added support that can be affixed to a stud and/or other cabinet will help. In some cases, glue may be required. On narrow cabinets that lie between 24” on center studs, attachment to adjacent cabinets will help. HHGL DO and DONT - 25.doc Page 55 10/25/2013 5:14:55 AM 120. At the top corners of the cabinets there are recessed plastic brackets. Screws are inserted through these brackets to secure the counter tops to the cabinets. 121. Caulk between the cabinets and drywall. HHGL DO and DONT - 25.doc Page 56 10/25/2013 5:14:55 AM HHGL DO and DONT - 25.doc Page 57 10/25/2013 5:14:55 AM HHGL DO and DONT - 25.doc Page 58 10/25/2013 5:14:55 AM CERAMIC TILE 122. When doing a tile floor, the floor must be clear of all debris such as plaster droppings, protruding nail/screw heads, protrusions of wood from the floor, etc. Any of this type of debris will interfere with the tile seating properly. Sweeping the floor will make it easier to see this debris. Also looking around the seams of the floor will help find nail/screw protrusions. Using a heavy duty floor scraper, plaster droppings can be detected and removed. The scraper will also find nails and screws, which should then be driven into the floor with a hammer. Use a shop-vac to suck up debris. Running the nozzle along the floor will also find debris/protrusions which should be corrected as described above. You may have to repeat these steps a few times. 123. When prepping the floor for the installation of the tile, go around the perimeter of the floor – where the baseboard will go – and look for any paper, foam, plaster or plastic that is sticking out from under the walls. Use a utility knife to trim what is sticking out. HHGL DO and DONT - 25.doc Page 59 10/25/2013 5:14:55 AM 124. Much like the sub-flooring for linoleum, you need to put down a sub-floor for ceramic tile. However, the sub-floor will be of a thicker material (11/32”). 125. Before you lay down any tile, assuming the joists in the floor and the studs in the wall line up, and both have the same on-center distances, mark at the base of the wall where the joists of the floor are. Make the mark so that when the baseboard is installed, the mark is covered and repainting the wall is not necessary. It is possible that the sheet rock has screws at the base of the sheet rock where the studs in the wall are, but they may also be where the bottom plate or shoe is located, so these screws may not be indicative of where studs are located. Hence the above is a good thing to do anyway. Knowing where the studs are (│or ║) can aid in the later installation of cabinets, vanities, door casings, baseboards, etc. Also knowing where electric outlet (Ø) wires, electric light switches (S), heat ducts/returns (HEAT), water pipes (P) and toilet are will tell you where NOT to nail. 126. When doing tile, choices as to where to start include along the entry door edge or along the tub edge. These are the long stretches that people see. Across the door threshold, use a metal trim piece that is nailed to the sub floor using roofing nails. It will protect the tile edges from chipping and provide a nice border/transition to whatever flooring is used in the adjacent room (linoleum, wood, carpet, etc). The tile will cover the base of the trim. The exterior vertical edge of the trim should line up with the door stop where it meets the door with a 1/8” gap. When laying out the tiles, use the spacers at the corners. Look at the where the distant HHGL DO and DONT - 25.doc Page 60 10/25/2013 5:14:55 AM tiles will wind up. You don't want these to be too narrow. You may have to reduce the depth of the first row of tiles to let the last row of tiles be deeper. Also look at where the tiles to the left and right (and other edges of the room) will wind up and do a similar analysis. 1/8” 127. The tile will go under the inside door casing. The casing should already have been cut at the bottom so that the tile and mortar would fit. If not, use a multi tool with plunge cutting saw blade to adjust the space at the bottom of the casing. 128. When placing tiles, use spacers to ensure the proper gap between tiles. When cutting tiles that abut the walls or cabinets leave a .25” gap. The spacers used have two sides. One side is shaped like a cross and is used at the intersection of 4 tiles. The other side is a bar and is used to separate tiles when there is no intersection such as at a cut out for a toilet or heat register. When there is an intersection of two tiles and a wall or vanity, the cross can be cut so it forms a “T”. These shapes and where they are used are shown in the photo, below. 129. When cutting tile, the resultant unfinished edge goes towards areas that aren't seen such as towards a bath tub, wall or vanity. Keep the other factory finished uncut edges of tiles adjacent to other finished edges. Not only are finished edges straight but they may have a nice bevel on them. Also some tiles may have a pattern on them and proper orientation of the tile will let it blend in with the other tiles. 130. When laying tile over mortar, you may find that an excess of mortar forms between the tiles. This may interfere with applying the grout or provide an unintended ring around the tile alongside the grout. To prevent this situation, a) HHGL DO and DONT - 25.doc Page 61 10/25/2013 5:14:55 AM do not put excessive pressure on the tile when placing them on the mortar, b) do not back butter the tiles (i.e., apply excessive or any mortar to the back of the tiles, before laying over the mortar.) To correct the situation if it happens, while the mortar is still wet, remove impacting spacers, use a flat bladed screwdriver and drag it along the space between tiles (with the blade perpendicular to the length of the space) and then re-insert spacers. Discard the mortar that is dredged up. Also, lightly run a damp sponge along the grout lines to remove excess mortar from the top edge of the tile. This is better than having to chisel out the hard mortar after it has dried. Mortar coming up may also indicate the mortar is too wet and needs to be stiffer. Also, if the back of the tile is rough you may need to back-butter the tiles before setting into the mortar. 131. When cutting tile, a corner piece might have two finished edges and two cut edges. The now unfinished or cut edges should be towards a wall or vanity. 132. When using a tile saw, keep the water in the water reservoir at the correct level to keep saw blade cool and to contain dust. There should be a fill line in the reservoir. You should check the water level periodically. Keep a liter bottle of water handy to make refilling the reservoir easy. 133. When using a tile saw use the guard over the saw blade to deflect spray and/or particles cut from the tile, and for safety reasons. With the guard installed you will still be able to see where the blade is cutting the tile. 134. When using a tile saw, use the saw in a location where the water sprayed from the tile saw during operation will not damage the floors and walls. For example, do not use the saw over a freshly installed sub-floor where linoleum will be laid. Laying a piece of discarded plywood beneath the saw can help but there will still be dripping from the saw and freshly cut tile as well as spray, so best to cut in a area where water will not be an issue. Also consider not sawing in rooms freshly painted, etc. 135. When using a tile saw, wear goggles so that dust and the water sprayed from the saw during operation will not spray into your eyes. 136. When using a tile saw, consider setting it up on a raised surface such as on a board supported by two saw horses or benches. This will allow you to more accurately see what you are cutting and reduce back fatigue. 137. When using a tile saw, don’t cut the tile too quickly. Take your time. If it seems like you cannot advance the tile towards the blade, the pattern on the bottom of the tile may be catching on the tile saw platform. If so, gently lift the rear of the tile in order to clear any catch points. 138. When using a tile saw, only push the tile towards the blade in one direction. Do not go back and forth. HHGL DO and DONT - 25.doc Page 62 10/25/2013 5:14:55 AM 139. When cutting tile, draw a line where the tile is to be cut, and either a) cut the tile free-hand, or b) use the saw guide to position the tile so it can be cut at the right offset. 140. When using a tile saw, if you have to assemble the unit, ensure that the blade is inserted with the correct side facing away from the motor and the blade rotation direction that is marked on the blade matches the direction that the motor turns. Also, some hardware that secures the blade to the motor shaft has two sides. One side is designed to center the blade with the shaft and should be used appropriately. 141. When assembling the tile saw, make sure you're using the right type of blade for the tile you're using and for the equipment you’re using. Some tile blades are for wet use, some are for dry, some do both. Some tile blades do not do stone. 142. When using a tile saw, read all directions including safety tips. 143. After using a tile saw, clean out the water reservoir. The material cut from the tile mixed with the water can make a thick muck that will settle and harden in the water reservoir. A shim to scrape/loosen the muck may be helpful. 144. When using a tile saw, to cut out a section, you can make lots of parallel cuts in the section to be cut out in a comb-like fashion and then snap these comb-like sections where they all end. Alternatively, you can make two cuts on the sides of the area to be removed and then use tile pliers to scribe the tile between the ends of the cuts and then bend the tile to break at the scribe line, much like the way plaster board is cut. 145. When cutting tile, shut off the saw after cutting and/or when not in use. 146. When using a tile saw, to cut out a section, if the tile will wind up with a narrow section you may find it easier to make the narrow section a separate piece. 147. When cutting tile around a toilet flange, the distance between the anchor bolts that hold down the toilet (8”) and the toilet exterior is about 2”, so ensure your tile HHGL DO and DONT - 25.doc Page 63 10/25/2013 5:14:55 AM will extend under the toilet and that there will be no visible gap. 148. When mixing the mortar, count the number of tiles across and down. Calculate the square footage of tiles, assuming 1 foot square tiles. The mortar bag will tell you how many square feet of mortar (for a given trowel profile) can be made per bag after being mixed with water. So if you have 8 tiles across and 6 feet deep, you need about 48 sq. feet of mortar. A 50 lb. bag of MAPEI Porcelain Tile Mortar, using a trowel size of ¼” x ¼” x ¼” (square notched) will handle approximately 75-90 sq. feet. So about 2/3 of a bag will be required. www.mapei.com 149. To apply mortar, see the video at http://www.youtube.com/watch?v=LBh2kEwx2cQ. 150. To mix the mortar, 1st add water to an old joint compound bucket. Use half the amount specified on the bag for the amount of mortar needed. Then add the dry mortar. Stir quickly with a mud beater or spiral mixer or mixing paddles attached to a power drill, and slowly add the remaining water, as necessary. The proper consistency is achieved when the wet mortar will "hang" on a trowel held at a 90° angle. The consistency will be that of creamy peanut butter. You can work with the mortar for about an hour. 151. Also, if possible, use a margin trowel to help mix the mortar, scrape out joints, move the mortar from the bucket to the floor, etc. As you get proficient with doing mortar, you may find that you can tilt the bucket used to mix the mortar and then use the mortar trowel to scrape the mortar out of the bucket onto the floor rather than use the mortar trowel to lift out limited amounts of mortar. HHGL DO and DONT - 25.doc Page 64 10/25/2013 5:14:55 AM 152. The key to applying mortar is a) to use a generous amount of mortar, basically dumping a generous amount from the bucket (and adding more as needed) b) using the trowel with the notched end towards the mortar at a 45° angle, and c) pulling the mortar around the area where the tile is to go. Mortar will accumulate beneath the trowel. Move the trowel to an area needing mortar and pull the trowel. Mortar will transfer to that area. You can also go in a circular direction to get mortar close to the tile edges, then going in perpendicular directions to get proper coverage, repeat. Use more mortar if the grooves created by the trowel are not the right shape (i.e., the ¼” x ¼” notch in the trowel does not make nice ¼” x ¼” runs). Do not confuse tile notched mortar trowel (left) and grout float (center). When doing grout, use a grout float with a pad that will not rub off against the tile. In-progress view of mortar is shown on right. Blue plastic is protecting bath tub. 153. Every 10 minutes, pick up a tile that you’ve just set. Look at the back. Mortar should adhere to the entire surface. If not, perhaps the mortar is too dry. Scrape it off the floor and throw it out. Also perhaps the mortar was not combed to a flat surface. Try tapping the tiles down with a beater board, as well. This will set the tile in firmly as well as help align the tops of adjacent tiles. Let tile/mortar dry overnight. 154. To apply tile grout, see: http://www.youtube.com/watch?v=lgrJioWMHDA 155. To apply tile grout, clean the tile joints of protruding mortar with a tool (e.g., margin trowel, chisel, screw driver, etc.) if not already done and then vacuum out debris. Tape off wall and vanity edges. Lightly dampen tile. Dampen grout float. Remove excess water from grout float. Use trowel or float to put glob of grout onto tile. Use narrow edge of grout float at a slight angle and at a diagonal direction to the tile joints to force the grout into the joints. Then use the tile float at a steep angle and at a diagonal orientation to the joints in a serpentine motion around the tiles to remove excess grout. Use a damp hydrophilic sponge at an angle to lightly sponge off the surface. Grout will harden in 30 minutes. http://www.youtube.com/watch?v=7_P__kq7aic and HHGL DO and DONT - 25.doc Page 65 10/25/2013 5:14:55 AM http://www.familyhandyman.com/tiling/grouting/grouting-tips-andtechniques/step-by-step 156. Use a damp sponge to wipe grout off tile surfaces. Then tool the grout lines. Depress the sponge with your index finger and smooth out high or uneven grout lines. Don’t push too hard. 157. If you will be using baseboard along the walls (no baseboard is used around a tub and vanity) do not grout the space between the walls and the tiles. If you do apply grout there, it may interfere with the baseboards seating properly and require the grout to be chipped away. 158. When grouting the space around tubs and vanities, try to keep the grout low to the tile instead of curved up onto the tub or vanity sides. 159. You will need to watch the surface of the tiles as the grout dries. A haze may appear. You need to keep wiping the glaze off the tiles with a damp sponge. Use clean water and frequently refresh the water. This may need to be done many times. Keep an eye on the tiles as the grout dries and repeat as necessary. HHGL DO and DONT - 25.doc Page 66 10/25/2013 5:14:55 AM 160. When done making mortar and grout mix, clean mud beater, spiral mixer or mixing paddles with water. 161. When done installing the ceramic tiles, scrape off excess mortar and clean mortar trowel with water. 162. When done applying grout, scrape off excess grout and clean grout float with water. 163. While not a ceramic tile issue, in laundry rooms where ceramic tile may be installed, there may be a gas dryer. In some situations additional ventilation may be required. This can entail cutting a hole in the ceramic tile. However since serviceability may be a requirement, accessibility will be required. Hence a hole under the appliance is not an option (in addition to the fact that a leg of the appliance could go thru this hole). A heat register already exists along the edge of the room, obviating placing another register there. An alternative is to put a register in a kick plate of a vanity in the room and cut a hole in the floor under the vanity. In any case, it is best to know which method will be used and to do it before tile and vanity have been put in place, at the dry fit phase. A 2.25 in. x 10 in. opening is sufficient. Plus three 2-3 in. holes in the floor under the vanity are sufficient. Determine the placement of these holes based upon information in the room that is also available in the floor below, such as the location of the existing register, and cut the holes from the floor below, so that you are positive where water pipes, etc. may be. A pilot hole going down may be an option but limited accessibility (long enough drill, near horizontal angle, etc.), and the risk of going too far down (and nicking a wire or tube) must be considered. Do not rely on any assumption that where the water pipes are in the vanity is where they will be in the floor below. Water pipes may enter the wall behind the vanity and then go horizontally before going vertically down into the floor below. The toilet drain may be another usable point of reference if registers are not present. A register 3.5” x 13” was used to cover the hole at the base of the vanity. HHGL DO and DONT - 25.doc Page 67 10/25/2013 5:14:55 AM HHGL DO and DONT - 25.doc Page 68 10/25/2013 5:14:55 AM HHGL DO and DONT - 25.doc Page 69 10/25/2013 5:14:55 AM HHGL DO and DONT - 25.doc Page 70 10/25/2013 5:14:55 AM LAMINATE FLOORING 164. Prior to working with the flooring stock (after 48-hour acclimation to room – relative humidity should be 35-75%, with temperature of 60-85°F), you need to prepare the floor. Follow the instructions for preparing the floor for the linoleum sub-floor installation. Basically scrape, sweep, vacuum, punch down screws and nails, repeat, etc. Trim excess paper, foam, plaster or plastic from the bottom of the sheetrock where it meets the floor. 165. You should also remove all doors so you can work easily. You can leave the door hardware in place and just pop the pins out of the hinges. Store the pins in the hinges on the jamb so they do not get lost. Mark the top of the door with the location where the door came from. 166. In a room, you need to trim the closet door casings (inner and outer sides), jambs, and stop. For the room entryway, trim the door casing (interior side only). For room door way, the flooring will not extend past the interior casing. T molding (transition), laminate surface reducer or quarter round, where applicable, will be used to bridge the flooring to the adjacent room. It will sit between the jamb/stop. These are available in matching style from the manufacturer/supplier (Dream House/Lumber Liquidators) and are shown below. Trimming is done using the Porter Cable Oscillating / Multi Tool with plunge cutting saw blade, or equivalent. Use a sample of the flooring or if other rooms have already been done, discard material to determine how much should be cut off the bottom of the items listed above. Go slow, so you do not burn the blade. A coping saw could also HHGL DO and DONT - 25.doc Page 71 10/25/2013 5:14:55 AM have been used. 167. Alternate T-Moldings, if those from the manufacturer are not available, such as those from “Simple Solutions” may also be applicable. Installation procedure varies. 168. Rubber backed laminate was used. Foam backing was not needed on the floor. This was to be a floating interlocked floor so no nails or adhesive would be needed. 169. Each container of the St. James 12mm African Mahogany laminate contained 18 planks. They came in 3 lengths. 6 planks were 20.7” long (Short). 6 planks were 27” long (Medium). 6 planks were 47.7” long (Long). All planks were .5” thick and 5.7” wide (finished / visible laminate surface). 170. The four sides of a plank are different. To make the floor, you should orient all planks exactly the same way as suggested by the manufacturer, described in the instructions on the back of the product documentation, found in each box of planking. The manufacturer suggests starting in a corner, from the left, the tongues facing into the wall and the grooves facing out from the walls (into the HHGL DO and DONT - 25.doc Page 72 10/25/2013 5:14:55 AM room). The manufacturer also says you may remove the tongues/grooves from the outer edges of planks at the perimeter of the floor. This includes the tongue (long edge) of the first row of planks, which goes against the wall. This includes the groove (short edge) of the first plank in the first row of planks. This includes the tongue (short edge) of the last plank in the first row of planks. Below is the left end/front edge (groove/groove) front edge/right end (groove/tongue) and right end/back edge (tongue/tongue) of a plank. WALL Facing out from wall kronotexusa.com Left (Groove-Groove) Center (Groove-Tongue) Right (Tongue-Tongue) 171. Start at the door way (what you see first when entering a room) with a row of planks. Ensure that there is a long plank across the doorway. Also follow the manufacturer’s recommendation to keep a 5/16” expansion gap between the planks and drywalls, wood studs, etc. Double check the thickness of the baseboard being used to ensure it is larger than the expansion gap. It’s a good idea to keep on hand a sample of the baseboard and to verify that the expansion gap is covered with every plank you install. Stepping into the room and looking HHGL DO and DONT - 25.doc Page 73 10/25/2013 5:14:55 AM at the wall containing the door, the left hand corner is used as the start point. See the photo below. Make sure that the distance from the first row of planks to the opposite wall is the same, “two feet in” from the left wall and “two feet in” from the right wall. The “two foot in” was so that one is not misled by the wall corners that might not be square (many times the corners are bowed in). By making sure the distance at these two points are the same, one knows one will be parallel to the far wall and not wind up with the last row at an angle to the wall. You will have to make adjustments for the bowed corners, if any. Mark the floor the entire length of the first row of planks. Check to see that the last row of planks at the far wall (from where one started) will not be too small a piece, as was done when laying out ceramic tile in the bathrooms. 2” minimum is what the manufacturer recommends for the width of a plank. Any smaller and the first plank row should be cut so the last plank row can make the 2” requirement. For stability, when one will be pushing subsequent rows against existing rows, nail a 2”x4” (or equivalent) across the door threshold against the tongue side of the first plank. If a closet door is in line with the main door, as in many cases, nail a 2”x4” there as well. Additionally, add wedges between the wall and the first plank, where appropriate, again for stability. When each row is added, horizontal force will be applied to fit the new row in and to keep all the rows tightly packed together. The 2”x4” and wedges provide stability against this force. Page 74 29 165.3 13' 9.3" 28 159.6 13' 3.6" 172. From the above photo you can see that in addition to adding planking from the door to the far wall, in line with the door opening there is a closet on the left. HHGL DO and DONT - 25.doc 27 153.9 12' 9.9" 26 148.2 12' 4.2" 25 142.5 11' 10.5" 24 136.8 11' 4.8" 23 131.1 10' 11.1" 22 125.4 10' 5.4" 21 119.7 9' 11.7" 20 114 9' 6.0" 19 108.3 9' 0.3" 18 102.6 8' 6.6" 17 96.9 8' 0.9" 16 91.2 7' 7.2" 15 85.5 7' 1.5" 14 79.8 6' 7.8" 13 74.1 6' 2.1" 12 68.4 5' 8.4" 11 10 57 62.7 5' 2.7" 51.3 4' 3.3" 4' 9.0" 45.6 3' 9.6" 9 39.9 3' 3.9" 8 34.2 2' 10.2" 7 28.5 2' 4.5" 6 22.8 1' 10.8" 5 17.1 1' 5.1" 4 11.4 ft & inches 0' 11.4" 3 5.7 2 inches 0' 5.7" # plank 1 To help understand what the size of row by the far wall would be, use the following chart. Measure the distance between the first plank (where laminate ends) and the far wall. Find where it lies in the chart below. The distance greater than the length of the last full row is the width of the row by the far wall. As an example, if the distance from the first row of planks to the far wall is 78”, one can put in 13 full width rows of planks (74.1”). The last row would be ripped using the table saw, to 3.9” minus the 5/16” expansion gap and meet the 2” manufacturer’s requirement. 10/25/2013 5:14:55 AM Planking will also have to go into the closet. The distance from the first plank (where laminate ends) to the rear of the closet needs to be checked to determine what the width of the last plank at the back of the closet will be. The manufacturer’s 2” recommendation applies here as well. Additionally, if on either of the side walls between the door opening and the far wall, there is another closet, the ends of the side walls of those closets needs to be checked against the manufacturer’s 2” recommendation. The room may also become wider or narrower as you enter it. Any width change means there will be a change to the length of the row of planks, and there will also be walls parallel to the wall adjacent to the door entry. Again, the distances of these walls from the first plank need to be checked against the manufacturer’s 2” recommendation. In the photo on the right, the dashed red lines are where the manufacturer’s 2” recommendation applies. 173. There are a few rules that need to be followed when adding planks to a row and the next two adjacent rows. First, never should the gap between planks in a row line up with the gap between planks in an adjacent row (just like with sub-floors). There should be some staggering of these gaps in adjacent row. There should also be staggering between gaps in a row and gaps two rows over. That is probably why a container of planks has a mix of 3 different sizes. The manufacturer suggests 3” between gaps. Initially aim for 18” between gaps. But with 20.7’ long planks, the 18” guideline is sure to be difficult to meet at times. The manufacturer suggests that the planks at the end of each row should not be shorter than 12”. These manufacturer recommendations are summarized, below. 174. When possible, install the row planks so they go across the floor joists, not parallel to them. 175. Each row starts with a wedge/shim against the side wall to allow for expansion, then a plank oriented as described above, then the next plank in the row is placed adjacent to the previous plank, angled up along the long edge near the previous HHGL DO and DONT - 25.doc Page 75 10/25/2013 5:14:55 AM row and snapped into the plank of the previous row, . The Precision 86157 tapping block can be used evenly distributed against the long edge (groove-side) of the new plank, to close any gaps with the planks in the previous row. Then a tapping block is used on the right side of the new plank (tongue-side) to snap into the previous plank of the current row. The two long edges of the tapping block are different. One edge has a narrow indent for use against the tongue side – when used at the right end (short edge) of plank. The other edge has a wide indent for use against the groove side – when used at the front edge of planks (long edge) (see figures, above). Tap evenly across the plank so the plank moves straight so there is no binding and so that the gap gets closed along the full edge. Repeat for remainder of planks in that row. The tapping block will not fit at the end of the row, against the wall. For the end, use the pull bar with a rubber mallet (not a steel mallet), shown below. Again, position the pull bar at multiple positions along the edge to apply even pressure so the plank moves straight so there is no binding and so that the gap gets closed along the full edge. You may want to put a shim between the pull bar and the face of the laminate so that if the pull bar comes up from the end of the plank when it is hammered, it scrapes against the wedge and not the laminate surface. When done, remember to add a wedge/shim at the end of the row. You may come back to this row later, to tighten up gaps within a row, if a gap opens up as the result of working on subsequent rows. NOTE: There are three pull bars available in the DIY market. One is smaller and available in a Roberts 10-28 kit (along with wedges and a tapping block) and can get into tighter spots but it is also made of softer material, hence can’t take excessive force and may bend. A standalone similar small pull bar is the Precision 188800 or 023245. Another small one made by Blue Hawk (33131), is less available and can get into tighter spots and has a welded end that can be hammered. The other also by Roberts (10-18-8) is larger and needs more gap space but is made of a heavier material and can take more force. So use each in the appropriate situation. NOTE: Do not directly hammer the planks with either a rubber mallet or metal claw hammer. If you do, you run the risk of damaging the tongue or groove (turning them into mush) such that other planks will not interlock with them. You may also damage the laminate surface (i.e., cause puckering of the laminate). Always hammer with the tapping block or pull bar (rubber mallet, only). Also even with the right tools, do not use excessive force, as you may damage the laminate (i.e., cause puckering of the laminate). Take great care when using the tapping block or pull bar. If while being hammered, either should slip off the plank edge, they could impact the laminate surface of a plank. Hold each securely while hammering. As stated above put protection between the surface of the laminate and the pull bar. Any gaps between planks or damage to the laminate will need to be corrected. It is better to do it now, rather than after the rest of the floor has been installed, the baseboards have been installed, the caulking has been done, the baseboards and walls have been painted, etc. Replacing a plank, either in the middle of the floor or under a baseboard causes all of the post floor installation activities enumerated above to be undone. This HHGL DO and DONT - 25.doc Page 76 10/25/2013 5:14:55 AM is a time consuming and messy job. Remember that the manufacturer suggests that the planks at the end of each row should not be shorter than 12”. The left over material from a plank cut to fit at the end of a row will still be useful. It can be the first in a subsequent row. Its leftmost edge will have a square cut edge that can go against a wall that will later be covered by baseboard. Its right edge will have the standard tongue end to which additional planks can be added. This helps add randomness to the location of seams which is pleasing to the eye. This also reduces waste. While selecting which plank (S/M/L) to use in a row, keep eyes on the planks coming out of the box. Try to use up all pieces equally so you will not be left with excesses of a given size. Check when opening each box. Also inspect all out-of-the-box planks for abnormal patterns, chips, or blemishes. They should be labeled with a blue piece of tape. If the imperfection is localized on a plank, the plank may be usable if the imperfection is in an area that will be cut off (i.e., if on the right side of a plank, it could be used as the last plank in a row). HHGL DO and DONT - 25.doc Page 77 10/25/2013 5:14:55 AM 176. The 2”x4” and shims/wedges added above keep the floor stable as the tapping block and pull bar are hammered. If you find that there are gaps between the planks in the same row, you can slightly tilt the area of the row (if not the entire row) involved up, close the gap and reseat the row. Alternately, you can use a flat pull bar at the end of the row to pull the gap closed. But first make sure you have a wedge/shim at the opposite end of the wall so you don’t lose your expansion gap by the wall when you hammer the near end. 177. When at the end of a row you can determine the length of the last plank by laying down a plank using the standard orientation (tongue side towards starting wall, laminate face up.) Flip the plank up at the groove edge, and over so that the tongue and groove edges have been swapped. Next, keep the laminate face down and rotate the plank 180°. The tongue edge will again be towards the starting wall. With the end of the last plank butted against the wall, mark with a pencil where the previous plank laminate surface meets the last plank. That is where you should cut. Also put a mark in the discard side so you know which side of the line the saw blade should traverse. As a double check, return the plank to the standard orientation. Measure and determine if the left side of this last plank is the length of the gap between the end of the previous plank and the wall. For the first couple of tries leave extra on your cut until you get the hang of it. You can re-cut as needed. This method should also leave the required clearance (that of the groove) to the wall for expansion and contraction due to climate. 178. When cutting the planks, be aware of any difficulties cutting the planks. The planks are very dense and may dull the saw blade rapidly and need changing. If a blade becomes dull, do not continue to use it, change it out immediately. When using a miter saw, push the blade forward into the stock (not down - chop saw style - into the stock as shown in the middle of the figure on the left, below), facing the laminate side down, and black padding up. This is following the premise to have the teeth turning into the good side. This is shown in the figure on the right, below. If you measured the plank (using other than the flip and rotate method and have your pencil made cut line on the surface of the laminate – remembering to include a 5/16” expansion gap), you will need to use the miter saw with the laminate side up. It is thought that this will produce less splintering, but remember the cut areas are normally hidden under a baseboard. Again cut slowly thru the plank. HHGL DO and DONT - 25.doc Page 78 10/25/2013 5:14:55 AM 179. With respect to making adjacent rows, there are multiple methods. The manufacturer suggests inserting a single plank using the above method. For the next row, insert a wedge/shim against the side wall. Then insert the next plank, close to the previous plank in the row, into the previous row of planking. Once inserted, use the tapping block or pull bar to insert the side groove of this last plank into the side tongue of the previous plank, in the row. Re-check for any verticals between the planks in this row as well as in the previous row (imparted to them when installing the current row). Re-check for any horizontal gaps between the current row and the next few previous rows (imparted to them when installing the current row.) Re-check for any laminate fracturing resulting from excess force used during hammering. Repeat for remainder of row. Insert a wedge/shim against the side wall. This sideways slide method may be the only option available to you if you are working alone. It may also be the only option you have if you need to insert a plank around a door casing, where the plank may need to be flat as it is inserted into the previous plank in the row. I consider it a forceful method because sliding a plank (especially the longer ones, even a short distance) can take considerable force to move due to the high friction along the length of the plank. I also consider it forceful because this sideways motion can get imparted to previously installed rows, opening up gaps between planks within previous rows. Another method (favored by another manufacturer, Armstrong) is where after the first row is installed, you insert the first plank of the next row into the plank of the previous row, but keep it tilted up at the 20°-45° angle, using blocks of wood, etc. Don’t forget to insert a wedge/shim against the side wall. Add/tap the narrow side of the next plank of the row into the previous plank in the row. Keep the plank at the 20°-45° angle with the previous row. Push this plank into the plank of the previous row. Keep the plank at the 20°-45° angle with the previous row. Continue doing this to the end of the row. Then tap in/down the whole row gradually. Don’t forget to insert a wedge/shim against the side wall. Remember to remove the blocks. Go the full distance gently, and then repeat for HHGL DO and DONT - 25.doc Page 79 10/25/2013 5:14:55 AM the whole row, repeat, etc. For the end, use the pull bar with a rubber mallet (not a steel mallet), if needed. Remember to add a wedge/shim at the end of the row. This can be a difficult procedure if the length of the row is long and unwieldy, or you have many small planks in the same row and they won’t stay together, irrespective of the use of the wood blocks. However, there is less sideways force on previous rows, hence reducing the possibility of opening gaps in previous rows. There is less parallel force on previous rows so there is less chance of damaging the laminate of previous rows. Perform all of the checks mentioned in the previous method. A variant of the first method is to lay down a long plank in the first row, then install a medium plank in the next row using the tilt down or horizontal slide method, then install a short plank in the third row using the tilt down or horizontal slide method. Then add an additional long plank to each of these three rows. Repeat. This creates a staggered pattern. A combination of these methods may be needed in the same row. 180. A repeat of a point made earlier. Try to use the planks in the same amounts so that you don’t wind up with an excess of 1 or 2 sizes. You don't want to use all long planks and wind up with too many short or medium planks for the next room. You also want to keep track of your scrap. As indicated elsewhere, cutting plank at the right-most edge provides for a plank that can be used as the first in a subsequent row. Also, the un-wanted long side of planks ripped for the last row of a room (where a whole plank width doesn’t fit) may be useful for opposite walls such as when there is a closet opening in the same wall as the entry door. 181. Large rooms actually go faster (fewer end cuts per unit of time, fewer special cases, like doorways, etc.) than a small room (with more cuts per unit of time) with special cases (like closets and width changes), so plan accordingly. 186. Less tricky than under door casings are floor heating registers. Typically a 4 in. x 12 in. floor diffuser has a .75” lip around it that will cover the flooring, yielding an outside dimension of 5.5” x 13.5”.Remember to leave an expansion gap around HHGL DO and DONT - 25.doc Page 80 10/25/2013 5:14:55 AM the opening. 187. After the floor has been cleaned up a visual inspection of the floor should be performed to find blemishes, chips, gaps, etc. If the gap at the wall is too big and will not be covered by the baseboard, for small gaps, one can place a (<1/8”) wedge behind the bottom of the baseboard. The top of the baseboard will still be flush against the wall. If a very minor scratch, a number of products are on the DIY market including Minwax Stain Markers or Minwax Blend-Fil Pencils can be considered. If a plank needs to be replaced, there are two basic steps. First, the old plank needs to be removed. NOTE: These procedures produce a large amount of dust. You should wear a mask. You might also want to wear knee pads. If possible use rigid Ram Board paper stood up on its side, to surround the area being worked on to contain the dust so you can easily clean it up, so you can later identify other areas of the floor with issues. This also reduces the dust that will get on the switch/outlet plates, walls and moldings that will need to be cleaned prior to second coat of paint. Taking into account downstream activities, rather than treating each function in isolation, results in a better experience and end product. Below, find three scenarios wherein holes are drilled and then a power saw is used to cut (to the depth of the plank, or just a tad deeper) out the rectangular areas and diagonal cuts between holes. You may need to use a chisel or multi-tool to completely cut thru the plank where the power saw was used. Be careful to not cut the planks surrounding the plank to be replaced. Pry up the parts of the plank which are to be replaced. Some pieces may need to be tilted, rotated, tugged, etc. Our planks were 5.7 inches wide so using a power saw to make the cuts parallel to the short edge of the plank were impractical and not done. So for method 1, cutting the 45° angle like method 2 produced a similar result. HHGL DO and DONT - 25.doc Page 81 10/25/2013 5:14:55 AM HHGL DO and DONT - 25.doc Page 82 10/25/2013 5:14:55 AM Second, the new laminate plank must be installed (shown above). A same sized and shaped plank needs to be made ready. Cut off the bottom lip of both grooves and the side tongue, using a utility knife, plane, etc. Per the various methods, then put a thin bead of wood glue or epoxy on the four edges of the new plank. Install the glued tongue of the new plank into the existing groove on the existing floor and drop the plank into place. Wipe off any excess glue. Ensure that the top of the new plank and the surrounding planks are flush. Load full pails of joint compound (over protective red rosin paper) on the plank and let dry. Do not rest these pails on linoleum when done as they could leave marks in the linoleum. Consider saving a few planks after completing the floor. This has the benefit of ensuring that you have replacements with the same pattern and groove/tongue placement as the original floor. Planking purchased at a later date could differ in these two areas should there be a change in the manufacturer supply chain. Something as simple as the groove/tongue sides on the small edges being switched could occur. 188. Real life scenarios of planks needing to be replaced include places other than in the center of the room. Consider the following. A plank is against the wall, partially under the baseboard. It has been hit by something and a large chunk of the laminate surface has been sheared off. The plank must be replaced. In the photos below, the right end of the HHGL DO and DONT - 25.doc Page 83 10/25/2013 5:14:55 AM plank is shown, but the same actions were performed on the left end. The lines were drawn as usual. Drilling the holes was not a problem, but making any of the cuts must be done a different way. A multi-tool was used to make the cuts. A wood chisel was used to expand the cuts. Fragmented parts were removed. The plank now had some ability to be moved left/right, as well as towards the wall up to the gap provided at installation time. The plank was moved towards the wall and a chisel was inserted into the gap so that the plank could be lifted up. HHGL DO and DONT - 25.doc Page 84 10/25/2013 5:14:55 AM NOTE: Above photos showing glue used on existing planks and replacement plank are from another location. Whenever the plank was damaged, it also opened up a gap with the adjacent plank on the left. This gap let us put the replacement plank into place. To close the gap, the baseboard at the left end of the row was cut with the multi-tool and pulled away. No attempt was made to make a scarf joint but could be tried, if desired. A utility knife was used to score the paint/caulking above the baseboard. A small pry bas was then used to pry the plank away from the end wall. As the gap was so near the wall, the small pry bar was sufficient to close the gap in the plank shown above. The pull bar was not needed. The baseboard was put back into place, nailed, caulked, and painted. NOTE: Red rosin paper was laid on the floor during this procedure to protect the floor, as should be done when any work is done in the room. HHGL DO and DONT - 25.doc Page 85 10/25/2013 5:14:55 AM This includes: painting; work on electrical switches, outlets, & ceiling lights; tilting out windows for cleaning; opening windows to install exterior screens; adjusting closet shelves, brackets, & rods; staging/using ladders; etc. Paint drippings, scratches and gouges can be avoided by proper protection of the floor. A scratch spanned two planks. Both planks were removed at the same time. This made the installation of the first plank easier. The first plank installed in the living room was across the threshold of the front door. There was a 3/8” gap between the plank and the threshold of the door. A thin strip of a plank, using discards from the last row of a room (just as the discard from the end of a row can be used at the beginning of the next row) can be used in this virtual first row. The tongues and grooves were trimmed. To facilitate the new plank being installed, the groove of long side of the existing plank was trimmed as well. Additionally, the tongue of the long side that would connect with the existing plank was also trimmed back an additional amount. Glue was applied to the areas that would touch, and wedges were installed to make things sit tight as they dried overnight. 189. Upon completion of the floor, cover the floor with Red Rosin or Ram Board paper to protect it from foot traffic, paint/plaster splatter, etc. Additional painting, foot traffic, appliance delivery, tool and equipment transport, etc. can mar the floor. This is a must do. HHGL DO and DONT - 25.doc Page 86 10/25/2013 5:14:55 AM 190. Lastly, install T molding (transition) or laminate surface reducer in thresholds. For our environment, the laminate will meet a) the ceramic tile in the main floor laundry room, where the T molding may be appropriate, b) linoleum in the main floor kitchen, where laminate surface reducer may be appropriate and c) carpet in the upstairs hallway, where nothing may be needed. laminate & linoleum laminate, T molding, linoleum laminate & carpet 191. If following the laminate floor installation, paint, etc. got on the laminate, use a plastic putty knife with GOO GONE Caulk Remover, to gently remove the paint. 192. For dust, use: HHGL DO and DONT - 25.doc Page 87 10/25/2013 5:14:55 AM HHGL DO and DONT - 25.doc Page 88 10/25/2013 5:14:55 AM HHGL DO and DONT - 25.doc Page 89 10/25/2013 5:14:55 AM HHGL DO and DONT - 25.doc Page 90 10/25/2013 5:14:55 AM SHELVING 193. For a shelf in a laundry room over a washer and dryer, the shelf will have a rounded edge in the front. If you only have square stock you can use a router with a round over bit to make a rounded edge. The shelf will be approximately 11” deep. It will have a 2.25” x 3/4” inch cleat (support) along the back and sides, put together in the shape of a horizontal “U”. As there will not be a clothing rod as part of the shelf, the left and right cleats need only extend to 10 3/4” from the back wall. Alternately, if the back cleat goes the full width of the wall, then the side cleats will be 3/4” shorter, or 10” in length. Doing this in a consistent manner will ensure the right size cuts are made. The rear cleat should be installed level and then nailed into the studs, as well as at both ends, using 2.5” nails. The side cleat should also be level and nailed into the studs, if possible, but since they are 10” to 10 3/4” long, chances are they will not be near a stud (they are 24” on center.) Therefore, spread wood glue onto the backs of the side cleats, set in place, and nail in place. If possible nail the rear and side cleats together. The top of the back and side cleats should be 5’ off the floor. For a wide wall (enough for a washer and dryer) a cleat should be added at the center. At a stud in the center would be perfect, but probably not possible. Use a cleat that is 10” long and place it beneath the center of the rear cleat, in a vertical orientation. It should also be glue backed and nailed to the wall and if possible, the rear cleat. After the shelf has been cut and put into position, you will attach a sturdy single piece bracket (without clothing rod retainer) to both the rear cleat and the just added vertical cleat. The top of the bracket will be flush with the bottom of the shelf and flush with the top of the rear cleat. Source: Unknown If the bracket does not seem to fit, flip the wall side leg of the bracket with the shelf side leg. This bracket will get its vertical strength from the rear cleat. The role of the vertical cleat is to keep the bracket away from the wall the same distance as the rear cleat. As things are placed on the shelf, the bracket will press against the vertical cleat and keep the shelf level. See the photos below for the placement of the items described, above. When securing the side cleats in a laundry room, be careful. There may be water pipes behind the drywall, especially if one of the side walls includes the water shut off valves (see left side wall in photo, below.) HHGL DO and DONT - 25.doc Page 91 10/25/2013 5:14:55 AM 194. For a shelf in a clothes closet, the same depth shelve as above will be used. The same rear cleat will be used and installed the same way. As there will be a clothing rod as part of the shelf, the side cleats will extend 13 3/4” (13” in front of the rear cleat) from the back wall. The side cleats should be level then glued and nailed into place, as in the case of the shelf in the laundry room. The top of the back and side cleats should be 65” off the floor. For a wide closet a cleat should be added at the center. At a stud would be perfect, but probably not possible. Use a cleat that is 9” long and place it beneath the center of the rear cleat, in a vertical orientation. It should also be glue backed and nailed to the wall and if possible, the rear cleat. After the shelf has been cut and put into position, you will attach a shelf and rod bracket assembly to both the rear cleat and the just added vertical cleat. The top of the bracket will be flush with the bottom of the shelf and flush with the top of the rear cleat. Source: Unknown At the front of the side cleats, add the clothing flange/socket set. One end will be shaped like a cup/circle that the clothing rod can be horizontally inserted into. The other end will be shaped like “U” that the clothing rod can be set down into. See the photos below for the placement of the items described, above. NOTE: The clothing rod extends in front of the shelf so that hangers can be lifted up off the clothing rod without coming into contact with the shelf. For a shelf in an even wider closet, one that has sliding doors for example, the only difference is that two vertical cleats and shelf and rod bracket assemblies need to be used. 195. For a shelf in a pantry, the same depth shelve as above will be used. The same rear cleat will be used and installed the same way. The side cleats will go the full width of the side walls. This allows at some later date, deeper shelves to be used, HHGL DO and DONT - 25.doc Page 92 10/25/2013 5:14:55 AM or the current shelves to be extended. But be warned, some people feel that if a shelf is too deep, you wind up with things hidden behind things or things you can’t reach because of so much other stuff in the way. They suggest using 8” to 16” deep shelves. Any longer and roll-out trays may be needed. The side cleats should be level and then glued and nailed into place. No center vertical cleat is needed. There should be 4 shelves. The heights to the top of the cleats, from the floor, are 30”, 42”, 56” and 68”. 196. For a linen shelf in a bathroom, the same depth shelve as above will be used. The same rear cleat will be used and installed the same way. The side cleats will extend 10 3/4” (10” if in front of the rear cleat) from the back wall. The side cleats should be glued and nailed into place. No center vertical cleat is needed. There should be 4 shelves. The heights to the top of the cleats, from the floor, are 24”, 38”, 52” and 66”. When securing the side cleats in a bathroom linen closet, be careful. There may be water pipes behind the drywall, especially if one of the side walls abuts the shower. If the depth of the linen shelf area is deep, one could use longer side cleats. This serves two purposes. First it might make it easier to find a stud so the side cleat will be able to carry more weight. Second, at a later date, deeper shelves could be used in order to store more linen. 197. NOTE: It is best if the shelves and cleats are painted before they are installed. Nail holes, etc. can be puttied and repainted. HHGL DO and DONT - 25.doc Page 93 10/25/2013 5:14:55 AM HHGL DO and DONT - 25.doc Page 94 10/25/2013 5:14:55 AM HHGL DO and DONT - 25.doc Page 95 10/25/2013 5:14:55 AM HHGL DO and DONT - 25.doc Page 96 10/25/2013 5:14:55 AM BASEBOARDS 198. If baseboards will be painted, it is best to paint them before installing them. Nail holes, etc. can be puttied and repainted. 199. When installing baseboards, check the floor to ensure the baseboard will cover any gaps between the flooring and the wall. Laminate floors typically mandate that an expansion gap be left between the laminate planks and the wall. If the gap is too large, it may be visible after the baseboard is installed. Either the laminate should be replaced with a longer plank, or the bottom of the baseboard should be slightly held out from the wall by placing a wedge at the bottom back of the baseboard when it is installed. The top of the baseboard will be installed flush with the wall. This is similar to when a wall is bowed and instead of forcing the baseboard to go tight against the wall and caulking is used to fill in the gap between the top of the baseboard and the wall. Here too, allowances are made and nothing is discernible. The above holds true for baseboards over ceramic floors. 200. When installing baseboards over laminate floors, a final check of the floor should be made. This is the last chance to fix the floor easily. Once the baseboard is installed, to remove it means cutting it out. Things to check include: underlying gaps between the flooring and the wall, as described above; gaps between planks; blemished planks; cracked ceramic tiles; missing Tmolding/thresholds; as yet uninstalled dependencies such as stair molding; etc. 201. For cases where the adjacent walls are guaranteed to be plumb and at right angles, the baseboards can be cut at 45 angles and adjacent baseboards can be easily fit together. 202. If the walls are not at a right angle, but the baseboards are painted, for outside and inside corners, the baseboards can be vertically cut at 45° angles and any ill fit can be remedied with caulking/putty, for either inside or outside corners. 203. If the walls are not at a right angle and the 45°method mentioned above is insufficient, or the baseboards are to have a clear coat, the inside corners of baseboards need to be handled differently. As a simple example, assume a rectangular room. Opposing long walls should have baseboards installed full length. The ends of these baseboards should be cut square. The baseboards that fit between the above baseboards will initially be cut to the full length, ends squared off. Then each end needs to be vertically miter cut at a 45° angle, off the wall, with the wall side of the baseboard being longer than the room side of the baseboard, at both ends. Then use a coping saw (with a thin blade) to slightly hollow/cope out (i.e., back bevel) the area behind the miter cut at the paint line. This is all better visualized than described so please see the photos, below. HHGL DO and DONT - 25.doc Page 97 10/25/2013 5:14:55 AM 45° angle saw With the hollow/cope, the connecting baseboards do not need to be at an exact 90° angle. The hollow/cope allows 90+/-° between the baseboards. Where the edge cut by the cope meets the adjoining baseboard you have a limited vertical pivot point. This works for the case where the walls are not square with each other. It does not help if the walls are not plumb. The rear of the baseboard as seen from the wall side is shown above. It is evident how the hollow/cope allows for the baseboards to be at angles other than 90°. The squared off baseboard can pivot into the hollow out space of the coped baseboard. 204. When doing baseboards in the bathroom, laundry room or kitchen, you need to be careful that you do not nail near water pipes. HHGL DO and DONT - 25.doc Page 98 10/25/2013 5:14:55 AM HHGL DO and DONT - 25.doc Page 99 10/25/2013 5:14:55 AM HHGL DO and DONT - 25.doc Page 100 10/25/2013 5:14:55 AM ATTIC ACCESS (SCUTTLE HOLE/HATCH) 205. When working on an attic access (scuttle hole), you will start with a roughly framed opening into the attic. 206. As with doors and windows, use a utility knife to cut away excess paper, plaster or plastic surrounding the rough frame. 207. Use a level against the ceiling around the opening to get an understanding about the contour of the ceiling. 208. The rough frame may have been constructed using a construction bracket such as a joist hanger, in the 4 corners. These brackets may have been screwed in. Allowances must be made for these brackets when constructing the scuttle hole, especially if the brackets and/or screws protrude excessively from the rough frame. The screws are intentionally inserted at an angle for strength. 209. Similar to a door, you need to make the equivalent of a jamb that sits horizontally and goes along the inside of the 4 edges of the roughly framed opening, using 4.5” x .75” stock. Ensure the bottom of the jamb is flush with the ceiling. If you can make the jamb square, it will make it easier to make the casing, described next. Exert caution when nailing the jamb to the rough frame. You don’t want to nail thru the joist hangers. 210. You then also need to add a horizontal casing using standard 2.5” door/window casing that goes around the jamb, being sure to include a .125” reveal around the jamb. 211. Then add the equivalent of a horizontal stop using 2.25” x .75” stock. This stock may need to be ripped on the table saw starting with 4.5” x .75” stock. The stop is placed .5” above the bottom of the jamb. The plywood attic access panel that will sit within the jamb, on top of the stop, will also support insulation such as multiple layers of rigid foam. The combined weight of the plywood panel and the rigid foam necessitates the use of the stop. These materials could not rest directly on the back of the casing. HHGL DO and DONT - 25.doc Page 101 10/25/2013 5:14:55 AM JAMB STOP Door Equivalent JAMB/JAMB CASING w/REVEAL 212. If you will be blowing insulation (i.e., cellulose) into the attic, you need to protect certain areas where insulation should not go. This includes soffit vents and the scuttle. You can attach a dam to the scuttle that extends up into the attic above the joists. This form ensures that when the insulation is blown in, it stays on the exterior side of the form and the interior scuttle side remains un-impacted. Depending upon the location of the joist hangers, you should be able to have at least 2” of the dam that connects to the rough scuttle frame below the joists. You may have to cover parts of a joist hanger. The dam should also extend at least 6” into the attic above the joists. Typically an 8” or greater wide piece of .5” plywood should be used. Ensure that the scuttle cover will not be impeded by this dam. Try to do the scuttle and this dam at the same time in case tradeoffs on size need to be made. See photos below of the frame and frame on top of scuttle. HHGL DO and DONT - 25.doc Page 102 10/25/2013 5:14:55 AM PATCHING BASEBOARDS, CASINGS, DRYWALL 213. If there is not enough material to make a door or window casing with a single piece of stock, or you need to replace a damaged section of casing, you can use the longest piece available and then extend it by adding an extension. As opposed to just adding a piece to a square end of the long piece, cut the long piece at a 45° angle when the casing is laying flat/horizontal. Then add the extension piece that is cut at a reciprocal angle and glue it to the long piece. This is shown in the photo below where the two pieces are slightly offset so you can easily identify where the pieces meet. 214. If there is not enough material to make a baseboard with a single piece of stock, or you need to replace a damaged section of baseboard, you can use the longest piece available and then extend it by adding an extension. As opposed to just adding a piece to a square end of the long piece, cut the long piece at a 45° angle when the baseboard is standing upright/vertical. Then add the extension piece that is also cut at the reciprocal angle and glue it to the long piece. This is called a scarf joint. 45° 215. If there is a gap in the drywall, such as at the top of a door, add a piece of wood which is as close as possible to the full size (length, width and depth) of the gap in the wall. This will act as the backer board for the drywall patch. Nail securely in place with framing nail gun. Then screw in a patch of drywall that is the size of the gap. Make sure the patch is as flush with the existing drywall as possible. Make sure the screw head is recessed into the patch. Apply drywall compound with a wide putty/drywall knife over the existing drywall, any gap, and the wood stock added. Do not make the drywall compound layer too thick. The thicker the layer, the longer it will take to dry, and the more that will have to be sanded down to get a flush surface. Additionally a very thick layer may develop cracks as it dries. HHGL DO and DONT - 25.doc Page 103 10/25/2013 5:14:55 AM Take a strip of fiberglass mesh and place it over the drywall compound just added. Press it into the drywall compound gently. The mesh has adhesive on one side but the drywall compound added will work better. Then spread a second layer of drywall compound over the mesh strip. Feather out the edges. Let it dry overnight. Lightly sand the area (fine grade sandpaper) using a sanding block, until smooth. You should not be able to see the mesh when done. If necessary, apply another light coat of drywall compound, feather, dry, sand, etc. Wipe dust away. When ready, prime and paint. (http://www.planitdiy.com/how-to/painting-decor/how-to-repairdrywall/) www.planitdiy.com www.planitdiy.com www.planitdiy.com www.bestmaterials.com When done, clean off putty/drywall knife by scraping off excess drywall compound using scrap wood, etc. Rinse with water if necessary. If easy to mimic the shape of the hole, a “hot patch” or “dutchman’s patch” or “blowout patch” or “butterfly patch” might be another solution. A backer board should still be used for structural integrity. Basically, take some scrap sheetrock that is 1” larger around the perimeter of the hole. On the back side of the sheetrock, score the sheetrock with a utility knife in the size and shape of the actual hole to be filled. Do not cut all the way thru, into the paper. Bend the sheetrock so that the 1” of sheetrock that is beyond the shape of the hole can be peeled from the front paper. To make a clean peel, place the section of the patch with the sheetrock to be kept on the surface of a 2”x4”. Hang any of the 1” sections over the side of the 2”x4”. Pull the section on top of the 2”x4” away from the 1” section. As the 1” section is pulled up, move the 1” section up vertically, while the paper rolls over the edge of the 2”x4” onto the top of the HHGL DO and DONT - 25.doc Page 104 10/25/2013 5:14:55 AM 2”x4”. Repeat for the other three sides. See the figures below. Joint compound can then be overlapped around the hole (in excess of 1”) to be patched. The patch can then be placed in the hole with the overlap paper placed over the overlap joint compound. Use putty knife to smooth out overlap paper and remove excess joint compound. Additional joint compound can then be placed over the overlap paper and adjoining area. Let dry and then sand as usual. The advantages of this method include: no tape needed, no mess from pressing down tape or mesh, less perfection needed as with squeezing joint compound out of mesh, 50% less edges to feather, no tape overlap or gap (i.e., intersecting tape strips around a patch), paper on patch helps position patch and may obviate the need for a backing board where insufficient space exists but where good fit exists, etc. This latter advantage is shown below. A pilot hole was made to run some wiring. There was no room for a backer board as there was a heat return duct behind the wall. The dutchman’s patch was put in the hole and it stayed flush with the surface of the wall without any backer board. HHGL DO and DONT - 25.doc Page 105 10/25/2013 5:14:55 AM 1” PAPER PATCH 1” 2” x 4” SCORING 2” x 4” An optional additional step is to lightly score 1” around the hole in the wall and to then peel off the paper from around the hole. In conjunction with the “dutchman’s patch you will have a virtually flush patch. EXISTING WALL PAPER ON WALL WITH 1” PEELED OFF HHGL DO and DONT - 25.doc PATCH EXISTING WALL PAPER FROM PATCH WITH 1” OVERLAP Page 106 PAPER ON WALL WITH 1” PEELED OFF 10/25/2013 5:14:55 AM HHGL DO and DONT - 25.doc Page 107 10/25/2013 5:14:55 AM HHGL DO and DONT - 25.doc Page 108 10/25/2013 5:14:55 AM PAINTING & CAULKING 216. When painting doors, remove the door from the jamb. Remove the hinge and lockset hardware and set aside in a memorable location. Mark the location of this door along the top so it can be returned to the proper location after painting. Paint both the door and casing/jamb/stop. Do not paint the areas where the hinges and lockset hardware will be attached. 217. When painting, protect the floors beneath the paint area. This includes laminate, linoleum and ceramic tile floors. Use spare card board or Red Rosin paper. You can move the card board and paper with you as you paint additional areas. For areas where multiple coats will be done, if not done already, it would be wise to lay the Red Rosin paper on the whole floor, taping pieces together with masking tape. Clean up any paint that land on the floor, cabinets, or vanities. 218. Where different surfaces meet that are either painted a different color or should not be painted, where warranted, use masking tape on the other surface. This could be a baseboard/floor transition, a baseboard/wall transition, a wall/cabinet transition, a wall/vanity transition, window sash/glass, etc. 219. When painting windows, paint them so that they can be opened after the paint dries. Areas to be mindful include between: the upper and lower sash; either sash and window jambs (all four sides), etc. Never paint the window channel. Should a window become painted shut, a gentle nudging against the area painted may help break the paint bead and separate the painted pieces. Additionally various putty knife-like tools including window zippers, 6-in-1 tool, etc. can be used to break the paint bead between the stuck surfaces. 220. When painting the edge of baseboards (per Benjamin Moore, True Value, Dupont, about.com, TLC & wikiHow): wipe the dust off baseboards; optionally, protect the wall just above the baseboard with painters tape; if available, use angular brush with flagged tips or tapered edges; start painting in a corner, working your way around the room; dip the brush into the paint (1/3 the length of HHGL DO and DONT - 25.doc Page 109 10/25/2013 5:14:55 AM the bristles, no more – to prevent overloading the brush with paint, to prevent dripping and to make it possible to later easily clean the brush); when painting the top/bottom edge of the baseboard (ensuring you don't paint the walls or floor) lightly drag one side of the brush on the inside of the pail (for full face of baseboard gently slap the brush against the inside of the paint can or lightly drag both sides of the brush on the inside of the pail), start with the dry side of the brush away from the edge to be painted and slowly draw the brush along (i.e., cutting-in); use gentle downward pressure; reload when the brush is dry and start where the previous stroke ended; go back over a section where the paint is shy of the baseboard edge; paint in straight lines, where your stroke follows the length of the baseboard rather than going up and down. NOTE: Close to the handle of your paint pail, inside the pail, is a square magnet that you can use to keep your brush upright when not in use. This will help keep the handle from getting paint on it, and keep the brush from sinking into the paint. Dupont TLC 221. Once you start painting, do not let your brushes dry out (i.e., food / bio break). 222. Prior to painting and/or touching up door and window casings, use a nail punch and drive any protruding nails (such as the initial nails used to place/square/plumb the casing as opposed to the nails added using the nail gun) into the casings until they are beneath the surface of the wood. Ensure that as you punch the nail in, it does not come out the opposite side. Putty over the hole. Let dry. Sand over any excess putty. Paint. 223. When done painting (per Benjamin Moore): remove excess paint on your brush into your pail; return excess paint in your cup/pail to the paint can; wipe brush against scrap wood to remove excess paint; add water to your pail so you can dilute/soak/rinse you brushes in your pail; afterwards, discard the liquid in the pail adding water to rinse it out – use a scrap piece of wood to gently loosen the paint off the side of the pail; apply a stream of clean water to your brush to remove remaining paint; let brushes and pail dry completely. HHGL DO and DONT - 25.doc Page 110 10/25/2013 5:14:55 AM 224. If using a roller and paint roller pan with liner, when done painting, in addition to the roller, clean and save the plastic liner such as that by Encore, shown below. 225. For exterior columns and trim, use the following paint. 226. For interior walls and baseboards, use the following paints. 227. For textured ceilings, use the following to do touch ups. Per the manufacturer’s literature: ToughRock Ready-Mix joint compound may be used as supplied or thinned with water to create a wide variety of textures and patterns. Apply ToughRock Ready-Mix joint compound with roller, sponge or brush for the desired effect. 228. When caulking seams use a caulking gun with caulk cartridges. Use blue masking tape to mask off both sides of the seam that is to be caulked. Keep the tape as close to the seam as possible. You want to wind up with caulk over the seam, bordered by minimal caulk over an adjacent side, and then the untouched adjacent side. You don’t want a wide area of thin (or thick) partially transparent HHGL DO and DONT - 25.doc Page 111 10/25/2013 5:14:55 AM caulk overflowing the seam onto a granite or laminate countertop. Take a utility knife and snip off the tip of the caulk cartridge nozzle at a 45º angle. Start by snipping off a small portion of the cartridge nozzle tip to see what size caulk bead will come out and stay within the size of the area masked off by the masking tape. Insert a long nail or the built-in tip snipper attached to the gun into the cartridge nozzle tip to puncture the seal within the nozzle. Apply the caulk holding the gun at a 45º angle, squeezing the caulking gun trigger while slowly and deliberately moving the tip along the seam to be caulked. Don’t over-apply caulk. You can always add caulk, but getting rid of excess caulk can be messy. Start off by doing a short section and with experience, do longer sections. Dampen your index finger. Press your finger securely over the seam at a 45º angle, firmly contacting both pieces of masking tape. Move your finger in short segments to remove excess caulk. As soon as you notice that too much caulk is being piled up, pull your finger away and clean the caulk off your finger. Resume caulking, overlapping the previous area. You may have to go over an area multiple times. If no caulk ever comes up or you have a hollow area, you may want to add more caulk. When done, remove the blue masking tape. Let caulk dry and after drying, check to see if shrinkage has occurred necessitating adding more caulk. HHGL DO and DONT - 25.doc Page 112 10/25/2013 5:14:55 AM HHGL DO and DONT - 25.doc Page 113 10/25/2013 5:14:55 AM HHGL DO and DONT - 25.doc Page 114 10/25/2013 5:14:55 AM STAIRS 229. During construction of homes, temporary rough construction treads and risers are installed. These steps are meant to weather the harsh treatment and conditions sustained during construction. As construction winds down, the risers and treads can be replaced with their final counterparts, over the existing triple stringers. It is a good idea while the construction grade treads and risers are installed and before the sheetrock goes up to mark on the stringer where the wall studs are located. Then even after the sheetrock is up, when you need to nail in the stair skirts (baseboard), you can easily find the wall studs. 230. Starting at the bottom of the stairs, remove a few sets of construction grade treads and risers. Start by installing a new riser, then a new tread, repeat. Be careful, it is easy to nail thru the tread or riser and miss the stringer. Either when nailing feel for a solid impact, or check that the tread or riser is secure after nailing. 231. Cut the risers such that its top edge will sit flush with the bottom of the tread above it. Apply glue to the vertical edges of the stringer. Nail the riser to the vertical section of the stingers (both sides and center) using 2 nails per stringer. HHGL DO and DONT - 25.doc Page 115 10/25/2013 5:14:55 AM The width of the risers should match the width of the stingers. http://www.youtube.com/watch?v=0jSwQEpr2uU 232. The treads sit on top of the horizontal sections of the stingers and the top of the riser. Square edge in towards the stringer, rounded edge facing outwards. They can overhang the stingers on the sides and on the front edge over the riser below it. The overhang would be approximately 1 inch. Apply lumber lock glue to the horizontal edge of the stingers as well as to the top of the riser beneath it. The glue is essential on the top of the riser to ensure a tight fit such that when walking on the steps, the action of the tread against the riser does not generate a squeaking noise. Be liberal when applying glue to the top of the riser. Should the tread not sit flush of the riser the glue will ensure that movement of the tread is limited. Secure the tread to each stringer (3) using 3 nails using the framing nail gun. 233. When nailing in the risers and treads, listen for a hollow sound, to catch where the nail has missed the stringer. As you are working on stairs, bending over, sitting on the steps, etc. you may be in close proximity to the nail gun. Wear safety glasses and keep as clear of the nailing area as possible. Also watch the air hose in this tight quarter to ensure you don’t get legs tangled up and trip. 234. Check the stringers for cracks or bad cuts. Cracks could cause parts of the stringer to come off when the treads and risers are nailed in. Also bad cuts could result in the treads and risers not seating properly. 235. If making the stingers from scratch, visit the web site: http://www.ezstairs.com/widgets/stair_calculator/index.html for assistance in determining tread sizes, # of treads and risers, etc. 236. At the bottom of the steps you should have at least 36” to the opposite wall. If not, a landing needs to be made that is at least 36” to the wall and 8” high. You may have to remove the lowest tread so the underlying stringer is part of the base for the landing. A box then abuts the stringers to form the remainder of the base of the landing. 5/8” plywood (same size as the tread stock) forms the top of the landing, covering the box and where the removed tread sat. As with the treads, the top of the landing should have an overhang, facing the entry point. HHGL DO and DONT - 25.doc Page 116 10/25/2013 5:14:55 AM 237. If the height of the landing is too high (>8”) a landing pad needs to be added and glued (lumber lock) to the cement floor. Masking tape can be used to mask the area where glue is not to go. After applying the glue under the pad, especially the leading corner, a beam from the ceiling to the pad can be used to wedge the landing pad down while the glue dries. HHGL DO and DONT - 25.doc Page 117 10/25/2013 5:14:55 AM 238. For fastening treads and risers to the stringers, use framing nails. 239. Then add the railings. 240. Additionally for stairs that are not in the basement, there should be the equivalent of a baseboard, called skirts, in-progress pictures, shown below. HHGL DO and DONT - 25.doc Page 118 10/25/2013 5:14:55 AM 241. The skirts get topped off with a trim piece that matches the baseboards used in the room. The skirt (without decorative molding) is 3.75” above the leading edge of a tread. The railing is 31” above the leading edge of a tread. 242. If carpeting will be laid over the steps, carpet grippers will need to be added. 243. For exterior steps, risers are the height dictated by the stringers. When installed they go across the stringers with no overlap. Risers should be installed flush to the top of the stringer it attaches to. The risers can be secured with 2.5” finished nails (all finished nails are galvanized) in a Hitachi finish nail gun. Use two nails wherever a stringer is behind a riser. The tread will then sit flush over the stringer and a riser. The short side of the treads should extend 1” beyond the outside stringers. When the tread is composed of two sections (in parallel length-wise) of composite deck material, keep a 1/8” gap between the long edges so that rain water can drain between the tread sections. Use 2.5” Hi Performance Composite Deck Screws II to attach the treads to the stringers. Use a T-20 torx hex bit in a power drill to drive the screws into the treads. Use two screws wherever a HHGL DO and DONT - 25.doc Page 119 10/25/2013 5:14:55 AM stringer is beneath a section of tread. The riser at the base of the steps may need to be ripped to fit the space present. The tread for the bottom step may need to be trimmed so that the columns on either side can fit. HHGL DO and DONT - 25.doc Page 120 10/25/2013 5:14:55 AM HHGL DO and DONT - 25.doc Page 121 10/25/2013 5:14:55 AM HHGL DO and DONT - 25.doc Page 122 10/25/2013 5:14:55 AM CEMENT & LUMBER 244. When securing lumber on top of concrete, such as for the base of steps in a basement or the frame of an exterior door in a basement, you need to use pressure treated wood (look for a green tint or small slits on the wood surface) or wood marked with a stapled on label as suitable for various Ground Contact. The AWPA UC4 series are of interest for ground contact. See below for various UC4* uses category labels. See table below for various definitions. Older designations such as “0.25 PT wood” and AWPB LP-22 standard may still be found in personal supplies. Below is an example of a non-UC4* uses category label. HHGL DO and DONT - 25.doc Page 123 10/25/2013 5:14:55 AM Other wood abbreviations that you may encounter include: S-P-F (Spruce, pine, or fir), SYP (Southern Yellow Pine), HT (Heat Treated), KD (Kiln Dried – moisture content between 16 & 19%), KD-19 (Kiln Dried to no more than 19% Moisture Content, surfaced green/S-GRN), TP (Timber Products Inspection), etc. HHGL DO and DONT - 25.doc Page 124 10/25/2013 5:14:55 AM 245. The size of lumber is summarized in the chart, below. SOFTWOOD LUMBER SIZES Actual (inches) Nominal (inches) Surfaced dry Surfaced Green 1x2 3/4 x 1-1/2 25/32 x 1-9/16 1x3 3/4 x 2-1/2 25/32 x 2-9/16 1x4 3/4 x 3-1/2 25/32 x 3-9/16 1x6 3/4 x 5-1/2 25/32 x 5-5/8 1x8 3/4 x 7-1/4 25/32 x 7-1/2 1x10 3/4 x 9-1/4 25/32 x 9-1/2 1x12 3/4 x 11-1/4 25/32 x 11-1/2 2x2 1-1/2 x 1-1/2 1-9/16 x 1-9/16 2x3 1-1/2 x 2-1/2 1-9/16 x 2-9/16 2x4 1-1/2 x 3-1/2 1-9/16 x 3-9/16 2x6 1-1/2 x 5-1/2 1-9/16 x 5-5/8 2x8 1-1/2 x 7-1/4 1-9/16 x 7-1/2 2x10 1-1/2 x 9-1/4 1-9/16 x 9-1/2 2x12 1-1/2 x 11-1/4 1-9/16 x 11-1/2 4x4 3-1/2 x 3-1/2 3-9/16 x 3-9/16 4x6 3-1/2 x 5-1/2 3-9/16 x 5-5/8 6x6 5-1/2 x 5-1/2 5-5/8 x 5-5/8 Source: The Home Depot Outdoor Projects 246. To secure lumber to concrete, use a Hilti type gun i.e., a) Ramset (HD222) or Duo-Fast (12284), etc. powder actuated hammer tool, b) Duo-Fast or Ramset 3” powder actuated pins & c) Duo-Fast powder actuated (.22 caliber) loads/shots. HHGL DO and DONT - 25.doc Page 125 10/25/2013 5:14:55 AM 247. Open the tool by pulling the tops and bottoms away from each other (an inch or so). Put on eye protection! Maybe some ear plugs as well. Insert a load into the chamber in the center of the tools shaft (nose down, rim up). Place a pin into the bottom of the tool, head side towards the top of the tool (positioning rubber washer towards the bottom). Hold tool against the wood. Push down on tool to close the chamber. A click may be heard. Also, when a load is in the chamber, make sure the tool is always pointed away from people. Do not load the tool if you will not be using it immediately. Keep legs and feet away from the area that is being nailed. When the tool is positioned perpendicular to the lumber, depress the trigger. Be prepared for a loud cracking sound and some kick of the tool. Should an obstacle be encountered (another nail, etc.) the nail may not go in properly and may actually bend over, ricochet, etc. Remember to eject the spent actuated load and to clean up your brass. #4 load (yellow) for 3” pins left about .25” of nail exposed. To rectify this, use a #3 load (green) to finish driving the nail in. HHGL DO and DONT - 25.doc Page 126 10/25/2013 5:14:55 AM HHGL DO and DONT - 25.doc Page 127 10/25/2013 5:14:55 AM HHGL DO and DONT - 25.doc Page 128 10/25/2013 5:14:55 AM EXTERIOR RAILINGS 162. Fiberon Homeselect railing components were used between the existing columns. This included a) top rail/top rail bracket/bracket flange, b) bottom rail/bottom rail bracket/bracket flange, c) balusters, and d) a center crush block. 163. The bottom rail dimensions are: 3.5” x 2”. The top rail dimensions are: 3.5” x 2”. The balusters are: 1.25” x 1.25”. The top and bottom rail brackets are 3.75” x 2.125” x 2”. 164. Measure the distance between left and right columns (at both the top and the bottom). Take the smaller dimension of the two. Mark the rails (top and bottom) to the dimension selected minus .75”. This will ensure you have space for the bracket flange, space for indents in the rail bracket, and that the rails will not be too tight to install. When marking this dimension on the rails, ensure that the distance from the end of the rail to the nearest baluster hole is the same on both ends. There are the two possible configurations: the center of the cut rail is a baluster hole (odd number of holes) or the center of the cut rail is the space between two baluster holes (even number of holes). Look at both to see which leads to the least interference with the rail brackets and has the most space from the end rail to the column. You want the rails to have symmetrically distributed balusters. Also: the distance from the end balusters to the respective column should not exceed the distance between balusters (4”) and should be at least 2” so as not to interfere with the rail brackets. The 2” minimum applies to both an even or odd number of balusters. 165. Wear safety glasses. Cut the rails. A miter saw can be used. 166. Insert the rail brackets on both ends of the rails. Remember that the baluster holes in the bottom rail open upwards. Remember that the baluster holes in the top rail open downward. 167. Note that the bottom rail is vertically oriented while the top rail is horizontally oriented. HHGL DO and DONT - 25.doc Page 129 10/25/2013 5:14:55 AM So use the corresponding rail bracket (horizontal vs. vertical) with each rail. You can also tell which is which by orienting the rail bracket so that it will have a vertical opening for the flange (open on the bottom side) such that it will slide down over the flange. If to do this you have to orient the rail bracket horizontally, it goes onto the top rail, otherwise, you have a rail bracket for the bottom rail. 168. If you have deviated from these instructions and a rail bracket covers any part of the end baluster holes you need to make some adjustments. This is not a manufacturer described scenario. If you continue with this scenario, you can use a jig saw to notch out part of the rail bracket covering the baluster hole. Note: A multi-tool blade is too wide and the rail bracket is too small and fragile to easily and safely secure such that it can readily handle and survive the vibrations of the multi-tool. You can trim rail bracket without removing it from the rail. Ensure that the rail is fully inserted into the rail bracket. Normally they fit super-securely to each other but if they don’t use tape to hold together securely. Secure the rail and rail bracket so they will not move. Cover the bracket with masking tape to protect the bracket finish. As always, wear safety goggles. Temporarily place a baluster over the blocked opening as if you were inserting it into the rail, and trace an outline on the rail bracket where the baluster needs to go. Insert the jig saw blade into the rail via the baluster opening and make gentle curved cuts slightly parallel to the rail bracket edge in both directions (not back and forth) to shave the bracket, using the baluster hole as your guide. Also make two small cuts perpendicular to the rail bracket to remove the shavings. Ensure that the jig saw blade is shorter than the depth of the rail so it does not bottom out onto the bottom inner edge of the rail. See illustrations below. Note: Only the jig saw HHGL DO and DONT - 25.doc Page 130 10/25/2013 5:14:55 AM blade is shown. 169. Locate the baluster hole at the center of the bottom rail. If you have an even number of balusters, then pick either of the two center baluster locations. Insert a piece of wood into a crush block beneath this location that will hold the crush block vertically as well as prevent the crush block from moving horizontally. At this location, use the baluster hole to gain access to the bottom interior of the rail. Drive a screw centrally thru the bottom interior of the rail into the wood in the crush block. The crush block height is the distance between the bottom of the bottom rail and the ground/floor. The bottom rail sits on the crush block and will also ensure that the crush block does not move. If you have chosen a different height for your rail, you will have to trim your crush block. 170. Position the bottom rail/rail bracket/crush block between your columns ensuring that the rail is parallel to the ground/floor and level. Trace the outline of the rail brackets on the columns. Temporarily move the bottom rail/rail bracket/crush block out of the way. Remove a rail bracket from one end of the rail or use a spare rail bracket (easiest method) and place it back against the column in the outlined location and trace onto the column the location where the flange will be located. If you don’t have a spare rail bracket, place a wooden block against the accessible inner sides of the bracket and use a rubber mallet against the wooden block (being careful not to mar the rail finish) to nudge the bracket off the rail. Try to do this evenly on all sides so the bracket does not bind and stick. 171. Use a flange to mark where the flange mounting holes are located. You may want to transfer this information to a piece of stock the same width as the column and the same height as the railing. You can use this as a template for the flange and mounting holes on the opposite column. Actually just the location of the holes is necessary. You can drill thru the holes in the template into the next column. Screw the flanges into both columns. NOTE: The columns are 4x4 stock covered with finished fascia. The screws supplied with the brackets are short and when screwed thru the fascia board, do not penetrate deeply into the 4x4 column, resulting in a less secure bracket. It is better to use 2-1/2” long High Performance screws with a T25 head, mentioned elsewhere in this document. HHGL DO and DONT - 25.doc Page 131 10/25/2013 5:14:55 AM The template can then be used for the bottom flange location on additional columns. This ensures that all railings will be at the same height. Later, you can transfer the information about the location of the flange and mounting holes for the top flange to the template. 172. Insert the bottom rail/rail bracket/crush block over the bottom flanges. 173. Insert the end balusters (2) into the bottom rail. Note that the balusters may need to be rotated 90º in order to fit into the rail. 174. Assemble the top rail/horizontal rail bracket remembering the orientation information above. 175. Place the top rail/ rail bracket over the two balusters and between the columns. Lower the top rail/rail bracket down until seated. As with the bottom rail/bracket, trace the outline of the rail brackets on the columns. Temporarily move the top rail/rail bracket out of the way. Then trace the location on the column where the flange will be located. Use a flange to mark where the flange mounting holes are located. Transfer this information to the template used above. Screw in the flange. Use the template and screw the flange into the opposite column. 176. With the top rail/rail bracket out of the way, install the remaining balusters into the bottom rail. Insert the top rail/rail bracket over the flanges just so the rail sits over the balusters. 177. One at a time, pull a baluster up and into the baluster hole in the bottom of the top rail, until the baluster is just in the rail. There is enough baluster in the bottom rail so that they can be moved up into the top rail without totally coming out of the bottom rail. When all balusters are in place, use a rubber mallet (with some protective surface in between to avoid marring the railing finish) to lower the top rail and associated brackets onto the flanges and balusters. 178. Ensure that the rail is level and the crunch block is firmly in place. When installing multiple rails, ensure that they are all at the same height. Cut a piece of stock the same dimension as the crush block and make sure both ends of the bottom rail sit at this template. It has been observed that the product has deviations between product lots. So, try to use the top and bottom rails as pairs as supplied. Sample measurements are given below, but subject to change based upon the lot they’re from. HHGL DO and DONT - 25.doc Page 132 10/25/2013 5:14:55 AM Per manufacturer’s documentation: NOTE: Rail lengths will vary slightly due to manufacturing processes. Make sure rails are cut properly to correct length, and with hole pattern centered between posts before securing. 1-1/8” 2.5” 38.125” 28-3/4” 28-7/8” 3-5/8” 3.5” 1-1/8” 179. When you install a railing and one edge attaches to the house, if there is siding, you may need to get creative in order for the flanges to have a firm and flat base to attach to that is also vertical. If you have an extra piece of siding, the color and contour might make it a good candidate as a spacer behind the flange. When attaching to siding, you might want to pre-drill the holes for the flanges to avoid any splitting and chipping. 180. If you are installing additional railings and you have made your template, the flanges can be set up easily and if desired by a different team member in parallel with the team doing the rail assembling. Brackets do not need to be put on and then removed. Rails/rail brackets do not need to be temporarily moved out of the way. You don’t need to put in two balusters at one time and the remainder at another. Just assemble your bottom rail/rail bracket/crush block and install it over the flanges. Insert all of your balusters into the bottom rail. Assemble your top rail/rail bracket and install it over the flanges and balusters. Use the method described above to pull the balusters into the top rail. Lower the top rail and associated brackets onto the flanges and balusters. HHGL DO and DONT - 25.doc Page 133 10/25/2013 5:14:55 AM 181. If you will be adding railings to stairs, some of the instructions above will be applicable. However, there is some additional complexity. First when dealing with steps, the balusters must be vertical or plumb, while the upper and lower railings are at an angle. NOTE: Per the manufacturers’ documentation, “the slope of the stairs can be 30-36 degrees.” This means that the baluster needs an adapter to connect to the angled rails, as shown above. Due to our environment our angles were 41 degrees for the front porch and 35 degrees for the back porch (49 Rock). OSHA allows angles of 30 to 50 degrees. Additionally, the tops and bottoms of the balusters need to be cut at an angle to connect to the rails. Second, the balusters do not go inside the rails, as with horizontal rails. Thus the length of the balusters is critical. NOTE: OSHA requirements are that the height of handrails shall be, not more than 37 inches nor less than 30 inches from the upper surface of the handrail to the surface of the tread, in line with the face of the riser at the forward edge of the tread. Too long and the rails will be bowed out. Too short and the balusters will show gaps and potentially move. Third, the rail brackets need to be cut at an angle. This angle is critical and will be dependent upon the angle of the steps. HHGL DO and DONT - 25.doc Page 134 10/25/2013 5:14:55 AM If you can envision a long piece of stock laid down the steps across the top of the treads, the rails need to be parallel to this long piece of stock at the desired offset. In summary: determining the angle of the steps leads to the angle of the rails – which helps with the length of the rails, the angle of the rails leads to the angles of the tops and bottoms of the balusters – which helps with the length of the balusters, the angle of the rails and balusters leads to the angle of the rail brackets. It is recommended that you have a sliding T-bevel or adjustable quick square layout tool (as shown above) on hand to help with all these angles, including being able to transfer the angle to the miter saw. A level will also help. Using a miter saw with a fixed angle set throughout this installation will help bring consistency into the effort. Fourth, unlike horizontal rails, there is no guidance for baluster spacing for stairs, such as minimum distance to column. One guiding factor however is the length of the screw used to affix the rail bracket into the column. The angle of the railing will have an effect on the length. A second factor is the lower bracket of the top railing. As shown below, the amount of space along the top dictates the minimum gap between the column and the adjacent baluster. Note the upper bracket of the bottom rail has a similar situation. For the most extreme case where there is no space left at the top, for anywhere between 30º and 40º angle, the gap (w) between the column and the 1st baluster ranges from 1-5/8” to 2-1/8”. Aesthetically, I’d like there to be some space between the bracket and both the column and the baluster. Practicality-wise some space would be good to allow for the bracket to be moved away from the column to allow for access to the base rail during installation. This will be discussed below. .5” for both seems like a good start. For the math lovers, the formulas used to get these numbers are given below. HHGL DO and DONT - 25.doc Page 135 10/25/2013 5:14:55 AM Sample scenarios for various angles and gaps are given below. While math is good, nothing works better than cut-to-fit. The simplest way to do this is to take new bottom and top rails (if too long to manage, make an educated guess and cut, leaving lots and lots of extra space, not in inches but in baluster holes), lay the bottom rail across the leading edges of treads at the angle of the steps, insert 2 full length balusters and rail adaptors into the rail at the guestimated ends between columns, lay the top rail onto the two balusters using the adaptors, plumb the end balusters, use masking tape to temporarily give some stability to this construct (top left to bottom right and top right to bottom left in an X-formation), and then slide the construct up and down along the treads. Center the construct so that the balusters have equal gaps to the respective columns. Determine that if the brackets were cut and installed, the constraints mentioned above would be met. These constraints include a) lower bracket of top rail having sufficient space on the upper side towards column (v) as well as lower side towards baluster (t), too-small test, b) upper bracket of bottom rail having sufficient space on the upper side towards baluster as well as lower side HHGL DO and DONT - 25.doc Page 136 10/25/2013 5:14:55 AM towards column, c) screws used to secure brackets will be long enough to go thru the bracket, thru the 5/8” fascia column covering and well into the underlying structural wood comprising the column (3” Phillips head screws come with the brackets), too-big test, and d) the resultant space between the column and adjacent baluster (w) is no greater than the space between two adjacent balusters (approx. 4”), looks nice test. You may need to move one baluster over one hole, either way to get the proper result. When satisfied, use a pencil to outline the rails where they meet the columns (this line will be at an angle and used for cutting), use a pencil to outline where the brackets would sit on the rails – just a reference for later, use a pencil to outline where the brackets would meet the columns (this line will be at an angle and used for cutting), and use a pencil to outline the rail angle on the top/bottom of the baluster (both sides) by placing the long edge of a speed square on the edge of the rail at the rail-baluster edge and use the inside (hollowed out part) long edge of the speed square to make a line on the baluster. When making the 1st cut of the baluster, you will be setting the miter saw to the pencil line. After determining the length you want for the baluster, the angle is already on the miter saw so all you have to do is cut to length, making sure you cut the right way. Both ends of the baluster should be parallel. The baluster will look like a parallelogram , NOT a trapezoid . Cut the rails where you made the pencil outlines. Use flat side of rail toward fence. It is NOT SAFE to cut the brackets by themselves. They are not very long and at least for the top rail, have curved regions which won’t sit flush against the fence on the miter saw. Attempting to cut them could result in fractured material, materials being snagged by the saw and sent flying, etc. Instead, insert bracket over rail, leaving a gap with the pencil mark made previously. Use tape to secure in place. Use a spacer between rail and miter saw fence to compensate for bracket thickness. Cut bracket. Finally, if all this complexity with angles isn’t enough, the rail brackets attach at an angle to the columns. VERT FORCE COLLATERAL VERT FORCE Potential for gaps When the rail brackets are screwed in at the required angle, in addition to the bracket moving tight horizontally to the column, the rail bracket will pull vertically. This can cause collateral movement of the rails away from the balusters which compounds the proper fit of the balusters. The vertical motion occurs in two critical areas. One is on the rail bracket at the top end of the top HHGL DO and DONT - 25.doc Page 137 10/25/2013 5:14:55 AM rail. The other is on the rail bracket at the bottom end of the bottom rail. Before screwing in the rail brackets (which causes the vertical motion), slide the rail bracket further in over the rail, insert one of the stainless steel 1-1/8” Robertson (square drive) trim screws described earlier into the now exposed end of the rail into the column. This is indicated by the green arrow in the figure, above. Also, push on the rail so there is a tight fit against the balusters. It is best to insert the Robertson screws in a direction perpendicular to the direction of the screws in the rail bracket, and flush with the rail. These screws can also help to ensure that the balusters are kept tightly secured between the rails. Then slide the rail bracket back to the end of the rail, against the column, covering the stainless steel screw added above. Pre-drill the holes that will secure the rail bracket to the column. Then screw the rail bracket into the column, enough to provide the strength to hold the banister securely, but not enough to move the rails vertically. Use the 3-1/2” long High Performance screws with a T25 head if the screws that come with the brackets are not long enough. 182. The balusters are: 1.25” x 1.25”. The top rail brackets is 3.375” H x 3.375” W. The bottom rail brackets are 4-5/16” H x 3-3/8” W. Per manufacturer’s documentation: NOTE: Rail lengths will vary slightly due to manufacturing processes. Make sure rails are cut properly to correct length, and with hole pattern centered between posts before securing. HHGL DO and DONT - 25.doc Page 138 10/25/2013 5:14:55 AM HHGL DO and DONT - 25.doc Page 139 10/25/2013 5:14:55 AM HHGL DO and DONT - 25.doc Page 140 10/25/2013 5:14:55 AM LIGHT FIXTURES AND BULBS 184. The table below enumerates the specific light fixtures used, the quantity and wattage of bulbs used, whether the bulbs are covered or not, etc. HHGL DO and DONT - 25.doc Page 141 10/25/2013 5:14:55 AM 185. The table below enumerates the bulbs ordered via the Massachusetts Residential New Construction Program. HHGL DO and DONT - 25.doc Page 142 10/25/2013 5:14:55 AM HHGL DO and DONT - 25.doc Page 143 10/25/2013 5:14:55 AM HHGL DO and DONT - 25.doc Page 144 10/25/2013 5:14:55 AM TOWEL BAR, TOWEL RING AND TOILET PAPER HOLDER 248. The standard heights of a towel bar are 48” from the floor for adults and lower for children. As the distance of the window in the bathrooms from the floor was lower than 48”, the towel rod was centered with the window and placed at a height of 41”. This allowed for space between the bottom of the window and the top of the towel rack. This is a height that is more kid-friendly. 249. There is no standard height for a towel ring but the following comments were found on-line 20-22 inches above a vanity 18” above a counter top 24” above the counter top 50-52” from the floor (with a 30” vanity) At hand height, when you are standing and your arm is at your side and bent at the elbow at a 90 degree angle. You should not have to reach up or down for it with wet hands The towel ring was placed midway between the toilet and the vanity and at a height of 52”. HHGL DO and DONT - 25.doc Page 145 10/25/2013 5:14:55 AM 250. With respect to placement, for a layout where there is a toilet and vanity against a wall, see the photos below for possible placement. http://www.houzz.com/photos/116096/Society-Hill-Bathrooms-contemporary-bathroom-philadelphia http://www.houzz.com/photos/51746/Jennifer-Brouwer-Design-Inc-traditional-bathroom-other-metro http://www.houzz.com/photos/215252/Rocky-Ledge-Powder-Room-contemporary-powder-room-boston 251. The standard height for a toilet paper holder is 26” above the floor. It is usually 8-12” in front of the toilet bowl. HHGL DO and DONT - 25.doc Page 146 10/25/2013 5:14:55 AM APPENDICES (Tables & Manufacturer’s Manuals) How To Install St James Flooring (Dream House) 148 Locking Laminate Planks – Wood and Tile Visuals (Armstrong) 150 Trigonometric Tables 152 Laminate Floors: How To Replace a Flooring Plank (Family Handyman) 153 How To Replace Laminate Floor Board In Middle Of A Floor (Home Guides) 158 How To Replace Laminate Planks (Kool Guide) 161 FIBERON Traditional/Deluxe Railing Installation Instructions 167 HHGL DO and DONT - 25.doc Page 147 10/25/2013 5:14:55 AM HHGL DO and DONT - 25.doc Page 148 10/25/2013 5:14:55 AM HHGL DO and DONT - 25.doc Page 149 10/25/2013 5:14:55 AM Installing the First Row 1. Begin on the left side of the room and work right. 2. Lay the first full piece with the small, tongue side facing the wall. 3. Install second and subsequent full pieces in the first row by aligning short ends of boards and locking into place. 4. 5. 6. 7. Use spacers along all sides that butt up against walls to maintain ¼”(6.35 mm) expansion zone. Continue laying boards in the first row until you need to cut the last piece. Measure the distance between the wall and the face surface of the last board. Subtract ¼”(6.35 mm), and cut the board. (See cutting instructions above). If this distance is less than 8”go back to the first full plank and cut approximately 8" from the end closest to the starting wall. This will leave a longer piece at the end of the first row Installing Remaining Rows 1. Begin the second row of planks with the piece cut from the last piece in the first row. If the piece is shorter that 8cut a new plank in half, and use it to begin the second row. Whenever practical, use the piece cut from the preceding row to start the next row. End joints of all boards should be staggered 8”or more and grout lines on planks with tile visuals must be aligned. 2. Install the long end of the first board at an angle to 3. 4. 5. 6. the board in the previous row. Keep this board at its natural angle slightly raised off the subfloor. Use a scrap piece of laminate to support the row if needed. Continue installing full boards in the second row by angling the short end of the next board in the row to lock into the previous board. Position the board so that the long side of the board is close to boards in the previous row and overlapping the groove of the boards in the previous row. Angle up and push forward until the boards lock together. Continue installing full boards in the second and subsequent rows until you reach the wall on your right. Mark the last piece, cut and install. After all boards in the row are installed, press or walk all boards flat to the subfloor to begin the next row. HHGL DO and DONT - 25.doc Page 150 10/25/2013 5:14:55 AM 7. Use a pull bar when necessary to ensure joints are tight. Installing the Last Row 1. The last row in the installation may need to be cut lengthwise. 2. Place the row of planks to be fit on top of the last r 3. Be sure to place a spacer between the marking pen and “scribe” piece of board. This adds the ¼”(6.35 mm) space you need at the finish wall. 4. Mark where the board should be cut. 5. If the fit at the finish wall is simple and straight, just measure for the correct width and cut. 6. After the last row is installed, use the pull bar to tighten the joints. 7. When appropriate, cut the underlayment even with the top of the floor. Installing Under a Door Jamb Installation of locking laminate through a door jamb requires the lip of the groove to be reduced in size. 1. Using a small plane or utility knife, plane or shave off 75% of the ledge of the groove. 2. Be careful not to trim too much. Excessive reduction an weaken the joint. 3. After the groove ledge has been trimmed, place the board in position laterally and lightly pull the board into place using the pull bar. 4. Sometimes, more than one passing may be necessary in order to trim the ledge of the groove to the correct height. 5. Joint should be tight with no movement, however a thin, 3/32”bead of glue on top of tongue only, should be used at this juncture to ensure joint integrity. Finishing the Installation 1. Remove spacers and install moulding pieces. (See Coordinated Transitions and Moulding Pieces section.) 2. Always predrill transitions or mouldings prior to nailing. To allow the floating floor to move freely, do not fasten the trim to the laminate flooring. 3. For everyday cleaning, vacuum or damp mop. To remove excessive dirt buildup, use Armstrong Laminate Floor Cleaner. 4. DO NOT WAX OR POLISH your floor. HHGL DO and DONT - 25.doc Page 151 10/25/2013 5:14:55 AM deg 0 1 2 3 4 5 6 7 8 9 10 11 12 13 14 15 16 17 18 19 20 21 22 23 24 25 26 27 28 29 30 31 32 33 34 35 36 37 38 39 40 41 42 43 44 45 sin 0.0000 0.0175 0.0349 0.0523 0.0698 0.0872 0.1045 0.1219 0.1392 0.1564 0.1736 0.1908 0.2079 0.2250 0.2419 0.2588 0.2756 0.2924 0.3090 0.3256 0.3420 0.3584 0.3746 0.3907 0.4067 0.4226 0.4384 0.4540 0.4695 0.4848 0.5000 0.5150 0.5299 0.5446 0.5592 0.5736 0.5878 0.6018 0.6157 0.6293 0.6428 0.6561 0.6691 0.6820 0.6947 0.7071 cos 1.0000 0.9998 0.9994 0.9986 0.9976 0.9962 0.9945 0.9925 0.9903 0.9877 0.9848 0.9816 0.9781 0.9744 0.9703 0.9659 0.9613 0.9563 0.9511 0.9455 0.9397 0.9336 0.9272 0.9205 0.9135 0.9063 0.8988 0.8910 0.8829 0.8746 0.8660 0.8572 0.8480 0.8387 0.8290 0.8192 0.8090 0.7986 0.7880 0.7771 0.7660 0.7547 0.7431 0.7314 0.7193 0.7071 tan 0.0000 0.0175 0.0349 0.0524 0.0699 0.0875 0.1051 0.1228 0.1405 0.1584 0.1763 0.1944 0.2126 0.2309 0.2493 0.2679 0.2867 0.3057 0.3249 0.3443 0.3640 0.3839 0.4040 0.4245 0.4452 0.4663 0.4877 0.5095 0.5317 0.5543 0.5774 0.6009 0.6249 0.6494 0.6745 0.7002 0.7265 0.7536 0.7813 0.8098 0.8391 0.8693 0.9004 0.9325 0.9657 1.0000 HHGL DO and DONT - 25.doc Page 152 10/25/2013 5:14:55 AM http://www.familyhandyman.com/floor/repair/laminate-floors-how-to-replace-a-flooring-plank/view-all Laminate Floors: How to Replace a Flooring Plank Fix severe damage by cutting out the old and inserting new material To repair severe damage in a laminate floor, cut out the damaged boards with a circular saw using these simple techniques. Glue the new board in place. By the DIY experts of The Family Handyman Magazine:June 2011 Step 1: Assess the laminate floor damage You can fix minor chips and scratches in a laminate floor with filler products from the home center. But if the damage is severe, you have to replace the plank (you did save a few from the installation, right?). It’s a job you can do yourself in about two hours. In addition to a spare plank, you’ll need a circular saw, hammer and chisel, router or table saw, drill and wood glue. Some flooring experts recommend removing the base molding and unsnapping and numbering every plank until you get to the damaged portion. That works if the damaged plank is close to the wall. But trust us, if the damaged section is more than a few rows out from the wall, it’s actually faster to just cut it out. If your laminate floor is glued together, the unsnapping routine won’t work at all. See “Replacing Glued Planks,” below. HHGL DO and DONT - 25.doc Page 153 10/25/2013 5:14:55 AM Step 2: Replace "snap-together" planks 1 of 3 Photo 1: Remove the center section Set the depth of your circular saw a tad deeper than the floor thickness. Then lift the blade guard and dip the blade into the cutting line. HHGL DO and DONT - 25.doc Page 154 10/25/2013 5:14:55 AM 2 of 3 Photo 2: Cut to the corners Cut from the center section to the drilled hole in each corner—but no farther! Break out the remainder with a chisel. 3 of 3 Photo 3: Remove the bottom lip Score the tongue several times with a utility knife. Then snap it off with pliers. Shave off any remaining scraps with your knife. Start by drawing a cutting line 1-1/2 in. in from all four edges of the plank. Drill a 3/8-in. relief hole at each corner of the cutting line and again 1/4 in. in from each corner of the plank. Cut out the center section with a circular saw, cutting from hole to hole (photo 1). Next, cut from the center section into each corner, stopping at the drilled hole (photo 2). Finally, cut a relief cut from the center section out toward the seam of each plank. Tap a chisel into each relief cut to break out the uncut portion. Then remove all the cut pieces. The new plank has a groove at one end and one side, as well as a tongue at the opposite end and side. But you can’t install it until you cut off the bottom lip of both grooves and the side tongue. Use a utility knife to remove them (Photo 3). Here’s a tip for cutting the HHGL DO and DONT - 25.doc Page 155 10/25/2013 5:14:55 AM groove. Stick the blade inside the groove and cut off the bottom from the inside (or use a table saw). Apply a bead of wood glue to all four edges of the new plank. Insert the glued tongue of the new plank into the groove on the existing flooring and drop the plank into place. Wipe off any excess glue and load books on the plank until it’s dry. Step 3: Replace glued planks 1 of 2 Photo 1: Raise the floor to gain leverage Slip a dowel or scrap piece of flooring under the seam. Grab the section with pliers and tilt it down until the glued seam cracks apart. Then snap it upward to break any remaining glue. 2 of 2 HHGL DO and DONT - 25.doc Page 156 10/25/2013 5:14:55 AM Photo 2: The old glue has to go Use a flat-blade screwdriver or small chisel to chip out the old glue. Get the surfaces as smooth as possible for a flush fit and a good glue bond. Most of the early laminate floors were fastened with glue. But that doesn’t mean you can’t do an "in-place" patch on those floors too. Follow all the cutting directions shown for a snap-together floor. Then use pliers to break the glue bond (Photo 1). Clean off the old glue (Photo 2) and lay in the new plank. Tools & Materials List Required Tools for this Project Have the necessary tools for this DIY project lined up before you start—you’ll save time and frustration. Hammer Circular saw 4-in-1 screwdriver Drill/driver, cordless Drill bit set Straightedge Pliers Utility knife Wood glue Wood chisel Required Materials for this Project Avoid last-minute shopping trips by having all your materials ready ahead of time. Here's a list. Extra flooring Printed From: http://www.familyhandyman.com/floor/repair/laminate-floors-how-to-replace-a-flooringplank Copyright © 2013 The Family Handyman. All Rights Reserved. HHGL DO and DONT - 25.doc Page 157 10/25/2013 5:14:55 AM http://homeguides.sfgate.com/replace-laminate-floor-board-middle-floor-37327.html Home Guides by Demand Media How to Replace a Laminate Floor Board in the Middle of a Floor by Chris Deziel, Demand Media When you cut out a damaged laminate board, you have to glue in its replacement. When a board sustains damage in the middle of a laminate floor, you have two options for replacing it. One is to disassemble the floor down to the damaged board, replace the board and reassemble the floor. That option isn't always practical, especially in large rooms filled with furniture. The other option is to cut out the damaged board and glue in a replacement. It's a job that requires carpentry skills, but it isn't as difficult as replacing a board on a hardwood floor. You'll get good results if you measure carefully and cut with a sure hand. HHGL DO and DONT - 25.doc Page 158 10/25/2013 5:14:55 AM Removing a Damaged Board 1. Draw a line down the center of the damaged board using a straightedge and pencil. The line should span the length of the board. 2. Set the cutting depth of a circular saw blade to 1/8 inch more than the thickness of the boards. If the subfloor is concrete, set the depth exactly equal to the board thickness. 3. Plunge the blade into the line near the center of the board and cut toward the one end. Stop cutting when the blade reaches the edge. Pull out the saw, reverse direction and cut to the same point on the other end. Finish the cut on either end of the board by tapping along the cut line with a hammer and chisel. 4. Drill a 1/2-inch hole at each corner of the board. The hole should be 1/2 inch from both edges that form the corner. Draw a line at a 45-degree angle from each hole toward the cut line in the center. 5. Plunge the saw into the center of the board and cut along each 45-degree line, stopping at the hole in the corner. This cutting procedure creates four triangular pieces that you can pry loose from the ends. 6. Lift the pointed end of each triangle with a pry bar and pull the triangle toward the center of the board with pliers. Remove it when it snaps loose. When you have removed all four triangular pieces, pry out the two center pieces. Installing a Replacement 1. Prepare the replacement board by cutting off the bottoms of the grooves on one side and one end. You also need to cut the tongue off the opposite end. Cut the grooves and tongue with a utility knife, scoring several times and then breaking off the pieces with pliers. 2. Spread carpenter's glue on the tongues of the boards that are installed in the floor. 3. Snap the intact tongue of the replacement board into the groove of the adjacent board on the floor. Lower the replacement board, press down on the edges and hold the board down with weights until the glue dries. Things You Will Need Straightedge Pencil Circular saw Hammer Chisel Drill 1/2-inch drill bit HHGL DO and DONT - 25.doc Page 159 10/25/2013 5:14:55 AM Pliers Utility knife Carpenter's glue Weights Tip Use a cotton swab to spread glue sparingly on the tongues to avoid having it ooze out when you lower the board. If you get glue on the surface of the boards, wipe it off with a damp rag before it dries. Warning Wear safety glasses to protect your eyes from plastic shards when cutting laminate flooring with a circular saw. References The Family Handyman: Laminate Floors -- How to Replace a Flooring Plank About the Author Chris Deziel began writing in 1974 as a feature writer for "Satellite News" magazine. He specializes in writing about home improvement and the arts and sciences. Deziel is a carpenter with more than 20 years of professional experience, a teacher and a musician. He has a Master of Arts in humanities from California State University, Dominguez Hills. Photo Credits Jupiterimages/Photos.com/Getty Images HHGL DO and DONT - 25.doc Page 160 10/25/2013 5:14:55 AM www.kool-glide.com/basics-flooring/replacelaminate.html How to Replace Laminate Planks by Jon Namba Reprinted from Floor Covering Installer Photo 1 I remember when laminate flooring was introduced to the United States and attending several manufacturer training/certifications and going through the hands-on process of board replacement. When laminate flooring was introduced in the United States in the nineties, there were not the number of glueless joint systems you see today. It has been a challenge when doing board replacements and maintaining a strong joint. Those of you who have done board replacements have probably experienced this. The fact that there is not much of a joint to glue to and hoping that the phone books or whatever weight you can find and leave for 24 hours is not always the most comforting feeling for the installer. Photo 2 Especially, when they tell the customer to remove the weight after 24 hours and hope that the board edges are all flat. That and the temporary joint swelling that generally occurs when using adhesive to bond the joints can create headaches for installers and retailers. Some installers have gone to using a 5-minute epoxy to alleviate the potential problems of using the “weight” and pray method. The 5-minute epoxy allows the installer to maintain weight on the board for the 5 minutes it takes for the epoxy to set up and does not cause edge swell as it contains no water. Be careful when using epoxy that you do not get build up of adhesive that will cause ledging of the board; also make sure to clean up immediately if epoxy gets on the surface of the board; once the epoxy is set it is permanent. Up until the introduction of a radio wave tool, our company used the 5-minute epoxy method; now we use the radio wave tool technology extensively for board replacements for floating floors as well as nail down or glue down floors. We have gone from 24 hours to 5 minutes to the present, where it takes seconds to adhere a board and it creates a much stronger joint with elastomeric properties. HHGL DO and DONT - 25.doc Page 161 10/25/2013 5:14:55 AM Photo 3 The biggest difference between the glue type joints and the glueless joints is the use of a router. Glue joints require the use of a router around the entire plank with a manufacturer’s specific router bit to remove the existing adhesive and glued joint. This creates a groove joint that receives a spline that is glued into the groove on one side and one length. This article will cover board replacement of the glueless joint, as these types of joints are more prevalent nowadays. Photo 4 Board replacement is considered the last solution; if the installer can use color pens, wood/laminate filler or hot wax to make any corrections, that is the best approach. If board replacement is necessary, there are a couple of ways to approach the replacement. If the board that requires replacement is fairly close to a wall, the installer may be able to “unclick” the flooring, replace the bad board and “re-click” the flooring. What if the board that needs to be replaced is out in the center of the room? It will be much easier at this point to just do a board replacement rather than “unclick” and “re-click” the floor back together. Cutting out the existing board is basically the same for floating laminate and hardwood. Tools that you will need for board replacements: • A pad to place your tools on while you work so you don’t end up scratching and then replacing more planks than you had planned on • Vacuum • Hammer • Sharp chisels • Center punch (regular and self centering) • Utility knife • Pry bar • 18 inch x 4’ section of 0.028”-0.032” thickness countertop laminate Photo 5 • Laminate snips • Drill with 3/16” drill bit • Circular saw • Table saw • Blue tape • Felt marker • 5-minute Epoxy • Paint thinner (for immediate clean up of epoxy on surface) HHGL DO and DONT - 25.doc Page 162 10/25/2013 5:14:55 AM • Kool Glide hard surface tool • Utility tape, double stick tape, carpet tape (Seam Master Ind., Only tape that will work with Kool Glide tool) • Carpenters square • Channel lock pliers • Suction cup ( to assist in lifting out board after dry fit) • Floating flooring Photo 6 First, make sure that the board you are going to use for replacement will fit the area to be repaired. This article covers boards that are the same dimensions. It may be necessary to cut boards to length at times, this requires more time, tools, and is another article. Photo 7 Place blue tape at the corners of the board to be replaced; this gives you a visual aid so that you avoid damage to the surrounding boards (Photo 2). You can also place tape along the length of the board. Using a felt tip marker and a carpenters square, draw lines from the corners at a 45-degree angle towards the center of the board; do this at both ends of the board. Next, draw lines along the length of the board approximately 1/2” to 1 1/2” (depending on manufacturer) in from the edge of the board (Photo 3). I make two marks toward the center of the board at a diagonal for ease of removal; this is not necessary but I have found that it makes it easier for some of those boards that are more difficult to remove (Photo 4). Corners now have to be addressed. Using a circular saw right to the corner will have the potential of cutting into the adjacent board; to avoid this, it will be necessary to either drill or punch out the corner. A drill with a sharp 3/16” drill bit or center punch is used to create a space where the circular saw can cut to without cutting into the adjacent board. If using a drill, a selfcentering punch is a handy tool to use as it is spring loaded and makes an indentation into the board (Photo 5). Place the drill bit in the center of the punch set making sure that the edges of the drill bit do not touch the edges of adjacent boards when drilling through the board. If the drill bit is not sharp and you do not use a punch, you may find that the drill bit will spin across the surface of the board and possibly cause damage to adjacent boards. You can also use a regular center punch. It is not necessary to use a drill when using just the center punch. Position the center punch so that it will not touch any adjacent boards, use a hammer and drive the center punch through the board (Photos 6 and 7). Photo 8 To prepare to cut the damaged board, adjust the circular saw blade to the depth of the board; keep safety in mind and make sure to remove the battery if using a cordless saw and unplug if using a corded saw (Photo 8). HHGL DO and DONT - 25.doc Page 163 10/25/2013 5:14:55 AM Photo 9 Start by cutting the diagonal cuts along the marked lines into the corners, making sure to stop short of the corner at the hole that was drilled or punched (Photo 9). Photo 10 Use the vacuum to maintain a clean work area; many floors have ceramic or aluminum oxide finishes which can scratch the surface of the surrounding flooring. Next, cut the lengths and then the two diagonals (Photo 10). Photo 11 Vacuum again and start the removal process by removing the diagonal piece in the center of the board; you may need a hammer and chisel to cut the piece loose (Photo 11). Photo 12 Continue removing each cut piece. When removing the corner pieces, a pair of channel lock pliers comes in handy (Photo 12 and 13). Gently rock the piece up until it starts to loosen; once it loosens up it can be removed. Photo 13 Be careful not to put too much of an angle on the corner piece when removing as it may cause some edge damage to the adjacent board. Take the channel lock pliers and do the same to the length pieces. Once everything has been removed, vacuum the area. If there is a moisture barrier attached to the underlayment and you happen to cut through the underlayment, use duct tape or manufacturer recommended tape to treat the cut. Photo 14 The table saw will now be used to prepare the replacement board. The bottom half of the groove needs to be removed on the length and the end of the new board (Photo 14). Photo 15 Adjust the saw blade so that it cuts only the bottom half of the groove (Photo 15). HHGL DO and DONT - 25.doc Page 164 10/25/2013 5:14:55 AM Photo 16 Next, align the guide rail so that only the portion of the groove that extends past the main board is cut (Photo 16). Photo 17 We use three different types of tape depending on the product and amount of traffic. If the board is being replaced in a minimal traffic area, use the KoolGlide hard surface tool and carpet seam tape with a thin film of epoxy along the edge where the groove joint that is cut, meets the tongue portion of the existing floor. If it is in a heavy traffic area, use the KoolGlide hard surface tool with either the double stick tape or the utility tape with a laminate backer. Countertop laminate in thicknesses of 0.028”- 0.032” work the best. Cut to 48-inch strips approximately six inches wide. The laminate backer is thin enough yet rigid enough to support the joint with the use of tape. Laminate backer can be cut on a table saw with a 60 to 80 tooth blade or with a hand held laminate cutter (Photo 17). Photo 18 The double stick tape and the utility tape have a pressure sensitive adhesive on the backside protected by a removable paper. Peel and stick the tape to the laminate backer and center the tape and laminate backer along the laminate flooring joint under the tongue portion of the installed flooring (Photos 18 and 19). Place a section of the laminate backer around the two groove sides of the installed flooring; it is not necessary to place any tape as this just helps to maintain flatness of the replacement board. Photo 19 To dry fit the board, depending on the manufacturer’s tongue and groove joint system, it may be necessary to start by slightly twisting the board at one end and applying pressure to where it lays in flat. With a tapping block, lightly tap on the opposite end and then along the length of the board until the board fits. Photo 20 If you prefer using epoxy on the tongues with the tape for added strength, dry fit the board and if it fits, use a suction cup to remove the board and apply a thin film of epoxy to the exposed tongue portion of the existing flooring (Photo 20). Photo 21 HHGL DO and DONT - 25.doc Page 165 10/25/2013 5:14:55 AM (Photo 21) After replacing the board, center the Kool Glide tool over the board joint using the white alignment marks on the front and back of the tool. Photo 22 A microprocessor calibrates the amount of time that the tool is activated. (Photo 22) The L,M,H buttons are used for different substrate temperatures; the higher the setting, the longer the activation time. Installers will have to determine settings based on temperature conditions of substrate and type of flooring for bonding. Photo 23 The T button is used when there is not a full length of tape underneath the tool for it to activate. If there is less than the distance from the front arrow to the back arrow, the tool will not activate properly. By turning the tool perpendicular to the tape and depressing the “T” button, this allows the tool to activate. Align the center transverse arrows to the center of the tape and joint. Make sure to deactivate the “T” button when activating the tool over full length of tape. Activate the tool by pressing either side of the green tab; a light will appear in the center of the green tab indicating the activation of the tool. Once the light turns off, apply pressure to bond tape and laminate. (Photo 23) Mark with your finger next to the front side advancement arrow of the tool. Move the tool until the back advancement arrow aligns with your finger (approximately 8 inches), and activate. You will need to repeat this process each time you move the tool forward. Do not move the tool while the activation light is on. Because it is a floating floor, the thickness of the laminate backer and tape, approximately 0.04”, will not affect the appearance or overall flatness of the flooring but it will add significant strength to the joint. For more detailed information about the KoolGlide tool, log onto www.kool-glide.com and download the safety and ops manual. HHGL DO and DONT - 25.doc Page 166 10/25/2013 5:14:55 AM HHGL DO and DONT - 25.doc Page 167 10/25/2013 5:14:55 AM HHGL DO and DONT - 25.doc Page 168 10/25/2013 5:14:55 AM HHGL DO and DONT - 25.doc Page 169 10/25/2013 5:14:55 AM HHGL DO and DONT - 25.doc Page 170 10/25/2013 5:14:55 AM HHGL DO and DONT - 25.doc Page 171 10/25/2013 5:14:55 AM HHGL DO and DONT - 25.doc Page 172 10/25/2013 5:14:55 AM HHGL DO and DONT - 25.doc Page 173 10/25/2013 5:14:55 AM HHGL DO and DONT - 25.doc Page 174 10/25/2013 5:14:55 AM