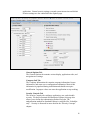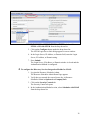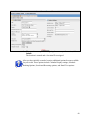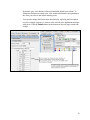
1
resource Scheduler v7.50 collaborate Administration Guide Copyright © 2003-2006 PeopleCube. All Rights Reserved. Resource Scheduler is a registered trademark of PeopleCube. Information in this document is subject to change without notice and does not represent a commitment on the part of PeopleCube. The software described in this document is furnished under a license agreement and may be used only in accordance with that agreement. This document has been provided pursuant to an agreement containing restrictions on its use. Federal copyright law also protects this document. No part of this document may be reproduced or distributed, tran¬scribed, stored in a retrieval system, translated into any spoken or computer language or transmitted in any form or by any means whatsoever without the prior written consent of PeopleCube. February 2006 PeopleCube makes no warranty, representation or promise not expressly set forth in this agreement. PeopleCube disclaims and excludes any and all implied warranties of merchantability, title, or fitness for a particular purpose. PeopleCube does not warrant that the software or documen¬tation will satisfy your requirements or that the software and documentation are without defect or error or that the operation of the software will be uninterrupted. LIMITATION OF LIABILITY: PeopleCube's aggregate liability, as well as that of the authors of programs sold by PeopleCube, aris¬ing from or relating to this agreement or the software or documentation is limited to the total of all payments made by or for you for the license. This limited warranty gives you specific legal rights. You may have others which vary from state to state. Some states do not allow the exclusion of limi¬tation of incidental or consequential damages, so the above limitation or exclusion may not apply to you. Meeting Maker, Meetingmaker, Resource Scheduler, RedESoft Resource Scheduler, the Resource Scheduler logo and the Meeting Maker logo are registered trademarks of PeopleCube. Macintosh is a registered trademark of Apple Computer, Inc., registered in the U.S. and other countries. IBM is a registered trademark of IBM Corporation. Pentium, Pentium III XEON, and Pentium 4 are either trademark or registered trademarks of Intel Corporation or its subsidiaries in the United States and other countries. Internet Explorer, Internet Information server (IIS), Outlook, SQL server, Windows, Windows NT, Windows NT server, Windows 95, Windows 98, Windows 2000, Windows XP, and Windows CE are either registered trademarks or trademarks of Microsoft Corpora¬tion in the United States and/or other countries. Netscape is a trademark or registered trademark of Netscape Communications Corporation in the United States and other countries. The Palm logo, HotSync, and Palm OS are registered trademarks of Palm, Inc. Palm, Palm Powered and Palm Powered logo are trademarks of Palm, Inc. Intellisync is a registered trademark of Pumatech, Inc. RIM and Research In Motion are regis¬tered trademarks of Research In Motion Limited. RIM, the RIM logo, BlackBerry, BlackBerry Enterprise Edition, BlackBerry Exchange Edition, BlackBerry Notes Edition, BlackBerry Internet Edition, the Black¬Berry logo, the “Envelope In Motion” symbol, 'Always On, Always Connected', RIM Wireless Handheld, RIM 850 Wireless Handheld, RIM 857 Wireless Handheld, RIM 950 Wireless Handheld, RIM 957 Wireless Handheld, RIM 850, RIM 857, RIM 950, RIM 957, RIM 802D, RIM 902M, Inter@ctive Pager and Research In Motion are trademarks of Research In Motion Limited. ServletExec is a trademark of New Atlanta Communications, LLC. Sun, Sun Microsystems, the Sun logo, Java, Solaris, Sun ONE, iPlanet, and all Sun, Java, and Sun ONE based trademarks and logos are trademarks or registered trademarks of Sun Microsystems, Inc. in the United States and other countries. All SPARC trademarks are used under license and are trademarks or registered trademarks of SPARC International, Inc. in the United States and other countries. Products bearing SPARC trademarks are based upon an architecture developed by Sun Microsystems, Inc. UNIX is a registered trademark of The Open Group in the United States and other countries. All trademarks, service marks and product names mentioned herein are the property of PeopleCube or their respective owners. PEOPLECUBE LICENSE AGREEMENT FOR RESOURCE SCHEDULER Web Site: http://www.PeopleCube.com BEFORE USING THE PROGRAM, YOU MUST READ THIS LICENSE AGREEMENT CAREFULLY. INSTALLING OR USING THE PROGRAM, INSTALLING REGISTRATION CODES, OPENING PROGRAM PACKAGING OR CLICKING “ACCEPT” IF YOU ARE READING THIS LICENSE ON A COMPUTER SCREEN, MEANS THAT “YOU” ARE AUTHORIZED TO ACCEPT THIS AGREEMENT, THAT YOU HAVE READ AND UNDERSTAND ITS TERMS AND THAT YOU AGREE TO BE BOUND BY IT. IF YOU DO NOT AGREE WITH ANY PART OF THIS AGREEMENT, YOU MAY NOT OPEN, INSTALL OR USE THE PROGRAM, AND MUST IMMEDIATELY RETURN THE PROGRAM UNUSED TO THE PLACE WHERE IT WAS ACQUIRED FOR A FULL REFUND. FOR PURPOSES OF THIS AGREEMENT, THE TERM “YOU” INCLUDES YOURSELF AND ANY ORGANIZATION OR INSTITUTION LICENSING THE PROGRAM OR ON WHOSE EQUIPMENT THE SOFTWARE MAY BE INSTALLED OR USED. 1. LICENSE GRANT. In consideration for the license fee paid, PeopleCube (hereafter “PeopleCube”), grants to You, a nonexclusive, restricted right to use the “Program” (in machine readable form only and including and all associated materials) solely for Your personal or internal business purposes, in accord with the terms of this Agreement. You may use the Program only for the number of Users and/or systems for which You are authorized. Copies; Prohibited Uses. You may make one copy of the Program for backup purposes only. You may not use or provide access to the Program or use the Program for any purpose other than Your personal or internal business purposes. You may not use the Program to provide services to any third party without PeopleCube’s express written consent. You may not modify, adapt, translate, reverse engineer, decompile, disassemble, or create derivative works based on the Program without PeopleCube’s prior written consent. (All information necessary to achieve interoperability is available in accord with applicable provisions of European Union and other government directives). You may not remove any disclaimer, copyright, trademark, proprietary rights, or other notice included on or embedded in the Program. Transfers. You may transfer the Program on a permanent basis (if not otherwise prohibited by Your agreement with PeopleCube), provided that You first inform PeopleCube in writing of the name and address of the recipient to which the Program will be transferred, You transfer all associated documentation, You retain no copies, and the recipient first agrees in writing to the terms of this Agreement. Please contact PeopleCube for appropriate transfer documentation. 2. OWNERSHIP. PeopleCube owns or licenses, and retains all title, copyright, trademark, trade secret, patent, and other proprietary rights in and to the Program. This license is NOT a sale of the Program or any copy of it. You obtain only the rights specified in this Agreement. PeopleCube reserves all rights not specifically granted. 3. TERM & TERMINATION. This Agreement is effective until terminated. PeopleCube may terminate this Agreement on written notice if You breach any provision of this Agreement. On termination, You must destroy or return to PeopleCube all copies of the Program, including all associated materials. This license may terminate after a limited period (e.g. three (3) years) if You (or Your institution or employer) have agreed in writing to a Lease Program. 4. LIMITED WARRANTY. The Program is a tool which PeopleCube hopes You will find useful. However You are solely responsible for the selection, use, performance, backup, and results associated with any Program use. PeopleCube does not warrant that the functions contained in the Program will meet Your requirements or that Program operation will be uninterrupted or error free. PeopleCube warrants any medium on which the Program is provided to be free from defects in materials and workmanship under normal use for a period of ninety (90) days from the date of delivery as shown on Your receipt. PeopleCube shall have no responsibility if failure results from accident, abuse or misapplication, or if any medium is lost or damaged due to theft, fire, or negligence. Any replacement medium will be warranted for the remainder of the original warranty period or thirty (30) days, whichever is longer. This warranty gives You specific legal rights. You may have other rights which may vary from jurisdiction to jurisdiction. EXCEPT AS EXPRESSLY PROVIDED ABOVE, ALL PROGRAMS ARE PROVIDED “AS IS”. PeopleCube DOES NOT MAKE ANY WARRANTY OF ANY KIND, EITHER EXPRESSED OR IMPLIED, INCLUDING, BUT NOT LIMITED TO THE IMPLIED WARRANTIES OF NONINFRINGEMENT, MERCHANTABILITY AND FITNESS FOR A PARTICULAR PURPOSE. THIS WARRANTY WILL NOT BE ENLARGED OR AFFECTED BY ANY PeopleCube TECHNICAL OR OTHER ADVICE IN CONNECTION WITH THE PROGRAM. 5. LIMIT OF REMEDIES & LIABILITY. PeopleCube’s entire liability and your exclusive remedy for any claim associated with the product or this agreement shall be, at PeopleCube’s sole option, return of purchase price or replacement of any medium returned to PeopleCube with a copy of the receipt. Notwithstanding any other provision of this or any other agreement, PeopleCube shall not be liable for (1) Any special, indirect, consequential, punitive, strict or incidental damages (including but not limited to damages related to inaccuracy of any data or cost of procurement of substitute goods, services or technology, or loss of profits, data or use) arising out of or in connection with any use or inability to use the program or any PeopleCube services which may be provided, or any cause related thereto, even if PeopleCube has been advised of the possibility of such damages; and (2) Any amount in excess of the lesser of the price, fee or charge therefor received by PeopleCube for product or service. Because some jurisdictions do not allow the exclusion or limitation of liability for consequential or incidental damages, some or all of the above limitations may not apply to You. 6. U.S. GOVERNMENT RESTRICTED RIGHTS. The Program is a “commercial item” as defined in 48 C.F.R. 2.101 (Oct. 1995) consisting of “commercial computer software” and “commercial computer software documentation” as such terms are used in 48 C.F.R. 12.212 (Sept. 1995). Consistent with 48 C.F.R. 12.212 and 48 C.F.R. 227.7202 (-1 through –4) (June 1995), all government entities which acquire the Program, do so only with the rights set forth in the license provided with the Program and this Agreement. 7. CONFIDENTIAL INFORMATION. You agree that all PeopleCube-furnished information which is labeled “confidential”, “proprietary” or the like (“Confidential Information”) contains valuable proprietary information and/or trade secrets developed by PeopleCube or its licensor at great expense. You will hold this Confidential Information in confidence and will not use, reproduce or distribute it except to Your employees (and agents who agree to this provision) who may use it only as part of their responsibilities to You. You will report any unauthorized use or disclosure of any Confidential Information. 8. EXPORT LAWS. The Program may not be exported or re-exported in violation of U.S. export laws, including the U.S. Export Administration Act and implementing regulations. 9. GOVERNING LAW & JURISDICTION. This Agreement is a Massachusetts contract, and shall be governed solely by the laws of Massachusetts, USA, without reference to its conflict of law provisions or the UN Convention for the International Sale of Goods. Any action relating to this Agreement, the parties’ relationship, or the Program or goods or services provided, purchased or licensed hereunder, shall be brought and tried in Massachusetts. 10. ENTIRE AGREEMENT. This Agreement (including any supplemental terms agreed in writing, e.g., with respect to PeopleCube’s Maintenance Advantage Program services) constitutes the complete and exclusive agreement between You and PeopleCube and supersedes any proposal or prior agreement or other communication with PeopleCube relating to the subject of this Agreement. This Agreement may be modified only by a writing which specifically references this Agreement and is signed by both You and a PeopleCube officer. NOTE: If You have any questions concerning this Agreement, or desire to contact PeopleCube for any reason, You may do so through the distributor from which You obtained the Program or the sales representative offices listed below: PeopleCube – United States, Inc. 411 Waverly Oaks Road, Suite 310, Waltham, MA 02452 – 1449 USA Main Number: +1 800 282 7319, Main Fax: +1 800 282 7414 Email: [email protected] PeopleCube Europe BV Hogehilweg 21 1101 CB Amsterdam Zuidoost PO Box 22859 1100 DJ Amsterdam Zuidoost Holland Main Number: +31 (0)20 4302025 Main Fax: +31 (0)20 4302908 http://www.peoplecube.com Email: [email protected] Resource Scheduler Admin Guide 7.50 Revised 2/16/2006 SEI. Table Of Contents Preface............................................................................................................................. i Resource Scheduler Components .......................................................................................................... i Resource Scheduler Modules .................................................................................................................ii Other Products from Meeting Maker, Inc. .............................................................................................. iii Technical Support................................................................................................................................... iv The Meeting Maker, Inc. Support Center...............................................................................................iv Professional Services..............................................................................................................................v Training Services.....................................................................................................................................v Documentation Conventions................................................................................................................. vi About This Book .................................................................................................................................... vii Chapter 1: Planning Your Resource Scheduler Environment ................................... 1 Overview ................................................................................................................................................... 1 What Resource Scheduler Can Do For You.......................................................................................... 2 System Requirements ............................................................................................................................. 5 Server Requirements ............................................................................................................................. 5 Application Data ..................................................................................................................................... 6 Client Requirements............................................................................................................................... 6 Planning Your Resource Scheduler Environment ............................................................................... 7 System Planning Recommendations..................................................................................................... 7 Optimizing Performance......................................................................................................................... 9 Installation Overview ............................................................................................................................. 11 Chapter 2: How Resource Scheduler works ............................................................. 12 Overview ................................................................................................................................................. 12 Components working together ............................................................................................................ 13 Resource Scheduler Concepts............................................................................................................. 14 Region .................................................................................................................................................. 14 Location................................................................................................................................................ 14 Group ................................................................................................................................................... 14 Resource .............................................................................................................................................. 14 User Defined Fields.............................................................................................................................. 14 Interface Overview ................................................................................................................................. 15 Tool Bar................................................................................................................................................ 15 Home Page .......................................................................................................................................... 15 Options Page........................................................................................................................................ 15 Resources Page................................................................................................................................... 18 Configurations Page............................................................................................................................. 19 History Page......................................................................................................................................... 20 Users Page........................................................................................................................................... 21 Holidays Page ...................................................................................................................................... 22 Calendars Page.................................................................................................................................... 23 Strings Page......................................................................................................................................... 24 Help Page............................................................................................................................................. 25 Chapter 3: Security Concepts .................................................................................... 26 Overview ................................................................................................................................................. 26 Security Recommendations ................................................................................................................. 27 Security Types........................................................................................................................................ 28 SSL Login Security............................................................................................................................... 28 Password Security ............................................................................................................................... 28 Application Security.............................................................................................................................. 29 Authentication Method ......................................................................................................................... 29 User Security........................................................................................................................................ 30 Security Groups.................................................................................................................................... 30 Schedule Security ................................................................................................................................ 31 Resource Level Security ...................................................................................................................... 31 Reservation Security ............................................................................................................................ 31 Directory Services Integration Module ................................................................................................ 32 Active Directory and NTLM Authentication .......................................................................................... 34 LDAP Authentication ............................................................................................................................ 34 Installing the Directory Services Integration Module............................................................................ 34 Configuring the Directory Services Integration Module ....................................................................... 35 Verifying the Directory Services Integration Module ............................................................................ 37 LDAP Login Settings ............................................................................................................................ 40 Chapter 4: Configuring General Options................................................................... 42 Overview ................................................................................................................................................. 42 General Options Tab.............................................................................................................................. 43 Company Info Tab.................................................................................................................................. 46 Security Controls Tab............................................................................................................................ 49 Email Settings Tab................................................................................................................................. 52 Location Defaults Tab ........................................................................................................................... 54 Virtual Tele-Conference Settings ......................................................................................................... 57 Chapter 5: Locations, Groups, Resources, and Combinations............................... 58 Overview ................................................................................................................................................. 58 Locations ................................................................................................................................................ 59 Creating a Location .............................................................................................................................. 59 Editing a Location................................................................................................................................. 61 Using the Location Admin Module ....................................................................................................... 62 Configuring the Location Admin password .......................................................................................... 63 Accessing the Location Admin Module ................................................................................................ 64 Deleting a Location .............................................................................................................................. 66 Regions ................................................................................................................................................... 67 Creating a Region ................................................................................................................................ 67 Adding a Location to a Region ............................................................................................................. 67 Editing Region Information................................................................................................................... 68 Editing Location Information for a Region............................................................................................ 68 Location Maintenance Fields ............................................................................................................... 69 Location Options Page Fields .............................................................................................................. 72 Groups .................................................................................................................................................... 75 Creating a Group.................................................................................................................................. 75 Editing a Group .................................................................................................................................... 76 Deleting a Group .................................................................................................................................. 77 Group Maintenance Fields ................................................................................................................... 78 Resources............................................................................................................................................... 81 Creating a Resource ............................................................................................................................ 81 Editing a Resource ............................................................................................................................... 82 Deleting a Resource............................................................................................................................. 83 Resource Maintenance Fields ............................................................................................................. 84 Combinations ......................................................................................................................................... 87 Creating a Combination ....................................................................................................................... 87 Editing a Combination .......................................................................................................................... 88 Deleting a Combination........................................................................................................................ 89 Combination Maintenance Fields......................................................................................................... 90 Chapter 6: Creating and Maintaining Users .............................................................. 92 Overview ................................................................................................................................................. 92 The Default User .................................................................................................................................... 93 Configuring the Default User................................................................................................................ 93 Individual User Access.......................................................................................................................... 94 Enabling Individual User Access.......................................................................................................... 94 User Security Settings.......................................................................................................................... 95 Adding Users.......................................................................................................................................... 96 Enabling Users to add themselves ...................................................................................................... 96 Adding a User Manually ....................................................................................................................... 97 Adding a User via LDAP ...................................................................................................................... 97 Editing a User....................................................................................................................................... 97 Deleting a User..................................................................................................................................... 98 Security Groups ..................................................................................................................................... 98 Configuring the Everyone Security Group ........................................................................................... 99 Creating a Security Group.................................................................................................................... 99 Security Group Page Fields ............................................................................................................... 100 Adding and Removing members........................................................................................................ 100 Editing a Security Group .................................................................................................................... 101 Deleting a Security Group .................................................................................................................. 101 User Settings Fields ............................................................................................................................ 103 Chapter 7: Resource Scheduler Customization...................................................... 106 Overview ............................................................................................................................................... 106 Resource Types ................................................................................................................................... 107 Creating a Resource Type ................................................................................................................. 107 Editing a Resource Type.................................................................................................................... 108 Deleting a Resource Type.................................................................................................................. 108 User Defined Field Types .................................................................................................................... 109 Creating a User Defined Field Type................................................................................................... 109 Editing a User Defined Field Type ..................................................................................................... 110 Deleting a User Defined Field Type ................................................................................................... 110 User Defined Fields ............................................................................................................................. 110 Creating a User Defined Field............................................................................................................ 111 Editing a User Defined Field .............................................................................................................. 112 Deleting a User Defined Field ............................................................................................................ 112 UDF Field Types ................................................................................................................................ 113 Resource Characteristic Templates .................................................................................................. 115 Creating a Resource Characteristic Template................................................................................... 115 Associating a Resource Characteristic with a Group......................................................................... 116 Editing and applying a Resource Characteristic Template ................................................................ 117 Deleting a Resource Characteristic Template ................................................................................... 118 Resource Setup.................................................................................................................................... 119 Creating a Resource Setup................................................................................................................ 119 Editing a Resource Setup .................................................................................................................. 120 Deleting a Resource Setup ................................................................................................................ 120 Reservation Request Tabs.................................................................................................................. 121 Creating a Reservation Request Tab................................................................................................. 122 Associating a Reservation Request Tab with a Group ...................................................................... 123 Editing a Reservation Request Tab ................................................................................................... 124 Deleting a Reservation Request Tab ................................................................................................. 124 Quick Reserve Templates ................................................................................................................... 126 Creating a Quick Reserve Template.................................................................................................. 126 Editing a Quick Reserve Template .................................................................................................... 127 Deleting a Quick Reserve Template .................................................................................................. 128 Configuring a Wait List for a Resource .............................................................................................. 129 Configuring a Pending Approval Process for a Resource ................................................................. 131 Chapter 8: Creating and Maintaining Holidays ........................................................... 2 Overview ................................................................................................................................................... 2 Adding a Holiday...................................................................................................................................... 3 Editing a Holiday...................................................................................................................................... 4 Deleting a Holiday.................................................................................................................................... 4 Chapter 9: Creating and Maintaining Event Calendars .............................................. 5 Overview ................................................................................................................................................... 5 Creating an Event Calendar.................................................................................................................... 7 Creating an Event Calendar with no access code ................................................................................. 7 Creating an Event Calendar with an access code ................................................................................. 8 Accessing an Event Calendar ................................................................................................................ 9 Accessing an Event Calendar with no access code .............................................................................. 9 Accessing an Event Calendar with an access code .............................................................................. 9 Modifying an Event Calendar................................................................................................................ 10 Deleting an Event Calendar .................................................................................................................. 10 Chapter 10: Advanced Administration Functions .................................................... 12 Overview ................................................................................................................................................. 12 Customizing the User Application Footer........................................................................................... 13 Enabling System Generated Reminder Messages ............................................................................. 14 Configuring Windows Task Scheduler ................................................................................................. 14 Configure Email Reminders in Resource Scheduler Admin ................................................................ 16 Performing SQL Queries ....................................................................................................................... 17 Useful SQL Queries ............................................................................................................................. 17 Resource Scheduler Maintenance ....................................................................................................... 18 Performing a Database Backup ........................................................................................................... 18 Performing a Web Application Backup ................................................................................................ 18 Purging Historical Records................................................................................................................... 20 Importing Users ..................................................................................................................................... 22 Importing Reservations......................................................................................................................... 24 Customizing HTML Tags for UDFs....................................................................................................... 26 Display an Image.................................................................................................................................. 26 Add an Email Link ................................................................................................................................ 26 Add a Hyperlink .................................................................................................................................... 26 Open Link in a New Browser................................................................................................................ 27 Open Link in a New Browser with a Display Image ............................................................................. 27 Customizing Color Category Text........................................................................................................ 28 Appendix A: Forms and Checklists ........................................................................... 31 Collecting Location Information........................................................................................................... 32 Collecting Group Information............................................................................................................... 33 Collecting Resource Information ......................................................................................................... 34 Appendix B: Stored Procedures ................................................................................. 1 Example ................................................................................................................................................. 1 Example ................................................................................................................................................. 3 Example ................................................................................................................................................. 4 Example ................................................................................................................................................. 5 Example ................................................................................................................................................. 5 Example ................................................................................................................................................. 6 Example ................................................................................................................................................. 7 Appendix B: Troubleshooting Resource Scheduler Admin....................................... 1 Preface This chapter contains basic information about Resource Scheduler, PeopleCube, and how to use this book. Topics include: ♦ Resource Scheduler Components ♦ Technical Support ♦ Documentation Conventions ♦ About this Book Resource Scheduler Components Resource Scheduler is the all-in-one solution for scheduling and managing shared corporate resources such as conference rooms, laptops, whiteboards, A/V equipment, studios, cars, etc. There are three editions of Resource Scheduler: Standard, Professional, and Enterprise. There is a Resource Scheduler solution sure to fit the requirements of your facility and the facilities of your clients. The Standard Edition offers all the features to make basic resource scheduling easy. The Professional Edition adds additional useful features, such as email integration and individual user access. The Enterprise Edition provides the ultimate solution including such features as customizable user personalization, integration with Outlook® and PIM devices, and sophisticated reporting tools for enhanced resource and asset management control. For more detailed information of the features for each edition, please see the section “What Resource Scheduler Can Do For You” on page 2. i Resource Scheduler Modules You can enhance your Resource Scheduler Enterprise Edition environment with the following modules: ♦ Service Requests Module Formerly known as the Catering Scheduler Module for Resource Scheduler, the new Service Requests is has been enhanced to not only provide the ability to schedule meals along with your functions, but also to schedule services with your functions. ♦ Web Requests Module The Web Requests Module for Resource Scheduler allows users to submit resource requests within a flexible set of time guidelines. All requests are directed to users with approver status who can then either approve or deny requests. ♦ Directory Services Integration Module The Directory Services Integration Module for Resource Scheduler enables the integration of LDAP and NTLM authentication methods for a more secure experience. ♦ Resource Scheduler for Microsoft® Outlook®/Exchange® The Resource Scheduler for Outlook/Exchange module enhances resource scheduling within Microsoft Exchange. The application provides Outlook users with search capabilities to find and book available resources in real time via an Outlook tab. ii Other Products from PeopleCube ♦ Meeting Maker Millennium The collaborative scheduling and time management software helping over 1.5 million busy people around the world to get the right people to the right place at the right time. ♦ Meeting Maker HTML Calendar You can use HTML Calendar to view and work with Meeting Maker accounts from any machine with a web browser. HTML Calendar comes with the basic Meeting Maker product, but requires a separate installation and has separate documentation. ♦ Arrival/Scheduling Web Services Toolkit Software and Web developers can use Arrival, the Meeting Maker Scheduling Web Services Toolkit, to integrate Meeting Maker’s powerful time management engine into your portal, intranet, or other applications. ♦ Meeting Maker Mobile™ Powered by Intellisync™ Meeting Maker Mobile™ Powered by Intellisync™ is the ideal solution for people on the go who need instant wireless access to their calendar and email. Compatible with a variety of mobile devices and carrier independent, Meeting Maker Mobile Powered by Intellisync ensures that you will always be up to date and up to speed. ♦ The Meeting Maker Admin API/CLI You can use the Meeting Maker Admin API/CLI to automate administrative tasks in your Meeting Maker environment using customized scripting. ♦ The Meeting Maker LDAP Gateway You can use the Meeting Maker LDAP Gateway to integrate and synchronize with an LDAP directory service for easy, centralized user and resource account management. iii Technical Support If you subscribe to the Maintenance Advantage Program, you can access PeopleCube technical support. If you need technical support, follow these steps: ♦ Log in to the PeopleCube Support Center at: http://connect.PeopleCube.com/support. ♦ Check the Support News - Hot Topics section for the latest technical announcements and information. ♦ Check the PeopleCube Knowledge Base to see if there is an existing tech note on your issue. ♦ If you still need help, click Create New Case on the main support center page to submit a case to the technical support team. ♦ You can also call PeopleCube Technical Support at 800-282-7319 or 781-530-2603 Monday through Friday from 9 AM to 7 PM Eastern Standard Time. In Europe, call +41 41 785 10 65. The PeopleCube Support Center As a Maintenance Advantage customer, you have access to a personalized PeopleCube Support Center account that provides a central location for all product support features. You can log in to the PeopleCube Support Center at: http://connect.PeopleCube.com/support For both administrators and end users, the Customer Support Center lets you submit and track: ♦ Technical support tickets ♦ Product enhancement requests ♦ Product bugs iv With the PeopleCube Support Center, you also have access to: ♦ The searchable Tech Note Knowledgebase ♦ Product downloads ♦ Product documentation ♦ Support News - Hot topics Professional Services The PeopleCube Professional Services team stands ready to accommodate customers of any size with installation, upgrade, migration, and custom development services. Professional services include: ♦ New enterprise customer deployment ♦ Pre-rollout planning and testing ♦ On-site upgrades and migrations with live data ♦ Migration services from other products ♦ Web services custom integration and development To learn more about available professional services, visit http://www.PeopleCube.com/services or call 781-530-2600. PeopleCube Training Services PeopleCube offers a variety of training services for administrators and end users, available online or in person. Training types include: ♦ Online instructor-led training ♦ Instructor-led classes at the PeopleCube Training Center ♦ Custom training at your site To learn more about available training, visit: http://www.PeopleCube.com/training or call 781-530-2600. v Documentation Conventions This book uses the following documentation conventions: Convention Explanation Italics Indicate a document title. Also used in some headings. Bold Indicates a definition term or an item you must act upon, such as a button you must click. Fixed width font Indicates a file name, file path, URL, code or text string, or text you must enter. > Indicates a series of selections on cascading menus. For example, from the top menu bar, choose File > New > Folder. <> Indicates a variable in a code or text string. NOTE: Presents brief, additional information related to the current topic. A note can also be used as a reminder or clarification. Indicates a procedure that must be followed carefully or an event that can possibly cause loss of data. WARNING: vi About This Book This book is intended for Resource Schedule administrators. It assumes strong computer skills and a basic knowledge of management of Microsoft Server, Microsoft IIS, and SQL Server. This book contains information on the administration of Resource Scheduler. It does not contain installation instructions for Resource Scheduler. Please see the Resource Scheduler Installation Guide for installation instructions. This book also does not contain installation or configuration information for any non-Resource Scheduler products, such as Sun's Java Runtime Environment, Microsoft Data Access Components (MDAC), Microsoft Server, Microsoft IIS, or SQL Server. Those applications have their own documentation containing separate installation and configuration instructions. vii Chapter 1: Planning Your Resource Scheduler Environment This chapter contains information you need when you plan your Resource Scheduler environment. It includes system requirements, system planning, and optimization recommendations. Topics include: ♦ Overview ♦ What Resource Scheduler Can Do For You ♦ System Requirements ♦ Planning Your Resource Scheduler Environment ♦ System Planning Recommendations ♦ Optimizing Performance ♦ Installation Overview Resource Scheduler is a web-based application for scheduling and managing shared resources. Before you install and configure Resource Scheduler in your environment, you should understand how Resource Scheduler works and plan the best system for your needs. 1 What Resource Scheduler Can Do For You Resource Scheduler is flexible enough to meet the needs of any size organization. Designed with business requirements in mind, its multiple calendar and resource views make tracking and controlling resource schedules simple! Resource Scheduler has many options that can be configured and changed to fit your organizational requirements. The chart below can help determine which edition of Resource Scheduler best fits your needs: Features Admin. Password Control Attachments Automated Assistance Availability Search Color Legend in Schedule View Configurable UDFs Find Scheduled Reservation "Go To Today" Links Multiple Location Support Multiple Views Multi-Resource Reservations Print Reservation Confirmation Quick Edit Quick Start Recurring Reservations Reservation Reassignment Benefits Administration feature allows passwords to be overridden Document attachments for file sharing User-friendly features such as mouse-over tips and popup information Search for available resources that match your criteria requirements Display the event type for each reservation or booking by designated color codes User defined fields to customize resources and bookings Search for reservations you have made "Go To Today" button enables users to easily navigate to the current date from within the schedule view User defined area for intranet links Number of locations supported (for geographic or departmental distinctions) User friendly views to print and post by resource Reserve multiple resources simultaneously (i.e. conference room and A/V equipment) Print reservation confirmation notices and distribute accordingly Easily modify resources and change resource location Quick setup with predefined templates Make reservations on a one-time, daily, weekly or monthly basis Easily reassign reservations to another resource 2 Schedule Granularity User Based Logins User Security Detailed Location Information Email Integration Group Security Holidays Multi-Language Support Multiple Locations Quick Reserve Templates Reminders Reports Reservation Wizard Schedule Colors Service Tabs User Dept./Account Info vCal Support Workflow (Req. Approval) Admin. By Location Event Calendar Event Scheduling Favorites Personalization Resource Level Security View resource schedules by day, week or month Designate users who can access the system and reserve/manage resources Establish administration privileges and create view-only users Location time zone, weather, map/directions and floor plan support Email your resource reservations to others Establish user privileges by group such as department or location Holidays displayed on schedule views Available in English, French and German Arrange resources by separate locations Option to set default values to make Quick Reserve even faster Provides automated reminder of your reservation Generate resource utilization, bill back and other customized reports Quick reserve system for the scheduling of popular resources Designate colors for specific types of resources or reservations Setup tabs to quickly book services such as A/V or catering Identifies users within authorized account Integration with Outlook, PalmPilot and other PIMs via vCal standard Requires reservation requests to go through administrator for approval or denial Provides admin. access on a per-location basis Include event-specific information in resource calendar and publish to wider audience Group and search for reservations by event type and modify resources required for a particular event Favorite resources, recent reservations list and assignments lists available Enables you to set your preferences for a customized experience Modify security settings to enable an 3 Resource Viewing Restrictions Room Setup Options Special UDFs Virtual Tele-conference Wait Listing individual or group of individuals to have administrative rights over a particular resource Limit specific users to view a single resource - useful if people are used as resources Specify room setup preference (classroom style, round table format, etc.) Offers ODBC and SQL connection to validate data against an external table and interact with external data Enables users to reserve resource types related to virtual tele-conferences Request resource that has already been reserved and receive notification of availability Optional Modules for Resource Scheduler – Enterprise Version Resource Scheduler for Outlook/Exchange Seamlessly integrates Resource Scheduler into the Outlook calendaring environment Service Requests Request catering services (select menu items, delivery times, designate account billing, etc.) Directory Services Integration Integrates Resource Scheduler with LDAP, Active Directory or NTLM authentication Report Writer's Toolkit Provides the necessary information write detailed customized reports Web Requests Enable users outside of your network to request resources 4 System Requirements Resource Scheduler can be hosted on Windows 2000 Server or Windows 2003 Server running Microsoft Internet Information Server (IIS) Version 4.0 or greater. The application may be installed with a royalty free, SQL Server compatible database. Organizations expecting large numbers of concurrent users may wish to use SQL Server for more robust performance. Server Requirements The server hosting Resource Scheduler requires the following hardware and software for a minimal installation. Requirements for your Resource Scheduler server vary depending on the expected size of your database, number of users, degree of traffic, and other factors. In many cases, a minimum installation may not support your database traffic. For more information on optimizing your system performance, see the section “Optimizing Performance” in this guide. Hardware / Software Requirements Operating System Microsoft Windows 2000 Server/Advanced Server, or Windows 2003 Server (NTFS and long file name support enabled.) Processor 550 MHz or higher Network TCP/IP Static IP address (Optional) Registered Domain Name Web Server Microsoft Internet Information Services (IIS) 5.0 or higher Scripting Engine Microsoft Scripting Engine 5.1 or greater (5.5 recommended) RAM 256 megabytes (MB) of RAM for the operating system and services, plus an additional 32 MB of RAM for each 10 concurrent users Disk 150 MB of available disk space (application only - see data requirements below) SMTP (Optional) SMTP mail server for email integration Other Microsoft Data Access Components (MDAC) 2.8 or higher Sun's Java Runtime Environment (JRE) 1.3.x. Note that problems with Sun's Java Runtime Environment (JRE) 1.4.x will cause Crystal Reports functionality to fail. 5 Application Data In addition to the Resource Scheduler server requirements, the application data for Resource Scheduler requires the following for a minimal installation. Resource Scheduler installs a SQL Server compatible database. Hardware / Software Requirements SQL Server Microsoft SQL Server Desktop Engine (MSDE) 1.0, 2000 or higher, or (Optional) SQL Server 2000 (Service Pack 3 or higher). Disk 50 MB of available disk space, plus an additional 10 MB per 50 resources. Data for the application can be installed on the same machine as the web application or on separate SQL Server machine. Client Requirements The user accessing Resource Scheduler requires the following hardware and software for a minimal installation. Hardware / Software Requirements Browser Connectivity Extensibility HTML 5.0 compatible web browser. For optimal viewing and performance, Internet Explorer version 5.5 or higher is recommended, or Netscape version 7 is recommended. Note: Internet Explorer 4 and Netscape 4 are no longer supported. JavaScript enabled Cookies enabled 1024 x 768 or greater display size recommended Available connection (via network, Intranet, Internet or dial-up) to server running the web application iCalendar enabled PIM (i.e. Outlook, Palm) for personal calendar access 6 Planning Your Resource Scheduler Environment You can use the following recommendations and guidelines to help ensure optimal performance in your Resource Scheduler environment. System Planning Recommendations These recommendations are provided as a reference for the implementation of Resource Scheduler. Depending on how you intend to use the product, portions of this guide may or may not be appropriate. For large organizations, it is recommended to assemble a meeting of the individuals responsible for managing and scheduling the resources you intend to track with Resource Scheduler. Make sure you have an edition of Resource Scheduler that fits your needs. Before installing Resource Scheduler, it is important that you identify all formal and informal scheduling processes and procedures within your organization. You should identify who will be allowed to schedule resources, which resources may have restricted access, and which resources require an approval process. Implementing Resource Scheduler is easier for organizations with well defined processes and procedures. Consider the following before implementing Resource Scheduler: ♦ Determine who will administer Resource Scheduler. You may choose to allow all users of Resource Scheduler to perform administration functions or allow only one person. ♦ Determine who will update resource schedules. You may choose to allow all users of Resource Scheduler to update resource schedules, or allow only a few staff members responsible to perform reservations. ♦ Identify all locations that will be tracked with Resource Scheduler. Locations are often considered a geographical location. Some organizations host offices in a campus-like environment where it might make more sense to setup a location as a specific building. ♦ Identify logical groupings of resources. These will become the Resource Groups. You may wish to create groups based on how you will be searching for available times to reserve. For example, if only a few of your 30 conference rooms are suitable for 7 external sales presentations, you may wish to create a group called “Demo Rooms”, separate from a general “Conference Rooms” group. This will allow for more precise searching for an available resource. ♦ Identify all resources to be scheduled using Resource Scheduler. When the resources are identified, it is sometimes easier to create groups based on the resources. ♦ Identify the contact person for each resource. This information will be visible in the detailed resource information. This is often an email address, but it can also be a name, phone extension, or other information. ♦ Identify the capacity for each of the resources, if applicable. You may use the capacity function of Resource Scheduler to enter room capacity or search for an available room by capacity. ♦ Identify common characteristics for locations, groups, and resources. Common characteristics for conference rooms are telephone extension and style of white board. Common characteristics for cars may be automatic or manual transmission or cost per day. Common characteristics for laptops may be CD Burner, DVD Burner, RAM, Hard drive, CPU, Serial Number, etc. Defining these characteristics help users to determine which resources fit their needs and may help to better prepare them for the event and provides useful forms to help you identify important characteristics of your locations, groups, and resources. ♦ Identify optional information to capture during resource reservations. A common example would be services required for a conference room, such as audio/visual services or housekeeping. This can be set at both the group level and the individual resource. ♦ Identify the time format for Resource Scheduler. Two formats are available: a 24 hour schedule or a schedule in which a start time and end time are set. Each location can be set to its own time format. Both formats allow the granularity of the schedule to be displayed in blocks of 5, 10, 15, 20, 30, or 60 minutes. ♦ Determine the authentication method to access Resource Scheduler. Several methods are available in the Enterprise Edition to authenticate users without manually creating user accounts. The Directory Services Integration Module for the Enterprise Edition includes NTLM, LDAP, and IIS. Each authentication method has it owns benefits and advantages that should be considered before implementation. For more information on security, please consult the section “Security Concepts” in this guide. ♦ Determine your deployment strategy. Rollout plans vary, but Resource Scheduler is simple enough to use with little or no training. Consider limiting the initial rollout to a few users to allow Resource Scheduler administrators to respond to feedback and identify any critical issues. 8 ♦ Review all documentation. Review all documentation about any add-on module you will be implementing and collect any information that may be necessary before installing and configuring Resource Scheduler. Optimizing Performance The recommendations below are for optimal performance in a wide variety of environments. The setup that works best for your environment will vary depending on details such as the number of users in your environment, network traffic levels in your environment, the specifications of the machines hosting your server, how heavily your users use Resource Scheduler, and other factors. Resource Scheduler will run if it meets the minimum system requirements. ♦ SQL Server For a more robust performance, you may wish to host the SQL server compatible application on a separate, dedicated machine. Although Microsoft SQL Server Desktop Engine may be installed, you may wish to install SQL Server. ♦ Hard Disk space Your Resource Scheduler database size increases as users schedule resources and add information. The amount of disk space you should reserve for the database depends on how heavily your users use Resource Scheduler. You should allocate at least 10 MB per 50 resources. More space should be allocated if you anticipate heavy Resource Scheduler usage. ♦ RAM 128 megabytes (MB) of RAM is typically the minimum for the operating system and services. Check your operating system documentation for optimizing RAM. Resource Scheduler requires a minimum of 32 MB of additional RAM for each 10 concurrent users. If you anticipate 40 concurrent users, a total of 128 MB of additional RAM would be the minimum. ♦ Network Bandwidth You should ensure that you have enough bandwidth to accommodate your network traffic. High network traffic can impact Resource Scheduler’s performance. ♦ Web Server Tuning The response time for accessing web pages can be increased with web server tuning. You may wish to review documentation about web server tuning available on the Internet. 9 ♦ Static IP address or DNS name Make sure that any machine hosting the web server for Resource Scheduler has a static IP address or DNS name. ♦ Maintenance Schedule maintenance of your SQL server machine, database, and web server machine at regular intervals to maintain data integrity. ♦ Backups Schedule backups of your Resource Scheduler installation and database at regular intervals. You may find additional information on optimization and system planning in the PeopleCube Support knowledge base at: http://connect.PeopleCube.com/support 10 Installation Overview The following is a brief overview of the installation process. For more detailed information about installing or upgrading Resource Scheduler, please consult the Resource Scheduler Installation Guide. 1. Configure Windows Server. Ensure that your Windows server meets all of the hardware and software requirements. 2. Configure IIS. Ensure that your IIS Web server permits access to Resource Scheduler. 3. (optional) Install Microsoft Scripting Engine. You can install the latest Microsoft Scripting Engine prior to installing Resource Scheduler, if desired. The Resource Scheduler Installation will install a version of Microsoft Scripting Engine if one is not detected during installation. 4. (optional) Install MSDE or SQL Server. You can install the latest MSDE or SQL Server prior to installing Resource Scheduler, if desired. The Resource Scheduler Installation will install a version of MSDE if one is not detected during a Quick Install or during a Custom Installation with the application database included. 5. Install the Resource Scheduler web application and database. You can install the Resource Scheduler web application and database on the same machine. You can also choose to install the Resource Scheduler web application on a dedicated Web server machine and the Resource Scheduler database on a dedicated SQL Server machine. 6. Verify your Resource Scheduler installation. You should verify that your Resource Scheduler installation is functioning properly. For more information, please refer to the “Verifying Resource Scheduler Installation” in the Installation Guide. 7. Configure your regions, locations, groups, resources, and then, if applicable, users. 8. Configure User Defined Fields (UDFs), Resource Characteristic Templates, Reservation Request Tabs, etc. 9. Begin using Resource Scheduler. 11 Chapter 2: How Resource Scheduler works This chapter contains concepts and information you need to understand how Resource Scheduler works. It contains an overview of components working together, Resource Scheduler concepts, and an introduction to the administrator interface. Topics include: ♦ Overview ♦ Components working together ♦ Resource Scheduler Concepts: Locations, Groups, Resources ♦ Interface Overview Overview A Resource Scheduler environment consists of the Resource Scheduler web application, the Resource Scheduler database, a web server, and a SQL Server. It can also include any of the add-on modules for the Enterprise Edition. ♦ The Resource Scheduler web application runs on the same machine as the web server and provides an interface to manage and reserve resources. ♦ The Resource Scheduler add-on modules are installed on the same machine as the Resource Scheduler web application to further enhance your environment. ♦ The Resource Scheduler database is installed on the same machine as the SQL server. The SQL Server can either be Microsoft Data Engine (MSDE) or another SQL-compatible server. 12 Components working together A Resource Scheduler installation consists of three main components: a web server, the Resource Scheduler web application, and a SQL Server-compatible data engine. Administrator The Administrator can access the Resource Scheduler Admin from any browser. Users The end users can access the Resource Scheduler application from any browser. Web Server SQL Server Machine The Web Server machine hosts the Resource Scheduler web application. The SQL Server can be either on the same machine as the Web Server or on a different machine. During installation, Resource Scheduler creates virtual directories in the web server. At minimum, Resource Scheduler creates two virtual directories: RSAdmin and ResourceScheduler. The ResourceScheduler directory allows your end users to access Resource Scheduler. The RSAdmin directory allows you to access the administrative functions. The Professional and Enterprise Editions of Resource Scheduler may create additional virtual directories, such as RSAdminLoc, RSEvents, and Viewer. RSAdminLoc allows access for Location Administrators to configure their location. RSEvents allows you to access event calendars. Viewer allows your end users to use Crystal Reports if you have installed the Crystal Reports components. 13 Resource Scheduler Concepts Resource Scheduler excels at scheduling multiple resources. To keep resources organized, Resource Scheduler presents the concepts of Regions, Locations, Groups and Resources. You can define characteristics about groups and resources with User Defined Fields. Region A region is a collection of groups and resources, and is often a geographical region, such as a country or a state. Location A location is a collection of groups, and is often a geographical location, such as a building. Group A group is a collection of any number of resources. The purpose of a group is to organize similar resources in a logical manner, such as several conference rooms. Resource A resource is an individual item, such as a vehicle, a projector, a conference room, or a VCR. User Defined Fields User Defined Fields, or UDFs, are characteristics of resources within a group. UDF Types help to classify the user defined fields that you create. An icon can be associated with each UDF Type. For example, for a group of conference rooms, you can define a UDF such as "Network Drop Available?", "Size of White Board?", and "Capacity". When you create each resource for a group, you can specify these characteristics. This allows Resource Scheduler users to see at a glance which room might best fit their needs. It is recommended that you experiment either on paper or in the web application with different structures to see what best fits your organizational needs. 14 Interface Overview This section contains an overview of the main pages within the Resource Scheduler Administration interface. Tool Bar The Tool Bar provides a list of links to options to configure. The Tool Bar appears on every page in Resource Scheduler Admin and is the main method for navigation. Home Page The Home Page is the default start page that appears when you connect to Resource Scheduler Admin. The Home Page includes links to various areas in the web application, which are duplicates of the options available on the tool bar. The Home Page is also where you can change the language of the Admin interface in the Enterprise edition. You can switch between French and English. Options Page The Options page is where you configure the appearance and functional behavior of Resource Scheduler. Several tabs are available to allow an administrator the ability to set the functional and cosmetic aspects of the web 15 application. General security settings, external system interaction and default location settings are also controlled in the Options page. General Options Tab The General Options tab contains various display, application-wide, and navigation tree settings. Company Info Tab The Company Information tab contains company information, license information, and some server configuration information. Most of this information is populated during installation and should not require modification. Improper values can cause the application to stop working. Security Controls Tab The Security Controls tab configures application, user, and schedule security. For the Professional and Enterprise Editions, this page also allows you to define the authentication method for login. The authentication method for Standard Edition is configured for “Scheduler only”. Security is discussed in more detail in the “Security Concepts” chapter. 16 Email Settings Tab The Email Settings tab configures the various options for email integration. Location Defaults Tab The Location Defaults tab sets parameters that will be applied to every location when it is initially created or to all existing locations. After a location has been created, you can override the default location configuration options for that location. For more information on creating and modifying a location, please consult Chapter 5, “Locations, Groups, Resources, and Combinations”. Virtual Tele-Conference Settings Tab The Virtual Tele-Conference Settings tab configures the various options for Tele-Conferencing scheduling. 17 Resources Page The Resources Page allows you to add or modify locations, as well as groups and individual resources within the location.For more information on creating and modifying a location, please consult Chapter 5, “Locations, Groups, Resources, and Combinations”. 18 Configurations Page The Configurations Page allows you to add and configure Resource Types, Resource Templates, Reservation Request Tabs, as well as add and configure User Defined Fields (UDFs) and UDF Types. For more information, please consult the chapter “Resource Scheduler Customization”. 19 History Page The History Page allows you to purge historical or deleted records from the database. For more information, please consult the section “Resource Scheduler Maintenance” on page 18. Backup your Resource Scheduler database and web application files before purging any information. 20 Users Page The Users Page allows you to define, modify, and view users. In the Enterprise Edition, this page also allows you to define certain security settings for existing groups. For more information on creating users, please see the chapter “Creating and Maintaining Users”. 21 Holidays Page (Enterprise Edition Only) The Holidays Page allows you to define holidays for each country listed. You can allow or block reservations from being created on a day marked as a holiday. 22 Calendars Page (Enterprise Edition Only) The Calendars Page allows you to publish a read-only schedule of reservations associated with a specific calendar to an events calendar. This is useful for publishing events for calendars to the public without allowing the public to change these events. For example, you created a recurring reservation for a class in a training room "Room 1A" from 8AM-Noon, Monday through Friday. The title of the reservation for the class is "ERP 101". You can publish the reservation on a calendar called "Public Classes". For more information on exporting calendars, please see the section “Creating and Maintaining Event Calendars” on page 5. 23 Strings Page The Strings Page allows you to customize the wording in your Resource Scheduler interface. To customize a string: 1. In the Resource Scheduler Admin home page, click on the Strings link. 2. Click the Select Language drop-down to select the language you want to update. 3. Click on the string you want to update. The String Maintenance page appears. 4. When you have completed updating a string, click the Submit button. Do not use the enter key in any string. To create a line break, use <br>. 24 Help Page The Help Page allows you to access the online help available in PDF format. To access the online help in PDF format, click on the link View On-line Help on the Help Page. 25 Chapter 3: Security Concepts This chapter contains information about configuring security for Resource Scheduler. This chapter does not include specific information about security for Microsoft Windows, IIS, NTLM, LDAP, or SQL Server. These technologies have their own documentation that includes information on security specific to that application. Topics include: ♦ Overview ♦ Security Recommendations ♦ Security Types ♦ Directory Services Integration Module Overview Security is a concern to everyone. Before you allow your end users to access Resource Scheduler, you should review all network security policies and procedures to ensure that Resource Scheduler has been implemented to meet your company’s security specifications. After changes are made in the administrative settings, end users must close then restart their browser for the changes to appear. All browser windows must be closed in order to clear out the old pages, including browser windows not running Resource Scheduler. 26 Security Recommendations As Resource Scheduler is a web-based application, there are many ways to enhance security for web-based applications on the web server and within the application. Resource Scheduler has several security features built in to all editions, including forcing SSL Login and disabling the use of cookies. The Directory Services Integration Module further extends the security features available. For more information about the Directory Services Integration Module, please consult the Directory Services Integration Module section in this document. These recommendations are general recommendations. You may wish to implement policies and procedures beyond the Resource Scheduler application. ♦ Review security procedures for web applications. Review security procedures for web applications to ensure that Resource Scheduler will be integrated accordingly. ♦ Review security procedures with users. Users who use Resource Scheduler on publicly accessible computers should close all browser windows after they logout. ♦ Implement an approval process for critical resources. Implementing an approval process can reduce undesired users from creating reservations in the Enterprise Edition. ♦ Configure primary contact for each resource. A primary contact can be notified when a reservation is created, modified, or deleted. ♦ Password-protect critical resources. Password-protect critical resources so that only those with the password can make reservations with that resource. ♦ Password-protect reservations. Password-protect reservations so that only those with the password can modify reservations. ♦ Implement Security Groups. Configure security groups to enable or restrict access to groups of resources in the Enterprise Edition. 27 Security Types Many of the security options within Resource Scheduler Admin are contained in the Security Controls Tab in the Options Page. SSL Login Security You can configure the Login Page to require that the user is connected via HTTPS. In Resource Scheduler Admin, in the Security Controls Tab in the Options Page you can force logins to use SSL protocol. Instead of an http: address to Resource Scheduler, users must enter https: to view the Resource Scheduler Login Page. A user will not be able to login to Resource Scheduler using HTTP. The user will only be able to login using HTTPS. Password Security All locations, groups, resources, and reservations in Resource Scheduler may be set with password protection. Additionally, a password can be set to control application-wide security. Location, group and resource level passwords do not override passwords set for a specific reservation. If a user elects to set a password on a reservation, only those with the password will be able to edit or delete that reservation. The password-protected reservation will be visible in all of the day, week, and month views. If a user attempts to view the details of the reservation after the user has logged into Resource Scheduler, they will be prompted for the reservation password. If you have installed RSOE (Resource Scheduler for Microsoft Outlook Exchange), password protection for Resource Scheduler does not provide access protection for RSOE. This same prompt is used when passwords are set on a location, a group, or a resource. When a user creates, edits, or deletes a reservation on a protected location, group or resource, the user will be prompted to enter the password for the “lowest level” of security present. For example, if passwords are set at the group and individual resource level, the user would be prompted to enter the password for the individual resource and not the group password. This allows you to customize the security levels for reservations and resources. When a user successfully enters a password for a location, group, resource or reservation, the password is stored in a cookie on the user’s computer. The next time the user tries to access that same location, group, resource or reservation, the cookie is automatically used to enter the password. This saves time for the user by not requiring them to re-enter passwords for a resource they may have been assigned to manage. This feature can be disabled so that no cookies are used and password entry will be required for every action. 28 If multiple users share computers, it is recommended to not enable cookies on the Default User. Individual users should be encouraged not to enable cookies if they share a computer. For more information on the Default User, please refer to the section “The Default User” in this manual. Application Security You can restrict the creation or modification of reservations by enabling application-wide security for editing and creating. Users can still view schedules and conduct resource searches, but they cannot create or modify a reservation unless they know the Application-wide security password. This is a simple form of security and the password should be changed periodically. For more information, see “Security Controls Tab” in the chapter “Configuring General Options”. Authentication Method The authentication method available in the Standard Edition is Scheduler Only. The authentication methods available in the Enterprise Edition are Scheduler Only and IIS with Scheduler. Three additional methods are available in the Enterprise Edition with the Directory Services Integration Module: Scheduler with NTLM, Scheduler with LDAP, and IIS with NTLM. Before you configure an authentication method other than Scheduler Only, you must enable individual user access. The authentication method can be accessed from the Security Controls tab in the Options Page. Scheduler Only (Available in all editions) When this option is selected, users are authenticated during login using only the information in the Resource Scheduler database. An administrator must create an individual account for each user. This method requires the most amount of administrative work, but does not require the use of external systems or networks for authentication. IIS with Scheduler (Enterprise Edition Only) Users will be prompted for a password from IIS instead of logging in from the Resource Scheduler Login Page. This information will then be used to authenticate the user against the Resource Scheduler user database. Each user must have a valid NT login account on the web server in order to access Resource Scheduler. Each user must have a Resource Scheduler account created prior to their first login. 29 For more information about Scheduler with NTLM, Scheduler with LDAP, IIS with Scheduler, and IIS with NTLM Authentication Methods in the Enterprise Edition with the Directory Services Integration Module, please see the section “Directory Services Integration Module” in this guide. For information on configuring general options, see “Security Controls Tab” in the chapter “Configuring General Options”. User Security (Enterprise Edition Only) There are various options for configuring user security in the Security Controls tab in the Options Page. You can enable individual user access, use security groups for users, and allow users to add themselves. You can enable Implied Security for Reservations to allow only the user who created the reservation, or an administrator, to be able to update or delete the reservation. For more information, see “Security Controls Tab” in the chapter “Configuring General Options”. Security Groups (Enterprise Edition Only) Users with a large number of resources or many locations will find that Group Security provides more flexibility in controlling access to resources. With Group Security, administrators can create multiple security groups, with each group defining the specific access users are allowed to have for the groups of resources at each location. This is useful for organizations with multiple locations that wish to have local administrators at each location, but do not want to grant them system-wide administrator rights. A security group can be setup for each location and each local administrator would be granted access to this security group. System-wide administrators would be granted access to all the local administrator security groups. For more information on Security Groups, please consult the section “Security Groups” in this guide. When Group Security is enabled, individual user security is disabled. Therefore it is very important that you check all group security settings before enabling this feature. Group Security is only available in the Enterprise edition of Resource Scheduler. 30 Schedule Security Schedule Security uses the Scheduler Login Page with the Scheduler Database to validate users. Resource Level Security Each resource can be configured with its own unique password. If a password is configured on a resource, the end user will need to enter the password for that resource in order to schedule it. In versions prior to v7.20 of Resource Scheduler, security settings could be established for groups of users and resources. Beginning with v7.20, security settings can be modified for any resource. This includes the ability to modify user group rights for the resource or to override security rights for an individual. Resource Level Security allows for a single user to have rights over a single resource in a group or allows multiple users to share administrative rights over a single resource. Resource Level Security allows administrators to create security settings as granular as they wish. Additionally, each resource can be configured to require an approval for use via a wait list or pending approval process. Reservation Security All users have the option to protect their reservation with a password. Additionally, administrators may wish to activate Implied Security in the Options section. With Implied Security enabled, only the user who created the reservation or an Administrator may update or delete that reservation. 31 Directory Services Integration Module The Directory Services Integration Module for Resource Schedule enables the integration of LDAP, NTLM, and Active Directory authentication methods in the Enterprise Edition for a more secure experience. You should be familiar with the configuration of NTLM, Active Directory, or LDAP in your network before proceeding. With the Directory Services Integration Module enabled and configured, you do not need to create individual user accounts. These accounts will be created automatically the first time a user is logged in. The Directory Services Integration Module for Resource Scheduler allows for seamless user integration and management with existing corporate account management tools such as LDAP and NTLM. This add on module reduces overall resource maintenance by using your network security and login information in place of Resource Scheduler. The following graphic helps to show this relationship: IIS Security Options • Anonymous access • Authenticated access Directory Services Integration Module LDAP or NTLM Server(s) • Validate IIS request or user login/password • Provides basic information to RS user table HTTP Resource Scheduler User The end users can access the Resource Scheduler application from any browser. 32 The four additional authentication methods available in the Enterprise Edition with the Directory Services Integration Module are: ♦ Scheduler with NTLM NTLM is a common authentication method used in businesses. When a user logs into a Microsoft Domain on their network, NTLM authentication is used. Resource Scheduler can use this authentication method to control access. Resource Scheduler supports a single primary NTLM domain. When a user connects to Resource Scheduler for the first time, they will be presented with the Resource Scheduler login page where they enter their network login name and password. Resource Scheduler will then verify this information against the server specified in the Login Server String. If entered correctly, the User Information Page will appear in which the user can enter additional information such as email address. On subsequent visits, the user will only be prompted for their login information. If a user’s network login account becomes disabled, their Resource Scheduler login account will also become disabled. If this option is selected, you must also enter a valid Login Server String, such as: yourcompany ♦ Scheduler with LDAP LDAP is another common authentication method. This authentication method works in the same way as NTLM authentication, except that users are authenticated against an LDAP server instead of a network server. Because LDAP contains additional information about users, including email address, user information is automatically populated at the user’s first login. LDAP can be used to authenticate against an Active Directory server. Chose this option if you use Active Directory. All other functions operate in the same way as using Scheduler with NTLM. If this option is selected, you must also enter a valid Login Server String. Such as LDAP: dc=us,dc=yourcompany,dc=com ♦ IIS with NTLM Users will be prompted by IIS with the NTLM login/password prompt instead of the Resource Scheduler login page. This method works in the same way as Scheduler with NTLM authentication. This method is used by organizations who do not wish to use the standard login page. If IIS with NTLM is selected, you must also enter a valid Login Server String, such as: yourcompany 33 ♦ Scheduler with Netegrity Users will be prompted with a Netegrity login/password prompt instead of the Resource Scheduler login page. This method is used by organizations who do not wish to use the standard login page. Active Directory and NTLM Authentication NTLM validation is performed against a single Primary Domain Controller (PDC) or a Backup Domain Controller (BDC). User information passed to the NTLM Server for authentication. If the user is successfully validated, Resource Scheduler returns the username from the NTLM Server to assure that Resource Scheduler has the most up-to-date values. Since email addresses are not available from NTLM accounts, email addresses cannot be synchronized. LDAP Authentication Resource Scheduler performs LDAP authentication in two parts. First, Resource Scheduler queries the LDAP server to return data about the distinct user account whose “User Login” attribute matches the value entered by the user. This must be a distinct value, and return an object of type “User Object Class”. Organizations often have equipment that has the same name as a person configured in their LDAP server. That is, the organization may have a user “John Smith”, and a laptop used by John Smith that is also named “John Smith”. Resource Scheduler will use the account with the object of type “User Object Class”. Once the query identifies the distinct user account, the Distinguished Name from that account and the password are passed to the Domain server to “bind” a connection. This process identifies the validity of the password entered by the user. When the password is verified, the user account in Resource Scheduler is updated with the most up-to-date name, email, department, and telephone values. Installing the Directory Services Integration Module The installation of the Directory Services Integration Module is simply a license key that you add to the Company Info tab in Resource Scheduler Admin. You must have installed the Enterprise Edition of Resource Scheduler before you can proceed. 34 If you are upgrading from the Standard Edition to the Enterprise Edition with the Directory Services Integration Module, you will need to reinstall the Resource Scheduler Application files and provide the Enterprise Edition Serial Number during the installation. This will ensure that all Enterprise Edition files are installed and all Enterprise Edition virtual directories are properly created. To install the Directory Services Integration Module: 1. Verify that you have the Enterprise Edition of Resource Scheduler installed. 2. Log into the Resource Scheduler Admin. The Resource Scheduler Admin Home Page appears. 3. Click on the Options link. The General Configuration Page opens to the General Options tab. 4. Click on the Company Info tab. The Company Information Page appears. 5. In the Integrated Security field, enter the license key for the Directory Services Integration Module. 6. Click the Submit button. The Directory Services Integration Module is activated. Configuring the Directory Services Integration Module You can configure the Directory Services Integration Module in Resource Scheduler Admin. Configuring for NTLM or Active Directory To configure the Directory Services Integration Module for NTLM/Active Directory: 1. Log into the Resource Scheduler Admin. The Resource Scheduler Admin Home Page appears. 2. Verify that you entered the correct license key in Resource Scheduler Admin in Options then Company Info. 3. Click on the Security Controls tab. The Security Control tab opens. 35 4. In the Authentication Method section, select Scheduler with NTLM or IIS with NTLM from the drop-down list. 5. Click on the Configure button under the drop-down list. The NTLM Login Server Info dialog appears in a new window. 6. In the Login Server, IP Address, or Domain field, enter the Login Server, IP Address, or Domain string. 7. Press Submit. The Login Server, IP Address, or Domain window is closed and the Authentication Method is configured. To configure the Directory Services Integration Module for LDAP: 1. Log into the Resource Scheduler Admin. The Resource Scheduler Admin Home Page appears. 2. Verify that you entered the correct license key in Resource Scheduler Admin in Options then Company Info. 3. Click on the Security Controls tab. The Security Control tab opens. 4. In the Authentication Method section, select Scheduler with LDAP from the drop-down list. 36 5. Click on the Configure button under the drop-down list. The LDAP Login Settings dialog appears in a new window. 6. In the LDAP Login Settings dialog, enter Login Server String, User Object Class, Bind Type, Bind With, and Schema attributes. For more information about each field, please consult “LDAP Login Settings”. 7. Press Submit. The LDAP Login Settings dialog is closed and the Authentication Method is configured. Verifying the Directory Services Integration Module After you have activated the Directory Services Integration Module and have configured the authentication method, you should verify that your settings are correct before users log in. Verifying NTLM Settings You will first test your settings from the /RSAdmin/NTLM_Test.asp test page. You will then repeat these tests with the /ResourceScheduler/NTLM_Test.asp page. To verify the NTLM Settings: 1. Log into the Resource Scheduler Admin application as an administrator. The Resource Scheduler Admin Home Page appears. 37 2. In the address bar of your navigator, enter the following address: http://127.0.0.1/RSAdmin/NTLM_Test.asp Replace 127.0.0.1 with the IP address or DNS name of your web server machine. The Meeting Maker NTLM Validation Diagnostic Tool dialog appears. 3. Complete the appropriate fields. 4. Click on the Test button. 5. The test results will appear above the User Name field. 6. If any field is invalid, you may need to reconfigure your test fields and perform the test again. You can reconfigure any connection information in the Options>Security Controls page of the Resource Scheduler Admin application. Click on the Configure button to configure the Authentication Method. You may proceed after all fields are valid. 7. In the address bar of your navigator, enter the following address: http://127.0.0.1/ResourceScheduler/NTLM_Test.asp Replace 127.0.0.1 with the IP address or DNS name of your web server machine. The Meeting Maker NTLM Validation Diagnostic Tool dialog appears. 8. Complete the appropriate fields. 9. Click on the Test button. 10. The test results will appear above the User Name field. 11. If any field is invalid, you may need to reconfigure your test fields and perform the test again. You can reconfigure any connection information in the Options>Security Controls page of the Resource Scheduler Admin application. Click on the Configure button to configure the Authentication Method. Verifying LDAP Settings You will first test your settings from the /RSAdmin/LDAP_Test.asp test page as an administrator, and then as the anonymous account if it is enabled. You will then repeat these tests with the /ResourceScheduler/LDAP_Test.asp page as an administrator, and then as the anonymous account if it is enabled. To verify the LDAP Settings: Phase 1: Verify connection with administrator permissions. 38 1. Log into the Resource Scheduler Admin application as an administrator. The Resource Scheduler Admin Home Page appears. 2. In the address bar of your navigator, enter the following address: http://127.0.0.1/RSAdmin/LDAP_Test.asp Replace 127.0.0.1 with the IP address or DNS name of your web server machine. The Meeting Maker LDAP Validation Diagnostic Tool dialog appears. 3. Complete the appropriate fields. 4. Click on the Test button. 5. The test results will appear above the Name or Unique ID field. 6. If any field is invalid, you may need to reconfigure your test fields and perform the test again. You can reconfigure any connection information in the Options>Security Controls page of the Resource Scheduler Admin application. Click on the Configure button to configure the Authentication Method. You may proceed after all fields are valid with an administrator account. 7. In the address bar of your navigator, enter the following address: http://127.0.0.1/ResourceScheduler/LDAP_Test.asp Replace 127.0.0.1 with the IP address or DNS name of your web server machine. The Meeting Maker LDAP Validation Diagnostic Tool dialog appears. 8. Complete the appropriate fields. 9. Click on the Test button. 10. The test results will appear above the Name or Unique ID field. 11. If any field is invalid, you may need to reconfigure your test fields and perform the test again. You can reconfigure any connection information in the Options>Security Controls page of the Resource Scheduler Admin application. Click on the Configure button to configure the Authentication Method. You may proceed after all fields are valid with an administrator account. Phase 2: Verify connection with anonymous permissions. 12. If the anonymous account is enabled for this virtual directory, log out of the Resource Scheduler Admin application as an administrator and then repeat steps 2-11 as the anonymous account. 39 You may proceed after all fields are valid as the anonymous account. 13. If any field is invalid, you may need to reconfigure your test fields and perform the test again. You can reconfigure any connection information in the Options>Security Controls page of the Resource Scheduler Admin application. Click on the Configure button to configure the Authentication Method. LDAP Login Settings The LDAP Login Settings Page, ConfigAut.asp, allow you to configure connection settings to authenticate a user with an LDAP Server. Field Description Login Server String Configures the connection string to the LDAP directory server used to validate accounts. This varies by LDAP implementations. Here are some of the possible formats: LDAP://DOMAIN LDAP://Subdomain.company.com LDAP://CompanyDomain/ou=people,o=company.com User Object Class Identifies the class name for users in the LDAP schema. By default, the setting is “user”. Bind Type Identifies the type of bind used when validating user passwords, either Simple or Secure. Secure binds require that the web server is authenticated to securely bind to the LDAP server. Bind With Identifies the schema with which to bind, either Distinguished Name or User Login. When attempting to authenticate the user account, this setting determines which value is passed to the server. Schema Attributes User Login Identifies the LDAP schema attribute that contains the distinct user login. Telephone Field Identifies the LDAP schema attribute that contains the user’s telephone number as shown in Resource Scheduler. Department Field Identifies the LDAP schema attribute that contains the user’s department as shown in Resource Scheduler. Name Field Identifies the LDAP schema attribute that contains the user’s name as shown in Resource Scheduler. Bind Domain Used when the binding domain is different than the one (Optional) specified by the Login Server. 40 ADsPath Filter If the Distinguished Name returned by the LDAP query needs (Optional) have some of its values replaced or removed before binding to the server, enter the text that needs to be replaced or removed from the Distinguished Name. For example, a user query might return the following distinguished name: LDAP://nae01/empid=10032742, ou=people, o=company.com But needs to bind with: empid=10032742, ou=people, o=company.com Users would enter LDAP://nae01/ into the ADsPath Filter value to remove LDAP://nae01/ from the Distinguished Name when binding. 41 Chapter 4: Configuring General Options This chapter contains information about configuring general options. This chapter focuses on the options available in the Options for General Configuration. Topics include: ♦ Overview ♦ The General Options Tab ♦ The Company Info Tab ♦ The Security Controls Tab ♦ The Email Settings Tab ♦ The Location Defaults Tab Overview The Options pages allow you to control general information, company information, basic security, email settings, and location defaults. This includes the ability to change the schedule display and the navigation tree, as well as enable or disable certain application-wide features, such as weather information. Each page in Resource Scheduler Admin may have as many as three buttons: Submit, Reset, and Return. The Submit button applies the changes made in that page. The Reset button will erase any changes made before pressing the Submit button. Return will prompt you to save any changes made then will bring you to the default view for that page. For example, if you navigate to the Email Settings tab under Options and make changes, you will be prompted to save your changes when you click on the Return button and then the General Options tab will appear. 42 General Options Tab The General Options tab allows you to configure general items such as Display Settings, Application Wide Settings, and Navigation Tree Settings. Below are a list of fields in the General Options tab and a definition for each field. Field Description Display Settings Location Display Configures whether the Location, Group, and Resource are displayed, just the resources, or display nothing in Resource Scheduler. Resource Display Configures whether the Resource Title or Resource Description displays in Resource Scheduler. Most organizations use Title to keep the interface simple. 43 Reservation Title Configures the maximum length of a reservation title. You can Length choose 10, 20, 30 or 40 characters. 20 is the recommended length, as more characters may make the schedule appear cluttered and difficult to read. Use Reservation Enables users to classify their reservations into color coded Types categories. You can specify a default color. When enabled, users can color code the event from a drop-down list. Application Wide Settings Allow Multi-Day Permits users to create reservations that span more than one Reservations day. Display Capacity on Enables the display of the capacity for a resource in Group Group Schedule Schedule Views. Views Skip User Reload Omits loading application changes at login. Each time a user logs into Resource Scheduler the application settings are scanned for changes. In small organizations this helps to ensure changes to the configuration are presented to the users as soon as possible. In large organizations this scanning can consume considerable server resources, and therefore can be disabled. If the User Reload option is disabled, then the administrator must manually load any application changes. This is done by loading the following page in Resource Scheduler: http://127.0.0.1/ResourceScheduler/ReLoad.asp Replace 127.0.0.1 with the IP address or DNS name of your web server machine. Allow vCal Enables users to create a vCalendar format (.vcs) file. This integration allows users to update their Outlook, Palm or other vCalcompliant PIM software. Users can easily send the reservations they make with Resource Scheduler to their own personal electronic scheduling device. vCal files are stored in the vCalfile directory on the system where Resource Scheduler was installed. They take up a minimal amount of disk space and can be deleted at any time. The files will be regenerated each time they are needed. Use weather Enables a link to weather information to appear for users. information Weather information is updated every hour. Allow use of the Enables the Location Admin module in the Enterprise Edition. AdminLoc module The Location Admin module allows local administrators to for location settings update and manage resources for their location, without having access to other location information or system-wide settings. For more information, please consult the section “Using the Location Admin Module”. 44 Enable Detailed Enables users to generate Crystal Reports in the Enterprise Auditing Edition with the Crystal Reports components installed. Event Calendar Enables an event calendar to display a drop-down list of other Selection List event calendars in the Enterprise Edition. “None” means that they will never see a list of possible calendars to view. “Anonymous” means they will only see calendars that allow anonymous viewing (not code protected). For more information on event calendars, please consult the section “Creating and Maintaining Event Calendars”. Allowed Languages Enables English, French, and German to be used in the Admin or User interface in the Enterprise edition. When a language has been activated, the Admin or User will see this language as an option at the Login page. Hide footer on login Deactivates the footer at the Login page. page Navigation Tree Settings Width/Height Controls the width and height of the navigation tree in pixels. You can adjust the default size (176x400 pixels) to accommodate a long list of locations. It is suggested that the default settings be used during the initial setup of the application. Colors Controls the background, line, text, and highlight colors. The values are in hexadecimal color format. Load State Controls whether all nodes are open or closed in the Navigation Tree by default. Organizations with a large number of locations, groups or resources may wish to keep the nodes closed by default. The load state affects the expansion of both locations and groups and is set for all locations. Resources Sorted By Controls the sort method of items in the navigation tree. The sort method can be changed to use the display order for each resource in order to match the schedule display. 45 Company Info Tab The Company Info tab contains all of the license keys and server configuration information for Resource Scheduler. Most of this information is populated during installation and should not require modification. If your configuration changes, you can modify these settings. Improper values in this section can cause the web application to stop working. Before changing any information in the Company Info tab, it is recommended to either make note of all information in this tab, or perform a backup of the web application files and the Resource Scheduler database files. Next are a list of fields in the Company Info tab and a definition for each field. 46 Field Description Company Information Company Name Configures the name of your company. You can enter up to 40 characters. Logo File Replaces the default Resource Scheduler logo with your company logo. To fit in the space provided, the image should not exceed 204x88 pixels. The image must be a GIF file. It is recommended that the image has a transparent background. Enter the filename in this field, including any relative directory path. If you place your company logo file, ourlogo.gif, in the Resource Scheduler images directory, you would enter "images/ourlogo.gif". If this field is blank, then the default Resource Scheduler logo will appear. Department Title Configure the department, organization, or workgroup. This title will then be displayed on the user setup page and other places within the application. Acct Code Title Configures an accounting or chargeback code or title for this installation of Resource Scheduler. License Values Scheduler Displays the license key for Resource Scheduler. Modifying this field may cause Resource Scheduler to no longer function. Catering Module Displays the license key for the Services Module for Resource Scheduler, previously known as the Catering Module. Modifying this field may cause the Services Module for Resource Scheduler to no longer function. Web Requests Displays the license key for Resource Scheduler Web Module Requests Module. Modifying this field may cause the Web Requests Module for Resource Scheduler to no longer function. Integrated Security Displays the license key for Resource Scheduler Directory Services Integration Module. Modifying this field may cause the Directory Services Integration Module for Resource Scheduler to no longer function. Server Information 47 Virtual Path Displays the virtual path created during installation for end users to access Resource Scheduler. If you rename the virtual directory in IIS, you should also change this setting to reflect the new path name. The default virtual path is: http://127.0.0.1/resourcescheduler where 127.0.0.1 is replaced by the IP address or DNS name of your web server machine. Physical Path Displays the physical path where Resource Scheduler is installed on your server. The default location for installation is: C:\inetpub\wwwroot\Rscheduler Connection String Displays information on how to connect to the Resource Scheduler database. The connection string may point to a database installed on another server. This connection information should not be modified unless you move the Resource Scheduler database to another server. Catering URL Displays the link to the Service Requests Module for Resource Scheduler. This field is configured during the installation of the Catering module and should not require modification. Server Time Zone Configures the time zone in which the server resides. Costing Information When you activate detailed costing, the change will occur in resource configuration. A “Costing information” tab will appear that allows you to configure a base fee (one per reservation) and an hourly cost (up to a specified number of hours per day) for each reservation. Display costing Controls where users have access to the second page you information to users listed. Even if the users cannot access the tab, the database tables are still updated. Enable detailed This controls whether the system will use the detailed costing. costing There are two fee types that can be configured and there is an additional costing tab that shows up at the resource level if this is enabled. Fee 1 Title These are the titles for the additional costing fields. Fee 2 Title These are the titles for the additional costing fields. 48 Security Controls Tab The Security Controls tab establishes various security options in Resource Scheduler. Although these options can be changed after installation, administrators should consider these settings prior to installation. Some settings will require interaction with other servers on your network and may need approval from those responsible for network or application security. For more information on security, please consult the section Security Concepts. Below are a list of fields in the Security Controls tab and a definition for each field. Field Description Application Security Application wide security for editing/creating password Restricts the creation or modification of reservations to those who know the password. Users can still view schedules and conduct resource searches. This option offers a simple form of security in which a single password is used across all groups and resources. The password can be up to 30 characters in length. This should not be used in conjunction with Location, Group or Resource passwords. Allow admin Allows people who know the password to create or edit any reservation security over-ride in the system. By entering the over-ride password, the administrator can clear or change the reservation password. The password can have a maximum of 30 characters. To activate the over-ride mode in the scheduler, you must access the following page: 49 http://127.0.0.1/ResourceScheduler/superuser.asp Replace 127.0.0.1 with the IP address or DNS name of your web server machine. Authentication Method Login Method Configures the method of authentication at login in the Enterprise Edition. Users must be enabled in the system before configuring an authentication method. Five different methods are available to authenticate users during the login process: Scheduler Only, Scheduler with NTLM, Scheduler with LDAP, IIS with Scheduler, and IIS with NTLM. For more information on Login Methods, please consult the chapter “Security Concepts”. 50 User Security Enable Users Enables individual user access in the Professional and Enterprise editions. When enabled, end-users have options to customize characteristics of the web application as it appears to them. Reservations and assignments can be associated with specific users, and email can be used to notify users of schedule changes or other information. When disabled, there is no distinction between Resource Scheduler end users: Personal customization and many other options are not available. Use Security Enables administrators to further control access to locations and groups Groups for Users of resources in the Enterprise Edition. Security Groups are only available when users have been enabled in the application. By default, individual user security is used when users are enabled. Allow Users to Enables users to control various cookie settings when individual user specify Cookie access is enabled. Settings Allow Users to Enables users to add themselves to Resource Scheduler in the Add Themselves Professional and Enterprise editions. This eliminates the need for administrators to add users. This is ideal if security is not an issue in your organization. Alternatively, administrators import users from a text or other source. For more information on importing users, please see the section “Importing Users”. Implied Security Enables only the user who created the reservation, or an administrator, for Reservations to update or delete the reservation in the Enterprise Edition. Force SSL Logins Enables logins only when accessing Resource Scheduler through Secure Socket Layer (SSL). When enabled, users can only connect from an https login page. Schedule Security Schedule Security Enables protection options for reservations. “Password” and “Private” Type activates an option to hide reservation details from other users when creating or editing a reservation. Other users will see the resources as unavailable, but the description will show “Private”. Users will not be able to see the details of a reservation. The “Password” option means that access to the details is password protected. The “Private” option means that users will have a checkbox labeled “Private” which they can check to make it private. “None” means users won’t be given that option. 51 Email Settings Tab The Email Settings tab defines email settings. Below are a list of fields in the Email Settings tab and a definition for each field. Field Description Email Integration Allow user EMail Enables notification via email. Resource Scheduler will notification automatically notify users about a change or cancellation in a reservation. A valid SMTP mail server and a valid email address for this automatic email are required. Mail server Configures the SMTP mail server. Sender's EMail Configures the email address from which email is sent. address Alternate Server Configures an alternative SMTP mail server. EMail Options Allow Forgotten Enables users to retrieve their Resource Scheduler password Password without assistance from an administrator. This option is not Reminders available for NTLM or LDAP authentication methods. Users can enter in their email address or login name and their password will be sent to the email address in their account. Allow users to edit Enables users to edit email notification when using the the EMail request/approval functionality in the Enterprise Edition. notification Users responsible for approving requests can edit the system 52 generated email messages before they are sent. Use HTML Email Enables all system generated emails relating to resource use Format to be sent in HTML format. Password reminder and Request Tab notifications are not affected by this setting. Mark Messages Enables all messages to be marked as urgent within the Urgent Within X defined number of hours before the start time of the Hours of start time reservation. Allow email Enables system generated reminder messages of reminders of reservations. This feature requires the use of the Windows schedule Task Scheduler, and is only available on IIS servers on Windows 2000 or XP. When enabled, email messages will be generated for each of the time intervals set. You must create a task to run periodically in the Windows Task Scheduler. The program to generate reminder messages is EmailRemind.exe and is located in: C:\Inetpub\wwwroot\Rscheduler\Bin\EmailRemind.exe For more information, please consult the section “Enabling System Generated Reminder Messages” in this manual. 53 Location Defaults Tab All locations created in Resource Scheduler will use the settings configured in the Location Defaults tab until modifications are made to a specific location. Once a specific location has been modified, these default settings no longer apply to that location. You can force the default settings to be applied to all existing locations in the application by checking the Overwrite box just above the Submit button before saving the page. This will populate all the existing locations with information configured on this page. You can still edit individual locations after all the default location information have been overwritten. Field Description Calendar Display 54 24 Hour Schedule/ Configures the time display. You can choose either a 24-hour Specific schedule schedule or a specific schedule. A 24-hour schedule displays all times in a day and users can create reservations for any time. If you choose Specific schedule, you must choose the schedule time by clicking on the drop-down menus to select the hour at which you would like your schedule to begin and end. Schedule Configures the time display units on schedules. If you select Granularity 30 as the granularity, all of the calendar views will show time in 30-minute increments (i.e. 7:00, 7:30, and 8:00). When you set granularity, the reservation times will be in those increments. If you set the granularity to be 30 minutes, the only options in the Quick Reserve section would be 00 or 30 minutes. This prohibits users from reserving resources at 7:15 or 7:45, for example. Allow Quick Enables Quick Reserve Templates. Quick Reserve Templates Reserve Templates allow standard types of reservations to be entered with fewer mouse clicks. These templates are most commonly used by organizations that schedule people or resources for appointments that require a standard amount of time, such as a haircut or massage. Quick Reserve Templates are displayed in the Quick Reserve section of Resource Scheduler and will automatically fill in the reservation description and the appropriate end time for the start time requested. The Quick Reserve Templates are unique by location. Disable the Disables the Reservation Wizard for all locations using the Reservation Wizard default settings. The Reservation Wizard is a way to schedule resources. Display Required Enables the display of required UDFs when a reservation is UDFs in Quick created using Quick Reserve. Reserve Prevent editing Configures when the users can no longer edit reservations. Reservations … This is used to prohibit changes in reservations that may cause problems. To deactivate these functions, leave at 0. Search and Recurring Use Saturday/ Determines whether Saturdays or Sundays are used in Sunday searches or for recurring reservations. If Saturday is a valid day for reserving resources, you would select Saturday, for example. If neither value is selected, weekend days will be ignored when searching for resource availability or when users create recurring reservations. 55 Allow Recurring Enables users to create recurring reservations. If selected, Reservations you must also select the maximum number of months a user can make a recurring reservation. This prevents users from creating recurring reservations extending out for years at a time. By default, the limit is 3 months. Apply Limit to non- Configures the recurring schedule date limit to standard Recurring Schedules schedules. That is, no reservations can be created after a certain date or a rolling time period. Schedule Booking Options Do not show Users Disables the appearance of the Attendees tab on the reservation detail screen for locations using default settings. Users at this location will not be able to invite guests from the Resource Scheduler list of users if this option is enabled. Do not show Files Disables the file attachment tab on the Reservation Detail page for locations using default settings. If you do not wish to allow users to attach files to reservations, enable this option. Do not show Disables the appearance of the Additional Resource tab in the Additional Reservation Detail screen for locations using default settings. Resources Users will not be able to reserve additional resources with the primary resource. Do not show Disables the appearance of the Reservation Request tab for Reservation locations using default settings. Requests Do not show Quick Disables the appearance of the Quick Reserve Save for Reserve Save locations using default settings. Enable Catering Enables the Catering Module, if installed. If enabled and the Catering Module installed, the Catering Module will appear for locations using the default settings. If the Catering Module is installed but you do not want all locations using the default settings to access the Catering Module, then disable this option. A Catering Tab will appear on the Reservation Detail screen when the Catering Module has been installed and enabled. Default reservation Enables the Reservation Title to be populated with the current title to users name user's full name when a user creates a reservation using the Quick Reserve and Wizard. EMail Text Email Footer Configures the email footer for any system generated email. Use this space to include your message. This message is for locations using the default settings. Customized footers can be attached by location, see the section regarding Locations 56 for more information. Email Attachment Configures a file attachment to be included with each system generated message. This is useful for distributing forms that must be completed prior to the event date. File attachments can be of any document type, such as Word or PDF. Some firewalls and email applications will block potentially dangerous attachments, so it is not recommended to attach executables or other file types that may be blocked. Virtual Tele-Conference Settings The Virtual Tele-Conference (VTC) Settings page allows users to specify resource types that are used for virtual teleconferences. Administrators can define the number of resources, that when combined, require a bridge connection versus point-to-point. A report is available for bridge operators to view the number of virtual teleconferences that have been scheduled for any period of time. Administrators can also choose to include a multi-line service tab in the connection count. By using a multi-line service tab, information can be collected on external sites connecting to the virtual teleconference. These external sites are then included in the bridge count. Additional time can automatically be added to the start and end of a virtual teleconference when the connection count equals the number set by the administrator. This functionality makes management of rooms and equipment used in virtual teleconferences much easier to manage. The Virtual Tele-Conference (VTC) Settings page allows you to configure the following fields: ♦ VTC Resource Type(s) Click the select button to open the web page where you can select the resources that will be used for your video Tele-Conference. ♦ VTC Request Tab Select the Request Tab in which you would like the VTC settings to appear. ♦ VTC Site Count Enter the possible number of sites attending the teleconference. ♦ VTC Minimum Setup Enter the estimated number of minutes for setup time. ♦ VTC Minimum Cleanup Enter the estimated number of minutes for cleanup time. 57 Chapter 5: Locations, Groups, Resources, and Combinations This chapter contains information about creating and maintaining locations, groups, resources, and combinations. Topics include: ♦ Overview ♦ Creating and Maintaining Locations ♦ Configuring and Using the Location Admin Module ♦ Creating and Maintaining Groups ♦ Creating and Maintaining Resources ♦ Creating and Maintaining Combinations Overview You can create and maintain locations, groups, resources, and combinations. In order for the Navigation Tree to be displayed for the end user, you must define at least one location and then add one group and one resource to a location. The Standard Edition of Resource Scheduler allows you to create one location. The Professional Edition allows you to create two locations. The Enterprise Editions of Resource Scheduler allow you to create many locations based on your license key. All editions of Resource Scheduler allow you to create an unlimited number of groups and resources. After you have identified your locations, groups, and resources for your environment, you can begin creating them. After changes are made in the administrative settings, end users must close then restart their browser for the changes to appear. All browser windows must be closed in order to clear out the old pages, including browser windows not running Resource Scheduler. 58 Locations You can create locations to represent geographic locations or specific buildings within a campus-like environment. The Standard Edition of Resource Scheduler allows you to create one location. The Professional Edition allows you to create two locations. The Enterprise Editions of Resource Scheduler allow you to create many locations based on your license key. All editions of Resource Scheduler allow you to create an unlimited number of groups and resources. Each page in Resource Scheduler Admin may have as many as three buttons: Submit, Reset, and Return. The Submit button applies the changes made in that page. The Reset button will erase any changes made before pressing the Submit button. Return will prompt you to save any changes made then will bring you to the default view for that page. For example, if you navigate to the Email Settings tab under Options and make changes, you will be prompted to save your changes when you click on the Return button and then the General Options tab will appear. Creating a Location To create a location: 1. Log into the Resource Scheduler Admin. The Resource Scheduler Admin Home Page appears. 2. Click on the Resources link. The Resource Configuration Page appears. 3. Click on the link New... The Location Maintenance Page appears. 4. Enter a title, a description, and any appropriate information. The Title and Description fields are required. For detailed information on each field, please view “Location Maintenance Fields”. 59 5. When you have completed configuring the necessary information, click Submit. The location is created and a Location ID is assigned. After you have initially created a location, additional options become available for you to edit. These options include Calendar Display settings, Schedule Booking Options, Search and Recurring options, and Email Text options. 60 Editing a Location You can edit a location to update its information in Resource Scheduler Admin. After a location has been created, new fields are available to edit, including Calendar Display settings, Schedule Booking Options, Search and Recurring options, and Email Text options. To edit a location: 1. Log into the Resource Scheduler Admin. The Resource Scheduler Admin Home Page appears. 2. Click on the Resources link. The Resource Configuration Page appears. 3. In the location drop-down list, select the location to edit and click Select. The Resource Configuration Page appears with the location listed under the section Location Information. 4. Under the Location Information section, click the Edit button to edit this location. The Location Maintenance Page appears. 5. Edit the fields you wish to update or click on the Location Details tab to edit Location Details. 61 Click the Quick Reserve tab to use or create Quick Reserve templates. Information on Quick Reserve Templates, please see the section “Quick Reserve Templates”. Click the Location Options tab to further customize the location. 6. When you have completed editing the necessary information, click Submit. Using the Location Admin Module The Enterprise Edition of Resource Scheduler allows location administrators to update and manage resources for their location, without having access to other location information or system-wide settings. During installation of the Enterprise Edition, a virtual directory, RSAdminLoc, is created. 62 Any location to be accessed by a location administrator must have a password configured in the “Location Maintenance Page” for that location. The “Requires Password” field contains two items: a checkbox and a text input field. You do not need to check the box, as the checkbox enables password protection on all reservations created with groups and resources at that location. Enabling the “Requires Password” checkbox would require users to enter a password for all reservations created with groups and resources at that location. Configuring the Location Admin password To access the Location Admin, you must first add a password to the location and make note of the Location ID number. To configure a password for a location: 1. Log into the Resource Scheduler Admin. The Resource Scheduler Admin Home Page appears. 2. Click on the Resources link. The Resource Configuration Page appears. 3. In the location drop-down list, select the location to edit and click Select. The Resource Configuration Page appears with the location listed under the section Location Information. 4. Under the Location Information section, click the Edit button to edit this location. The Location Maintenance Page appears. 5. Enter a password in the Requires Password field. You do not have to enable Requires Password. If you enable this option, you will activate password protection for all groups and resources within this location. To create reservations at this location with Requires Password enabled, users will need to enter the password for that location. 6. Make note of the Location ID: number, located just below the tabs. 7. Click Submit when you are finished. 63 Accessing the Location Admin Module You can allow one or more individuals to administer a single location with the Location Admin module in the Professional and Enterprise editions of Resource Scheduler. The Location Administer will not have access to general configuration options and will not have access to resources and groups within other locations. To access the Location Admin Module, you must first identify the Location ID then form the correct URL. Identifying the Location ID To identify the Location ID: 1. Log into the Resource Scheduler Admin. The Resource Scheduler Admin Home Page appears. 2. Click on the Resources link. The Resource Configuration Page appears. 3. Select the location from the drop-down list and press Select. The Resource Configuration Page appears for that location. In the browser’s Address bar, the location ID is listed in the address. For example, in the address bar you may see ResStart.asp?LocID=4&btnLoc=Select. The Location ID is 4. 4. Click on the Edit button. The Location Maintenance Page appears. 5. Make note of the Location ID: number, located just below the tabs. Accessing the Location Admin URL To use the Location Admin Module, you must configure the URL to contain the Location ID of the location you wish to maintain. The Location ID is a number and can be found on the Location Maintenance page in the Resource Scheduler 64 Admin. You should send the proper link to the various location administrators for their location. The URL is: http://127.0.0.1/RSAdminLoc/Default.asp?LocID=XX Replace 127.0.0.1 with the IP address or DNS name of your web server machine. Replace XX with the Location ID for that location. For example, if the Location ID is 5, the URL is: http://www.CompanyName.com/RSAdminLoc/Default.asp?LocID=5 If the Location ID is 17, the URL is: http://www.CompanyName.com/RSAdminLoc/Default.asp?LocID=17 When the location administrator accesses this URL, they will be prompted for the password for that location. When the password is successfully entered, they will have full access to add, change or delete the groups and resources associated with that location. They will not have access to general configuration options and will not have access to resources and groups within other locations. 65 Deleting a Location You can delete a location in Resource Scheduler Admin. When you delete a location, all groups and resources within that location are also deleted. Before deleting a location, be sure to make a backup of your Resource Scheduler database. Proceed with caution. To delete a location: 1. Log into the Resource Scheduler Admin. The Resource Scheduler Admin Home Page appears. 2. Click on the Resources link. The Resource Configuration Page appears. 3. In the location drop-down list, select the location to edit and click Select. The Resource Configuration Page appears with the location listed under the section Location Information. 4. Under the Location Information section, click the Delete button to delete this location. A confirmation dialog appears asking to continue with the deletion. 5. Click OK to continue, or Cancel to cancel the deletion of the location and all of the groups and resources within the location. The location, its groups, and its resources are deleted. 66 Regions You can create regions to represent geographic locations for locations, groups and resources in the Professional Edition. For example, if your organization has many locations in the United States, you may wish to create a “West Coast” Region, a “New England” Region, a “Mid-West” Region, etc. Each page in Resource Scheduler Admin may have as many as three buttons: Submit, Reset, and Return. The Submit button applies the changes made in that page. The Reset button will erase any changes made before pressing the Submit button. Return will prompt you to save any changes made then will bring you to the default view for that page. For example, if you navigate to the Email Settings tab under Options and make changes, you will be prompted to save your changes when you click on the Return button and then the General Options tab will appear. Creating a Region To create a region: 1. Log into the Resource Scheduler Admin. The Resource Scheduler Admin Home Page appears. 2. Click on the Resources link. The Resource Configuration Page appears. 3. Click on New... next to Region Information The Region Maintenance Page appears. 4. Enter a title, a description, and any appropriate information. The Title and Description fields are required. For detailed information on each field, please view “Location Maintenance Fields”. 5. When you have completed configuring the necessary information, click Submit. The region is created and a Region ID is assigned. You can now edit the region to add locations. Adding a Location to a Region To add a location to a region: 1. Log into the Resource Scheduler Admin. The Resource Scheduler Admin Home Page appears. 2. Click on the Resources link. The Resource Configuration Page appears. 3. Select the region in the Region drop-down menu and click Select. The Region Maintenance Page appears. 67 4. Click on New... next to Location Information. A New Location page appears. 5. Enter all of the necessary information. 6. When you have completed configuring the necessary information, click Submit or click Quick Reserve, Approvers, or Location Options to further define this location. The location for this region is created and a Location ID is assigned. Editing Region Information Once you have created a region, you can edit a region to update its information in Resource Scheduler Admin or to add locations, assign approvers, etc. To edit a region: 1. Log into the Resource Scheduler Admin. The Resource Scheduler Admin Home Page appears. 2. Click on the Resources link. The Resource Configuration Page appears. 3. In the location drop-down list, select the region to edit. If you already have created locations for this region you can select the location to edit. Click Select. The Resource Configuration Page appears with the location listed under the section Location Information. 4. Under the Region Information section, click the Edit button to edit the region information. The Region Maintenance Page appears. 5. Edit the fields you wish to update. 6. When you have completed editing the necessary information, click Submit. Editing Location Information for a Region Once you have created a region and a location for the region, you can edit any location to assign approvers, etc. To edit location information for a region: 1. Log into the Resource Scheduler Admin. The Resource Scheduler Admin Home Page appears. 2. Click on the Resources link. The Resource Configuration Page appears. 3. In the location drop-down list, select the region to edit. If you already have created locations for this region you can select the location to edit. Click Select. 68 The Resource Configuration Page appears with the location listed under the section Location Information. 4. Under the Region Information section, click the Edit button to edit the region information. The Region Maintenance Page appears. 5. Edit the fields you wish to update. 6. When you have completed editing the necessary information, click Submit. Location Maintenance Fields Below are a list of fields in the Location Maintenance Page and a definition for each field. Field Description Location Details - Location Details Tab Title Configures the title displayed in the Navigation Tree. The title field is limited to 16 characters. Description Configures the description for the location. The Description field is used when generating reports. The Title field is limited to 16 characters. The Description field is limited to 30 characters. This information is available to end users when they click to view the Location Information Page. Requires Password Configures a password for the Location Admin Module and enables password protection to create or edit any reservation at this location. The password can be up to 30 characters long. If you plan to use the Location Admin Module for local administration, then a password must be entered into this field. If you do not wish to have the location password protected for scheduling, do not check this option. Status Bar Message Configures the pop-up information that appears in the browser status bar when a user moves the mouse over this location in the Navigation Tree. Contact Configures a text description about the contact for the Information location. Common types of information are street address, phone numbers, dress code, directions. This information is available to end users when they click to view the Location Information Page. 69 Time Zone Configures the time zone for that location. Users will be able to click the time zone if you have an internet connection to see the current time at that location. Reservations will be created in the time zone of the location. Weather URL Configures the Weather URL in the Professional and Enterprise editions. The Weather URL allows you to enter or generate a URL for users to get weather information for that location. You can enter a fully qualified URL. You can also generate a URL by clicking on one of the buttons, enter the location’s postal code and click OK. Waiting List Purge Configures when a reservation on a wait list will Days automatically be removed from the wait list. Optional Settings - Location Details Tab Available Hours Configures a text description of the availability of groups and resources at this location. This information is available to end users when they click to view the Location Information Page. After Hours Access Configures a text description of the type of access after normal business hours. Typical descriptions include “Badge-only access”, “Security Code Access”, etc. This information is available to end users when they click to view the Location Information Page. Currency Symbol Configures the display of the symbol for the local currency for the location. This symbol will be used in any reports that for resources that have a cost associated. This is for reporting purposes only. This information is available to end users when they click to view the Location Information Page. Map Image Tag Configures an image of a map of the location using valid HTML "IMG" (image) tag. It is recommended to place the image in the UserData or Images directory where the web application was installed. This image is displayed to end users when they click to view the Location Information Page. For more information on using an image tag, please consult the section “Customizing HTML Tags for UDFs”. Example: <img src='userdata/locmap.jpg'> 70 Floorplan Image Configures an image of the floor plan or image of the location using valid HTML "IMG" (image) tag. It is recommended to place the image in the UserData or Images directory where the web application was installed. This image is displayed to end users when they click to view the Location Information Page. For more information on using an image tag, please consult the section “Customizing HTML Tags for UDFs”. Example: <img src='userdata/locmap.jpg'> Email Settings - Location Details Tab Contact Email Configures the name or email address for the primary contact for the location. A typical contact person would be someone who can provide airport, hotel and driving directions for this location. This information is available to end users when they click to view the Location Information Page. Quick Reserve Tab Quick Reserve Quick Reserve Templates are used to quickly create Templates reservations by populating the reservation title and duration of the reservation. This is useful for organizations that schedule common tasks in a repetitive manner. 71 Location Options Page Fields Below are a list of fields in the Location Options Page and a definition for each field. Field Description Calendar Display Options 24 Hour schedule, or Configures the display of time for the location in either a 24Specific schedule hour format or a specific format. For a 24-hour schedule, users can reserve resources around the clock. Choosing a Specific schedule and configuring the hours of the day allow you to restrict when reservations are made at this location. Schedule Specifies the time display units on the schedules. For Granularity example, if you selected 30 as the granularity, then all of the calendar views would show a time scale in 30-minute increments (i.e. 7:00, 7:30, and 8:00). When you set granularity, the only options for reservation times will be in those increments. If you set the granularity to be 30 minutes, the only options in the Quick Reserve section would be 00 or 30 minutes. Users could not reserve resources at 7:15 or 7:45, for example. Allow Quick Reserve Enables the use of Quick Reserve Templates to quickly Templates create reservations by populating the reservation title and duration of the reservation. This is useful for organizations that schedule common tasks in a repetitive manner. Disable the Disables the Reservation Wizard. The Reservation Wizard is Reservation Wizard an alternative way to schedule resources, instead of using the Quick Reserve feature. Some organizations do not wish their users to be presented with multiple methods for scheduling and therefore disable the Reservation Wizard. Checking this box will hide the Reservation Wizard for all locations using the default settings. Display Required Enables the display of required UDFs in Quick Reserve UDFs in Quick templates. Reserve Prevent editing Disables the modification or deletion of a reservation within Reservations … the time selected. 72 Schedule Booking Options Do not show Users Disables the appearance of the Attendees tab on the reservation detail screen for locations using default settings. Users at this location will not be able to invite guests from the Resource Scheduler list of users if this option is enabled. Do not show Files Disables the file attachment tab on the Reservation Detail page for locations using default settings. If you do not wish to allow users to attach files to reservations, enable this option. Do not show Disables the appearance of the Additional Resource tab in Additional the Reservation Detail screen for locations using default Resources settings. Users will not be able to reserve additional resources with the primary resource. Do not show Disables the appearance of the Reservation Request tab for Reservation locations using default settings. Requests Do not show Quick Disables the appearance of the Quick Reserve Save for Reserve Save locations using default settings. Enable Catering Enables the Catering Module, if installed. If enabled and the Catering Module installed, the Catering Module will appear for locations using the default settings. If the Catering Module is installed but you do not want all locations using the default settings to access the Catering Module, then disable this option. A Catering Tab will appear on the Reservation Detail screen when the Catering Module has been installed and enabled. Search and Recurring Use Saturday/ Determines whether Saturdays or Sundays are used in Sunday searches or recurring reservations. For example, if Saturday is a valid day for reserving resources, you would select Saturday. If neither value is selected, weekend days will be ignored when searching for resource availability or when creating recurring reservations. Allow recurring Determines whether or not you will allow end users to make reservations recurring reservations. If selected, you must also select the maximum number of months a user can make a recurring reservation. This prevents users from creating recurring reservations extending out for years at a time. Apply Limit to non- Configures the recurring schedule date limit to standard Recurring Schedules schedules. That is, no scheduling after a certain date, or a rolling time period. 73 Email Text Email Footer Configures the email footer for any system generated email. Use this space to include your message. This message is for locations using the default settings. Customized footers can be attached by location, see the section regarding Locations for more information. Email Attachment Configures a file attachment to be included with each system generated message. This is useful for distributing forms that must be completed prior to the event date. File attachments can be of any document type, such as Word or PDF. Some firewalls and email applications will block potentially dangerous attachments, so it is not recommended to attach executables or other file types that may be blocked. 74 Groups Groups serve to organize similar resources so that they can be found quickly and easily by your end users. You can define common characteristics for groups using UDFs. You can create a group of resources in Resource Scheduler after you have created and configured one location. It is not recommended to create groups before the location is created and configured. All editions of Resource Scheduler allow you to create an unlimited number of groups and resources. Each page in Resource Scheduler Admin may have as many as three buttons: Submit, Reset, and Return. The Submit button applies the changes made in that page. The Reset button will erase any changes made before pressing the Submit button. Return will prompt you to save any changes made then will bring you to the default view for that page. For example, if you navigate to the Email Settings tab under Options and make changes, you will be prompted to save your changes when you click on the Return button and then the General Options tab will appear. Creating a Group Before you create a group, you may wish to first define Resource Characteristics (UDFs), Request Tabs, and Additional Reservation Information for a group. To define Resource Characteristics (UDFs), please see “User Defined Fields” on page 110. To define Reservation Request Tabs, please see “Reservation Request Tabs” on page 121. To create a group: 1. Log into the Resource Scheduler Admin. The Resource Scheduler Admin Home Page appears. 2. Click on the Resources link. The Resource Configuration Page appears. 3. Click on the link New... next to “Groups and Resources”. The Group Maintenance Page appears. 4. Enter a title, a description, and any appropriate information. The Title and Description fields are required. For detailed information on each field, please view “Group Maintenance Fields”. 5. When you have completed configuring the necessary information, click Submit. The group is created and a Group ID is assigned. 75 Editing a Group You can edit a group to update its information in Resource Scheduler Admin. After a group has been created, new options may be available to edit, including Resource Characteristics, Request Tabs, and Additional Reservation Information. You must first define Resource Characteristics (UDFs), Request Tabs, and Additional Reservation Information for a group in order to edit these settings. To define Resource Characteristics (UDFs), please see “User Defined Fields”. To define Reservation Request Tabs, please see “Reservation Request Tabs”. To edit a group: 1. Log into the Resource Scheduler Admin. The Resource Scheduler Admin Home Page appears. 2. Click on the Resources link. The Resource Configuration Page appears. 3. In the Location, Group and Resource Maintenance drop-down list, select the Location in which the group had been created and click Select. The details of the location appear, including the groups and resources within the location. 4. Click on the group name. The Group Maintenance Page opens to the Details tab. 5. Edit the fields you wish to update in the Details tab, or click on the tab you wish to update. For detailed information on each field, please view “Group Maintenance Fields”. 6. If you update a field in the Details tab then click on another tab, a confirmation appears asking if you wish to save changes. Click OK. 7. When you have completed editing the necessary information, click Submit. The changes are applied and you are returned to the Resource Configuration Page. 76 Deleting a Group You can delete a group and all of its resources in Resource Scheduler Admin. To delete a group: 1. Log into the Resource Scheduler Admin. The Resource Scheduler Admin Home Page appears. 2. Click on the Resources link. The Resource Configuration Page appears. 3. In the Location, Group and Resource Maintenance drop-down list, select the Location in which the group had been created and click Select. The details of the location appear, including the groups and resources within the location. 4. Click on the Delete Group icon, , next to the group. A confirmation dialog appears asking to continue with the deletion. 5. Click OK to continue, or Cancel to cancel the deletion of the group and all of its resources. The group and all of its resources are deleted. 77 Group Maintenance Fields Below are a list of fields in the Group Maintenance Page for each tab and a definition for each field. Note that some of these fields are not available when you create a group. Some fields are only available when you edit a group. Field Description Group Details/Resource Details Tab Title Configures the title displayed in the Navigation Tree. The title field is limited to 16 characters. Description Configures the description for the group. The Description field is used when generating reports. The Description field is limited to 30 characters. This information is available to end users when they click to view the group’s Information Page. Requires Password Configures a password for the group and enables password protection to create or edit any reservation that involves a resource in this group. The password can be up to 30 characters long. Contact Email Configures the name or email address for the primary contact for the group. A typical contact person would be someone who can provide airport, hotel and driving directions for this location. This information is available to end users when they click to view the group’s Information Page. Status Bar Message Configures the pop-up information that appears in the browser status bar when a user moves the mouse over this group in the Navigation Tree. Contact Information Configures a text description about the contact for the group. Common types of information are street address, phone numbers, dress code, directions. This information is available to end users when they click to view the group’s Information Page. Resource Characteristic Templates Select Template Selects the Resource Characteristics Template to associate UDFs with resources in this group. For more information on Resource Characteristics Templates, please see the section “Resource Characteristic Templates”. 78 Everyone Security Group Permissions Administrator Enables any user who belongs to this Security Group to have full administrator rights when scheduling Resources in this group. View Admin UDFs Enables any user who belongs to this Security Group to view User Defined Fields marked as Admin only. Create Reservations Enables all members of this Security Group to create reservations as they normally would in Resource Scheduler. All other Security settings, including passwords and Implied Security settings, still apply for Resources in this group. View on Schedule If unchecked, the schedule for this Group of Resources will not be visible to members of this Security Group. Using this feature allows private resources to be hidden from normal users, but still be available for certain individuals with appropriate rights. If a Resource Group is not viewable, then it will be removed from the Navigation Tree and the Additional Resources tab on the Schedule Detail page. Email Settings Contact Email Configures the email address for the primary contact for this group. This field could also contain a name. A typical contact person would be someone who can provide information about this resource. This information is available to end users when they click to view the resource’s Information Page. Request Tabs tab Request Tabs Selects the Reservation Request Tab to be used for reservations with resources in this group. For more information on Reservation Request Tabs, please see the section “Reservation Request Tabs”. Resource Characteristics Tab Resource Selects Resource Characteristics (UDFs) to associate with Characteristics resources in this group. When you create a group, by default the list of UDFs is populated by UDFs in the Resource Characteristic Template selected. To define Resource Characteristics (UDFs), please see “User Defined Fields” on page 110. Admin Only Enables only a user marked as Administrator to view this UDF. Order Configures the position or sequence of the UDF in the list of UDFs. 79 Required Specifies that the UDF is essential for resources in this group. Reservation Prompts Tab Reservation Prompts Selects Resource Characteristics (UDFs) to associate with resources in this group when a user creates a reservation. Admin Only Enables only a user marked as Administrator to view this UDF in a Reservation Prompt. Order Configures the position or sequence of the UDF in the list of UDFs in a Reservation Prompt. Required Specifies that the UDF is essential for resources in Reservation Prompts for this group. 80 Resources Resources are physical items that your end users will schedule. You create resources within a group. You can define common characteristics of resources with UDFs. You can create an unlimited number of resources. Each page in Resource Scheduler Admin may have as many as three buttons: Submit, Reset, and Return. The Submit button applies the changes made in that page. The Reset button will erase any changes made before pressing the Submit button. Return will prompt you to save any changes made then will bring you to the default view for that page. For example, if you navigate to the Email Settings tab under Options and make changes, you will be prompted to save your changes when you click on the Return button and then the General Options tab will appear. Creating a Resource You create resources in Resource Scheduler Admin. After you have added a group, you can create a resource in that group. All editions of Resource Scheduler allow you to create an unlimited number of groups and resources. To create a resource: 1. Log into the Resource Scheduler Admin. The Resource Scheduler Admin Home Page appears. 2. Click on the Resources link. The Resource Configuration Page appears. 3. Under the group in which you wish to create a new resource, click on the link Click to add resource... The Resource Maintenance Page opens to the Details tab. The link New... next to “Groups and Resources” is used to create a new group. 4. Enter a title, a description, and any appropriate information. The Title and Description fields are required. For detailed information about each field, please see “Resource Maintenance Fields”. 5. When you have completed configuring the necessary information, click Submit. The resource is created and a Resource ID is assigned. 81 Editing a Resource You can edit a resource to update its information in Resource Scheduler Admin. After a resource has been created, additional options may be available to edit, including facilities information, Resource Characteristics, and Reservation Prompts for the resource. You may wish to first define Resource Characteristics (UDFs), Request Tabs, and Additional Reservation Information for a group in order to edit these settings. To define Resource Characteristics (UDFs), please see the section “User Defined Fields”. To define Reservation Request Tabs, please see the section “Reservation Request Tabs”. To edit a resource: 1. Log into the Resource Scheduler Admin. The Resource Scheduler Admin Home Page appears. 2. Click on the Resources link. The Resource Configuration Page appears. 3. Under the group that the resource is in, click on the resource name. The Resource Maintenance Page opens to the Details tab. 4. Edit the fields you wish to update in the Details tab, or click on the tab you wish to update. If you update a field in the Details tab then click on another tab, a confirmation appears asking if you wish to save changes. Click OK. 5. When you have completed editing the necessary information, click Submit. The changes are applied and you are returned to the Resource Configuration Page. 82 Deleting a Resource You can delete a resource in Resource Scheduler Admin. A resource that has been deleted will still exist in the database until you perform a database purge. For more information on performing a database purge, please refer to the section “Purging Historical Records”. To delete a resource: 1. Log into the Resource Scheduler Admin. The Resource Scheduler Admin Home Page appears. 2. Click on the Resources link. The Resource Configuration Page appears. 3. Click on the Delete Resource icon, . A confirmation dialog appears asking to continue with the deletion. 4. Click OK to continue, or Cancel to cancel the deletion of the resource. The resource is deleted. 83 Resource Maintenance Fields Below are a list of fields in the Resource Maintenance Page and a definition for each field. Field Description Resource Details Title Configures the title displayed in the Navigation Tree. The title field is limited to 16 characters. Description Configures the description for the resource. The Description field is used when generating reports. The Description field is limited to 30 characters. This information is available to end users when they click to view the resource’s Information Page. Location/Group Specifies the resource within a specific group within a specific location. Resource Type Specifies the type of resource. Requires Password Configures a password for the resource and enables password protection to create or edit any reservation that involves a resource at this group. The password can be up to 30 characters long. Status Bar Message Configures the pop-up information that appears in the browser status bar when a user moves the mouse over this resource in the Navigation Tree. Additional Configures additional information about this resource. Information Users will see this information when they select the Information Icon to obtain more information about this resource. Contact Information Configures a text description about the contact for the resource. Common types of information are street address, phone numbers, dress code, directions. This information is available to end users when they click to view the resource’s Information Page. Optional Settings Display Order Configures the position of the resource in the Resource Configuration Page. This does not affect the Navigation Tree display order of this resource for end users. To affect the display order of the resource in the Navigation Tree, please see the General Options page. Capacity Configures capacity of the resource, if applicable. This is used as search criteria. Set this field to 0 for items where capacity does not apply. 84 Cost Configures the cost of this resource at the rate specified in the Cost Rate field. This information is used for reporting and analysis. Cost Rate Configures the rate at which the cost is determined. This information is used for reporting and analysis. Max Reserve Configures the maximum duration of a reservation in (Minutes) minutes. The reservation process will enforce this limit if it is set. Leave this at 0 if there is no maximum duration for the reservation. Set this Resource as Hides this resource from users. This is helpful when you do Inactive not wish to delete a resource or if you do not want users to access this resource. Reservations require approval (Enterprise Edition only) Enables an approval process for this resource. If a resource is marked as requiring approval, reservations made by schedule users are marked as pending approval, and the reservation must be approved by the Resource Contact or someone with Administrative rights to this resource. An email is sent to the Resource Contact notifying them that a reservation request has been made, including a link to that reservation. Allow a Wait List Enables a wait list or pending approval process for this for this Resource resource. Users who have requested this resource when the resource is unavailable will be notified when this resource becomes available due to a moved or deleted reservation. Email must be enabled for this option to function. Email Settings Notify when utilized Enables emails to be sent to the contact for this resource when there is any type of reservation activity. If enabled, an email will be sent to the addresses defined in the Contact Email and the Additional Email fields. Contact Email Configures the email address for the primary contact for this resource. This field could also contain a name. A typical contact person would be someone who can provide information about this resource. This information is available to end users when they click to view the resource’s Information Page. Additional Email Configures an additional email address or contact name for this resource. This information is available to end users when they click to view the resource’s Information Page. 85 Facilities Tab - Setup and Cleanup Times Setup Time Configures the number of minutes required before to a reservation for setup. If a Setup Time is configured, no reservation can be made during the Setup Time. To disable the Setup Time, select 0. Cleanup Time Configures the number of minutes required after a reservation for cleanup. If a Cleanup Time is configured, no reservation can be made during the Cleanup Time. To disable the Cleanup Time, select 0. Setup Options Configures the options for setup from Resource Setups that have been defined. Resource Selects Resource Characteristics (UDFs) to associate with Characteristics resources in this resource. Reservation Prompts Tab Reservation Selects Resource Characteristics (UDFs) to associate with Prompts resources in this group when a user creates a reservation. 86 Combinations Combinations are collections of two or more resources that can be reserved individually or together. For example, you can create a combination for a room that can be partitioned. You can create a resource for each section of the room, and then create a combination that contains all sections of the room. When a user reserves the combination, the user can select the sections of the room necessary for the reservation. You can even specify which resources associated with a combination can be reserved individually or must be reserved together. For example, in a room that has 3 partitions, A, B, and C, you can specify that the A and B partitions cannot be scheduled separately from each other. Creating a Combination Before you can create a combination in a group, you must create one or more resources. If you are defining sections of a room as a partition, you must create each section of the room as a resource. For information on creating a resource, please see “Creating a Resource”. You may wish to create a Resource Setup before creating a combination to provide a description of the combination. For more information about a Resource Setup, please see the section “Resource Setup”. To create a combination: 1. Log into the Resource Scheduler Admin. The Resource Scheduler Admin Home Page appears. 2. Click on the Resources link. The Resource Configuration Page appears. 3. Under the group in which you wish to create a new combination, click on the link Click to add combination... The Combination Maintenance Page opens to the Combination Details tab. The link New... next to “Groups and Resources” is used to create a new group. 4. Enter a title, a description, and any appropriate information. The Title and Description fields are required. For detailed information about each field, please see “Combination Maintenance Fields”. 87 5. When you have completed configuring the necessary information, click Submit. The combination is created and a Combination ID is assigned. Editing a Combination Before you edit a combination in a group, you may wish to add or edit any resources or a Resource Setup. For information on creating a resource, please see “Creating a Resource”. For more information about a Resource Setup, please see the section “Resource Setup”. To edit a combination: 1. Log into the Resource Scheduler Admin. The Resource Scheduler Admin Home Page appears. 2. Click on the Resources link. The Resource Configuration Page appears. 3. Under the group that the combination is in, click on the combination name. The Combination Maintenance Page opens to the Details tab. 4. Edit the fields you wish to update in the Combination Details tab, or click on the tab you wish to update. If you update a field in the Combination Details tab then click on another tab, a confirmation appears asking if you wish to save changes. Click OK. 5. When you have completed editing the necessary information, click Submit. The changes are applied and you are returned to the Resource Configuration Page. 88 Deleting a Combination You can delete a combination in Resource Scheduler Admin. A combination that has been deleted will still exist in the database until you perform a database purge. For more information on performing a database purge, please refer to the section “Purging Historical Records”. To delete a combination : 1. Log into the Resource Scheduler Admin. The Resource Scheduler Admin Home Page appears. 2. Click on the Resources link. The Resource Configuration Page appears. 3. Click on the Delete Combination icon, . A confirmation dialog appears asking to continue with the deletion. 4. Click OK to continue, or Cancel to cancel the deletion of the combination. The combination is deleted. 89 Combination Maintenance Fields Below are a list of fields in the Combination Maintenance Page and a definition for each field. Field Description Combination Details Tab Title Configures the title displayed in the Navigation Tree. The title field is limited to 16 characters. Description Configures the description for the group. The Description field is used when generating reports. The Description field is limited to 30 characters. This information is available to end users when they click to view the group’s Information Page. Location/Group Configures the location and the group under which to create the combination. Status Bar Message Configures the pop-up information that appears in the browser status bar when a user moves the mouse over this group in the Navigation Tree. Combination Resources Tab Select Resource Selects the resources to associate with this combination. Schedulable Configures which resources associated with this Individually? combination can be reserved separately from other resources associated with this combination. Details - Combinations Tab Title Configures the title displayed in the Navigation Tree. Capacity Determines the capacity of the combination. Resource Setup - Combinations Tab Select Resource Includes this resource in a combination of resources. Primary Resource The main resource in a combination of resources. Setup and Cleanup Times - Combinations Tab Setup Time Configures the time required prior to the reservation in 0, 30, 60, or 90 minute increments to prepare for the reservation. The combination will not be available during the Setup Time. Cleanup Time Configures the time required prior to the reservation in 0, 30, 60, or 90 minute increments. The combination will not be available during the Cleanup Time. Resource Setup - Combinations Tab 90 Available Configures that the Resource Setup is available. Description Displays a description of the Resource Setup. Capacity Configures the capacity for the Resource Setup. 91 Chapter 6: Creating and Maintaining Users This chapter contains information about creating and maintaining users. This chapter also contains information about creating and configuring Security Groups. Topics include: ♦ Overview ♦ The Default User ♦ Individual User Access ♦ Adding Users ♦ Editing Users ♦ Deleting Users ♦ Security Groups Overview In the Professional and Enterprise editions of Resource Scheduler, you can create and maintain users. You can create and configure users manually or you can allow users to add themselves. The Directory Services Integration Module allows you to automatically create and add user information when a new user logs in for the first time. Enabling individual user access allows end users to personalize certain characteristics of Resource Scheduler as it appears to them. Reservations and assignments can be associated to specific users. Email can be used to notify users and contacts about schedule changes or other information. When disabled, there is no distinction between Resource Scheduler end users: Personal customization and many other options are not available. The Standard Edition of Resource Scheduler does not allow individual users to be defined. All users are treated as the same Default User. The end user’s interface cannot be individually customized. 92 The Default User The Default User settings are used to define how Resource Scheduler appears to the end user in the Standard Edition of Resource Scheduler. For the Professional and Enterprise editions of Resource Scheduler, the Default User settings are used as a template for all new users, when individual user access is enabled. Standard Default User settings are configured when the application is installed. Configuring the Default User You can configure the Default User settings in Resource Scheduler Admin. In the Standard Edition of Resource Scheduler, these settings will affect all users. For the Professional and Enterprise editions of Resource Scheduler, these settings will be used when you create new users. Before you modify the Default User, you must create and configure at least one location and one group. To configure the Default User Settings: 1. Log into the Resource Scheduler Admin. The Resource Scheduler Admin Home Page appears. 2. Click on the Users link. The User Maintenance Page appears. 3. Click on the link Configure default user account. The User Settings Page appears. The User ID is 0 for the Default User. 4. Enter the appropriate information. To view information about the fields used for user settings, please consult the table “User Settings Fields” below. 5. Click Submit to define the Default user. The Default User settings are now defined. 93 Individual User Access The Professional and Enterprise editions of Resource Scheduler allow individual user access. Individual user access allows users to customize Resource Scheduler as it appears to them. Users can receive email notification, assign a reservation to another user, and perform many other functions when individual user access is enabled. If you are using the Directory Services Integration Module, you must enable Individual User Access. Enabling Individual User Access After you have defined the Default User, you can enable individual user access in the Professional and Enterprise editions of Resource Scheduler. Before you enable individual user access, you must create and configure at least one location and one group. To enable individual user access: 1. Log into the Resource Scheduler Admin. The Resource Scheduler Admin Home Page appears. 2. Click on the Options link The General Configuration Page opens to the General Options tab. 3. Click on the Security Controls tab. The Security Controls tab opens. 4. Under the User Security section, check Enable users. 5. Configure the other options as appropriate. 6. When you have completed enabling users and have enabled other settings as appropriate, click Submit. Individual user access is now enabled. 94 User Security Settings Below are a list of fields in the User Security Settings Page and a definition for each field. Field Description Enable users Enables individual user access in the Professional and Enterprise editions. When enabled, end-users have options to customize characteristics of the web application as it appears to them. Reservations and assignments can be associated with specific users, and email can be used to notify users of schedule changes or other information. When disabled, there is no distinction between Resource Scheduler end users: Personal customization and many other options are not available. Use Security Groups Enables administrators to further control access to locations and for Users groups of resources in the Enterprise Edition. Security Groups are only available when users have been enabled in the web application. By default, individual user security is used when users are enabled. Allow Users to This setting allows users control of various cookie settings. specify Cookie Settings Allow users to add Enables users to add themselves to Resource Scheduler in the themselves Professional and Enterprise editions. This eliminates the need for administrators to add users. This is ideal if security is not an issue in your organization. Alternatively, administrators import users from a text file or other source. For more information on importing users, please see the section “Importing Users”. Implied security for Enables only the user who created the reservation, or an reservations administrator, to update or delete the reservation in the Enterprise Edition. Force SSL Logins Enables logins only when accessing Resource Scheduler through Secure Socket Layer (SSL). When enabled, users can only connect from an https URL. 95 Adding Users The Professional and Enterprise editions of Resource Scheduler allow you to add users when individual user access is enabled. Users can customize Resource Scheduler as it appears to them. Users can receive email notification, assign a reservation to another user, and perform many other functions when individual user access is enabled. If you are using the Directory Services Integration Module, you do not need to create individual user accounts. These accounts will be created automatically the first time a user is logged in. Enabling Users to add themselves After you have configured the Default User and have enabled individual user access, you can allow users to add themselves in the Professional and Enterprise editions of Resource Scheduler. To allow users to add themselves: 1. Log into the Resource Scheduler Admin. The Resource Scheduler Admin Home Page appears. 2. Click on the Options link The General Configuration Page opens to the General Options tab. 3. Click on the Security Controls tab. The Security Controls tab opens. 4. Ensure that Enable users is checked. 5. Check Allow users to add themselves. 6. Click Submit. Users will now be able to add themselves. 96 Adding a User Manually You can add users manually in the Professional and Enterprise editions of Resource Scheduler. To add a user manually: 1. Log into the Resource Scheduler Admin. The Resource Scheduler Admin Home Page appears. 2. Click on the Users link The User Maintenance Page appears. 3. Click the link New next to User List. The User Settings Page appears. 4. Enter the appropriate information. For detailed information about each field, please consult “User Settings Fields” below. 5. Click Submit to create the user. The user is created and a User ID is assigned. Adding a User via LDAP You can add users via LDAP in the Enterprise Edition of Resource Scheduler with the Directory Services Integration Module. You can configure information for the user to be populated from LDAP. Please refer to the “Directory Services Integration Module” section for more information. Editing a User After a user has been created, you can edit the user in Resource Scheduler Admin. To edit a user: 1. Log into the Resource Scheduler Admin. The Resource Scheduler Admin Home Page appears. 2. Click on the Users link The User Maintenance Page appears. 3. If the user does not appear in the User Maintenance page, click the button Show Users. The user list can display up to 1000 users. If you have more than 1000 users, you may wish to choose criteria in order to display the user. 4. Click on the name of the user you wish to edit. The User Maintenance Page appears for that user. 97 5. Edit the appropriate information. For detailed information about each field, please consult “User Settings Fields” below. 6. Click Submit to save changes. The changes to the user are saved. Deleting a User You can delete a user in Resource Scheduler Admin. A user that has been deleted will still exist in the database until you perform a database purge. For more information on performing a database purge, please refer to the section “Purging Historical Records”. To delete a user: 1. Log into the Resource Scheduler Admin. The Resource Scheduler Admin Home Page appears. 2. Click on the Users link The User Maintenance Page appears. 3. If the user does not appear in the User Maintenance page, click the button Show Users. The user list can display up to 1000 users. If you have more than 1000 users, you may wish to choose criteria in order to display the user. 4. Click on the Delete User icon, , next to the user. A confirmation dialog appears asking to continue with the deletion. 5. Click OK to continue, or Cancel to cancel the deletion of the user. The user is deleted. Security Groups The Enterprise Edition allows you to create Security Groups. Security Groups allow you to control users’ access to locations, groups, and resources when individual user access is enabled. When a user is a member of a Security Group, the user inherits the permissions of that group. You can configure the Security Group to have rights to administrator, view Admin UDFs, create reservations, and prohibit the members from viewing a schedule for resources in that group. An Everyone Security Group is created by default in the application. The permissions assigned in the Everyone group apply to all users. It is recommended that you set the lowest level of permissions to the Everyone 98 Security Group. That is, you may wish all users to create reservations and view schedules, but not allow all users to administer resources or to view Admin UDFs. You can modify the Everyone Security Group at any time. After you have created locations, groups and resources and you have enabled individual user access, you can define customized Security Groups. Configuring the Everyone Security Group You can configure the Everyone Security Group at any time in the Resource Scheduler Admin. To configure the Everyone Security Group: 1. Log into the Resource Scheduler Admin. The Resource Scheduler Admin Home Page appears. 2. Click on the Users link. The User Maintenance Page appears. 3. In the Security Group Name section, click Everyone. The Everyone Security Group Maintenance Page appears. 4. Select the permissions for each group of resources to grant to all users. 5. When you have completed, click Submit. The User Maintenance Page appears. Creating a Security Group You can create a Security Group and add or remove members to a Security Group in Resource Scheduler Admin. To create a Security Group: 1. Log into the Resource Scheduler Admin. The Resource Scheduler Admin Home Page appears. 2. Click on the Users link. The User Maintenance Page appears. 3. In the Security Groups section, click New.... The Security Group Maintenance Page appears. 4. In the Description field, enter a description for the Security Group. 5. Select the permissions for each group you would like to grant to all users that belong to this group. 6. When you have completed, click Submit. The User Maintenance Page appears. 99 Security Group Page Fields Below are a list of fields in the Security Group Maintenance Page and a definition for each field. Field Description Administrator Enables all members of the Security Group to have full Administrator rights to all of the resources in the group specified when they schedule resources in this group. View Admin UDFs Enables all members of the Security Group to view User Defined Fields marked as Admin only. Create Reservations Enables all members of this Security Group to create reservations. All other Security settings, including passwords and Implied Security settings, are still in effect for resources in this Group. View on Schedule Enables all members of this Security Group to view the schedule for this group of resources. This allows private resources to be hidden from users. If a user does not have access to view a group of resources on the schedule, the group of resources will be removed from the Navigation Tree and from the Additional Resources tab on the Schedule Detail page. Adding and Removing members You can assign a user to one or more Security Groups to inherit all of the rights for each group assigned. You can also remove the user from one or more Security Groups. To add or remove members to a Security Group: 1. Log into the Resource Scheduler Admin. The Resource Scheduler Admin Home Page appears. 2. Click on the Users link. The User Maintenance Page appears. 3. To assign the Default User to a Security Group, click on the link Click to change default user settings.... To assign an individual user to a Security Group, click on the button Show Users then click on the name of the user you would like to modify. The User Settings Page appears. 4. In the Security Options section, click on the link Select next to Group Based. The Assign Security Groups Page appears. 100 5. Assign the user to a Security Group by selecting the Group from the Available list on the left and clicking on Select. Repeat this step to assign the user to additional Security Groups. 6. You can remove the user from a Security Group by selecting the Group from the “Selected” list on the right and clicking on Remove. Repeat this step to remove the user from additional Security Groups. 7. When completed, click Submit. The User Settings Page appears. Editing a Security Group You can edit a Security Group in Resource Scheduler Admin. To edit a Security Group: 1. Log into the Resource Scheduler Admin. The Resource Scheduler Admin Home Page appears. 2. Click on the Users link. The User Maintenance Page appears. 3. In the Security Group Name section, click on the Security Group name to edit. The Security Group Maintenance Page appears. Members who belong to this Security Group are listed on the left side of the page. You can edit a member from this list by clicking on the member’s name and selecting View User Info. 4. You can change the description of the Security Group in the Description field. 5. Select the permissions for each group you would like to grant to all users that belong to this group 6. When you have completed, click Submit. The User Maintenance Page appears. Deleting a Security Group You can delete a Security Group in Resource Scheduler Admin. To delete a Security Group: 1. Log into the Resource Scheduler Admin. The Resource Scheduler Admin Home Page appears. 101 2. Click on the Users link. The User Maintenance Page appears. 3. Click on the delete icon, , next to the name of the Security Group. A confirmation dialog appears. 4. Click OK to delete the Security Group or click Cancel to abort the deletion. The User Maintenance Page appears. 102 User Settings Fields Below are a list of fields in the User Maintenance Page and a definition for each field. Field Description Personal Information Name Defines the user’s name. Email Defines the user’s email address. Password Defines the user’s password. Use Login Name Specifies whether to use the Login Name instead of the instead of E-Mail to email address to login. Do not enable this if you are using Login the Directory Services Integration Module with LDAP or NTLM enabled. Login Name Defines the Login Name to be used in place of the user’s email address when logging in to Resource Scheduler. Phone & (ext) Defines the user’s phone number. If LDAP is enabled, this information will be obtained from the LDAP server. Department Defines the department name, workgroup name, or business unit of the user. The title of this field can be changed in Options. This field can not be changed by the user. Account Code Defines billing information for the user. The title of the field can be changed in Options. This field can not be changed by the user. Schedule Accessibility Single Resource Restricts the user to view only a single location, group, or View resource. Set to “None” to allow the user to see all locations, groups, and resources. Update User Enables the user to modify their personal settings. This does Information not allow users to modify their security rights. Limited by Time If you have time fence limits set up, all users, including Fence administrators, will not be able to schedule beyond that time fence date. If you want a user to book past that date, this box should be checked. Generate Reports Enables the user to run reports in the application. You should restrict the number of users who are allowed to generate reports. Users should be instructed on how to generate reports before given this option. Deactivated User Deactivates the user without deleting the user. 103 Security Options Administrator Enables the user to update or delete any reservation, including password-protected items. This option is similar to Administrative Over-ride feature in the Options page View Admin UDFs Enables the user to view User Defined Fields used for Resource Characteristics and Reservation Details marked for administrators only. Check this box if you have resource information that should not be made public, or if you want to hide a field in the reservation form. Checking this box will allow this user to be able to see these hidden fields. Create Enables the user to create reservations. When the box is not Reservations checked, the Quick Reserve section of the Schedule display is removed for this user. Group Based Displays the Security Groups to which the user belongs. Click on the Select link to view all the Security Groups and modify the groups to which the user belongs. These Security Groups only apply if Group Based security is marked as active. Application Options Language Specifies the default interface langue for the user in the (Calendar) Enterprise Edition. Country (Holidays) Specifies the holidays to display in the user’s schedule in the Enterprise Edition. Refresh Specifies the time interval in minutes in which the schedule display will automatically refresh for the user. Browsers do not automatically check the database to see if there is new schedule information available. If zero, the user’s browser will not automatically refresh. Allow Assignments Enables other users to add this user to a reservation. If a user is assigned to a reservation, the user will be notified about any changes or deletion of that reservation. Info as Popup Enables information to appear in a popup window outside the browser when the user clicks on an information icon. Use Cookies for Enables cookies to store password information for secure Passwords reservations, locations, groups or resources so you do not have to re-enter them. In organizations that do not allow browsers to use cookies, this may not be available to you. 104 Edit Notification Enables the user to edit the system generated email before it Emails is sent. The message is generated when the Approver approves or denies a request for a resource. Editing the notification email before it is sent allows the user to add additional information or include other addresses in the message. Receive Reminders Enables the user to receive reminders. If a user does not wish to receive Reminder Messages, then they can uncheck the box and reminder messages will not be generated. Show My Favorites Enables My Favorites to appear for the user on the navigation tree. Show My Enables recent reservations to appear for the user on the Reservations navigation tree. Show My Enables reservations assigned to the user to appear on the Assignments navigation tree. Default Location Specifies the default location for the user. Default Group Specifies the default group for the user. When the user click on the schedule without specifying any criteria, the group specified here will appear. Default View Specifies the view to appear by default. Choices are Day, Week, Month. Time Format Specifies the default time format. Choices are 12 Hour or 24 Hour. 105 Chapter 7: Resource Scheduler Customization This chapter contains concepts and information you need to customize Resource Scheduler. Topics include: ♦ Overview ♦ Resource Types ♦ User Defined Field Types ♦ User Defined Fields ♦ Resource Characteristic Templates ♦ Resource Setup ♦ Reservation Request Tabs ♦ Quick Reserve Templates Overview The Configurations Page is where you can customize the application by creating Resource Types, User Defined Fields, Quick Reserve Templates and Tabs. User Defined Fields describe characteristics of resources within a group or allow reservation information to be collected when a user creates a reservation. Reservation Request Tabs are a collection of User Defined Fields grouped together for a user to fill out when the user creates a reservation. Reservation Request Tabs and User Defined Fields are important tools for customizing Resource Scheduler to fit the needs of your organization. After changes are made in the administrative settings, end users must close then restart their browser for the changes to appear. All browser windows must be closed in order to clear out the old pages, including browser windows not running Resource Scheduler. 106 Resource Types A Resource Types is a label to help classify resources, such as “Computer Equipment” or “Conference Room”. This is helpful when using the Reservation Wizard to find available resources. When you create a new Resource Type, you must assign an icon with the Resource Type. The icon must be a 16x16 file in GIF format. Resource Scheduler provides icons in the images directory, typically C:\inetpub\wwwroot\Rscheduler\images. If you do not wish to have an icon associated with the Resource Type, you must enter in clr.gif in the Icon File field. Creating a Resource Type You can create a Resource Type in Resource Scheduler Admin. To add a Resource Type: 1. Log into the Resource Scheduler Admin. The Resource Scheduler Admin Home Page appears. 2. Click on the Configurations link. The Resource Configuration Page appears. 3. Click on the link Click to add a new resource type… The Resource Type Maintenance Page appears. 4. In the Description field, enter a description. For example, “Computer Equipment”. 5. In the Icon File field, enter the name of the icon file found in the images directory, or enter clr.gif for no icon to appear. For example, ico_mycomp.gif. The icon must exist in the images directory. Only enter the filename of the icon and not a physical or virtual path to the icon. The filename of an image should not contain a space. If the filename must contain a space, then replace the space in the filename with %20. %20 resolves to a space in HTML. 6. When you have completed configuring the necessary information, click Submit. The resource type is created and a Resource Type ID is assigned. 107 Editing a Resource Type You can edit a Resource Type in Resource Scheduler Admin. To edit a Resource Type: 1. Log into the Resource Scheduler Admin. The Resource Scheduler Admin Home Page appears. 2. Click on the Configurations link. The Resource Configuration Page appears. 3. In the drop-down menu under Resource Types, select the resource type to edit, and then click Edit. The Resource Type Maintenance Page appears. 4. Edit the Description field or the Icon File field. Remember that the icon must exist in the images directory. Only enter the filename of the icon and not a physical or virtual path to the icon, or enter clr.gif for no icon to appear. For example, ico_mycomp.gif. 5. When you have completed configuring the necessary information, click Submit. The Resource Type is updated with the changes. Deleting a Resource Type You can delete a Resource Type in Resource Scheduler Admin. To delete a Resource Type: 1. Log into the Resource Scheduler Admin. The Resource Scheduler Admin Home Page appears. 2. Click on the Resources link. The Resource Configuration Page appears 3. In the drop-down menu under Resource Types, select the Resource Type to delete, and then click Delete. A Confirmation dialog appears asking if you wish to continue with the deletion of the Resource Type. 4. Click OK to delete the Resource Type, or click Cancel to cancel the deletion. The Resource Type is deleted. 108 User Defined Field Types A User Defined Field Type is a label to help classify the User Defined Fields (UDFs) that you create, such as “Computer Equipment”. You should create a UDF Type before creating a User Define Field as you will need to assign a UDF Type to a UDF. When you create a new UDF Type, you must assign an icon with the UDF Type. The icon must be a 16x16 file in GIF format. Resource Scheduler provides icons in the images directory, typically C:\inetpub\wwwroot\Rscheduler\images. If you do not wish to have an icon associated with the UDF Type, you must enter in clr.gif in the Icon File field. Creating a User Defined Field Type You can create User Defined Field Type in Resource Scheduler Admin. To create a User Define Field Type: 1. Log into the Resource Scheduler Admin. The Resource Scheduler Admin Home Page appears. 2. Click on the Configurations link. The Resource Configuration Page appears. 3. Click on the link Click to add a new UDF Type… The UDF Type Maintenance Page appears. 4. In the Description field, enter a description. For example, “Computer Equipment”. 5. In the Icon File field, enter the name of the icon file found in the images directory, or enter clr.gif for no icon to appear. For example, ico_mycomp.gif. The icon must exist in the images directory. Only enter the filename of the icon and not a physical or virtual path to the icon. The filename of an image should not contain a space. If the filename must contain a space, then replace the space in the filename with %20. %20 resolves to a space in HTML. 6. When you have completed configuring the necessary information, click Submit. The UDF Type is created and a UDF Type ID is assigned. 109 Editing a User Defined Field Type You can edit User Defined Field Type in Resource Scheduler Admin. To edit a User Defined Field Type: 1. Log into the Resource Scheduler Admin. The Resource Scheduler Admin Home Page appears. 2. Click on the Configurations link. The Resource Configuration Page appears. 3. In the drop-down menu under User Defined Field Types, select the UDF Type to edit, and then click Edit. The UDF Type Maintenance Page appears. 4. Edit the Description field or the Icon File field. Remember that the icon must exist in the images directory, or enter clr.gif for no icon to appear. Only enter the filename of the icon and not a physical or virtual path to the icon. For example, ico_mycomp.gif. 5. When you have completed configuring the necessary information, click Submit. The UDF Type is updated with the changes. Deleting a User Defined Field Type You can delete User Defined Field Type in Resource Scheduler Admin. To delete a User Defined Field Type: 1. Log into the Resource Scheduler Admin. The Resource Scheduler Admin Home Page appears. 2. Click on the Resources link. The Resource Configuration Page appears 3. In the drop-down menu under User Defined Field Types, select the UDF Type to delete, and then click Delete. A Confirmation dialog appears asking if you wish to continue with the deletion of the UDF Type. 4. Click OK to delete the UDF Type, or click Cancel to cancel the deletion. The UDF Type is deleted. User Defined Fields User Defined Fields are characteristics of a resource that appear when creating or viewing information about a group or a resource. You can define the type of 110 a User Defined Field as text field, long text field, checkbox, choice, display only, ODBC List, and ODBC Validated. You may also specify a Default SQL Query for each UDF. You can also define the Text/HTML to display and popup messages for new reservations. A User Defined Field is also known as a Resource Characteristic. For example, you may wish to create a UDF called “Whiteboard Type” as a Choice type with the choices “None;Standard;Printable” for the UDF Type titled “Conference Room”. When you create a new conference room as a “Conference Room” UDF Type, you can specify “None, Standard, or Printable” for the “Whiteboard Type” under Resource Characteristics. When a user views detailed information about that conference room, the UDF “Whiteboard Type” will indicate the type of whiteboard: None, Standard, or Printable. User Defined Fields are grouped together by type, such as A/V Equipment, only for displaying an icon next to the User Defined Fields. Tabs and Templates can contain User Defined Fields from multiple UDF types and are used for creating pre-defined characteristics when adding multiple resources to a group. Creating a User Defined Field Before you define a UDF, you must first define a UDF Type. Common User Defined Fields are pre-defined in the application. You can add, edit, or delete UDFs to fit your company’s needs. If you have a limited number of resources, you may wish to delete unused UDFs in order to simplify some of the Group and Resource Configuration pages, as there are fewer options from which to select. To define a User Defined Field: 1. Log into the Resource Scheduler Admin. The Resource Scheduler Admin Home Page appears. 2. Click on the Configurations link. The Resource Configuration Page appears. 3. Create or configure a UDF Type, if necessary. For more information on creating or configuring a UDF Type, please refer to the section “User Defined Field Types”. 4. Click on the link Click to add a new user defined field... The UDF Maintenance Page appears. 5. Enter a description in the Description field. 6. Select the UDF Type in the Type field. 7. Enter a Default Query SQL, if necessary. 8. Select a UDF Field Type, and configure if necessary. For information about each UDF Field Type, please refer to “UDF Field Types” below. 111 9. When you have completed creating the User Defined Field, click Submit. Editing a User Defined Field After you have created a User Defined Field, you can edit it. You cannot change the UDF Field Type by editing. To change the UDF Field Type you must delete the User Defined Field and create a new one. To edit a User Defined Field: 1. Log into the Resource Scheduler Admin. The Resource Scheduler Admin Home Page appears. 2. Click on the Configurations link. The Resource Configuration Page appears. 3. Create or configure a UDF Type, if necessary. For more information on creating or configuring a UDF Type, please refer to the section “User Defined Field Types”. 4. In the section User Defined Fields, select the User Defined Field to edit. 5. Click on the Edit button. The UDF Maintenance Page appears. 6. Change description in the Description field. 7. Change the type in the Type field. 8. Change the Default Query SQL, if necessary. 9. When you have completed editing the User Defined Field, click Submit. The Configurations Page appears. Deleting a User Defined Field You can delete a User Defined Field Type. To delete a User Defined Field: 1. Log into the Resource Scheduler Admin. The Resource Scheduler Admin Home Page appears. 2. Click on the Configurations link. The Resource Configuration Page appears. 3. In the section User Defined Fields, select the User Defined Field to delete. 4. Click on the Delete button. A confirmation dialog appears. 112 5. Click OK to delete the User Defined Field, or click Cancel to abort the deletion of the User Defined Field. UDF Field Types Below are descriptions for each UDF Field Type. UDF Field Type Description Text Select Text type to enter a single line of text when you define the resource characteristics. Long Text Select Long Text type to allow multiple lines of text when you define the resource characteristics. Checkbox Select Checkbox when you desire a “Yes/No” or “True/False” response when you define the resource characteristics. Choice Select Choice when you wish to display a drop-down selection list to restrict the choices to what you have defined here. Separate each item in the list with a semi-colon, “;”. For example, select Choice for “Whiteboard Type” and set the list values as: None;Standard;Printable Display only Select Display Only when you wish to define information to display for each resource without having to enter the information for every resource. You may enter HTML tags in this field. An example would be a contact email address or a link to a floor map. When used at the reservation detail level, the display only field is most commonly used to display an image or hyperlink. A Display Only field must be used in these instances, as a normal text field will only prompt a user for information and does not allow the input of text or HTML by the administrator ODBC List Select ODBC List to create a list of items generated from a SQL query. For example: Default Query SQL: SELECT user_email FROM tbl_user WHERE user_id='#USER#' Enter connection string: Provider=SQLOLEDB; Data Source=RSSERVER; Initial Catalog=RedESoft; User ID=RedESoft; Password=1234567 Enter SQL statement: SELECT '<option value="' + user_name + '">' + user_name + '</option>' FROM tbl_user 113 ODBC Validated Select ODBC Validated to create a drop-down list of items generated from a SQL query that will be validated against the results of the ODBC query specified. For example: Default Query SQL: SELECT user_email FROM tbl_user WHERE user_id='#USER#' Enter connection string: Provider=SQLOLEDB; Data Source=RSSERVER; Initial Catalog=RedESoft; User ID=RedESoft; Password=1234567 Enter SQL for Validation: select user_name from tbl_user where user_name = %1 Enter SQL statement: SELECT user_name as 'Name', user_email as 'Email Address', user_phone as 'Phone Number' FROM tbl_user WHERE user_name LIKE '%1' 114 Resource Characteristic Templates Resource Characteristic Templates are a collection of User Defined Fields (UDFs) used for resource characteristics. Templates are an easy way to group together specific User Defined Fields so that you can quickly assign these characteristics to a new group of resources. Templates are especially useful when you want resource characteristics to be consistent across multiple groups. Templates are only used for the creation of resource characteristics and should not contain UDFs intended for use at the reservation detail level. There is no connection between Templates and User Defined Field types, other than a template is a collection of User Defined Fields. You can select a template when you create a new group: All the UDFs in the template will automatically be added as resource characteristics to the new group. Templates can contain User Defined Fields from several UDF Types. Creating a Resource Characteristic Template You can create a template in Resource Scheduler Admin. Before you create a template, you may wish to add or configure User Defined Field Types or User Defined Fields. For more information, please see “User Defined Field Types” or “User Defined Fields”. To create a Resource Characteristic template: 1. Log into the Resource Scheduler Admin. The Resource Scheduler Admin Home Page appears. 2. Click on the Configurations link. The Configuration Page appears. 3. Click on the link Click to add a new template... The Template Maintenance Page appears. 4. Enter a name for the template in the field Enter new template name. 5. Click Submit. The Configurations Page appears. 6. To configure the new template, follow the steps listed in “Editing a template”. 115 Associating a Resource Characteristic with a Group You can associate a Resource Characteristic with a group. All resources within this group will contain this Resource Characteristic. To associate a Resource Characteristic with a group: 1. Log into the Resource Scheduler Admin. The Resource Scheduler Admin Home Page appears. 2. Click on the Resources link. The Resource Configuration Page appears. 3. In the Location, Group and Resource Maintenance drop-down list, select the Location in which the group had been created and click Select. The details of the location appear, including the groups and resources within the location. 4. Click on the group name. The Group Maintenance Page opens to the Details tab 5. Click on the Resource Characteristics tab. The Group Maintenance - Resource Characteristics page appears. 6. Click the Select button. The Group Maintenance - Resource Characteristics Page displays the available UDFs in the Available list. 7. Select the UDFs to associate from the Available list and click Select. The selected UDF moves from the Available column to the Selected column. 8. To remove a UDF, select the UDF from the Selected list and click Remove. 9. When you have completed, click on the Submit button. The Group Maintenance Page opens to the Resource Characteristics tab. 10. Click Submit to save your changes. 116 Editing and applying a Resource Characteristic Template You can edit a template in Resource Scheduler Admin. You can also apply a template to an existing location, group, or resource. Before you edit a template or apply a template, you may wish to add or configure User Defined Field Types or User Defined Fields. For more information, please see User Defined Field Types or User Defined Fields. Editing a Resource Characteristic Template To edit a template: 1. Log into the Resource Scheduler Admin. The Resource Scheduler Admin Home Page appears. 2. Click on the Configurations link. The Configuration Page appears. 3. Add or configure User Defined Field Types or User Defined Fields, if necessary. For more information, please see User Defined Field Types or User Defined Fields. 4. Choose the template to edit in the drop-down list. 5. Click Edit. The Template Maintenance Page appears. 6. To add a UDF to the template, select the UDF in the Available column and choose Select. 7. To remove a UDF to the template, select the UDF in the Selected column and choose Remove. 8. When complete, click the Submit button. Applying a Resource Characteristic Template To apply a template to a location, a group or a resource: 1. Log into the Resource Scheduler Admin. The Resource Scheduler Admin Home Page appears. 2. Click on the Configurations link. The Configuration Page appears. 117 3. Add or configure User Defined Field Types or User Defined Fields, if necessary. For more information, please see User Defined Field Types or User Defined Fields. 4. Choose the template to edit in the drop-down list. 5. Click Edit. The Template Maintenance Page appears. 6. To add a UDF to the template, if necessary, select the UDF in the Available column and choose Select. 7. To remove a UDF to the template, if necessary, select the UDF in the “Selected” column and choose Remove. 8. When complete, click the Apply Template button. The Apply a Template Page appears. 9. Select the group or groups to which to apply the template and click Select. 10. Click Submit. The Configurations Page appears. Deleting a Resource Characteristic Template You can delete a Resource Characteristic template in Resource Scheduler Admin. Deleting a template has no affect on the User Defined Fields associated with it or the Groups to which it had been previously applied. To delete a template: 1. Log into the Resource Scheduler Admin. The Resource Scheduler Admin Home Page appears. 2. Click on the Configurations link. The Configuration Page appears. 3. Choose the template to delete in the drop-down list. 4. Click Delete. A confirmation dialog appears asking if you wish to delete the template. 5. Click OK to delete the template, or click Cancel to abort the deletion of the template. The template is deleted and the Configuration Page appears 118 Resource Setup The Resource Setup in the Configurations Page allows you to create descriptions of a set of resources or combinations that will appear in the Facilities tab of the Resource Configuration page or in the Combination Tab for combinations. For example, you may wish to create a Resource Setup for U-shaped rooms or for rooms that resemble a theatre. When you create or edit a resource or a combination, this description will appear in the Facilities tab or the Combination tab where you can select the style of the resource its capacity, if applicable, and whether to enforce the limit. You can associate a 16x16 image in GIF format to that Resource Setup type. Creating a Resource Setup You can create a Resource Setup in Resource Scheduler Admin. To create a Resource Setup: 1. Log into the Resource Scheduler Admin. The Resource Scheduler Admin Home Page appears. 2. Click on the Configurations link. The Configuration Page appears. 3. Click on the link Click to add a new resource setup... The Resource Setup Maintenance Page appears. 4. In the description field, enter a description. 5. In the Image Path field, enter the filename of the image to use from the images directory, if desired. 6. Click Submit. The Resource Setup is created and the Configuration Page appears. 119 Editing a Resource Setup You can edit a Resource Setup in Resource Scheduler Admin. To edit a Resource Setup: 1. Log into the Resource Scheduler Admin. The Resource Scheduler Admin Home Page appears. 2. Click on the Configurations link. The Configuration Page appears. 3. Choose the Resource Setup to edit in the drop-down list. 4. Click Edit. The Resource Setup Maintenance Page appears. 5. Change the description in the Description field, or change the image associated with the Resource Setup in the Image Path field. 6. When completed, click Submit. The changes are applied and the Configurations Page appears. Deleting a Resource Setup You can delete a Resource Setup in Resource Scheduler Admin. To delete a Resource Setup: 1. Log into the Resource Scheduler Admin. The Resource Scheduler Admin Home Page appears. 2. Click on the Configurations link. The Configuration Page appears. 3. Choose the Resource Setup to edit in the drop-down list. 4. Click Delete. A confirmation dialog appears. 5. Click OK to delete the Resource Setup, or click Cancel to cancel the deletion. The Resource Setup is deleted and the Configurations Page appears. 120 Reservation Request Tabs Reservation Request Tabs allow you to gather information from users when they make a reservation. When a user makes a reservation with a resource within a group that contains Reservation Request Tabs, an additional tab will appear with UDFs that you have defined, such as items, options, and notes for the resource. Request Tabs use the same User Defined Fields as used with Resource Characteristics and Reservation Information. Reservation Request Tabs work well for initiating workflow or for notifying an individual or a department that a request that has been made for a reservation. The notification will include all of the items requested. For example, you may wish to create an “A/V Equipment” tab that contains checkboxes for UDFs such as wireless microphone, VHS player, DVD player, Projection screen, and text fields for Video Equipment Notes. When a user makes a reservation that includes a resource in a group with an “A/V Equipment” tab associated, the user can request items listed and provide additional notes to the contact of the Request Tab. If an item is requested, an email will be sent to the contact of the Request Tab with the details of the request to the contact’s email address. You can select whether the user must complete a UDF within the Reservation Request Tab. You can associate an icon to the Request Tab. You can provide an additional contact that will also be notified by email when an item is requested. You can provide additional information in a header or footer. The text within the header or footer can be either text or HTML. Users can generate reports for all the requests made for a specific Request Tab. 121 Creating a Reservation Request Tab You can create and configure a Reservation Request Tab in Resource Scheduler Admin. Before creating and configuring a Reservation Request Tab, you should create or configure User Defined Field Types or User Defined Fields. After creating and configuring a Reservation Request Tab, you can add the Reservation Request Tab to all the resources within a group. To create a Reservation Request Tab: 1. Log into the Resource Scheduler Admin. The Resource Scheduler Admin Home Page appears. 2. Click on the Configurations link. The Configuration Page appears. 3. Add or configure User Defined Field Types or User Defined Fields, if necessary. For more information, please see User Defined Field Types or User Defined Fields. 4. Under Reservation Request Tabs, click on the link Click to add a new request tab... The Request Tab Maintenance Page appears. 5. Enter a title in the Title field. The Title can have a maximum of 20 characters. 6. Enter a description in the Description field. 7. Enter the name of an image file in the Icon File field. If you do not wish to have an icon associated with the Request Tab, you must enter in clr.gif in the Icon File field. It is highly recommended to have an image associated with a Request Tab. 8. Enter the email of the contact in the Contact Email field. 9. If you would like the contact to be emailed when the Resource Request Tab is used, enable the checkbox Notify when utilized. 10. Enter the email of an additional contact in the Additional Email field. 11. Enter the header for the page in the Page Header field. 12. Enter the footer for the page in the Page Footer field. 13. Click Submit if you do not wish to add any UDFs to the Request Tab, or click Select next to Request Tab Options to add UDFs to the Request Tab.. If you pressed Submit, the Configurations Page appears. If you pressed Select, the Request Tab Maintenance - Request Fields Page appears 14. To add a UDF to the Request Tab, select the UDF in the Available column and choose Select. 122 15. To remove a UDF to the Request Tab, select the UDF in the Selected column and choose Remove. 16. When complete, click the Submit button. The Request Tab Maintenance Page appears. 17. Each UDF selected is listed under Request Tab Options. 18. Select Admin Only if you want that UDF to be available to users with the ability to view Admin UDFs. 19. Change the sorting or display order of the UDF in the Order field, if desired. A lower number will display the UDF in a higher position than a higher number. 20. If this UDF is required, check the “Required” box. 21. When you have completed making the changes, click the Submit button. The Configurations Page appears. 22. Associate the Reservation Request Tab to a group. Associating a Reservation Request Tab with a Group In order for a Request Tab to appear for reservations with resources in a group, you must associate a Reservation Request Tab with a group in Resource Scheduler Admin. To associate a Reservation Request Tab: 1. Log into the Resource Scheduler Admin. The Resource Scheduler Admin Home Page appears. 2. Click on the Resources link. The Resource Configuration Page appears. 3. In the Location, Group and Resource Maintenance drop-down list, select the Location in which the group had been created and click Select. The details of the location appear, including the groups and resources within the location. 4. Click on the group name. The Group Maintenance Page opens to the Details tab. 5. Click on Requests Tab. The Requests Tab opens. 6. Click on the Select button next to Request Tabs. The Group Maintenance - Select Request Tabs Page appears. 7. Select the Request Tab from the Available list and click Select. The selected Request Tab moves from the Available list to the Selected list. 123 8. To remove a Request Tab, select the Request Tab from the Selected list and click Remove. 9. When you have completed, click on the Submit button. The Group Maintenance Page opens to the Request Tab. 10. Click Submit to save your changes. Editing a Reservation Request Tab You can edit a Reservation Request Tab in Resource Scheduler Admin. To edit a Reservation Request Tab: 1. Log into the Resource Scheduler Admin. The Resource Scheduler Admin Home Page appears. 2. Click on the Configurations link. The Configuration Page appears. 3. Add or configure User Defined Field Types or User Defined Fields, if necessary. For more information, please see User Defined Field Types or User Defined Fields. 4. Under Reservation Request Tabs, select the Reservation Request Tab to edit from the drop-down list and click Edit. The Request Tab Maintenance Page appears. 5. Edit the fields necessary. 6. Click the Select button to edit the Request Tab Options, or click Submit if you have completed making the necessary changes. 7. To add a UDF to the Request Tab, select the UDF in the Available column and choose Select. 8. To remove a UDF to the Request Tab, select the UDF in the Selected column and choose Remove. 9. When complete, click the Submit button. The Request Tab Maintenance Page appears. 10. Click the Submit button again. The Configurations Page appears. Deleting a Reservation Request Tab You can delete a Reservation Request Tab in Resource Scheduler Admin. To delete a Reservation Request Tab: 1. Log into the Resource Scheduler Admin. The Resource Scheduler Admin Home Page appears. 124 2. Click on the Configurations link. The Configuration Page appears. 3. Under Reservation Request Tabs, select the Reservation Request Tab to delete from the drop-down list. 4. Click Delete. A confirmation dialog appears asking if you wish to delete the Reservation Request Tab. 5. Click OK to delete the Reservation Request Tab, or click Cancel to abort the deletion of the Reservation Request Tab. The Reservation Request Tab is deleted and the Configuration Page appears. 125 Quick Reserve Templates You can manage Quick Reserve Templates in the Location Maintenance pages of Resource Scheduler Admin. Quick Reserve Templates allow standard types of reservations to be entered with fewer mouse clicks. These templates are most commonly used by organizations that schedule people or resources for appointments that require a standard amount of time, such as a haircut or massage. Quick Reserve Templates are displayed in the Quick Reserve section of Resource Scheduler and will automatically fill in the reservation description and the appropriate end time for the start time requested. The Quick Reserve Templates are unique by location. Creating a Quick Reserve Template You can create a Quick Reserve Template in Resource Scheduler Admin. To create a Quick Reserve Template: 1. Log into the Resource Scheduler Admin. The Resource Scheduler Admin Home Page appears. 2. Click on the Resources link. The Resource Configuration Page appears. 3. In the location drop-down list, select the location to edit and click Select. The Resource Configuration Page appears with the location listed under the section Location Information. 4. Under the Location Information section, click the Edit button to edit this location. The Location Maintenance Page opens to the Location Details tab. 5. Click on the Quick Reserve tab. The Quick Reserve tab appears. 6. Click on the link New... Fields appear to configure the new Quick Reserve Template. 7. Enter a description in the Description field. 8. In the Duration drop-down menus, select hours and minutes of the duration, or choose All Day for the duration to be all day. 9. Click Submit when you are done. The Quick Reserve Template is created and the Quick Reserve tab appears. 126 Editing a Quick Reserve Template You can edit a Quick Reserve Template in Resource Scheduler Admin. To edit a Quick Reserve Template: 1. Log into the Resource Scheduler Admin. The Resource Scheduler Admin Home Page appears. 2. Click on the Resources link. The Resource Configuration Page appears. 3. In the location drop-down list, select the location to edit and click Select. The Resource Configuration Page appears with the location listed under the section Location Information. 4. Under the Location Information section, click the Edit button to edit this location. The Location Maintenance Page opens to the Location Details tab. 5. Click on the Quick Reserve tab. The Quick Reserve tab appears. 6. Click on Quick Reserve Template to edit. Fields appear to configure the Quick Reserve Template. 7. Modify the description in the Description field. 8. Modify the duration using the Duration drop-down menus. Select hours and minutes of the duration, or choose All Day for the duration to be all day. 9. Click Submit when you are done. The Quick Reserve Template is modified and the Quick Reserve tab appears. 127 Deleting a Quick Reserve Template You can delete a Quick Reserve Template in Resource Scheduler Admin. To delete a Quick Reserve Template: 1. Log into the Resource Scheduler Admin. The Resource Scheduler Admin Home Page appears. 2. Click on the Resources link. The Resource Configuration Page appears. 3. In the location drop-down list, select the location to edit and click Select. The Resource Configuration Page appears with the location listed under the section Location Information. 4. Under the Location Information section, click the Edit button to edit this location. The Location Maintenance Page opens to the Location Details tab. 5. Click on the Quick Reserve tab. The Quick Reserve tab appears. 6. Click on the Delete Quick Reserve Template icon, , next to the Quick Reserve Template. A confirmation dialog appears asking to continue with the deletion. 7. Click OK to continue, or Cancel to cancel the deletion of the Quick Reserve Template. The Quick Reserve Template is deleted. Wait List and Pending Approval When you create a resource, you can specify a wait list for a resource in the Professional and Enterprise Editions. Users who have requested a resource specified as on a wait list will be notified when this resource becomes available, if the resource is not available at the time that the reservation is created. In the Enterprise Edition, you can also specify an approval process for a resource. When an approval process for a resource is enabled, if a resource is marked as requiring approval, reservations made by schedule users are marked as pending approval, and the reservation must be approved by the Resource Contact or someone with Administrative rights to this resource. An email is sent to the Resource Contact notifying them that a reservation request has been made, including a link to that reservation. Email must be enabled for either a wait list or a pending approval process to function. 128 Configuring a Wait List for a Resource In the Professional and Enterprise Editions, you can specify a wait list for a resource. If a resource allows for a wait list, if the resource is not available when a user creates a reservation, the reservation request for the resource will be placed on a wait list. If the resource becomes available, the user will be notified that resource is now available and reserved for their reservation. While a resource is on a wait list for a reservation, the user can cancel their reservation and request a new resource that is available, or they can wait to see if the resource will become available. Configuring a Wait List for a New Resource To configure a wait list for a new resource: 1. Log into the Resource Scheduler Admin. The Resource Scheduler Admin Home Page appears. 2. Click on the Options link. The Resource Scheduler Admin - General Configuration page appears. 3. Click on the Email Settings tab. The EMail Integration page appears. 4. Enable Allow user EMail notification. 5. In the Mail server field, enter the IP address or DNS name of your email server. For example: smtp.yourcompany.com 6. In the Sender's EMail address field, enter the email address from which email notification will be sent. For example: [email protected] 7. In the Alternate Server field, enter the IP address or DNS name of your alternative or backup email server, if applicable. For example: smtp2.yourcompany.com 8. You may configure additional settings in the EMail Options section. For more information on the Email Setting tab, please see “Email Settings Tab” on page 52. 9. Click the Submit button when you are done. 10. Click on the Resources link. The Resource Configuration Page appears. 11. Under the group in which you wish to create a new resource, click on the link Click to add resource... The Resource Maintenance Page opens to the Details tab. The link New... next to “Groups and Resources” is used to create a new group. 129 12. Enter a title, a description, and any appropriate information. The Title and Description fields are required. For detailed information about each field, please see “Resource Maintenance Fields”. 13. In the Optional Settings section, enable Allow a Wait List for this Resource. 14. When you have completed configuring the necessary information, click Submit. The resource is created and a Resource ID is assigned. For information on editing a resource, please see “Editing a Resource” on page 82. Configuring a Wait List for an Existing Resource To configure a wait list for an existing resource: 1. Log into the Resource Scheduler Admin. The Resource Scheduler Admin Home Page appears. 2. Click on the Options link. The Resource Scheduler Admin - General Configuration page appears. 3. Click on the Email Settings tab. The EMail Integration page appears. 4. Enable Allow user EMail notification. 5. In the Mail server field, enter the IP address or DNS name of your email server. For example: smtp.yourcompany.com 6. In the Sender's EMail address field, enter the email address from which email notification will be sent. For example: [email protected] 7. In the Alternate Server field, enter the IP address or DNS name of your alternative or backup email server, if applicable. For example: smtp2.yourcompany.com 8. You may configure additional settings in the EMail Options section. For more information on the Email Setting tab, please see “Email Settings Tab” on page 52. 9. Click the Submit button when you are done. 10. Click on the Resources link. The Resource Configuration Page appears. 11. Under the group that the resource is in, click on the resource name. The Resource Maintenance Page opens to the Details tab. 130 12. Edit the fields you wish to update in the Details tab, or click on the tab you wish to update. If you update a field in the Details tab then click on another tab, a confirmation appears asking if you wish to save changes. For detailed information about each field, please see “Resource Maintenance Fields”. 13. In the Optional Settings section, enable Allow a Wait List for this Resource. 14. When you have completed configuring the necessary information, click Submit. The resource is created and a Resource ID is assigned. For information on editing a resource, please see “Editing a Resource” on page 82. Configuring a Pending Approval Process for a Resource In the Enterprise Edition, you can specify an approval process for a resource. When a reservation for a resource requires approval, reservations are initially marked as pending approval. The reservation request must be approved by the Resource Contact or someone with Administrative rights to this resource. An email is sent to the Resource Contact notifying them that a reservation request has been made, including a link to that reservation. In order to create or configure a resource to require approval, you must configure the following before proceeding: • Configure email settings, page 52. • Enable Individual User Access, page 94. • Add Users, page 96. • Create or configure a resource or location to require approval, below. Configuring a Pending Approval Process for a New Resource To configure a new resource to require approval: 1. Log into the Resource Scheduler Admin. The Resource Scheduler Admin Home Page appears. 2. Click on the Options link. The Resource Scheduler Admin - General Configuration page appears. 3. Click on the Email Settings tab. The EMail Integration page appears. 4. Enable Allow user EMail notification. 131 5. In the Mail server field, enter the IP address or DNS name of your email server. For example: smtp.yourcompany.com 6. In the Sender's EMail address field, enter the email address from which email notification will be sent. For example: [email protected] 7. In the Alternate Server field, enter the IP address or DNS name of your alternative or backup email server, if applicable. For example: smtp2.yourcompany.com 8. You may configure additional settings in the EMail Options section. For more information on the Email Setting tab, please see “Email Settings Tab” on page 52. 9. Click the Submit button when you are done. 10. Click on the Resources link. The Resource Configuration Page appears. 11. Under the group in which you wish to create a new resource, click on the link Click to add resource... The Resource Maintenance Page opens to the Details tab. The link New... next to “Groups and Resources” is used to create a new group. 12. Enter a title, a description, and any appropriate information. The Title and Description fields are required. For detailed information about each field, please see “Resource Maintenance Fields”. 13. In the Optional Settings section, enable Reservations require approval. 14. When you have completed configuring the necessary information, click the Resource Approvers tab. The resource is created, a Resource ID is assigned, and the Resource Level Security page appears for the resource. 15. In the Add Approvers section, select the display type and click on the Show Users button. A list of the users appears. 16. Click on the green arrow button, Approver. , next to the user to add the user as an 17. Repeat this process to add any additional users as an Approver. 18. Click on the Return button and then the Submit button to save your changes. 132 For information on editing a resource, please see “Editing a Resource” on page 82. Configuring a Wait List for an Existing Resource To configure an existing resource to require approval: 1. Log into the Resource Scheduler Admin. The Resource Scheduler Admin Home Page appears. 2. Click on the Options link. The Resource Scheduler Admin - General Configuration page appears. 3. Click on the Email Settings tab. The EMail Integration page appears. 4. Enable Allow user EMail notification. 5. In the Mail server field, enter the IP address or DNS name of your email server. For example: smtp.yourcompany.com 6. In the Sender's EMail address field, enter the email address from which email notification will be sent. For example: [email protected] 7. In the Alternate Server field, enter the IP address or DNS name of your alternative or backup email server, if applicable. For example: smtp2.yourcompany.com 8. You may configure additional settings in the EMail Options section. For more information on the Email Setting tab, please see “Email Settings Tab” on page 52. 9. Click the Submit button when you are done. 10. Click on the Resources link. The Resource Configuration Page appears. 11. Under the group that the resource is in, click on the resource name. The Resource Maintenance Page opens to the Details tab. 12. Edit the fields you wish to update in the Details tab, or click on the tab you wish to update. If you update a field in the Details tab then click on another tab, a confirmation appears asking if you wish to save changes. For detailed information about each field, please see “Resource Maintenance Fields”. 13. In the Optional Settings section, enable Reservations require approval. 14. When you have completed configuring the necessary information, click the Resource Approvers tab. The resource is created, a Resource ID is assigned, and the Resource Level Security page appears for the resource. 133 15. In the Add Approvers section, select the display type and click on the Show Users button. A list of the users appears. 16. Click on the green arrow button, Approver. , next to the user to add the user as an 17. Repeat this process to add any additional users as an Approver. 18. Click on the Return button and then the Submit button to save your changes. For information on editing a resource, please see “Editing a Resource” on page 82. Approving or Denying a Pending Requests Once a location or a resource has been assigned an approver, the approver can log into the Resource Scheduler user application as the approver and either approve or deny the pending reservation request. To approve or deny a pending request: 1. Log into Resource Scheduler user application as a user that has been defined as an approver for a location or a resource. The Resource Scheduler Admin Home Page appears. 2. Click on the Approvals link in the Tool Bar. The Pending Requests page appears. 3. In the list of Pending External Requests, you can approve or deny a request. Click on the approve icon, , to approve the request. Click on the delete icon, , to deny the request. Legend Sort Column Problem with Request Current Request Approve Request Deny Request Recurring Request More information Email Requestor 134 Chapter 8: Creating and Maintaining Holidays This chapter contains information about creating and maintaining holidays. Topics include: ♦ Overview ♦ Adding Holidays ♦ Maintaining Holidays ♦ Deleting Holidays Overview The Enterprise Edition of Resource Scheduler can display holiday information in all Resource Scheduler views for days that contain a holiday. The holidays shown correspond with the country specified for the Location being viewed, and the country specified in the User's personal settings. Users may see two holidays on the same date if the countries are different (and both have a holiday on that date). The holiday is displayed with a flag for that country, and if the user passes the mouse over the flag and pauses, they will see the holiday name. Resource Scheduler comes pre-defined with common holidays for countries around the world. In addition, you can add or delete holidays as suits the needs of your business. You can configure a holiday to block resources from being scheduled on that day or not. Holidays do not have to be legal holidays. The Holiday function can be used to indicate important days, such as “Company Outing”. 2 Adding a Holiday You can add a holiday in Resource Scheduler Admin. After you create a holiday, you cannot change the country for that holiday nor can you change the date of the holiday. To change the date or the country of the holiday, you must delete the holiday then re-create it. To add a holiday: 1. Log into the Resource Scheduler Admin The Home Page appears. 2. Click on the Holidays link at the top of the page The Holidays Page appears. 3. Select the appropriate country from the drop-down menu and click Show. The holidays configured for that country are displayed. 4. Click on the link Click to add a holiday... The Holiday Maintenance Page appears. 5. In the Country drop-down menu, select the country. 6. In the date field, click on the calendar icon to the right of the date field. The Calendar navigator appears. 7. Navigate in the calendar and select the date of the holiday. The date field now contains the date of the holiday. You can manually add the date in the Date field by entering the date in the short date format set by your computer. For many computers in the U.S., for example, the short date format is typically MM/DD/YYYY. For many European computers, the short date format may be DD/MM/YYYY. 8. In the Description field, enter the name of the Holiday. 9. If you wish to prohibit resources from being scheduled on this day, check Block reservations on this holiday. 10. Click the Submit button when you are finished. The holiday is added. 3 Editing a Holiday You can edit the Description field or configure whether to block or not to block the creation of reservations on that date. You cannot change the country for that holiday nor can you change the date of the holiday. To change the date or the country of the holiday, you must delete the holiday then re-create it. To edit a holiday: 1. Log into the Resource Scheduler Admin The Home Page appears. 2. Click on the Holidays link at the top of the page The Holidays Page appears. 3. Select the appropriate country from the drop-down menu and click Show. The holidays configured for that country are displayed. 4. Click on the holiday you wish to edit. The Holiday Maintenance Page appears. 5. You may edit the name of the Holiday in the Description field. 6. If you wish to prohibit resources from being scheduled on this day, check Block reservations on this holiday. 7. Click the Submit button when you are finished. The holiday is modified. Deleting a Holiday You can delete a holiday in Resource Scheduler Admin. To delete a holiday: 1. Log into the Resource Scheduler Admin The Home Page appears. 2. Click on the Holidays link at the top of the page The Holidays Page appears. 3. Select the appropriate country from the drop-down menu and click Show. The holidays configured for that country are displayed. 4. Click on the Delete icon, , next to the holiday you wish to delete. A confirmation dialog appears. 5. Click OK to delete the holiday, or click Cancel to abort the deletion of the holiday. The holiday is deleted. 4 Chapter 9: Creating and Maintaining Event Calendars This chapter contains information about creating and maintaining event calendars. Topics Include: ♦ Overview ♦ Creating an Event Calendar ♦ Accessing an Event Calendar ♦ Modifying an Event Calendar ♦ Deleting an Event Calendar Overview The Professional and Enterprise editions of Resource Scheduler allow you to publish reservations to an Event Calendar. You can create the name of the Event Calendar to which a user may publish a reservation. Event Calendar is also known as an Export Calendar. Event Calendars allow users to navigate dates and view reservations, but there is no access to any of the schedule reservation features found in Resource Scheduler. After installing the Professional or Enterprise Edition, a virtual directory appears in your Web server called RSEvents. The RSEvents directory contains items that allow you to display a schedule of reservations that have been associated with a specific calendar. For security reasons, there is no default web page to view Event Calendars. You may manually create your own web page and insert links to Event Calendars that you have created. To further restrict access to an Event Calendar, you can specify an access code for an event calendar. For example, you created a recurring reservation for training room "Training Room 1A". The reservation is titled “Orientation”. If you publish the reservation to an Event Calendar called "Public Classes", all users who visit the 5 "Public Classes" calendar in the RSEvents page will see the reservation for “Orientation”. Persons viewing the event calendar can navigate through dates in the "Public Classes" schedule and get information about reservations in the event calendar, but the viewers do not have access to create, modify, or delete reservations. It is anonymous access to published reservation information. Because the Event Calendar is not associated with a resource, the calendar can display events for any number of resources, even events from different locations. 6 Creating an Event Calendar You can create an event calendar to which users can publish reservations. This is simply a label that allows users to which to publish a reservation. You can create event calendars that require no access code so that anyone may view the reservations. Also, you can create event calendars that require an access code to restrict the viewing of the event calendars to those who have the access code. Creating an Event Calendar with no access code You can create an Event Calendar with no access code so that anyone may view the calendar. To create an Event/Export Calendar with no access code: 1. Log into the Resource Scheduler Admin. The Resource Scheduler Admin Home Page appears. 2. Click on the Calendars link Export Calendars Page appears 3. Click on the link Click to add a calendar... The Export Calendar Maintenance Page appears 4. Enter description in the Description field. For example “Public Classes”. 5. Click Submit. Event Calendar is created and an Export Calendar ID is assigned. The Export Calendars Page is displayed. 6. Make note of the Export Calendar ID. For example, in the Export Calendar List, “Classes” is listed as “(#1) Classes: Code=”. #1 indicates that the ID of this Event Calendar is 1 and there is no access code. 7. Create or modify a reservation in the Resource Scheduler application and publish the reservation to the event calendar in the Publish tab. At least one reservation published to that event calendar is necessary before accessing the event calendar. For more information on creating or modifying a reservation, please consult the Resource Scheduler User Guide. 8. Determine the URL for the event calendar by following the steps listed in the section “Accessing an Event Calendar”. 7 Creating an Event Calendar with an access code You can create an Event Calendar with an access code to restrict who can view the calendar. To create an Event/Export Calendar with an access code: 1. Log into the Resource Scheduler Admin. The Resource Scheduler Admin Home Page appears. 2. Click on the Calendars link Export Calendars Page appears 3. Click on the link Click to add a calendar... The Export Calendar Maintenance Page appears 4. Enter description in the Description field. For example “Public Classes”. 5. Enter access code in the Access Code field. For example “1234” 6. Click Submit. Event Calendar is created and an Export Calendar ID is assigned. The Export Calendars Page is displayed. 7. Make note of the Export Calendar ID. For example, in the Export Calendar List, “Classes” is listed as “(#1) Classes: Code=1234”. #1 indicates that the ID of this Event Calendar is 1 and the access code is 1234. 8. Create or modify a reservation in the Resource Scheduler application and publish the reservation to the event calendar in the Publish tab. At least one reservation published to that event calendar is necessary before accessing the event calendar. For more information on creating or modifying a reservation, please consult the Resource Scheduler User Guide. 9. Determine the URL for the event calendar by following the steps listed in the section “Accessing an Event Calendar”. 8 Accessing an Event Calendar After an event calendar has been created in Admin and at least one reservation has been published to that event calendar by a user, you can access the event calendar. Accessing an Event Calendar with no access code To access an Event Calendar without an access code: 1. Make note of the Export Calendar ID as indicated in step 7 of “Creating an Event Calendar”. For example, in the Export Calendar List, “Classes” is listed as “(#1) Classes: Code=”. #1 indicates that the ID of this Event Calendar is 1 and there is no access code. 2. In your browser’s address bar, enter the following address: http://127.0.0.1/RSEvents/eventcal.asp?ID=1 Replace 127.0.0.1 with the IP address or DNS name of your web server machine. 3. Replace 1 with the ID of your Event Calendar. 4. Go to that URL. A Calendar View is the default view for the event calendar. Users may click on the List View link to view the event calendar in a list format. You may wish to manually create a web page that lists the event calendars that are published. Accessing an Event Calendar with an access code To access an Event Calendar with an access code: 1. Make note of the Export Calendar ID as indicated in step 7 of “Creating an Event Calendar”. For example, in the Export Calendar List, “Classes” is listed as “(#1) Classes: Code=1234”. #1 indicates that the ID of this Event Calendar is 1 and the access code is 1234. 2. In your browser’s address bar, enter the following address: http://127.0.0.1/RSEvents/eventcal.asp?ID=1&Code=12 31 Replace 127.0.0.1 with the IP address or DNS name of your web server machine. 3. Replace 1 with the ID of your Event Calendar. 9 4. Replace 1234 with the Access Code you have defined. 5. Go to that URL. A Calendar View is the default view for the event calendar. Users may click on the List View link to view the event calendar in a list format. Modifying an Event Calendar You can modify the description and add or remove an access code for an event calendar. To modify a reservation published to an event calendar, please see information about modifying a reservation in the Resource Scheduler User Guide. To modify a an Event/Export Calendar: 1. Log into the Resource Scheduler Admin. The Resource Scheduler Admin Home Page appears. 2. Click on the Calendars link Export Calendars Page appears. 3. Click on the link Click to add a calendar... The Export Calendar Maintenance Page appears. 4. Modify the description in the Description field, if desired. 5. Add, modify, or delete the access code in the Access Code field, if desired. 6. Click Submit. Event Calendar is updated. The Export Calendars Page is displayed. Deleting an Event Calendar You can delete an event calendar that is published. To delete a reservation published to an event calendar, please see information about modifying a reservation in the Resource Scheduler User Guide. To delete an Event/Export Calendar: 1. Log into the Resource Scheduler Admin. The Resource Scheduler Admin Home Page appears. 2. Click on the Calendars link Export Calendars Page appears. 3. In the Export Calendars List, select the event calendar to delete. 10 4. Click the Delete button. The event calendar is deleted and reservations are no longer published to that event calendar. 11 Chapter 10: Advanced Administration Functions This chapter contains information on performing advanced functions in Resource Scheduler Admin. Topics include: ♦ Overview ♦ Customizing the User Application Footer ♦ Enabling System Generated Reminder Messages ♦ Performing SQL Queries ♦ Resource Scheduler Maintenance ♦ Importing Users ♦ Importing Reservations ♦ Customizing HTML Tags for UDFs ♦ Customizing Color List Overview Resource Scheduler is an application that can be customized to meet your company’s needs. The following are advanced functions to enhance your Resource Scheduler implementation. After changes are made in the administrative settings, end users must close then restart their browser for the changes to appear. All browser windows must be closed in order to clear out the old pages, including browser windows not running Resource Scheduler. 12 Customizing the User Application Footer A footer is displayed at the bottom of every page in the Resource Scheduler User application. You can customize the footer that appears using basic HTML. By default the text of the footer is: Note that this footer can be configured by the administrator. You can put links here to your corporate intranet or other sites. Sample Link 1 Sample Link 2 These lines are generated in the file Include\inccofooter.asp as ASP code within standard HTML tags. To modify a location: 1. Log into the machine on which Resource Scheduler has been installed. 2. Open Explorer and navigate to the directory to which Resource Scheduler has been installed. Typically, this location is C:\Inetpub\wwwroot\Rscheduler 3. Navigate to the Include folder. 4. Copy the file inccofooter.asp to inccofooter.bak create a backup. If you encounter any problems with the footer, you can easily replace the customized footer file with the original. 5. Open inccofooter.asp in a text editor. It is not recommended to open inccofooter.asp in an HTML editor: The HTML editor may remove or modify code without your knowledge. 6. Replace the ASP code between <a href="#top"> and </a> with your own text. There are two lines that contain <a href="#top">. You can replace the ASP code on each line with standard HTML. 7. Make sure that the text you have entered adheres to standard HTML. 8. When you have completed customizing your footer, save the file and exit the text editor. Users may have to close all browser window, and then log back into Resource Scheduler for changes to take place. 13 Enabling System Generated Reminder Messages You can enable system generated reminder messages of reservations to be sent to the organizer of the reservation. This feature requires the use of the Windows Task Scheduler, and is only available on IIS servers on Windows 2000 or XP. When enabled, email messages will be generated for each of the time intervals configured in Options, Email Settings in Resource Scheduler Admin. The organizer of the reservation must have a valid email address. You must create a task to run periodically in the Windows Task Scheduler. The program to generate reminder messages is EmailRemind.exe and is located in: C:\Inetpub\wwwroot\Rscheduler\Bin\EmailRemind.exe You may need to consult your Windows documentation for configuring a scheduled task for your specific operating system. To configure system generated reminder messages you must configure Windows Task Scheduler then configure Resource Scheduler Admin to allow email reminders. You can use command line options for the EmailRemind program when you run it manually. The command line options are case sensitive: EmailRemind.exe –l -v • -l enables logging. This will send event information to a log file, EmailRemind.log, located in the same directory as the program. • -v enables verbose mode. This will launch a form that displays all event information Configuring Windows Task Scheduler To configure Windows Task Scheduler: 1. Install Windows Task Scheduler, if necessary. 2. Click Start > Programs > Accessories > System Utilities and select Task Scheduler. 3. Double-click on Create a Scheduled Task. The Scheduled Task Wizard appears. 4. Click Next. A list of programs to select appears. 14 5. Click Browse. 6. Navigate to C:\Inetpub\wwwroot\Rscheduler\Bin and choose EmailRemind.exe. The dialog “Enter a Name for the task” appears. 7. Replace “EmailRemind” with “RS Email Reminder” or another name to help you quickly identify the scheduled task. 8. Choose when to execute this task. You may wish to execute this task every day. 9. Click Next. The dialog “Choose the day and the time” appears. 10. Configure the hour at which to execute this task. 11. Configure the other options as necessary. 12. Click Next. The “Enter the username and password” dialog appears. 13. Enter a username and a password. 14. Click Next. A summary dialog appears. 15. Check “Open advanced properties…” to configure this task to run more than one time per day. 16. Click Finish. The properties dialog appears for this task. 17. Click on the Schedule tab. The Schedule tab appears. 18. Click on the Advanced button. Advanced Scheduling Options dialog appears 19. Check Repeat this task. The repeat options become activated. 20. Configure the frequency to repeat this task. 21. When you have completed, click OK. 22. Click OK again to exit the properties of the scheduled task. 15 Configure Email Reminders in Resource Scheduler Admin After you have configured Windows Task Scheduler, you must configure Resource Scheduler Admin to allow email reminders. The organizer of the reservation must have a valid email address configured before they can receive a reminder. Users can configure this in “My Information”, or you can configure this in the Users section of Resource Scheduler Admin. To configure Resource Scheduler Admin to allow email reminders: 1. Log into the Resource Scheduler Admin. The Resource Scheduler Admin Home Page appears. 2. Click on the Options link The General Configuration Page opens to the General Options tab. 3. Click on the Email Settings tab. The Email Settings appear. 4. Check Allow email reminders of schedule. 5. Select the number of day before a reservation to send the first, second, and third reminders from the drop-down menus. 6. When you have completed, click Submit. 16 Performing SQL Queries You can perform SQL queries in Resource Scheduler Admin using the SQL Update page, SQLUpdate.asp. The SQL Update page allows you to perform To perform a SQL query: 1. Log into the Resource Scheduler Admin The Resource Scheduler Admin Home Page appears. 2. In the web browser’s Address field, enter the following URL: http://127.0.0.1/RSAdmin/SQLUpdate.asp Replace 127.0.0.1 with the IP address or DNS name of your web server machine. 3. In the text input field, enter your SQL query. 4. Select Treat as single statement, if appropriate. 5. Click Submit to process the SQL query. Click Reset to erase the text in the text area. The SQL query is processed and the results page appears. Useful SQL Queries Here are a few useful SQL query statements. Display the number of resources in Resource Scheduler select count(*) from tbl_res where obsolete_flag=0 Display the number of locations in Resource Scheduler select count(*) from tbl_loc where obsolete_flag=0 17 Resource Scheduler Maintenance Although Resource Scheduler requires little maintenance, you can follow the recommendations below to help maintain Resource Scheduler and ensure optimal performance. You may wish to review procedures for maintaining your system to see how the following Resource Scheduler Maintenance recommendations may be integrated. ♦ Perform a nightly backup of the database and the web application files in a separate location. ♦ Perform a backup of the database and the web application files before performing major configuration changes. ♦ Backup the registry periodically. ♦ Purge historical and deleted information periodically. Performing a Database Backup It is important to perform a backup of your Resource Scheduler database at regular intervals, prior to upgrades, changes to your system, and prior to performing a database purge. You must stop the SQL Server Service before you perform a backup. Typically this service is MSSQLServer. You can stop the MSSQLServer service from the Services window in the Microsoft Management Console. Also, you can stop and start the MSSQLServer service using the following DOS commands: net stop MSSQLSERVER net start MSSQLSERVER Resource Scheduler database files are located in the directory selected when you performed the database installation. The default location is C:\MSSQL7\Data or C:\Program Files\Microsoft SQLServer\MSSQL\Data. There are two files that contain the data: ♦ RedESoft_Data.mdf ♦ RedESoft_Log.ldf P e Do not keep a backup on the same machine as your SQL server. 18 rforming a Web Application Backup It is important to perform a backup of your Resource Scheduler web application at regular intervals and prior to upgrades or changes to your system. A backup includes both the application files as well as the Registry settings. A Repair/Reinstall will reinstall all of the default files, but you may have added your own graphics or placed files for upload in the UserData directory. Web Application Files Resource Scheduler web application files are located in the directory selected when you performed the installation. The default location is: C:\Inetpub\wwwroot\Rscheduler. Registry Settings Many configuration settings are stored in the Registry. You may wish to perform a backup of these settings periodically. 1. Run Registry Editor. Click Start > Run. In the Open Field, enter REGEDIT.EXE. Click OK. The Registry Editor launches. 2. Navigate to HKEY_LOCAL_MACHINE\Software\RedESoft 3. Right-click on RedESoft and choose Export. The Export Registry dialog appears. 4. Navigate to the directory to save the Registry settings. 5. At the bottom of the Export Registry dialog, choose Branch Selected and make sure that HKEY_LOCAL_MACHINE\SOFTWARE\RedESoft is listed in the field. 6. Enter a filename with an extension of .reg. 7. Click on the Save button. The Resource Scheduler Registry settings have been saved. 19 Purging Historical Records Periodically, historical and deleted records can be purged out of the system. This will nominally improve performance, but is not a required task. Be aware of any special auditing requirements your organization might have - you may not want to purge any records if they are part of an audit trail process. You should also make sure to only purge items not used in any analysis or other reports. By selecting the appropriate option, you can purge either deleted records or all records (meaning past reservations that may no longer be of value). Double-check the dates prior to purging. Files that have been uploaded to the system as attachments to reservations can also be deleted from the system using this screen. Files that are no longer associated with a reservation, files that are associated with deleted reservations, and file records that are missing the physical files can all be removed from the system. Use the drop down list to select the action you wish to perform. To Purge historical and deleted records, and uploaded files: 1. Log into the Resource Scheduler Admin. The Resource Scheduler Admin Home Page appears. 2. Click on the History link The Delete Historical Records Page appears. 3. Choose Purge all reservations or Purge only deleted reservations. 4. Configure Purge prior to date or click on the Calendar Navigator icon, to choose a date from the Calendar Navigator. , 5. Click Submit to perform the purge. The selected records have been deleted and the Delete Historical Records Page appears. 20 6. Choose Purge Uploaded Files to permanently delete records for uploaded files, and the files themselves, if desired. 7. Select a file purge option from the drop-down list. 8. Click Submit to delete uploaded files. The uploaded files will be deleted. 21 Importing Users You can import users into Resource Scheduler. The import process is performed by the stored procedure, sp_ins_user_import. In order to run the stored procedure, you first need to make a text file with one line for each user. Each value must be separated with a comma. To insert the records, you can process the text file from the SQL Query Analyzer or from Interactive SQL. Stored Procedure sp_ins_user_import Syntax: sp_ins_user_import 'Email', 'Name', 'Password', 'Phone', 'Extension', 'Department', Account_code, NTLM_Name, LDAP_NAME, Use_Login_Name_bit, Return_error Example: sp_ins_user_import '[email protected]', 'Sample Name', 'Pwd', '616-555-1212', 'Sales', '627.8473.2.3994', 0 Parameters Parameter Email Name Password Phone Extension Department Account_code NTLM_name LDAP_name Use_Login_Name Description User's Email address User's Name User's Password User's phone number User's phone extension User's department, if needed User’s Account Code NTLM login name, if needed LDAP login name, if needed Use Login Name for login Return_error_flag Return error flag Max. Characters 50 characters 50 characters 30 characters 20 characters 10 characters 50 characters 50 characters 50 characters 50 characters 1=True 0=False 1= show error and stop 0= don’t show error and skip user If you are using MSDE, you can import the users from the OSQL commandline utility. To run the import process from the command line: 1. Create an ASCII file as shown above, 2. Save the file 3. Run the following statement from the command prompt: 22 osql.exe -U RedESoft -d RedESoft -P RedESoft -i filename 23 Importing Reservations You can import reservations from another system directly into Resource Scheduler. The import process is done via the stored procedure, sp_ins_sched_qr. In order to run the stored procedure, you first need to make a text file with one line for each reservation. Each value must be separated with a comma. To insert the records, you can process the text file from the SQL Query Analyzer or from Interactive SQL. Recurring options are not supported for imported reservations. Stored Procedure sp_ins_sched_qr Syntax resource_id, start_date, end_date, all_day_flag, pending_flag, sched_desc, user_id, user_flag, sched_color Parameters Value resource_id Format integer Description This is the ID for the resource being reserved. The ID is displayed for each resource on the resource maintenance page Example 23 Value start_date Format smalldatetime, ’YYYY-MM-DD HH:MM:SS AM’ Description This is the date & time the reservation starts in smalldatetime format in single quotes. Example ’2004-05-05 08:00:00 AM’ Value end_date Format smalldatetime, ’YYYY-MM-DD HH:MM:SS AM’ Description This is the date & time the reservation ends in smalldatetime format in single quotes. Example ’2004-05-05 08:00:00 AM’ Value all_day_flag Format bit Description This determines whether the reservation is for the entire day or 24 Example Value Format Description Example Value Format Description Example Value Format Description Example Value Format Description Example Value Format Description Example not. If the reservation is not an all day event, set this parameter to 0. Set this to 1 for an all day event. For an all-day event, you must also set the start time to 12:00:00 AM on the day of the reservation and the end time to 12:00:00 AM on the NEXT day. 0 pending_flag bit This determines whether the reservation is pending approval. If the reservation is not pending, set this to 0. If the reservation is pending, set this to 1. 0 sched_desc text This sets the text description of the reservation. The text must be contained within single quotes. The maximum length is 40 characters. ‘Meeting Title’ user_id integer This sets the reservation to a specific user or to the default user. It is recommended to set this to the default user ID, 0. If you want the reservation associated with a different user ID, insert the desired user’s ID number. See the User Maintenance Page for user ID numbers. 0 user_flag bit This determines whether the user us assigned to this reservation. If user_id is set to 0, is highly recommended to set the user_flag to 0 in order to not assign the Default user to this reservation. If the user_id has been set to a value other than 0, the default user, you would set this to 1. 0 sched_color integer This sets the color flag for the reservation. 5 – Blue 0 – Gray 6 – Navy 1 – Red 7 – Purple 2 – Orange 8 – Silver 3 – Yellow 9 – Black 4 – Green For example if the engineering department normally uses Blue to identify their reservations, the value would be 5. 5 25 Example For example, to insert a reservation for the engineering group on May 5, from 8:00-9:00 AM, called “Meeting” for resource 23, the line would be as follows: exec sp_ins_sched_qr 23, '2001-05-05 08:00:00 AM', '2001-05-05 09:00:00 AM', 0, 0, 'Meeting', 0, 0,5 Customizing HTML Tags for UDFs You can use HTML tags within a User Defined Field. It is recommended to use HTML tags in UDFs that are for display only. The following are a few examples of common HTML that can be used in UDF's to enhance the user interface. Display an Image Format: <img src='userdata/imagename.jpg' width=150> This will display an image named “imagename.jpg” located in the c:\inetpub\wwwroot\ResourceScheduler\userdata directory. Images can be jpg’s or gif’s. By setting a value for the width you can control the size of the displayed image. Make sure that any path referenced is appropriate and does not reference a physical path. Referencing a physical path will cause the image to appear correctly only on the machine on which you add the image. For example, you should never reference an image as <img src='C:\MyImages\imagename.jpg'> Add an Email Link Format: <a href='MailTo:[email protected]'>[email protected]</a> This example will display as a hypertext item within Resource Scheduler. By clicking on the text [email protected], the individual’s default email application will be launched and the To: field will be populated with the email address listed above. Add a Hyperlink Format: <a href='http://www.YourURL.com'>Your text</a> 26 This example shows how to link to other web sites, either internally located on your network or externally located on the Internet. As shown, the display name and the link do not have to be the same. Open Link in a New Browser Format: <a href='http://www.YourURL.com' target=’new’>Display Name</a> By changing the link to include the target=’new’ statement, the link will now be opened in a new browser window, instead of using the current browser session. Open Link in a New Browser with a Display Image Format: <a href='http://www.YourURL.com' target=’new’> <img src='userdata/imagename.jpg' width=150></a> By replacing “Display Name” in the example above with the image example from above, an image can be displayed in place of the hyperlink text. Also, by adding the target=’new’ switch, a user can click on the displayed image and a new browser window will open displaying the image in full size. 27 Customizing Color Category Text You can associate a color with each reservation in Resource Scheduler by selecting the color from a drop-down list on the Reservation Detail screen. You can modify the title and the text of the drop-down list to classify reservations in a different manner, such as by activity type or status. The individual colors can not be modified, but the label for each color can be changed. In order to modify this list you will need administrator access to the web server running Resource Scheduler. To customize the Color Title text for categories: 1. Log into the Resource Scheduler Admin. The Resource Scheduler Admin Home Page appears. 2. (a)Click on the Options link. 3. (b)The General Configuration Page opens to the General Options tab. 4. (c) To associate reservation types with colors, check the Use Reservation Types check box. 28 By default, grey is the default color associated with default reservations. To change the default reservation color, click on the redial button corresponding to the color you select as the default meeting color. You can also change the Reservation description by replacing the Description text. For example, suppose we want to color code all sales department meetings with green. Click the Submit button at the bottom of the web page to make the change. 29 In this example, grey is the default color so that anytime a reservation is created it will still be colored grey. To change the color of your reservation, click on your reservation and a Reservation Details window appears. Once you click SUBMIT, the color code for the reservation changes. 30 Appendix A: Forms and Checklists This appendix contains useful forms and checklists to help you plan your Resource Scheduler environment. You may photocopy these forms. Each form is presented on a separate page for ease of use. Here is a list of common characteristics for items that are frequently tracked with Resource Scheduler. Company Car VIN, vehicle make, vehicle model, passenger capacity, transmission type (automatic/manual), cost per day, insurance policy number, and emergency service numbers Laptop Serial Number, LCD Resolution, Software installed, CD Burner, DVD Burner, RAM, Hard drive, CPU Conference Room or Training Room Room number, room size, capacity, size of whiteboard, size of main table, projector in room, network drop available, extension, speaker phone available, A/V Services, Lighting notes, number of PCs, Guest Office Room number, room size, size of whiteboard, network drop available, extension, speaker phone available Company Apartment Kitchen amenities, address, direction to apartment, housekeeping available, fireplace, number of beds, type of beds, URL for local guide 31 Collecting Location Information Use this form to record information about a specific location. Use one form per location. Location Name: Location Characteristics After Hours Access Available Hours Contact email Currency Description Weather URL or ZIP code Description Groups in Location 32 Collecting Group Information Use this for to record information about a specific group. Use one form per group. Group Name: Group Location: Group Characteristic (UDF) Description Allow pending/Wait List Contact email 33 Collecting Resource Information Use this for to record information about a specific resource. Use one form per resource. Resource Name: Resource Location: Resource Group: Resource Characteristics (UDF) Allow pending/Wait List Contact email Description 34 Appendix B: Stored Procedures Stored Procedures Overview In order to run the stored procedure, you first need to make a text file with one line for each reservation. Process the text file from the SQL Query Analyzer or from Interactive SQL. Separate each parameter with a comma. Surround any varchar parameter with quotes. sp_ins_requser_import The following Stored Procedure describes importing user records into the Resource Scheduler Web Requests module database. This Stored Procedure identifies accounts where the user ID’s are automatically generated by the Resource Scheduler Web Requests module. PROCEDURE sp_ins_requser_import Parameter @user_email @user_first_name @user_last_name @pwd @phone @show_err Data Type varchar(50) varchar(25) varchar(25) varchar(30) varchar(15) bit @use_cookie_flag* bit @lang_id* tinyint Description User's Email address User's First Name User’s Last Name User's Password User's phone number Return error flag; 0= don’t show error and skip user, 1= show error and stop Use cookie flag; 0= do not save a cookie on the user’s computer to remember their logon information; 1= save a cookie on the user’s computer to remember their logon information; defaults to the value set for the Default User Language ID; 1=Common English, 2=Deutsch, 4=Français; defaults to the value set for the Default User * indicates parameter is optional Example EXEC sp_ins_requser_import '[email protected]', 'Sample', 'Name', 'Pwd', '616.555.1212' 0 sp_ins_requser_import_with_id The following Stored Procedure describes importing user records into the Resource Scheduler Web Requests module database. This Stored Procedure 1 allows the User ID to be specified, assuming you have a unique, numeric value for a user ID. Parameter @user_id Data Type int @user_email @user_first_name @user_last_name @user_pwd @user_phone @show_err varchar(50) varchar(25) varchar(25) varchar(30) varchar(15) bit *@use_cookie_flag bit *@lang_id tinyint Description Unique integer representing the user account User's Email address User's First Name User’s Last Name User's Password User's phone number Return error flag; 0= don’t show error and skip user, 1= show error and stop Use cookie flag; 0= do not save a cookie on the user’s computer to remember their logon information; 1= save a cookie on the user’s computer to remember their logon information; defaults to the value set for the Default User Language ID; 1=Common English, 2=Deutsch, 4=Français; defaults to the value set for the Default User sp_ins_res_import The following Stored Procedure enables you to import resources into Resource Scheduler. Parameter res_id Data Type int grp_id res_type_id display_order res_desc res_hdr tree_msg contact_info contact_email capacity cost_amt cost_type int smallint smallint varchar(30) varchar(16) varchar(75) varchar(255) varchar(50) smallint smallmoney char(3) sec_flag sec_pwd bit varchar(30) allow_pending_flag notify_usage_flag max_reserve bit bit smallint ext_desc varchar(255) Description Unique Resource ID - leave 0 for auto assignment ID of group for Resource Resource Type ID Sort order for resource - optional Longer Description of resource Short description of resource Msg displayed in Java applet Textual information about resource contact Email of contact person Capacity if relevent, else 0 Cost per hour/day, typically 0 Either 'HR' , 'DAY', or ‘EACH’; required even if not used Typically 0 - this is for older versions Typically blank - '' - this is for older versions 0 or 1, usually 0 for imported data 0 or 1, usually 0 for imported data Typically 0 - max minutes a resource can be booked For extended descriptions of resource 2 addl_email varchar(1000) wait_list inactive_flag bit bit setup_time int cleanup_time int Any additional emails to be notified usually blank 0 or 1, usually 0 for imported data 0 or 1, usually 0 for imported to – indicates if resource is active Time in minutes for setup or set to 0 if setup isn’t required Time in minutes for cleanup or set to 0 if setup isn’t required Example EXEC sp_ins_res_import 999, 1, 1, 99, 'Longer Description of Room', 'Short Desc.', 'Tree text', '','',0, 0, 'HR', 0, '', 0, 0, 0, 'Extend Desc', '', 0, 0, 0, 0 sp_ins_sched_qr The following Stored Procedure enables you to import reservations into Resource Scheduler. Recurring options are not supported for imported reservations. Reservations that contain multiple resources are not supported. While this is possible, it is beyond the scope of this document and you should contact PeopleCube Professional Services. Parameter resource_id Data Type int start_date smalldatetime end_date smalldatetime all_day_flag bit pending_flag bit sched_desc varchar(40) user_id int Description This is the ID for the resource being reserved. The ID is displayed for each resource on the resource maintenance page This is the date & time the reservation starts in smalldatetime format in single quotes. This is the date & time the reservation ends in smalldatetime format in single quotes. This determines whether the reservation is for the entire day or not. If the reservation is not an all day event, set this parameter to 0. Set this to 1 for an all day event. For an all-day event, you must also set the start time to 12:00:00 AM on the day of the reservation and the end time to 12:00:00 AM on the NEXT day. This determines whether the reservation is pending approval. If the reservation is not pending, set this to 0. If the reservation is pending, set this to 1. This sets the text description of the reservation. The text must be contained within single quotes. The maximum length is 40 characters. This sets the reservation to a specific user or to 3 user_flag bit sched_color int the default user. It is recommended to set this to the default user ID, 0. If you want the reservation associated with a different user ID, insert the desired user’s ID number. See the User Maintenance Page for user ID numbers. This determines whether the user us assigned to this reservation. If user_id is set to 0, is highly recommended to set the user_flag to 0 in order to not assign the Default user to this reservation. If the user_id has been set to a value other than 0, the default user, you would set this to 1. This sets the color flag for the reservation. 0 – Gray 5 – Blue 1 – Red 6 – Navy 2 – Orange 7 – Purple 3 – Yellow 8 – Silver 4 – Green 9 – Black For example if the engineering department normally uses Blue to identify their reservations, the value would be 5 Example For example, to insert a reservation for the engineering group on May 5, from 8:00-9:00 AM, called “Meeting” for resource 23, the line would be as follows: exec sp_ins_sched_qr 23, '2001-05-05 08:00:00 AM', '2001-05-05 09:00:00 AM', 0, 0, 'Meeting', 0, 0,5 sp_ins_user_import The following Stored Procedure enables you import users. The User ID is automatically assigned during import. Parameter Email Name Password Phone Extension Department Account Code NTLM Name LDAP Name Use Login Name Data Type varchar(50) varchar(50) varchar(30) varchar(20) varchar(10) varchar(50) varchar(50) varchar(50) varchar(50) bit Return Error Flag bit Description User's Email address User's Name User's Password User's phone number User's phone extension User's department, if needed User’s Account Code NTLM login name, if needed LDAP login name, if needed Use Login Name for login: 0=False 1=True Return error flag: 0=Do not show error and skip user 1=Show error and stop 4 Example EXEC sp_ins_user_import '[email protected]', 'Sample Name', 'Pwd', '616.555.1212', 'ext 999', 'Sales', '627.8473.2.3994', '', '', 0, 0 sp_ins_user_import_with_id The following Stored Procedure enables you import users and specify the User ID. Parameter User ID Data Type int Email Name Password Phone Extension Department Account Code NTLM Name LDAP Name Use Login Name varchar(50) varchar(50) varchar(30) varchar(20) varchar(10) varchar(50) varchar(50) varchar(50) varchar(50) bit Return Error Flag bit Description Unique integer representing the user account User's Email address User's Name User's Password User's phone number User's phone extension User's department, if needed User’s Account Code NTLM login name, if needed LDAP login name, if needed Use Login Name for login: 0=False 1=True Return error flag: 0=Do not show error and skip user 1=Show error and stop sp_resource_udf_import The following Stored Procedure allows you to import User Defined Fields. Parameter res_id udf_id value display_order Data Type int int varchar(255) smallint Description Unique Resource ID ID of UDF being referenced Value of the UDF Display order of UDF, if needed. 99 is default Example The example below defines 4 UDFs for room characteristics/values as Administrator, Usage Rules, Machine Name and Phone. You might have the following for importing a single resource: EXEC EXEC EXEC EXEC sp_resource_udf_import sp_resource_udf_import sp_resource_udf_import sp_resource_udf_import 999, 999, 999, 999, 179, 180, 181, 182, '[email protected]’, 1 'Internal Only’, 2 'REDESOFT\MIDWEST\RF2211', 3 '231.922.0980 ext 333', 4 sp_sched_udf_import 5 Parameter sched_id udf_id value display_order Data Type int int varchar(255) smallint Description Unique Schedule ID ID of UDF being referenced Value of the UDF Display order of UDF, if needed. 99 is default Example The example below defines 3 UDFs for optional reservation data as billable project (Check box), customer on-site (Check box) and chargeback code (text). As an import, you might have the following for a single resource: EXEC sp_sched_udf_import -1999948980, 174, 'True', 1 EXEC sp_sched_udf_import -1999948980, 175, 'True', 2 EXEC sp_sched_udf_import -1999948980, 176, ''AC-1131, 3 sp_upd_requser_api The following Stored Procedure enables you to update user information in the Web Request module. If use_cookie_flag or lang_id are not provided, these fields will not be updated. Parameter user_email user_first_name user_last_name user_phone obsolete_flag Data Type varchar(50) varchar(25) varchar(25) varchar(20) bit show_err bit *use_cookie_flag bit *lang_id tinyint Description User’s email address User’s First Name User’s Last Name User’s Phone Obsolete Account; 0=Active User; 1=Inactive User Return error flag; 0= don’t show error and skip user, 1= show error and stop Use cookie flag; 0=Do not save a cookie on the user’s computer to remember their logon information; 1=Save a cookie on the user’s computer to remember their logon information; if value is not provided, it will not be updated. Language ID: 1=Common English 2=Deutsch 4=Français If value is not provided, it will not be updated. *Optional parameters sp_upd_user_api 6 The following Stored Procedure enables you to add new users or update existing users, and enables you to associate a user with an NTLM or an LDAP account name. Parameter link_type Data Type smallint user_LDAP user_NTLM user_email user_name user_phone user_phone_ext user_dept user_acct_code obsolete_flag varchar(50) varchar(50) varchar(50) varchar(50) varchar(20) varchar(10) varchar(50) varchar(50) bit Description 0=link by email; 1=link by NTLM value; 2=link by LDAP value User’s LDAP account name User’s NTLM account name User’s email address User’s Name User’s Phone User’s Phone Extension User’s Department User’s Account Code Obsolete Account; 0=Active User; 1=Inactive User Example EXEC sp_upd_user_api 0, '', '', '[email protected]', 'Sample Name', '616.555.1212', 'ext 999', 'Sales', '627.8473.2.3994', 0 7 Appendix B: Troubleshooting Resource Scheduler Admin You can view the most up-to-date technical documentation in the PeopleCube Support Center at: http://connect.PeopleCube.com/support Issue: You cannot create more than one location or you are unable to access the Resource Scheduler User application. Cause: Various: Incorrect license key, Registry settings cannot be read, Windows Scripting is older than version 5 Resolution 1. You do not have a proper license key for the software or the : trial has expired. Ensure that the license key you received matches the license key in Resource Scheduler Admin in Options, Company Info. If it is incorrect, update the license key in Resource Scheduler Admin and click Submit. 2. Resource Scheduler cannot read the registry settings, or has an older version of Windows Scripting (Version 5.0 or later is needed). This is likely due to either a system-wide change in registry permissions or the deletion of the HKEY_LOCALMACHINE\Software\RedESoft registry values. 3. Verify that Windows Scripting is version 5 or higher. Issue: When adding a user, you receive “No locations or groups found for this user!” Cause: No location or group exists when you are attempting to create a user. Resolution You must create at least one location and one group before you : can create users. For information on creating locations and groups, please consult Chapter 5 – Locations, Groups, Resources, and Combinations. 1 Issue: When you make changes to options in the Options Page in Resource Scheduler Admin, the options are not saved. Cause: The anonymous user account does not have the rights to update the registry. Resolution You must disable anonymous access to the RSAdmin virtual : directory. Navigate to the RSAdmin virtual directory in the Internet Services snap-in. 1. Right-click on the RSAdmin directory and select Properties. The Properties dialog appears. 2. Select the Directory Security tab. The Directory Security tab appears. 3. Press the Edit button for anonymous access. The Edit Anonymous Access dialog appears. 4. Unselect the option “Allow Anonymous Access”, 5. Select Basic Authentication. 6. Save your changes. 7. Access Resource Scheduler Admin. A login dialog should appear. 8. Enter a valid username and password and click OK. Resource Scheduler Admin appears. 2