1
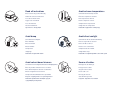
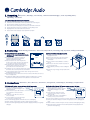
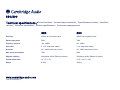
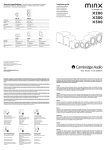
S80/S90
Subwoofer / Сабвуфер
Installation guide / Installationsleitfaden / Guide d’installation / Guía de instalación /
Guida d’installazione / Installatiehandleiding / Installationsvejledning / Руководство по установке
Introduction
Introduzione
Thank you for purchasing this Cambridge Audio S90 subwoofer. Installed
and used properly the subwoofer will deliver astonishing sound quality,
whether playing music or movies, whatever the listening environment.
Please read this guide carefully, as it contains essential information in
getting the very best from your subwoofer.
Grazie per aver acquistato questo subwoofer Cambridge Audio S90. Una
volta installato ed utilizzato in maniera corretta, questo subwoofer sarà
in grado di offrire una qualità acustica stupefacente, che riproduca
musica o colonne sonore, in qualsiasi ambiente d'ascolto. Leggete con
attenzione il presente manuale, poiché contiene informazioni
indispensabili per trarre il meglio dal Vostro nuovo subwoofer.
Einleitung
Vielen Dank, dass Sie diesen Subwoofer S90 von Cambridge Audio
gekauft haben. Bei richtiger Installation und Verwendung liefert der
Subwoofer eine überragende Klangqualität, bei Musik und bei Filmen,
und dies unabhängig vom Umfeld des Hörers. Bitte lesen Sie diesen
Leitfaden gründlich durch, denn er enthält wichtige Informationen für
den optimalen Hörgenuss mit Ihrem Subwoofer.
Introduction
Nous vous remercions d'avoir choisi ce caisson de grave Cambridge
Audio S90. Installé et utilisé dans les règles de l'art, ce caisson de grave
délivrera une qualité sonore stupéfiante avec de la musique ou des
films, quel que soit l'environnement d'écoute. Nous vous
recommandons de lire attentivement ce guide. Il contient des
informations essentielles qui vous permettront de tirer le meilleur de
votre caisson de grave.
Introducción
Gracias por adquirir este subwoofer Cambridge Audio S90. Instalados y
utilizados correctamente, los subwoofer proporcionan una sorprendente
calidad acústica, bien sea en la reproducción de música o películas, con
independencia del entorno de audición. Por favor lea esta guía
detenidamente puesto que contiene información fundamental para
sacar el mayor partido de su subwoofer.
Inleiding
Dank u voor de aanschaf van deze Cambridge Audio S90 subwoofer. Als
de subwoofer correct wordt geïnstalleerd en gebruikt zal deze een
verbazingwekkende geluidskwaliteit geven, of u nu muziek of films
afspeelt en ongeacht de luisteromgeving. Lees deze handleiding
aandachtig door, aangezien deze essentiële informatie bevat over hoe u
het beste uit uw subwoofer haalt.
Indledning
Tillykke med købet af din Cambridge Audio S90 Subwoofer. Korrekt
opsat og anvendt vil subwooferen levere en fænomenal lydkvalitet
uanset om det er til musik eller film, og uanset lytteområde. Læs
venligst denne guide grundigt igennem, da den indeholder vigtige
informationer om, hvordan du får mest ud af din subwoofer.
Введение
Мы благодарны Вам за покупку этого сабвуфера S90 компании
Cambridge Audio. При правильной установке и использовании
сабвуфер обеспечит поразительное качество звучания при
воспроизведении музыки или фильмов в любой окружающей
обстановке для прослушивания. Внимательно прочитайте это
руководство, поскольку в нем содержится важнейшая
информация, необходимая для получения самых лучших
результатов от вашего сабвуфера.
Read all instructions
Avoid extreme temperatures
Bitte lesen Sie die gesamte Anleitung
Vermeiden Sie Extremtemperaturen
Veuillez lire toutes les instructions
Éviter des températures extrêmes
Lea todas las instrucciones
Evite temperaturas extremas
Leggere tutte le istruzioni
Evitare temperature estreme
Lees alle instructies
Vermijd extreme temperaturen
Læs alle instruktioner
Undgå ekstreme temperaturer
Прочтите все инструкции
Избегайте предельных температур
Avoid damp
Avoid direct sunlight
Vermeiden Sie Feuchtigkeit
Vermeiden Sie direkte Sonneneinstrahlung
Éviter l'humidité
Éviter les rayons directs du soleil
Evite la humedad
Evite la luz directa del sol
Evitare l'umidità
Evitare la luce solare diretta
Vermijd vocht
Vermijd rechtstreeks zonlicht
Undgå fugt
Undgå direkte sollys
Избегайте воздействия влаги
Избегайте попадания прямых солнечных лучей
Avoid solvent-based cleaners
Secure all cables
Vermeiden Sie auf Lösungsmitteln basierende Reinigungsmittel
Befestigen Sie alle Kabel gut
Éviter les produits d'entretien à base de solvant
Protéger tous les câbles
Evite utilizar limpiadores basados en disolventes
Asegure todos los cables
Evitare detergenti basati su solventi
Fissare tutti i cavi
Vermijd schoonmaakmiddelen met oplosmiddel
Bevestig alle snoeren
Brug ikke rengøringsmidler med opløsningsmiddel
Sæt alle kabler godt fast
Избегайте применения чистящих средств,
содержащих растворители
Надежно закрепите все кабели
1. Unpacking / Auspacken / Déballage / Desembalaje / Rimozione dall'imballaggio / Uit de verpakking halen /
Udpakning / Распаковка
1.1 Follow the diagrams to unpack your subwoofer:
1.1 Bitte folgen Sie den Zeichnungen, um den Subwoofer auszupacken:
1.1 Veuillez suivre les instructions des schémas pour déballer votre caisson de grave :
1.1 Siga los diagramas indicados para desembalar el subwoofer:
1.1 Attenersi alla sequenza dei disegni qui sotto riportati per disimballare il subwoofer:
1.1 Volg de onderstaande schema's om uw subwoofer uit de verpakking te halen:
1.1 Følg diagrammerne for, hvordan subwooferen pakkes ud:
1.1 При распаковке вашего сабвуфера следуйте указаниям на рисунках:
kg
2. Positioning / Positionierung / Installation / Colocación / Disposizione / Plaatsing / Valg af position / Выбор размещения
2.1 Your subwoofer can be placed almost
anywhere in the room as bass sound is largely
non-directional.
2.1 Ihr Subwoofer kann praktisch überall im Raum
aufgestellt werden, da Basstöne größtenteils
ungerichtet wahrgenommen werden.
2.2 Fix feet to cabinet using supplied screws.
2.2 Befestigen Sie die Füße am Schrank mithilfe der
beigefügten Schrauben.
5.1
2.1 Vous pouvez placer votre caisson de grave dans
presque tous les coins de votre pièce étant donné que
les sons graves sont largement non directionnels.
2.1 El subwoofer puede colocarse prácticamente en
cualquier lugar de la habitación ya que los bajos, en
gran medida, no tienen carácter direccional.
2.1 Il subwoofer può essere posizionato praticamente ovunque all'interno dell'ambiente d'ascolto
dal momento che le basse frequenze non sono direzionali.
2.1 U kunt uw subwoofer bijna overal in de kamer zetten: voor lage tonen maakt de
geluidsrichting grotendeels niet uit.
2.2 Fixez les pieds à l'enceinte à l'aide des vis fournies.
2.2 Fije el pedestal a la caja utilizando los tornillos
suministrados.
2.2 Fissare i piedini al mobile utilizzando le viti fornite a
corredo.
2.2 Maak de poten vast aan de ombouw met behulp van
de geleverde schroeven.
2.2 Monter fødderne på kabinettet med de medfølgende
skruer.
2.2 Прикрепите опору к корпусу, используя прилагаемые
винты.
2.1 Din subwoofer kan placeres nærmest hvor som helst i lokalet, da lavfrekvente toner stort set
ikke er retningsbestemte.
2.1 В помещении сабвуфер можно устанавливать практически в любом месте, поскольку
звук низкой частоты распространяется почти одинаково во всех направлениях.
3. Connections / Anschlüsse / Raccordements / Conexiones / Collegamenti / Aansluitingen / Tilslutninger / Подключения
3.1 If using an AV receiver, connect sub-out to the Sub Input socket.
3.2 If using with a 2-channel hi-fi system, connect pre-out to Line Input.
3.1 Wenn Sie einen AV-Receiver verwenden,
verbinden Sie den SUB OUT-Ausgang mit der
SUB-Eingangsbuchse.
3.2 Wenn Sie den Subwoofer mit einem 2kanaligen HiFi-System verwenden, verbinden
Sie den PRE OUT-Ausgang mit dem LINEEingang.
3.1 Si vous utilisez un récepteur AV, raccordez la
sortie subwoofer au connecteur d'entrée
subwoofer.
3.1 Si utiliza un receptor AV, conecte sub-out al
conector Sub Input.
3.1 In caso di utilizzo di un ricevitore AV, collegare
la sub-out alla presa di ingresso Sub.
3.1 Als u een AV-ontvanger gebruikt, verbind dan sub-out met de Sub-ingang.
3.1 Hvis der anvendes en AV-modtager, skal sub-out tilsluttes til Sub Input-stikket.
3.1 При использовании аудио-видеоресивера подключите сабвуферный выход к гнезду входа
сабвуфера.
3.2 Si vous utilisez une chaîne hi-fi 2 canaux,
raccordez la sortie pre-ampli au connecteur
d'entrée de ligne.
3.2 Si lo utiliza con un sistema de alta fidelidad de
2 canales, conecte pre-out a Line Input.
3.2 In caso invece di utilizzo di un sistema hi-fi a 2 canali, collegare la pre-out all'ingresso Line.
3.2 Sluit bij een tweekanaals hifisysteem 2-channel hi-fi system pre-out aan op Lijningang (Line
Input).
3.2 Hvis der anvendes et 2-kanals hi-fi system, skal pre-out tilsluttes til Linieudgang (Line Input).
3.2 При использовании с 2-канальной hi-fi системой подключите выход предварительного
усилителя к линейному входу.
4. Controls / Bedienelemente / Réglages / Controles / Regolazioni / Bediening / Styrningar / Органы управления
4.1 Set Volume to balance subwoofer output with your system.
4.1 Gleichen Sie die Wiedergabe des Subwoofers mit dem Balanceregler am System ab.
4.1
4.2
3.1
4.3
4.1 Réglez le volume de façon à ce que la sortie du caisson de grave corresponde à celle de
votre chaîne.
4.1 Fije el volumen para equilibrar la salida del subwoofer con el sistema.
4.1 Regolare il volume per equilibrare il livello d'uscita del subwoofer con il resto del sistema.
4.1 Stel het volume in om de uitvoer van de subwoofer af te stemmen op uw systeem.
4.1 Indstil Volume (Lydstyrke) for at justere subwooferens udgangseffekt, så den passer til
udgangseffekten på dit system.
3.2
4.1 Настройте громкость для согласования выходного сигнала сабвуфера с вашей системой.
4.2 Adjust Frequency to integrate subwoofer with your system.
4.2 Stellen Sie die Übergangsfrequenz ein, um den Subwoofer in Ihr System zu integrieren.
4.2 Réglez la fréquence pour que le caisson de grave soit parfaitement intégré au système.
4.2 Haga el ajuste de frecuencia para integrar el subwoofer en el sistema.
4.2 Impostare la frequenza che consenta di ottenere la migliore integrazione possibile del
subwoofer con il resto del sistema.
4.2 Stel de frequentie af om de subwoofer te integreren met uw systeem.
4.2 Indstil Frequency (Frekvens) for at tilpasse subwooferen til frekvensniveauet for dit system.
4.2 Отрегулируйте частоту для полной интеграции сабвуфера в вашу систему.
4.3 Set Phase for best system sound (0 = normal).
4.3 Stellen Sie die Phase für den optimalen Sound des Systems ein (0 = normal).
4.3 Réglez la phase pour obtenir le meilleur son (0 = normal).
4.7
4.4
4.6
4.5
4.3 Fije la fase para obtener el sonido de máxima calidad (0 = normal).
4.3 Regolare la fase (Phase) in modo da ottenere la migliore resa sonora del sistema (0 = normale).
4.3 Stel Phase in voor het beste systeemgeluid (0 = normaal).
4.3 Indstil Phase (fase) så du opnår den bedste lyd fra din opstilling (0 = normal)
4.3 Настройте фазировку для наилучшего качества звука (0 = нормально).
4.4 Mains power on / off.
4.4 Netz ein/aus.
4.4 Secteur électrique allumé / éteint.
4.4 Encendido/apagado de la alimentación.
4.4 Pulsante d'accensione/spegnimento.
4.4 Hoofdstroom aan/uit.
4.4 Huvudströmbrytare på / av.
4.4 Включение и выключение питания от электросети.
4.7 For continued protection against fire hazard, replace only with specified fuse:
S80: 230V = T0.8AL 250V / 115V = T1.6AL 250V
S90: 230V = T1AL 250V / 115V = T2AL 250V
4.5 AC power socket.
4.7 Zur Vermeidung von Bränden nur durch vorgeschriebene Sicherung ersetzen:
4.5 Netzbuchse.
4.5 Prise d’alimentation courant AC.
4.5 Toma de alimentación CA.
4.5 Presa di alimentazione CA.
4.5 AC-voedingsaansluiting.
4.5 Vekselstrømsstik.
4.5 Гнездо питания переменного тока.
4.6 Mains voltage selector switch.
4.6 Netzspannungswahlschalter.
4.6 Commutateur de sélection de la tension du secteur.
4.6 Interruptor selector de tensión de red.
4.6 Commutatore di selezione della tensione di rete.
4.6 Keuzeschakelaar netspanning.
4.6 Spændingsomskifter.
4.6 Селекторный переключатель напряжения питания.
S80: 230V = T0.8AL 250V / 115V = T1.6AL 250V
S90: 230V = T1AL 250V / 115V = T2AL 250V
4.7 Pour garantir une protection continue contre les risques d'incendie, merci de remplacer
uniquement avec les types de fusibles indiqués:
S80: 230V = T0.8AL 250V / 115V = T1.6AL 250V
S90: 230V = T1AL 250V / 115V = T2AL 250V
4.7 Para una continua protección contra daños de incendio, reemplace sólo con el fusible
especificado:
S80: 230V = T0.8AL 250V / 115V = T1.6AL 250V
S90: 230V = T1AL 250V / 115V = T2AL 250V
4.7 Per una costante protezione dal rischio di incendio, si prega di sostituire solamente con il
fusibile indicato:
S80: 230V = T0.8AL 250V / 115V = T1.6AL 250V
S90: 230V = T1AL 250V / 115V = T2AL 250V
4.7 Vervang de zekering alleen door een zekering van het opgegeven type, zodat het toestel
blijvend beveiligd is tegen het risico van brand:
S80: 230V = T0.8AL 250V / 115V = T1.6AL 250V
S90: 230V = T1AL 250V / 115V = T2AL 250V
4.7 For fortsat beskyttelse mod brandfare må sikringer kun udskiftes med specificerede
sikringer:
S80: 230V = T0.8AL 250V / 115V = T1.6AL 250V
S90: 230V = T1AL 250V / 115V = T2AL 250V
4.7 Для длительной защиты от возгорания плавкие предохранители необходимо заменять
только на такие как:
S80: 230B = T0.8AL 250B / 115B = T1.6AL 250B
S90: 230B = T1AL 250B / 115B = T2AL 250B
S80/S90
Technical specifications / Technische Daten / Caractéristiques techniques / Especificaciones técnicas / Specifiche
tecniche / Technische specificaties / Tekniske specifikationer / Технические характеристики
S80
S90
Sensitivity
250mV for full power output
200mV for full power output
Rated output power
50W
70W
Frequency response
40 - 180Hz
40 - 180Hz
Drive units
1 x 6.5" long-throw woofer
1 x 8" long-throw woofer
Crossover
40 - 180Hz continuous/active
40 - 180Hz continuous/active
Max. power consumption
70W
90W
Magnetic shielding
Shielded to within 150mm of product
Shielded to within 100mm of product
Speaker dimensions
11" x 9" x 13"
12.5" x 12.5" x 12.5"
Weight
8.2Kg
10.6kg
www.cambridge-audio.com
Part No. AP25592/6
Important Safety Instructions
Wichtige SicherheitsmaBnahmen
Consignes de securite importantes
Iflstrucciones de seguridad importantes
EspecificaQoes tecnicas
Precauzioni importanti ai fini della sicurezza
Vigtige sikkerhedsforanstaltninger
Viktiga sakerhetsinstruktioner
Ba>KHble IIIHCTpyKLI,lII111 no TeXHIIIKe 6e30nacHocTIII
m~*~:t~~
8
Cambridge Audio'"
Important safety instructions
For your own safety please read the following important safety instructions
carefully before attempting to connect this unit to the mains power supply.
They will also enable you to get the best performance and prolong the life of
the unit:
1. Read these instructions.
2. Keep these instructions.
3. Heed all warnings.
The lightning flash with the arrowhead symbol within an equilateral triangle
is intended to alert the user to the presence of un-insulated 'dangerous
voltage' within the product's enclosure that may be of sufficient magnitude
to constitute a risk of electric shock to persons.
5. Do not use this apparatus near water.
The exclamation point within an equilateral triangle is intended to alert the
user to the presence of important operating and maintenance instructions
in the service literature relevant to this appliance.
6. Clean only with a dry cloth.
WEEE symbol
7. Do not block any ventilation openings. Install in accordance with the
manufacturer's instructions.
The crossed-out wheeled bin is the European Union symbol for
indicating separate collection for electrical and electronic
equipment. This product contains electrical and electronic
equipment which should be reused, recycled or recovered and
should not be disposed of with unsorted regular waste. Please
return the unit or contact the authorised dealer from whom you purchased
this product for more information.
4. Follow all instructions.
8. Do not install near any heat sources such as radiators, heat registers,
stoves, or other apparatus (including amplifiers) that produce heat.
9. Do not defeat the safety purpose of the polarized or grounding-type plug.
A polarized plug has two blades with one wider than the other. A
grounding type plug has two blades and a third grounding prong. The wide
blade or the third prong are provided for your safety. If the provided plug
does not fit into your outlet, consult an electrician for replacement of the
obsolete outlet.
10. Protect the power cord from being walked on or pinched, particularly at
plugs, convenience receptacles, and the point where they exit from the
apparatus.
11. Only use attachments/accessories specified by the manufacturer.
12. Use only with the ca.rt, stand, tripod, bracket, or table
specified by the manufacturer, or sold with the apparatus.
When a cart is used, use caution when moving the
cart/apparatus combination to avoid injury from tip-over.
(I)
13. Unplug this apparatus during lightning storms or when unused for long
periods of time.
14. Refer all servicing to qualified service personnel. Servicing is required
when the apparatus has been damaged in any way, such as the powetsupply cord or plug being damaged, liquid has been spilled or objects
have fallen into the apparatus, the apparatus has been exposed to rain
or moisture, does not operate normally, or has been dropped.
WARNING - To reduce the risk of fire or eiectric shock, do not expose this unit
to rain or moisture.
The unit must be installed in a manner that makes disconnection of the
mains plug from the mains socket outlet (or appliance connector from the
rear of the unit) possible. Where the mains plug is used as the disconnect
device, the disconnect device shall remain readily operable. Only use the
mains cord supplied with this unit.
Please ensure there is ample ventilation (at least 10cm clearance all round).
Do not put any objects on top of this unit. Do not situate it on a rug or other
soft surface and do not obstruct any air inlets or outlet grilles. Do not cover
the ventilation grilles with items such as newspapers, table-cloths, curtains
etc.
This unit must not be used near water or exposed to dripping or splashing
water or other liquids. No objects filled with liquid, such as vases, shall be
placed on the unit.
)t
CE mark
( E:
This product complies with European Low Voltage (2006/95/EC)
and Electromagnetic Compatibility (89/336/EEC) Directives when
used and installed according to this instruction manual. For
continued compliance only Cambridge Audio accessories should be used
with this product and servicing must be referred to qualified service
personnel.
C-Tick mark
~~ This product meets the Australian Communications Authority's Radio
"
communications and EMC requirements.
Ross Test Stamp
C1
This product meets Russian electronic safety approvals.
FCC regulations
NOTE: THE MANUFACTURER IS NOT RESPONSIBLE FOR ANY
RADIO OR TV INTERFERENCE CAUSED BY UNAUTHORIZED
MODIFICATIONS TO THIS EQUIPMENT. SUCH MODIFICATIONS
COULD VOID THE USER AUTHORITY TO OPERATE THE
EQUIPMENT.
~ThiS equipment has been tested and found to comply with the limits
~for a Class B digital device, pursuant to Part 15 of the FCC Rules.
These limits are designed to provide reasonable protection against harmful
interference in a residential installation. This equipment generates, uses
and can radiate radio frequency energy and, if not installed and used in
accordance with the instructions, may cause harmful interference to radio
communications. However, there is no guarantee that interference will not
occur in a particular installation.
If this equipment does cause harmful interference to radio or television
reception, which can be determined by turning the equipment off and on,
the user is encouraged to try to correct the interference by one or more of
the following measures:
- Re-orient or relocate the receiving antenna.
- Increase the separation between the equipment and receiver.
- Connect the equipment into an outlet on a circuit different from that to
which the receiver is connected.
- Consult the dealer or an experienced radio/TV technician for help.
Limited warranty
Ventilation
IMPORTANT - The unit will become hot when in use. Do not stack multiple
units on top of each other. Do not place in an enclosed area such as a
bookcase or in a cabinet without sufficient ventilation. Ensure that small
objects do not fall through any ventilation grille. If this happens, switch off
immediately, disconnect from the mains supply and contact your dealer for
advice.
Positioning
Choose the installation location carefully. Avoid placing it in direct sunlight or
close to a source of heat. No naked flame sources, such as lighted candles,
should be placed on the unit. Also avoid locations subject to vibration and
excessive dust, cold or moisture. The unit can be used in a moderate
climate.
This unit must be installed on a sturdy, level surface. Do not place in a
sealed area such as a bookcase or in a cabinet. Any space open at the back
(such as a dedicated equipment rack) is fine however. Do not place the unit
on an unstable surface or shelf. The unit may fall, causing serious injury to
a child or adult as well as serious damage to the prodUCt. Do not place other
equipment on top of the unit.
Due to stray magnetic fields turntables or CRT TVs should not be located
nearby due to possible interference. Electronic audio components have a
running in period of around a week (if used several hours per day). This will
allow the new components to settle down, the sonic properties will improve
over this time.
Power sources
The unit should be operated only from the type of power source indicated on
the marking label. If you are not sure of the type of power supply to your
home, consult your product dealer or local power company.
This unit has been designed to be left in Standby mode when not in use, this
will increase the life of the subwoofer (this is true with all electronic
equipment). To turn the unit off completely switch off on the rear panel. If
you do not intend to use this unit for a long period of time, unplug it from the
mains socket.
Overloading
Do not overload wall outlets or extension cord as this can result in a risk of
fire or electric shock. Overloaded AC outlets, extension cords, frayed power
cords, damaged or cracked wire insulation, and broken plugs are dangerous.
They may result in a shock or fire hazard.
Be sure to insert each power cord securely. To prevent hum and noise, do
not bundle the interconnect leads with the power cord or speaker leads.
Cleaning
To clean the unit, wipe its case with a dry, lint-free cloth. Do not use any
cleaning fluids containing alcohol, ammonia or abrasives. Do not spray an
aerosol at or near the unit.
Battery disposal
Please dispose of any discharged batteries according to
environmental/electronic waste disposal guidelines.
local
Loudspeakers
Before making any connections to loudspeakers, make sure all power is
turned off and only use suitable interconnects.
Servicing
These units are not user serviceable, never attempt to repair, disassemble
or reconstruct the unit if there seems to be a problem. A serious electric
shock could result if this precautionary measure is ignored. In the event of a
problem or failure, please contact your dealer.
Cambridge Audio warrants this product to be free from defects in materials
and workmanship (subject to the terms set forth below). Cambridge Audio
will repair or replace (at Cambridge Audio's option) this product or any
defective parts in this product. Warranty periods may vary from country to
country. If in doubt consult your dealer and ensure that you retain proof of
purchase.
To obtain warranty service, please contact the Cambridge Audio authorised
dealer from which you purchased this product. If your dealer is not equipped
to perform the repair of your Cambridge Audio prOduct, it can be returned by
your dealer to Cambridge Audio or an authorised Cambridge Audio service
agent. You will need to ship this product in either its original packaging or
packaging affording an equal degree of protection.
Proof of purchase in the form of a bill of sale or receipted invoice, which is
evidence that this product is within the warranty period, must be presented
to obtain warranty service.
This Warranty is invalid if (a) the factory-applied serial number has been
altered or removed from this product or (b) this product was not purchased
from a Cambridge Audio authorised dealer. You may call Cambridge Audio or
your local country Cambridge Audio distributor to confirm that you have an
unaltered serial number and/or you purchased from a Cambridge Audio
authorised dealer.
This Warranty does not cover cosmetic damage or damage due to acts of
God, accident, misuse, abuse, negligence, commercial use, or modification
of, or to any part of, the product. This Warranty does not cover damage due
to improper operation, maintenance or installation, or attempted repair by
anyone other than Cambridge Audio or a Cambridge Audio dealer, or
authorised service agent which is authorised to do Cambridge Audio
warranty work. Any unauthorised repairs will void this Warranty. This
Warranty does not cover products sold AS IS or WITH ALL FAULTS.
REPAIRS OR REPLACEMENTS AS PROVIDED UNDER THIS WARRANTY ARE
THE EXCLUSIVE REMEDY OF THE CONSUMER. CAMBRIDGE AUDIO SHALL
NOT BE LIABLE FOR ANY INCIDENTAL OR CONSEQUENTIAL DAMAGES FOR
BREACH OF ANY EXPRESS OR IMPLIED WARRANTY IN THIS PRODUCT.
EXCEPT TO THE EXTENT PROHIBITED BY LAW, THIS WARRANTY IS EXCLUSIVE
AND IN LIEU OF ALL OTHER EXPRESS AND IMPLIED WARRANTIES
WHATSOEVER INCLUDING, BUT NOT LIMITED TO, THE WARRANTY OF
MERCHANTABILITY AND FITNESS FOR A PRACTICAL PURPOSE.
Some countries and US states do not allow the exclusion or limitation of
incidental or consequential damages or implied warranties so the above
exclusions may not apply to you. This Warranty gives you specific legal rights,
and you may have other statutory rights, which vary from state to state or
country to country.
Plug Fitting Instructions (UK Only)
The cord supplied with this appliance is factory fitted with a UK mains plug
fitted with a 5 amp fuse inside. If it is necessary to change the fuse, it is
important that a 5 amp one is used. If the plug needs to be changed
because it is not suitable for your socket, or becomes damaged, it should be
cut off and an appropriate plug fitted following the wiring instructions below.
The plug must then be disposed of safely, as insertion into a mains socket
is likely to cause an electrical hazard. Should it be necessary to fit a 3-pin BS
mains plug to the power cord the wires should be fitted as shown in this
diagram. The colours of the wires in the mains lead ofthis appliance may not
correspond with the coloured markings identifying the terminals in your plug.
Connect them as follows:
The wire which is coloured BLUE must be
connected to the terminal which is marked with
the letter 'N' or coloured BLACK.
The wire which is coloured BROWN must be
connected to the terminal which is marked with
the letter 'L: or colou red RED.
FUSE
BLUE
N
The wire which is coloured GREENjYELLOW
must be connected to the terminal which is
marked with the letter 'E' or coloured GREEN.
If a standard 13 amp (BS 1363) plug is used, a 5 amp fuse must be fitted,
or if any other type of plug is used a 5 amp fuse must be fitted, either in the
plug or adaptor, or on the distribution board.
www.cambridge-audio.com
AP25563/1