1
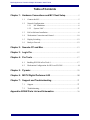
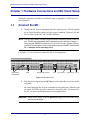
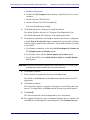
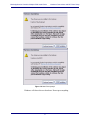
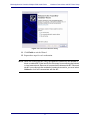
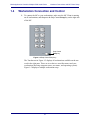
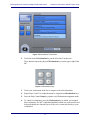
MC Pro Multi Workstation Install Guide Version 2.5.6 Legal Notices This guide is copyrighted ©2010 by Avid Technology, Inc., (hereafter “Avid”), with all rights reserved. Under copyright laws, this guide may not be duplicated in whole or in part without the written consent of Avid. 003, 96 I/O, 96i I/O, 192 Digital I/O, 192 I/O, 888|24 I/O, 882|20 I/O, 1622 I/O, 24-Bit ADAT Bridge I/O, AudioSuite, Avid, Avid DNA, Avid Mojo, Avid Unity, Avid Unity ISIS, Avid Xpress, AVoption, Axiom, Beat Detective, Bomb Factory, Bruno, C|24, Command|8, Control|24, D-Command, D-Control, D-Fi, D-fx, D-Show, D-Verb, DAE, Digi 002, DigiBase, DigiDelivery, Digidesign, Digidesign Audio Engine, Digidesign Intelligent Noise Reduction, Digidesign TDM Bus, DigiDrive, DigiRack, DigiTest, DigiTranslator, DINR, DV Toolkit, EditPack, Eleven, EUCON, HD Core, HD Process, Hybrid, Impact, Interplay, LoFi, M-Audio, MachineControl, Maxim, Mbox, MediaComposer, MIDI I/O, MIX, MultiShell, Nitris, OMF, OMF Interchange, PRE, ProControl, Pro Tools M-Powered, Pro Tools, Pro Tools|HD, Pro Tools LE, QuickPunch, Recti-Fi, Reel Tape, Reso, Reverb One, ReVibe, RTAS, Sibelius, Smack!, SoundReplacer, Sound Designer II, Strike, Structure, SYNC HD, SYNC I/O, Synchronic, System 5, TL Aggro, TL AutoPan, TL Drum Rehab, TL Everyphase, TL Fauxlder, TL In Tune, TL MasterMeter, TL Metro, TL Space, TL Utilities, Transfuser, Trillium Lane Labs, Vari-Fi, Velvet, X-Form, and XMON are trademarks or registered trademarks of Avid Technology, Inc. Xpand! is Registered in the U.S. Patent and Trademark Office. All other trademarks are the property of their respective owners. Product features, specifications, system requirements, and availability are subject to change without notice. Guide Part Number 9324-65009-00 REV A 11/10 Documentation Feedback At Avid, we are always looking for ways to improve our documentation. If you have comments, corrections, or suggestions regarding our documentation, email us at [email protected]. Regulatory and Safety Notices FCC Notice Part 15 of the Federal Communication Commission Rules and Regulations has established Radio Frequency (RF) emission limits to provide an interference free radio frequency spectrum. Many electronic devices produce RF energy incidental to their intended purpose. These rules place electronic equipment into two classes, A and B, depending on the intended use. Class A devices are those that may be expected to be installed in a business or commercial environment. Class B devices are those that may be expected to be installed in a home or residential environment. The FCC requires devices in both classes to be labeled with the interference likelihood and additional operating instructions. The rating label on the equipment will show which class the product is (A or B). Class A product will not have an FCC logo. Class B equipment will have an FCC logo. The information statements differ on the two classes. Class A Equipment This equipment has been tested and found to comply with the limits for a Class A digital device, pursuant to Part 15 of the FCC rules. These limits are designed to provide reasonable protection against harmful interference when the equipment is operated in a commercial environment. This equipment generates, uses, and can radiate radio frequency energy and, if not installed and used in accordance with the instructions, may cause harmful interference to radio communications. Operation of this equipment in a residential area is likely to cause harmful interference, in which case the user will be required to correct the interference at personal expense. Euphonix is Avid. Learn more at www.avid.com Modifications The FCC requires the user to be notified that any changes or modifications made to Avid hardware that are not expressly approved by Avid Technology may void the user’s authority to operate the equipment. Cables Connections to Avid hardware must be made with shielded cables with metallic RFI/EMI connector hoods in order to maintain compliance with FCC Rules and Regulations. Canadian ICES-003 Class A Equipment This Class A digital apparatus meets all requirements of the Canadian Interference-‐Causing Equipment Regulations. Cet appareil numérique de la classe A respecté toutes les exigences du Règlement sur le matériel brouilleur du Canada. Euphonix is Avid. Learn more at www.avid.com European Union Declaration of Conformity Declaration of conformity Konformitätserklärung Déclaration de conformité Declaración de Confomidad Verklaring de overeenstemming Dichiarazione di conformità We/Wir/ Nous/WIJ/Noi: Avid Technology 1925 Andover Street Tewksbury, MA, 01876 USA European Contact: Nearest Avid Sales and Service Office or Avid Technology International B.V. Sandyford Industrial Estate Unit 38, Carmanhall Road Dublin 18, Ireland declare under our sole responsibility that the product, erklären, in alleniniger Verantwortung,daß dieses Produkt, déclarons sous notre seule responsabilité que le produit, declaramos, bajo nuestra sola responsabilidad, que el producto, verklaren onder onze verantwoordelijkheid, dat het product, dichiariamo sotto nostra unica responsabilità, che il prodotto, Euphonix is Avid. Learn more at www.avid.com Product Name(s) : MC Pro Model Number(s): NA Product Options: This declaration covers all options for the above product(s). to which this declaration relates is in conformity with the following standard(s) or other normative documents. auf das sich diese Erklärung bezieht, mit der/den folgenden Norm(en) oder Richtlinie(n) übereinstimmt. auquel se réfère cette déclaration est conforme à la (aux) norme(s) ou au(x) document(s) normatif(s). al que se refiere esta declaración es conforme a la(s) norma(s) u otro(s) documento(s) normativo(s). waarnaar deze verklaring verwijst, aan de volende norm(en) of richtlijn(en) beantwoordt. a cui si riferisce questa dichiarazione è conforme alla/e seguente/i norma/o documento/i normativo/i. The requirements of the European Council: Safety: Directive 2006/95/EC EN 60065:2002 /A1:2006 EMC: Directive 2004/108/EC EN 55103-1:1996 EN 55103-2:1996 Euphonix is Avid. Learn more at www.avid.com LED Safety Notices Avid hardware might contain LED or Laser devices for communication use. These devices are compliant with the requirements for Class 1 LED and Laser Products and are safe in the intended use. In normal operation the output of these laser devices does not exceed the exposure limit of the eye and cannot cause harm. Standard to which conformity is declared: (IEC 60825-‐1) Euphonix is Avid. Learn more at www.avid.com Disposal of Waste Equipment by Users in the European Union Requirements for Rack-mountable Equipment The following rack-‐mount requirements are listed below: • Elevated Operating Ambient — If installed in a closed or multi-‐unit rack assembly, the operating ambient temperature of the rack environment might be greater than room ambient. Therefore, consider installing the equipment in an environment compatible with the maximum ambient temperature (Tma) specified by the manufacturer. • Reduced Air Flow — Installation of the equipment in a rack should be such that the amount of air flow required for safe operation of the equipment is not compromised. Do not block vents. • Mechanical Loading — Mounting of the equipment in the rack should be such that a hazardous condition is not achieved due to uneven mechanical loading. • Circuit Overloading — Consideration should be given to the connection of the equipment to the supply circuit and the effect that overloading of the circuits might have on overcurrent protection and supply wiring. Appropriate consideration of equipment nameplate ratings should be used when addressing this concern. • Reliable earthing — Reliable earthing of rack-‐mounted equipment should be maintained. Particular attention should be given to supply connections other than direct connections to the branch circuit (for example, use of power strips). Euphonix is Avid. Learn more at www.avid.com Lithium Battery Replacement If a battery is supplied in this Avid product it must only be replaced by qualified personnel. Contact Avid Customer Support for assistance. WARNING Danger of explosion if battery is incorrectly replaced. Replace with only the same or equivalent type recommended by the manufacturer. Dispose of used batteries according to the manufacturer’s instructions. ADVARSEL! Lithiumbatteri -‐ Eksplosionsfare ved fejlagtig håndtering. Udskiftning må kun ske med batteri af samme fabrikat og type. Levér det brugte batteri tilbage til leverandøren. ADVARSEL! Lithiumbatteri -‐ Eksplosjonsfare. Ved utskifting benyttes kun batteri som anbefalt av apparatfabrikanten. Brukt batteri returneres apparatleverandøren. VARNING Explosionsfara vid felaktigt batteribyte. Använd samma batterityp eller en ekvivalent typ som rekommenderas av apparattillverkaren. Kassera använt batteri enligt fabrikantens instruktion. VAROITUS Paristo voi räjähtää, jos se on virheellisesti asennettu. Vaihda paristo ainoastaan laitevalmistajan suosittelemaan tyyppiin. Hävitä käytetty paristo valmistajan ohjeiden mukaisesti. Euphonix is Avid. Learn more at www.avid.com Media Application Controller Multiple Workstation Install Guide Table of Contents Chapter 1: Hardware Connections and MC Client Setup .............................5 1.1 Connect the MC.........................................................................................5 1.2 Network Configuration..............................................................................6 1.2.1 1.2.2 MC Standalone............................................................................6 System 5-MC ..............................................................................6 1.3 EuCon Software Installation......................................................................6 1.4 Workstation Connection and Control......................................................10 1.5 Display Switching ...................................................................................12 1.6 Ready to Proceed.....................................................................................12 Chapter 2: Nuendo–PC and Mac ..............................................................................13 Chapter 3: Logic Pro .......................................................................................................15 Chapter 4: Pro Tools .......................................................................................................17 4.1 Enabling EUCON in Pro Tools 9 ............................................................17 4.2 Workstation Configuration for HUI over EUCON ..................................18 Chapter 5: Pyramix ..........................................................................................................22 Chapter 6: MOTU Digital Performer 6.02....................................................... 26 Chapter 7: Support and Troubleshooting ...........................................................27 7.1 Support ....................................................................................................27 7.2 Troubleshooting.......................................................................................27 Appendix A:DAW Parts List and Schematics .................................................... 29 iii Media Application Controller Multiple DAW Install Guide Chapter 1: Hardware Connections and MC Client Setup Schematics and parts are listed for each DAW setup in Appendix A: DAW Parts List and Schematics. 1.1 Connect the MC 1. Unpack the MC from its packaging and select a place to put it. The MC should go on a hard flat surface inorder to allow proper ventilation. (System 5-MC has its own frame for the MC and CM408T modules). NOTE: The MC and CM408T modules require sufficient ventilation space on the bottom. The MC has detachable feet for standalone users without a System 5 frame, but the CM408T modules do not. If you do not use a System 5 frame, you MUST have at least 1 inch of clearance under the CM408T modules and MC or damage to the units may occur. Use Figure 1-1 as a reference to connect the MC to its components. FOOT VGA KEYBOARD USB SWITCH TALKBACK MIC VGA and Keyboard USB LAN Talkback Mic Output LAN HEADPHONES DC IN Foot Switch Headphone DC In Figure 1-1 MC Rear Panel 2. Plug the power supply into the DC In port on the right side as you look at the rear panel. Be careful plugging this in as the connector has easily-bent pins. When the pins are seated, twist the ring on the connector’s side until it locks. Do not turn on the MC yet; network configuration must be completed first. WARNING: Attach power supply to the MC BEFORE plugging into AC power or the unit may be damaged. 5 Media Application Controller Multiple DAW Install Guide 1.2 Network Configuration 1.2.1 MC Standalone Hardware Connections and MC Client Setup Using the RJ-45 Ethernet (included) cables, connect your workstations to the LAN ports on the Netgear RP614 router. Then connect the MC to one of the otherLAN ports on the Netgear router. Because the Netgear has four LAN ports, you must use an additional Ethernet switch if you have more than three workstations. NOTE: You have now created a small local area network comprised of just the MC and your workstations. The MC ships with DHCP enabled, allowing it to automatically obtain an IP address. The Netgear RP614 has a DHCP server and hands out IP addresses to the devices connected to its LAN ports (the MC and your workstations). This allows for easy plug and play network configuration. For this reason, the Netgear router must be turned on before the MC and your workstation. 1.2.2 System 5-MC 1. Connect the MC andCM408T modules to LAN ports on the SonicWALL 1260 router. 2. Connect your workstations to LAN ports on the SonicWALL. The MC ships with DHCP enabled, allowing it to automatically obtain an IP address. The SonicWALL ships from Euphonix with its DHCP server enabled, such that it hands out IP addresses to the MC, CM408T modules, and your workstations. For this reason the SonicWALL must be turned on before the MC, CM408T modules, and your workstations. 1.3 EuCon Software Installation Follow these instructions to install the EuCon Software on each workstation: 1. Insert the Euphonix MC Software Installation CD in your workstation’s CD/ DVD drive. 2. In Mac OS X, double-click the CD icon on the desktop, and double-click the EuConWS package. The Install program launches. Proceed to Step 4. 3. In Windows, if AutoRun is enabled, the setup program starts from the CD automatically. If AutoRun is not enabled: 6 Media Application Controller Multiple DAW Install Guide Hardware Connections and MC Client Setup a. Minimize all programs. b. Double-click My Computer on the desktop to display the drives on your computer. c. Double-click the CD/DVD drive. d. Double-click the EuConWS executable file. The Setup Wizard begins running. 4. Click Next and choose a directory to install the software. The default Windows directory is C:\Program Files\Euphonix\EuCon. The default Macintosh OS X directory is the Applications folder. 5. For Windows installations, click Next to customize the software components to install. EuCon Workstation Core is automatically selected (this is thebasic software used to communicate with the MC. Select further options according to your DAW: a. For Nuendo workstations, select only the EuCon adapter for Nuendo and VST plugin layouts for Nuendo options. b. For Pyramix, select only the EuCon adapter for Pyramix option. c. For all other DAWs, select Studio Monitor Express or Studio Monitor Pro 2 option. WARNING:Running Studio Monitor Express and Studio Monitor Pro 2 on the same machine may cause conflicts and is not recommended 6. Click Next to continue. 7. Select locations for application shortcuts in the Start menu. The default is a EuCon folder in the Start menu with shortcuts to the MC’s applications. 8. Click Next to continue. The Wizard now displays a summary of all options selected during the setup process. To change them, click Back until the desired setup option appears. 9. Click Install. The Wizard installs the selected components to your workstation. 10. The windows installer may ask you abouttwo Euphonix drivers: Euphonix Virtual MIDI Driver and Euphonix Virtual Keyboard. Click Continue Anyway. 7 Media Application Controller Multiple DAW Install Guide Hardware Connections and MC Client Setup Figure 1-2 New Driver prompt Windows will detect the new hardware. Do not press anything. 8 Media Application Controller Multiple DAW Install Guide Hardware Connections and MC Client Setup Figure 1-3 Found New Hardware dialog 11. Click Finish to exit the Wizard. 12. Repeat these steps for each workstation. NOTE: When first running the MC Client, the Windows Firewall may ask whether to block or unblock MC Client and EuCon Discovery from accessing the Internet or local area network. Because all communication between the MC Client and the MC occurs through the workstation’s network connection, you must select Unblock or it will not communicate with the MC. 9 Media Application Controller Multiple DAW Install Guide 1.4 Hardware Connections and MC Client Setup Workstation Connection and Control 1. To connect the MC to your workstations, make sure the MC Client is running on all workstations, and thenpress the Strip Control Setup key on the right side of the MC. Strip Control Layouts Flip Home MC Nudge Nudge Bank Bank Setup Setup Strip Control Setup key Figure 1-4 Strip Control Setup key The Touchscreen in Figure 1-5 displays all workstations available on the network in the right pane. There are two choices: none/disconnect and your workstation (showing computer name, user name, and operating system). Figure 1-5 displays a multiple workstation setup. 10 Media Application Controller Multiple DAW Install Guide Hardware Connections and MC Client Setup Figure 1-5 Workstation Touchscreen 2. Touch the desired Workstation key on the left of the Touchscreen. These buttons map to the physical Workstation keys on the upper right of the MC. Workstation 1 2 3 4 Figure 1-6 Workstation keys 3. Touch your workstation in the list to assign it to the selected number. 4. Repeat Steps 2 and 3 for eachworkstation to assign them toWorkstation keys. 5. Press the Strip Control Setup key again to exit Workstation assignment mode. 6. To control a workstation, press the Workstation key to which you assigned that workstation. The MC’s right-hand trackball (which acts as the mouse) and keyboard should now function just as if they were connected directly to your workstation. 11 Media Application Controller Multiple DAW Install Guide 1.5 Hardware Connections and MC Client Setup Display Switching The MC uses the Ontrack ADU-200 relay device to control a KVM (keyboard/video/ mouse) switch with an RJ-45 port, such as the Gefen eX-Tend-It series. To implement this functionality: 1. Connect the video outputs of your workstations to the KVM inputs. 2. Connect the KVM video output to your main display. 3. Connect the Ontrack ADU-200’s USB plug to the MC’s USB port (left side of MC’s rear panel). 4. Connect a shielded RJ-45Ethernet cable from the Ontrack’s RJ-45 port to your KVM’s RJ-45 port. The cable MUST BE SHIELDED or the switching will not function properly. Check that the RJ-45 connectors have metal ends. Now when a Workstation key is pressed, the MC sends a switch command to the KVM and changes your display to reflect that KVM input. NOTE: Since the MC does not know the order your workstations were connected to the KVM, we recommend assigning the workstation attached to KVM input 1 to Workstation key 1, the workstation attached to KVM input 2 to Workstation key 2, etc. Otherwise the MC will not control the desired workstation when the display is switched. 1.6 Ready to Proceed You have successfully connected your MC to your workstation. Proceed to the chapter of this installation guide for your DAW software to configure it to work with the MC. Chapter 3: Logic Pro Chapter 2: Nuendo–PC and Mac Chapter 4: Pro Tools Chapter 5: Pyramix NOTE: If your MC did not connect properly, or a step failed, see Chapter 6: Support and Troubleshooting. 12 Media Application Controller Multiple Workstation Install Guide Chapter 2: Nuendo–PC and Mac To enable Nuendo to work with the MC, you must obtain a Nuendo EuCon Adapter license from Euphonix and download it to yourNuendo USB protection device (dongle): 1. Close all open applications. Make sureyour Syncrosoft USB dongle is plugged into your Nuendo workstation. 2. Start the Syncrosoft License Control Center by choosing Start Menu->Steinberg Nuendo 4->License Control Center. Windows: Click Start Menu->Syncrosoft->License Control Center. OS X: Navigate to the Applications\Syncrosoft folder and run License Control Center. 3. Choose License Download from the Wizards menu. Choose License Transfer to transfer an existing Nuendo EuCon license to a new USB dongle. 4. When prompted, enter the activation code for Nuendo EuCon provided by Euphonix. 5. Make sure you are downloading the correct license, then click Next. 6. If you have more than one Syncrosoft USB dongle attached to your workstation, select the one onto which you wish to download the license. Click Next. 7. Press Download to transfer the license onto your USB dongle. 8. Close the wizard and open Nuendo. The Nuendo EuCon Adapter must be installed must be installed during the EuConWS software installation (see page 7). Note thatthis is the MC Client’s Nuendo adapter. For Nuendo to communicate with the MC, Nuendo’s EuCon device must be added in the Nuendo Device Setup dialog: 1. Choose Device Setup from Nuendo’s Devices menu. The Device Setup dialog opens. 2. Click the + button (add) on the top-left. A drop-down list of devices appears. EuCon should appear near the top of the list. If not, check that you have successfully downloaded the license for the EuCon Adapter to your USB dongle using the License Control Center. 13 Media Application Controller Multiple Workstation Install Guide 3. Nuendo–PC and Mac Select EuCon from the drop-down list. The EuCon device is added and the MC surface immediately updates with the Nuendo default Application Set to reflect the open Nuendo project. For the System 5-MC, the MC auto-assigns the Nuendo channels to the CM408T strips, beginning with channel 1 on the first CM408T’s leftmost strip. Steinberg has created a default Nuendo Application Set with the most commonly used functions and commands. 14 Media Application Controller Multiple Workstation Install Guide Chapter 3: Logic Pro Logic Pro 8.02 has EuCon support and connectivity built into the application. With the MC Client running on your Macintosh, load Logic Pro, and the MC automatically connects to the application and displays the Logic Pro application set. Versions of Logic prior to 8.02 do not have EuCon support. However, the updates for Logic are part of Apple’s Software Update program, so simply check for new updates (Apple Menu-> System Preferences -> Software Update -> Check Now), download, and install the Logic 8.02 update. Then re-open Logic and the MC will connect. You have now successfully set up the MC to operate with your Logic Pro workstation. • See the MC Operation Manual to learn about the MC’s application sets, touchscreens, and any other information. • Check the Euphonix website (www.euphonix.com) for technical bulletins, product support notices, and new software releases. • Please register your MC by filling out the online registration form at www.euphonix.com/registration. Registration is required to download software updates. 15 Media Application Controller Multiple Workstation Install Guide 16 Logic Pro Media Application Controller Multiple Workstation Install Guide Chapter 4: Pro Tools 4.(QDEOLQJ(8&21LQ3UR7RROVY After installing the EuCon software and restarting your Mac, the MC Client launches automatically upon startup of OS X and EuCon applications can now function. To configure Pro Tools to work with the MC: 1. Launch Pro Tools. 2.Choose Setup > Peripherals, and click to go to the Ethernet Controllers tab. 3.&OLFNWRVHOHFW(QDEOH(8&21 4.Click OK. You do not need to configure any other Ethernet Controllers settings. These settings do not apply to EUCON. 5. Verify the Mix window displays a blue-green border around Pro Tools tracks that are currently displayed on the MC Pro or System5-MC. Color outlines in the Mix window showing currently banked tracks 17 Media Application Controller Multiple Workstation Install Guide 4. Workstation ConfigurationIRU+8,RYHU(8&21 After installing the EuCon software and restarting your Mac, the MC Client launches automatically upon startup of OS X and EuCon applications can now function. To configure your HUI or Mackie Control applications to work with the MC: 1. Click Apple Menu-> System Preferences. The System Preferences dialog opens. 2. Click on EuPrefsPane. The Euphonix Preferences pane opens. Figure 4-1 Euphonix Preferences pane 3. Open a Finder window and navigate to the folder containing the HUI or Mackie Control application(s) you wish to use. 4. Drag the application(s) into the Euphonix Preferences pane. 18 Media Application Controller Multiple Workstation Install Guide Pro Tools NOTE: You must drag the actual application icon into the preferences pane, not a shortcut or alias! 5. For each application, select HUI or Mackie Control from the drop-down menu under Protocol, and select the MIDI ports for the application to use. NOTE: The EuCon software sets up a virtual MIDI driver with 32 ports, and each application can use up to four (the limit with HUI applications). Keep track of which application uses which ports in order to configure them properly. 4. 6. Close the Euphonix Preferences pane. When prompted, restart your Macintosh. 7. Connect the MC to the Macintosh. Pro Tools ConfigurationIRU+8,RYHU(8&21 To configure Pro Tools to recognize the MC: 1. Launch Pro Tools. 2. Choose Peripherals from the Operations menu. The Peripherals dialog opens. 3. Click the MIDI Controllers tab. Figure 4-2 Pro Tools Peripherals dialog 19 Media Application Controller Multiple Workstation Install Guide Pro Tools Pro Tools has configuration boxes for the four possible controllers. MC standalone users need to configure only one controller. System 5-MC users need to configure one controller for each CM408T module because the MC mirrors one CM408T and does not require an extra HUI controller. 4. For each controller you use, select HUI from the Type drop-down menu. 5. Configure each controller to have the input and output MIDI ports set for ProTools in the Euphonix Preferences Pane. Click on theReceive From and Send To drop-down menus, hover over Predefined, then select from the Euphonix MIDI ports. For example, if you set ProTools to use MIDI ports 9–12, your first HUI controller’s receive and transmit ports should be set to EphMIDIEP9. Figure 4-3 Excerpt from Pro Tools MIDI menu 6. Select 8 from the Ch # drop-down menu as the number of channels for each controller. 7. Press OK. The MC updates the channel and track information. NOTE: System 5-MC owners with joystick panners can set the last controller to Surround Panner to use the MC's joysticks to control panning in Pro Tools. See the Media Application Controller Operation Manual for more information. 20 Media Application Controller Multiple Workstation Install Guide 21 Pro Tools Media Application Controller Multiple Workstation Install Guide Chapter 5: Pyramix (v6.1.3Y) To enable the use of the MC with Pyramix, the EuCon adapter for Pyramix checkbox must be selected during the MC Client software installation (see page 7). Then add the MC as an installed controller in Pyramix: 1. Launch the Pyramix Virtual Studio software. 2. Press the Pref key on the top bank of the MC Soft Keys. The bank changes to show two options: Home: Restores the first bank of soft keys Show Settings: Opens the Pyramix Settings dialog box (alternatively, choose All Settings from the Settings menu in Pyramix Virtual Studio). 3. Click Show Settings. A dialog appears showing a list of the various types of adjustable settings on the left side. 22 Media Application Controller Multiple Workstation Install Guide Pyramix Figure 5-1 Pyramix Settings 4. Click Controller. The right pane shows any installed controllers. However, at this point the pane is empty unless other interface controllers have been installed previously. 23 Media Application Controller Multiple Workstation Install Guide 5. Pyramix Click the Add button. The Controller Properties dialog opens. Figure 5-2 Controller Properties dialog 6. Type the desired name for the MC in the Name field (i.e., MC in Studio 2). 7. Select the Enable checkbox. 8. Choose OASIS from the Driver drop-down selection box. 9. Click the Properties button next to the Driver selection box. The OASIS Configuration Properties dialog opens. Figure 5-3 OASIS Configuration Properties dialog 10. Select EuCon from the Transport drop-down menu. If EuCon is not in the drop-down menu, it is probably because the MC Client is not running. Check that the MC Client menu tray icon is present. If not, launch the MC Client using the shortcuts in the Start menu or the Euphonix folder. 24 Media Application Controller Multiple Workstation Install Guide Pyramix Leave the Station ID at its default setting of 1 unless you have multiple controllers, in which case simply increment the setting (i.e., if two controllers are installed, set the Station ID = 3 for the MC). 11. Press OK to exit that dialog, press OK on the Controller Properties dialog and press OK on the General Settings dialog. 12. Close Pyramix, reboot the workstation, and then open Pyramix Virtual Studio. Pyramix will not connect to the MC properly without rebooting the workstation. The MC will now load the default Pyramix Application Set if a project is open. Otherwise, the Application Set will not be loaded, but the Soft Keysat the top-left illuminate to show that EuCon communication is enabled. 25 Chapter 6: MOTU Digital Performer 6.02 6.1 Configuration 1. In DP 6, goto: Setup > Control Surfaces 2. Press + 3. Select EuCon from the dropdown menu Figure 11-16 DP6 - Add Control Surface NOTE: “Listen to Control Surfaces in Background” should be Enabled at all times when using EuCon Control Surface Driver. 26 Media Application Controller Multiple Workstation Install Guide Chapter 7: Support and Troubleshooting The MC is a professional control surface engineered with industrial-grade components, and it should operate reliably in your studiosetup. It is, however, a complex device and issues can arise due to environmental or other factors. Euphonix provides a one year warranty on the MC and CM408T modules. If you are having trouble with your MC, these sections can either resolve the problem or provide useful troubleshooting information for our technical support personnel. 7.1 Support Euphonix maintains a support section for the MC on our website: http://www.euphonix.com/support/mc.htm. This page has the latest versions of: • the EuCon software (for both workstations and the MC); • this manual; • constantly expanding FAQ section. You must sign up for a user account to download new versions of the EuCon software. If you cannot find an answer for your question in this manual, consult the FAQ section to see if it is answered there. Those who purchased their MC through a VAR (value-added reseller), such as Guitar Center Pro, are supported by that reseller. Euphonix does not provide service directly to VAR customers. This avoids confusion between Euphonix and your VAR regarding your MC and its support needs. System 5-MCs are supported only by Euphonix. 7.2 Troubleshooting If you are having problems with your MC or System-5 MC: 1. Look for a solution in the Common Issues and Solutions section below. 2. Then try the Euphonix website’s FAQ or technical bulletins. 3. If you still are unable to solve your issue, contact your VAR (if applicable) or Euphonix for support. Our technical support phone hours (650-855-0412) areMonday through Friday 9 AM – 5 PM. The website is always available. 27 Media Application Controller Multiple Workstation Install Guide Support and Troubleshooting Common Issues and Solutions My MC does not turn on. Make sure the MC’s power connector is securely connected. Push on it lightly to seat it, twist the outer ring to lock it onto the MC, and make sure the transformer is plugged into the wall. The MC cannot connect to a workstation; the workstation does not appear in the MC's Workstation Setup screen. • • • • Make sure the MC Client is installed on the workstation, and that the Windows Firewall is not blocking the MC Client and EuCon Discovery applications. The MC, CM408T modules, and workstation must be connected to the same network segment (router/switch): the Netgear RP614 or SonicWALL 1260. Both the workstation and MC must have thesame version of the EuCon software. To further troubleshoot this issue, we recommend using a cross-over cable between the MC and one workstation, to remove network variables from the equation. Once this setup is working, re-connect the MC and workstation(s) to the switch/router, and verify proper operation. The MC does not connect to Nuendo. • • • The Nuendo EuCon Adapter must also be installed when installing the EuCon software on your workstation. Make sure Studio Monitor Pro isNOT installed, as SME usurps Nuendo when installed on the same machine. Make sure your Nuendo license includes EuCon connectivity, and that you have added the EuCon device in Nuendo Device Setup. Make sure the MC is properly connected to the workstation. The MC’s Main Touchscreen should display the networkname of your workstation in the upper left-hand corner. The MC does not connect to Pyramix. • The Pyramix EuCon Adapter must alsobe installed when installing the EuCon software on your workstation. Make sure Studio Monitor Pro isNOT installed, as SME interferes with Pyramix-MC connectivity. • Verify that the Pyramix connection procedure has been properly executed, and that the MC is properly connected to the workstation. The talkback mic does not produce any audio. The talkback mic is a condenser microphone and the XLR output is at mic level so it must be connected to a pre-amp with +48V phantom power. 28 Media Application Controller Multiple Workstation Install Guide Appendix A: DAW Parts List and Schematics The following diagrams illustrate how to use the supplied parts to interconnect the MC with the supported DAWs. System 5 MC QTY (32 Fader shown) DESCRIPTION 1 Euphonix 32 Fader System 5 MC 1 1 1 Sonic Wall Pro 1260 DHCP Router/Ethernet Switch Apple 20" Cinema Display Euphonix USB Relay Box (included with Euphonix packout) 1 Euphonix RJ45 Control Cable (included with Euphonix packout) 1 DVI Cable M-M (included with Cinema Display packout) 6 1 Ethernet Cable USB Memory Stick (for app sets and configuration data) 1 PC Audio Labs (or equivalent) Workstation fitted: 1 1 1 1 1 2 Nuendo 4.2.2 (PC Version) Euphonix Nuendo EUCO License Euphonix Studio Monitor Pro V1.0 RME Fireface 400 Gefen DVI Detective DVI Cable M-M ( 1 included with Gefen packout) Firewire Cable Ethernet Cable Audio Cables for Speakers 1 1 1 Apple G5 Workstation fitted: 1 1 1 2 Apple Logic Pro 8.02 Apogee Ensemble Audio Interface Gefen DVI Detective DVI Cable M-M ( 1 included with Gefen packout) Firewire Cable Ethernet Cable Audio Cables to Nuendo Audio Input(s) 1 1 1 Apple G5 Workstation fitted: 1 1 1 2 DigiDesign ProTools LE7 (or higher) DigiDesign 007 Rack Gefen DVI Detective DVI Cable M-M ( 1 included with Gefen packout) Firewire Cable Ethernet Cable Audio Cables to Nuendo Audio Input(s) 1 1 29 Media Application Controller Multiple Workstation Install Guide H G GEFEN 4 x 2 DVI SW USB USB OUT DVI OUT APPLE CINEMA DISPLAY DVI IN USB IN DVI IN DVI IN DVI IN DVI IN 1 USB IN RJ45 EUPHONIX SYSTEM 5MC FADERS 1-8 USB EUPHONIX SYSTEM 5MC FADERS 9-16 EUPHONIX MC CONTROLLER USB DVI OUT NET GEFEN DVI DETECTIVE EUPHONIX SYSTEM 5MC FADERS 17-24 EUPHONIX SYSTEM 5MC FADERS 25-32 DVI IN NET GEFEN DVI DETECTIVE DVI OUT 1 16 15 14 13 SONIC WALL 1260 ROUTER/SWITCH 2 24 24 23 22 21 20 19 18 17 3 5 WAN 4 6 7 8 9 10 11 12 NET 10 WAN 11 USB FIREWIRE NETWORK DVI ANALOG Legend: Comments - 220 Portage Ave. Palo Alto, CA 94306 Revisions Scale 1 2 3 4 2 USB RELAY BOX (supplied) DVI IN NET NET 2 1 9 - USB IN DVI OUT NET 1 3 2 4 5 6 8 7 8 30 Drawing 3 GEFEN DVI DETECTIVE PC AUDIO LABS NUENDO 3.2 NET 1 NET APPLE G5 LOGIC PRO NET 2 NET 1 DVI OUT APPLE G5 Protools LE NET 2 USB USB PCI DVI OUT DVI OUT PCIe USB FW400 RME FIREFACE 400 LINE OUT ADAT OUT SPDIF OUT 1 2 PCIe FIRE WIRE SPDIFIN ADAT IN LINE IN INST IN MIC IN USB 1 2 1 2 1 4 3 2 1 4 3 2 USB FW400 APOGEE ENSEMBLE LINE OUT WC OUT 1 2 3 4 5 6 7 8 USB MIC IN FW-400 WC IN LINE IN USB FW400 Digidesign 002 Rack LINE OUT 1 2 USB 1 2 3 4 1 2 3 4 7 USB 1 2 1 2 3 4 5 6 7 8 6 Apprvl USB IN DVI IN MIC IN LINE IN FW-400 5 DH 4 REMOTE 1 2 3 4 1 2 3 4 1 2 4 LAN PORTS EUPHONIX INC. EUPHONIX S5-MC 32 FADER MULTI DAW INTERCONNECT Drafter ORG 5-05-06 DH REV1 REV2 REV3 REV4 REV5 REV6 REV7 NONE This drawing represents original concepts and ideas that belong exclusively to Euphonix. The information presented herein is not to be reproduced in any form without prior written consent from Euphonix. Title DH Designer F E 3 R Sub D 2 Rs C B A 1 L C Studio Monitor Pro V1.0 LAN PORTS Ls Euphonix EUCON License Connections Power Monitor USB Ethernet Mouse & Keyboard Headphone Connector Footswitch Connector External w/ IEC connector VGA HD 15 D Type (1024x768) 2 USB 1.1 RJ45 -‐ 100MB IEEE 802.3 PS-‐2 service ports ¼” Stereo ¼” Mono Specifications Power Requirements Power Consumption Tempreture of Operation Dimensions Weight Heat Dissipation MC Pro Technical Specification 110-‐240 VAC; 50 or 60 Hz (Auto-‐ranging) 150W Max (80W avgerage) 5-‐35 ºC H 91.5mm W 952.5mm (914.5mm w/out end caps) D 526mm 40 lbs (18.2 kg) 512 BTU/hr Euphonix is Avid. Learn more at www.avid.com Avid Technical Support (USA) Product Information 2001 Junipero Serra Boulevard Daly City, CA 94014-3886 USA Visit the Online Support Center at www.avid.com/support For company and product information, visit us on the web at www.avid.com