1
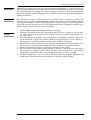
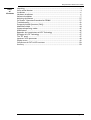
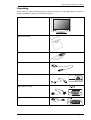
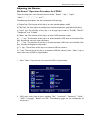
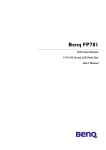
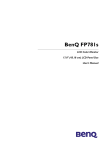
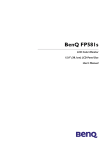
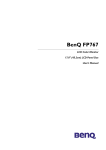
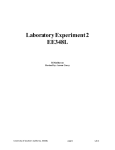
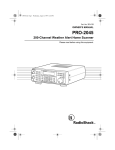
Benq FP2081
LCD Color Monitor
20.1" (51cm) LCD Panel Size
User's Manual
Benq LCD Color Monitor User's Guide
Copyright
Disclaimer
2002. Benq Corporation (formerly Acer Communications & Multimedia Inc.). All rights reserved.
No part of this publication may be reproduced, transmitted, transcribed, stored in a retrieval system or translated into any language or computer language, in any form or by any means, electronic,
mechanical, magnetic, optical, chemical, manual or otherwise, without the prior written permission
of Benq Corporation.
Benq Corporation makes no representations or warranties, either expressed or implied, with
respect to the contents hereof and specifically disclaims any warranties, merchantability or fitness
for any particular purpose. Further, Benq Corporation reserves the right to revise this publication
and to make changes from time to time in the contents hereof without obligation of Benq Corporation to notify any person of such revision or changes.
1.
2.
Safety
Instructions
3.
4.
5.
6.
7.
The AC adapter isolates this equipment from the AC supply.
Unplug this product from the wall outlet before cleaning. Do not use liquid or aerosol cleaners. Use a soft cloth to clean the monitor housing and a tape to stick dust and fingerprints on
the screen panel.
Slots and openings on the back or top of the cabinet are provided for ventilation. They must
not be blocked or covered. This product should never be placed near or over a radiator or
heat register, or in a built-in installation unless proper ventilation is provided.
This product should be operated from the type of power indicated on the marking label. If you
are not sure of the type of power available, consult your dealer or local power company.
Never push objects of any kind, or spill liquid of any kind into this product.
Do not attempt to service this product yourself, as opening or removing covers may expose
you to dangerous voltages or other risks. If any above mentioned misuse or other accident
(dropping, mis-operations) occurs, contact qualified service personnel for servicing.
The power supply cord serves as a power disconnect device for pluggable equipment. The
socket outlet shall be installed near the equipment and shall be easily accessible.
English 1
Benq LCD Color Monitor User's Guide
=
Table
==
of
Contents
Unpacking .......................................................................................................................................... 3
Views of the Monitor ..................................................................................................................... 4
Installation ......................................................................................................................................... 6
Hardware Installation ....................................................................................................... 6
Software Installation ....................................................................................................................... 7
Adjusting the Monitor .................................................................................................................. 37
On-Screen" Operation Procedure for FP2081 ...................................................................... 37
Troubleshooting ............................................................................................................................ 43
Frequently Asked Questions (FAQ) ......................................................................................... 43
Need More Help? .......................................................................................................................... 44
Supported operating modes ....................................................................................................... 45
Specifications .................................................................................................................................. 46
Appendix: An Introduction to LCD Technology ................................................................... 47
Principles of LCD Technology .................................................................................................... 47
The TFT panel ................................................................................................................................ 47
Important LCD parameters ........................................................................................................ 48
Display errors ................................................................................................................................ 49
Comparison of CRT & LCD monitors ..................................................................................... 50
Summary .......................................................................................................................................... 50
English 2
Benq LCD Color Monitor User's Guide
Unpacking
Please check you have the following items. If they are missing or are damaged, please contact the
dealer immediately at which you purchased the good.
LCD monitor
Quick Start Guide
CD-ROM
Power cord
Power Adaptor
Signal cable 1: D-Sub
Signal cable 2: DVI-D
English 3
Benq LCD Color Monitor User's Guide
Views of the Monitor
Front View
Back View (1)
English 4
Benq LCD Color Monitor User's Guide
Back View (2): Locations of plugs & sockets
1. Power adaptor jack
2. D-Sub port
3. DVI-D port
4. S-Video port
5. Composite port
6. Power cord
7. D-Sub signal cable
8. DVI-D signal cable
9. S-Video signal cable
10. Composite signal cable
English 5
Benq LCD Color Monitor User's Guide
Installation
Hardware Installation
A. Make sure that the computer and monitor’s power are both turned off. Please follow
the steps to install your LCD monitor.
1 . Connect the signal cable and power adaptor to Benq LCD monitor.
2 . Please connect power cord to power adaptor first and then connect the power adaptor to LCD monitor.
B. Connect the signal cable to the VGA output of the graphics card on the computer.
There are 4 types of signal cables:
a. D-Sub (included and attached)
b. DVI-D (included but not attached)
c. S-Video (not included)
d. Composite (not included)
Note: If you are using AV connector, please connect Video output of device to Composite
port of FP2081.
C. Connect the power cord at the back of the monitor to an AC power socket. Please
make sure that the socket is not blocked or covered, so you can disconnect the unit
from AC supply if you need to. Your monitor is equipped with an automatic power supply for a voltage range from 100 to 240 Volt at a frequency of 50 to 60 Hz. Be sure that
your local power is within the supported range. If you are unsure, ask your electricity
supplier.
English 6
Benq LCD Color Monitor User's Guide
Adjusting the Monitor
On-Screen" Operation Procedure for FP2081
There are 8 keys for user's control, which includes " Power" , " iKey ", "Input" ,
" Menu ", " ↑ ", " ↓ " , " +" , and "-" .
The following descriptions are the introduction of these keys.
a) "Power"key: The function of this key is to tune monitor power on/off.
b) "iKey" key: For auto adjust vertical position, horizontal position, pixel clock and phase.
c) "Input" key: The function of this key is to change input mode as "D-SUB", "DVI-D",
"Composite", and "S-Video".
d) "Menu" key: The function of this key is to enter OSD operation mode.
e) " ↑ " key : The function of this key is to select between OSD items and included "Hot
Key" function for contrast ratio adjustment.
f) " ↓ " key : The function of this key is to select between OSD items and included “Hot
Key” function for Brightness adjustment.
g) "+" key : The function of this key is to increase OSD bar volume.
h) "-" key: The function of this key is to decrease OSD bar volume. Press " Menu " key to
enter main menu of OSD as Figure below.
1. Press " Menu " key to enter main menu of OSD as Figure below.
2. OSD main menus have 8 items including "Exit", "Luminance", "Geometry", "Color",
"OSD", "Language", "Recall" and "PIP". The following pages are the introduction of
these items.
English 37
Benq LCD Color Monitor User's Guide
3. Luminance:
Press " ↑ " or " ↓ " to select Luminance item and press "Menu" to enter Luminance submenu. Press " ↑ " or " ↓ " to select between Brightness and Contrast functions.
When those keys are highlighted, the highlight function is activated then press "+" or "-" to
adjust the Brightness or Contrast of the display.
a) Brightness:
Press "Menu" to show the bar of adjustment, press "+" or "-" to adjust the brightness of the display
and then press "Menu" to back to the previous screen.
b) Contrast:
Press "Menu" to show the bar of adjustment, press "+" or "-" to adjust the contrast of the display
and then press "Menu" to back to the previous screen
.
4. Geometry:
Press " ↑ " or " ↓ " to select Geometry function from main menu and press "Menu" to
enter Geometry sub-menu. Press " ↑ " or " ↓ " to select between H. Position, V. Position,
Pixel Clock, Phase, Sharpness, and Scaling functions. When those keys are highlighted, the
highlighted function is activated then press "+" or "-" to adjust the H. Position, V. Position,
Pixel Clock, Phase, Sharpness, and Scaling functions.
a) H. Position:
Press "Menu" to show the bar of adjustment, press "+" or "-" to adjust the horizontal position of
the display and then press "Menu" to back to the previous screen.
English 38
Benq LCD Color Monitor User's Guide
b) V. Position:
Press "Menu" to show the bar of adjustment, press "+" or "-" to adjust the vertical position of the
display and then press "Menu" to back to the previous screen.
c) Pixel Clock:
Under Geometry sub-menu, press "Menu" to show the bar of adjustment, press "+" or "-" to adjust
the volume of Pixel Clock and then press "Menu" to back to the previous screen.
d) Phase:
Under Geometry sub-menu, press "Menu" to show the bar of adjustment, press "+" or "-" to adjust
the volume of Phase and then press "Menu" to back to the previous screen.
e) Sharpness:
Under Geometry sub-menu, press "Menu" to show the bar of adjustment. Then press "Menu” to
show the bar of adjustment, press "+" or "-" to adjust the volume of Sharpness and then press
"Menu" to back to the previous screen.
f) Scaling:
Scaling optimizes the display for the type of software you are using. Includes "1:1" and "fill".
Scaling smoothes an image which may help the eye to see more detail.
Under Geometry sub-menu, press "Menu" to activate the scaling adjustment bar and by pressing
"+" or "-" to select among 1:1 and fill. Then press "Menu" once to back to the Geometry sub-menu
or twice to back to main menu.
5. Color:
Color adjusts the color hue and saturation.
Press " ↑ " or " ↓ " to select Color function from main menu and press "Menu" to enter
Color sub-menu. Press " ↑ " or " ↓ " to select between C1 (9300K), C2 (6500K), and User
Preset.
a) User Preset: Use the plus and minus buttons to increase or decrease each of the three colors
independently.
Under User Preset sub-menu, by pressing "+" or "-" to increase or decrease the volume of R, G,
and B separately. Then press "Menu" once to back to the Color sub-menu or twice to back to main
menu.
English 39
Benq LCD Color Monitor User's Guide
6. OSD:
The function OSD is to change the position of OSD on screen.
Press " ↑ " or " ↓ " to select OSD function from main menu and press "Menu" to enter
OSD sub-menu. Press " ↑ " or " ↓ " to select H. Position, V. Position, and OSD Time.
a) H. Position:
Under OSD sub-menu, use the "↑" or "↓" buttons to select H. Position. By pressing "+" or "-" to
increase or decrease the volume of H. Position. Then press "Menu" once to back to the OSD submenu or twice to back to main menu.
b) V. Position:
Under OSD sub-menu, use the " ↑ " or " ↓ " buttons to select V. Position. By pressing "+" or "-" to
increase or decrease the volume of Vertical Position. Then press "Menu" once to back to the OSD
sub-menu or twice to back to main menu.
c) OSD time:
Under OSD sub-menu, use the "↑ " or " ↓ " buttons to select OSD Time. By pressing "+" or "-" to
increase or decrease the time of OSD appear on the screen. Then press "Menu" once to back to
the OSD sub-menu or twice to back to main menu.
7. Language:
Press " ↑ " or " ↓ " to select Language function from main menu and press "Menu" to enter
Language sub-menu. Press "↑" or "↓" to select different languages such as English, Espaol,
Franais, Italiano, Deutsch, Japanese, Traditional Chinese, and Simple Chinese.
English 40
Benq LCD Color Monitor User's Guide
8. Recall:
The function of "Recall " is to reset controls return the settings to the factory preset values for the selected group of functions. Press " ↑ " or " ↓ " to select Recall function from
main menu and press "Menu" to enter Recall sub-menu. Then press " ↑ " or " ↓ " to select
among Position Recall, Recall All, and Color Recall then press Menu to execute.
9. PIP:
The function of "PIP " is to set the Picture-In-Picture window. Press " ↑ " or " ↓ " to select
PIP function from main menu and press "Menu" to enter PIP sub-menu. Then press " ↑ " or
" ↓ " to select among PIP Source, PIP Size, Hue, Saturation, PIP H. P., and PIP V. P. then
press Menu to enter each function.
a) PIP Source:
Under PIP sub-menu, use the " ↑ " or " ↓ " buttons to select PIP Source then press Menu to enter
PIP Source sub-menu. There are two sources of video inputs such as S-video and Composite. By
pressing "+" or "-" to select among Off, S-video, and Comp. The "Off" item means that monitor will
detect the PIP source automatically. Then press "Menu" once to back to the PIP sub-menu or twice
to back to main menu.
English 41
Benq LCD Color Monitor User's Guide
b) PIP size:
Under PIP sub-menu, use the " ↑ " or " ↓ " buttons to select PIP Size then press Menu to enter PIP
Size sub-menu. There are three sizes of PIP window included Small, Medium, and Large. By pressing
"+" or "-" to select among Small, Medium, and Large. Then press "Menu" once to back to the PIP
sub-menu or twice to back to main menu.
c) Hue:
Under PIP sub-menu, use the "↑" or "↓" buttons to select Hue. By pressing "+" or "-" to increase
or decrease the hue of PIP window. Then press "Menu" once to back to the PIP sub-menu or twice
to back to main menu.
d) PIP Saturation:
Under PIP sub-menu, use the " ↑ " or " ↓ " buttons to select PIP Saturation. By pressing "+" or "-"
to increase or decrease the Saturation of PIP window. Then press "Menu" once to back to the PIP
sub-menu or twice to back to main menu.
e) PIP H.P.:
Under PIP sub-menu, use the " ↑ " or " ↓ " buttons to select PIP H. P. By pressing "+" or "-" to
move the PIP window position horizontally. Then press "Menu" once to back to the PIP sub-menu
or twice to back to main menu.
f) PIP V.P.:
Under PIP sub-menu, use the " ↑ " or " ↓ " buttons to select PIP V. P. By pressing "+" or "-" to
move PIP window position vertically. Then press "Menu" once to back to the PIP sub-menu or
twice to back to main menu.
English 42
Benq LCD Color Monitor User's Guide
Troubleshooting
Frequently Asked Questions (FAQ)
✓ The image is blurred:
☞ Read the chapter, Installation/Adjustment and then select the correct resolution, refresh
rate and make adjustments based on these instructions.
☞ Do you use a VGA extension cable?
Remove the extension cable for the test. Is the image now in focus? If not, optimize the
image working on the description in the chapter, Installation/Adjustment. It is normal
for blurring to occur due to conduction losses in extension cables. You can minimize
these losses by using an extension cable with better conduction quality or with a built-in
booster.
☞ Does the blurring only occur at resolutions lower than the native (maximum) resolution?
Read the chapter Installation/Adjustment. Select the native resolution.
✓ Pixel errors can be seen:
☞ One of several pixels are permanently black, one or more pixels are permanently white,
one or more pixels are permanently red, green, blue or another colour.
Read the chapter Pixel error rates.
✓ The image has a faulty colour appearance:
☞ It has a yellow, blue or pink appearance.
On the monitor press the "Menu" button and move to the "Recall" menu. Select the
"Color recall" item and press "Menu", or simply press "ikey". If the image is still not correct and the OSD also has a fault colour appearance, then one of the three primary
colours is missing in the signal input. Now check the VGA cable contacts. If any pins are
bent or broken off, then contact your dealer or read the chapter, Additional Help,
Repairs & Service.
✓ No image can be seen:
☞ Is the prompt on the display illuminated in green?
If the LED is illuminated in green, then press the "Exit" button on the monitor to access
the On Screen Display. If the message "Out of range" appears there, read the chapter
Installation/Adjustment.
☞ Is the prompt on the display illuminated in orange?
English 43
Benq LCD Color Monitor User's Guide
If the LED is illuminated in orange, then the power management mode is active. Press a
button on the computer keyboard or move the mouse. If that does not help, then check
the VGA cable contacts. If any pins are bent or broken off, then contact your dealer or
read the chapter, Additional Help, Repairs & Service.
☞ Is the prompt on the display not illuminated at all?
Check the power supply mains socket, the external power supply and the mains switch.
✓ The image is or distorted, flashes or flickers:
☞ Read the chapter, Installation/Adjustment and then select the correct resolution, refresh
rate and make adjustments based on these instructions.
✓ The image is displaced in one direction:
☞ Read the chapter, Installation/Adjustment and then select the correct resolution, refresh
rate and make adjustments based on these instructions.
Need More Help?
If your problems remain after checking this manual, please contact your place of purchase or e-mail
us at: [email protected]
English 44
Benq LCD Color Monitor User's Guide
Supported operating modes
Resolution
Refresh Rate ( Hz )
H. Freq. ( kHz )
720 x 400
70.087
31.469
640 x 480
59.940
31.469
640 x 480
75.000
37.500
800 x 600
60.317
37.879
800 x 600
75.000
46.875
1024 x 768
60.004
48.363
1024 x 768
75.029
60.023
1280 x 1024
60.000
64.000
1280 x 1024
75.025
79.976
1600 x 1200
60.000
75.000
hModes, which are not listed in the above table, may not be supported. For an optimal picture
it is recommended to choose a mode listed in the table.
hYou have 10 available modes compatible with Windows.
hIt can happen that the image is disrupted. This can occur as a result of a signal frequency from
the VGA card, which does not correspond with the usual standard. This is not, however, an
error. You can improve this situation by altering an automatic setting or by manually changing
the phase setting and the pixel frequency from the "Geometry" menu.
hIf you switch off the monitor, interference lines can occur on your screen. But do not be concerned about this, as it is normal.
hTo extend the service life of the product, we recommend that you use your computer's
power management function.
English 45
Benq LCD Color Monitor User's Guide
Specifications
Model
FP2081
Display type
20.1",active, TFT
Viewable diagonal
51cm
Native (maximum) resolution
1600X1200
Colors
16.7 million
Contrast / Brightness
350:1 / 250 cd/m²
Response time
25ms
Viewing angle (left/right, up/down)
80/80, 80/80
Line frequency
31-80 kHzMulti- frequency monitor
Image frequency
56-76 Hz modes within these parameters
Image checks
Digital, Screen OSD Technology, iKey (automatic image
setting)
Controls
iScreen functions
6 buttons and iKey.
Contrast, brightness, vert. & hor. image position,
phase, pixel clock, color balance, color palette, choice
of language (8 language OSD), OSD position, status
indicator
Basic Modes
10 Factory Preset Timings and 5 user defined.
Power Management
VESA DPMS, EPA
max. power consumption
60 Watt Max
Power saving mode
< 5 Watt
Input signal connector
1. D-SUB 2.DVI-D 3.S-Video 4.Composite
Temperature (operating)
5 °C - 40 °C
Air humidity (operating)
20% - 80%
Certifications
TCO 95, TÜV/Ergonomics, TÜV/GS, IEC950, FCC
Class B, DSNF, ISO 13406-2, VCCI, UL, CB Report,
CE, C-Tick, BSMI, Fimko, CCIB
Operating voltage
Automatic switched mode power supply, 90-264 V, 4763Hz
Dimensions (W x H x D)
514x492x260 mm
Weight
10.5 kg
English 46
Benq LCD Color Monitor User's Guide
Appendix: An Introduction to LCD Technology
Principles of LCD Technology
The functionality of LCD (Liquid Crystal Display) screens is based on the special physical properties
of liquid crystals. Their rod shaped molecules arrange themselves similarly to the molecules of
crystals - always uniformly and in one particular direction. Yet liquid crystals are not set in this orientation, but behave like a liquid: They can be manipulated by applying an electric voltage. The layers of the liquid crystal molecules can therefore be longitudinal or diagonal to the polarising
direction of the light and thereby have a varying effect on the course of light waves.
LIQUID CRYSTALS POLARISE INCIDENT LIGHT
An LC display consists of two polarising filters, a control layer, the respective colour filters and the
liquid crystal layer.
The light from a background lamp hits an initial polarisation membrane so that only a specific plane
of polarisation of the light reaches the liquid crystal layer. Without any external electrical influence
the liquid crystal molecules arrange themselves in a screw-like shape between the two vertically
aligned polarising filters and the directional structure imposed as a result. The light follows this orientation and is rotated by 90 degrees. The second polarising filter only allows through light with
this rotated polarisation. The light valve is open - as a result the controlled pixel lights up.
If an electrical voltage is applied, the liquid crystal molecules orientate themselves along the field
lines. The 90' screw is lifted up, the LC molecules appear parallel to the incident light and allow it to
pass through without altering the polarising direction. The unrotated light hits the second, rotated
polarising filter and is blocked. As a result the corresponding pixel remains dark. The intensity of
the departing, visible light can be controlled by means of the voltage applied to the crystal layer and
the polarised light rotated to a greater or lesser extent as a result.
The TFT panel
A. The standard TFT panel
With TFT displays, also called active matrix, the light transmitting capacity of each pixel is in
each case controlled by a transistor. The pixels can therefore be operated individually and
addressed very quickly, which in turn guarantees perfect display even of moving images. With
high-resolution LCDs well over two million pixels (three colour dots for the primary colours
red, green and blue per pixel) have to be controlled. The voltage is continuously on so that the
image does not have to be rebuilt constantly. The great advantage of this is that LC displays do
not flicker, even when they are controlled at low refresh frequencies (e.g. at 60 Hz). Because
faulty transistors can occur during production, pixel errors resulting from this are unavoidable.
B. The super TFT panel
The super TFT panel works according to the same physical principle. A significantly increased
viewing angle can be created through more precise production and through slightly brighter
pixels. This, however, is partly at the expense of the gray level resolution.
English 47
Benq LCD Color Monitor User's Guide
C. Comparison of standard and super TFT display
Standard
Super
h good gray level resolution
h very good viewing angle
hF satisfactory viewing angle
hsatisfactory gray level resolution
Field of applications:
hImage processing
hmedical field
hStandard workstation
hBanks (confidential area)
Field of applications:
his several people are working at one
screen.
hStandard workstation
hPresentation tasks
hBanks (public area)
Important LCD parameters
A. Viewing angle
The viewing angle is the display's visible field. If one were to imagine a vertical line in the centre of
the image and to pivot up and down and to the right and to the left from that point, then that is the
viewing angle.†Working ergonomically requires a viewing angle of at least 60°/60° (right/left) horizontally and 45°/45° vertically (up/down). If only two values are specified for horizontal and vertical,
the values for right and left, and for horizontal and vertical are added together. If this were the case
then this would provide a viewing angle of 120° horizontally and 90° vertically.
B. Contrast
Contrast is the ratio between the light intensity of the brightest and the darkest point of an image.
High contrast values improve readability and ergonomics.
A display should in all instances attain contrast values of 100:1. This is a point on which LCD monitors are clearly superior to monitors.
C. Response time
The response time is the time, which a TFT cell requires to switch on and switch off. †For standard
applications a response time of a maximum of 70 ms (milliseconds) is sufficient. If a more rapid
image build-up is required (e.g. the multimedia field), then values of a maximum of 30 ms are
required.
D. Brightness
Brightness is the emitted luminous power over a specified area. Brightness is another point, on
which LCD monitors are superior to CRT devices. Traditional monitors create approx. 80 to 100
cd/m² (candela per meter square). In the case of LC displays, values below 150 cm/m² are not
acceptable.
English 48
Benq LCD Color Monitor User's Guide
Display errors
A. Pixel errors
Pixel errors are (unfortunately) unavoidable with today's production methods, if you want to manufacture displays at an economically sensible price.
A display with a resolution of 1600x1200 dots therefore has 1920000 pixels. Each pixel consists of
the three sub-pixels for red, green and blue. That makes 5,760,000 individual control transistors. It
can occur during production that one or several transistors is defective, which means that pixel
errors occur, in which a sub-pixel does not light up at all or does so all of the time.
If you were to accept the same error rate as in the case of the strip mask, for which two horizontal
lines are completely disrupted, then you would end up with an error rate of 0.001 per thousand.
The accepted error rates for LC displays are far lower, however. If, for example, you were to
accept a tolerance of three permitted pixel errors per display, the you would end up with an error
rate of 0.0015 per thousand.
B. Blurred image
You can also end up with blurred images with LC displays indeed whenever you depart from the
native resolution. A display is built for a set resolution, smaller resolutions can only be displayed
interpolated. If, for example, you want to display a resolution of 800x600 on a display with a native
resolution of 1600x1200, then each horizontal dot would have to display 2 dots of the resolution.
This doesn't work of course and so intermediate values are calculated and this distorts the original
image.
C. Multifrequency as opposed to Multiscan
LC displays require a digital control and because currently there is still no valid standard for a digital
control, for the sake of compatibility there is a tendency to revert to the standard VGA connection. This is also ideal for monitors, as they require an analog signal.
The image digitally created in the computer is converted in the graphics card into an analog signal
and thus directly controls a CRT monitor. If, however, you use the analog signal of the VGA connection for a digital LC display, then transducer electronics at the input of the display must cater for
conversion back into digital signals. Two problems occur with this:
1. conversion losses:
The image is not so optimal as compared with direct, digital control. It can otherwise be
the case that subsequent adjustments are necessary every couple of months on a regular basis. This is generally executed via the OSD or an automatic function)
2. Limitation to specific operating modes:
Nowadays A CRT monitor is usually a multiscan monitor, which means it can be operated
within the limits of its horizontal and vertical frequency, even in non-standard modes.
An LCD monitor, in contrast, is a multi-frequency monitor, which means it is only guaranteed to work together with specific modes (see list in the user's guide).
English 49
Benq LCD Color Monitor User's Guide
Comparison of CRT & LCD monitors
CRT monitor
Flat panel display
Advantages:
Advantages:
hMultiscan monitor.
hno geometry errors
hsame quality in all resolutions.
hno convergence errors
hproven connector standard
hexcellent brightness and contrast values
hanalog (infinite) colour depth
hflicker-free
hno pixel errors
hinsensitive to magnetic and electric fields
halso large proportions
hlow power consumption
hinexpensive
hlow heat build-up
hsmall footprint
hlow weight
Disadvantages:
Disadvantages:
hgeometry errors possible
hMulti-frequency monitor.
hconvergence errors possible
hbest quality only in its native resolution.
hlimited brightness and contrast values
hAbsence of standards
honly flicker-free from 72 Hz
hpixel errors
hsensitive to magnetic and electric
fields
hrelatively high power consumption
hlimited colour depth
hno large proportions
hexpensive
hhigh heat build-up
hlarger footprint
hhigh weight
Summary
Ultimately, it cannot be said that LCD monitors are superior to CRT monitors or vice-versa either.
Rather when choosing which device to use you need to weigh up the advantages and disadvantages
in order to decide which technology to use.
In the public and presentational arena, LC displays are definitely preferable over CRT monitors. In
relation to the display workstation order, the small footprint is also an important argument and in
this respect more favours flat panel displays. On the other hand, when it comes to particular colour
depth, or you need a large viewable diagonal, the choice of a CRT monitor is still unrivalled.
English 50