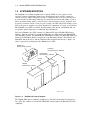
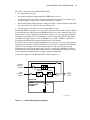
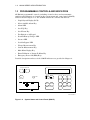
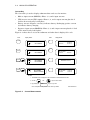
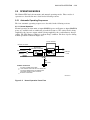
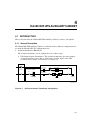
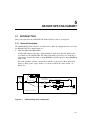
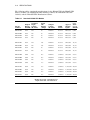
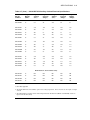
1
HA3000 20-80 kVA
Uninterruptible Power System
User Guide
Order Number EK-HA32X-UG-002
Digital Equipment Corporation
July 1991
The information in this document is subject to change without notice and should not be construed as a
commitment by Digital Equipment Corporation. Digital Equipment Corporation assumes no responsibility for
any errors that may appear in this document.
Possession, use, duplication, or dissemination of the software described in this documentation is authorized
only pursuant to a valid written license from Digital or the third-party owner of the software copyright.
No responsibility is assumed for the use or reliability of software on equipment that is not supplied by
Digital Equipment Corporation.
Copyright © Digital Equipment Corporation 1991
All Rights Reserved.
Printed in U.S.A.
The postpaid Reader’s Comment Card included in this document requests the user’s critical evaluation to
assist in preparing future documentation.
FCC NOTICE: The equipment described in this manual generates, uses, and may emit radio frequency
energy. The equipment has been type tested and found to comply with the limits for a Class A computing
device pursuant to Subpart J of Part 15 of FCC Rules, which are designed to provide reasonable protection
against such radio frequency interference when operated in a commercial environment. Operation of this
equipment in a residential area may cause interference, in which case the user at his own expense may be
required to take measures to correct the interference.
The DIGITAL logo is a trademark of Digital Equipment Corporation.
This document was prepared and published by Educational Services Development and Publishing, Digital
Equipment Corporation.
Contents
vii
About This Manual
ix
Notes to the User
1
HA3000 SERIES UPS INTRODUCTION
1.1
GENERAL . . . . . . . . . . . . . . . . . . . . . . . . . . . . . . . . . . . . . . . . . . . . . .
1.2
SYSTEM DESCRIPTION . .
1.2.1
Rectifier/Battery Charger
1.2.2
Static Inverter . . . . . . . . .
1.2.3
Static Switch . . . . . . . . . .
1.2.4
Manual Bypass . . . . . . . .
.
.
.
.
.
.
.
.
.
.
.
.
.
.
.
.
.
.
.
.
.
.
.
.
.
.
.
.
.
.
.
.
.
.
.
.
.
.
.
.
.
.
.
.
.
.
.
.
.
.
.
.
.
.
.
1–2
1–4
1–4
1–4
1–4
1.3
PROGRAMMABLE CONTROLS AND INDICATORS . . . . . . . . . . . . . .
1–6
1.4
BATTERY CABINET . . . . . . . . . . . . . . . . . . . . . . . . . . . . . . . . . . . . . .
1–7
1.5
OPTIONS . . . . . . . . . . . . . . . . . . . . . . . .
1.5.1
UPS Auxiliary Cabinet . . . . . . . . . . . .
1.5.2
UPS CSA Cabinet (Canada Only) . . . .
1.5.3
UPS Distribution Cabinet . . . . . . . . . .
1.5.4
Remote Status Panel . . . . . . . . . . . . . .
1.5.5
Remote Alarm Panel . . . . . . . . . . . . . .
1.5.6
DC Ground Fault Detector . . . . . . . . .
1.5.7
Smoke Detector . . . . . . . . . . . . . . . . . .
1.5.8
Remote Emergency Power Off (REPO)
2
.
.
.
.
.
.
.
.
.
.
.
.
.
.
.
.
.
.
.
.
.
.
.
.
.
.
.
.
.
.
.
.
.
.
.
.
.
.
.
.
.
.
.
.
.
.
.
.
.
.
.
.
.
.
.
.
.
.
.
.
.
.
.
.
.
.
.
.
.
.
.
.
.
.
.
.
.
.
.
.
.
.
.
.
.
.
.
.
.
.
.
.
.
.
.
.
.
.
.
.
.
.
.
.
.
.
.
.
.
.
.
.
.
.
.
.
.
.
.
.
.
.
.
.
.
.
.
.
.
.
.
.
.
.
.
.
.
.
.
.
.
.
.
.
.
.
.
.
.
.
.
.
.
.
.
.
.
.
.
.
.
.
.
.
.
.
.
.
.
.
.
.
.
.
.
.
.
.
.
.
.
.
.
.
.
.
.
.
.
.
.
.
.
.
.
.
.
.
.
.
.
.
.
.
.
.
.
.
.
.
.
.
.
.
.
.
.
.
.
.
.
.
.
.
.
.
.
.
.
.
.
.
.
.
.
.
.
.
.
.
.
.
.
.
.
.
.
.
.
.
.
.
.
.
.
.
.
.
.
.
.
.
.
.
.
.
.
.
.
.
.
.
.
.
.
.
.
.
.
.
.
.
.
.
.
.
.
.
.
.
.
.
.
.
.
.
.
.
.
1–1
.
.
.
.
.
.
.
.
.
.
.
.
.
.
.
.
.
.
1–7
1–7
1–7
1–8
1–8
1–8
1–9
1–9
1–9
2.1
GENERAL . . . . . . . . . . . . . . . . . . . . . . . . . . . . . . . . . . . . . . . . . . . . . .
2–1
2.2
SYSTEM STATUS AND CONTROL PANEL (SS&CP) . . . . . . . . . . . . .
2–1
2.3
CONTROLS . . . . . . . . . . . . . . . . . . . . . . . . . . . . . . . . . . . . . . . . . . . . .
2.3.1
Electromechanical Controls . . . . . . . . . . . . . . . . . . . . . . . . . . . . . . . .
2.3.2
Programmable Controls . . . . . . . . . . . . . . . . . . . . . . . . . . . . . . . . . .
2–6
2–6
2–6
HA32A UPS OPERATION
2.4
UPS MONITOR AND MENUS . . . . . . . . . . . . . . . . . . . . . . . . . . . . . . . 2–8
2.4.1
START-UP Menu . . . . . . . . . . . . . . . . . . . . . . . . . . . . . . . . . . . . . . . . 2–10
2.4.2
INVERTER ON/OFF Menu . . . . . . . . . . . . . . . . . . . . . . . . . . . . . . . . 2–12
iii
iv Contents
2.4.3
2.4.4
2.4.5
2.4.6
2.4.6.1
2.4.6.2
2.4.6.3
2.4.6.4
2.4.6.5
2.4.6.6
2.4.6.7
2.4.7
2.4.8
2.4.9
3
DISPLAY CONTRAST Menu . . . . . . . . . . .
BATT TRANS. TEST Menu . . . . . . . . . . . .
BYPASS PROCEDURE Menu . . . . . . . . . . .
COMMANDS Menu . . . . . . . . . . . . . . . . . .
Rectifier/Battery Charger Start and Stop
Inverter Start and Stop . . . . . . . . . . . . . .
Resetting Faults Stored in Memory . . . .
Synchronous/Nonsynchronous Operation
Battery Boost Charge . . . . . . . . . . . . . . .
Battery Equalization Charge . . . . . . . . .
Language Selection . . . . . . . . . . . . . . . . .
DIAGNOSIS Menu . . . . . . . . . . . . . . . . . . .
PERSONALIZATION Menu . . . . . . . . . . . .
COMMUNICATION Menu . . . . . . . . . . . . .
.
.
.
.
.
.
.
.
.
.
.
.
.
.
.
.
.
.
.
.
.
.
.
.
.
.
.
.
.
.
.
.
.
.
.
.
.
.
.
.
.
.
.
.
.
.
.
.
.
.
.
.
.
.
.
.
.
.
.
.
.
.
.
.
.
.
.
.
.
.
.
.
.
.
.
.
.
.
.
.
.
.
.
.
.
.
.
.
.
.
.
.
.
.
.
.
.
.
.
.
.
.
.
.
.
.
.
.
.
.
.
.
.
.
.
.
.
.
.
.
.
.
.
.
.
.
.
.
.
.
.
.
.
.
.
.
.
.
.
.
.
.
.
.
.
.
.
.
.
.
.
.
.
.
.
.
.
.
.
.
.
.
.
.
.
.
.
.
.
.
.
.
.
.
.
.
.
.
.
.
.
.
.
.
.
.
.
.
.
.
.
.
.
.
.
.
.
.
.
.
.
.
.
.
.
.
.
.
.
.
.
.
.
.
.
.
.
.
.
.
.
.
.
.
.
.
.
.
.
.
.
.
.
.
.
.
.
.
.
.
.
.
.
.
.
.
.
.
.
.
.
.
.
.
.
.
.
.
.
.
.
.
.
.
.
.
2–14
2–15
2–17
2–20
2–20
2–21
2–21
2–21
2–22
2–22
2–23
2–24
2–28
2–28
2.5
OPERATING MODES . . . . . . . . . . . . . . . . . . . . . . . . . . . . . . . . . . . .
2.5.1
Automatic Operating Sequences . . . . . . . . . . . . . . . . . . . . . . . . . .
2.5.1.1
Normal Operation . . . . . . . . . . . . . . . . . . . . . . . . . . . . . . . . . . .
2.5.1.2
On Battery Operation . . . . . . . . . . . . . . . . . . . . . . . . . . . . . . . .
2.5.1.3
Input Power Restored/Battery Charging . . . . . . . . . . . . . . . . . .
2.5.1.4
UPS Inverter Shutdown or Major Overload . . . . . . . . . . . . . . .
2.5.2
Manual Operating Sequences . . . . . . . . . . . . . . . . . . . . . . . . . . . .
2.5.2.1
Rectifier/Battery Charger Start or Stop . . . . . . . . . . . . . . . . . .
2.5.2.2
UPS Inverter Start or Stop . . . . . . . . . . . . . . . . . . . . . . . . . . . .
2.5.2.3
UPS Manual Bypass . . . . . . . . . . . . . . . . . . . . . . . . . . . . . . . . .
2.5.2.4
Returning the UPS to Normal Operation from Manual Bypass
.
.
.
.
.
.
.
.
.
.
.
.
.
.
.
.
.
.
.
.
.
.
2–29
2–29
2–29
2–30
2–31
2–31
2–32
2–32
2–32
2–33
2–33
2.6
ALARMS . . . . . . . . . . . . . . . . . . . . . . . . . . . .
2.6.1
Minor Alarms . . . . . . . . . . . . . . . . . . . . . .
2.6.2
Major Alarms . . . . . . . . . . . . . . . . . . . . . .
2.6.2.1
Rectifier/Battery Charger Major Alarms
2.6.2.2
Inverter Major Alarms . . . . . . . . . . . . .
.
.
.
.
.
.
.
.
.
.
.
.
.
.
.
.
.
.
.
.
.
.
.
.
.
.
.
.
.
.
.
.
.
.
.
.
.
.
.
.
.
.
.
.
.
.
.
.
.
.
.
.
.
.
.
.
.
.
.
.
.
.
.
.
.
.
.
.
.
.
.
.
.
.
.
.
.
.
.
.
.
.
.
.
.
.
.
.
.
.
.
.
.
.
.
.
.
.
.
.
2–34
2–34
2–35
2–35
2–36
HA32B UPS BATTERY CABINET
3.1
INTRODUCTION . . . .
3.1.1
General Description
3.1.2
Specifications . . . . .
3.1.3
Protection Period . . .
.
.
.
.
.
.
.
.
.
.
.
.
.
.
.
.
.
.
.
.
.
.
.
.
.
.
.
.
.
.
.
.
.
.
.
.
.
.
.
.
.
.
.
.
.
.
.
.
.
.
.
.
.
.
.
.
.
.
.
.
.
.
.
.
.
.
.
.
.
.
.
.
.
.
.
.
.
.
.
.
.
.
.
.
.
.
.
.
.
.
.
.
.
.
.
.
.
.
.
.
.
.
.
.
.
.
.
.
.
.
.
.
.
.
.
.
.
.
.
.
.
.
.
.
.
.
.
.
.
.
.
.
.
.
.
.
.
.
.
.
.
.
.
.
.
.
.
.
3–1
3–2
3–2
3–2
3.2
OPERATION . . . . . . . . . . . . . . . . . . . . . . . .
3.2.1
Battery Disconnect Circuit Breaker QF1
3.2.1.1
Normal Operation . . . . . . . . . . . . . . . .
3.2.1.2
QF1 Trip . . . . . . . . . . . . . . . . . . . . . . .
3.2.1.3
QF1 Reset . . . . . . . . . . . . . . . . . . . . . .
3.2.2
Emergency Power Off (EPO) . . . . . . . . . .
.
.
.
.
.
.
.
.
.
.
.
.
.
.
.
.
.
.
.
.
.
.
.
.
.
.
.
.
.
.
.
.
.
.
.
.
.
.
.
.
.
.
.
.
.
.
.
.
.
.
.
.
.
.
.
.
.
.
.
.
.
.
.
.
.
.
.
.
.
.
.
.
.
.
.
.
.
.
.
.
.
.
.
.
.
.
.
.
.
.
.
.
.
.
.
.
.
.
.
.
.
.
.
.
.
.
.
.
.
.
.
.
.
.
.
.
.
.
.
.
.
.
.
.
.
.
3–3
3–3
3–3
3–3
3–3
3–3
Contents v
4
5
6
A
HA32C/D/E UPS AUXILIARY CABINET
4.1
INTRODUCTION . . . . . . . . . . . . . . . . . . . . . . . . . . . . . . . . . . . . . . . . .
4.1.1
General Description . . . . . . . . . . . . . . . . . . . . . . . . . . . . . . . . . . . . .
4.1.2
Input Circuit Breaker (CB1) . . . . . . . . . . . . . . . . . . . . . . . . . . . . . . .
4–1
4–1
4–3
4.2
OPERATION . . . . . . . . . . . . . . . .
4.2.1
Input Circuit Breaker (CB1) . .
4.2.2
Input Isolation Transformer . .
4.2.3
Input Harmonic Current Filter
.
.
.
.
.
.
.
.
.
.
.
.
.
.
.
.
.
.
.
.
.
.
.
.
.
.
.
.
.
.
.
.
.
.
.
.
.
.
.
.
.
.
.
.
.
.
.
.
.
.
.
.
.
.
.
.
.
.
.
.
.
.
.
.
.
.
.
.
.
.
.
.
.
.
.
.
.
.
.
.
.
.
.
.
.
.
.
.
.
.
.
.
.
.
.
.
.
.
.
.
.
.
.
.
.
.
.
.
.
.
.
.
.
.
.
.
4–4
4–4
4–4
4–4
5.1
INTRODUCTION . . . . . . . . . . . . .
5.1.1
General Description . . . . . . . . .
5.1.2
Contactor Control Switch (SW1)
5.1.3
Input Circuit Breaker (CB1) . . .
.
.
.
.
.
.
.
.
.
.
.
.
.
.
.
.
.
.
.
.
.
.
.
.
.
.
.
.
.
.
.
.
.
.
.
.
.
.
.
.
.
.
.
.
.
.
.
.
.
.
.
.
.
.
.
.
.
.
.
.
.
.
.
.
.
.
.
.
.
.
.
.
.
.
.
.
.
.
.
.
.
.
.
.
.
.
.
.
.
.
.
.
.
.
.
.
.
.
.
.
.
.
.
.
.
.
.
.
.
.
.
.
5–1
5–1
5–2
5–2
5.2
OPERATION . . . . . . . . . . . . . . . . . . . . . . .
5.2.1
Input Circuit Breaker (CB1) . . . . . . . . .
5.2.2
Contactor Control Switch (SW1) . . . . . .
5.2.3
Input Isolation/Step-Down Transformer
.
.
.
.
.
.
.
.
.
.
.
.
.
.
.
.
.
.
.
.
.
.
.
.
.
.
.
.
.
.
.
.
.
.
.
.
.
.
.
.
.
.
.
.
.
.
.
.
.
.
.
.
.
.
.
.
.
.
.
.
.
.
.
.
.
.
.
.
.
.
.
.
.
.
.
.
.
.
.
.
.
.
.
.
.
.
.
.
5–3
5–3
5–3
5–3
6.1
INTRODUCTION . . . . . . . . . . . . . . . . . . . . . . . . . . . . . . . . . . . . . . . . .
6.1.1
System Description . . . . . . . . . . . . . . . . . . . . . . . . . . . . . . . . . . . . . .
6–1
6–2
6.2
OPERATION . . . . . . . . . . . . . . . . . . . . . . . . . . . . . . . . . . . . . . . . . . . . .
6.2.1
Circuit Breaker(s) CB1, CB2, and CB3 . . . . . . . . . . . . . . . . . . . . . . .
6.2.2
Output Circuit Breaker(s) . . . . . . . . . . . . . . . . . . . . . . . . . . . . . . . . .
6–3
6–3
6–4
HA33D/F UPS CSA CABINET
HA32J/K UPS DISTRIBUTION CABINET
SPECIFICATIONS
GLOSSARY
Index
Figures
1–1
1–2
1–3
1–4
2–1
2–2
2–3
2–4
2–5
HA32A UPS . . . . . . . . . . . . . . . . . . . . . . . .
HA3000 UPS Layout Diagram . . . . . . . . . .
HA32A UPS Single-Line Diagram . . . . . . .
System Status and Control Panel (SS&CP)
System Status and Control Panel (SS&CP)
Voltage Measurements . . . . . . . . . . . . . . . .
Current Measurements . . . . . . . . . . . . . . . .
HA32A UPS . . . . . . . . . . . . . . . . . . . . . . . .
Normal Operation Power Flow . . . . . . . . . .
.
.
.
.
.
.
.
.
.
.
.
.
.
.
.
.
.
.
.
.
.
.
.
.
.
.
.
.
.
.
.
.
.
.
.
.
.
.
.
.
.
.
.
.
.
.
.
.
.
.
.
.
.
.
.
.
.
.
.
.
.
.
.
.
.
.
.
.
.
.
.
.
.
.
.
.
.
.
.
.
.
.
.
.
.
.
.
.
.
.
.
.
.
.
.
.
.
.
.
.
.
.
.
.
.
.
.
.
.
.
.
.
.
.
.
.
.
.
.
.
.
.
.
.
.
.
.
.
.
.
.
.
.
.
.
.
.
.
.
.
.
.
.
.
.
.
.
.
.
.
.
.
.
.
.
.
.
.
.
.
.
.
.
.
.
.
.
.
.
.
.
.
.
.
.
.
.
.
.
.
. 1–1
. 1–2
. 1–3
. 1–6
. 2–1
. 2–3
. 2–4
. 2–7
. 2–29
vi Contents
2–6
2–7
2–8
3–1
4–1
4–2
4–3
5–1
5–2
6–1
6–2
6–3
On Battery Operation Power Flow . . . . . . . . . . . . . . . . . . . . . . . . . .
UPS Inverter Shutdown or Major Overload Power Flow . . . . . . . . . .
UPS Manual Bypass Power Flow . . . . . . . . . . . . . . . . . . . . . . . . . . .
HA32B UPS Battery Cabinet . . . . . . . . . . . . . . . . . . . . . . . . . . . . . .
UPS Input Isolation Transformer Configuration . . . . . . . . . . . . . . . .
Bypass Input Isolation Transformer Configuration . . . . . . . . . . . . . .
UPS Input and Bypass Input Isolation Transformer Configuration .
CSA Assembly Only Configuration . . . . . . . . . . . . . . . . . . . . . . . . . .
CSA Assembly and Isolation/Step-Down Transformer Configuration
HA32J/K UPS Distribution Cabinet . . . . . . . . . . . . . . . . . . . . . . . . .
HA32J/K and HA32A Single-Line Diagram . . . . . . . . . . . . . . . . . . .
HA32J/K Circuit Breaker Locations . . . . . . . . . . . . . . . . . . . . . . . . .
.
.
.
.
.
.
.
.
.
.
.
.
. 2–30
. 2–31
. 2–33
. 3–1
. 4–1
. 4–2
. 4–2
. 5–1
. 5–2
. 6–1
. 6–2
. 6–3
Minor Alarm Messages . . . . . . . . . . . . . . . . . . . . . . . . . . . . .
Rectifier/Battery Charger Major Alarm Messages . . . . . . . . .
Inverter Major Alarm Messages . . . . . . . . . . . . . . . . . . . . . .
Standard HA32A UPS Models . . . . . . . . . . . . . . . . . . . . . . .
HA32A Currents . . . . . . . . . . . . . . . . . . . . . . . . . . . . . . . . . .
UPS Battery Cabinet Model Numbers . . . . . . . . . . . . . . . . .
Maximum DC Current Requirements . . . . . . . . . . . . . . . . . .
Interbattery Link Torque Values . . . . . . . . . . . . . . . . . . . . . .
UPS Auxiliary Cabinet Weights and Dimensions . . . . . . . . .
HA32C/D/E UPS Auxiliary Cabinet Electrical Specifications
UPS CSA Cabinet Weights and Dimensions . . . . . . . . . . . . .
HA33D/F UPS CSA Cabinet Electrical Specifications . . . . . .
UPS Distribution Cabinet Specifications . . . . . . . . . . . . . . . .
.
.
.
.
.
.
.
.
.
.
.
.
.
.
.
.
.
.
.
.
.
.
.
.
.
.
Tables
2–1
2–2
2–3
A–1
A–2
A–3
A–4
A–5
A–6
A–7
A–8
A–9
A–10
.
.
.
.
.
.
.
.
.
.
.
.
.
.
.
.
.
.
.
.
.
.
.
.
.
.
.
.
.
.
.
.
.
.
.
.
.
.
.
.
.
.
.
.
.
.
.
.
.
.
.
.
.
.
.
.
.
.
.
.
.
.
.
.
.
.
.
.
.
.
.
.
.
.
.
.
.
.
2–34
2–36
2–36
A–4
A–5
A–6
A–6
A–7
A–7
A–8
A–10
A–10
A–11
About This Manual
OVERVIEW
This manual is intended for users of the HA3000 20-80 kVA series Uninterruptible Power
System (UPS). It provides a general introduction to the UPS and available options, and
detailed information on system controls and operation.
WARNING
This unit contains no user-serviceable parts. Only the key-locked doors should
be opened to gain access to the circuit breakers. No other doors should be
opened or covers removed, for any reason, by untrained personnel. If this unit
is in need of repair, only qualified personnel familiar with safety procedures
for electrical equipment and this product should access components inside the
unit.
WARNING
The HA32B UPS Battery Cabinet contains batteries that are wired together to
produce a high voltage. Even with no external connections, hazardous voltage
exists inside the UPS Battery Cabinet that can cause severe burns or death
upon contact.
WARNING
To stop this unit from delivering power in the event of an emergency, press both
Emergency Power Off (EPO) keys simultaneously on the System Status and
Control Panel. See Figure 2–1.
vii
viii About This Manual
The manual covers the following topics:
•
Chapter 1 provides a general system description of the HA32A UPS and a description
of the options available for use with the HA32A UPS.
•
Chapter 2 provides detailed information on the operation of the system status and
control panel, the electromechanical and programmable controls, the UPS monitor
and available menus, the automatic and manual operating modes, and the alarm
conditions and their causes.
•
Chapter 3 provides a general description and operating procedures for the UPS
Battery Cabinet.
•
Chapter 4 provides a general description and operating information for the UPS
Auxiliary Cabinet.
•
Chapter 5 provides a general description and operating information for the UPS CSA
Cabinet.
•
Chapter 6 provides a general description and operating information for the UPS
Distribution Cabinet.
•
Appendix A provides specifications for the HA3000 series equipment.
•
The Glossary provides a glossary of terms and abbreviations used in this manual.
RELATED DOCUMENTS
Title
Part Number
HA3000 20-80 kVA Uninterruptible Power System Installation Manual
EK-HA32X-IN
HA3000 20-80 kVA Uninterruptible Power System Installation Drawings
EK-HA32X-ID
HA3000 20-80 kVA Uninterruptible Power System Handling Instructions
EK-HA32X-HI
Notes to the User
The purpose of the HA3000 UPS is to provide short-term power outage
protection for the critical load.
The protection time will vary depending upon the size of the load, the charge
condition of the batteries, the temperature, and the amount of battery time
purchased.
For extended power outages, operators wishing to initiate an orderly shutdown
should be aware of the battery time available on their system. If an orderly
shutdown is desired, ensure that the shutdown procedure is started with
enough time left on battery operation to complete the shutdown.
Registered customers that need assistance with the operation of their HA3000
UPS can call 1-800-272-2001.
ix
1
HA3000 SERIES UPS INTRODUCTION
1.1 GENERAL
This chapter introduces the HA3000 series of UPS products rated 20 to 80 kVA. It
describes the UPS system, introduces controls and indicators, and describes available
options. Figure 1–1 shows the HA32A UPS.
SYSTEM STATUS AND
CONTROL PANEL (SS&CP)
IDENTIFICATION
LABEL
Q5N SWITCH
Q1 CIRCUIT BREAKER
Q3BP SWITCH
Q4S SWITCH
DOOR LOCK
AIR FILTER
(BEHIND SCREEN,
BENEATH ENCLOSURE)
MKV-A2056-91
Figure 1–1
HA32A UPS
1–1
1–2 HA3000 SERIES UPS INTRODUCTION
1.2 SYSTEM DESCRIPTION
The HA3000 series Uninterruptible Power System (UPS) is a three-phase on-line
interface between a building’s utility power distribution system and the customer’s
critical load. The UPS is designed to ensure a continuous flow of clean electrical power
to critical loads by addressing common power problems associated with utility ac power.
These problems include spikes, electrical noise, sags, brownouts, surges, dropouts, and
frequency variations. In the event of a power outage, the UPS will provide battery power
that is adequate to complete an orderly shutdown of equipment or to turn on a generator.
The HA3000 series UPS is available in kVA ratings of 20, 40, 60, and 80 kVA and can
accept three-phase input power of 208, 220, 480, and 600 Vac.
The basic HA3000 series UPS consists of a HA32A UPS and a HA32B UPS Battery
Cabinet. Options available to expand the HA3000 series UPS include the HA32C/D/E
UPS Auxiliary Cabinet, the HA32J/K UPS Distribution Cabinet, the HA33D/F UPS CSA
Cabinet, the HA320-Ax Remote Status Panel, the HA320-A3 Remote Alarm Panel, the
HA320-B1 Smoke Detector, and the HA320-C2 DC Ground Fault Detector. Figure 1–2
shows a typical layout diagram of the HA3000 series UPS.
HA320-Ax
Remote Status Panel
HA32J/K
UPS Distribution Cabinet
HA32C/D/E
UPS Auxiliary Cabinet
HA32A
UPS
HA32B
UPS Battery Cabinet
MKV-A2078-91
Figure 1–2
HA3000 UPS Layout Diagram
The HA32A UPS and its auxiliary equipment are listed by Underwriter’s Laboratories,
Inc. (UL). The addition of a CSA listed HA33D/F cabinet makes the HA32A UPS CSA
compliant.
HA3000 SERIES UPS INTRODUCTION 1–3
The major components of the HA32A UPS include:
•
A rectifier/battery charger
•
A transistorized pulse-width modulated (PWM) static inverter
•
A continuous-duty rated static switch that automatically transfers the load to and
from the bypass ac input source and the UPS inverter output
•
An internal manual bypass function comprised of three separate switches that allows
the critical load to be operated from the utility source
•
A battery system housed in an external matching enclosure
The HA32A UPS uses microprocessors to control operation of the rectifier/battery charger;
transistorized pulse-width modulated (PWM) static inverter; and continuous-duty rated
static switch to ensure optimum performance for all line, load, and operating conditions.
In addition, a microprocessor-based diagnostic system assists in troubleshooting faulty
assemblies for replacement in order to minimize service time. Modular construction
throughout the HA32A UPS facilitates maintenance of the system.
A system status and control panel (SS&CP) provides controls to select system operation,
and indicators that allow system performance to be monitored. A liquid-crystal display
(LCD) is used to display system operating parameters and step-by-step operating
instructions to the system operator, and to provide a diagnostic capability to assist in
troubleshooting. The built-in UPS monitor software is programmed to display messages
in five languages—English, French, German, Spanish, and Italian.
A single-line diagram of the HA32A UPS is shown in Figure 1–3.
STATIC SWITCH
BYPASS
AC INPUT/
MAINS2
Q4S
RECTIFIER/BATTERY
CHARGER
MAIN
AC INPUT/
MAINS1
Q3BP
INVERTER
Q1
Q5N
TO
CRITICAL
LOAD
HA32A UPS
HA32B
UPS BATTERY
CABINET
QF1
MKV-A2057-91
Figure 1–3
HA32A UPS Single-Line Diagram
1–4 HA3000 SERIES UPS INTRODUCTION
1.2.1 Rectifier/Battery Charger
The rectifier/battery charger consists of:
•
AC Input Circuit Breaker (Q1): The ac input circuit breaker provides mechanical
isolation and electrical protection for the input of the UPS.
•
Input Autotransformer: The input autotransformer is used to match the external
ac input source to that required internally for the UPS.
•
Power Module: The power module is a plug-in unit that converts incoming ac power
to a regulated dc output voltage. The regulation is carried out by controlling the SCR
conduction angles, allowing the rectifier/battery charger to supply a stable dc voltage
(± 1%). The dc voltage is filtered by a capacitor bank.
•
DC Shunt: The dc shunt is used to monitor the battery charge current and provide
data for regulating the dc voltage at the desired level. Battery current is normally
limited to
10 (that is, 1/10th of the battery capacity specified for a 10-hour
discharge rate).
1.2.2 Static Inverter
The static inverter consists of:
•
Power Module: The power module is a plug-in unit, used to chop the dc voltage to
obtain the PWM waveform at the primary of the output transformer. A single power
module is used for UPS systems having an output rating of 20 kVA. UPS systems
rated above 20 kVA use three power modules, one module per phase.
•
Inverter Transformer: The inverter transformer is a full-isolation transformer that
provides input/output electrical isolation for the UPS, the required output voltage,
and the required inductance for the ac output filter.
•
AC Output Filter: The ac output filter is used to achieve a computer-grade sine
wave output voltage waveform, with a total harmonic distortion (THD) of 4%
maximum (3% typical).
1.2.3 Static Switch
The static switch transfers the load from the UPS inverter output to the bypass ac
input source or from the bypass ac input source to the UPS inverter output, without any
interruption to the load (provided that the UPS inverter output is synchronized to the
bypass ac input source). These transfers take place automatically upon inverter startup
or shutdown. The static switch is rated for continuous duty, and is of plug-in construction
for easy maintenance.
The delta-RC network protects the static switch against high-voltage spikes and surges
by absorbing the excess energy. The delta-RC circuit network is protected by fuses, and
any failure of these fuses is displayed on the SS&CP LCD.
1.2.4 Manual Bypass
The internal manual bypass function consists of three switches that, when operated as
specified, provide a make-before-break transfer of the load from the UPS inverter output
to the bypass ac input source or from the bypass ac input source to the UPS inverter
output. This feature allows the critical load to be operated from the utility power source.
HA3000 SERIES UPS INTRODUCTION 1–5
The three internal manual bypass nonautomatic switches are designated as:
•
Bypass (MAINS2) Input (Q4S)
•
UPS Output Isolation (Q5N)
•
Manual Bypass (Q3BP)
For startup or shutdown of the equipment, correct operation of the three switches is
shown on the liquid-crystal display (LCD), which is located on the system status and
control panel (SS&CP).
1–6 HA3000 SERIES UPS INTRODUCTION
1.3 PROGRAMMABLE CONTROLS AND INDICATORS
All HA32A programmable controls (excluding circuit breakers and nonautomatic
switches) and indicators are located on the system status and control panel (SS&CP),
which is shown in Figure 1–4. The SS&CP contains the elements listed below:
•
Liquid-Crystal Display (LCD)
•
Silence Audible Alarm Key
•
Alarm LED
•
Scroll Up Key
•
Scroll Down Key
•
Ten-Digit (0 to 9) Keypad
•
Rectifier/Battery Charger LED
•
Inverter LED
•
Load On Bypass LED
•
Voltage Measurement Key
•
Current Measurement Key
•
Main Menu Display Key
•
Enter/Validation or Return To Menu Key
•
Emergency Power Off (EPO) Keys
Detailed descriptions and uses of the SS&CP indicators are provided in Chapter 2.
Emergency Power Off
Push Both
Silence
Alarm
Scroll
Alarm
7
8
9
4
5
6
1
2
3
0
Enter
Scroll
Volts
Current
Menu
MKV-A2058-91
Figure 1–4
System Status and Control Panel (SS&CP)
HA3000 SERIES UPS INTRODUCTION 1–7
1.4 BATTERY CABINET
Each HA32A UPS requires a separate HA32B UPS Battery Cabinet, which contains
batteries having sufficient ampere-hour (A h) capacity to support the UPS and its
intended load for the protection time specified.
The UPS Battery Cabinet features sealed, maintenance-free, recombination type
batteries. The batteries are maintenance-free because they do not require that the
electrolyte level or the density of the electrolyte be checked periodically. The UPS Battery
Cabinets do require that the interior of the assembly, including the exterior surfaces of
the individual batteries, be kept clear of all foreign matter including dust. The integrity
of the individual battery connections must be verified annually.
The HA32B series UPS Battery Cabinet is explained in Chapter 3.
1.5 OPTIONS
Section 1.5.1 through Section 1.5.8 introduce the options available for the HA32A UPS.
1.5.1 UPS Auxiliary Cabinet
The HA32C/D/E UPS Auxiliary Cabinet provides the means to incorporate two separate
features into the HA3000 series UPS (see Chapter 4). The UPS Auxiliary Cabinet
attaches to the right side of the HA32A UPS enclosure.
The UPS Auxiliary Cabinet enclosure will accommodate right-side cable entry when
required, which may occur if the UPS is installed in an equipment room with limited
space. The UPS Auxiliary Cabinet may include an input isolation transformer, an input
harmonic current filter, or both, depending on which features are purchased. The input
isolation transformer provides complete electrical isolation between the utility line
and the input of the UPS (rectifier/battery charger and battery). It also provides extra
protection against electrical noise and ground faults. The input harmonic current filter
limits the amount of harmonic current fed back into the input ac power source to less
than 10% when the HA32A UPS is operating at full load.
NOTE
Systems with a 600 Vac input require an HA32C-Ex or HA32D-Ex UPS Auxiliary
Cabinet or an HA33D-Ex UPS CSA Cabinet with an isolation/step-down
transformer to step down the 600 Vac to 208 Vac for use with the HA32Ax UPS.
1.5.2 UPS CSA Cabinet (Canada Only)
The HA33D/F UPS CSA Cabinet provides the means to make the HA3000 UPS compliant
with Canadian Standard Association (CSA) requirements. This is done by providing a
mechanical contactor that opens in case of a power failure. This prevents the flow of
power from the inverter output to the bypass ac input branches in the event of a static
switch SCR failure (short circuit). See Chapter 5 for more information on the HA33D/F
UPS CSA Cabinet. The UPS CSA Cabinet attaches to the right side of the HA32A UPS
enclosure or the right side of the HA32C/D/E UPS Auxiliary Cabinet enclosure.
The UPS CSA Cabinet enclosure will accommodate right-side cable entry when required,
which may occur if the UPS is installed in an equipment room with limited space. The
UPS CSA Cabinet may also include an input isolation/step-down transformer. The
input isolation/step-down transformer is used for systems with a 600 Vac input. The
1–8 HA3000 SERIES UPS INTRODUCTION
transformer secondary voltage is 208 Vac. The transformer supplies both the main ac
input (MAINS1), and through the mechanical contactor, the bypass ac input (MAINS2).
The transformer also provides complete electrical isolation between the utility line
and the input of the UPS (rectifier/battery charger and battery). It also provides extra
protection against electrical noise and ground faults.
NOTE
Systems with a 600 Vac input require an HA32C-Ex or HA32D-Ex UPS Auxiliary
Cabinet, or an HA33D-Ex UPS CSA Cabinet with an isolation/step-down
transformer to step down the 600 Vac to 208 Vac for use with the HA32Ax UPS.
1.5.3 UPS Distribution Cabinet
The HA32J/K UPS Distribution Cabinet provides the means for distributing power from
the HA32A UPS system to the user’s intended equipment (see Chapter 6). The UPS
Distribution Cabinet is furnished in an enclosure matching the other HA3000 series UPS
equipment. The UPS Distribution Cabinet attaches to the right side of the HA32A UPS
enclosure, the right side of the UPS Auxiliary Cabinet, or the right side of the UPS CSA
Cabinet.
1.5.4 Remote Status Panel
The Remote Status Panel option may be deskmounted or wallmounted, and uses the
same SS&CP as the HA32A UPS (see Figure 1–4). The Remote Status Panel includes
the mimic panel to indicate the flow of power; an LCD for display of status, alarms, and
parameters measured; and keys for requesting voltage and current data. An interface
cable between the Remote Status Panel and the HA32A UPS is included. The HA320-AA
model has a 150-foot cable, and the HA320-AB model has a 300-foot cable.
1.5.5 Remote Alarm Panel
The HA320-A3 Remote Alarm Panel consists of a wallmounted panel with four indicating
LEDs:
•
A green UPS On Line LED
•
A yellow Load On Bypass LED
•
A yellow UPS On Battery LED
•
A red Summary Alarm LED
The Remote Alarm Panel also includes:
•
An Alarm Reset push button, to reset the latching alarm
•
An Audible Alarm (horn), for alarm annunciation
•
An Audio Reset push button, to reset the Audible Alarm
When an alarm occurs, the appropriate LED will stay on (latch) even if the alarm is
corrected. This feature allows the operator to verify the occurance of the alarm. Once
the alarm has been corrected, the operator can silence the Audible Alarm by pressing the
Audio Reset push button, and can reset the latching LEDs by pressing the Alarm Reset
push button.
HA3000 SERIES UPS INTRODUCTION 1–9
1.5.6 DC Ground Fault Detector
The HA320-C2 DC Ground Fault Detector is used to detect current flowing from the
battery terminals to ground. When a dc ground fault is detected, The UPS main ac
input (MAINS1) circuit breaker (Q1) trips, shutting off the rectifier/battery charger,
and initiates On Battery operation, which prevents any cascading failures. This fault is
indicated by an "ENVIRONMENTAL FAULT" message on the UPS LCD display. The DC
Ground Fault Detector is located inside the UPS Battery Cabinet.
1.5.7 Smoke Detector
The HA320-B1 Smoke Detector is used to detect the presence of smoke within the
UPS Battery Cabinet. When smoke is detected inside the UPS Battery Cabinet, an
"ENVIRONMENTAL FAULT" message is displayed on the UPS LED display. The Smoke
Detector is located inside the UPS Battery Cabinet.
1.5.8 Remote Emergency Power Off (REPO)
The Remote Emergency Power Off (REPO) option is a wallmounted push button. The
REPO feature performs the same function as the EPO (see Section 2.2) but from a remote
location.
2
HA32A UPS OPERATION
2.1 GENERAL
This chapter describes the HA32A system status and control panel (SS&CP), including
programmable controls, electromechanical controls, the UPS monitor and available
menus, operating modes, and alarm conditions.
2.2 SYSTEM STATUS AND CONTROL PANEL (SS&CP)
The SS&CP is located on the upper right portion of the HA32A UPS enclosure. The
SS&CP is shown in Figure 2–1, and its elements are described in the following text.
NOTE
When pressed, all of the keys on the SS&CP emit a short tone to indicate to the
user that a key has been pressed.
EMERGENCY POWER OFF (EPO) KEYS
(BOTH KEYS MUST BE PRESSED SIMULTANEOUSLY
TO INITIATE AN EMERGENCY POWER OFF)
TEN DIGIT KEYS
SCROLL UP AND
SCROLL DOWN KEYS
ALARM LED (RED)
SILENCE AUDIBLE
ALARM KEY
LIQUID CRYSTAL DISPLAY (LCD)
Emergency Power Off
Push Both
Scroll
Silence
Alarm
Alarm
7
8
9
4
5
6
1
2
3
0
Enter
Scroll
Volts
Menu
RECTIFIER/BATTERY
CHARGER LED (GREEN)
INVERTER LED (GREEN)
LOAD ON BYPASS LED (GREEN)
Current
MAIN MENU DISPLAY KEY
VOLTAGE MEASUREMENT KEY
ENTER/VALIDATION KEY
CURRENT MEASUREMENT KEY
MKV-A2059-91
Figure 2–1
System Status and Control Panel (SS&CP)
2–1
2–2 HA32A UPS OPERATION
Liquid-Crystal Display (LCD)
The liquid-crystal display (LCD) consists of two lines, 20 characters per line. It is
used to display measurements, startup and operating procedures, diagnostics, and
alarm messages. The LCD contrast can be adjusted to suit the viewing environment by
accessing the DISPLAY CONTRAST Menu (Section 2.4.3).
Silence Alarm Key
The Silence Alarm key is used to silence the audible alarm.
Scroll Up/Down Keys
The Scroll Up/Down keys allow the operator to scroll up or down menus on the LCD.
When arrows appear on the left side of the LCD, additional text is available that can be
viewed by pressing either the Scroll Up or Scroll Down key.
Ten Digit (0 to 9) Keys
These ten digit keys are used to select menus, select items from menus, and to enter or
change system settings. When the LCD prompt indicates that a number is to be entered,
press the appropriate number key. The number appears on the right side of the LCD.
All entries can be modified by re-entering the numbers as long as they have not been
validated by pressing the Enter key. If the number has been validated by pressing the
Enter key, then the operational sequence must be repeated to change the number.
HA32A UPS OPERATION 2–3
Volts Key
The Volts key is used to display submenus that can be used to monitor:
•
Main ac input voltage (MAINS1)—Phase 1 to 2, 2 to 3, and 3 to 1 input voltages
•
UPS inverter voltage (UPS output)—Phase 1 to 2, 2 to 3, and 3 to 1 output voltages
plus the inverter output frequency
•
DC bus voltage (battery)—Battery voltage
•
Bypass ac input voltage (MAINS2)—Phase 1 to 2, 2 to 3, and 3 to 1 input voltages
plus the input voltage frequency
Figure 2–2 shows how to access the submenus and what data is displayed for each.
1
2
INPUT VOLTAGE
INV VOLTAGE
1
2
INPUT VOLTAGE
INV VOLTAGE
2
3
INV VOLTAGE
DC VOLTAGE
3
4
DC VOLTAGE
MAINS2 VOLTAGE
INPUT
U23=xxx V
U12=xxx V
U31=xxx V
INV. F=xx.x
U23=xxx V
U12=xxx V
U31=xxx V
2
Volts
Volts
Display Reads:
1
Volts
Volts
Press:
Display Reads:
Press:
Scroll
3
BATTERY U=xxx V
Scroll
Twice
4
M2 F=xx.x
U23=xxx V
U12=xxx V
U31=xxx V
NOTES:
1. The desired menu must appear on the LCD before it can be selected for access.
2. Use the
Scroll
3. By pressing the
and
Enter
Scroll
keys for menu review.
key once, you will
return to the place in the previous menu where you exited.
Figure 2–2
Voltage Measurements
MKV−R5027−91
2–4 HA32A UPS OPERATION
Current Key
The Current key is used to display submenus that can be used to monitor:
•
Main ac input current (MAINS1)—Phase 1, 2, and 3 input currents
•
UPS inverter current (UPS output)—Phase 1, 2, and 3 output currents plus the %
load for the most heavily loaded phase
•
Battery current—Negative current (-) indicates battery discharging; positive current
(+) indicates battery charging
•
Bypass ac input current (MAINS2)—Phase 1, 2, and 3 input currents plus the % load
for the most heavily loaded phase
Figure 2–3 shows how to access the submenus and what data is displayed for each.
1
2
INPUT CURRENT
INV CURRENT
1
2
INPUT CURRENT
INV CURRENT
2
3
INV CURRENT
BAT CURRENT
3
4
BAT CURRENT
MAINS2 CURRENT
INPUT
I2=xxx A
I1=xxx A
I3=xxx A
INV IC=xxx%
I2=xxx A
I1=xxx A
I3=xxx A
2
Current
Current
Display Reads:
1
Current
Current
Press:
Display Reads:
Press:
3
Scroll
BATTERY I=xxx.x A
Scroll
Twice
4
M2 IC=xxx%
I2=xxx A
I1=xxx A
I3=xxx A
NOTES:
1. The desired menu must appear on the LCD before it can be selected for access.
2. Use the
Scroll
3. By pressing the
and
Enter
Scroll
keys for menu review.
key once, you will
return to the place in the previous menu where you exited.
Figure 2–3
Current Measurements
MKV−R5028−91
HA32A UPS OPERATION 2–5
Menu Key
The Menu key is used to return the operator to the Main Menu display. If an error is
made while working with the HA32A UPS, pressing the Menu key twice always returns
the operator to the Main Menu.
Enter Key
The Enter key is used to validate an entry or to return to the exited place in the previous
menu.
Emergency Power Off (EPO) Keys
The two EPO keys must be pressed simultaneously to initiate an EPO shutdown. When
an EPO shutdown is initiated, the main ac input (MAINS1) circuit breaker (Q1) is
opened, the bypass ac input (MAINS2) switch (Q4S) is turned off, the battery circuit
breaker (QF1) located in the UPS Battery Cabinet is opened, and the load power is
disconnected.
These keys should only be used for emergency situations. DO NOT use these keys for a
normal shutdown sequence.
WARNING
If the HA32A UPS is in manual or maintenance bypass, the EPO keys will not
remove the load power. In these situations, the load power can only be removed
by locating and removing the input power source(s).
INDICATORS
There are four LED indicators on the SS&CP that are used to monitor the status of the
HA32A UPS. The LED indicators and their functions are given below.
WARNING
These LEDs are mode indicators and do not indicate the absence or presence of
voltage.
Alarm LED (Red) - The red Alarm LED flashes to indicate that a major or minor alarm
condition has occurred. The condition that caused the alarm is shown on the LCD. The
Scroll Up and Scroll Down keys are used to review all alarm conditions.
Rectifier/Battery Charger LED (Green) - The green "rectifier/battery charger" LED
is lit when the rectifier/battery charger is operating.
Inverter LED (Green) - The green "inverter" LED is lit when the inverter is supplying
power to the load.
Load On Bypass LED (Green) - The green "load on bypass" LED is lit when the
bypass ac input (MAINS2) source is supplying power to the load.
2–6 HA32A UPS OPERATION
2.3 CONTROLS
There are two types of controls for the HA32A UPS: electromechanical and
programmable.
2.3.1 Electromechanical Controls
The circuit designator for the five electromechanical controls of the HA32A UPS, and the
function of each, are listed below. See Figure 2–4 for the location of these controls.
Circuit
Designator
Function
Q1
Main ac input (MAINS1) circuit breaker. Applies input voltage to the
rectifier/battery charger and provides input current protection.
Q3BP
Manual bypass nonautomatic switch. Allows the bypass ac input to bypass the
UPS and is used in conjunction with Q4S and Q5N.
Q4S
Bypass ac input (MAINS2) ON/OFF switch. Applies power to or isolates the
static switch. Used in conjunction with Q3BP and Q5N.
Q5N
UPS output isolation switch. Isolates the UPS output and is used in conjunction
with Q4S and Q3BP.
K3N
Inverter output contactor. Mechanically isolates the UPS inverter from the static
switch. When the static switch is ON, K3N is open. When the static switch
is OFF, K3N is closed. This contactor makes a loud mechanical sound when it
changes position.
2.3.2 Programmable Controls
The programmable controls are covered in detail in Section 2.4 and include such control
functions as:
•
Rectifier/battery charger start and stop
•
Inverter start and stop
•
Clearing faults
•
Synchronized/nonsynchronized UPS inverter operation
•
Output ac voltage adjustment
•
DC voltage and battery charger current limit adjustments
•
Boost or equalization charge on battery
•
Selecting display language
•
Diagnostic and test routines
•
Adjusting display contrast
HA32A UPS OPERATION 2–7
SYSTEM STATUS AND
CONTROL PANEL (SS&CP)
IDENTIFICATION
LABEL
Q5N SWITCH
Q1 CIRCUIT BREAKER
Q3BP SWITCH
Q4S SWITCH
DOOR LOCK
AIR FILTER
(BEHIND SCREEN,
BENEATH ENCLOSURE)
MKV-A2056-91
Figure 2–4
HA32A UPS
2–8 HA32A UPS OPERATION
2.4 UPS MONITOR AND MENUS
The UPS monitor is a firmware package that allows the operator to interact with the
HA32A UPS. The UPS monitor is menu driven to perform a function. The operator
chooses the appropriate menu and then selects the desired function from the menu.
NOTE
If a UPS Auxiliary Cabinet with an input isolation transformer is installed,
circuit breaker CB1 on the UPS Auxiliary Cabinet must be turned on before the
UPS can be powered up.
When the HA32A UPS is powered up, the following language selection screens scroll
vertically on the LCD until one language is selected.
1
2
ENGLISH
FRANCAIS
2
3
FRANCAIS
DEUTSCH
3
4
DEUTSCH
ESPANOL
4
5
ESPANOL
ITALIANO
To select a language, press the number key that corresponds to the language desired
(press the 1 key to select English). The desired language does not need to be shown on
the LCD to make the selection, nor does the Enter key need to be pressed to validate the
entry.
After the language selection is made, the LCD displays the following:
* * CHECKING * *
* * * * *
After a few seconds, the LCD automatically displays the following during startup:
TEST POSITION
HA32A UPS OPERATION 2–9
The UPS monitor consists of the nine menus that are listed below and described in the
following sections.
•
Menu 1 - START-UP
•
Menu 2 - INVERTER ON/OFF
•
Menu 3 - DISPLAY CONTRAST
•
Menu 4 - BATT TRANS. TEST
•
Menu 5 - BYPASS PROCEDURE
•
Menu 6 - COMMANDS
•
Menu 7 - DIAGNOSIS
•
Menu 8 - PERSONALIZATION
•
Menu 9 - COMMUNICATION
When the Menu key is pressed the first two menu items are displayed on the LCD. The
Scroll Up and Scroll Down keys can be used to manually scroll through the available
menus. To select a menu, press the number key that corresponds to the desired menu
number (for example; press the 1 key for the START-UP menu) only when the desired
menu is displayed on the LCD.
Use the following procedure to display and scroll through the available menu items.
1. Press the Menu key and the LCD displays the following:
1
2
START-UP
INVERTER ON/OFF
2. Press the Scroll Down key twice and the LCD displays the following:
3
4
DISPLAY CONTRAST
BATT TRANS. TEST
3. Press the Scroll Down key twice more and the LCD displays the following:
5
6
BYPASS PROCEDURE
COMMANDS
4. Press the Scroll Down key twice more and the LCD displays the following:
7
8
DIAGNOSIS
PERSONALIZATION
5. Press the Scroll Down key once more and the LCD displays the following:
8
9
PERSONALIZATION
COMMUNICATION
2–10 HA32A UPS OPERATION
2.4.1 START-UP Menu
The START-UP menu is used to return the HA32A UPS to normal operation after it has
been completely powered down.
The following procedure is for accessing and stepping through the START-UP menu.
1. Press the Menu key and the LCD displays the following:
1
2
START-UP
INVERTER ON/OFF
2. Press the 1 key to select menu item number one, START-UP, and the LCD displays
the following:
CLOSE OUTPUT SWITCH
ITEM: Q5N
3. Close the output isolation switch Q5N and the LCD displays the following:
CLOSE MAINS2 SWITCH
ITEM: Q4S
4. Close the bypass ac input (MAINS2) switch Q4S. The green "load on bypass" LED
goes on and the LCD displays the following:
START THE CHARGER
1 = START
____
5. To start the rectifier/battery charger press the 1 key and then the Enter key. The
following three screens are displayed on the LCD and the green "rectifier/battery
charger" LED goes on when the third screen is displayed.
RESET FAULTS
* * CHECKING * *
* * * * *
COMMAND ACCEPTED
6. After the command to start the charger is accepted and the green "rectifier/battery
charger" LED goes on, the LCD displays the following:
CLOSE BAT. BREAKER
ITEM: QF1
7. Close the battery circuit breaker QF1 located inside the UPS Battery Cabinet right
door. The audible alarm sounds once every three seconds and the LCD displays the
following:
START THE INVERTER
1 = START
____
HA32A UPS OPERATION 2–11
8. To start the inverter press the 1 key and then the Enter key. The following five
screens are displayed on the LCD:
RESET FAULTS
* * CHECKING * *
* * * * *
COMMAND ACCEPTED
END OF PROCEDURE
1
2
START-UP
INVERTER ON/OFF
9. After the command to start the inverter is accepted, the inverter starts, the green
"inverter" LED goes on, the green "load on bypass" LED goes off, the audible alarm
silences, and the flashing red Alarm LED goes off.
10. Press the Enter key and the LCD displays the following screen to indicate that the
HA32A UPS has been returned to its normal operating condition.
NORMAL OPERATION
LOAD ON UPS
2–12 HA32A UPS OPERATION
2.4.2 INVERTER ON/OFF Menu
The INVERTER ON/OFF menu is used to stop the inverter and force the static switch to
transfer the load to the bypass ac input (MAINS2) power source, or to start the inverter
and return the UPS from bypass to normal operation.
The following procedure is for accessing and going through the INVERTER ON/OFF
menu.
1. Press the Menu key and the LCD displays the following:
1
2
START-UP
INVERTER ON/OFF
2. Press the 2 key to select menu item number two, INVERTER ON/OFF, and the LCD
displays the following:
INVERTER
0=STOP
1=START
____
3. To start the inverter, press the 1 key and then the Enter key. The following three
screens are displayed on the LCD and the green "inverter" LED goes on when the
second screen is displayed.
* * CHECKING * *
* * * * *
COMMAND ACCEPTED
INVERTER
0=STOP
1=START
____
If the inverter is commanded to start with the rectifier/battery charger off, the LCD
will display the following message and the rectifier/battery charger must be started
(see Section 2.4.6) before the inverter can be started.
COMMAND REJECTED
CHARGER OFF
4. To stop the inverter, press the 0 key and then the Enter key. The following three
screens are displayed on the LCD. The green "inverter" LED goes off and the green
"load on bypass" LED goes on when the second screen is displayed.
* * CHECKING * *
* * * * *
COMMAND ACCEPTED
INVERTER
0=STOP
1=START
____
HA32A UPS OPERATION 2–13
If the inverter is commanded to stop during nonsynchronous operation, the LCD will
display the following screens and the inverter must be forced off (see Section 2.4.6). The
static switch is inhibited during nonsynchronous operation. When the inverter is forced
off, the load will transfer to the bypass ac input (MAINS2) with a 200 to 800 millisecond
break.
MAINS2 OUT OF SPEC
INV STOP INHIBITED
INV FORCED STOP
0=NO
1=YES
____
5. Press the Enter key to return to the menu display.
2–14 HA32A UPS OPERATION
2.4.3 DISPLAY CONTRAST Menu
The DISPLAY CONTRAST menu allows the operator to adjust the contrast of the LCD so
that it can be easily read under different room lighting conditions.
The following procedure is for accessing and going through the DISPLAY CONTRAST
menu.
1. Press the Menu key and the LCD displays the following:
1
2
START-UP
INVERTER ON/OFF
2. Press the Scroll Down key twice and the LCD displays the following:
3
4
DISPLAY CONTRAST
BATT TRANS. TEST
3. Press the 3 key to select menu item number three, DISPLAY CONTRAST, and the
LCD displays the following:
+
CONTRAST
4. Press the Scroll Up key to decrease the contrast (lighten the LCD) or the Scroll Down
key to increase the contrast (darken the LCD).
5. Press the Enter key to return to the menu display.
HA32A UPS OPERATION 2–15
2.4.4 BATT TRANS. TEST Menu
The BATT TRANS. TEST menu allows the operator to simulate an input power failure by
turning off the rectifier/battery charger and allowing the inverter to operate from battery
power for two minutes, then returning the UPS to normal operation. This test should be
performed periodically to ensure proper UPS operation.
This test is only possible if the battery has been charged for at least 10 hours. The bypass
ac input (MAINS2) source frequency and voltage must also be within the prescribed
limits for a no-break transfer to the bypass ac input (MAINS2) source in case of a battery
problem.
After running this test, some period of time is required to recharge the batteries to their
full rated capacity.
If this test is attempted and the battery has been discharged within the last 10 hours,
the following message will be displayed on the LCD:
BATTERY RECHARGE
MINI AUTO = X MN
The following procedure is for accessing and going through the BATT TRANS. TEST
menu.
1. Press the Menu key and the LCD displays the following:
1
2
START-UP
INVERTER ON/OFF
2. Press the Scroll Down key twice and the LCD displays the following:
3
4
DISPLAY CONTRAST
BATT TRANS. TEST
3. Press the 4 key to select menu item number four, BATT TRANS. TEST, and the LCD
displays the following:
STOP THE CHARGER
0 = STOP
____
4. Press the 0 key and then the Enter key. The LCD displays the following screens:
* * CHECKING * *
* * * * *
COMMAND ACCEPTED
BATTERY TEST
AUTO=XX MN
Ub=XXX V
5. When the command to stop the rectifier/battery charger is accepted, the green
"rectifier/battery charger" LED goes off and the time remaining on battery operation
and the battery voltage are displayed on the LCD.
2–16 HA32A UPS OPERATION
6. When the test has completed successfully the LCD displays the following:
BATTERY OK
RESET FAULTS
COMMAND ACCEPTED
* * CHECKING * *
* * * * *
3
4
DISPLAY CONTRAST
BATT TRANS. TEST
HA32A UPS OPERATION 2–17
2.4.5 BYPASS PROCEDURE Menu
The BYPASS PROCEDURE menu is used to manually transfer the load to the bypass ac
input (MAINS2) source without interruption to the load, and for the reverse transfer of
the load back to the UPS inverter output.
If the bypass ac input (MAINS2) source is out of tolerance, these transfers will result in
a 200 to 800 millisecond load interruption and can be performed only with a FORCED
STOP command (see Section 2.4.6.4). The FORCED STOP command can be issued only
after entering the two-digit password.
The following procedure is for accessing and going through the BYPASS PROCEDURE
menu.
1. Press the Menu key and the LCD displays the following:
1
2
START-UP
INVERTER ON/OFF
2. Press the Scroll Down key four times and the LCD displays the following:
5
6
BYPASS PROCEDURE
COMMANDS
3. Press the 5 key to select menu item number five, BYPASS PROCEDURE, and the
LCD displays the following:
1
2
SW TO MAN BY-PASS
RETURN TO UPS
To Transfer To Manual Bypass
4. To transfer to manual bypass, press the 1 key and the LCD displays the following:
STOP THE INVERTER
0 = STOP
____
5. Press the 0 key and then the Enter key. The LCD displays the following screens:
* * CHECKING * *
* * * * *
COMMAND ACCEPTED
CLOSE BY-PASS SW
ITEM: Q3BP
6. When the command to stop the inverter is accepted, the inverter turns off, the green
"inverter" LED goes off, the green "load on bypass" LED goes on, the audible alarm
activates, and the red Alarm LED flashes.
7. Close the manual bypass switch Q3BP. The LCD displays the following:
OPEN MAINS2 SWITCH
ITEM: Q4S
2–18 HA32A UPS OPERATION
8. Open the bypass ac input (MAINS2) switch Q4S. The green "load on bypass" LED
goes off and the LCD displays the following:
OPEN OUTPUT SWITCH
ITEM: Q5N
9. Open the output isolation switch Q5N. The LCD displays the following:
END OF PROCEDURE
1
2
SW TO MAN BY-PASS
RETURN TO UPS
WARNING
Manual bypass is not intended for maintenance procedures. Contact Digital
Services for maintenance procedures.
To Return To Inverter
1. To return the UPS to normal (inverter) operation, press the 2 key and the LCD
displays the following:
CLOSE OUTPUT SWITCH
ITEM: Q5N
2. Close the output isolation switch Q5N. The LCD displays the following:
CLOSE MAINS2 SWITCH
ITEM: Q4S
3. Close the bypass ac input (MAINS2) switch Q4S. The green "load on bypass" LED
goes on and the LCD displays the following:
OPEN BY-PASS SWITCH
ITEM: Q3BP
4. Open the manual bypass switch Q3BP. The audible alarm activates and the LCD
displays the following:
START INVERTER
1 = START
____
HA32A UPS OPERATION 2–19
5. Press the 1 key and then the Enter key. The LCD displays the following screens:
RESET FAULTS
* * CHECKING * *
* * * * *
COMMAND ACCEPTED
END OF PROCEDURE
1
2
SW TO MAN BY-PASS
RETURN TO UPS
6. When the command to start the inverter is accepted, the inverter turns on, the green
"inverter" LED goes on, the green "load on bypass" LED goes off, the audible alarm
silences, and the red Alarm LED goes off.
7. Press the Enter key and the LCD displays the following:
5
6
BYPASS PROCEDURE
COMMANDS
8. Press the Enter key again and the LCD displays the following screen to indicate that
the UPS has returned to normal operation:
NORMAL OPERATION
LOAD ON UPS
2–20 HA32A UPS OPERATION
2.4.6 COMMANDS Menu
The COMMANDS menu is used to initiate the following operations:
•
Rectifier/battery charger start and stop
•
Inverter start and stop
•
Reset faults stored in memory
•
Synchronous/nonsynchronous UPS inverter operation
•
Boost charging of the battery
•
Equalization charging of the battery
•
Selection of the display language
After accessing the COMMANDS menu, use the Scroll Up and Scroll Down keys to select
the desired command. While the selected command is being executed, the LCD displays
the following two screens:
* * CHECKING * *
* * * * *
COMMAND ACCEPTED
The following procedure is for accessing and going through the COMMANDS menu.
1. Press the Menu key and the LCD displays the following:
1
2
START-UP
INVERTER ON/OFF
2. Press the Scroll Down key four times and the LCD displays the following:
5
6
BYPASS PROCEDURE
COMMANDS
3. Press the 6 key to select menu item number six, COMMANDS, and the LCD displays
the first available command operation.
2.4.6.1 Rectifier/Battery Charger Start and Stop
Use the following procedure to access the rectifier/battery charger start and stop
command.
1. When the COMMANDS menu is accessed by pressing the 6 key, the first command
available is the rectifier/battery charger start and stop command, and the LCD
displays the following:
CHARGER
0=STOP 1=START
____
2. To start the rectifier/battery charger, press the 1 key and then the Enter key. To stop
the rectifier/battery charger, press the 0 key and then the Enter key.
HA32A UPS OPERATION 2–21
2.4.6.2 Inverter Start and Stop
Use the following procedure to access the inverter start and stop command.
1. After accessing the COMMANDS menu, press the Scroll Down key until the LCD
displays the following:
INVERTER
0=STOP 1=START
____
2. To start the inverter, press the 1 key and then the Enter key. To stop the inverter,
press the 0 key and then the Enter key.
2.4.6.3 Resetting Faults Stored in Memory
Use the following procedure to access the resetting faults stored in memory command.
1. After accessing the COMMANDS menu, press the Scroll Down key until the LCD
displays the following:
RESET FAULTS
1=YES
____
2. To reset faults stored in memory, press the 1 key and then the Enter key.
2.4.6.4 Synchronous/Nonsynchronous Operation
Synchronizing and desynchronizing the inverter requires the entry of a two-digit
password. If an error is made when entering the password, the UPS monitor will allow
the password to be re-entered.
NOTE
The two-digit password will not appear on the LCD.
CAUTION
The !LOAD INTERRUPT! message indicates that the load power will be
interrupted for a minimum of 200 milliseconds. Be certain that the load can
tolerate this interruption.
NOTE
When the UPS inverter is operated in nonsynchronous mode in relation to the
bypass ac input (MAINS2) source, operation of the static switch is inhibited.
2–22 HA32A UPS OPERATION
Use the following procedure to access the synchronous/nonsynchronous operation
command.
1. After accessing the COMMANDS menu, press the Scroll Down key until the LCD
displays the following:
MAINS2 UNSYNCHRON.
PASSWORD?
__ __
2. Enter the password by pressing the 1 key, the 9 key, and then the Enter key. The
LCD displays the following:
MAINS2 UNSYNCHRON.
0=NO 1=YES
____
3. For synchronous operation, press the 0 key and then the Enter key. For
nonsynchronous operation, press the 1 key and then the Enter key.
4. After the Unsync Decision screen appears, the LCD displays the following:
MAINS2 UNSYNCHRON.
PASSWORD?
__ __
2.4.6.5 Battery Boost Charge
(Not an operator selectable command)
Use the following procedure to access the boost charging of the battery command.
1. After accessing the COMMANDS menu, press the Scroll Down key until the LCD
displays the following:
BAT BOOSTING
1=YES
____
2. To apply boost charge voltage to the battery, press the 1 key and then the Enter key.
2.4.6.6 Battery Equalization Charge
(Not an operator selectable operation)
Use the following procedure to access the equalization charging of the battery command.
1. After accessing the COMMANDS menu, press the Scroll Down key until the LCD
displays the following:
BATT. EQUALIZATION
0=NO 1=YES
____
2. To continue without applying an equalization charge voltage to the battery, press the
0 key and then the Enter key.
HA32A UPS OPERATION 2–23
3. To apply an equalization charge voltage to the battery, press the 1 key and then the
Enter key. Since the inverter must be shut down to apply an equalization charge
voltage to the battery, the LCD displays the following.
STOP THE INVERTER
0=STOP
____
4. Press the 0 key and then the Enter key. The inverter stops and equalization charging
of the battery begins.
2.4.6.7 Language Selection
Use the following procedure to access the language selection command.
1. After accessing the COMMANDS menu, press the Scroll Down key until the LCD
displays the following:
LANGUAGE?
1=ENGLISH
____
2. To select English as the display language, press the 1 key and then the Enter key. If
English is not the desired language, press the Scroll Down key and the LCD displays
the following:
LANGUAGE?
2=FRANCAIS
____
3. To select French as the display language, press the 2 key and then the Enter key. If
French is not the desired language, press the Scroll Down key and the LCD displays
the following:
LANGUAGE?
3=DEUTSCH
____
4. To select German as the display language, press the 3 key and then the Enter key. If
German is not the desired language, press the Scroll Down key and the LCD displays
the following:
LANGUAGE?
4=ESPANOL
____
5. To select Spanish as the display language, press the 4 key and then the Enter key. If
Spanish is not the desired language, press the Scroll Down key and the LCD displays
the following:
LANGUAGE?
5=ITALIANO
____
6. To select Italian as the display language, press the 5 key and then the Enter key.
2–24 HA32A UPS OPERATION
2.4.7 DIAGNOSIS Menu
The DIAGNOSIS menu is used to initiate the standard self-test routine that is built into
the UPS.
The following procedure is for accessing and going through the DIAGNOSIS menu.
1. Press the Menu key and the LCD displays the following:
1
2
START-UP
INVERTER ON/OFF
2. Press the Scroll Down key six times and the LCD displays the following:
7
8
DIAGNOSIS
PERSONALIZATION
3. Press the 7 key to select menu item number seven, DIAGNOSIS, and the LCD
displays the following:
STOP THE INVERTER
FOR SELF-TEST
STOP THE INVERTER
0 = STOP
____
4. Press the 0 key and then the Enter key. The LCD displays the following screens:
* * CHECKING * *
* * * * *
COMMAND ACCEPTED
5. When the command to stop the inverter is accepted, the inverter turns off, the green
"inverter" LED goes off, the green "load on bypass" LED goes on, the audible alarm
activates, the red Alarm LED flashes, and the LCD displays the following screens:
STOP THE CHARGER
FOR SELF-TEST
STOP THE CHARGER
0=STOP
____
6. Press the 0 key and then the Enter key. The LCD displays the following screens:
* * CHECKING * *
* * * * *
COMMAND ACCEPTED
HA32A UPS OPERATION 2–25
7. When the command to stop the rectifier/battery charger is accepted, the
rectifier/battery charger turns off, the green "rectifier/battery charger" LED goes
off, and the LCD displays the following:
Q1 SWITCH CLOSED?
ITEM: Q1 OK=1
__
8. If the main ac input (MAINS1) circuit breaker (Q1) is closed, press the 1 key and
then the Enter key. The LCD displays the following:
Q4S SWITCH CLOSED?
ITEM: Q4S OK=1
__
9. The five alarms shown in the following three LCD screens are normal alarm
conditions that should appear for the present status of the UPS (both the inverter
and rectifier/battery charger are off). If any other alarm conditions are displayed,
immediate action should be taken. Write down all of the alarms and contact Digital
Services for assistance at 1-800-272-2001. Have your access number available.
If the bypass ac input (MAINS2) switch (Q4S) is closed, press the 1 key and then the
Enter key. The LCD displays the following:
NOTE THE ALARMS
THEN PUSH ON
ALARMS
INVERTER OFF
10. Press the Scroll Down key twice and the LCD displays the following:
INVERTER OV OR UV
K3N IS OPEN
11. Press the Scroll Down key twice more and the LCD displays the following:
CHARGER OFF
INV PHASE OUT TOL
12. After viewing all of the alarm conditions, press the Enter key. The LCD displays the
following screens:
* * SELF-TESTING * *
* * * * *
SELF TEST RESULT:
LOGIC OK
2–26 HA32A UPS OPERATION
13. Press the Enter key and the LCD displays the following screens:
ANALOG TEST
PCB AQCX
ANALOG TEST
PCB AQOX
START THE CHARGER
1=START
____
14. Press the 1 key and then the Enter key to start the rectifier/battery charger. The
LCD displays the following screens:
RESET FAULTS
* * CHECKING * *
* * * * *
COMMAND ACCEPTED
15. When the command to start the rectifier/battery charger is accepted, the
rectifier/battery charger turns on, the green "rectifier/battery charger" LED goes
on, and the LCD displays the following:
START THE INVERTER
1=START
____
16. Press the 1 key and then the Enter key to start the inverter. The LCD displays the
following screens:
RESET FAULTS
* * CHECKING * *
* * * * *
COMMAND ACCEPTED
HA32A UPS OPERATION 2–27
17. When the command to start the inverter is accepted, the inverter turns on, the green
"inverter" LED goes on, the green "load on bypass" LED goes off, the audible alarm
silences, the red Alarm LED goes off, and the LCD displays the following screens:
END OF PROCEDURE
6
7
COMMANDS
DIAGNOSIS
18. Press the Enter key and the LCD displays the following screen to indicate that the
UPS has returned to normal operation.
NORMAL OPERATION
LOAD ON UPS
2–28 HA32A UPS OPERATION
2.4.8 PERSONALIZATION Menu
The PERSONALIZATION menu allows access to routines that tailor the operation of the
UPS to the specific installation. This menu should be accessed by an authorized Digital
Services representative.
2.4.9 COMMUNICATION Menu
The COMMUNICATION menu is used to enter the RS-232 interface parameters when
required, and should be accessed only by an authorized Digital Services representative.
The RS-232 port was designed for use with Digital’s Remote Environmental Monitoring
Software (REMS). Contact a Digital sales representative for more information on REMS.
HA32A UPS OPERATION 2–29
2.5 OPERATING MODES
The HA32A UPS has both automatic and manual operating modes. These modes of
operation are described in more detail in the following sections.
2.5.1 Automatic Operating Sequences
The four automatic operating sequences are described in the following sections.
2.5.1.1 Normal Operation
Normal operation is when main ac input (MAINS1) power and bypass ac input (MAINS2)
power are available and are within the prescribed tolerances. The critical load is being
supplied by the inverter output, which is being supplied by the rectifier/battery charger
output. The UPS Battery Cabinet is on float charge condition. The flow of power during
normal operation is shown in Figure 2–5.
STATIC SWITCH
BYPASS AC INPUT
(MAINS2)
RECTIFIER/
BATTERY CHARGER
INVERTER
MAIN AC INPUT
CRITICAL
LOAD
(MAINS1)
Q1
HA32A
HA32B
QF1
BATTERY
NORMAL OPERATION
AC INPUT POWER AVAILABLE
LOAD POWER SUPPLIED BY UPS INVERTER
VIA RECTIFIER/BATTERY CHARGER AND
ISOLATED FROM AC INPUT SOURCE
BATTERY CHARGING
MKV-A2060-91
Figure 2–5
Normal Operation Power Flow
2–30 HA32A UPS OPERATION
2.5.1.2 On Battery Operation
On battery operation occurs when main ac input (MAINS1) power is lost, if the
main ac input (MAINS1) power drops more than 15% below nominal value, or if the
rectifier/battery charger circuit fails. The flow of power during on battery operation is
shown in Figure 2–6.
STATIC SWITCH
BYPASS AC INPUT
(MAINS2)
RECTIFIER/
BATTERY CHARGER
INVERTER
MAIN AC INPUT
(MAINS1)
CRITICAL
LOAD
Q1
HA32A
HA32B
QF1
ON BATTERY OPERATION
BATTERY
AC INPUT POWER FAILURE
LOAD POWER SUPPLIED BY
UPS INVERTER FROM BATTERY
BATTERY DISCHARGING
MKV-A2061-91
Figure 2–6
On Battery Operation Power Flow
Battery protection time depends on the the ampere-hour capacity of the installed
batteries and the power consumed by the load. The specified nominal battery protection
time for the installed UPS Battery Cabinet is the minimum duration when operating at
25°C (77°F) with the inverter output under full-rated load (rated kVA @ 0.8 Power Factor
lagging). The actual protection time can be greater than the specified protection time if
the inverter is operating at less than full load. During a main ac input (MAINS1) power
failure, operation on battery power can be extended by reducing the load (noncritical
equipment). This can be monitored by using the Volts key and selecting DC VOLTAGE
(Figure 2–2).
The battery protection period ends when the battery voltage reaches the inverter cut-off
voltage (325 Vdc). When the battery voltage is 10 Vdc above the inverter cutoff voltage,
the LCD displays the message:
LOW BATTERY SHUTDOWN
This is a warning that the battery is approaching the end point of discharge and that the
protection period has nearly expired.
HA32A UPS OPERATION 2–31
2.5.1.3 Input Power Restored/Battery Charging
As soon as main ac input (MAINS1) power is restored, and the voltage and frequency are
within specified tolerances, the UPS returns to normal operation (see Section 2.5.1.1). If
the battery reaches its end point of discharge before the main ac input (MAINS1) power
is restored, the UPS inverter will shut down and must be manually restarted by following
the START-UP menu in Section 2.4.1.
Under normal circumstances the rectifier/battery charger immediately begins recharging
the battery. Minimum battery recharge time (yielding 95% capacity) is ten times the
discharge time.
Example:
A 5 minute discharge time will require 50 minutes of charge time to reach 95% capacity.
Twenty four hours is required for full recharge.
2.5.1.4 UPS Inverter Shutdown or Major Overload
In the event of a UPS inverter shutdown (either manually initiated by the user or caused
by the UPS internal protective devices), the load is automatically transferred to the
bypass ac input (MAINS2) power source without interruption of load power. The power
flow for a UPS inverter shutdown or major overload is shown in Figure 2–7.
STATIC SWITCH
BYPASS AC INPUT
(MAINS2)
RECTIFIER/
BATTERY CHARGER
INVERTER
MAIN AC INPUT
(MAINS1)
CRITICAL
LOAD
Q1
HA32A
HA32B
QF1
BATTERY
UPS INVERTER SHUTDOWN OR MAJOR OVERLOAD
AC INPUT POWER AVAILABLE (1)
OVERLOAD POWER SUPPLIED BY BYPASS
AS INPUT (MAINS2) SOURCE VIA STATIC SWITCH
INVERTER OFF
INVERTER AUTOMATICALLY RESTARTS AS SOON
AS OVERLOAD CLEARS
TRANSFER OF LOAD TO AND FROM BYPASS AC
INPUT (MAINS2) SOURCE OCCURS WITHOUT LOSS
OF LOAD POWER
NOTE:
IN THE EVENT THAT AN OVERLOAD
OCCURS WHEN THE BYPASS AC INPUT
(MAINS2) SOURCE IS NOT AVAILABLE,
THE UPS INVERTER WILL LIMIT THE
OUTPUT CURRENT TO ITS 150%
CURRENT RATING AT REDUCED
VOLTAGE.
MKV-A2062-91
Figure 2–7
UPS Inverter Shutdown or Major Overload Power Flow
2–32 HA32A UPS OPERATION
In the event of a major overload (inrush condition) on the output of the UPS inverter,
an immediate transfer of the load to the bypass ac input (MAINS2) power source
takes place. The load is automatically returned to the UPS inverter output without
interruption when the inrush condition is over. This operating mode allows startup of
load devices demanding short-term, high inrush currents, provided that the UPS inverter
is synchronized to the bypass ac input (MAINS2) power source.
The UPS inverter output is synchronized to the bypass ac input (MAINS2) power source
when the following conditions are satisfied.
•
Bypass voltage must be within ±10% of nominal value
•
Bypass frequency must be within the frequency window selected (±0.25, ±0.5, ±0.75,
or ±1.0 Hz)
•
Bypass phase must be within 3° of the UPS inverter output
NOTE
OUT OF SYNCHRONIZATION messages will be displayed on the LCD as minor
alarms.
If an overload condition occurs and the UPS inverter output is not synchronized to the
bypass ac input (MAINS2) power source, the UPS inverter will limit the output current
at 150% of its full-load current rating for 0.2 seconds before shutting down and forcing an
interrupted transfer of the load to the bypass ac input (MAINS2) power source.
The UPS inverter provides full output voltage at 125% overload for 10 minutes or at
150% overload for 1 minute. If a 125% overload still exists after 10 minutes or a 150%
overload still exists after 1 minute, the static switch will transfer the load to the bypass
ac input (MAINS2) power source. If the the 125% overload still exists after 10 minutes
on bypass or the 150% overload still exists after 1 minute on bypass, the static switch
will shut off and the load will be dropped.
2.5.2 Manual Operating Sequences
The six manual operating sequences are described in the following sections.
2.5.2.1 Rectifier/Battery Charger Start or Stop
This sequence is used to stop the rectifier/battery charger to force the UPS to on battery
operation, and to start the rectifier/battery charger to return the UPS from on battery
operation to normal operation. These operational sequences can be initiated by following
the instructions in the Main Menu, item COMMANDS (see Section 2.4.6.1).
2.5.2.2 UPS Inverter Start or Stop
This sequence is used to stop the inverter to force the static switch to transfer the
load to the bypass ac input (MAINS2) power source, and to start the inverter to
return the UPS from bypass to normal operation. These operational sequences can
be initiated by following the instructions in the Main Menu, item INVERTER ON/OFF
(see Section 2.4.2).
HA32A UPS OPERATION 2–33
2.5.2.3 UPS Manual Bypass
This sequence is used to manually transfer the load to the bypass ac input (MAINS2)
power source to bypass the UPS circuits. This sequence should be initiated when
problems with the rectifier/battery charger or static switch present the possibility
of dropping power to the critical load. This operational sequence can be initiated
by following the instructions in the Main Menu, item BYPASS PROCEDURE (see
Section 2.4.5). The power flow for the UPS manual bypass is shown in Figure 2–8.
WARNINGS
The EPO keys and the REPO push button will NOT remove output power from
the UPS when the UPS is in manual bypass.
There are still high voltages present in the HA32A UPS cabinet with the UPS in
manual bypass. DO NOT open the left door or remove any covers or protective
panels when in manual bypass.
Q3BP
STATIC SWITCH
BYPASS AC INPUT
Q4S
(MAINS2)
RECTIFIER/
BATTERY CHARGER
INVERTER
MAIN AC INPUT
(MAINS1)
Q5N
Q1
HA32A
HA32B
CRITICAL
LOAD
QF1
BATTERY
UPS MANUAL BYPASS
AC INPUT POWER AVAILABLE
LOAD POWER SUPPLIED BY BYPASS
AS INPUT (MAINS2) POWER SOURCE
MKV-A2063-91
Figure 2–8
UPS Manual Bypass Power Flow
2.5.2.4 Returning the UPS to Normal Operation from Manual Bypass
To return to normal operation from manual bypass, press the Menu key and scroll
down the menus available with the Scroll Down key until item number 5, BYPASS
PROCEDURE, is displayed on the LCD. Press the 5 key and then select submenu
number 2, RETURN TO UPS, by pressing the 2 key. Follow the instructions displayed on
the LCD to transfer the UPS back on-line.
2–34 HA32A UPS OPERATION
2.6 ALARMS
There are two types of alarms in the HA32A UPS; minor and major alarms. The
following sections describe the minor and major alarms and contain tables listing the
alarms and what they indicate.
There are no customer serviceable parts in the UPS equipment. For all repairs, call
1-800-272-2001 or your Digital Services office.
2.6.1 Minor Alarms
Minor alarms are those that occur during normal operation but do not interfere with
the normal operation of the UPS. These alarms should be corrected as soon as possible.
Minor alarms are indicated by the audible alarm sounding, the red Alarm LED flashing,
and the following screen being displayed on the LCD:
ALARMS
LOAD ON UPS
Table 2–1 contains minor alarm messages that could appear on the LCD after pressing
the Scroll Down key and what each message indicates.
Table 2–1 Minor Alarm Messages
Alarm Message
Problem Indication
MAINS2 RC FU BLOWN
A bypass ac input (MAINS2) surge protector network fuse (F4,
F5, or F6) has blown.
UPS FAN FAILURE
One of the two internal fans has failed.
OUTPUT OVERLOAD
One or more of the three output phases is providing more than
100% of the full load current rating of the UPS.
CHARGER CT FAULT
The input current sensing circuit (CT1 or CT2) is not operating
correctly.
CHARG MODULE FAULT
A fault has occurred in the rectifier/battery charger module.
MAINS2 OV OR UV
The UPS inverter output is not synchronized to the bypass ac
input (MAINS2) source because the bypass ac input voltage is
not within ±10% of the nominal value. Operation of the static
switch is inhibited.
MAINS2 OF OR UF
The UPS inverter output is not synchronized to the bypass ac
input (MAINS2) source because the bypass ac input frequency
is not within the selected frequency window (normally ±0.5 Hz).
Operation of the static switch is inhibited.
MAINS2 UNSYNCHRON
The UPS inverter output is not synchronized to the bypass ac
input (MAINS2) source because the phase differential between
the two is greater than 3°. Operation of the static switch is
inhibited.
HA32A UPS OPERATION 2–35
Table 2–1 (Cont.) Minor Alarm Messages
Alarm Message
Problem Indication
ENVIRONMENTAL FAULT
This indicates that one of eight problems has occurred in the
UPS Battery Cabinet, the UPS Auxiliary Cabinet, the UPS CSA
Cabinet, or the UPS Distribution Cabinet:
1.
The Smoke Detector has detected smoke in the UPS
Battery Cabinet.
2.
The DC Ground Fault Detector has detected battery
currents flowing to ground in the UPS Battery Cabinet.
3.
The input circuit breaker CB1 in the UPS Auxiliary
Cabinet has tripped.
4.
The input isolation transformer in the UPS Auxiliary
Cabinet has overheated.
5.
One or more of the input harmonic current filter fuses (F1,
F2, and F3) in the UPS Auxiliary Cabinet have blown.
6.
The isolation/step-down transformer in the UPS
Distribution Cabinet has overheated.
7.
The isolation/step-down transformer in the UPS CSA
Cabinet has overheated.
8.
The input circuit breaker CB1 in the UPS CSA Cabinet has
tripped.
2.6.2 Major Alarms
There are two types of major alarms in the HA32A UPS; rectifier/battery charger and
inverter alarms. Major alarms are those that prevent normal operation of the UPS by
causing the rectifier/battery charger or the inverter to shut down. These alarms should
be corrected immediately.
The following sections describe the rectifier/battery charger and inverter major alarms
and contain tables listing the alarms and what they indicate.
2.6.2.1 Rectifier/Battery Charger Major Alarms
Rectifier/battery charger major alarms occur when the rectifier/battery charger is not
operating and load power is being provided by the batteries. These alarms are indicated
by the audible alarm sounding, the red Alarm LED flashing, the UPS being on battery
operation, and the following screen being displayed on the LCD:
INV ON BATTERY
MINI AUTO. = xxxMN
2–36 HA32A UPS OPERATION
Table 2–2 contains the rectifier/battery charger major alarm messages that could appear
on the LCD after pressing the Scroll Down key and what each message indicates.
Table 2–2 Rectifier/Battery Charger Major Alarm Messages
Alarm Message
Problem Indication
END OF AUTOMY
The battery has reached its end point of discharge and the
inverter has turned off.
MAINS1 OV OR UV
The rectifier/battery charger has turned off because of an input
ac over/undervoltage condition.
MAX BAT VOLTAGE
The rectifier/battery charger has turned off because of a high dc
output voltage condition.
MAINS1 PH SEQ NOK
The rectifier/battery charger will not start because of an
incorrect phase rotation sequence on the input.
CHARGER OFF
The rectifier/battery charger has been programmed OFF or
turned off automatically.
2.6.2.2 Inverter Major Alarms
Inverter major alarms occur when the inverter is not operating and load power is being
supplied by the bypass ac input (MAINS2) source after a successful static transfer. These
alarms are indicated by the audible alarm sounding, the red Alarm LED flashing, the
UPS being on bypass operation, and the following screen being displayed on the LCD:
ALARMS
INVERTER OFF
Table 2–3 contains the inverter major alarm messages that could appear on the LCD
after pressing the Scroll Down key and what each message indicates.
Table 2–3 Inverter Major Alarm Messages
Alarm Message
Problem Indication
INV FUSE BLOWN
One or more of the inverter output fuses (F1, F2, or F3) has
blown.
TRANSFO OVERTEMP
The inverter transformer (T2) has an overtemperature condition
INV LEG1 OVERTEMP
The inverter module for phase 1 has an overtemperature
condition.
INV LEG2 OVERTEMP
The inverter module for phase 2 has an overtemperature
condition.
INV LEG3 OVERTEMP
The inverter module for phase 3 has an overtemperature
condition.
S.S. OVERTEMP
The static switch has an overtemperature condition.
LEG1 POW SUP FAULT
The inverter module for phase 1 has a power supply fault.
LEG2 POW SUP FAULT
The inverter module for phase 2 has a power supply fault.
LEG3 POW SUP FAULT
The inverter module for phase 3 has a power supply fault.
LEG1 DESATURATION
The inverter module for phase 1 is not operating in saturation.
LEG2 DESATURATION
The inverter module for phase 2 is not operating in saturation.
HA32A UPS OPERATION 2–37
Table 2–3 (Cont.) Inverter Major Alarm Messages
Alarm Message
Problem Indication
LEG3 DESATURATION
The inverter module for phase 3 is not operating in saturation.
PCB POW SUP FAULT
Logic power supply board (ALIP) fault.
MIN BAT VOLTAGE
The inverter has turned off because of low battery voltage.
INV OV OR UV
The inverter has turned off because of an over/under output
voltage condition.
THERM UPS OVERLOAD
The UPS has shut down because of an overtemperature
condition.
INV CT FAULT
The inverter output current sensing circuits are not operating
correctly.
MAINS2 PH SEQ NOK
The inverter has turned off and prevented a static switch
transfer because of an incorrect phase sequence on the bypass
ac input (MAINS2) source.
K3N IS OPEN
The inverter output contactor is open.
INV CURRENT LIMIT
The inverter has turned off because of an overload condition on
the inverter output.
THERM S.S. OVERLOAD
The static switch has shut down due to an overload condition.
3
HA32B UPS BATTERY CABINET
3.1 INTRODUCTION
This chapter provides a general description, a description of components, and the
specifications of the UPS Battery Cabinet. Figure 3–1 depicts the HA32B UPS Battery
Cabinet.
LABEL
BATTERY DISCONNECT
CIRCUIT BREAKER QF1
DOOR LOCK
MKV-A2064-91
Figure 3–1
HA32B UPS Battery Cabinet
3–1
3–2 HA32B UPS BATTERY CABINET
3.1.1 General Description
Each HA32A UPS requires a separate HA32B UPS Battery Cabinet(s), which contains
batteries having sufficient ampere-hour (A h) capacity to support the UPS and its
intended load for the protection time specified.
The UPS Battery Cabinets are supplied in compact enclosures similar to the enclosures
used for the HA32A UPS. They provide a convenient means of reducing expensive floor
space requirements for uninterruptible power systems installations when compared with
open-rack battery configurations. In addition to minimizing floor space requirements,
installation time is drastically reduced.
The HA32B UPS Battery Cabinet features sealed, maintenance-free, recombination
type batteries. The batteries are maintenance-free because they do not require that the
electrolyte level or the density of the electrolyte be checked periodically. The UPS Battery
Cabinets do require that the interior of the assembly, including the exterior surfaces of
the individual batteries, be kept clear of all foreign matter including dust. The integrity
of the individual battery connections must be verified on a yearly basis.
The batteries are sealed and do not release gas under normal operating conditions. They
can be used practically anywhere. They operate on the principle of gas recombination
within the battery itself. The batteries have a safe, low-pressure venting system that
releases excess gas should the internal gas pressure rise to a level above the normal rate,
then seals automatically when internal pressure returns to normal.
The batteries are designed for maximum life when operated within an ambient
temperature range of 20° to 25°C (68° to 77°F). Operating in a warmer environment
increases the ampere-hour capacity of the battery, which extends the protection period
in the short run. Operating the batteries at warmer temperatures, however, reduces
expected battery life. Conversely, operating in a cooler environment decreases the
ampere-hour capacity of the battery, reducing the protection period in the short run,
but extending expected battery life.
The HA32B UPS Battery Cabinet provides ready access to the internal batteries, which
are rack mounted on easily accessible pull-out rack assemblies. The 31.5-inch cabinet
has a single pull-out rack assembly on which the batteries are mounted. All 45-inch
and 52-inch wide cabinets have two pull-out rack assemblies on which the batteries are
mounted.
3.1.2 Specifications
The UPS Battery Cabinet is designed to accommodate multiple combinations of batteries
in order to match the requirements of a particular load. A basic 12-volt battery, made
up of six series-connected lead-calcium cells, forms the basic building block for all UPS
Battery Cabinets. The batteries are series-connected to form a "string" of batteries that
provides the required dc voltage level to operate with the HA32A UPS.
3.1.3 Protection Period
Each UPS Battery Cabinet is designed to provide a specified backup or protection time
for the equipment with which it is designed to operate. This protection time is based on
the equipment operating at rated load (full kVA rating at 0.8 power factor lagging) in an
ambient temperature of 25°C (77°F). Operating at a warmer temperature extends this
protection period but reduces expected battery life. Operating at a cooler temperature
shortens this protection period but increases expected battery life.
HA32B UPS BATTERY CABINET 3–3
3.2 OPERATION
This section describes standard operating procedures, including battery disconnect circuit
breaker QF1 operation, normal operation, and emergency power off (EPO) operation.
The UPS Battery Cabinet should be kept in a charged condition for optimum performance
over the extended life of the batteries. A discharged UPS Battery Cabinet should be
recharged as soon as possible and should not be allowed to remain in a discharged state
for an extended period of time (battery life could be significantly reduced).
If the equipment that the UPS Battery Cabinet is intended to protect is taken out of
service for an extended period of time, the UPS Battery Cabinet should be left connected
to the operating rectifier/battery charger in each system to maintain the batteries in an
optimum condition.
3.2.1 Battery Disconnect Circuit Breaker QF1
QF1 allows you to manually connect or disconnect the UPS Battery Cabinet from its
intended load, the HA32A UPS. QF1 also provides overload protection in the event that
the intended load demands more current than the UPS Battery Cabinet can safely
furnish. Each UPS Battery Cabinet has a battery disconnect circuit breaker QF1,
therefore, if the system has two UPS Battery Cabinets, there are two QF1s.
3.2.1.1 Normal Operation
Under normal operation, QF1 acts as an on/off switch to connect or disconnect the UPS
Battery Cabinet from the HA32A UPS.
3.2.1.2 QF1 Trip
The reasons that circuit breaker QF1 might trip include:
•
Overload
•
Low battery voltage
•
Emergency power off (EPO) command from the HA32A UPS
3.2.1.3 QF1 Reset
After correcting the condition that caused QF1 to trip, manually place QF1 to the off
position, then place QF1 to the on position to reset it.
3.2.2 Emergency Power Off (EPO)
The UPS Battery Cabinet disconnect circuit breaker QF1 is connected to the UPS
emergency power off system. The two EPO keys, located on the HA32A UPS SS&CP,
are pushed simultaneously to initiate an emergency power off signal. When the UPS
Battery Cabinet disconnect circuit breaker QF1 receives this signal, QF1 turns off and
the UPS Battery Cabinet is disconnected from the UPS. The EPO keys should only
be used for emergency situations. DO NOT use the EPO keys for a normal shutdown
sequence.
4
HA32C/D/E UPS AUXILIARY CABINET
4.1 INTRODUCTION
This section describes the HA32C/D/E UPS Auxiliary Cabinets, features, and options.
4.1.1 General Description
The HA32C/D/E UPS Auxiliary Cabinet is available in three different configurations for
use with the HA32A UPS. The configurations are:
1. Isolation Transformer (HA32D-xx)
The isolation transformer can be configured in one of three ways:
a. UPS Input Isolation Transformer: The isolation transformer provides complete
electrical isolation between the ac input source and the input of the UPS
(rectifier/battery charger and battery). See Figure 4–1.
HA32A UPS
PROVIDED
BY
OTHERS
HA32C/D
UPS AUXILIARY CABINET
CB1
∆
Y
BYPASS AC
INPUT (MAINS2)
Q4S
STATIC SWITCH
RECTIFIER/BATTERY
CHARGER
UPS MAIN AC
INPUT (MAINS1)
INVERTER
Q1
ISOLATION
TRANSFORMER
Q3BP
Q5N
UPS
OUTPUT
TERMINALS
BATTERY
TERMINALS
MKV-A2066-91
Figure 4–1
UPS Input Isolation Transformer Configuration
4–1
4–2 HA32C/D/E UPS AUXILIARY CABINET
b. Bypass Input Isolation Transformer: The isolation transformer provides complete
electrical isolation between the ac input source and the critical load when the
UPS is operated on static bypass or manual bypass. See Figure 4–2.
HA32A UPS
∆
Y
CB1
PROVIDED
BY
OTHERS
ISOLATION
TRANSFORMER
BYPASS AC
INPUT (MAINS2)
Q4S
RECTIFIER/BATTERY
CHARGER
UPS MAIN AC
INPUT (MAINS1)
HA32C/D
UPS AUXILIARY CABINET
STATIC SWITCH
Q3BP
INVERTER
Q1
Q5N
UPS
OUTPUT
TERMINALS
BATTERY
TERMINALS
MKV-A2067-91
Figure 4–2
c.
Bypass Input Isolation Transformer Configuration
UPS Input and Bypass Input Isolation Transformer: The isolation transformer
can be connected to provide electrical isolation for both the main ac input
(MAINS1) and the bypass ac input (MAINS2) to the UPS. See Figure 4–3.
NOTE
To connect the isolation transformer described in configuration "c" above, the
UPS main ac input (MAINS1) and bypass ac input (MAINS2) voltages must be
from the same source. See Figure 4–3.
HA32A UPS
PROVIDED
BY
OTHERS
HA32C/D
UPS AUXILIARY CABINET
CB1
∆
Y
JUMPER BYPASS AC
CABLES INPUT (MAINS2)
UPS MAIN AC
INPUT (MAINS1)
Q4S
STATIC SWITCH
RECTIFIER/BATTERY
INVERTER
CHARGER
Q1
ISOLATION
TRANSFORMER
Q3BP
Q5N
BATTERY
TERMINALS
UPS
OUTPUT
TERMINALS
MKV-A2068-91
Figure 4–3
UPS Input and Bypass Input Isolation Transformer Configuration
HA32C/D/E UPS AUXILIARY CABINET 4–3
2. UPS Input Harmonic Current Filter (HA32E-Px)
The input harmonic current filter limits the amount of current distortion fed back
onto the ac input source to less than 10% when the HA32A UPS is operating at full
load.
3. Isolation Transformer and UPS Input Harmonic Current Filter (HA32C-xx)
The UPS Auxiliary Cabinet can be supplied with both of these UPS options installed
within the single Auxiliary Cabinet enclosure.
NOTE
The HA32C-Ex or HA32D-Ex UPS Auxiliary Cabinet models or the HA33D-Ex
UPS CSA Cabinet are required for use with the HA32A-Ax UPS for systems
with a 600 Vac input. These UPS Auxiliary Cabinets and the UPS CSA Cabinets
house the isolation/step-down transformer. The transformer secondary voltage
is 208 Vac and the transformer supplies both the UPS main ac input (MAINS1)
and the bypass ac input (MAINS2). See Figure 4–3.
4.1.2 Input Circuit Breaker (CB1)
Each HA32C and HA32D UPS Auxiliary Cabinet is provided with an input circuit
breaker (CB1). This breaker is located on the ac input source to the UPS Auxiliary
Cabinet. It provides overcurrent protection and mechanical isolation for maintenance
purposes.
4–4 HA32C/D/E UPS AUXILIARY CABINET
4.2 OPERATION
This section describes standard operating procedures, including operation of the input
circuit breaker (CB1), the input isolation transformer, and the input harmonic current
filter.
4.2.1 Input Circuit Breaker (CB1)
CB1 allows you to manually connect or disconnect the input isolation transformer located
inside the HA32C or HA32D UPS Auxiliary Cabinet. CB1 also provides extra protection
against overload conditions. Overload conditions cause the input circuit breaker CB1 to
trip.
The position of CB1 is monitored by the HA32A UPS. If CB1 trips, the LCD on the
HA32A UPS will display: "ENVIRONMENTAL FAULT".
Check the position of circuit breaker CB1. If it is in the center position (trip condition),
reset the circuit breaker by pushing down on the handle, then close the circuit breaker
by pulling up on the handle.
When circuit breaker CB1 is opened or tripped, the rectifier/battery charger in the
HA32A UPS will shut down, and the inverter will operate on battery if the UPS Auxiliary
Cabinet is configured as shown in Figure 4–1 or Figure 4–3. If the UPS Auxiliary Cabinet
is configured as shown in Figure 4–2, the HA32A UPS will remain on-line, but additional
alarms will be generated.
4.2.2 Input Isolation Transformer
The input isolation transformer is protected against thermal overload and is continuously
monitored by the HA32A UPS. Should the input isolation transformer overheat, the
rectifier/battery charger will shut down and the inverter will operate on battery. The
LCD on the HA32A UPS will display: "ENVIRONMENTAL FAULT".
4.2.3 Input Harmonic Current Filter
The input harmonic current filter is protected by three (3) fuses: F1, F2, and F3.
Should one or more of these fuses open, the LCD on the HA32A UPS will display:
"ENVIRONMENTAL FAULT".
The failure of these fuses will not cause the HA32A UPS rectifier/battery charger to shut
down.
5
HA33D/F UPS CSA CABINET
5.1 INTRODUCTION
This section describes the HA33D/F UPS CSA Cabinets, features, and options.
5.1.1 General Description
The HA33D/F UPS CSA Cabinet is available in two different configurations for use with
the HA32A UPS. The configurations are:
1. CSA Assembly Only (HA33F-Px)
A UPS CSA Cabinet with only a CSA assembly is used when 208 Vac utility power
is available for the HA32A UPS. The UPS CSA Cabinet provides power from the ac
input source for both the main ac input (MAINS1) and the bypass ac input (MAINS2)
in the UPS.
The CSA assembly contains a mechanical contactor to provide feedback protection
during a utility power outage if there is a shorted SCR in the static switch. See
Figure 5–1.
SW!
K4
K2
PROVIDED
BY
OTHERS
HA32A UPS
BYPASS AC
INPUT (MAINS2)
TB4
UP S M A I N A C
INPUT (MAINS1)
Q4S
STATIC SWITCH
RECTIFIER/BATTERY
INVERTER
CHARGER
Q1
HA33F UPS CSA CABINET
Q3BP
Q5N
BATTERY
TERMINALS
UPS
OUTPUT
TERMINALS
MKV-A2221-91
Figure 5–1
CSA Assembly Only Configuration
5–1
5–2 HA33D/F UPS CSA CABINET
2. CSA Assembly and Isolation/Step-down Transformer Configuration (HA33D-Ex)
This configuration of the UPS CSA Cabinet is used when 600 Vac utility power
is available for the HA32A UPS. The CSA assembly and the isolation/step-down
transformer are both installed within the single UPS CSA Cabinet enclosure.
NOTE
The HA32C-Ex or HA32D-Ex UPS Auxiliary Cabinet models, or the HA33D-Ex
UPS CSA Cabinet are required for use with the HA32A-Ax UPS for systems
with a 600 Vac input. These UPS Auxiliary Cabinets and the UPS CSA Cabinets
house the isolation/step-down transformer. The transformer secondary voltage
is 208 Vac, and the transformer supplies both the UPS main ac input (MAINS1)
and the bypass ac input (MAINS2). See Figure 5–2.
The isolation/step-down transformer provides a step-down of 600 Vac to 208 Vac and
electrical isolation for both the main ac input (MAINS1) and the bypass ac input
(MAINS2) to the UPS. See Figure 5–2.
SW!
K4
K2
PROVIDED
BY
OTHERS
HA32A UPS
CB1
∆
Y
ISOLATION/
STEP-DOWN
TRANSFORMER
BYPASS AC
INPUT (MAINS2)
UPS MAIN AC
INPUT (MAINS1)
Q4S
STATIC SWITCH
Q3BP
RECTIFIER/BATTERY
INVERTER
CHARGER
Q1
Q5N
BATTERY
TERMINALS
UPS
OUTPUT
TERMINALS
HA33D UPS CSA CABINET
MKV-A2220-91
Figure 5–2
CSA Assembly and Isolation/Step-Down Transformer Configuration
5.1.2 Contactor Control Switch (SW1)
Each HA33D and HA33F UPS CSA Cabinet contains a contactor control switch (SW1).
This switch is closed to allow the ac input source to energize the mechanical contactor
which provides power to the bypass ac input (MAINS2) of the UPS.
Switch SW1 is used for maintenance purposes to electrically isolate the contactor control
fuses (F4, F5, and F6) and the coils of contactors K2 and K4.
5.1.3 Input Circuit Breaker (CB1)
The HA33D UPS CSA Cabinets are provided with an input circuit breaker (CB1).
This breaker is located on the ac input source to the UPS CSA Cabinet. It provides
overcurrent protection and mechanical isolation for maintenance purposes.
HA33D/F UPS CSA CABINET 5–3
5.2 OPERATION
This section describes standard operating procedures, including operation of the input
circuit breaker (CB1), the contactor control switch (SW1), and the input isolation/stepdown transformer.
During normal operation, the UPS inverter supplies power to the load while the static
switch is off and in standby mode. The contactor control switch SW1 in the UPS CSA
Cabinet is manually closed to allow the ac input source to energize contactor coils K2
and K4, causing their contacts to close. This allows the ac input source to be gated to the
bypass ac input (MAINS2) of the UPS.
If the ac input source power fails, the contactor coils of K2 and K4 will deenergize causing
their contacts to open. When the contacts of contactor K2 open, a mechanical isolation
between the bypass ac input (MAINS2) in the UPS and the ac input source will exist.
This will prevent the flow of power from the inverter output to the ac input source in the
event of a static switch SCR failure (short circuit).
5.2.1 Input Circuit Breaker (CB1)
CB1 allows you to manually connect or disconnect the input isolation/step-down
transformer located inside the HA33D UPS CSA Cabinet. CB1 also provides extra
protection against overload conditions. Overload conditions cause the input circuit
breaker CB1 to trip.
The position of CB1 is monitored by the HA32A UPS. If CB1 trips, the LCD on the
HA32A UPS will display: "ENVIRONMENTAL FAULT".
Check the position of circuit breaker CB1. If it is in the center position (trip condition),
reset the circuit breaker by pushing down on the handle, then close the circuit breaker
by pulling up on the handle.
When circuit breaker CB1 is opened or tripped, the rectifier/battery charger in the
HA32A UPS will shut down, and the inverter will operate on battery.
5.2.2 Contactor Control Switch (SW1)
The contactor control switch SW1 is closed during normal operation. This allows the ac
input source to energize the K4 and K2 contactor coils and gate the ac input source to the
bypass ac input (MAINS2) of the UPS. The contactor control circuit is protected by three
5 Amp fuses: F4, F5, and F6.
The failure of one or more of these fuses will deenergize the K2 contactor and disconnect
the ac input source from the bypass ac input (MAINS2) of the UPS, but will not cause
the HA32A UPS rectifier/battery charger to shut down.
Contactor control switch SW1 is used for maintenance purposes to electrically isolate the
contactor control fuses (F4, F5, and F6) and the coils of contactors K2 and K4.
5.2.3 Input Isolation/Step-Down Transformer
The input isolation/step-down transformer is protected against thermal overload and
is continuously monitored by the HA32A UPS. Should the input isolation/step-down
transformer overheat, the rectifier/battery charger will shut down and the inverter will
operate on battery. The LCD on the HA32A UPS will display: "ENVIRONMENTAL
FAULT".
6
HA32J/K UPS DISTRIBUTION CABINET
6.1 INTRODUCTION
This chapter introduces the HA32J/K UPS Distribution Cabinet. The equipment is
described, followed by a description of available options. Figure 6–1 depicts the HA32J/K
UPS Distribution Cabinet.
DOOR LOCK
MKV-A2069-91
Figure 6–1
HA32J/K UPS Distribution Cabinet
6–1
6–2 HA32J/K UPS DISTRIBUTION CABINET
6.1.1 System Description
The HA32J/K UPS Distribution Cabinet provides the means to distribute power from the
HA32A UPS to the user’s intended equipment. The HA32J/K UPS Distribution Cabinet
is furnished in an enclosure matching the other HA3000 series equipment. The HA32J/K
is designed to attach to the right side of the HA32A UPS, or to either the right side of the
HA32C/D/E UPS Auxiliary Cabinet or the HA33D/F UPS CSA Cabinet if these options
are purchased.
The HA32J is furnished with one 42-pole position, 225-ampere rated panelboard, and one
225-ampere rated branch circuit breaker. The HA32K is furnished with two 42-pole
position, 225-ampere rated panelboards, and two 225-ampere rated branch circuit
breakers.
A single-line diagram of the HA32A UPS and the HA32J/K UPS Distribution Cabinet is
shown in Figure 6–2.
Q4S
BYPASS
AC INPUT
(MAINS2)
STATIC SWITCH
RECTIFIER/BATTERY
INVERTER
CHARGER
MAIN
AC INPUT
(MAINS1)
Q1
CB2
225 A
Q3BP
CBI
*
(OPTIONAL)
∆
Y
BRANCH
CIRCUIT BREAKER
HA32J/K
HA32A UPS
HA32B UPS
BATTERY CABINET
CB3
225 A
Q5N
UPS DISTRIBUTION CABINET
QF1
BRANCH
CIRCUIT BREAKER
42-POLE
POSITION
PANELBOARD
TO
CRITICAL
LOAD
42-POLE
POSITION
PANELBOARD
TO
CRITICAL
LOAD
* ONLY IF TRANSFORMER IS INSTALLED
MKV-A2070-91
Figure 6–2
HA32J/K and HA32A Single-Line Diagram
HA32J/K UPS DISTRIBUTION CABINET 6–3
6.2 OPERATION
This section describes the operation of circuit breaker(s) CB1, CB2, and CB3, and the
operation of the output circuit breaker(s). Figure 6–3 shows the location of the circuit
breakers.
OUTPUT CIRCUIT BREAKERS
PANELBOARD #2
CIRCUIT
BREAKER
CB2
OUTPUT CIRCUIT BREAKERS
PANELBOARD #1
CIRCUIT
BREAKER
CB3
CIRCUIT
BREAKER
CB1
MKV-A2071-91
Figure 6–3
HA32J/K Circuit Breaker Locations
6.2.1 Circuit Breaker(s) CB1, CB2, and CB3
Circuit breaker CB1 is present in a UPS Distribution Cabinet with an isolation
transformer. All power to a UPS Distribution Cabinet with an isolation transformer
passes through CB1.
Circuit breakers CB2 and CB3 allow you to manually connect or disconnect the HA32J/K
UPS Distribution Cabinet panelboards to the output of the HA32A UPS. They also
provide extra protection against overload conditions. Overload conditions cause the
branch circuit breaker(s) to trip.
6–4 HA32J/K UPS DISTRIBUTION CABINET
The branch circuit breaker(s) handle has three positions:
1. OFF or circuit breaker open = handle in the bottom position
2. TRIP or circuit breaker open = handle in the middle position
3. ON or circuit breaker closed = handle in the top position
To reset the branch circuit breaker after it has tripped, push the handle down to the OFF
position, then move the handle up to the ON position.
6.2.2 Output Circuit Breaker(s)
The output circuit breaker(s) allow you to manually connect or disconnect each load
connected to the output of the HA32J/K UPS Distribution Cabinet without affecting the
other loads. The output circuit breaker(s) protects the individual loads against overload
conditions. Overload conditions cause the output circuit breaker(s) to trip.
The output circuit breaker(s) handle has three positions:
1. OFF or circuit breaker open
2. TRIP or circuit breaker open
3. ON or circuit breaker closed
To reset an output circuit breaker after it has tripped, push the handle to the OFF
position, then move the handle to the ON position.
A
SPECIFICATIONS
The following are electrical and environmental specifications for the HA32A UPS.
AC Input (MAINS1) Ratings
Refer to Table A–1 for nominal voltage (Vac) values available.
Voltage:
As specified, nominal +10%, -15%
Frequency:
Nominal, ±5%
Phases:
Three-phase, phase rotation A, B, C
Wires:
Three, plus equipment ground
Current:
See Table A–2
Power Factor:
0.82 lagging minimum at full load output, nominal input voltage, and
normal float voltage on the battery
Bypass AC Input (MAINS2) Ratings
Voltage:
Must match UPS nominal output voltage ±10%
Frequency Window:
Nominal, ± 0.25, 0.50, 0.75, or 1.0 Hz. Standard setting for bypass
input frequency window is ±0.50 Hz, unless otherwise specified when
ordered. The frequency window can be changed after the unit is
installed, but only an authorized Digital Services representative can
modify the equipment.
Phases:
Three-phase, phase rotation A, B, C
Wires:
Four-wire wye
Current:
See Table A–2
Power Factor:
Load-dependent
A–1
A–2 SPECIFICATIONS
Inverter AC Output Ratings
Refer to Table A–1 for nominal voltage (Vac) values available.
Voltage:
Nominal value ±1% for all conditions of line, load, and temperature
Frequency:
Normally synchronized to the bypass ac input source (when
available); otherwise, the output frequency is the nominal value
±0.1%
Phases:
Three-phase, phase rotation A, B, C
Wires:
Three or four. The UPS inverter output is normally a wye
configuration with the neutral grounded. A three-wire delta load can
be connected to the UPS inverter output, but the phase connections
cannot be grounded.
Current:
See Table A–2
Power Factor:
The UPS inverter output is rated at full kVA, 0.8 power factor lagging
load
Slew Rate:
The rate of change of the UPS inverter output frequency, while
tracking within the frequency window, when synchronizing to the
bypass ac input source, or when going to a free-running condition
after losing ac input power, is 1 Hz/second maximum
Overload
Characteristics:
Applies to the UPS output when operating from either the bypass ac
input source or the UPS inverter output:
125% for 10 minutes
150% for 1 minute
Overloads in excess of 150% or exceeding the overload time periods
previously indicated, will cause the load to be transferred from the
UPS inverter output to the bypass ac input source, provided the
sources are synchronized. Once the load is transferred to the bypass
ac input source after exceeding the time periods previously indicated,
the timed periods will start again for operation on the UPS static
switch. If the load does not return to less than the unit’s fill load
rating prior to completing the timed overload periods, the load will be
disconnected.
Dynamic
Characteristics:
Peak voltage deviation on the UPS inverter output is listed below for
the conditions indicated:
50% step load change ±3% maximum
100% step load change ±5% maximum
Dynamic Response:
The UPS inverter output voltage returnd to ±1% of nominal within
one cycle after experiencing a 100% step load change
Battery Characteristics
DC Voltage Range:
325 Vdc minimum
436 Vdc maximum
DC Current Required:
See Table A–2
SPECIFICATIONS A–3
Environmental Characteristics
Temperature:
•
Operating Range:
0° to 40°C (32° to 104°F), excluding battery
•
Nonoperating and
Storage:
-25° to 70°C (-13° to 158°F)
NOTE
Batteries should be stored only in a fully charged condition at temperatures not
exceeding 25°C (77°F). Storage at higher temperatures will reduce storage life and may
reduce battery life.
Relative Humidity:
0 to 95%, noncondensing
Recommended
Environment:
Computer room or other temperature-controlled environment
Recommended
Temperature:
20° to 30°C (68° to 86°F)
Battery protection time is based on a 25°C (77°F) ambient
temperature
Recommended
Relative Humidity:
50%
A–4 SPECIFICATIONS
The following tables contain the specifications for the HA32A UPS, the HA32B UPS
Battery Cabinet, the HA32C/D/E UPS Auxiliary Cabinet, the HA33D/F UPS CSA
Cabinet, and the HA32J/K UPS Distribution Cabinet.
Table A–1 Standard HA32A UPS Models
Model
Number
Nominal
Output Input
Rating Voltage
kVA/kW 3 (Volts)
Input
CB
Rating
(Amps)
Output
Voltage
3 (Volts)
Width
mm/in
Approx.
Weight
kg/lbs
Heat
Loss
(Full
Load)
BTU/hr
HA32A-AH
20/16
208
80
208Y/120
800/31.5
488/1,075
8,189
HA32A-DH
20/16
220
80
220Y/127
800/31.5
488/1,075
8,189
HA32A-BH
20/16
480
40
208Y/120
800/31.5
488/1,075
8,189
HA32A-CH
20/16
480
40
480Y/277
800/31.5
488/1,075
8,189
HA32A-AK
40/32
208
175
208Y/120
800/31.5
628/1,385
15,013
HA32A-DK
40/32
220
175
220Y/127
800/31.5
628/1,385
15,013
HA32A-BK
40/32
480
80
208Y/120
800/31.5
628/1,385
15,013
HA32A-CK
40/32
480
80
480Y/277
800/31.5
628/1,385
15,013
HA32A-AM
60/48
208
250
208Y/120
1,143/45.0
783/1,725
20,130
HA32A-DM
60/48
220
250
220Y/127
1,143/45.0
783/1,725
20,130
HA32A-BM
60/48
480
100
208Y/120
1,143/45.0
783/1,725
20,130
HA32A-CM
60/48
480
100
480Y/277
1,143/45.0
783/1,725
20,130
HA32A-AN
80/64
208
350
208Y/120
1,143/45.0
1,023/2,250 26,954
HA32A-DN
80/64
220
350
220Y/127
1,143/45.0
1,023/2,250 26,954
HA32A-BN
80/64
480
150
208Y/120
1,143/45.0
1,023/2,250 26,954
HA32A-CN
80/64
480
150
480Y/277
1,143/45.0
1,023/2,250 26,954
Height, all models: 1,402 mm/55.18 in
Depth, all models: 817 mm/32.18 in
SPECIFICATIONS A–5
Table A–2 HA32A Currents
HA32A-xH
HA32A-xK
HA32A-xM
HA32A-xN
20/16
40/32
60/48
80/64
Output Power Rating
kVA/kW
Unit Nominal AC Input Current (Amperes) @ Nominal Input Voltage
208 Vac
61.5
121.5
180.4
237.7
220 Vac
58.2
114.9
170.5
224.8
480 Vac
29.3
52.7
78.2
103.0
Unit AC Output and Bypass AC Input Current (Amperes) @ Nominal Voltage (Note 1)
Full Load Continuous
208Y/120
55.5
111.0
166.5
222.1
220Y/127
52.5
105.0
157.5
209.9
480Y/277
24.1
48.1
72.2
96.2
125% Overload for 10 Minutes
208Y/120
69.4
138.8
208.2
277.6
220Y/127
65.6
131.2
196.8
262.4
480Y/277
30.1
60.1
90.2
120.3
208Y/120
83.3
166.5
249.8
333.1
220Y/127
78.7
157.5
236.2
314.9
480Y/277
36.1
72.2
108.3
144.3
109.2
163.9
218.5
150% Overload for 1 Minute
Maximum Battery Current (Note 2)
Amperes
54.6
NOTES:
1. As a minimum, bypass ac input (MAINS2) power should match the UPS output rating. The bypass ac input
should have a continuous rating of 125% of the UPS output power rating to supply fault-clearing current.
2. Battery wiring should be sized to keep the total cable voltage drop to less than 0.5 Vdc at the current
shown.
A–6 SPECIFICATIONS
Table A–3 UPS Battery Cabinet Model Numbers
Circuit
Breaker
(QF1)
Rating in
Amperes
Width of
Battery
Cabinet
mm/in
Approx.
Installed
Weight
kg/lbs
Model
Number
kVA
Rating
Nominal
Protection
in Minutes
HA32B-AH
20
5
90
800/31.5
530/1,169
HA32B-CH
20
15
90
800/31.5
530/1,169
HA32B-FH
20
30
90
1,143/45.0
905/1,995
HA32B-AK
40
5
125
800/31.5
530/1,169
40
14
125
1,143/45.0
905/1,995
40
30
125
2 x 1,143/45.0
2 x 826/1,820
HA32B-CK
HA32B-FK
1
HA32B-AM
60
5
175
1,143/45.0
905/1,995
HA32B-CM
1
60
10
175
2 x 1,143/45.0
2 x 826/1,820
HA32B-FM
1
60
30
175
2 x 1,143/45.0
2 x 826/1,820
HA32B-AN
80
5
225
1,143/45.0
905/1,995
HA32B-CN
1
80
14
225
2 x 1,143/45.0
2 x 826/1,820
HA32B-FN
1
80
22
225
2 x 1,143/45.0
2 x 905/1,995
1 Consists
of two battery cabinets with same dimensions and weight.
Depth of all models: 817 mm/32.18 in
Height of all models: 1,402 mm/55.18 in
Table A–4 Maximum DC Current Requirements
UPS Battery Cabinet
Model Number
Maximum DC Current
(Amperes)
HA32B-XH
54.6
HA32B-XK
109.2
HA32B-XM
163.9
HA32B-XN
218.5
SPECIFICATIONS A–7
Table A–5 Interbattery Link Torque Values
Manufacturer
Model No.
Initial Torque Values
Subsequent Torque Values
Yuasa
DM33-12
1.8 N·m (16.3 inch-pounds)
1.2 N·m (10.85 inch-pounds)
Yuasa
DM55-12
1.8 N·m (16.3 inch-pounds)
1.2 N·m (10.85 inch-pounds)
Yuasa
DM80-12
1.8 N·m (16.3 inch-pounds)
1.2 N·m (10.85 inch-pounds)
Johnson
Controls
UPS12-95
3.9 N·m (35.0 inch-pounds)
3.4 N·m (30.0 inch-pounds)
Johnson
Controls
UPS12-135
3.9 N·m (35.0 inch-pounds)
3.4 N·m (30.0 inch-pounds)
Johnson
Controls
UPS12-225
3.9 N·m (35.0 inch-pounds)
3.4 N·m (30.0 inch-pounds)
Johnson
Controls
JC12250
Not applicable
Not applicable
Table A–6 UPS Auxiliary Cabinet Weights and Dimensions
Output
Rating
(kVA)
HA32D-XX
Isolation
Transformer
Only
(kg/lbs)
HA32E-PX
Input Current
Filter Only
(kg/lbs)
HA32C-XX
Isolation Transformer
and Input Current Filter
(kg/lbs)
20
204/450
154/341
268/591
40
249/550
169/374
328/724
60
327/720
214/473
450/993
80
386/850
260/573
556/1,255
Depth of all models: 817 mm/32.18 in
Height of all models: 1,402 mm/55.18 in
Width of all models: 477 mm/18.78 in
A–8 SPECIFICATIONS
Table A–7 HA32C/D/E UPS Auxiliary Cabinet Electrical Specifications
Model
Number
Output
Rating
(kVA)
Input
Voltage
(Vac)
Input
Current
(Amps)
Output
Voltage
(Vac)
Output
Current
(Amps)
Input CB
Rating
(Amps)
With Input Isolation Transformer and Harmonic Current Filter
HA32C-AH
20
208
62
208
62
90
HA32C-BH
20
480
30
208
62
40
HA32C-CH
20
480
30
480
30
40
HA32C-DH
20
220
59
220
59
90
HA32C-EH
20
600
24
208
62
40
HA32C-AK
40
208
122
208
122
175
HA32C-BK
40
480
53
208
122
90
HA32C-CK
40
480
53
480
53
90
HA32C-DK
40
220
115
220
115
175
HA32C-EK
40
600
43
208
122
60
HA32C-AM
60
208
181
208
181
250
HA32C-BM
60
480
79
208
181
100
HA32C-CM
60
480
79
480
79
100
HA32C-DM
60
220
171
220
171
250
HA32C-EM
60
600
63
208
181
80
HA32C-AN
80
208
238
208
238
350
HA32C-BN
80
480
103
208
238
150
HA32C-CN
80
480
108
480
103
150
HA32C-DN
80
220
225
220
225
350
HA32C-EN
80
600
93
208
238
100
With Input Isolation Transformer Only
HA32D-AH
20
208
62
208
62
90
HA32D-BH
20
480
30
208
62
40
HA32D-CH
20
480
30
480
30
40
NOTES:
1. NA = Not Applicable
2. The Input Harmonic Current Filter option is not voltage dependent. It does not increase the input or output
current.
3. The UPS Auxiliary Cabinet models with an Input Isolation Transformer (HA32C and HA32D) contain an
input circuit breaker (CB1).
SPECIFICATIONS A–9
Table A–7 (Cont.) HA32C/D/E UPS Auxiliary Cabinet Electrical Specifications
Model
Number
Output
Rating
(kVA)
Input
Voltage
(Vac)
Input
Current
(Amps)
Output
Voltage
(Vac)
Output
Current
(Amps)
Input CB
Rating
(Amps)
HA32D-DH
20
220
59
220
59
90
HA32D-EH
20
600
24
208
62
40
HA32D-AK
40
208
122
208
122
175
HA32D-BK
40
480
53
208
122
90
HA32D-CK
40
480
53
480
53
90
HA32D-DK
40
220
115
220
115
175
HA32D-EK
40
600
43
208
122
60
HA32D-AM
60
208
181
208
181
250
HA32D-BM
60
480
79
208
181
100
HA32D-CM
60
480
79
480
79
100
HA32D-DM
60
220
171
220
171
250
HA32D-EM
60
600
63
208
181
80
HA32D-AN
80
208
238
208
238
350
HA32D-BN
80
480
103
208
238
150
HA32D-CN
80
480
108
480
103
150
HA32D-DN
80
220
225
220
225
350
HA32D-EN
80
600
93
208
238
100
With Harmonic Current Filter Only
HA32E-PH
20
NA
NA
NA
NA
NA
HA32E-PK
40
NA
NA
NA
NA
NA
HA32E-PM
60
NA
NA
NA
NA
NA
HA32E-PN
80
NA
NA
NA
NA
NA
NOTES:
1. NA = Not Applicable
2. The Input Harmonic Current Filter option is not voltage dependent. It does not increase the input or output
current.
3. The UPS Auxiliary Cabinet models with an Input Isolation Transformer (HA32C and HA32D) contain an
input circuit breaker (CB1).
A–10 SPECIFICATIONS
Table A–8 UPS CSA Cabinet Weights and Dimensions
Output Rating
(kVA)
HA33D-XX
Isolation/Step-Down
Transformer and CSA
Assembly
(kg/lbs)
HA33F-XX
CSA Assembly Only
(kg/lbs)
20
211/465
98/215
40
256/565
98/215
60
333/735
98/215
80
392/865
98/215
Depth of all models: 817 mm/32.18 in
Height of all models: 1,402 mm/55.18 in
Width of all models: 477 mm/18.78 in
Table A–9 HA33D/F UPS CSA Cabinet Electrical Specifications
Model
Number
Output
Rating
(kVA)
Input
Voltage
(Vac)
Output
Voltage
(Vac)
Input CB Rating
(Amps)
With Input Isolation/Step-Down Transformer and CSA Assembly
HA33D-EH
20
600
208
40
HA33D-EK
40
600
208
60
HA33D-EM
60
600
208
80
HA33D-EN
80
600
208
100
With CSA Assembly Only
HA33F-PH
20
NA
NA
NA
HA33F-PK
40
NA
NA
NA
HA33F-PM
60
NA
NA
NA
HA33F-PN
80
NA
NA
NA
NOTES:
1. NA = Not Applicable
2. The CSA assembly is not voltage dependent.
3. The UPS CSA Cabinet models with an Input Isolation/Step-Down Transformer (HA33D) contain an input
circuit breaker (CB1).
SPECIFICATIONS A–11
Table A–10 UPS Distribution Cabinet Specifications
Model
Number
UPS
Output
Rating
(kVA)
Input
Voltage
(Vac)
Maximum
Input
Current
(Amps)
Output
Voltage
(Vac)
Maximum
Output
Current
(Amps)
Weight
(kg/lbs)
HA32J-AT
1
20 - 40
208/220
222
208/220
222
225/495
HA32K-AT
1
60 - 80
208/220
222
208/220
222
239/525
HA32J-AH
20
208
55.5
208
55.5
352/775
HA32J-BH
20
480
24.1
208
55.5
352/775
HA32J-DH
20
220
55.5
220
55.5
352/775
HA32J-AK
40
208
111
208
111
389/855
HA32J-BK
40
480
48.1
208
111
389/855
HA32J-DK
40
220
111
220
111
389/855
HA32K-AK
40
208
111
208
111
399/880
HA32K-BK
40
480
48.1
208
111
399/880
HA32K-AM
60
208
166.5
208
166.5
461/1,015
HA32K-BM
60
480
72.2
208
166.5
461/1,015
HA32K-DM
60
220
166.5
220
166.5
461/1,015
HA32K-AN
80
208
222
208
222
516/1,135
HA32K-BN
80
480
96.2
208
222
516/1,135
HA32K-DN
80
220
222
220
222
516/1,135
1 These models DO NOT contain an isolation/step-down transformer. The input voltage will equal the output
voltage.
The HA32J-XX models contain one (1) 42-pole panelboard.
The HA32K-XX models contain two (2) 42-pole panelboards.
Height, all models: 1,402 mm/55.18 in
Depth, all models: 817 mm/32.18 in
Width, all models: 800 mm/31.50 in
GLOSSARY
/
Represents "and/or"
%
Percent; of each hundred.
°F
Degrees Fahrenheit
°C
Degrees Centigrade
±
Plus or minus
Phase
Ohms
A, B, C
Normal sequence of phases in three phase power.
AC or ac
Alternating current.
Ambient air temperature
The temperature of the surrounding air.
ANSI
American National Standards Institute.
AWG
American Wire Gauge, formerly Brown & Sharp gauge; a standard for sizing crosssectional area of wire conductors, and for measuring sheet metal thickness.
B or BAT or BATT.
Battery.
BAT TRANS.TEST
Battery Transfer Test; simulates a main input power failure and tests inverter operation
on the battery for two minutes.
GLOSSARY–1
GLOSSARY–2
BATTERY OV
Battery overvoltage.
BATTERY UV
Battery undervoltage.
BREAKER
Circuit breaker.
British Thermal Unit
A unit of heat equal to 252 calories (see Calories below). One British Thermal Unit is
defined as the amount of energy required to raise the temperature of one pound of water
by one degree Fahrenheit.
Btu
British Thermal Unit.
Btu/Hr
British Thermal Units per hour.
BYP
Bypass.
BYPASS
Manual Bypass; manual bypass without interruption to the load using the Bypass Circuit
Breaker Q3BP in conjunction with Q4S and Q5N.
BYPASS AC INPUT
The MAINS2 power source.
BYPASS PROCEDURE
Main Menu selection for access to the procedure for manually transferring the load to the
bypass ac input (MAINS2) source, and returning the load to the inverter output.
Calorie
A unit of heat. One calorie is defined as the amount of energy required to raise the
temperature of one gram of water by one degree Centigrade.
Carrier
The company or individual responsible for delivering goods from one area to another.
CAPAC DISCHARGING
Capacitors discharging; indicates that the capacitors are discharging. The voltage
across the capacitor terminals is indicated on the next LCD line. When this indication
appears on the LCD, wait until the capacitor voltage reaches zero before carrying out any
operations on the equipment.
CB
Circuit breaker.
CH
(CHarger) rectifier/battery charger.
GLOSSARY–3
CHANGE OK=1
Prompt requesting replacement of subassembly indicated on the preceding LCD line. By
entering 1, you indicate to the UPS Monitor that the change has been made.
CHARG.
(CHARGer) rectifier/battery charger.
CHARGE I MAX
Prompt for entry of the maximum battery charge current value.
CHARGER ACQUISITION FAULT
The rectifier/battery charger is not receiving information required for operation.
CHARGER CT FAULT
Indicates a fault on current transformer T1 or T2, which is installed on the
rectifier/battery charger input lines.
CHECK LOAD
Transfer the load to the bypass ac input (MAINS2) source, and check to see that the
currents of the three phases do not exceed the inverter current rating (In=Pn/3Un, where
In = inverter nominal current rating in kVA, Pn = inverter current rating in kVA, and Un
= inverter line-to-neutral voltage).
CHECK MAINS
Measure the main ac input (MAINS1) voltages to ensure that they are within tolerance
(+10%, -15%).
CHGR.
Rectifier/battery charger.
COMMUNICATION
Main Menu selection providing access to parameter programming for communication
with a remote computer system.
Conduit
A flexible or rigid tube surrounding electrical conductors.
CT
Current transformer.
Curr.
Current.
Current Rating
The maximum current that a piece of electrical equipment was designed to carry.
DC or dc
Direct current.
DC FAULT
Indicates an internal fault at the dc voltage level (between the rectifier/battery charger,
the inverter, and the battery).
DESIG.
Designation.
GLOSSARY–4
DIAGNOSIS
Main Menu selection providing access to UPS diagnostic routines for troubleshooting the
HA32A UPS.
Earth Ground
A ground circuit that has contact with the earth.
Electrician
Refers to an installation electrician qualified to install heavy-duty electrical components
in accordance with national and local codes and regulations. Not qualified to maintain or
repair electrical or electronic equipment; compare with Technician.
EPO
Emergency power off.
FAN FAILURE
Failure of a UPS enclosure cooling fan. For normal room temperatures, the remaining
fan is sufficient for continued UPS operation.
FAULT CLEAR
Clearing of memorized faults after the condition(s) causing the fault(s) has been
corrected.
FORCED OFF
Inverter shutdown, with an 0.8 second load interruption caused by incorrect bypass ac
input (MAINS2) characteristics.
FORCE ON
Load transferred to inverter with an 0.8 second interruption.
FORCE TRANSFER
Prompt requesting password entry to obtain load transfer to inverter after an
interruption of 0.8 seconds.
FREE RUNNING
Indicates that the inverter frequency is stable and independent of the bypass ac input
(MAINS2) frequency.
FREQ
Frequency.
Fusible
Capable of being melted with heat.
GEN SET DESYNCHRO
Inverter frequency desynchronization action with respect to the bypass ac input
(MAINS2) source upon transfer to a motor-generator set.
GEN SET POW LIM
Motor-generator set power limit; reducing the power consumed by the rectifier/battery
charger during operation of the UPS on a motor-generator set.
GND
Ground.
GLOSSARY–5
GRAD CH STOP
Gradual rectifier/battery charger shutdown; a gradual shutdown of the rectifier/battery
charger initiated by the closure of an external contact.
Hz
Hertz; one cycle per second equals one Hertz.
I
Current.
I SENSOR FAULT
Indicates a fault on the inverter output current sensor.
Input Branch Circuit
The input circuit from the building power panel circuit breaker to the UPS module.
INV
Inverter.
INV FUSE BLOWN
Inverter fuse(s) blown; indicates that fuse F1, F2, or F3 has blown on the inverter output.
INV LEG THERMO
Indicates overtemperature on the transistors of the inverter leg.
INV NON SYNC
Indicates that the phase shift between the inverter and the bypass ac input (MAINS2)
source is outside of tolerance (± 3°). Transfer of the load without an interruption is not
possible.
INV STOP DISABLED
Indicates that the inverter cannot be stopped using the INVERTER STOP command
because the bypass ac input (MAINS2) characteristics are incorrect, which would lead to
an 0.8 second interruption to the load if the inverter were stopped.
INVERT 2 PHASES
The main ac input (MAINS1) or bypass ac input (MAINS2) connections are incorrect.
Swap any two phases to correct the phase sequence.
INVERTER ACQUISITION FAULT
Indicates that the inverter is not receiving information required for operation.
INVERTER FORCED
Load supplied by the inverter regardless of circumstances [transfer to bypass ac input
(MAINS2) source is locked out].
INVERTER RETURN
Prompt requesting entry of the number 2 for access to the load return to inverter
procedure from maintenance bypass status.
I/P
Input.
kVA
Kilovolt-amperes; a measure of apparent power.
GLOSSARY–6
kW
Kilowatt; a measure of real power.
LCD
Liquid-crystal display.
LED
Light-emitting diode.
LEG
Inverter phase.
LEG DESATURATION
Indicates that the inverter power transistors are not operating in saturation.
LEG POWER SUP FAULT
Inverter leg power supply fault; indicates a power supply fault on the PC board
controlling the transistors of the inverter leg.
Load
The equipment being protected by the UPS.
!LOAD INTERRUPT!
Warning that impending action will cause an 0.8 second load interruption.
MAINS1
Main ac input power source.
MAINS2
Bypass ac input power source.
MAINS2 FU RC BLOWN
Indicates blown fuses on the voltage surge suppression circuit connected to the bypass ac
input (MAINS2) power source.
MAINS2 NOT OK
Indicates that the bypass ac input (MAINS2) voltage or frequency is outside tolerance
limits (± 10% and ± 0.5% of nominal, respectively).
MAINS2 PHASING
Indicates zero volts on one phase of the bypass ac input (MAINS2) power source.
MAINS PH SEQ NOK
Mains phase sequence not okay; indicates that the phase rotation is incorrect. Swap any
two phases to correct this situation.
MAX
Maximum.
MCM
Thousand circular mil; wire sizing method for multiple stranded conductors over 4/0 AWG
in diameter. M is for the Roman Numeral symbol for 1,000.
MG
Motor-generator set; an alternator (generator) driven by an electric motor.
GLOSSARY–7
MOV
Metal-oxide varistor; a device used to suppress voltage transients (spikes) on an electrical
line.
NEC
National Electrical Code, ANSI/NFPA 70 (latest issue).
NFPA
National Fire Protection Association.
NO. or No.
Part number.
NOK
Not okay.
OF
Overfrequency.
OF/UF
Over- or underfrequency.
O.T.
Out of tolerance.
OUTPUT OVERLOAD
Indicates that an overload (110%) has occurred.
OUTSIDE CONTACT
An external contact supplied by the user that: initiates independent inverter
frequency, initiates a reduction in the power consumed on the main ac input (MAINS1)
power source, forces the load to be supplied by the inverter, or initiates a gradual
rectifier/battery charger shutdown.
OV
Overvoltage.
OV/UV
Over- or undervoltage.
Packing List
The list of articles included in a given shipment.
PCB
Printed circuit board; refers to the electronic cards used in the equipment.
PERSONALIZATION
Main menu heading for access to the programming of nonstandard equipment
characteristics.
P.F.
Power factor.
PH
Phase.
GLOSSARY–8
PIA
Plug-in assembly.
Power Factor
The ratio (decimal) of real power to apparent power, with current specified as leading or
lagging voltage.
POWER SUPPLY FAULT
Indicates a fault on the control electronics power supply board ALIP.
Q1
UPS main ac input (MAINS1) circuit breaker designation.
Q3BP
Manual bypass circuit breaker designation.
Q4S
Bypass ac input (MAINS2) circuit breaker designation.
Q5N
UPS output isolation circuit breaker designation.
QF1
UPS Battery Cabinet circuit breaker designation.
Remote Emergency Power Off
A switch used to shut down electrical equipment from a location away from the
equipment.
REPO
Remote emergency power off.
REP
Replacement.
SCR
Silicon-controlled rectifier.
SEQ
Sequence.
S.G.
Specific gravity.
Shipping Damage
Any damage done to an article while it is in transit.
Shipping Pallet
A platform on which articles are fixed for shipping.
Specific Gravity
The ratio of the weight of a given volume of one substance (such as battery electrolyte) to
that of an equal volume of a reference substance (such as water).
GLOSSARY–9
SPEED = BAUDS
Programming of the transmission speed in bits per second (baud rate).
S.S. or STATIC SW
Static switch; used to transfer the load to the bypass ac input (MAINS2) power source
without interruption to the load.
S.S. PROTECTIVE DEVICE FAULT
Indicates a fault on the voltage surge protection circuit connected to the bypass ac input
(MAINS2) power source.
S.S. THERMO
Indicates an overtemperature condition on the SCRs of the static switch assembly.
SS&CP
System status and control panel; the front panel of the UPS that contains the controls
and indicators.
SYNC. or SYNCHRO
Synchronization.
SW
Switch.
SW TO MAN BY-PASS
Switch to manual bypass.
Technician
Refers to an electronic technician qualified to maintain and repair electronic equipment.
Not qualified to install electrical wiring. Compare with Electrician.
Temp.
Temperature.
TEST POSITION
Indicates that the inverter has been stopped and is not available. The load is on manual
bypass (Q4S is open, Q5N is open, and Q3BP is closed).
THERMAL OVERLOAD
Indicates that an overload (between 120% and 150%) has occurred.
THERMO
Abbreviation for overtemperature.
TRANSF.
Transfer.
TRANSFO
Transformer.
TRANSFO THERMO
Indicates an overtemperature condition on the inverter output transformer T5.
U
Voltage.
GLOSSARY–10
UF
Underfrequency.
UL
Underwriter’s Laboratories, Inc.
UPS
Uninterruptible power system.
UV
Undervoltage.
Vac
Volts of alternating current.
Vb
Battery voltage (in volts).
Vdc
Volts of direct current.
Via
By way of.
VPC
Volts per cell; the measure of the electrical potential of a storage cell, such as a battery.
W/O
Without.
XFMR
Transformer.
Index
A
Alarms, 2–34
major, 2–35
minor, 2–34
B
Battery disconnect circuit breaker QF1,
3–3
Battery transfer test, 2–15
BATT TRANS. TEST menu, 2–15
BYPASS PROCEDURE menu, 2–17
C
COMMANDS menu, 2–20
battery boost charge, 2–22
battery equalization charge, 2–22
inverter start and stop, 2–21, 2–32
language selection, 2–23
rectifier/battery charger start and stop,
2–20, 2–32
resetting faults stored in memory, 2–21
synchronous/nonsynchronous operation,
2–21
COMMUNICATION menu, 2–28
Controls
electromechanical, 2–6
programmable, 2–6
HA32A UPS (Cont.)
manual bypass, 1–4, 2–33
system status and control panel
(SS&CP), 2–1
HA32B UPS Battery Cabinet, 1–7, 3–1
HA32C/D/E UPS Auxiliary Cabinet, 1–7,
4–1
HA32J/K UPS Distribution Cabinet, 1–8,
6–1
HA33D/F UPS CSA Cabinet, 1–7, 5–1
I
INVERTER ON/OFF menu, 2–12
Inverter start and stop, 2–21, 2–32
M
Major alarms, 2–35
inverter, 2–36
rectifier/battery charger, 2–35
Manual bypass, 1–4, 2–33
Menus, 2–8
BATT TRANS. TEST menu, 2–15
BYPASS PROCEDURE menu, 2–17
COMMANDS menu, 2–20
COMMUNICATION menu, 2–28
DIAGNOSIS menu, 2–24
DISPLAY CONTRAST menu, 2–14
INVERTER ON/OFF menu, 2–12
PERSONALIZATION menu, 2–28
START-UP menu, 2–10
Minor alarms, 2–34
D
DC Ground Fault Detector, 1–9
DIAGNOSIS menu, 2–24
DISPLAY CONTRAST menu, 2–14
H
HA320-A3 Remote Alarm Panel, 1–8
HA320-AA/AB Remote Status Panel, 1–8
HA320-B1 Smoke Detector, 1–9
HA320-C2 DC Ground Fault Detector,
1–9
HA32A UPS
O
Operating modes
automatic, 2–29
input power restored/battery
charging, 2–31
inverter shutdown or major
overload, 2–31
normal operation, 2–29
on battery operation, 2–30
manual, 2–32
inverter start and stop, 2–32
manual bypass, 2–33
Index 1
2 Index
Operating modes
manual (Cont.)
rectifier/battery charger start and
stop, 2–32
return to normal operation from
manual bypass, 2–33
Options
DC Ground Fault Detector, 1–9
Remote Alarm Panel, 1–8
Remote Emergency Power Off (REPO),
1–9
Remote Status Panel, 1–8
Smoke Detector, 1–9
UPS Auxiliary Cabinet, 1–7
UPS CSA Cabinet, 1–7
UPS Distribution Cabinet, 1–8
P
PERSONALIZATION menu, 2–28
Programmable controls and indicators,
1–6
R
Rectifier/battery charger, 1–4
Rectifier/battery charger start and stop,
2–20, 2–32
Remote Alarm Panel, 1–8
Remote Emergency Power Off (REPO),
1–9
Remote Status Panel, 1–8
Return to normal operation from manual
bypass, 2–33
S
Smoke Detector, 1–9
Specifications, A–1
START-UP menu, 2–10
Static inverter, 1–4
Static switch, 1–4
System description, 1–2
System status and control panel (SS&CP),
2–1
U
UPS Auxiliary Cabinet, 1–7, 4–1
input circuit breaker CB1, 4–3, 4–4
input harmonic current filter, 4–4
input isolation transformer, 4–4
UPS Battery Cabinet, 1–7, 3–1
UPS CSA Cabinet, 1–7, 5–1
contactor control switch (SW1), 5–2,
5–3
input circuit breaker CB1, 5–2, 5–3
input isolation/step-down transformer,
5–3
UPS Distribution Cabinet, 1–8, 6–1
UPS Distribution Cabinet (Cont.)
input circuit breakers, 6–3
output circuit breakers, 6–4