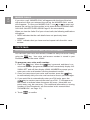
1
Table of Contents .................................................................................1
Introduction ..........................................................................................3
Main features ....................................................................................3
Package contents .............................................................................4
Product Overview .................................................................................5
Handset with Touch Sensitive Keypad ..............................................5
Base unit ..........................................................................................6
LCD display symbols ........................................................................6
Touch phone use and handling ........................................................6
Getting Started .....................................................................................7
Connecting base unit AC adapter ....................................................7
Handset battery pack .......................................................................8
Activating and charging the handset battery pack ............................8
Low battery warning .........................................................................9
Connecting phone line ......................................................................9
Attaching the belt clip .....................................................................10
Basic Functions .................................................................................10
Making and receiving calls .............................................................10
Standby mode and sleep mode ......................................................12
Phonebook..........................................................................................12
Storing phonebook record ..............................................................12
Deleting phonebook record ............................................................13
Editing records ...............................................................................14
Calling stored numbers...................................................................14
Caller ID Display .................................................................................15
Viewing and calling Caller ID records .............................................15
Formatting Caller ID numbers ........................................................16
Saving Caller ID records to phonebook ..........................................16
Deleting Caller ID record ................................................................17
Deleting all Caller ID records ..........................................................17
Missed calls ....................................................................................18
1
EN
CONTENTS
EN
Voice Mail ............................................................................................18
Programming voice mail access number ........................................18
Message waiting .............................................................................19
Handset Settings ................................................................................20
Using handset keys to enter text ....................................................20
Navigate handset menus ................................................................21
Change display settings .................................................................23
Change ring and key tones.............................................................23
Assigning a name to a handset ......................................................24
Handset reception ..........................................................................24
Reset ...................................................................................................25
Default Settings ..................................................................................25
Handset Special Features .................................................................26
Phone setup ...................................................................................26
Smart Key lock ...............................................................................26
Auto answer ....................................................................................27
Clock and alarm settings ................................................................27
Paging the handset.........................................................................28
Headset ..........................................................................................29
Multi-Handset Operation ...................................................................29
Handset Registration ......................................................................29
Using the intercom function ............................................................30
Room monitor .................................................................................31
Troubleshooting .................................................................................33
Safety information ..............................................................................35
Care and maintenance .......................................................................38
Caring for your product ...................................................................38
Specifications .....................................................................................39
FCC Statement ...................................................................................40
Declaration of conformity ................................................................40
Consumer information ....................................................................40
Limited warranty .............................................................................42
Procedure for warranty repair .........................................................44
2
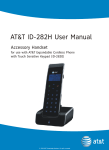
Thank you for selecting the AT&T ID-2820 Digital Cordless Telephone with
Touch Sensitive Keypad. This stylish cordless phone provides the freedom
to communicate from anywhere in your home. It has been designed to
provide a clear and crisp calling experience and incorporates features
that make phone company services like Caller ID, Call Waiting and Voice
Mail easier to use.
Start using your AT&T ID-2820 Cordless Phone quickly by reading the
Getting Started section in the following pages. Be sure to charge the
battery for a minimum of 15 hours prior to first use. This will insure a full
battery charge and long battery life.
MAIN FEATURES
• Touch Sensitive Keypad with Smart Key Lock
• Multiple Handset Capability
• 60 Phonebook Records with Search and Edit Function
• 20 Last Number Redial Records
• 40 Incoming Caller ID Records
• 10 Polyphonic Melodies and 4 Traditional Ring Tones
• Handset Speakerphone
• Intercom / Call Transfer / Conference Call Capability
• Mute / Redial Functions
• Message Waiting / Missed Call Notification
• Clock / Alarm Functions
• Multiple Language Display
• Standby Time - 120 hours
• Talk Time - 5 hours
3
EN
INTRODUCTION
EN
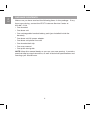
PACKAGE CONTENTS
Make sure you have received the following items in the package. If any
items are missing, contact the AT&T Customer Service Center at
800-667-2118.
• One handset
• One base unit
• One rechargeable handset battery pack (pre-installed inside the
handset)
• One base unit AC power adapter
• One base unit phone line cord
• One handset belt clip
• One user manual
• One quick start guide
NOTE: Keep this manual handy as you use your new product. It contains
practical step-by-step instructions, as well as technical specifications and
warnings you should know.
4
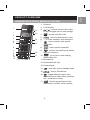
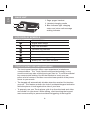
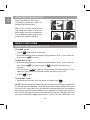
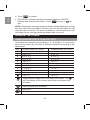
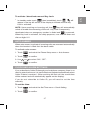
HANDSET WITH TOUCH SENSITIVE KEYPAD
1. Receiver
1
2
3
4
5
2. LCD Display
12
13
14
15
6
7
8
9
10
11
3.
4.
: answer and dial calls
: view and dial previous calls
5.
6. 1 - 9: enter numbers and characters
7.
: enter numbers and special
characters
8.
: enter special characters
9.
: answer call waiting call; delete
text; exit submenu
10.
: go to menu; enter setting;
manual key lock.
16
17
/
: volume control; view caller
ID log; navigate menus and settings
11. Microphone
12. Detachable belt clip
13. Headset jack
14.
: end calls; exit to standby mode
: access Phonebook
15.
16.
: toggle between upper-case
and lower-case letters when entering
text ; conference calling
17.
: dial pre-programmed voice
mail access number; mute handset
5
EN
PRODUCT OVERVIEW
EN
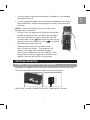
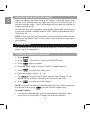
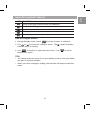
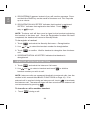
BASE UNIT
1. Page: pages handset
2. Handset charging cradle
1
2
3. Blue indicator light: charging
status and voice mail message
waiting indicator
3
LCD DISPLAY SYMBOLS
SYMBOL
DESCRIPTION
Signal within range
Key Lock activated
Handset ring silenced
Alarm set
Lower-case letters activated
Voice mail message waiting
Battery full - icon does not flash
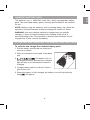
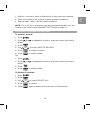
TOUCH PHONE USE AND HANDLING
• The touch panel handset offers a new experience in telephone
communication. This Touch Sensitive Keypad technology is very
sensitive and may take a little time to get used to. To avoid accidental
key contact while talking, first lift the handset to touch your ear,
pause a brief moment, and then move the lower portion of the phone
closer to your mouth.
• The keypad will automatically disable when the receiver first touches
your ear. This feature reduces the risk of accidental keypad activation
while the phone is held against the side of your face.
• To properly use your Touch phone, pick it up from the back and sides
and cradle it in your hand. While talking, avoid touching the keypad
area unnecessarily to prevent accidental triggering of the keypad.
6
backlight will be off.
• To turn keypad backlight on and activate the keypad, touch any of
the number keys, wait for the backlight to come on and then dial
normally.
NOTE: If more than one key area is touched, the
keypad may not activate.
• During a call, the keypad will automatically disable
and the backlight will turn off. When the backlight
turns off and when you want to end the call, the
first key-press of the
key will only wake up the
keypad, and a second press of the
key will be
required to terminate the call.
• When dialing, hold your hand away from
the LCD area as shown. Touching the LCD
display may trigger the automatic keypad
lock sensor and prevent you from dialing. If the
keypad lock sensor is triggered, a small key will
appear in the top left corner of the display.
GETTING STARTED
CONNECTING BASE UNIT AC ADAPTER
Plug the AC Adapter cord into the base unit and then into the wall outlet.
The electrical outlet should be located near the equipment.
USE ONLY CLASS 2 POWER SOURCE, Rated 6VDC, 400mA.
7
EN
• It is very easy to tell when the keypad is disabled, as the keypad
NOTE: Before using the handset, and to prolong battery life, place the
handset in the base handset cradle and charge for at least 15 hours.
WARNING: You must replace handset in charger base for periodic
charging. Failure to keep the battery fully charged could result in
decreased battery life. If the handset is removed from the base unit for
long periods of time, remove the battery.
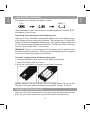
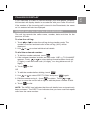
ACTIVATING AND CHARGING THE HANDSET BATTERY PACK
To activate and charge the handset battery pack:
1. Pull the battery contact tab out slowly and
remove as shown.
2. Place the handset in the cradle of the base
unit.
3.
The battery icon on
the display will flash and the base indicator
light will turn on to indicate the handset is
charging.
4. Charge battery pack for at least 15 hours
prior to first use.
5. When the battery is fully charged, the battery icon will stop flashing
will appear.
and
8
EN
EN
HANDSET BATTERY PACK
The handset uses 1 NiMH 650 mAh 3.6V (AAA) rechargeable battery
pack. The removable battery pack is already pre-installed in the handset
for you.
EN
EN
LOW BATTERY WARNING
The battery icon indicates the battery status:
FULL
EMPTY
When the battery is low, there will be an audible signal and ‘LOW BATTERY’
will appear on the screen.
Removing and replacing handset battery pack
After years of use, all NiMH rechargeable batteries loose the ability to hold
a full charge and may need to be replaced. The handset uses 1 NiMH 650
mAh 3.6V (AAA) rechargeable battery pack. Only replace with an approved
ID-2820 battery pack available through AT&T. Contact the AT&T Customer
Service Center at 800-667-2118 to order.
WARNING: There is a risk of explosion if the battery pack is replaced with
an incorrect battery pack type. Dispose of the used battery pack according
to your local waste management guidelines.
To install a replacement handset battery pack:
1. Remove the battery door cover on the telephone handset.
2. Insert the battery pack as shown.
3. Slide the cover back on so that it clicks firmly into place.
NOTE: Before using the handset and to prolong battery life, place the
handset in the base handset cradle and charge for at least 15 hours.
CONNECTING PHONE LINE
Plug one end of the modular phone cord (provided) into the telephone wall
jack. Plug the other end of the cord into the back of the base unit.
9
EN
ATTACHING THE BELT CLIP
Attach the belt clip as shown:
To detach, spread the “arms” of
the belt clip and remove.
TIP: If you cannot remove the
clip using your hand, use a thin
blunt object such as a screwdriver
(not supplied), taking care not to
scratch the handset surface.
BASIC FUNCTIONS
MAKING AND RECEIVING CALLS
To make a call:
• Touch
and wait for a dial tone.
• Enter destination phone number using numbers 0 - 9. If you make an
error, touch
to cancel.
To pre-dial a call:
• Enter destination phone number using numbers 0 - 9. If you make an
error, touch
re-enter.
to cancel or touch
to delete numbers and
• You can touch
to insert a 2-second pause while dialing. ‘P’ will
appear on the screen to indicate where the pause will occur.
• Touch
to dial.
To answer a call:
• Remove the handset from the base unit and touch
.
NOTE: When making or answering calls, bring the top of handset (receiver)
to your ear before speaking. Once the receiver has made contact with your
ear, the unit’s Smart Key Lock function will automatically lock the handset
keys and you may bring the bottom of the handset (microphone) closer to
your mouth and speak into the microphone. Handle the handset with care
to avoid accidentally triggering the keys. If you encounter difficulties, use
10
To activate speakerphone during a call:
• While in Talk mode, touch
. ‘SPKR’ will appear on the handset
display to indicate the speakerphone is activated.
• Touch
again to deactivate speakerphone and return to Talk
mode during a call. ‘TALK’ will appear on the handset display to
indicate talk mode is activated.
To end a call:
• Touch
.
OR
• Place the handset back into the base cradle.
To redial a call:
• To redial the last number dialed, touch
then touch
.
OR
• Touch
• Use
• Touch
to access a list of the previous 20 dialed numbers.
or
to scroll through and select the desired number.
to dial.
Call waiting:
When you hear a call waiting tone:
• Touch
to answer the incoming call and place your existing call
on hold.
• Touch
to toggle between calls.
NOTE: You must subscribe to Call Waiting service through your local
phone company.
To adjust volume during call:
• Touch
or
to raise or lower the volume.
To mute the microphone during call:
• Touch
to activate and deactivate mute.
11
EN
the manual Key Lock feature (see the SMART KEY LOCK section in this
manual on Page 26 for more details).
EN
STANDBY MODE AND SLEEP MODE
When the handset has been inactive for a while, it will enter sleep mode
and the LCD backlight and key lights will switch off. Press any key to
return to standby mode. The LCD backlight and key lights will activate to
indicate standby mode.
To adjust the time from standby to sleep mode, please refer to the section
in this manual titled CHANGE DISPLAY SETTINGS to alter BACKLIGHT
TIME Page 23.
NOTE: If Key Lock is on, you will need to unlock the phone to enter standby
mode. (see the SMART KEY LOCK section in this manual on Page 26 for
more details).
PHONEBOOK
The Phonebook can store up to 60 phone numbers (of up to 24 digits) and
names (up to 16 characters).
STORING PHONEBOOK RECORD
1. Touch
.
2. Touch
. The cursor is pointing to ‘ADD RECORD’
3. Touch
again to confirm.
4. Enter the name using 1 - 9 (see TO INPUT NAMES below).
5. Touch
to confirm and save name.
6. Enter the number using 0 - 9, *, #.
key can be used to enter a pause when dialing. ‘P’ will
7. The
appear on the screen to indicate where the pause will occur.
8. Touch
to confirm and save record.
NOTE: A number can be saved without entering a name. When requested
key and move to number entry.
to enter the name, press
To input names:
1. Using the number keypad, press the appropriate digit key 1 - 9 as
many times as necessary to display the desired character.
12
3. Press the number 1 key to enter a space between characters
4. Repeat steps 1 and 2 until the name is entered.
NOTE: For a full list of characters and their assigned numbers see the
section in this manual titled HANDSET SETTINGS on Page 20.
DELETING PHONEBOOK RECORD
To delete 1 record:
1. Touch
2. Touch
delete.
.
or
3. Touch
4. Use
or alphabetic search to select the record you wish to
.
or
to select ‘DELETE RECORD’.
5. Touch
to confirm selection.
6. Touch
to confirm delete.
OR
.
1. Touch
2. Touch
delete.
or
3. Touch
or alphabetic search to select the record you wish to
.
to confirm delete.
4. Touch
To delete all records:
1. Touch
.
2. Touch
.
3. Use
or
to select ‘DELETE ALL’.
4. Touch
to confirm.
5. Touch
again to delete all records stored in Phonebook.
13
EN
2. Wait for 1 second or touch a different key to input the next character.
EN
EDITING RECORDS
1. Touch
.
or
2. Touch
edit.
3. Touch
4. Use
or alphabetic search to select the record you wish to
.
or
to select ‘EDIT RECORD’.
to confirm.
5. Touch
6. Press the
key to delete any characters or numbers in the
name you wish to edit.
7. Use 0 - 9 keys to edit the name, touch
does not need to be modified, press
8. Use 0 - 9 keys to edit the number or press
the number before saving.Touch
to confirm. If the name
to edit the number.
or
to delete and edit
to move the cursor left or
right to edit the number
9. Touch
to confirm.
CALLING STORED NUMBERS
.
1. Touch
2. Touch
or
to scroll to the record you wish to dial.
OR
Touch the 1 - 9 key corresponding to the first letter of the record and
use
or
to select name you are seeking. For example, for
names beginning with the letter ‘R’ press the 7 key three times.
3. Touch
to dial.
14
If you subscribe to Caller ID service through your local phone company,
the handset will display details in accordance with your Caller ID service.
If the number of the incoming call is stored in the Phonebook, the name
as it is entered will also be displayed.
VIEWING AND CALLING CALLER ID RECORDS
The call log records the caller name, number, date and time for the
previous 40 calls.
To view the call log:
1. Touch
or
to enter the call log during standby mode. The
number of missed and total calls in the call log (‘ALL’) will be
displayed.
2. Use
or
to review individual call details.
To dial the reviewed number:
1. To dial the number selected, touch
.
2. If the reviewed number includes an area code. ‘USE v ^ TO CHANGE’
appears. Touch
or
to select dialing format between local call,
(7 digits), a call with area code (10 digits), or a long distance call (11
digits).
3. Touch
to dial.
OR
1. To edit the number before dialing, touch
2. Use
or
.
to select ‘EDIT TO DIAL’ and press
again.
to delete. Touch
or
3. Edit the number using 0 - 9 and
keys to move the cursor left or right to edit the phone number to dial.
4. Touch
to dial.
NOTE: The ‘NEW’ icon indicates that the call details have not previously
been reviewed. The ‘REPT’ icon indicates that you have received repeat
calls from the same number.
15
EN
CALLER ID DISPLAY
EN
FORMATTING CALLER ID NUMBERS
The number stored in call log can be reformatted prior to dialing. To edit
the number:
or
1. Touch
memory.
to select the number you wish to dial from call log
2. Touch
. The number you selected can now be reformatted by
touching
again to choose the format you prefer, and also touch
0-9 to edit prefix while reformatting.
For example: The caller ID number 206-123-4567 can be reformatted
by pressing the
key as shown below. (NOTE: For details on
how to edit Phonebook entries please see the section in this manual
titled PHONEBOOK on Page 12.)
Press
, Caller ID shows 206-123-4567.
Press
again, Caller ID shows 061234567.
Press
again, Caller ID shows 61234567.
Press
again, Caller ID shows 123-4567.
Press
again, Caller ID shows 206-123-4567 again.
You may add prefix numbers before displayed numbers by touching
the desired prefix numbers.
The ‘*’ key may be added to the dialing string and a ‘#’ may be
pressed to enter a Pause (‘P’).
3. Touch
to dial the number.
SAVING CALLER ID RECORDS TO PHONEBOOK
1. Touch
or
to review the call log. The number of missed and
total calls will be displayed.
2. Use
or
to select the number you wish to save.
3. Touch
. The cursor is pointing to ‘ADD RECORD’
4. Touch
to confirm.
16
to confirm name or press
to edit the name before
EN
5. Touch
saving.
6. Touch
to confirm number or press
to edit the number
before saving. For long distance calls, you must add a 1 at the start
of the number for correct dialing.
7. The record is now saved.
NOTE: For details on how to edit Phonebook entries please see the
section in this manual titled PHONEBOOK on Page 12.
DELETING CALLER ID RECORD
1. Touch
2. Use
or
or
to review the call log.
to select the Caller ID record you wish to delete.
3. Touch
. Touch
4. Touch
to confirm.
5. Touch
to confirm and delete the Caller ID record.
or
until ‘DELETE RECORD’ appears.
OR
or
to review the call log. The number of missed and
1. Touch
total calls will be displayed.
2. Use
3. Touch
4. Touch
or
to select the Caller ID record you wish to delete.
to delete.
to confirm.
DELETING ALL CALLER ID RECORDS
or
to enter the call log. Touch
1. Touch
select any record.
or
or
again to
2. Touch
. Touch
3. Touch
to confirm.
until ‘DELETE ALL’ appears.
4. Touch
to confirm and delete all Caller ID records.
17
EN
MISSED CALLS
If you miss a call, ‘MISSED CALL’ will appear with the time of the last
call received. After you reviewed the call log, the MISSED CALL record
or
to enter and
will disappear. To view your MISSED CALL, use
browse the call log (see the section in this manual titled VIEWING AND
CALLING CALLER ID RECORDS Page 15 for more details).
When you view the Caller ID of your missed calls, the following notifications
will appear:
• ‘NEW’ indicates that the call details have not previously been
reviewed.
• ‘REPT’ indicates that you have received repeat calls from this same
number.
VOICE MAIL
PROGRAMMING VOICE MAIL ACCESS NUMBER
You can store your voice mail access number for easy one-touch dialing
using the
key. Your voice mail access number is stored in your
Phonebook under the name ‘VMAIL’
To program your voice mail number:
1. Press the
key. When the
key is pressed, and there is no
voice mail number programmed, the unit will momentarily display ‘NO
VMAIL SET’ and will then display VMAIL NUMBER to prompt you to
enter your voice mail number into the phonebook record.
2. Once you have stored your voice mail number, press the
key
to automatically dial your voice mail service to access you messages.
3. If you would like to automatically enter your PIN code, press the
key to create a pause then enter your PIN. ‘P’ will appear on
the screen to indicate where the pause will occur. More than one
pause entry may be necessary. (For additional information on storing
numbers in the Phonebook, see the section in this manual titled
PHONEBOOK - on Page 12.)
4. Touch
to confirm
18
1. Touch
, your voice mail number will appear.
2. If you have pre-programmed your voice mail access number, it will be
automatically dialed.
To edit your voice mail number:
1. Touch
.
or
2. Touch
or
4. Use
or alphabetic search to select the VMAIL record.
to confirm.
3. Touch
to select ‘EDIT RECORD’.
to confirm.
5. Touch
6. Do not change the VMAIL name. Press
without changes.
7. Use 0 - 9 keys to edit the number or press
the number before saving.
to confirm the name
to delete and edit
to confirm.
8. Touch
NOTE: You must subscribe to Voice Mail service through your local phone
company.
MESSAGE WAITING
If you subscribe to Voice Mail service through your local phone company
and have a voice mail message waiting:
•
will appear on the screen and the backlight will flash.
• The base unit Indicator Light will flash.
NOTE:
will disappear and the Indicator Light will stop flashing
automatically once all new messages have been saved or deleted.
NOTE: You must subscribe to this service through your local phone
company.
To manually clear the message waiting indicator:
1. Touch
2. Use
and select the Security Set menu > Clear Msg Wait.
or
to select ‘YES’.
19
EN
To call your pre-programmed voice mail number:
EN
3. Touch
to confirm.
4. ‘ACCEPTED’ indicates that base has been selected. ‘RETRY?’
indicates that selection has failed. Touch
to retry or
to
quit.
NOTE: Clearing the message waiting indicator without deleting or saving
the new voice mail message(s) will only turn the indicator light off until
next new call is received. You must first delete or save all new voice mail
messages for the message waiting indicator light to turn off.
HANDSET SETTINGS
USING HANDSET KEYS TO ENTER TEXT
Characters are entered by touching the 0 - 9, * and # keys. A consecutive
touch of the same key will enter a different character according to the
table below:
KEY
1
UPPER-CASE LETTERS
space 1,.;:
LOWER-CASE LETTERS
space 1,.;:
2
ABC2([
abc2([
3
DEF3)]
def3)]
4
5
6
7
8
9
0
GHI4$<
J K L 5 ’>
MNO6+PQRS7%
TUV8~^
W XY Z 9 =
0/\&|_
*#?!{}
ghi4$<
j k l 5 ’>
mno6+pqrs7%
tuv8~^
wxyz9=
0/\&|_
*#?!{}
Toggle between upper-case and lower-case letters. The
icon will display on the screen when lower-case letters are
activated.
Delete the previous character
Enter text
Exit to standby mode
20
EN
NAVIGATE HANDSET MENUS
KEY FUNCTION
Scroll up through current menu and submenu
Scroll down through current menu and submenu
Confirm selection
Exit to previous menu
Exit and return to standby mode
How to navigate menus:
1. During Standby mode, touch
to enter a menu or submenu.
or
to select the setting or menu. The
2. Use
selected menu or setting.
3. Use
to confirm or select the next menu. Use
the previous menu.
symbol indicates
to exit to
TIPS
• You cannot enter the menu if you are making a call or have pre-dialed
any part of a phone number.
• When you have changed a setting, the handset will beep and exit the
menu.
21
EN
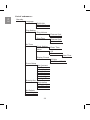
List of submenus:
Standby
Language
Ring Setting
ENGLISH
FRANCAIS
ESPANOL
Ring Volume
Ring Tone
Set Time
Clock Setting
Alarm
Security Set
External Call
Intercom Call
Enter Time
Off
On
Display Format
Phone Setup
External Call
Intercom Call
Set Contrast
Key Tone
Smart Key Lock
Auto Answer
Dial Mode
Flash Time
Handset Name
Backlight Time
Registration
Deregistration
Clear Msg Wait
Select Base
Set Default
Room Monitor
Intercom Call
22
Enter Time
12/24hr
MM/DD or DD/MM
To change language:
1. Go to Language menu.
2. Use
or
to select desired language.
to confirm.
3. Touch
To adjust screen contrast:
1. Go to Phone Setup menu > Set Contrast.
2. Use
or
to change contrast.
to confirm.
3. Touch
To alter backlight time:
1. Go to Phone Setup menu > Backlight Time.
or
2. Use
seconds).
3. Touch
to change select backlight time (20, 30, 40, 50 or 60
to confirm.
CHANGE RING AND KEY TONES
There is a choice of 10 polyphonic ring melodies and 4 ring tones. You
can also choose from 4 key tones.
To adjust ring volume:
1. Go to Ring Setting menu > Ring Volume.
2. Select ‘EXTERNAL CALL’ or ‘INTERCOM CALL’ .
3. Use
tone).
4. Touch
NOTE:
selected.
or
to select volume level. (Select ‘OFF’ to silence the ring
to confirm.
will appear to indicate ring tone is silenced if ‘OFF’ is
23
EN
CHANGE DISPLAY SETTINGS
The handset can display information in English, Spanish, or French.
EN
To adjust ring tone:
1. Go to Ring Setting menu > Ring Tone
2. Select ‘EXTERNAL CALL’ or ‘INTERCOM CALL’ .
3. Use
or
t to select ring tone.
to confirm.
4. Touch
To adjust key tone:
Adjusting the key tone allows you to change the sound the key makes
when touched.
1. Go to Phone Setup menu > Key Tone.
2. Use
3. Touch
or
to select key tone. (Select ‘OFF’ to silence the key tone)
to confirm.
ASSIGNING A NAME TO A HANDSET
1. Touch
and select the Phone Setup menu > Handset Name.
2. Use the 0 - 9 keys to enter a name. Press the appropriate digit key as
many times as necessary to enter the first letter of the name. The cursor
will move to the right and the next letter can be entered after about 1
second or if another key is pressed. Spaces can be added by pressing
the number 1 key. (For additional information on entering text, see the
section in this manual titled USING HANDSET KEYS TO ENTER TEXT
on Page 20).
3. Touch
to confirm.
HANDSET RECEPTION
The range of your handset is up to 984 feet (300 meters) from the base
unit, subject to environmental conditions. Interference from other electrical
appliances such as a TV, microwave or computer should be avoided. If you
are out of range or the signal is interrupted
will disappear and ‘OUT
OF RANGE’ will be displayed.
24
RESET
To reset the handset to the default setting:
1. Touch
2. Use
and select the Set Default menu.
or
3. Touch
to select ‘YES’.
to confirm.
NOTE: Resetting the handset will not delete Caller ID, Redial, Phonebook
or Vmail data.
DEFAULT SETTINGS
SETTING
DEFAULT VALUE
Language
Intercom & External Ring Volume
External Ring Tone
Intercom Ring Tone
Alarm
Alarm time
Display format
Month-Date display format
Key Click Tone
Smart Key Lock
Auto Answer
Dial Mode
Handset Name
Backlight Time
Room monitor
Handset volume
Speaker phone volume
Flash time
English
3
Ring Tone 3
Tone 1
Off
12:00 AM
12-hour
MM / DD
Pattern 3
On
Off
Tone Dial
Clear
60 seconds
OFF
Level 1
Level 1
600ms
Set Contrast
8
25
EN
NOTE: Due to radio interference, occasional loss of synchronization
between the handset and base unit may occur. If this happens, the base
unit will very quickly switch to another channel and automatically restore
synchronization.
EN
HANDSET SPECIAL FEATURES
In addition to the basic functions, your handset also has a number of
special features.
PHONE SETUP
To select between pulse and tone dial modes:
1. Go to Phone Setup menu > Dial Mode.
2. Use
or
to select ‘PULSE’ or ‘TONE’.
to confirm.
3. Touch
To change flash time:
1. Go to Phone Setup menu > Flash Time.
2. Use
or
to change select flash time (100, 270, 300 or 600ms).
to confirm.
3. Touch
SMART KEY LOCK
Smart Key Lock prevents accidental key activation during a call. A sensor
inside the top of the handset where the receiver is located senses when
your ear touches the receiver and automatically locks the keypad. To ensure
the Smart Key Lock function is activated, make sure to place the handset
receiver to your ear first before speaking into the handset microphone and
avoid touching the keypad with your fingers until the handset receiver rests
on your ear. Smart Key Lock will disengage as soon as you remove the
handset receiver from your ear.
To activate / deactivate Smart Key Lock function:
1. Go to Phone Setup menu > Smart Key Lock.
2. Touch
3. Use
4. Touch
to confirm.
or
to select ‘ON’ / ‘OFF’.
to confirm.
26
• In standby mode touch
then immediately touch
.
will
appear in the top left corner of the display to indicate manual Key
Lock is activated.
NOTE: Upon receiving an incoming call, the
key will automatically
unlock to enable the answering of the call. Key Lock is temporarily
deactivated when an emergency number is dialed and
is pressed.
When Key Lock is activated, for safety purposes, user can still enter and
dial out digits 911.
AUTO ANSWER
When auto answer is activated, incoming calls are answered automatically
when the handset is lifted from the base cradle.
To activate auto answer:
1. Touch
and select the Phone Setup menu > Auto Answer.
to confirm.
2. Touch
3. Use
4. Touch
or
to select ‘ON’ / ‘OFF’.
to confirm.
CLOCK AND ALARM SETTINGS
If you subscribe to Caller ID through your local phone company, there is no
need to enter the time as it is transmitted and updated automatically when
Caller ID data is received. (After receiving the first call, the current time
will be entered and will automatically appear on the display).
If you do not subscribe to Caller ID, you will need to set the time
manually.
To set the time:
1. Touch
and select the Set Time menu > Clock Setting.
2. Touch
to confirm.
27
EN
To activate / deactivate manual Key Lock:
EN
3. Use 0 - 9 to enter the time. (Use
display format is selected).
4. Touch
to change AM / PM if 12 hour
to confirm.
To set the alarm:
1. Touch
and select the Set Time menu > Alarm.
2. Touch
to confirm.
3. Use
or
4. Touch
to select ‘ON’.
to confirm.
5. Use 0 - 9 to enter alarm time. (Use
to change AM / PM if 12
hour display format is selected)
6. Touch
to confirm.
NOTE:
indicates alarm is set. To turn alarm off, simply touch the
keypad. If the keypad is not touched, alarm will ring for 2 minutes and
then automatically turn off.
To change time display format:
1. Touch
2. Use
and select the Set Time menu > Display Format.
or
to confirm.
3. Touch
4. Use
5. Touch
to select 12 / 24 hour format.
or
to select day-month format.
to confirm.
PAGING THE HANDSET
• To locate a misplaced handset, press PAGE on the base unit .
• All of the handsets registered to the base will beep and the display
will show PAGING.
28
The ID-2820 may be used with any industry standard two-band
2.5mm headset (not included). Connect the headset to the jack
located on the side of the handset. Your phone is now ready for
headset use. You can purchase a suitable headset from AT&T or from
any electronics retailer that sells phone equipment.
MULTI-HANDSET OPERATION
The ID-2820 provides multiple handset capability supporting up to 4
handsets. Each accessory handset (model AT&T ID-282H) comes with
a charging cradle you can plug into any electrical outlet. No extra phone
jack is required. Many extra functions become possible when there is
more than one handset in your system. Call the AT&T Customer Service
Center to find out how to purchase accessory handsets (AT&T ID-282H)
at 800-667-2118.
HANDSET REGISTRATION
The handset and base unit are factory pre-registered with each other.
Therefore, the unit should be in full working order when it is received. When
you purchase an accessory handset (model ID-282H), it will be necessary
to register it to the base unit in order to make and receive calls.
You can register up to 3 more handsets to make and receive calls via the
same base unit. Handsets are numbered 1 to 4.
If your handset is not registered to the base “NOT REGISTERED” will
display on the handset. The handset must first be registered to the base
to be used.
To register a new handset:
1. Touch
2. Use
and select the Security Set menu >Registration.
or
to select the base
number for registration.
3. Touch
to confirm.
29
EN
HEADSET
• Once the handset is located, touch any key to discontinue paging.
EN
4. ‘REGISTERING’ appears instead of you will see the message. Press
and hold the PAGE key on the cradle of the base unit. This may take
up to a minute.
5. ‘REGISTRATION ACCEPTED’ indicates that handset is registered.
‘RETRY?’ indicates that registration has failed. Touch
retry or
to quit.
to
NOTE: The base unit will then send a signal to the handset registering
the handset to the base unit. Once the Registration function has been
completed, the handset will return to Standby Mode.
To de-register a handset:
1. Touch
2. Use
and select the Security Set menu > Deregistration.
or
3. Touch
unit.
to select the handset number for deregistration.
to confirm. Wait for handset to deregister from the base
4. ‘DEREGISTRATION ACCEPTED’ indicates that handset is
deregistered.
USING THE INTERCOM FUNCTION
and select the Intercom Call menu.
1. Touch
2. Use
and
to select a handset and touch
or dial the
handset number you wish to call.
NOTE: Intercom calls are answered identically to external calls (see the
section in this manual titled BASIC FUNCTIONS on Page 10). If an
external call is received during an intercom call, touch
to terminate
the intercom call. The external ringer will then sound and the external call
.
can be answered by pressing
To transfer a call to another handset:
1. Touch
during a call.
30
3. If other handset connects (by touching
will appear. Touch
) , the handset number
to toggle between the internal and external
line.
4. To transfer the call, touch
in handset 1, or place the handset 1
back into the base cradle.
To establish an intercom conference call with an outside line:
1. Connect to an outside line by making or answering a call.
2. Transfer the call to another handset (see above) and press
to
begin an intercom conference call.
OR
Touch
on the any other handset to begin the conference call.
3. Touch
on either handset to finish the intercom conference call.
The connection will remain between the other handset and the
outside line.
NOTE: ‘INTERCOM HOLD’ will appear in the other handset if you have
toggled to an external line during an intercom call.
ROOM MONITOR
The Room Monitor feature can be used to listen through another handset
located in a nearby room. When the Room Monitor feature is set, another
handset user can listen to the sound surrounding the room monitor unit
by using the Intercom function. The called handset will display ‘ROOM
MONITOR’ in the middle of the screen and transmit the microphone signal
to the calling handset. It will not generate the audio signal received from
the calling handset.
31
EN
2. Use
or
to select the intercom handset and touch
or dial
the handset number you wish to call. If the handset selected is not
available, the line is automatically reconnected with the original call.
EN
Enable / disable the Room Monitor handset:
1. Touch
2. Use
3. Touch
and select the Room Monitor menu
or
to select ‘ON’ / ‘OFF’.
to confirm.
To listen to the room monitor handset:
1. Place the enabled handset in the room you wish to monitor.
2. Touch
3. Use
touch
and select the Intercom Call menu.
and
to select a handset number you wish to monitor and
or dial the handset number.
NOTE: When the Room Monitor is active, ‘ROOM MONITOR’ will appear
on the display to indicate the feature is activated. The handset speaker
will be turned off so only the microphone will be activated.
32
See below for some common problems and their remedies. Whatever the
problem, you should first check that:
• The base unit is connected to the power supply and phone line.
• The main power is switched on at the electrical outlet.
• The handset battery is installed and has not run out of power.
DO NOT attempt to make repairs yourself. This will void your warranty.
PROBLEM
POSSIBLE CAUSES / REMEDIES
Unable to make a call OUT OF RANGE
appears on the handset
• The handset is out of range of base unit -
move closer to the base
• Interference due to environment -
position base unit to reduce interference
(move base station at least 3-feet
from the nearest electrical appliance)
• De-synchronization has occurred. The
base unit will reset synchronization
automatically. Occasional loss of
synchronization between the handset
and base unit is normal if there is
significant interference from the
surrounding environment.
Unable to make
a call - NOT
REGISTERED
appears on the
handset
• Handset may not be registered to base
Unable to enter the
submenus
• Ensure unit is not in the base cradle
Caller ID is not
displayed
• Check your network subscription to
unit (see the section in this manual titled
HANDSET REGISTRATION Page 29)
• Return to standby mode by pressing
Caller ID
• Wait until the phone rings twice before
answering
33
EN
TROUBLESHOOTING
• Full name and number (including area
EN
code) need to be stored in Phonebook
for name display if the name is unavailable
through Caller ID.
Caller ID is not
displayed during a
Call Waiting call
• You must subscribe to the Call Waiting
Caller ID service for this feature to work.
Contact your local phone company to
confirm you have signed up for
Call Waiting Caller ID service.
• While receiving the Call Waiting call, a
second phone was in use. The ID-2820
cannot receive Call Waiting ID data when
a second phone is in use.
Handset does not ring
• Ring Volume is set to ‘OFF’ (see the
section in this manual titled HANDSET
SETTINGS - CHANGE RING AND KEY
TONES Page 23).
Keys activated while
talking
• Activate the Smart Key Lock feature (see
the section in this manual titled HANDSET
SPECIAL FEATURES Page 26).
• Make sure that your ear is touching the top
section of the handset (receiver) while you
are talking.
Mute, intercom,
and speakerphone
features do not work
during a call
• Check if manual Key Lock or Smart
Low Battery
indicator displays
even if recharged
• Battery pack may need to be replaced.
Key Lock is engaged (see the section in
this manual titled HANDSET SPECIAL
FEATURES Page 26).
Replace battery pack with the
same or equivalent type recommended
by the manufacturer:
NiMH 650mAh 3.6V(AAA) battery pack.
34
• A maximum of 4 units can be registered
at one time. De-register a handset and
try again.
• Make sure you select a base number that
has not been assigned.
• Make sure that you are attempting to
register only an AT&T ID-282H handset.
Unable to make an
intercom call
• Only one external call and one internal
intercom call can take place at once.
Make sure no other handset is in use.
SAFETY INFORMATION
Warning! AT&T DOES NOT represent this unit to be waterproof. To
reduce the risk of fire, electrical shock, or damage to the unit, DO NOT
expose this unit to rain or moisture. Observe the following safety
precautions and warnings when setting up and using this product.
1.
Read and understand all instructions.
2.
Follow all warnings and instructions marked on the product.
3.
Unplug this product from the wall outlet before cleaning. Do not use
liquid cleaners or aerosol cleaners. Use a damp cloth for cleaning.
4.
Do not use this product near water, for example, near a bathtub,
sink, or laundry tub, in a wet basement, or near a swimming pool.
5.
If the base unit ever falls into water, do not retrieve it until you
have unplugged both the power cord and phone line from their wall
outlets; then pull the base out by the unplugged cables.
6.
Do not place this product on an unstable cart, stand, or table. This
product may fall, causing serious damage to the product.
7.
Install this product in a protected location where no one can step on
or trip over the line cord. Protect cords from damage or abrasion.
8.
Use only the power source marked on the power supply (adapter).
If you are unsure of the power supplied to your home consult your
power company. Do not place objects on the power cord.
35
EN
Unable to register
new handset
EN
9.
To reduce the risk of electric shock, do not disassemble this
product, but take it to a qualified serviceperson when some service
or repair work is required. Opening or removing covers may expose
you to dangerous voltages or other risks. Incorrect reassembly
can cause electric shock when the appliance is subsequently used.
10. Never use this unit near a gas leak as this can cause explosions.
11. Unplug this product from the wall jack and refer servicing to
qualified service personnel under the following conditions:
a) If liquid has been spilled into the product.
b) If the product does not operate normally by following the
operating instructions. Adjust only those controls that are
covered by the operating instructions because improper
adjustment of other controls may result in damage and will
often require extensive work by a qualified technician to restore
the product to normal operation.
c) If the product has been exposed to rain or water.
d) If the product has been dropped or the cabinet has been
damaged.
e) If the product exhibits a distinct change in performance.
12. Avoid using a telephone (other than a cordless type) during an
electrical storm. There may be a remote risk of electric shock from
lightning.
13. Do not use the telephone to report a gas leak in the vicinity of the
leak.
14. Caution: To maintain compliance with the FCC’s RF exposure
guidelines place the base unit at least 8 inches from nearby
persons.
15. Use only the power cord and batteries indicated in this manual. Do
not dispose of batteries in a fire. They may explode. Check with
local codes for possible special disposal instructions.
16. Plug the adapter into the socket/outlet that is near the equipment
and easily accessible.
17. CAUTION
Risk of explosion if battery is replaced by an incorrect type.
Dispose of used batteries according to the instructions.
36
Caution! To reduce the risk of fire or injury to persons by the battery,
read and follow these instructions:
1. Use only the AT&T battery pack specified in the user’s manual.
Do not use Alkaline or Lithium battery pack, or mix battery packs of
different sizes or from different manufacturers in this product. Do
not use a non-rechargeable battery pack.
2. Do not dispose of the battery pack in a fire; the cells may explode.
Do not expose battery pack to water. Dispose of old, defective
battery packs in an environmentally-friendly manner in accordance
with the relevant legislation.
3. Do not open or mutilate the battery pack. Released electrolyte
is corrosive and may cause damage to the eyes or skin. The
electrolyte may be toxic if swallowed.
4. Exercise care in handling the battery pack in order not to short the
battery pack with conducting materials such as rings, bracelets, and
keys. The battery pack or conducting material may overheat and
cause burns or fire.
5. Change the battery pack provided with, or identified for use with,
this product only in accordance with the instructions and limitation
specified in the user’s manual. Do not attempt to charge the battery
pack by any means other than those specified in the user’s manual.
Rechargeable Nickel-Metal-Hydride Battery Warning:
• This equipment contains a rechargeable Nickel-Metal-Hydride battery.
• Nickel is a chemical known to state of California to cause cancer.
• The rechargeable Nickel-Metal-Hydride battery contained in this
equipment may explode if disposed of in a fire.
• Do not short-circuit the battery
• Do not charge the rechargeable Nickel-Metal-Hydride battery used
in this equipment in any charger other than the one designed to
charge this battery as specified in the owner’s manual. Using another
charger may damage the battery or cause the battery to explode.
37
EN
Battery Safety Precautions:
EN
CARE AND MAINTENANCE
The following suggestions for care for your handset will enable you to
enjoy many years of problem-free use.
• Keep the handset dry. If it gets wet, wipe it dry immediately. Liquids
might contain minerals that can corrode the electronic circuits.
• Use and store the handset only in normal temperature environments.
Temperature extremes can shorten the life of electronic devices, and
distort or melt plastic parts.
• Handle the handset gently and carefully. Dropping it can damage
circuit boards and cases and can cause it to malfunction.
• Keep the handset away from excessive dust and dirt, which can
cause premature part wear.
• Occasionally wipe the handset with a damp cloth to keep it looking
new. Do not use harsh chemicals, cleaning solvents, or strong
detergents..
Modifying or tampering with the handset internal components can
cause a malfunction and might invalidate the warranty and void
your FCC authorization to operate it.
CARING FOR YOUR PRODUCT
• Do not clean any part of your phone with benzene, thinner or other
solvent chemicals as this may cause permanent damage and will not
be covered by warranty. When necessary, clean with a damp cloth.
• Keep your phone away from hot, humid conditions or strong sunlight.
• The LCD display panel is made of glass, and may break if the unit is
dropped. Place the unit securely on a stable surface.
• Keep the product away from heat sources, such as radiators, stoves,
heaters, and other heat-generating products.
• Never immerse the unit in water, use your phone outdoors in the rain,
or handle it with wet hands.
• Do not subject the base unit to extreme force, shock, or fluctuations in
humidity.
• Do not tamper with the internal components or disassemble the unit.
38
types. Replace battery pack with the same or equivalent type
recommended by the manufacturer.
• Every effort has been made to ensure the highest standards of
reliability for your phone. However, if something does go wrong, do
not try to repair it yourself - Contact the AT&T Customer Service
Center at 800-667-2118.
SPECIFICATIONS
TYPE
DESCRIPTION
Handset L x W x H
5.55 x 1.73 x 0.94 in
Handset weight
4.41oz (with battery)
Base L x W x H
4.96 x 4.48 x 1.50 in
Base Weight
Standard
5.29 oz
Worldwide Digital Cordless
Telecommunication (WDCT)
Frequency range
2.4GHz ISM
Channel bandwidth
1.729MHz
Modulation
GFSK
Communication range
Up to 984ft in open area
Base power supply
120V / 60Hz
Handset power supply
1 x NiMH 650mAh 3.6V (AAA) battery pack
Operating time
Talk: Approximately 5 hours
Standby: Approximately 120 hours
Operating temperature
32°F to 113°F
Storage temperature
-4°F 140°F
39
EN
• Do not mix new and old battery pack or battery packs of different
EN
FCC STATEMENT
DECLARATION OF CONFORMITY
This device complies with Part 15 of the FCC Rules. Operation is subject
to the following two conditions: (1) This device may not cause harmful
interference, and (2) This device must accept any interference received,
including interference that may cause undesired operation.
WARNING: Changes or modifications to this unit not expressly approved
by the party responsible for compliance could void the user authority to
operate the equipment.
NOTE: This equipment has been tested and found to comply with the
limits for a Class B digital device, pursuant to Part 15 of the FCC Rules.
These limits are designed to provide reasonable protection against harmful
interference in a residential installation.
This equipment generates, uses and can radiate radio frequency energy
and, if not installed and used in accordance with the instructions, may
cause harmful interference to radio communications. However, there is
no guarantee that interference will not occur in a particular installation.
If this equipment does cause harmful interference to radio or television
reception, which can be determined by turning the equipment off and on,
the user is encouraged to try to correct the interference by one or more
of the following measures:
• Reorient or relocate the receiving antenna.
• Increase the separation between the equipment and receiver.
• Connect the equipment into an outlet on a circuit different from that to
which the receiver is connected.
• Consult the dealer or an experienced radio / TV technician for help.
CONSUMER INFORMATION
a. This equipment complies with Part 68 of the FCC rules and the
requirements adopted by the ACTA. On the bottom of this equipment
is a label that contains, among other information, a product identifier
in the format US:KT5W400BID2820. If requested, this number must
be provided to the telephone company.
40
c. A plug and jack used to connect this equipment to the premises
wiring and telephone network must comply with the applicable FCC
Part 68 rules and requirements adopted by the ACTA. A compliant
telephone cord with modular plug is provided with this product. It is
designed to be connected to a compatible modular jack that is also
compliant. See installation instructions for details.
d. The REN (Ring Equivalence Number) is used to determine
the number of devices that may be connected to a telephone line.
Excessive RENs on a telephone line may result in the devices not
ringing in response to an incoming call. In most but not all areas,
the sum of RENs should not exceed five (5.0). To be certain of the
number of devices that may be connected to a line, as determined
by the total RENs, contact AT&T Customer Service. [For products
approved after July 23, 2001, the REN for this product is part of the
product identifier that has the format US:KT5W400BID2820. The
digits represented by ## are the REN without a decimal point (e.g.,
03 is a REN of 0.3). For earlier products, the REN is separately
shown on the label].
e. If this equipment causes harm to the telephone network, the
telephone company shall make reasonable efforts to notify you in
advance that temporary discontinuance of service may be required.
However, if advance notice is not practical, the telephone company
will notify the customer as soon as possible. In addition, you will be
advised of your right to file a complaint with the FCC if you believe it
is necessary.
f. The telephone company may make changes in its facilities,
equipment, operations or procedures that could affect the operation
of the equipment. If this happens, the telephone company will provide
advance notice in order for you to make necessary modifications to
maintain uninterrupted service.
41
EN
b. An applicable certification jack Universal Service Order Codes
(USOC) for the equipment is provided (i.e., RJ11C) in the packaging
with each piece of approved terminal equipment. The mounting of
the approval unit in the final assembly must be made so that the
approved unit is isolated from exposure to any hazardous voltages
within the assembly. Adequate separation and restraint of cable and
cords have provided.
EN
g. Should you experience trouble with this equipment, please contact
the AT&T Customer Service Center at 800-667-2118 for repair or
warranty information. If the equipment is causing harm to the
telephone network, the telephone company may request that you
disconnect the equipment until the problem is resolved.
h. Please follow instructions for repairing if any (e.g. battery
replacement section); otherwise do not alter or repair any parts
of device except as specified.
i. Connection to party line service is subject to state tariffs. Contact the
state public utility commission, public service commission or
corporation commission for information.
j. NOTICE: If your home has specially wired alarm equipment
connected to the telephone line, ensure the installation of this Digital
Cordless Telephone does not disable your alarm equipment. If you
have questions about what will disable alarm equipment, consult
AT&T Customer Service or a qualified alarm company.
k. Privacy of communications may not be ensured when using the
phone.
NOTICE: According to telephone company reports, AC electrical surges,
typically resulting from lightning strikes, are very destructive to telephone
equipment connected to AC power sources. To minimize damage from
these types of surges, a surge arrestor is recommended.
NOTICE TO HEARING AID WEARERS: This telephone has been
registered with the FCC as hearing aid compatible.
LIMITED WARRANTY
Warranty Term: This limited, non-transferable warranty is provided to the
original purchaser. The product is warranted to be free from defects in
materials and workmanship under normal installation, use, and service
for a period of one (1) year from the date of purchase as shown on the
purchaser’s receipt.
If the unit should prove defective within the warranty period, please call
the AT&T Customer Service Center at 800-667-2118 for product return
information.
42
If the product is repaired, reconditioned component parts or materials may
be used. If the product is replaced, AT&T may chose to replace it with a
new or reconditioned product of the same or similar design. The repaired
or replacement product will be warranted for either (a) 90 days or (b) the
remainder of the original one (1) year warranty period, w h i c h e v e r i s
longer. Battery pack is warranted to be free from defects at the time of
purchase.
This warranty does not apply to defects outside of AT&T’s control,
including but not limited to acts of God, fire, flood, damage while in transit
to service facility. We do not warranty that the product will be compatible
with any telephone equipment or systems or party lines.
This warranty shall be void if the product is damaged as a result of
defacement, misuse, abuse, neglect, accidents, destruction, or
alteration of the serial number, improper electrical voltages or currents,
repair, alteration or maintenance by any person or party other than AT&T’s
authorized service facility or any violation of instructions furnished by
AT&T.
This warranty is also void if this product is removed from the country in
which the original purchaser purchased it, if it is used in a country, which
it not registered for use, or if it is used in a country for which it was not
designed. Due to variations in telephone systems and communications
laws, this product may be illegal for use in some countries. AT&T
assumes no responsibility for damages or penalties incurred resulting from
the use of this product in a manner or location other than that for which it
is intended.
THIS ONE-YEAR LIMITED WARRANTY IS IN LIEU OF ALL OTHER
WARRANTIES EXPRESS OR IMPLIED. ANY IMPLIED WARRANTIES,
INCLUDING BUT NOT LIMITED TO THE IMPLIED WARRANTIES OF
MERCHANTABILITY AND FITNESS FOR A PARTICULAR PURPOSE,
43
EN
Statement of Remedy: AT&T’s obligation under this warranty is limited
to repair or replacement (at AT&T’s option) of the product or any part(s)
which are defective provided that the product is returned to the AT&T
Customer Service Center during the warranty period. A copy of the
purchase receipt must accompany products returned. In the absence of a
purchase receipt, the warranty period shall be one (1) year from the date
of manufacture. Repair or replacement of the product is your sole and
exclusive remedy.
EN
SHALL BE LIMITED IN DURATION TO THE ONE-YEAR DURATION OF
THIS WRITTEN LIMITED WARRANTY. WE DISCLAIM ANY LIABILITY
FOR DAMAGES FOR LOSS OF USE OF THE PRODUCTS, LOSS OF
TIME, INCONVENIENCE, INJURY TO CUSTOMER OR ANY OTHER
PERSON, OR DAMAGE TO CUSTOMER PROPERTY CAUSED BY
THE PRODUCT, LOSS OF REVENUE OR PROFIT, OR DAMAGES FOR
ANY FAILURE TO PERFORM. IN NO EVENT SHALL AT&T BE LIABLE
FOR ANY SPECIAL, INCIDENTAL, PUNITIVE OR CONSEQUENTIAL
DAMAGES EVEN IF WE ARE ADVISED OF THE POSSIBILITY OF SUCH
DAMAGES.
Some states do not allow limitations on how long an implied warranty lasts,
so the above limitations may not apply to you.
This warranty is the sole and exclusive warranty provided for the product.
There are no other express warranties. This warranty gives you specific
legal rights, and you may also have other rights, which vary from state
to state.
PROCEDURE FOR WARRANTY REPAIR
Q & A:
WHAT DOES THE WARRANTY COVER?
• Any defect in material or workmanship.
HOW LONG IS THE WARRANTY PERIOD?
• The warranty period is one year from the original date of purchase.
The warranty is non-transferable.
WHAT WILL AT&T DO?
• At our option, repair or replace your unit.
HOW DO I SEND MY UNIT, IN OR OUT OF WARRANTY?
• In the U.S., call the AT&T Customer Service Center for Return
Authorization at: 800-667-2118.
• Properly pack your unit. Include any cables and accessories that
were originally provided with the product. We recommend using the
original carton and packing materials.
44
date of original purchase (if the unit was purchased within the last
twelve months).
• Print your name and address, along with a description of the defect,
and include this in the package.
• Include payment for any service or repair not covered by warranty, as
determined by AT&T.
WHAT IS NOT COVERED UNDER THE WARRANTY?
• Battery pack
• Damage from misuse, neglect, or acts of nature (lightning, floods,
power surges, etc.)
• Products, which may have been modified or incorporated into other
products.
• Products purchased and/or operated outside the USA, its territories,
or Canada.
• Products serviced by the owner or a service facility not expressly
authorized by AT&T Communications.
• Products purchased more than 12 months from current date.
• Units purchased in “AS IS” condition, or units purchased as
“Distressed Merchandise”.
HOW DOES STATE LAW OR PROVINCIAL LAW RELATE TO THIS
WARRANTY?
• This warranty gives you specific rights. You may also have other
rights that vary from state to state or province to province.
SAVE THESE INSTRUCTIONS
For questions regarding the operation of this product, customer care or
for problem resolution, call the AT&T Customer Service Center at
800-667-2118.
45
EN
• Include in the package a copy of the sales receipt or other evidence of