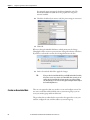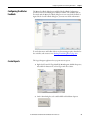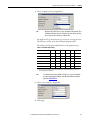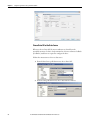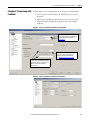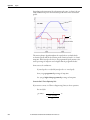
1
User Manual
Integrated Motion on the EtherNet/IP Network Configuration
and Startup
ControlLogix, CompactLogix, Kinetix 350, Kinetix 5500, Kinetix 5700, Kinetix 6500, PowerFlex 755
Important User Information
Read this document and the documents listed in the additional resources section about installation, configuration, and
operation of this equipment before you install, configure, operate, or maintain this product. Users are required to
familiarize themselves with installation and wiring instructions in addition to requirements of all applicable codes, laws,
and standards.
Activities including installation, adjustments, putting into service, use, assembly, disassembly, and maintenance are required
to be carried out by suitably trained personnel in accordance with applicable code of practice.
If this equipment is used in a manner not specified by the manufacturer, the protection provided by the equipment may be
impaired.
In no event will Rockwell Automation, Inc. be responsible or liable for indirect or consequential damages resulting from the
use or application of this equipment.
The examples and diagrams in this manual are included solely for illustrative purposes. Because of the many variables and
requirements associated with any particular installation, Rockwell Automation, Inc. cannot assume responsibility or
liability for actual use based on the examples and diagrams.
No patent liability is assumed by Rockwell Automation, Inc. with respect to use of information, circuits, equipment, or
software described in this manual.
Reproduction of the contents of this manual, in whole or in part, without written permission of Rockwell Automation,
Inc., is prohibited.
Throughout this manual, when necessary, we use notes to make you aware of safety considerations.
WARNING: Identifies information about practices or circumstances that can cause an explosion in a hazardous environment,
which may lead to personal injury or death, property damage, or economic loss.
ATTENTION: Identifies information about practices or circumstances that can lead to personal injury or death, property
damage, or economic loss. Attentions help you identify a hazard, avoid a hazard, and recognize the consequence.
IMPORTANT
Identifies information that is critical for successful application and understanding of the product.
Labels may also be on or inside the equipment to provide specific precautions.
SHOCK HAZARD: Labels may be on or inside the equipment, for example, a drive or motor, to alert people that dangerous
voltage may be present.
BURN HAZARD: Labels may be on or inside the equipment, for example, a drive or motor, to alert people that surfaces may
reach dangerous temperatures.
ARC FLASH HAZARD: Labels may be on or inside the equipment, for example, a motor control center, to alert people to
potential Arc Flash. Arc Flash will cause severe injury or death. Wear proper Personal Protective Equipment (PPE). Follow ALL
Regulatory requirements for safe work practices and for Personal Protective Equipment (PPE).
Allen-Bradley, Rockwell Automation, ControlLogix, RSLinx, RSLogix, Rockwell Software, Kinetix, PowerFlex, Logix5000, Integrated Architecture, PhaseManager, DriveExecutive, ControlFLASH, Stratix 8000,
POINT I/O, CompactLogix, GuardLogix, and Studio 5000 are trademarks of Rockwell Automation, Inc.
Trademarks not belonging to Rockwell Automation are property of their respective companies.
Summary of Changes
This manual contains new and updated information. Changes throughout this
revision are marked with change bars, as shown to the right of this paragraph.
New and Updated
Information
This table contains the major changes that are made in this revision.
Topic
Page
Added reference information about the Kinetix® 5700 Multi-axis Servo drive. Throughout
For the Kinetix 5700 drive, see the Kinetix 5700 Multi-axis Servo Drives User
Manual, publication 2198-UM002. Although, the Kinetix 5700 drive is
included in several tables, for example, Compare the Axis Configuration
Types for the Drives on page 32.
Updated Screen captures.
Rockwell Automation Publication MOTION-UM003F-EN-P - March 2015
Throughout
3
Summary of Changes
Notes:
4
Rockwell Automation Publication MOTION-UM003F-EN-P - March 2015
Table of Contents
Preface
Studio 5000 Environment . . . . . . . . . . . . . . . . . . . . . . . . . . . . . . . . . . . . . . . .
What You Need . . . . . . . . . . . . . . . . . . . . . . . . . . . . . . . . . . . . . . . . . . . . . . . . .
Integrated Motion
EtherNet/IP Drives . . . . . . . . . . . . . . . . . . . . . . . . . . . . . . . . . . . . . . . . . . . . . .
Configuration and Start-up Scenarios. . . . . . . . . . . . . . . . . . . . . . . . . . . . . .
Help for Selecting Drives and Motors . . . . . . . . . . . . . . . . . . . . . . . . . . . . . .
Where to Find Sample Projects. . . . . . . . . . . . . . . . . . . . . . . . . . . . . . . . . . . .
For More Information. . . . . . . . . . . . . . . . . . . . . . . . . . . . . . . . . . . . . . . . . . . .
11
12
13
14
16
16
17
Chapter 1
Configure Integrated Motion Control Configuring a Kinetix Drive . . . . . . . . . . . . . . . . . . . . . . . . . . . . . . . . . . . . . . 20
Add a Kinetix EtherNet/IP Drive . . . . . . . . . . . . . . . . . . . . . . . . . . . . . . . . . 20
Using Kinetix Drives
Create an Associated Axis. . . . . . . . . . . . . . . . . . . . . . . . . . . . . . . . . . . . . . . . .
Create an Axis for a Kinetix Drive . . . . . . . . . . . . . . . . . . . . . . . . . . . . .
Configuring the General Parameters . . . . . . . . . . . . . . . . . . . . . . . . . . . . . . .
Associate Axes and Drives . . . . . . . . . . . . . . . . . . . . . . . . . . . . . . . . . . . . .
Configure the Associated Axis and Control Mode. . . . . . . . . . . . . . .
Create a Motion Group . . . . . . . . . . . . . . . . . . . . . . . . . . . . . . . . . . . . . . .
Associate the Axis to the Motion Group. . . . . . . . . . . . . . . . . . . . . . . .
Set the Base Update Period. . . . . . . . . . . . . . . . . . . . . . . . . . . . . . . . . . . .
Specifying the Motor Data Source . . . . . . . . . . . . . . . . . . . . . . . . . . . . . . . . .
Choose the Catalog Number . . . . . . . . . . . . . . . . . . . . . . . . . . . . . . . . . .
Choose Nameplate . . . . . . . . . . . . . . . . . . . . . . . . . . . . . . . . . . . . . . . . . . .
Choose Motor NV . . . . . . . . . . . . . . . . . . . . . . . . . . . . . . . . . . . . . . . . . . .
Display Motor Model Information . . . . . . . . . . . . . . . . . . . . . . . . . . . . . . . .
Assign Motor Feedback. . . . . . . . . . . . . . . . . . . . . . . . . . . . . . . . . . . . . . . . . . .
Configuring the Load Feedback . . . . . . . . . . . . . . . . . . . . . . . . . . . . . . . . . . .
Configuring the Master Feedback . . . . . . . . . . . . . . . . . . . . . . . . . . . . . . . . .
Create Reports. . . . . . . . . . . . . . . . . . . . . . . . . . . . . . . . . . . . . . . . . . . . . . . . . . .
24
25
28
29
31
34
36
37
39
39
41
42
42
43
44
45
45
Chapter 2
Configure Integrated Motion Using a About the PowerFlex 755 Drives . . . . . . . . . . . . . . . . . . . . . . . . . . . . . . . . . . 48
Add a PowerFlex 755 Drive . . . . . . . . . . . . . . . . . . . . . . . . . . . . . . . . . . . . . . . 49
PowerFlex 755 Drive
Select a Peripheral Feedback Device and Slot Assignment . . . . . . . . 51
Assign a Power Structure. . . . . . . . . . . . . . . . . . . . . . . . . . . . . . . . . . . . . . 52
Create an Axis for a PowerFlex 755 Drive . . . . . . . . . . . . . . . . . . . . . . . . . . 54
Establish Feedback Port Assignments for the PowerFlex 755 Drive 56
Configure the Associated Axis and Control Mode. . . . . . . . . . . . . . . 59
Create a Motion Group . . . . . . . . . . . . . . . . . . . . . . . . . . . . . . . . . . . . . . . 62
Associate the Axis to the Motion Group. . . . . . . . . . . . . . . . . . . . . . . . 64
Set the Base Update Period. . . . . . . . . . . . . . . . . . . . . . . . . . . . . . . . . . . . 65
Select the Motor Data Source . . . . . . . . . . . . . . . . . . . . . . . . . . . . . . . . . . . . . 67
Choose Catalog Number as the Motor Data Source . . . . . . . . . . . . . 67
Motor Model Dialog Box . . . . . . . . . . . . . . . . . . . . . . . . . . . . . . . . . . . . . 68
Motor Analyzer Dialog Box . . . . . . . . . . . . . . . . . . . . . . . . . . . . . . . . . . . 68
Rockwell Automation Publication XXXX-X.X.X - Month Year
5
Table of Contents
Choose Nameplate as the Motor Data Source . . . . . . . . . . . . . . . . . . .
Choose Drive NV as the Data Source. . . . . . . . . . . . . . . . . . . . . . . . . . .
Motor Model Dialog Box. . . . . . . . . . . . . . . . . . . . . . . . . . . . . . . . . . . . . .
Motor Analyzer Dialog Box . . . . . . . . . . . . . . . . . . . . . . . . . . . . . . . . . . .
Feedback Configuration Options for the PowerFlex 755 Drive . . .
69
70
71
71
73
Chapter 3
Configure Axis Scheduling
Example Axis Scheduling Application . . . . . . . . . . . . . . . . . . . . . . . . . . . . . .
Axis Scheduling Configuration . . . . . . . . . . . . . . . . . . . . . . . . . . . . . . . . . . . .
Configuring the Update Periods . . . . . . . . . . . . . . . . . . . . . . . . . . . . . . .
Motion Utilization . . . . . . . . . . . . . . . . . . . . . . . . . . . . . . . . . . . . . . . . . . . . . . .
78
79
80
87
Chapter 4
Configure a Project for Integrated
Motion on the EtherNet/IP Network
Create a Controller Project. . . . . . . . . . . . . . . . . . . . . . . . . . . . . . . . . . . . . . . . 89
Set Time Synchronization. . . . . . . . . . . . . . . . . . . . . . . . . . . . . . . . . . . . . . . . . 92
Add a 1756-ENxTx Communication Module . . . . . . . . . . . . . . . . . . . . . . 95
Chapter 5
Configuration Examples for a Kinetix Example 1: Position Loop with Motor Feedback Only. . . . . . . . . . . . . . . 99
Example 2: Position Loop with Dual Feedback. . . . . . . . . . . . . . . . . . . . . 103
Drive
Example 3: Feedback Only . . . . . . . . . . . . . . . . . . . . . . . . . . . . . . . . . . . . . . . 108
Example 4: Kinetix 5500 Drive, Velocity Loop with Motor Feedback 112
Example 5: Kinetix 350 Drive, Position Loop with Motor Feedback . 116
Chapter 6
Axis Configuration Examples for the
PowerFlex 755 Drive
Example 1: Position Loop with Motor Feedback Using
a UFB Feedback Device . . . . . . . . . . . . . . . . . . . . . . . . . . . . . . . . . . . . . .
Example 2: Position Loop with Dual Motor Feedback Via
a UFB Feedback Device . . . . . . . . . . . . . . . . . . . . . . . . . . . . . . . . . . . . . .
Example 3: Velocity Loop with Motor Feedback Via
a UFB Feedback Device . . . . . . . . . . . . . . . . . . . . . . . . . . . . . . . . . . . . . .
Example 4: Velocity Loop with No Feedback . . . . . . . . . . . . . . . . . . . . . .
Example 5: Frequency Control with No Feedback. . . . . . . . . . . . . . . . . .
Example 6: Torque Loop with Feedback. . . . . . . . . . . . . . . . . . . . . . . . . . .
122
125
130
134
137
141
Chapter 7
Commission
Scaling Dialog Box. . . . . . . . . . . . . . . . . . . . . . . . . . . . . . . . . . . . . . . . . . . . . . .
Direct Coupled Rotary . . . . . . . . . . . . . . . . . . . . . . . . . . . . . . . . . . . . . . .
Direct Coupled Linear . . . . . . . . . . . . . . . . . . . . . . . . . . . . . . . . . . . . . . .
Rotary Transmission . . . . . . . . . . . . . . . . . . . . . . . . . . . . . . . . . . . . . . . . .
Linear Actuator . . . . . . . . . . . . . . . . . . . . . . . . . . . . . . . . . . . . . . . . . . . . .
Hookup Tests Dialog Box. . . . . . . . . . . . . . . . . . . . . . . . . . . . . . . . . . . . . . . .
Test Cable Connections, Wiring, and Motion Polarity. . . . . . . . . .
Run a Motor and Feedback Test . . . . . . . . . . . . . . . . . . . . . . . . . . . . . .
Run a Motor Feedback Test . . . . . . . . . . . . . . . . . . . . . . . . . . . . . . . . . .
6
Rockwell Automation Publication XXXX-X.X.X - Month Year
146
147
148
148
149
150
151
153
155
Table of Contents
Run a Marker Test . . . . . . . . . . . . . . . . . . . . . . . . . . . . . . . . . . . . . . . . . .
Commutation Test . . . . . . . . . . . . . . . . . . . . . . . . . . . . . . . . . . . . . . . . . .
Applying the Commutation Hookup Test. . . . . . . . . . . . . . . . . . . . .
Run a Commutation Test . . . . . . . . . . . . . . . . . . . . . . . . . . . . . . . . . . . .
Polarity Dialog Box. . . . . . . . . . . . . . . . . . . . . . . . . . . . . . . . . . . . . . . . . . . . . .
Autotune Dialog Box. . . . . . . . . . . . . . . . . . . . . . . . . . . . . . . . . . . . . . . . . . . .
Load Dialog Box . . . . . . . . . . . . . . . . . . . . . . . . . . . . . . . . . . . . . . . . . . . . . . . .
Load Observer . . . . . . . . . . . . . . . . . . . . . . . . . . . . . . . . . . . . . . . . . . . . . . . . . .
Motion Analyzer Software . . . . . . . . . . . . . . . . . . . . . . . . . . . . . . . . . . . . . . .
Test an Axis with Motion Direct Commands. . . . . . . . . . . . . . . . . . . . . .
Access Motion Direct Commands for an Axis or Group . . . . . . . .
Understanding STO Bypass When Using
Motion Direct Commands . . . . . . . . . . . . . . . . . . . . . . . . . . . . . . .
Troubleshoot the Safe Torque Off Function. . . . . . . . . . . . . . . . . . .
155
156
156
159
160
160
164
166
169
170
170
173
174
Chapter 8
Home an Axis
Guidelines for Homing . . . . . . . . . . . . . . . . . . . . . . . . . . . . . . . . . . . . . . . . . .
Active Homing. . . . . . . . . . . . . . . . . . . . . . . . . . . . . . . . . . . . . . . . . . . . . .
Passive Homing . . . . . . . . . . . . . . . . . . . . . . . . . . . . . . . . . . . . . . . . . . . . .
Examples . . . . . . . . . . . . . . . . . . . . . . . . . . . . . . . . . . . . . . . . . . . . . . . . . . . . . . .
Active Homing. . . . . . . . . . . . . . . . . . . . . . . . . . . . . . . . . . . . . . . . . . . . . .
Passive Homing . . . . . . . . . . . . . . . . . . . . . . . . . . . . . . . . . . . . . . . . . . . . .
Absolute Position Recovery (APR) . . . . . . . . . . . . . . . . . . . . . . . . . . . . . . .
APR Terminology . . . . . . . . . . . . . . . . . . . . . . . . . . . . . . . . . . . . . . . . . . .
APR Supported Components . . . . . . . . . . . . . . . . . . . . . . . . . . . . . . . .
Absolute Position Recovery Functionality . . . . . . . . . . . . . . . . . . . . . . . . .
Absolute Feedback Device . . . . . . . . . . . . . . . . . . . . . . . . . . . . . . . . . . .
Sercos Versus CIP . . . . . . . . . . . . . . . . . . . . . . . . . . . . . . . . . . . . . . . . . . .
APR Faults . . . . . . . . . . . . . . . . . . . . . . . . . . . . . . . . . . . . . . . . . . . . . . . . . . . . .
APR Fault Conditions . . . . . . . . . . . . . . . . . . . . . . . . . . . . . . . . . . . . . . .
APR Fault Generation . . . . . . . . . . . . . . . . . . . . . . . . . . . . . . . . . . . . . . .
Absolute Position Recovery Scenarios . . . . . . . . . . . . . . . . . . . . . . . . .
Scaling. . . . . . . . . . . . . . . . . . . . . . . . . . . . . . . . . . . . . . . . . . . . . . . . . . . . . .
Online Scaling . . . . . . . . . . . . . . . . . . . . . . . . . . . . . . . . . . . . . . . . . . . . . .
Resetting an APR Fault . . . . . . . . . . . . . . . . . . . . . . . . . . . . . . . . . . . . . .
Absolute Position Loss without APR Faults . . . . . . . . . . . . . . . . . . .
Behavior of APR for Incremental Encoders . . . . . . . . . . . . . . . . . . . .
Saving an ACD File Versus Upload of a Project . . . . . . . . . . . . . . . .
175
176
176
177
177
181
182
182
182
183
183
183
184
184
185
187
191
192
192
192
193
194
Chapter 9
Manual Tune
Manual Tune an Axis. . . . . . . . . . . . . . . . . . . . . . . . . . . . . . . . . . . . . . . . . . . .
Axis Configuration Types . . . . . . . . . . . . . . . . . . . . . . . . . . . . . . . . . . . .
Current Tuning Configuration. . . . . . . . . . . . . . . . . . . . . . . . . . . . . . .
Loop Responses . . . . . . . . . . . . . . . . . . . . . . . . . . . . . . . . . . . . . . . . . . . . .
Motion Generator and Motion Direct Commands . . . . . . . . . . . . .
Additional Tune . . . . . . . . . . . . . . . . . . . . . . . . . . . . . . . . . . . . . . . . . . . . . . . .
Rockwell Automation Publication XXXX-X.X.X - Month Year
195
196
196
197
199
201
7
Table of Contents
Additional Tune for the Kinetix 6500 Module . . . . . . . . . . . . . . . . .
Configure Torque Values. . . . . . . . . . . . . . . . . . . . . . . . . . . . . . . . . . . . .
Additional Tune for the PowerFlex 755 Drive . . . . . . . . . . . . . . . . .
Quick Watch. . . . . . . . . . . . . . . . . . . . . . . . . . . . . . . . . . . . . . . . . . . . . . . .
Motion Generator . . . . . . . . . . . . . . . . . . . . . . . . . . . . . . . . . . . . . . . . . . .
201
203
205
207
208
Chapter 10
Faults and Alarms
Faults and Alarms Dialog Box . . . . . . . . . . . . . . . . . . . . . . . . . . . . . . . . . . . .
QuickView Pane. . . . . . . . . . . . . . . . . . . . . . . . . . . . . . . . . . . . . . . . . . . . .
Data Monitor . . . . . . . . . . . . . . . . . . . . . . . . . . . . . . . . . . . . . . . . . . . . . . .
Drive Status Indicators . . . . . . . . . . . . . . . . . . . . . . . . . . . . . . . . . . . . . . .
Troubleshoot Faults . . . . . . . . . . . . . . . . . . . . . . . . . . . . . . . . . . . . . . . . . . . . .
Manage Motion Faults . . . . . . . . . . . . . . . . . . . . . . . . . . . . . . . . . . . . . . . . . . .
Configure the Exception Actions for AXIS_CIP_DRIVE . . . . . . . . . .
Inhibit an Axis . . . . . . . . . . . . . . . . . . . . . . . . . . . . . . . . . . . . . . . . . . . . . . . . . .
Example: Inhibit an Axis . . . . . . . . . . . . . . . . . . . . . . . . . . . . . . . . . . . . .
Example: Uninhibit an Axis . . . . . . . . . . . . . . . . . . . . . . . . . . . . . . . . . .
211
213
213
214
214
215
216
219
220
221
Appendix A
CIP Drive Module Properties
Module Properties. . . . . . . . . . . . . . . . . . . . . . . . . . . . . . . . . . . . . . . . . . . . . . .
General Tab. . . . . . . . . . . . . . . . . . . . . . . . . . . . . . . . . . . . . . . . . . . . . . . . .
Connection Tab . . . . . . . . . . . . . . . . . . . . . . . . . . . . . . . . . . . . . . . . . . . . .
Safety Tab . . . . . . . . . . . . . . . . . . . . . . . . . . . . . . . . . . . . . . . . . . . . . . . . . .
Time Sync Tab . . . . . . . . . . . . . . . . . . . . . . . . . . . . . . . . . . . . . . . . . . . . . .
Module Info Tab . . . . . . . . . . . . . . . . . . . . . . . . . . . . . . . . . . . . . . . . . . . .
Internet Protocol Tab. . . . . . . . . . . . . . . . . . . . . . . . . . . . . . . . . . . . . . . .
Port Configuration Tab . . . . . . . . . . . . . . . . . . . . . . . . . . . . . . . . . . . . . .
Network Tab. . . . . . . . . . . . . . . . . . . . . . . . . . . . . . . . . . . . . . . . . . . . . . . .
Associated Axes Tab . . . . . . . . . . . . . . . . . . . . . . . . . . . . . . . . . . . . . . . . .
Power Tab . . . . . . . . . . . . . . . . . . . . . . . . . . . . . . . . . . . . . . . . . . . . . . . . . .
Digital Input Tab . . . . . . . . . . . . . . . . . . . . . . . . . . . . . . . . . . . . . . . . . . . .
Motion Diagnostics Tab . . . . . . . . . . . . . . . . . . . . . . . . . . . . . . . . . . . . .
223
224
226
227
228
229
231
233
237
240
244
247
248
Appendix B
Parameter Group Dialog Boxes
Parameter Dialog Box Listings . . . . . . . . . . . . . . . . . . . . . . . . . . . . . . . . . . . . 251
Appendix C
Program
Program a Velocity Profile and Jerk Rate . . . . . . . . . . . . . . . . . . . . . . . . . .
Definition of Jerk . . . . . . . . . . . . . . . . . . . . . . . . . . . . . . . . . . . . . . . . . . . .
Choose a Profile . . . . . . . . . . . . . . . . . . . . . . . . . . . . . . . . . . . . . . . . . . . . .
Use % of Time for the Easiest Programming of Jerk. . . . . . . . . . . . .
Velocity Profile Effects . . . . . . . . . . . . . . . . . . . . . . . . . . . . . . . . . . . . . . .
Jerk Rate Calculation . . . . . . . . . . . . . . . . . . . . . . . . . . . . . . . . . . . . . . . .
Profile Operand . . . . . . . . . . . . . . . . . . . . . . . . . . . . . . . . . . . . . . . . . . . . .
Enter Basic Logic . . . . . . . . . . . . . . . . . . . . . . . . . . . . . . . . . . . . . . . . . . . . . . . .
8
Rockwell Automation Publication XXXX-X.X.X - Month Year
255
255
256
257
258
258
263
266
Table of Contents
Example Motion Control Program . . . . . . . . . . . . . . . . . . . . . . . . . . .
Download a Project and Run Logix . . . . . . . . . . . . . . . . . . . . . . . . . . .
Choose a Motion Instruction . . . . . . . . . . . . . . . . . . . . . . . . . . . . . . . . . . . .
Troubleshoot Axis Motion. . . . . . . . . . . . . . . . . . . . . . . . . . . . . . . . . . . . . . .
Why does my axis accelerate when I stop it?. . . . . . . . . . . . . . . . . . . .
Why does my axis overshoot its target speed? . . . . . . . . . . . . . . . . . .
Why is there a delay when I stop and then restart a jog? . . . . . . . . .
Why does my axis reverse direction when I stop and start it? . . . .
Programming with the MDSC Function . . . . . . . . . . . . . . . . . . . . . . . . . .
267
268
268
271
271
272
275
277
279
Appendix D
History of Changes
Glossary
Index
History of Changes. . . . . . . . . . . . . . . . . . . . . . . . . . . . . . . . . . . . . . . . . . . . . . 283
Glossary . . . . . . . . . . . . . . . . . . . . . . . . . . . . . . . . . . . . . . . . . . . . . . . . . . . . . . . . .285
Index. . . . . . . . . . . . . . . . . . . . . . . . . . . . . . . . . . . . . . . . . . . . . . . . . . . . . . . . . . . .289
Rockwell Automation Publication XXXX-X.X.X - Month Year
9
Table of Contents
Notes:
10
Rockwell Automation Publication XXXX-X.X.X - Month Year
Preface
Use this manual to configure an Integrated Motion on the EtherNet/IP network
application and to start up your motion solution using the ControlLogix® and
CompactLogix™ systems.
Topic
Page
What You Need
12
Integrated Motion EtherNet/IP Drives
13
Configuration and Start-up Scenarios
14
Help for Selecting Drives and Motors
16
Where to Find Sample Projects
17
This manual is designed to give you the quickest and easiest approach to an
integrated motion control solution. If you have any comments or suggestions, see
Documentation Feedback on the back cover of this manual.
Studio 5000 Environment
The Studio 5000 Automation Engineering and Design Environment™ combines
engineering and design elements into a common environment. The first element
in the Studio 5000® environment is the Studio 5000Logix Designer™ application.
The Logix Designer application is the rebranding of RSLogix™ 5000 software
and continue to be the product to program Logix5000™ controllers for discrete,
process, batch, motion, safety, and drive-based solutions.
The Studio 5000 environment is the foundation for the future of Rockwell
Automation® engineering design tools and capabilities. The Studio 5000
environment. It is the one place for design engineers to develop all elements of
their control system.
Rockwell Automation Publication MOTION-UM003F-EN-P - March 2015
11
Preface
What You Need
You need a combination of the following hardware and software to configure an
integrated motion solution:
• ControlLogix controllers (supports up to 100 position loop configured
drives) that support integrated motion control:
– 1756-L7x
– 1756-L7xS
TIP
ControlLogix controllers 1756-L6x and L6xS are not supported in Logix
Designer application, version 21.00.00 and later.
• CompactLogix 5370 L1, L2, and L3 family of controllers have the
embedded EtherNet/IP network, which supports integrated motion
control
•
•
•
•
12
The CompactLogix controllers that support the AXIS_CIP_DRIVE axis
type:
– 1769-L18ERM, up to 8 drives and 2 position loops
– 1769-L27ERM, up to 16 drives and 4 position loops
– 1769-L30ERM, up to 16 drives and 4 position loops
– 1769-L33ERM, up to 32 drives and 8 position loops
– 1769-L36ERM, up to 48 drives and 16 position loops
Ethernet communication modules, with updated firmware to version 3.3
or later:
– 1756-EN2T
– 1756-EN2TR
– 1756-EN3TR
– 1756-EN2F
Integrated Motion EtherNet/IP control modules, drives, and adapters:
– Kinetix 350 Ethernet drive, single axis servo drive, with RSLogix 5000
programming software, version 20.00.00, or the Logix Designer
application, version 21.00.00 or later
– Kinetix 5500 mid-range Ethernet servo drive, with the Logix Designer
application, version 21.00.00 or later
– Kinetix 5700, multi-axis servo drive, with the Logix Designer
application, version 26.00.00 or later.
– Kinetix 6500 control module, multi-axis servo drive with RSLogix
5000 programming software, version 18.00.00 or later, or the Logix
Designer application, version 21.00.00 or later
– PowerFlex® 755 Embedded EtherNet/IP drive, with RSLogix 5000
programming software, version 19.00.00…20.00.00 or later, or the
Logix Designer application, version 21.00.00 or later
Logix Designer application, version 21.00.00 or later
RSLinx® Classic software, version 3.51.00 or later
Rockwell Automation Publication MOTION-UM003F-EN-P - March 2015
Preface
This table lists the EtherNet/IP drives available for integrated motion.
Integrated Motion
EtherNet/IP Drives
Table 1 - Integrated Motion EtherNet/IP Drives
Drive
Description
Supported Axis Types(1)
Voltage Ranges
Resources
Kinetix 350
The Kinetix 350 drive is a singleaxis EtherNet/IP servo drive with
Safe Torque Off feature that
support the Integrated Motion
on EtherNet/IP network.
Position
Velocity
Torque
Input power
120/240V or 480V AC
Kinetix 350 Single-axis EtherNet/IP
Servo Drives User Manual, publication
2097-UM002
Output power
0.4…3.0 kW (2…12 A rms)
Kinetix 5500
The Kinetix 5500 single-axis
Kinetix 5500 (ers) servo drive that supports the
Integrated Motion on EtherNet/
IP network. Multi-axis, AC, DC,
AC/DC, and AC/DC hybrid bussharing configurations are also
possible.
Frequency Control
Position
Velocity
Torque
Kinetix 5500 (ers): Safe Torque Off
Voltage Ranges
195…264V rms single-phase
195…264V rms three-phase
324…528V rms three-phase
Kinetix 5700
The Kinetix 5700 is a Multi-axis
EtherNet/IP servo drive with Safe
Torque Off feature that supports
the Integrated Motion on
EtherNet/IP network.
The Safe Torque Off is supported
on the drive as either HardwiredSTO(ers) or Network-STO(ers2),
combined on one Drive
Catalog(ers3) 2198-K5700.
It consists of a Converter module
(DFE), Inverter modules HIpower (HPI), and Dual-Axis DAI
in 200amp Shared DC-Bus, BusSharing configurations with DFE
as DC Converter.
Frequency Control
Feedback Only
Position
Velocity
Torque
Kinetix 5700 (ers): Safe Torque Off
324…528V rms, three-phase (480V nom) AC
Kinetix 5700 Multi-axis Servo Drive
User Manual, publication 2198-UM002
Kinetix 6500
The Kinetix 6500 drive is a closed
loop servo modular drive. It
consists of an integrated axis
(IAM) power module and up to
seven axis (AM) power modules,
each coupled with a Kinetix 6500
control module.
The IAM and AM power modules
provide power for up to eight
drives.
Feedback Only
Position
Velocity
Torque
Voltage Range
324…528V rms three-phase
Kinetix 6500 Modular Multi-axis Servo
Drives User Manual,
publication 2094-UM002
The PowerFlex 755 Drive
EtherNet/IP Embedded Adapter
is a closed loop drive. It consists
of an integrated axis power
module and five configuration
option slots for control,
communication, I/O, feedback,
safety, and auxiliary control
power.
Frequency Control
Position
Velocity
Torque
Input Power: 380…480V AC
Output Power: 0.75...1400 kW / 1...2000 Hp /
2.1...2330 A
PowerFlex 755
Output Power Kinetix 5500 Servo Drives User Manual,
publication 2198-UM001
0.2…1.0 kW
0.3…7.2 kW
0.6…14.9 Kw
Continuous Output Power
6.0…45 kW
Input Power: 600V AC
Output Power: 0.5...1500 Hp / 1.7...1530 A
PowerFlex 755 Drive Embedded
EtherNet/IP Adapter Installation
Instructions, publication 750-IN001
PowerFlex 750-Series AC Drives
Programming Manual,
publication 750-PM001
Input Power: 690V AC
Output Power: 5.5...1500 kW / 12...1485 A
(1) For more information about the configuration types, see Configure the Associated Axis and Control Mode on page 31 and the Integrated Motion on the EtherNet/IP Network Reference Manual, publication
MOTION-RM003.
Rockwell Automation Publication MOTION-UM003F-EN-P - March 2015
13
Preface
Configuration and Start-up
Scenarios
The two ways to get an Integrated Motion on the EtherNet/IP network solution
up and running are to connect the hardware first or configure the software.
Connect Hardware First
1 - Connect
• Install modules and drives.
• Check software and firmware for the latest revisions.
2 - Configure the controllers and communication modules.
• Open the Logix Designer application.
• Check software and firmware for the latest revisions and update if needed.
• You must configure the controllers and communication modules for time
synchronization and motion.
• To setup a project and enable time synchronization, follow the steps in Chapter 4,
Configure a Project for Integrated Motion on the EtherNet/IP Network on page 89.
3 - Configure the drive module and an axis.
Check drive firmware for the latest revisions and update if needed.
• For a Kinetix drives, follow the steps in Chapter 1, Configure Integrated Motion Control
Using Kinetix Drives on page 19.
• For a PowerFlex 755 drive, follow the steps in Chapter 2, Configure Integrated Motion
Using a PowerFlex 755 Drive on page 47.
If you are using a PowerFlex 755 drive and are unfamiliar with the integrated motion interface
and attributes, see the Integrated Motion on EtherNet/IP appendix in the PowerFlex 750-Series
AC Drives Programming Manual, publication 750-PM001.
For example configuration scenarios, see these chapters:
For Kinetix drives, Chapter 5, Configuration Examples for a Kinetix Drive on page 99.
For PowerFlex drives, Chapter 6, Axis Configuration Examples for the PowerFlex 755 Drive on
page 121.
4 - Commission
• Download project.
• Follow steps in Chapter 7, Commission on page 145.
5 - Program
• Follow steps in Appendix C, Program on page 255.
14
Rockwell Automation Publication MOTION-UM003F-EN-P - March 2015
Preface
Configure Software First
1 - Configure the controllers and communication modules.
• Open the Logix Designer application.
• Check software and firmware for the latest revisions and update if needed.
• You must configure the controllers and communication modules for time synchronization
and motion.
• To build a project and enable time synchronization, follow the steps in Chapter 4,
Configure a Project for Integrated Motion on the EtherNet/IP Network on page 89.
2 - Configure the drive module and configure an axis.
Check drive firmware for the latest revisions and update if needed.
• For Kinetix drives, follow the steps in Chapter 1, Configure Integrated Motion Control Using
Kinetix Drives on page 19.
• For PowerFlex 755 drives, follow the steps in Chapter 2, Configure Integrated Motion Using a
PowerFlex 755 Drive on page 47.
If you are using a PowerFlex 755 drive and are unfamiliar with the integrated motion
interface and attributes, see the Integrated Motion on EtherNet/IP appendix in the
PowerFlex 750-Series AC Drives Programming Manual, publication 750-PM001.
For example configuration scenarios, see these chapters:
For Kinetix drives, Chapter 5, Configuration Examples for a Kinetix Drive on page 99.
For PowerFlex drives, Chapter 6, Axis Configuration Examples for the PowerFlex 755 Drive
on page 121.
3 - Program
• Follow steps in Appendix C, Program on page 255.
4 - Connect
• Install modules and drives.
• Check software and firmware for the latest revisions.
5 - Commission
• Download project.
• Follow steps in Chapter 7, Commission on page 145.
Rockwell Automation Publication MOTION-UM003F-EN-P - March 2015
15
Preface
Help for Selecting Drives and
Motors
Motion Analyzer software helps you select the appropriate Allen-Bradley® drives
and motors that are based on your load characteristics and typical motion
application cycles. The software guides you through wizard-like screens to collect
information specific to your application.
After you enter the information for your application, such as, load inertia,
gearbox ratio, feedback device, and brake requirements, the software generates an
easy-to-read list of recommended motors, drives, and other support equipment.
You can download the Motion Analyzer software at
http://www.ab.com/motion/software/analyzer_download.html.
Where to Find Sample
Projects
There are three ways to find the sample projects:
• Studio 5000 Main Dialog Box
• Logix Designer Start Page (ALT+F9)
There is a PDF file that is named
Vendor Sample Projects on the
Start Page that explains how to
work with the sample projects.
• Logix Designer Help Menu
The Rockwell Automation sample project default location is:
C:\Users\Public\Documents\Studio 5000\Samples\ENU\V24\Rockwell
Automation
There is a PDF file that is named Vendor Sample Projects on the Start Page that
explains how to work with the sample projects.
Free sample code is available at: http://samplecode.rockwellautomation.com/.
16
Rockwell Automation Publication MOTION-UM003F-EN-P - March 2015
Preface
These resources contain information about related products from Rockwell
Automation.
For More Information
Table 2 - Publications About Related Products
Resource
Description
Logix5000 Controller Motion Instructions Reference Manual,
publication MOTION-RM002
Provides a programmer with details about motion instructions for a Logix-based
controller.
Integrated Motion on the EtherNet/IP network Reference Manual,
publication MOTION-RM003
Provides a programmer with details about the Integrated Motion on the EtherNet/IP
network Control Modes, Control Methods, and AXIS_CIP_DRIVE Attributes.
Logix5000 Controllers Quick Start, publication 1756-QS001
Describes how to get started programming and maintaining Logix5000 controllers.
Logix5000 Controllers Common Procedures, publication 1756-PM001
Provides detailed and comprehensive information about how to program a Logix5000
controller.
Logix5000 Controllers General Instructions Reference Manual, publication 1756-RM003
Provides a programmer with details about general instructions for a Logix-based
controller.
Logix5000 Controllers Process and Drives Instructions Reference Manual, publication
1756-RM006
Provides a programmer with details about process and drives instructions for a Logixbased controller.
The Integrated Architecture™ and CIP Sync Configuration Application Technique,
publication IA-AT003
Provides detailed configuration information on CIP Sync technology and time
synchronization.
PhaseManager™ User Manual, publication LOGIX-UM001
Describes how to build and program a Logix5000 controller to use equipment phases.
EtherNet/IP Modules in Logix5000 Control Systems User Manual,
publication ENET-UM001
Describes Ethernet network considerations, networks, and setting IP addresses.
ControlLogix Controller User Manual, publication 1756-UM001
Describes the necessary tasks to install, configure, program, and operate a ControlLogix
system.
GuardLogix Controllers User Manual, publication 1756-UM020
It describes the GuardLogix-specific procedures you use to configure, operate, and
troubleshoot your controller.
Kinetix 6200 and Kinetix 6500 Modular Servo Drive User Manual,
publication 2094-UM002
Provides information on installing, configuring, start up, troubleshooting, and
applications for the Kinetix 6200 and Kinetix 6500 servo drive systems.
Kinetix 350 Single-axis EtherNet/IP Servo Drive User Manual, publication 2097-UM002
Provides detailed information on wiring, power, troubleshooting, and integration with
ControlLogix, or CompactLogix controller platforms.
Kinetix 5500 Drives Installation Instructions, publication 2198-IN001
Provides installation instructions for the Kinetix 5500 Integrated Axis Module and Axis
Module components.
Kinetix 5500 Servo Drives User Manual, publication 2198-UM001
Provides information on installing, configuring, start up, troubleshooting, and
applications for the Kinetix 5500 servo drive systems.
Kinetix 5700 Multi-axis Servo Drives User Manual, publication 2198-UM002
Provides information on installing, configuring, start up, troubleshooting, and
applications for the Kinetix 5700 servo drive systems including the Dual Axis Inverter,
High Power Inverter, and the Diode Front End modules.
Rockwell Automation Publication MOTION-UM003F-EN-P - March 2015
17
Preface
Table 2 - Publications About Related Products (Continued)
Resource
Description
PowerFlex 750-Series AC Drives Reference Manual, publication 750-RM002
Provides detailed drive information including operation, parameter descriptions, and
programming of the AC drive.
PowerFlex 750-Series AC Drives Programming Manual, publication 750-PM001
Provides information that is needed to install, start-up, and troubleshoot PowerFlex
750-Series Adjustable Frequency AC Drives.
PowerFlex 755 Drive Embedded EtherNet/IP Adapter User Manual,
publication 750COM-UM001
Provides information on installing, configuring, start up, troubleshooting, and
applications for the PowerFlex 755 Drive Embedded EtherNet/IP Adapter.
Integrated Motion Encoder on EtherNet/IP User Manual, publication 842E-UM002
Provides information on how to install, configure, diagnose the 842E-CM Integrated
Motion Encoder.
GuardLogix Controllers User Manual, publication 1756-UM020
Provides information on configuring and programming the 1756 GuardLogix® controller.
GuardLogix Controller Systems Safety Reference Manual, publication 1756-RM093
Contains detailed requirements for achieving and maintaining SIL 3 with the GuardLogix
controller system.
Industrial Automation Wiring and Grounding Guidelines, publication 1770-4.1
Provides general guidelines for installing a Rockwell Automation industrial system.
Product Certifications website, http://www.ab.com
Provides declarations of conformity, certificates, and other certification details.
Network specifications details, http://www.odva.org
ODVA is the organization that supports network technologies that are built on the
Common Industrial Protocol (CIP) — DeviceNet, EtherNet/IP, CompoNet, and
ControlNet.
You can view or download publications at
http://www.rockwellautomation.com/literature/. To order paper copies of technical
documentation, contact your local Allen-Bradley distributor or Rockwell
Automation sales representative.
18
Rockwell Automation Publication MOTION-UM003F-EN-P - March 2015
Chapter
1
Configure Integrated Motion Control Using
Kinetix Drives
This chapter provides procedures on how to configure integrated motion control
by using the Kinetix 350, Kinetix 5500, and Kinetix 6500 drives. The basic
configuration for an integrated motion solution is to associate a drive with motor
feedback and an axis configuration type.
For the examples in this chapter, the Kinetix 6500 drive is used and the
exceptions for the Kinetix 350, Kinetix 5500 drives noted. For the Kinetix 5700
drive, see the Kinetix 5700 Multi-axis Servo Drives User Manual,
publication 2198-UM002. Although, the Kinetix 5700 drive is included in
several tables, for example, Compare the Axis Configuration Types for the Drives
on page 32.
Topic
Page
Configuring a Kinetix Drive
20
Add a Kinetix EtherNet/IP Drive
20
Create an Associated Axis
24
Configuring the General Parameters
28
Create a Motion Group
34
Specifying the Motor Data Source
39
Display Motor Model Information
42
Assign Motor Feedback
43
Configuring the Load Feedback
44
Configuring the Master Feedback
45
Create Reports
45
For information about what attributes are replicated in the drive, see the
Integrated Motion on the EtherNet/IP network Reference Manual, publication
MOTION-RM003.
For complete information on how to configure a drive with integrated safety
connections, see the Kinetix 5500 Servo Drives User Manual,
publication2198-UM001.
Rockwell Automation Publication MOTION-UM003F-EN-P - March 2015
19
Chapter 1
Configure Integrated Motion Control Using Kinetix Drives
Configuring a Kinetix Drive
After you add the drive to your project, use software dialog boxes to configure the
drive. As you configure a drive, notice that the dialog boxes change based on your
configuration choices, for example, feedback configuration.
This table provides you with the basic tasks needed to configure a drive.
Table 3 - Category Dialog Boxes to Configure Kinetix Drive
Add a Kinetix EtherNet/IP
Drive
Category Dialog Box
Perform These Tasks
Page
General
•
•
•
•
•
•
Assign the axis configuration.
Choose the feedback configuration.
Choose the application type, if applicable.
Choose the loop response (low, medium, or high), if applicable.
Create and associate an axis to a new Motion Group.
Associate a drive module to the axis.
28
Motor
• Specify a motor with the Data Source = Nameplate Datasheet.
• Specify a motor with the Data Source = Catalog Number.
• Select a motor with the Data Source = Motor NV.
39
Motor Feedback
• Connect the Motor Feedback cable.
• Select the Motor Feedback Type.
43
Load Feedback
• Select the Load Feedback Type, if applicable.
44
Scaling
• Configure feedback by choosing the load type, entering the scaling units, and
choosing the Travel mode.
• Enter the Input Transmission and Actuator ratio, if applicable.
146
Follow these instructions to add a Kinetix drive your project.
IMPORTANT
20
To configure 2198-Hxxx-ERS (hardwired safety) drives, you must use the Logix
Designer application, version 21.00 or later.
To configure 2198-Hxxx-ERS2 (integrated safety) drives, you must use the Logix
Designer application, version 24.00 or later.
To configure the Kinetix 5700 Multi-axis Servo drive and associated inverter and
diode modules, you must use the Logix Designer application, version 26.00 or
later. The configuration of the Kinetix 5700 drive is considerably different than
the other drives, be sure to reference the Kinetix 5700 Multi-axis Servo Drives
User Manual for all configuration information.
• For complete information about configuring Kinetix 5700 Multi-axis Servo
Drives User Manual, publication 2198-UM002.
• For complete information about configuring Kinetix 350 Single-axis
EtherNet/I/P Servo Drive User Manual, publication 2097-UM002.
• For complete information about configuring Kinetix 5500 Servo Drives, see
the Kinetix 5500 Servo Drive User Manual, publication 2198-UM001.
• For complete information about configuring Kinetix 6500 drive, see the
Kinetix 6500 Modular Multi-axis Servo Drives User Manual, publication
2094-UM002.
Rockwell Automation Publication MOTION-UM003F-EN-P - March 2015
Configure Integrated Motion Control Using Kinetix Drives
TIP
Chapter 1
When you add drive modules for a sercos network, you see the power
structures and catalog numbers. With integrated motion, you assign the
power structure later in the configuration process.
See Assign the appropriate Power Structure. on page 23.
1. Right-click the Ethernet network (node) and choose New Module.
2. Check the Motion checkbox to filter the selections and choose the Kinetix
350, Kinetix 5500, or a Kinetix 6500 drive.
3. Click Create.
Rockwell Automation Publication MOTION-UM003F-EN-P - March 2015
21
Chapter 1
Configure Integrated Motion Control Using Kinetix Drives
4. Type a Name for the module.
5. Type a description, if desired.
6. Assign an EtherNet/IP address.
For Private Network segments, you can establish the Node Address of the
drive by entering a private IP address via a thumbwheel switch on the drive,
using the format 192.168.1.xxx, where the last octet, xxx, is the switch
setting.
See the EtherNet/IP Modules in Logix5000 Control Systems User
Manual, publication ENET-UM001, for information on setting IP
addresses and other Ethernet network considerations.
7. Under Module Definition, click Change.
22
Rockwell Automation Publication MOTION-UM003F-EN-P - March 2015
Configure Integrated Motion Control Using Kinetix Drives
Chapter 1
The Module Definition dialog box appears.
8. Choose an Electronic Keying option.
ATTENTION: The electronic keying feature automatically compares the
expected module, as shown in the configuration tree, to the physical
module before communication begins.
When you are using motion modules, set the electronic keying to either
`Exact Match‘ or `Compatible Keying‘.
Never use `Disable Keying’ with motion modules.
For more information about electronic keying see the ControlLogix
Controller User Manual, publication 1756-UM001.
9. Assign the appropriate Power Structure.
When you select a Kinetix 6500 drive catalog number, you are specifying
only a class of drives. To specify the drive, you must assign a power
structure. Some of the drives do not require a power structure.
TIP
You can locate the power structure reference numbers by doing the following.
• Checking the hardware
• Referring to the device documentation
• Reviewing the purchase order or the bill of materials.
Rockwell Automation Publication MOTION-UM003F-EN-P - March 2015
23
Chapter 1
Configure Integrated Motion Control Using Kinetix Drives
You assign the power structure for the Kinetix 6500 drive only. The
Kinetix 350 and Kinetix 5500 drives auto-populate the only power
structure available.
10. Check the checkbox if you want to verify the power rating on connection.
11. Click OK.
When you change the Module Definition, related parameters also change.
Changing the major revision or power structure changes the identity of the drive.
If your drive is associated to an axis, these changes disassociate the axis.
12. On the General tab, click OK to apply the changes.
TIP
Create an Associated Axis
If you go to the Associated Axis tab before you click OK and exit the General tab,
the option to create or associate an axis is unavailable. Once you exit, you can
return to the Associated Axis tab and create an axis or associate an existing
axis. Alternatively, you can create an axis by right-clicking the Motion Group in
the Controller Organizer tree.
There are two approaches that you can take to create and configure an axis. You
can create an axis first and then add the axis to your motion group or you can
create your motion group and then add an axis.
The procedure that is outlined in this section takes the approach to create your
axis first, configure the axis, and then add it to your motion group.
24
Rockwell Automation Publication MOTION-UM003F-EN-P - March 2015
Configure Integrated Motion Control Using Kinetix Drives
Chapter 1
Create an Axis for a Kinetix Drive
Follow these steps to create an axis.
1. Double-click the drive in the Controller Organizer to open the Module
Properties dialog box.
2. Click the Associated Axes tab.
3. Click New Axis.
TIP
You can create an axis directly off the Associated Axis dialog box in the drive
Module Properties dialog box, or by right-clicking the Motion Group and
choosing New Axis.
Rockwell Automation Publication MOTION-UM003F-EN-P - March 2015
25
Chapter 1
Configure Integrated Motion Control Using Kinetix Drives
The New Tag dialog box appears.
Notice that the fields in the next steps are automatically entered for the
AXIS_CIP_DRIVE data type.
4. Type a Tag name.
5. Type a Description, if desired.
6. Choose the Tag Type.
7. Choose the Data Type AXIS_CIP_DRIVE.
8. Choose the Scope.
9. Choose the External Access.
For more information about External Data Access Control and Constants,
see the Logix5000 Controllers I/O and Tag Data Programming Guide,
publication 1756-PM004.
10. Click Create.
26
Rockwell Automation Publication MOTION-UM003F-EN-P - March 2015
Configure Integrated Motion Control Using Kinetix Drives
Chapter 1
If you have checked Open AXIS_CIP_DRIVE Configuration, then the
General dialog box of the Axis Properties appears. If not, double-click the
axis in the Controller Organizer.
Establish Feedback Port Assignments
The Kinetix 6500 drive has two feedback ports. Port 1 is reserved for Motor
Feedback on the primary axis (Axis_1). Port 2 can be used either as Load
Feedback for the primary axis or as Master Feedback associated with a secondary
feedback only axis (Axis_2).
See Configuration Examples for a Kinetix Drive on page 99.
Example Primary Axis Configuration
Follow these steps to associate axes to the Kinetix module.
1. Double-click the Kinetix 6500 drive in the Controller Organizer to go to
Module Properties.
2. Click the Associated Axes tab.
Notice that the motor feedback is already configured by default.
The AUX Feedback Port (Port 2) of the drive can be optionally used for
load feedback of the primary axis (Axis 1) to support Load or Dual
Feedback Configuration.
Rockwell Automation Publication MOTION-UM003F-EN-P - March 2015
27
Chapter 1
Configure Integrated Motion Control Using Kinetix Drives
3. From the Load Feedback Device pull-down menu, choose AUX Feedback
Port.
Configuring the General
Parameters
The parameters that you configure on the General dialog box result in the
presentation of attributes and parameters that are available for the combination
of your selections.
IMPORTANT
All AXIS_CIP_DRIVE Axis Properties dialog boxes are dynamic. Optional
attributes and dialog boxes that are related to each integrated motion axis
you create come and go based on what combination of axis characteristics
you define.
Axis attributes are either required, optional, or conditional based on the selected
control mode. The Axis Attribute you use determines internally the usage
definition.
See the Integrated Motion Reference Manual, publication MOTION-RM003,
for complete information on Axis Attributes and how to apply Control Modes.
On the General dialog box, you can modify these parameters:
• Associate a drive module to the axis.
• Select the axis configuration.
• Choose the feedback configuration.
• Choose the application type, if applicable.
• Choose the loop response, if applicable.
• Create and associate a new motion group.
Optional attributes are dependent on the associated drive characteristics.
IMPORTANT
28
Be sure to associate the drive as the first step in configuring the axis
because the drive determines what optional attributes are supported.
Rockwell Automation Publication MOTION-UM003F-EN-P - March 2015
Configure Integrated Motion Control Using Kinetix Drives
Chapter 1
Associate Axes and Drives
The two ways to establish the drive/axis associations are:
• The first way is to assign the drive to the axis on the Associated Axis tab in
the Module Properties dialog box.
• The second way is to assign the axis to the drive on the General dialog box
for the axis.
Follow these steps on the General dialog box and the Module Properties dialog
box to associate the axis to a drive module and to map the drive to the axis.
1. Go to the General dialog box for the axis.
2. Choose the drive module that you want the axis to be associated with.
3. Leave the Axis Number as 1, the default.
When you select a Kinetix 6500 drive, the drive catalog and the power
structure you assigned appears. If you have not assigned a power structure,
this message appears The Kinetix 350 and the Kinetix 5500 drives do not
require a power structure, so this message does not appear.
If you are using a Kinetix 6500 drive, click the hyperlink to go to the Module
Properties dialog box for the drive to assign a Power Structure.
This message means that without fully defining the drive with a power
structure, the factory defaults cannot be computed.
See Assign the appropriate Power Structure. on page 23.
Rockwell Automation Publication MOTION-UM003F-EN-P - March 2015
29
Chapter 1
Configure Integrated Motion Control Using Kinetix Drives
Map a Kinetix Drive to the Axis
Follow this instruction to map a Kinetix drive.
1. Go the Module Properties dialog box of the drive.
• Right-click the module in the I/O tree and choose Properties.
• Double-click the module in the I/O tree.
• Right-click the axis in the Controller Organizer and choose Go to
Module.
2. Go to the Associated Axis tab.
Axis 1 on the Associated Axes tab in Module Properties corresponds to
Axis 1 listed on the General dialog box in the Axis Properties: see step 2 on
page 29.
The axis tag field appears as Axis 1, for example, Axis_I_Position_Motor.
The Motor/Master Feedback Device (Motor Feedback Port) is populated
based on the Feedback Configuration type.
3. Choose the Load Feedback device.
This selection maps the second port of the Kinetix 6500 drive as the input
port for the Dual (or Load) feedback device.
For the Axis Configuration type, Position Loop and Feedback
Configuration type, Dual (or Load) Feedback, see Example 2: Position
Loop with Dual Feedback on page 103.
For more detailed examples, see Configuration Examples for a Kinetix
Drive on page 99.
4. Click OK.
30
Rockwell Automation Publication MOTION-UM003F-EN-P - March 2015
Configure Integrated Motion Control Using Kinetix Drives
Chapter 1
The changes are applied the Module Properties dialog box closes. If you
have not enabled Time Synchronization, this message appears.
You must go to the 1756-ENxT Communication Module Properties and enable
time synchronization.
See Add a 1756-ENxTx Communication Module on page 95 for more
information.
Configure the Associated Axis and Control Mode
Now that the axis is associated to the drive module, meaningful values are
available for other axis properties.
For more information on Control Modes, see the Integrated Motion Reference
Manual, publication MOTION-RM003.
1. In the Controller Organizer, double-click the Axis that you want to
configure.
The Axis Properties General dialog box appears.
2. Choose an Axis Configuration type. For this example, choose Position
Loop.
TIP
The associated drive determines what Axis and Feedback
Configuration choices are presented.
Rockwell Automation Publication MOTION-UM003F-EN-P - March 2015
31
Chapter 1
Configure Integrated Motion Control Using Kinetix Drives
This table compares the axis configuration types for the drives.
Table 4 - Compare the Axis Configuration Types for the Drives
Axis Type
Loop Type Kinetix 350
Kinetix 5500
Kinetix 5700
Kinetix 6500
PowerFlex 755
Position Loop
P
Yes
Yes
Yes
Yes
Yes
Velocity Loop
V
Yes
Yes
Yes
Yes
Yes
Torque Loop
T
Yes
Yes
Yes
Yes
Yes
Feedback Only
N
No
No
Yes
Yes
No
Frequency Control
F
No
Yes
Yes
No
Yes
3. In the Feedback Configuration drop down, choose Motor Feedback.
TIP
The Kinetix 350, Kinetix 5500, and Kinetix 5700 drives support only
Motor Feedback.
This table compares the feedback configuration types for the Kinetix
drives.
Table 5 - Compare the Feedback Configuration Types for the Drives
Feedback Type Loop Type
Kinetix 350 Kinetix 5500
Kinetix 5700
Kinetix 6500
PowerFlex 755
Motor Feedback
P, V, T
Yes
Yes
Yes
Yes
Yes
Load Feedback
P, V, T
No
Yes
No
Yes
Yes
Dual Feedback
P
Yes
Yes
No
Yes
Yes
Dual Integrator
P
No
No
No
No
No
Master Feedback
N
No
No
No
Yes
No
No Feedback
V, F
No
No
No
No
Yes
Table 6 - Kinetix 5700 Feedback Summary
32
Kinetix 5700 Inverter
Inverter Cat. No.
Motor Feedback
Auxiliary Feedback
Single-axis Inverters
2198-Sxxx-ERS3
1 (axis 1)
1 (axis 2)
Dual-axis Inverters
2198-Dxxx-ERS3
2 (axis 1 and 3)
2 (axis 2 and 4)
Rockwell Automation Publication MOTION-UM003F-EN-P - March 2015
Configure Integrated Motion Control Using Kinetix Drives
Chapter 1
4. Choose an Application Type, if applicable.
Application Type defines the servo loop configuration
automatically. These combinations determine how the
calculations are made that can eliminate the need for you to
perform an Autotune or a Manual Tune.
TIP
The Application Type determines the type of motion control application.
This attribute is used to set the Gain Tuning Configuration Bits. This
table illustrates the gains established based on application type.
Table 7 - Customize Gains to Tune
Application Type
Kpi
Kvi
ihold
Kvff
Kaff
torqLPF
Custom(1)
-
-
-
-
-
Basic (V20 and later)
No
No
No
Yes
No
Yes
Basic (V19 and earlier)
No
No
No
No
No
-
Tracking
No
Yes
No
Yes
Yes
Yes
Point-to-Point
Yes
No
Yes
No
No
Yes
Constant Speed
No
Yes
No
Yes
No
Yes
(1) If you set the type to Custom, you can control the individual gain calculations by changing the bit settings in the
Gain Tuning Configuration Bits Attribute.
5. Choose a Loop Response, if applicable.
TIP
Loop Response settings also impact the calculations that are made that can
eliminate the need for you to perform an Autotune or a Manual Tune.
Rockwell Automation Publication MOTION-UM003F-EN-P - March 2015
33
Chapter 1
Configure Integrated Motion Control Using Kinetix Drives
Create a Motion Group
All axes must be added to the Motion Group in your project. If you don’t group
the axes, they remain ungrouped and unavailable for use. You can only have one
Motion Group per Logix controller.
You can have eight Position Loop axes per 1756-EN2T module. Each drive
requires one TCP and one CIP connection. If you have other devices that
consume TCP connections on the module, it reduces the number of drives you
can support.
Table 8 - Position Loop Configured Axes
Controller
Communication Modules
Supported Axes(1)
Position Loop(2)
1756-L6x and L7x
1756-EN2T and 1756-EN2TF
1756-L6x and L7x
Other Loop Types
Integrated Motion Drives(3)
8
Up to 100
1756-EN3TR
100
Up to 100
1756-EN2TR
8
Up to 100
1769-L18ERM
Embedded Ethernet
2
Up to 100
8 max nodes
1769-L27ERM
Embedded Ethernet
4
Up to 100
16 max nodes
1769-L30ERM
Embedded Ethernet
4
Up to 100
16 max nodes
1769-L33ERM
Embedded Ethernet
8
Up to 100
32 max nodes
1769-L36ERM
Embedded Ethernet
16
Up to 100
48 max nodes
(1) Multiple controllers can control drives on a common 1756-ENxTx module, so based on the TCP connection limit, up to 128 can be supported.
(2) Only the drives/axes configured for Position Loop are limited. Frequency Control, Velocity Loop, and Torque Loop configured drives/axes are not limited.
(3) If more than the maximum I/O modules are configured in the I/O tree under Embedded Ethernet, then you get a Project Verify Error:
Error: Maximum number of nodes on the local Ethernet port has been exceeded.
Follow these instructions to create a motion group.
1. Click New Group.
2. Type a Tag name.
3. Type a description, if desired.
4. Choose the Tag Type.
34
Rockwell Automation Publication MOTION-UM003F-EN-P - March 2015
Configure Integrated Motion Control Using Kinetix Drives
Chapter 1
5. Choose a Data Type of MOTION-GROUP.
6. Choose the Scope.
7. Choose the External Access.
For more information about External Data Access Control and Constants,
see the Logix5000 Controllers I/O and Tag Data Programming Guide,
publication 1756-PM004.
8. Check Open MOTION_GROUP configuration and click Create.
The Motion Group Properties dialog box appears.
Rockwell Automation Publication MOTION-UM003F-EN-P - March 2015
35
Chapter 1
Configure Integrated Motion Control Using Kinetix Drives
Associate the Axis to the Motion Group
There are two ways to assign axes to a Motion Group:
• Create a motion group through the Axis Assignment tab on the Motion
Group Properties dialog box.
• Drag the axis into the Motion Group in the Controller Organizer tree.
Follow these instructions to associate an axis to the Motion Group.
1. Select an axis and click Add.
2. Verify that the axis has been assigned to the group.
3. Click Finish.
The axis appears under the Motion Group in the Controller Organizer
tree.
36
Rockwell Automation Publication MOTION-UM003F-EN-P - March 2015
Configure Integrated Motion Control Using Kinetix Drives
Chapter 1
Set the Base Update Period
The Base Update Period is basically the RPI rate for Ethernet communication
between the controller and the motion module, a Unicast connection.
There are two alternate update periods that you can configure when using the
Axis Scheduling function. See Configure Axis Scheduling on page 77 for details.
The Base Update Period determines how often the Motion Task runs. When the
Motion Task runs, it interrupts most other tasks regardless of their priority. The
Motion Task is the part of the controller that takes care of position and velocity
information for the axes.
Follow these steps to set the Base Update Period.
1. Click the Attribute tab in the Motion Group Properties dialog box.
2. Set the Base Update Period to 2.0…32.0 ms.
TIP
Check the Last Scan time values. Typically, the value is less than 50% of
the Base Update Period.
Rockwell Automation Publication MOTION-UM003F-EN-P - March 2015
37
Chapter 1
Configure Integrated Motion Control Using Kinetix Drives
For the Kinetix 6500 drive, the minimum Base Update Rate is 1 ms.
Figure 1 - Base Update Period Example
Motion Task
Scans of Your Code, System
Overhead, and so on
0 ms
10 ms
20 ms
30 ms
40 ms
In this example, the Base Update Period = 10 ms. Every 10 ms the controller stops scanning your code and whatever else it is doing and
runs the motion planner.
The Base Update Period is a trade-off between updating positions of your axes
and scanning your code. In general, you do not want the Motion Task to take
more than 50% of the overall Logix controller time on average. The more axes
that you add to the Motion Group, the more time it takes to run the Motion
Task.
For a 1756-L6x controller, the incremental impact on the Motion Task is roughly
2…3 drives/ms. For the 1756-L7x controller, the incremental impact on the
Motion Task is roughly at 6…8 drives/ms. Actual impact can vary depending on
axis configuration.
For detailed information on the Axis Scheduling function, Axis Assignment tab,
and Alternate Update Period Scheduling, see Configure Axis Scheduling on
page 77.
Integrated Architecture Builder
To help you determine motion system performance, use the motion performance
calculator in the Integrated Architecture Builder (IAB).
The IAB is a graphical software tool for configuring Logix-based automation
systems. It helps you select hardware and generate bills of material for
applications that include controllers, I/O, networks, PowerFlex drives, OnMachine cabling and wiring, motion control, and other devices.
You can find the software at
http://www.rockwellautomation.com/en/e-tools/configuration.html
38
Rockwell Automation Publication MOTION-UM003F-EN-P - March 2015
Configure Integrated Motion Control Using Kinetix Drives
Chapter 1
The Motor Data Source is where you tell the axis where the motor configuration
values are originating. You can select a motor by catalog number from the Motion
Database. You can enter motor data from a nameplate or datasheet, or use the
motor data that is contained in the drive or motor nonvolatile memory.
Specifying the Motor Data
Source
On the Motor dialog box you specify what motor you want to use and where the
data is coming from:
• Specify a motor with the Data Source = Nameplate Datasheet.
• Specify a motor with the Data Source = Catalog Number.
• Select a motor with the Data Source = Motor NV.
Choose the Catalog Number
Follow these steps to choose a motor from the Motion Database.
1. If the Axis Properties dialog box is not open, double-click the axis.
2. Go to the Motor dialog box of Axis Properties.
The asterisk next
to a category
means that you
have not applied
changes.
3. From the Data Source pull-down menu, choose Catalog Number.
4. Click Change Catalog.
Rockwell Automation Publication MOTION-UM003F-EN-P - March 2015
39
Chapter 1
Configure Integrated Motion Control Using Kinetix Drives
5. Select a motor.
Use these filters to reduce
the size of the list.
The Motor dialog box is now populated with all information related to the
motor you selected from the Motion Database.
6. Click Apply.
TIP
40
When you use a motor catalog number as the data source, default
values, for example, gains and dynamics, are automatically set based
on the Application Type and Loop Response settings from the General
dialog box.
The defaults minimize the need for Autotune, Manual Tune, and the
manual setting of these parameters.
Rockwell Automation Publication MOTION-UM003F-EN-P - March 2015
Configure Integrated Motion Control Using Kinetix Drives
Chapter 1
Choose Nameplate
The Nameplate option requires you to enter the motor specification information
from the motor nameplate and the motor datasheet.
1. On the Motor dialog box of Axis Properties, from the Data Source pulldown menu, choose Nameplate Datasheet.
2. Choose a motor type.
This table illustrates the motor types and drives that are compatible.
Table 9 - Compatible Motor Types
Motor Type
Kinetix 350
Kinetix 5500
Kinetix 5700
Kinetix 6500
PowerFlex 755
Rotary Permanent Magnet
Yes
Yes
Yes
Yes
Yes
Linear Permanent Magnet
No
No
Yes
Yes
No
Rotary Induction
No
Yes
Yes
No
Yes
Notice that the motor information fields are initialized to defaults.
3. Enter the parameter information from the motor Nameplate Datasheet
and click Apply.
Rockwell Automation Publication MOTION-UM003F-EN-P - March 2015
41
Chapter 1
Configure Integrated Motion Control Using Kinetix Drives
Choose Motor NV
When you choose Motor NV as the data source, the motor attributes are derived
from nonvolatile memory of a motor-mounted smart feedback device that is
equipped with a serial interface. Only a minimal set of motor and motor
feedback (Feedback 1) attributes are required to configure the drive.
1. From the Motor dialog box of Axis Properties, choose Motor NV.
2. Choose the Motor Units that are associated with the motor, either Rev for
rotary motor or Meters for linear motor.
No other motor information is needed.
3. Click Apply.
Display Motor Model
Information
The Motor Model dialog box displays more information that is based on the
motor type you select.
The asterisk next
to a category
means that you
have not applied
changes.
• If the motor data source is Database, this information is populated
automatically.
• If the motor data source is Nameplate Datasheet, this information must be
entered manually, or by running the optional Motor Analyzer.
• If the motor data source is Motor NV, this dialog box is blank.
42
Rockwell Automation Publication MOTION-UM003F-EN-P - March 2015
Configure Integrated Motion Control Using Kinetix Drives
Assign Motor Feedback
Chapter 1
What appears on the Motor Feedback dialog box is dependent on what you select
on the General dialog box for Feedback Configuration.
The Motor Feedback dialog box represents the information for the feedback
device that is directly coupled to the motor. This dialog box is available if the
feedback configuration specified on the General dialog box is anything other
than Master Feedback.
If the motor that you select has Catalog Number as the data source, all
information on this dialog box with be entered automatically. Otherwise you
have to enter the information yourself.
Attributes that are associated with the Motor Feedback dialog box are designated
as Feedback 1.
If a permanent magnet motor is selected from the Motion Database, the
Commutation Alignment is set to Controller Offset. However, if a permanent
magnet motor is specified from Nameplate Datasheet, you must specify the
Commutation Alignment method. The default is set to Not Aligned.
Table 10 - Commutation Alignment Settings
Type
Description
Not Aligned
Not Aligned indicates that the motor is not aligned, and that the
Commutation Offset value is not valid. If the Commutation Offset is not
valid, the drive cannot use it to determine the commutation angle. Any
attempt to enable the drive with an invalid commutation angle results in a
Start Inhibit condition.
Controller Offset
Controller Offset applies the Commutation Offset value from the controller
to determine the electrical angle of the motor.
Motor Offset
The drive derives the commutation that is offset directly from the motor.
Self-Sense
The drive automatically measures the commutation that is offset when it
transitions to the Starting state for the first time after a power cycle. This
generally applies to a PM motor equipped with a simple incremental
feedback device.
In most cases, the Commutation Alignment is set to Controller Offset and the
Commutation test is run during commissioning to determine the Commutation
Offset and Polarity.
See the Integrated Motion Reference Manual, publication MOTION-RM003,
for complete descriptions of the axis attributes.
Rockwell Automation Publication MOTION-UM003F-EN-P - March 2015
43
Chapter 1
Configure Integrated Motion Control Using Kinetix Drives
Configuring the Load
Feedback
The Load Feedback dialog box contains the information from the feedback
device that is directly coupled to the load-side of a mechanical transmission or
actuator.
For your convenience, you can use this link
to the Module Properties dialog box for the
associated drive.
The Load Feedback dialog box is available if the Feedback Configuration
specified on the General dialog box is Load or Dual.
Attributes that are associated with the Load Feedback dialog box are designated
Feedback 2.
Unlike the Motor Feedback dialog box, you must explicitly enter load feedback
device information on the Load Feedback dialog box, including the Feedback
Type. This is because the Load Feedback device is not built into the motor.
Default values are displayed based on the Feedback Type selected.
44
Rockwell Automation Publication MOTION-UM003F-EN-P - March 2015
Configure Integrated Motion Control Using Kinetix Drives
Configuring the Master
Feedback
Chapter 1
The Master Feedback dialog box is available if the Feedback Configuration
specified on the General dialog box is Master Feedback. The attributes that are
associated with the Master Feedback dialog box are associated with Feedback 1.
Again, like the Load Feedback dialog box, you must enter all the information.
To verify that motor and feedback device are functioning properly, download to
the controller, and continue on to Hookup Tests Dialog Box on page 150.
Create Reports
The Logix Designer application lets you print various reports.
1. Right-click Controller Tags, MainTask, MainProgram, Module Properties,
Axis, Add-On Instructions, or Data Types and choose Print.
2. On the Print dialog box, select Adobe PDF and click Print Options.
Rockwell Automation Publication MOTION-UM003F-EN-P - March 2015
45
Chapter 1
Configure Integrated Motion Control Using Kinetix Drives
3. Check the Include Special Properties and Advanced list to see all of the
information.
Figure 2 - Axis Tag Report Example
You can also right-click a controller, communication module, and any motion
module to print the Module Properties you have configured.
46
Rockwell Automation Publication MOTION-UM003F-EN-P - March 2015
Chapter
2
Configure Integrated Motion Using a PowerFlex
755 Drive
This chapter provides procedures on how to configure Integrated Motion on the
EtherNet/IP network control by using a PowerFlex 755 Embedded EtherNet/IP
drive.
Topic
Page
About the PowerFlex 755 Drives
48
Add a PowerFlex 755 Drive
49
Select a Peripheral Feedback Device and Slot Assignment
51
Assign a Power Structure
52
Create an Axis for a PowerFlex 755 Drive
54
Configure the Associated Axis and Control Mode
59
Create a Motion Group
62
Set the Base Update Period
65
Choose Catalog Number as the Motor Data Source
67
Choose Nameplate as the Motor Data Source
69
Choose Drive NV as the Data Source
70
Feedback Configuration Options for the PowerFlex 755 Drive
73
IMPORTANT
When you perform an import/export on a project in the RSLogix 5000
software, version 19 or earlier, the axis absolute position is not recovered on
download to the controller.
See Absolute Position Recovery (APR) on page 182.
Rockwell Automation Publication MOTION-UM003F-EN-P - March 2015
47
Chapter 2
Configure Integrated Motion Using a PowerFlex 755 Drive
About the PowerFlex 755
Drives
Integrated Motion on the EtherNet/IP network supports closed loop servo
drives and frequency drives. The PowerFlex 755 drive contains an EtherNet/IP
adapter that is embedded on the main control board. The PowerFlex 755 drives
supports Position Loop, Velocity Loop, Torque Loop, and Frequency Control
axis configuration types.
The PowerFlex 755 drive has five option ports capable of accepting a
combination of options for control, communication, I/O, feedback, safety, and
auxiliary control power.
This embedded adapter lets you easily configure, control, and collect drive data
over Ethernet networks. The drive can operate also in the integrated motion
mode or the existing I/O mode.
When a PowerFlex 755 is used in Integrated Motion on EtherNet/IP mode, the
Logix controller and Logix Designer are the exclusive owners of the drive (same
as Kinetix). An HIM or other drive software tools, such as DriveExplorer and
DriveTools SP, cannot be used to control the drive or change configuration
settings. These tools can only be used for monitoring.
See these publications for more information:
• PowerFlex 750-Series AC Drives Programming Manual,
publication 750-PM001
• PowerFlex 755 Drive Embedded EtherNet/IP Adapter User Manual,
publication 750COM-UM001
• PowerFlex 755 Drive Embedded EtherNet/IP Adapter Installation
Instructions, publication 750COM-IN001
• Integrated Motion on the EtherNet/IP network Reference Manual,
publication MOTION-RM003, for information about what attributes are
replicated in the drive
48
Rockwell Automation Publication MOTION-UM003F-EN-P - March 2015
Configure Integrated Motion Using a PowerFlex 755 Drive
Add a PowerFlex 755 Drive
Chapter 2
There are six PowerFlex 755 Ethernet drives that you can configure for Integrated
Motion on the EtherNet/IP network.
TIP
When you add drive modules for a sercos network, you see the power
structures and catalog numbers. With Integrated Motion on the EtherNet/
IP network, you assign the power structure later in the configuration
process.
See Assign a Power Structure on page 52.
Follow these instructions to add the PowerFlex 755 drive your project.
1. Right-click the Ethernet network (node) and choose New Module.
2. Clear the small ‘select all’ checkboxes, Module Type Category, and Vendor
Filters.
3. In the Module Type Vendors Filters window, check Allen-Bradley.
4. In the Module Type Category Filters window, check and Drive.
5. Choose the drive and click create.
Rockwell Automation Publication MOTION-UM003F-EN-P - March 2015
49
Chapter 2
Configure Integrated Motion Using a PowerFlex 755 Drive
6. Type a Name for the module
7. Type a description, if desired.
8. Assign an EtherNet/IP address.
See these manuals for information about configuring IP addresses:
• PowerFlex 755 Embedded EtherNet/IP Adapter User Manual,
publication 750COM-UM001
• Ethernet User Manual, publication ENET-UM001
9. Under Module Definition, click Change.
The Module Definition dialog box appears.
ATTENTION: The electronic keying feature automatically compares the
expected module, as shown in the configuration tree, to the physical
module before communication begins.
50
Rockwell Automation Publication MOTION-UM003F-EN-P - March 2015
Configure Integrated Motion Using a PowerFlex 755 Drive
Chapter 2
10. From the Electronic Keying pull-down menu, choose an option.
WARNING: When using motion modules, the electronic keying must be
either `Exact Match‘ or `Compatible Keying‘.
Never use `Disable Keying` with motion modules.
Select a Peripheral Feedback Device and Slot Assignment
Feedback devices on the PowerFlex 755 drives are called peripheral devices. You
must assign the port/channel for each device you are using.
Follow these steps to select a feedback device.
1. Right-click on the device and choose New Peripheral Device.
The peripheral device refers to the type of feedback device you are using
with the PowerFlex 755 drive.
2. From the Port pull-down menu, choose the appropriate port/slot.
3. From the Peripheral Device pull-down menu, choose the appropriate
catalog number.
4. Click OK.
Rockwell Automation Publication MOTION-UM003F-EN-P - March 2015
51
Chapter 2
Configure Integrated Motion Using a PowerFlex 755 Drive
The device is added. Notice that the feedback device appears.
Assign a Power Structure
When you select a drive catalog number, you are specifying only a class of drives.
You must assign the appropriate power structure you have installed.
You can locate the power structure reference numbers in these ways:
• On the actual product, usually on the right side of the drive
• In the device documentation
• On a purchase order
Follow these instructions to complete the drive configuration.
1. From the Power Structure pull-down menu, choose the appropriate power
structure.
2. Click OK.
If you go to the Associated Axis tab before you click OK and close the
Module Properties dialog box, the option to create an axis is unavailable.
Once you exit the dialog box, you can return to the Associated Axes tab
and create an axis. You can create an axis also by right-clicking the Motion
Group in the controller organizer.
52
Rockwell Automation Publication MOTION-UM003F-EN-P - March 2015
Configure Integrated Motion Using a PowerFlex 755 Drive
Chapter 2
See Create an Axis for a PowerFlex 755 Drive on page 54.
IMPORTANT
When you change the major revision on the PowerFlex 755 drive,
change the power structure, or change the peripheral feedback
device, the axis is no longer associated with the modules.
When you change parameters, other related parameters change as well.
This message always appears after you have changed a configuration. This
message is a reminder that when you change the power structure the
identity of the drive changes. If your drive is associated to an axis and you
change the power structure, the axis is disassociated.
Even though a feedback card has been selected, the drive is not configured.
You must associate the axis first, and then you have the options to
configure a feedback module.
3. On the General Tab, click OK to apply the changes.
Rockwell Automation Publication MOTION-UM003F-EN-P - March 2015
53
Chapter 2
Configure Integrated Motion Using a PowerFlex 755 Drive
Create an Axis for a
PowerFlex 755 Drive
Once you have added a drive, selected the power structure, and assigned a
feedback device, you can create and configure an axis. You must apply the changes
and exit the Associated Axis dialog box before the option to create an axis
becomes available.
There are two approaches that you can take to create and configure an axis. You
can create an axis first and then add the axis to your motion group, or you can
create your motion group and then add an axis. The procedure that is outlined in
this section takes the approach to create your axis first, configure the axis, and
then add it to your motion group.
Follow these steps to create an axis.
1. Double-click the drive in the Controller Organizer.
2. Click the Associated Axes tab.
3. Click New Axis.
TIP
You can also create an axis directly off the Motion Group in the controller
organizer.
The New Tag dialog box appears.
4. Type the name.
54
Rockwell Automation Publication MOTION-UM003F-EN-P - March 2015
Configure Integrated Motion Using a PowerFlex 755 Drive
Chapter 2
5. Type a Description, if desired.
The fields in the next steps are automatically entered for the
AXIS_CIP_DRIVE data type.
6. Change the Tag Type, Data Type, Scope, and External Access, if needed.
7. Click Create.
For more information about External Data Access Control and Constants,
see the Logix5000 Controllers I/O and Tag Data Programming Guide,
publication 1756-PM004.
The axis parameters that you configure on the General dialog box result in the
presentation of attributes and parameters that are available for the combination
of your selections.
IMPORTANT
The AXIS_CIP_DRIVE axis properties dialog boxes appear or disappear
depending on the Axis Configuration, except for Tag, Status, Faults,
Dynamics, and Homing, they are always present.
Optional attributes that are related to each integrated motion axis you
create come and go based on what combination of axis characteristics you
define.
Axis Attributes control modes are either Required, Optional, or Conditional.
Elements of the General dialog box depend on the control mode you select. The
Axis Attribute determines the usage definition internally.
See the Integrated Motion on the EtherNet/IP Network Reference Manual,
publication MOTION-RM003, for complete information on the Axis
Attributes and Control Modes.
Rockwell Automation Publication MOTION-UM003F-EN-P - March 2015
55
Chapter 2
Configure Integrated Motion Using a PowerFlex 755 Drive
Map the PowerFlex 755 Drive Port Assignment to the Axis
Follow these instructions to map the drive port to the axis.
1. Go the Module Properties of the drive.
2. Click the Associated Axis tab.
Axis 1 on the Associated Axes tab in Module Properties corresponds to the
Axis 1 listed on the General tab on the Axis Properties, see step 2 on page
54.
For more detailed examples, see Axis Configuration Examples for the
PowerFlex 755 Drive on page 121.
3. Click OK.
Establish Feedback Port Assignments for the PowerFlex 755 Drive
There are two ways to establish the drive/axis associations.
• The first way is to assign the drive to the axis on the Associated Axis tab in
the Module Properties dialog box.
• The second way is to assign the axis to the drive on the General Category
dialog box.
Unlike a Kinetix 6500 drive where the motor feedback association is automatic,
you must manually establish the motor feedback (Port/Channel) assignment for
the PowerFlex 755 drive.
Follow these instructions to associate an axis to the drive by using the Module
Properties dialog box for the drive.
1. Right-click the PowerFlex 755 and choose Properties.
56
Rockwell Automation Publication MOTION-UM003F-EN-P - March 2015
Configure Integrated Motion Using a PowerFlex 755 Drive
Chapter 2
2. Click the Associated Axes tab.
3. From the Axis 1 pull-down menu, choose the axis to associate the drive to.
When you select the axis, the power structure of the drive is verified. If you
have not assigned a power structure, this message appears on the General
dialog box.
Click the hyperlink to go to the Module Properties dialog boxes for
the drive so you can assign a Power Structure.
This message means that without fully defining the drive with a power
structure the factory defaults cannot be computed.
See Assign a Power Structure on page 52.
4. From the Motor/Master Feedback Device pull-down menu, choose the
port and channel combination that is applicable to your hardware
configuration.
In this case, Port 4 Channel A is associated with the Motor Feedback
device.
Similarly, if you have not assigned the feedback device on the drive’s
Module Properties dialog box, you will get this message on the Motor
Feedback dialog box telling you to define the feedback device.
Click the link to define the feedback device.
See Configure the Associated Axis and Control Mode on page 59.
Rockwell Automation Publication MOTION-UM003F-EN-P - March 2015
57
Chapter 2
Configure Integrated Motion Using a PowerFlex 755 Drive
The ports and channels that you can select are related to what hardware you have
installed. The choices depend on the installation and automatically appear.
• If you are configuring a Position Loop, you can choose between Motor
Feedback, Dual Feedback, and Dual Integrated Feedback.
• If you are configuring a Torque or Velocity Loop, you will have only the
option for Motor Feedback.
• If you are configuring for Frequency Control, no feedback is available.
For an Axis Configuration of Position Loop and a Feedback
Configuration of Motor Feedback, using a UFB peripheral device, see
Example 1: Position Loop with Motor Feedback Using a UFB Feedback
Device on page 122.
Axis 1 on the Associated Axes tab in Module Properties corresponds to
Axis 1 listed on the General tab in the Axis Properties, see step 2 on page
54.
The axis tag field appears as Axis 1, for example, Axis_I_Position_Motor.
The Motor/Master Feedback Device (Motor Feedback Port) is populated
based on the Feedback Configuration type.
For more information about control modes and control methods, see the
Integrated Motion on the EtherNet/IP Network Reference Manual,
publication MOTION-RM003.
5. If you chose Dual Feedback as the Feedback Configuration type for the
axis on the General tab, choose the Load Feedback device.
For an Axis Configuration of Position Loop and a Feedback
Configuration of Dual (or Load) Feedback, see Example 2: Position Loop
with Dual Motor Feedback Via a UFB Feedback Device on 125.
See Feedback Configuration Options for the PowerFlex 755 Drive on page
73.
For more examples, see Axis Configuration Examples for the
PowerFlex 755 Drive on page 121.
6. Click OK to apply the changes and close the dialog box.
58
Rockwell Automation Publication MOTION-UM003F-EN-P - March 2015
Configure Integrated Motion Using a PowerFlex 755 Drive
Chapter 2
If you have not enabled Time Synchronization, this message appears.
You must go to the 1756-ENxT communication module properties and
enable time synchronization.
See Add a 1756-ENxTx Communication Module on page 95.
Configure the Associated Axis and Control Mode
Now that the axis is associated to the drive, meaningful values are available for
other axis configuration properties. The combination of the attributes that are
selected when configuring an axis and feedback determines the control mode.
See the Integrated Motion on the EtherNet/IP Network Reference Manual,
publication MOTION-RM003, for complete information on axis attributes and
control modes.
Follow these steps to configure an axis.
1. In the Controller Organizer, double-click the axis that you want to
configure.
The Axis Properties General dialog box appears.
Rockwell Automation Publication MOTION-UM003F-EN-P - March 2015
59
Chapter 2
Configure Integrated Motion Using a PowerFlex 755 Drive
2. Choose an Axis Configuration.
TIP
The associated drive determines what axis and feedback configuration
choices are presented.
3. Choose a Feedback Configuration type.
This table compares the feedback type and loop type.
Feedback Type
Loop Type
PowerFlex 755
PowerFlex 527
Motor Feedback
P, V, T
Yes
No
Motor Feedback
P, V, F
No
Yes
Load Feedback
P, V, T
No
No
Dual Feedback
P
Yes
No
Dual Integrator
P
Yes
No
Master Feedback
N
No
No
No Feedback
V, F
Yes
No
For more information, see Feedback Configuration Options for the
PowerFlex 755 Drive on page 73.
60
Rockwell Automation Publication MOTION-UM003F-EN-P - March 2015
Configure Integrated Motion Using a PowerFlex 755 Drive
Chapter 2
4. Choose an Application Type, if applicable.
Application Type defines the servo loop configuration automatically. These
combinations determine how the calculations are made, which can reduce
the need to perform an Autotune or a Manual Tune.
TIP
The Application Type determines the type of motion control application.
This attribute is used to set the Gain Tuning Configuration Bits.
This table provides the gains established base on the application type.
Table 11 - Customize Gains to Tune
Application Type
Kpi
Kvi
ihold
Kvff
Kaff
torqLPF
Custom(1)
-
-
-
-
-
Basic (V20 and later)
No
No
No
Yes
No
Yes
Basic (V19 and earlier)
No
No
No
No
No
-
Tracking
No
Yes
No
Yes
Yes
Yes
Point-to-Point
Yes
No
Yes
No
No
Yes
Constant Speed
No
Yes
No
Yes
No
Yes
(1) If you set the type to Custom, you can control the individual gain calculations by changing the bit settings in the
Gain Tuning Configuration Bits Attribute.
TIP
For information about other attribute calculations, see the specific attribute
description in the Integrated Motion on the EtherNet/IP Reference Manual,
publication MOTION-RM003.
5. Choose a Loop Response, if applicable.
6. Click Apply.
Rockwell Automation Publication MOTION-UM003F-EN-P - March 2015
61
Chapter 2
Configure Integrated Motion Using a PowerFlex 755 Drive
Create a Motion Group
All axes must be added to the Motion Group in your project. If you don’t group
the axes, they remain ungrouped and unavailable for use.
You must create a Motion Group for an axis to be configured properly.
Table 12 - Position Loop Configured Axes
Controller
Communication Modules
Supported Axes(1)
Position Loop
1756-L6x(3) and L7x
1756-EN2T and 1756-EN2TF
1756-L6x(3) and L7x
Other Loop Types
CIP_Drives(2)
8
Up to 100
1756-EN3TR
100
Up to 100
1756-EN2TR
8
Up to 100
1769-L18ERM
Embedded Ethernet
2
Up to 100
8 max in I/O tree
1769-L27ERM
Embedded Ethernet
4
Up to 100
16 max in I/O tree
1769-L30ERM
Embedded Ethernet
4
Up to 100
16 max in I/O tree
1769-L33ERM
Embedded Ethernet
8
Up to 100
32 max in I/O tree
1769-L36ERM
Embedded Ethernet
16
Up to 100
64 max in I/O tree
(1) Multiple controllers can control drives on a common 1756-ENxTx module, so based on the TCP connection limit, up to 128 can be supported.
(2) If more than the maximum I/O modules are configured in the I/O tree under Embedded Ethernet, then you will get a Project Verify Error:
Error: Maximum number of nodes on the local Ethernet port has been exceeded.
(3) The 1756-L6x controllers are not supported in the Logix Designer application, Version 21.00.00.
You can have eight Position Loop axes per 1756-EN2T module. Each drive
requires one TCP and one CIP connection. If you have other devices that
consume TCP connections on the module, it reduces the number of drives you
can support. Only the drives/axes configured for Position Loop are limited.
Frequency Control, Velocity Loop, and Torque Loop configured drives/axes are
not limited.
1. Click New Group.
2. Type a name.
62
Rockwell Automation Publication MOTION-UM003F-EN-P - March 2015
Configure Integrated Motion Using a PowerFlex 755 Drive
Chapter 2
3. Type a description, if desired.
The fields in the next steps are automatically entered for the
Motion_Group data type.
4. Change the Tag Type, Data Type, Scope, and External Access, if needed.
For more information about External Data Access Control and Constants,
see the Logix5000 Controllers I/O and Tag Data Programming Guide,
publication 1756-PM004.
5. Check Open MOTION_GROUP configuration and click Create.
The Motion Group Wizard appears with unassigned axes.
Rockwell Automation Publication MOTION-UM003F-EN-P - March 2015
63
Chapter 2
Configure Integrated Motion Using a PowerFlex 755 Drive
Associate the Axis to the Motion Group
There are three ways to assign axes to a Motion Group:
• Create a motion group. The Motion Group wizard appears and takes you
through the necessary screens.
• Open the Motion Group properties and make changes.
• Drag the axis into the Motion Group in the Controller Organizer.
1. Select an axis and click Add.
2. Verify that the axis has been assigned to the group.
3. Click OK.
The axis appears under the Motion Groups.
64
Rockwell Automation Publication MOTION-UM003F-EN-P - March 2015
Configure Integrated Motion Using a PowerFlex 755 Drive
Chapter 2
Set the Base Update Period
The Base Update Period is basically the RPI rate for Ethernet communication
between the controller and the motion module, a Unicast connection. It also sets
the motor feedback that is returned from the drive in the drive-to-controller
connection.
There are two alternate update periods that you can configure when using Axis
Scheduling. See Configure Axis Scheduling on page 77 for details.
The Base Update Period is how often the motion planner runs. When the motion
planner runs, it interrupts most other tasks regardless of their priority. The
motion planner is the part of the controller that takes care of position and
velocity information for the axes.
Follow these steps to set the Base Update Period.
1. Click the Attribute tab in the Motion Group Properties dialog box.
2. Set the Base Update Period to 3.0…32.0 ms.
For the PowerFlex 755 drive, the minimum Base Update Rate 3 ms.
Rockwell Automation Publication MOTION-UM003F-EN-P - March 2015
65
Chapter 2
Configure Integrated Motion Using a PowerFlex 755 Drive
TIP
Check to see if the Last Scan time values on the Attribute tab are less.
Typically, the value is less than 50% of the Base Update Period.
Figure 3 - Base Update Period Example
Motion Planner
Scans of your code and
system overhead.
0 ms
10 ms
20 ms
30 ms
40 ms
In this example, the Base Update Period = 10 ms. Every 10 ms the controller stops scanning your code and whatever else it is doing and
runs the motion planner.
The Base Update Period is a trade-off between updating positions of your axes
and scanning your code. For a 1756-L6x or 1756-L6xS controller, you can have
4 axes/ms and 8 axes/ms for the 1756-L7x controller.
For detailed information on the Axis Scheduling function, Axis Assignment tab,
and Alternate Update Period Scheduling, see Configure Axis Scheduling on
page 77.
Integrated Architecture Builder
To help you determine motion system performance, use the motion performance
calculator in the Integrated Architecture Builder (IAB).
The IAB is a graphical software tool for configuring Logix-based automation
systems. It helps you select hardware and generate bills of material for
applications that include controllers, I/O, networks, PowerFlex drives, OnMachine cabling and wiring, motion control, and other devices.
You can find the software at
http://www.rockwellautomation.com/en/e-tools/configuration.html
66
Rockwell Automation Publication MOTION-UM003F-EN-P - March 2015
Configure Integrated Motion Using a PowerFlex 755 Drive
Select the Motor Data Source
Chapter 2
The Motor Data Source is where you tell the axis where the motor configuration
values are originating. You can select a motor from the database, nameplate, or
nonvolatile memory.
Choose Catalog Number as the Motor Data Source
Follow these steps to identify the specification information that is originating
from the Motion Database.
1. If the Axis Properties dialog box is not open, double-click the axis.
2. Click the Motor tab of the Axis Properties dialog box.
3. From the Data Source pull-down menu, choose Catalog Number.
4. Click Catalog Number.
5. Click Change Catalog.
6. Select a motor and click OK.
The Motor dialog box is populated with all information related to the
motor you selected from the Motion Database.
Rockwell Automation Publication MOTION-UM003F-EN-P - March 2015
67
Chapter 2
Configure Integrated Motion Using a PowerFlex 755 Drive
Motor Dialog Box
7. Click Apply.
Motor Model Dialog Box
The Motor Model dialog box displays the Motor Model Phase to Phase
parameters. The parameters that are available depends on the Motor Data Source.
Nameplate Datasheet is the only Motor Data Source that lets you input the
values. The Motor Analyzer is helpful when configuring the Motor Model dialog
box parameters.
See Motor Model Dialog Box on page 71.
Motor Analyzer Dialog Box
The Motor Analyzer provides the Dynamic Motor Test for an AC drive, such as
the PowerFlex 755 drive.
See Motor Analyzer Dialog Box on page 71.
68
Rockwell Automation Publication MOTION-UM003F-EN-P - March 2015
Configure Integrated Motion Using a PowerFlex 755 Drive
Chapter 2
Choose Nameplate as the Motor Data Source
The Nameplate option requires you to enter the motor specification information.
You can find the information on the hardware nameplate or product data sheets.
1. From the Motor dialog box of Axis Properties, choose Nameplate
Datasheet.
2. Choose a motor type.
This table describes the motor types that are available.
Motor Type
PowerFlex 755
PowerFlex 527
Rotary Permanent Magnet
Yes
No
Linear Permanent Magnet
No
No
Rotary Induction
Yes
Yes
Notice that the motor information fields display zeros.
3. Enter the parameters information from the motor Nameplate Datasheet.
4. Click Apply.
Rockwell Automation Publication MOTION-UM003F-EN-P - March 2015
69
Chapter 2
Configure Integrated Motion Using a PowerFlex 755 Drive
Choose Drive NV as the Data Source
When you choose Drive NV, the motor attributes are derived from the
nonvolatile memory of a drive. Only a minimal set of motor and motor feedback
(Feedback 1) attributes are required to configure the drive.
Follow these instructions to choose a data source.
1. From the Data Source pull-down menu, choose Drive NV.
2. From the Units pull-down menu, choose Revolutions or Meters.
70
Rockwell Automation Publication MOTION-UM003F-EN-P - March 2015
Configure Integrated Motion Using a PowerFlex 755 Drive
Chapter 2
Motor Model Dialog Box
The Motor Model dialog box displays additional information based on the
motor, axis, and feedback configuration types you choose.
The asterisk next
to a category
means that you
have not applied
changes.
• If the motor data source is Catalog Number, the fields are populated
automatically from the database and the fields are read-only.
• If the motor data source is Nameplate Datasheet, you can to enter the
information.
TIP
You can leave the default values, go online, and run a Motor Test to get the
proper values from the drive.
See Hookup Tests Dialog Box on page 150.
• If the motor data source is Drive NV, the data comes from the nonvolatile
memory of the drive.
• If you select Catalog Number, Motor NV, or Drive NV, the values display
as read-only.
Motor Analyzer Dialog Box
The Motor Analyzer provides the following three tests:
• Dynamic Motor
• Static Motor
• Calculate Model
The tests analyze motor parameters for rotary and linear induction motors and
permanent magnet motors. The parameters that appear on the tests are
dependent on the motor type you choose.
TIP
If the motor you are using is a Permanent Magnet, the Dynamic Motor is the
only test that appears.
Rockwell Automation Publication MOTION-UM003F-EN-P - March 2015
71
Chapter 2
Configure Integrated Motion Using a PowerFlex 755 Drive
Motor Analyzer Dialog Box
Table 13 - Motor Analyzer Parameters
Parameter
Description
Motor Resistance
Specifies the phase-to-phase, resistance of a permanent magnet motor.
Motor Inductance
Specifies the phase-to-phase, inductance of a permanent magnet motor.
Motor Rotary Voltage Constant
Specifies the voltage, or back-EMF, constant of a rotary permanent magnet motor in
phase-to-phase RMS Volts per KRPM.
Motor Stator Resistance
Specifies the Y circuit, phase-neutral, winding resistance of the stator as shown as
R1 in the IEEE motor model.
Motor Stator Leakage Reactance Specifies the Y circuit, phase-neutral, leakage reactance of the stator winding, at
rated frequency, as shown as X1 in the IEEE motor model.
Motor Torque Constant
Specifies the torque constant of a rotary permanent magnet motor in Newtonmeters per RMS amp.
Motor Rotor Leakage Reactance
Specifies the Y circuit, phase-neutral, equivalent stator-referenced leakage
inductance of the rotor winding, at rated frequency, as shown as X2 in the IEEE
motor model.
Motor Flux Current
Id Current Reference that is required to generate full motor flux. This value is closely
approximated by the No Load Motor Rated Current commonly found in Induction
Motor data sheets.
The Kinetix 350 does not support this parameter.
Rated Slip
Rated Slip is the amount of slip at motor rated current (full load) and motor rated
frequency.
See the Integrated Motion on the EtherNet/IP Network Reference Manual,
publication MOTION-RM003, for complete information on Axis
Attributes.Motor Feedback
72
Rockwell Automation Publication MOTION-UM003F-EN-P - March 2015
Configure Integrated Motion Using a PowerFlex 755 Drive
Chapter 2
The PowerFlex 755 drive requires a peripheral feedback device. As with all
parameters, the types of feedback available are dependent on what you select on
the General dialog box for Feedback Configuration.
Axis Configuration Type
Parameters
Frequency Control
No Feedback
Position Loop
• Motor Feedback, one mounted device
• Dual Feedback, two mounted devices
• Dual Integral Feedback, two mounted devices
Velocity Loop
• No Feedback
• Motor Feedback, mounted device
Torque Loop
• Motor Feedback, mounted device
Feedback Configuration Options for the PowerFlex 755 Drive
The following feedback module combinations are supported.
Option
Supported Module
Catalog Number
Valid Ports
Two Feedback Options
Single Incremental Encoder
20-750-ENC-1
4…8
Dual Incremental Encoder
20-750-DENC-1
4…8
Universal Feedback Card
20-750-UFB-1
4…6
Single Incremental Encoder
20-750-ENC-1
4 and 5
Dual Incremental Encoder
20-750-DENC-1
4 and 5
Universal Feedback
20-750-UFB-1
4 and 5
Safe Torque Off
20-750-S
6
Single Incremental Encoder
20-750-ENC-1
4 and 5
Dual Incremental Encoder
20-750-DENC-1
4 and 5
Universal Feedback
20-750-UFB-1
4 and 5
Safe Speed Monitor
20-750-S1
6
Two Feedback Options and
One Safe Torque Off Option
Two Feedback Options and
One Safe Speed Monitor
Option(1)
(1) The Safe Speed Monitor option module must be used with the 20-750-DENC-1 Dual Incremental Encoder module or the
20-750-UFB-1 Universal Feedback module.
For more information, see the PowerFlex 750-Series AC Drive Installation
Instructions, publication 750-IN001.
Rockwell Automation Publication MOTION-UM003F-EN-P - March 2015
73
Chapter 2
Configure Integrated Motion Using a PowerFlex 755 Drive
There are seven available peripherals:
• HIM
• I/O
• Communications, Ethernet Standard
• Aux Power
• Safety
• Encoder Interface
• Universal Feedback
This table lists valid peripheral devices and ports for various PowerFlex drives.
Table 14 - Peripheral Devices That Drives Support
Drive
Ports
Peripheral Devices
PowerFlex 755EENET-CM
4, 5, 6, 7, 8
PowerFlex 755EENET-CM-S
4 and 5
6 is reserved for Safety
PowerFlex 755-EENET-CM-S1
4 and 5
6 is reserved for Safety
• HIM, Safety, Encoder Interface,
Universal Feedback.
• HIM is only supported in CIP - Control
Mode.
• Integrated Motion on the EtherNet/IP
Network does not support I/O, Aux
Power, 20-COMM-x.
For more listings of peripheral devices that PowerFlex drives support, see the
PowerFlex 755 Drive Embedded Ethernet Adapter User Manual, publication
750COM-UM001, and the PowerFlex 755 Drive Embedded EtherNet/IP
Adapter Installation Instructions, publication 750-IN001.
74
Rockwell Automation Publication MOTION-UM003F-EN-P - March 2015
Configure Integrated Motion Using a PowerFlex 755 Drive
Chapter 2
The Motor Feedback dialog box contains the information for the feedback
device. This category dialog box is not available for Frequency axis configuration
and is dependent on the axis configuration type and the motor selection.
Select a Feedback Type and Units. The type of feedback available depends on the
axis and feedback configurations.
The asterisk next
to a category
means that you
have not applied
changes.
1. From the Type pull-down menu, choose the appropriate type of motor
feedback.
2. Click Apply and OK to exit the Motor Feedback dialog box.
3. Set the commutation alignment type and the percentage of offset.
TIP
All commutation attributes apply only to permanent magnet motors.
Rockwell Automation Publication MOTION-UM003F-EN-P - March 2015
75
Chapter 2
Configure Integrated Motion Using a PowerFlex 755 Drive
If you are using a motor that is not in the database, the default is Not
Aligned. If the motor is in the database, the alignment is set to Controller
Offset.
Type
Description
Not Aligned
Not Aligned indicates that the motor is not aligned, and that the
Commutation Offset value is not valid. If the Commutation Offset is not valid,
the drive cannot use the value to determine the commutation angle. Any
attempt to enable the drive with an invalid commutation angle results in a
Start Inhibit condition.
Controller Offset
It applies the Commutation Offset value from the controller to determine the
electrical angle of the motor.
Motor Offset
The drive derives the commutation that is offset directly from the motor.
Self-Sense
The drive automatically measures the commutation that is offset when it
transitions to the Starting state for the first time after a power cycle. This
generally applies to a PM motor equipped with a simple incremental
feedback device.
4. Go online with the controller and click Test Commutation.
When the test is complete, you see the status of the polarity.
See the Integrated Motion on the EtherNet/IP Network Reference Manual,
publication MOTION-RM003, for complete descriptions of the axis attributes.
76
Rockwell Automation Publication MOTION-UM003F-EN-P - March 2015
Chapter
3
Configure Axis Scheduling
This chapter describes how to configure the Axis Scheduling feature that is
located in the Motion Group properties dialog box.
Topic
Page
Example Axis Scheduling Application
78
Axis Scheduling Configuration
79
Motion Utilization
87
Axis Scheduling provides a way for you to configure drives to run at different
update rates. Axis Scheduling can improve the performance of your controllers.
You can use Axis Scheduling with integrated motion drives and virtual axes. By
using Axis Scheduling you can optimize your controller, network, and drive
performance. For smaller controller applications (CompactLogix), you can
expect to see a significant improvement in system performance.
Many applications have motion drives with different performance requirements.
At the simplest level, motion drives can be assigned into a ‘fast’ and ‘slow’ update
rate groupings.
• The ‘fast’ group typically includes high speed coordinated process
positioning drives with aggressive PCAM or interpolation profiles and
auxiliary functions like registration position/velocity phase correction.
• The ‘slow’ group typically includes noncoordinated motion drives used for
automatic machine reconfiguration, noncoordinated point-to-point
motion process drives, or coordinated drives with less aggressive PCAM or
gearing functions.
Axis Scheduling is compatible with these products:
• ControlLogix L7x and later controllers
• GuardLogix L7x and later controllers
• CompactLogix 5370 and later controllers
• All Integrated Motion EtherNet/IP drives, for example, Kinetix,
PowerFlex and other third-party drives
Rockwell Automation Publication MOTION-UM003F-EN-P - March 2015
77
Chapter 3
Configure Axis Scheduling
Example Axis Scheduling
Application
Axis Scheduling can improve ControlLogix and CompactLogix EtherNet/IP
Integrated Architecture Motion system performance by reducing average Logix
controller and EtherNet/IP network utilization. Axis Scheduling supports three
separate controller/network motion drive update rates per controller, one rate for
high performance drives, and two additional rates for lower performance drives.
For example, suppose you have a robot removing product from a conveyor belt
that has three precision axes on the robot and four general purpose axes on the
conveyor belt. You would like to configure the controller to run all seven axes at 2
ms to best control the precision axes, but this will take your controller's network
utilization too high. In the past, one option would have been to run all seven axes
8 ms, but this is not fast or precise enough for the robot axes. So you might have
had to add a second controller and Ethernet module to get the performance you
needed. Axis Scheduling lets you configure the axes at different rates based on the
needs of the application, balancing the motion performance and network
utilization of your controller.
With Axis Scheduling, you can configure the axes on the robot to run at a high
base update rate (2 ms) and then configure the conveyor to run at a slower update
rate (8 ms).
Being able to configure three update periods, the four conveyor axes can run as a
single channel, thus appearing to the controller as a single drive. The axes are
updated round-robin style; every 2 ms, three of the robot axes are updated as well
as one of the conveyor axes.
During the next update, three robot axes are updated and then the next conveyor
axis is updated; eventually all conveyor axes are updated and the process starts
again. The controller updates four axes every update period. The controller can
handle the load of four axes easier than a load of seven axes. This improves the
performance of the controller.
78
Rockwell Automation Publication MOTION-UM003F-EN-P - March 2015
Configure Axis Scheduling
Axis Scheduling
Configuration
Chapter 3
In Logix Designer, you use the Axis Schedule Panel to configure the update
periods. The Axis Schedule Panel provides a Base Update Period and two
alternatives. Information such as, Estimated Utilization and Actual Utilization
appear on this panel.
The alternative rates for lower performance drives provide a way for multiple
drives to be ‘multiplexed’ through a single drive update channel. Axis Scheduling
allows multiple drives to be updated by using the same amount of controller and
network capacity as used in updating a single non-multiplexed drive.
For more information on how to set up a motion group, see Create a Motion
Group on page 34 for Kinetix drives and Create a Motion Group on page 62 for
PowerFlex drives.
Rockwell Automation Publication MOTION-UM003F-EN-P - March 2015
79
Chapter 3
Configure Axis Scheduling
Configuring the Update Periods
Follow these steps to configure the update periods:
1. Double-click the Motion Group.
The Motion Group Properties dialog box appears.
2. Assign axes to the group.
3. Click Apply.
4. Go to the Attribute tab.
5. Choose a Base Update Period.
80
Rockwell Automation Publication MOTION-UM003F-EN-P - March 2015
Configure Axis Scheduling
Chapter 3
In this example, the Base Update Period is 4.0 ms and the Alternate 1 and 2
Update Periods are 8 ms and 20 ms. The base period acts as the anchor
value for the axis scheduling feature.
The Alternate Update Periods are multiples of the base. You can edit the
Base Update Period when the controller is offline and is read-only when
the controller is online. The alternate rates on the Attribute tab are read
only.
6. Click the Axis Schedule to go to the Axis Schedule Panel.
The Axis Schedule Panel appears.
The axes that you assigned in the Axis Assignment tab appear in the Base
column.
7. Use the positioning arrows to assign the axes to the Alternate Update
Periods.
Rockwell Automation Publication MOTION-UM003F-EN-P - March 2015
81
Chapter 3
Configure Axis Scheduling
The axes appear in the Alternate columns.
8. Choose the Alternate 1 Update Period.
The multipliers range from 2…32, so if the base update rate is 2.0, the
values in the alternate rates are 4, 6, 8, 10, 12…32. If the base update rate is
3.0, the values are 6, 9, 12, 15, and so on.
If you change the base rate to a non-multiple value, a warning flag appears
next to an Alternate rate if you change the base rate value where the
alternate rate is no longer a multiple.
82
Rockwell Automation Publication MOTION-UM003F-EN-P - March 2015
Configure Axis Scheduling
Chapter 3
Once an alternate rate is set on the Axis Schedule Panel, the Base Update
Period for the group on the Attribute tab becomes disabled. You can still
set the base update rate on the Axis Schedule Panel.
If you enter a value outside of that range, a warning appears and the value is
set to either 0.5 or 32, depending on if you entered too small or too large of
a value.
TIP
If the Base Update Period is too small, the controller may not have time
to execute non-motion related ladder logic. Generally, the motion task
for the controller needs 1 millisecond per axis to have reasonable
execution time.
As a result, the configuration sets the lower limit on the Base Update
Period that is based on the number of axes in the group.
9. Choose the Alternate 2 update period.
If the base update rate is changed to a value that invalidates the alternate
update rates, a warning tool tip appears.
• If you click OK or Apply, a warning box appears that tells you that you
must select valid alternate update rates before you apply any changes.
10. Update the periods as required.
11. Click Apply.
Rockwell Automation Publication MOTION-UM003F-EN-P - March 2015
83
Chapter 3
Configure Axis Scheduling
The Alternate update rates appear on the Attribute tab.
Here’s another example.
1. Go to the Axis Schedule Panel and change all rates to be the same, for
example 4 ms.
84
Rockwell Automation Publication MOTION-UM003F-EN-P - March 2015
Configure Axis Scheduling
Chapter 3
The Base Update Period on the Attribute tab becomes active.
Notice that after you have made all update periods in the Axis Schedule
Panel, the update period values are the same and the Base Update Period is
now active. The Alternate Update Periods are always read-only.
2. Change the Base Update Period.
Rockwell Automation Publication MOTION-UM003F-EN-P - March 2015
85
Chapter 3
Configure Axis Scheduling
After you click Apply (or OK), the values in the alternate fields change to
match the base.
The values are also changed in the Axis Schedule Panel.
86
Rockwell Automation Publication MOTION-UM003F-EN-P - March 2015
Configure Axis Scheduling
Motion Utilization
Chapter 3
The following values are updated in real time as you change your configuration.
You can see how the utilization metrics are responding to your configuration
changes and you have the option to modify your configuration.
• The yellow! warning indicates that the value is at the borderline of the
controller capabilities.
• The red X next to the Task I/O Cycle warning indicates that the value has
reached beyond what the motion task cycle can handle.
If you find that you are reaching utilization limits and you only have the Base
Update Period that is assigned to axes, start to assign axes to the Alternate Update
Periods.
Table 15 - Utilization Parameter Descriptions
Parameter
Description
Estimated Utilization - Motion
Estimated utilization assumes basic default configuration with no active
motion planner activity, no transmission statistics, and no cyclic read or write.
The estimated percent of time the controller spends on motion while online.
Logix Controller
The estimated percentage of the Logix controller's time that is consumed by a
motion task. If this value exceeds 50%, a warning icon appears. If this value
exceeds 80%, an error icon appears.
Task I/O Cycle
The estimated percentage of time available in the update cycle Motion Task to
process input, run motion planner, and send output to motion devices. If this
value exceeds 100%, a warning icon appears. If this value exceeds (200
connection I/O cycle Cycle)%, an error icon appears.
Connection I/O Cycle
The estimated percentage of time available in the update cycle for input and
output data transmission over the motion connection. If this value exceeds
80%, a warning icon appears. If the value exceeds 100%, an error icon appears.
Communications
Shows the estimated percentage of the communications controller's time that
is consumed to process motion connection packets. If this values exceeds 50%,
a warning icon appears. If this value exceeds 100%, an error icon appears.
Ethernet Media
Shows the estimated percentage of Ethernet media bandwidth used by motion
connection packet traffic. If the value exceeds 50%, a warning icon appears. If
the values exceeds 100%, an error icon appears.
Actual Utilization - Motion
Actual utilization is based on measurements that are made by the Logix
controller. Actual utilization values may be substantially higher than estimated
utilization values depending on factors such as active motion planner activity,
transmission statistics, and cyclic read or write data.
Logix Controller
Shows the actual percentage of the Logix controller's time that is consumed by
motion task.
Task I/O Cycle
Shows the actual percentage of time available in the update cycle for motion
task to process input, run motion planner, and send output to motion devices.
Rockwell Automation Publication MOTION-UM003F-EN-P - March 2015
87
Chapter 3
Configure Axis Scheduling
Notes:
88
Rockwell Automation Publication MOTION-UM003F-EN-P - March 2015
Chapter
4
Configure a Project for Integrated Motion on the
EtherNet/IP Network
This chapter describes how to configure an integrated motion project in the
Logix Designer application.
Topic
Page
Create a Controller Project
89
Set Time Synchronization
92
Add a 1756-ENxTx Communication Module
95
IMPORTANT
Create a Controller Project
When you perform an import/export on a project in the RSLogix 5000
software, version 19 or earlier, the axis absolute position is not recovered on
download to the controller.
See APR Faults on page 184 for more information.
Follow these instructions to create a project.
1. On the Studio 5000 dialog box, choose Create New Project.
Rockwell Automation Publication MOTION-UM003F-EN-P - March 2015
89
Chapter 4
Configure a Project for Integrated Motion on the EtherNet/IP Network
2. Choose a controller, type a name, and click Next.
3. Type a Name for the controller.
4. Assign a location (optional).
5. Click Next.
Project Configuration dialog box appears.
6. Choose the chassis type.
7. Assign the slot location of the controller.
90
Rockwell Automation Publication MOTION-UM003F-EN-P - March 2015
Configure a Project for Integrated Motion on the EtherNet/IP Network
Chapter 4
8. Assign the Security Authority.
9. Type a description (optional).
10. Click Finish.
The Logix Designer application opens with new project.
Rockwell Automation Publication MOTION-UM003F-EN-P - March 2015
91
Chapter 4
Configure a Project for Integrated Motion on the EtherNet/IP Network
This technology supports highly distributed applications that require time
stamping, sequence of events recording, distributed motion control, and
increased control coordination. All controllers and communication modules
must have time synchronization that is enabled for applications that use
Integrated Motion on the EtherNet/IP network.
Set Time Synchronization
Time synchronization in the Logix system is called CIP Sync. CIP Sync provides
a mechanism to synchronize clocks between controllers, I/O, and other devices
that are connected over CIP networks and the ControlLogix or CompactLogix
backplane. The device with the best clock becomes the Grandmaster time source
for your system.
Figure 4 - Star Topology with the ControlLogix Controller as the Grandmaster
Supervisory
Stratix 8000 TM
CIP Sync
CIP Sync
M
Logix5563
S
EtherNet/IP™
S
SOE INTPUT
S
SOE INTPUT
S
S
SOE INTPUT
EtherNet/IP™
SOE INTPUT
S
M
EtherNet/IP™
L
7
X
P2=1
GM
E
N
2
T
S
O
E
S
O
E
S
O
E
S
O
E
E
N
2
T
E
N
2
T
M
S
S
S
SOE INTPUT
SOE INTPUT
S
O
E
S
O
E
SOE INTPUT
S
O
E
SOE INTPUT
S
O
E
S
S
SOE INTPUT
SOE INTPUT
S
O
E
S
O
E
S
PowerFlex 755
S
EtherNet/IP
CIP Sync
CIP Sync
M
CIP Sync
C
A
B
D
E
M
MEM
350
ETHERNET
CIP Sync
Stratix 8000
S
SOE INTPUT
S
O
E
S
O
E
S
S
S
SOE INTPUT
SOE INTPUT
S
SOE INTPUT
S
SOE INTPUT
SOE INTPUT
S
O
E
S
O
E
S
24VDC
INPUT
MORTOR FEEDBACK
E
N
2
T
BRAKE/
DC BUS
Kinetix 350
S
O
E
S
O
E
CIP Sync
C
A
B
D
E
MEM
350
ETHERNET
NTP
EtherNet/IP™
A=ENABLE
B= REGEN
C=DATA ENTRY
D=FAULT
E=COM ACTIVITY
A=ENABLE
B= REGEN
C=DATA ENTRY
D=FAULT
E=COM ACTIVITY
S
24VDC
INPUT
MORTOR FEEDBACK
S
S
BRAKE/
DC BUS
Kinetix 350
HMI
CIP Sync
Kinetix 5500
S
Logix5563
M
EtherNet/IP™
CIP Sync
L
7
X
P2=2
E
N
2
T
D
I
O
D
I
O
D
I
O
D
I
O
Kinetix 6500
D
I
O
6500
S
6500
6500
6500
6500
DANGER
S
S
POINT I/O TM
CIP Sync
GM = Grandmaster (time source)
M = Master
S = Slave
P1 and P2 = Priorities
Priorities are automatically assigned based on their clock quality, which is determined by the Best Clock Algorithm. In this example, P2=1 is
the best quality so it becomes the Grandmaster. If the P2=1 device loses clock quality for some reason, then P2=2 would become the
Grandmaster for the system.
92
Rockwell Automation Publication MOTION-UM003F-EN-P - March 2015
Configure a Project for Integrated Motion on the EtherNet/IP Network
Chapter 4
The Best Master Clock algorithm determines what device has the best clock. The
device with the best clock becomes the Grandmaster time source for your system.
All controllers and communication modules must have time synchronization that
is enabled to participate in CIP Sync.
See the Integrated Architecture and CIP Sync Configuration Application
Technique, publication IA-AT003, for detailed information.
You must enable time synchronization for motion applications. Follow these
instructions to enable time synchronization.
1. In the Controller Organizer, right-click the controller and choose
Properties.
2. Click the Date/Time tab.
This graphic is an example of the Controller Properties dialog box for the
1756-L71 controller.
Rockwell Automation Publication MOTION-UM003F-EN-P - March 2015
93
Chapter 4
Configure a Project for Integrated Motion on the EtherNet/IP Network
3. Check Enable Time Synchronization.
4. Click OK.
94
Rockwell Automation Publication MOTION-UM003F-EN-P - March 2015
Configure a Project for Integrated Motion on the EtherNet/IP Network
Add a 1756-ENxTx
Communication Module
Chapter 4
Follow these instructions to add an Ethernet communication module to your
project. These modules are compatible with the CIP Sync protocol: catalog
numbers 1756-EN2T, 1756-EN2F, 1756-EN2TR, and 1756-EN3TR.
IMPORTANT
For all communication modules, use the firmware revision that goes with
the firmware revision of your controller. See the release notes for the
firmware of your controller.
1. To add a module, right-click the backplane and choose New Module.
2. Clear the Module Type Category Filters select all checkbox.
3. Check the Communication checkbox.
On the Select Module Type dialog box, you can filter to the exact type of
module you are looking for, which makes your search faster.
4. Under Communications, select the 1756-ENxTx module and click OK.
Rockwell Automation Publication MOTION-UM003F-EN-P - March 2015
95
Chapter 4
Configure a Project for Integrated Motion on the EtherNet/IP Network
The New Module configuration tabs appear.
5. Type a name for the module.
6. If you want, type a description.
7. Assign the Ethernet address of the 1756-ENxTx module.
For information on creating an Ethernet network and setting IP addresses
for the communication and motion modules, see these manuals:
– EtherNet/IP Modules in Logix5000 Control Systems User Manual,
publication ENET-UM001
– PowerFlex 755 Drive Embedded EtherNet/IP Adapter User Manual,
publication, 750COM-UM001
– Knowledgebase Technote # 66326
– Converged Plantwide Ethernet (CPwE) Design and Implementation
Guide, publication ENET-TD001
8. Assign the slot for the module.
9. In the module definition area, click Change.
96
Rockwell Automation Publication MOTION-UM003F-EN-P - March 2015
Configure a Project for Integrated Motion on the EtherNet/IP Network
Chapter 4
10. Choose an Electronic Keying option.
ATTENTION: The electronic keying feature automatically compares the
expected module, as shown in the configuration tree, to the physical
module before communication begins.
When you are using motion modules, set the electronic keying to either
`Exact Match‘ or `Compatible Keying‘.
Never use `Disable Keying’ with 1756-ENxTx communication and motion
modules.
For more information about electronic keying see the ControlLogix
Controller User Manual, publication 1756-UM001.
Rockwell Automation Publication MOTION-UM003F-EN-P - March 2015
97
Chapter 4
Configure a Project for Integrated Motion on the EtherNet/IP Network
11. Choose Time Sync and Motion.
IMPORTANT
For CIP Sync time coordination to work in motion control, you must set the
Time Sync Connection to Time Sync and Motion on all 1756-ENxTx
communication modules. The CIP Sync protocol is what enables motion
control on the EtherNet/IP network.
The Time Sync and Motion selection is available only for firmware version
3.0 and later. You must be offline to change the Time Sync and Motion
selection.
If you are online at a major revision of 1 or 2, you can only change the
revision to a 1 or 2. You must go offline to change the module to revision 3
or 4 and return to revision 1 or 2.
IMPORTANT
For the CompactLogix 5370 controllers: 1769-L18ERM, 1769-L27ERM,
1769-L30ERM, 1769-L33ERM, and 1769-L36ERM, the embedded dualport
Ethernet is automatically set with Time Sync Connection= Time Sync and
Motion.
Check the `Enable Time Synchronization’ checkbox on the controller time/
date tab to enable Integrated Motion.
12. Click OK.
IMPORTANT
98
If you have not enabled time synchronization, you get errors when you try to
associate an axis.
Rockwell Automation Publication MOTION-UM003F-EN-P - March 2015
Chapter
5
Configuration Examples for a Kinetix Drive
This chapter provides three typical axis configuration examples when using a
Kinetix 6500 drive. The differences between the Kinetix drives are noted where
applicable.
Topic
Page
Example 1: Position Loop with Motor Feedback Only
99
Example 2: Position Loop with Dual Feedback
103
Example 3: Feedback Only
108
Example 4: Kinetix 5500 Drive, Velocity Loop with Motor Feedback
112
Example 5: Kinetix 350 Drive, Position Loop with Motor Feedback
116
For examples of configuring the Kinetix 5700 drive, see the Kinetix 5700
Multi-axis Servo Drives User Manual, publication 2198-UM002.
Example 1: Position Loop
with Motor Feedback Only
In this example, you create an AXIS_CIP_DRIVE and a Kinetix 6500 drive,
which includes the control module and a power structure. You then connect the
motor feedback cable to the Motor Feedback port of the Kinetix 6500 drive.
1. Once you have created an AXIS_CIP_DRIVE, open the Axis Properties.
2. From the Axis Configuration pull-down menu, choose Position Loop.
3. From the Feedback Configuration pull-down menu, choose Motor
Feedback.
The axis and feedback configurations determine the control mode.
For more information on the control modes, see the Integrated Motion on the
EtherNet/IP network Reference Manual, publication MOTION-RM003.
Rockwell Automation Publication MOTION-UM003F-EN-P - March 2015
99
Chapter 5
Configuration Examples for a Kinetix Drive
Example 1: General Dialog Box, Position Loop with Motor Feedback Only
The type of drive you selected and the power
structure you assigned via the Kinetix 6500 Module
Properties.
For more information, see Add a Kinetix EtherNet/IP
Drive on page 20.
The newly created Kinetix 6500 drive module name is
the default. The Axis Number defaults to 1, indicating
the primary axis of the drive. Axis Number 2 is used only
for configuring a Feedback Only axis.
TIP
After you have configured the axis and you change the Axis Configuration type
or the Axis Number, some of the configuration information will be set to
default values. This change can cause some previously entered data to be reset
back to its default setting.
When you select the Position Loop with Motor Feedback, the Motor and
Motor Feedback dialog boxes become available.
4. Choose Catalog Number as the Motor Data Source.
5. Click Change Catalog and choose your motor.
100
Rockwell Automation Publication MOTION-UM003F-EN-P - March 2015
Configuration Examples for a Kinetix Drive
Chapter 5
In this case, a MPL-B310P-M motor was chosen.
Example 1: Position Loop with Motor Feedback Only, Motor Dialog Box
When you select the Catalog Number for the motor specification,
the MPL-B310P-M motor is in the Motion Database. The specification data for
this motor is automatically entered for you.
If the motor you are using is not in the Change Catalog list, then it is not in the
Motion Database. You have to input the specification data or add a custom motor
to the Motion Database that can be selected.
For more information, see Choose Nameplate on page 41.
Rockwell Automation Publication MOTION-UM003F-EN-P - March 2015
101
Chapter 5
Configuration Examples for a Kinetix Drive
Example 1: Position Loop with Motor Feedback Only, Scaling Dialog Box
6. Choose the Load Type.
7. Enter the Scaling Units.
8. Choose the Travel Mode.
For more information about Scaling, see Scaling Dialog Box on page 146.
9. Click Apply.
You are now finished configuring the axis for Position Loop with Motor
Feedback.
102
Rockwell Automation Publication MOTION-UM003F-EN-P - March 2015
Configuration Examples for a Kinetix Drive
Example 2: Position Loop
with Dual Feedback
Chapter 5
In this example, you create an AXIS_CIP_DRIVE and a Kinetix 6500 drive,
which includes the control module and a power structure. You need to configure
both feedback ports. You need to have two feedback cables that are connected to
the Kinetix 6500 drive for one axis.
You connect the Motor Feedback cable to the Motor Feedback port, and the
Load Feedback cable to the Aux Feedback port of the Kinetix 6500 drive.
1. Once you have created an AXIS_CIP_DRIVE, open the Axis Properties.
2. From the Axis Configuration pull-down menu, choose Position Loop.
3. From the Feedback Configuration pull-down menu, choose Dual
Feedback.
The axis and feedback configurations determine the control mode.
For more information on the control modes, see the Integrated Motion on
the EtherNet/IP network Reference Manual,
publication MOTION-RM003.
Example 2: Position Loop with Dual Feedback, General Dialog Box
The type of drive you selected and the power
structure you assigned via the Kinetix 6500 Module
Properties.
For more information, see Add a Kinetix EtherNet/IP
Drive on page 20.
The newly created Kinetix 6500 drive module name is
the default. The Axis Number defaults to 1, indicating
the primary axis of the drive. Axis Number 2 is used only
for configuring a Feedback Only axis.
IMPORTANT
After you have configured the axis and you change the Axis Configuration type
or the Axis Number, some of the configuration information will be set to
default values. This change can cause some previously entered data to be reset
back to its default setting.
Rockwell Automation Publication MOTION-UM003F-EN-P - March 2015
103
Chapter 5
Configuration Examples for a Kinetix Drive
Now that you defined the axis as being a Position Loop with Dual
Feedback axis, the Motor, Motor Feedback, and Load dialog boxes become
available.
4. From the Data Source pull-down menu, choose Catalog Number.
5. Click Change Catalog and choose your motor.
In this case, a MPL-B310P-M motor was chosen.
Example 2: Position Loop with Dual Feedback, Motor Dialog Box
When you select the Data Source for the motor specification,
the MPL-B310P-M motor is in the Motion Database, so you can select it
by Catalog Number. Notice that the specification data for this motor is
automatically entered for you.
If the motor you are using is not in the Change Catalog list, then it is not in
the Motion Database. You need to input the specification data.
For more information, see Choose Nameplate on page 41.
On the Motor Feedback dialog box, the information is automatically filed
in based on your selections on the Motor dialog box.
104
Rockwell Automation Publication MOTION-UM003F-EN-P - March 2015
Configuration Examples for a Kinetix Drive
Chapter 5
Example 2: Position Loop with Dual Feedback, Motor Feedback Dialog Box
The drive gets the commutation that is
offset directly from the motor.
For information about Commutation, see Assign Motor Feedback on
page 43 and Commutation Test on page 156.
The axis is now configured as the primary feedback. The next task is to
configure Feedback 2 on the Load Feedback dialog box.
6. Click the Define feedback device link or go to the Module Properties of
the drive to assign the Load Feedback device.
Example 2: Position Loop with Dual Feedback, Load Feedback Dialog Box, Load-side Feedback
Rockwell Automation Publication MOTION-UM003F-EN-P - March 2015
105
Chapter 5
Configuration Examples for a Kinetix Drive
7. From the Load Feedback Device pull-down menu, choose Aux Feedback
Port.
8. Click OK to apply your changes and return to the Load Feedback dialog
box.
Example 2: Kinetix 6500 Module Properties, Associated Axis Tab
9. Choose the Feedback Type and Units.
Example 2: Position Loop with Dual Feedback, Load Feedback Dialog Box
Default values for Resolution and Interpolation
are automatically provided. You must enter the
actual Resolution of load-side feedback device.
106
Rockwell Automation Publication MOTION-UM003F-EN-P - March 2015
Configuration Examples for a Kinetix Drive
Chapter 5
Example 2: Position Loop with Dual Feedback, Scaling Dialog Box
The Scaling values are in Load Feedback units.
You are now finished configuring the axis as Position Loop axis with Dual
Feedback.
10. Click OK to apply your changes and close Axis Properties.
Rockwell Automation Publication MOTION-UM003F-EN-P - March 2015
107
Chapter 5
Configuration Examples for a Kinetix Drive
Example 3: Feedback Only
In this example, you create a half axis AXIS_CIP_DRIVE type by using the
AUX Feedback port of the drive for Master Feedback. You need to connect the
Master Feedback device cable to the Aux Feedback port of the Kinetix 6500
drive.
TIP
You can use feedback only axes, for example, as a master reference for gearing,
with PCAM moves, and MAOC output CAMs.
1. From the Axis Configuration pull-down menu, choose Feedback Only.
2. From the Feedback Configuration pull-down menu, choose Master
Feedback.
This determines the control mode.
For more information, see the Integrated Motion on the EtherNet/IP
network Reference Manual, publication MOTION-RM003.
3. From the Module pull-down menu, choose the associated module that you
want to use for the Master Feedback device.
Example 3: Feedback Only with Master Feedback, General Dialog Box
The Axis Number will be set to 2, because Axis 1 is
already assigned to the primary axis of the drive.
108
Rockwell Automation Publication MOTION-UM003F-EN-P - March 2015
Configuration Examples for a Kinetix Drive
Chapter 5
4. Click the Define feedback device link to associate the drive with the axis.
Example 3: Feedback Only with Master Feedback, Master Feedback Dialog Box
Feedback 1 is the logical port for this axis that is
assigned to physical Port 2, or Aux Feedback
port of the Kinetix 6500 drive.
5. From the Axis 2 (Auxiliary Axis) pull-down menu, choose
Axis_IV_Feedback Only to associate the axis.
Example 3: Master Feedback Dialog Box
6. From the Master Feedback Device pull-down menu, choose Aux Feedback
Port to map the port to the device.
7. Click OK to apply your changes and return to Axis Properties.
Rockwell Automation Publication MOTION-UM003F-EN-P - March 2015
109
Chapter 5
Configuration Examples for a Kinetix Drive
Example 3: Feedback Only with Master Feedback, Master Feedback Dialog Box
This is Feedback 1 of Axis 2. It is connected to the Aux
Feedback port of the primary axis. This Feedback-only
axis is also known as the 1/2 axis.
Default values are filled in for you.
8. From the Type pull-down menu, choose Digital AqB as the feedback type.
9. From the Units pull-down menu, choose Rev.
10. In the appropriate field, type the resolutions of your specific feedback
device.
110
Rockwell Automation Publication MOTION-UM003F-EN-P - March 2015
Configuration Examples for a Kinetix Drive
Chapter 5
Example 3: Feedback Only with Master Feedback, Scaling Dialog Box
11. From the Load Type pull-down menu, choose your load type.
12. Enter the Scaling Units.
13. From the Mode pull-down menu, choose your Travel mode.
For more information about Scaling, see Scaling Dialog Box on page 146.
14. Click Apply.
You are now finished configuring an axis for Feedback Only.
Rockwell Automation Publication MOTION-UM003F-EN-P - March 2015
111
Chapter 5
Configuration Examples for a Kinetix Drive
Example 4: Kinetix 5500
Drive, Velocity Loop with
Motor Feedback
In this example, you are configuring a Kinetix 5500 servo drive, catalog number
2098-H025-ERS, with motor feedback by using a Rotary Permanent Magnet
motor, catalog number VPL-A1001M-P.
You will need to connect the Motor Feedback cable to the Motor Feedback port
of the Kinetix 5500 drive and then configure the feedback port.
1. Once you have added the drive to your project and created an
AXIS_CIP_DRIVE, open the Axis Properties.
This is type of drive you selected the Kinetix 5500
Module Properties.
For more information, see Add a Kinetix EtherNet/IP
Drive on page 20.
The newly created Kinetix 5500 drive module name is
the default. The Axis Number defaults to 1, indicating
the axis of the drive.
TIP
After you have configured the axis and you change the Axis Configuration type
or the Axis Number, some of the configuration information will be set to
default values. This may cause some previously entered data to be reset back to
its default setting.
Having selected Velocity Loop with Motor Feedback, the Motor and
Motor Feedback dialog boxes become available.
2. Click the Motor dialog box.
3. Choose Catalog Number as the Motor Data Source.
112
Rockwell Automation Publication MOTION-UM003F-EN-P - March 2015
Configuration Examples for a Kinetix Drive
Chapter 5
4. Click Change Catalog and choose your motor, for example, catalog
number VPL-A1001M-P.
When you select the Catalog Number for the motor specification, the
VPL-A1001M-P motor is in the Motion Database, The specification data
for this motor is automatically filled in for you.
If the motor you are using is not in the Change Catalog listing, then it is
not in the Motion Database. You will need to input the specification data
or add a custom motor to the Motion Database that can be selected.
For more information, see Choose Nameplate on page 41.
Rockwell Automation Publication MOTION-UM003F-EN-P - March 2015
113
Chapter 5
Configuration Examples for a Kinetix Drive
5. Click the Motor Feedback dialog box.
With this drive and motor combination, the Motor Mounted Feedback
that is available is the Hiperface DSL type. The data is automatically
populated based on that selection. You can assign the commutation
alignment.
114
Rockwell Automation Publication MOTION-UM003F-EN-P - March 2015
Configuration Examples for a Kinetix Drive
Chapter 5
6. Click the Scaling dialog box to adjust the Scaling attributes.
7. Choose the Load Type
8. Enter the Scaling Units
9. .Choose the Travel Mode.
For more information about Scaling, see Scaling Dialog Box on page 146.
10. Click Apply.
You are now finished configuring the Kinetix 5500 axis for Velocity Loop
with Motor Feedback.
Rockwell Automation Publication MOTION-UM003F-EN-P - March 2015
115
Chapter 5
Configuration Examples for a Kinetix Drive
Example 5: Kinetix 350 Drive,
Position Loop with Motor
Feedback
In this example, create a project with a CompactLogix controller, for example,
1769-L36ERM. You are configuring a Kinetix 350 drive, catalog number 2097V33PR6-LM, with motor feedback by using a Rotary Permanent Magnet motor,
catalog number MPAR-A1xxxB-V2A.
You will need to connect the Motor Feedback cable to the Motor Feedback port
of the Kinetix 350 drive and then configure the feedback port.
1. Once you have added the drive to your project and created an
AXIS_CIP_DRIVE, open the Axis Properties.
This is type of drive you selected the Kinetix 350
Module Properties.
For more information, see Add a Kinetix EtherNet/IP
Drive on page 20.
The newly created Kinetix 350 drive module name is the
default. The Axis Number defaults to 1, indicating the
axis of the drive.
TIP
After you have configured the axis and you change the Axis Configuration type
or the Axis Number, some of the configuration information will be set to
default values. This may cause some previously entered data to be reset back to
its default setting.
2. Click the Motor dialog box.
3. Choose Catalog Number as the Motor Data Source.
116
Rockwell Automation Publication MOTION-UM003F-EN-P - March 2015
Configuration Examples for a Kinetix Drive
Chapter 5
4. Click Change Catalog and choose your motor, for example, catalog
number MPAR-A1xxxB-V2A.
When you select the Catalog Number for the motor specification, the
MPAR-A1xxxB-V2A motor is in the Motion Database, The specification
data for this motor is automatically filled in for you.
If the motor you are using is not in the Change Catalog listing, then it is
not in the Motion Database. You will need to input the specification data
or add a custom motor to the Motion Database that can be selected.
For more information, see Choose Nameplate on page 41.
Rockwell Automation Publication MOTION-UM003F-EN-P - March 2015
117
Chapter 5
Configuration Examples for a Kinetix Drive
5. Click the Motor Feedback dialog box.
With this drive and motor combination, the data is automatically
populated based on that selection.
118
Rockwell Automation Publication MOTION-UM003F-EN-P - March 2015
Configuration Examples for a Kinetix Drive
Chapter 5
6. Click the Scaling dialog box to adjust the Scaling attributes.
The default load type is linear actuator.
7. Enter the Scaling Units.
8. Enter the Travel Range.
For more information about Scaling, see Scaling Dialog Box on page 146.
9. Click OK.
You are now finished configuring the Kinetix 350 axis for Position Loop
with Motor Feedback.
Rockwell Automation Publication MOTION-UM003F-EN-P - March 2015
119
Chapter 5
Configuration Examples for a Kinetix Drive
Notes:
120
Rockwell Automation Publication MOTION-UM003F-EN-P - March 2015
Chapter
6
Axis Configuration Examples for the
PowerFlex 755 Drive
This chapter provides example axis configurations when using a PowerFlex 755
drive.
Topic
Page
Example 1: Position Loop with Motor Feedback Using a UFB Feedback Device
122
Example 2: Position Loop with Dual Motor Feedback Via a UFB Feedback Device
125
Example 3: Velocity Loop with Motor Feedback Via a UFB Feedback Device
130
Example 4: Velocity Loop with No Feedback
134
Example 5: Frequency Control with No Feedback
137
Example 6: Torque Loop with Feedback
141
The following six examples are typical axis configuration applications for the
PowerFlex 755 drive:
•
•
•
•
•
•
Position Loop with Motor Feedback
Position Loop with Dual Feedback
Velocity Loop with Motor Feedback
Velocity Control with No Feedback
Frequency Control with No Feedback
Torque Loop with Feedback
Rockwell Automation Publication MOTION-UM003F-EN-P - March 2015
121
Chapter 6
Axis Configuration Examples for the PowerFlex 755 Drive
Example 1: Position Loop
with Motor Feedback Using a
UFB Feedback Device
This example describes how to create an AXIS_CIP_DRIVE axis that is
associated to a PowerFlex 755 drive with motor feedback via a universal feedback
device, catalog number 20-750-UFB-1.
TIP
Remember that you already assigned the feedback device when you
added the drive to your project.
See Create an Axis for a PowerFlex 755 Drive on page 54 for more information
about feedback devices.
1. Once you have created an AXIS_CIP_DRIVE, open the Axis Properties.
2. From the Axis Configuration pull-down menu, choose Position Loop.
When you choose the configuration type, it determines the Control
Mode.
See the Integrated Motion on the EtherNet/IP Network Reference
Manual, publication MOTION-RM003.
Example 1: Position Loop with Motor Feedback, General Dialog Box
The newly created PowerFlex 755 drive module
name is the default. The Axis Number defaults
to 1, indicating the primary axis of the drive.
Axis Number 2 is used only for configuring a
Feedback Only axis.
Module type shows you the
type of drive you selected and
power structure you assigned
to via the PowerFlex 755 drive
Module Properties.
See Add a PowerFlex 755
Drive on page 49.
3. From the Feedback Configuration pull-down menu, choose Motor
Feedback.
TIP
After you have configured the axis and you change the Axis Configuration
type or the Axis Number, some of the configuration information is set to
default values. This can cause some previously entered data to be reset back
to its default setting.
Now that you defined the axis as being a Position Loop with Motor
Feedback, the Motor and Motor Feedback dialog boxes become available.
122
Rockwell Automation Publication MOTION-UM003F-EN-P - March 2015
Axis Configuration Examples for the PowerFlex 755 Drive
Chapter 6
Example 1: Position Loop with Motor Feedback, Motor Dialog Box
4. Choose Catalog Number as the Data Source.
5. Click Change Catalog and choose a motor.
When you select the Catalog Number for the motor specification,
the MPL-B310P-M motor is in the Motion Database. The specification
data for this motor is automatically entered for you. If the motor you are
using is not in the Change Catalog list, then it is not in the Motion
Database. You have to enter the specification data on your own.
The Motor Feedback dialog box is automatically filled based on your
motor selection.
Example 1: Position Loop with Motor Feedback, Motor Feedback Dialog Box
6. Choose the Commutation Alignment.
Rockwell Automation Publication MOTION-UM003F-EN-P - March 2015
123
Chapter 6
Axis Configuration Examples for the PowerFlex 755 Drive
For more information about Commutation, see Assign Motor Feedback
on page 43 and Commutation Test on page 156.
Example 1: Position Loop with Motor Feedback, Scaling Dialog Box
7. From the Load Type pull-down menu, choose your type of load.
8. Enter the Scaling Units.
9. From the Travel Mode pull-down menu, choose your Travel Mode.
For more information about Scaling, see Scaling Dialog Box on page 146.
10. Click Apply and OK to exit Axis Properties.
The axis is now configured for Position Loop with Motor Feedback.
124
Rockwell Automation Publication MOTION-UM003F-EN-P - March 2015
Axis Configuration Examples for the PowerFlex 755 Drive
Example 2: Position Loop
with Dual Motor Feedback
Via a UFB Feedback Device
Chapter 6
This example describes how to create an AXIS_CIP_DRIVE axis that is
associated to a PowerFlex 755 drive with dual motor feedback via a universal
feedback device, catalog number 20-750-UFB-1.
TIP
Remember that you already assigned the feedback device when you
added the drive to your project.
See Create an Axis for a PowerFlex 755 Drive on page 54 for more information
about feedback devices.
1. Once you have created an AXIS_CIP_DRIVE, open the Axis Properties.
2. From the Axis Configuration pull-down menu, choose Position Loop.
3. From the Feedback Configuration pull-down menu, choose Dual
Feedback.
When you choose the configuration type, it determines the Control
Mode.
See the Integrated Motion on the EtherNet/IP Network Reference
Manual, publication MOTION-RM003.
Example 2: Position Loop with Dual Feedback, General Dialog Box
This shows you the type of
drive you selected and power
structure you assigned to via
the PowerFlex 755 drive
Module Properties.
See Add a PowerFlex 755 Drive
on page 49.
The newly created PowerFlex 755 drive module name is the default. The Axis
Number defaults to 1, indicating the primary axis of the drive. Axis Number 2
is used only for configuring a Feedback Only axis.
IMPORTANT
After you have configured the axis and you change the Axis Configuration type
or the Axis Number, some of the configuration information is set to default
values. This can cause some previously entered data to be reset back to its
default setting.
Now that you defined the axis as being a Position Loop with Dual
Feedback axis, the Motor Feedback, and Load Feedback dialog boxes
become available.
Rockwell Automation Publication MOTION-UM003F-EN-P - March 2015
125
Chapter 6
Axis Configuration Examples for the PowerFlex 755 Drive
4. From the Data Source pull-down menu, choose Catalog Number.
Example 2: Position Loop with Dual Feedback, Motor Dialog Box
5. Click Change Catalog and choose your motor.
In this case, a MPL-B310P-M motor was chosen.
When you select the Catalog Number for the motor specification,
the MPL-B310P-M motor is in the Motion Database. The specification
data for this motor is automatically entered for you. If the motor you are
using is not listed in Change Catalog, then it is not in the Motion
Database. You have to enter the specification data on your own.
The Motor Feedback dialog box is automatically filled based on your
motor selection.
Example 2: Position Loop with Dual Feedback, Motor Feedback Dialog Box
6. Choose the Commutation Alignment.
126
Rockwell Automation Publication MOTION-UM003F-EN-P - March 2015
Axis Configuration Examples for the PowerFlex 755 Drive
Chapter 6
For more information about Commutation, see Commutation Test on
page 156.
Example 2: Position Loop with Dual Feedback, Motor Feedback Dialog Box
On the Motor Feedback dialog box, the information is automatic based on
your selections on the Motor dialog box.
If you have not defined a feedback device, the motor dialog box
displays a link taking you to the module definition for the drive.
The axis is now configured as a Position Loop with two feedback devices.
The next task is to configure Feedback 2 on the Load Feedback dialog box.
Rockwell Automation Publication MOTION-UM003F-EN-P - March 2015
127
Chapter 6
Axis Configuration Examples for the PowerFlex 755 Drive
Follow these instructions to define the Load feedback.
1. From the Load Feedback dialog box, click the Define feedback device link.
Example 2: Load-side Feedback, Load Feedback Dialog Box
Link
2. Click Associated Axes in Module Properties dialog box.
3. From the Load Feedback Device pull-down menu, choose the appropriate
port/channel for the Load Feedback Device.
Example 2: PowerFlex 755 Module Properties, Associated Axis Tab
4. From the Type pull-down menu, choose the type of feedback.
5. From the Units pull-down menu, choose the appropriate units.
6. Click Apply.
128
Rockwell Automation Publication MOTION-UM003F-EN-P - March 2015
Axis Configuration Examples for the PowerFlex 755 Drive
Chapter 6
Example 2: Load-side Feedback, Load Feedback Dialog Box
Example 2: Position Loop with Dual Feedback, Scaling Dialog Box
7. From the Load Type pull-down menu, choose your load type.
8. Enter the Scaling Units.
9. From the Travel Mode pull-down menu, choose a Travel Mode.
See Scaling Dialog Box on page 146 for more information about Scaling.
10. Click Apply and OK to exit Axis Properties.
You are now finished configuring a PowerFlex 755 drive axis as Position Loop
with Dual Feedback.
Rockwell Automation Publication MOTION-UM003F-EN-P - March 2015
129
Chapter 6
Axis Configuration Examples for the PowerFlex 755 Drive
Example 3: Velocity Loop
with Motor Feedback Via a
UFB Feedback Device
This example describes how to create two AXIS_CIP_DRIVE axes that are
associated to a PowerFlex 755 drive with dual motor feedback via a universal
feedback device, catalog number 20-750-UFB-1.
TIP
Remember that you already assigned the feedback device when you
added the drive to your project.
1. Once you have created an AXIS_CIP_DRIVE, open the Axis Properties.
2. Connect the Feedback Port 1 with one feedback cable that is connected to
the PowerFlex 755 drive.
3. From the Axis Configuration pull-down menu, choose Velocity Loop.
4. From the Feedback Configuration pull-down menu, choose Motor
Feedback.
Example 3: Velocity Loop with Motor Feedback, General Dialog Box
The selections determine the Control Mode.
See the Integrated Motion on the EtherNet/IP
Network Reference Manual, publication,
MOTION-RM003.
The newly created PowerFlex 755 drive module
name is the default. The Axis Number defaults to
1, indicating the primary axis of the drive. Axis
Number 2 is used only for configuring a Feedback
Only axis.
IMPORTANT
This shows you the type of drive you selected
and power structure you assigned via the
PowerFlex 755 drive Module Properties.
See Add a PowerFlex 755 Drive on page 49.
After you have configured the axis and you change the Axis Configuration type
or the Axis Number, some of the configuration information is set to default
values. This can cause some previously entered data to be reset back to its
default setting.
Now that you defined the axis as a Velocity Loop with Motor Feedback,
the Motor and Motor Feedback dialog boxes become available.
130
Rockwell Automation Publication MOTION-UM003F-EN-P - March 2015
Axis Configuration Examples for the PowerFlex 755 Drive
Chapter 6
Example 3: Velocity Loop with Motor Feedback, Motor Dialog Box
5. From the Data Source pull-down menu, choose Nameplate Datasheet.
6. From the Motor Type pull-down menu, choose Rotary Induction.
7. Enter the parameters by using the information from the motor Nameplate
or Datasheet and click Apply.
8. Enter the parameters on the Motor Model dialog box by using the
information from the motor Nameplate or Datasheet and click Apply.
Rockwell Automation Publication MOTION-UM003F-EN-P - March 2015
131
Chapter 6
Axis Configuration Examples for the PowerFlex 755 Drive
Example 3: Motor Feedback Dialog Box, Velocity Loop with Motor Feedback
9. From the Type pull-down menu, choose the type of feedback.
The fields are populated with the data that relates to the motor and
feedback types you chose.
Example 3: Velocity Loop with Motor Feedback, Motor Feedback Dialog Box
10. Click Scaling.
132
Rockwell Automation Publication MOTION-UM003F-EN-P - March 2015
Axis Configuration Examples for the PowerFlex 755 Drive
Chapter 6
Example 3: Velocity Loop with Motor Feedback, Scaling Dialog Box
11. From the Load Type pull-down menu, choose the appropriate load type.
12. Enter the Scaling Units.
13. From the Travel Mode pull-down menu, choose the appropriate Travel
Mode.
See Scaling Dialog Box on page 146 for more information.
14. Click Apply and OK to exit Axis Properties.
You are now finished configuring the axis as Velocity Loop with Motor
Feedback.
Rockwell Automation Publication MOTION-UM003F-EN-P - March 2015
133
Chapter 6
Axis Configuration Examples for the PowerFlex 755 Drive
Example 4: Velocity Loop
with No Feedback
In this example, you create an AXIS_CIP_DRIVE configured for a Velocity
Loop with No Feedback axis and associate the axis to the PowerFlex 755 drive.
1. From the Axis Configuration pull-down menu, choose Velocity Loop.
2. From the Feedback Configuration pull-down menu, choose No Feedback.
Example 4: Velocity Loop with No Feedback, General Dialog Box
The selections determine the Control Mode.
See the Integrated Motion on the EtherNet/IP
Network Reference Manual, publication,
MOTION-RM003.
This shows you the type of drive you selected
and power structure you assigned via the
PowerFlex 755 drive Module Properties.
See Add a PowerFlex 755 Drive on page 49.
The newly created PowerFlex 755 drive module
name is the default. The Axis Number defaults
to 1, indicating the primary axis of the drive.
Axis Number 2 is used only for configuring a
Feedback Only axis.
134
Rockwell Automation Publication MOTION-UM003F-EN-P - March 2015
Axis Configuration Examples for the PowerFlex 755 Drive
Chapter 6
3. From the Data Source pull-down menu, choose Nameplate Datasheet.
Example 4: Velocity Loop with No Feedback, Motor Dialog Box
When you select No Feedback, the
Motor Feedback dialog box does not
appear.
In this case, the drive has already
been configured for the motor by the
DriveExecutive™ software or the HIM
configuration tools.
Example 4: Velocity Loop with No Feedback, Scaling Dialog Box
For scaling with Feedback = [No Feedback], the
Scaling factor's denominator is forced to have
fixed units = [Motor Rev/s] because the
controller internally simulates the Feedback
(Configuration =[No Fdbk]).
4. From the Load Type pull-down menu, choose the appropriate load type.
5. Enter the Scaling Units.
6. From the Travel Mode pull-down menu, choose the appropriate Travel
Mode.
See Scaling Dialog Box on page 146 for more information.
7. Click Apply.
Rockwell Automation Publication MOTION-UM003F-EN-P - March 2015
135
Chapter 6
Axis Configuration Examples for the PowerFlex 755 Drive
Example 4: Velocity Loop with No Feedback, Load Dialog Box
8. From the Load Coupling pull-down menu, choose the appropriate load
coupling.
9. Enter the System Inertia.
10. Enter the Torque Offset, if applicable.
For more information about the load characteristics, see Load Dialog Box
on page 164.
11. Click Apply.
You are now finished configuring an axis as Velocity Loop with No Feedback.
136
Rockwell Automation Publication MOTION-UM003F-EN-P - March 2015
Axis Configuration Examples for the PowerFlex 755 Drive
Example 5: Frequency
Control with No Feedback
Chapter 6
In this example, you are configuring an axis for Frequency Control with No
Feedback.
1. Once you have created the AXIS_CIP_DRIVE axis, open the Axis
Properties.
2. From the Axis Configuration pull-down menu, choose Frequency
Control.
3. From the Feedback Configuration pull-down menu, choose No Feedback.
Example 5: Frequency Control with No Feedback, General Dialog Box
This defines the controller Control Mode.
See the Integrated Motion on the EtherNet/
IP Network Reference Manual, publication,
MOTION-RM003.
This shows you the type of drive you selected and
power structure you assigned via the PowerFlex 755
drive Module Properties.
See Add a PowerFlex 755 Drive on page 49.
The newly created PowerFlex 755 drive module
name is the default. The Axis Number defaults to
1, indicating the primary axis of the drive. Axis
Number 2 is used only for configuring a Feedback
Only axis.
Rockwell Automation Publication MOTION-UM003F-EN-P - March 2015
137
Chapter 6
Axis Configuration Examples for the PowerFlex 755 Drive
4. From the Data Source pull-down menu, choose a data source.
In this case, Nameplate Datasheet is the Data Source.
See the Specifying the Motor Data Source on page 39 for more
information about Data Sources.
Example 5: Frequency Control with No Feedback, Motor Dialog Box
In this case, the data source is Catalog Number and the Motion Database
provides values for these fields.
See the Display Motor Model Information on page 42 for more
information about data sources.
Example 5: Frequency Control with No Feedback, Motor Model Dialog Box
138
Rockwell Automation Publication MOTION-UM003F-EN-P - March 2015
Axis Configuration Examples for the PowerFlex 755 Drive
Chapter 6
5. From the Frequency Control Method pull-down menu, choose the
appropriate method.
6. Click Apply.
Example 5: Frequency Control with No Feedback, Frequency Control Dialog Box
Example 5: Frequency Control Method, Basic Volts/Hertz
Rockwell Automation Publication MOTION-UM003F-EN-P - March 2015
139
Chapter 6
Axis Configuration Examples for the PowerFlex 755 Drive
Example 5: Frequency Control with No Feedback, Scaling Dialog Box Conversion Units
7. From the Load Type pull-down menu, choose the appropriate load type.
8. Enter the Transmission Ratio.
9. From the Actuator Type pull-down menu, choose the appropriate actuator.
10. Enter the Diameter dimensions.
11. Enter the Scaling Units.
See the Scaling Dialog Box on page 146 for more information.
12. From the Travel Mode pull-down menu, choose the appropriate travel
mode.
13. Click Apply.
You are now finished configuring the axis for Frequency Control with No
Feedback.
140
Rockwell Automation Publication MOTION-UM003F-EN-P - March 2015
Axis Configuration Examples for the PowerFlex 755 Drive
Example 6: Torque Loop with
Feedback
Chapter 6
In this example, you are configuring the axis for Torque Loop with feedback.
1. Once you have created the AXIS_CIP_DRIVE axis, open the Axis
Properties.
2. From the Axis Configuration pull-down menu, choose Torque Loop.
3. From the Feedback Configuration pull-down menu, choose Motor
Feedback.
Example 6: Torque Loop with Motor Feedback, General Dialog Box
This defines the controller Control Mode.
See the Integrated Motion on the EtherNet/IP
Network Reference Manual, publication,
MOTION-RM003.
This shows you the type of drive you selected
and power structure you assigned via the
PowerFlex 755 drive Module Properties.
See Add a PowerFlex 755 Drive on page 49.
The newly created PowerFlex 755 drive module
name is the default. The Axis Number defaults to
1, indicating the primary axis of the drive. Axis
Number 2 is used only for configuring a
Feedback Only axis.
Example 6: Torque Loop with Motor Feedback, Motor Dialog Box
Rockwell Automation Publication MOTION-UM003F-EN-P - March 2015
141
Chapter 6
Axis Configuration Examples for the PowerFlex 755 Drive
Example 6: Torque Loop with Motor Feedback, Feedback Type
4. From the Type pull-down menu, choose the appropriate feedback type.
Example 6: Torque Loop with Motor Feedback, Feedback Type
142
Rockwell Automation Publication MOTION-UM003F-EN-P - March 2015
Axis Configuration Examples for the PowerFlex 755 Drive
Chapter 6
Example 6: Torque Loop with Motor Feedback, Scaling Load Type
5. From the Load Type pull-down menu, choose the appropriate load type.
Example 6: Torque Loop with Motor Feedback, Scaling Conversions
6. Enter the Transmission Ratio.
7. Enter the Scaling Units.
8. From the Travel Mode pull-down menu, choose the appropriate travel
mode.
See the Scaling Dialog Box on page 146 for more information.
9. Click Apply.
You are now finished configuring the axis for Torque Loop with Motor
Feedback.
Rockwell Automation Publication MOTION-UM003F-EN-P - March 2015
143
Chapter 6
Axis Configuration Examples for the PowerFlex 755 Drive
Notes:
144
Rockwell Automation Publication MOTION-UM003F-EN-P - March 2015
Chapter
7
Commission
This chapter discusses how to commission an axis for a motion application.
Commissioning includes Off-line Scaling settings, downloading a project,
running a Hookup Test, performing Tuning, and using the Motion Direct
Commands.
Topic
Page
Scaling Dialog Box
146
Hookup Tests Dialog Box
150
Test Cable Connections, Wiring, and Motion Polarity
151
Commutation Test
156
Polarity Dialog Box
160
Autotune Dialog Box
160
Load Dialog Box
164
Load Observer Configuration
167
Test an Axis with Motion Direct Commands
170
Once you have followed the steps in Configuration Examples for a Kinetix Drive
on page 99, or Configure Integrated Motion Using a PowerFlex 755 Drive on
page 47, you commission the axis.
Rockwell Automation Publication MOTION-UM003F-EN-P - March 2015
145
Chapter 7
Commission
Scaling Dialog Box
Axis motion can be specified in whatever units you want. In the Scaling dialog
box, you configure the motion control system to convert between raw internal
motion units. For example, Feedback Counts or Planner Counts can be
converted to your preferred unit of measure, be it revolutions, degrees, meters,
inches, or candy bars.
This conversion involves three key Scaling Factor attributes, Conversion
Constant, Motion Resolution, and Position Unwind. If you use the Scaling dialog
box, the software calculates the Scaling Factors for you. The only task that you do
is select the Load Type that best matches the mechanical linkage between the
motor and the load.
There are four Load types:
• Direct Coupled Rotary
The load is directly coupled to the linear motor moving mass.
• Direct Coupled Linear
The load is directly coupled to the linear motor moving mass.
• Rotary Transmission
The rotational load is coupled to the motor through a geared transmission.
• Linear Actuator
The linear load is coupled to a rotary motor through a rotary to linear
mechanical system.
This is the default Scaling dialog box for a Direct Coupled Rotary load type. By
default, the Scaling dialog box is set for 1 ‘Position Unit’ per Motor Rev.
By default the Scaling dialog box is set
for 1 `Position Unit’ per Motor Rev.
When you click Parameters you see values for the Conversion Constant and the
Motion Resolution, each having a value of 1 million. These values are generated
from the software calculator.
In most cases, the software scaling calculator generates Scaling Factor values that
are suitable for the application. But in rare cases, like applications that require
online product recipe changes, you can set the Scaling Source attribute to Direct
Scaling Factor Entry. This allows you to enter the Scaling Factors.
146
Rockwell Automation Publication MOTION-UM003F-EN-P - March 2015
Commission
TIP
Chapter 7
In a sercos application, the Scaling Factors are Conversion Constant, Drive
Resolution, and Position Unwind.
Direct Coupled Rotary
For a Direct Coupled Rotary load type, you can express Scaling Units for the
rotary motor, for example, Degrees.
Here is an example of Direct Coupled Rotary load that is scaled in Degrees and
the resulting values for the Conversion Constant and Motion Resolution.
Rockwell Automation Publication MOTION-UM003F-EN-P - March 2015
147
Chapter 7
Commission
Direct Coupled Linear
For a Direct Coupled Linear load type, you can express Scaling Units for the
linear motor, for example, Inches.
Here is an example of Direct Coupled Linear load that is scaled in Inches and the
resulting values for the Conversion Constant and Motion Resolution.
For more information about Conversion Constant and Motion Resolution, see
the Integrated Motion on the EtherNet/IP Network Reference Manual,
publication MOTION-RM003.
Rotary Transmission
For a Rotary Transmission load type, you enter the Transmission ratio
mechanical system. When you allow the software scaling calculator to compute
the Scaling Factors by using the Transmission Ratio, it reduces the risks of
cumulative errors due to irrational numbers.
Here is an example of Rotary Transmission load scaled in Packages (three
packages per Load Revolution) and the resulting values for the Conversion
Constant and Motion Resolution.
Scaling Units for Rotary Transmission
load type is expressed in terms of Load
Revolutions, for example, Packages.
148
Rockwell Automation Publication MOTION-UM003F-EN-P - March 2015
Commission
Chapter 7
Linear Actuator
With the Linear Actuator load type, you can specify the characteristics of the
linear actuator mechanics by the Actuator Type.
Changing Scaling
Changing Scaling configuration factors can have a significant impact on the
calculations of factory defaults for scaling dependent axis configuration
attributes.
When certain criteria are met, described below, the following dialog box appears
when you apply changes.
This dialog box gives you the choice to recalculate factory defaults for scaling
dependent attributes.
1. Click Yes to recalculate and apply all dependent attribute values.
2. Click No to apply only changes to the scaling attributes.
Rockwell Automation Publication MOTION-UM003F-EN-P - March 2015
149
Chapter 7
Commission
Once you have applied your configurations, the factory defaults for dynamic
configuration attributes, for example, gain, limits, and filter settings are
automatically computed. The calculations are based on your drive and motor
configuration settings and selection for application type and loop response.
The factory defaults yield a stable operational system that can then be tailored to
the specific requirements for many types of machine applications.
If you find that the gain set provided to you by the factory defaults does not
satisfy your configuration requirements of your system, then you can use
Autotune to improve performance.
See Autotune Dialog Box on page 160.
Hookup Tests Dialog Box
Use the Hookup Tests dialog box to check the following:
• your cabling
• adjust motor and feedback polarity
• establish your sense of positive motion direction
• and, if applicable, check encoder marker and commutation function.
To run any of the Hookup Tests, you must first download your program.
ATTENTION: These tests can actively move the axis even with the
controller in remote Program mode:
• Before you do the tests, make sure no one is in the way of the axis.
• Changing motor or feedback after performing the Hookup Test can
result in an axis-runaway condition when the drive is enabled.
These tasks are the run tests on the Hookup test dialog box.
• Download a program.
• Run a Hookup test to test motor and feedback device wiring.
• Run a Marker test to check for the marker pulse.
• Run a Motor Feedback test to check for feedback counts.
• Set a test distance and run a Motor and Feedback test.
• Run a Load Feedback test.
• Run a Commutation test.
The combination of the Axis and Feedback configuration types you choose
determines what Hookup tests are available.
150
Rockwell Automation Publication MOTION-UM003F-EN-P - March 2015
Commission
Chapter 7
Test Cable Connections, Wiring, and Motion Polarity
Various types of Hookup Tests become available depending on what type of drive
you are using and what combinations of Axis Configuration and Feedback
Configuration types you choose.
Table 16 - Types of Hookup Tests
Test
Description
Marker
Checks that the drive gets the marker pulse. You must manually move the
axis for this test.
Motor and Feedback
Tests the polarity of the motor, motion, load, and motor feedback.
Motor Feedback
Tests the polarity of the motor feedback.
Load Feedback
Test the load feedback polarity of the motor.
Commutation
Tests the commutation offset and polarity of a drive.
Master Feedback
Test the master feedback polarity.
Rockwell Automation Publication MOTION-UM003F-EN-P - March 2015
151
Chapter 7
Commission
This table lists the Hookup Tests that is based on axis configuration and drive
type.
Table 17 - Types of Hookup Tests
Drive(1)
Axis Type
Feedback Type
Feedback Only
Master Feedback Kinetix 5500
x
Kinetix 6500
x
Frequency Control
No Feedback
Position Loop
Velocity Loop
Torque Loop
Motor Feedback
Master Feedback Motor and Feedback
Motor Feedback Load Feedback Marker
x
x
Kinetix 5500
x
PowerFlex 755
x
Kinetix 350
x
x
x
Kinetix 5500
x
x
x
Kinetix 6500
x
x
x
x
x
x
PowerFlex 755
x
x
Load Feedback
Kinetix 6500
x
x
x
x
Dual Feedback
Kinetix 6500
x
x
x
x (motor)
x (motor)
PowerFlex 755
x
x
x
x (motor)
x (motor)
Dual Integrated
Feedback
PowerFlex 755
x
x
x
x (motor)
x (motor)
Motor Feedback
Kinetix 350
x
x
x
Kinetix 5500
x
x
x
Kinetix 6500
x
x
x
x
PowerFlex 755
x
x
x
x
Load Feedback
Kinetix 6500
x
x
x
x
No Feedback
PowerFlex 755
x
Motor Feedback
Kinetix 350
x
x
x
Kinetix 5500
x
x
x
Kinetix 6500
x
x
x
x
PowerFlex 755
x
x
x
x
Kinetix 6500
x
x
x
x
Load Feedback
(1) For the Kinetix 5700 drive, see the Kinetix 5700 Multi-axis Servo Drives User Manual, publication 2198-UM002.
152
Commutation
Rockwell Automation Publication MOTION-UM003F-EN-P - March 2015
x
x
Commission
Chapter 7
Run a Motor and Feedback Test
The Motor and Feedback Test is the most commonly used Hookup Test because
it automatically tests both the motor and feedback wiring and determines correct
polarity values.
ATTENTION: These tests make the axis move even with the controller in
remote Program mode. Before you do the tests, make sure no one is in
the way of the axis.
Follow these steps to perform a Motor and Feedback Hookup Test.
1. Go to the Hookup Tests dialog box.
Remember that a blue arrow next to a field means that when you change its
value the new value automatically gets written to the controller when you
leave the field.
2. Enter the Test Distance.
This is the distance that the test moves the axis.
3. Click Start to run the Motor and Feedback test.
4. The axis will move on its own to test for feedback polarity and proper
wiring. Watch the axis to check for proper rotation direction.
Rockwell Automation Publication MOTION-UM003F-EN-P - March 2015
153
Chapter 7
Commission
The drive determines that the feedback device is working properly and the
test passed.
5. Click OK.
6. If your axis moved in a forward direction, click yes and you see that the test
result is Normal.
If the motor does not move in the forward direction, according to your
application the test result is inverted. When you accept test results the
Current shows inverted.
See the Polarity Dialog Box on page 160.
If you are satisfied with the results, you can accept the test results.
The test can pass but give you results that you are not expecting. In this
case, you can have a wiring problem.
See the related drive documentation that is listed in the Preface on page 11.
7. Click Yes or No depending on whether the axis moved in the forward
direction for your application.
8. Click Accept Results, if the test ran successfully.
154
Rockwell Automation Publication MOTION-UM003F-EN-P - March 2015
Commission
Chapter 7
Run a Motor Feedback Test
The Motor Feedback Test tests the polarity of the motor feedback. Follow these
steps to perform a Motor Feedback test.
1. From the Hookup Tests dialog box, click the Motor Feedback tab.
2. Enter the Test Distance.
3. Click Start.
Run a Marker Test
The Marker Test checks that the drive receives the marker pulse from the position
feedback device. You must manually move the axis for this test. Follow these steps
to perform a Marker test.
1. From the Hookup Tests dialog box.
2. Click the Marker tab.
3. Click Start to check for the marker pulse.
4. Manually move the axis until you get the marker pulse.
Rockwell Automation Publication MOTION-UM003F-EN-P - March 2015
155
Chapter 7
Commission
The drive receives the marker pulse and the test passed.
5. Click OK.
Commutation Test
The Commutation Test determines an unknown Commutation Offset and
potentially the unknown polarity of the start-up commutation wiring. The
Commutation Test can be used also to verify both a known Commutation Offset
and the polarity start-up commutation wiring. This test is applied to third-party
or custom Permanent Magnet motors that are not available as a Catalog Number
in the Motion Database.
When a motor needs a Commutation Offset and you are not using Catalog
number as the Motor Data Source, you cannot enable the axis.
Applying the Commutation Hookup Test
There are several different cases where the Commutation Hookup Test can be
applied to a PM motor:
• Unknown Commutation Offset
• Verification of Known Commutation Offset
• Non-standard or Incorrect Wiring
156
Rockwell Automation Publication MOTION-UM003F-EN-P - March 2015
Commission
Chapter 7
Unknown Commutation Offset
The primary use for the Commutation Hookup Test is the case where the
machine is equipped with a PM motor that has an unknown Commutation
Offset.
The Commutation Offset, and potentially Commutation Polarity, can be
unknown for different reasons, including an unprogrammed ‘smart encoder’ or
any generic third-party encoder where Commutation Offset is unknown.
TIP
The Kinetix 350 and the Kinetix 5500 drives do not support the
Commutation Polarity attribute.
Rockwell Automation Publication MOTION-UM003F-EN-P - March 2015
157
Chapter 7
Commission
Verification of Known Commutation Offset
Another use of the Commutation Test is to verify that the motor is wired
correctly and has the expected Commutation Offset. A machine engineer may
not want to correct for a wiring error in software but rather flag a wiring error so
that it may be physically corrected. Incorrect wiring of the motor power phases,
encoder signal wiring, or commutation signal wiring may show up as an
unexpected Commutation Offset.
For example, suppose that a motor was wired in a ‘WUV’ sequence instead of the
normal ‘UVW’ sequence. The motor would still rotate in the correct direction,
but the Commutation Test indicate that the Commutation Offset was off by a
factor of 120 electrical degrees.
After running the Motor and Feedback Hookup Tests, you can run the
Commutation Test to determine the specific Commutation Offset and
Commutation Polarity. The drive executes the Commutation Test, which
includes rotating the motor in the positive direction by at least one revolution.
The results of the Commutation Test are reported back to compare against the
known Commutation Offset and Commutation Polarity to determine if a wiring
issue exists.
Non-standard or Incorrect Wiring
The Commutation Test can also be applied to a PM motor that is wired in a nonstandard manner or incorrectly. In the case of incorrect wiring, it is sometimes
desirable to mitigate the problem via software. This can be the case on larger
machines where changing the wiring would be difficult due to the size and
location of the wiring.
After running the Motor and Feedback Hookup Tests, you can run the
Commutation Test to determine the specific Commutation Offset and
Commutation Polarity. The drive executes the Commutation Test, which
includes rotating the motor in the positive direction by at least one revolution.
The results of the Commutation Test are reported back for review, and, if found
satisfactory, you can accept the results as part of the controller’s stored axis
configuration that is sent to the drive during initialization to establish the correct
wiring polarity.
158
Rockwell Automation Publication MOTION-UM003F-EN-P - March 2015
Commission
Chapter 7
Run a Commutation Test
Setting the Motor and Feedback Polarity by using the Motor and Feedback Test
prior to running the Commutation Test helps ensure that the motor spins in the
correct direction for the Commutation Test for monitoring the Commutation
Angle.
You should run the Motor and Feedback Test first to determine that your
feedback is working. If the Feedback is not working, the Commutation Test
will give you incorrect results or the test will timeout.
TIP
Follow these steps to run a commutation test.
1. Click Start to run the Commutation Test to determine the Commutation
Offset and Commutation Polarity.
TIP
The Kinetix 350 and the Kinetix 5500 drives do not support the
Commutation Polarity attribute.
The drive executes the Commutation Test, which includes rotating the
motor in the positive direction by at least one revolution.
The results of the Commutation Test appear.
2. If the results are satisfactory, click Accept Test Results.
Commutation Offset and Polarity results are stored in the controller as
part of the axis configuration that is sent to the drive during initialization.
Rockwell Automation Publication MOTION-UM003F-EN-P - March 2015
159
Chapter 7
Commission
Polarity Dialog Box
If you have run the Motor and Feedback Hookup Test, the settings on the
Polarity dialog box are already correct for the application. If the polarity settings
are known and cables to the motor and feedback devices are prefabricated and
tested, the polarity settings can be entered on this dialog box.
At this point in the commissioning process, the axis is ready for operation. You
may use Direct Commands to initiate axis motion or you may run your
application program. If you find that the dynamic performance of your axis does
not meet your system requirements, use Autotune to improve performance.
Autotune Dialog Box
Once you have set the parameters and performed tasks in the General, Motor,
Motor Feedback, Scaling, Hookup Test, and Polarity dialog boxes, you are ready
to Autotune, if needed. These steps are included in Autotune.
• Select the Application Type, Loop Response, and Load Coupling.
• Set the Travel Limit, Speed, Torque, and Direction.
• Perform Tune.
• Review results.
Autotune is optional. Typically you don’t use Autotune or Manual Tune. Once
you select your drive and use the Motion Database as the data source, the defaults
often provide adequate tuning performance.
In most cases, the software default calculations are adequate and Autotune and/
or Manual Tune should not be needed. Depending on the application type and
axis configuration, you may need to use Manual Tune.
See Manual Tune an Axis on page 195.
ATTENTION: When you tune an axis, it moves even with the controller
in Remote Program mode. In that mode, your code is not in control of
the axis. Before you tune an axis, make sure no one is in the way of the
axis.
1. Click the Autotune dialog box.
160
Rockwell Automation Publication MOTION-UM003F-EN-P - March 2015
Commission
Chapter 7
The Application Type, Loop Response, and Load Coupling settings are
conveniently grouped at the top left of the Autotune dialog box. These
three attributes control the Autotune servo loop gain and filter bandwidth
calculations.
If this box is checked, the Autotune
moves the motor using a Tune
Profile to measure inertia.
If this box is not checked, gain and
filter bandwidth calculations are
still made but the inertia is not
measured.
Choose whether the motor is
coupled to the load or not.
These are the same settings you made on the General dialog box. You can
change them here, if desired.
Autotune normally applies a Tune Profile to briefly accelerate and
decelerate the motor to measure its inertia. The measured inertia is
normally used to establish the overall System Inertia. However, if the
Uncoupled Motor box is checked, the measured inertia is applied to Motor
Inertia attribute.
To configure the Tune Profile, you enter the Travel Limit, Speed, Torque,
and Direction.
2. Set the Travel Limit that is based on the travel constraints of the machine.
Rockwell Automation Publication MOTION-UM003F-EN-P - March 2015
161
Chapter 7
Commission
3. Set the Speed to the expected operation speed.
4. Set the Torque to the level you want to apply to the motor during the
Autotune.
The default of 100% Rated Torque usually give good results.
5. Set the Direction that is based on machine constrains.
Unidirectional tune profile measures inertia and friction. Bidirectional
tune profile adds measurement of active torque loading.
Blue arrows next to a field means that these values are immediately
applied. Once you put a value in the field and then leave that field, it is
automatically sent to the controller.
TIP
6. Click Start.
This message appears if you have edits that have not been applied. If you
don’t save pending edits, Autotune does not run.
The Autotune status should display Success. A tune configuration fault
can occur if any number of attributes are zero.
Fault
Description
Tune Configuration Fault
A tune configuration fault can occur if any number of
attributes are zero. This occurs only when you use Nameplate
Data as the motor data source. The following attributes are
checked for zero:
•
•
•
•
•
•
•
•
•
•
•
Tuning Torque
Conversion Constant
Drive Model Time Constant
System Damping (Damping Factor)
Rotary Motor Inertia
Linear Motor Mass
– The Kinetix 350 drive does not support this attribute.
Motor Rated Continuous Current
PM Motor Rotary Voltage Constant
PM Motor Linear Voltage Constant
Rotary Motor Rated Speed
Linear Motor Rated Speed
The Autotune profile accelerates and decelerates the motor according to
the Tune Direction.
162
Rockwell Automation Publication MOTION-UM003F-EN-P - March 2015
Commission
Chapter 7
Once the Autotune is finished, the test state changes.
7. Click OK.
After completing the Autotune profile, the measurements that are made
during this process are used to update the fields in the Gains Tuned and
Inertia Tuned grids.
Check your Tune Status
Any value that has an
asterisk in the left most
column has a different
value than it’s tuned
value.
8. You can compare existing and tuned values for your gains and inertias with
the prospective tune values.
If the value does not fit in the
column, a tool tip appears to
show the complete value. You
can also change the column
widths.
9. Choose to accept the new values and apply them to the controller.
Rockwell Automation Publication MOTION-UM003F-EN-P - March 2015
163
Chapter 7
Commission
Now you can run the system with the new gain set and evaluate
performance. You can improve the performance by adjusting application
type, loop response, and/or load coupling selections.
TIP
Load Dialog Box
If your application requires stricter performance, you can further improve
performance with manual tuning.
See Manual Tune an Axis on page 195.
The Load dialog box contains the characteristics of the motor load. You can also
use the values that are provided by autotune. Most of these values are
automatically set by the Autotune:
• If you use the Catalog Number as the Data Source, the Motor Inertia,
Total Inertia, and System Inertia are pre-populated with the correct values.
• If you know what the Load Ratio values are, you can enter that
information on the Load dialog box or you can use the values that are
provided by Autotune.
Kinetix 6500 Load Dialog Box
Table 18 - Load Inertia/Mass Parameter Descriptions
Parameter
Description
Load Coupling
Lets you control how tightly the system is physically coupled. Your choices are the
following:
• Rigid (default)
• Compliant
Load Coupling appears dimmed when the axis is Servo On.
Inertia Compensation
Inertia compensation controls relate to rotary motors.
Load Ratio
The Load Ratio attribute’s value represents the ratio of the load inertia or mass to the
motor inertia, or mass.
Motor Inertia
The Motor Inertia attribute is a float that specifies the unloaded inertia of a rotary motor.
This control is calculated based on the load inertia ratio. Generally it is not equal to 0 for
Kinetix drives and equal to 0 for PowerFlex 755 drives.
164
Rockwell Automation Publication MOTION-UM003F-EN-P - March 2015
Commission
Chapter 7
Table 18 - Load Inertia/Mass Parameter Descriptions
Parameter
Description
Total Inertia
Total Inertia represents the combined inertia of the rotary motor and load in engineering
units.
Inertia/Mass
Compensation
Inertia compensation controls relate to rotary motors. Mass compensation controls relate
to linear motors.
System Acceleration
System Inertia is recalculated anytime the System Acceleration changes:
• System Inertia = 0, if System Acceleration = 0
• System Inertia = 1/System Acceleration
• Units are Rev/s^2 @100% Rated
System Inertia
The torque or force scaling gain value converts commanded acceleration into equivalent
rated torque/force. Properly set, this value represents the total system inertia or mass.
System Inertia is a read-only field that is based on Total Inertia. The software recalculates
System Acceleration anytime the dependent attributes change:
• If the data Source is Motor Catalog Number, the System Acceleration value is read
directly from the motion database.
• If the Data Source is Nameplate Datasheet, the System Acceleration value is calculated.
• If the Data Source is Drive NV or Motor NV, this field is blank.
Torque Offset
The Torque Offset attribute provides a torque bias when performing closed loop control.
Mass Compensation
Mass compensation controls relate to linear motors.
Motor Mass
The mass of the motor displays in Kg units. This control is calculated based on the load
inertia ratio. Generally it is not equal to 0 for Kinetix drives.
Total Mass
Total Mass represents the combined mass of the linear motor and load in engineering
units.
Load Backlash
This provides backlash configuration options for the load of the motor.
The Kinetix 350 does not support this parameter.
Load Compliance
• The Torque Low Pass Filter Bandwidth attribute is the break frequency for the 2nd
order low pass filter that is applied to the torque reference signal.
• The Torque Notch Filter Frequency attribute is the center frequency of the notch filter
that is applied to the toque reference signal. A value of 0 for this attribute disables this
feature.
• The Torque Lag Filter Gain attribute sets the high frequency gain of the torque
reference Lead-Lag Filter. A value greater than one results in a lead function and value
less than one results in a lag function. A value of 1 disables the filter.
• The Torque Lag Filter Bandwidth attribute sets the pole frequency for the torque
reference Lead-Lag Filter. A value of 0 disables the filter.
The Kinetix 350 does not support this parameter.
Load Friction
• Sliding Friction Compensation is the value added to the current/torque command to
offset the effects of coulomb friction.
• Compensation Window defines a window around the command position.
The Kinetix 350 does not support this parameter.
Load Observer
This configures the operation of the Load Observer.
The Kinetix 350 does not support this parameter.
See the Integrated Motion on the EtherNet/IP Network Reference Manual,
publication MOTION-RM003, for detailed descriptions of the
AXIS_CIP_DRIVE attributes.
Rockwell Automation Publication MOTION-UM003F-EN-P - March 2015
165
Chapter 7
Commission
Load Observer
Acceleration Control can optionally include a Load Observer. Feeding the
Acceleration Reference (Kinetix 350 drive not supported) into a Load Observer,
along with the velocity feedback signal, has been found to be effective in
compensating for mechanical backlash, mechanical compliance, and various load
disturbances. For example, the effectiveness of the Load Observer can be thought
of as a result of the Observer adding virtual inertia to the motor.
The Load Observer functions as an inner feedback loop, like the current loop, but
unlike the current loop in that the observer’s control loop includes the motor
mechanics. Due to the work of the Load Observer, variations in load inertia,
mass, and even the motor’s torque/force constant can be nearly eliminated as seen
by the velocity loop.
Because the Load Observer includes the Acceleration Reference signal as an
input, it can provide a velocity estimate signal that has less delay than the velocity
feedback estimate generated by the actual feedback device. Thus, applying the
Load Observer’s velocity estimate to the velocity loop can be used to improve the
performance of the velocity loop.
Acceleration Feedback Selection
Feedback to the Load Observer can be derived from either feedback device,
Feedback 1 or Feedback 2. Which feedback source is used by the loop is governed
by Feedback Mode. In general, the Load Observer works best when using a high
resolution feedback device.
Acceleration and Torque Estimates
The output of the Load Observer is the Acceleration Estimate signal that is
subsequently applied to the acceleration reference summing junction.
166
Rockwell Automation Publication MOTION-UM003F-EN-P - March 2015
Commission
Chapter 7
When configured for Load Observer operation, the Acceleration Estimate signal
represents the error between the actual acceleration as seen by the feedback
device and the acceleration that is estimated by the Load Observer that is based
on an ideal model of the motor and load.
By subtracting the Acceleration Estimate signal from the output of the
Acceleration Limiter, the Load Observer is forcing the actual motor and load to
behave like the ideal model, as seen by the velocity loop. The Acceleration
Estimate signal can be seen in this light as a dynamic measure of how much the
actual motor and load are deviating from the ideal model.
Such deviations from the ideal motor model can be modeled as torque
disturbances. Scaling the Load Observer Acceleration Estimate signal by the
System Inertia results in the Load Observer Torque Estimate signal. This signal
represents an estimate of the motor torque disturbance.
TIP
The Kinetix 350 and the Kinetix 5500 drives do not support all Load
Observer attributes.
When configured for Acceleration Feedback operation, the Load Observer
Acceleration Estimate represents an acceleration feedback signal. Applying this
signal to the acceleration reference summing junction forms a closed acceleration
loop. Scaling the Load Observer Acceleration Estimate signal by the System
Inertia results in the Load Observer Torque Estimate signal. This signal
represents an estimate of motor torque.
Load Observer Configuration
The Load Observer can be configured in various ways by using the Load
Observer Configuration attribute. Choose ‘Load Observer Only’ when you want
to enable the Standard Load Observer function.
Load Observer Only: Kinetix 6500 Drive
Load Observer Only: PowerFlex 755 Drive
Rockwell Automation Publication MOTION-UM003F-EN-P - March 2015
167
Chapter 7
Commission
By choosing Load Observer with Velocity Estimate or Velocity Estimate Only,
you can apply the Load Observer’s estimated velocity signal as feedback to the
velocity loop.
Load Observer with Velocity Estimate: Kinetix 6500 Drive
When you choose Acceleration Feedback, it degenerates the Load Observer to an
acceleration feedback loop by disconnecting the Acceleration Reference input
from the observer. The velocity estimate is not available in this mode of
operation.
Acceleration Feedback: Kinetix 6500 Drive
Acceleration Feedback: PowerFlex 755 Drive
168
Rockwell Automation Publication MOTION-UM003F-EN-P - March 2015
Commission
Motion Analyzer Software
Chapter 7
Load Ratio can also be found through Autotune from Motion Analyzer.
If you don’t want to run the autotune you can go to Motion Analyzer software
and get the load ratio or the total inertia.
See Help for Selecting Drives and Motors on page 16 and 169 for more
information about the Motion Analyzer software.
Rockwell Automation Publication MOTION-UM003F-EN-P - March 2015
169
Chapter 7
Commission
Test an Axis with Motion
Direct Commands
Motion direct commands let you issue motion commands while you are online
without having to write or execute an application program. You must be online to
execute a Motion Direct Command. There are several ways to access the Motion
Direct Command.
Motion Direct Commands (MDC) are useful when you are commissioning or
troubleshooting a motion application. During commissioning, you can configure
an axis and monitor the behavior by using Trends in the Controller Organizer.
Use of Motion Direct Commands can fine-tune the system with or without load
to optimize its performance. When testing and/or troubleshooting, you can issue
Motion Direct Commands to establish or re-establish conditions such as Home.
Often during initial development, test the system in small manageable areas.
These tasks include the following:
• Home to establish initial conditions
• Incrementally Move to a physical position
• Monitor system dynamics under specific conditions
Access Motion Direct Commands for an Axis or Group
To access the Motion Direct Commands for the Motion Group or axis, rightclick the Group or Axis in the Controller Organizer and choose Motion Direct
Commands.
170
Rockwell Automation Publication MOTION-UM003F-EN-P - March 2015
Commission
Chapter 7
Figure 5 - Motion Direct Commands Dialog Box
The content of the Motion Direct Command dialog box will varies, depending
on the command you have chosen. In the Command list, you can either type the
mnemonic and the list advances to the closest match or you can choose a
command from the Axis pull-down menu. Choose the desired command and its
dialog box appears.
You can access an axis by using the drop down list. Axis status indicators are
located in this dialog box.
Axis Status Indicators
Rockwell Automation Publication MOTION-UM003F-EN-P - March 2015
171
Chapter 7
Commission
This dialog box is an example of axis indicator values.
You can also get to the commands either by right-clicking the axis and choosing
Motion Generator or on the Manual Tune dialog box.
IMPORTANT
If you are using a PowerFlex 755 drive and it’s configured for Velocity Mode,
and you have set the Flying Start Enable attribute to true, the device starts
spinning at the command velocity immediately after you execute an MDS
command.
For more information about the Flying Start Attribute, see the Integrated Motion
on the EtherNet/IP Network Reference Manual,
publication MOTION-RM003.
172
Rockwell Automation Publication MOTION-UM003F-EN-P - March 2015
Commission
Chapter 7
Understanding STO Bypass When Using Motion Direct Commands
For complete information about Motion Direct Commands in motion control
systems including the Safe Torque Off feature, see the Kinetix 5500 Servo Drives
User Manual, publication 2198-UM001 and the Kinetix 5700 Multi-axis Servo
Drives User Manual, publication 2198-UM002.
If a Safety connection between the GuardLogix safety controller and the 2198Hxxx-ERS2 servo drive was established at least once after the drive was received
from the factory, the drive does not allow motion while the safety controller is in
Program mode by default.
This is because the Safety Task is not executed while the GuardLogix safety
controller is in Program mode. This applies to applications running in a singlesafety controller (with Motion and Safety connections). When an integrated
safety drive has a Motion connection to a standard controller and a separate
Safety connection to a dual-safety controller, the standard controller can
transition to Program mode while the safety controller stays in Run mode and
continues to execute the Safety Task.
However, 2198-Hxxx-ERS2 drive systems are designed with a bypass feature for
the STO function in single-safety controller configurations. You can use the
Motion Direct Command (MDC) feature to allow motion while following all
the necessary and prescribed steps per machine safety operating procedures.
ATTENTION: Consider the consequences of allowing motion through the use of
MDC when the controller is in Program mode. You must acknowledge warning
messages in the Logix Designer application that warn of the drive bypassing the
STO function and unintended motion can occur. The integrated safety drive does
not respond to the request of STO function if MDC mode is entered.
ATTENTION: It is your responsibility to maintain machine safety integrity while
executing Motion Direct Commands. One alternative is to provide ladder logic
for Machine Maintenance mode that leaves the controller in Run mode with
safety functions executing.
Table 19 defines which drive supports the type of STO functionality.
Table 19 - Drives Supporting STO - Safe Torque Off
Drive
Mechanism
Axis Status
STO Configuration
K6500s0
STO Hardwired
.GuardStatus
Web page
K6500s1
STO Hardwired
.GuardStatus
Web page
PF755s
STO Hardwired
.GuardStatus
Web page
PF755s1
STO Hardwired
.GuardStatus
Web page
K350
STO Hardwired
.GuardStatus
None (hardwired)
K5500ers
STO Hardwired
.GuardStatus
None (hardwired)
Rockwell Automation Publication MOTION-UM003F-EN-P - March 2015
173
Chapter 7
Commission
Table 19 - Drives Supporting STO - Safe Torque Off
Drive
Mechanism
Axis Status
STO Configuration
K5500ers2
STO Networked
.SafetyStatus
Logix K5500ers2 Profile, and Module-Defined tag.
K5700
STO Hardwired
.GuardStatus
None (Hardwired)
K5700
STO Networked
.SafetyStatus
Logix K5700ers2 Profile, K5700 is two pieces of
functionality in 1 hardware package and ModuleDefined tag.
Troubleshoot the Safe Torque Off Function
For complete information about troubleshooting the Safe Torque Off function,
see the Kinetix 5500 Servo Drives User Manual, publication 2198-UM001and
the Kinetix 5700 Multi-axis Servo Drives User Manual,
publication2198-UM002.
Table 20 - 2198-Hxxx-ERS2 Servo Drive Troubleshooting
Exception Code on Drive Display
Fault Message
Logix Designer
Problem
Possible Solutions
SAFE FLT S01- Safety Core Internal
CPUWatchdogFault (1)
Drive safety diagnostic detected internal STO design failure.
• Cycle control power
• Return drive for repair if fault continues
SAFE FLT S03- Safe Torque Off
SafeTorqueOffFault (2)
Drive safety diagnostic detected internal STO design failure.
• Cycle control power
• Execute STO function
• Return drive for repair if fault continues
(1) Displayed in the Quick View Pane as Module Fault.
(2) Displayed in the Quick View Pane as Safety Fault.
174
Rockwell Automation Publication MOTION-UM003F-EN-P - March 2015
Chapter
8
Home an Axis
Homing puts your equipment at a specific starting point for operation. This
starting point is called the home position. Typically, you home your equipment
when you reset it for operation.
When using Integrated Motion on the EtherNet/IP network, all active and
passive homes are setting absolute positions as long as an absolute device is being
used.
Topic
Page
Guidelines for Homing
175
Active Homing
176
Passive Homing
176
Examples
177
Absolute Position Recovery (APR)
182
See the Integrated Motion on the EtherNet/IP Network Reference Manual,
publication MOTION-RM003, for more details about the Homing attributes.
This table describes guidelines for homing procedures.
Guidelines for Homing
Table 21 - Guidelines for the Homing Procedures
Guideline
Description
To move an axis to the home position, use Active
homing.
Active homing turns on the servo loop and moves the axis to the home position. Active homing also does the following:
• Stops any other motion.
• Uses a trapezoidal profile.
For a Feedback-only device, use Passive homing.
Passive homing doesn’t move the axis:
• Use passive homing to calibrate a Feedback-only axis to its marker.
• If you use passive homing on a servo axis, turn on the servo loop and use a move instruction to move the axis.
For single-turn equipment, consider homing to a
marker.
The marker homing sequence is useful for single-turn rotary and linear encoder applications because these applications
have only one encoder marker for full axis travel.
For multi-turn equipment, home to a switch or switch
and marker.
These homing sequences use a home limit switch to define the home position:
• You need a home limit switch if the axis moves more than one revolution when it runs. Otherwise, the controller can’t
tell which marker pulse to use.
• For the most precise homing, use both the switch and marker.
Rockwell Automation Publication MOTION-UM003F-EN-P - March 2015
175
Chapter 8
Home an Axis
Table 21 - Guidelines for the Homing Procedures (Continued)
Guideline
Description
If your equipment can’t back up, use unidirectional
homing.
With unidirectional homing, the axis doesn’t reverse direction to move to the Home Position. For greater accuracy, consider
using an offset:
• Use a Home Offset that is in the same direction as the Home Direction.
• Use a Home Offset that is greater than the deceleration distance.
• If the Home Offset is less than the deceleration distance does the following:
– The axis simply slows to a stop. The axis doesn’t reverse direction to move to the Home Position. In this case, the MAH
instruction doesn’t set the PC bit.
– On a rotary axis, the controller adds one or more revolutions to the move distance. This makes sure that the move to
the Home Position is unidirectional.
Choose a starting direction for the homing sequence.
Decide which direction you want to start the homing sequence in:
• Positive direction—choose a Forward direction.
• Negative direction—choose a Negative direction.
Active Homing
When the axis Homing mode is configured as Active, the physical axis is first
activated for servo operation. As part of this process, all other motion in process
is cancelled and appropriate status bits cleared. The axis is then homed by using
the configured Home Sequence, which may be Immediate, Switch, Marker, or
Switch-Marker. The later three Home Sequences result in the axis being jogged in
the configured Home Direction and then after the position is redefined. Based
on detection of the home event, the axis is automatically moved to the configured
Home Position.
IMPORTANT
When unidirectional active homing is performed on a rotary axis and the
Home Offset value is less than the deceleration distance when the home
event is detected, the control moves the axis to the unwind position of zero.
This helps ensure that the resulting move to the Home Position is
unidirectional.
Passive Homing
When the axis Homing mode is configured as Passive, the MAH instruction
redefines the actual position of a physical axis on the next occurrence of the
encoder marker. Passive homing is most commonly used to calibrate Feedback
Only axes to their markers, but can also be used on Servo axes. Passive homing is
identical to active homing to an encoder marker except that the motion
controller does not command any axis motion.
After initiating passive homing, the axis must be moved past the encoder marker
for the homing sequence to complete properly. For closed-loop Servo axes, this
may be accomplished with a MAM or MAJ instruction. For physical Feedback
Only axes, motion cannot be commanded directly by the motion controller, and
must be accomplished via other means.
176
Rockwell Automation Publication MOTION-UM003F-EN-P - March 2015
Home an Axis
Examples
Chapter 8
Active Homing
These examples show different ways to use active homing.
Table 22 - Active Homing Examples
Sequence
Description
Active immediate home
This sequence sets the axis position to the Home Position without moving the axis. If feedback isn’t enabled, this sequence
enables feedback.
Active home to switch in forward bidirectional
The switch homing sequence is useful for multi-turn rotary and linear applications.
Active Bidirectional Home with Switch then Marker
Homing Vel
Axis Velocity
1
3
Axis Position
2
Return Vel
1: Home Limit Switch Detected
2: Home Limit Switch Cleared
3: Home Position
These steps occur during the sequence.
1. The axis moves in the Home Direction at the Home Speed to the home limit switch and stops.
2. The axis reverses direction and moves at the Home Return Speed until it clears the home limit switch and then stops.
3. The axis moves back to the home limit switch or it moves to the Offset position. The axis moves at the Home Return
Speed. If the axis is a Rotary Axis, the move back to the Home Position takes the shortest path (that is, no more than a
half revolution).
If the axis is past the home limit switch at the start of the homing sequence, the axis reverses direction and starts the return
leg of the homing sequence.
Use a Home Return Speed that is slower than the Home Speed to increase the homing accuracy. The accuracy of this
sequence depends on the return speed and the delay to detect the transition of the home limit switch.
Uncertainty = Home Return Speed x delay to detect the home limit switch.
Example: Suppose that your Home Return Speed is 0.1 in./s and it takes 10 ms to detect the home limit switch.
Uncertainty = 0.1 in./s x 0.01 s = 0.001 in.
The mechanical uncertainty of the home limit switch also affects the homing accuracy.
Rockwell Automation Publication MOTION-UM003F-EN-P - March 2015
177
Chapter 8
Home an Axis
Table 22 - Active Homing Examples (Continued)
Sequence
Description
Active home to marker in forward bidirectional
The marker homing sequence is useful for single-turn rotary and linear encoder applications because these applications
have one encoder marker only for full axis travel.
Active Bidirectional Home with Marker
Homing Vel
Axis Velocity
1
2
Axis Position
Return Vel
1: Encoder Marker Detected
2: Home Position
These steps occur during the sequence.
1. The axis moves in the Home Direction at the Home Speed to the marker and stops.
2. The axis moves back to the marker or it moves to the Offset position. The axis moves at the Home Return Speed. If the
axis is a Rotary Axis, the move back to the Home Position takes the shortest path (that is, no more than a half
revolution).
The accuracy of this homing sequence depends on the homing speed and the delay to detect the marker transition.
Uncertainty = Home Speed x delay to detect the marker.
Example: Suppose your Home Speed is 1 in/s and it takes 1 μs to detect the marker.
Uncertainty = 1 In./s x 0.000001 s = 0.000001 in.
178
Rockwell Automation Publication MOTION-UM003F-EN-P - March 2015
Home an Axis
Chapter 8
Table 22 - Active Homing Examples (Continued)
Sequence
Description
Active home to switch and marker in forward
bidirectional
This is the most precise active homing sequence available.
Active Bidirectional Home with Switch then Marker
Homing Vel
Axis Velocity
1
4
Axis Position
2
3
Return Vel
1: Home Limit Switch Detected
2: Home Limit Switch Cleared
3: Encoder Marker Detected
4: Home Position
These steps occur during the sequence.
1. The axis moves in the Home Direction at the Home Speed to the home limit switch and stops.
2. The axis reverses direction and moves at the Home Return Speed until it clears the home limit switch.
3. The axis keeps moving at the Home Return Speed until it gets to the marker.
4. The axis moves back to the marker or it moves to the Offset position. The axis moves at the Home Return Speed. If the
axis is a Rotary Axis, the move back to the Home Position takes the shortest path (that is, no more than ½ revolution).
If the axis is past the home limit switch at the start of the homing sequence, the axis reverses direction and starts the return
leg of the homing sequence.
Active home to switch in forward unidirectional
This active homing sequence is useful for when an encoder marker is not available and either unidirectional motion is
required or proximity switch is being used.
These steps occur during the sequence.
1. The axis moves in the Home Direction at the Home Speed to the home limit switch.
2. The axis moves to the Home Offset position if it’s in the same direction as the Home Direction.
Active home to marker in forward unidirectional
This active homing sequence is useful for single-turn rotary and linear encoder applications when unidirectional motion is
required.
These steps occur during the sequence.
1. The axis moves in the Home Direction at the Home Speed to the marker.
2. The axis moves to the Home Offset position if it’s in the same direction as the Home Direction.
Active home to switch and marker in forward
unidirectional
This active homing sequence is useful for multi-turn rotary applications when unidirectional motion is required.
These steps occur during the sequence.
1. The axis moves in the Home Direction at the Home Speed to the home limit switch.
2. The axis keeps moving at the Home Speed until it gets to the marker.
3. The axis moves to the Home Offset position if it’s in the same direction as the Home Direction.
Rockwell Automation Publication MOTION-UM003F-EN-P - March 2015
179
Chapter 8
Home an Axis
Table 22 - Active Homing Examples (Continued)
Sequence
Description
Active Home to Torque
The Home to Torque Level sequence is a type of homing used when a hard stop is going to be used as the home position, as
in a linear actuator.
Torque Level homing is similar to Home Switch homing, with the exception that the torque level is used instead of the home
switch input. This graphic depicts the Position/Velocity for Torque Level Homing.
Torque Level Homing
1
Homing Vel
Axis Velocity
2
4
Axis Position
3
Return Vel
1: End of Travel / Hard Stop
2: Homing Torque Above Threshold = TRUE
3: Homing Torque Above Threshold = FALSE
4: Home Position
Torque Level-Marker homing is similar to Home Switch-Marker homing, with the exception that the torque level is used
instead of the home switch input. This graphic depicts the Position/Velocity for Torque Level-Marker Homing.
Torque Level - Marker Homing
Homing Vel
1
Axis Velocity
2
5
Axis Position
3
4 Return Vel
1: End of Travel / Hard Stop
2: Homing Torque Above Threshold = TRUE
3: Homing Torque Above Threshold = FALSE
and Arm Regestration for Encoder Marker
4: Encoder Marker Detected
5: Home Position
180
Rockwell Automation Publication MOTION-UM003F-EN-P - March 2015
Home an Axis
Chapter 8
Passive Homing
These examples show different ways to use passive homing.
Table 23 - Passive Homing Examples
Sequence
Description
Passive Immediate Home
This is the simplest passive homing sequence type. When this sequence is performed,
the controller immediately assigns the Home Position to the current axis actual
position. This homing sequence produces no axis motion.
Passive Home with Switch
This passive homing sequence is useful for when an encoder marker is not available or a
proximity switch is being used.
When this sequence is performed in the Passive Homing mode, an external agent
moves the axis until the home switch is detected. The Home Position is assigned to the
axis position at the moment that the limit switch is detected. If you are using a Home
Offset, then the Home Position is offset from the point where the switch is detected by
this value.
Passive Home with Marker
This passive homing sequence is useful for single-turn rotary and linear encoder
applications.
When this sequence is performed in the Passive Homing mode, an external agent
moves the axis until the marker is detected. The home position is assigned to the axis
position at the precise position where the marker was detected. If you are using a Home
Offset, then the Home Position is offset from the point where the marker is detected by
this value.
Passive Home with Switch
then Marker
This passive homing sequence is useful for multi-turn rotary applications.
When this sequence is performed in the Passive Homing mode, an external agent
moves the axis until the home switch and then the first encoder marker is detected. The
home position is assigned to the axis position at the precise position where the marker
was detected. If you are using a Home Offset, then the Home Position is offset from the
point where the marker is detected by this value.
Rockwell Automation Publication MOTION-UM003F-EN-P - March 2015
181
Chapter 8
Home an Axis
Absolute Position Recovery
(APR)
APR is the recovery of the absolute position of an axis that has been machine
referenced after a power cycle, or reconnection. The terms Absolute Position and
Machine Reference Position are synonymous.
APR Terminology
This table describes terminology related to the APR feature.
Term
Description
Absolute Feedback Position
Position value read from an absolute feedback device.
Incremental Feedback Position
Position value read from an incremental feedback device.
Feedback Position
Value read from a feedback device, absolute or incremental.
Absolute Position
Absolute Machine Reference Position
Machine Reference Position
Position registers in the 1756-L6x(1), 1756-L6xS, and 1756-L7x controllers
after the following instructions have been executed on a machine with an
absolute or an incremental feedback device:
• MAH, machine home
• MRP, machine redefine position
A machine home/reference
Establishes a Machine Reference Offset as follows:
HomeOffset =
ConfiguredHomePosition - AbsoluteFeedbackPosition
AbsoluteMachineReferencePosition = AbsoluteFeedback Position
+ HomeOffset
Absolute Position Recovery (APR)
Recovers the Absolute Machine Reference Position by maintaining the
Home Offset through various scenarios as described on page 183.
(1) The 1756-L6x controllers are not supported in the Logix Designer application, version 21.00.00 and later.
APR Supported Components
There are differences in the way the 1756-L6x, 1756-L6xS, and the 1756-L7x
ControlLogix controllers recover machine position:
• The 1756-L6x and 1756-L6xS controllers have a battery and use a
CompactFlash card to save information.
• The 1756-L7x controller has a 1756-ESMxxx module and uses a Secure
Digital (SD) card to save information.
• The 1756-L6x and 1756-L6xS series A controllers have a battery to
recover the position after a power cycle but does not support APR.
• The 1756-L6 and 1756-L6xS series B controllers recover the position after
a download or restore from CompactFlash software card or a firmware
update from the ControlFLASH utility. A battery is not required.
• The 1756-L7x controller with a ControlLogix Controller Energy Storage
Module (ESM) works the same as the 1756-L6x series B controller with a
battery.
• The 1756-L7x controller without a ControlLogix Controller Energy
Storage Module (ESM) works like a 1756-L6x series B controller without
a battery.
182
Rockwell Automation Publication MOTION-UM003F-EN-P - March 2015
Home an Axis
Absolute Position Recovery
Functionality
Chapter 8
APR provides support for maintaining absolute position referenced to a specific
machine, commonly called the machine referenced absolute position or just
absolute position, after a power loss, program download, or firmware update.
Absolute position is established by a homing procedure initiated by successful
execution of an MAH instruction. Once the homing procedure has successfully
established a machine reference, the Axis Homed bit is set in the Motion Status
attribute, indicating that actual position and command position now have
meaning with respect to the associated machine.
It is good application programming practice to qualify dynamic machine
operation with the Axis Homed bit being set. Otherwise, absolute moves to a
specific position may not have any relationship to the position of the axis on the
actual machine.
Because the homing procedure usually requires the machine to be taken offline
and placed in a manual operating mode, for example, not making product,
anything that would require you to rehome one or more axes on the machine is
undesirable. This is downtime and costs money. The APR feature maintains the
machine reference or absolute position through power cycles, program
downloads, and even firmware updates under certain conditions.
See APR Fault Conditions on page 184 and Absolute Position Recovery
Scenarios on page 187 for more details.
Absolute Feedback Device
The absolute feedback device lets absolute position be retained through a power
cycle. These devices take various forms, but they all are capable of maintaining
absolute feedback position while power to the drive and feedback device is off.
When power is turned back on, the drive reads the feedback referenced absolute
position from the feedback device and, by applying a saved absolute offset to this
absolute feedback position, the motion control system can recover the machine
referenced absolute position.
Most drive products provide this capability. However, Absolute Position is
generally lost if the drive is swapped out or drive firmware is updated. Integrated
Motion on the EtherNet/IP network lets you recover Absolute Position through
power cycles, program downloads, and firmware updates.
Sercos Versus CIP
For a SERCOS axis with absolute feedback, the drive scaling function and
absolute position is maintained in the drive and therefore may be easily restored
in the control after a power cycle or download of a new project by simply reading
the position from the drive.
Rockwell Automation Publication MOTION-UM003F-EN-P - March 2015
183
Chapter 8
Home an Axis
By contrast, an Integrated Motion on the EtherNet/IP network axis supports
controller based scaling where absolute position is maintained in the controller’s
firmware. Without the work of the APR feature, absolute position would be lost
after a power cycle or project download.
APR Faults
APR faults are generated during the events and when one of the conditions
defined in the following APR Fault Conditions is present.
APR Fault Conditions
The axis must be in the homed state for an APR Fault to occur. The Axis Homed
Status Bit must be set.
Attribute Changes
A Motion Resolution or an Axis Feedback Polarity attribute has been changed
and downloaded to the controller. This can also happen during the execution of
an SSV.
Axis Feedback Changes
The feedback device has been replaced. This creates an Axis Feedback Serial
Number mismatch APR fault.
Axis Feedback mode has changed, for example, axis with feedback changed to
axis without feedback or vice versa and downloaded to the controller.
• A user program is downloaded.
• A user program and tags are restored from the CompactFlash card.
– Manual Restore
– Power-up restore, when configured
• Firmware is updated via ControlFLASH software.
• An SSV to either change Feedback Polarity or one of the attributes, which
results in a change to the Motion Resolution attribute.
184
Rockwell Automation Publication MOTION-UM003F-EN-P - March 2015
Home an Axis
Chapter 8
APR Fault Generation
An APR fault that is caused by a project download, restore from a CompactFlash
card, a restore from an SD card, or a ControlFLASH firmware update after one
of these events:
• Axis configuration
– Change in any of the axis attributes that impacts the absolute machine
position.
• Attribute changes
– Offline edits of the axis attributes or configuration does not cause an
APR fault until after download occurs.
– Online edits of certain attributes result in an immediate APR fault.
Changing the axis feedback device or feedback polarity without
downloading the project also generates an immediate APR fault.
• Axis hardware change or malfunction.
• Axis hardware resource insufficiency.
– Hardware resource insufficiencies are detected only during download
or ControlFLASH firmware update.
• Reconnection of the drive axis.
When an APR fault occurs, the actual position of the axis is set to the feedback
reference position of the axis. This value is read from the absolute encoder of the
axis. The APR Fault clears the axis homed status bit.
Downloading of a Project
The following checks are made during a download of a project.
1. Does the Axis already exist? If not, then it is a new axis and no APR fault
will ever result will ever get generated.
2. Does the Scaling Signature match the saved Scaling Signature?
3. Does the Feedback Serial Number match the saved Feedback Serial
Number?
If these three checks pass, generally absolute position is restored.
During operation, the system monitors changes to that following attributes,
which do not impact the Scaling Signature or result in the loss of the absolute
machine reference and therefore does not generate an APR Fault.
• Conversion Constant
• Position Unwind
• Travel Mode
Rockwell Automation Publication MOTION-UM003F-EN-P - March 2015
185
Chapter 8
Home an Axis
Care must be taken when changing these values so that the new values are
correctly related to the Position Unit of the product and the mechanics of the
system. This is typically done as part of a product recipe change. For example,
when you are wrapping regular sized candy bars and then you need to change and
make king sized bars, you would change the conversion constant.
If the Axis Homed status bit is clear, indicating that position has not been
absolutely referenced to the machine, the APR function is bypassed and there is
no attempt to restore absolute position.
There are two types of APR Faults: Standard APR Faults and RA Specific Faults.
APR Faults display in the Axis Properties dialog box, Faults and Alarms.
Table 24 - Standard APR Fault Descriptions
Value
Exception
Description
1
Memory Write Error
Error in saving absolute position data to nonvolatile memory.
2
Memory Read Error
Error in reading absolute position data from nonvolatile memory.
3
Feedback Serial Number Mismatch
Position Feedback Serial Number does not match saved Feedback
Serial Number.
4
Buffer Allocation Fault
Caused when there is not enough RAM memory left to save APR
data.
5
Scaling Configuration Changed
Scaling attribute configuration for this axis does not match the
saved scaling configuration.
6
Feedback Mode Change
Feedback Mode has changed and does not match the saved
Feedback Mode configuration.
Table 25 - Rockwell Automation Specific Fault Descriptions
186
Value
Exception
Description
1
Persistent Media Fault
(L6x) - Means that all six sectors that are reserved for APR in persistent
memory are marked as bad. This is not a recoverable fault condition:
• After you get this fault, the APR feature stops working until you
replace the 1756-L6x or 1756-L6xS controller.
• You never get this error when using a 1756-L7x controller.
2
Firmware Error
Used to trap firmware errors that should never happen.
Rockwell Automation Publication MOTION-UM003F-EN-P - March 2015
Home an Axis
Chapter 8
Absolute Position Recovery Scenarios
ATTENTION: Whenever memory becomes corrupt, you lose position even if you
have it stored on an SD card.
This table provides detailed information on when the APR feature recovers
absolute position. The following assumptions need to be considered. In each of
these cases, the APR feature restores absolute position and preserves the state of
the Axis Homed bit, indicating that the axis has a machine referenced absolute
position:
• All relevant axes are CIP axes
• Yes, indicates that machine reference is recovered (for Axes that have been
homed)
• No, indicates that machine reference is not recovered (for Axes that have
been homed)
Rockwell Automation Publication MOTION-UM003F-EN-P - March 2015
187
Chapter 8
Home an Axis
This table describes the scenarios whether the APR feature recovers absolute position. In each of these cases marked by Yes,
the APR feature restores absolute position and preserves the state of the Axis Homed bit, indicating that the axis has a
machine referenced absolute position.
Table 26 - APR Recovery Scenarios
Controller
188
Event
Machine Reference Retained
Controller removal and insertion under power (RIUP) with a battery(1).
Yes
Controller power cycle with battery.
Yes
Controller Firmware Update.
Yes
Controller update from CompactFlash card.
Yes
Controller swap (CompactFlash card also swapped).
Yes
Steps
1. Axes are homed.
2. Project saved to CompactFlash or SD card.
3. Axes are moved and rereferenced.
4. System restored from CompactFlash or SD card.
Result
The system absolute position is restored to rereferenced positions and the
Home bit remains set.
Yes
Steps
1. Axes are homed.
2. Project is saved to CompactFlash or SD card.
3. Same CompactFlash or SD card is used on machines 2, 3, 4 ...
4. Axes are homed on machines 2, 3, 4... at different positions.
5. System restore from CompactFlash or SD card on each machine.
Result
The system absolute position on each machine becomes restored correctly at
its respective position and the Home bit remains set.
Yes
Change controller (CompactFlash card not swapped).
No
Change controller without a CompactFlash card.
No
Controller power cycle without battery.
No
Controller removal and insertion under power (RIUP) without battery.
No
Take the controllers out of two systems with a battery or energy storage module
and swap controller. There is no CompactFlash or SD cards on either controller.
No
1. Controller remains powered.
2. Power cycle drives.
3. Change feedback device but not motor.
No
Steps
1. Axes are homed.
2. Project is saved to a CompactFlash or SD card.
3. Memory becomes corrupt.
4. System restores from the CompactFlash or SD card.
Result
The system absolute position is lost, the axes must be rehomed, and the Home
bit is cleared.
No
Controller power cycle or removal and insertion under power without a battery
or energy storage module.
No
1. Controller and drives remained powered.
2. Hardware feedback failure on an axis.
No
1. Battery Backed Controller.
2. User program running with an axis that is not homed.
No
Rockwell Automation Publication MOTION-UM003F-EN-P - March 2015
Home an Axis
Chapter 8
Table 26 - APR Recovery Scenarios
Controller and drives remained powered
Battery backed controller
Event
Machine Reference Retained
Disconnect and reconnect the Ethernet cable.
Yes
Disconnect and reconnect the same feedback and/or motor cable on an axis.
Yes
Inhibit or uninhibit an axis or drive.
Yes
Event
Save to a CompactFlash(2)
Machine Reference Retained
(3)
or SD card with a homed axis and you initiate the
Yes
restore.
Change controller
Same controller
Controller remains powered or power cycled
with battery and power cycle drives
RIUP controller.
Yes
Cycle power-on controller.
Yes
Cycle power-on controller that is configured to restore user program from a
CompactFlash card or SD card on power-up.
Yes
RAM memory becomes corrupt and the user program is restored from the
CompactFlash or SD card.
No
The machine must be referenced again if RAM memory becomes corrupt. There is
no way of retrieving the machine reference positions from either an SD or an SD
card after machine memory becomes corrupt.
No
User program running with a homed axis and you manually restore the user
program from a CompactFlash or an SD card.
If you reset the machine reference by using MAH or MRP after storing the user
program to a CompactFlash or SD card, the MAH and MRP changes will not be
lost. The APR is not restored to the reference stored on the CompactFlash or SD
card. The APR is restored to the reference stored in RAM.
Yes
Battery backed controller: Restore by taking the CompactFlash or an SD card to
another controller.
If the other controller has the exact same Axis ID and scaling constants as the
CompactFlash or SD card, and has homed axes, the APR is not restored to the
reference stored on the card. The APR is restored to the reference stored in RAM.
The Axis ID attribute is automatically generated when you create an axis in the
Logix Designer application. See The Axis ID attribute description in the Integrated
Motion on the EtherNet/IP Network Reference Manual,
publication MOTION-RM003 for more information.
Yes
Event
Machine Reference Retained
Transfer the CompactFlash or SD card from the first controller to the second with
the following preconditions.
1. Empty the second controller. There is no user program in the second
controller.
2. The user program has been saved on a CompactFlash or SD card with
Integrated Motion on the EtherNet/IP network axes homed.
Yes
Transfer the CompactFlash or SD card from the first controller to the second with
the following preconditions.
1. The second controller has the same user program with the controller being
swapped.
2. The second controller has axes homed.
Yes
Event
Machine Reference Retained
Reload the same user program from a CompactFlash or SD card. This scenario
assumes that the axis is homed in RAM prior to reload.
Yes
Update controller firmware from CompactFlash or SD card.
Yes
Event
Machine Reference Retained
Change the drive with the same or different catalog number.
Yes
Change the motor but not the feedback device.
Yes
Rockwell Automation Publication MOTION-UM003F-EN-P - March 2015
189
Chapter 8
Home an Axis
Table 26 - APR Recovery Scenarios
Download same program with no hardware
changes
Download same program and no hardware
changes
Position feedback
Feedback device
Event
Machine Reference Retained
Change the name of an axis.
Yes
Download the same program to the controller.
Yes
Save As with a different filename.
Yes
Partial Export and then import an axis.
Yes
Added application logic.
Yes
Download a project of an existing axis.
Yes
Event
Machine Reference Retained
Add an axis.
No for the new axis.
Copy or cut and paste or drag/drop axis into the same project or another project.
No for the new or pasted axis.
Export and then import into the same or another project.
Tip: Save the project as an .ACD file to recover the absolute position.
No
There are changes to the axis scaling attributes.
No
Event
Machine Reference Retained
The position feedback device disconnect/reconnect.
Yes
Event
Machine Reference Retained
The position feedback device was disconnected or reconnected.
Yes
The feedback device changed.
No
The position feedback device was swap.
No
The position feedback device failed.
No
The position feedback polarity changed.
No
The Feedback mode changed.
No
When any of these conditions occur, the Axis Homed bit, if set, is cleared indicating that axis position is no longer referenced to the machine. To flag the condition that the Axis
Homed bit has been cleared and that the machine referenced absolute position has been lost, an APR Fault is generated. This is a recoverable fault that may be cleared via any Fault
Reset or Shutdown Reset instruction.
Restore
Inhibit or Uninhibit
Logix Designer project
190
Event
Machine Reference Retained
Restore from the CompactFlash card or SD card.
Yes
Event
Machine Reference Retained
Inhibit or uninhibit an axis.
Yes
Inhibit or uninhibit an I/O module.
Yes
Event
Machine Reference Retained
Import or export the project download.
No
Download the project download of new or copied axis.
No
Rockwell Automation Publication MOTION-UM003F-EN-P - March 2015
Home an Axis
Chapter 8
Table 26 - APR Recovery Scenarios
Drive
Scaling
Event
Machine Reference Retained
The drive cycled power with incremental feedback.
No
The drive firmware updated with incremental feedback.
No
Change the drive.
Yes
Cycle power to the drive.
Yes
Cycle power to the drive with absolute feedback.
Yes
Change the motor, assuming the motor does not contain a feedback device.
Yes
The drive firmware was update with absolute feedback.
Yes
The drive was disconnected or reconnected.
Yes
The drive was Inhibited or Uninhibited.
Yes
The drive was swapped with the same feedback.
Yes
Event
Machine Reference Retained
Scaling signature changed.
The scaling signature changed. This includes Transmission, Linear Actuator,
Motion Resolution, and Motion Unit attribute changes.
No
(1) The term Battery in this table assumes the 1756-L6x or 1756-L6xS controller with a battery or a 1756-L7x and a 1756-ESMxxx Energy Storage Module.
(2) 1756-L6x or 1756-L6xS controller.
(3) 1756-L7x controller.
Scaling
Changing the Scaling parameters can potentially generate an APR fault because
internal constants computed from these two parameters can generate a motion
resolution change. If this happens, an APR fault is generated.
Rockwell Automation Publication MOTION-UM003F-EN-P - March 2015
191
Chapter 8
Home an Axis
Online Scaling
Any change or SSV message that results in a motion resolution change can
generate an APR fault.
Resetting an APR Fault
There are three ways to reset an APR Fault:
• Instruction execution:
– Executing an MAFR
– Executing an MGSR
– Executing an MASR
– Executing a MCSR
• Do the following from the Controller Organizer:
– Clear the group fault, the software executes an MGSR
– Clear the axis fault, the software executes an MASR
• Download the same project a second time
Absolute Position Loss without APR Faults
The Absolute Position Recovery is not retained after the following:
• A project is exported, saved as a .L5K, and imported (downloaded)
• A major non-recoverable fault (MNRF)
192
Rockwell Automation Publication MOTION-UM003F-EN-P - March 2015
Home an Axis
Chapter 8
• A power loss
TIP
When you perform an import/export on a project in the RSLogix 5000
software, version 19 or earlier, the axis absolute position is not
recovered on download to the controller.
The APR can potentially be restored from a CompactFlash card on a
1756-L6x or 1756-L6xS controller (if a battery is not present) or an SD
card on a 1756-L7x controller (if a 1756-ESMxxx module is not
present) as described on page 182.
• A download of an axis that does not have its home bit set
• Power cycling of an incremental encoder
Behavior of APR for Incremental Encoders
APR for incremental encoders means Absolute Machine Reference Position
Retention. When an incremental encoder is homed, the homed bit is set.
When any of the events and/or conditions that generate an APR fault for an
absolute encoder occur for an incremental encoder then an APR fault is
generated and the axis home bit is cleared.
For example, the behavior of APR faults for an incremental encoder is identical to
that of an absolute encoder except when an incremental encoder is power cycled,
and its position comes up as 0. Its Absolute Machine Reference Position is lost.
An APR fault is not generated.
Rockwell Automation Publication MOTION-UM003F-EN-P - March 2015
193
Chapter 8
Home an Axis
Saving an ACD File Versus Upload of a Project
The following is an example of a sequence of events that can generate an APR
fault.
1. Make an online change to an axis attribute that generates an APR fault.
2. Rehome the axis.
This is normally done so APR will restore axes positions after a download.
3. Save your project.
4. Download your project.
You still get an APR fault because saving the project only uploads the tags,
not the changed attributes.
IMPORTANT
194
You must upload the project for the changed attributes to be
saved and to prevent an APR fault on a subsequent download.
Rockwell Automation Publication MOTION-UM003F-EN-P - March 2015
Chapter
9
Manual Tune
The Manual Tune function lets you manually improve motion performance by
adjusting system bandwidth, damping factor, and drive loop gains, filters, and
compensations via direct online control. Perform a manual tune when you are
online with a controller to get a real-time tune of an axis.
Manual Tune an Axis
Topic
Page
Manual Tune an Axis
195
Axis Configuration Types
196
Current Tuning Configuration
196
Additional Tune for the Kinetix 6500 Module
201
Additional Tune for the PowerFlex 755 Drive
205
Motion Generator and Motion Direct Commands
199
If Autotune does not meet your system specifications, the manual tuning feature
lets you customize your tuning parameters. Perform a manual tune when you are
online with the controller to perform real-time adjustments to an axis. The
default Application Type is Basic, which implies manual tune modifies
proportional gains.
If you are not sure you need to Manual Tune, use this process:
• If the software calculation defaults are acceptable, tuning is complete.
• If the software calculation defaults are not acceptable, perform an
Autotune. If the Autotune results are acceptable, tuning is complete.
See Autotune Dialog Box on page 160 for details.
• If the Autotune results are not acceptable, perform a Manual Tune.
Rockwell Automation Publication MOTION-UM003F-EN-P - March 2015
195
Chapter 9
Manual Tune
Axis Configuration Types
Manual Tune applies to Position Loop and Velocity Loop axis configurations.
Manual Tune is not available for any other axis configurations. If you change the
axis configuration to a value other than Position Loop or Velocity Loop while
Manual Tune is open, the contents of the Manual Tune expander becomes
disabled. This also applies to the Additional Tune functions.
Current Tuning Configuration
Manual Tune displays the current tuning configuration. All parameters on the
Manual Tuning dialog box are available while online.
TIP
In the RSLogix 5000 software, version 20 and later you can make edits when
online. In the RSLogix 5000 software, version 19 and earlier, changes can only
be made when online and the SERVO is enabled.
When you adjust the sliders it tells you what gains you need to update. When
servo is on, the left area of the dialog box lights up. This gives you real manual
tuning capability. When you expand the Tuning Configuration, you are
reminded of the application type and coupling (loop response affects the system
damping) you selected. These values are governing the displayed values.
There are three Loop Response settings on the General dialog box.
Loop Response relates to the
following values for System
Damping.
Low = 1.5
Medium = 1.0
High = 0.8
System Damping is for
setting the axis
Bandwidth and Error
Tolerance values.
196
Rockwell Automation Publication MOTION-UM003F-EN-P - March 2015
Manual Tune
Chapter 9
Loop Responses
This is where you can enter values for system bandwidth and system damping,
which affect the loop gains. You can also individually modify the gains. The gains
and filters that you have tuned by using either default factory values or Autotune
are your initial values in the Manual Tune dialog box. Coupling displays how
tightly set or how you chose the system to tune.
The Motion Console dialog box displays Manual Tuning and Motion Generator.
Use the left of the dialog box to test in an inactive state. As you perform the tune,
you can test in an active state with Motion Generator.
The blue arrows indicate an immediate commit.
When you change a value and leave the field, the
values are sent automatically to the controller
including changes you made to slider values.
The Additional Tune tabs are available for the Kinetix 6500 and
PowerFlex 755 drives. The type of drive determines what
attributes you can configure.
See Additional Tune on page 201.
ATTENTION: Before you tune or test axis motion, make sure no one is in
the way of the axis.
Typically motion does not occur in Program mode but you can test an axis
in Remote Program mode by using Motion Direct Commands.
When you tune an axis, your code is not in control of the axis.
Rockwell Automation Publication MOTION-UM003F-EN-P - March 2015
197
Chapter 9
Manual Tune
The tuning procedure tunes the proportional gains. Typically, tune the
proportional gains first and see how your equipment runs.
Follow these instructions to manually tune an axis.
1. To open Manual Tune, do one of the following:
• Double-click an axis while online with a controller.
• Right-click an axis and choose Manual Tune.
• Click Manual Tune in the lower left of any category dialog box.
The Manual Tune dialog box appears.
When the Manual Tune dialog box appears, you may find that you cannot
see all of the console. You can create more space for the console by reducing
the size of the Controller Organizer or by adjusting the toolbars.
TIP
2. Adjust your settings according to your application.
3. When you make a change to a value, it is sent to the controller
immediately.
4. Execute a command.
5. Watch the result.
6. Make adjustments and execute a command.
TIP
198
You can click Reset to return to default values.
Rockwell Automation Publication MOTION-UM003F-EN-P - March 2015
Manual Tune
Chapter 9
Motion Generator and Motion Direct Commands
The commands on the Motion Generator give you basic control of a closed loop
servo axis.
Commands, also called instructions.
Manual Tune Tab
Click Axis State to go to the Status
category dialog box.
Click Axis Fault to go to the Faults and
Alarms category dialog box.
The following instructions are available are on the Motion Generator dialog box.
Table 27 - Available Instructions
Command
Description
MDS
Motion Drive Start
MSO
Motion Servo On
MSF
Motion Servo Off
MAH
Motion Axis Home
MAJ
Motion Axis Jog
MAM
Motion Axis Move
MAS
Motion Axis Stop
MAFR
Motion Axis Fault Reset
When you click the More Commands link on the Motion Generator, you are
taken to the Motion Direct Commands dialog box. In this dialog box, you can
observe the effects of the manual tune. You can turn the axis on and off, home
and move the axis, and resetting faults.
Rockwell Automation Publication MOTION-UM003F-EN-P - March 2015
199
Chapter 9
Manual Tune
Follow these instructions to use a Motion Direct Command.
1. Select MSO (Motion Servo On) and click Execute.
2. Click Reset.
Reset restores all values that were there when you first opened Manual
Tune.
3. Select MAM (Motion Axis Move) and click Execute.
4. Click Execute.
Your drive moves according to your configuration settings.
5. Adjust your settings, if desired.
6. Select another command and click Execute.
200
Rockwell Automation Publication MOTION-UM003F-EN-P - March 2015
Manual Tune
Additional Tune
Chapter 9
The Additional Tune tabs are available for both the Kinetix 6500 and
PowerFlex 755 drives. The attributes that appear on the tabs are determined by
the type of drive you are using.
See the Integrated Motion on the EtherNet/IP Network Reference Manual,
publication MOTION-RM003, for detailed information about the
AXIS_CIP_DRIVE attributes.
Additional Tune for the Kinetix 6500 Module
The Additional Tune section gives you access to additional tuning parameters,
typically needed for more advanced servo loop settings. Additional Tune for the
Kinetix 6500 module provides access to five parameter tabs:
• Feedforward
• Compensation
• Filters
• Limits
• Planner
TIP
You may need to turn all your toolbars off to see the complete screen. When
you’re done, choose View>Toolbars>Factory Defaults, or turn on the
toolbars you want to see.
The Feedforward tab lets you adjust velocity and acceleration feedforward.
Attribute
Description
Velocity Feedforward Command
A command signal that is a scaled version of the command velocity profile.
Acceleration Feedforward Command
A signal that is a scaled version of the command acceleration profile.
Rockwell Automation Publication MOTION-UM003F-EN-P - March 2015
201
Chapter 9
Manual Tune
The Compensation tab lets you input scaling gain and friction offset values.
Attribute
Description
System Inertia
Torque or force scaling gain value that converts commanded acceleration
into equivalent rated torque/force.
Torque Offset
Provides a torque bias when performing closed loop control.
Friction
Value added to the current/torque command to offset the effects of
coulomb friction.
Friction Compensation
Value added to the current/torque command to offset the effects of
friction.
The Kinetix 350 drive does not support this parameter.
Backlash Compensation
Defines a window around the command position.
Load Observer Configuration
Configures the operation of the Load Observer.
Load Observer Bandwidth
Determines the proportional gain, Kop, of the load observer.
Load Observer Integral Bandwidth
Determines the load observer integral gain, Koi, that together with the
Kop, multiplies the integrated error signal within the observer.
The Filters tab lets you input torque values.
202
Attribute
Description
Torque Low Pass Filter Bandwidth
Break frequency for the second order low pass filter that is applied to the
torque reference signal.
Torque Notch Filter Frequency
Center frequency of the notch filter that is applied to the toque reference
signal.
Torque Lag Filter Gain
Sets the high frequency gain of the torque reference Lead-Lag Filter.
Torque Lag Filter
Sets the lag filter that is applied to the torque reference filter.
Adaptive Tuning Configuration
Configured advanced gain tuning options. The modes for the adaptive tuning
include:
• Disabled
• Notch Filter Tuning
• Gain Stabilization
• Notch Filter Tuning and Gain stabilization
Rockwell Automation Publication MOTION-UM003F-EN-P - March 2015
Manual Tune
Chapter 9
Attribute
Description
Torque Notch Filter High Frequency
Limit
The high frequency limit for vibration suppression. The value must be greater
than the Torque Notch Filter Low Frequency Limit value.
The default Torque Notch Filter High Frequency limit is 1000 Hertz
Torque Notch Filter Low Frequency
Limit
The low frequency limit for vibration suppression. The value must be less than
the Torque Notch Filter High Frequency Limit value.
The default Torque Notch Filter Low Frequency limit is 100 hertz.
Torque Notch Filter Tuning Threshold
Enter a threshold valued for the resonance frequency identified by the tuning
algorithm. The magnitude of an identified natural resonance frequency must
be higher than this threshold value to be applied to the Torque Notch Filter
Frequency estimate.
The default value is 5.0% Motor Rated.
The Limits tab lets you input peak, velocity, and accel/decel values.
Configure Torque Values
The torque values are additional tuning parameters that are typically needed by
more advanced servo loop settings. The values that appear are determined by the
type of drive you are using.
Follow these steps to configure torque values:
1. Right-click an axis and click Manual Tune.
2. In the bottom left corner of the Manual Console dialog box, click
Additional Tune to display the additional tune tabs.
3. Click the Filters tab to access the torque values.
4. Adjust the torque values as desired.
5. After you adjust the values, click Additional Tune to close the tabs.
Attribute
Description
Peak Torque Limit
Floating point that is based on calculations using Max Motor Torque, Max Drive
Torque, Motor Peak Current, Motor Rated Current, and Drive Peak Current
attributes.
Velocity Limit
Positive or Negative velocity reference value.
Acceleration
Defines the maximum acceleration (increasing speed) allowed for the
acceleration reference value into the acceleration summing junction.
The Kinetix 350 does not support this attribute.
Deceleration
Defines the maximum deceleration (decreasing speed) allowed for the
acceleration reference signal into the acceleration summing junction.
The Planner tab lets you input the maximum values for acceleration and
deceleration.
Rockwell Automation Publication MOTION-UM003F-EN-P - March 2015
203
Chapter 9
204
Manual Tune
Attribute
Description
Maximum
The value of the Maximum Speed attribute used by various motion instructions
to determine the steady-state speed of the axis.
Maximum Acceleration and
Maximum Deceleration
The Maximum Acceleration and Maximum Deceleration values frequently used
by motion instructions, for example, MAJ, MAM, and MCD, to determine the
acceleration/deceleration rate to apply to the axis.
Rockwell Automation Publication MOTION-UM003F-EN-P - March 2015
Manual Tune
Chapter 9
Additional Tune for the PowerFlex 755 Drive
The Additional Tune section gives you access to additional tuning parameters,
typically needed for more advanced servo loop settings. Additional Tune for the
PowerFlex 755 drive provides access to five parameter tabs:
• Feedforward
• Compensation
• Filters
• Limits
• Planner
TIP
You may need to turn all your toolbars off to see the complete screen. When
you’re done, choose View>Toolbars>Factory Defaults, or turn on the
toolbars you want to see.
The Feedforward tab lets you adjust velocity and acceleration feedforward.
Attribute
Description
Velocity Feedforward
A command signal that is a scaled version of the command velocity profile.
Acceleration
A signal that is a scaled version of the command acceleration profile.
The Compensation tab lets you input scaling gain and friction offset values.
Attribute
Description
System Inertia
Torque or force scaling gain value that converts commanded acceleration into
equivalent rated torque/force.
Torque Offset
Provides a torque bias when performing closed loop control.
Load Observer Configuration
Configures the operation of the Load Observer.
Load Observer Bandwidth
Determines the proportional gain, Kop, of the load observer.
Rockwell Automation Publication MOTION-UM003F-EN-P - March 2015
205
Chapter 9
Manual Tune
The Filters tab lets you input torque values.
Attribute
Description
Torque Low Pass Filter Bandwidth
Break frequency for the second order low pass filter that is applied to the
torque reference signal.
Torque Notch Filter Frequency
Center frequency of the notch filter that is applied to the toque reference
signal.
The Limits tab lets you input peak and velocity values.
Attribute
Description
Peak Torque Limit
Floating point that is based on calculations using Max Motor Torque, Max Drive
Torque, Motor Peak Current, Motor Rated Current, and Drive Peak Current
attributes.
Velocity Limit
Positive or Negative velocity reference value.
The Planner tab lets you input the maximum values for acceleration and
deceleration.
206
Attribute
Description
Maximum
The value of the Maximum Speed attribute used by various motion instructions
to determine the steady-state speed of the axis.
Maximum Acceleration
and Maximum Deceleration
The Maximum Acceleration and Maximum Deceleration values frequently used
by motion instructions, for example, MAJ, MAM, and MCD, to determine the
acceleration/deceleration rate to apply to the axis.
Rockwell Automation Publication MOTION-UM003F-EN-P - March 2015
Manual Tune
Chapter 9
Quick Watch
The Quick Watch window lets you monitor the tags in your program while you
are executing commands. To open Quick Watch, press ALT+3 or choose it from
the View menu.
You create Quick Watch Lists by choosing Quick Watch from the pull-down
menu.
Once you name a Quick Watch List, it available in the ACD, L5K, and L5X files.
Make sure to name your lists. Lists that do not have names are lost when you close
the software.
Rockwell Automation Publication MOTION-UM003F-EN-P - March 2015
207
Chapter 9
Manual Tune
Motion Generator
This example assumes the following:
• The servo is off, with session Online
• Axis State: Stopped
• Axis Faults: No Faults
1. Choose MSO (Motion Servo On).
This readies the drive for motion, and enables the servo loop.
2. Click Execute.
The axis state goes to Servo = On.
The Motion Console dialog box displays the following:
• Axis State: Running
• Axis Faults: No Faults
The Results window displays the following message.
3. Select MAH (Motion Axis Home) and click Execute.
Use this step to execute the Homing command to establish a feedback
positional reference, if a Position loop is being tuned.
208
Rockwell Automation Publication MOTION-UM003F-EN-P - March 2015
Manual Tune
Chapter 9
The axis state goes Servo-On, and the controller performs the Axis Home
procedure, which is based on the configured Home settings.
The Motion Console dialog box appears:
• Axis State: Running
• Axis Faults: No Faults
Blue arrows next to a field means that these
values are immediately applied. Once you put a
value in the field and then leave that field, it is
automatically sent to the controller.
The Results window displays No Error.
4. Choose MAM (Motion Axis Move).
This step initiates an Axis-Move at the selected speed, acceleration/
deceleration, profile, and end point position and lets you observe the axis
response.
Before executing this MAM Move, you may want to initiate a method to
observe the axis response during the move.
Rockwell Automation Publication MOTION-UM003F-EN-P - March 2015
209
Chapter 9
Manual Tune
Some examples include the following:
• Watch-window:
Quick Watch tag name = Axis_y.ActualPosition or =
Axis_y.ActualVelocity
• New Trend with Tags:
Axis_y.ActualPosition or = Axis_y.ActualVelocity
• Axis Properties:
Status dialog box = Axis_y.ActualPosition or = Axis_y.ActualVelocity
5.
Click Execute.
The controller performs a controlled axis move.
The Motion Console dialog box appears:
• Axis State: Running
• Axis Faults: No Faults
The Results window displays No Error.
6. Observe and verify the Axis response.
The axis motion moves according to the configured MAM settings:
– If the settings and response are satisfactory, then tuning is finished and
you can close Manual Tune.
– If the settings or response are not satisfactory, stay in Manual Tune and
adjust the parameters.
Also useful for diagnostics purposes are the hyperlinks to Axis State and
Axis Fault.
– Axis State goes to the Status dialog box of the Axis Properties.
– Axis Faults is a hyperlink to Faults and Alarms dialog box of Axis
Properties.
210
Rockwell Automation Publication MOTION-UM003F-EN-P - March 2015
Chapter
10
Faults and Alarms
There are four ways to find and view faults and alarms:
• Fault and Alarm Log
• QuickView Pane
• Tag Monitor, see the individual fault-related attributes
• Drive Status Indicators
Faults and Alarms Dialog Box
Topic
Page
Troubleshoot Faults
214
Manage Motion Faults
215
Configure the Exception Actions for AXIS_CIP_DRIVE
216
Inhibit an Axis
219
The Faults and Alarms dialog box displays the status of faults and alarms in the
controller for an axis. The display is read-only except for the ability to clear logs.
Fault and alarm entries are displayed only when you are online with a controller.
When online, check or clear the checkboxes in the Show row to toggle between
showing and hiding the specified group of entries. The last 25 faults and alarms
only display.
Figure 6 - Faults and Alarms Log
Rockwell Automation Publication MOTION-UM003F-EN-P - March 2015
211
Chapter 10
Faults and Alarms
This table describes the parameters for the Faults and Alarms dialog box.
Table 28 - Faults and Alarms Dialog Box Descriptions
212
Parameter
Description
Indicator
Displays the following icons to indicate the state of a fault or alarm:
• Alarm On
• Alarm Off
• Fault Occurred
• Reset Occurred
Date/Time
Displays the date and time the event occurred. The time stamp is the workstation setting.
Source
Displays the source of the event, for example:
• Safety Fault
• Module Fault
• Group Fault
• Axis Fault
• Axis Alarm
Condition
Displays detailed information specific to the event category and code.
For drive exception conditions, the information is the same text used for the condition. This
field can contain more information when the Subcode field has been used for that entry
and is a more detailed entry if both codes are used in the log, for example:
• Group Sync Failure
• Bus Overvoltage UL
• All Axis Faults
• Motor Overspeed
• Axis Init Fault
Action
Displays the action command that was executed in response to the event as configured in
the axis. For instance, in many cases this indicates that a command sent to a drive, for
example:
• Planned Stop
• Ramped Stop
• Limited Stop
• Coast
• No Action
• Alarm Off
• Alarm On
End State
Displays the action result that is returned from the axis, which can be more detailed than
the command sent. For instance, a send of Disable Drive can result in either Holding,
Shutdown or other status, for example:
• Stopped - Hold
• Stopped - Disable
• Shutdown
• Shutdown Reset
Faults
Toggles between faults; display or hide.
Alarms
Toggles between alarms; display or hide.
Clear Log
Clears both the fault and alarm logs in the controller for this axis.
Rockwell Automation Publication MOTION-UM003F-EN-P - March 2015
Faults and Alarms
Chapter 10
QuickView Pane
The QuickView pane gives you a quick summary of faults and alarms that are
related to the axis you select in the Controller Organizer. The information
includes the type of axis, description, axis state, faults, and alarms.
Data Monitor
The Data Monitor is where you can read and write the values that are assigned to
specific tags, both online and offline.
You can do the following:
• Set a tag description.
• Change the display style of a value.
• Change a force mask value.
• Sort your tags alphabetically.
Rockwell Automation Publication MOTION-UM003F-EN-P - March 2015
213
Chapter 10
Faults and Alarms
Drive Status Indicators
For complete information on drive status indicators, see the following
publications:
Kinetix 6500 drive
• Kinetix 6500 Control Modules Installation Instructions,
publication 2094-IN014
• Kinetix 6000 Multi-Axis Drive User Manual, publication 2094-UM001
Kinetix 350 drive
• Kinetix 350 Single-axis EtherNet/IP Servo Drives User Manual,
publication 2097-UM002
Kinetix 5500 drive
• Kinetix 5500 Servo Drives User Manual, publication 2198-UM001
Kinetix 5700 drive
• Kinetix 5700 User Manual, publication 2198-UM002
PowerFlex 755 drive
• PowerFlex 755 Drive Embedded EtherNet/IP Adapter Installation
Instructions, publication 750-IN001
• PowerFlex 755 Drive Embedded EtherNet/IP Adapter User Manual,
publication 750COM-UM001
• PowerFlex 750-Series AC Drives, publication 750-PM001
Troubleshoot Faults
The controller has these types of motion faults.
Type
214
Description
Example
Instruction Caused by a motion instruction:
error
• Instruction errors do not impact controller operation.
• Review the error code in the motion control tag to see why an
instruction has an error.
• Fix instruction errors to optimize execution time and make sure that
your code is accurate.
See Error Codes (ERR) for Motion Instructions, publication MOTION-RM002.
A Motion Axis Move
(MAM) instruction with a
parameter out of range.
Fault
• Loss of feedback.
• Actual position that
exceeds an overtravel
limit.
Caused by an anomaly with the servo loop:
• You choose whether motion faults give the controller major faults.
• Can shut down the controller if you do not correct the fault condition.
Rockwell Automation Publication MOTION-UM003F-EN-P - March 2015
Faults and Alarms
Manage Motion Faults
Chapter 10
By default, the controller runs when there is a motion fault. As an option, you can
have motion faults cause a major fault and shut down the controller.
1. Choose a General Fault Type.
2. Do you want any motion fault to cause a major fault and shut down the
controller?
• YES - Choose Major Fault.
• NO - Choose Non-Major Fault. You must write code to handle motion
faults.
3. Right-click Motion Group and choose Properties.
4. Click the Attribute tab.
5. From the General Fault Type pull-down menu, choose the general fault
type.
Rockwell Automation Publication MOTION-UM003F-EN-P - March 2015
215
Chapter 10
Faults and Alarms
Configure the Exception
Actions for AXIS_CIP_DRIVE
Use exception actions to set how an axis responds to different types of faults. The
types of faults depend on the type of axis and how you configure it.
TIP
If you have used sercos motion, these are called fault actions.
The available actions for each Exception are controlled by the drive the axis is
associated with. When a fault or alarm occurs, the corresponding fault or alarm
axis attributes are set.
See Exception, Fault, and Alarm Attributes in the Integrated Motion on the
EtherNet/IP Network Reference Manual, publication MOTION-RM003.
Open the Axis Properties Actions dialog box for an axis to configure the
Exception Actions.
Options for each of the actions and the list of Exceptions may change based on
how you configure the drive. If an exception is not possible for a specific drive (as
defined by the profile of the drive), then that exception is not shown in this list.
216
Rockwell Automation Publication MOTION-UM003F-EN-P - March 2015
Faults and Alarms
Chapter 10
The list of actions that are taken can be restricted by the drive. When a previously
selected entry is no longer supported due to a configuration change, most of the
entries default to Stop Drive. In the few cases where Stop Drive does not apply,
the default is Fault Status Only. For example, Stop Drive does not apply with a
Feedback Only type configuration.
Figure 7 - Action Parameter Group Dialog Box
Table 29 - Action Tasks and Related Faults
Task
Choose
Description
Shut down the axis and let it
coast to a stop.
Shutdown
Shutdown is the most severe action. Use it for faults that could
endanger the machine or the operator if you don’t remove power
quickly and completely.
A fault happens when the following occurs:
• Axis servo action is disabled
• Servo amplifier output is zeroed
• Appropriate drive enable output is deactivated
• OK contact of the servo module opens. Use this to open
the E-Stop string to the drive power supply
Stop the axis and let the drive
stop the axis where you use the
Stopping Action attribute to
configure how to stop the drive.
Stop Drive
A fault happens when the following occurs:
• Axis servo action is disabled
• Servo amplifier output is zeroed
• Appropriate drive enable output is deactivated
• Drive switches to local servo loop control and the axis is
slowed to a stop using the Stopping Torque
• The servo action and the power structure are disabled if the
axis doesn’t stop in the Stopping Time
Rockwell Automation Publication MOTION-UM003F-EN-P - March 2015
217
Chapter 10
Faults and Alarms
Table 29 - Action Tasks and Related Faults
Task
Choose
Description
Leave the servo loop on and stop
the axis at its Maximum
Deceleration rate.
Stop Planner
Use this fault action for less severe faults. It is the gentlest way to
stop. Once the axis stops, you must clear the fault before you can
move the axis. The exception is Hardware Overtravel and Software
Overtravel faults, where you can jog or move the axis off the limit.
A fault happens when the following occurs:
• Axis slows to a stop at the Maximum Deceleration Rate
without disabling servo action or the servo module Drive
Enable output
• Control of the drive’s servo loop is maintained
• Axis slows to a stop at the Maximum Deceleration rate without
disabling the drive
Write your own application code
to handle the fault.
218
Fault Status
Only
Use this fault action only when the standard fault actions are not
appropriate. With this fault action, you must write code to handle
the motion faults. For Stop Motion or Status Only, the drive must
stay enabled for the controller to continue to control the axis.
Selecting Status Only lets motion continue only if the drive itself
is still enabled and tracking the command reference.
Ignore
Ignore instructs the device to completely ignore the exception
condition. For some exceptions that are fundamental to the
operation of the axis, it may not be possible to Ignore the
condition.
Alarm
Alarm action instructs the device to set the associated bit in the
Axis Alarm word, but to otherwise not affect axis behavior. For
some exceptions that are fundamental to the operation of the
device, it may not be possible to select this action or any other
action that leaves device operation unaffected.
Rockwell Automation Publication MOTION-UM003F-EN-P - March 2015
Faults and Alarms
Inhibit an Axis
Chapter 10
Follow these instructions to determine when to inhibit an axis and how to block
the controller from using an axis.
You want to block the controller from using
an axis because the axis has faulted or is not
installed.
You want to let the controller use the other
axes.
Table 30 - Inhibit Axes
Before you inhibit or uninhibit an axis, turn off all axes.
Before you inhibit or uninhibit an axis, be aware that inhibit/uninhibit of an axis will also affect any half axes in the same
drive.
1. Stop all motion in the axis.
2. Use an instruction such as the Motion Servo Off (MSF) for the axis.
This lets you stop motion under your control. Otherwise the axes turn off on their own when you inhibit or uninhibit one
of them.
CIP only connections to the drive with the affected axis
are shut down. Connections and motion on all other
drives axes continue uninterrupted.
Kinetix 6500 Ethernet
Drives
Ethernet
Switch
Controller
1756-ENxT
The controller automatically restarts the connections.
To inhibit the axes, inhibit the communication module.
Do you want to inhibit the Integrated Motion on the EtherNet/IP network axes?
• YES—Inhibit the 1756-ENxT communication modules.
• NO—Inhibit the individual axes.
You can inhibit the axes of a module on an individual basis. However, it is more efficient to inhibit all axes at once by
inhibiting the module.
Important: If you inhibit an axis on a drive, you inhibit all action on the drive, including any half axes. Make sure that
you are aware of all action on a drive before inhibiting the axis.
Rockwell Automation Publication MOTION-UM003F-EN-P - March 2015
219
Chapter 10
Faults and Alarms
Example: Inhibit an Axis
1. Make sure all axes are off.
And this axis is off.
This axis is off.
All axes are off.
2. Use a one-shot instruction to trigger the inhibit.
Your condition to inhibit the axis
is on.
Your condition to uninhibit the
axis is off.
Give the command to inhibit the axis.
All axes are off.
3. Inhibit the axis.
The inhibit command turns on.
Inhibit this axis.
Inhibit the axis.
4. Wait for the inhibit process to finish.
All of these have happened:
· The axis is inhibited.
· All uninhibited axes are ready.
· The connections to the motion drive module are running again.
What you want to do next?
220
Rockwell Automation Publication MOTION-UM003F-EN-P - March 2015
Faults and Alarms
Chapter 10
Example: Uninhibit an Axis
1. Make sure all axes are off.
This axis is off.
All axes are off.
And this axis is off.
2. Use a one-shot instruction to trigger the uninhibit.
Your condition to uninhibit the
axis is on.
Your condition to inhibit the axis
is off.
All axes are off.
Give the command to uninhibit the axis.
3. Uninhibit the axis.
Uninhibit this axis.
The uninhibit command turns on.
Uninhibit the axis.
4. Wait for the inhibit process to finish.
All of these have happened:
• The axis is uninhibited.
• All uninhibited axes are ready.
• The connections to the motion drive module
are running again.
This axis is on.
Rockwell Automation Publication MOTION-UM003F-EN-P - March 2015
This axis is OK to run.
221
Chapter 10
Faults and Alarms
Notes:
222
Rockwell Automation Publication MOTION-UM003F-EN-P - March 2015
Appendix
A
CIP Drive Module Properties
Use this appendix for a description of each tab of the CIP drive Module
Properties dialog box.
Module Properties
Topic
Page
General Tab
224
Connection Tab
226
Safety Tab
227
Time Sync Tab
228
Module Info Tab
229
Internet Protocol Tab
231
Port Configuration Tab
233
Network Tab
237
Associated Axes Tab
240
Power Tab
244
Digital Input Tab
247
Motion Diagnostics Tab
248
The Module Properties dialog boxes provide the configuration information that
you use to configure your CIP drive module. For all tabs, when you click Apply,
the software accepts and applies your edits and you can continue configuring
your module. When you are online, the information is automatically sent to the
controller. The controller tries to send the information to the module, if the
connection to the module is not inhibited. These examples show the Kinetix
6500 drive module properties pages. Other module property pages for drives,
such as PowerFlex 755, Kinetix 350, and Kinetix 5500 servo drives are noted
where appropriate.
Rockwell Automation Publication MOTION-UM003F-EN-P - March 2015
223
Appendix A
CIP Drive Module Properties
General Tab
The General tab provides the internal drive type description, vendor, and the
parent 1756-EnxT communication module. On the General tab, you can do the
following:
• Name the drive module.
• Write a description for the drive module.
• Configure the module.
Figure 8 - General Tab
Click Change in the Module Definition area to select the following:
• Revision of the module.
• Electronic Keying type, do not use Disable Keying for motion
applications.
• Type of connection, in this case Motion.
• Correct Power Structure that is coupled to the drive module. You can also
verify the power rating of the power structure when you go online.
224
Rockwell Automation Publication MOTION-UM003F-EN-P - March 2015
CIP Drive Module Properties
Appendix A
Figure 9 - General Tab
Table 31 - Module Properties: General Tab Parameter Descriptions
Parameter
Description
Revision
Assign the major and minor revision of the drive.
The major revision is set automatically and it cannot be changed.
If you change the major revision, any axis that is associated with the drive is lost and the
module configuration settings are reset to default values.
The minor revision is a value from 1…255.
It is enabled when Electronic Keying is not set to Disable Keying and the controller is
offline, or when the controller is in Remote Run mode. It is not available when the
controller is in Run mode.
Electronic Keying
Set the electronic keying as Exact Match or Compatible Module. Never use Disable
Keying in motion applications.
Power Structure
Defines the current and voltage of the drive. It is a voltage current duty cycle
combination. When you change the power structure, the associated axis settings are
removed and the values are reset to defaults.
Power Ratings
Verifies that the power structure in the profile is the same as the connected drive. You
can see a power mismatch depending on state of the checkbox.
Verify that Power Rating on Connection is checked by default. It is enabled in offline
mode. You can access the Verify Power Rating by clicking Change.
Connection
Available offline only. The default and only value is Motion.
Ethernet Address
Assign an Ethernet address for the integrated motion drive. Depending on your
application requirements, you can either assign a Private Network Address or a general
IP address.
You can also assign a Host Name. A Host Name can have up to 64 ASCII characters.
Valid values:
• 0...9
• A...Z
• Upper or lower case letters
• - (dash)
• . (period)
For specific information about configuring the EtherNet/IP network for the Kinetix 6500
control module, see the Kinetix 6200 and Kinetix 6500 Modular Servo Drive User Manual,
publication 2094-UM002.
For general information about setting IP addresses and other Ethernet network
considerations, see the Ethernet User Manual, publication ENET-UM001.
Rockwell Automation Publication MOTION-UM003F-EN-P - March 2015
225
Appendix A
CIP Drive Module Properties
Connection Tab
The Connection tab provides you with information about the connection
condition between the controller and a module. The information comes from the
controller.
Figure 10 - Connection Tab
Table 32 - Module Properties: Connections Tab Parameter Descriptions
Parameter
Description
Requested Packet
Interval (RPI)
Each controller has its own RPI setting. The Connection tab for each module displays its own
value. This is also true for a virtual adapter.
Inhibit Module
Check to inhibit your connection to the module. When you inhibit the module, it causes a
disconnection to the module.
When you go online, an icon appears on the
module that
states that the module is inhibited.
Inhibit Online
If you inhibit the module while you are online and are connected to the module, the connection
is closed and the outputs go to the last configured Program mode state.
Inhibit Online but Connection Not Established
If you inhibit the module while online but a connection to the module has not been
established, due to an error condition or fault, the module is inhibited. The module status
information changes to indicate that the module is Inhibited and not Faulted.
Uninhibit Online
If you uninhibit a module online, and no fault condition occurs, a connection is made to the
module, and the module is reconfigured. If you are not the owner and in Listen Only mode, the
module is not reconfigured.
Uninhibit Online and a Fault Occurs
If you uninhibit a module while online and a fault condition occurs, a connection is not made to
the module.
Major Fault
Configure the controller so that a loss of connection to this module causes a major fault.
Module Faults
Displays the fault code that is returned from the controller and provides details about the fault.
The following table describes common connection errors.
Table 33 - Common Connection Errors
226
Error
Description
Connection Request Error
The controller is attempting to make a connection to the module and has
received an error. The connection was not made.
Service Request Error
The controller is attempting to request a service from the module and has
received an error. The service was not performed successfully.
Module Configuration Invalid
The configuration in the module is invalid. Module Configuration Rejected invalid power structure.
Electronic Keying Mismatch
Electronic Keying is enabled and some part of the keying information differs
between the software and the module.
Rockwell Automation Publication MOTION-UM003F-EN-P - March 2015
CIP Drive Module Properties
Appendix A
Safety Tab
The Safety tab provides you with information about the connection between the
owner and the 2198-Hxxx-ERS2 servo drive. The information comes from the
controller.
The connection between the owner and the 2198-Hxxx-ERS2 servo drive is
based on the following:
• Servo drive catalog number must be 2198-Hxxx-ERS2 (integrated)
• Servo drive safety network number
• GuardLogix slot number
• GuardLogix safety network number
• Path from the GuardLogix controller to the 2198-Hxxx-ERS2 drive
• Configuration signature
If any differences are detected, the connection between the GuardLogix
controller and the 2198-Hxxx-ERS2 drive is lost, and the yellow yield icon
appears in the controller project tree after you download the program.
For complete information on how to configure a drive with integrated safety
connections, see the Kinetix 5500 Servo Drives User Manual,
publication 2198-UM001.
Rockwell Automation Publication MOTION-UM003F-EN-P - March 2015
227
Appendix A
CIP Drive Module Properties
Time Sync Tab
When you are online with the controller, you can review the time
synchronization status data that is related to the network. When you are offline,
no values display.
Figure 11 - Time Sync Tab
Table 34 - Time Sync Tab Descriptions for the Grandmaster Clock
228
Parameter
Description
Identity
Specifies the unique identifier for the Grandmaster clock. The format depends on the
network protocol. Ethernet network encodes the MAC address into the identifier
while ControlNet and DeviceNet networks encode the vendor ID and serial number
into the identifier.
Class
Specifies a measure of the quality of the Grandmaster clock. Values are defined from
0 … 255 with zero as the best clock.
Accuracy
Indicates the expected absolute accuracy of the Grandmaster clock relative to the PTP
epoch. The accuracy is specified as a graduated scale that starts at 25 ns and ends at
greater than 10 seconds or unknown. The lower the accuracy value, the better the
clock.
Variance
Displays the measure of inherent stability properties of the local clock. The value is in
offset scaled log units. The lower the variance, the better the clock.
Source
Specifies the time source of the Grandmaster clock (for example, GPS, NTP, and hand).
Priority1/Priority 2 specifies the relative priority of the Grandmaster clock to other
clocks in the system. These fields can be used to override the best master in the
system.
Rockwell Automation Publication MOTION-UM003F-EN-P - March 2015
CIP Drive Module Properties
Appendix A
Table 35 - Time Sync Tab Descriptions for the Local Clock
Parameter
Description
Local Clock
Specifies clock property information for the local clock. The Local Clock values appear
dimmed in offline mode or when PTP is disabled.
Synchronization Status
Specifies whether the local clock is synchronized with the Grandmaster reference
clock. The value is 1 if the local clock is synchronized and zero if the local clock is not
synchronized. A clock is synchronized if it has one port in the slave state and is
receiving updates from the time master.
Offset Master
Specifies the amount of deviation between the local clock and the Grandmaster clock
in nanoseconds.
Backplane State
Specifies the state of the backplane.
Ethernet State
Specifies the state of the Ethernet port.
• For more information about the Time Sync tab, see Set Time
Synchronization on page 92.
• For detailed information about CIP Sync, see the Integrated Architecture
and CIP Sync Configuration Application Technique,
publication IA-AT003.
Module Info Tab
The Module Info Tab displays module and status information. You can also reset
a module to the power-up state. Use this tab to determine the identity of the
module. The data on this tab comes directly from the module. If you selected a
Listen-Only communication format when you created the module, this tab is not
available. You cannot see any values if you are offline or you are creating a module.
When you are online with the controller, you can review real time drive status
information. When you are offline, no values display.
Rockwell Automation Publication MOTION-UM003F-EN-P - March 2015
229
Appendix A
CIP Drive Module Properties
Table 36 - Module Properties: Module Info Tab Descriptions
Category
Parameter
Description
Identification
Vendor
Manufacturer of the module.
Product Type
Type of module.
Product Code
Usually the same as the name.
Revision
Firmware revision of the module.
Serial Number
Serial number of the module.
Product Name
This value comes from the module. It relates to the Kinetix 6500
drive that you configured as part of your network.
Major Fault
Unrecoverable.
Minor Fault
Recoverable.
Internal State
Current operational state.
Configured
Displays a yes or no value that indicates whether the module is
configured by an owner controller who is connected to it.
Once you configure a module, it stays configured until you reset,
cycle power, or if the owner drops connection to the module.
Owned
Displays a yes or no value that indicates whether an owner
controller is connected to the module.
Module Identity
Match
For the display to Match, the following must agree:
• Vendor
• Module Type, the combination of Product Type and Product
Code for a particular Vendor
• Major Revision
• Mismatch
The values that are returned from the module do not match what
appears in the General tab.
This field does not take into account the Electronic Keying or Minor
Revision selections for the module that were specified on the
General tab.
Status
230
Refresh
Gathers updated data from the module.
Reset Module
• Resets a module to the power-up state by emulating a power cycle.
• A module reset causes all connections to or through the module to be closed, and this can
result in loss of control.
Rockwell Automation Publication MOTION-UM003F-EN-P - March 2015
CIP Drive Module Properties
Appendix A
Internet Protocol Tab
The Internet Protocol tab lets you configure EtherNet/IP settings. You must be
online to configure EtherNet/IP settings. These settings appear dimmed when
you are offline. They also appear dimmed when you are online and there is a
module mismatch or a communication error occurs. BOOTP or DHCP is not
supported.
If you use the switches on the module to set the EtherNet/IP address, the IP is set
automatically. If the module does not support setting the IP address via switches,
this option does not display.
You can disable IP settings set by switches on the module. Change the switch
settings on the module and then reset the module either by cycling power to the
module or by clicking Reset on the Module Info tab.
Figure 12 - Internet Protocol
Rockwell Automation Publication MOTION-UM003F-EN-P - March 2015
231
Appendix A
CIP Drive Module Properties
Table 37 - Module Properties: Internet Protocol Tab Descriptions
232
Parameter
Description
Physical Module IP Address
Displays physical IP address of the module or, if you selected to configure the IP
settings manually, enter a valid physical module IP address. See the IP address
for valid values.
• The Physical Module IP Address appears dimmed and has no value when you
are offline or online with a module mismatch or a communication error
occurs.
• The Physical Module IP Address also appears dimmed when you set the IP
address by using the switches on the module.
Both a warning message and the IP address that is entered on the General tab
appear when you enter a physical module IP address that does not match the IP
address that is entered on the General tab.
The warning message does not display when you are offline or online and a
module mismatch or communication error occurs. You can click Copy IP address
from the General tab so that the Physical Module IP Address matches the IP
address on the General tab.
It appears only when you choose to configure the IP settings manually and
when there is a mismatch between the IP address in the physical module and
the IP address entered on the General tab.
Subnet Mask
Displays the subnet mask of the module or, if you selected to configure the IP
settings manually, enter a valid subnet mask.
• The Subnet Mask appears dimmed and is blank when you are offline or
online and a module mismatch or communication error occurs.
• The Subnet Mask appears dimmed when the module supports the option to
set the IP address by using the switches and you choose to set the IP address
using the switches.
Gateway Address
Displays the gateway IP address of the module or, if you selected to configure
the IP settings manually, enter a valid gateway address.
• The Gateway Address appears dimmed and is blank when you are offline or
online and a module mismatch or communication error occurs.
• The Gateway Address appears dimmed when the module supports the
option to set the IP address by using the switches and you choose to set the
IP address using the switches on the module.
Domain Name
Displays the domain name of the module or to configure the IP settings
manually, enter a valid domain name. See Domain Name for valid values for the
domain name.
• The Domain Name appears only if the module supports a domain name. It
appears dimmed and is blank when you are offline or online and a module
mismatch or communication error occurs.
• The Domain Name appears dimmed when the module supports the option
to set the IP address by using the switches and when you choose to set the IP
address by using the switches on the module.
Host Name
Displays the host name of the module or, enter a valid host name. A warning
message appears when the host name in the physical module does not match
the host name on the General tab. Make sure that the host name entered here
matches the host name on the General tab and click Set.
The Host Name appears only if the module supports a host name. It appears
dimmed and is blank when you are offline or online and a module mismatch or
communication error has occurred.
Primary DNS Server Address
Displays the primary DNS server IP address of the module or, if you selected to
configure the IP settings manually, enter a valid primary DNS server address.
• The Primary DNS Server Address appears only if the module supports a
primary DNS server address. It appears dimmed and is blank when you are
offline or online and a module mismatch or communication error occurs.
• The Primary DNS Server Address appears dimmed when the module
supports the option to set the IP address by using the switches that you
choose to set the IP address by using the switches on the module.
Rockwell Automation Publication MOTION-UM003F-EN-P - March 2015
CIP Drive Module Properties
Appendix A
Table 37 - Module Properties: Internet Protocol Tab Descriptions
Parameter
Description
Secondary DNS Server Address
Displays the secondary DNS server IP address of the module or, if you selected to
configure the IP settings manually, enter a valid secondary DNS server address.
The Secondary DNS Server Address appears only if the module supports a
secondary DNS server address. It appears dimmed and is blank when you are
offline online and a module mismatch or communication error occurs.
The Secondary DNS Server Address appears dimmed when the module
supports the option to set the IP address by using the switches on the module
you choose to set the IP address by using the switches.
Refresh Communication
Appears when communication with the module has failed. Click Refresh
communication to attempt to refresh communication.
Set
Commits modifications to the module.
Set appears dimmed when you are offline or online and a module mismatch or
communication error has occurred.
Port Configuration Tab
By enabling Auto-negotiate, the communication between communication
modules and drives is automatic.
Figure 13 - Auto-Negotiate Enabled
Rockwell Automation Publication MOTION-UM003F-EN-P - March 2015
233
Appendix A
CIP Drive Module Properties
Notice in Figure 13 on page 233 that you cannot see the current Speed or
Duplex. You must click Refresh communication to have those fields populate
after you select Auto-Negotiate.
After you click Refresh communication, you
can see that this drive’s communication port
is set to 100 Mbps for Speed and Full for
Duplex.
Click Set to commit your changes.
IMPORTANT
You must reset the drive to use the new settings. When you reset the drive,
it causes a loss of connection and motion stops. The drive is in the STOPPED
state.
If you click … Port Diagnostics you see the values for the Interface and Media
Counters.
234
Rockwell Automation Publication MOTION-UM003F-EN-P - March 2015
CIP Drive Module Properties
Appendix A
Table 38 - Module Properties: Port Configuration Tab Descriptions
Parameter
Description
Port
Port name.
Enable
Enabled state of the port or check to enable the port.
Enable appears dimmed when you are offline or online and a module mismatch
or communication error has occurred.
Link Status
Displays the link status as Inactive (port is inactive) or Active (port is active).
Link Status appears dimmed when you are offline or online and a module
mismatch or communication error has occurred.
Auto-Negotiate
Displays the port’s auto-negotiate status.
• Check Auto-Negotiate to enable the module to negotiate the port’s speed
and duplex automatically.
• Clear the Auto-Negotiate checkbox to set the port’s speed and duplex
manually.
• Auto-Negotiate appears dimmed and checked when the module’s port and
duplex cannot be specified manually.
• Auto-Negotiate appears dimmed and unchecked when the port’s speed and
duplex are specified by the module.
Auto-Negotiate is unchecked and appears dimmed when you are offline, online
and Enable is unchecked, or online and a module mismatch or communication
error has occurred.
Selected Speed
Displays the port’s selected speed if Auto-Negotiate is unchecked. You can also
select the port’s speed.
Valid speeds:
• 10 Mbps
• 100 Mbps
• 1000 Mbps
Selected Speed appears dimmed and has no value if either of the following
occurs:
• You are offline
• Online and Enable is unchecked
• Online and Auto-Negotiate is checked
• Online and Auto-Negotiate appears dimmed
• Online and a module mismatch or communication error has occurred
Current Speed
Displays the port’s current speed.
Current Speed has no value when you are offline, online and Enable is
unchecked, online and a module mismatch, or communication error has
occurred.
Selected Duplex
Displays the port’s selected duplex if Auto-Negotiate is unchecked. You can
select the port’s duplex. Valid duplexes are Half and Full.
Selected Duplex appears dimmed and has no value if either of the following
occurs:
• You are offline or online and Enable is unchecked
• Online and Auto-Negotiate is checked
• Online and Auto-Negotiate appears dimmed
• Online and a module mismatch or communication error has occurred
Current Duplex
Displays the port’s current duplex.
Current Duplex is blank when you are offline, online and Enable is unchecked,
online and a module mismatch, or communication error has occurred.
Port Diagnostics
Port Diagnostics appears dimmed when you are offline, online and Enable is
unchecked, online and a module mismatch, or communication error has
occurred.
Rockwell Automation Publication MOTION-UM003F-EN-P - March 2015
235
Appendix A
CIP Drive Module Properties
Table 38 - Module Properties: Port Configuration Tab Descriptions
236
Parameter
Description
Reset Module
A reset module message appears stating that the module needs to be reset
before the modifications take effect. After you make modifications to either:
• Auto-Negotiate state
• Selected Speed
• Selected Duplex configuration values
Clicking Reset Module initiates a reset operation on the module, which returns
the module to its power-up state by emulating the cycling of power.
Refresh Communication
Appears when communication with the module has failed. When you click
Refresh communication, an attempt is made to refresh communication with the
module.
Set
Commits your modifications.
Set appears dimmed when you are offline or online and a module mismatch or
communication error has occurred or there are no pending edits on the tab.
Apply
Accepts and applies your edits on any tab and you can continue configuring.
When you click Apply or OK, the information is automatically sent to the
controller. The controller tries to send the information to the module, if the
module’s connection is not inhibited.
Rockwell Automation Publication MOTION-UM003F-EN-P - March 2015
CIP Drive Module Properties
Appendix A
Network Tab
The Network tab provides you the network information for the port.
TIP
The Network tab does not exist on the module properties of the PowerFlex
755 or Kinetix 350 drives.
Figure 14 - Network Tab
Table 39 - Module Properties: Network Tab Descriptions
Parameter
Description
Network Topology
Displays the current network topology as either Linear/Star or Ring.
Network Topology has no value when offline, online and a module mismatch or
communication error has occurred.
Network Status
Displays the current network status as either of the following occurs:
• Normal
• Ring Fault
• Unexpected Loop Detected
Network Status has no value when offline, online and a module mismatch or
communication error has occurred.
Active Ring Supervisor
If the network topology is operating in a Ring mode, it displays the IP Address or
MAC Address of the Active Ring Supervisor.
Active Ring Supervisor appears dimmed if either of the following:
• Offline
• Online and a module mismatch or communication error has occurred
• The network topology is not operating in a Ring mode
Active Supervisor Precedence
If the network topology is operating in a Ring mode, it displays the Active Ring
Supervisor’s precedence.
Active Supervisor Precedence appears dimmed if either of the following:
• Offline
• Online and a module mismatch or communication error has occurred
• The network topology is not operating in a Ring mode
Enable Supervisor Mode
Displays the Supervisor mode of the module or, checks for the module to be
configured as a supervisor on the network.
Enable Supervisor mode appears dimmed if either of the following:
• Offline
• Online and a module mismatch or communication error has occurred
Rockwell Automation Publication MOTION-UM003F-EN-P - March 2015
237
Appendix A
CIP Drive Module Properties
Table 39 - Module Properties: Network Tab Descriptions
238
Parameter
Description
Ring Faults Detected
When the module is configured as a ring supervisor on the network, it displays the
number of times that a ring fault is detected by the Ring.
Ring Faults Detected has no value if either of the following occurs:
• Offline
• Online and a module mismatch or communication error has occurred
• The module is not configured as a ring supervisor
Reset Counter
When the module is configured as a ring supervisor on the network, click Reset
Counter to reset the ring fault count of the module to zero.
Reset Counter appears dimmed if either of the following occurs:
• Offline
• Online and a module mismatch or communication error has occurred
• The module is not configured as a ring supervisor
Supervisor Status
When the module is configured as a ring supervisor on the network, it displays the
ring supervisor status of the module as the following:
• Active, the module is the Active Ring Supervisor
• Back up, the module is the back-up ring supervisor
• Cannot support current Beacon Interval or timeout, the module cannot support
either the beacon interval or timeout values of the current Active Ring
Supervisor
Supervisor Status has no value if either of the following occurs:
• Offline
• Online and a module mismatch or communication error has occurred
• The module is not configured as a ring supervisor
Ring Fault
Last Active Node on Port 1
When the module is the Active Ring Supervisor on the network, it displays the IP
Address or MAC Address of the last active node on Port 1 if a ring fault has occurred.
Last Active Node on Port 1 is not displayed if either of the following occurs:
• Offline
• Online and a module mismatch or communication error has occurred
• Online and the module is not a ring supervisor
• Online and the module is not the Active Ring Supervisor
Last Active Node on Port 2
When the module is the Active Ring Supervisor on the network, it displays the IP
Address or MAC Address for the last active node on Port 2 if a ring fault has
occurred.
Last Active Node on Port 2 is not displayed if either of the following occurs:
• Offline
• Online and a module mismatch or communication error has occurred
• Online and the module is not configured as a ring supervisor
• Online and the module is not the Active Ring Supervisor
Verify Fault Location
Verify Fault Location causes the active ring supervisor to verify the last node fault
location on port 1 and port 2 of the module. The last fault location that has
occurred continues to display until you verify the fault.
Verify Fault Location is not displayed if either of the following occurs:
• Offline
• Online and a module mismatch or communication error has occurred
• Online and the module is not configured as a ring supervisor
• Online and the module is not the Active Ring Supervisor
Status
When the module is the Active Ring Supervisor on the network, Status displays the
ring fault condition on the network as either of the following occurs:
• Partial Network Fault
• Rapid Fault/Restore Cycles
Status is not displayed if either of the following occurs:
• Offline
• Online and a module mismatch or communication error has occurred
• Online and the module is not configured as a ring supervisor
• Online and the module is not the Active Ring Supervisor
• The ring fault condition is not Partial Network Fault or Rapid Fault/Restore
Cycles
Rockwell Automation Publication MOTION-UM003F-EN-P - March 2015
CIP Drive Module Properties
Appendix A
Table 39 - Module Properties: Network Tab Descriptions
Parameter
Description
Clear Fault
Clear Fault causes the Active Ring Supervisor to clear the Rapid Faults/Restore
Cycles fault.
Clear Fault is not displayed if either of the following occurs:
• Offline
• Online and a module mismatch or communication error has occurred
• Online and the module is not configured as a ring supervisor
• Online and the module is not the Active Ring Supervisor
• The ring fault condition is not Rapid Fault/Restore Cycles
Advanced
Configure advanced network properties.
Advanced appears dimmed if either of the following occurs:
• Offline
• Online and a module mismatch or communication error has occurred
Refresh Communication
Refresh communication appears when communication with the module has failed.
Refresh communication attempts to refresh communication with the module.
Apply
When you click Apply or OK, the information is automatically sent to the controller
if either of the following occurs:
• You are online in Program, Remote Program or Remote Run mode
• This controller is the owner controller
• You have changed the configuration of the module in the software
The controller tries to send the information to the module (if the connection of the
module is not inhibited). If you do not click Apply, your changes are not sent to the
controller.
Rockwell Automation Publication MOTION-UM003F-EN-P - March 2015
239
Appendix A
CIP Drive Module Properties
Associated Axes Tab
The Associated Axes tab provides different functions depending on the drive you
are configuring.
Kinetix 6500 and PowerFlex 755 Drives
For the Kinetix 6500 and PowerFlex 755, use the Associated Axes tab to do the
following:
• Associate an axis from a list of axis tags.
• Create axis tags.
• Choose the Motor Feedback Device.
• Choose the Load Feedback Device.
• Choose the Master Feedback Device.
Each Kinetix 6500 drive module can have one full axis and one half axis. You
assign the full (primary) axis as Axis 1: the (half ) secondary axis as Axis 2. If you
change the listed properties of Major Revision, feedback configuration, or power
structure, the axis association is removed.
TIP
Only the Kinetix 6500 drive supports a half axis.
When you remove an association, either by changing the module definition or
selecting a different axis, causes the following to be reset:
• Association in the axis
• References to motors in the axis
• References to feedback devices in the axis
• Access the Axis Property category dialog boxes
Kinetix 350 Drive
For the Kinetix 350, use the Associated Axes tab to do the following:
• Associate an axis from a list of axis tags.
• Create axis tags.
Each drive module can have one full axis. If you change the drive’s Major Revision
module property, you will remove the axis association. The feedback
configuration and power structure module properties are fixed.
When you remove an association, either by changing the module definition or
selecting a different axis causes the following to be reset:
• Association in the axis.
• References to motors in the axis.
• References to feedback devices in the axis.
• Access the Axis Property category dialog boxes.
240
Rockwell Automation Publication MOTION-UM003F-EN-P - March 2015
CIP Drive Module Properties
Appendix A
Kinetix 5500 Drive
• Associate an axis from a list of axis tags.
• Create axis tags.
Each drive module can have one full axis. If you change the drive’s Major Revision
module property, you remove the axis association. The feedback configuration
and power structure module properties are fixed.
When you remove an association, either by changing the module definition or
selecting a different axis causes the following to be reset:
• Association in the axis.
• References to motors in the axis.
• References to feedback devices in the axis.
• Access the Axis Property category dialog boxes.
Kinetix 5700 HPI and DAI Drive
For the Kinetix 5700 HPI and DAI Inverter modules, use the Associated Axes
tab to do the following:
• Associate an axis from a list of axis tags.
• Create axis tags.
• Choose the Motor Feedback Device.
• Choose the Load Feedback Device.
• Choose the Master Feedback Device.
Each Kinetix K5700 HPI drive module can have one full axis and one half axis.
Each Kinetix K5700 DAI drive module can have two pairs of this configuration:
• Instance 1 and 2, one full axis and one half axis
• Instance 3and 4, 2nd full axis and a 2nd half axis
You assign the full (primary) axis as Axis 1: the (half ) secondary axis as Axis 2,
and for DAI you assign the 2nd full axis as Axis.3, and the 2nd (half ) secondary
axis as Axis4. If you change the listed properties of Major Revision, feedback
configuration, or power structure, the axis association is removed.
When you remove an association, either by changing the module definition or
selecting a different axis, causes the following to be reset:
• Association in the axis.
• References to motors in the axis.
• References to feedback devices in the axis.
• Access the Axis Property category dialog boxes.
Rockwell Automation Publication MOTION-UM003F-EN-P - March 2015
241
Appendix A
CIP Drive Module Properties
Figure 15 - Associated Axes Tab
Table 40 - Module Properties: Associated Axis Tab Descriptions
Parameter
Description
Axis 1
Select the AXIS_CIP_DRIVE axis tag that you want to be associated as the full axis for
the drive module.
Axis 2
Select the axis that you want to be the half axis, if needed.
New Axis
Opens the New Tag dialog box where you can create an AXIS_CIP_DRIVE axis.
Motor Feedback Device
The motor feedback device is set to Motor Feedback Port and cannot be changed.
Load Feedback Device
Click to select the port for the physical feedback device that is used by Axis 1 load
feedback.
Aux Feedback Port
Master Feedback Device
Choose the port for the physical feedback device that is used by Axis 2 master
feedback.
Figure 16 - Associated Axes Tab for the Kinetix 5500 Drive
Figure 17 - Associated Axes Tab for the Kinetix 350 Drive
Figure 18 - Associated Axes Tab for the PowerFlex 755 Drive
242
Rockwell Automation Publication MOTION-UM003F-EN-P - March 2015
CIP Drive Module Properties
Appendix A
Figure 19 - Associated Axes Tab for the 5700 Drive and DAI 1
Table 41 - Module Properties: Associated Axis Tab Descriptions
Parameter
Description
Axis 1
Select the AXIS_CIP_DRIVE axis tag that you want to be associated as the full axis for
the drive module.
Motor Feedback Device
Allows selection of the Motor feedback device for Axis 1.
Selections: [DSL Feedback Port, Universal Feedback Port 1]
Load Feedback Device
Allows selection of the Load feedback device for Axis 1.
Selections: [DSL Feedback Port, Universal Feedback Port 1]
Axis 2 (Auxiliary Axis)
Select the a xis that you want to be the half axis, if needed.
Master Feedback Device
Allows the selection of the Auxiliary axis feedback device.
Selections: [DSL Feedback Port, Universal Feedback Port 1]
Figure 20 - Associated Axes Tab for the 5700 Drive and DAI 2
For more information about how to associate an axis, see Associate Axes and
Drives on page 29 for the Kinetix drives and Configure the Associated Axis and
Control Mode on page 31 for the PowerFlex 755 drive.
Rockwell Automation Publication MOTION-UM003F-EN-P - March 2015
243
Appendix A
CIP Drive Module Properties
Power Tab
The parameters that display on this tab is different depending on the drive you
are configuring, even within a drive family. It varies based on the Power Structure
you select.
Figure 21 - Power Tab for the PowerFlex 755 Drive
Catalog Number
Figure 22 - Power Tab for the Kinetix 6500 Drive
Catalog Number
Figure 23 - Power Tab for the Kinetix 5500 Drive
Catalog Number
Figure 24 - Power Tab for the Kinetix 350 Drive
Catalog Number
244
Rockwell Automation Publication MOTION-UM003F-EN-P - March 2015
CIP Drive Module Properties
Appendix A
Table 42 - Module Properties: Power Tab Descriptions
Parameter
Description
Power Structure
Displays the drive catalog number and the drive power rating.
AC Input Phasing
Specify the AC input phasing.
Valid values are 3 Phase and Single Phase.
Regenerative Power Limit
Enter a negative percentage value for the regenerative power limit.
Bus Regulator Action
Get or Set the bus regulator action to a configuration tag. Valid values include
the following:
• Disabled
• Shunt Regulator
• CommonBus Follower
Shunt Regulator Resistor Type
Select either an internal or external shunt.
Shunt Regulator Resistor Type appears dimmed in online mode and when Bus
Regulator Action is disabled (set to CommonBus Follower).
The Kinetix 350 drive does not support this parameter.
External Shunt
These external shunt values are enabled when the Shunt Regulator Resistor
Type is set to External.
If you select External for the Shunt Regulator Resistor Type, choose the external
shunt value.
Valid values include the following:
• <none>
• Custom
• The external shunt regulator catalog numbers
External Bus Capacitance
Kinetix 6500 Drive
Kinetix 350 and Kinetix 5500 do not
support this parameter
When Bus Regulator Action is set to Shunt Regulator or CommonBus Follower,
enter the External Bus Capacitance in μf.
External Bus Capacitance is enabled when the Bus Regulator Action is set to
Disabled or Shunt Regulator.
Valid values are determined by the type of drive you are configuring. The value
that you enter is validated when you click OK. You receive an error message if
the value is over or under the valid range for the drive.
External Shunt Resistance
PowerFlex 755 Drive
External Shunt Power
PowerFlex 755 Drive
External Shunt Pulse Power
PowerFlex 755 Drive
You can change the overload and voltage limits when you are offline. You cannot
make changes while online but the values are displayed.
Figure 25 - Kinetix 6500 Offline Display of the Advanced Limits Dialog Box
Rockwell Automation Publication MOTION-UM003F-EN-P - March 2015
245
Appendix A
CIP Drive Module Properties
Figure 26 - Kinetix 5500 Offline Display of the Advanced Limits Dialog Box
Figure 27 - PowerFlex 755 Offline Display of the Advanced Limits Dialog Box
The Kinetix 350 drive does not have an Advanced Limits dialog box.
246
Rockwell Automation Publication MOTION-UM003F-EN-P - March 2015
CIP Drive Module Properties
Appendix A
Digital Input Tab
Use the Digital Input tab to enter digital input values for the drive module. These
offline displays are the default values for the Kinetix 6500 and PowerFlex 755
Ethernet drives. The Kinetix 350 and the Kinetix 5500 drives do not have a
Digital Input tab.
Figure 28 - Digital Input Tab for the Kinetix 6500 Drive
Figure 29 - Digital Input Tab for the PowerFlex 755 Drive
Table 43 - Module Properties: Digital Input Tab Descriptions
Parameter
Description
Digital Input 1
Digital Input 2
Digital Input 3
Digital Input 4
Choose one of these values for Digital Input 1, 2, 3, and 4:
• Unassigned
• Enable
• Home
• Registration 1
• Registration 2
• Positive Overtravel
• Negative Overtravel
• Regeneration OK
Rockwell Automation Publication MOTION-UM003F-EN-P - March 2015
247
Appendix A
CIP Drive Module Properties
Motion Diagnostics Tab
When online, the Motion Diagnostics tab displays basic connection information
that is related to the Motion Ethernet packet transmission rates. You can also go
to the Transition Statistics dialog box to view Lost and Late transmissions and
Timing Statistics. No values display during these conditions:
• Offline mode
• No axis is assigned to the module
Figure 30 - Motion Diagnostics Tab
Table 44 - Module Properties: Motion Diagnostics Tab Descriptions
Parameter
Description
Course Update Period
Displays the associated motion group Base Update Period.
Controller to Drive
Displays the current size of the CIP connection to the drive.
Drive to Controller
Displays the current size of the CIP connection from the drive.
Enable Transmission Timing
Statistics
View data on Lost and Late transmissions and Timing Statistics.
The default is unchecked, which means timing statistics do not display on the
Transmission Statistics dialog box. Checking this box displays the Transmission Statistic
dialog box.
• You can improve performance by not checking this box, which limits the amount of
diagnostic data that appears on the Transmission Statistics dialog box.
• Enable Transmission Timing Statistics appears dimmed in Hard Run mode.
• Transmission Statistics appears dimmed in offline mode or when a connection error
exists.
Figure 31 - Transmission Timing Statistics Dialog Box
248
Rockwell Automation Publication MOTION-UM003F-EN-P - March 2015
CIP Drive Module Properties
Appendix A
Notes:
Rockwell Automation Publication MOTION-UM003F-EN-P - March 2015
249
Appendix A
250
CIP Drive Module Properties
Rockwell Automation Publication MOTION-UM003F-EN-P - March 2015
Appendix
B
Parameter Group Dialog Boxes
This appendix describes the parameter group dialog boxes. You can access all
parameters that are associated with each category dialog box by clicking
Parameters on the dialog box.
Parameter Dialog Box
Listings
Each Parameter dialog box list can contain more attributes than the associated
category dialog box. In some cases, attributes that are contained on the Parameter
List dialog box are not contained on the associated category dialog box.
Figure 32 - Scaling Parameters
You can configure advanced parameters only on the dialog box for that group and
not all parameters can be set on each category dialog box.
Rockwell Automation Publication MOTION-UM003F-EN-P - March 2015
251
Appendix B
Parameter Group Dialog Boxes
This dialog box is an example of the parameters available for an axis that is
configured as a Position Loop. There are six parameters that you can set on the
Position Loop and Position Loop Parameter Group dialog boxes.
Click Parameters to open the
Parameter Group listing.
On this dialog box, the list includes the parameters
that are on the Position Loop dialog box and more
advanced parameters.
On this dialog box, the list includes the parameters that are on the Position Loop
dialog box and more advanced parameters.
252
Rockwell Automation Publication MOTION-UM003F-EN-P - March 2015
Parameter Group Dialog Boxes
Appendix B
Figure 33 - Frequency Control Parameters
Rockwell Automation Publication MOTION-UM003F-EN-P - March 2015
253
Appendix B
Parameter Group Dialog Boxes
Notes:
254
Rockwell Automation Publication MOTION-UM003F-EN-P - March 2015
Appendix
C
Program
This chapter describes how to program a velocity profile and jerk rate.
Program a Velocity Profile
and Jerk Rate
Topic
Page
Program a Velocity Profile and Jerk Rate
255
Enter Basic Logic
266
Choose a Motion Instruction
268
Troubleshoot Axis Motion
271
Troubleshoot Axis Motion
271
Why does my axis overshoot its target speed?
272
Why is there a delay when I stop and then restart a jog?
275
Why does my axis reverse direction when I stop and start it?
277
Programming with the MDSC Function
279
You can use either of these motion profiles for various instructions:
• Trapezoidal profile for linear acceleration and deceleration
• S-curve profiles for controlled jerk
Definition of Jerk
The Jerk is the rate of change of acceleration or deceleration.
The jerk parameters apply only to S-curve profile moves using these instructions:
• MAJ
• MCS
• MAM
• MCCD
• MAS
• MCCM
• MCD
• MCLM
For example, if acceleration changes from 0 to 40 mm/s2 in 0.2 seconds, the jerk
is:
(40 mm/s2 - 0 mm/s2 ) / 0.2 s = 200 mm/s3
Rockwell Automation Publication MOTION-UM003F-EN-P - March 2015
255
Appendix C
Program
Choose a Profile
Consider cycle time and smoothness when you choose a profile.
Choose this profile
Consideration
• Fastest acceleration and deceleration
times
• More flexibility in programming
subsequent motion
Trapezoidal
Jerk doesn’t limit the acceleration and
deceleration time:
• The Acceleration and Deceleration rates
control the maximum change in Velocity.
• Your equipment and load get more stress
than with an S-curve profile.
• Jerk is considered infinite and is shown as a
vertical line.
Velocity
If you want
Accel
Time
Jerk
Time
Time
Jerk limits the acceleration and deceleration
time:
• It takes longer to accelerate and decelerate
than a trapezoidal profile.
• If the instruction uses an S-curve profile,
the controller calculates acceleration,
deceleration, and jerk when you start the
instruction.
• The controller calculates triangular
acceleration and deceleration profiles.
Velocity
Smoother acceleration and deceleration that S-curve
reduces the stress on the equipment and load
Accel
Time
Jerk
Time
Time
256
Rockwell Automation Publication MOTION-UM003F-EN-P - March 2015
Program
Appendix C
Use % of Time for the Easiest Programming of Jerk
Use % of Time to specify how much of the acceleration or deceleration time has
jerk. You don’t have to calculate actual jerk values.
Example
Profile
100% of Time
At 100% of Time, the acceleration or deceleration changes the entire time that the axis speeds up or slows down.
Speed
100% of Time
Jerk
Deceleration
100% of Time
60% of Time
At 60% of Time, the acceleration or deceleration changes 60% of the time that the axis speeds up or slows down. The
acceleration or deceleration is constant for the other 40%.
Speed
60% of Time
Jerk
Deceleration
30% 40% 30%
Rockwell Automation Publication MOTION-UM003F-EN-P - March 2015
257
Appendix C
Program
Velocity Profile Effects
This table summarizes the differences between profiles.
Profile
ACC/DEC
Motor
Priority of Control
Type
Time
Stress
Highest to Lowest
Trapezoidal
Fastest
Worst
Acc/Dec
Velocity
Position
S-curve
2X Slower
Best
Jerk
Acc/Dec
Velocity
Position
Jerk Rate Calculation
If the instruction uses or changes an S-curve profile, the controller calculates
acceleration, deceleration, and jerk when you start the instruction.
The system has a Jerk priority planner. In other words, Jerk always takes priority
over acceleration and velocity. Therefore, you always get the programmed Jerk. If
a move is velocity-limited, the move does not reach the programmed acceleration
and/or velocity.
Jerk Parameters for MAJ programmed in units of % time are converted to
engineering units as follows:
If Start Speed < MAJ Programmed Speed
Accel Jerk (Units/Sec3) =
Programmed Accel Rate2
*
Programmed Speed
(
200
% of Time
-1
)
Velocity
Programmed Speed
Accel Jerk
Time
If Start Velocity > MAJ Programmed Speed
Decel Jerk (Units/Sec3) =
Programmed Decel Rate2
Max (Programmed Speed, [Start Speed - Programmed Speed])
Velocity
Decel Jerk
Programmed Speed
Time
258
Rockwell Automation Publication MOTION-UM003F-EN-P - March 2015
*
(
200
% of Time
-1
)
Program
Appendix C
Jerks for programmed moves, such as MAM or MCLM instructions, in units of
% time are converted to engineering units as follows:
If Start Speed < Programmed Speed
Programmed Accel Rate2
Accel Jerk (Units/Sec3) =
Programmed Speed
*
(
200
% of Time
-1
)
Programmed Decel Rate2
Decel Jerk (Units/Sec3) =
Max (Programmed Speed, [Start Speed - Programmed Speed])
*
*
(
200
% of Time
-1
)
(
200
% of Time
-1
)
Velocity
Programmed Speed
Decel Jerk
Accel Jerk
Time
If Start Speed > Programmed Speed
DecelJerk1 =
Max (Programmed Speed, [Start Speed - Programmed Speed])
Programmed Decel Rate2
Programmed Speed
*
(
200
% of Time
-1
)
DecelJerk1
Velocity
DecelJerk2 =
Programmed Decel Rate2
Programmed Speed
DecelJerk2
Time
DecelJerk1 is used while Current Speed > Programmed Speed
DecelJerk2 is used while Current Speed < Programmed Speed
Rockwell Automation Publication MOTION-UM003F-EN-P - March 2015
259
Appendix C
Program
Depending on the instruction’s Speed parameter, the same ‘% of time’ jerk can
result in different slopes for the acceleration profile than on the deceleration
profile.
Speed
60% of Time
Jerk
Deceleration
The motion planner algorithm adjusts the actual jerk rate so that both the
acceleration profile and the deceleration profile contain at least the ‘% of time’
ramp time. If the Start Speed is close to the programmed Speed parameter, the
actual percentage of ramp time can be higher than the programmed value.
In most cases, the condition is:
if: (start Speed is == 0.0) OR (start Speed is > 2 * max Speed)
then: you get programmed percentage of ramp time
else: you get higher than programmed percentage of ramp time
Conversion from% Time to Engineering Units
If you want to convert % of Time to Engineering Units, use these equations.
For Accel Jerk:
2
ja [% of Time] =
1+
260
ja
[EU/s3] v
max [EU/s]
amax [EU/s2]
Rockwell Automation Publication MOTION-UM003F-EN-P - March 2015
100
Program
Appendix C
For Decel Jerk:
2
jd [% of Time] =
1+
jd [EU/s3] vmax [EU/s]
100
dmax [EU/s2]
Jerk Programming in Units/Sec3
If you want to specify the jerk in 'Units/sec3' instead of '% of time', adjust your
jerk value as follows so that you get the value that you programmed.
Programmed Decel Rate2
Temporary Speed =
Desired Decel Jerk value in Units/Sec3
Start Speed - Programmed Speed
k=
Max (Programmed Speed, Temporary Speed)
if (k < 1)
•Instruction faceplate Decel jerk in Units/Sec3 = Desired Decel Jerk in Units/Sec3
else
•Instruction faceplate Decel jerk in Units/Sec3 = Desired Decel Jerk in Units/Sec3 * k
Unique Program Considerations
If you program a move by using the % of Time units, the programming software
computes an Accel Jerk = a2/v where a = the programmed Accel Rate and v =
programmed Speed.
Therefore, the higher the programmed speed, the lower the computed Jerk. The
system has a Jerk priority planner. In other words, Jerk always takes priority over
acceleration and velocity.
Therefore, you always get the programmed Jerk. If a move is velocity-limited, the
move does not reach the programmed acceleration and/or velocity. Once you
reach the velocity limit for the length of the move, as the velocity is increased, the
move takes longer and longer to complete.
Decel Jerk is computed similarly to the Accel Jerk described above. The only
difference is that instead of a2/v, Decel Jerk = d2/v, where d = the programmed
Decel Rate.
Rockwell Automation Publication MOTION-UM003F-EN-P - March 2015
261
Appendix C
Program
EXAMPLE
Example #1
Start Speed = 8.0 in/sec
Desired Speed = 5.0 in/sec
Desired Decel Rate = 2.0 in/sec2
Desired Decel Jerk = 1.0 in/sec3
Temporary Speed = (Desired Decel Rate)2 / Desired jerk value in Units/Sec3
= 2.02 / 1.0 =
= 4.0 in/sec
k = (8.0 - 5.0) / max(5.0, 4.0) = 3.0 / 5.0 =
= 0.6
Because k < 1, we can enter the desired Decel jerk directly in the faceplate
Instruction faceplate Decel jerk in Units/Sec3 = 1.0 in/sec3
EXAMPLE
Example #2
Start Speed = 13.0 in/sec
Desired Speed = 5.0 in/sec
Desired Decel Rate = 2.0 in/sec2
Desired Decel Jerk = 1.0 in/sec3
Temporary Speed = (Desired Decel Rate)2 / Desired jerk value in Units/Sec3
= 2.02 / 1.0 =
= 4.0 in/sec
k = (13.0 - 5.0) / max(5.0, 4.0) = 8.0 / 5.0 =
= 1.6
Because k > 1, we have to calculate the Decel jerk to use on the instruction
faceplate as:
Instruction faceplate Decel jerk in Units/Sec3 =
= 1.0 in/sec3 * 1.6 =
= 1.6 in/sec3
Which revision do you have?
• 15 or earlier – % of Time is fixed at 100.
• 16 or later – % of Time defaults to 100% of time on projects converted
from earlier versions. For new projects, you must enter the Jerk value.
262
Rockwell Automation Publication MOTION-UM003F-EN-P - March 2015
Program
Appendix C
Profile Operand
This operand has two profile types:
• Trapezoidal Velocity Profile
• S-curve Velocity Profile
Trapezoidal Velocity Profile
The trapezoidal velocity profile is the most commonly used profile because it
provides the most flexibility in programming subsequent motion and the fastest
acceleration and deceleration times. The change in velocity per unit time is
specified by acceleration and deceleration. Jerk is not a factor for trapezoidal
profiles. Therefore, it is considered infinite and is shown as a vertical line in the
following graph.
Velocity
Trapezoidal Accel/Decel Time
Accel
Time
Jerk
Time
Time
Rockwell Automation Publication MOTION-UM003F-EN-P - March 2015
263
Appendix C
Program
S-curve Velocity Profile
S-curve velocity profiles are most often used when the stress on the mechanical
system and load needs to be minimized. The acceleration and deceleration time is
balanced against the machine stress using two additional parameters, acceleration
jerk and deceleration jerk.
Depending on the Jerk settings, the acceleration profile can be set to almost pure
rectangular, see Trapezoidal Accel/Decel Time on page 263 (fastest and highest
stress), or to triangular, see Programmable S-curve Accel/Decel Time,
Acceleration Jerk = 60% of Time on page 265 (slowest, lowest stress).
The typical acceleration profile is a trade-off between stress and speed, as shown
in S-curve Accel/Decel Time, Backward Compatibility Setting: Acceleration
Jerk = 100% of Time on page 266.
The Jerk is either specified by the user (either in Units/sec3 or as a percentage of
maximum) or it is calculated from the percentage of time. (Percentage of time is
equal to the percentage of ramp time in the acceleration/deceleration profile).
ja [EU/s3] =
ja
[EU/s3] =
amax2 [EU/s2]
vmax [EU/s]
dmax2 [EU/s2]
vmax [EU/s]
(
(
200
ja [% of time]
200
ja [% of time]
-1
)
-1
)
Backward Compatibility
The Jerk of 100% of time produces triangular acceleration and deceleration
profiles. These profiles are ones that would have been previously produced as
shown in S-curve Accel/Decel Time, Backward Compatibility Setting:
Acceleration Jerk = 100% of Time on page 266.
264
Rockwell Automation Publication MOTION-UM003F-EN-P - March 2015
Program
Appendix C
Very small Jerk rates, that is less than 5% of time, produce acceleration and
deceleration profiles close to rectangular ones, such as the one shown in
Trapezoidal Accel/Decel Time on page 263.
Higher values of the % of Time result in lower values of Jerk Rate Limits
and, therefore, slower profiles. See the following table for reference.
IMPORTANT
Table 45 - Velocity versus Jerk
Trapezoidal Velocity
Profile(1)
∞
Accel/Decel Jerk in
Units/sec3
S-shaped Velocity Profile
with 1< = Jerk <100% of
Time(2)
Max Accel2
S-shaped Velocity Profile
with Jerk = 100% of
Time(3)
Max Accel2
to ∞
Max Velocity
Max Velocity
Accel/Decel Jerk in
% of Maximum
NA
0 - 100%
NA
Accel/Decel Jerk in
% of Time
0%
1 - 100%
100%
(1) The example on page 263 (labeled Trapezoidal Accel/Decel Time) uses a rectangular acceleration profile.
(2) The example on page 265 (labeled Programmable S-curve Accel/Decel Time, Acceleration Jerk = 60% of Time) uses a trapezoidal
acceleration profile.
(3) The example on page 266 (labeled S-curve Accel/Decel Time, Backward Compatibility Setting: Acceleration Jerk = 100% of Time)
uses a triangular acceleration profile.
Calculations are performed when an Axis Move, Change Dynamics, or an MCS
Stop of StopType = Move or Jog is initiated.
Velocity
Programmable S-curve Accel/Decel Time,
Acceleration Jerk = 60% of Time
Accel
Time
Jerk
Time
Time
30% 40% 30%
% of Time = 60%
Rockwell Automation Publication MOTION-UM003F-EN-P - March 2015
265
Appendix C
Program
Velocity
S-curve Accel/Decel Time, Backward Compatibility Setting:
Acceleration Jerk = 100% of Time
Accel
Time
Jerk
Time
Time
Enter Basic Logic
The controller gives you a set of motion control instructions for your axes:
• Use these instructions just like the rest of the Logix Designer instructions.
You can program motion control in these programming languages:
– Ladder diagram (LD)
– Structured text (ST)
– Sequential function chart (SFC)
• Each motion instruction works on one or more axes.
• Each motion instruction needs a motion control tag. The tag uses a
MOTION_INSTRUCTION data type. The tag stores the status
information of the instruction.
Motion Control Tag
ATTENTION: Use the tag for the motion control operand of motion
instruction only once. Unintended operation of the control variables
may happen if you reuse the same motion control tag in other
instructions.
266
Rockwell Automation Publication MOTION-UM003F-EN-P - March 2015
Program
Appendix C
Example Motion Control Program
This is an example of Ladder Logix that homes, jogs, and moves an axis.
If Initialize_Pushbutton = on and the axis = off (My_Axis_X.ServoActionStatus = off) then
the MSO instruction turns on the axis.
If Home_Pushbutton = on and the axis hasn’t been homed (My_Axis_X.AxisHomedStatus = off) then
the MAH instruction homes the axis.
If Jog_Pushbutton = on and the axis = on (My_Axis_X.ServoActionStatus = on) then
the MAJ instruction jogs the axis forward at 8 units/s.
If Jog_Pushbutton = off then
the MAS instruction stops the axis at 100 units/s2.
Make sure that Change Decel is Yes. Otherwise, the axis decelerates at its maximum speed.
If Move_Command = on and the axis = on (My_Axis_X.ServoActionStatus = on) then
the MAM instruction moves the axis. The axis moves to the position of 10 units at 1 unit/s.
Rockwell Automation Publication MOTION-UM003F-EN-P - March 2015
267
Appendix C
Program
Download a Project and Run Logix
Follow these steps to download your program to a controller.
1. With the keyswitch, place the controller in Program or Remote Program
mode.
2. From the Communications menu, choose Download.
3. Confirm that you wish to complete the download procedure.
4. Click Download.
5. Once the download is complete, place the controller in Run/Test mode.
After the project file is downloaded, status and compiler messages appear
in the status bar.
Choose a Motion Instruction
Use this table to choose an instruction and see if it is available as a Motion Direct
Command.
Table 46 - Available Motion Direct Commands
If You Want To
And
Use This Instruction
Motion Direct
Command
Change the state of an axis
Enable the drive and activate the axis loop.
MSO
Motion Servo On
Yes
Disable the drive and deactivate the axis loop.
MSF
Motion Servo Off
Yes
Force an axis into the shutdown state and block any instructions that
initiate axis motion.
MASD
Motion Axis Shutdown
Yes
Reset the axis from the shutdown state.
MASR
Motion Axis Shutdown Reset
Yes
Activate the drive control loops for the CIP axis and run the motor at
the specified speed.
MDS
Motion Drive Start
Clear all motion faults for an axis.
MAFR
Motion Axis Fault Reset
268
Rockwell Automation Publication MOTION-UM003F-EN-P - March 2015
Yes
Program
Appendix C
Table 46 - Available Motion Direct Commands
If You Want To
And
Use This Instruction
Motion Direct
Command
Control axis position
Stop any motion process on an axis.
MAS
Motion Axis Stop
Yes
Home an axis.
MAH
Motion Axis Home
Yes
Jog an axis.
MAJ
Motion Axis Jog
Yes
Move an axis to a specific position.
MAM
Motion Axis Move
Yes
Start electronic gearing between two axes.
MAG
Motion Axis Gear
Yes
Change the speed, acceleration, or deceleration of a move or a jog that
is in progress.
MCD
Motion Change Dynamics
Yes
Change the command or actual position of an axis.
MRP
Motion Redefine Position
Yes
Calculate a Cam Profile based on an array of cam points.
MCCP
Motion Calculate Cam Profile
No
Start electronic camming between two axes.
MAPC
Motion Axis Position Cam
No
Start electronic camming as a function of time.
MATC
Motion Axis Time Cam
No
Calculate the slave value, slope, and derivative of the slope for a cam
profile and master value.
MCSV
Motion Calculate Slave Values
No
Stop motion of all axes.
MGS
Motion Group Stop
Yes
Force all axes into the shutdown state.
MGSD
Motion Group Shutdown
Yes
Transition all axes to the ready state.
MGSR
Motion Group Shutdown Reset
Yes
Latch the current command and actual position of all axes.
MGSP
Motion Group Strobe Position
Yes
Arm the watch-position event checking for an axis.
MAW
Motion Arm Watch Position
Yes
Disarm the watch-position event checking for an axis.
MDW
Motion Disarm Watch Position
Yes
Arm the module registration-event checking for an axis.
MAR
Motion Arm Registration
Yes
Disarm the module registration-event checking for an axis.
MDR
Motion Disarm Registration
Yes
Arm an output cam for an axis and output.
MAOC
Motion Arm Output Cam
No
Disarm one or all output cams connected to an axis.
MDOC
Motion Disarm Output Cam
No
Initiate action on all axes
Arm and disarm special event checking
functions, such as registration and watch
position
Rockwell Automation Publication MOTION-UM003F-EN-P - March 2015
269
Appendix C
Program
Table 46 - Available Motion Direct Commands
If You Want To
And
Use This Instruction
Motion Direct
Command
Tune an axis and run diagnostic tests for
your control system. These tests include
the following:
• Motor/encoder hookup test
• Encoder hookup test
• Marker test
Control multi-axis coordinated motion
Run a tuning motion profile for an axis
MRAT
Motion Run Axis Tuning
No
Run one of the diagnostic tests on an axis.
MRHD
Motion Run Hookup Diagnostic
No
Start a linear coordinated move for the axes of a coordinate system.
MCLM
Motion Coordinated Linear Move
No
Start a circular move for the axes of a coordinate system.
MCCM
Motion Coordinated Circular Move
No
Change in path dynamics for the active motion on a coordinate
system.
MCCD
Motion Coordinated Change Dynamics
No
Stop the axes of a coordinate system or cancel a transform.
MCS
Motion Coordinated Stop
No
Shut down the axes of a coordinate system.
MCSD
Motion Coordinated Shutdown
No
Start a transform that links two coordinate systems together. This is
like bi-directional gearing.
MCT
Motion Coordinated Transform (1)
No
Calculate the position of one coordinate system with respect to
another coordinate system.
MCTP
Motion Calculate Transform Position(1)
No
Transition the axes of a coordinate system to the ready state and clear
the axis faults.
MCSR
Motion Coordinated Shutdown Reset
No
(1) You can only use this instruction with 1756-L6x or 1756-L6xS controllers.
270
Rockwell Automation Publication MOTION-UM003F-EN-P - March 2015
Program
Troubleshoot Axis Motion
Appendix C
This section helps you troubleshoot some situations that could happen while you
are running an axis.
Example Situation
Page
Why does my axis accelerate when I stop it?
271
Why does my axis overshoot its target speed?
272
Why is there a delay when I stop and then restart a jog?
275
Why does my axis reverse direction when I stop and start it?
277
Why does my axis accelerate when I stop it?
While an axis is accelerating, you try to stop it. The axis keeps accelerating for a
short time before it starts to decelerate.
Example
You start a Motion Axis Jog (MAJ) instruction. Before the axis gets to its target
speed, you start a Motion Axis Stop (MAS) instruction. The axis continues to
speed up and then eventually slows to a stop.
Look For
Rockwell Automation Publication MOTION-UM003F-EN-P - March 2015
271
Appendix C
Program
Cause
When you use an S-curve profile, jerk determines the acceleration and
deceleration time of the axis:
• An S-curve profile has to get acceleration to 0 before the axis can slow
down.
• The time it takes depends on the acceleration and speed.
• In the meantime, the axis continues to speed up.
The following trends show how the axis stops with a trapezoidal profile and an
S-curve profile.
Stop while accelerating
Trapezoidal
The axis slows down as soon as you start the stopping instruction.
S-curve
The axis continues to speed up until the S-curve profile brings the acceleration rate
to 0.
Corrective Action
If you want the axis to slow down right away, use a trapezoidal profile.
Why does my axis overshoot its target speed?
While an axis is accelerating, you try to stop the axis or change its speed. The axis
keeps accelerating and goes past its initial target speed. Eventually it starts to
decelerate.
Example
You start a Motion Axis Jog (MAJ) instruction. Before the axis gets to its target
speed, you try to stop it with another MAJ instruction. The speed of the second
instruction is set to 0. The axis continues to speed up and overshoots its initial
target speed. Eventually it slows to a stop.
272
Rockwell Automation Publication MOTION-UM003F-EN-P - March 2015
Program
Appendix C
Look For
Cause
When you use an S-curve profile, jerk determines the acceleration and
deceleration time of the axis:
• An S-curve profile has to get acceleration to 0 before the axis can slow
down.
• If you reduce the acceleration, it takes longer to get acceleration to 0.
• In the meantime, the axis continues past its initial target speed.
The following trends show how the axis stops with a trapezoidal profile and an
S-curve profile.
Rockwell Automation Publication MOTION-UM003F-EN-P - March 2015
273
Appendix C
Program
Stop while accelerating and reduce the acceleration rate
Trapezoidal
The axis slows down as soon as you start the stopping instruction.
The lower acceleration doesn’t change the response of the axis.
274
S-curve
The stopping instruction reduces the acceleration of the axis. It now takes longer to
bring the acceleration rate to 0. The axis continues past its target speed until
acceleration equals 0.
Rockwell Automation Publication MOTION-UM003F-EN-P - March 2015
Program
Appendix C
Corrective Action
Use a Motion Axis Stop (MAS) instruction to stop the axis or set up your
instructions like this.
Why is there a delay when I stop and then restart a jog?
While an axis is jogging at its target speed, you stop the axis. Before the axis stops
completely, you restart the jog. The axis continues to slow down before it speeds
up.
Example
You use a Motion Axis Stop (MAS) instruction to stop a jog. While the axis is
slowing down, you use a Motion Axis Jog (MAJ) instruction to start the axis
again. The axis doesn’t respond right away. It continues to slow down. Eventually
it speeds back up to the target speed.
Rockwell Automation Publication MOTION-UM003F-EN-P - March 2015
275
Appendix C
Program
Look For
Cause
When you use an S-curve profile, jerk determines the acceleration and
deceleration time of the axis. An S-curve profile has to get acceleration to 0
before the axis can speed up again. The following trends show how the axis stops
and starts with a trapezoidal profile and an S-curve profile.
Start while decelerating
Trapezoidal
The axis speeds back up as soon as you start the jog again.
276
S-curve
The axis continues to slow down until the S-curve profile brings the acceleration
rate to 0.
Rockwell Automation Publication MOTION-UM003F-EN-P - March 2015
Program
Appendix C
Corrective Action
If you want the axis to accelerate right away, use a trapezoidal profile.
Why does my axis reverse direction when I stop and start it?
While an axis is jogging at its target speed, you stop the axis. Before the axis stops
completely, you restart the jog. The axis continues to slow down and then
reverses direction. Eventually the axis changes direction again and moves in the
programmed direction.
Example
You use a Motion Axis Stop (MAS) instruction to stop a jog. While the axis is
slowing down, you use a Motion Axis Jog (MAJ) instruction to start the axis
again. The axis continues to slow down and then moves in the opposite direction.
Eventually it returns to its programmed direction.
Look For
Cause
When you use an S-curve profile, jerk determines the acceleration and
deceleration time of the axis:
• An S-curve profile has to get acceleration to 0 before the axis can speed up
again.
• If you reduce the acceleration, it takes longer to get acceleration to 0.
• In the meantime, the axis continues past 0 speed and moves in the opposite
direction.
Rockwell Automation Publication MOTION-UM003F-EN-P - March 2015
277
Appendix C
Program
The following trends show how the axis stops and starts with a trapezoidal profile
and an S-curve profile.
Start while decelerating and reduce the deceleration rate
Trapezoidal
S-curve
The axis speeds back up as soon as you start the jog again. The lower
deceleration doesn’t change the response of the axis.
The jog instruction reduces the deceleration of the axis. It now takes longer to bring
the acceleration rate to 0. The speed overshoots 0 and the axis moves in the
opposite direction.
Corrective Action
Use the same deceleration rate in the instruction that starts the axis and the
instruction that stops the axis.
278
Rockwell Automation Publication MOTION-UM003F-EN-P - March 2015
Program
Programming with the MDSC
Function
Appendix C
This is an example of programming motion with the MDSC functionality. In
this example, we illustrate a 50.0 mm move.
Figure 34 - Slave Speed Control from Master with Lock Position, MDSC Time Based
Speed
Slave Speed2 or Master
20 mm/s
Master
10 mm/s
Operational Speed
Start
0.0 mm
0.2 sec
Target Position
50.0 mm
Master Programmed Total Move Time 0.2 sec
Programmed Total Move Time 1.2 sec
Lock Position
Time
Slave: Speed= 2.02 MasterUnits, accel/decell = 2.0 [Master Units]
Lock Position = 10.0
Table 47 - Comparison of the Enumerations for the Motion Instructions
Revision
Operand
Units
Type
Profile
V19 and
earlier
Speed
Units/sec
Rate
Trapezoidal, S-curve
(PJerk)
Accel/Decel
Units/sec2
Rate
3
Units/sec
Rate
% of time
Time
% of max
% of units/sec
Rate
Units/sec
Rate
Trapezoidal, S-curve
Sec
Time
Trapezoidal, S-curve
Master units
Feedback
Trapezoidal, S-curve
Units/sec2
Rate
Trapezoidal, S-curve
Sec
Time
Trapezoidal, S-curve
Master units
Feedback
Trapezoidal, S-curve
Units/sec2
Rate
Trapezoidal, S-curve
Sec
Time
Trapezoidal, S-curve
Master units
Feedback
Trapezoidal, S-curve
Jerk
Speed, Accel/Decel, and Jerk
For instructions: MAM, MAJ, MCD, and MAS
V20
Speed
Accel/Decel
Jerk
For instructions, MDSC, MAM, MAJ, and MATC
Rockwell Automation Publication MOTION-UM003F-EN-P - March 2015
279
Appendix C
Program
In this figure, we are programming rate. The controller calculates the time of the
move: Speed & Accel/Decel as units = units (seconds).
Figure 35 - Programming Rate in RSLogix 5000 Software Version 19 and Earlier
Speed
Programmed Speed
Decel
Accel
47.5 mm
1.25 mm
1.25 mm
Programmed Distance per Rate
Time
Travel Distance @ speed = Rate
Start 0.0
Equivalent to:
End = 50.0 mm
Distance
Speed = 10 mm/sec Accel/Decel = 40.0 mm/sec2
Rate
RSLogix 5000 software version 19 and earlier
MAM instruction programmed as rate.
Position
Speed
Accel
Decel
50.0 mm (start 0.0)
10.0 mm/sec
40.0 mm/sec2
40.0 mm/sec2
So Travel_Distance = area under the
curve [accel + at_speed + decel]
Travel_Distance = 50 mm
Travel_Distance = 50 mm [1.25 mm + 47.5 mm + 1.25 mm
280
Rockwell Automation Publication MOTION-UM003F-EN-P - March 2015
Program
Appendix C
In this figure, we are programming time. The controller calculates the speed of
the move: Speed & Accel/Decel as time [seconds]
Figure 36 - Programming Time in RSLogix 5000 Software Version 20 and Later
Speed
Calculated Speed
Decel
Accel
4.75sec
.25 sec
Target Distance per Time
.25sec
Time
Travel Distance @ speed = Time
Start 0.0
Equivalent to:
End = 50.0 mm
Distance
Speed = 10 mm/sec
Time
Accel/Decel = 0.25 sec
RSLogix 5000 software version 20 and later
MAM instruction programmed as time.
Position
Speed
Accel
Decel
50.0 mm (start 0.0)
5.25 sec
0.25 sec
0.25 sec
So Travel_Distance = area under the
curve [accel + at_speed + decel]
Travel_Distance = 50 mm
Travel_Time = 5.25 sec [0.25 + 4.75 + 0.25 sec]
Rockwell Automation Publication MOTION-UM003F-EN-P - March 2015
281
Appendix C
Program
Notes:
282
Rockwell Automation Publication MOTION-UM003F-EN-P - March 2015
Appendix
History of Changes
D
This appendix summarizes the revisions to this manual. Reference this appendix
if you need information to determine what changes have been made across
multiple revisions. This may be especially useful if you are deciding to upgrade
your hardware or software based on information added with previous revisions of
this manual.
This table contains the changes that were made in MOTION-UM003E-EN-P
Topic
Page
Added a chapter for the Axis Scheduling feature.
77
Added content for Safe Torque Off feature.
9, 170
Updated Motion Group Properties dialog box content and graphics
Throughout
Updated graphics to reflect Studio 5000® environment, version 24
Throughout
Added Understanding STO Bypass When Using Motion Direct Commands
173
Added Safety Tab
227
This table contains the changes that were made in MOTION-UM003D-EN-P.
Topic
Page
Updated graphics for Logix Designer software, version 21.00.00
Throughout
Added information related to the Kinetix® 5500 Ethernet drive
Throughout
Added Studio 5000™ Engineering and Design Environment Information
Preface
Updated What You Need
10
Added Integrated Motion EtherNet/IP Drives Table
11
Updated Configuration and Start-up Scenarios
12
Where to Find Sample Projects
14
Updated Create a Controller Project
17
Updated Set Time Synchronization
20
Updated Add a 1756-ENxTx Communication Module
22
Updated Configuring a Kinetix Drive
28
Updated Add a Kinetix EtherNet/IP Drive
28
Updated Create an Associated Axis
32
Updated Configuring the General Parameters
35
Added Integrated Architecture Builder
45, 97
Updated Specifying the Motor Data Source
46
Added Example 4: Kinetix 5500 Drive, Velocity Loop with Motor Feedback
68
Added Example 5: Kinetix 350 Drive, Position Loop with Motor Feedback
72
Update Screen Captures in Configure Integrated Motion Using a PowerFlex
755 Drive
77
Updated Absolute Position Recovery Scenarios
173
Rockwell Automation Publication MOTION-UM003F-EN-P - March 2015
283
History of Changes
Notes:
284
Rockwell Automation Publication MOTION-UM003F-EN-P - March 2015
Glossary
The following terms and abbreviations are used throughout this manual. For
definitions of terms that are not listed here, refer to the Allen-Bradley Industrial
Automation Glossary, publication AG-7.1.
Absolute Position Retention (APR) While Homing creates an absolute machine reference position, the APR bit is
designed to retain the absolute position.
Axis An axis is a logical element of a motion control system that exhibits some form of
movement. Axes can be rotary or linear, physical or virtual, controlled or simply
observed.
Bus Regulator A bus regulator is used to limit the rise in DC Bus voltage level that occurs when
decelerating a motor.
CIP Common Industrial Protocol.
CIP Sync CIP Sync defines extensions to CIP Common objects and device profiles to
support time synchronization over CIP Networks.
Closed Loop Closed loop is a method of control where there is a feedback signal of some kind
that is used to drive the actual dynamics of the motor to match the commanded
dynamics by servo action. In most cases, there is a literal feedback device to
provide this signal, but in some cases the signal is derived from the motor
excitation, for example, sensorless operation.
Converter A converter is a device that generally converts AC input to DC output. A
Converter is also commonly called the Drive Power Supply. In the context of a
drive system, the Converter is responsible for converting AC Main input into
DC Bus power.
Course (Base) Update Period The base update period of the motion group's update task, which is specified in
milliseconds.
Cyclic Data Block The cyclic data block is a high priority real-time data block that is transferred by
an Integrated Motion on the EtherNet/IP network connection on a periodic
basis.
Drive A drive is a device that is designed to control the dynamics of a motor.
Event Data Block The event data block is a medium priority real-time data block that is transferred
by an Integrated Motion on the EtherNet/IP network connection only after a
specified event occurs. Registration and marker input transitions are typical drive
events.
Get/Read A Get/Read involves retrieving an attribute value from the perspective of
Controller side of the interface.
Integrated Motion on the EtherNet/ Defines extensions to CIP Common objects and device profiles to support
IP Network motion control over CIP networks.
Rockwell Automation Publication MOTION-UM003F-EN-P - March 2015
285
Glossary
Integrated Motion on the EtherNet/ The I/O connection is the periodic bidirectional, Class 1, CIP connection
IP network I/O Connection between a controller and a drive that is defined as part of the Integrated Motion
on the EtherNet/IP network standard.
Integrated Motion on the EtherNet/ Refers to any drive device that complies with the CIP Motion standard.
IP Network Drive
Inverter An inverter is a device that generally converts DC input to AC output. An
Inverter is also commonly called the Drive Amplifier. In the context of a drive
system, the Inverter is responsible for controlling the application of DC Bus
power to an AC motor.
Motion Motion refers to any aspect of the dynamics of an axis. In the context of this
document, it is not limited to servo drives but encompasses all forms of drive
based motor control.
Motion Group A user defined grouping of motion axes. A motion group has configuration
parameters and status attributes that apply to all axes in the group.
Multiplexing Multiplexing is the method by which multiple signals are combined into one
signal for transmission.
Multiplex Update Multiplier Number of multiplexed drives that determines the multiplex update period.
Multiplex Update Period Task update period for a Multiplexed Axis.
Open Loop Open loop is a method of control where there is no application of feedback to
force the actual motor dynamics to match the commanded dynamics. Examples
of open loop control are stepper drives and variable frequency drives.
Safe Torque Off The Safe Torque Off (STO) feature provides a method, with sufficiently low
probability of failure, to force the power-transistor control signals to a disabled
state. When the command to allow torque ceases from the GuardLogix
controller, all of the drive output-power transistors are released from the Onstate.
For complete information about the Safe Torque Off feature, see the Kinetix
Multi-axis servo EtherNet/IP drive User Manual, publication 2198-UM002.
Service Data Block The service data block is a lower priority real-time data block associated with a
service message from the controller that is transferred by an Integrated Motion
on the EtherNet/IP network connection on a periodic basis. Service data
includes service request messages to access attributes, run a drive-based motion
planner, or perform various drive diagnostics.
Set/Write A Set/Write involves setting an attribute to a specified value from the perspective
of the Controller side of the interface.
Shunt Regulator A shunt regulator is a specific Bus Regulator method that switches the DC Bus
across a power dissipating resistor to dissipate the regenerative power of a
decelerating motor.
286
Rockwell Automation Publication MOTION-UM003F-EN-P - March 2015
Glossary
Synchronized Synchronized is a condition where the local clock value on the drive is locked
onto the master clock of the distributed System Time. When synchronized, the
drive and controller devices can use time stamps that are associated with an
Integrated Motion on the EtherNet/IP network connection data.
System Time System time is the absolute time value as defined in the CIP Sync standard in the
context of a distributed time system where all devices have a local clock that is
synchronized with a common master clock. In the context of Integrated Motion
on the EtherNet/IP network, System Time is a 64-bit integer value in units of
microseconds or nanoseconds with a value of 0 corresponding to January 1, 1970.
Time Offset Time offset is the System Time Offset value associated with the Integrated
Motion on the EtherNet/IP network connection data that is associated with the
source device. The System Time Offset is a 64-bit offset value that is added to a
device’s local clock to generate System Time for that device.
Time Stamp Time stamp is a system time stamp value that is associated with the Integrated
Motion on the EtherNet/IP network connection data. The time stamp conveys
the absolute time when the associated data was captured, or can be also used to
determine when associated data is applied.
Variable Frequency Drive (VFD) Variable Frequency Drive (VFD) is a class of drive products that seek to control
the speed of a motor, typically an induction motor, through a proportional
relationship between drive output voltage and commanded output frequency.
Frequency drives are, therefore, sometimes referred to as Volts/Hertz drives.
TIP
The Kinetix 350 drive does not support the Output Frequency attribute.
Vector Drive Vector drive is a class of drive products that seek to control the dynamics of a
motor via closed loop control, which includes, but is not limited to, closed loop
control of both torque and flux vector components of the motor stator current
relative to the rotor flux vector.
Rockwell Automation Publication MOTION-UM003F-EN-P - March 2015
287
Glossary
Notes:
288
Rockwell Automation Publication MOTION-UM003F-EN-P - March 2015
Index
Numerics
1756-EN2F 95
1756-EN2T 95
1756-EN2TR 95
1756-EN3TR 95
1756-ENxT
firmware 95
1756-L6x
APR 186
1756-L7x
APR 186
2198-Hxxx-ERS2 227
axis scheduling 77
alternate update period 82
axis assignment 81
base update rate 78
multiple drives 79
system performance 77
utilization 87
AXIS_CIP_DRIVE
exception actions 216
exceptions 217
alarm 218
fault status only 218
ignore 218
stop drive 217
stop planner 218
A
absolute feedback device 183
absolute feedback position 182
absolute position 175, 182, 183
absolute position loss
without APR fault 192
absolute position recovery 187
active homing 176
active supervisor precedence 237
APR
absolute position recovery 182
fault 186
faults 184
functionality 183
incremental encoders 193
recovery 182
battery backed controller 189
change controller 189
controller 188
controller and drives remained powered
189
download same program and no hardware changes 190
download same program with no hardware changes 190
drive 191
feedback device 190
inhibit or uninhibit 190
position feedback 190
restore 190
RSLogix 5000 project 190
scaling 191
reset 192
retention 182
sequence of events 193
supported components 182
terminology 182
associated products 11
auto-negotiate 233
axis
homed bit 183
homed status bit 186
inhibit 219
tune 195
axis configuration types
compare 32
B
Base 66
base update period
integrated architecture builder 38, 66
C
CIP motion drive module
associated axes 240
axis 1 242, 243
axis 2 243
load feedback device 242, 243
master feedback device 242
motor feedback device 243
configuring 223
connection 225, 226
electronic keying mismatch 226
inhibit module 226
major fault 226
module configuration invalid 226
request error 226
requested packet interval (RPI) 226
service request error 226
digital input 247
ethernet address 225
internet protocol 231, 233
domain name 232
gateway address 232
host name 232
IP address 232
primary DNS server address 232
refresh communication 233
secondary DNS server address 233
subnet 232
module info 229
identification 230
refresh 230
reset module 230
status 230
motion diagnostics 248
controller to drive 248
course update period 248
drive to controller 248
enable transmission timing statistics
248
network 237, 239
Rockwell Automation Publication MOTION-UM003F-EN-P - March 2015
289
Index
active ring supervisor 237
advanced 239
clear fault 239
enable supervisor mode 237
network status 237
reset counter 238
ring fault 238
ring faults detected 238
status 238
supervisor status 238
topology 237
verify fault location 238
port configuration 233, 234, 236
auto-negotiate 235
current duplex 235, 236
current speed 235
enable 235
link status 235
port 235
refresh communication 236
selected duplex 235
selected speed 235
power 244, 245
AC input phasing 245
bus regulator action 245
power structure 245
regenerative power limit 245
power ratings 225
power structure 224
properties 223
revision 225
time sync 228
accuracy 228
backplane state 229
class 228
ethernet state 229
identity 228
local clock 229
offset master 229
source 228
synchronization status 229
variance 228
CIP Sync 17, 93
commission
hookup test 145
Motion Direct Commands 145
CompactFlash 182, 193
CompactLogix 12, 34, 62, 98
coordinated motion instructions
Motion Coordinated Change Dynamics
(MCCD) 270
Motion Coordinated Circular Move (MCCM)
270
Motion Coordinated Linear Move (MCLM) 270
Motion Coordinated Shutdown (MCSD) 270
Motion Coordinated Shutdown Reset (MCSR)
270
Motion Coordinated Stop (MCS) 270
D
dependent attributes 149
diagnostics 234
direct commands
motion state 268
direct coupled rotary 146, 147
drive status indicators 214
E
electronic keying 224
EtherNet/IP 231
external bus capacitance 245
external shunt 245
F
faults
major 215
manage motion 214, 215
non-major 215
status 217
faults and alarms 211
action 212
alarms 212
clear log 212
condition 212
data monitor 213
date and time 212
drive status indicators 211
end state 212
faults 212
indicator 212
log 211
quick view 211, 213
source 212
tag monitor 211
feedback configuration types
compare 32
feedback position 182
feedforward 201, 205
G
gains
established 33
gains to tune
customize 33
grandmaster 228
GuardLogix 227
H
home offset 182
homing
axis 175
guidelines 175
hookup tests 152
290
Rockwell Automation Publication MOTION-UM003F-EN-P - March 2015
Index
I
incremental feedback position 182
Integrated Architecture Builder
base update period 66
course update period 38
interface and media counters 234
K
Kinetix 350 12
voltage ranges 13
Kinetix 5500
voltage ranges 13
Kinetix 6500 12
voltage ranges 13
L
linear actuator 146, 149
load type 146, 148
Logix Designer 11
M
machine home/reference 182
MAFR
Motion Axis Fault Reset 199
MAH 183
Motion Axis Home 199
MAJ
Motion Axis Jog 199
MAM
Motion Axis Move 199
manual tune 201
marker homing sequence 175
MAS
Motion Axis Stop 199
master speed 279
MDS
Motion Drive Start 199
MDSC
lock position 279
program rate 280
program time 281
programming 279
Motion Arm Output Cam 269
Motion Arm Registration 269
Motion Arm Watch Position 269
motion attributes
configuration attributes 177
motion homing configuration 18
Motion Axis Fault Reset 268
Motion Axis Gear 269
Motion Axis Home 269
Motion Axis Jog 269
Motion Axis Move 200, 269
Motion Axis Position Cam 269
Motion Axis Shutdown 268
Motion Axis Shutdown Reset 268
Motion Axis Stop 269
Motion Axis Time Cam 269
Motion Calculate Cam Profile 269
Motion Calculate Slave Values 269
Motion Change Dynamics 269
motion configuration instructions
Motion Run Axis Tuning (MRAT) 270
Motion Run Hookup Diagnostic (MRHD) 270
Motion Coordinated Change Dynamics 270
Motion Coordinated Circular Move 270
Motion Coordinated Linear Move 270
Motion Coordinated Shutdown 270
Motion Coordinated Shutdown Reset 270
Motion Coordinated Stop 270
Motion Direct Commands 199
motion direct commands
STO bypas 173
STO bypass 173
Motion Disarm Output Cam 269
Motion Disarm Registration 269
Motion Disarm Watch Position 269
Motion Drive Start 268
motion event instructions
Motion Arm Output Cam (MAOC) 269
Motion Arm Watch Position (MAWP) 269
Motion Disarm Output Cam (MDOC) 269
Motion Disarm Registration (MDR) 269
Motion Disarm Watch Position (MDW) 269
Motion Generator 199
motion group instructions
Motion Group Shutdown (MGS) 269
Motion Group Shutdown Reset (MGSR) 269
Motion Group Stop (MGS) 269
Motion Group Strobe Position (MGSP) 269
Motion Group Shutdown 269
Motion Group Shutdown Reset 269
Motion Group Stop 269
Motion Group Strobe Position 269
motion instructions 170
motion move instructions
Motion Axis Gear (MAG) 269
Motion Axis Home (MAH) 269
active homing 176
passive homing 176
Motion Axis Jog (MAJ) 269
Motion Axis Move (MAM) 269
Motion Axis Position Cam (MAPC) 269
Motion Axis Stop (MAS) 269
Motion Axis Time Cam (MATC) 269
Motion Calculate Cam Profile (MCCP) 269
Motion Calculate Slave Values (MCSV) 269
Motion Change Dynamics (MCD) 269
Motion Redefine Position (MRP) 269
Motion Redefine Position 269
Motion Run Axis Tuning 270
Motion Run Hookup Diagnostic 270
motion servo off 268
Rockwell Automation Publication MOTION-UM003F-EN-P - March 2015
291
Index
motion state instructions
Motion Axis Fault Reset (MAFR) 268
Motion Axis Shutdown (MAS) 268
Motion Axis Shutdown Reset (MASR) 268
Motion Servo Off 268
Motion Servo On 268
motioni event instructions
Motion Arm Registration (MAR) 269
MSO
Motion Servo Off 199
Motion Servo On 199, 268
O
overload and voltage limits 245
ownership 227
P
passive home 175
persistent media fault
firmware error 186
planner 201, 205
power cycle 182
power structure
auto-populate 24
PowerFlex 755 12, 48
customize gains 60
feedback configuration type 60
voltage ranges 13
proportional gains 195
stop drive 217
Studio 5000 11
system performance 38, 66
T
time synchronization 92
set 92
trapezoidal 175
troubleshoot faults
instruction error 214
tune
compensation 201, 205
feedforward 201, 205
filters 201, 205
limits 201, 205
manual 195
tuning parameters
customize 195
V
velocity profile effects 258
Q
quick watch 207
R
refresh communication 239
rotary transmission 146, 148
RSLogix 5000 programming software
motion instructions 170
S
Safe Torque Off 173
troubleshooting 174
scaling 146
off-line 145
online 192
signature 191
secure digital 182
card 193
shunt regulator resistor type 245
shutdown 217
single-axis 13
slave speed 279
STO
bypass 173
292
Rockwell Automation Publication MOTION-UM003F-EN-P - March 2015
Rockwell Automation Support
Rockwell Automation provides technical information on the Web to assist you in using its products.
At http://www.rockwellautomation.com/support you can find technical and application notes, sample code, and links to
software service packs. You can also visit our Support Center at https://rockwellautomation.custhelp.com/ for software
updates, support chats and forums, technical information, FAQs, and to sign up for product notification updates.
In addition, we offer multiple support programs for installation, configuration, and troubleshooting. For more
information, contact your local distributor or Rockwell Automation representative, or visit
http://www.rockwellautomation.com/services/online-phone.
Installation Assistance
If you experience a problem within the first 24 hours of installation, review the information that is contained in this
manual. You can contact Customer Support for initial help in getting your product up and running.
United States or Canada
1.440.646.3434
Outside United States or Canada
Use the Worldwide Locator at http://www.rockwellautomation.com/rockwellautomation/support/overview.page, or contact your local
Rockwell Automation representative.
New Product Satisfaction Return
Rockwell Automation tests all of its products to help ensure that they are fully operational when shipped from the
manufacturing facility. However, if your product is not functioning and needs to be returned, follow these procedures.
United States
Contact your distributor. You must provide a Customer Support case number (call the phone number above to obtain one) to your
distributor to complete the return process.
Outside United States
Please contact your local Rockwell Automation representative for the return procedure.
Documentation Feedback
Your comments will help us serve your documentation needs better. If you have any suggestions on how to improve this
document, complete this form, publication RA-DU002, available at http://www.rockwellautomation.com/literature/.
Rockwell Automation maintains current product environmental information on its website at
http://www.rockwellautomation.com/rockwellautomation/about-us/sustainability-ethics/product-environmental-compliance.page.
Rockwell Otomasyon Ticaret A.Ş., Kar Plaza İş Merkezi E Blok Kat:6 34752 İçerenköy, İstanbul, Tel: +90 (216) 5698400
Publication MOTION-UM003F-EN-P - March 2015
Supersedes Publication MOTION-UM003E-EN-P - October 2014
Copyright © 2015 Rockwell Automation, Inc. All rights reserved. Printed in the U.S.A.
Integrated Motion on the EtherNet/IP Network Configuration and Startup
User Manual