1
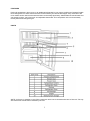
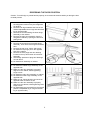
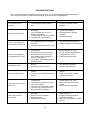
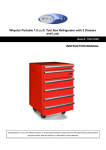
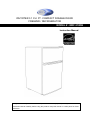
0 WHYNTER 3.1 CU. FT. COMPACT DOUBLE DOOR FREEZER / REFRIGERATOR MODEL # : MRF-310DB Instruction Manual Congratulations on your new WHYNTER product. To ensure proper operation, please read this Instruction Manual carefully before using this product. Keep this manual in a safe place for future reference. TABLE OF CONTENTS FEATURES AND PARTS 3 SAFETY PRECAUTIONS 4 REQUIREMENTS 5 OPERATION 6 DEFROSTING 7 NORMAL SOUNDS 7 REVERSING THE DOOR POSITION 8 CLEANING AND MAINTENANCE 9 SPECIFICATIONS 9 TROUBLESHOOTING 10 WARRANTY INFORMATION 11 2 FEATURES Perfect for workplaces, dorm rooms, or an additional refrigerator for your home, the Whynter Compact Double Door Refrigerator can store fresh and frozen food as well as your favorite beverages. A dry erase door with neon marker can be used to write notes and then can be easily wiped away. Added features include bottle and can storage on door, low noise level, and adjustable thermostat. This compressor unit is environmentally friendly with R134a refrigerant gas. PARTS NOTE: A drip tray is installed on top of the compressor which can be located at the back of the unit. This tray will catch all the condensation collected by the unit. 3 WARNING TO REDUCE THE RISK OF FIRE, ELECTRICAL SHOCK, OR INJURY WHEN USING YOUR REFRIGERATOR, FOLLOW THESE BASIC PRECAUTIONS: READ ALL INSTRUCTIONS BEFORE USING THE REFRIGERATOR. WARNING: RISK OF DANGER TO SMALL CHILDREN AND SMALL ANIMALS. ENTRAPMENT AND SUFFOCATION DANGER IF NOT PROPERLY SECURED. DISPOSED OR ABANDONED APPLIANCES ARE STILL DANGEROUS BEFORE YOU DISPOSE OF YOUR REFRIGERATOR: REMOVE THE DOOR TO PREVENT CHILDREN FROM CLIMBING INTO THE UNIT. NEVER ALLOW CHILDREN TO OPERATE, PLAY WITH, OR CRAWL INTO THE APPLIANCE. NEVER CLEAN REFRIGERATOR PARTS WITH FLAMMABLE FLUIDS. THE FUMES CAN CREATE A FIRE HAZARD. DO NOT STORE OR USE GASOLINE OR ANY OTHER FLAMMABLE VAPORS AND LIQUIDS IN THE VICINITY OF THIS OR ANY OTHER APPLIANCE. THE FUMES CAN CREATE A FIRE HAZARD. SAFETY PRECAUTIONS Read all of the instructions before using this appliance. When using this appliance, always exercise basic safety precautions, including the following: Do not use if the power supply cord is damaged. If damaged, it must be replaced by qualified technician/electrician. Ensure the appliance is unplugged before cleaning or if not in use. To clean the appliance use only mild detergents or glass cleaning products. Never use harsh chemicals or solvents. Do not use this appliance with an extension cord or power strip. Please ensure that the appliance is plugged directly into the electrical outlet. Close the doors immediately after opening. Avoid placing the appliance near external heat sources or direct sunlight. Make sure the appliance is placed on a flat, level, and solid surface. Make sure that the surface on which the appliance is placed is strong enough to hold the appliance once it is fully loaded. The refrigerator is an electrical appliance. To avoid serious injury from electrical shock, do not operate the refrigerator with wet hands, while standing on a wet surface, or while standing in water. Do not expose this appliance to rain or excessive moisture. Do not turn the appliance upside down, on its side, or 45° or more off level. Never pull the power cord to disconnect the unit from an outlet. Grasp the plug directly and pull it from the outlet. This appliance is designed for non-commercial use only. Do not plug this appliance into the power socket before setup is completed. The cord should be secured behind the unit and should not be left exposed or dangling. Do not move this appliance without securing the doors. Performance may vary based on operational and ambient conditions. 4 Do not remove any safety, warning, or product information labels from your refrigerator. Use two or more people to move refrigerator. Failure to do so can result in back or other injury Before you begin Preparing the refrigerator for use before you plug the refrigerator in to a power supply, be sure to let it stand upright for at least 24 hours to allow the compressor’s oils to settle. Unpacking the refrigerator Carefully remove the packaging materials. Remove any shipping tape and glue from your refrigerator before using. Do not use sharp instruments, rubbing alcohol, flammable fluids, or abrasive cleaners to remove tape or glue. These products can damage the surface of your refrigerator. If any parts are missing, please contact our customer service. Put the refrigerator on a level and flat surface and away from direct sunlight and other sources of heat such as a stove, furnace, radiator, etc. The appliance must be positioned so that the power plug is accessible. Before using your refrigerator, you are strongly recommended to clean it thoroughly. (This process should clean the unit of any impurities that may have been left behind during the manufacturing process.) 1. Clean the interior with a diluted cleaning solution, warm water and a soft cloth. (DO NOT use any caustic or abrasive solutions) (Do not clean your refrigerator with flammable fluids.) 2. The outside of the refrigerator should be cleaned regularly with a mild detergent and warm water. 3. Dry the interior and exterior with a soft cloth. REQUIREMENTS Installation Requirements The refrigerator has been designed for free-standing installation which will allow you to install the unit in almost any place you desire. Please make sure to follow the instructions for clearance, water and electrical requirements. Clearance and Environment Requirements Choose a well-ventilated area with temperatures above 50°F and below 90°F. Operation outside these temperatures may result in lowered production or may cause other adverse effects. This unit must be installed in an area protected from the elements, e.g., wind, rain, water spray or drips. The refrigerator should not be located next to ovens, grills or other high heat sources. The unit should be located on a firm and level surface that is able to support the refrigerator’s total weight with water. There must be at least 4 inches of space around the back and sides of the unit for proper air circulation. If you are installing your refrigerator next to a fixed wall, leave sufficient space on the hinge side to allow for the door to swing open. Electrical Requirements Read all safety precautions listed at the beginning of this manual. It is recommended that a separate circuit serving only your refrigerator be provided. Use receptacles that cannot be turned off by a switch or pull chain. The refrigerator is equipped with a power supply cord having a 3-prong grounding plug. To minimize possible shock hazard, the cord must be plugged into a mating 3-pronged and grounding-type wall 5 receptacle providing 110-120V, 60Hz, grounded in accordance with the National Electrical Code and local codes and ordinances. If a mating wall receptacle is not available, it is the personal responsibility of the customer to have a properly grounded, 3-prong wall receptacle installed by a certified electrician. NOTE: Before performing any type of installation, cleaning, or removing a light bulb, turn the refrigerator control to OFF and then disconnect the refrigerator from the electrical source. When you are finished, connect the refrigerator to the electrical source and reset the control to the desired setting. OPERATION Keep flammable materials and vapors, such as gasoline, away from refrigerator. Failure to do so can result in death, explosion, fine or burns. Before using your refrigerator, it is strongly recommended to clean it thoroughly. After you remove all of the packaging materials, clean the inside of your refrigerator before using it. To obtain the best possible results from your refrigerator, it is important that you operate it properly. Setting the Thermostat control The thermostat knob controls the internal temperature. The higher the number setting, the longer the compressor will run to keep the temperature colder. The temperature controls for the refrigerator and freezer are located at the top shelf of the refrigerating compartment. Set your refrigerator’s thermostat control at 3 on its first run. Give your refrigerator time to cool down completely. It is best to wait for 24 hours before adding food. When the thermostat control knob is set to OFF, the refrigerator stops running. Changing the Light Bulbs To change the light bulb, make sure to unplug refrigerator or disconnect unit from power supply before removing the bulb. Replace the bulb with a 10-watt appliance bulb. Please note that not all bulbs will fit your refrigerator. Be sure to replace the bulb with one of the same size and shape. Plug in the refrigerator or reconnect refrigerator to power supply after bulb replacement. Power Interruptions If the electricity goes off for a short period, keep both doors closed to help food stay cold and frozen. If the power will be out for a longer period of time, remove food from the freezer and store it in a frozen food locker. Fresh Food Storage Wrap or store food in the refrigerator in airtight and moisture – proof material. This prevents food odor and taste transfer throughout refrigerator Fruit – wash, dry and store in refrigerator in plastic bags or crisper Leafy vegetables- remove wrapping and trim or tear off bruised and discolored areas then wash in cold water and drain. Place in plastic bag or plastic container and store in crisper Fish – use fresh fish the same day as purchased 6 Meat – store most meat in original wrapping as long as it is airtight and moisture – proof. Re-wrap if necessary. Leftovers – cover leftovers with plastic wrap or aluminum foil. Plastic containers with tight-seal lid can also be used. Frozen Food Storage The freezer compartment is designed for storing frozen food and for freezing food at home. Successful freezing depends on the correct packaging. When you close and seal the package you must not allow air or moisture in or out. If you do, you could have food odor and taste transfer throughout the refrigerator, and will also cause frozen food to dry out. Note: Never put bottled food or drinks in the freezer compartment. For best performance, leave enough space in the freezer and refrigerator compartment for air to circulate around the packages. Also let enough room at the front so the door can close tightly. Defrosting Refrigerator compartment - Defrosting process is automatic by thermostat knob Melted frost flow into drip tray and automatic evaporating. Freezer compartment – Defrosting for the freezer compartment is by manual process. Turn the thermostat knob to set at OFF position and leave the freezer door open. Remove all food, ice cube tray and shelf or transfer to refrigerating compartment. Clean and wipe out the melted frost with a cloth. After defrosting, turn thermostat knob to origin position. Note: To avoid damaging the freezing compartment wall, do not use any sharp objects to remove the frost or separate the frozen food. Normal Sounds Your new refrigerator may make sounds that are not familiar to you. Most of the new sounds are normal. Hard surfaces like the floor, walls can make the sounds seem louder than they actually are. The following describes the kinds of sounds that might be new to you and what may be making them. Rattling noises may be produced from the flow of the refrigerant. The compressor may make a pulsating or high-pitched sound. The compressor may also produce a low tone humming sound. As each cycle ends, you may hear a gurgling sound due to the refrigerant flowing. You may hear fan noise and air being forced over the condenser by the condenser fan. Dry Erase Door Panel Feature Featuring a dry-erase finish on the door panel, the Whynter MRF-310DB refrigerator can be used to record messages, manage schedules, or draw pictures right on the refrigerator. Dry-erase markers make sketches easy to erase, wiping away concerns that temporary messages and artwork will become permanent. Use only dry erase markers pens that are made specifically for dry erase panels. The Whynter MRF-310DB refrigerator comes with one (1) neon blue dry erase marker. Clean the surface regularly with a damp cloth to ensure the condition of the panel is maintained. If you accidentally use a permanent ink marker or pen on the surface of your refrigerator door, you can use the ink from the dry erase marker as a solvent. Scribble over the permanent mark with the dry erase marker and wipe away with a paper towel. You may have to do this more than one to clean it off entirely. Never use ball point pens, pencils or sharp, metal-end hard objects to write on the dry erase panel as this permanently damage the surface of the unit. 7 REVERSING THE DOOR POSITION Caution: To avoid injury to yourself and/or property, we recommend someone assist you during the door reversal process. 1. To access the lower hinge assembly, tilt back the refrigerator cabinet or lay the refrigerator on its back 2. Remove both legs located at the front of the cabinet: adjustable left on hinge side and fixed leg on opposite side. 3. Remove the screws holding the lower hinge assembly to the cabinet 4. Remove the main door assembly from the refrigerator cabinet by opening the door and pulling down. 5. Remove the screws from the middle hinge assembly. Then remove the hinge and freezer door. 6. Remove the top cover, hinge, and screws 7. Re-install the top hinge pin on the opposite side of the cabinet 8. Remove the door plugs and door bushing located on the top and bottom of each door assembly 9. Interchange positions of plugs and bushings on both doors 10. Re-install door assembly on cabinet 11. Re-install the middle hinge assembly on the opposite side 12. Make sure the door assembly is properly aligned on the cabinet, before tightening hinge screws 13. Re-install the main door assembly on cabinet 14. Re-install the lower hinge assembly on the opposite side 15. Make sure to change bushing and screw on opposite sides on bottom of unit 16. Make sure the door assembly is properly aligned on the cabinet, before tightening lower hinge screws 17. Re-install both legs (reversed from the original positions: adjustable leg on hinge and fixed leg on opposite side.) 8 CLEANING AND MAINTENANCE The refrigerator must be thoroughly cleaned if it has been left unused for a long time DO NOT turn the refrigerator upside down to dry! This will cause the oils from the compressor to shift, which can result in the machine breaking or becoming inoperable. Periodic cleaning and proper maintenance will ensure efficiency, top performance, and long life. Never use a solvent-based cleaning agent. These cleaners may transmit taste to the ice cubes, or damage and discolor the interior. ALWAYS unplug the unit before cleaning the exterior and interior. Routine maintenance 1. Using a 10:1 ratio of water to either white vinegar or lemon juice, scrub the interior of the refrigerator with the solution. 2. Remove the solution from the refrigerator by wiping down the refrigerator’s interior with hot water. 3. Leave the door open for a few minutes to have the interior of the unit air dried 4. Plug the refrigerator to the outlet and is ready for use. If the refrigerator will not be used for an extended period of time, you should unplug the unit from power, drain the water from the reservoir and dry the interior with a clean soft cloth. Note: Do not touch the power plug when your hands are wet. Never unplug the unit by pulling on the plug. SPECIFICATIONS Description of product Voltage/Frequency Rated Power Rated Current Color Refrigerant Dimensions (Height x Width x Depth) Freezer Internal Dimensions (Height x Width x Depth) Refrigerator Internal Dimensions (Height x Width x Depth) Weight Capacity: Portable refrigerator/freezer AC 115V~60Hz 100W 1.3A Black Dry Erase Surface R134a 33” H X 18.5” W X 19.75” D 8.25” H X 15.25” W X 14.75” D 18” H X 15.25” W X 14.75” D 52 lbs Total Storage Volume : 3.1 cu. ft. / 87 Liters Freezer Volume: 0.9 cu. ft. / 26 Liters Refrigerator Volume: 2.2 cu. ft. / 61 Liters Note: Technical data and performance information provided for reference only. Specifications are subject to change. Check the rating label on the refrigerator for the most accurate information. 9 TROUBLESHOOTING Many common refrigerator problems are easily resolved. Try the troubleshooting suggestions below to see if the problems can be resolved before having to contact the service department. Problem The machine won't operate. The light does not work Food in the refrigerator compartment is freezing Food in the refrigerator compartment is not cold Refrigerator leaks Noise during operation There is interior moisture build - up Doors will not close completely Possible Causes The refrigerator is unplugged. The refrigerator power switch is OFF Solutions Plug in the refrigerator. Check if the power outlet is working The power supply cord is unplugged. The household fuse or circuit breaker has tripped. The light bulb is loose in the socket. The light bulb has burned out Plug in refrigerator. Check circuit breaker Check light bulb if properly installed Replace light Bulb The position of food stored touches the refrigerant power of refrigerator back wall The thermostat knob is set too cold Put a space in between the food and the refrigerator back wall Adjust refrigerator’s temperature The air vents are blocked in the compartment The door(s) are opened too often A large amount of food has just been added to the refrigerator or freezer compartment The position of thermostat knob is adjusted too low Remove obstruction or items that are blocking the air vents Do not overload the refrigerator of large amount of food Adjust thermostat control The drain – off mouth entrance is blocked Evaporator pan not in place Remove obstruction or items that are causes the blockage Secure evaporator pan The refrigerator is not leveled and locked. The body of the refrigerator touches the wall Make sure that unit is on leveled surface Make sure unit has 4 inches clearance from wall The air vents are blocked in the compartment The door(s) are opened too often The room is humid The food is not packaged correctly The control is not set correctly of the surrounding conditions Remove obstruction or items that are blocking the air vents Make sure food are securely sealed Set the correct temperature Food packages are blocking the door open shelves are out of position gaskets are dirty refrigerator is not level Remove obstruction or items that blocks the door Properly secure the shelves Check door gaskets Make sure that unit is on leveled surface 10 ONE YEAR LIMITED WARRANTY This Whynter refrigerator is warranted, to the original owner within the 48 continental states, for one year from the date of purchase against defects in material and workmanship under normal use and service. Should your refrigerator prove defective within one year from the date of purchase, return the defective part or unit, freight prepaid (within two months of purchase; after two months to one year, customer will be responsible for freight cost to Whynter’s service department), along with an explanation of the claim to Whynter LLC. Please package the refrigerator carefully in its original packaging material to avoid damage in transit. Please retain the original box and packaging material. Under this warranty, Whynter will repair or replace any parts found defective. This warranty is not transferable. After the expiration of the warranty, the cost of labor and parts will be the responsibility of the original owner of the unit. THIS WARRANTY DOES NOT COVER: Acts of God, such as fire, flood, hurricanes, earthquakes and tornadoes. Damage, accidental or otherwise, to the refrigerator while in the possession of a consumer not caused by a defect in material or workmanship; Damage caused by consumer misuse, tampering, or failure to follow the care and special handling provisions in the instructions. Damage to the finish of the case, or other appearance parts caused by wear. Damage caused by repairs or alterations to the product by anyone other than authorized by the manufacturer. Freight and Insurance cost for the warranty service. DISCLAIMER OF IMPLIED WARRANTIES; LIMITATION OF REMEDIES CUSTOMER'S SOLE AND EXCLUSIVE REMEDY UNDER THIS LIMITED WARRANTY SHALL BE PRODUCT REPAIR OR REPLACEMENT AS PROVIDED HEREIN. CLAIMS BASED ON IMPLIED WARRANTIES, INCLUDING WARRANTIES OF MERCHANTABILITY OR FITNESS FOR A PARTICULAR PURPOSE, ARE LIMITED TO ONE YEAR OR THE SHORTEST PERIOD ALLOWED BY LAW, BUT NOT LESS THAN ONE YEAR. WHYNTER SHALL NOT BE LIABLE FOR CONSEQUENTIAL OR INCIDENTAL DAMAGES SUCH AS PROPERTY DAMAGE AND INCIDENTAL EXPENSES RESULTING FROM ANY BREACH OF THIS WRITTEN LIMITED WARRANTY OR ANY IMPLIED WARRANTY. SOME STATES AND PROVINCES DO NOT ALLOW THE EXCLUSION OR LIMITATION OF INCIDENTAL OR CONSE- QUENTIAL DAMAGES, OR LIMITATIONS ON THE DURATION OF IMPLIED WARRANTIES, SO THESE LIMITATIONS OR EXCLUSIONS MAY NOT APPLY TO YOU. THIS WRITTEN WARRANTY GIVES YOU SPECIFIC LEGAL RIGHTS. YOU MAY ALSO HAVE OTHER RIGHTS THAT VARY FROM STATE TO STATE. To obtain service or information, contact Whynter via email at [email protected] or call 866-WHYNTER. Product contents and specifications may change without notice. Copyright © 2013 Whynter LLC www.Whynter.com 11