1
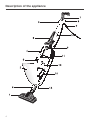
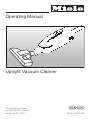
Operating Manual
Upright Vacuum Cleaner
This operating manual
is to be used for vacuum
models S140 - S157.
UV
M.-Nr. 05 637 900
Contents
Help protect our environment . . . . . . . . . . . . . . . . . . . . . . . . . . . . . . . . . . . . . . . . 3
Description of the appliance . . . . . . . . . . . . . . . . . . . . . . . . . . . . . . . . . . . . . . . . . 4
IMPORTANT SAFETY INSTRUCTIONS . . . . . . . . . . . . . . . . . . . . . . . . . . . . . . . . 6
MESURES DE SÉCURITÉ IMPORTANTES . . . . . . . . . . . . . . . . . . . . . . . . . . . . . . 9
Assembling the vacuum . . . . . . . . . . . . . . . . . . . . . . . . . . . . . . . . . . . . . . . . . . . 12
Connecting the extension tube . . . . . . . . . . . . . . . . . . . . . . . . . . . . . . . . . . . . . . . 12
Connecting the handle . . . . . . . . . . . . . . . . . . . . . . . . . . . . . . . . . . . . . . . . . . . . . 12
Connecting the rug and floor tool . . . . . . . . . . . . . . . . . . . . . . . . . . . . . . . . . . . . . 13
Winding up the power cord . . . . . . . . . . . . . . . . . . . . . . . . . . . . . . . . . . . . . . . . . . 13
Included accessories. . . . . . . . . . . . . . . . . . . . . . . . . . . . . . . . . . . . . . . . . . . . . . 14
Accessory clip . . . . . . . . . . . . . . . . . . . . . . . . . . . . . . . . . . . . . . . . . . . . . . . . . . . . 14
Crevice tool . . . . . . . . . . . . . . . . . . . . . . . . . . . . . . . . . . . . . . . . . . . . . . . . . . . . . . 15
Upholstery nozzle . . . . . . . . . . . . . . . . . . . . . . . . . . . . . . . . . . . . . . . . . . . . . . . . . 15
Operation . . . . . . . . . . . . . . . . . . . . . . . . . . . . . . . . . . . . . . . . . . . . . . . . . . . . . . . 16
Unwinding the power cord. . . . . . . . . . . . . . . . . . . . . . . . . . . . . . . . . . . . . . . . . . . 16
Adjusting the telescopic wand . . . . . . . . . . . . . . . . . . . . . . . . . . . . . . . . . . . . . . . 16
Plug the vacuum in . . . . . . . . . . . . . . . . . . . . . . . . . . . . . . . . . . . . . . . . . . . . . . . . 16
Turning the vacuum On and Off. . . . . . . . . . . . . . . . . . . . . . . . . . . . . . . . . . . . . . . 17
Adjusting the suction . . . . . . . . . . . . . . . . . . . . . . . . . . . . . . . . . . . . . . . . . . . . . . . 17
Setting the rug and floor tool for the type of floor being vacuumed . . . . . . . . . . . 18
Parking and storing the vacuum cleaner . . . . . . . . . . . . . . . . . . . . . . . . . . . . . . 19
Maintenance and care . . . . . . . . . . . . . . . . . . . . . . . . . . . . . . . . . . . . . . . . . . . . . 20
Suction Level Indicator . . . . . . . . . . . . . . . . . . . . . . . . . . . . . . . . . . . . . . . . . . . . . 21
When should the dustbag and filters be changed? . . . . . . . . . . . . . . . . . . . . . . . 22
Where to purchase dustbags and filters . . . . . . . . . . . . . . . . . . . . . . . . . . . . . . . . 22
Replacing the dustbag . . . . . . . . . . . . . . . . . . . . . . . . . . . . . . . . . . . . . . . . . . . . . 23
Replacing the dust compartment filter . . . . . . . . . . . . . . . . . . . . . . . . . . . . . . . . . 24
Replacing the "SUPER air clean" filter . . . . . . . . . . . . . . . . . . . . . . . . . . . . . . . . . . 25
Replacing the "ACTIVE air clean" filter or the "HEPA" filter. . . . . . . . . . . . . . . . . . . 26
Changing the thread catcher pads . . . . . . . . . . . . . . . . . . . . . . . . . . . . . . . . . . . . 27
Exchanging Exhaust Filters . . . . . . . . . . . . . . . . . . . . . . . . . . . . . . . . . . . . . . . . 28
Maintenance and care . . . . . . . . . . . . . . . . . . . . . . . . . . . . . . . . . . . . . . . . . . . . . 29
Optional Accessories . . . . . . . . . . . . . . . . . . . . . . . . . . . . . . . . . . . . . . . . . . . . . 30
Safety feature . . . . . . . . . . . . . . . . . . . . . . . . . . . . . . . . . . . . . . . . . . . . . . . . . . . . 36
After sales service . . . . . . . . . . . . . . . . . . . . . . . . . . . . . . . . . . . . . . . . . . . . . . . . 37
2
Help protect our environment
Disposal of the packing material
Disposal of an old vacuum
cleaner
The box and packaging material are
designed to protect the appliance during shipping and are biodegradable
and recyclable. Please dispose of
these items as you would any other recyclable products.
Before discarding an old vacuum
cleaner, please cut off the power cord
to render it inoperative and child resistant. Old vacuum cleaners may contain
materials that can be reused or recycled. Consult your local waste removal
company or recycling center for the
proper way to dispose of an old vacuum.
Disposal of the dustbag and filters
Genuine Miele dustbags and filters are
made from environmentally friendly materials. They can be thrown out with
your household trash, provided the vacuum has not been used on restricted
materials.
3
Description of the appliance
4
Description of the appliance
a Rug and floor tool
b Suction level indicator
c Dust compartment release button
d Carrying handle with On/Off switch
e Accessory clip *
f Locking button
g Telescopic handle with anti-slide device and hook
h Power cord hook
i Power cord
j Telescopic wand adjustment button *
k Exhaust filter compartment (on rear)
l Dust compartment filter
m Dustbag
n Powerbrush outlet *
The illustration shows all possible features available on Miele vacuum cleaners.
Separate operating instructions for the Powerbrush and electric hose (not shown)
are included with models featuring these items.
Features marked with * do not come standard with all vacuums and may not be included with your model.
5
IMPORTANT SAFETY INSTRUCTIONS
When using an electrical appliance, always observe basic safety precautions, including the following:
READ THESE OPERATING INSTRUCTIONS COMPLETELY BEFORE USING
THE VACUUM CLEANER FOR THE FIRST TIME. PLEASE KEEP THESE OPERATING INSTRUCTIONS IN A SAFE PLACE FOR FUTURE REFERENCE.
This vacuum is intended for
household use only. Do not use it
on people or animals.
WARNING The manufacturer cannot accept responsibility for damage caused by
improper use, or if the vacuum is
used for purposes other than those
for which it was designed. Use the
vacuum only as described in this
manual.
To reduce the risk of fire, electric shock, or injury:
Do not use the vacuum outdoors or
on wet surfaces.
Check the voltage rating of the
vacuum cleaner before connecting
the power cord to an electrical outlet.
Your power supply should correspond
to the voltage rating given on the data
plate located on the bottom of the vacuum cleaner. Use only household AC
outlets. Never use DC power sources. If
you are unsure of the voltage supply in
your area, consult a qualified electrician. Connecting the vacuum cleaner to
a higher voltage than indicated on the
data plate may result in damage to the
vacuum cleaner and personal injury.
6
Do not leave the appliance when
plugged in. Unplug it from the outlet when not in use and before servicing.
To reduce the risk of electric shock,
this appliance has a polarized plug
(one blade is wider than the other). This
plug will fit in a polarized outlet only one
way. If the plug does not fit fully in the
outlet, reverse the plug. If it still does
not fit, contact a qualified electrician to
install the proper outlet. Do not modify
the plug in any way.
Only dry dirt should be vacuumed
with this cleaner.
Do not allow the vacuum cleaner to
be used as a toy. Pay close attention when the vacuum cleaner is used
by or near children.
Do not use with a damaged cord or
plug. If the appliance is not working correctly, has been dropped, damaged, left outdoors, or immersed in water, bring it to your Miele dealer for
servicing.
IMPORTANT SAFETY INSTRUCTIONS
Do not pull or carry the vacuum by
the cord, use the cord as a handle,
close a door on the cord, or pull the
cord around sharp edges or corners.
Do not run the vacuum over the cord
and keep it away from heated surfaces.
Do not unplug the machine by pulling on the cord. To unplug the vacuum, grasp the plug, not the cord.
Do not handle the plug or appliance with wet hands.
Turn off all controls before unplugging the vacuum.
Do not put any objects into the
openings. Do not use with any
openings blocked; keep the openings
free of dust, lint, hair or anything that
may reduce the air flow.
Keep hair, loose clothing, fingers
and all parts of the body away from
any openings or moving parts.
Use extra care when vacuuming
while on stairs.
Do not vacuum up flammable or
combustible liquids, such as gasoline, or use it in areas where fumes may
be present.
Do not use the vacuum to pick up
liquids. This also applies to freshly
shampooed carpets or rugs. Wait until
they are dry before vacuuming.
Do not vacuum toner dust. Toner,
such as that used in printers and
photocopiers can conduct electricity.
Do not vacuum items that are burning or smoking, such as cigarettes,
matches, or hot ashes.
Do not operate the vacuum cleaner
unless a dustbag, dust compartment filter and exhaust filter are in
place. Use only genuine MIELE double-layer dustbags, dust compartment
filters and exhaust filters (see the
“Maintenance and care” section for instructions on how to insert the dustbag
and filters).
The vacuum should only be
cleaned when disconnected from
the power supply. Use a dry or slightly
damp cloth only. Never submerse the
vacuum in water or use a dripping wet
rag.
The vacuum cleaner will shut off
automatically if it overheats. Overheating can be caused by a clogged
hose, a heavily soiled dust compartment or exhaust filter, or a full dustbag.
If overheating occurs, correct the problem and wait about 20 - 30 minutes for
the motor to cool down. The vacuum
cleaner can then be turned on again.
Miele vacuum cleaner bags are
disposable and made to be used
only once. Do not attempt to reuse
them.
Only use Miele attachments and
accessories. Use of non - Miele designed items will decrease the efficiency of your machine and may be
dangerous.
7
IMPORTANT SAFETY INSTRUCTIONS
Do not attempt any repairs other
than those listed in the “Maintenance and care” section. Any other required service should be performed by
an Authorized Miele Service Agent.
When using this appliance in conjunction with a Turbobrush or
Electrobrush (if applicable to your
model), always unplug the machine before connecting or disconnecting the
brush from the body of the machine.
Before disposing an old vacuum,
cut off the power cord and make it
unusable to prevent children from
harming themselves.
SAVE THESE
INSTRUCTIONS
THIS VACUUM IS
INTENDED FOR
HOUSEHOLD
USE ONLY.
DO NOT USE IT
ON PEOPLE
OR ANIMALS.
8
MESURES DE SÉCURITÉ IMPORTANTES
Au moment d’utiliser un appareil électrique, il faut toujours observer des mesures
de sécurité, y compris:
LIRE TOUTES CES INSTRUCTIONS POUR L’UTILISATION AVANT D’UTILISER
L’ASPIRATEUR POUR LA PREMIÈRE FOIS.
VEUILLEZ CONSERVER CES INSTRUCTIONS POUR L’UTILISATION DANS UN
ENDROIT SÛR, POUR LE CONSULTER PLUS TARD.
Cet aspirateur est destiné à
l’usage ménager seulement. Ne
pas l’utiliser sur des gens ni des
animaux.
AVERTISSEMENT Le fabricant ne peut pas être tenu
responsable des dommages causés
par l’utilisation inadéquate de
l’aspirateur ou pour des fins autres
que celles auxquelles il est destiné.
Utiliser l’aspirateur uniquement tel
que prescrit dans ce manuel.
Pour réduire les risques
d’incendie, de choc électrique
ou de blessure:
Ne pas utiliser l’aspirateur à l’extérieur ou sur des surfaces mouillées.
Vérifier la tension nominale de l’aspirateur avant de brancher le cordon dans une prise électrique. Votre
source de courant devrait correspondre
à la tension nominale indiquée sur la
plaque signalétique située au-dessous
de l’aspirateur. Utiliser uniquement des
prises de courant CA domestiques. Ne
jamais utiliser de prise de courant CD.
Si vous n’êtes pas certain de la source
de courant dans votre région, consulter
un électricien compétent. Si vous raccordez l’aspirateur à une tension plus
élevée que celle indiquée sur la plaque
signalétique, vous pourriez endommager l’aspirateur et vous blesser.
Ne pas laisser l’appareil sans surveillance lorsqu’il est branché. Débrancher l’appareil lorsqu’il n’est pas
utilisé et avant l’entretien.
9
MESURES DE SÉCURITÉ IMPORTANTES
Afin de réduire les risques de choc
électrique, cet appareil est muni
d’une fiche polarisée (une des broches
est plus large). Cette fiche ne peut être
insérée dans une prise polarisée que
d’une seule façon. Si vous ne pouvez
pas insérer la fiche dans la prise, inverser la fiche. Si vous ne pouvez toujours
pas insérer la fiche, faire installer une
prise adéquate par un électricien compétent. Ne pas modifier la fiche d’aucune façon.
Aspirer uniquement de las saleté
sèche à l’aide de cet aspirateur.
Ne pas permettre aux enfants de
jouer avec l’aspirateur. Une attention particulière est nécessaire lorsque
l’aspirateur est utilisé par des enfants
ou à proximité de ces derniers.
Ne pas utiliser si le cordon ou la
fiche est endommagé. Apporter
l’appareil chez votre marchand Miele
s’il ne fonctionne pas bien, s’il a été
échappé, endommagé, oublié à l’extérieur ou immergé.
Ne pas tirer ou soulever l’appareil
par le cordon. Ne pas utiliser le
cordon comme une poignée, le coincer
dans l’embrasure d’une porte ou l’appuyer contre des arêtes vives ou des
coins. Ne pas faire rouler l’appareil sur
le cordon. Garder le cordon à l’écart
des surfaces chaudes.
Ne pas débrancher l’appareil en tirant sur le cordon. Tirer plutôt sur
la fiche.
10
Ne pas toucher à la fiche ou à l’appareil lorsque vous avez les mains
mouillées.
Mettre toutes les commandes au
point d’arrêt avant de débrancher
l’aspirateur.
N’insérer aucun objet dans les ouvertures. Ne pas utiliser l’appareil
lorsqu’une ouverture est bloquée; s’assurer que de la poussière, de la peluche, des cheveux ou d’autres matières ne réduisent pas le débit d’air.
Garder les cheveux, les vêtements,
les doigts et toutes les parties du
corps à l’écart des ouvertures ou des
pièces mobiles.
User de prudence lors du nettoyage des escaliers.
Ne pas aspirer des liquides inflammables ou combustibles tels que
de l’essence et ne pas faire fonctionner
dans des endroits où des vapeurs sont
présentes.
Ne pas aspirer de liquides. Ceci
s’applique aussi aux moquettes ou
tapis fraîchement lavés. Attendre qu’ils
aient séché avant de passer l’aspirateur.
Ne pas aspirer de matières en
combustion ou qui dégagent de la
fumée, comme des cigarettes, des allumettes ou des cendres chaudes.
Ne pas ramasser la poussière de
cartouche. La poussière de cartouche d’imprimante ou de photocopieuse peut être conductible d’électricité.
MESURES DE SÉCURITÉ IMPORTANTES
Ne pas utiliser l’aspirateur si le sac
à poussière, le filtre à compartiment de poussière et le filtre d’échappement ne sont pas en place.Utiliser
uniquement des sacs à poussière à
double paroi, des filtres à compartiment
de poussière et des filtres d’échappement MIELE (consulter la section “Nettoyage et entretien” pour savior comment insérer le sac à poussière et les
filtres).
Nettoyer uniquement l’aspirateur
lorsqu’il est débranché de la prise
de courant. Utiliser un linge sec ou légèrement humide seulement. Ne jamais
immerger l’aspirateur dans l’eau ni utiliser un linge mouillé.
L’aspirateur s’arrêtera automatiquement s’il surchauffe. Le surchauffage peut être causé par un
boyau obstrué, un sac à poussière
plein, un filtre d’échappement ou un
filtre à compartiment de poussière très
sale. Si un surchauffage se produit, corriger le problème et attendre de 20 à 30
minutes que le moteur refroidisse. Vous
pourrez ensuite remettre l’aspirateur en
marche.
Les sacs d’aspirateur Miele sont jetables et ont été conçus pour une
utilisation seulement. Ne pas essayer
de les réutiliser.
Utiliser uniquement les accessoires
et pièces Miele. L’utilisation d’articles non fabriqués par Miele réduira
l’efficacité de votre appareil et peut être
dangereuse.
Ne pas essayer d’effectuer des réparations autres que celles prescrites dans la secton “Nettoyage et entretien”. Toute autre réparation doit être
confiée à un technicien d’entretien autorisé par Miele.
Au moment d’utiliser cet appareil
avec une brosse électrique ou une
brosse turbo (s’il y a lieu), if faut toujours débrancher l’appareil avant de
raccorder la brosse sur l’appareil ou de
l’enlever.
Avant de jeter votre ancien aspirateur, couper le cordon électrique et
le rendre inutilisable afin d’empêcher
les enfants de se blesser.
CONSERVER CES
INSTRUCTIONS
CET ASPIRATEUR
EST DESTINÉ À
L’USAGE
MÉNAGER
SEULEMENT.
NE PAS
L’UTILISER
SUR DES GENS
NI DES ANIMAUX.
11
Assembling the vacuum
Connecting the extension tube
^ With the square hole facing the carrying handle, insert the extension tube
into the top of the vacuum
body.Gently turn the tube until it locks
in place.
^ To remove the extension tube, press
down on the locking button (see inset) and pull.
Connecting the handle
^ Lining up the square hole and the
locking button, insert the handle into
the extension tube. Gently turn the
handle until it locks in place.
^ To remove the handle, press and hold
the locking button (see arrow) while
gently turning and pulling off the handle.
The vacuum can be used as a hand
held vacuum by connecting the handle
directly to the vacuum housing.
This allows for easier vacuuming of upholstered furniture, mattresses, etc.
In addition
(see next page)
12
Assembling the vacuum
...the extension tube can also be used
as a suction wand to extend the reach
of the vacuum, making it easier to clean
under furniture.
Connecting the rug and floor
tool
^ Insert the lower tube of the vacuum
into the floor brush and gently turn
until it locks into place.
^ To remove the rug and floor tool,
press and hold the locking button
and pull the rug and floor tool off of
the vacuum tube.
Winding up the power cord
When the vacuum is not in use, the
power cord can be wound around the
two cable hooks attached to the handle
and extension tube. To prevent the cord
from unwinding, press the cord into the
loocking groove of the plug (see inset).
13
Included accessories
The vacuum cleaner includes the following accessories:
a Accessory clip (standard on some
models)
b Crevice tool
c Upholstery nozzle
d Filter frame
The filter frame is only included with
models that come with the "ACTIVE air
clean" or "HEPA" filter. It only needs to
be used if a "SUPER air clean" filter is to
be used instead of the "ACTIVE air
clean" or "HEPA" filter (see "Exchanging
Exhaust Filters").
Accessory clip
(standard on some models)
^ Attach the accessory clip to the telescopic wand for easy access of the
crevice nozzle and upholstery brush.
^ Attach the accessory clip a above
the power cord hook b as shown.
14
Included accessories
Crevice tool
For vacuuming in crevices, corners and
narrow places.
Upholstery nozzle
For cleaning upholstery, mattresses,
cushions, curtains, etc.
15
Operation
Unwinding the power cord
The lower cord hook rotates.
^ Turn the cord hook so that the lower
portion of the wound cord hangs free.
The cord can now be easily removed
and unwound.
Adjusting the telescopic wand
(depending on model)
One piece of the telescopic wand is
stored inside the other and can be adjusted to suit your height for comfortable vacuum cleaning.
^ Press the slide control (see arrow) to
release the lock. Pull apart the sections and adjust to the desired
height.
Plug the vacuum in
^ Plug the vacuum into an outlet protected by a 15 A circuit breaker.
^ To prevent the power cord from getting in the way or kinking while vacuuming, hang the unwound cord over
the hook on the handle (see inset).
16
Operation
Turning the vacuum On and
Off
There are two slide switches located on
the handle to turn the vacuum on or off
easily whether the vacuum is used upright or horizontally. Either of these slide
switches can be used to operate the
vacuum.
Double slide switch
0
= vacuum is off
min = minimum suction
max = maximum suction
^ To turn the vacuum On, slide either
switch to min or max.
^ To turn the vacuum Off, slide either
switch to 0.
Select min, for vacuuming light weight
items such as rugs or curtains.
Adjusting the suction
(depending on model)
Some models have an adjustable suction control that allows you to optimize
the vacuum’s performance to meet different cleaning needs. The suction can
be adjusted to the amount of dirt and
the type of material that will be vacuumed.
Light weight items such as throw rugs
or curtains can be vacuumed at a lower
suction level to prevent them from being damaged, while carpets or heavy
mats can be vacuumed at the highest
setting in order to remove deep seated
dirt. The highest setting should also be
used if a Turbobrush is connected to
the vacuum.
17
Operation
Setting the rug and floor tool
for the type of floor being
vacuumed
The rug and floor tool has been designed to give excellent cleaning results on either carpeted or smooth floor.
For vacuuming carpets and rugs:
^ Set the selector to the g position.
For vacuuming smooth floors:
^ Set the selector to the h position.
18
Parking and storing the vacuum cleaner
There is a non-skid rubber bumper on
the handle of the vacuum.
This allows the vacuum to be leaned
upright against a wall if desired.
Before leaving the vacuum make
sure it is turned off and leaning
against the wall at a safe angle.
To protect the bristle rings on the floor
brush, we suggest hanging the vacuum
on a wall hook by using the hole located on the bottom of the handle.
For longer term storage, the vacuum
can be hung on a wall hook from the
hole located on the bottom of the handle.
19
Maintenance and care
,Turn off and unplug the vacuum
before performing any maintenance
work.
The Miele Filtering System consists of
the following three components.
a Double layered dustbag
b Dust compartment filter (for motor
protection)
c Exhaust filter
Each of these filters must be changed
periodically to maintain the vacuum
cleaner’s efficiency.
For best results, only use genuine
Miele filters and double-layered
dustbags, type K/K. Technical failures and damage from the use of
substitute, inferior dustbags and filters will void any product warranty.
Different types of exhaust filters
Your model could have either:
a a “SUPER Air Clean filter”,
b an “ACTIVE Air Clean filter”
c or a “HEPA filter”
20
Maintenance and care
Suction Level Indicator
Only test the vacuum’s suction level
indicator with the rug and floor tool
attachment. Using any other attachment will give an inaccurate reading.
^ Set the suction power selector, (according to model), to the highest setting and close the air inlet valve.
^ Lift the rug and floor tool off the floor.
^ The dustbag should be changed if
the red marker completely fills the indicator window, even if the dustbag
is not completely full.
Please note:
The indicator measures the airflow
through the dustbag.
Vacuuming up even a small bit of fine
dust such as flour, ash or powder can
cause enough of a drop in airflow to
cause a "full bag" indication, even
though the dustbag may appear almost
empty. Since the airflow (suction power)
is greatly reduced, the bag should be
changed. On the other hand, the
dustbag may be bulging with carpet lint
or pet fur yet the airflow may still be
high enough to prevent the suction
level indicator from registering "full". If
this occurs the dustbag should be
changed.
Either of these extremes can occur during normal use.
The suction level indicator is designed
to work when a mixture of the above
items, along with hair, sand, etc . are
vacuumed, as is generally the case
when using the vacuum for normal
household cleaning.
We recommend that:
1. If you vacuum a lot of fine dust or
sand:
^ Change the dustbag as soon as the
red marker fills the indicator window,
even if the bag is not full.
2. If you vacuum a lot of hair, pet fur or
loose carpet fibers: the suction level
indicator will show only reduced suction when in fact the bag is full.
^ Change the dustbag as soon as it
physically full, even if the suction
level indicator shows that it is not.
21
Maintenance and care
When should the dustbag and
filters be changed?
The Dustbag
The dustbag should be changed when
the red marker fills the suction level indicator window or when the bag is full.
(Make sure the rug and floor tool is attached when testing the vacuum’s suction)
Miele dustbags are disposable and
made to be used only once. Do not
attempt to reuse them.
The dust compartment filter:
The dust compartment filter should be
changed whenever a new box of genuine Miele dustbags is opened.
A dust compartment filter is included
with every pack of Miele dustbags.
The exhaust filter
(see page 20 to determine which filter
is included with your vacuum):
SUPER air clean filter
Each time you open a new pack of genuine Miele dustbags change the filter. A
"SUPER air clean filter" is included with
every box of Miele dustbags.
ACTIVE air clean filter
About once a year or as soon as the filter no longer absorbs odors. This filter
is sold separately.
22
HEPA filter
Every 18 months or sooner if the airflow
is reduced to an inefficient level. This
filter is sold separately.
Where to purchase dustbags
and filters
Genuine Miele filters and Type K/K
dustbags can be purchased from any
authorized Miele vacuum dealer.
Technical failures and damage from
the use of substitute, inferior
dustbags and filters will void any
product warranty.
Maintenance and care
Replacing the dustbag
^ Press the dust compartment release
button and open the compartment
lid.
The dustbag has a built in flap that will
automatically slide over the hole when
the dustbag is removed to prevent any
dirt from escaping.
^ Grasp the card collar and pull out
slightly to seal bag before completely
removing it from the dustbag holder.
As long as the vacuum has not been
used on restricted or hazardous materials, the dustbag can be thrown out with
the household trash.
Do not unfold the dustbag when you
take it out of the box. Keeping it folded
will prevent it from getting caught when
the dust compartment lid is closed.
^ Slide the collar of the new dustbag
into the empty frame.
^ Close the dust compartment lid so
that it catches. The dustbag will automatically seat itself over the vacuum
intake tube inside of the compartment.
,If the dustbag is not inserted
correctly, or it is trapped between
the dust compartment lid and the
vacuum housing, the lid will not
close properly.
Do not attempt to force the lid shut!
23
Maintenance and care
Replacing the dust
compartment filter
^ Press the dust compartment release
button and open the compartment
lid.
A dust compartment filter is included
with every pack of genuine Miele
dustbags.
^ Open the filter door and replace the
used filter with a new one.
^ Snap shut the filter door and close
the dust compartment lid.
24
Maintenance and care
Replacing the "SUPER air
clean" filter
^ Press the release button for the exhaust filter compartment lid on the
rear of the vacuum and remove the
lid.
^ Remove the used filter and replace it
with a new one.
^ Place the locator pins on the bottom
of the lid into their respective notches
and close the lid.
25
Maintenance and care
Replacing the "ACTIVE air
clean" filter or the "HEPA" filter
^ Press the release button for the exhaust filter compartment lid on the
rear of the vacuum and remove the
lid.
^ Write the date of the next scheduled
filter change on the label of the new
filter.
^ Remove the used filter and replace it
with the new one.
^ Place the locator pins on the bottom
of the lid into their respective notches
and close the lid.
26
Maintenance and care
Changing the thread catcher
pads
The thread catcher pads on the bottom
of the rug and floor tool and the upholstery nozzle should be replaced as
soon as they appear to be worn.
^ Use a screwdriver as shown to remove the thread catcher pads from
their slots.
^ Press the new pads into the rug and
floor tool or the upholstery nozzle.
New thread catcher pads can be purchased from any authorized Miele vacuum dealer.
27
Exchanging Exhaust Filters
Depending on the model, one of the following types of exhaust filters is included with your vacuum.
a "SUPER air clean"
b "ACTIVE air clean" or
c "HEPA"
All of the above filters are interchangeable.
The differences in the filter types is explained in "Optional Accessories".
Please note:
1. If you want to exchange filter a for filter b or c, the filter frame attached to
the rear of the exhaust filter compartment lid must be removed. The new filter should be installed in its place.
2. If you want to exchange filter b or c
for filter a, the filter frame must be installed on the rear of the exhaust filter
compartment lid.
Removing or inserting the filter frame
^ Grasp the sides of the filter frame at
the locations shown in the picture
and squeeze. The frame can now be
inserted or removed.
28
Maintenance and care
,Turn off the vacuum and unplug
it from the outlet before performing
any maintenance work.
Vacuum and Accessories
The vacuum cleaner and other plastic
accessories can be cleaned with a
damp cloth or a cleaner made especially for plastics.
,Never use abrasive, glass or all
purpose cleaners on the vacuum.
These cleaners may chemically react with and damage the plastic
components of the vacuum and accessories.
Dust compartment
The dust compartment can be cleaned
using another vacuum or a dry rag or
brush.
,Never immerse the vacuum
cleaner in water!
29
Optional Accessories
Turbobrush
Recommended for cleaning and restoring crushed pile on low-nap carpeting.
The Turbobrush is mechanically driven
by the suction power of the vacuum.
Hand Turbobrush
Recommended for vacuuming upholstery, mattresses, car seats, carpeted
stairs and other areas not easily
reached by the standard Turbobrush.
SEB 217 Powerbrush
(standard on some models)
(can only be used with models having a
Powerbrush outlet)
Recommended for cleaning and restoring crushed pile on medium-nap carpeting.
30
Optional Accessories
Smooth floorbrush
A soft bristled floorbrush for cleaning
tile, wood or other smooth floor surfaces.
Parquet brush
(standard on some models)
Special brush with real horsehair bristles for cleaning parquet floors, floorboards and flooring susceptible to
scratching.
31
Optional Accessories
Canister vacuum accessories
By attaching a hose to the extension
tube of the vacuum, the upright vacuum
can be used as a canister vacuum.
This allows easy cleaning of taller items
such as bookshelves, furniture, blinds,
etc. Vacuuming inside closets or under
beds is also made easier.
Important
When buying canister accessories for
your vacuum, be sure to tell your authorized Miele vacuum dealer the correct
model number of your upright so that
you may purchase the correct accessories.
32
Optional Accessories
Dusting brush
For moldings and carved or ornate
items.
The head of the dusting brush swivels
and can be turned to the angle best
suited to the items being cleaned.
Universal brush
For cleaning books, shelves, etc.
Accessory clip
(standard on some models)
Conveniently holds the crevice tool and
upholstery brush on the wand of the
vacuum.
33
Optional Accessories
Radiator brush
For cleaning radiators, narrow shelves,
or crevices.
^ Attach the radiator brush to the crevice tool.
Mattress brush
For vacuuming mattresses and upholstery. Even deep crevices between
mattresses can be vacuumed easily.
34
Optional Accessories
ACTIVE air clean filter
(standard on some models)
This special active charcoal filter absorbs odors from the vacuumed dust.
The "ACTIVE air clean filter" is used in
place of the "SUPER air clean filter".
There is no difference in the filtration
level between the "ACTIVE air clean filter" and "SUPER air clean filter".
HEPA Filter
(standard on some models)
This filter has a very high filtration level,
EN 1822. It is capable of filtering out
99.97% of all particles 0.0003 mm in diameter. For larger particles, the filtration
level is even greater. Vacuum cleaners
equipped with this exhaust filter are
recommended for allergy sufferers or
anyone wishing to avoid inhaling LDPs
(Lung Damaging Particles). The HEPA
filter is installed in place of the "SUPER
air clean filter".
Cloth dustbag
If desired a reusable cloth dustbag can
be used instead of normal dustbags. It
can be easily emptied by removing the
clamp at the bottom of the bag.
Do not wash the cloth dustbag.
Washing will permanently damage the
airflow characteristics of the bag.
35
Safety feature
The vacuum turns itself off
If the vacuum detects an airflow problem, it will shut itself off in order to prevent the motor from over heating.
This can occur anytime the airflow
through the machine is impeded. A full
or clogged dustbag, clogged filters, or
clogged wand or accessory can cause
this safety feature to activate. If this occurs, turn off the vacuum and check for
any blockages. After 20 to 30 minutes,
the vacuum will reset itself, allowing you
to turn it on and use it.
36
After sales service
In the event of a problem that you can
not easily fix yourself, please contact
– your authorized Miele vacuum dealer
or:
– the nearest Miele Technical Service
(see addresses and telephone numbers on back cover)
37
38
39
Alteration rights reserved / 000 (S 140 - S157)
These instructions are printed on 100% chlorine free paper and are completely biodegradable.
3301