1
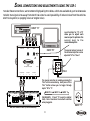
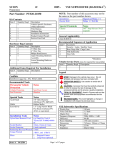
CONTROL SYSTEM 3-INPUT SWITCH
INSTALLATION INSTRUCTIONS
1
Dear customer,
Congratulations on your purchase of a Bazooka Audio Input Control System. At Bazooka, we are fanatics
about accurate music reproduction. Your selection of our products for your sound system indicates that
quality sound is also important to you too. At SAS, we take great pride in manufacturing revolutionary audio
products, and through the years of engineering expertise, hand craftsmanship and critical testing
procedures, we have created this high-performance input switcher. We hope that you will take as much
pride in owning and using one of these high-quality audio products as we do designing and manufacturing
them.
When properly installed and operated, your Bazooka Audio Input Control System will give you years of clean
uninterrupted sound reproduction. Therefore, we urge you to take a few minutes to carefully read through
this manual. It will explain all of the features of your amplifier and help insure trouble free installation.
Sound can be deceiving. Over time your hearing comfort level adapts to higher volumes of sound. What may
have sounded normal can actually be too loud and harmful to your hearing. Guard against this by setting your
equipment at a safe level before your hearing adapts.
To establish a “safe level”,
Start with your volume control at a low setting.
Slowly increase the volume control until you can hear comfortably, clearly and without
distortion.
Once you have established a comfortable “sound level”, make a note of this position and do not go
above this setting
Taking a minute to do this will help prevent your hearing from being damaged and allow you to enjoy listening
to music throughout your lifetime.
2
SAFETY PRECAUTIONS
Fuse amplifiers power wire at the battery.
Be sure to fuse the power wire within 6” of the vehicles battery. This will protect the vehicle and CSS-3I in
case of a short circuit between the CSS-3I and battery.
Use high grade wire connectors.
To ensure maximum power transfer and secure safe connections, it is recommended to use high grade
barrier spades (for connection at amplifier if applicable) and terminal rings (for connection at battery).
Do not run any wires underneath vehicle.
Exposed wires have a chance of being cut or damaged. It is best to run all wires through the vehicle under
the carpet and/or side panels. This lends to a cleaner installation and less risk of damage.
Use caution when mounting the CSS-3I.
Remember there are many electrical wires, gas lines, vacuum lines, brake lines as well as a gas tank in the
automobile. Make sure you know where they are when mounting the amplifier to avoid puncturing lines,
shorting wires or drilling holes in the gas tank.
Run signal wires away from electrical wires.
To avoid possibility of induced noise from the vehicles electrical system (i.e. popping noises or engine noise),
run wires away from the vehicles electrical wiring.
Make all ground wires as short as possible and at the same point.
In order to reduce the chance of ground loops (i.e. engine noise), make the grounding wire as short as
possible to reduce the wire's resistance. Also, when using multiple components, make sure all units are
grounded at the same point.
Avoid sharp edges when running the wires.
To avoid the possibility of power, signal or speaker shorts, be careful not to allow the CSS-3I wires to come in
contact with sharp edges. Use a grommet to protect the wire when running through the fire wall .
3
FEATURES AND BENEFITS
Multiple Source Inputs
The CSS-3I’s allows for two low level inputs (RCA’s) and one Stereo 3.5mm stereo input jack (MP3 or iPod). This
gives the flexibility to choose what source input you wish to play through your amplifier.
Source Thru-puts
We have included source thru-puts for the inputs A & B. This allows you to pass the same source signal to
another CCS-3I or additional amplifiers in the system.
Remote Turn-on
Automatically turns the CSS-3I on when connected to the head unit's remote output. The CSS-3I will turn on
and off with the head unit along with the amplifier attached to the CSS-3I.
CSR Input Jack
A remote input jack has been provided for connection with optional CSR-W or CSR-I Power, Source and Volume
Control. The CSR’s allow independent control of source inputs and the volume of the amplifier(s) connected
to the CSS-3I.
Adjustable Level Control for A & B Level Inputs
Independent level matching between each input source and the power amplifier. This allows you to adjust
each source input to optimize the overall level to the connected amplifier.
4
MOUNTING LOCATION
Before you start the installation, it will be necessary to find a mounting location for the unit. Find a location
in which the CSS-3I will receive adequate ventilation in order to dissipate the heat it develops during
operation. Do not mount in the engine compartment.
Select the location in which you wish to mount the CSS-3I. Use caution when mounting the CSS-3I, there are
many wires, gas lines, vacuum lines, brake lines as well as a gas tank in the automobile. Make sure you know
where they are when mounting the unit to avoid puncturing lines, shorting wires or drilling holes in the gas
tank. Once you are ready, use a pencil to mark the mounting holes in the bottom panel. After you have marked
the locations of the holes move CSS-3I out of the way and drill small starter holes to make the tapping screws
easier to install. Use provided screws to tighten down the CSS-3I.
5
POWER CONNECTIONS
IMPORTANT! Before making any connections, disconnect the vehicles battery until the installation is
completed to avoid possible damage to the electrical system.
HIGH LEVEL INPUT
BAZOOKA
SPEAKER OUTPUT
FILTER
CSR-W or CSR-I
The Power button on the CSR-W or
CSR-I turns any amplifier
connected to the Orange wire “ON”
or “OFF”. Please note that the
CSS-3I itself must be powered
“ON” from the radio as explained
below.
REMOTE
ORANGE WIRE
L
R
Input A
Input B
Level A
Level B
RJ-45
Status
CSS-3I
Audio Input Control System
The Radio's Remote Wire turns
the CSS-3I On and Off as well as
any amplifiers connected to the
switched orange wire. Think of
the Radio as a master power
switch for the entire system.
Power
Thru-put B
L
R
BLUE WIRE
Thru-put A
L
R
RADIO'S REMOTE
TURN-ON OUTPUT
94.7
SWITCHED +12V INPUT
Output to Amp
L
R
SWITCHED +12V OUTPUT
BLUE WIRE FROM CSA-2’S
SPEAKER OUTPUT
WIRE HARNESS
SEL
L
R
3.5mm
Stereo Input
HPF/FULL
BLACK WIRE
YELLOW WIRE
GROUND
+12V INPUT
-
+
BATTERY
+12V
GROUND
6
SIGNAL CONNECTIONS AND ADJUSTMENTS USING THE CSR-W
To make these connections, we recommend high quality RCA cables, which are available at your local Bazooka
retailer. Run signal wires away from electrical wires to avoid possibility of induced noise from the vehicles
electrical system (i.e. popping noises or engine noise).
INPUT “A”
R
L
R
L
R
L
INPUT “B”
R
3.5mm
Stereo Input
L
Input A
Input B
Level A
Level B
MENU
The overall output volume of the attached
amplifier can be adjusted “UP” or “Down”
RJ-45
Status
CSS-3I
Audio Input Control System
Power
SEL
INPUT “C”
Thru-put A
L
R
Output to Amp
L
R
Level Controls for “A” & “B”
allow you to adjust each
source input to optimize the
overall level to the
connected amplifier.
L
BATTERY
GND
L
The source selection is made by pressing the
“SEL” button momentarily. Each press of the
“SEL” button allows you to toggle through
inputs “A” to “C”.
R
INPUT A
R
CSA-2
INPUT
+12V
INPUT B
INPUT C
AUX
GAIN
POWER
MIN
L
CSR-W
Thru-put B
L
R
MAX
R
OUTPUT AMPLIFIER (CSA-2 SHOWN)
7
PLEASE NOTE: If input “C” is used (i.e. Mp3 or
iPod), then it becomes the default selection
when plugged in.
SIGNAL CONNECTIONS AND ADJUSTMENTS USING THE CSR-I
To make these connections, we recommend high quality RCA cables, which are available at your local Bazooka
retailer. Run signal wires away from electrical wires to avoid possibility of induced noise from the vehicles
electrical system (i.e. popping noises or engine noise).
INPUT “A”
R
L
R
L
R
R
3.5mm
Stereo Input
Level Controls for “A” & “B”
allow you to adjust each
source input to optimize the
overall level to the
connected amplifier.
L
L
Input A
Input B
Level A
Level B
The overall output volume of
the attached amplifier can be
adjusted “UP” or “Down”
INPUT “B”
RJ-45
Status
CSS-3I
Audio Input Control System
Power
SEL
AUX
Thru-put A
L
R
Output to Amp
L
R
L
BATTERY
GND
L
The source selection is made by pressing the
“SEL” button momentarily. Each press of the
“SEL” button allows you to toggle through
inputs “A” to “C”.
R
INPUT A
R
CSA-2
INPUT
+12V
INPUT B
INPUT C
MENU
AUX
GAIN
POWER
MIN
L
CSR-I
Thru-put B
L
R
MAX
R
PLEASE NOTE: If input “C” is used (i.e. Mp3 or
iPod), then it becomes the default selection
when plugged in.
INPUT “C”
OUTPUT AMPLIFIER (CSA-2 SHOWN)
8
USING CSS-3I FOR MULTIPLE ROOM APPLICATIONS
The following example shows how multiple CSS-3I’s can be connected to share one input source. The CD
Player (Input A) signal is passed to the second CSS-3I so that when “Input A” is selected, the CD player can be
played through the system in the second room.
SEL
INPUT “A”
AUX
L
R
L
R
3.5mm
Stereo Input
L
R
Input A
Input B
Level A
Level B
L
R
CSR-I
L
R
3.5mm
Stereo Input
RJ-45
L
R
Input A
Input B
Level A
Level B
Status
SEL
RJ-45
AUX
Status
MENU
CSR-I
CSS-3I
Audio Input Control System
INPUT “C”
Thru-put A
L
R
Output to Amp
L
R
L
R
L
CSS-3I
Audio Input Control System
Power
Thru-put B
L
R
Thru-put A
L
R
Output to Amp
L
R
R
L
Power
Thru-put B
L
R
R
MENU
L
BATTERY
GND
L
R
CSA-2
INPUT
+12V
BATTERY
AUX
GND
GAIN
R
CSA-2
INPUT
+12V
AUX
GAIN
POWER
MIN
L
POWER
MAX
MIN
L
R
MAX
R
INPUT “C”
OUTPUT AMPLIFIER (CSA-2 SHOWN)
OUTPUT AMPLIFIER (CSA-2 SHOWN)
9
TROUBLE SHOOTING THE SYSTEM
We have put together this trouble-shooting guide if you experience problems after installing the CSS-3I.
Please keep in mind that the majority of problems incurred are caused by improper installation and not the
equipment itself. In addition, there are many components in the system that could cause various signal
problems such as inducted electrical noise and engine noise.
Before you can properly address the problem, you must first find the component that is causing the problem.
This will take patience and a process of elimination.
LOOK FOR....
SOLUTION
No Output
Blown fuse
Bad RCA Cable(s)
+12V at power wire
+12V at remote wire
Grounding point clean and tight
Head Unit's fader not in center position
Replace
Replace
Check connection
Check connection
Check for ground w/meter
Set to center position
Check level adjustments
Bad RCA cable(s)
Improper level setting
Re-adjust
Replace
Re-adjust
Grounding points are clean and tight
Ground all components at same point
Try different grounding point
Bad RCA cable(s)
Use High Quality shielded RCA cables
Low Vehicle charging system and/or battery
Check for ground w/meter
Ground at same point
Change for better ground
Replace
Rejects inducted noise
Fix and/or replace
Low Output
Engine Noise
Music Stops Playing (Possible Amplifier Problem)
Speaker short
Check speakers connection for short circuit
Speaker grounding out
Make sure speaker wires do not touch ground
Impedance too low
Check speaker impedance (Min 2 ohm Stereo)
Overheating
Check mounting location for Adequate air Circulation
Speaker impedance too low
10
SPECIFICATIONS
CSS-3I
Inputs:
Low Level (RCA). . . . . . . . . . . . . . . . . . . . . . . . . . . . . . . . . . . . . . . . . . . . . . . . . . . . . . . . . . . . . . . . . . . . . . . 2 Pairs
3.5mm Jack . . . . . . . . . . . . . . . . . . . . . . . . . . . . . . . . . . . . . . . . . . . . . . . . . . . . . . . . . . . . . . . . . . . . . . . . . 1 Stereo
Outputs:
Amplifier . . . . . . . . . . . . . . . . . . . . . . . . . . . . . . . . . . . . . . . . . . . . . . . . . . . . . . . . . . . . . . . . . . . . . . . . . . . . . . 1 Pair
Thru-put “A” . . . . . . . . . . . . . . . . . . . . . . . . . . . . . . . . . . . . . . . . . . . . . . . . . . . . . . . . . . . . . . . . . . . . . . . . . . . 1 Pair
Thru-put “B” . . . . . . . . . . . . . . . . . . . . . . . . . . . . . . . . . . . . . . . . . . . . . . . . . . . . . . . . . . . . . . . . . . . . . . . . . . . 1 Pair
Frequency Response . . . . . . . . . . . . . . . . . . . . . . . . . . . . . . . . . . . . . . . . . . . . . . . . . . . . . . . . . . . . . . . . . . . . . 10Hz-100KHz
S/N Ratio . . . . . . . . . . . . . . . . . . . . . . . . . . . . . . . . . . . . . . . . . . . . . . . . . . . . . . . . . . . . . . . . . . . . . . . . . . . . . . . . . . . . . >77dB
THD (Thru-put A & B). . . . . . . . . . . . . . . . . . . . . . . . . . . . . . . . . . . . . . . . . . . . . . . . . . . . . . . . . . . . . . . . . . . . . . . . . . 0.001%
THD (Output to Amplifier) . . . . . . . . . . . . . . . . . . . . . . . . . . . . . . . . . . . . . . . . . . . . . . . . . . . . . . . . . . . . . . . . . . . . . . 0.02%
Input Jack for CSR Connection . . . . . . . . . . . . . . . . . . . . . . . . . . . . . . . . . . . . . . . . . . . . . . . . . . . . . . . . . . . . . . . . . . RJ-45
Battery Voltage Range . . . . . . . . . . . . . . . . . . . . . . . . . . . . . . . . . . . . . . . . . . . . . . . . . . . . . . . . . . . . . . . . . . 9.5VDC-16VDC
Fuse . . . . . . . . . . . . . . . . . . . . . . . . . . . . . . . . . . . . . . . . . . . . . . . . . . . . . . . . . . . . . . . . . . . . . . . . . . . . . . . . . . . . . . . . . . 2A x1
Due to continuing product improvement, specifications subject to change without notice.
11
LIMITED WARRANTY
Southern Audio Services, Inc., warrants all products to be free from defects in material and workmanship
for a period of one (1) year from the date of purchase. In the event the product is not as warranted, SAS’ sole
obligation shall be to repair or replace the defective product at SAS’ option: SAS limits its obligation under
any implied warranties under state laws to a period not to exceed the limited warranty period. SAS and its
authorized BAZOOKA® dealers specifically disclaim liability for any incidental or consequential damages.
Some states do not allow limitations on how long an implied warranty lasts, and some states do not allow the
exclusion or limitation of incidental or consequential damages, so the above limitation or exclusions may not
apply to you. This warranty gives you specific legal rights, and you may have other rights, which vary from
state to state.
What is covered: This warranty covers all defects in materials or workmanship (parts and labor) in the
product.
What is not covered: This warranty does not cover the following:
1.
Damages occurring during shipment of the product to SAS for repair
(Claims must be presented to the carrier).
2. Damages caused by accident, abuse, negligence, misuse or improper
Operation or installation.
3. Damages caused by an act of God, including without limitation, fire, flood
Storm or other acts of nature.
4. Any product, which has a serial number, defaced, altered, modified, or
removed.
5. Any product that has been altered or modified without SAS’ consent.
12
How to obtain warranty services:
1. You are responsible for delivery of the product to an authorized BAZOOKA® dealer or contact SAS at
1-800-THE-TUBE for a Return Authorization number. The Return Authorization number must be clearly
written on the outside of the box. Freight must be prepaid to SAS. Warranty replacement parts will be
returned freight prepaid. The entire enclosure may be returned for warranty service, but return will be
freight collect.
2. You must provide proof of the date of purchase of the product. If proof of purchase is not provided,
original date of manufacture will be used to determine warranty period.
3.
You must package the product securely to avoid damage during shipment.
4. After acquiring a Return Authorization number, ship to the address below. Please complete this section
and retain for your records.
Model(s) purchased _______________________________________________________________________
Serial number(s) _________________________________________________________________________
Date Purchased __________________________________________________________________________
Dealer’s name ___________________________________________________________________________
13
14
If you have any questions contact the Bazooka Mobile Audio tech dept. at:
Phone: 225-272-7135 Fax: 225-272-9844
Email - [email protected] Website - www.bazooka.com
SAS, BAZOOKA, BASS TUBES and LISTEN TO YOUR EARS are registered trademarks of Southern Audio Services INC. © Southern Audio Services INC. All Rights Reserved
Rev. 6.11.09