1
6303 8006 – 02/2006 GB
Operating instructions
RC30 programmable room
thermostat
Also applies to the following accessories: mixing
valve module MM10 and low loss header module
WM10
Please read thoroughly before use.
For the user
Contents
1
Introduction
2
What you should know about your heating system .
2.1
2.2
2.3
2.4
2.5
. . . . . . . . . . . . . . . . . . . . . . . . . . . . . . . . . . . 4
How does the RC30 work? . . . . . . . . . . . . . . . . . . . . . . . .
Control modes for the RC30 . . . . . . . . . . . . . . . . . . . . . . .
Why do the thermostatic radiator valves have to stay fully open?
Why do I need a heating program? . . . . . . . . . . . . . . . . . . .
What are heating circuits? . . . . . . . . . . . . . . . . . . . . . . . .
3
Tips on economical heating .
4
For your safety
4.1
4.2
4.3
4.4
4.5
5
Correct use . . . . . . . . . . .
Please observe these notes .
Cleaning . . . . . . . . . . . .
Disposal . . . . . . . . . . . .
Other notes . . . . . . . . . . .
Language
7
Basic functions .
8
7
8
9
. . . . . . . . . . . . . . . . . . . . . . . 11
. . . . . . . . . . . . . . . . . . . . . . . 13
. . . . . . . . . . . . . . . . . . . . . . . 13
. . . . . . . . . . . . . . . . . . . . . . . 14
. . . . . . . . . . . . . . . . . . . . . . . 14
. . . . . . . . . . . . . . . . . . . . . . . 14
. . . . . . . . . . . . . . . . . . . . . . . . 15
. . . . . . . . . . . . . . . . . . . . . . . . . . . . . . . . . . . . . 19
. . . . . . . . . . . . . . . . . . . . . . . . . . . . . . . . 20
Changing the room temperature directly .
Selecting the operating mode . . . . . . .
Setting the room temperature . . . . . . .
Heating domestic hot water . . . . . . . . .
Extended functions .
8.1
8.2
8.3
8.4
8.5
8.6
6
Controls . . . . . . . . . . . . . . . . . . . . . . . . . . . . . . . . . . . . 15
Quick reference guide . . . . . . . . . . . . . . . . . . . . . . . . . . . 17
Switching on and off . . . . . . . . . . . . . . . . . . . . . . . . . . . . 18
6
7.1
7.2
7.3
7.4
5
. . . . . . . . . . . . . . . . . . . . . . . . . . . . . . . . . 13
First steps with your RC30 .
5.1
5.2
5.3
. . . . . . 5
. . . . . . . . . . . . . . . 20
. . . . . . . . . . . . . . . 20
. . . . . . . . . . . . . . . 24
. . . . . . . . . . . . . . . 26
. . . . . . . . . . . . . . . . . . . . . . . . . . . . . 30
Buttons for extended functions
Using the extended functions .
Displaying operating menu . . .
Setting the date . . . . . . . . . .
Setting the time . . . . . . . . . .
Selecting a heating circuit. . . .
. . . . . . . . . . . . . . . . . . . . . 30
. . . . . . . . . . . . . . . . . . . . . 30
. . . . . . . . . . . . . . . . . . . . . 31
. . . . . . . . . . . . . . . . . . . . . 33
. . . . . . . . . . . . . . . . . . . . . 34
. . . . . . . . . . . . . . . . . . . . . 35
We reserve the right to make any changes due to technical modifications.
2
Operating instructions RC30 programmable room thermostat • Issue 02/2006
Contents
8.7
8.8
8.9
8.10
8.11
8.12
8.13
8.14
8.15
8.16
8.17
8.18
8.19
9
Special functions (additional menu).
9.1
9.2
9.3
9.4
9.5
9.6
9.7
9.8
9.9
9.10
9.11
9.12
10
Changing settings for another heating circuit . . . . . . . . .
Selecting and modifying a heating program . . . . . . . . . .
Selecting a preset heating program . . . . . . . . . . . . . . .
Overview of the preset heating programs . . . . . . . . . . . .
Modifying the heating program by moving switching points
Creating a new heating program . . . . . . . . . . . . . . . . .
Adding switching points . . . . . . . . . . . . . . . . . . . . . .
Deleting switching points . . . . . . . . . . . . . . . . . . . . . .
Setting the operating mode for domestic hot water . . . . . .
Entering a DHW program . . . . . . . . . . . . . . . . . . . . . .
Setting the operating mode for DHW circulation . . . . . . . .
Entering a DHW circulation program . . . . . . . . . . . . . . .
Changing the standard display . . . . . . . . . . . . . . . . . .
. . . 39
. . . 40
. . . 41
. . . 42
. . . 45
. . . 47
. . . 48
. . . 50
. . . 51
. . . 53
. . . 54
. . . 55
. . . . . . . . . . . . . . . . . 56
Opening and using the additional menu . . . . . . . . . . .
Setting the holiday function . . . . . . . . . . . . . . . . . .
Setting the bank holiday function . . . . . . . . . . . . . . .
Calibrating the room temperature . . . . . . . . . . . . . . .
Setting the Party function . . . . . . . . . . . . . . . . . . . .
Setting the Pause function . . . . . . . . . . . . . . . . . . .
Thermal disinfection . . . . . . . . . . . . . . . . . . . . . . .
Changing the standard display . . . . . . . . . . . . . . . .
Switching on the button lock . . . . . . . . . . . . . . . . . .
Setting summer/winter changeover . . . . . . . . . . . . . .
Automatic summer and winter time adjustment . . . . . .
Setting the preheat phase for a gas-operated heat pump
(not in the UK) . . . . . . . . . . . . . . . . . . . . . . . . . . .
Troubleshooting .
. . . 37
. . . . . 57
. . . . . 58
. . . . . 62
. . . . . 64
. . . . . 66
. . . . . 67
. . . . . 69
. . . . . 70
. . . . . 71
. . . . . 72
. . . . . 75
. . . . . 76
. . . . . . . . . . . . . . . . . . . . . . . . . . . . . . . 78
10.1 Frequently asked questions . . . . . . . . . . . . . . . . . . . . . . . 78
10.2 Fault table . . . . . . . . . . . . . . . . . . . . . . . . . . . . . . . . . . 81
11
Index
. . . . . . . . . . . . . . . . . . . . . . . . . . . . . . . . . . . . . . . . 83
We reserve the right to make any changes due to technical modifications.
Operating instructions RC30 programmable room thermostat • Issue 02/2006
3
1
1
Introduction
Introduction
The RC30 makes it easy to operate your Buderus heating system
and forms part of the Energy Management System (EMS). The
heating system is controlled in such a way that you benefit from
optimum heating comfort and minimum energy consumption.
The RC30 is factory-preset. You can adjust these settings, such as
the heating program for example, and match them to your
requirements.
Special functions help you to save energy, without sacrificing your
personal comfort.
Your heating system offers a wealth of other useful functions,
including automatic summer/winter changeover and a holiday
function.
Function modules (accessories)
These instructions also apply to the RC30 used in conjunction with
the mixer module MM10 and low loss header module WM10 (see
also page 9). These function modules are set up by your installer
and do not need to be modified.
This device meets all requirements of applicable standards and
guidelines.
Conformity has been verified. All associated documents and the
declaration of conformity are available from the manufacturer.
We reserve the right to make any changes due to technical modifications.
4
Operating instructions RC30 programmable room thermostat • Issue 02/2006
What you should know about your heating system
2
2
What you should know about your heating system
2.1
How does the RC30 work?
The RC30 ensures comfortable heat and economical consumption
of fuel and electricity. It switches the boiler and pumps ON if DHW
(domestic hot water) or a higher room temperature are required.
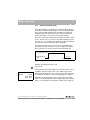
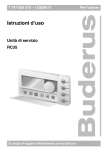
Modern heating control units calculate the temperature required
within the boiler (the so-called flow temperature) subject to the
outside temperature and the desired room temperature (set
temperature). The relationship between the outside temperature
and the flow temperature is described as the heating curve. The
lower the outside temperature, the higher the flow temperature
must be to achieve the required room temperature.
For example, if you increase the set room temperature by 2 °C, the
heating curve is raised in parallel. This increases the flow
temperature by around 6 Kelvin (one Kelvin corresponds to one
degree Celsius).
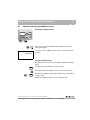
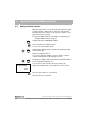
Flow temperature in °C
The gradient of the heating curve depends on the type of heating
system (e.g. radiators or underfloor heating). This will be
determined by your installer during the commissioning process.
2
1
Outside temperature in °C
Fig. 1
Heating curve (example), before (1) and after (2) increasing the
set room temperature by 2 °C
We reserve the right to make any changes due to technical modifications.
Operating instructions RC30 programmable room thermostat • Issue 02/2006
5
2
2.2
What you should know about your heating system
Control modes for the RC30
The RC30 can operate in three control modes:
–
outside temperature dependent control
–
room temperature control or
–
outside temperature control with room temperature influence
Outside temperature dependent control
With outside temperature dependent control, only the outside
temperature measured by the outside temperature sensor is taken
into account for the flow temperature level. The advantage of
outside temperature dependent control is that the overall heat
requirement of the house is considered, rather than the
temperature in a single reference room where the thermostat is
located. Room temperature fluctuations through solar gain,
occupants, open fireplaces or similar external heat sources are
then ignored.
If you use this type of control, adjust the thermostatic radiator
valves so that the required room temperature is obtained in each
room.
Room temperature control*)
A further possible RC30 method is room temperature control. The
RC30 calculates the temperature required inside the boiler or the
output required from the boiler, subject to the set and the actual
room temperature.
To be able to utilise the room temperature control, you require a
room which is representative of your whole home. All factors
influencing the temperature in this "reference room" – in which the
RC30 is located – will also apply to all other rooms. Not every
home has a room which meets these requirements. A pure room
temperature control has, in such cases, certain limitations.
Should you, for example, open a window in the room where the
room temperature is measured, the control unit will "think" that you
have opened the windows in all rooms in your home and will begin
to heat more vigorously.
*) Please note that the RC30 has to be located in the reference room and not in the boiler for this
option
We reserve the right to make any changes due to technical modifications.
6
Operating instructions RC30 programmable room thermostat • Issue 02/2006
What you should know about your heating system
2
Or conversely: You measure the temperature in a south-facing
room with different heat sources (solar or other heating sources,
e.g. an open fireplace). Now the control unit "thinks" that it is as hot
in all rooms as in the reference room; consequently the boiler
output will be severely cut back so that, for example, the northfacing rooms are too cold.
With this kind of control you will need to keep all thermostatic
radiator valves in the reference room fully open.
Outside temperature dependent control with room
temperature influence *)
The outside temperature dependent control with room temperature
influence combines the advantages of both above control modes.
The required flow temperature, which is mainly subject to the
outside temperature, can be adjusted by the room temperature
only to a limited degree. This achieves an improved maintenance
of the room temperature within the room containing the RC30,
without fully ignoring the other rooms.
With this kind of control you will also need to keep all thermostatic
radiator valves in the reference room fully open.
2.3
Why do the thermostatic radiator valves have to stay fully open?
For example, if you want to reduce the room temperature in the
reference room and you close the thermostatic valve, the flow rate
through the radiator will be reduced and, therefore, less heat is
transferred to the room. This reduces the room temperature. The
RC30 unit will endeavour to counteract the falling room
temperature by raising the flow temperature. However, raising the
flow temperature will not raise the room temperature, as the
thermostatic valve continues to limit the room temperature.
A flow temperature which is too high results in unnecessary heat
losses in boiler and pipework. At the same time, the temperature
in all other rooms without thermostatic valves increases due to the
higher boiler water temperature.
*) Please note that the RC30 has to be located in the reference room and not in the boiler for this
option
We reserve the right to make any changes due to technical modifications.
Operating instructions RC30 programmable room thermostat • Issue 02/2006
7
2
2.4
What you should know about your heating system
Why do I need a heating program?
Unlike standard controls, the RC30 offers more choice than just
ON/OFF. Modern heating systems offer a choice of heating
programs. A heating program sets the times at which the system
automatically switches between two different room temperatures.
The first setting, called „day mode“, is for when the building is
actively occupied and a higher temperature is required. The
second setting, called „night mode“ is not just for the night but for
any time when you want to maintain a lower temperature i. e. when
the building is unoccupied or when everyone is in bed at night. This
enables you to set a reduced room temperature at night or at other
times when a reduced temperature is sufficient (also known as
"night setback"). You can save a lot of energy by choosing a
heating program to match your lifestyle.
The RC30 offers four options on "night mode" for reducing the
room temperature. Your installer will select and set up one of these
options according to your requirements:
–
"OUTSIDE STOP" (also possible without remote control,
outside sensor required)
"Outside stop" switches the heating circuit according to the
outside temperature and the set frost protection temperature
(see Chapter 5.8.10 "Frost protection", page 39).
Above the frost protection temperature the heating circuit is
switched off. Below this temperature the system heats to the
set night mode temperature.
–
- "ROOM STOP" (only possible with RC30 in reference room)
"Room stop" switches the heating circuit according to the room
temperature.
Above the set room temperature the heating circuit is switched
off. Below the set room temperature the system heats to the set
night mode temperature. This function requires the RC30 to be
located in the reference room.
–
"STANDBY" (also possible without remote control)
Here the heating circuit is simply turned off in night mode. You
must activate frost protection monitoring (see Chapter 5.8.9
"Frost protection type", page 38).
We reserve the right to make any changes due to technical modifications.
8
Operating instructions RC30 programmable room thermostat • Issue 02/2006
What you should know about your heating system
2
- "REDUCED" (also possible without remote control)
Here the system heats to the set night temperature in setback
heating mode.
The heating circuit pumps operate constantly.
The heating program is only switched on in automatic mode; night
setback is not available in manual mode.
2.5
What are heating circuits?
A heating circuit describes the circuit taken by the heating water
from the boiler via the radiators and back to the boiler (Fig. 1 on
page 5). Several heating circuits may be connected to one boiler,
for example one heating circuit for supplying radiators and a further
heating circuit for supplying an underfloor heating system. In this
case, the radiators are supplied at a higher flow temperature than
the underfloor heating system.
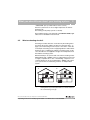
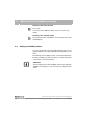
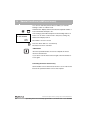
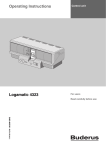
With the RC30 you can operate and control the two heating circuits
independently (Fig. 2, Item 1). If the second heating circuit is used
to supply a separate flat or area of the building, a separate room
controller RC20 can also be installed (Fig. 2, Item 2). This allows
you to operate the second heating circuit as an "independent"
system.
1
2
RC20
RC30
Fig. 2
RC30
Heating system with two heating circuits. One RC30 for both
heating circuits (1) or RC30 plus RC20 as a remote control for
the second heating circuit (2).
We reserve the right to make any changes due to technical modifications.
Operating instructions RC30 programmable room thermostat • Issue 02/2006
9
2
What you should know about your heating system
Mixer module MM10
The supply of different flow temperatures to different heating
circuits in a heating system can only be achieved if a three-way
mixing valve is installed between the boiler and the second heating
circuit. This valve is controlled by the mixer module MM10
(accessory). Using an additional temperature sensor in the flow of
the heating circuit to be supplied, sufficient cold return water is
added to the hot flow water via the three-way mixing valve to
achieve the required lower temperature.
Low loss header module WM10
It is important to note that heating circuits with three-way mixing
valves require an additional pump. This pump enables the second
heating circuit to be operated independently of the first heating
circuit. A low loss header can be used for this hydraulic decoupling
between the boiler and heating circuit. This is controlled by the
function module WM10. The WM10 can also be used for DHW
heating via a cylinder loading pump.
We reserve the right to make any changes due to technical modifications.
10
Operating instructions RC30 programmable room thermostat • Issue 02/2006
Tips on economical heating
3
3
Tips on economical heating
Here are a few tips on how to heat economically, without sacrificing
comfort, using your RC30:
z Only heat if you need warmth. Use the heating programs preset
in the RC30 or those which you have tailored to your personal
needs.
z Ventilate correctly during the cold season: Open the windows
wide three to four times per day for approx. five minutes.
Having the window slightly open all the time does not provide
fresh air changes and wastes valuable energy.
z Close the thermostatic radiator valves when the room is being
ventilated.
z Windows and doors are places where a lot of heat is lost. So
check that the doors and windows are correctly sealed. At
night, close your shutters and blinds (if installed).
z Heat in an energy-conscious manner during in spring and
autumn, and make use of the summer/winter changeover
function (see Chapter 9.10 "Setting summer/winter
changeover", page 72). In summer mode the heating is
switched off and only DHW is heated. In winter mode the
heating and DHW are activated.
z Never position large objects such as a sofa or a desk
immediately in front of the radiators (maintain a clearance of at
least 50 cm). Otherwise the heated air cannot circulate and
heat the room adequately.
z In those rooms which you occupy during the day, you can set
a room temperature of 21 °C, for example, whilst 17 °C may be
sufficient at night. You can do this using day and night modes
(see Chapter 7 "Basic functions", page 20).
z Never overheat rooms. Overheated rooms are unhealthy and
cost energy and money. If you reduce the daytime room
temperature, from 21 °C to 20 °C, for example, you will save
around six percent on your heating bill.
We reserve the right to make any changes due to technical modifications.
Operating instructions RC30 programmable room thermostat • Issue 02/2006
11
3
Tips on economical heating
z A comfortable room climate depends not only on the room
temperature but also on the relative humidity. The drier a room,
the cooler it feels. You can improve the relative humidity with
houseplants.
z You can also save energy when heating DHW by running the
circulation pump in intermittent mode only. Research has
shown that it is generally sufficient to run the DHW circulation
pump for three minutes in every 30.
z Arrange with your installer to service your heating system
annually.
We reserve the right to make any changes due to technical modifications.
12
Operating instructions RC30 programmable room thermostat • Issue 02/2006
For your safety
4
4
For your safety
The RC30 has been designed and built in accordance with
currently recognised standards and safety requirements.
However, dangers or material losses may arise if it is used
improperly.
z You should therefore only operate the heating system as
intended and when it is in perfect working order.
z Please read these instructions carefully.
z Always observe the safety instructions to prevent injury and
material losses.
4.1
Correct use
The RC30 must only be used to operate and control Buderus
heating systems with EMS (Energy Management System).
4.2
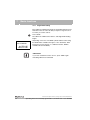
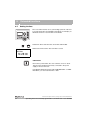
Please observe these notes
USER NOTE
z In an emergency isolate the heating system from the mains
supply using the emergency stop switch outside the boiler
room or by removing the main fuse.
z Call in your installer to remedy all faults in your heating system
immediately.
SYSTEM DAMAGE
through frost.
CAUTION!
The heating system can freeze up in cold weather if it has been
switched off.
z Leave the heating system switched ON constantly.
z In case of fault shutdown, try to remedy the fault by resetting
or notify your installer.
We reserve the right to make any changes due to technical modifications.
Operating instructions RC30 programmable room thermostat • Issue 02/2006
13
4
4.3
For your safety
Cleaning
z The RC30 should only be cleaned with a damp cloth.
4.4
Disposal
z Dispose of packaging in an environmentally responsible
manner.
z Dispose of old components in an environmentally responsible
manner.
4.5
Other notes
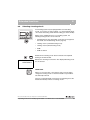
Assembly, maintenance and repairs, as well as fault diagnosis,
must only be carried out by installers.
USER NOTE
All changes and adjustments carried out on the RC30 must
correspond to the heating system requirements.
Never open the housing of the RC30.
We reserve the right to make any changes due to technical modifications.
14
Operating instructions RC30 programmable room thermostat • Issue 02/2006
First steps with your RC30
5
First steps with your RC30
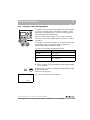
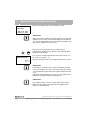
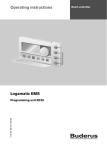
5.1
Controls
5
2
3
1
4
5
Fig. 3
Controls on the RC30
Item 1:
Temperature, percentage and summer mode display
Item 2:
Buttons for basic functions with LEDs
Item 3:
Dial for changing values and temperatures or for navigating
through the menus
Item 4:
Buttons for extended functions and special functions
Item 5:
Hinged flap covering the buttons for extended functions and
special functions
Buttons for basic functions
(Fig. 3, Item 2)
Buttons for extended functions
(Fig. 3, Item 4)
"AUT" button (Automatic)
"Display" button
"Day mode" button (normal
heating mode)
"Time" button
"Night mode" button
(reduced heating mode)
"Weekday" button (Day / Date)
"DHW" button
"Prog" button (Program)
"Heating circuit" button
"Back" button
We reserve the right to make any changes due to technical modifications.
Operating instructions RC30 programmable room thermostat • Issue 02/2006
15
5
First steps with your RC30
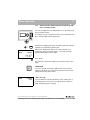
Display (Fig. 3, Item 1)
ACTUAL
ROOM TEMP
21.5°
As soon as you press a button or move the dial, the display shows
the selected value (set value). After about 2 seconds the standard
display is restored.
The standard display shows the actual room temperature. This is
the factory setting. You can also choose a different standard
display (see Chapter 8.19 "Changing the standard display",
page 55).
LEDs (Fig. 3, Item 2)
The green LEDs provide information about the current operating
status:
LED
Operating status
"AUT"
The LED lights up when automatic mode (heating
program) is active. In addition, the "Day mode" or "Night
mode" LED is illuminated.
If the holiday function is active, only the "AUT" button
LED is illuminated.
"Day
mode"
The LED lights up in normal heating mode (day mode).
"Night
mode"
The LED lights up in reduced heating mode (night
mode).
The LED lights up if the DHW temperature falls below
the set value.
"DHW"
The LED is off if the DHW temperature is within the
desired temperature range or if there is no DHW heating
function installed in the EMS.
The LED flashes when hot water is being heated by
means of the "DHW single loading" function.
Tab. 1
Operating status
Flap (Fig. 3, Item 5)
To open the flap, take hold of the recessed grip on the left-hand
side and pull the flap towards you. Opening the flap activates a
switch allowing you to use the extended functions and special
functions.
We reserve the right to make any changes due to technical modifications.
16
Operating instructions RC30 programmable room thermostat • Issue 02/2006
First steps with your RC30
5.2
5
Quick reference guide
For funktions press and hold button, turn dail to select value, release button.
Setting temperatures (Basic functions, Chapter 7, page 20)
Buttons
Flap closed
Function
Setting
Factory
setting
Range
+
Temperature for
day mode
21 °C
11 – 30 °C
+
Temperature for
night mode
17 °C
10 – 29 °C
+
DHW temperature
60 °C
30 – 60(80) °C
System
Return to Automatic mode after changing the day or night
temperature
Extended functions (Chapter 8, page 30)
Buttons
Function
Page
+
Changing the standard display
page 55
+
Setting the time
page 34
+
Setting the date
page 33
+
Selecting a heating program
page 39
+
Select: heating circuit, DHW, solar
page 35
Flap open
Back to previous level (menu), settings are retained
We reserve the right to make any changes due to technical modifications.
Operating instructions RC30 programmable room thermostat • Issue 02/2006
17
5
First steps with your RC30
Additional menu (Chapter 9, page 56)
Buttons
+
+
Press the "Time" and "weekday"
buttons at the same time to open
the additional menu.
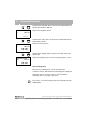
5.3
Menu
Menu
HOLIDAY
THERM DISINF
BNK HOLIDAY
STD DISPLAY
CALIBRATION
KEY LOCK
PARTY
SU/WI CHANGE
PAUSE
SU/WI TIME
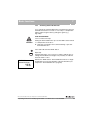
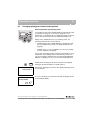
Switching on and off
The RC30 is powered by the heating system and is permanently
switched on. It is only switched off if the heating system is switched
off, e.g. for maintenance purposes.
The power consumption is designed for this constant operation
and at 0.3 W is very low (0.6 W with background lighting).
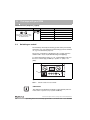
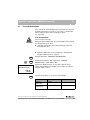
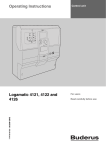
To switch the heating system on or off, set the ON/OFF switch on
the base controller (Fig. 4, Item 1) to position "1" (ON) or "0"
(OFF).
1
Fig. 4
Base controller BC10
Item 1:
ON/OFF switch on base controller
USER NOTE
The settings in the RC30 are retained for approximately 10 hours
in the event of a power cut (or system shutdown).
We reserve the right to make any changes due to technical modifications.
18
Operating instructions RC30 programmable room thermostat • Issue 02/2006
Language
6
6
Language
You can choose the language in which messages on the RC30 are
displayed.
Proceed as follows:
z Open the flap (by pulling the recessed grip on the left).
Simultaneously press the "Display", "Heating circuit" and "Back"
buttons.
SERVICE MENU
LANGUAGE
The main service level menu is displayed, indicated by "SERVICE
MENU".
Press the "Display" button to select "SERVICE MENU
LANGUAGE".
Hold down the "Display" button and select the required language
with the dial.
LANGUAGE
ENGLISH
The selected language is displayed.
Release the "Display" button. The language selection is saved.
All messages will now be displayed in the chosen language.
z Press the "Back" button twice or close the flap to return to the
standard display.
We reserve the right to make any changes due to technical modifications.
Operating instructions RC30 programmable room thermostat • Issue 02/2006
19
7
7
Basic functions
Basic functions
This chapter describes how to change room and DHW
temperatures, the advantages of automatic mode, how to make
effective use of manual mode, etc.
The basic functions are controlled by pressing and holding a button
on the right-hand side of the RC30 and turning the dial.
7.1
Changing the room temperature directly
If it is too cold in the house in general, increase the room
temperature on the RC30 and leave the thermostatic radiator
valves unaltered.
Set the required room temperature by turning the dial. (Note: To do
this the RC30 flap must be closed.)
USER NOTE
If your heating system has several heating circuits, you must
select the correct heating circuit first (see Chapter 8.6 "Selecting
a heating circuit", page 35). Only then can you set the room
temperature.
7.2
Selecting the operating mode
You can operate the RC30 in two ways:
–
in automatic mode
–
in manual mode
We reserve the right to make any changes due to technical modifications.
20
Operating instructions RC30 programmable room thermostat • Issue 02/2006
Basic functions
7
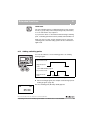
7.2.1
Selecting automatic mode
Generally, buildings are heated less at night than during the day.
In automatic mode the RC30 changes over automatically between
day mode (standard heating mode) and night mode (reduced
heating mode). This means that you do not have to adjust the
thermostatic radiator valves every morning and evening.
The times at which the heating system changes from day to night
mode – and vice versa – are factory-set via the heating program.
However, you or your installer can modify this setting (see Chapter
8.9 "Selecting a preset heating program", page 40).
The heating program raises or lowers the room temperature at
fixed times. The time at which the system changes from night to
day mode (and vice versa) is known as the "switching point".
Day "Normal" mode
Night "Reduced"
mode
Fig. 5
21 °C
17 °C
5:30
22:00
Changeover between day and night mode at fixed times
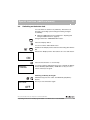
Example: Activating automatic mode
Press "AUT".
The LED in the "AUT" button lights up; automatic mode is active.
HEAT CIRC 1
AUTO
DAY
21.0°
In addition, either the "Day mode" or the "Night mode" LED is
illuminated. This depends on the set times for day and night mode
(see Chapter 2.4 "Why do I need a heating program?", page 8).
Depending on which heating circuit you have selected, "HEAT
CIRC 2" or "RC30 HEATCIR" may be displayed instead of "HEAT
CIRC 1" (see Chapter 8.6 "Selecting a heating circuit", page 35).
We reserve the right to make any changes due to technical modifications.
Operating instructions RC30 programmable room thermostat • Issue 02/2006
21
7
Basic functions
USER NOTE
During spring and autumn, you may find that your home feels too
cold, even though the heating system is in summer mode (DHW
heating only) because of the outside temperature. In such a case
choose manual mode to run the heating. The heating is then
permanently on and must be turned off by pushing the
"AUT" button.
You can also change the setting for automatic summer/winter
changeover (see Chapter 9.10 "Setting summer/winter
changeover", page 72).
We reserve the right to make any changes due to technical modifications.
22
Operating instructions RC30 programmable room thermostat • Issue 02/2006
Basic functions
7
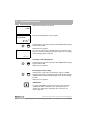
7.2.2
Selecting manual mode
For example, if you want the heating to run for longer in the
evening or earlier in the morning, you can also select the day and
night mode manually. There are two temperatures for manual day
and night mode. You can use manual day mode to run the heating
on cooler days,when the system is operating in summer mode.
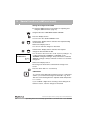
Press the "Day mode" button to switch to manual mode.
HEAT CIRC 1
MAN
DAY
21.0°
The LED in the "Day mode" button lights up. Now your heating
system is set in constant day mode (standard heating mode).
You can set the room temperature using the dial.
Press the "Night mode" button to switch to manual mode.
HEAT CIRC 1
MAN
NIGHT
The LED in the "Night mode" button lights up. Now your heating
system is set in constant night mode (setback heating mode), and
operates at a lower room temperature.
17.0°
USER NOTE
If you have selected manual mode, other automatic functions will
also be switched off, such as the heating program (i.e. no night
setback of the room temperature) or summer/winter changeover.
USER NOTE
To return to automatic mode, press "AUT".
We reserve the right to make any changes due to technical modifications.
Operating instructions RC30 programmable room thermostat • Issue 02/2006
23
7
7.3
Basic functions
Setting the room temperature
The room temperature applies to the currently active heating
mode, i.e. day or night mode. The currently active heating mode is
indicated by an illuminated green LED.
7.3.1
Setting the room temperature for the current operating
mode
Condition: The RC30 flap is closed.
You are currently in automatic "Day" mode and would like to alter
the room temperature.
Set the required room temperature by turning the dial. Turning the
dial clockwise increases the value, turning anti-clockwise reduces
the value.
The newly selected room temperature will be saved after approx.
2 seconds. Then the selected standard display will be shown
again.
SET
ROOM TEMP
21.0°
To adjust the room temperature with the flap open, you must press
either the "Day mode" or "Night mode" button whilst turning the
dial.
USER NOTE
Changing the set room temperature moves the heating curve up
or down in parallel (see "How does the RC30 work?", page 5).
USER NOTE
Any adjustment applies to all heating circuits allocated to the
RC30 (see Chapter 8.7 "Changing settings for another heating
circuit", page 37).
We reserve the right to make any changes due to technical modifications.
24
Operating instructions RC30 programmable room thermostat • Issue 02/2006
Basic functions
7
7.3.2
Setting the room temperature for an operating mode
that is currently inactive
You can also adjust the room temperature for an operating mode
that is currently inactive.
For example, you are currently in automatic "Day" mode and would
like to alter the night setback temperature.
+
HEAT CIRC 1
MAN
NIGHT
Hold down the "Night mode" button and at the same time select the
required room temperature with the dial.
Release the "Night mode" button. The newly selected room
temperature will be saved after approx. 2 seconds. Then the
standard display will be shown again.
17.0°
Press "AUT".
The LED in the "AUT" button lights up; automatic mode is active
again.
USER NOTE
If you are currently in automatic "Night mode" and you wish to
adjust the day mode, proceed as described above, but instead
hold down the "Day mode" button.
MAN
NIGHT
OFF
"OFF" message
If your installer has selected "Shutdown" as the setback type, a
room temperature cannot be set for night mode (see "Why do I
need a heating program?", page 8).
We reserve the right to make any changes due to technical modifications.
Operating instructions RC30 programmable room thermostat • Issue 02/2006
25
7
7.4
Basic functions
Heating domestic hot water
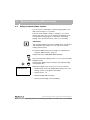
The RC30 also allows you to heat the DHW in an energyconscious manner. With the factory setting, DHW heating begins
automatically 30 minutes before day mode starts the first heating
circuit, and ends when the last circuit switches to night mode (see
Fig. 6).
Outside the times set in the heating program, DHW heating is
switched off, i.e. no DHW is heated in night mode.
Heating circuit 1
Day "normal" mode
Night "reduced"
6:30
mode
Heating circuit 2
23:00
Day "normal" mode
Night "reduced"
6:00
mode
22:00
DHW
Day "normal"
mode
-0:30
Night "reduced"
23:00
5:30
mode
Fig. 6
DHW heating according to the heating circuits
The DHW temperature for day mode is factory-set to 60 °C. The
DHW cylinder is loaded once in the morning before the start of
heating and is only reloaded if the DHW temperature falls 5 °C
below the set value (to conserve energy).
USER NOTE
If the green LED in the "DHW" button lights up, the DHW
temperature has fallen below the set value.
We reserve the right to make any changes due to technical modifications.
26
Operating instructions RC30 programmable room thermostat • Issue 02/2006
Basic functions
7
USER NOTE
In a modern Buderus DHW cylinder, the water only cools down at
a rate of around 0.5 °C per hour when not being drawn, i.e.
reloading only occurs after 10 hours. If necessary you can
manually reload the DHW to 60 °C (see Chapter 7.4.2 "Single
DHW loading", page 28).
If you regularly need large amounts of hot water in the evening, you
can also set up a separate DHW program (see Chapter 8.16
"Entering a DHW program", page 51).
7.4.1
Setting the DHW temperature
RISK OF SCALDING
The factory-set DHW temperature is 60 °C. There is a risk of
scalding at the taps if the temperature is set to above 60 °C.
WARNING!
z If the DHW temperature is set to above 60 °C, you should only
draw off mixed hot and cold water.
You can check or change the DHW temperature setting:
+
Hold down the "DHW" button and select the required DHW
temperature with the dial (max. 80 °C).
Release the "DHW" button. The new DHW temperature setting is
saved immediately. Then the standard display is shown again.
SET
DHW TEMP
60°
SET
DHW TEMP
BLOCK
"BLOCK" message
If the display reads "SET DHW TEMP – BLOCK", the DHW
temperature can only be changed via the boiler and not via the
RC30.
z Check the setting on the BC10 boiler base controller. Select the
setting "Aut" using the dial for the DHW temperature.
We reserve the right to make any changes due to technical modifications.
Operating instructions RC30 programmable room thermostat • Issue 02/2006
27
7
Basic functions
7.4.2
Single DHW loading
If the LED in the "DHW" button lights up, the DHW temperature has
fallen below the set value. Should you require a large amount of
hot water, proceed as follows:
Press "DHW".
The LED in the "DHW" button flashes, and single DHW heating
begins.
DHW
SGL LOADING
ACTIVE
Depending on the size of the DHW cylinder and the boiler rating,
the DHW will be available after approx. 10 to 30 minutes. With
instantaneous water heaters or combination boilers, DHW is
available almost immediately.
USER NOTE
If you have started this function in error, press "DHW" again.
Reloading will then be terminated.
We reserve the right to make any changes due to technical modifications.
28
Operating instructions RC30 programmable room thermostat • Issue 02/2006
Basic functions
7
7.4.3
Activating thermal disinfection
If you activate the "Thermal disinfection" [pasteurisation] function,
the DHW is heated once a week or once a day to a temperature
which is high enough to destroy pathogenic agents (e.g.
legionella).
RISK OF SCALDING
WARNING!
from hot water at the taps.
During the thermal disinfection process the DHW can be heated
to a temperature above 60 °C.
z Only draw off mixed hot and cold water during or just after
thermal disinfection.
Press and hold down the "DHW" button.
Open flap.
Using the dial select "Yes". Then in accordance with the factory
settings thermal disinfection begins every Tuesday at 1.00 and
heats the water to 70 °C.
THERMAL
DISINFECTION
Release the "DHW" button. Thermal disinfection does not begin
immediately but on the specified day at the specified time (see
Chapter 9.7 "Thermal disinfection", page 69).
YES
We reserve the right to make any changes due to technical modifications.
Operating instructions RC30 programmable room thermostat • Issue 02/2006
29
8
8
Extended functions
Extended functions
The extended functions allow you to access other operating levels
in which you can change the presets for your heating system.
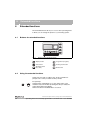
8.1
Buttons for extended functions
Fig. 7
8.2
Buttons for the extended functions
"Display" button
"Prog" button (Program)
"Time" button
"Heating circuit" button
"Weekday" button
(day / date)
"Back" button
Using the extended functions
At this level, proceed according to the "Push, hold and turn"
principle. The control procedure is always similar:
z Open flap.
+
Hold down the required button, e.g. the "Time" button, and
simultaneously turn the dial. By turning the dial you modify the
values which flash in the display.
Release the button. Modified values are saved.
We reserve the right to make any changes due to technical modifications.
30
Operating instructions RC30 programmable room thermostat • Issue 02/2006
Extended functions
8.3
8
Displaying operating menu
You can display and check the various operating values of the
boiler, the selected heating circuit and the system.
z Open flap.
Turn the dial clockwise. The following operating values are
displayed in sequence:
Setting
Explanation
"ACTUAL ROOM TEMP"
Actual room temperature
"SET ROOM TEM"
Set room temperature and operating
mode
"OP MODE"
Set operating mode and heating
circuit
"BOILER
TEMPERATURE"
Actual boiler temperature
"OUTSIDE
TEMPERATURE"
Actual temperature outside the
building
"ACTUAL DHW TEMP" 1)
"SET DHW TEMP"
1)
Actual DHW temperature
Set DHW temperature
"OP MODE
DHW" 1)
Selected mode for DHW
"DHW LOADING" 1)
Cylinder loading pump is on or off (i.e.
DHW is being heated)
"DHW CIRC" 1)
Circulation pump is on or off
"FLOW TEMPERATURE"
Actual heating circuit flow
temperature of heating circuit No. 2 (if
installed)
"DATE"
Current date
"TIME"
Current time
Tab. 2
1)
Operating values which can be displayed
DHW operating values can only be displayed if a DHW circuit is installed.
We reserve the right to make any changes due to technical modifications.
Operating instructions RC30 programmable room thermostat • Issue 02/2006
31
8
Extended functions
Setting
Explanation
"HOURS RUN"
Burner running time
Stage 1
Stage 2 (if available)
"FLUE GAS
TEMPERATURE"
Actual flue gas temperature (if
additional sensor fitted)
"CONTROL DEV USED"
Control device for your heating
system
"MODE USED"
Current programming unit for your
heating system (RC30 / RC20)
Tab. 2
1)
Operating values which can be displayed
DHW operating values can only be displayed if a DHW circuit is installed.
We reserve the right to make any changes due to technical modifications.
32
Operating instructions RC30 programmable room thermostat • Issue 02/2006
Extended functions
8.4
8
Setting the date
The correct date must be set on your heating system in order for it
to work properly. After an extended power failure, for example, you
will therefore have to reset the date on the RC30.
+
Hold down "Weekday" and select the current day with the dial.
The day of the week is automatically changed.
Release the "Weekday" button.
+
Hold down "Weekday" again and select the current month with the
dial.
Release the "Weekday" button.
+
DATE INPUT
WEDNESDAY
Hold down "Weekday" again and select the current year with the
dial.
Release the "Weekday" button. The new date is saved.
22.05.02
USER NOTE
If no day is displayed, an invalid date has been entered, such as
31.02.03. This date is not saved.
We reserve the right to make any changes due to technical modifications.
Operating instructions RC30 programmable room thermostat • Issue 02/2006
33
8
8.5
Extended functions
Setting the time
The correct time must be set on your heating system in order for it
to work properly. After an extended power failure, for example, you
will therefore have to reset the time on the RC30.
Hold down "Time" and select the current time with the dial.
+
Release the "Time" button. The new time is saved.
TIME
SETTING
14:28:00
USER NOTE
Even after a power failure, the clock continues to run for about
10 hours if the RC30 was previously connected to the power
supply for at least six hours.
If the display with the flap open reads "TIME NOT SET" or "DATE
NOT SET", you must reset the time or date.
We reserve the right to make any changes due to technical modifications.
34
Operating instructions RC30 programmable room thermostat • Issue 02/2006
Extended functions
8.6
8
Selecting a heating circuit
Your heating system may be equipped with several heating
circuits. If you want to change a setting – e.g. the heating program
– first select the heating circuit with the setting you wish to modify.
Subject to the equipment level of your heating system, the
following heating circuits can be selected:
+
HEAT CIRC
HEAT CIRC 1
–
RC30 heating circuits (all heating circuits that are assigned to
the RC30, see "RC30 heating circuits" page 36)
–
Heating circuit 1 (unmixed heating circuit)
–
Heating circuit 2 (mixed heating circuit)
–
DHW
–
DHW circulation
Hold down the "Heating circuit" button and select the required
heating circuit with the dial.
Release the "Heating circuit" button. The displayed heating circuit
is now selected.
USER NOTE
When you close the flap, or five minutes after your last setting
change, the heating circuit for which the RC30 is responsible is
automatically selected.
If there is a separate RC20 connected for each heating circuit, the
RC30 automatically switches to heating circuit 1.
We reserve the right to make any changes due to technical modifications.
Operating instructions RC30 programmable room thermostat • Issue 02/2006
35
8
Extended functions
RC30 heating circuits
Several heating circuits can be controlled at the same time using
the RC30. These are grouped together under the term "RC30
heating circuits".
"RC30 HEATCIR" is displayed as a selection option when you set
one of the following functions:
–
Operating mode
–
Required room temperature
–
Holiday
–
Bank holiday
–
Party
–
Pause
–
Summer/winter changeover
Even if the heating circuits are grouped together, you can still set
the functions separately for each circuit. Exception: The operating
mode and the required room temperature can only be entered for
the "RC30 HEATCIR" together.
A heating program can only be selected separately for each
heating circuit.
USER NOTE
You cannot select "RC30 HEATCIR" if the heating system only
has one heating circuit or has one programmer per heating circuit.
Your installer must have assigned the RC30 as the control for
both heating circuit 1 and heating circuit 2.
We reserve the right to make any changes due to technical modifications.
36
Operating instructions RC30 programmable room thermostat • Issue 02/2006
Extended functions
8.7
8
Changing settings for another heating circuit
Room temperature and operating mode
Your heating system may be equipped with several heating circuits
(see Section 2.5, page 9). If you want to change the room
temperature or operating mode for a different heating circuit than
the one last selected, first select the required heating circuit.
Subject to the equipment level of your heating system, the
following heating circuits can be selected:
–
RC30 heating circuits ("RC30 HEATCIR", all heating circuits
that are assigned to the RC30, see "RC30 heating circuits"
page 36)
–
Heating circuit 1 or 2 (not available if more than one heating
circuit is assigned to the RC30)
If more than one heating circuit is assigned to the RC30, the room
temperature and operating mode for these heating circuits can
only be set together. Otherwise the message "RC30 HEATCRC
SELECT" is displayed. In such a case select "RC30 HEATCIR".
+
HEAT CIRC
HEAT CIRC 2
ACTUAL
ROOM TEMP
Hold down the "Heating circuit" button and select the required
heating circuit with the dial (here: "HEAT CIRC 2").
Release the "Heating circuit" button. The displayed heating circuit
is now selected.
As soon as heating circuit has been selected, the display returns
to the standard display.
21.5°
We reserve the right to make any changes due to technical modifications.
Operating instructions RC30 programmable room thermostat • Issue 02/2006
37
8
Extended functions
Automatic mode
Hold down the "AUT" button and select the room temperature with
the dial (here: "20 °C") which is required for the heating circuit.
+
HEAT CIRC 2
AUTO
DAY
20.0°
Release the button to store your input.
The heating circuit is now in automatic mode and the day room
temperature has been set to 20 °C. Then the selected standard
display will be shown again.
Manual mode
Press either the "Day mode" or "Night mode" button instead of the
"AUT" button:
Hold down the "Day mode" button and select the room
temperature with the dial (here: "20 °C") which is required for the
heating circuit.
+
HEAT CIRC 2
MAN
DAY
The LED in the "Day mode" button lights up. Now the heating
circuit is set in constant day mode (standard heating mode).
20.0°
Hold down the "Night mode" button and select the room
temperature with the dial (here: "16 °C") which is required for the
heating circuit.
+
HEAT CIRC 2
MAN
NIGHT
The LED in the "Night mode" button lights up. Now the heating
circuit is set in constant night mode (reduced heating mode), and
operates at a lower room temperature.
16.0°
We reserve the right to make any changes due to technical modifications.
38
Operating instructions RC30 programmable room thermostat • Issue 02/2006
Extended functions
8.8
8
Selecting and modifying a heating program
What is a heating program?
A heating program provides the automatic changeover of
operating mode (day and night mode) at fixed times. In the factory
setting the heating program also sets the times for DHW heating
and operation of the circulation pump. You can also set up a
separate DHW or circulation program.
Before you select a heating program, consider the following:
–
At what time in the morning do you want your home to be
warm? Does this time also depend on the day of the week?
–
Are there days when you don't want to heat during the day?
–
From what time in the evenings do you no longer need
heating? This too may depend on the day of the week.
With the RC30, Buderus offers eight different, pre-programmed
heating programs for direct selection.
USER NOTE
Check after commissioning, whether the selected heating
program suits your lifestyle. If this is not the case, several options
are available for matching the heating program to your individual
requirements so as to optimise heating comfort and energy
consumption.
Time taken to heat up the home
The time taken for your heating system to heat up individual rooms
may vary. This will be subject to the outside temperature, the
building insulation and the drop in room temperature.
The "Optimisation " function of the RC30 calculates the various
heat-up times. Ask your installer whether he has activated this
function. If he has, all you need to do is enter the times at which
your home should be warm.
We reserve the right to make any changes due to technical modifications.
Operating instructions RC30 programmable room thermostat • Issue 02/2006
39
8
8.9
Extended functions
Selecting a preset heating program
The RC30 comes with eight different preset heating programs. See
the next page for a summary of the time settings for the preset
heating programs.
Please check which heating program best meets your
requirements. In particular, check the number of switching points
and then the times. The "FAMILY" program is factory pre-set.
Each programme can be adjusted or you can enter a specific
programme to meet your exact needs.
Select a heating circuit (see Chapter 8.6 "Selecting a heating
circuit", page 35).
Press and hold down the "Prog" button.
+
PROG SELECT
FAMILY
Initially the heating circuit for which you want to select a heating
program will be displayed. Two seconds later the name of the
currently set heating program will be displayed.
Select the desired heating program using the dial.
Release the "Prog" button. The newly selected heating program is
stored and the first switching point is displayed.
Press "Back". The display returns to the standard display.
USER NOTE
The selected heating program is only effective if automatic mode
is set (see Chapter 7.2.1 "Selecting automatic mode", page 21).
We reserve the right to make any changes due to technical modifications.
40
Operating instructions RC30 programmable room thermostat • Issue 02/2006
Extended functions
8
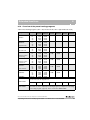
8.10 Overview of the preset heating programs
Tab.3 Preset heating programs ("On" = day "Normal" mode, "Off" = night "Reduced" mode)
ON
Normal
OFF
Reduced
8:30
8:30
23:30
22:00
12:00
12:00
22:00
23:00
6:00
6:00
6:30
7:00
11:30
11:30
23:30
22:00
16:00
15:00
22:00
23:00
Mo–Th
Fr
Sa
Su
6:00
6:00
6:00
7:00
8:00
8:00
23:00
22:00
11:30
11:30
13:00
23:00
"SINGLES"
Mo–Th
Fr
Sa
Su
6:00
6:00
7:00
8:00
8:00
8:00
23:30
22:00
16:00
15:00
22:00
23:00
"SENIORS"
Mo–Su
5:30
22:00
Program name
"FAMILY"
"EARL
MORNING"
Early shift work
"EVENING"
Late shift work
"MORNING"
Part-time work in
the morning
"AFTERNOON"
Part-time work in
the afternoon
"MID DAY"
Lunch at home
Day
ON
Normal
OFF
Reduced
Mo–Th
Fr
Sa
Su
5:30
5:30
6:30
7:00
22:00
23:00
23:30
22:00
Mo–Th
Fr
Sa
Su
4:30
4:30
6:30
7:00
22:00
23:00
23:30
22:00
Mo–Fr
Sa
Su
6:30
6:30
7:00
23:00
23:30
23:00
Mo–Th
Fr
Sa
Su
5:30
5:30
6:30
7:00
Mo–Th
Fr
Sa
Su
ON
Normal
OFF
Reduced
17:00
22:00
You can enter your own program here:
"NEW PROG"
"OWN PROG"
If none of the preset heating programs suit you, you may alter it, have it changed by
your installer or enter a completely new heating program (see Chapter 8.12 "Creating
a new heating program", page 45). This is stored under "OWN PROG".
We reserve the right to make any changes due to technical modifications.
Operating instructions RC30 programmable room thermostat • Issue 02/2006
41
8
Extended functions
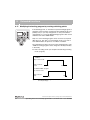
8.11 Modifying the heating program by moving switching points
If the switching points, i.e. the times in a preset heating program at
which the system changes over between day and night mode, only
partially suit you, you may change them, or ask your installer to
change them for you. The modified heating program is then saved
under the new name "OWN PROG".
Only one custom heating program can be stored for each period
(Mon-Thur, Fri, Sat, Sun), for each heating circuit. If you enter a
new "OWN PROG", the previous one will be overwritten.
The example below (Fig. 8) shows how the switching points of the
"FAMILY" heating program can be changed for the days Monday
to Thursday.
z Select a heating circuit (see Chapter 8.6 "Selecting a heating
circuit", page 35).
"FAMILY"
Day "normal" mode
Night "reduced"
mode
5:30
22:00
New "OWN PROG" program
Day "normal" mode
Night "reduced"
mode
Fig. 8
6:00
23:00
Changing the switching points from 5:30 to 6:00 and from 22:00
to 23:00 (example)
We reserve the right to make any changes due to technical modifications.
42
Operating instructions RC30 programmable room thermostat • Issue 02/2006
Extended functions
+
PROG SELECT
FAMILY
SWITCH POINT
ON
MO
8
Hold down the "Prog" button and select the required heating
program with the dial.
Release the "Prog" button.
The first switching point (Monday, 05:30) appears.
05:30
+
Hold down the "Time" button and select the required time with the
dial. Example: "06:00".
Release the "Time" button. The new time for the "On" [start "day
mode"] switching point is now saved.
Continue to turn the dial until the next switching point is displayed.
The "Off" [start "night mode"] switching point for Monday then
appears. Now you can modify the time for the "Off" switching point.
+
Hold down the "Time" button and select the required time with the
dial. Example: "23:00".
Release the "Time" button. The new time for the "Off" switching
point is now saved.
–
To add more switching points, refer to section 8.13
–
To delete switching points refer to section 8.14
We reserve the right to make any changes due to technical modifications.
Operating instructions RC30 programmable room thermostat • Issue 02/2006
43
8
Extended functions
Next switching point
Continue to turn the dial until the next switching point is displayed.
The next switching point (Tuesday, 05:30) appears.
Change these switching points to 6:00 and 23:00 too. Continue to
enter the new switching points in this way for the days up to and
including Thursday. Now the system will heat from 6:00 to 23:00
from Monday to Thursday.
Press "Back". The modified heating program is stored under the
name "OWN PROG". Any previous own program will be
overwritten.
USER NOTE
You can change the day of the week by pressing "Weekday"
instead of "Time".
You can change the switch state ("On"/"Off") by pressing
"Display" instead of "Weekday" or "Time". The switch state
determines the operating mode: "On" = day mode, "Off" = night
mode.
Make sure that there is an OFF switching point for every ON
switching point so that the heating system can also switch back to
night mode.
We reserve the right to make any changes due to technical modifications.
44
Operating instructions RC30 programmable room thermostat • Issue 02/2006
Extended functions
8
8.12 Creating a new heating program
You can also set up a new heating program that is tailored entirely
to your personal requirements. The RC30 offers blocks of days,
which makes programming easier. The new heating program is
stored under the name "OWN PROG".
Only one custom heating program can be stored. Per heating
circuit, if you enter a new "OWN PROG", the previous one will be
overwritten.
For example, you want the heating to run on Monday to Thursday
from 05.00 to 21.00, on Friday from 07.00 to 22.00 and on
Saturday and Sunday from 09.00 to 23.00.
You can choose from the following input options:
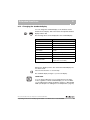
Input
Input range
Weekday
Mo, Tu, We, Th, Fr, Sa, Su, Mo–Th, Mo–Fr,
Mo–Su, Sa–Su
Time
00:00 – 23:50
Operating mode (switch
state)
"On" = day mode
"Off" = night mode
Tab. 3
Overview of the input options for a new heating program
z Select a heating circuit (see Chapter 8.6 "Selecting a heating
circuit", page 35).
+
Hold down the "Prog" button and select the "NEW PROG" heating
program with the dial.
Release the "Prog" button.
SWITCH POINT
-------
You can now enter the first switching point.
--:--
We reserve the right to make any changes due to technical modifications.
Operating instructions RC30 programmable room thermostat • Issue 02/2006
45
8
Extended functions
Hold down the "Day/Date" button and select the required day block
with the dial. Example: "MO–TH".
+
SWITCH POINT
---MO-TH
Release the "Day/Date" button.
--:-Hold down the "Time" button and select the required time with the
dial. Example: "05:00".
+
SWITCH POINT
---MO-TH
Release the "Time" button.
05:00
Hold down the "Display" button and select the "ON" switch state
with the dial.
+
SWITCH POINT
ON
MO-TH
Release the "Display" button. The new switching point is stored.
05:00
Next switching point
Enter the next switching point, an OFF switching point.
Continue to turn the dial until the next switching point is displayed.
Repeat the steps as necessary until you have entered the
switching points for every day of the week.
Press "Back". Your new heating program is stored under the name
"OWN PROG".
We reserve the right to make any changes due to technical modifications.
46
Operating instructions RC30 programmable room thermostat • Issue 02/2006
Extended functions
8
USER NOTE
The next switching point is not displayed until you have entered
the day or group of days, time and operating mode (switch state).
You can enter them in any sequence.
If you press the "Back" or "AUT" button whilst entering a switching
point, a switching point that has been partially entered will be lost.
Make sure that you enter an OFF switching point for every ON
switching point so that the heating system can also switch back to
night mode.
8.13 Adding switching points
You can also add one or more switching points to an existing
heating program.
"FAMILY"
Day "Normal" mode
Night "Reduced"
mode
5:30
22:00
New "OWN PROG" program
Day "Normal" mode
Night "Reduced"
mode
Fig. 9
5:30
10:00
13:00
22:00
Adding switching points to interrupt a heating phase
z Select a heating program (see Chapter 8.9 "Selecting a preset
heating program", page 40).
SWITCH POINT
ON
MO
The first switching point (Monday, 05:30) appears.
05:30
We reserve the right to make any changes due to technical modifications.
Operating instructions RC30 programmable room thermostat • Issue 02/2006
47
8
Extended functions
Turn the dial anti-clockwise until the display illustrated below
appears.
SWITCH POINT
-------
Enter the switching point (see Chapter 8.12 "Creating a new
heating program", page 45).
--:-USER NOTE
If you have assigned all 42 switching points, the "SWITCH
POINT" display no longer appears. You cannot enter any more
switching points.
8.14 Deleting switching points
You can delete individual switching points in a heating program.
"SINGLES"
Day "Normal" mode
Night "Reduced"
mode
6:00
8:00
16:00
22:00
New "OWN PROG" program
Day "Normal" mode
Night "Reduced"
mode
Fig. 10
6:00
8:00
Deleting switching points at 16:00 and 22:00
z Select a heating program (see Chapter 8.9 "Selecting a preset
heating program", page 40).
Using the dial select the first switching point to be deleted.
Example: "16:00".
We reserve the right to make any changes due to technical modifications.
48
Operating instructions RC30 programmable room thermostat • Issue 02/2006
Extended functions
SWITCH POINT
ON
MO
8
The first switching point (Monday, 16:00) appears.
16:00
+
Simultaneously press the "Display" and "Heating circuit" buttons.
SWITCH POINT
DELETE
On the display all the eights appear and then disappear. When all
the eights disappear, the selected switching point has been
deleted.
888888
Release the "Display" and "Heating circuit" buttons.
USER NOTE
Make sure that you always delete both an ON switching point and
an OFF switching point. Otherwise the heating system will remain
in day mode at night, for example (Fig. 11).
"SINGLES"
Day "Normal"
mode
Night "Reduced"
mode
6:00
8:00
16:00
22:00
New "OWN PROG" program
Day "Normal"
mode
Night "Reduced"
mode
Fig. 11
6:00
8:00
16:00
Incomplete deletion of switching points
We reserve the right to make any changes due to technical modifications.
Operating instructions RC30 programmable room thermostat • Issue 02/2006
49
8
Extended functions
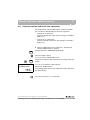
8.15 Setting the operating mode for domestic hot water
This allows you to change the DHW temperature in the DHW
cylinder.
Hold down the "Heating circuit" button and select "DHW" with the
dial.
+
Release the "Heating circuit" button.
HEAT CIRC
DHW
Then the standard display will be shown again.
ACTUAL
ROOM TEMP
21.5°
Choose the operating mode you require for DHW heating by
pressing a button:
Button
DHW operating mode
"AUT"
"DHW AUTO DAY" (automatic mode)
In the factory setting, DHW heating begins 30 minutes
before the day mode of the first heating circuit, and ends
with the beginning of night mode of the last heating
circuit. The "DAY" or "NIGHT" display indicates the
current operating status, i.e. DHW is switched on or off.
Alternatively, you can enter a separate DHW program.
"Day
mode"
"DHW CONSTANT OP"
The water inside the DHW cylinder is constantly
maintained at the set temperature.
"Night
mode"
"DHW OFF"
DHW heating is switched OFF. You can start DHW
heating at any time by pressing the "DHW" button (see
Chapter 7.4.2 "Single DHW loading", page 28).
Tab. 4
DHW operating mode
We reserve the right to make any changes due to technical modifications.
50
Operating instructions RC30 programmable room thermostat • Issue 02/2006
Extended functions
8
Approximately one second after pressing the button, the display
returns to the standard display.
USER NOTE
In automatic mode, the DHW temperature is reduced when all
heating circuits are in night mode (see Chapter 7.2.1 "Selecting
automatic mode", page 21) or if you have entered a separate
DHW program.
8.16 Entering a DHW program
In the factory setting, the ON and OFF times for DHW heating are
linked to the chosen heating program. This ensures that hot water
is available during the heating phases (day mode).
If you want to enter a separate DHW program, we recommend
loading the DHW cylinder once in the morning before heating
begins and possibly reloading it once in the evening if further hot
water is required (see Fig. 12). This will allow you to reduce your
energy consumption even more.
Day "normal" mode
Night "Reduced"
mode
Fig. 12
60 °C
OFF
5:30
9:00
18:00
21:00
Example: DHW heating
USER NOTE
Should you need additional hot water, you can reload it for a short
time (see Chapter 7.4.2 "Single DHW loading", page 28).
Entering a DHW program
+
Hold down the "Heating circuit" button and select "DHW" with the
dial.
We reserve the right to make any changes due to technical modifications.
Operating instructions RC30 programmable room thermostat • Issue 02/2006
51
8
Extended functions
Release the "Heating circuit" button.
HEAT CIRC
DHW
Then the standard display is shown again.
ACTUAL
ROOM TEMP
21.5°
Hold down the "Prog" button and select the "NEW PROG" heating
program with the dial.
+
Release the "Prog" button.
SWITCH POINT
-------
You can now enter the first switching point. Proceed in the same
way as for entering a heating program (see Chapter 8.12 "Creating
a new heating program", page 45).
--:-Activating a new DHW program
+
Hold down the "Prog" button and select the "OWN PROG" heating
program with the dial.
Release the "Prog" button.
Restoring the factory setting
+
Hold down the "Prog" button and select the "TO HC T PROG"
heating program (HTC = heating circuit time) with the dial. The ON
and OFF-Times for DHW are linked again to the chosen heating
program.
Release the "Prog" button.
USER NOTE
In order for the DHW program to be effective, make sure that
"DHW AUTO DAY" is selected as the operating mode (see
Chapter 8.15 "Setting the operating mode for domestic hot
water", page 50).
We reserve the right to make any changes due to technical modifications.
52
Operating instructions RC30 programmable room thermostat • Issue 02/2006
Extended functions
8
8.17 Setting the operating mode for DHW circulation
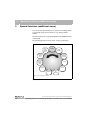
The DHW circulation pump provides an almost instantaneous
supply of DHW to the taps. To this end, the DHW is circulated by
a separate DHW circulation pipe twice an hour for three minutes.
Your installer can adjust this interval at the service level.
You can modify the operating mode of the DHW circulation as
follows:
+
Hold down the "Heating circuit" button and select "CIRCULATION"
with the dial.
HEAT CIRC
DHW CIRC
Release the "Heating circuit" button.
ACTUAL
ROOM TEMP
Then the standard display is shown again.
21.5°
We reserve the right to make any changes due to technical modifications.
Operating instructions RC30 programmable room thermostat • Issue 02/2006
53
8
Extended functions
Choose the operating mode you require for DHW circulation by
pressing a button:
Button
DHW circulation operating mode
"AUT"
"DHW CIRC AUTO DAY" (automatic mode)
30 minutes before the first heating circuit is switched on,
the DHW circulation pump starts to run at the set interval
and stops when the last heating circuit is switched off
(factory setting). The "DAY" or "NIGHT" display
indicates the current operating status, i.e. the DHW
circulation pump is switched on or off.
Alternatively, you can enter a separate DHW circulation
program.
"Day
mode"
"DHW CIRC CONSTANT OP"
The DHW circulation pump will operate at the set
interval, i.e. independent of the heating circuits.
"Night
mode"
"DHW CIRC OFF"
There will be no interval selection of the DHW circulation
pump. When you press the "DHW" button, you switch
the DHW circulation pump ON for the duration of the
single DHW loading.
Tab. 5
DHW circulation operating mode
After pressing the button, the display returns to the standard
display.
8.18 Entering a DHW circulation program
With a DHW circulation program you can enter the ON and OFF
times for the DHW circulation pump independently from the
heating program. Proceed in the same way as for entering a DHW
program (see Chapter 8.16 "Entering a DHW program", page 51).
We reserve the right to make any changes due to technical modifications.
54
Operating instructions RC30 programmable room thermostat • Issue 02/2006
Extended functions
8
8.19 Changing the standard display
You can change the standard display on the RC30 as follows:
+
Hold down the "Display" button and select the required standard
display with the dial.
The following values can be displayed as the standard display:
Setting
Explanation
"ACT ROOM TEM"
Actual room temperature (factory setting)
"SET ROOM TEM"
Set room temperature
"OUTSIDE TEMP"
Actual temperature outside the building
"BOILER TEMP"
Actual boiler temperature
"DHW TEMP"
Actual DHW temperature in the DHW
cylinder
"OP MODE"
Selected operating mode
"TIME"
Current time
"DATE"
Current date
"FLUE GAS TMP"
Actual flue gas temperature (if
temperature sensor fitted)
Tab. 6
Possible standard displays
Release the "Display" button. The selected standard display has
now been saved.
Press the "Back" button or close the flap.
The standard display changes to your chosen display.
USER NOTE
You can always adjust the set room temperature in automatic
mode, regardless of which standard display you choose. Whilst
you are adjusting the setting, the display changes to "SET ROOM
TEM" (see Chapter 7.3 "Setting the room temperature", page 24).
We reserve the right to make any changes due to technical modifications.
Operating instructions RC30 programmable room thermostat • Issue 02/2006
55
9
9
Special functions (additional menu)
Special functions (additional menu)
You can use the special functions to operate your heating system
economically in special circumstances, e.g. during a winter
holiday.
The special functions are grouped together in the additional menu
on the RC30.
The following special functions can be chosen via the menu:
Heat
pump
preheat
phase*
Holiday
Bank
holiday
Actual
room temperature
correction
Summer/
winter
time
Summer/
winter
changeover
Party
Key lock
Pause
Standard
display
Thermal
disinfection
* Only if a gas heat pump is installed.
Fig. 13
Special functions in the additional menu
We reserve the right to make any changes due to technical modifications.
56
Operating instructions RC30 programmable room thermostat • Issue 02/2006
Special functions (additional menu)
9.1
9
Opening and using the additional menu
Opening the additional menu
+
ADD MENU
HOLIDAY
Press the "Time" and "Weekday" buttons simultaneously and
release them again.
You are now in the additional menu and can access the special
functions.
Using the additional menu
The special functions are selected using the dial and the "Display"
button.
Turn the dial to move between the menu options.
Press and release the "Display" button to select a menu option.
+
Hold down the "Display" button and simultaneously turn the dial to
change a value.
Release the "Display" button to store a changed value.
We reserve the right to make any changes due to technical modifications.
Operating instructions RC30 programmable room thermostat • Issue 02/2006
57
9
Special functions (additional menu)
Returning to the menu selection
Press "Back".
You are back in the additional menu and can choose the next
setting.
Returning to the standard display
Press the "Back" button repeatedly or close the flap to return to the
standard display.
9.2
Setting the holiday function
You want to interrupt the current heating program because you are
going on holiday for a few days and want less heating while you are
away.
The advantage of the holiday function over manual night mode is
that after your holiday you will come back to a warm home and the
control returns to its normal funktion.
USER NOTE
The set holiday function starts at 00:00 on the start day and ends
at 00:00 on the end day. You can only enter one holiday period at
a time.
We reserve the right to make any changes due to technical modifications.
58
Operating instructions RC30 programmable room thermostat • Issue 02/2006
Special functions (additional menu)
9
z Open the additional menu (see "Opening and using the
additional menu" page 57).
Using the dial select "ADD MENU HOLIDAY".
Press and release the "Display" button.
You are now in the "HOLIDAY" menu.
+
HOLIDAY
RC30 HEATCIR
Hold down the "Display" button and select the required heating
circuit with the dial.
Release the "Display" button. Now you can choose between
–
RC30 heating circuits (only displayed if heating circuit 1 and
heating circuit 2 are assigned to the RC30)
–
Heating circuit 1 or 2
–
DHW (including DHW circulation)
–
Entire system (heating circuits and DHW)
USER NOTE
DHW heating is only switched off if both heating circuits are in
holiday mode (DHW heating "TO HT C PROG"). This does not
apply if you have entered a separate DHW or DHW circulation
program, however.
HOLIDAY
START DATE
You can now enter the start date for your holiday.
21.12.02
+
Hold down the "Display" button and select the required start date
with the dial.
Release the "Display" button. The start date is stored.
Now set the end date for your holiday.
+
Hold down the "Display" button and select the required end date
with the dial.
We reserve the right to make any changes due to technical modifications.
Operating instructions RC30 programmable room thermostat • Issue 02/2006
59
9
Special functions (additional menu)
Release the "Display" button. The end date is stored.
HOLIDAY
END DATE
03.01.03
USER NOTE
Make sure that the end date is after the start date. If the start and
end dates are the same, the specified holiday period is deleted.
You can cancel the holiday function at any time by setting the start
date and the end date to the same date.
Now set the room temperature for the holiday function:
Hold down the "Display" button and select the required holiday
temperature with the dial.
+
HOLIDAY
TEMPERATURE
17°
You can enter a holiday temperature in the range from 10 °C to
30 °C (factory setting 17 °C).
Release the "Display" button. The holiday temperature is stored.
USER NOTE
If the RC30 or an RC20 remote control is installed in the living
room (room temperature control), then the heating only switches
on if the temperature drops below the holiday temperature in this
room.
Otherwise (outside temperature control) the room temperature is
reduced to the holiday temperature (pumps run).
USER NOTE
If the holiday function is active, only the "AUT" button LED is
illuminated. The LEDs in the "Day mode" and "Night mode"
buttons are not illuminated.
We reserve the right to make any changes due to technical modifications.
60
Operating instructions RC30 programmable room thermostat • Issue 02/2006
Special functions (additional menu)
9
Interrupting and continuing the holiday function
If you are staying in your home during the holiday function period
and want to run the heating, you can interrupt the holiday function.
To run the heating (in day mode):
Press "Day mode".
To continue the holiday function:
Press "AUT".
We reserve the right to make any changes due to technical modifications.
Operating instructions RC30 programmable room thermostat • Issue 02/2006
61
9
9.3
Special functions (additional menu)
Setting the bank holiday function
You can choose to interrupt the current heating program if your
daily routine changes for a short time.
If there is a bank holiday coming, for example, or you want to
spend a day off at home, you can adopt the heating times from
your Saturday heating program for these days. The heating
settings for this period are then the same as for a Saturday.
USER NOTE
The set bank holiday function starts at 00:00 on the start day and
ends at 00:00 on the end day. You can only enter one bank
holiday period at a time.
z Open the additional menu (see Chapter 9.1 "Opening and
using the additional menu", page 57).
Using the dial select "ADD MENU BNK HOLIDAY".
Press and release the "Display" button. You are now in the "BNK
HOLIDAY" menu.
Hold down the "Display" button and select the required heating
circuit with the dial.
+
BNK HOLIDAY
RC30 HEATCIR
Release the "Display" button. Now you can choose between
–
RC30 heating circuits (only displayed if heating circuit 1 and
heating circuit 2 are assigned to the RC30)
–
Heating circuit 1 or 2
–
DHW (including DHW circulation)
–
Entire system (heating circuits and DHW)
We reserve the right to make any changes due to technical modifications.
62
Operating instructions RC30 programmable room thermostat • Issue 02/2006
Special functions (additional menu)
9
Press the "Display" button. You can now enter the start date for the
bank holiday.
+
BNK HOLIDAY
START DATE
29.03.02
+
BNK HOLIDAY
END DATE
Hold down the "Display" button and select the required start date
with the dial.
Release the "Display" button. The start date is stored.
Now enter the date of the first normal day after the holiday:
Hold down the "Display" button and select the required end date
with the dial.
Release the "Display" button. The end date is stored. Now the
Saturday heating program will be used on the specified days.
01.04.02
USER NOTE
Make sure that the end date is after the start date. If the start and
end dates are the same, the specified period is deleted. You can
cancel the bank holiday function at any time by setting the start
date and the end date to the same date.
You do not need to enter a room temperature for the bank holiday
function, because it will automatically be taken from the active
heating program.
We reserve the right to make any changes due to technical modifications.
Operating instructions RC30 programmable room thermostat • Issue 02/2006
63
9
Special functions (additional menu)
Interrupting and continuing the bank holiday function
If you leave home for an extended period during the current bank
holiday function period and want to heat in setback mode only, you
can interrupt the bank holiday function.
To heat with a reduced temperature (in night mode):
Press the "Night mode" button.
To continue the bank holiday function:
Press "AUT".
9.4
Calibrating the room temperature
There may be a separate thermometer near to the RC30,
displaying a different value. If you want to calibrate the RC30 to the
thermometer, you can use the "Calibration" function. Before
calibrating the room temperature, please consider the following
points:
–
Is the thermometer more accurate than the RC30?
–
Is the thermometer situated right next to the RC30?
USER NOTE
A thermometer may display temperature changes more slowly or
more quickly than the RC30. It is therefore unadvisable to
calibrate the RC30 while your heating system is cooling down or
heating up.
z Open the additional menu (see Chapter 9.1 "Opening and
using the additional menu", page 57).
Using the dial select "ADD MENU CALIBRATION".
Press the "Display" button.
You are now in the "CALIBRATION" menu.
+
Hold down the "Display" button and select the required calibration
value with the dial.
We reserve the right to make any changes due to technical modifications.
64
Operating instructions RC30 programmable room thermostat • Issue 02/2006
Special functions (additional menu)
9
CALIBRATION
ACT ROOM TEM
You can enter a value in the range from –5.0 to +5.0 (factory
setting 0.0). The "K" in the display stands for the unit Kelvin; 1 K
corresponds to 1 °C.
+0.5 K
Example: If the temperature displayed by the thermometer is
0.5 °C higher than that displayed by the RC30, enter "+0.5 K" as
the calibration value.
Release the "Display" button. The set calibration value is stored.
Press the "Back" button or close the flap.
USER NOTE
You can also have an additional room temperature sensor
installed for the RC30. This is useful if you want to measure the
temperature in another room with the RC30, for example if the
comparison with a thermometer is still unsatisfactory even after
calibration.
We reserve the right to make any changes due to technical modifications.
Operating instructions RC30 programmable room thermostat • Issue 02/2006
65
9
9.5
Special functions (additional menu)
Setting the Party function
With the Party function you can set the time at which the heating
normally switches to night mode to a later time. This extends
heating in day mode so that you can enjoy the company of your
guests later into the evening.
z Open the additional menu (see Chapter 9.1 "Opening and
using the additional menu", page 57).
Using the dial select "ADD MENU PARTY".
Press and release the "Display" button.
You are now in the "PARTY" menu.
Hold down the "Display" button and select the required heating
circuit with the dial.
+
Release the "Display" button.
You can now enter the number of hours for which you want to
continue heating in day mode (starting from now).
Hold down the "Display" button and select the required number of
hours with the dial. Example: "2 h".
+
PARTY
NO OF HOURS
You can enter a value from 0 to 99 (factory setting = 0).
Release the "Display" button. The number of hours is stored.
2h
Press the "Back" button or close the flap.
The Party function is activated.
We reserve the right to make any changes due to technical modifications.
66
Operating instructions RC30 programmable room thermostat • Issue 02/2006
Special functions (additional menu)
9
USER NOTE
Once the specified number of hours has elapsed, the Party
function is deactivated.
If you want to use the Party function again the next evening, enter
the number of hours again.
Cancelling the Party function early
Set the number of hours in the Party function to "0" in order to end
it before the specified number of hours has elapsed.
9.6
Setting the Pause function
The Pause function can be used to switch your heating to setback
heating mode (night mode) for a certain period, regardless of the
current heating program.
z Open the additional menu (see Chapter 9.1 "Opening and
using the additional menu", page 57).
Using the dial select "ADD MENU PAUSE".
Press and release the "Display" button.
You are now in the "PAUSE" menu.
+
Hold down the "Display" button and select the required heating
circuit with the dial.
Release the "Display" button.
We reserve the right to make any changes due to technical modifications.
Operating instructions RC30 programmable room thermostat • Issue 02/2006
67
9
Special functions (additional menu)
You can now enter the period of time for which you want the
heating to switch to setback mode.
Hold down the "Display" button and select the required number of
hours with the dial. Example: "4 h".
+
PAUSE
NO OF HOURS
Your heating system will interrupt the normal heating mode for 4
hours. You can enter a value from 0 to 99 (factory setting = 0).
Release the "Display" button.
4h
The number of hours is stored.
Press the "Back" button or close the flap.
The Pause function is activated.
USER NOTE
Once the specified number of hours has elapsed, the Pause
function is deactivated.
If you want to use the Pause function again, enter the number of
hours again.
Cancelling the Pause function early
Set the number of hours in the Pause function to "0" in order to end
it before the specified number of hours has elapsed.
We reserve the right to make any changes due to technical modifications.
68
Operating instructions RC30 programmable room thermostat • Issue 02/2006
Special functions (additional menu)
9.7
9
Thermal disinfection
If you activate the "Thermal disinfection" [pasteurisation] function,
the DHW is heated once a week or once a day to a temperature
which is high enough to destroy pathogenic agents
(e.g. legionella).
RISK OF SCALDING
WARNING!
from hot water at the taps.
During the thermal disinfection process the DHW can be heated
to a temperature above 60 °C.
z Only draw off mixed hot and cold water during or just after
thermal disinfection.
z Open the additional menu (see Chapter 9.1 "Opening and
using the additional menu", page 57).
Using the dial select "ADD MENU THERM DISINF".
+
THERMAL
DISINFECTION
Hold down the "Display" button and select "THERMAL
DISINFECTION – YES" with the dial.
Release the "Display" button. In accordance with the factory
settings thermal disinfection begins every Tuesday at 1.00 and
heats the water to 70 °C.
YES
Turn the dial clockwise to access the other settings.
Input range
Factory setting
Thermal
disinfection
Yes/No
No
Disinfection
temperature
60 °C–80 °C
70 °C
We reserve the right to make any changes due to technical modifications.
Operating instructions RC30 programmable room thermostat • Issue 02/2006
69
9
Special functions (additional menu)
+
Input range
Factory setting
Disinfection day
Mo, Tu, We, Th, Fr,
Sa, Su,
Mo–Su
Tu
Disinfection time
00:00 – 23:00
1:00
Hold down "Display" and turn the dial until the required value
appears.
Release "Display" to store the value.
USER NOTE
If possible, choose a time for thermal disinfection at which nobody
will be drawing off DHW (e.g. during the night).
9.8
Changing the standard display
You can change the standard display on the RC30 either via the
additional menu or directly – as described in Chapter 8.19
"Changing the standard display", page 55. This section also
describes all the standard display options.
We reserve the right to make any changes due to technical modifications.
70
Operating instructions RC30 programmable room thermostat • Issue 02/2006
Special functions (additional menu)
9.9
9
Switching on the button lock
You can switch on a button lock (child lock). The button lock
prevents your heating system settings from being changed
accidentally.
z Open the additional menu (see Chapter 9.1 "Opening and
using the additional menu", page 57).
Using the dial select "ADD MENU KEY LOCK".
Press the "Display" button.
You are now in the "KEY LOCK" menu.
Hold down the "Display" button and select the setting "On" with the
dial.
+
Release the "Display" button. The button lock is now switched on.
KEY LOCK
ON
Press the "Back" button or close the flap.
If you press a button whilst the button lock is activated, the display
shows "Weekday (DAY/DATE) + TIME KEY" to tell you how to
switch off the key lock again.
WEEKDAY
+ TIME KEY
Switching off the key lock again
+
KEY LOCK
Simultaneously press the "Time" and "Weekday (Day/Date)"
buttons.
The key lock is switched off again.
OFF
We reserve the right to make any changes due to technical modifications.
Operating instructions RC30 programmable room thermostat • Issue 02/2006
71
9
Special functions (additional menu)
9.10 Setting summer/winter changeover
If your heating system is in automatic mode (LED next to the "AUT"
button illuminated), the RC30 performs the summer/winter
changeover automatically. In summer mode the heating is
switched off and only DHW is heated. In winter mode the heating
and DHW are activitated.
Automatic summer/winter changeover depends on the following
factors:
–
Outside temperature
–
Type of construction/thermal insulation
Outside temperature in °C
The "adjusted" outside temperature is calculated from the outside
temperature and the thermal insulation of your home (Fig. 14).
2
1
Time in h
Fig. 14
Current and adjusted outside temperature in comparison
Item 1:
Current outside temperature
Item 2:
Adjusted outside temperature
The adjusted outside temperature is a theoretical variable
calculated by the RC30, which takes into account the heat storage
capacity of the walls. For example, with an outside temperature of
10 °C and the heating switched off, the temperature inside the
home can still be 16 °C. The inside temperature falls slowly.
We reserve the right to make any changes due to technical modifications.
72
Operating instructions RC30 programmable room thermostat • Issue 02/2006
Special functions (additional menu)
9
USER NOTE
For summer/winter changeover, your installer must have set up
outside temperature dependent control (see "Outside
temperature dependent control", page 6).
Summer/winter changeover does not apply to room temperature
control.
Summer mode
A changeover threshold for summer/winter changeover is entered
in the RC30 (factory setting 17 °C). When the adjusted outside
temperature exceeds the changeover threshold, the heating
system switches to summer mode (DHW heating only).
If you require heating for a short period in summer mode:
Press the "Day mode" button to switch to normal heating mode for
a short time (see Chapter 7.2.2 "Selecting manual mode",
page 23).
Press "AUT" to return to automatic summer mode.
Winter mode
When the adjusted outside temperature falls below the
changeover threshold, the heating system switches to winter mode
(heating and DHW heating).
We reserve the right to make any changes due to technical modifications.
Operating instructions RC30 programmable room thermostat • Issue 02/2006
73
9
Special functions (additional menu)
Setting the changeover threshold
z Open the additional menu (see Chapter 9.1 "Opening and
using the additional menu", page 57).
Using the dial select "ADD MENU SU/WI CHANGE".
Press the "Display" button.
You are now in the "SU/WI CHANGE" menu.
Hold down the "Display" button and select the required heating
circuit with the dial.
+
Release the "Display" button.
You can now enter the changeover threshold.
Hold down the "Display" button and select the required
changeover threshold with the dial.
+
SU/WI CHANGE
THRESHOLD
17°
You can enter a value from 10 °C to 30 °C (factory setting 17 °C)
or sellect permanently "SUMMER" or "WINTER". In the
"SUMMER" setting the heating is always switched off, and in the
"WINTER" setting it is always switched on. There is no automatic
changeover.
Release the "Display" button.
The changeover threshold for summer/winter changeover is
stored.
Press the "Back" button or close the flap.
USER NOTE
To conserve energy during the in-between seasons of spring and
autumn, you can lower the changeover threshold to e.g. 16 °C.
This turns off the heating when the adjusted outside temperature
is 1 °C lower.
If you would like a higher level of heating comfort during the inbetween seasons, raise the changeover threshold.
We reserve the right to make any changes due to technical modifications.
74
Operating instructions RC30 programmable room thermostat • Issue 02/2006
Special functions (additional menu)
9
9.11 Automatic summer and winter time adjustment
The RC30 switches automatically between summer and winter
time. The date is determined by the European agreement:
–
Changeover to winter time:
On the last Sunday in October the time changes from 03:00 to
02:00 (–1 h).
–
Changeover to summer time:
On the last Sunday in March the time changes from 02:00 to
03:00 (+1 h).
z Open the additional menu (see Chapter 9.1 "Opening and
using the additional menu", page 57).
Using the dial select "ADD MENU SU/WI TIME".
Press the "Display" button.
You are now in the "SU/WI TIME" menu.
+
SU/WI TIME
CHANGEOVER
YES
Hold down the "Display" button and select the setting "YES" with
the dial.
You can choose between "YES" and "NO".
Release the "Display" button.
Your heating system will now switch between summer and winter
time automatically.
Press the "Back" button or close the flap.
We reserve the right to make any changes due to technical modifications.
Operating instructions RC30 programmable room thermostat • Issue 02/2006
75
9
Special functions (additional menu)
USER NOTE
Should the statutory dates change, set summer/winter time
changeover to "NO".
Then change the time manually (see Chapter 8.5 "Setting the
time", page 34).
9.12 Setting the preheat phase for a gas-operated heat pump
(not in the UK)
If a gas-operated heat pump (Loganova GWP) is installed in your
heating system, we recommend that you set a preheat phase. This
setting has no effect on other devices.
During the preheat phase the heat pump unit preheats the heating
system without the peak load boiler. The continuous running of the
heat pump generally increases the overall efficiency and saves
more energy than a reduction in the room temperature.
The preheat phase starts at the preset time before the day mode
of the first heating circuit.
z Open the additional menu (see Chapter 9.1 "Opening and
using the additional menu", page 57).
Using the dial select "ADD MENU HP PREHEAT".
Press the "Display" button.
You are now in the "HP PREHEAT" menu.
We reserve the right to make any changes due to technical modifications.
76
Operating instructions RC30 programmable room thermostat • Issue 02/2006
Special functions (additional menu)
+
HEAT PUMP
PREHEAT PHS
02:00
9
Hold down the "Display" button and select the required length of
the preheat phase with the dial.
You can set a value in hours and minutes (up to max. 16:30 h:min).
In the factory setting preheating is switched off. The maximum
efficiency is obtained when the heat pump runs constantly. To
achieve this, set the length of the preheat phase so that it is longer
than the night mode period in the chosen heating program.
Release the "Display" button.
The preheat phase length is stored.
Press the "Back" button or close the flap.
We reserve the right to make any changes due to technical modifications.
Operating instructions RC30 programmable room thermostat • Issue 02/2006
77
10
Troubleshooting
10
Troubleshooting
This chapter details frequently asked questions about your heating
system and their respective answers. This will, in many cases,
enable you to troubleshoot perceived faults. At the end of the
chapter, faults and their remedies are listed in a table.
10.1 Frequently asked questions
Why do I set a room
temperature, even
though it is not
measured?
When you set the room temperature, even though the room
temperature is not measured, you change the heating curve. This
also changes the room temperature. When you set the room
temperature, the temperature of the water in the boiler changes
and hence the temperature of the radiators (see "How does the
RC30 work?", page 5).
Why does the room
temperature measured
with a separate
thermometer not
correlate with the set
room temperature?
Different values influence the room temperature. If the RC30 is
mounted against a cold wall, it will be influenced by the cold
temperature of the wall. If it is installed in a warm part of the room,
e.g. close to a radiator, it will be influenced by the heat from that.
This is why a separate thermometer can display a different room
temperature from that set on the RC30.
To compare the actual room temperature with the values
measured by another thermometer, the following are important:
–
The separate thermometer and the RC30 must be located
close together.
–
The separate thermometer must be accurate.
–
Do not compare the room temperatures when the heating
system is in the process of heating up as the RC30 and the
separate thermometer may respond to the increasing room
temperature at different speeds.
If you have checked these points and there is still a discrepancy,
you can use the "Calibrating the room temperature" function (see
Chapter 9.4 "Calibrating the room temperature", page 64).
We reserve the right to make any changes due to technical modifications.
78
Operating instructions RC30 programmable room thermostat • Issue 02/2006
Troubleshooting
Why do the radiators
get (too) hot when the
outside temperature is
relatively high?
10
If you have a heating system with a heating circuit and no mixer
valve, this is normal (see "What are heating circuits?", page 9).
The circulation pump only starts up when the boiler reaches a
predefined flow temperature. If the flow temperature is higher than
the temperature required on the basis of the outside temperature,
the radiators may get hotter for a short time. The heating control
unit detects this and quickly responds accordingly. Do not adjust
the thermostatic valves on the radiators and wait until the set room
temperature is reached.
In summer mode, radiators can heat up in certain circumstances
for a short time: The circulation pump is started up automatically at
a predefined interval to prevent it from blocking. If the pump
happens to be started up immediately after DHW heating, the
unusable residual heat is dissipated via the heating circuit and the
radiators.
Why does the heating
system pump run
during the night, even
though there is little or
no heating on?
This depends on the setting chosen for night setback by your
installer (see "Why do I need a heating program?", page 8). Please
ask your installer about the setback mode setting.
–
Total shutdown: The heating system (and therefore also the
pump) is automatically switched off in night mode. If the
outside temperature drops below the frost protection
temperature, the pump is automatically switched on by the
"Frost protection" function.
–
Reduced room temperature: The pump continues to run
even if the heating is reduced, in order to maintain the lower
room temperature.
–
Change between total shutdown and reduced heating
subject to room temperature or outside temperature: The
heating system is switched on automatically if the actual
temperature falls below the set value. The pump then starts up
too.
We reserve the right to make any changes due to technical modifications.
Operating instructions RC30 programmable room thermostat • Issue 02/2006
79
10
Troubleshooting
The actual room
temperature is higher
than the set room
temperature. Why is
the boiler still running?
The boiler may heat up in order to heat DHW.
Your heating system can be set to three possible control modes
(see "How does the RC30 work?", page 5):
–
Room temperature control: The boiler switches off when the
set room temperature is reached.
–
Outside temperature dependent control: The heating
system runs according to the outside temperature.
–
Outside temperature dependent control with room
temperature hook-up: The heating system uses the
advantages of both of the above control modes.
In the last two cases, the boiler may run even if the actual room
temperature is higher than the set room temperature.
We reserve the right to make any changes due to technical modifications.
80
Operating instructions RC30 programmable room thermostat • Issue 02/2006
Troubleshooting
10
10.2 Fault table
Please notify your installer if a fault occurs that is not listed in the
table, or if you cannot rectify the fault yourself.
Code
Display
Cause
Remedy
No display
Your heating system has been
switched OFF.
Switch ON the heating system.
The power supply from the heating
system has been cut off.
Check whether the RC30 sits
correctly in its wall mounting base.
Check whether two leads are
connected to the RC30 wall
mounting base.
"MAKING
CONNECTION
EMS"
When the controller is switched on,
Wait a few seconds.
data is exchanged between the EMS
and the RC30 (no fault).
A01/816 "CONNECTION
INTERRUPTED
EMS
Communication to the Energy
Management System (EMS) is faulty,
e.g. through a loose contact or
through electro-magnetic
interference.
A11/802 "TIME NOT
SET"
The date or time is not set. This may Enter the time or date so that all
have been caused by an extended
heating programs and other
power failure.
functions can operate.
A11/803 "DATE NOT
SET"
Check whether the RC30 sits
correctly in its wall mounting base.
Check whether two leads are
connected to the RC30 wall
mounting base.
Hxx
"OPEN FLAP"
Maintenance is required.
Open the flap to display the code.
The heating system remains active as Notify your installer who should
long as possible.
carry out the maintenance.
H7
"MAINTENANCE
SYSTEM
PRESSURE"
The water pressure in the heating
Top up the heating water as
system has dropped to a low value. described in the boiler operating
This is the only maintenance
instructions.
message which you can action
yourself. The heating system must be
equipped with a digital pressure
sensor. Regularly check the heating
system water pressure at the
pressure gauge, if this is not installed.
xxx/xxx
"OPEN FLAP
FAULT"
There is a fault on the heating system. Open the flap to display the code.
Inform your installer and give him
the code.
Tab. 7
Fault table
We reserve the right to make any changes due to technical modifications.
Operating instructions RC30 programmable room thermostat • Issue 02/2006
81
10
Troubleshooting
Code
Maintenance messages are identified by one three-digit code,
faults by two three-digit codes. These give the installer information
about the cause.
The first three-digit code is displayed directly.
Press the "Display" button to display the second code.
Resetting faults (Reset)
Some faults can be rectified by resetting the system.
z Press the "Reset" button on the control panel to reset faults.
The display shows "rE" whilst the reset is implemented.
If the fault recurs, notify your installer as soon as possible,
especially if there is a risk of frost.
SYSTEM DAMAGE
CAUTION!
through frost.
The heating system can freeze up in cold weather if it has been
switched OFF through a fault shutdown.
z Try and reset the fault.
z If this is impossible, immediately notify your installer.
We reserve the right to make any changes due to technical modifications.
82
Operating instructions RC30 programmable room thermostat • Issue 02/2006
Index
11
11
Index
Symbols
Display
"OFF" display . . . . . . . . . . . . . . 25
"SET DHW TEMP - BLOCK" display . . 27
"WEEKDAY + TIME KEY" display . . . 71
E
Emergency stop switch –
heating system . . . . . . . . . . . . . 13
Extended functions . . . . . . . . . . . 30
A
Additional menu . . . . . . . . . . . . .
Adjusted outside temperature . . . . .
Automatic mode . . . . . . . . . . . .
DHW . . . . . . . . . . . . . . . . . . . . . . . . .
DHW circulation . . . . . . . . . . . . . . . .
56
72
21
50
54
F
Factory setting
DHW temperature . . . . . . . . . . . . . . .
holiday mode . . . . . . . . . . . . . . . . . .
party function . . . . . . . . . . . . . . . . . .
pause function . . . . . . . . . . . . . . . . .
summer/winter changeover . . . . . . .
Fault table . . . . . . . . . . . . . . . .
Flap, key cover . . . . . . . . . . . 15,
Flow temperature . . . . . . . . . . . .
Frost risk . . . . . . . . . . . . . . 13,
B
Bank holiday function . . . . . . . . . . 62
Basic functions . . . . . . . . . . . . . 20
C
Child lock, see Key lock . . . . .
Cleaning . . . . . . . . . . . . .
Control
outside temperature dependent
with room temperature hook-up
Controls . . . . . . . . . . . . . .
. . . 71
. . . 14
Heat pump, gas-operated . . . . . . . .
Heating circuit . . . . . . . . . . 9, 35,
Heating comfort . . . . . . . . . . . 39,
Heating control unit . . . . . . . . . . .
Heating curve . . . . . . . . . . . . . .
Heating mode
normal, see Day mode
setback, see Night mode
Heating program . . . . . . . . . . 39,
DHW . . . . . . . . . . . . . . . . . . . . . . . . .
DHW circulation . . . . . . . . . . . . . . . .
Heating, economical . . . . . . . . . .
Holiday function . . . . . . . . . . . . .
D
33
21
51
50
54
53
54
51
31
69
26
60
66
68
74
81
16
.5
82
H
..... 6
..... 7
. 15, 18
Date . . . . . . . . . . . . . . . . . . .
Day mode . . . . . . . . . . . . . . 16,
DHW
heating . . . . . . . . . . . . . . . . . . . . 26,
operating mode . . . . . . . . . . . . . . . .
DHW circulation
automatic mode . . . . . . . . . . . . . . . .
operating mode . . . . . . . . . . . . . . . .
DHW circulation program . . . . . . . .
DHW program . . . . . . . . . . . . .
DHW temperature . . . . . . . . . 27,
Disinfection, thermal . . . . . . . . 29,
. . . . . . . . . . . . . . . 15, 16
76
37
74
.5
.5
45
51
54
11
58
I
In-between seasons, heating in . . . 22, 74
We reserve the right to make any changes due to technical modifications.
Operating instructions RC30 programmable room thermostat • Issue 02/2006
83
11
Index
K
Key lock . . . . . . . . . . . . . . . . . 71
L
Language selection . . . . . . . . . . . 19
LED . . . . . . . . . . . . . . . . . . . 16
Low loss header module WM10 . . . 4, 10
M
Manual mode . . . . . . . . . . . . . . 23
Mixer module MM10 . . . . . . . . . 4, 10
N
Night mode
. . . . . . . . . . . . .16, 21
O
Operating level
basic functions . . . . . . . . . . . . . . . . . 20
extended functions . . . . . . . . . . . . . . 30
special functions . . . . . . . . . . . . . . . . 56
Operating mode
automatic . . . . . . . . . . . . . . . . . . .20, 21
day . . . . . . . . . . . . . . . . . . . . . . . . . . 23
DHW . . . . . . . . . . . . . . . . . . . . . . . . . 50
DHW circulation . . . . . . . . . . . . . . . . . 54
manual . . . . . . . . . . . . . . . . . . . . . . . 23
night . . . . . . . . . . . . . . . . . . . . . . . . . 23
selection . . . . . . . . . . . . . . . . . . . . . . 20
Operating status (LEDs) . . . . . . . . . 16
Operating values . . . . . . . . . . . . 31
Outside temperature . . . . . . . . 5, 72
Reference room . . . . . . . . . . . . . 6
Remote control . . . . . . . . . . . . . 9
Reset . . . . . . . . . . . . . . . . . . 82
Room temperature
actual . . . . . . . . . . . . . . . . . . . . . . . . . 31
calibration . . . . . . . . . . . . . . . . . . . . . 64
set . . . . . . . . . . . . . . . . . . . . . . . . . . . 31
setting as required . . . . . . . . . . . . . . . 24
Room temperature control . . . . . . . . 6
Room temperature sensor, external . . . 65
S
Safety . . . . . . . . . . . . . . . . . . 13
Saving energy . . . . . 8, 11, 39, 51, 74
Shutdown . . . . . . . . . . . . . . . . 18
Special functions . . . . . . . . . . . . 56
Standard display . . . . . . . . . . 55, 70
Start-up . . . . . . . . . . . . . . . . . 18
Summer mode . . . . . . . . . . . . . . 15
Summer/winter changeover . . . . . . . 72
Summer/winter time adjustment, autom. 75
Switching point . . . . . . . . . . . . . 21
adding . . . . . . . . . . . . . . . . . . . . . . . . 47
deleting . . . . . . . . . . . . . . . . . . . . . . . 48
moving . . . . . . . . . . . . . . . . . . . . . . . . 42
T
Temperature, see Room temperature
Thermal disinfection . . . . . . . . .
Thermostatic valve . . . . . . . . .
Time . . . . . . . . . . . . . . . . .
Type of construction . . . . . . . . .
.
.
.
.
. 69
. 7
. 34
. 72
P
Party function . . . . . . . . .
Pause function . . . . . . . .
Power failure . . . . . . . . .
Preheat phase, gas heat pump
.
.
.
.
.
.
.
.
.
.
.
.
.
.
.
.
. 66
. 67
. 18
. 76
R
RC30 heating circuits . . . . . . . . . . 36
We reserve the right to make any changes due to technical modifications.
84
Operating instructions RC30 programmable room thermostat • Issue 02/2006
Notes
We reserve the right to make any changes due to technical modifications.
Operating instructions RC30 programmable room thermostat • Issue 02/2006
85
Notes
We reserve the right to make any changes due to technical modifications.
86
Operating instructions RC30 programmable room thermostat • Issue 02/2006
Notes
We reserve the right to make any changes due to technical modifications.
Operating instructions RC30 programmable room thermostat • Issue 02/2006
87
Your installer:
Buderus
Cotswold Way, Warndon,
Worcester WR4 9SW
Tel.: 01905 752794, Fax: 01905 753130
www.buderus-commercial.co.uk
In the UK, Buderus is a trading name of
BBT Thermotechnology Ltd.
BBT Thermotechnik GmbH
D-35573 Wetzlar
www.heiztechnik.buderus.de
[email protected]