1
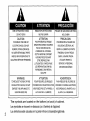
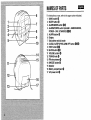
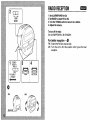
FR-A37 “
RADIO RECEIVER
RECEPTOR DE RADIO
OWNER’S RECORD
For your convenience, record the model number (you
itatthe bottom of the unit) andserial number (you will
the batfery compartment) inthespace
provided below.
refer to them when you contact your AIWA dealer in
difficulty.
‘ode’‘0 ~
‘eria’
‘0”~
will find
find itin
Please
case of
A
A
RISK OF ELECTRIC SHOCK
REMOVE
SHOCK, DO NOT
COVER (OR BACK).
NO USER SERVICEABLE PARTS
INSIDE. REFER SERVICING
QUALIFIED
SERVICE
NOLO ABRA
PRECAUTION:
ATTENTION:
CAUTION:
TO REDUCE THE RISK OF
ELECTRIC
PELIGRO DE SACUDIDA ELECTRICA
RISQUE DELECTROCUTION
NE PAS OUVRIR
DO NOT OPEN
TO
PERSONNEL
POUR REDUIRE LE RISQUE
D’ELECTROCUTION,
N’OUVREZ
PAS LE COUVEFiCLE OU
L’ARRIERE DE L’APPAREIL
PAR REDUCIR EL PELIGRO DE
SACUDIDA
EL~CTRICA,
NO
QUITE LA CUBIERTA (O PARTE
TRASERA).
CETTE RADIO NE CONTIENT
AUCUNE PIECE POUVANT
ETRE REPAREE PAR
NO HAY PIEZAS
QUE EL USUARIO PUEDA
UTILIZAR. REMITA EL
SERVICIO A PERSONAL
L’UTILISATEUR, FAITES FAIRE
LES REPARATIONS PAR DU
PERSONNEL D’ENTRETIEN
DE SERVICIO ID6NE0
QUALIFIE
OR ELECTRIC
SHOCK, DO NOT
EXPOSE THIS APPLIANCE
TO
RAIN OR MOISTURE
The symbols
ADVERTENCIA:
ATTENTION:
WARNING:
TO REDUCE THE RISK OF FIRE
are located
PARA REDUCIR EL PELIGRO DE
POUR REDUIRE LES RISQUES
D’INCENDIE
N’EXPOSEZ
OU DELECTROCUTION,
PAS CET APPAREIL
A
LA PLUIE OU A L’HUMIDITE
on the bottom
(or back)
INCENDIO O CHOCYJE ELECTRICO,
NO EXPONGA
of cabinet.
Les symboles se trouvent en dessous (OUa I’arriere) de I’appareil.
Los simbolos estan ubicados en la parte inferior (o trasera)del gabinete.
2
EL APARATO A LA
LLUVIA O A LA HUMEDAD.
The lightning flash with arrowhead,
user of the prescence
A
within an equaiateral
of uninsulated
“dangerous
that may be of sufficient magnitude to constitute
a risk of electric shock to persons
L’ectair avec une fleche clans Ie triangle equilateral
est destine a prevenir I’utilisateur
presence a I’inteneur de I’appareil o’une ‘tension dangereuse”
d’une magnitude suffisante pour constituer
de la
non isotee qui risque d’ etre
un risque d’electrocution
pour un individu.
El rayo con una punts de flecha dentro de un triangulo es para alertar al usuario de la
eexistencia de “voltaje peligroso” sin aielamiento dentro de la caja del producto. Este
puede ser de suficiente magnitude como para consfituir un peligro de sacudidad electrica
a una ~ersona.
The exclamation
point within the equilateral
triangle is intended to alert the user of the
presence of important operating and maintenance
literature accompanying
Le point d’exclamation
accompagnant
(servicing) instructions
in the
the appliance.
clans Ie triangle equilateral
la presense d’instructions
est destine a prevenir I’utilisateur de
d’utilisation et d’entretien
importance clans la brochure
I’appareil.
Los puntos de exclamation
dentro del trianguio
existencia de instrucciones
para el funcionamiento
panfietos que acompanan
This appliance
triangle, is intended to alert the
voltage” within the product’s enclosure
has a polarized
son para alertar al usuano de la
y mantenimiento
(servicio) en Ios
al aparato,
plug (one blade is wider than the other.) To reduce
the risk of electric shock, this plug is intended to fit into a polarized outlet only one way. If the
plug does not fit fully into the outlet, reverse the plug. If it still does not fit, contact a qualified
electrician. Do not attempt to modify the plug in any way.
3
NAMES OF PARTS
For instructions
on use, refer to the page number
mm
indicated.
1 BANDswitch@
2 SLEEP button@
3 ALARM MODE switch@@
4 ALARM/POWER switch (ALARM - RADIO/BLJZZER,
POWER - ON/O STANDBY) @@@
5 ALARM button@
6 Display
7 Dial pointer and dial scale
8 CLOCK, SLEEP OFFIALARM OFF button @@@
9 FAST button@@
10 SLOW button@@
11 VOLUME control@
12 TUNING knob@
13 FM wire antenna@
14 SNOOZE button@
15 Speaker
16 Battery compartment@
17 AC power cord@
NOMBRE DE LAS PARTES
-
NOMENCLATURE DES PIECES -
Para Ias instrucciones sobre el USO, refierase a Ios ntimeros
de pagina indicados a continuacion de cada patte.
1 Conmutador de banda (BAND)@
2 Boton de dormir (SLEEP) @
3 Interrupter del modo de alarma (ALARM MODE) @@
4 Conmutador de alarma/corriente (ALARM RADIOIBUZZER, POWER - ON/r5 STANDBY) @@@
5 Boton de aiarma (ALARM) @
6 Pantalla
7 Aguja del cuadrante y escala de frecuencias
8 Boton del reloj (CLOCK, SLEEP OFF/ALARM OFF)
(D@@
9
10
11
12
13
14
Boton de la hors (FAST) @@
Boton de minutes (SLOW)@@
Control de volumen (VOLUME) @
Perilla de sintonizaci6n (TUNING) @
Antena de cable para FM @
Boton de deaconexion para dormitar/dormir
(B
15 Altavoz
16 Compartimiento de la pila @
17 Cable electrico @
(SNOOZE)
/’
Pour Ies instructions d’utilisation, reportez-vous au numero de
page indique.
1 Commutateur de gamme d’ondes (BAND) @
2 Touche de minuterie d’arr& differe (SLEEP) @
3 Commutateur de mode d’alarme (ALARM MODE)@@
4 Commutateur d’alarme/alimentation
(Alarme - signal
sonore/radio, Alimentation - veille/marche) (ALARM RADIO/BUZZER, POWER - ON/c5 STANDBY) @@@
5 Touche de reglage de I’alarme (ALARM) @
6 Afficheur
7 Aiguille et echelie du cadran
8 Touche de reglage de I’heure, annulation de la
minuterie d’arr~t differe/alarme (CLOCK, SLEEP
OFFIALARM OFF) @@@
9 Touche d’augmentation rapide (FAST) @@
10 Touche d’augmentation Iente (SLOW) @@
11 Commande de niveau du son (VOLUME) @
12 Commande d’accord sur Ies stations (TUNING) @
13 Antenne-fil FM @
14 Touche de temporisation d’alarme (SNOOZE)@
15 Haut-parleur
16 Logement de la pile @
17 Cordon secteur @
5
BACKUP FUNCTION
mm
If the AC power supply is interrupted, the clock display goes
off and the alarm setting is canceled. To back up the clock and
alarm, insert a 6F22 battery in the battery compartment on the
rear of the unit. -+@
● The backup
function lasts about 10 minutes.
● The backup
battery is not for radio reception.
Replacing the battery
Replace the battery with new one if the clock display flashes or
the alarm timer does not work properly when you connect the
AC power cord again.
Note on battery
When you are not going to use the unit for a long period of
time, remove the battery to prevent possible electrolyte
leakage.
● To prevent
the risk of electrolyte leakage or explosions,
never recharge the battery, apply heat to it, or take it apart.
●
FUNCION DE RESPALDO
-
Si se corta la fuente de corriente
alterna, se apaga la
indication del reloj y se cancela la alarma. Para mantener el
respaldo del reloj la alarma, instale una pila 6F22 en el
portapilas en la parte trasera del aparato, + ~
●
La funcion de respaldo dura unos 10 minutes.
●
La pila de respaldo no sirve para escuchar la radio.
Cambio de la pita
Cambie la pila por una nueva cuando la indication del reloj
destella o la alarma no funciona bien al conectar nuevamente
el cable electrico.
Notas sobre la pila
Si no se va a utilizar el aparato durante un Iargo periodo de
tiempo, saque la pila para evitar que se produzca
una
perdida de electrolito.
● Para evitar
que se produzca una perdida de electrolito o
explosion, no recargue la pila, caliente o desarme.
FONCTION D’ALIMENTATION
DE SECOURS
-
En cas de coupure de courant, I’affichage d’horloge disparalt
et Ie reglage d’alarme est annule. Pour sauvegarder I’horloge
et I’alarme, inserez une pile 6F22 clans Ie Iogement piles situe
a I’arri&re de I’appareil. + @
● La fonction
de sauvegarde dure pendant environ 10 minutes,
● La pile
d’alimentation
de secours n’est pas destinee a la
reception de la radio.
Replacement
de la pile
Remplacez la pile par une neuve si I’affichage de I’horloge
clignote ou si Ie programmateur d’alarme ne fonctionne pas
correctement Iorsque vous rebranchez Ie cordon secteu r.
●
Remarques sur la pile
Si vous ne prevoyez
pas d’utiliser
I’apparei[
pendant
Iongtemps,
retirez la pile afin d’emp~cher
une fuite
d’electrolyte.
● Pour emp~cher
une fuite d’electrolyte ou une explosion, ne
rechargez
jamais la pile, ne la chauffez
pas et ne la
demontez pas.
●
7
SETTING THE CLOCK + @
-
1 Connect the AC power cord to a wall outlet (@).
The clock display begins flashing.
2 Keeping CLOCK down, prese SLOW to set the clock.
12:00
midnight
12:00. noon
To increase the clock digits quickly, press FAST instead of
SLOW. The clock starts running at “00 seconds.
To display the seconds, press SNOOZE. + @
The seconds are displayed while the button is pressed.
@ The 1st place of the minute
@ Seconds
AJUSTE DEL RELOJ + @
-
1 Conecte el cable electrico en el tomacorriente de la
pared (@).
La pantalla del reloj empieza a destellar.
2 Mantenga el boton CLOCK oprimido y presione SLOW
para ajustar el reloj.
12:00 medianoche
12:00. mediodia
Para que el reloj avarice rapidamente, presione FAST en
Iugar de SLOW.
El reloj empezara a funcionar desde “00 segundos.
Para que aparazcan Ios segundos,
presione SNOOZE.
+0
Los segundos
aparecen
cuando se mantiene
et boton
presionado.
@ La primers cifra de Ios minutes
@ Segundos
MISE A L’HEURE DE
L’HORLOGE + @
-
1 Branchez Ie cordon secteur a une prise murale (@).
L’affichage de I’horloge se met a clignoter.
2 Tout en maintenant CLOCK enfonce, amxryez
. . . sur
SLOW pour regler I’horloge.
12:00 minuit
12:00. midi
Pour faire augmenter rapidement I’indication de I’horloge,
appuyez sur FAST au lieu de SLOW.
L’horloge commencera a avancer a partir de “00” secondes.
Pour afficher Ies secondes, appuyez sur SNOOZE. + @
Les secondes s’afficheront pendant la pression de la touche.
@ Premier chiffre des minutes
@ Secondes
9
7
mm
RADIO RECEPTION
2-
FM.
1
2
3
4
.AM
@m
Set ALARMIPOWER to ON.
Set BAND to select FM or AM.
Turn the TUNING control to tune in to a station.
Adjust the volume.
To turn off the radio
Set ALARM/POWER to (!) STANDBY.
For better reception + @
FM: Extend the FM wire antenna fully.
AM: Turn the unit to find the position
reception.
=:=
TUNING
I
I
t
-
-VOLUME
which gives the best
RECEPCION DE LA RADIO
1
2
3
4
Mueva
Mueva
Gire el
Ajuste
RECEPTION
m
RADIO
1 Placez ALARIWPOWER sur ON.
2 Choisissez une gamme d’ondes avec BAND.
3 Tournez la commande TUNING pour faire I’accord sur
une station.
4 Reglez Ie volume.
el ALARM/POWER a ON.
el BAND para seleccionar FM o AM.
control TUNING para sintonizar una emisora.
el volumen.
Para desconectar la radio
Mueva ei ALARM/POWER a (!) STANDBY.
Pour arr6ter la radio
Placez ALARM/POWER
sur (!) STANDBY.
Para una mejor recepcion + @
FM: Extienda completamente la antena de cable FM.
la position
donde
AM: Gire et aparato para encontrar
recepcion
sea la mejor posible.
Pour ameliorer la reception +43
la
FM: Deployez completement l’antenne-fil FM.
AM: Tournez I’appareil
pour trouver la position
meilleure reception.
off rant la
11
ALARM SETTING
The radio or buzzer automatically sounds at the designated
time every day.
You can set two different alarm times, one in ALARM 1 and
one in ALARM 2, so that the alarm timer operates twice a day.
1 Set ALARM MODE to 1 or 2.
You cannot set the alarm time when ALARM MODE is set to
1+2.
2 Keeping ALARM down, press SLOW to set the alarm
time.
12:00 midnight
12:00. noon
To increase the clock digits quickly, press FAST instead of
SLOW,
3 Set ALARM/POWER to RADIO or BUZZER.
The ALARM SET indicator 1 or 2 (@) lights up in the display.
When the preset time comes, the radio or buzzer sounds.
To turn off the alarm, press ALARM OFF or SNOOZE.
When SNOOZE is pressed, the buzzer will automatically come
on again after about 7 minutes.
To check the alarm time
Set ALARM MODE to 1 or 2 and press ALARM.
time will be displayed.
The alarm
To change the alarm time
Set the alarm time again.
Listening to radio while the alarm is set
Set ALARM/POWER to ON. After listening, set the switch to
RADIO or BUZZER.
Note
The radio or buzzer automatically turns off after about 1 hour,
● To cancel
the alarm before the preset time comes, set
ALARM/POWER
to O STANDBY.
The ALARM
SET
indicator goes off in the display.
●
AJUSTE DE LA ALARMA
REGLAGE
-
La radio o la alarma suenan automaticamente
a la hors
especificada todos IOSalias.
Se pueden ajustar dos horas de alarma diferentes, una en la
ALARM 1 y la otra en la ALARM 2 para que la alarma suene
dos veces al dia.
1 Ajuste el ALARM MODE a 10 a 2.
No es posible ajustar la hors de la alarma cuando el
ALARM MODE esta en 1 +2.
2 Mantenga presionado el ALARM y presione SLOW para
ajustar la hors de la alarma.
12:oO medianoche
12:00. mediodia
Para que avarice rapidamente el reloj, pulse FAST en Iugar
de SLOW.
3 Mueva el ALARWPOWER a RADIO o BUZZER.
El indicador ALARM SET 102 (@) se enciende en la pantalla.
Cuando Ilega la hors programada,
suena la radio o la
campana de alarma.
Para desactivar
la alarma,
presione ALARM OFF o
SNOOZE. Cuando se presiona SNOOZE, la campana suena
nuevamente despues de unos 7 minutes.
Para verificar la hors de la alarma
Ajuste el ALARM MODE a 1 0 a 2 y presione
Aparecera la hors de la alarma.
ALARM.
Para cambiar la hors de la alarma
Ajuste nuevamente la hors de la alarma.
Para escuchar la radio mientras la alarma esta puesta
Mueva el ALARM/POWER
a ON. Cuando termine
escuchar, mueva el interruptor a RADIO o BUZZER.
de
Nota
●
●
La radio
o la campana se desconecta
automaticamente
despues de unas 2 horas.
Para cancelar la alarma antes de la hors prefijada, mueva el
ALARM/POWER a O STANDBY.
El indicador ALARM SET
se apaga en la pantalla.
DU REVEIL
La radio ou Ie signal sonore se fait entendre automatiquement
chaque jour a I’heure programmed.
II est possible de regler deux heures d’alarme differences,
ALARM 1 et ALARM 2, ce qui fait fonctionner
la minuterie
d’alarme deux fois par jour.
1 Reglez ALARM MODE sur 1 ou 2.
L’heure d’alarme ne peut pas i??treposee quand ALARM
MODE est regle sur 1 +2.
2 Tout en maintenant ALARM enfonce, appuyez sur
SLOW pour poser I’heure de I’alarme.
12:00 minuit
12:00. “midi
Pour faire augmenter rapidement I’indication de I’horloge,
appuyez sur FAST au lieu de SLOW.
3 Reglez ALARNVPOWER sur RADIO ou BUZZER.
Le voyant ALARM SET 1 ou 2 (@) s’allumera clans I’affichage.
A I’heure prereglee, la radio ou Ie signal sonore se fera entendre,
Pour arr~ter I’alarme Iorsqu’elle se fai entendre, appuyez sur
ALARM OFF ou SNOOZE. Si vous ap$ uyez sur SNOOZE, Ie
signal sonore se fera a nouveau entendre apres 7 minutes environ,
Pour verifier I’heure de I’alarme
Reglez ALARM MODE sur 1 ou 2 et appuyez sur ALARM.
L’heure de I’alarme s’affichera.
Pour changer I’heure de I’alarme
Reglez a nouveau I’heure de I’alarme.
Ecoute de la radio alors que I’alarme est reglee
Reglez ALARM/POWER
sur ON. Apres I’ecoute, reglez Ie
commutateur sur RADIO ou BUZZER.
Remarques
● La radio ou Ie signal sonore
s’arr&e automatiquement apres
1 heure environ.
● Pour
annuler I’alarme avant qu’elle se fasse entendre a
I’heure
programmed,
placez
ALARM/POWER
sur 0
STANDBY. Le voyant ALARM SET s’eteint clans I’affichage.
13
ALARM SETTING
m
To set the alarm timer to sound twice a day
1 Set two alarm times ALARM 1 and 2 respectively referring
to steps 1 and 2 on page 16.
2 Set ALARM/POWER to RADIO or BUZZER.
3 Set ALARM MODE to 1 +2.
The ALARM SET indicators 1 and 2 (@) light up in the
display.
About the buzzer sound
● The buzzer tones of ALARM 1 and 2 are different.
. The buzzer volume is fixed and cannot be set with the
VOLUME control.
Note
. When the alarm times set on ALARM 1 and 2 are the same,
the alarm timer functions once at the preset time.
● You cannot
set buzzer and radio alarms at the same time.
AJUSTEDE LAALARMA
-
REGLAGEDU REVEIL
Para aiustar la alarma para aue suene dos veces al dia
1 Aju;te
dos horas”de
aiarma
en ALARM
1 y en 2
respectivamente refiriendose alospasosl
y2de Ia pagina
17.
2 Mueva el ALARM/POWER a RADIO o BUZZER.
3 Ajuste el ALARM MODE a 1 +2.
Los indicadores ALARM SET 1 y 2 (@) se encienden en la
pantalla.
Pour r6gler la minuterie d’alarme a deux fois par jour
1 Reglez
Ies deux heures
d’alarme
ALARM
1 et 2
respectivement
en vous referant aux etapes 1 et 2 de la
page 17.
2 Reglez ALARM/POWER sur RADIO ou BUZZER.
3 Reglez ALARM MODE sur 1 +2.
Les voyants ALARM SET 1 et 2 (@) s’allumeront clans
I’affichage.
Sobre el sonido de la alarma
Los tonos de Ias campanas de alarma ALARM 1 y 2 son
diferentes.
● El volumen de la campana
esta fijo y no puede ajustarse con
el control VOLUME.
A propose du signal sonore
● La tonalite
des signaux
sonores d’ALARM
1 et 2 est
difference.
● Le volume
du signal sonore est fixe et ne peut pas ~tre regle
avec la commande VOLUME.
●
Nota
Cuando Ios tiempos de alarma en ALARM 1 y 2 son iguales,
la alarma funciona solo una vez a la hors programada.
● No se pueden
ajustar Ias alarmas de la campana y de la
radio para el mismo dia.
●
Remarques
Quand Ies heures dalarme posees pour ALARM 1 et 2 sent
identiques,
la minuterie
d’alarme fonctionne
une fois a
I’heure programmed.
c Les alarmes par signal sonore et radio ne peuvent pas &re a
la m~me heure.
●
15
SLEEP TIMER SETTING
You can use the sleep timer to turn the radio off automatically
after up to 59 minutes.
● Before setting,
tune in to a station. (See page 14.)
1 Set ALARMIPOWER to 6 STANDBY.
2 Press SLEEP.
The radio comes on. The power will automatically cut off
after 59 minutes.
To set less than 59 minutes,
press SLOW repeatedly
while keeping SLEEP pressed.
SLEEP OFF
To cancel the sleep timer, press SLEEP OFF.
SLEEP
To check the remaining time of the sleep timer.
Press SLEEP.
To use both tha sleep timer and the alarm
You can fall asleep listening to the radio and still be awakened
by the radio/buzzer alarm at a preset time.
Press SLEEP to set the sleep timer after setting the alarm
timer.
AJUSTE DEL
TEMPORIZADOR
PARA DORMIR
Se puede utilizar el temporizador para dormir para desconectar
automaticamente la radio despues de 59 minutes
● Antes
de este ajuste, sintonice una emisora. (Consulte la
~aaina 15.)
1’ Mueva el ALARM/POWER a 6 STANDBY.
2 Presione SLEEP.
Se enciende
la radio.
La corriente
se desconecta
automaticamente despues de 59 minutes.
Para programar la desconexion
a menos de 59 minutes,
presione varias veces SLOW mientras mantiene presionado
SLEEP,
Para cancelar
SLEEP
el tamporizador
para
dormir,
Vous pouvez utiliser la minuterie d’arr& differe pour que la
radio s’eteigne automatiquement apres une duree jusqu’a 59
minutes.
● Avant
de proceder au reglage, syntonisez
une station.
(Voyez page 15.)
1 Placez ALARM/POWER sur O STANDBY.
2 Appuyez sur SLEEP.
La radio s’allume. La radio s’eteindra automatiquement
apres 59 minutes.
Pour regler a moins de 59 minutes, appuyez de maniere
repetee sur SLOW en maintenant SLEEP presse.
presione
Pour annuler
SLEEP OFF.
para
Pour verifier Ie temps
appuyez sur SLEEP.
OFF.
Para verificar el tiempo restante del temporizador
dormir.
Presione SLEEP.
REGLAGE DE LA
MINUTERIE D’ARRET DIFFERE
Para utilizar tanto el temporizador para dormir como la
alarma
Puede quedarse dormido escuchando la radio y sin embargo
despertarsecon la alarmade la radio/campanaa la hors prefijada.
Presione SLEEP para ajustar el temporizador para dormir
despues de ajustar la hors de Ia’alarma.
la minuterie
d’arr~t
restant
differe,
appuyez
de la minuterie
sur
d’arr&rt,
Pour utiliser a la fois la minuterie d’arr& differe et I’alarme
Vous pouvez vous endormir au son de la radio et vous faire
reveiller par la radio/signal sonore a I’heure programmed.
Appuyez sur SLEEP pour activer la minuterie d’alarme apres
avoir regle I’heure de I’alarme.
17
SPECIFICATIONS
mm
Power source
Household current
AC 120 V, 60 Hz
output
280 mW (EIAJ)/Max: 400 mW
Power consumption
4W
Spesker
57 mm
Frequency rsnge FM: 87.5 – 108 MHz
AM: 530-1,710
kHz
Antennss
FM wire antenna
Ferrite bar antenna for AM
Dimensions (W x H x D)
130x 140x l17mm
Weight
Approx. 720 g
●
●
The specifications and external appearance are subject to
change without notice.
Specifications, trade mark and model name are marked on
the bottom of the unit.
To maintain good performance
Keep cassette tapes, magnetic cards and other magnetically
recorded materials away from the speaker as the recorded
information may be erased or noise on cassette tapes may
occur.
To clean the csbinet
Use a soft cloth lightly moistened
with a mild detergent
solution.
Do not use strong solvents, such as alcohol, benzine or
thinner.
ESPECIFICACIONES
-
Fuente de alimentacion
Corriente del hogar
CA de 120 V, 60 Hz
280 mW (EIAJ)/Max. 400 mW
Salida
Consumo electrico
4W
Altavoz
57 mm
Gama de frecuencias
FM: 87,5 – 108 MHz
AM: 530-1.710
kHz
Antenas
Antena de cable FM
Antena de barra de ferrita para AM
Dimensioned (An. x Al. x Prof.)
130x 140x l17mm
Peso
Aprox. 720 g
●
●
Las especificaciones
y aspecto exterior estan sujetos a
cambios sin previo aviso.
Las especificaciones,
Iogotipo de la marca y nombre del
modelo estan indicados debajo del aparato.
Para mantenerlo en buen estado
Mantenga Ias cintas de casete, tarjetas magneticas u otros
materials grabados magneticamente alejados del altavoz ya
que la information grabada puede borrarse o puede haber
ruidos en Ias cintas de cassette.
Para Iimpiar ei mueble
Utilice un patio suave empapado
en una solution
de
detergence neutro.
No utilice disolventes fuertes tales como alcohol, bencina o
diluyente de pintura.
FICHE TECHNIQUE
Source d’alimentation
Aiimentation secteur
120 V CA, 60 I-Iz
Courant de sortie 280 mW (EIAJ)/Maxi: 400 mW
Consummation electrique
4W
Haut-parieur
57 mm
Plage de frequencies
FM: 87,5-108
MHz
AM: 530-1.710
kHz
Antennes
Antenne-fil FM
Antenne-tige de ferrite pour AM
Dimensions (1x h x p)
141 xl18x122mm
Poids
720 g
●
●
Les caracteristiques
et I’aspect exterieur sent susceptible
d’&re modifies saris preavis.
Les caracteristiques, la marque et la designation du modele
sent indiques au-dessous de I’appareil.
Pour assurer un bon fonctionnement
N’approchez pas de cassettes, cartes magnetiques ou autres
supports d’enregistrement
magnetique du haut-parleur
car
ceci pourrait effacer ies information
enregistrees ou creer des
parasites sur Ies cassettes.
Pour nettoyer Ie coffret
Utiiisez un chiffon doux Iegerement imbibe d’une solution de
detergent doux.
N’utilisez pas de solvants puissants, tels qu’alcool, benzine ou
diiuant.
19
AIWA CO.,LTD.
87-RU4-906-01
961 107AA0-OX
Printed in Hong Kong