1
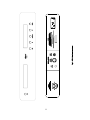
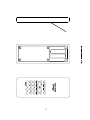
CLASSÉ AUDIO
CDT-1
CD TRANSPORT
CDT-1
OWNER'S MANUAL
CLASSÉ DESIGN PHILOSOPHY
1. REPEATED LISTENING DESIGN SESSIONS:
Fine tuning the sound by exchanging and mixing different parts (transistors, capacitors, wiring,
PCB boards etc.), and adjusting many specific operating voltages within proper engineering ranges, has
allowed us to produce an overall sonic recipe giving the most natural harmonic realism of music typical
of instruments in a live performance.
2. UPGRADABLE SINGLE CIRCUIT DESIGNS:
All Classé products share exactly the same circuit design philosophy. This means all amplifiers
and all high level circuits benefit from the same design goals. Similar circuits are then tailored to
different power levels etc. Differences between less expensive models and more expensive models are
parts quality and compliment, power supply extravagance and the amount of filtering etc., as well as
features and packaging.
This means that for years Classé has been constantly sonically fine tuning and technically upgrading this
circuit design and its application, thus reaching a very high level of natural musical enjoyment as well as
excellent reliability which benefits all models.
3. EXTREME LONG LIFE IN REAL WORLD CONDITIONS:
Choosing the best attainable quality parts and materials combined with the advantages of the two
above-mentioned areas provides Classé owners with years of proven trouble-free reliability and musical
enjoyment.
CDT-1
OWNER'S MANUAL
TABLE OF CONTENTS
UNPACKING & SET-UP............................................................. 4
A.C. LINE POWER ...................................................................... 5
REAR PANEL CONNECTIONS AND FUNCTIONS.............. 6
DISPLAY, FUNCTIONS AND OPERATIONS.......................... 7
TECHNICAL DESCRIPTION..................................................... 13
SPECIFICATIONS....................................................................... 15
WARRANTY................................................................................ 16
WARRANTY REGISTRATION.................................................. 18
3
UNPACKING & SET-UP
1. UNPACKING AND ACCESORIES:
The Classé CDT-1 has been carefully wrapped in heavy gauge plastic, packed in semi-rigid
foam and contained in a special box. To remove the unit, open and spread the top flaps of the box. By
its sides, lift the CDT-1 out along with its attached foam packing. Remove each foam side by pulling
them straight out. Remove the plastic wrap and inspect the unit for any concealed damage. Report any
concealed damage to your dealer promptly.
Apart from this owner's manual, please ensure the following is also included:
1) Detachable A.C. power cord.
2) Remote control handset (along with allen key and two (2) type "AAA" batteries).
Please report any missing parts to your dealer promptly.
2. SETUP:
The CDT-1 transport must be operated on a horizontal platform (see specifications for details)
such as a table or, preferably, specialized audio furniture to extract the best performance. Like fine
turntables and interconnect cables, the final location of the CDT-1 should be free of any hum-inducing
magnetic fields, such as those caused by power amplifiers, AC line filters and other regulation devices.
Such locations can introduce noise into an audio system, which inevitably degrades sound quality.
Ideally, a few feet should separate the CDT-1 from the power amplifier. As well, keep low-level
interconnect cables away from the power amp and separate from A.C. power cords.
The CDT-1 generates negligible amounts of heat. Therefore, air space around the CDT-1 for ventilation
need not be a concern.
Important! Check the Serial Number sticker on the back of the unit for the correct operating voltage.
Regardless of the voltage, the fuse rating should be a 3/8 AMP SLO-BLO type.
4
A.C. LINE POWER
The CDT-1 has no ON/OFF switch. Its low power consumption and improved sonics from
always being ON led to the use of a STANDBY switch only. While thoroughly musical shortly after
turn-on, the CDT-1 will exhibit "sonic growth" for the first 300 hours of use.
For optimum sonic performance, you should consider use of the optional CLASSÉ
REFERENCE A.C. LINE CORD. Consult your dealer regarding this accessory.
CAUTION: "FLOATING THE GROUND” OR DEFEATING THE GROUND ON A 3-PRONG
LINE CORD MAY CREATE A SHOCK HAZARD. CONNECT ALL INTERCONNECT CABLES
BETWEEN THE ELECTRONICS BEFORE CONNECTING THE A.C. LINE CORDS TO THE
WALL OUTLETS. THIS WILL REDUCE THE POTENTIAL SHOCK HAZARD. IN ADDITION,
PLEASE READ THE WARRANTY SECTION OF THIS OWNER'S MANUAL.
5
REAR PANEL CONNECTIONS AND FUNCTIONS
Connecting the CDT-1 to your audio system requires a digital interface cable between the CDT1 and your digital processor, and the supplied AC power cord. Each is described in detail below. Refer
to Fig. 1 on page 11 for visual aid.
The CDT-1 is equipped with three types of high-quality digital output interfaces:
1. ST OPTICAL DATA OUTPUT CONNECTOR:
This is a high quality digital output for optical ST standards. To use this output, you need an ST
Glass interface cable and an optical ST input on your digital processor. Consult your dealer regarding
the optimum cable for your system.
2. BALANCED (AES/EBU) DATA OUTPUT CONNECTOR:
This is a high quality digital output built around an XLR connector. To use this output, you
require a balanced cable and an AES/EBU input connector on your digital processor. Consult your
dealer regarding an optimum quality cable for your system.
3. COAXIAL DATA OUTPUT CONNECTOR:
This is the popular S/PDIF digital output for electrical S/PDIF standards. It requires a coaxial
interconnect cable and a digital coaxial input on your digital processor. Again, contact your dealer
regarding a high quality digital cable for your system.
A NOTE ABOUT THE CONNECTING CABLES:
The overall performance of the CD transport will vary dramatically with the quality and type of
cables chosen. Selection of the highest quality digital output cables combined with proper output
interconnects is recommended for maximum performance of the Classé CDT-1.
AC LINE INPUT
In addition to the three digital outputs, the remaining connection on the rear panel of the CDT-1
is the AC input connector. Connect the supplied AC power cord to this input. As the CAUTION
section on the previous page indicates, it is always a wise PRECAUTION to connect all interconnect
cables before attaching the AC power cords.
6
DISPLAY, FUNCTIONS AND OPERATIONS
1. FUNCTIONS:
The front panel of the CDT-1 has six buttons that perform all the basic necessary functions. The
remote control contains all the basic functions found on the front panel (except the LOAD button) as
well as all advanced programming features.
Using Figure 1 on page 11, the front panel controls are (from left to right):
LOAD: Press this button once to open the disk tray. Pressing it again will close the tray.
STOP: Stops playing the disk, and also clears all programs in memory.
PREVIOUS (½): Pressed once during playback, the CDT-1 will start playing the previous track.
Pressing it sequentially will cause the CDT-1 to go back one track each time it is pressed. This button is
also used to select tracks to play and program into memory.
PLAY/PAUSE: Press this button to start playback. Pressing it again will pause the music until it is
pressed once more.
NEXT (¾): Each time this button is pressed, the CDT-1 will advance one track i.e. press it twice to
advance two tracks, three for three tracks, etc. If pressed during playback, the CDT-1 resumes playing
from the desired track. If pressed while stopped, the CDT-1 will await further commands.
STANDBY: This is the "power switch" of the CDT-1. Press it to turn the CDT-1 on and off.
In addition to all the above functions, the remote handset of the CDT-1 contains the following additional
functions (see Fig.2 on page 12):
NUMERIC KEYPAD (digits 0 through 9): This is a convenient alternative to the PREVIOUS and
NEXT buttons. Pressing the desired track number on the numeric keypad is usually faster than the
PREVIOUS and NEXT buttons. For example, if you just inserted a disk and wish to play track 8,
pressing 8 followed by PLAY is easier than pressing the NEXT button eight times, and then PLAY.
REPEAT: Repeats the whole disk, the programmed tracks or just the single track being heard.
SCAN: Plays the first ten seconds of each track.
SHUFFLE: Plays all tracks on a disk in random order.
STORE: Stores selected tracks into memory for playback.
7
FORWARD (») AND REVERSE («) SEARCH: The CDT-1 employs a convenient 2-speed search.
These buttons allow you to quickly search through the disk in both directions. Press and hold down the
desired SEARCH button. The time counter will approximately double in speed, and the track heard will
be reduced in volume. Once the desired point is reached, release the SEARCH button. Playback will
resume.
If the SEARCH button is held for more than 4 seconds, the CDT-1 goes into a high-speed search
mode, and the time counter advances very rapidly. During high-speed search, the volume is completely
muted.
2. DISPLAY INFORMATION AND VARIOUS MODES OF OPERATION:
To insert a disk, press LOAD to open the CD tray. Gently place the disk with the label side up
on the tray, and press LOAD again. The tray will close, and several seconds later the display will
indicate the total number of tracks on the disk with the total playing time.
If the disk has not been
properly inserted, or is inserted upside down, the message NO DISC will appear on the display. Disks
with bad scratches, pinholes, or other severe manufacturing defects might also not be useable.
Once the display confirms the number of tracks and playing time, the CDT-1 is in STOP mode. At this
point, you can carry out several different playback modes. Each is described in detail below.
Playback from the beginning or from a selected track
To play an entire disk from the beginning, press PLAY. The CDT-1 will start playing in a few
seconds, and will play the entire disk. To play from a desired track onwards, select the desired track
using the NEXT (¾) and/or PREVIOUS (½) buttons, or with the numeric keypad on the remote control.
Then press PLAY. The disk will play from that point on until the end of the disk. While playing, the
display will show each track currently playing along with the elapsed time from the beginning of that
track. Once the disk is over, the CDT-1 will return to STOP mode.
Playback of only selected tracks
You can program the CDT-1 to play any combination of tracks on a disk, up to a maximum of
20. Using the NEXT (¾) and PREVIOUS (½) buttons, or the numeric keypad, find the first desired
track on the display. Then press the STORE button. Repeat this procedure until all desired tracks have
been stored. As each track is being stored, the display indicates the total playing time of all tracks
8
currently programmed. Press PLAY. Playback will commence from the first programmed track, and all
programmed tracks will play in the order they were stored. Please note that:
- If you try to program more than 20 tracks, the display will indicate FULL, and no more tracks
will be entered into memory.
- Each track can only be programmed once.
- During programmed playback, the numeric keypad is disabled; use NEXT and PREVIOUS to
change tracks.
- The programmed tracks don't have to be in ascending numerical order; i.e. you can program
track 2 to play after track 6.
- If you programmed a track by accident, simply go to that track once more and press STORE
again. That track will be deleted from memory.
- To clear all the tracks programmed in memory, press the STOP button twice if the CDT-1 is
already playing, or once if it is not. If you intend on changing the disk, simply opening the disk
tray automatically erases all programmed tracks from memory.
Playback using REPEAT
Pressing the REPEAT button sequentially toggles between three different functions: Repeating
the entire disk, repeating the track currently being played or indicated on the display, or not repeating at
all. In each case, the display indicates which mode is selected (REPEAT, REPEAT 1, or a nothing at
all). Once the desired mode of repeat is chosen, press PLAY.
The REPEAT feature can also be used with tracks programmed in memory in the same way as above.
Playback using SHUFFLE
Also known as Random Play, pressing the SHUFFLE button instructs the CDT-1 to play all
tracks in a random order. Once all tracks have been played, the CDT-1 will return to STOP mode.
While in SHUFFLE play, the display will indicate SHUFFLE. After pressing SHUFFLE, you do not
need to press PLAY.
The SHUFFLE feature can be used in conjunction with the REPEAT button to provide endless
hours of randomly selected, uninterrupted music.
9
Playback using SCAN
This is a handy feature that lets you "preview" the contents of a disk. By pressing SCAN, the
CDT-1 will automatically play the first 10 seconds of each track on the disk. Once you've found a track
you like, pressing SCAN again will disable the SCAN feature and play the entire track currently being
heard.
3. ERROR REPORTING:
The CDT-1 will report any erroneous operation via an "ERR" message on the display. For
example, trying to program a disk while it is playing, or trying to play or program a track number nonexistent on a disk (i.e. track 12 on a disk with 10 tracks) will trigger the error message. The "FULL"
error message only appears when the user attempts to store more than twenty tracks into memory.
10
11
12
TECHNICAL DESCRIPTON
The Classé CDT-1 compact disk transport is high quality digital transport utilizing the latest
innovations in digital audio reproduction. The philosophy behind the CDT-1 is advanced technology for
extracting the maximum musical performance, but also embraces the time proven idea of simplicity, in
accordance with the saying "simpler is better."
No effort has been spared in the development of the CDT-1. The chassis is of exceptionally thick gauge
metal, and has been designed to resist vibration through solid construction and proper isolation from
sources of vibration. The half-inch thick faceplate is a tribute to its construction and aesthetics.
Inside, main power is provided by a custom high-current 27VA toroidal transformer. The power
supply of the CDT-1 is generously oversized to assure that regardless how much current is drawn, the
circuitry will remain unaffected by any fluctuations. Numerous power supplies are used, to assure the
elimination of interference caused by fluctuations often induced by heavy current draw on shared
supplies.
The CDT-1 inherently has a low power consumption, but micro-information is easily
contaminated when traditional power supplies clip due to their inadequate output. This is the general
idea behind the high current, stable supply that powers the CDT-1.
The disk transport itself is the latest Philips CDM12.4 with the L1210 Loader assembly. This
mechanism employs a newly-developed linear tracking laser pickup which is faster, quieter, and longer
lasting that the well received CDM9 Pro mechanism. The isolated suspension system of the CDM12.4's
optical circuitry and disk motor is completely separate from the disk tray, eliminating micro-vibrations
caused by sudden atmospheric pressure changes around the front panel. The CDM12.4 is of broadcast
quality, and its outstanding construction using highly efficient, long life motors assures excellent longterm reliability. In addition, this transport is designed not to require periodic calibration, assuring that
long-term alignment will always be right on specification.
Jitter, also known as errors in the time domain, is the prime factor in performance degradation,
and Classé has addressed this problem from every perspective. One aspect is the outstanding power
supply described above; another is the exceptional reclocking circuitry. Using a 16.9344 MHz crystal
oscillator to generate the digital outputs, the final jitter measured at the outputs is typically so low it can
barely be detected. The crystal oscillator itself is designed to generate a spectacularly low jitter of
13
approximately 2 picoseconds! Standard outputs are an AES/EBU balanced on an XLR 3-pin Neutrik
connector, a Hewlett-Packard optical ST output and an S/PDIF coaxial connector using a heavy-duty
gold-plated RCA jack.
A final technical highlight of the CDT-1 is the custom remote handset.
It features an
exceptionally wide transmission angle to the IR receiver on the CDT-1, and is engineered to last an
extremely long time.
14
CLASSÉ CDT-1
COMPACT DISK TRANSPORT
SPECIFICATIONS:
Wow and Flutter
Jitter
Below measurement level
Below measurement level
Digital outputs:
AES/EBU
Impedance
Level
Tr = Tf
Balanced on XLR-3 connector
110 ohms + 5%
3.0 Vpp typ. with 110 ohm load
7 ns typ.
SPDIF
Single ended on RCA connector
75 ohms + 5%
1.2 Vpp typ. with 75 ohm load
8 ns, typ.
Impedance
Level
Tr = Tf
Glass - ST
Power
HP HFBR-1414
60 uw into 62 um fiber
Laser, semi-conductor
Sampling rate
Disc rotational velocity
Quantization
Error correction
GaAIAs, 0.5 mw, continuous, 790 nm
352.8 KHz
200-500 rpm (constant linear velocity)
16 bits, linear
CTRC principle
POWER REQUIREMENTS:
Europe/UK
Canada/USA/Japan
180-260 VAC, 50 Hz, 27 Watts typ.
90-130 VAC, 60 Hz, 27 Watts typ.
WEIGHT AND DIMENSIONS:
Dimensions: Gross:
Net:
Weight:
Gross:
Net:
Operating temperature
Storage temperature
Operating position
22"x 19 1/2" x 10 1/2"
19" x 13 3/4" x 4" (W x D x H)
18 lbs.
13 lbs.
0ºC to + 40ºC
-20ºC to + 60ºC
Horizontal, up to ±5º inclination in any direction.
15
CLASSÉ CDT-1 LIMITED FACTORY WARRANTY (North America only).
IMPORTANT: Warranty registration and a copy of the “Authorized Dealer Bill of Sale” must be
received at the Classé Audio factory (address PAGE 18) within thirty (30) days of purchase by the
original retail purchaser in order to validate this warranty.
FIVE YEAR WARRANTY (all parties)
Classé Audio, Inc. warrants this product to be free from defects in materials and
workmanship to the original retail purchaser for a period of FIVE YEARS from date of manufacture,
provided that any claim in virtue of this warranty be made in writing within such period. (Hand held
remote control and transport mechanisms are warranted for one year only. No warranty is offered
for batteries).
This warranty may not be transferred to any subsequent owner unless the following
conditions have been met: the product will be re-sold through an authorized Classé Audio dealer,
who will be responsible for contacting Classé with all specifics (name of new owner, address of new
owner, serial number of the product) of the subsequent sale. If the subsequent owner has purchased
the product through an authorized Classé Audio dealer, and all of the above conditions have been
met, the new owner will have the benefit of any remaining coverage from the original five year
period.
In order to initiate service of any kind, it is necessary to OBTAIN PRIOR FACTORY
AUTHORIZATION, AND SHIP THE UNIT PREPAID TO THE CLASSÉ FACTORY. Units coming from
the USA should be shipped directly to our CUSTOMS BROKER: STARBER FRITZ
INTERNATIONAL, C/O CLASSÉ AUDIO, HIGHWAY 114 EAST, NORTON, VERMONT 05907
USA.
The warranty shall be void and of no effect in the event of any of the following:
1) Operation not in accordance with this manual.
2) Accident, abuse, tampering, or unauthorized
modification, as determined by Classé Audio Inc.
3) Removal, defacing, or falsifying the serial number plate.
4) Shipping without the complete factory packaging.
16
5) Transfer or sale of this processor by the original owner;
6) Non-compliance with any of the other conditions hereof.
CLASSÉ AUDIO INC. SHALL NOT BE LIABLE FOR ANY SPECIAL, INCIDENTAL, OR
CONSEQUENTIAL DAMAGES ARISING FROM OR RELATING TO THE SET-UP, OPERATION,
FAILURE, TROUBLESHOOTING, OR REPAIR OF THE CDT-1 AND/OR ANY OTHER
EQUIPMENT USED THEREWITH.
THIS WARRANTY, ALL CLAIMS MADE IN VIRTUE HEREOF, AND ALL ISSUES
RELATING TO ANY SUCH CLAIM SHALL BE GOVERNED BY THE LAWS OF THE
PROVINCE OF QUÉBEC.
17
WARRANTY REGISTRATION
You must fill out and return the form below, along with a copy of the authorized dealer bill of
sale, to the factory within thirty (30) days of purchase. This will allow us to provide expedient service,
information regarding updates and new products, and validate the Classé warranty.
CDT-1 SERIAL NUMBER______________________________________________________
PURCHASE DATE_____________________________________________________________
AUTHORIZED DEALER________________________________________________________
PURCHASER'S NAME_________________________________________________________
STREET ADDRESS____________________________________________________________
CITY________________________________STATE/PROV.____________________________
COUNTRY________________________ZIP/POSTAL CODE__________________________
I BECAME AWARE OF THIS PRODUCT BY:_____________________________________
(DEALER, MAGAZINE, FRIEND, ETC.)
SEND TO: CLASSÉ AUDIO INC.
Product Registration
5070 François Cusson
Lachine, Quebec, Canada
H8T 1B3
18
Notice to all Classé Product owners:
Thank you for your purchase of a Classé Audio component.
All of us at Classé have taken extreme care to ensure
that your purchase will become a prized investment.
We
are proud to inform you that all Classé Audio components
have been officially approved for the European Community
CE mark.
This means that your Classé product has been subjected to
the most rigorous manufacturing and safety tests in the
world, and have proven to meet or exceed all European
Community CE requirements for unit to unit consistency
and consumer safety.
All of us at Classé Audio wish you many years of musical
enjoyment.
As of July 18, 1996, Classé Audio has been granted
Certificate No: C401CLA1.MGS, which indicates CE
approval for all models of the Classé Audio product line.
19