1
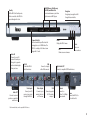
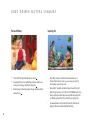
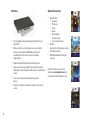
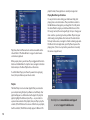
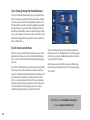
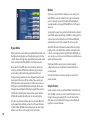
U S E R
G U I D E
For Software Release 1.5.18
HD1000
W e l c o m e t o R o k u ™!
In This Guide . . .
2 The Roku HD1000
Bring your HDTV to life with Roku. For the first time, you’ll enjoy viewing your favorite digital photos in
high-definition on your HDTV. Simply snap in your digital camera’s memory card or use the easy network
4 Roku HD1000 Feature
Summary
connection between Roku and your home PC. And if you like a more sophisticated atmosphere, choose
7 Connecting the HD1000
from a wide selection of motion and still artwork to turn your flat screen or HDTV into beautiful wall art.
13 Using the HD1000
Roku offers custom Art Packs on CompactFlash® cards so you can create an inspiring home gallery in your
13 Main Menu
living room.
14 Viewing Pictures
Roku even plays digital music files over your home network, so you can enjoy your growing digital music
library on your home stereo system. Any way you use it, Roku is simple and easy. Just connect to your
home network for sharing digital media from your PC, or pop in a variety of memory cards and watch your
HDTV come to life with high-definition digital photos, art and music.
This guide provides the basics for using your new HD1000. For the most up-to-date information about tips
and tricks, networking, troubleshooting and frequently asked questions, please visit www.rokulabs.com.
(And while you’re there, please register your HD1000. Periodically, we release software upgrades that add
15 Viewing MPEG Video
15 Playing Music
17 Photo, Video and
Music Sharing from
the Computer
20 Photo Viewing Tips
25 Setup and Preferences
29 Troubleshooting
new features — and if you don’t register, we can’t let you know about the updates.)
1
Package Contents
The Roku HD1000
• Roku HD1000
• Component Video Cable
Power the HD1000
on and off.
• Remote Control
• Two AAA Batteries
The Roku Remote
• Audio Cable
Enjoying pictures, art and
music involves just a few
touches of a button.
• Power Cable
Optional Accessories
• Rack Ears
Make sure you install batteries in the remote before
setting up your HD1000.
Display the Main Menu.
Select an on-screen item.
• Wi-Fi Adapter
• Roku Art Packs
Navigating
• Crestron Driver
To get around the screen,
move the yellow highlight
using the four arrow (navigation) buttons. Press the Select
key to choose an on-screen
item. Press the Menu key to
display the Main Menu, from
which you can access other
media and functions.
Visit www.rokulabs.com for
more information on optional
accessories.
2
Skip to Previous image/track.
Exit screens and menus.
Navigate on-screen
menus and Pan around
zoomed images.
Skip to Next image/track.
Play/Pause music
or slideshow.
Rotate images to
desired viewing angle.
Additional Information
about displayed image.
Zoom In/Out, fit to
screen and multiple
magnification levels.
SD/MMC, Memory Stick, Memory
Stick PRO, SmartMedia Slots
Receive standard memory cards from
digital cameras and MP3 players.
Standby
Put the HD1000 in Standby mode.
Video connected to the HD1000 is
passed through in this state.
CompactFlash Slot
Receive standard CompactFlash cards for
viewing photos, art or MPEG2 video. The
HD1000 can display a 1080i video stream
along with 5.1 audio.
Audio IN
Connect to your A/V
receiver for audio passthrough or to generate
audio visualizer displays
from your stereo.
Audio OUT
Connect to external
speakers or compatible
audio devices.
RS-232
Control the HD1000
with other devices.
Video Inputs
Connect your A/V
receiver to pass video
through the HD1000.
VGA
Connect to a display
with a VGA connector.
Video Outputs
Connect to your
monitor, television
or A/V receiver.
USB
Connect supported
802.11b wireless
adapters.*
Navigation
Navigate up, down, right and left
through the user interface.
Menu
Display the HD1000 menu.
Exit
Dismiss screens and menus.
Select
Choose an
on-screen item.
Digital Audio OUT
Connect to compatible S/PDIF audio devices.
Ethernet
Connect to a
10baseT or 100Mbps
home network.
Power
Connect the HD1000 to
an electrical outlet.
* Check www.rokulabs.com for compatible Wi-Fi devices.
3
Roku HD1000 Featur e sum m ary
Personal Photos
•
•
•
The world’s first high-definition photo viewer.
View digital photos in beautiful high resolution, with zoom,
rotate, pan, and image data display functions.
Browse images manually or play an image slideshow, with or
without music.
Inspiring Art
•
•
•
4
Roku offers motion and still Art Packs by download or on
CompactFlash memory cards so you can enjoy an inspiring
home gallery in your living room.
Roku LiveArt™ (available on Nature, Aquarium and Clocks Art
Packs) brings motion to art in the form of HD MPEG2 video clips.
Enjoy a rippling mountain lake, a breezy California poppy field,
or a lifelike aquarium from the comfort of your living room.
See www.rokulabs.com/products/artpacks for details about
Gallery Collection and individual Roku Art Packs.
Digital Music
Video Playback
•
•
•
•
•
Play your PC or Mac library of MP3, WAV, and AIFF audio files
and playlists (M3U and PLS formats) when you connect the
Roku through your home network.
View an HD photo slideshow accompanied by your favorite
songs.
Play HD ATSC-compliant MPEG2 transport stream video, which
is the type of signal typically broadcast over the air by a local
digital television station.
Customers who use tuner cards to record digital broadcast
television to a computer will enjoy viewing these recorded
segments on their HDTV through the Roku HD1000.
Third-party applications are available to support additional
formats.
Roku Open Platform & SDK
•
•
•
The Roku HD1000 is based on the
Roku OS, an open-source, Linuxbased platform optimized for
digital media.
Software Developer Kit (SDK)
enables developers to create
innovative new applications.
See www.rokulabs.com/developers
for more information.
5
Hardware
Optional Accessories
•
•
•
•
•
•
•
6
The only digital media player designed specifically for your
high-def TV.
Memory card slots on the front give easy access to digital
media on CompactFlash, SD, MMC, Memory Stick, and
SmartMedia cards. XD cards can also be used with a
simple adapter.
Network ready with built-in Ethernet or Wi-Fi adapter.
Supports a broad range of digital and analog AV connectors,
allowing for seamless integration with any home entertainment
system.
Screen saver and pass-through modes help prevent
burn-in.
Intuitive user interface controlled via simple, custom remote
control.
•
•
•
•
Roku Art Packs
• Aquarium
• The Classics
• Clocks
• Nature
• Winter Holiday
(download only)
• Space (download only)
Rack Ears
Crestron Driver (third-party accessory)
Extra Remote Control
WiFi Network Adapter (third-party
accessory)
Art Packs and other accessories are
available at www.rokulabs.com and in
stores where the Roku HD1000 is sold.
Connecting the HD1000
Connection Methods
The HD1000 is designed to connect to your AV system in one of two
ways. In the first method, you connect the HD1000 like you would
a DVD player or any other normal audio-video source. An alternate
method allows you to connect your HD1000 “in-line” as the last
device between an AV source (such as an AV receiver) and your display
device. Both of these options are discussed in more detail below.
Separate AV Source
Connect the appropriate HD1000 audio and video outputs to the corresponding inputs on your TV or AV receiver. You will use the HD1000
like you would any other audio-video source by switching to the
appropriate audio-video source on your TV or AV receiver.
In-Line/Video Pass Through
When using the in-line mode, you connect both the Video/Audio
Ins and Outs on your HD1000. The video and audio will be passed
through (using high-quality analog switches) when the HD1000 is in
Standby mode. The HD1000 enters Standby mode when you press
the power button and the power light is off. When in this mode your
HD1000 monitors the incoming video signal and automatically generates a screen saver when appropriate, decreasing the chance of burnin. For more information on this connection method, see “Connecting
Your HD1000 to Use the Video Pass-Through Feature” below.
Mode
1
2
3
4
5
6
7
8
9
10
Connector
Component
S-Video
Composite
Component
Component
Component
VGA
VGA
VGA
VGA
Format
480i
480i
480i
480p
720p
1080i
480p
720p
1080i
1024x768
Picture Quality
Good
Good
Good
Better
Best
Best
Better
Best
Best
*
Preparing to Connect
How you connect the HD1000 also depends upon your type of display
and its available inputs. The HD1000 offers four options for connection to your display: Composite, S-Video, VGA and Component. Only
one type of connector may be connected at a time, or image quality
will be adversely affected. We highly recommend that you use either
Component or VGA for the best image quality. However, we have
provided S-Video and Composite for specialized applications.
From the factory, the HD1000 is set to output Component 480i. This
connection is widely supported by most HDTVs, but the other options
yield superior results and are recommended if your display supports
them (see the chart). We recommend a Component 720p or 1080i
connection for best results, if supported by your display.
7
*Note: Generally, the Roku HD1000 supports wide-screen resolutions
(1280x720, 1920x1080), but it also supports 1024x768 in standard 4:
3 aspect ratio for certain (primarily commercial) applications. The
HD1000 user interface was designed for use on wide-screen HDTV
monitors. Therefore, when displayed 4:3 in this 1024x768 mode, the
menus and buttons and so forth look slightly stretched vertically.
However, images themselves (photos, art) are displayed in their
proper aspect ratio without distortion. Please note that LiveArt™ will
have the same vertical stretching effect as the user interface.
Connecting via Component
Most component-capable displays are able to display the HD1000’s
initial setup screen when connected via the component cables. In the
event you cannot see the initial setup screen, proceed to the “Connecting Without On-Screen Display” section.
6. If you do not see the setup screen, check the input selection on the
display, then re-check the cable connections (being certain that
the colors are matched and that the cables are connected to the
Video Out connection on the HD1000). If there is still no picture,
proceed to “Connecting Without On-Screen Display.”
7. You should see the Display Format setup screen on your display at
this point, and it should read “Component 480i.” The Power LED
will begin blinking with the mode number referenced in the previous table.
Note: The Power LED will change the number of times it blinks to
correspond to the current mode.
1. Connect the component cables (the three-wire cable with red,
green and blue plugs) to the HD1000, taking care to connect to the
Video Out connectors and being certain to match the colors of the
cables to the colors of the connectors.
8. Once the proper format has been selected, press Select. Then use
the down arrow to move the yellow highlight to the Accept button,
and press the Select key to confirm your choice.
2. Connect the other end of the component cables to your display
(or your component AV receiver), again being certain to match the
colors. If your display has both Component and separate HDTV
or HD Component input connectors, connect to the HDTV or HD
Component connectors.
Connecting via VGA
3. Turn on the display and, with the remote for your TV, select the
input to which you have just connected the cable.
4. Connect the power cable to the back of the HD1000 and plug it
into an electrical outlet.
8
5. You’ll see a Busy light blinking, and a startup graphic will appear on
your screen. Once the HD1000 is fully started up, the Busy light will
stop, the Power light will begin to blink and you will see the initial
setup screen.
Most VGA-capable displays are able to display the HD1000’s initial
setup screen when connected via the VGA cable, but the display may
appear in black and white or green because the HD1000 is outputting
a Component Video signal. This is normal. The following steps cover
selecting the correct output signal:
1. Connect a VGA cable to the HD1000, taking care to make sure the
connection is secure.
2. Connect the other end of the VGA cable to your display.
3. Turn on the display and select the input to which you have just
connected the cable.
4. Connect the power cable to the back of the HD1000 and plug it
into an electrical outlet.
5. You’ll see a Busy light blinking, and a startup graphic will appear on
your screen. Once the HD1000 is fully started up, the Busy light will
stop, the Power light will begin to blink and you will see the initial
setup screen.
6. If you do not see the startup and setup screens, check the input
selection on the display, then re-check the cable connection. If
there is still no picture, proceed to “Connecting Without On-Screen
Display” on page 10.
7. You should see the Video Output Format setup screen on your
display at this point (in black and white or green), and it should
read “Component 480i.” The Power LED will begin blinking with
the mode number referenced in the previous table.
8. Proceed to the VGA resolutions by pressing the right arrow
button on the front panel or remote control. The screen may go
dark when cycling through non-VGA modes.
Note: The Power LED will change the number of times it blinks to
correspond to the current mode.
9. Once the proper format has been selected, press Select. Then use
the down arrow to move the yellow highlight to the Accept button,
and press the Select key to confirm your choice.
Connecting via S-Video
Most S-Video displays are able to display the HD1000’s initial setup
screens when connected via the S-Video cable, but the display will
appear initially in black and white or green because the HD1000 is
outputting a Component compatible signal. This is normal. The following steps cover selecting the correct output signal:
1. Connect an S-Video cable to the Video Out S-Video connector on
the back of the HD1000.
2. Connect the other end of the cable to an S-Video input connector
on your display.
3. Turn on the display and select the input to which you have just
connected the cable.
4. Connect the power cable to the back of the HD1000 and plug it
into an electrical outlet.
5. You’ll see a Busy light blinking, and a startup graphic will appear on
your screen. Once the HD1000 is fully started up, the Busy light will
stop, the Power light will begin to blink and you will see the initial
setup screen.
6. Once the initial setup screen appears, the Power LED will begin
blinking with the mode number referenced in the previous chart.
Press the right arrow button on the front panel or remote control
until you arrive at mode 2: S-Video 480i.
Note: The Power LED should be blinking twice — indicating mode
2 — when you have arrived on S-Video 480i.
7. Once the proper format has been selected, press Select. Then use
the down arrow to move the yellow highlight to the Accept button,
and press the Select key to confirm your choice.
Connecting via Composite
Most Composite capable displays are able to display the HD1000’s
initial setup screen when connected via the Composite cable, but the
9
display may appear in black and white or green because the HD1000
is outputting a Component Video signal. This is normal. The following
steps cover selecting the correct output signal. (Composite is normally
a single yellow RCA jack on your TV. On the HD1000, the composite
connector is shared with the “Y” component connector.)
1. Connect a composite video cable to the HD1000, making sure the
cable is connected to the green output jack labeled “Y.”
Note: This is the Y ouput jack for Component video — it is a shared
jack with Composite.
2. Connect the other end of the Composite cable to your display.
3. Turn on the display and select the input to which you have just
connected the cable.
4. Connect the power cable to the back of the HD1000 and plug it
into an electrical outlet.
5. You’ll see a Busy light blinking, and a startup graphic will appear on
your screen. Once the HD1000 is fully started up, the Busy light will
stop, the Power light will begin to blink and you will see the initial
setup screen.
6. If you do not see the startup and setup screens, check the input
selection on the display, then re-check the cable connection. If
there is still no picture, go to “Connecting Without On-Screen
Display” below.
7. You should see the Video Output Format setup screen on your
display at this point (in black and white or green), and it should
read “Component 480i.” The Power LED will begin blinking with
the mode number referenced in the previous table.
8. Proceed to Composite 480i by pressing the right arrow button on
the front panel or remote control until you arrive at that selection.
10
Note: The Power LED will change the number of times it blinks to
correspond to the current mode as you change selections.
9. Once the proper format has been selected, press Select. Then use
the down arrow to move the yellow highlight to the Accept button
and press the Select key to confirm your choice.
Connecting Without On-Screen Display
Some displays are not able to display the initial picture from the
HD1000. However, once the HD1000 has started up, you can use the
front-panel buttons to step through the HD1000’s supported output
connections and formats until your display shows the correct picture.
1. Ensure that the appropriate cable(s) are connected to the proper
Video Out connector(s) on your HD1000 (matching the cable and
connector colors if using Component) and are connected to the
display.
2. Turn on the display and select the input corresponding to the connection you have just made.
3. Connect the power cable to the back of the HD1000 and plug it
into an electrical outlet.
4. Wait a minute or so for the front-panel Power LED to begin to blink.
It blinks the number of times corresponding to the video mode in
the table on page 4.
5. Press the right arrow button on the front panel of the HD1000 and
check the display for a picture. If no picture appears after about
five seconds, press the right arrow again. Repeat this process until a
picture appears in color.
Note: Each time you press the right arrow the Power LED changes
the number of times it blinks corresponding to the video mode
listed in the previous table. If you have pressed the right arrow
button ten times without a picture appearing, check the “Troubleshooting” section.
6. Once the proper format has been selected, press Select. Then use
the down arrow to move the yellow highlight to the Accept button,
and press the Select key to confirm your choice.
7. Once the proper format has been selected, use the down arrow to
move the yellow highlight to the OK button, and press the Select
key to confirm your choices.
Audio Connections
You may connect your HD1000 to an amplifier, a display with powered speakers or an external set of powered speakers to enjoy music
playback. The HD1000 supports both analog audio output and digital
(S/PDIF) audio output.
colors. Connect the other end of the cable to the audio output of the
desired audio source. For example, the Monitor connection on your
AV receiver, or the Audio Out connection on your stereo. When the
HD1000 is in Standby, this audio connection is passed through to the
stereo Audio Out connectors.
Connecting Your HD1000 to Your Home Network
Your HD1000 can be used to enjoy your existing collection of pictures,
music and more by connecting to your computer over your home network. A 10/100 Ethernet port is included right on the back of the unit,
and the HD1000 will automatically configure itself via the DHCP protocol. Just connect the network cable before plugging the unit into AC
Power. Wireless network adapters are also supported for connection
to an existing Wi-Fi network. See our website at www.rokulabs.com/
support for details on supported wireless adapters, as well as detailed
instructions for accessing your PC or Mac over the network.
1. Decide which audio output you want to use: analog or digital.
2. If using analog audio, connect a standard stereo audio cable
(supplied) to the red and white Audio Out connectors on the back
of your HD1000. Connect the other end of the cable to the audio
input on your amplifier, display or speakers. Be sure to match the
colors of the plugs to the colors of the connectors.
3. If using digital audio, connect a coaxial digital audio cable to the
Digital Audio Out connector on your HD1000. Connect the other
end of the cable to an S/PDIF-compatible audio input on your
amplifier, display or speakers.
Your HD1000 can also act as a pass-through for external audio
sources. Connect a standard stereo audio cable to the Audio In jacks
on the back of your HD1000, taking care to match plug and connector
Connecting Your HD1000 To Use the Video
Pass-Through Feature
Your HD1000 comes equipped with S-Video and Component video
inputs. This feature allows you to connect the HD1000 between an
existing source component (like a DVD player or AV receiver) and your
display. In this way, you can share an input on your display without
running another cable. And the HD1000 can act as an automatic
Screen Saver, detecting a non-moving picture on the video input and
switching to a display designed to minimize burn-in.
To use your HD1000 in pass-through mode, follow these steps:
1. Decide on the type of input you will use on your display. If that
display input is already connected to an existing source, discon-
11
nect the cable from the existing display device and connect it to
your HD1000 inputs. Otherwise, select your source device and connect it to the appropriate Video-In connector(s) on the back of the
HD1000. This cable/source type must match the cable/type you
will use to connect the HD1000 video output. When the HD1000 is
in Standby mode, this source will be “passed through” the HD1000
“as-is” — no conversion or transformation is applied to the signal.
2. Follow the appropriate steps in the “Connecting the HD1000” sections above to connect the HD1000 Video-Out to your display.
When your HD1000 is in Standby mode (Power LED not lit), the signal
present on the Video In connector will now be sent to the Video
Out connector. Pressing the Power key for your HD1000 displays the
HD1000’s signal. Use the Setup option on the Main Menu to configure
the screen saver and pass-through modes.
Note: Only one type of output cable may be connected to the HD1000
at a time or the output picture quality will be reduced. The video
input used for pass-through must be the same type of cable (S-Video
or Component). Video pass-through is not available in VGA mode.
For more information about connecting your HD1000, please see the
“Troubleshooting” section on page 29.
For more information about troubleshooting,
tips & tricks and frequently asked questions,
please visit our Website at www.rokulabs.com.
12
using the HD1000
Main Menu
Media Sources. Your various media sources will be displayed
vertically on the left side of the screen. At the top, you’ll see an icon
for Built-In Storage. (This internal memory can be used to store a
limited number of photos or small applications.) Below the BuiltIn Storage icon, you’ll see icons representing inserted memory
cards and/or connected network shares containing photos, art,
video, music, or Roku applications. Highlight the source you want,
and then move to the right to choose Slideshow, Browse or Listen.
These options will change depending on the actual content of each
media source. You’ll also notice that the selected media source is
surrounded by a lighter blue tab for easy identification of the active
source.
Setup. Setup, in the bottom left corner, allows you to set the type
of connection used from the HD1000 to your display, the output
resolution and many other options. See the “Setup and Preferences” section for additional details.
Images. The Images section will appear in the Main Menu when
a selected media source contains photos, art or video. You’ll have
the option to choose to view the images as a Slideshow or Browse
through a series of small, catalogued images called “thumbnails.”
Music. The Music section will appear in the Main Menu when a
selected media source contains digital music files. The only option
is Listen. Listen will take you to an extensive menu of song titles, as
well as album and artist information.
Roku Applications. The Roku HD1000 uses Roku’s Open OS Platform. Just as Windows is a platform for writing desktop PC applications, the Roku OS is a platform for creating sophisticated and
easy-to-use digital media applications for the home. Roku writes
applications for this platform, as do several third-party developers.
Roku Applications that are on a selected memory card or network
share will appear here. Select the application icons to run them.
13
Viewing Pictures, Art and LiveArt™
Press the Menu button on your remote control to view your media
sources, if you don’t see them already. Your screen should look
similar to the one below.
If you have more than one media source to choose from . . .
1. In the Main Menu, move the yellow highlight into the left-hand
column.
2. Use the up and down arrows to highlight each of the media
sources. Notice that the options shown on the right of the screen
change as you highlight each media source.
3. When the desired media source is highlighted, move the
highlight to the right, and choose Slideshow to begin viewing
the images, or Browse to quickly look through your images in a
thumbnail representation.
Note: In the Browse screen, you can also change the active media
source without returning to the Main Menu.
Slideshow. Select Slideshow to start the Slideshow Viewer and
see each image or MPEG video from the selected media source. If
your HD1000 is currently showing the Main Menu and you insert a
memory card with photos, art or MPEG video, the slideshow begins
automatically, displaying the content from that card.
Images advance every five seconds. Refer to “The Roku Remote” on
page 2 to learn how to control image viewing. The 5-second delay
can be adjusted in the Photo Options screen (see page 27).
Note: A screen saver will display if an image remains on screen for
an extended period of time. This feature reduces the chance of
screen burn-in.
14
Browse. Select Browse to see a series of thumbnail images representing each image or MPEG video from the selected media source.
Move the highlight around the screen and press the Select button
to view an image. Press Exit at any time when viewing pictures to
return to the Browse screen.
Shortcuts
• Press the Play button to start a slideshow beginning with the
highlighted image.
• If there are more thumbnails than can fit on the screen, press
Zoom In to page up; press Zoom Out to page down.
• To rotate an image to the proper orientation before viewing,
highlight the image and press the Rotate button. This is quicker
than rotating in the full-screen view.
• To exit the Image Viewer and return to the Main Menu, press
Menu or Exit on your remote control. Exit takes you to the prior
screen.
Viewing MPEG Video
The HD1000 has the capability of playing ATSC-compliant MPEG2
transport streams. This is the type of signal typically broadcast over
the air by a local digital television station. These streams may be
either standard- or high-definition, and may include multichannel
audio (Dolby Digital 5.1).
There are a number of PC-based products (tuner cards) that allow
the recording of digital broadcast television to a computer hard
disk as a transport stream.
There are also some PC utilities for converting video files of other
types into a transport stream that may be compatible with the
HD1000, although we have not had the opportunity to test these
conversion utilities.
The HD1000 treats MPEG2 video clips in your media folders as
images. If you play a slideshow that contains a supported video clip,
the clip will play with the same timing as the rest of your images
in the slideshow. For example, if your delay time is 5 seconds, and
your clip is 10 seconds long, only the first 5 seconds will play, and
then the slideshow will advance to the next image or video clip.
(If your clip is shorter than the selected delay time, it will play the
clip all the way through and continue playing the beginning again
until the delay time has been reached.) If you would like to play a
video clip all the way through, navigate to the clip using the Browse
button, highlight the clip, and press Select on your remote. The clip
will play all the way through, then loop to play from the beginning
again. This continuous play will continue until you press Pause or
Exit on the remote.
Playing MPEG2 Video Clips Using Roku’s StreamPlayer Utility
Roku’s StreamPlayer utility, available as a free download from
Roku’s website, allows playback of ATSC MPEG2 transport stream
files, including seamless sequential playback of multifile recording.
Visit www.rokulabs.com/support for details.
Playing Music
Select Listen to hear your digital music files. The HD1000 offers
familiar music playing features and controls. To play music, insert a
card from your MP3 player into one of the front slots, then choose
the Listen option; or press Menu to navigate to a shared media
source that contains your music files.
The music player screen shows the songs on the media source
along with the artist and album.
15
playlist formats; iTunes playlists are currently not supported.
Play, Pause, Next and Previous track controls are available on the
remote. Refer to “The Roku Remote” on page 2 to learn how to
control music playback.
Playing Music During a Slideshow
It is easy to listen to music during your slideshow. Simply start
playing music as described above. Then press Menu to return to
the Main Menu and navigate to your image files. Press Play inside
the desired folder to begin your slideshow. When the end of the
first song is reached, the next song will play. To stop or change your
music selection, you must go back to your Music Player. Stop your
slide show by pressing Menu or Exit and select the Listen button
from any media source, or navigate to a folder containing any audio
file. Once in the Listen application, press Play/Pause to pause the
playing music .(There is no stop button; paused music is basically
the same as stopped music.)
When you play music, you will see a Play icon ( ) inside the Listen
button on the Main Menu. To stop the music, navigate to the Listen
button and press the Pause/Play button on the remote.
To exit the Music Player, press Pause if you want to stop playing
music, then press Menu on your remote control.
Playlists
The Music Player screen also shows playlists that you created on
your computer using third-party software such as Winamp. Your
playlist will appear as a folder named as the playlist. To play that
playlist, highlight the folder and press Play — or press Select to
open and view contents of the playlist, then press Play to play the
contents. (If the HD1000 can’t locate one of the files in your playlist,
it will be omitted.) The HD1000 currently supports .M3U and .PLS
16
Photo,
Video
and
Sharing from the Computer
Need
help?
GoMusic
to www.rokulabs.com/support
or contact [email protected].
Sharing photos, video and music from your PC requires:
• Wired or wireless Ethernet network (Networked HD video
playback requires a wired network; wireless networks require an
optional adapter);
• PC with Microsoft® Windows® 98, Windows 2000, Windows ME,
Windows XP Home Edition or Professional, with Windows File
Sharing enabled; or
• Mac OS X 10.2 or later (10.2.6 or later recommended) is required
for music and photos.
Important: Shared folder names on your PC or Mac must be 12 or
fewer characters in length.
Visit www.rokulabs.com/support for networking setup instructions specific to each supported platform.
You can press Select to navigate to the next level down in the folder
structure, or press Play on your remote to play all media inside the
active folder (and any of its subfolders).
Browsing Directories
Your Roku HD1000 scans each media source and finds all of the
media files it contains. When viewing the contents of your removable
memory card, you will see all files displayed in one list (Roku “flattens” directory structures and shows one combined list of files). Press
Select while the memory card Media Source is highlighted, then
navigate to Browse or Listen to see the image and music contents.
When browsing media on your networked computer, you will see
all folders within the shared media source, making it easier to find
the files you want. After highlighting the media source from the
Main Menu, navigate to Browse or Listen then press Select to see
the image and music contents.
Notice how your path location is always displayed on the top of the
screen. You can navigate back up a level by highlighting the folder
with a Back arrow inside and pressing Select, or by pressing Exit on
your remote.
17
You may notice that once you begin browsing images, you enter
Image Viewer mode (or Music Player mode if you began by browsing music). Any browsing will be confined to that media type until
you exit to the Main Menu by pressing Menu or Exit. From the Main
Menu, you once again have the option to access both image and
music files.
Memory Card Specifications
CompactFlash cards must have a sustained read speed of 3 MBps or
more for viewing high-definition MPEG2 video and LiveArt.™ Only
CompactFlash cards or the network drive connected via 100MBps
wired Ethernet may be used for high-definition video playback.
Need help? Go to www.rokulabs.com/support
or contact [email protected].
18
Photo Viewing Tips
Tip #1: The basics
Your HD1000’s image viewer has several user-configurable options:
* Fit/fill mode
* Delay between images in a slideshow
Highlight the Options button and press Select on the remote to
bring up the Options dialog. While looking at pictures full-screen,
just press the Select button on the remote. (Note that bringing
up the Options window with a slideshow playing will pause the
slideshow. Press Play/Pause on the remote once you’ve closed the
window.)
* Info display mode
* Preferred rotation direction
These options can be accessed in two ways:
In the browse screen (where you look at your images as miniature
thumbnails), there is an Options button.
In either case, you just make your choices and click the Done
button. Roku remembers your settings until you change them, even
if you turn your HD1000 off. Press Exit on the remote to dismiss the
dialog without making any changes.
19
Tip #2: To play or not to play
When you press the Slideshow button on the Main Menu, insert
an image card, or launch an Art Pack, your HD1000 automatically
advances through the images on the selected media source. Sometimes, you may want to linger over a particular image. This is easy:
just press the Play/Pause button on the remote. Notice that a pause
icon appears momentarily in the lower right corner of the screen.
The image will now stay on screen until you manually change it.
You can use the Next or Previous keys on the remote to move at
your own pace, or you can press Play/Pause again to resume automatic advance. The Options screen (see Tip #1) allows you to set the
length of time each picture is displayed.
If you’re browsing pictures in the thumbnail browser, there are two
ways to launch into the full-screen viewer, as well. Press Select with
a particular image highlighted to view that image. The image will
stay on screen until you change it. Or, you can press Play/Pause
with a particular image highlighted to begin viewing a slideshow
starting with that image.
Tip #3: Wait! Wait! Back up a couple!
Whether you’re clicking your way through your images manually
using the Next/Previous keys or letting the HD1000 do the work
for you, you may find yourself wanting to back up a few pictures
or skip over a few. Even a high-performance image viewer like the
HD1000 takes a couple of seconds to decode a large file, so it would
be a bummer to have to wait for each picture to come up before
you could press Next or Previous again.
20
Happily, there is no need to wait. If you want to back up three
pictures, just press the Previous button on your remote three times.
Same goes for skipping forward.
Tip #4: The Smart way to put a square peg into a
round hole
While television is moving on into the brave new wide-screen
world, photography is still pretty much back in the old square (well,
4:3 anyway) box. Therefore, most pictures taken with a digital
camera won’t fit perfectly on a 16:9 HDTV. Also, many artists (especially the pesky Renaissance types) were a bit lax in maintaining a
proper 16:9 wide-screen aspect ratio as well.
Fortunately, your HD1000 has more than one way to fit a non-16:9
image onto your wide-screen HDTV.
First up is the most basic: “Fit.” In Fit mode, the entire image is displayed centered on the screen. If the image isn’t the same shape as
your screen, the remainder of the screen is filled with black.
Next is “Fill.” Fill mode zooms in on the image until it fills the entire
screen. If the image isn’t the same shape as the screen, then part of
the image will be cropped.
in a given image that you want to look at more closely. Or maybe
you’ve selected Fill mode, and something interesting is being
cropped on a particular image.
No worries. The Zoom rocker on the remote control allows you to
zoom out until the entire image is visible on the screen, or zoom in
to several levels of magnification.
As you zoom, notice the little indicator that appears in the lower
left part of the screen. The transparent box represents your image,
and the gray shaded portion represents the portion of the image
visible on your screen. When you zoom all the way out, the whole
box will be filled with gray – the whole image is visible. But as you
zoom in onto a small portion of the image, the gray-shaded region
shrinks, showing you only the portion of the image that’s on your
screen. This indicator can be pretty useful for finding your way
around a picture at high magnifications.
Last but far from least is SmartDisplay.™ This mode will fill your
screen unless doing so would cause too much of the image to be
cropped. If filling the screen crops too much, then the image is
fitted to the screen instead. This mode works great when you have
a mixture of portrait and landscape pictures.
In any of these modes, what is being adjusted is really just the initial
zoom factor for the image. You can always zoom in or out on any
given image, using the zoom rocker on the remote.
Tip #5: Zoom in on the action
Your HD1000 supports a multilevel zoom feature. As mentioned in
the previous tip, the initial presentation of your image will depend
upon the Fit/Fill mode you select. But, maybe there’s something
Tip #6: Panning for gold
When you zoom in on a freshly displayed image, you’re zooming
in on the center of the image. But maybe the interesting part isn’t
in the middle! No problem. Use the four arrow keys on the remote
control to scroll a different portion of the image into view. Press
the up arrow to move toward the top of the image, the left arrow
to move toward the left edge of the image, and so on. As you do,
again check out the pan & zoom indicator in the lower-left corner
of the screen and notice how you can make it scoot around.
By the way, both the Zoom keys and the arrow keys repeat if you
hold them down. No need to press Left 20 times to get to the left
edge of the picture. Just press and hold.
21
Tip #7: Which way is up?
If you take a picture holding the camera right side up, you get
what’s called a “landscape” picture — one wider than it is tall.
Sometimes, though, the subject calls for a “portrait” picture — one
taken with the camera rotated 90 degrees to the left or right so that
the resulting image is taller than it is wide.
Some cameras actually have a built-in sensor which records
whether the camera was rotated for a given picture. If you’re lucky
enough to have one of those cameras, your HD1000 will rotate the
image right side up for you automatically.
For the rest of us, there’s the Rotate button on the remote. Statistically, most people rotate their cameras counterclockwise when they
take a portrait picture, putting the top of the subject at the right
edge of the recorded image. By default, pressing the rotate button
on the HD1000 remote also rotates the picture counterclockwise,
which for most images will put the top where it should be.
Some people, however, rotate their cameras the other way. In the
Options screen (see Tip #1), you can change the default rotation
direction to match your preference. When you press the Rotate
button on the remote, you’ll notice that a rotation indicator pops
up in the lower right corner of the screen. The direction of the
arrow shows the direction of rotation.
By the way, sometimes a picture might not be rotated in your
“usual” direction. Perhaps you’re looking at pictures taken by a
friend, and they prefer to turn the camera the other way. Not to
worry. As with Next and Previous, you can press the Rotate button
more than once in quick succession. Three presses will rotate an
opposite-direction picture to the right orientation — no need to
wait for each rotation to complete.
Finally, what if you want to get your pictures ready for a slideshow
rather than having them initially pop up sideways? Easy. The Rotate
button works in the thumbnail view as well. Just rotate the pictures
so that their thumbnails look right, and your slideshow will look
great.
Two quick notes on the subject of rotation: First, some PC image
editing software will rotate an image but leave the thumbnail in
its original orientation. If you’ve used this type of software, your
thumbnails won’t be an accurate representation of what you’ll see
on screen. Second, in version 1.5 of the HD1000 software, your
HD1000 does not remember image rotations once you’ve changed
22
media sources or exited back to the Main Menu. That feature is in
the works for a later software upgrade.
Tip #8: Just the facts about this picture, Ma’am
Photography buffs may want even more information about the
picture: What was the f-stop? What was the shutter speed? Did I
use a flash? Well, take heart, photo buffs. Press Info a second time
to show exposure and flash information, as well as the dimensions
of the image.
If you’re like a lot of digital camera owners, you have lots and lots
of pictures. You may have so many of them that you can hardly
remember when you took them. Fortunately, your HD1000 can
help.
When viewing a picture, press the Info key on the remote. In the
lower left corner of the screen you’ll see some information displayed. The first line is the name of the file. Unless you’ve renamed
your pictures with descriptive file names, this will probably look
like “IMG0005.JPG.“ The second line is the time and date that the
picture was taken, as recorded by your camera. (*)
Press Info a third time to dismiss the display.
If you find yourself pressing the Info button a lot, you may want
to set your HD1000 to automatically display info for each image
when it first appears. This is done in the Options screen (see the
first tip). You can choose whether to display the brief (2-line) info
or the whole ball of wax. After a few seconds (a little longer for the
detailed info), the display disappears automatically.
Note: If the time and date display is all zeros, the clock wasn’t set on
the camera. You may want to double-check to make sure that it is
properly set for your future pictures. Refer to your camera’s instruction manual.
23
Tip #9: Tiptoeing through the Thumbnail Browser
If you are in the Browse feature looking at your image thumbnails,
there are lots of ways to get around. The four directional arrow buttons on the remote control move the highlight one item at a time.
The Next and Previous buttons advance the highlight sequentially
through the images, as you would advance through a slideshow.
And the Zoom In/Zoom Out rocker does double duty here to allow
you to scroll a page at a time. In all cases, if you reach the first or last
thumbnail, the display will wrap around to the other end of the list
with an additional press.
Tip #10: Extra fun with Art Packs
Art Packs come on a CompactFlash card similar to the ones used in
digital cameras. When you insert the card with the Main Menu visible on screen, the Art Pack will start automatically, playing images
and music.
If you return to the Main Menu, you’ll notice that there are probably
more options visible on the menu than you usually see with your
own cards. The Browse and Slideshow buttons are available, as well
as the Listen button. And there’s an extra button at the bottom
of the screen representing the Art Pack itself. You can use Browse,
Slideshow and Listen just as you would on any other media source.
To play the pictures and music together, just press the button
under Roku Applications that corresponds to the Art Pack.
The music will stop when you exit the slideshow, either to the
thumbnail browser or to the Main Menu. To start the show again
with the music, go back to the Main Menu and press the button
corresponding to the Art Pack.
One thing to note: some Art Packs may select a different delay
between images than what you have set for your usual viewing.
This is normal.
Need help? Go to www.rokulabs.com/support
or contact [email protected].
24
Set up a nd Pr efer ences
The HD1000 maintains a set of general user preferences that apply
to all features. Additionally, some features (such as the image
viewer) have their own user preferences.
Setup
The general user preferences that apply to all features are configured in the Setup screen, accessed from the Main Menu. Press the
Menu key on your remote to reach the Main Menu, then use the
arrow keys to move the yellow highlight to the Setup button. Press
the Select key to open the Setup window. In the Setup window you
can modify settings in the following categories:
•
•
•
•
•
•
Date and Time
General
Network Servers
Screen Saver
Video Format
Video Placement
Move the yellow highlight to select a category of settings to
modify, then press Select to access that category. When you access
a category, a setup panel for that category appears. Usually, these
panels will have on-screen directions. A more detailed discussion of
their function follows:
Set Time
Access the Date and Time settings panel to manually change the
date and time on your HD1000. If your Roku HD1000 is connected
to the Internet, the date and time will be updated automatically.
This setup panel may be used to manually adjust the date and time
in the event you do not have an Internet connection.
General
Access the General settings panel to modify the general settings
of your Roku HD1000. General settings include whether or not you
want slideshows to autoplay when inserting a memory card, and
options for browsing your media files.
Network Servers
Access the Network Servers panel to specify which servers on
your network your Roku HD1000 will use as a source for displaying
photos, art and music. Your Roku HD1000 will search your local area
network for exported network directories (Windows shares). It will
automatically make the first two it finds available as sources for
photos, art and music. Access the Network Servers panel to manually specify which network shares your Roku HD1000 should use.
Visit www.rokulabs.com/support to download a PDF document
containg detailed instructions for connecting the HD1000 to your
home network.
25
Screen Saver
This panel allows you to modify default screen saver settings.
video placement of the output signal the HD1000 sends to your
television.
Video Format
This setup panel allows you to adjust the video output format of
your HD1000. For detailed information regarding adjusting the
video output format, consult the “Connecting the HD1000” section
in this manual.
First you will be asked to adjust the top left corner of your display
using the directional arrow keys. Adjust the display so that the left
and top edges are just visible at the edges of your television screen.
Then you will be asked to adjust the bottom-right corner of the
display, again using the directional arrow keys. You should adjust
the display so that the right and bottom edges are just visible at the
edges of your television screen. When finished with video placement adjustment you can accept or cancel your changes.
Video Placement
This setup panel allows you to optimize the size and position
(placement) of the video output signal your HD1000 sends to your
television. Most HD television and monitors have their own settings for adjusting video size and position. These settings are often
referred to as “horizontal and vertical size” or “picture position” and
determine where on the screen the set will display the video image
coming in.
This setup panel provides a wizard that allows you to optimize the
video placement for your television or monitor in three easy steps.
A good rule of thumb is to reset your television’s settings for video
size and position to their default values before accessing this setup
panel. If you are passing a video signal through your HD1000 (see
the section in this manual entitled “Connecting Your HD1000 to Use
the Video Pass-Through Feature”), then rather than resetting your
television to its default values, you may want to adjust your television to make the source (pass-through) video signal look good
before accessing this setup panel.
Once you are happy with your television’s settings for video size
and position, you are ready to run the Roku HD1000’s video placement wizard. Follow the on-screen instructions for adjusting the
26
Note: During adjustment, a circle on a multicolored square background is displayed for your reference. To maintain a 16:9 aspect
ratio, you should strive to keep this circle as round as possible. If
you wish, you may hold a ruler up to your television screen and
measure the sides of the multicolored square. If the sides are equal,
your aspect ratio is a correct 16:9. It will appear elongated on a 4:3
display, as well as when you are using a 480i video format to output
to a 16:9 display.
If you are using a 4:3 display (such as a standard definition TV),
you may choose to adjust your video placement so that the image
fills the screen (circle will appear elongated), or you may adjust
your video placement in “letterbox” style so that the circle appears
round. In this case, you will have a 16:9 aspect ratio, but the image
will not fill the screen. It is your choice.
If you are using a 480i video format to output to a 16:9 display, your
display will likely have different aspect ratio modes such as Normal,
Zoom and Fill. In Normal mode, your television will display the
480i image in its native 4:3 aspect ratio, and the circle will appear
elongated. In Fill mode, your television will display the 480i image
stretched to a 16:9 aspect ratio, and the circle will appear round.
Use of a 480i video format on a 16:9 display is not recommended,
but in the event you choose to do so, it is recommended that you
use your television’s Fill mode to stretch the 4:3 480i image to a 16:
9 aspect ratio. You may then make video placement adjustments
to fit the Roku HD1000’s video output to the full screen and use the
circle as a guide to maintaining a true 16:9 aspect ratio.
Note: When changing the video output connector and resolution,
you may choose a setting which your display does not support. If
this happens, your screen may go blank or show a garbled picture.
No problem! Just wait 30 seconds, and the HD1000 will automatically return to the prior selection.
Image Viewer Settings
Select a media source containing photos or movies, then move the
highlight to the right onto the Browse button. Press Select. When
the Browse window opens, move the highlight to the Options
button and press Select. The Image Viewer Options window will
open. In this window, you can customize how your images are
displayed.
• Slideshow Delay: Set the delay between photos when watching
an automatic slideshow.
• Image Display: Choose whether images should be displayed so
that the entire picture fits on the screen (Fit Image), or zoomed
and cropped so that they fill the entire screen (Fill Screen).
SmartDisplay automatically selects the most appropriate option
based on the orientation of the image (Portrait or Landscape).
• Info Display: Choose whether information about the image is
displayed momentarily when each image is displayed. “Brief
Info” displays the filename and creation date. “All Info” shows
additional image information.
• Rotation: Choose which direction images are rotated when using
the Rotate button on the remote control.
• Browse Folders: Select whether you want to navigate through
folders to access your images, or whether you would like the
Image Viewer to “collapse” folders within a media source and
display all the images in the same window. The Browse Folders
option is useful when accessing large numbers of images stored
in folders and subfolders.
Note: These options may also be accessed while actually viewing pictures by pressing Select on the remote to open the Photo
Options window.
Art Pack Settings
If you have purchased a Roku Art Pack, you can change the settings
for Art Pack playback in the Art Pack Settings Menu. From the Main
Menu, navigate down to the Setup button and press Select. Then
select the highlighted Art Pack Settings button. Use the Up/Down
arrows to navigate between the options and the Right/Left arrows
to choose settings. When finished, select Done and then press Exit
to return to the Main Menu.
Need help? Go to www.rokulabs.com/support
or contact [email protected].
27
Wireless
If you have a supported wireless adapter, you can connect your
Roku HD1000 to a wireless network. First, make sure the wireless
receiver is properly connected to the Roku HD1000’s USB port.
See www.rokulabs.com/support/HD1000WiFi for a list of supported devices.
To complete the connection, you must enter the wireless network’s
name (ESSID) and password (if any) in the Wireless setup panel. You
only need to enter this information once. The Roku HD1000 will
automatically reconnect to the network if it ever loses power.
Bypass Mode
When you press the power button on your Roku HD1000, it will enter
Standby mode and display a pass-through video signal on its video
outputs. The pass-through video signal will be the same video signal
that is connected to the Roku HD1000’s video input connectors.
If you select the “Auto ON” option on the No Video selector, and
then place your Roku HD1000 in Standby mode (by pressing the
power button), it will automatically switch between the passthrough video signal and its own video display whenever the input
video signal is turned on or off. For example, if you connect your
DVD player to the video input connectors, whenever you turn your
DVD player on, the Roku HD1000 will automatically switch to passthrough video and display the DVD player’s output. When you turn
the DVD player off (and remove the input video signal), the Roku
HD1000 will automatically switch back to its own video display.
28
Also, when you have the No Video selection set to “Auto ON,” pressing the power button will take you in and out of an override mode,
in which the Roku HD1000 remains displaying its own video signal,
whether or not there is a video signal present on its inputs.
The ESSID is the name of the wireless network. Enter the name by
pressing Select on the ESSID button, and then entering the name
in the on-screen keyboard to the right. Remember that ESSIDs are
case-sensitive, so use the on-screen Shift button to switch between
capital and lowercase letters.
The Password field is only necessary on wireless networks
configured to have a password. Enter a password with the onscreen keyboard.
Press the Done button to use these settings to connect to the
wireless network.
Sample Content
Sample content is stored on your Roku HD1000’s internal memory.
Select the Built-in media source at the top left side of your screen
and get to know your new product. If you scroll down to Roku
Applications and select Roku Art, the images and audio will play
together as a musical slideshow.
TROUBLESHOOTING
If your question isn’t answered here, please visit the support section of our website for more troubleshooting hints, information and
software updates.
Connection troubleshooting
Symptom: No picture
1. Check that the HD1000 and the display device are connected
to active AC power outlets and turned on. The Power LED on
the HD1000 should be blinking or steadily lit. If the Power LED
is blinking, you are in initial setup mode. If the Power LED is
steadily lit, see “Resetting Your Roku HD1000 to Initial Setup
Mode” below to put your unit back into initial setup mode.
2. Check that the display is set to the correct input.
3. Check that the video cable from the HD1000 is connected to the
correct Video Out connector(s).
4. If using component cables, unplug each of the three (red, green,
blue) connectors from the HD1000 and verify that the color of
the plug matches the color of the connector on the HD1000.
Blue and green are easy to reverse accidentally, and this will
result in loss of picture. If this does not solve the problem, do the
same check on the display’s connectors. Use a flashlight or other
light source to verify the connector colors — green and blue
look very similar in low light.
5. The Power LED should be blinking with the mode number of
the current video output mode in the table on page 7. If it is not
blinking, reset your unit to initial setup mode — consult the section “Resetting Your Roku HD1000 to Initial Setup Mode” below.
6. If your unit is in initial setup mode, follow the procedure in the
section “Connecting Without On-Screen Display” on page 10.
7. If you still see no video, you may have a defective cable. Try
another cable of the same type.
Symptom: Picture appears, but is black and white
1. If using an S-Video or VGA connection, ensure that the cables
are firmly connected to both the HD1000 and the display.
2. If using a Component connection, ensure that all three (red,
green, blue) plugs on the cable are connected to the corresponding connectors on the HD1000, and that all three plugs are
similarly connected on the display end of the cable.
3. The HD1000 may be misconfigured. Consult the section “Resetting Your Roku HD1000 to Initial Setup Mode” below and follow
the procedure outlined there.
4. You may have a defective cable. Try another cable of the same
type.
29
Symptom: Picture Appears, But Colors Are Wrong
1. If using an S-Video or a VGA connection, ensure that the cables
are firmly connected to both the HD1000 and the display.
2. If using a Component connection, un-plug each of the three
(red, green, blue) connectors from the HD1000 and verify that
the color of the plug matches the color of the connector on the
HD1000. Swapping the red and blue connectors accidentally
will result in improper color display. If this does not solve the
problem, do the same check on the display connectors.
3. You may have a defective cable. Try another cable of the
same type.
Resetting Your Roku HD1000 to Initial Setup Mode
In some cases you may find yourself in a situation where the video
output format has been set to a setting that your television cannot
display. This procedure allows you to reset your unit so that you
may re-run the initial setup procedures outlined at the beginning
of this chapter.
1. Press the Exit button on the front panel five times.
2. Hold down the Menu button on the front panel.
3. With the Menu button held down, press and release the Exit
button on the front panel.
4. Your Roku HD1000 should now be in initial setup mode. This is
indicated by the Power LED blinking to indicate video format
mode 1 (see table on page 7).
5. If your HD1000 is in initial setup mode, go to the beginning of
this chapter and follow the procedures outlined there to set up
your video mode.
30
6. If your HD1000 is not in initial setup mode (indicated by a
steady Power LED or no Power LED), unplug your Roku HD 1000
for 10 seconds. Plug it in again. Wait two minutes and repeat
this procedure.
7. If you still cannot get your Roku HD1000 reset to initial setup
mode, please contact [email protected] for assistance.
Resetting Your Roku
Great care has gone into designing the software that runs on the
HD1000. But the software is very complicated, and it is possible that
in rare circumstances your HD1000 could stop responding to remote
control signals. In this case, you have two options. One is to unplug
the HD1000, wait 10 seconds, and then plug it back in. This will
“reboot” (reset) the HD1000 (a process that can take up to a minute).
The other way to reboot the HD1000 is to hold down the Standby
button for a few moments (until the green LED goes dark). Then
release the button. This will also reboot the HD1000.
Browsing/Viewing Troubleshooting
Symptom: Music files won’t play
The HD1000 supports audio files in the following formats: MP3,
WAV, AIFF (or AIF). Supported sample rates include: 8kHz, 16kHz,
22.05kHz, 24.0kHz, 32kHz, 44.1kHz, 48kHz, 96kHz. Files must be
stereo, in 16-bit depth. The HD1000 currenlty does not support
mono audio and bit depths other than 16-bit (such as 8-bit).
Symptom: Images won’t display
The HD1000 supports JPEG images with standard (not progressive)
JPEG compression only. Make sure that your image uses the extension .JPG or .JPEG (not .JPE). Images with EXIF data are supported.
Symptom: Video files won’t play
The HD1000 supports MPEG2 Transport Stream files only. First,
make sure the video file has one of the following extensions
.MPG, .MPEG, .TS, .TP, and .TSP. Then, make sure that your video is
a transport stream file. These are usually files created from ATSC
video capture cards found in computers. They are commonly used
to record broadcast TV programming as MPEG2 files. If you see the
error message that the MPEG file does not play, the file is probably
not a transport stream. Program Stream MPEG2 files (commonly
found on DVD files) and all MPEG1 files (commonly found on files
downloaded from the Internet) are not supported. Also, video files
must be played over a wired (Ethernet) network. Playback over a
wireless network is currently not supported.
Symptom: Files recently saved on networked media source
don’t appear on HD1000.
To refresh the HD1000’s browser, click Menu. Browse to the icon
corresponding to your shared media source on the left of the
screen and press Select. If the folder selection window pops up,
highlight the Select button at the bottom of the window and press
Select on your remote control. Your contents should now appear
refreshed. If you still have trouble viewing files, make sure your files
match the supported formats (see “Music files won’t play,” “Video
files won’t play,” and “Images won’t display,” above).
Symptom: I am viewing images and would now like to listen to
music. How do I go back to the Music Player?
Press Menu to return to the Main Menu and press Listen. To navigate to desired music files on other media sources, highlight the
desired media source on the left side of the Main Menu screen and
press Select to view its contents. To listen to music and view images
at the same time, see below.
Symptom: I am listening to music and would now like to view
images. How do I go back to the Image Viewer?
With your music playing, press Menu to return to the Main Menu
and press Slideshow. To navigate to other desired image files, highlight the Browse button and press Select (or, highlight the desired
media source on the left side of the screen and press Select to view
its contents). If you would like to view images without listening to
music, press Pause before navigating from your Music Player back
to the Main Menu.
Symptom: I like the clock that comes with the HD1000, but the
time isn’t correct.
From the main menu, select Setup. Scroll through the setup options
and pick “Set Time.” Set your time and timezone. Note: If your
HD1000 is connected to the Internet, it should set the time automatically via “NTP.”
For more helfpful tips, see
www.rokulabs.com/support.
31
Need help? Go to www.rokulabs.com/support
or contact [email protected].
Note: The Roku software is based in part on the work of the Independent JPEG Group.
© 2004 Roku, LLC. All rights reserved. ROKU, the ROKU logo, and LiveArt are trademarks of Roku, LLC in the United States and other countries.
Software Version 1.5.18 | Revised April 29, 2004
www.rokulabs.com