1
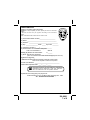
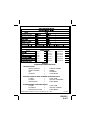
Model APS-45N Owner's Manual 4 Button Remote Keyless Entry System With Two Auxiliary Outputs FEATURES: 2 Four Button, RF Transmitters Four Channel Code Learning Receiver Remote Panic In All Modes Built-In Parking Light Output LED Status Indicator Ignition Door Locking/Unlocking Horn Output OPTIONS: Remote Trunk Release Remote Power Window Control Remote Garage Door Interface Remote Engine Starter Starter Interrupt Siren Access Guard / 2 Step Unlock Illuminated Entry Page 1 128-8601 1 of 8 Your Keyless Entry System has many features and available options some of which must be selected at time of installation. For your reference, the list on the back page of this manual shows what features and options have been installed with this particular system. Consult your installing dealer for options that may have been installed and are not listed. REMOTE DOOR LOCKING - ACTIVE 1. Turn the engine off, exit the vehicle, and close all doors. 2. Press and release the lock button of your key chain transmitter one time, the doors will lock, the parking lights will flash once, the vehicle's horn (or optional siren) will chirp once and the dash mounted LED will begin to flash slowly confirming the system is locked. SILENT LOCKING - ACTIVE 1. Turn the engine off, exit the vehicle and close all doors. 2. Press and hold the lock button of your key chain transmitter for two seconds, the doors will lock, the parking lights will flash once and the dash mounted LED will begin to flash slowly confirming the system is locked. The horn or optional siren will not chirp. BACKUP PASSIVE OPERATION (AUTOMATIC) If the passive arming feature has been selected: Turn the engine off, exit the vehicle and close all doors. The dash mounted LED will immediately begin to flash rapidly indicating that the 30 second passive arming timer has begun. If any entry point is opened during the 30 second arming cycle, arming will be suspended. When all entry points are closed, the arming cycle will begin again. At the end of the 30 seconds, the parking lights will flash once, the vehicle's horn (or optional siren) will chirp once, and the dash mounted LED will begin to flash slowly confirming the system is armed. If the horn (or optional siren) did not sound when arming, then the chirps have been turned off. Please refer to the section titled "Eliminating the Arm/Disarm Chirps" later in this manual. Passive door locking is a selectable feature. The doors may or may not lock passively dependent upon the setup during installation. PROTECTION WHILE THE SYSTEM IS ARMED If the optional Starter Interrupt relay has been installed, then whenever the system is armed, the vehicle starter circuit is disabled, even with the ignition key, the vehicle will not start. Whenever the system is armed, the dash mounted LED will slowly flash. This serves as a visual deterrent to a potential thief. This LED is a very low current light emitting diode and will not cause the battery to drain even if left unattended for long periods of time. UNLOCKING THE SYSTEM As you approach the vehicle, press and release the unlock button on the keychain transmitter, the doors will unlock, the parking lights will flash two times, the vehicle horn (or optional siren) will chirp twice and the dash mounted LED will turn off. If you have the optional entry illumination circuit installed, the interior light will turn on for 30 seconds or until the ignition key is switched on. Note: If the passive arming mode was selected at time of installation, the dash mounted LED will start flashing rapidly indicating that the system is rearming. Opening any door will suspend the automatic arming. SILENT UNLOCKING 1. As you approach the vehicle, press and hold the unlock button of your key chain transmitter for two seconds, or until the system responds. The doors will unlock, the parking lights will flash twice and the dash mounted LED will turn off, confirming that the system is disarmed. The vehicle horn (or optional siren) will not chirp. If you have the optional entry illumination circuit installed, the interior light will turn on for 30 seconds or until the ignition key is switched on. Page 2 128-8601 2 of 8 Note: If the passive arming mode was selected at time of installation, the dash mounted LED will start flashing rapidly indicating that the system is rearming. Opening any door will suspend the automatic arming. OPTIONAL ACCESS GUARD ( Two Step Unlock ) If the optional 2-step unlock feature was installed, then only the driver's door will unlock after the first press of the unlock button. If you want to unlock all doors, you can simply press the unlock button of the keychain transmitter a second time. Note: Two Step unlocking is an optional feature that must be wired upon installation. VALET / PROGRAM / MANUAL OVERRIDE SWITCH The valet switch allows you to temporarily prevent the system from arming, eliminating the need to hand your keychain transmitter to parking attendants or garage mechanics. When the system is in the valet mode, it will not passively arm or activate the starter interrupt circuit. However, all keyless entry features, as well as the remote panic feature will remain operational. To enter the valet mode: 1. Start with the valet switch in the "off" position 2. Turn the ignition switch to the "on" position. 3. Flip the valet switch to the "on" position. The dash mounted LED will turn on solid (not flashing) indicating that the valet mode has successfully been entered. To return to the normal mode of operation, move the valet switch to the "off" position at any time the ignition switch is in the on position. Note: In the event that you lose your keychain transmitter or the transmitter fails to operate the keyless entry system, the valet switch can be used to override the optional Starter Interrupt, and therefore allow the engine to be started. To override system: 1. Open the door with the vehicle's door key. 2. Turn the ignition switch to the on position. 3. Flip the valet/override switch to the on position. LED will turn on solid. The system will disarm, allowing the engine to be started and the vehicle to be operated normally. Always remember to move the valet switch to the off position to allow the passive arming and optional starter interrupt features to be operable the next time you park the vehicle. ELIMINATING THE LOCK/UNLOCK CHIRPS You can selectively eliminate the normal lock and unlock chirps by holding the transmitter button slightly longer when locking and unlocking. This will prevent the horn/siren chirps for one lock or unlock cycle. If you find this inconvenient and wish to eliminate these chirps permanently, 1. Start with the valet switch in the off position. 2. Turn the ignition switch "on" then "off". 3. Within 10 seconds of turning off the ignition, flip the valet switch on, "off", "on", "off", "on", "off". 4. If the chirps were on before you started, the siren will emit 2 short chirps indicating that the chirps are now off. If the chirps were off before you started, the siren will emit one short chirp indicating that the chirps are now on. REMOTE PANIC OPERATION The lock or unlock button of your keychain transmitter also serves as a panic button and will cause the vehicle horn (or optional siren) to sound on demand. To use the panic feature, you must be within the system's maximum operating range. In an emergency situation, to use the panic feature, press and hold the lock or unlock button of your keychain transmitter for 3 seconds. This will cause the lights to flash, the vehicle horn (or optional siren) to sound, and if the optional interior illumination circuit was installed, the interior lights to flash. The panic mode will continue for 30 seconds and then reset. Page 3 128-8601 3 of 8 To disengage the panic feature before the 30 seconds are up, press and hold either the lock or unlock button of your keychain transmitter for 3 seconds or press the option button momentarily. The doors can be unlocked or locked while in "panic" mode by momentarily pressing the lock or unlock button respectively. ADDITIONAL REMOTE FUNCTION CHANNEL 2 The system has an additional output, (Channel 2) , that can be connected to a number of different optional accessories. Some of the more common uses for this channel are: Remote Trunk Release Remote Window Close To operate the accessory associated with Channel 2, press and hold the option button of your keychain transmitter for four seconds. NOTE: You may access the Channel 2 command regardless of whether the system is "locked" or "unlocked", but not when the ignition switch is in the on position. This is to prevent the output from accidentally opening the vehicle's trunk when the vehicle is in motion. ADDITIONAL REMOTE FUNCTION CHANNEL 3 The system has an additional output, (Channel 3), that can be connected to a number of different optional accessories. Some of the more common uses for this channel are: Remote Engine Start Remote Window Close Remote Garage Door Interface To operate the accessory associated with Channel 3, simply press the Option button of your keychain transmitter which was configured and programmed for this function. NOTE: The channel 3 output will remain active for as long as the transmitter button is pressed. Certain accessories may take advantage of the extended output capability of this channel. To discontinue the output, simply release the transmitter button. IGNITION DOOR LOCKING/UNLOCKING The system is capable of being programmed for the added safety and security of ignition controlled door locking and unlocking. These features are separate, so the unit may be programmed for one, or both, or neither. When the ignition door locking feature is programmed, the system will cause all door locks to lock whenever the ignition switch is turned from the off to on position, (providing that all doors are closed at that time). All doors will lock approximately 3 seconds after the vehicle's ignition switch is turned on. This is a nice feature for maintaining the personal safety of the occupants of the vehicle, in an effortless and automatic manner. When the ignition door unlocking feature is programmed, the system will cause all door locks to unlock whenever the ignition switch is turned from the on to off position. All doors will unlock immediately after the vehicle's ignition switch is turned off. If 2 Step unlock was installed, only the driver's door will unlock. As stated these features are programmed separately, so you may chose to use one, both, or neither. Please consult with your dealer to consider your options. TWO STEP UNLOCK (ACCESS GUARD) By pressing the unlock button of the keychain transmitter as you would normally, (Please see the section titled "Unlocking The System", earlier in this manual), the system will disarm, and only the driver's door will unlock. If however, you should then decide instead that you want all doors to unlock, you can simply press the unlock button a second time and all doors will unlock. Page 4 128-8601 4 of 8 PROGRAMMING TRANSMITTERS: At times it may become necessary to program replacement or additional transmitters for use with your system. To do this: 1) With the system unlocked or disarmed, turn the ignition key to the on position. 2) Press and release the Program/Override push-button switch three times The unit will flash the parking lights and or beep the horn once to indicate that the system is in the transmitter program mode. The LED will also flash one time pause, one time pause, etc... indicating that you are in the transmitter program mode of the unit’s channel 1 or single button program mode. 3) Press and hold the lock button of each additional transmitter you wish to operate your system. NOTE: The unit is capable of storing up to 4 transmitters. If a fifth transmitter is added, the first transmitter programmed will be bumped out. This unit will also program all 4 buttons of your transmitter when the lock button is operated while in the program mode. Once all transmitter have been programmed, turn the ignition switch off to exit the program mode. If you require priority programming for multiple vehicle operation please read on. The system allows priority button programming in case you intend to operate two vehicle with one transmitter. In this instance you will program the default button combination, (One Button Programming), for the main vehicle you drive, and a different combination for the second vehicle so you are not unlocking, locking, or starting both vehicles when they are within range of each other. To prioritize transmitters after programming the transmitter into the first vehicle: Enter the transmitter program of the second vehicle as above by: 1) With the system unlocked or disarmed, turn the ignition key to the on position. 2) Press and release the push-button switch three times The unit will flash the parking lights and or beep the horn once to indicate that the system is in the transmitter program mode. The LED will also flash one time pause, one time pause, etc... indicating that you are in the transmitter program mode of the unit’s channel 1 or single button program mode. 3) Press and hold any combination of buttons of your transmitter that was not used for your primary vehicle. If, for instance you can press & hold the lock & unlock buttons simultaneously, for controlling Lock function of the second vehicle. 4) Press and release the program push-button switch once to advance to channel 2, unlock. Here you can press and hold the lock & start buttons simultaneously, for controlling the unlock function of the second vehicle. 5) Press and release the program push-button switch once to advance to channel 3, start. Here you can press and hold the start & option buttons simultaneously, for controlling the start function of the second vehicle. Page 5 128-8601 5 of 8 DELETING TRANSMITTERS FROM YOUR SYSTEM: It may be necessary to delete a lost transmitter or to reprioritize a transmitter that is programmed to your system. To remove a transmitter that has been programmed in your system: 1) Enter the transmitter program mode of channel 1 as indicated above. 2) Press and hold any transmitter button that has not been programmed into channel 1 until you hear a chirp, then release and immediately press the same button a second time until you hear a long chirp followed by a short chirp. This action erases the transmitter. If the transmitter you wish to erase has been lost or stolen then following the information below will successfully remove the transmitter. NOTE: For this procedure, you must have all transmitters you wish to remain programmed in your system available. 1) Enter the transmitter program mode of channel 1 as indicated above. 2) Press and hold the lock button of each transmitter you wish to operate the lock function of your unit making sure you occupy all 4 transmitter slots. In other words, you have three transmitters you wish to remain programmed. Press and hold the lock button of transmitter one until a long chirp is heard, then press and hold the lock button of transmitter two, then press and hold the lock button of transmitter three, followed by pressing and holding the lock button of transmitter one again. This action fills all 4 receiver slots. 3) Advance to receiver channel 2 by pressing the push-button switch one time. 4) Press and hold the unlock button of each transmitter you wish to operate the unlock function of your vehicle, again making sure all 4 transmitter slots are filled. 4) Advance to receiver channel 3 by pressing the push-button switch one time. 5) Press and hold the unlock button of each transmitter you wish to operate the start function of your vehicle, again making sure all 4 transmitter slots are filled. If you are uncomfortable about the programming of additional transmitters as outlined in the processes above please contact your installation center or call the technical service number listed on the back of the transmitter for help. BATTERY REPLACEMENT The transmitter incorporates a small LED visible through the case which is used to indicate battery condition. You will notice a decrease in transmitter range as the battery condition deteriorates. Transmitter battery replacement is recommended at least every 10 to 12 months, depending upon how frequently the transmitter is used. To replace the battery in the 91P Transmitter 1) Carefully pry apart the case using the edge of a coin as shown. 2) Remove the rear cover to access the discharged battery paying attention to the proper polarity orientation. 3) Carefully remove and properly dispose of the discharged battery. 4) Insert the new battery, than carefully snap closed the transmitter case. 5) If you accidently dislodge the circuit board from the transmitter housing, be certain that the rubber membrane is seated properly, and the buttons are properly exposed from the front view of the case, then insert the circuit board, and return to step #4. 91P Uses 2 x CR2016 Lithium Battery 128-8601 6 of 8 ORDER FORM FOR 91P Attention: Transmitter Ordering Department Important: To help us expedite your order, please print all of the information legibly and mail this form and your payment according to the instructions below. Note: Transmitter model number found on back of case. 1) Transmitter Model Number_____________________ 2) Name: _______________________________________ 3) Address: ______________________________________ 4) City: ________________ State: _____ Zip Code: ________ 5) Telephone Number: (_____) _______________ 6) Total Number Of Transmitters Required: Cost Per Transmitter is: $65.00 Multiply By Number Of Transmitters X ______ 7) Enter Total Amount Enclosed _________________ (New York State Residents must include the appropriate sales tax) 8) Method of Payment: Mastercard Visa Check or Money Order (do not send cash) Make Checks Payable To Audiovox Corporation Credit Card Number: _________________________________ Credit Card Expiration Date: ____ / _____ / _____ Credit card purchasers can order additional or replacement transmitters by phone. Simply dial 1 - 800 - 645 - 4994, and follow the instructions from the operator interface. 9) Mail this form along with your payment to: Audiovox Electronics Corp., 150 Marcus Blvd., Hauppauge, N.Y., 11788 Attn.: TRANSMITTER DEPARTMENT 128-8601 7 of 8 Option Button Lock 1 Unlock 2 Lock 1 Unlock 2 Option Button Lock 1 Unlock 2 Option Button Lock 1 Unlock 2 Option Button Lock 1 Unlock 2 Option Button Lock 1 Unlock 2 Option Button APS-45N SYSTEM FUNCTIONS AT A GLANCE LED INDICATORS: RAPID FLASHING SLOW FLASHING OFF ON SOLID = = = = PASSIVE ARMING ARMED DISARMED VALET MODE OPTIONAL VEHICLE HORN OR SIREN CHIRP INDICATION: 1 CHIRP = LOCK / ARM 2 CHIRPS = UNLOCK / DISARMED CONTINUOUS = PANIC MODE ALARM PARKING LAMP INDICATIONS: 1 FLASH = 2 FLASHES = CONTINUOUS FLASH = LOCK / ARM UNLOCK / DISARM PANIC MODE © 2009 Audiovox Electronics Corp., Hauppauge, NY 11788 128-8601 Page 6 128-8601 8 of 8