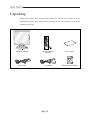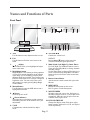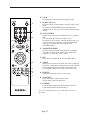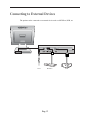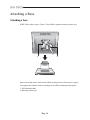
1
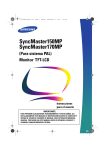
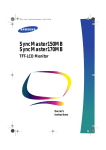
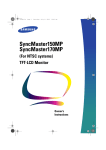
TFT-LCD MONITOR
SMT-170MN
SMT-170MP
User Guide
CAUTION
RISK OF ELECTRIC SHOCK
DO NOT OPEN
CAUTION : TO REDUCE THE RISK OF ELECTRIC SHOCK, DO NOT
REMOVE COVER (OR BACK). NO USER SERVICEABLE
PARTS INSIDE. REFER SERVICING TO QUALIFIED
SERVICE PERSONNEL.
Graphic Symbol Explanation
The lightning flash with arrowhead symbol, within an
equilateral triangle, is intended to alert the user to the
presence of uninsulated ‘dangerous voltage’ within the
product’s enclosure that may be of sufficient magnitude to
constitute a risk of electric shock to persons.
The exclamation point within an equilateral triangle is
intended to alert the user to the presence of important
operating and maintenance (servicing) instructions in
the literature accompanying the appliance.
Warning - To Prevent Fire or Shock Hazard, Do Not
Expose This Monitor To Rain or Moisture.
Eng-2
IMPORTANT SAFEGUARDS
Caution
Power source is indicated on the rear of the set. It contains high-voltage parts.
If you remove the cover, it may cause fire or electric shock. Do not remove the
cover by yourself. (Control switches are at the front of the monitor.)
1. Read Instructions : All the safety and operating instructions should be
read before the appliance is operated.
2. Retain Instructions : The safety and operating instructions should be
retained for future reference.
3. Heed Warnings : All warnings on the monitor and in the operating
instructions should be adhered to.
4. Follow Instructions : All operating and user instructions should be
followed.
5. Cleaning : Unplug this monitor from the wall outlet before cleaning.
Do not use liquid cleaners or aerosol cleaners. Use a damp cloth for
cleaning.
Exception. A monitor that is meant for uninterrupted service and that for
some specific reason, such as the possibility of the loss of an
authorization code for a CATV converter, is not intended to be
unplugged by the user for cleaning or any other purpose, may exclude
the reference to unplugging the monitor in the cleaning description
otherwise required in Item 5.
6. Attachments : Do not use attachments not recommended by Samsung
as they may cause hazards.
7. Water and Moisture : Do not use this monitor near water for example,
near a bathtub, wash bowl, kitchen sink, or laundry tub, in a wet
basement, or near a swimming pool, and the like wet basement, or near a
swimming pool, and the like.
Eng-3
8. Accessories : Do not place this monitor on an unstable cart, stand,
tripod, bracket, or table. The monitor may fall, causing serious injury to
a child or adult, and serious damage to the appliance. Use only with a
cart, stand, tripod. bracket, or table recommended by Samsung, or sold
with the monitor. Any mounting of the monitor should follow
Samsung’s instructions, and should use a mounting accessory
recommended by Samsung.
9. Ventilation : Slots and openings in the cabinet are provided for
ventilation and to ensure reliable operation of the monitor and to protect
it from overheating, and these openings should never be blocked by
placing the monitor on a bed, sofa, rug, or other similar surface. This
monitor should never be placed near or over a radiator or heat register.
This monitor should not be placed in a built-in installation such as a
bookcase or rack unless proper ventilation is provided or Samsung’s
instructions have been adhered to.
10. Power Sources : This monitor should be operated only from the type of
power source indicated on the making label. If you are not sure of the
type of power supply to your installation site, consult your Samsung
dealer or local power company.
11. Grounding or Polarization : For monitors equipped with a 3-wire
grounding-type plug having a third(grounding) pin. This plug will only
fit into a grounding type power outlet. This is a safety feature. If you are
unable to insert the plug into the outlet, contact your electrician to
replace your obsolete outlet. Do not defeat the safety purpose of the
grounding-type plug.
12. Power : Cord Protection-Power supply cords should be routed so that
they are not likely to be walked on or pinched by items placed upon or
against them, paying particular attention to cords at plugs, convenience
receptacles, and the point where they exit from the monitor.
Eng-4
13. Lightning : For added protection for this monitor during a lightning
storm, or when it is left unattended and unused for long periods of time,
unplug it from the wall outlet and disconnect the cable system. This will
prevent damage to the monitor due to lightning and power-line surges.
14. Overloading : Do not overload wall outlets and extension cords as this
can result in a risk of fire of electric shock.
15. Object and liquid Entry : Never push objects of any kind into this
monitor through openings as they may touch dangerous voltage points or
short-out parts that could result in a fire or electric shock.
Never spill liquid of any kind on the monitor.
16. Servicing : Do not attempt to service this monitor yourself as opening or
removing cover may expose you to dangerous voltage or other hazards.
Refer all servicing to qualified service personnel.
17. Damage Requiring Service : Unplug this monitor from the wall outlet
and refer servicing to qualified service personnel under the following
conditions.
a. When the power-supply cord or plug is damaged.
b. If liquid has been spilled, or objects have fallen into the monitor.
c. If the monitor has been exposed to rain or water.
d. If the monitor does not operate normally by following the operating
instructions. Adjust only those controls that are covered by the
operating instructions as an improper adjustment of other controls
may result in damage and require extensive work by a qualified
technician to restore the monitor to its normal operation.
e. If the monitor has been dropped or the cabinet has been damaged.
f. When the monitor exhibits a distinct change in performance-this
indicates a need for service.
Eng-5
18. Replacement Parts : When replacement parts are required, be sure the
service technician has used replacement parts specified by Samsung or
have the same characteristics as the original parts.
Unauthorized substitutions may result in fire, electric shock or other
hazards.
19. Safety Check : Upon completion of any service or repairs to this
monitor, ask the service technician to preform safety checks to
determine that the monitor is in proper operating condition.
FCC & ICES Information
Warning
This equipment has been tested and found to comply the limits for a class A
digital device, pursuant to part 15 of the FCC Rules and ICES-003 of
Industry Canada.
These limits are designed to provide reasonable protection against harmful
interference when the equipment is operated in a commercial environment.
This equipment generate, uses, and can radiate radio frequency energy and,
if not installed and used in accordance with the instruction manual, may
cause harmful interference to radio communications.
Operation of this equipment in a residential area is likely to cause harmful
interference in which case the user will be required to correct the interference
at his own expense.
User-Installer Caution
Your authority to operate this FCC verified equipment could be voided if
you make changes or modifications not expressly approved by the party
responsible for compliance to part 15 of the FCC Rules.
Eng-6
Information to user
Changes or modifications not expressly approved by the party responsible
for compliance could void the user's authority to operate the equipment.
NOTE: This equipment has been tested and found to comply with the limits
for a Class A digital device, pursuant to Part 15 of the FCC Rules.
These limits are designed to provide reasonable protection against harmful
interference when the equipment is operated in a commercial environment.
This equipment generates, uses, and can radiate radio frequency energy and,
if not installed and used in accordance with the instruction manual, may
cause harmful interference to radio communications.
Operation of this equipment in a residential area is likely to cause harmful
interference in which case the user will be required to correct the interference
at his own expense.
This device complies with Part 15 of the FCC Rules.
Operation is subject to the following two conditions: (1) this device may not
cause harmful interference, and (2) this device must accept any interference
received, including interference that may cause undesired operation.
Changes or modifications not expressly approved by the party responsible
for compliance could void the user's authority to operate the equipment.
If necessary, consult your dealer or an experienced radio/television
technician for additional suggestions.
You may find the booklet called How to Identify and Resolve Radio/TV
Interference Problems helpful.
This booklet was prepared by the Federal Communications Commission.
It is available from the U.S. Government Printing Office, Washington, DC
20402, Stock Number 004-000-00345-4.
Eng-7
The party responsible for product compliance:
SAMSUNG ELECTRONICS CO., LTD.
America QA Lab of Samsung
3351 Michelson Drive,
Suite #290, Irvine, CA92612 USA
IC Compliance Notice
This Class (A) digital apparatus meets all requirements of the Canadian
Interference-Causing Equipment Regulations.
Cet appareil numérique de la classe (A) respecte toutes les exigences du
Règlement sur le matériel brouilleur du Canada.
This Class A digital apparatus complies with Canadian ICES-003.
Cet appareil numéique de la classe A est conforme à la norme NMB-003 du
Canada.
Warning
This is a class A product. In a domestic environment this product may cause
radio interference in which case the user may be required to take adequate
measures.
Eng-8
Contents
IMPORTANT SAFEGUARDS........................................ e-3
FCC & ICES Information................................................. e-6
Unpacking....................................................................... e-10
Names and Functions of Parts ........................................ e-11
Connecting to External Devices ..................................... e-15
Attaching a Base............................................................. e-16
Appendix ........................................................................ e-17
Eng-9
Unpacking
Remove the package cover and place the product on a flat and secure surface or in the
installation location. Check whether all the following devices and accessories are included
with the main system.
TFT-LCD Monitor
Remote Control/
Batteries
Power Cord
AC Adapter
Eng-10
User’s Guide
VESA Mounting Bracket
Names and Functions of Parts
Front Panel
A
A. Auto
Use this button to auto adjustment direct access.
C
G
H
I J
D
E
F
K L M
SOURCE
Pressing ▲ and ▼ buttons at the same time
converts to DVR and signal input select.
(Adjust)
These buttons allow you to highlight and adjust
items in the menu.
C-. MagicBright button
MagicBright is a new feature providing optimum
viewing environment depending on the contents
of the image you are watching. Currently three
different modes are available: Text, Internet, and
Entertain. Each mode has its own pre-configured
brightness value. You can easily select one of
three settings by simply pressing MagicBright
control buttons.
D. Menu(Monitor)
Use this button to open the OSD and activate a
highlighted menu item.
E.
(Power)
Turns the power on/off.
F.
(Power indicator)
This light glows green during normal operation,
and blinks green once as the monitor saves your
adjustments.
G. TALK
Communicates with the doorbell in duplex
mode.
C-
H. VOLUME ▲/▼
Controls the volume level.
B. Exit
Use this button to Exit the active menu or the
OSD.
C.
B
I. Multi Switch (Left, Right, Up, Down, Enter)
Use Left, Right, Up and Down buttons to move
Zoom Area and Setup Menu, or change channels
and other settings.
Use the Enter button to change PIP to full size or
select a sub-menu from Setup Menu. The Enter
button is also used to Zoom in the selected area
by twice.
J. Remote Control Sensor
Aim the remote control towards this spot on the
Monitor.
K. MENU(MUX)
Display the Setup menu on the screen.
Press it again to exit the Setup menu.
L. MULTISCREEN
Switches to the split screen view. Each press of
this button changes to the 4, 8, and 9-split screen
sequentially. Only the 9 and 16 split screens are
available in the Triplex mode.
M. LIVE/P.B./TRIPLEX
Changes the Display mode. Each press of this
button switches between Live, P.B., and Triplex
modes sequentially.
Eng-11
Remote Control
A. POWER SAVE
Changes to Power Save mode.
A
B
C
D
E
F
G
H
I
J
B. ONEAF
Performs Auto Focus for the selected camera once in the
present status. Only the remote control has this button.
It is only available when a camera (SOC-420(P), or SOC920(P), sold separately) is connected with the product.
C. FOCUS(FAR/NEAR)
Only the remote control has this button. It is used for
camera Focus control and available only when a camera
(SOC-420(P) or SOC-920(P), sold separately) is
connected to the system.
D. IRIS(CLOSE/OPEN)
Only the remote control has this button. It is used for
camera Iris control and available only when a camera
(SOC-420(P) or SOC-920(P), sold separately) is
connected to the system.
E. UP, DOWN, LEFT, RIGHT, ENTER
Press the LEFT button to direct the camera to the left; the
RIGHT button, to the right. In the center is the ENTER
button. Use this wheel to move a Zoomed-in screen, or to
scroll through Menu items or channels. Press ENTER to
select an item, enter a sub menu, or replay the events.
VOLUME +/Controls the volume level.
Note: An input signal cannot be selected by using the
Volume +/- buttons on this remote control.
Use the Volume ▲/▼ buttons on the front panel to select
an input signal.
F. MENU(MUX)
Display the Setup menu on the screen. Press it again to
exit the Setup menu.
G. SEQUENCE
When pressed in the full screen mode, channels are
switched automatically and sequentially within a specified
time period.
H. PIP
Selects the Picture in Picture mode.
I. MULTISCREEN
Switches to the split screen view. Each press of this
button changes to the 4, 8, and 9-split screen sequentially.
Only the 9 and 16 split screens are available in the Triplex
mode.
J. LIVE/P.B./TRIPLEX
Changes the Display mode. Each press of this button
switches between Live, P.B., and Triplex modes
sequentially.
Eng-12
K. TALK
Communicates with the doorbell in duplex mode.
K
L
M
N
L. Number Key(0 ~ 9)
Press the number of the channel to watch it in full screen
mode.
Or, press the SYSTEM ID button and then press the
number of the system you want to control with the remote
control.
M. AUX CONTROL
Outputs relay pulses to an external device for a specified
time.
You can adjust this control according to your
environment. (For example, when the doorbell rings, you
can move to the corresponding camera and identify the
visitor before opening the door using the AUX
CONTROL button.)
N. ZOOM(TELE/WIDE)
Only the remote control has this button. It is available
only when a camera (SOC-420(P), SOC-920(P) sold
separately) is connected to the system.
O. SET
Enters the selected Sub Menu from the Main Menu.
O
P
Q
R
S
P. ZOOM
When pressed in full screen mode, the screen is enlarged.
Each press of this button enlarges the screen two and four
times sequentially and then returns to the normal size.
Use the Rotary Wheel to move the Zoomed-in screen.
Q. FREEZE
Captures the selected screen as a still screen.
R. SYSTEM ID
Selects the system to control with the remote.
Only the remote control has this button.
S. ID RESET
Located on the remote control, this button resets the
selected System ID to the default ID (1).
Note: For detailed function, see the MUX Box instruction
provided.
Eng-13
Rear Panel
A
B
C
A. 14V DC
Connect the power cord for your monitor to the power port on the back of the monitor.
B. SIGNAL (RJ-45)
MUX input port.
C. DVR
DVR input terminals.
Eng-14
Connecting to External Devices
The product can be connected to an external device such as a MUX Box, DVR, etc.
Power
MUX Box
Eng-15
DVR
Attaching a Base
Attaching a base
NOTE: This monitor accepts a 75mm x 75mm VESA-compliant mounting interface pad.
Squeeze the folded monitor stand into the VESA mounting bracket. Then fasten it using the
four supplied nuts with the monitor, mounting pad and VESA mounting bracket aligned.
1. VESA Mounting Brkt
2. Mounting interface pad
Eng-16
Appendix
Specifications
1. Model Name
SMT-170MN/SMT-170MP
2. Size
17.0 inch diagonal
3. Display area
337.92(H) x 270.336(V)
4. Pixel pitch
0.264(H) x 0.264(V)
5. Type
a-si TFT active matrix
6. Viewing Angle
70/70/60/60 (L/R/T/B)
7. Power Supply
AC 90 to 264 VAC, 60/50Hz ± 3Hz
8. Power Consumption
Max. 42W
9. Dimensions
385 x 233 x 413.7 mm (After installation of stand)
(WxDxH)
385 x 64.0 x 335.2 mm (After folding the stand)
10. Weight
5.1 kg (with multimedia stand)
11. Environmental
Operating Temperature: 50˚F to 104˚F (10˚C to 40˚C)
Considerations
Operating Humidity: 10% to 80%, Non-condensing
Storage Temperature: -4˚F to 113˚F (-20˚C to 45˚C)
Storage Humidity: 5% to 95%, Non-condensing
12. DVR mode
NTSC: 640 x 480, 1024 x 768 / 60Hz
PAL: 800 x 600 / 60Hz
Eng-17
Memo
Eng-18
Memo
Eng-19
Part No.: AA68-03107A-00
Printed in Korea